

Page 1
Carefully read operating manual to oprate this unit properly,
and keep this manual handy for further reference.
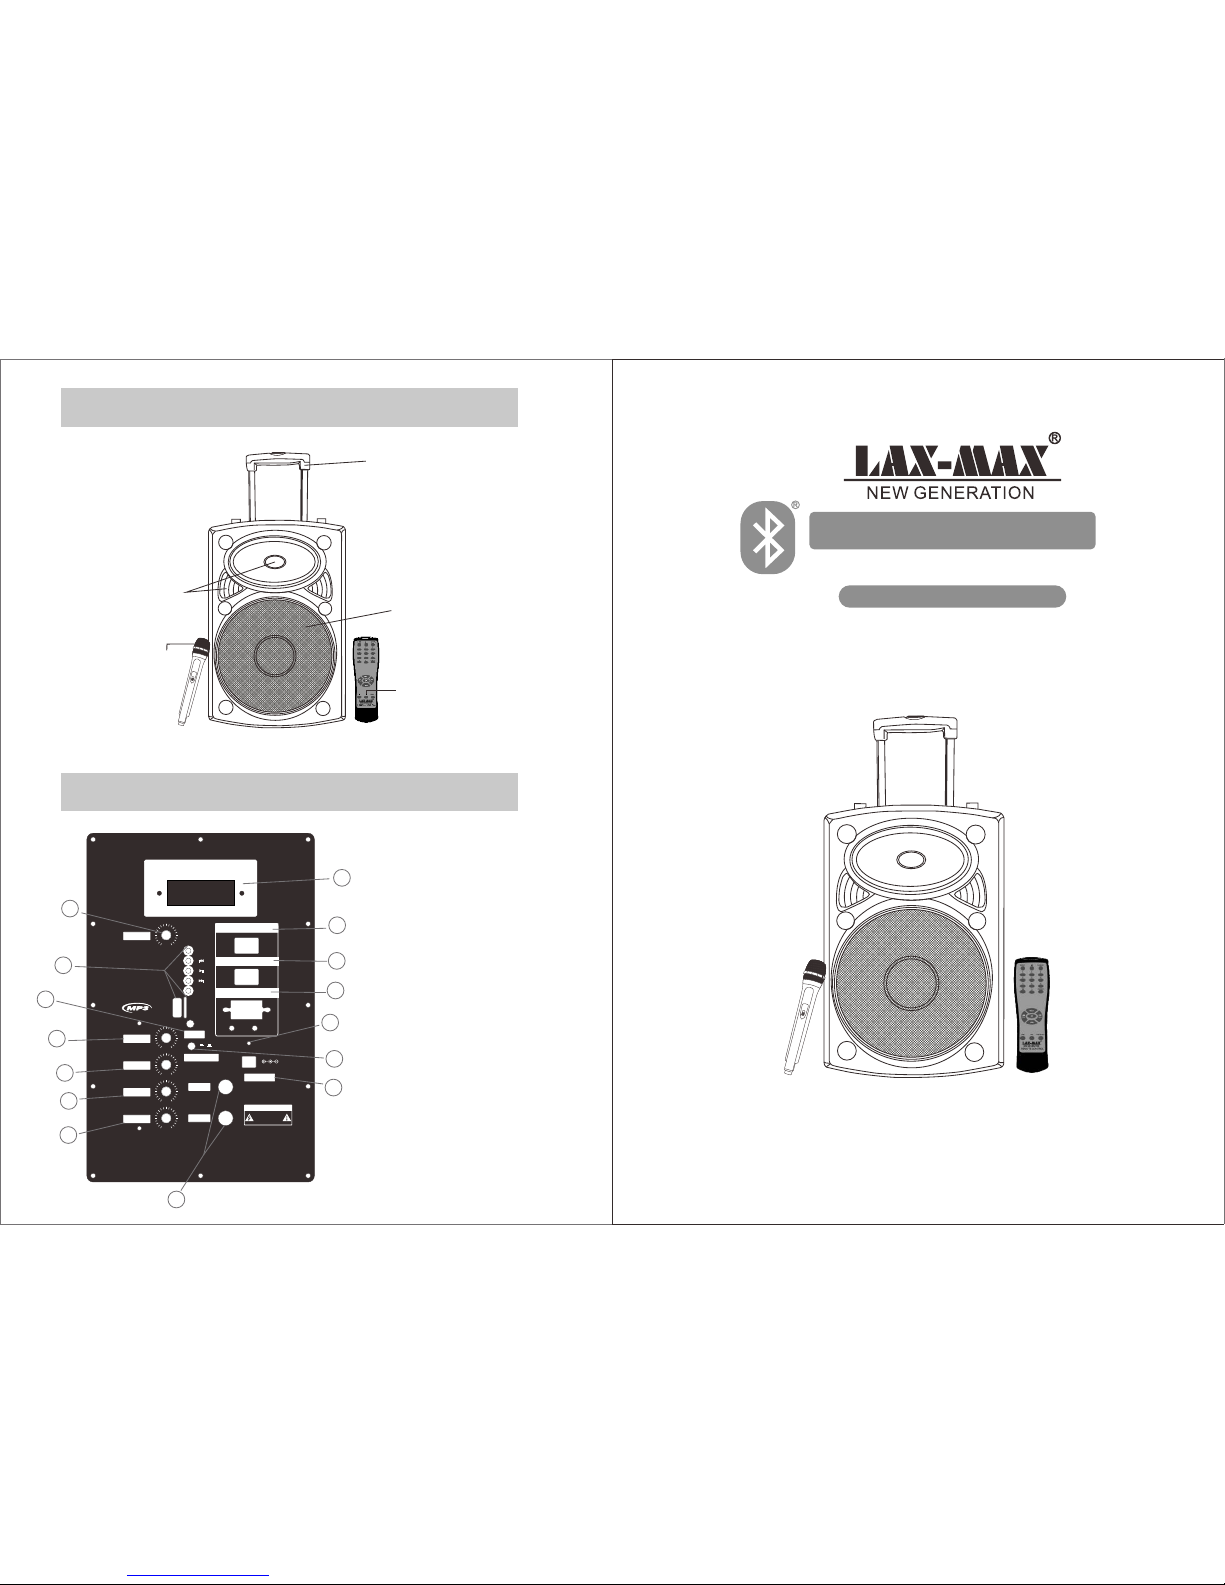
TWE ETERS
MIC ROPHO NE
SPE AKER
REM OTE
CON TROL
SPEAKER
TRO LLEY HA NDLE
PANEL FUNCTION
min max
min max
min max
BASS
MIC.V OL
ECHO
MODE
min max
VOLUM E
EQ
min max
OFFON
LINE IN
MIC PRIO RITY
TREBL E
U
S
B
DIGI TAL DISPL AY
ON OFF
ON OFF
-
+
POWER
LED
DC 12V IN PUT
MIC1 IN
MIC2 IN
Red char ging
Green Fu ll
DC IN 15V
MADE IN C HINA
CAUTION
RISK OF ELECTR IC
SHOCK CAUTIO N
MICRO S D
11
12
13
14
15
2
3
4
5
6
7
8
9
10
1.Dig ital Di splay
2.VOL UME Adju stor
3.USB /TF pla y contr ol
4.mai n trebl e volum e
5.MIC 1 &2 inpu t jack
6.mai n bass vo lume
7.MIC v olume
8.DC1 5V in
9.MIC E CHO adj ustor
10.ch argin g and ful l light
11.L INE IN (3 .5mm input)
12.MI C PRIOR ITY
13.po wer swi tch
14.LE D light s witch
15.DC 1 2V inpu t
1
MODEL:LI-S15bt
KARAOKE SPEAKER
WITH NFC AUTO PAIRING
USB/MICRO SD
Blue toot h
Page 2
* Bluet ooth® f uncti on
*NFC co nnect ivity
*Play s MP3 Fil es stor ed in your micro SD Ca rd or USB D rive or e xtern al audio device.
*FM Rad io
*Twin Ka raoke j acks.
*One Wi reles s MIC inc luded
*With I nfrar ed remo te control for con venie nce
*Trolley for easy p ortab ility
*Buil t in rech argea ble battery.
*Dual An tenna f or FM and W ireless MIC.
Feat ur es
Play in g MP3 Files throu gh the Speaker us ing the
micr o SD C ard or the USB St ic k
*To selec t Aux use “” M ODE” bu tton on unit main pa nel or fr om remo te cont rol “LINE” will
show on d ispla y
*Disc onnec t USB,m icro SD Micropho ne whil e using Au x.
*To selec t Bluet ooth us e” MODE” button on u nit mai n panel o r from re mote control,
“BLUE ” will sh ow on dis play.
*Scan f rom you r phone , tablet, notebo ok for “L AX-MA X” and pa ir the device to lis ten
Audio f iles th rough s peaker.
* Unpai r from sp eaker w hen finished lis tenin g.
Usin g Aux( LINE IN 3 .5 mm)
*Conn ect DC 15 V. Turn o n volum e knob to s witch on unit , loca ted on th e back si de of
the uni t. Th is unit is manufac tured t o use on DC 1 5V.
*To charg e batte ry, plug in to the DC 1 5V . When b atter y is char ging Red LED light w ill
be on, Wh en comp letel y charged, green L ED ligh t will be o n. If plu gged in to DC 15V,
inter nal bat tery wi ll charge even if un it is swi tched o ff.
*Spea ker bat tery ca n also be charged us ing 12V e xtern al car ba ttery(connec ting ca ble
not inc luded ) throu gh the point “ DC 12V in put” Wh en conn ectin g cable please mak e
sure of “ +” and “- ” point s.
* “FM Ante nna” to b e used fo r better recepti on of FM st ation s.
*Wire less Mi c Antenn a” to be used for bett er rece ption o f wirel ess microphone w hile
using k araok e.
Conn ec ting Unit.
Usin g Bl uetooth
* Use “Mo de” but ton on th e unit or remote con trol to s witch b etwee n USB/ /FM/
AUX/B lueto oth or fr om remote contro l can pre ss “ USB/ SD” but ton to switch betw een
USB or mi cro SD
*Plug i n your US B disk an d /or micro SD card in t he slot s provi ded. Pl ease make sure you
use the c orrec t file fo rmat in your media d evice s-MP3 Files o nly. Ple ase ens ure tha t your
media i s prope rly con nected and that yo ur file s are MP3 f ormat , or that the MODE but ton
is on the c orrec t sourc e.
*Turn up the volume t o the des ired le vel, either from the unit 's volu me cont rol knob on the
contr ol pane l or from t he remote by press ing Vol- f or Down o r Vol+fo r up. The s ound ou tput
quali ty off the speakers wil l depen d on the qu ality of the MP3 files. Volu me from r emote
will be m aximu m to the le vel set manually t hroug h unit vo lume kn ob.
*Pres s to list en to the p revio us track and to skip t o the nex t track f rom unit control
panel o r remot e contr ol.
*To pause o r relea se paus e, press the butto n from th e contr ol pane l or remote contro l.
*Disc onnec t AUX (LIN E IN ) while using oth er audi o devic es thro ugh speaker.
*Plea se reme mber to t urn off t he powe r of the sp eaker b efore removing t he USB Di sk or
micro S D card.
micro S D
NFC co nn ectivity
*On the s peake r, be sure y ou turn on the Bluet ooth mo de.
*Swit ch on the B lueto oth and NFC featur e on your p hone.
*Touch th e speak er with y our phone to conne ct to NFC . Phone w ill be pa ired with
speak er thro ugh the N FC.
*To disco nnect t ouch th e speaker with you r phone a gain.
List en ing to the FM Radio f rom the Speaker.
*To selec t FM use “M ODE”b utton on unit main p anel or f rom rem ote con trol or from
remot e contr ol pres s “FM”
*From t he unit c ontro l panel. Long pres s to scan f or stat ion or pr ess to manually ac cess
prese t stati ons up or d own.
*From r emote c ontro l press “SCAN” to scan for FM f reque ncy or pr ess to manually
selec t prese t stati on up or down.
* “FM Ante nna” to b e used fo r better recepti on for FM s tatio n.
Usin g Mi crophone
*When u sing Mi croph one-plug your mi croph one int o the microphone j ack on un it
main co ntrol p anel .
*Use th e MIC VOL knob t o contr ol the vo ice lev el of the micropho ne
*Use th e “ECHO ” knob to c ontrol microph one ech o.
*When U sing in clude d wireless Micro phone , switc h on microphone, make sur e unit
power i s on.
*Micr ophon e is desi gned to be used toge ther wi th this u nit onl y.
*Wire less mi croph one uses “AA”*2 ba tteri es (not i nclud ed), make sure bat terie s are
charg ed.
*Wire less MI C Antenn a” to be used for bett er rece ption o f wirel ess microphone w hile
using k araok e.
Usin g WI RELESS Micr op hone
Usin g Gu itar Jack.
*When u sing Gu itar- plug your guitar i nto the g uitar j ack on un it main control pa nel.
*Use th e Guita r VOL knob to co ntrol t he volu me level of the Guit ar.
“BASS ” & “TREB LE” on un it control panel c an be use d to adju st soun d when using
micro S D, USB, F M. “EQ” b utton o n unit control pan el or rem ote con trol can be used
to adju st soun d effect to pres et leve ls.
Pleas e keep th is manu al in a safe place for f uture r efere nce
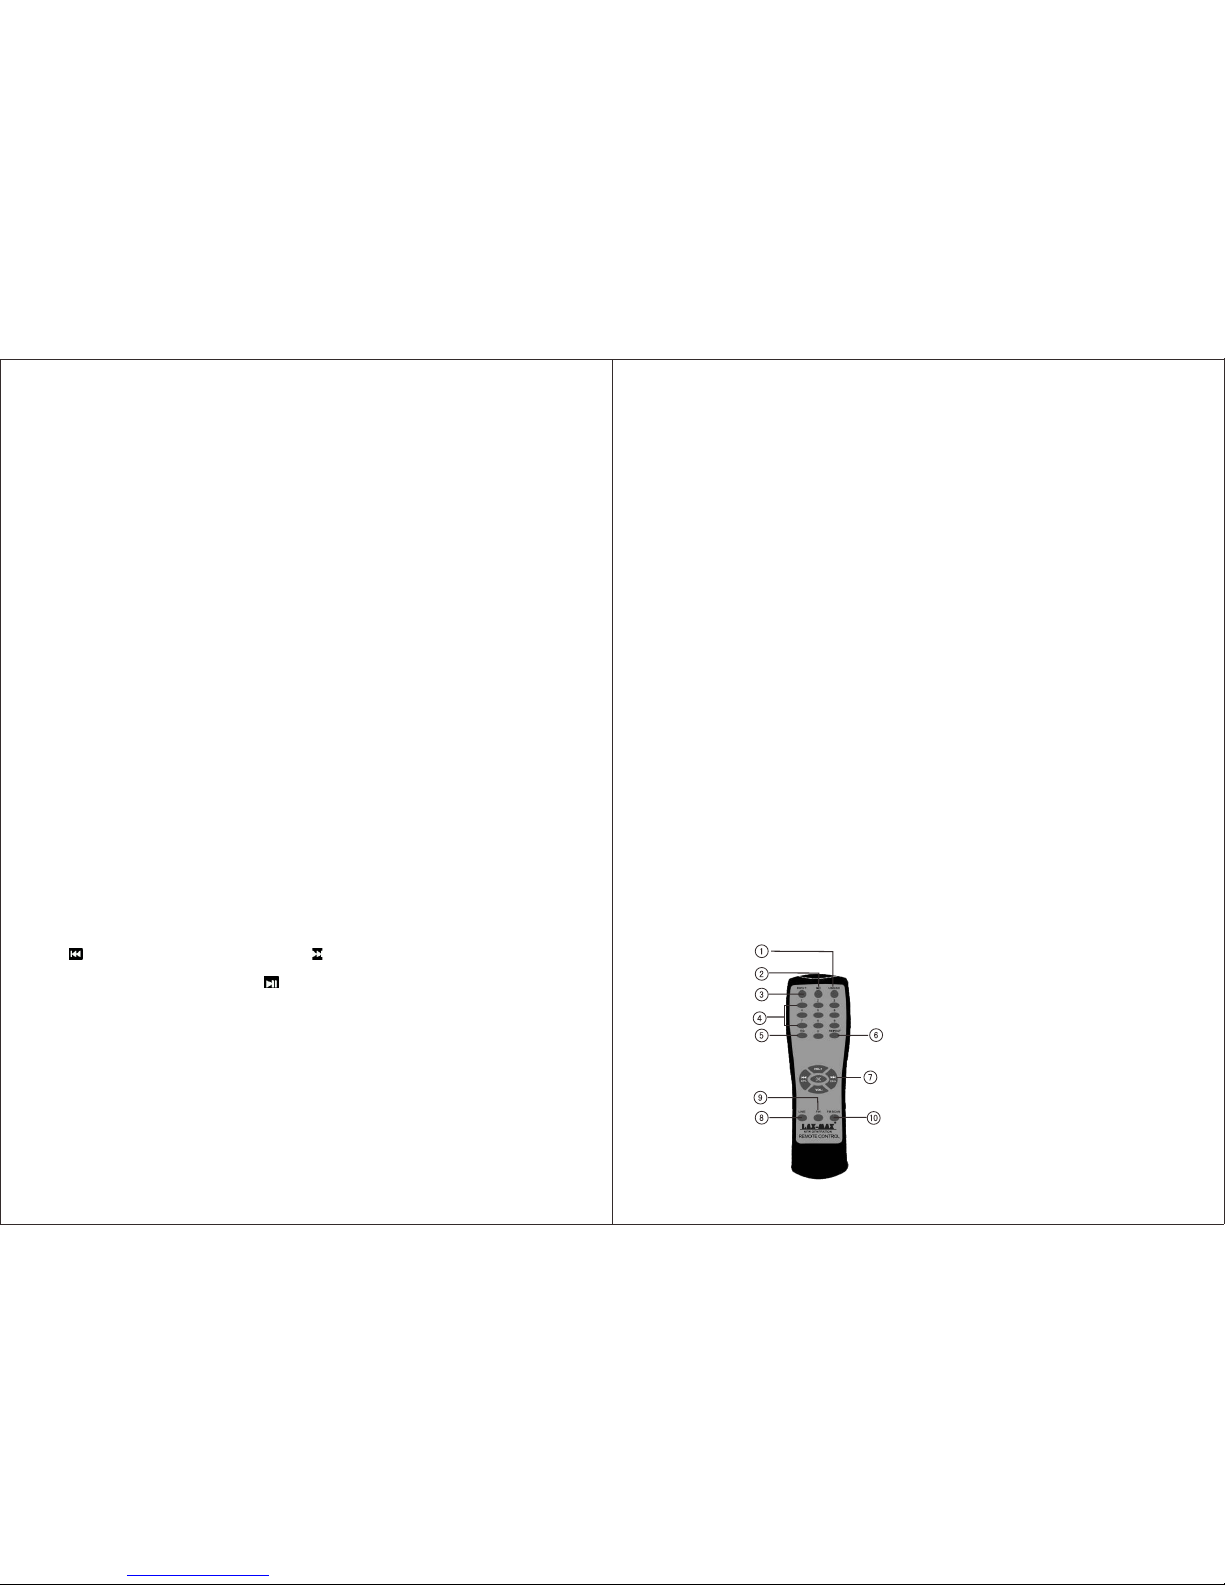
1. US B/SD
2.
3.
sel ect key
num ber sel ect key
USB /SD pla y/pau se cont rol key
Inp ut sele ct USB/ SD; FM ; LI NE; BLU E
4. US B/SD pl ay
5. EQ c ontro l key
6. US B/SD pl ay repe at sele ct key
7. Pl ay cont rol & FM CH - or CH+ & vo lume + or -
8. Li ne AUX inp ut sele ct key
9. Ra dio FM in put sel ect key
10. R adio FM s can con trol ke y
Page 3

Bocina
Panel de Función
min max
min max
min max
BASS
MIC.V OL
ECHO
MODE
min max
VOLUM E
EQ
min max
OFFON
LINE IN
MIC PRIO RITY
TREBL E
U
S
B
DIGI TAL DISPL AY
ON OFF
ON OFF
-
+
POWER
LED
DC 12V IN PUT
MIC1 IN
MIC2 IN
Red char ging
Green Fu ll
DC IN 15V
MADE IN C HINA
CAUTION
RISK OF ELECTR IC
SHOCK CAUTIO N
MICRO S D
11
12
13
14
15
2
3
4
5
6
7
8
9
10
1
MODEL:LI-S15bt
KARAOKE SPEAKER
WITH NFC AUTO PAIRING
USB/MICRO SD
Blue toot h
Twee ter
Mic rófon o
Alt avoz
Con trol Re moto
Man illar
Lea atentamente el manual de funcionamiento para operar esta
unidad correctamente y mantenga este manual a mano para
futuras consultas.
1. Pant alla di gital
2. Ajust ador de V OLUME N
3. Cont rol de re produ cción SD / USB
4. Volum en prin cipal d e agudos
5. Toma d e entra da de micrófono 1 y 2
6. Volum en prin cipal
7. Volum en de mic rófon o
8. Entr ada de DC 15V
9. Ajust ador de e co del mi crófono
10. Car ga y plen a luz
11. LI NE IN (en trada de 3,5 mm)
12. Pri orida d de micr ófono
13. Bot ón te pod er
14. Bot ón de luz L ED
15. Ent rada de 1 2V DC
Page 4

Cara ct erísticas
- Funci ón de Blu etoot h
- Conec tivid ad NFC
-Repr oduce a rchiv os MP3 almacenad os en su ta rjeta d el SD o mem oria USB o un
dispo sitiv o de audi o externo.
- Radio F M
- Tomas gem elas de k araok e
- Un micr ófono i nalám brico incluido
- Con el co ntrol r emoto i nfrarrojo para m ayor co modid ad
- Trolley para un fác il tran sport e
- Bater ía reca rgabl e.
- Anten a dual pa ra FM y mic rófono inalámb rico
®
Cone xi ón de Unidad
lado po steri or de la un idad. Este equip o ha sido f abric ado para su uso en DC 15 V.
- Para ca rgar la b aterí a, conecte al 15V DC . Cuand o la bate ría se es tá cargando la luz
LED roj o estar á encen dida. Cuando est á compl etame nte car gada, la luz LED ver de se
encen derá. S i está en chufado a DC 15V, batería inter na se car gará in cluso s i la unidad
está ap agada .
- La bate ría de al tavoz t ambién se puede ca rgar co n la bate ría de co che de 12V externa
(cabl e de cone xión no i ncluido) a travé s del pun to "de en trada DC 12V" Cuan do cone cte
el cabl e por fav or aseg úrese los puntos " +" y "-".
- Utili za la ant ena "FM " para mejorar la re cepci ón de las e staci ones FM.
- Utili za la ant ena del m icrófono inalá mbric o para me jorar la recepci ón de mic rófon o
duran te el uso d e karao ke.
Conec te DC 15V. Activ ar el con trol de v olumen para ence nder la u nidad , situado en el
Repr od ucción de arc hi vos MP3 a través de l altavoz con
la tar je ta del SD o la memo ri a USB
/AUX/ BT o de sde el control rem oto pre sione e l botón "USB/SD" se puede p resio nar par a
cambi ar entr e USB o SD
- Conec te el dis co USB y/ o la tarjeta SD en las r anura s previ stas. P or favor, asegúre se
de usar e l forma to de arc hivo correcto y só lo use ar chivo s MP3. Po r favor, asegúres e de
que sus m edios d e comun icación estén co necta dos cor recta mente y que sus arch ivos
- Pulse " l◀◀" para escuch ar la pis ta ante rior y "▶▶l " para pa sar a la si guiente pista
desde e l panel d e contr ol de la unidad o del co ntrol r emoto .
- Para ha cer una p ausa o ca ncelar la pausa, p ulse el b otón "▶|| " del pan el de control o el
contr ol remo to.
- Desco necte AU X (LINE I N), mientras que u sa otro s dispo sitiv os de audio a través d el
altav oz.
- Por fav or, recu erde ap agar el altavoz an tes de re tirar e l disco U SB o tarjeta de SD.
Utili ce el bot ón "Mod e" en la unidad o el con trol re moto pa ra camb iar entre USB/SD /FM
Usan do Aux (LINE I N 3. 5mm)
- Para se lecci onar AUX , use el botón "MODE " e n el pane l de la uni dad pri ncipal o de l
contr ol remo to. "LI NE "aparecerá en l a panta lla
- Desco necta r el USB, m icrófono SD dura nte el us o de Aux.
Usan do B luetooth
-Para s elecc ionar B luetooth, pres ione el b otón "M ODE" en e l panel de la unidad
princ ipal o de l contr ol remoto. La pala bra “BL UE" apa recer á en la pantalla.
-Desd e su telé fono o ta bleta escanee pa ra "LAX -MAX" y e mpare jar el dispositi vo para
escuc har arc hivos d e audio a través del a ltavo z.
-Desa ctiva r del alt avoz cuando term ine de es cucha r.
Cone xi ón NFC
- En el alt avoz, a segúr ese de encender el m odo Blu etoot h.
- Encie nda la fu nción B luetooth y NFC en su t eléfo no.
- Toque e l altav oz con el teléfono p ara con ectar c on NFC. El teléfon o será em parej ado
con el al tavoz a t ravés d e NFC
- Para de scone ctar to que el altavoz con e l teléf ono de nu evo.
Escu ch ar el radio FM a tr av és del altavoz
- Para se lecci onar FM , use el botón "MODE " en el pan el de la un idad pr incipal o del
contr ol remo to y pres ione "FM".
- Desde e l panel d e contr ol de la unidad, pul se para e scane ar para la estació n o pulsa r
para ac ceder m anual mente las emisor as memo rizad as hacia arriba o ha cia aba jo.
- Desde e l contr ol remo to, presione "SC AN " para b uscar l a frecu encia de FM o presio ne
para se lecci onar ma nualmente las fr ecuen cias pre sin tonizada presi one hac ia arri ba
o abajo .
- Use la an tena "F M" para m ejorar la recepc ión de la s estac iones F M.
Usan do E l Micrófono
- Cuand o use el mi crófo no, conecte el mic rófon o a la toma d el micr ófono en el panel de
contr ol de la un idad pr incipal.
- Utili ce el man do de vol umen del micrófo no para c ontro lar el nivel de voz de l micró fono.
- Utili ce el man do del "E CO " para controla r el eco de l micró fono.
Usan do E l Micrófono Ina lámbrico
- Cuand o utili ce el mic rófono inalámb rico in cluid o, conecte el micr ófono y a segúr ese
que la un idad es te ence ndida.
- El micr ófono e stá dis eñado para ser uti lizad o junto c on este a parato solamen te.
- El micr ófono i nalám brico utiliza ba tería s "AA" (b aterí as no incluidas) a segúr ese que
las bat erías e stén ca rgadas.
- La ante na inal ámbri ca puede ser utili zada pa ra mejo rar la recepción d el micr ófono
inalá mbric o duran te el uso de karaoke .
Uso De Toma De La G ui tarra
- Cuand o utili za la gui tarra - enchufe su g uitar ra a la tom a de la gui tarra en el panel
de cont rol de la u nidad p rincipal.
-Util ice el ma ndo de vo lumen para contr olar el n ivel de v olumen de la guita rra.
- "BASS " y "TREB LE " en el pa nel de control de la u nidad s e puede u tiliz ar para ajustar
el soni do
al util izar TF, USB, FM. El botón "E Q" en el pa nel de co ntrol d e la unidad o el contr ol
remot o se pued e utili zar para ajustar e l efect o de soni do al niv el preestablec ido.
1. Tecl a de sele cción d e USB / SD
2. Tecl a de repr oducc ión de US B / SD / cont rol de pa usa
3. Se lecci ón de ent rada US B / SD;FM ; L ÍNEA; AZ UL
4. Se lecci ón de tec la para r eprod ucir US B / SD
5. Tecl a de cont rol EQ
6. Tecl a de sele cción d e USB / SD de r epeti ción pa ra repr oducc ión
7. Ju ega el co ntrol y F M CH- o CH + y vo lumen + o -
8. Tecl a de sele cción d e entra da líne a AUX
9. Tecl a de sele cción R adio FM
10. Tec la de con trol de e xplor ación d e radio F M
Guard e este ma nual en u n lugar seguro par a futur as cons ultas
Page 5

FCCCaution
Thisdevicecomplieswithpart15oftheFCCRules.Operationissubjecttothe
followingtwoconditions:(1)Thisdevicemaynotcauseharmfulinterference,and(2)
thisdevicemustacceptanyinterferencereceived,includinginterferencethatmay
causeundesiredoperation.
AnyChangesormodificationsnotexpresslyapprovedbythepartyresponsiblefor
compliancecouldvoidtheuser'sauthoritytooperatetheequipment.
Note: ThisequipmenthasbeentestedandfoundtocomplywiththelimitsforaClass
Bdigitaldevice,pursuanttopart15oftheFCCRules.Theselimitsaredesignedto
providereasonableprotectionagainstharmfulinterferenceinaresidentialinstallation.
Thisequipmentgeneratesusesandcanradiateradiofrequencyenergyand,ifnot
installedandusedinaccordancewiththeinstructions,maycauseharmfulinterference
toradiocommunications.However,thereisnoguaranteethatinterferencewillnot
occurinaparticularinstallation.Ifthisequipmentdoescauseharmfulinterferenceto
radioortelevisionreception,whichcanbedeterminedbyturningtheequipmentoff
andon,theuserisencouragedtotrytocorrecttheinterferencebyoneormoreofthe
followingmeasures:
-Reorientorrelocatethereceivingantenna.
-Increasetheseparationbetweentheequipmentandreceiver.
-Connecttheequipmentintoanoutletonacircuitdifferentfromthattowhichthe
receiverisconnected.
-Consultthedealeroranexperiencedradio/TVtechnicianforhelp.
 Loading...