

Page 1
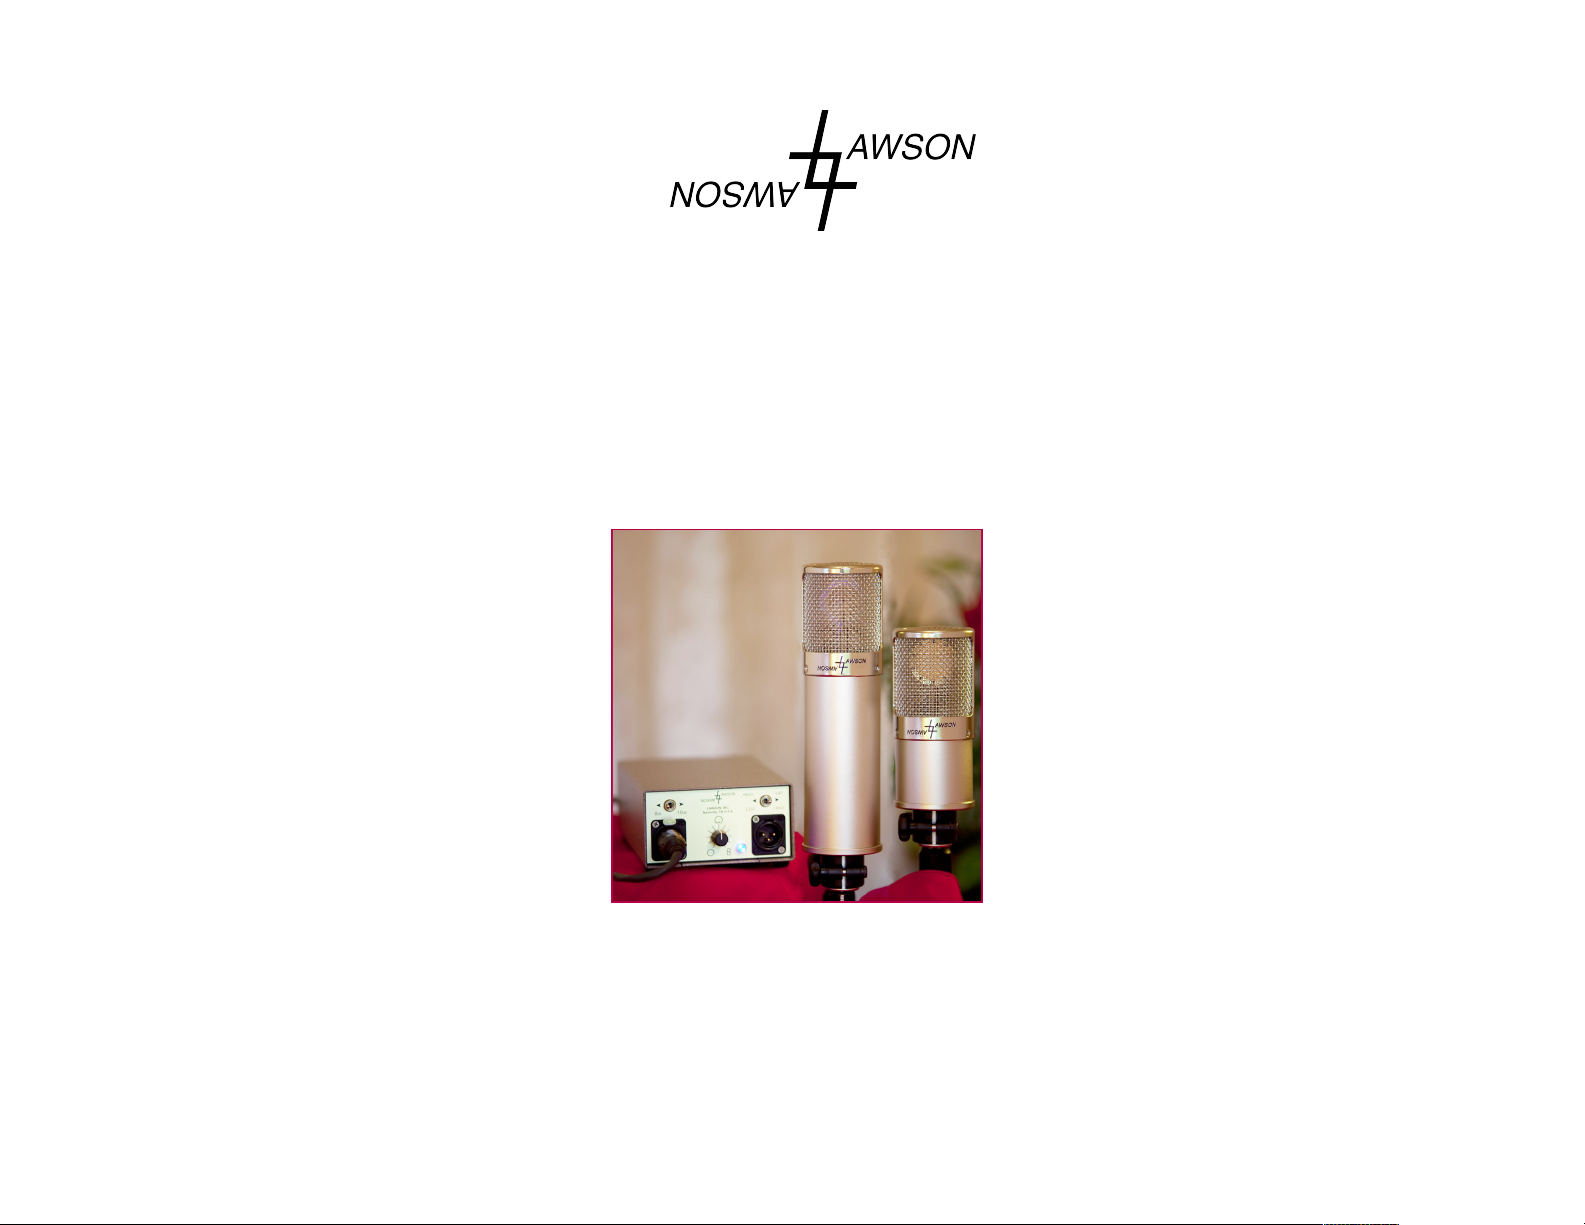
Operation Guide for Lawson Models:
L47MP MKII Tube Mic
L251 Tube Mic
L47FET
L251FET
Quick Change™ Capsule System
Lawson, Inc.
Relive the Magic™
2739 Larmon Avenue
Nashville, TN 37204 U.S.A.
615-269-5542
Fax 615-269-5745
www.LawsonMicrophones.com
Page 2

CAUTION! The Lawson vacuum tube mic power supply
contains voltages exceeding 200 volts.
* Disconnect the microphone from the power supply before
removing or replacing Quick Change™ Capsules.
* Disconnect the microphone from the power supply before
changing the vacuum tube.
* Your Pelican case is water proof; your microphone is not. Do
not immerse your microphone in any water or liquid.
* Do not spray cleaners directly onto your microphone. Doing
so may damage the capsule. If you wish to clean the exterior
of your mic, spray Windex (or similar cleaner) onto a clean
towel and then wipe.
* The capsule is housed in a protective wire cloth head
assembly. Do not remove the capsule from its protective
housing. To do so may damage the diaphragms and void your
warranty.
* During the warranty period, repairs should be referred to
Lawson, Inc. After expiration of the warranty, for safety
reasons any repairs should be referred to Lawson, Inc., or to
qualified service technicians.
Safety Precautions
Congratulations and thank you for purchasing Lawson
microphones featuring the versatility of QuickChange™
capsule(s). Lawson microphones are hand-crafted in the USA
by real people with pride to give you many years of service
and enjoyment.
To familiarize yourself with the special features of your
Lawson microphones, please take the time to read this
manual.
Your Lawson microphone(s) shipped from the factory
configured as indicated below:
Checked by: ???
Date: xxxx.xx.xx
Vacuum Tube Microphone Serial Number:
???
FET Microphone Serial Number:
???
Introduction
Page 3

3
(=included; =not included)
L251 Quick Change™ Capsule--a faithful reproduction of
the one inch capsule used in the Telefunken ELAM 251, a rare
vintage mic renowned and coveted for its sparkling
airy
highs
and warm solid lows
L47MP MKII Quick Change™ Capsule--a faithful repro-
duction of the M7 capsule used in the legendary German-made
U47 and M49 microphones featuring 3-micron gold sputtered
diaphragms for improved high frequency and transient
response. Each capsule is precision machined from solid brass,
then hand-lapped in the Lawson lab to insure consistent per-
formance from mic to mic. The L47 is renowned for its versa-
tility, warmth, character, and ability to stand out in a mix.
Universal FET (field effect transistor) 48V Phantom
powered electronics that accepts any Lawson Quick Change™
Capsule. The FET features the cardioid pattern only, a -10/-
20dB pad, and switchable Low Frequency control
Tube Electronics that accepts any Lawson Quick
Change™ Capsule
Universal tube mic power supply featuring an infinitely
adjustable polar pattern control, 10 dB pad control, and
switchable Low Frequency Contour Control
30 foot 7-pin cable specially designed and shielded for
tube mic usage
(1) Swivel Mic Holder(s)
Power Cord
Shock Proof Carrying Case(s)
Your Microphone Components
2
Introduction
Your Microphone Components . . . . . . . . . . . . . . . . . . .3
Classic 251 Sound . . . . . . . . . . . . . . . . . . . . . . . . . . . . . . .4
Classic 47 Sound . . . . . . . . . . . . . . . . . . . . . . . . . . . . . . .5
Setting Up Your Tube Microphone . . . . . . . . . . . . . . .6
Proximity Effect . . . . . . . . . . . . . . . . . . . . . . . . . . .7
Multi-Pattern/Cardioid Only Position . . . . . . . . .7
Polar Pattern Selection . . . . . . . . . . . . . . . . . . . . .7
10 dB Pad . . . . . . . . . . . . . . . . . . . . . . . . . . . . . . . . .8
Low Frequency Contour Control . . . . . . . . . . . . .8
Vacuum Tube . . . . . . . . . . . . . . . . . . . . . . . . . . . . .9
How to Replace the Fuse . . . . . . . . . . . . . . . . . .10
Setting Up Your FET Microphone . . . . . . . . . . . . . . . .11
10dB/20dB Pad . . . . . . . . . . . . . . . . . . . . . . . . . . . .11
Low Frequency Rolloff . . . . . . . . . . . . . . . . . . . . .12
Quick Change™ Capsule System . . . . . . . . . . . . . . . . . .13
Specifications Summary . . . . . . . . . . . . . . . . . . . . . . . .14
Warranty . . . . . . . . . . . . . . . . . . . . . . . . . . . . . . . . . . . .16
Appendix
Pelican Case (Things You Should Know) . . . . . .17
Table of Contents
Page 4
5
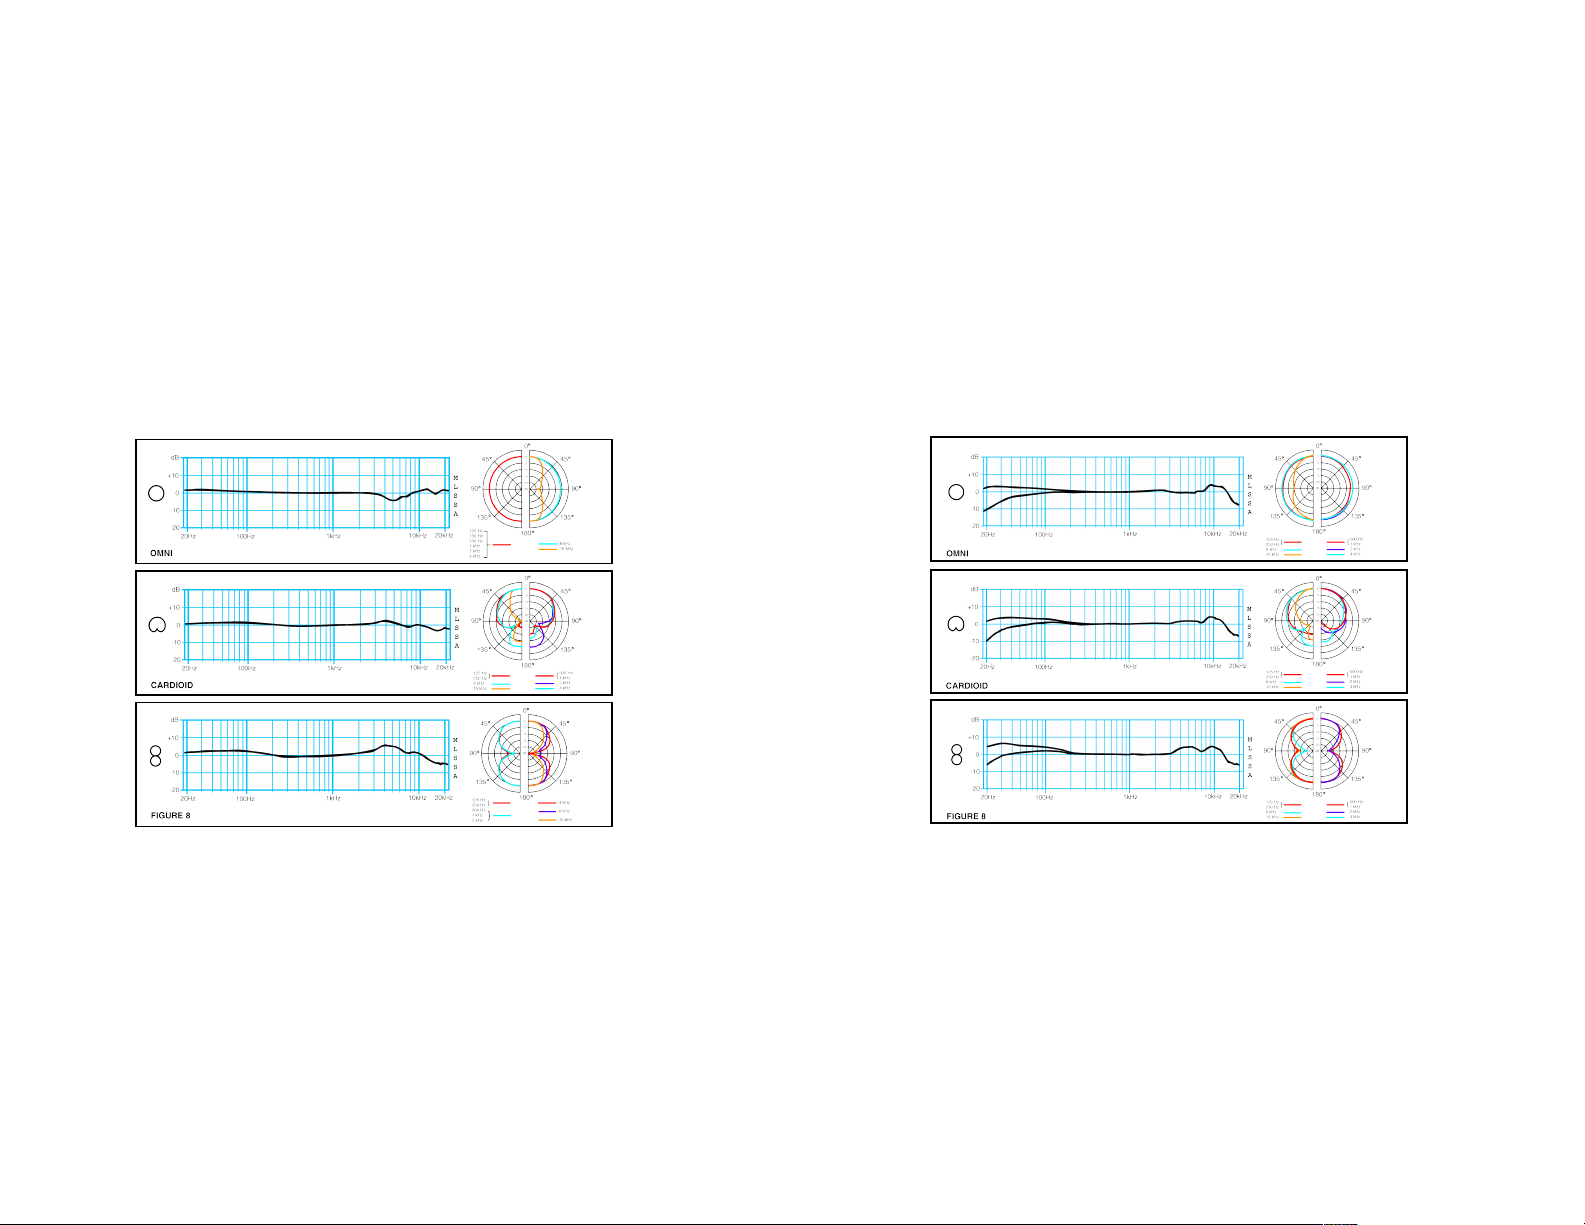
Classic 251 Sound The classic 251 sound has been
characterized as
airy, sparkly
, and
breathy
. These
characteristics in large part can be attributed to the broad
boost at approximately 10 kHz. The L251 capsule also exhibits
a large proximity effect that provides a warm bottom end.
L251 Frequency Responses
4
Classic 47 Sound The classic 47 sound has been characterized
as
forward, present
, and
warm
with the ability to
stand out in
a mix
even when
wrapped with the band
making it an
excellent choice for vocal and voice over applications. These
characteristics in large part can be attributed to the presence
rise at approximately 4.5 kHz. Although not as great as the
L251, the L47MP Mk II capsule also exhibits a proximity effect
that provides a warm bottom end.
L47MP MKII Frequency Responses
Page 5

7
amount of glass cleaner directly to a lintless cloth and gently
wipe. Do not spray cleaners directly onto the mic.
Proximity Effect is the low frequency boost that occurs with
close miking. The closer the mic, the greater the low
frequency boost. Adjusting the pattern control actually
changes proximity effect The greatest proximity effect occurs
in the figure 8 position. No proximity effect occurs in the
omni position. Adjusting the pattern control changes
proximity effect and frequency response as illustrated in the
plots. To achieve your desired results, experiment with various
combinations of miking distance, polar pattern, and low
frequency contour switch positions.
Multi-Pattern/Cardioid Only Position Your tube mic features
a Multi-pattern/Cardioid-only switch located on the base of
the tube microphone. A blue LED behind the mic windscreen
glows when the multi-pattern mode is selected. When the
cardioid-only position is selected, the multi-pattern control on
the power supply is disabled and the blue LED inside the head
is off. The cardioid-only position increases the output of the
microphone by about 3 dB at the same time lowering the noise
floor by the same amount. Note! Turn the microphone
channel down at the console before changing the position
of this switch as an ear and speaker destroying A-bomb
wump will ensue.
Note! Turn down the microphone channel
at the console before changing the position
of the 10dB pad and the Cardioid-Only
switches to prevent transient thumps.
Polar Pattern Selection The pattern selector control knob is
located on the front center of the tube microphone power
supply unit. This control is continuously variable and allows
small incremental settings anywhere between major
directional patterns. In other words, you are not limited to a
few preset clickstops. You may find it valuable and
6
The Lawson tube microphone is heavy. To protect your
investment and the toes of your clients, avoid the use of light-
weight stands or extremely long or unbalanced booms. When
attaching the tube mic to boom stands, wrap the cable around
the boom a few turns. By using the cable in this manner, it
may prevent a damaging fall, especially when using quick
disconnect mic holders. The L251 and L47 capsules are
internally shock mounted. No external shock mounting is
required.
Connect the provided 7-pin cable from the tube microphone to
the power supply. This cable should be connected BEFORE the
power supply is plugged into the AC wall outlet (AC mains)
and BEFORE being switched to the ONposition. This
procedure will avoid unnecessary power surges to the vacuum
tube and insure maximum tube life. Allow at least five
minutes warm-up time for maximum signal-to-noise ratio.
Use a standard 3-pin XLR mic cable between the tube mic
power supply and your mic pre. Forty-eight volt (48V)
phantom power is not necessary. If applied, it will have no
effect on the performance of the tube mic. The tube mic only
requires 20 to 30dB of mic preamp gain at the console with
close-up vocals. To insure lowest distortion, monitor the
console meters with the channel fader at its unity gain setting
(0 dB) and then set the gain of the mic preamp. Make this
adjustment BEFORE inserting outboard limiters, equalizers,
etc.
The Lawson logo engraving indicates the front of the
microphone. This side of the microphone normally points
toward the sound source. Use of a fabric windscreen is
recommended to prevent pops when doing up-close vocals.
The mic head and base are plated with nickel and/or 24 karat
gold to provide a lasting finish. To clean the mic, apply a small
Setting Up Your Tube Microphone
Page 6
98
of the original U47 low frequency characteristics (no low
frequency rolloff). The
-BASS
position provides a 6 dB/octave
rolloff below 100 Hz).
Vacuum Tube Your tube mic uses the 6N1P vacuum tube. This
tube is a standard nine-pin vacuum tube. All tubes used in
Lawson tube mics have been specially selected for extremely
low noise. It is important when replacing this tube to obtain a
low noise 6N1P tube that has been selected for low noise
characteristics specifically related to use in microphones.
Lawson, Inc., can supply these specially selected tubes. To
further insure low noise, an innovative, low-loss tube socket is
utilized employing military grade, heavily gold-plated
beryllium copper contacts, resulting in unparalleled grip, low
contact resistance, and long life.
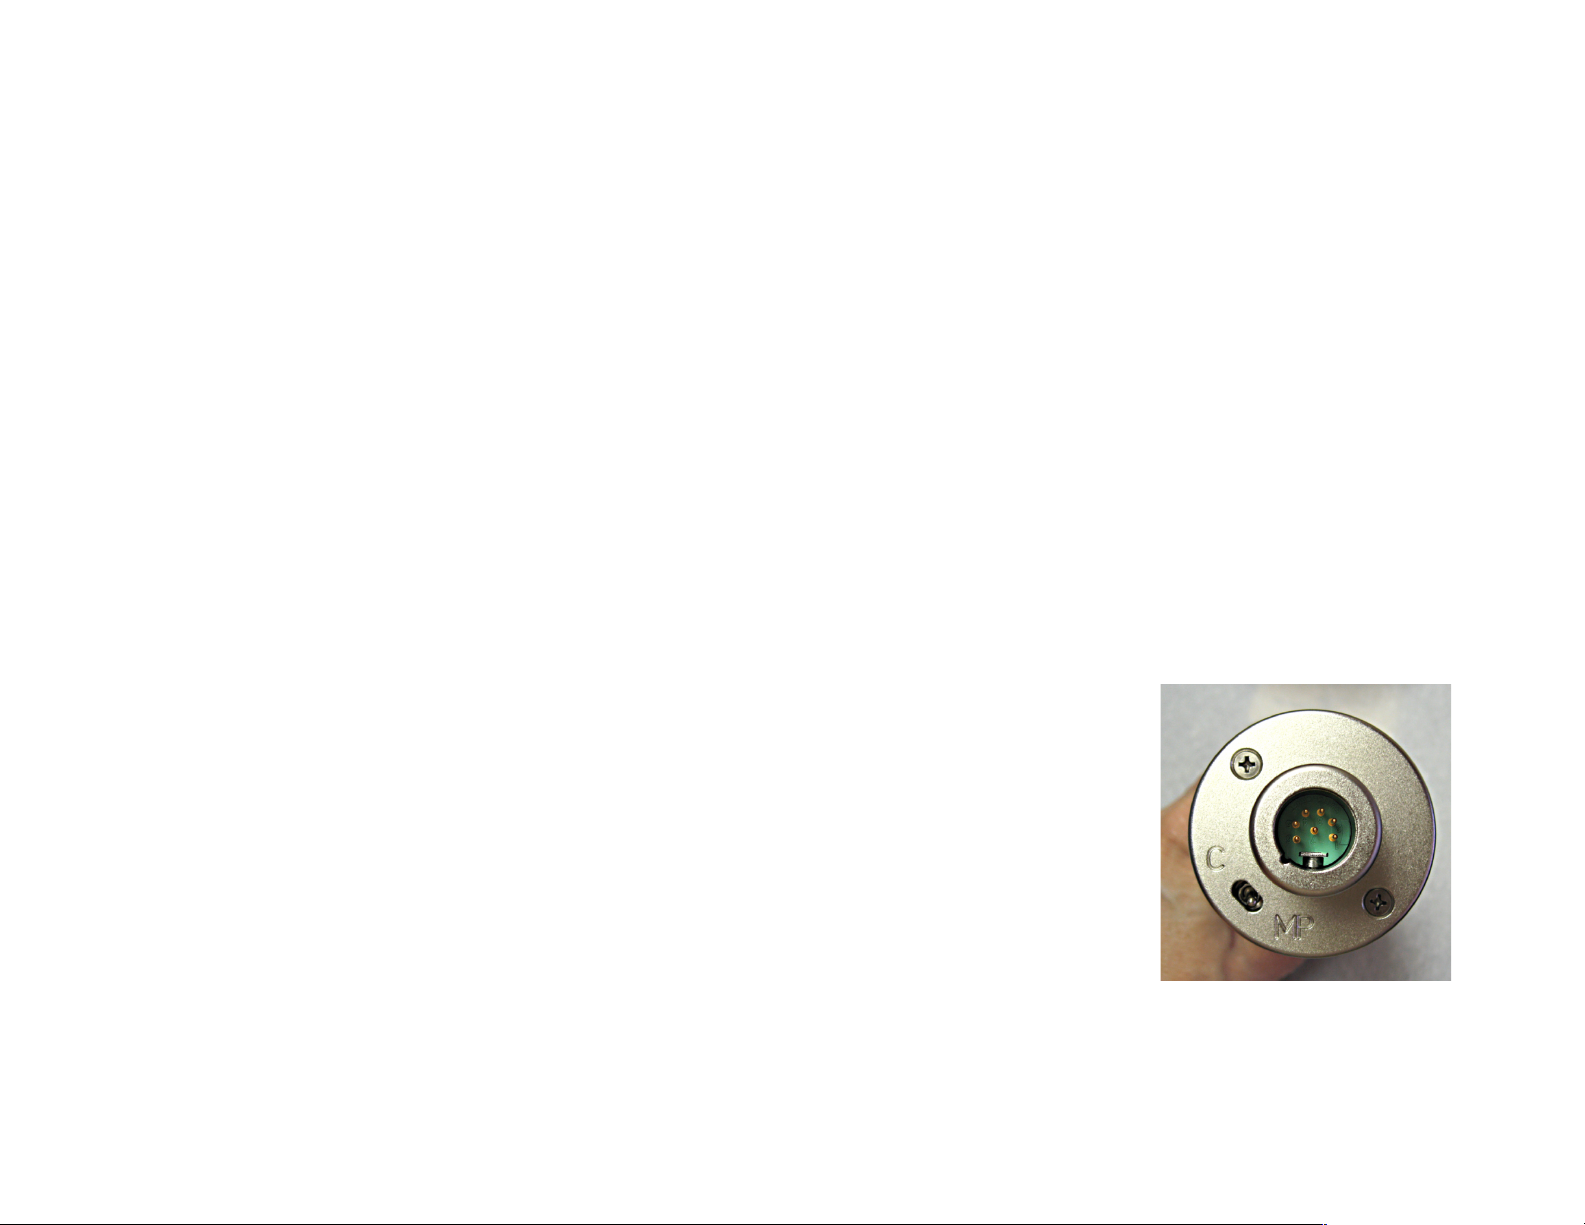
Replacing the Vacuum Tube. To remove the vacuum tube,
first unplug the power supply cable from the mic. Disassemble
and remove the mic holder by removing the two wing/thumb
nuts exposing the base of the microphone as seen here.
Remove the two Phillips screws on the bottom of the
microphone. The C/MP plate
and the body cylinder can then
be removed exposing the
internal vacuum tube and
circuitry. Grasp the tube and
pull straight down toward the
base of the microphone, taking
care not to use sideward
motion which could bend the
tube pins. Make sure the pins
are straight on your new tube
by using a tube pin straightener. Line up the tube pins with
the socket and push straight in. Replace the body cylinder.
Replace the C/MP plate making sure to line up the toggle
switch handle with the hole. Replace the two Phillips screws.
Do not over-tighten. Reassemble swivel mic holder.
informative to have the power supply in the control room and
make pattern adjustments while monitoring a performance to
find the ideal position.
Make sure your microphone is set to
the MPmode by checking the position of the switch on the
base of the microphone. The polar pattern control is
disabled in the Cmode.
A blue LED inside the windscreen
glows when the multi-pattern mode is selected.
It is normal to experience a slight low-frequency noise while
the pattern control is being rotated. The pattern change is not
instantaneous. Please allow five to ten seconds for the new
pattern to stabilize after readjustment.
10dB Pad Output may be reduced by 10dB with the switch
located on the left-hand side of the power supply unit. Note!
Turn down the microphone channel at the console before
changing the position of this switch to prevent transient
thumps. The -10 dB pad switch actually lowers the capsule
polarizing voltage thus lowering the input level to the vacuum
tube and raises the sound pressure level capability. To
preserve the low noise floor, use the -10 dB position for
extreme sound pressure levels only.
Low Frequency Contour Control (-BASS/L251
L47/+BASS) A two-position low frequency contour switch is
located on the front of the universal power supply. This switch
can be changed during a performance without transient clicks
or pops. The FET electronics provide the same low frequency
effects.
With the L251 capsule, the
L251
(or
-BASS
) position provides a
faithful reproduction of the original ELAM251 (a 6 dB/octave
rolloff below 100 Hz). The
+BASS
position provides extended
low frequency characteristics and more profound proximity
effect (actually a flat frequency characteristic).
With the L47 Quick Change™ Capsule on your tube electronics,
the
L47
(or
+BASS
) position provides a faithful reproduction
Page 7
11
Use a standard 3-pin XLR mic cable between the FET
microphone and the console microphone input with 48 volt
phantom. The FET only requires 20 to 30 dB of mic preamp
gain at the console with close-up vocals. To insure lowest
distortion, set the gain of the console mic preamp, and
monitor the console meters BEFORE the insertion of any
outboard limiters, equalizers, etc.
10dB/20dB Pad A 10 or 20 dB reduction in sensitivity can be
achieved with the miniature three-position toggle switch
located in the microphone base:
Center = no attenuation
10
= -10dB
20
= -20 dB
The -10 and -20 dB positions help to insure low distortion
operation when miking instruments of very high sound
pressure levels. To maintain lowest noise, use pads only when
miking high sound pressure levels. Console fader levels should
be lowered before changing pad settings as loud transients
may occur.
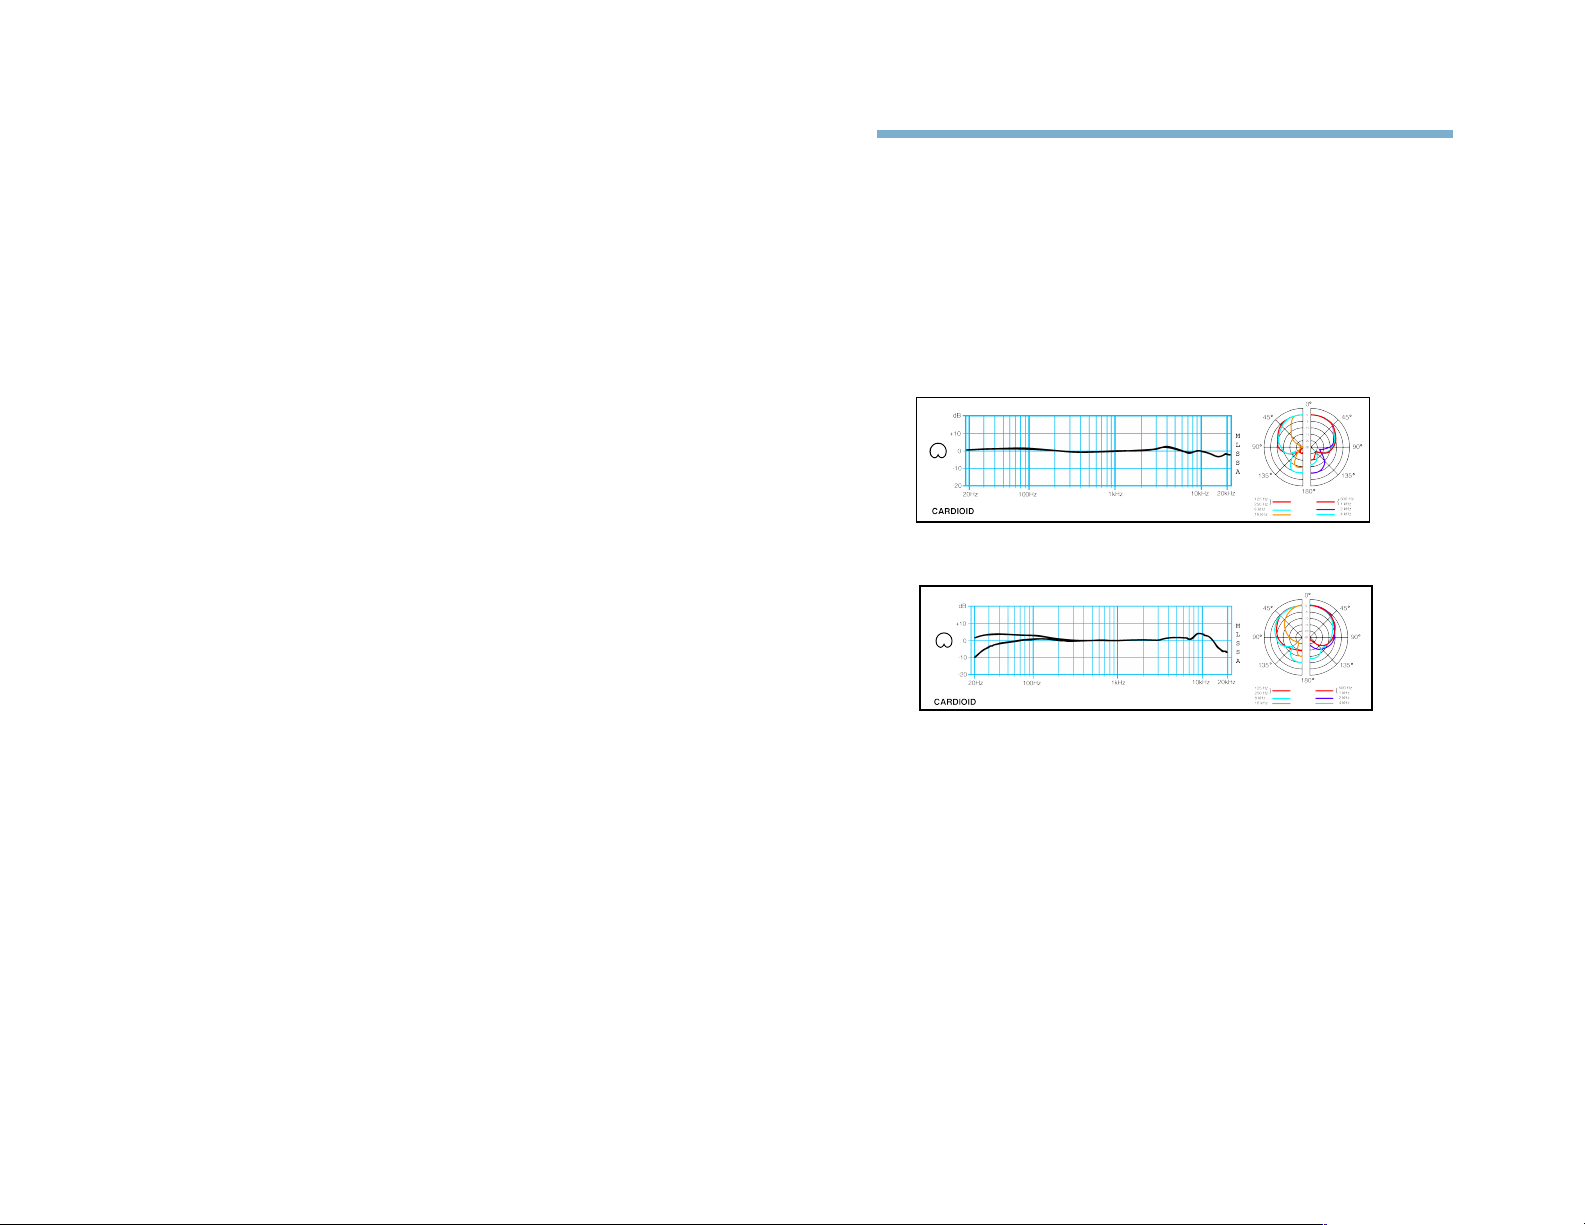
Low Frequency Rolloff A gentle 6dB per octave low
L47FET Frequency Response
L251FET Frequency Response
Setting Up Your FET Microphone
10
How to Replace the Fuse Disconnect the power supply from
the electrical outlet. The fuse holder is located on the rear of
the power supply unit just above the AC power connector. To
replace the fuse, pull the fuse retainer cap with a screwdriver.
Examine the 1/2 amp (500 mA) fuse visually or with an
electrical continuity tester. Replace the fuse, if necessary. (A
spare fuse is included in the retainer cap.) Insert the new fuse
into the fuse retainer cap. Insert the cap and fuse into the
holder by pushing straight in. If the unit continues to blow
fuses, refer the unit to a competent service technician. Do not
attempt repairs yourself as potentially dangerous voltages are
present within the power supply and unauthorized repairs
during the warranty period may void the warranty.
Page 8

Your Lawson Quick Change™ Capsules are fully compatible
with other Lawson microphones in the Quick Change™ series
and may be used on your Lawson tube electronics with full
multi-pattern functionality. To disconnect the head from your
tube microphone,
first turn off the power supply and
disconnect the 7-pin cable at the mic. When disconnecting the
head from your FET electronics, there is no need to disconnect
the three-pin cable, however, it is advisable to turn down your
fader at the console. Using a Phillips head screw driver,
remove the three stainless steel screws that are located just
below the microphone wire cloth screen. After removal of
these screws, hold the mic body with one hand and with the
other hand, pull the head/capsule section up and off,
separating the head from the mic body. Replace with the
Lawson Quick Change™ capsule of your choice by carefully
mating the connectors. Replace the three screws into the
head. Do not overtighten these screws. Reconnect the 7-pin
cable to the microphone and turn on the power supply.
The capsule is the heart of a condenser microphone. The
integrity of the capsule, more than any other element,
determines the microphone's character and quality as a
transducer. In 1927 German inventors von Braunmuhl and
Weber patented the operating principles for a new condenser
microphone capsule. In 1932 these principles were first
incorporated into the manufacture of German microphones.
Today these classic microphones are still revered and sought
after for their special sound. Lawson Microphones continues
this 60-year-plus heritage and pays homage to the genius of
those past designers and makers of timeless classics.
13
Quick Change™ Capsule System
12
frequency roll-off is provided by the use of another two-
position toggle switch in the microphone base:
F
= Flat/No rolloff
LC
= Low Cut
The two positions of this control provide the same
characteristics as the two-position switch on the Lawson tube
mic power supply. The rolloff is designed to counter the low
frequency buildup which occurs as a result of the proximity
effect when closely miking voices/instruments. Console fader
levels should be lowered before changing rolloff settings as
loud transients may occur.
Page 9

15
Frequency Range 20 to 20,000 Hz
Polar Patterns Cardioid (full multi-pattern
functionality with Lawson MP
Electronics)
Sensitivity at 1 kHz 11 mV @ 1 Pascal (94 dB SPL)
Max SPL (1 kHz 3%) 135 dB (-10 145 dB; -20 155 dB)
Equivalent Noise Level 18 dBA
Rated Impedance 150 ohms
Connector 3-pin gold-plated XLR
Pad -10 dB and -20 dB
Dimensions Mic: 6.25”L, 2.375”D
48V Phantom (nominal) 1mA
L47FET Specifications Summary
Low Frequency Contour 6 dB per octave @ 100 Hz
Frequency Range 20 to 20,000 Hz
Polar Patterns Cardioid (full multi-pattern
functionality with Lawson MP
Electronics)
Sensitivity at 1 kHz 11 mV @ 1 Pascal (94 dB SPL)
Max SPL (1 kHz 3%) 135 dB (-10 145dB; -20 155 dB)
Equivalent Noise Level 18 dBA
Rated Impedance 150 ohms
Connector 3-pin gold-plated XLR
Pad -10 dB and -20 dB
Dimensions Mic: 6.25”L, 2.375”D
48V Phantom (nominal) 1mA
L251FET Specifications Summary
Low Frequency Contour 6 dB per octave @ 100 Hz
14
Frequency Range 20 to 20,000 Hz
Polar Patterns Cardioid, omni-directional,
figure 8, and infinite
intermediate patterns;
also cardioid-only position
Sensitivity at 1 kHz 11.4 mV @ 1 Pascal (94 dB SPL)
18.2mV (cardioid-only mode)
Max SPL (1 kHz 3%) 134 dB
(144 db SPL with -10 dB pad)
Equivalent Noise Level 16 dBA multi-pattern
13 dBA cardioid-only mode
Rated Impedance 150 ohms
Tub e 6N1P/6922 dual triode
Connector 7-pin gold-plated XLR
Pad -10 dB
Dimensions Mic: 9.75”L, 2.375”D
Supply: 8”L X 4.375”W X
2.625”H
Shipping Weight 14 lbs.
Power Supply (VAC factory set) 100/120/200/220/240
L47MP MKII Specifications Summary
Low Frequency Contour “L47”=Flat & “-Bass”=Rolloff
Frequency Range 20 to 20,000 Hz
Polar Patterns Cardioid, omni-directional,
figure 8, and infinite
intermediate patterns;
also cardioid-only position
Sensitivity at 1 kHz 11.6 mV @ 1 Pascal (94 dB SPL)
18 mV/Pascal (cardioid only)
Max SPL (1 kHz 3%) 134 dB
(144 db SPL with -10 dB pad)
Equivalent Noise Level 16 dBA multi-pattern
13 dBA cardioid-only
Rated Impedance 150 ohms
Tub e 6N1P/6922 dual triode
Connector 7-pin gold-plated XLR
Low Frequency Contour “L251”=Rolloff & “+Bass”=Flat
Pad -10 dB
Dimensions Mic: 9.75”L, 2.375”D
Supply: 8”L X 4.375”W X
2.625”H
Shipping Weight 14 lbs.
Power Supply (VAC factory set) 100/120/200/220/240
L251 Specifications Summary
Page 10

17
16
One-Year Limited Warranty
Lawson Incorporated microphones purchased in the U.S.A. from
Lawson, Inc., or its authorized agents are warranted for one year from
date of purchase by Lawson, Inc., to be free of defects in materials and
workmanship (vacuum tubes excluded). In event of such defect, product will be repaired promptly without charge or, at our option,
replaced with a new product of equal or superior value if delivered to
Lawson, Inc., prepaid, together with the sales slip or other proof of
purchase date. Prior approval from Lawson, Inc., is required for
return. This warranty excludes vacuum tubes, defects due to normal
wear, abuse, shipping damage, or failure to use product in accordance
with instructions. This warranty is non-transferable and is void in the
event of unauthorized repair or modification.
For return approval and shipping information, contact Lawson, Inc.,
2739 Larmon Avenue, Nashville, TN 37204 U.S.A.
To validate and extend your warranty to five years, please return
the enclosed registration card.
Warranty
Page 11

18
Notes
 Loading...