

1
MODEL LSBV 2800
GARDEN VACUUM / BLOWER / MULCHER
OPERATING INSTRUCTIONS
2
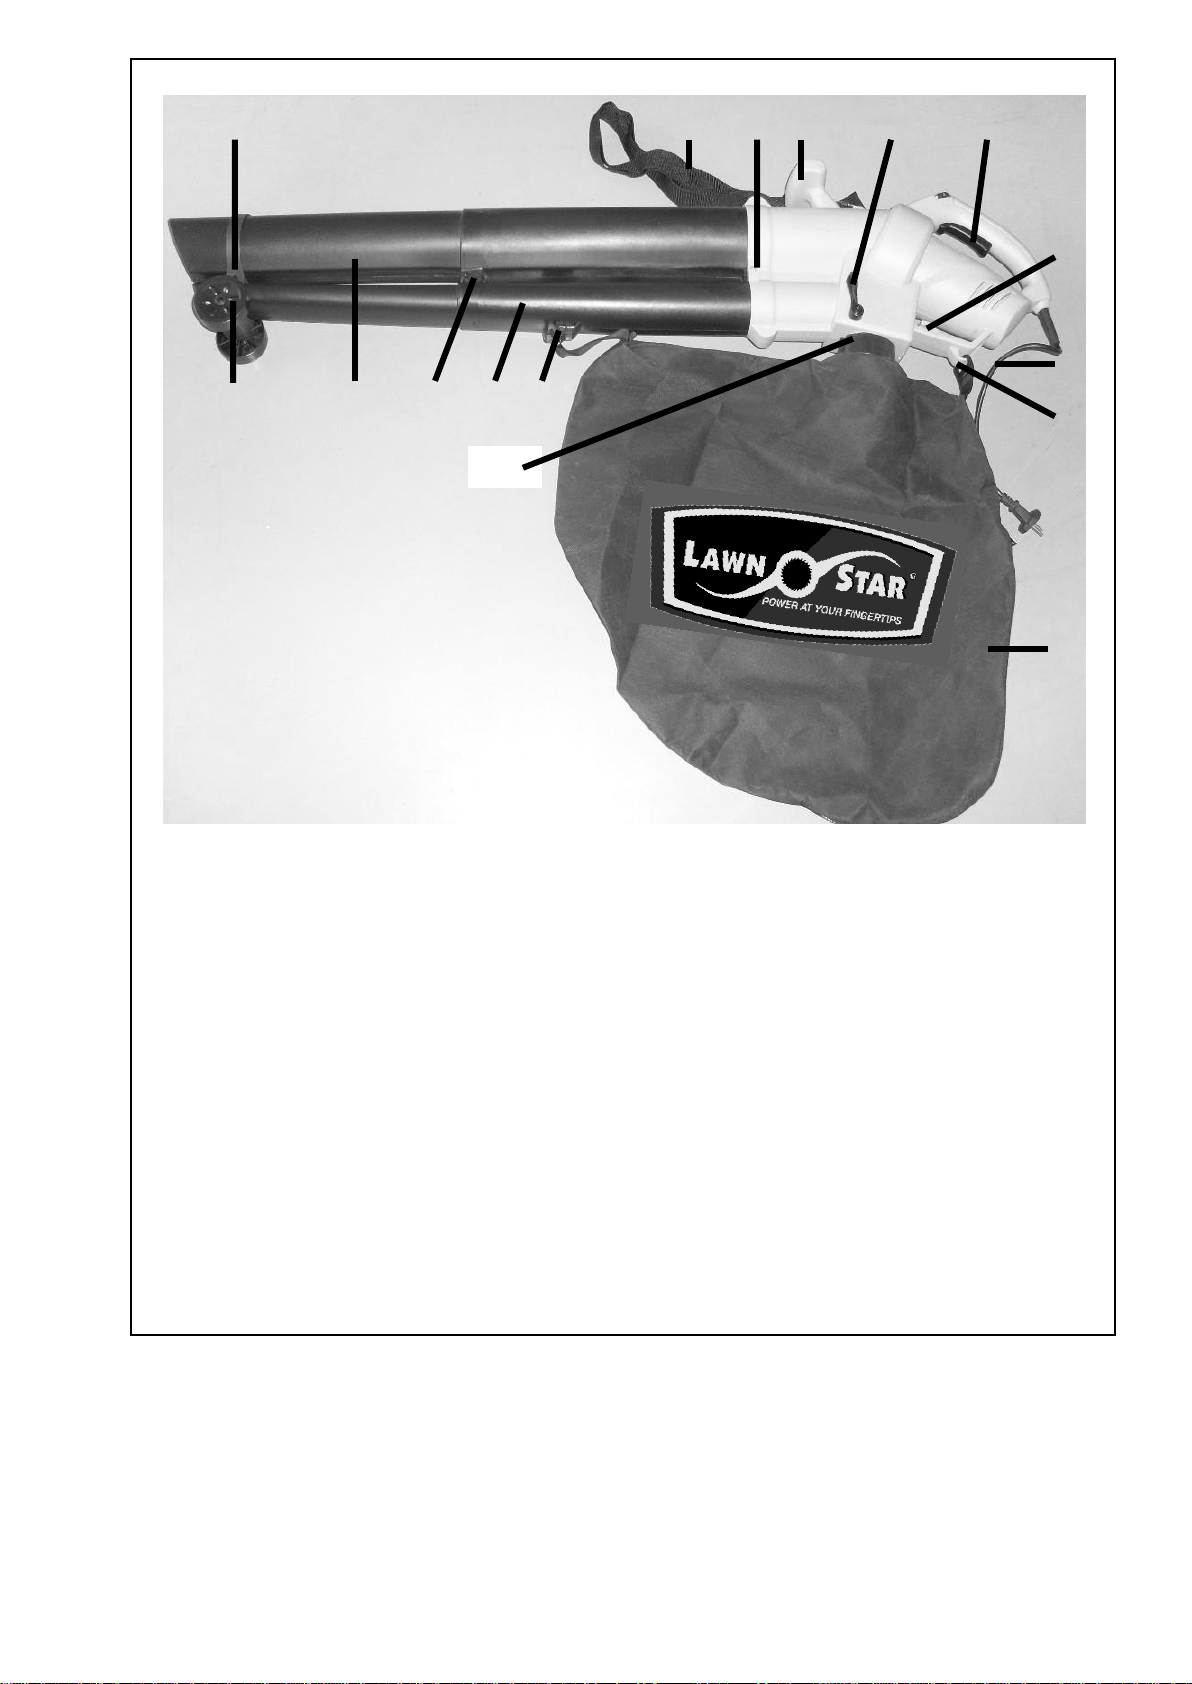
Figure 1
DESCRIPTION OF PARTS
1. Strap
2. Screw
3. Front assist handle
4. Function selector lever
5. ON/OFF Power switch
6. Cord restraint
7. Cable & plug
8. Hook for collection bag
9. Collection bag
10. Hook for collection bag
11. Upper chute
12. Screw
13. Lower chute
14. Wheel
15. Screw
16. Collection bag connector
1 3 5
7
6
8
4
9
10
11
12
13
14 2 15
16
3
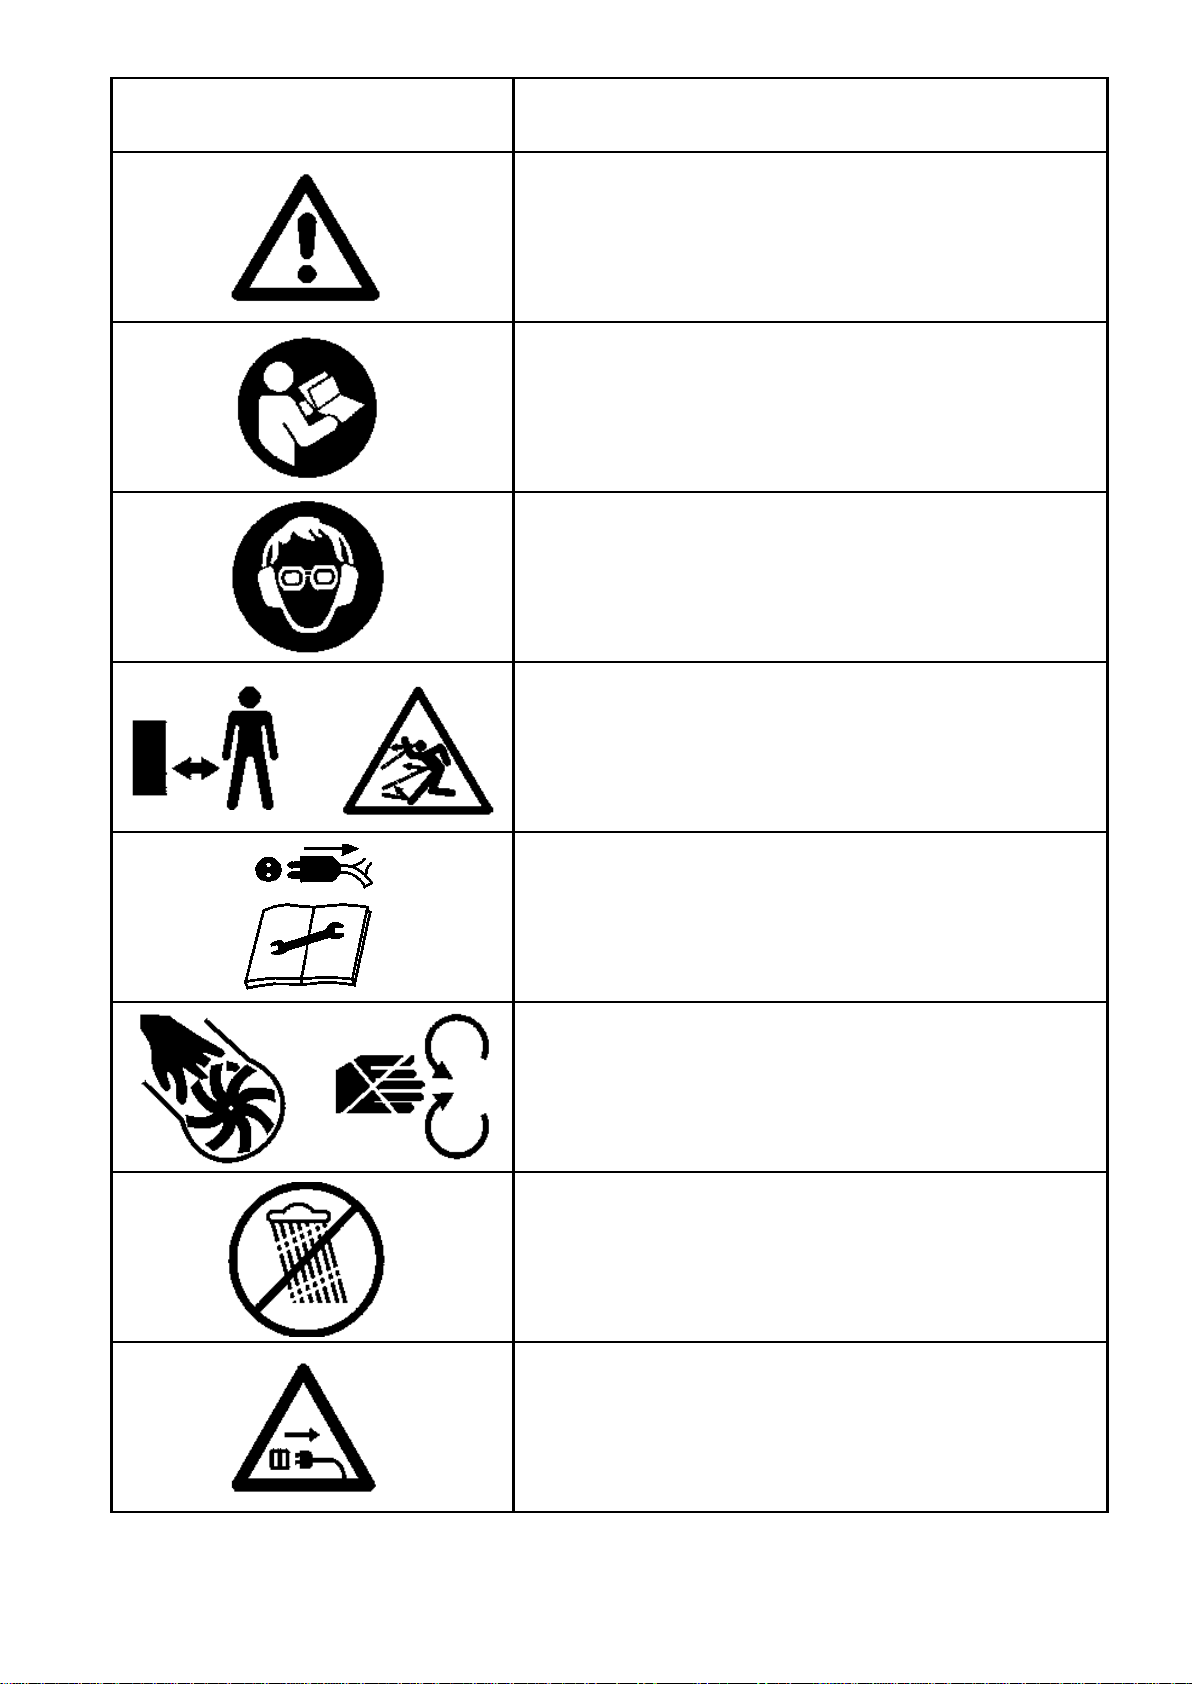
ATTENTION! OBSERVE THE FOLLOWING SAFETY
WARNINGS
READ THE OPERATORS MANUAL BEFORE
OPERATING THIS MACHINE. IT CONTAINS SAFETY
AND OPERATING INSTRUCTIONS. KEEP IT IN A SAFE
PLACE FOR FUTURE REFERENCE.
WEAR EYE AND EAR PROTECTION
KEEP ALL PERSONS AND ANIMALS AT A SAFE
DISTANCE. THROWN OBJECTS CAN CAUSE
SEVERE INJURY.
WARNING!
SWITCH THE GARDEN VACUUM OFF AND DISCONNECT
FROM THE MAINS SUPPLY BEFORE MAKING
ADJUSTMENTS, CLEANING BLOCKAGES, OR STARTING
ANY CLEANING AND MAINTENANCE PROCEDURES.
BEWARE OF ROTATING BLADES. KEEP HANDS
WELL CLEAR OF ALL OPENINGS AND INLETS
DURING OPERATION. USE CAUTION WHEN
CLEANING OR SERVICING.
DO NOT USE THIS GARDEN/VAC/BLOWER/MULCHER
IN THE RAIN
WARNING!
SWITCH THE GARDEN VACUUM OFF AND DISCONNECT
FROM THE MAINS SUPPLY BEFORE MAKING
ADJUSTMENTS, CLEANING BLOCKAGES, OR STARTING
ANY CLEANING AND MAINTENANCE PROCEDURES.
SYMBOL
DESCRIPTION

4
Thank you for purchasing the Lawn Star garden vac / blower / mulcher which is one of the finest and
most advanced vac / blower / mulchers today’s technology can produce. Before you begin using it,
please read this instruction manual carefully and familiarise yourself with the control and the proper
use of this product to ensure you get the best possible performance from it.
SAFETY PRECAUTIONS
Inspect your vac/blower/mulcher and its supply/extension cable before each operation. If any part is
damaged or worn, repair or replace before operation . Do not operate with damaged or tangled
supply/extension cable. If the supply cord is damaged, it must be replaced by a special cord available
from Lawn Star (Pty)Ltd or its service agent.
Use only genuine Lawn Star (Pty)Ltd. replacement parts when servicing or repairing the unit. These
parts are available from your supplying dealer or service agent.
WARNING : To prevent electrical shock hazards, use only extension cables suitable for outdoor use,
with splash-proof socket outlets, preferably protected by sensitive Residual Current Device (RCD)
with tripping current of not more than 30 mA.
Always switch off the vac/blower and wait for it to stop before removing bag or putting the unit down.
Disconnect the unit from the power supply when unattended or not in use, before servicing, cleaning or
when emptying the bag.
It is essential that the operator wears safety goggles, protective clothing and sturdy , non-slip
footwear.
Do not use your vac/blower/mulcher for any jobs other than those for which it was intended.
Use care in picking up or holding the vac/blower/mulcher. Always hold with both hands.
Do not carry, pull or hang the vac/blower/mulcher by the cable.
Do not use the vac/blower/mulcher in poor light or in damp or wet locations. Do not use in the rain. Do
not use on steep slopes, especially if damp. Work across slope faces, not up and down. Do not overreach. Ensure good footing and balance are maintained.
Do not suck up or blow wet materials, liquids, flammable materials, hot ash or any other materials that
are a potential fire hazard.
Do not operate the unit without the suction/blowing chutes and bag in place.
Do not direct the blowing/suction opening at people or animals.
Do not allow children under 16, nor anyone who is not familiar with these instructions to use the
vac/blower. Children, pets and onlookers should be kept at least 5 metres away from the work area .
When not in use, store the unit indoors in a dry and locked place, out of reach of children.
Check regularly that all screws are tight.
PREPARATIONS FOR USE
1. Insert the lower chute (Fig.3) into the upper chute ensuring that all parts slot into each other
correctly and push together securely. When in position, lock the chutes together by inserting the
chute locking screw (Fig.4) and tighten.
2. Insert the upper chute (Fig.5) into the motor housing ensuring that all parts slot into each other
correctly and push together securely. Lock into position by inserting the screw into the motor
housing (Fig.6) and tighten.
3. Slide the wheel bracket over the end of the lower chute (Fig.7) until it reaches the end stop. Lock it
into position by inserting the screw into the axle bracket (Fig.8) and tighten.
4. Attach the collector bag connector by aligning it with the outlet tube on the motor housing (Fig.9-
1). Fasten the screws to secure the collector bag connector (Fig.9-2). Attach the bag connector
collar by aligning it with the collector bag connector and push it up into position until the clips
click into place (Fig.9-3). Attach the two bag support straps on the two hooks (Fig.9-4 and 5). To
remove the bag, depress the two buttons on either side of the bag connector collar and pull (Fig.9-
3), then remove the two hooks (Fig.9-4 and 5).
5. Attach the strap to the ring provided on the housing (Fig.10) and adjust the strap length to suit.
6. Connect the plug provided with the vac/blower/mulcher to a suitable female socket. Attach to an
extension cord not more than 25 meters of length. Use 2-core insulated cable, minimum (HO5VVF) 2x1,0mm, in turn connected to a suitable mains connection plug. All components should meet
your national, IEC or EN specifications.

5
Figure 3
Figure 4
Upper
chute
Lower
chute
Clip
Slot
Slot (not visible
in this picture)
Clip (not visible
in this picture)
Motor
housing
Lower
chute
Figure 5
Figure 6
Upper
chute
Lower
chute
50mm Screw
Clip
Slot on
inside
Clip
Slot on
inside
Motor
housing
Upper
chute
50mm Screw
15mm
Screw
Wheel
bracket
End stop
for axle
bracket
Figure 7
Figure 8
End stop for
axle bracket
THE USE OF THIS VAC/BLOWER/MULCHER FOR COMMERCIAL OR RENTAL
PURPOSES WILL INVALIDATE THE WARRANTY.

6
CAUTION
Before switching the vac/blower/mulcher on, ensure that the bag collar, bag support straps and bag are
correctly attached to the main body.
Ensure that the zipper on the bag is closed.
OPERATING INSTRUCTIONS
Attach extension cord with suitable female coupler to the plug provided on the vac/blower/mulcher.
Insert a loop of the extension cord into the strain-relief mechanism provided in the underside of the
main body (Fig.11) to prevent accidental detachment of plug. Fit shoulder strap and adjust to suit.
To blow rotate the function selector lever (Fig.13) to “BLOW” ensuring it clicks into position.
To vacuum rotate the function selector lever (Fig.13) to “VACUUM” ensuring it clicks into position.
Before switching from blowing to vacuuming, switch off the machine and wait until the motor has
come to a complete stop.
To switch on the vac/blower/mulcher ensure the machine is directed in a safe direction then depress
the trigger switch (Fig.1 No.5) and the blower vac will start. Be sure to be holding the blower vac
firmly on start up.
To turn the blower vac off simply release the trigger switch.
To vacuum/blow hold the machine with the suction chute in front of you so that it rests on the support
wheels. Use the vac/blower/mulcher only to suck up or blow leaves and small twigs. The sucked-up
leaves are passed through the fan which shreds them into small pieces for convenient composting or
disposal.
To empty the collection bag switch off the unit, wait for the motor to stop turning, disconnect from the
main power supply, open the zipper on the bag and pour out contents. The bag can, but need not be
removed for this.
MAINTENANCE, CARE AND STORAGE
Disconnect plug from power supply before carrying out any maintenance, service or repair work.
Do not oil – this is unnecessary.
Keep air intake vents, in plastic housing above motor, free of debris and dirt to ensure unobstructed
cooling air-flow through the motor. Clogged-up air intake vents cause the motor to overheat and can
result in failure. Use a damp cloth moistened with water to clean. Do not use any solvents or
detergents.
To clear blockages remove bag and chute from motor housing. Check that the fan and function selector
are unblocked and move freely. Remove debris to unblock if necessary. Ensure fan rotates freely and is
not damaged. Do not operate if the fan is damaged, immediately have it repaired by service agent.
If the machine does not operate, switch-off immediately, check the plug, cable and isolator switch.
When not in use, store the unit indoors in a dry and locked place, out of reach of children.

7
Figure 9
Figure 10
Figure 11
Figure 12
Vacuum
mode
Blower
mode
Figure 13
Vacuum
Blower
1 2 3
4
5

8
LAWN STAR ( PTY ) LTD.
For service and warranty repairs please contact your nearest Service
Agent listed below:
CUSTOMER CARE : 0860-LAWNSTAR
HEAD OFFICE : 98 Bofors Circle, Epping 2 South, Cape Town
PO Box 496, Parow, 7499
Tel: 021-535-5249 Fax: 021-535-4624
EASTERN CAPE: Tel: 041-366-1300 Fax: 041-366-1300
FREE STATE : Tel: 082-556-6325 Fax: 086-691-6297
GAUTENG : Tel: 011-979-0162 Fax: 011-979-0174
KZN : Tel: 031-579-4390 Fax: 031-579-4400
WEST COAST : 082-460-3507
NORTHERN CAPE: 082-460-3507
OVERBERG : 084-609-7341
NAMIBIA : Tel: 061- 232-475 Fax: 061- 242-139
BOTSWANA : +267-318-6851
ZIMBABWE : +263-4-486 192/646
For more information visit: www.lawnstar.co.za

9
LAWN STAR ( PTY ) LTD.
WARRANTY CARD
LSBV 2800
Please read carefully
This card is required for warranty repair claims. Please fill in this card and keep it in a safe place,
stapled to the original proof of purchase. The original proof of purchase (i.e. receipt, invoice, docket,
etc.) must show the original date of purchase and clearly identify the product.
WITHOUT THIS CARD AND ORIGINAL PROOF OF PURCHASE , ANY WARRANTY
BECOMES NULL AND VOID .
Make :…………………………Serial No:……………………Date of Purchase:………………….
Model :………………………...
PURCHASER PURCHASED FROM
NAME: NAME :
ADDRESS: ADDRESS:
PHONE : PHONE:
LIMITED DOMESTIC USE WARRANTY
Lawn Star (Pty) Ltd. guarantees this unit to be free from defects in material and workmanship. If any
such defect should become apparent during a period of
12 MONTHS
from the date of the original purchase, we undertake to repair this unit free of charge or replace this
unit with a factory reconditioned unit at our discretion. This does not prejudice your rights in terms of
the Consumer Protection Act.
Transport costs to our service centre and back to the owner, should such costs occur , will be carried
by the owner of the unit , not by us.
The repaired or replaced unit will be covered by this warranty for the remainder of the original
warranty period.
This warranty covers only the original purchaser of this unit.
This warranty becomes invalid if :
- the unit has been used commercially or for rental purposes;
- damage has been caused by misuse, abuse, accident or normal wear and tear;
- spares and accessories other than specified by us are used with this unit;
- the unit has been opened, altered or otherwise tampered with;
The fan and dust bag are wearing parts and are not covered by Warranty.
PLEASE READ AND UNDERSTAND THE INSTRUCTION MANUAL BEFORE YOU
OPERATE THIS UNIT.
 Loading...