

LawnMaster MEB1016M R Operator's Manual

Electric Mow er MEB1016M R
Tondeuse Électrique 15po MEB1016m R
3084514
Read all safety rules and instructions carefully before operating this tool.
Distributed By Cleva North America 601 Regent Park Court Greenville, SC 29607 (866)-384-8432
Lisez toutes les rè gles et consignes de sécurité avant d'utiliser cette tondeuse.
Distribuée par Cleva North America 601 Regency Park Court, Greenville, SC 29607 (866)-384-8432
MNL_ MEB1016M R_ V1
EN p. 2
FR p. 28
Operators Manual / Guide d'Utilisation

2
CONTENTS 2
SPECIFICATIONS 2
INTRODUCTION 3
GENERAL SAFETY RULES 3-5
SPECIFIC SAFETY RULES 5-6
SYMBOLS 7-8
ELECTRICAL 9-10
FEATURES 11-12
ASSEMBLY 12-15
OPERATION 16-19
MAINTENANCE 20-23
TROUBLESHOOTING 24
WARRANTY 25
EXPLODED VIEW 26
PARTS LIST 27
NOTES 28
TABLE OF CONTENTS
SPECIFICATIONS
Electric Mow er MEB1016M R
Voltage 120 V~60Hz
Electricity 10 A
Motor Speed 3400 r/min
Cutting Width 15 inch (380mm)
Cutting height adj ustment
1"-3" (22-75mm)
Volume of catch bag 10.5 gallon (40liters)
Wheel size 6.7/10 inch (170/255mm)
Weight 45.2 lbs (20.5kg)

GENERAL SAFETY RULES
3
INTRODUCTION
WARNING
READ ALL INSTRUCTIONS
■ This cuttingmachine is capable of amputating hands and feet and throwing obj ects. Failure to
observe all safety instructions could result in serious inj ury or death.
■ Do not use the lawn mower in damp or wet conditions or operate in the rain.
■ Never allow adults to operate the product without proper instruction.
■ K eep the area clear of all by standers, children, and pets while mowing. Stop machine if any one
enters the area.
■ Tragic accidents can occur if the operator is not alert to the presence of children. Children are
often attracted to the machine and the mowing activity . Never assume that children will remain
where y ou last saw them.
• K eep children out of the mowing area and under the watchful care of a responsible adult other
than the operator.
• Be alert and turn mower off if a child enters the area.
• Never allow children to operate the machine.
• Use extra carewhen approaching blind corners, shrubs, trees, or other obj ects that may block
y our view of a child.
■ Do not wear loose clothing or j ewelry . They can be caught in moving parts. Use of rubber gloves
and footwear is recommended when working outdoors.
■ K eep firm footing and balance. Do not overreach. Over -reaching can result in loss of balance.
■ Do not operate the equipment while barefoot or when wearing sandals or similar lightweight
footwear. Wear protective footwear that will protect y our feet and improve y our footing on
slippery surfaces.
■ Do not leave the mower unattended while running.
■ K eep hands and feet away from cutting area. K eep hands and feet away from cutting area.
■ Operate the lawn mower only in day light or good artificial light.
This product has many features for making its use more pleasant and enj oy able.Safety ,
performance, and dependability have been given top priority in the design of this product making
it easy to maintain and operate.
READ AND UNDERSTAND ALL INSTRUCTIONS.
Failure to follow all instructions listed below and on the machine may result in electric shock, fire,
and/or serious personal inj ury .

4
GENERAL SAFETY RULES
■ Alway s wear safety glasses with side shields. Every day glasses have only impact resistant
lenses. They are NOT safety glasses. Following this rule will reduce the risk of ey e inj ury . Use
face mask if operation is dusty .
■ Wear safety glasses or goggles that aremarked to comply with ANSI Z87.1 standard when
operating this product.
■
Use the right appliance. Do not use the lawn mower for any j ob except that for which it is intended.
■
Do not force the lawn mower. It will do the j ob better and safer at the rate for which it was designed.
■ Stay alert, watch what y ou are doing, and use common sense when operating the lawn mower.
Do not operate the mower while tired or under the influence of drugs, alcohol, or medication.
A moment of inattention while operating the lawn mower may result in serious personal inj ury .
■
K eep machine in good working condition. K eep blades sharp and guards in place and in working
order.
■ Check all nuts, bolts, and screws at frequent intervals for proper tightness to be sure the
equipment is in safe working condition.
■
Stop the motor and wait until the blade comes to a complete stop before cleaning the lawn mower,
removing the grass catcher, or unclogging the discharge guard.
■ When not in use, mower should be stored indoors in a dry , locked up place— out of the reach of
children.
■ To reduce the risk of electric shock, this product has a polarized plug (one blade is wider than
the ther) and will require the use of a polarized extension cord.
The plug will fit into a polarized extansion cord only one way , if the plug does not fit fully into the
extension cord, reverse the plug.
If the plug still does not fit, obtain a correct polarized extension cord. A polarized extension cord
will require the use of a polarized wall outlet. This plug will fit into the polarized wall outlet only
one way . If the plug does not fit fully into the wall outlet, reverse the plug. If the plug still does
not fit, contact a qualified electrician to install the proper wall outlet. Do not change the equipment
plug, extension cord receptacle, or extension cord plug in any way .
■ Do not abuse the cord. Never use the cord to pull the lawn mower or to disconnect the plug from
an outlet. K eep cord away from heat, oil, sharp edges, or moving parts. Replace damaged cords
immediately . Damaged cords increase the risk of electric shock.
■ Mae sure your extension cord is in good condition. When using an extension cord, be sure to
use one heavy enough to carry the current y our product will draw. A wire gauge size (A.W.G.) of
at least 14 is recommended for an extension cord 50 feet or less in length. If in doubt, use the
next heavier gauge. The smaller the gauge number, the heavier the cord. An undersized cord
will cause a drop in line voltage resulting in loss of power and overheating.
■
WARNING: Use outdoor extension cords marked SW-A, SOW-A, STW-A, STOW-A, SJW-A, SJTA,
SJTW-A,or SJTOWA. These cords are rated for outdoor use and reduce the risk of electric shock.

GENERAL SAFETY RULES
5
SPECIFIC SAFETY RULES
■ Ground Fault Circuit Interrupter (GFCI) protection should be provided on the circuit(s) or outlet(s)
to be used for the lawn mower. Receptacles are available having built- in GFCI protection and may
be used for this measure of safety.
■ Inspect extension cords periodically and replace if damaged. eep handles dry, clean, and free
from oil or grease.
■ Do not operate the mower with out the entire grass catcher, discharge guard, rear guard, or other
safety protective devices in place and working.
■ Follow manufacturer’s instructions for proper operation and installation of accessories. Only use
accessories approved by the manufacturer.
■ Clear the wor area before each use. Remove all objects such as rocs, stics, wire, bones, toys,
or other obj ects which can be thrown by the blade. Stay behind the handle when the motor is running.
■ Avoid holes, ruts, bumps, rocs, or other hidden objects. Uneven terrain could cause a slip and fall
accident.
■ Do not mow near drop-offs, ditches, or embanments.
■ Mow across the face of slopes, never up and down. Exercise extreme caution when changing
direction on slopes.
■ Plan your mowing pattern to avoid discharge of material toward roads, sidewals, bystanders, and
the like. Also, avoid discharging material against a wall or obstruction, which may cause the
material to ricochet back toward the operator.
■ Do not mow on wet grass or excessively steep slopes. Poor footing could cause a slip and fall .
accident. Walk, never run.
■ Use extra care when approaching blind corners, shrubs, trees, or other objects that may bloc
yo ur view.
■ Do not pull the mower bacward unless absolutely necessary. If y ou must back the mower away
from a wall or obstruction, first look down and behind to avoid tripping.
■ Never direct discharged material toward anyone. Avoid dischargingmaterial against a wall or obstruction.
Material may ricochet back toward the operator. Stop the blade when crossing gravel surfaces.
■ Objects struc by the lawn mower blade can cause severe injuries to persons. The lawn should alway s
be carefully examined and cleared of all obj ects prior to each mowing.
■ If the lawn mower stries a foreign object, follow these steps:
• Stop the lawn mower and release the switch control.
• Disconnect the power cord.

SPECIFIC SAFETY RULES
6
• Thoroughly inspect the mower for any damage.
• Repair any damage before restarting and continuing to operate the mower.
■ Stop themotor, disconnect the power cord, and wait until the blade comes to a complete stop
before removing the grass catcher or unclogging the chute. The cutting blade continues to rotate
for a few seconds after the motor is shut off. Never place any part of the body in the blade area
until yo u are sure the blade has stopped rotating.
■ Disconnect the plug from power source before maing any adjustments, changing accessories, or
storing the lawn mower. Such preventive safety measures reduce the risk of starting the product
accidentally.
■
If the mower should start to vibrate abnormally , stop the motor and check immediately for the cause.
Vibration is motor and check immediately for the cause. Vibration is generally a warning of trouble.
■
Service on the product must be performed by qualified repair personnel only . Service or maintenance
performed by unqualified personnel could result in inj ury to the user or damage to the product.
■ Use only identical replacement parts when servicing the product. Use of unauthorized parts may
create a risk of serious inj ury to the user, or damage to the product.
■ If the power supply cord is damaged, it must be replaced only by the manufacturer or by an
authorized service center to avoid risk.
■ Save these instructions. Refer to them frequently and use them to instruct others who may use
this product. If yo u loan someone this tool, loan them these instructions also.
7
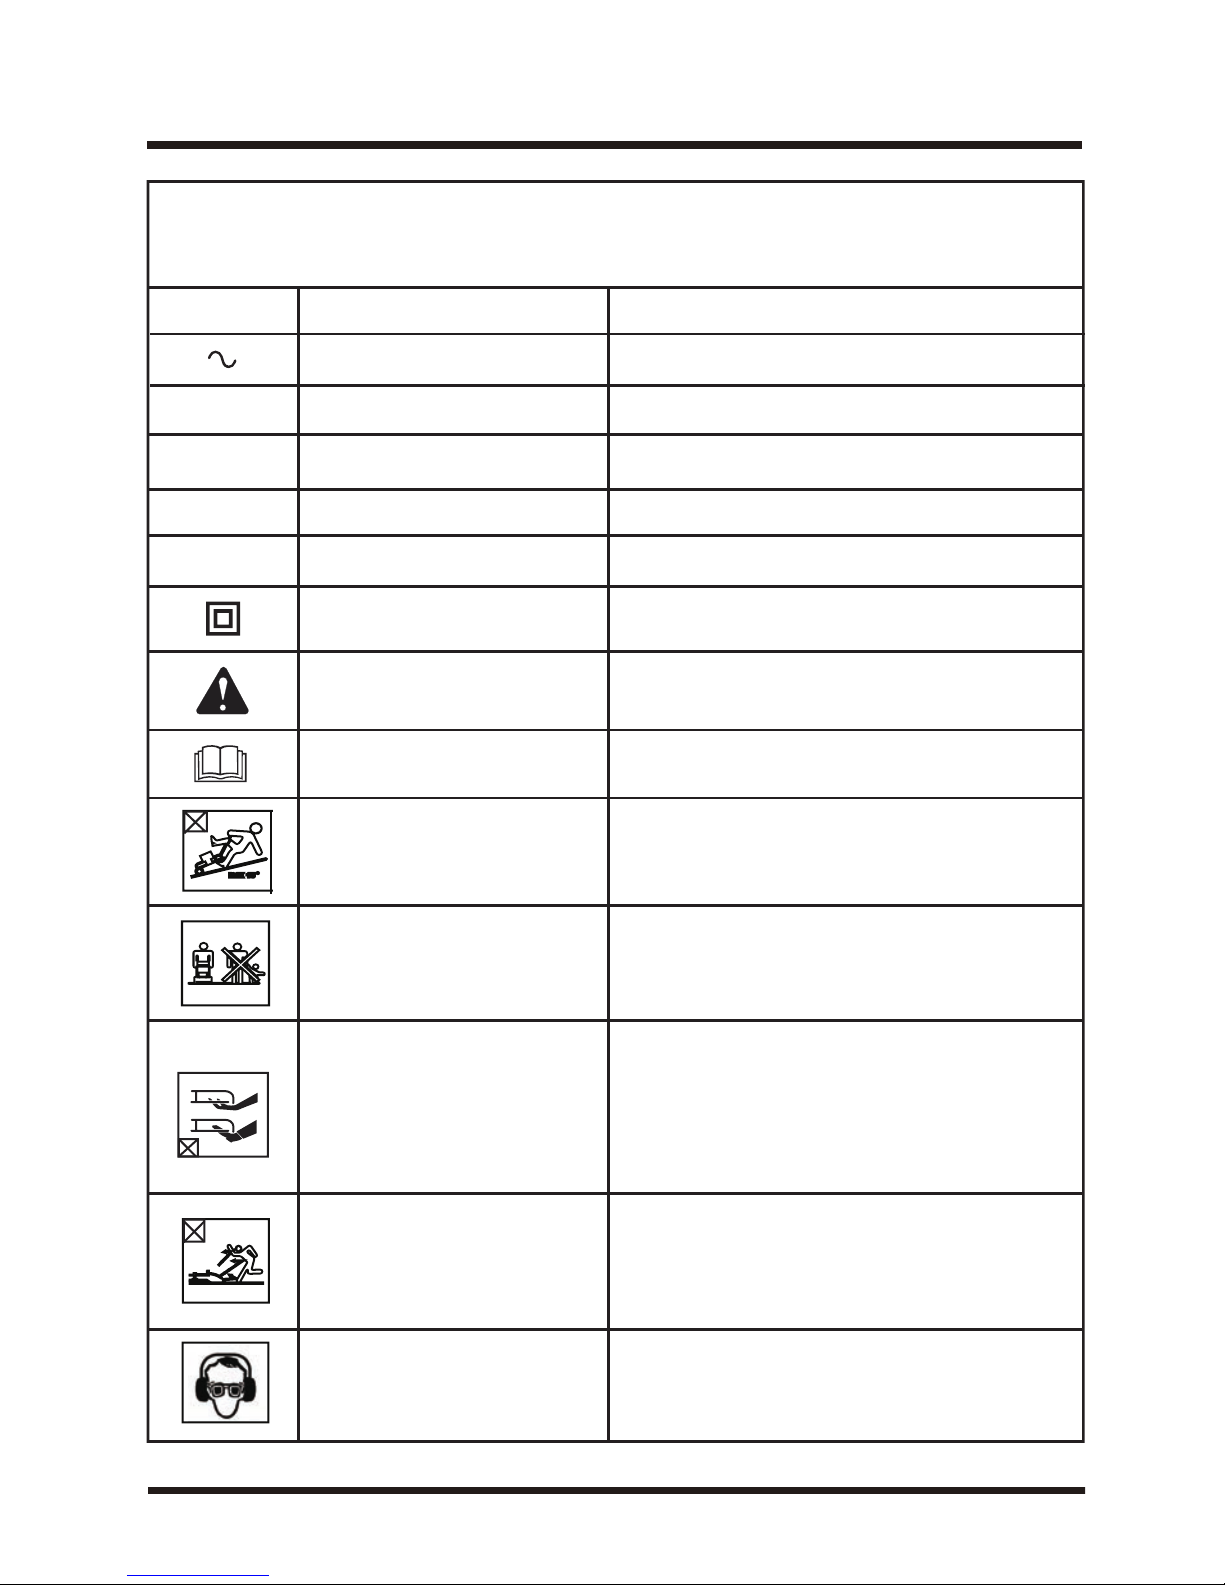
SYMBOLS
Some of the following sy mbols may be used on this product. Please study them and learn their
meaning. Proper interpretation of these sy mbols will allow y ou to operate the product better and safer.
NOITANALPXE/NOITANGISEDEMANLOBMYS
V
zH
W
srh
Volts
Do not mow up and down
slopes!
Stay behind the handle when
the motor is running!
Eye Protection Wear eye
protection when operating this
equipment.
Safety Alert Precautions that involve yo ur safety.
K eep hands and feet clear of
mower deck and discharge
opening at all times!
K eep all persons and pets at a
safe distance from the mower
while operating!
Read The Operator’s Manual
Safety Alert
Class II Construction
Hours
Watt
Hertz
Alternating Current
You must read the operating instructions carefully.
Precaution that invole yo ur safety.
To avoid the risk of inj ury do not mow up and
down slopes. Always mow across slopes.
( Angle≤15°
)
To avoid the risk of inj ury to byst anders keep all
persons and pets at a safe distance from the
mower while operating.
Obj ects struck by mower blade can cause serious
inj ury. Stay behind the handle when the moto
is running. Always ensure persons and pets are
clear of the discharge from the mower while
operating.
Rotating blades can cause serious inj ury. K eep
hands and feet clear of mower deck and discharge
opening at all times. Always be sure blade has
stopped after releasing switch lever and unplugging
before removing and replacing grass catcher,
cleaning, servicing, transporting or lifting the
mower.
Voltage
Double-insulated construction
Time
Power
Frequency (cycl es per second)
Typ e of current
A
Amperes Current
WARNING
8
SYMBOLS
SERVICE
Servicing requires extreme care and knowledge and should beperformed only by aqualified service
technician. For service we suggest yo u return the product to y our nearest SERVICE CENTER for
repair. When servicing, use only identical replacement parts.
To avoid serious personal inj ury, do not attempt to use this product until yo u read thoroughly and
understand completely the operator’s manual.
If you do not understand the warnings and instructions in the operator’s manual, do not use this
product. Call customer service for assistance.
SYMBOL SIGNAL MEANING
DANGER:
Indicates an imminently hazardous situation, which, if not avoided,
will result in death or serious inj ury .
WARNING:
Indicates a potentially hazardous situation, which, if not avoided,
could result in death or serious inj ury .
CAUTION:
Indicates a potentially hazardous situation, which, if not avoided, may
result in minor or moderate inj ury .
CAUTION:
(Without Safety Alert Sy mbol) Indicates a situation that may result in
property damage.
The following signal words and meanings are intended to explain the levels of risk associated with this
product.
WARNING
The operation of any power tool can result in foreign obj ects being thrown into yo ur eye s,
which can result in severe eye damage. Before beginning power tool operation, always
wear safety goggles or safety glasses with side shields and, when needed, a full face shield.
We recommend Wide Vision Safety Mask for use over eye glasses or standard safety glasses with
side shields. Always use eye protection which is marked to comply with ANSI Z87.1.

WARNING
9
ELECTRICAL
DOUBLE INSULATION
Double insulation is a concept in safety in electric power tools, which eliminates the need for the
usual three-wire grounded power cord.
All exposed metal parts are isolated from the internal metal motor components with protecting
insulation. Double insulated tools do not need to be grounded.
The double insulated syst em is intended to protect the user from shock resulting from a break in the
tool’s internal insulation. Observe all normal safety precautions to avoid electrical shoc.
NOTE: Servicing of a product with double insulation requires extreme care and knowledge of the
syst em and should be performed only by a qualified service technician. For service, we suggest yo u
return the product to yo ur nearest authorized service center for repair. Always use original factory
replacement parts when servicing.
ELECTRICAL CONNECTION
This product has a precision-built electric motor. It should be connected to a power supply that is 120
volts, 60 Hz, AC only (normal household current). Do not operate this product on direct current (DC).
A substantial voltage drop will cause a loss of power and the motor will overheat. If the product does
not operate when plugged into an outlet, double-check the power supply.
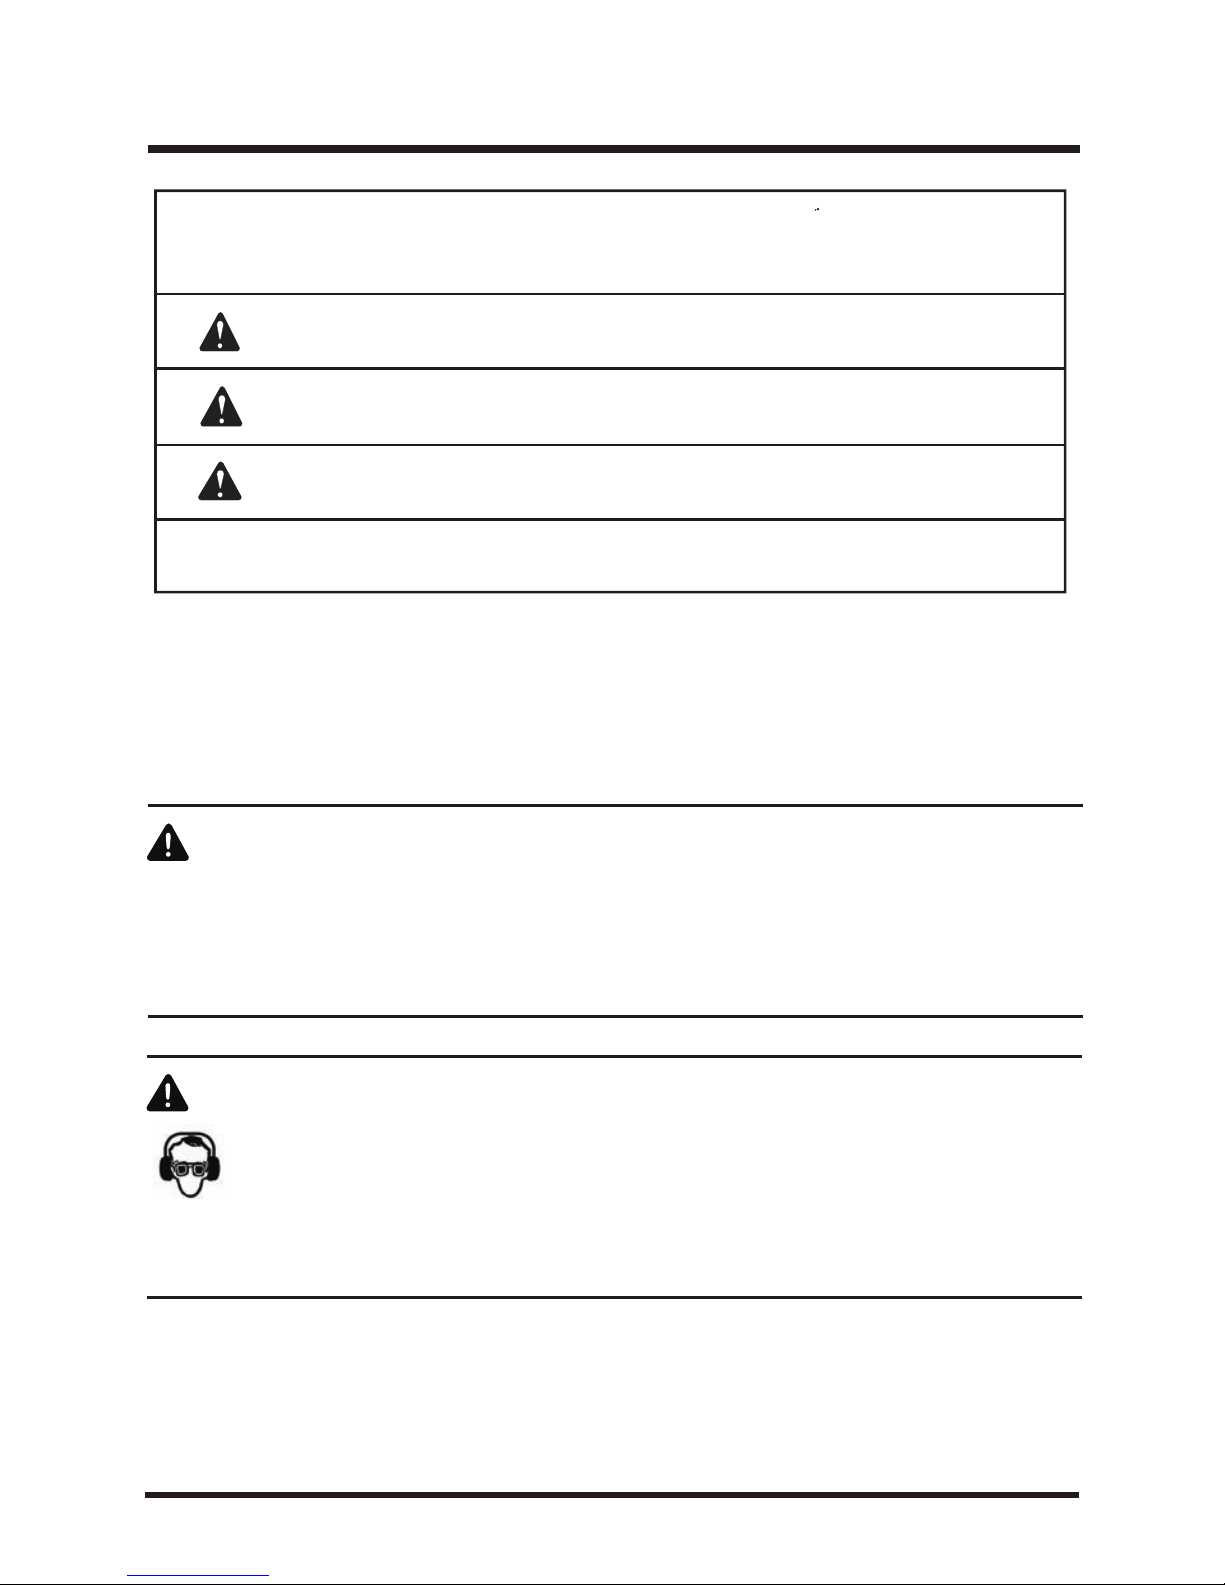
EXTENSION CORDS
When using a power tool at a considerable distance from a power source, be sure to use an
extension cord that has the capacity to handle the current the product will draw. An undersized cord
will cause a drop in line voltage, resulting in overheating and loss of power.
Use the chart to determine the minimum wire size required in an extension cord. Only round j acketed
cords listed by Underwriter’s Laboratories (UL) should be used.
When working outdoors with a product, use an extension cord that is designed for outside use.
This type of cord is designated with WA on the cord’s jacet.
Before using any extension cord, inspect it for loose or exposed wires and cut or worn insulation.It is
possible to tie the extension cord and power cord in a knot to prevent them from becoming
disconnected during use. Make knot as shown, then connect the plug end of the power cord into the
receptacle end of the extension cord. This method can also be used to tie two extension cords together.
10
ELECTRICAL
WARNING
WARNING
K eep the extension cord clear of the working area. Position the cord so that it will not get caught on l
umber, tools, or other obstructions while yo u are working with a power tool. Failure to do so can
result in serious personal inj ury.
Check extension cords before each use. If damaged replace immediately.
Never use the product with a damaged cord since touching the damaged area could cause electrical
shock resulting in serious inj ury.
Volts
120V
18
18
16
14
0 - 6
6 - 10
10 - 12
12 - 16
16
16
16
12
16
14
14
14
12
12
25 50 100 150
Total length of cord feet
Not Recommended
AWG
Ampere rating
more than
Ampere rating
not more than
11
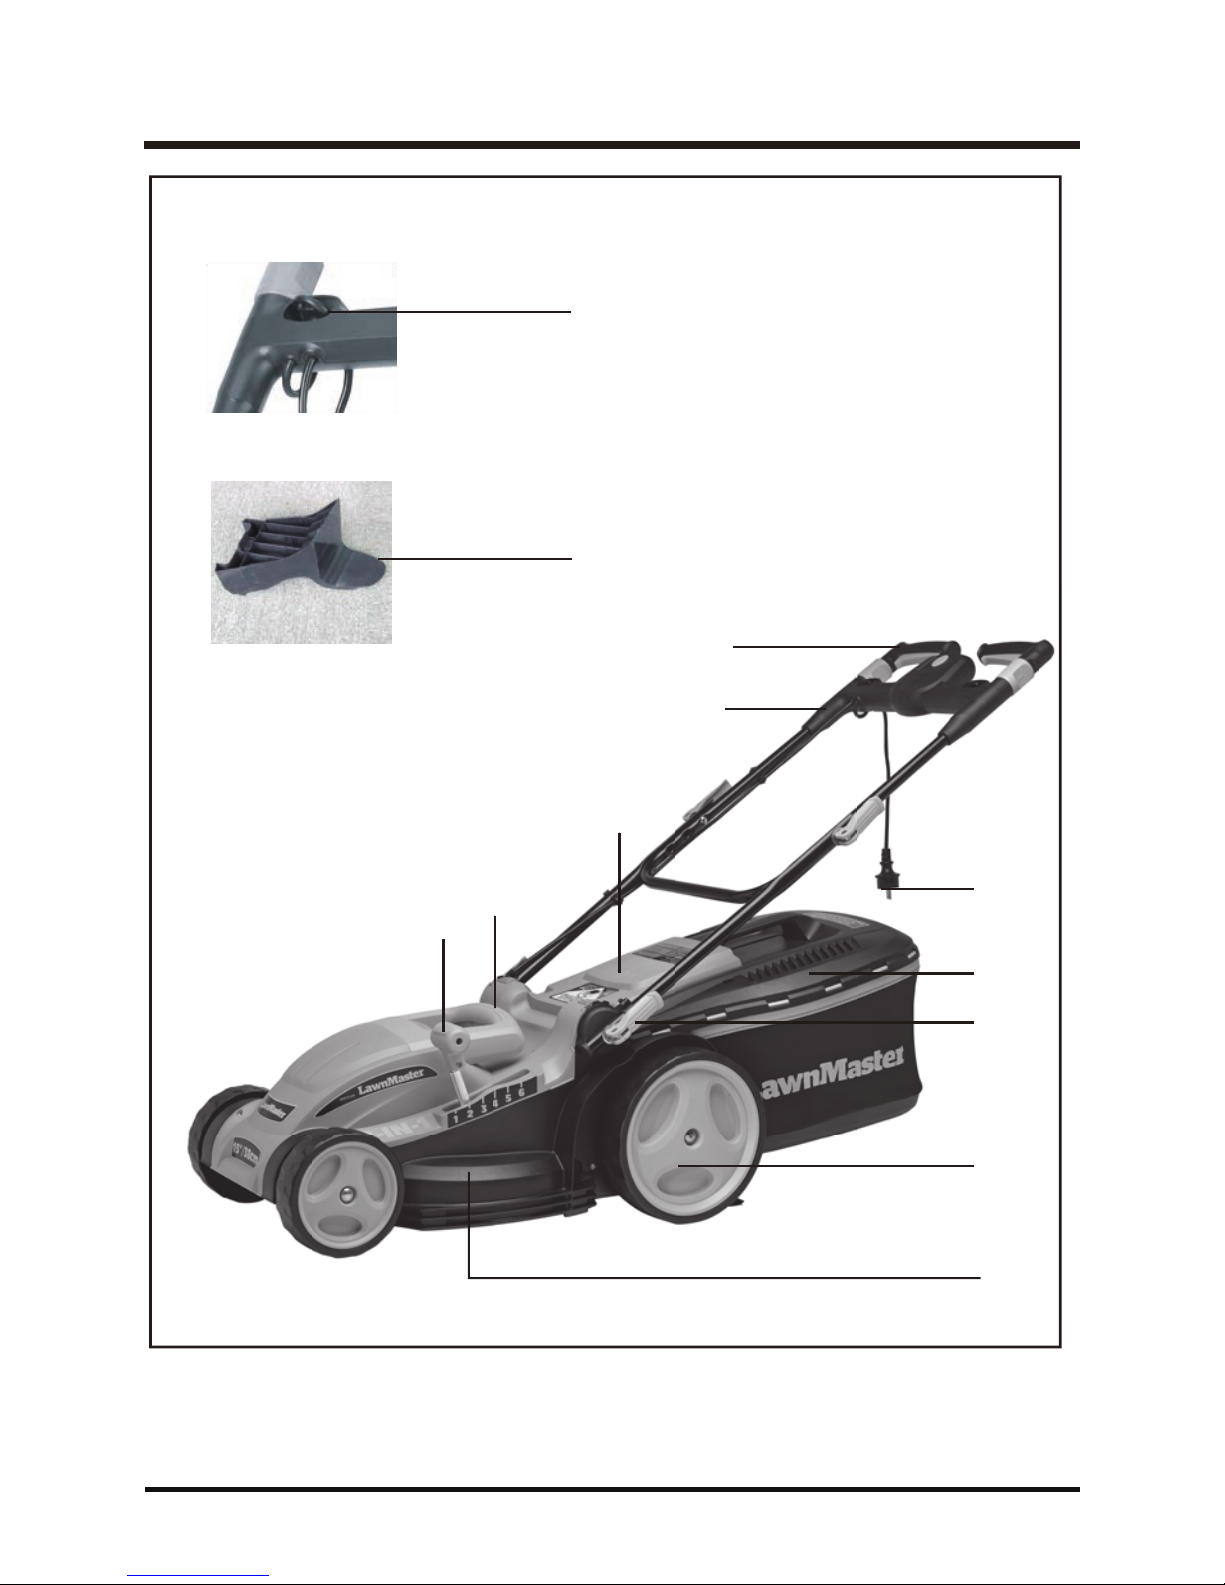
FEATURES
1
2
3
4
5
6
9
8
10
11
12
7
Fig. 1

FEATURES
KNOW YOUR LAWN MOWER (See Fig. 1)
The safe use of this product requires an understanding of the information on the product and in this
operator’s manual as well as a nowledge of the project you are attempting.
Before use of this product, familiarize yo urself with all operating features and safety rules.
1) Cord retainer - A convenient cord retainer helps keep the extension cord connection secure
during mower operation.
2) Mulching plug - optional mulching plug that cuts and recuts the grass for finer clippings.
3) Height adj ustment lever - one handed height adj ustment lever.
4) Lift Handle - makes lifting & moving simpler & safer.
5) Loop styl e handle - ergonomic cushion grip steel handle makes mowing easy.
6) Bale switch - when engaged, will allow power mower motor.
7) Switch button - engages power to bale switch allowing for start-up.
8) Power cord - easy attach power cord
9) Grass catcher - 10.5 gallon grass catcher with full capacity indicator.
10) Cam locks - allows for quick & easy adj ustments & storage.
11) Wheel - large 10" rear wheels
12) Mower deck - lightweight never rust mower deck.
KNOW YOUR LAWN MOWER
This product requires assembly .
■ Carefully remove the product and any accessories from the box. Make sure that all items listed in
the packing list are included.
■ Inspect the product carefully to mae sure no breaage or damage occurred during shipping.
■ Do not discard the pacing material until you have carefully inspected and satisfactorily operated
the product.
■ If any parts are damaged or missing, please call serice center.
PACKING LIST
Mower
Mulching Plug
Grass Catcher
Operator’s Manual
12
ASSEMBLY

13
ASSEMBLY
ADJUSTING HANDLE (See Figs. 2-7)
■ Fully loosen the four handle cam locs on both sides of the handle.
■ Pull up and bac on the lower handle and upper handle to raise the handles into operating position.
Make certain the handles snap.
■ Tighten the handle cam locs on both sides of the handle to secure.
Never operate the mower without the proper safety devices in place and working. Never operate the
mower with damaged safety devices. Failure to heed this warning can result in serious personal inj ury .
Fig. 2 Fig. 3 Fig. 4
Fig. 5 Fig. 6 Fig. 7
WARNING
If any parts are damaged or missing do not operate this product until the parts are replaced. Failure to
heed this warning so could result in serious personal inj ury .
WARNING
Do not attempt to modify this product or create accessories not recommended for use with this product.
Any such alteration or modification is misuse and could result in a hazardous condition leading to
possible serious personal inj ury .
WARNING
Do not connect to power supply until assembly is complete. Failure to comply could result in accidental
starting and possible serious personal inj ury .
WARNING
Handle Cam Locks
Handle Cam Locks
ASSEMBLY
14
INSTALLING THE GRASS CATCHER (See Fig. 12)
NOTE: When using the grass catcher, do not install the mulching plug.
■ Lift the rear discharge door.
■ Lift the grass catcher by its handle and place under the rear discharge door so that the hoos on
the grass catcher are seated on the door rod.
■ Release the rear discharge door.
INSTALLING THE MULCHING PLUG (See Fig. 13)
NOTE: When using the mulching plug, do not install the grass catcher.
■ Lift the rear discharge door.
■ Grasp the mulching plug by its handle.
■ Insert the plug into the rear discharge opening.
■ Lower the rear discharge door.
Fig. 12 Fig. 13
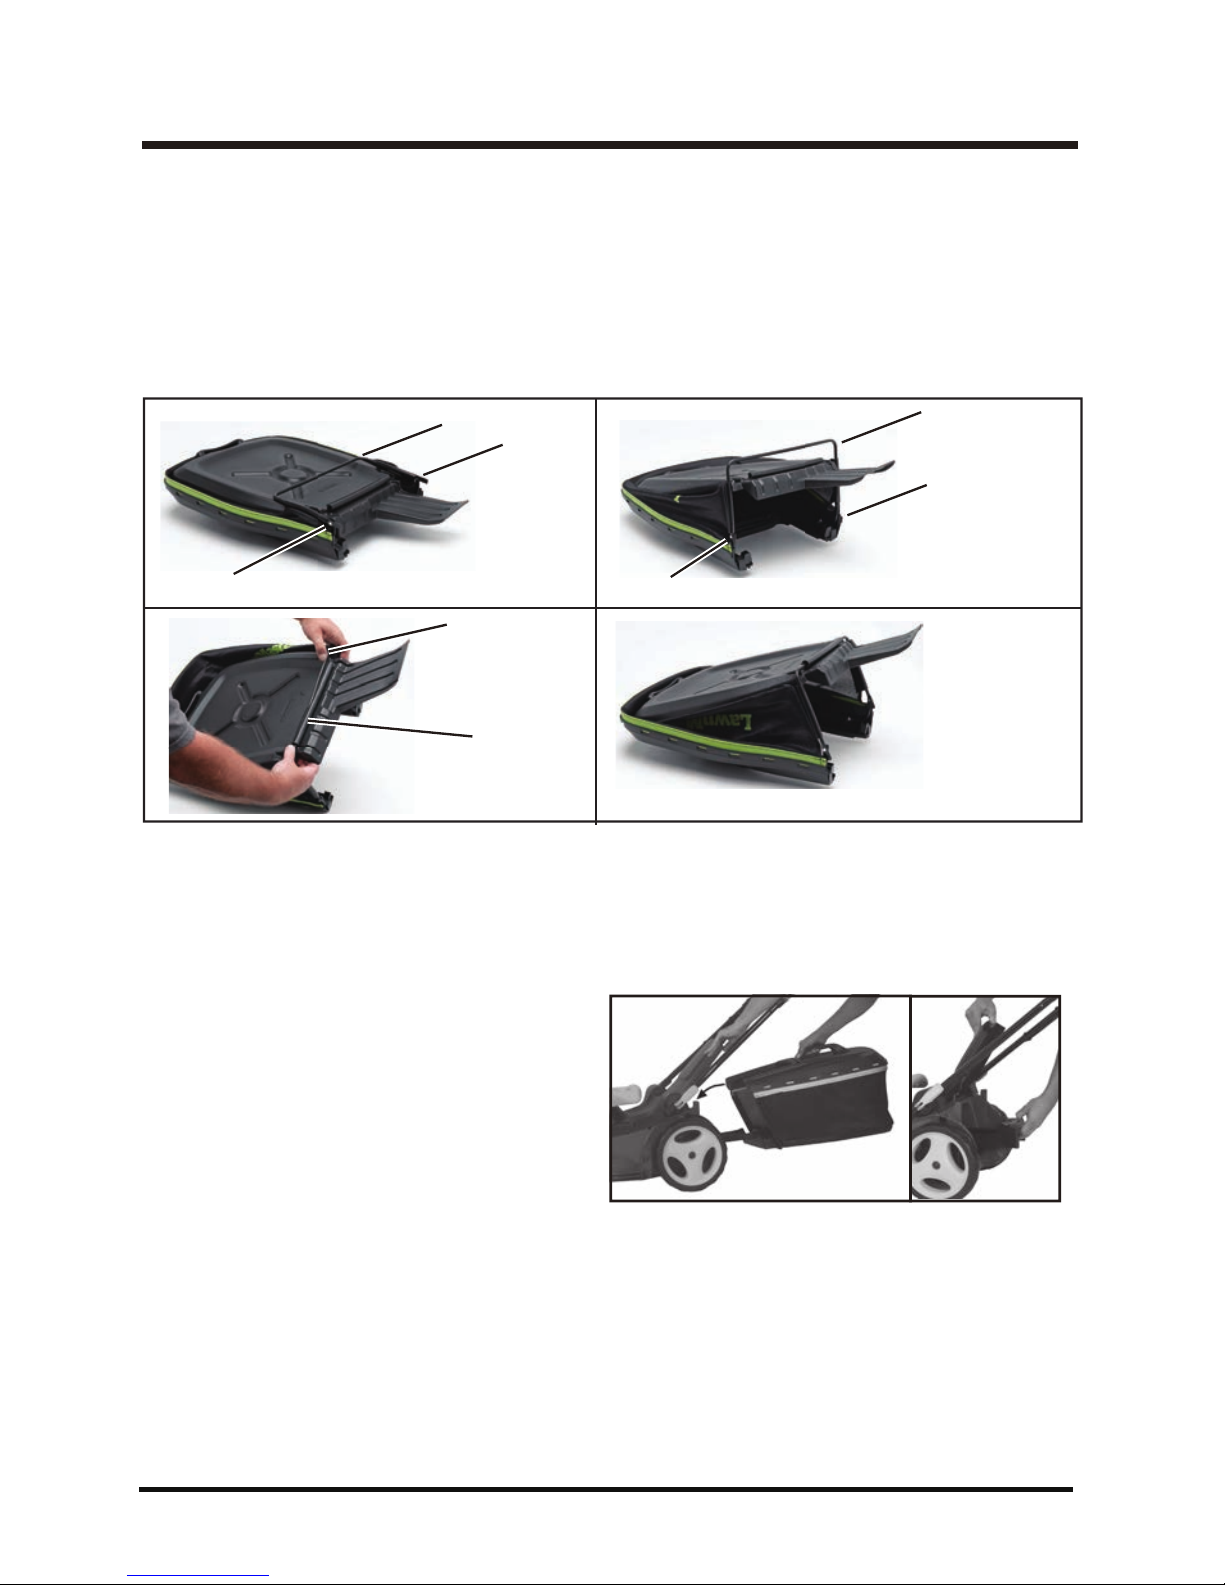
REDI-BAG GRASS CATCHER (See Figs. 8-11)
■ our Lawnmaster mower comes with a tool-less collection bag. our REDI-bag ships flat as shown.
■ To assemble the REDI-bag straighten the hinged steel frame at opening of bag as shown.
■ Pry open the long soft plastic tubular sleeve with you fingers and insert the steel frame into the
tube as shown.
■ ou fully assembeld REDI-bag as shown below.
Fig. 8
Fig. 9
Fig. 10 Fig.11
Hinge
Hinge
Steel Frame
Hinge
Steel Frame
Hinge
Soft Plastic
Tube
Steel Frame
REDI-Bag Fully
Assembled
APPLICATIONS
You may use this product for the purpose listed below: Mowing yo ur lawn
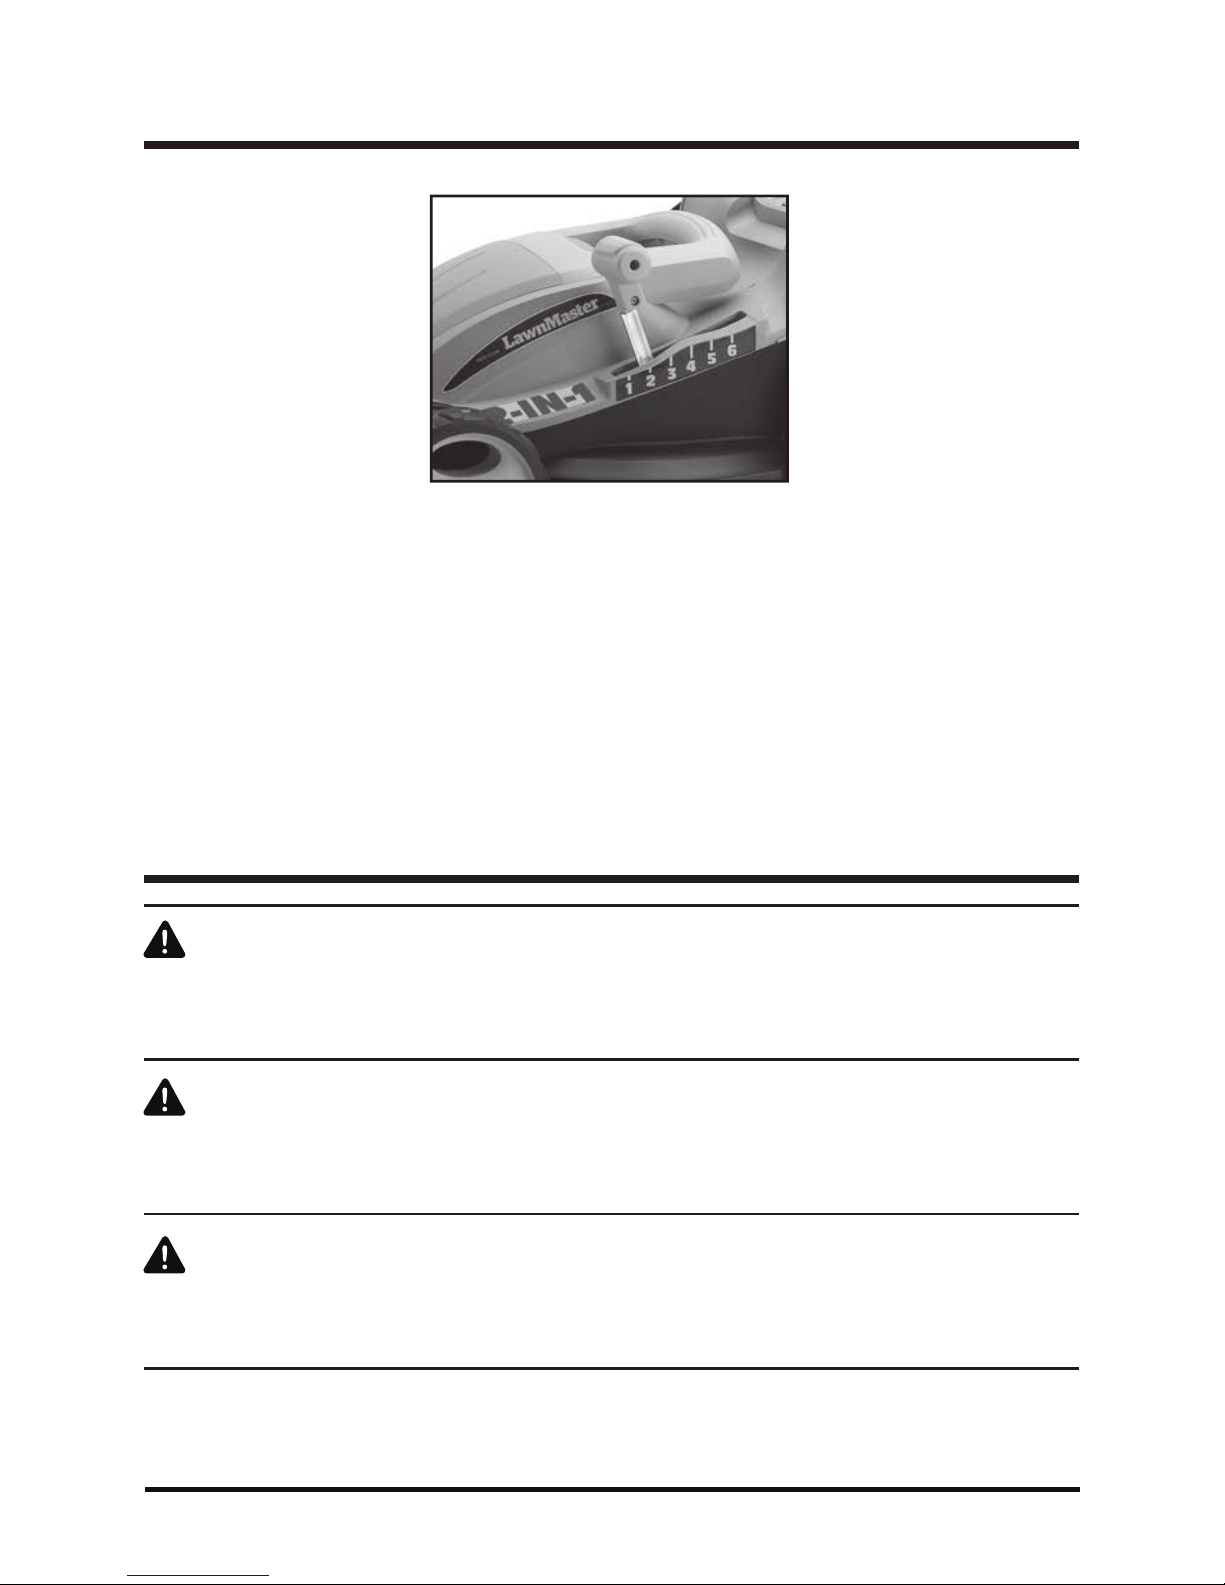
SETTING CUTTING HEIGHT (See Fig. 14)
When shipped, the wheels on the mower are set to a low-cutting position. Bofore using the mower for
the first time, adj ust the cutting position to the height best suited for yo ur lawn. The average lawn
should be between 1" to 3".
To set the cutting height:
■
To raise the cutting height, grasp the height adj ustment lever and move it toward the back of the mower.
■
To lower the cutting height, grasp the height adj ustment lever and move it toward the front of the mower.
ASSEMBLY
OPERATION
15
Do not allow familiarity with this ty pe of product to make y ou careless. Remember that a careless
fraction of a second is sufficient to inflict serious inj ury .
WARNING
Alway s wear safety goggles or safety glasses with side shields when operating this product. Failure
to do so could result in obj ects being thrown into y our ey es, resulting in possible serious inj ury .
WARNING
Do not use any attachments or accessories not recommended by the manufacturer of this product.
The use of attachments or accessories not recommended can result in serious personal inj ury .
WARNING
Fig. 14
16
OPERATION
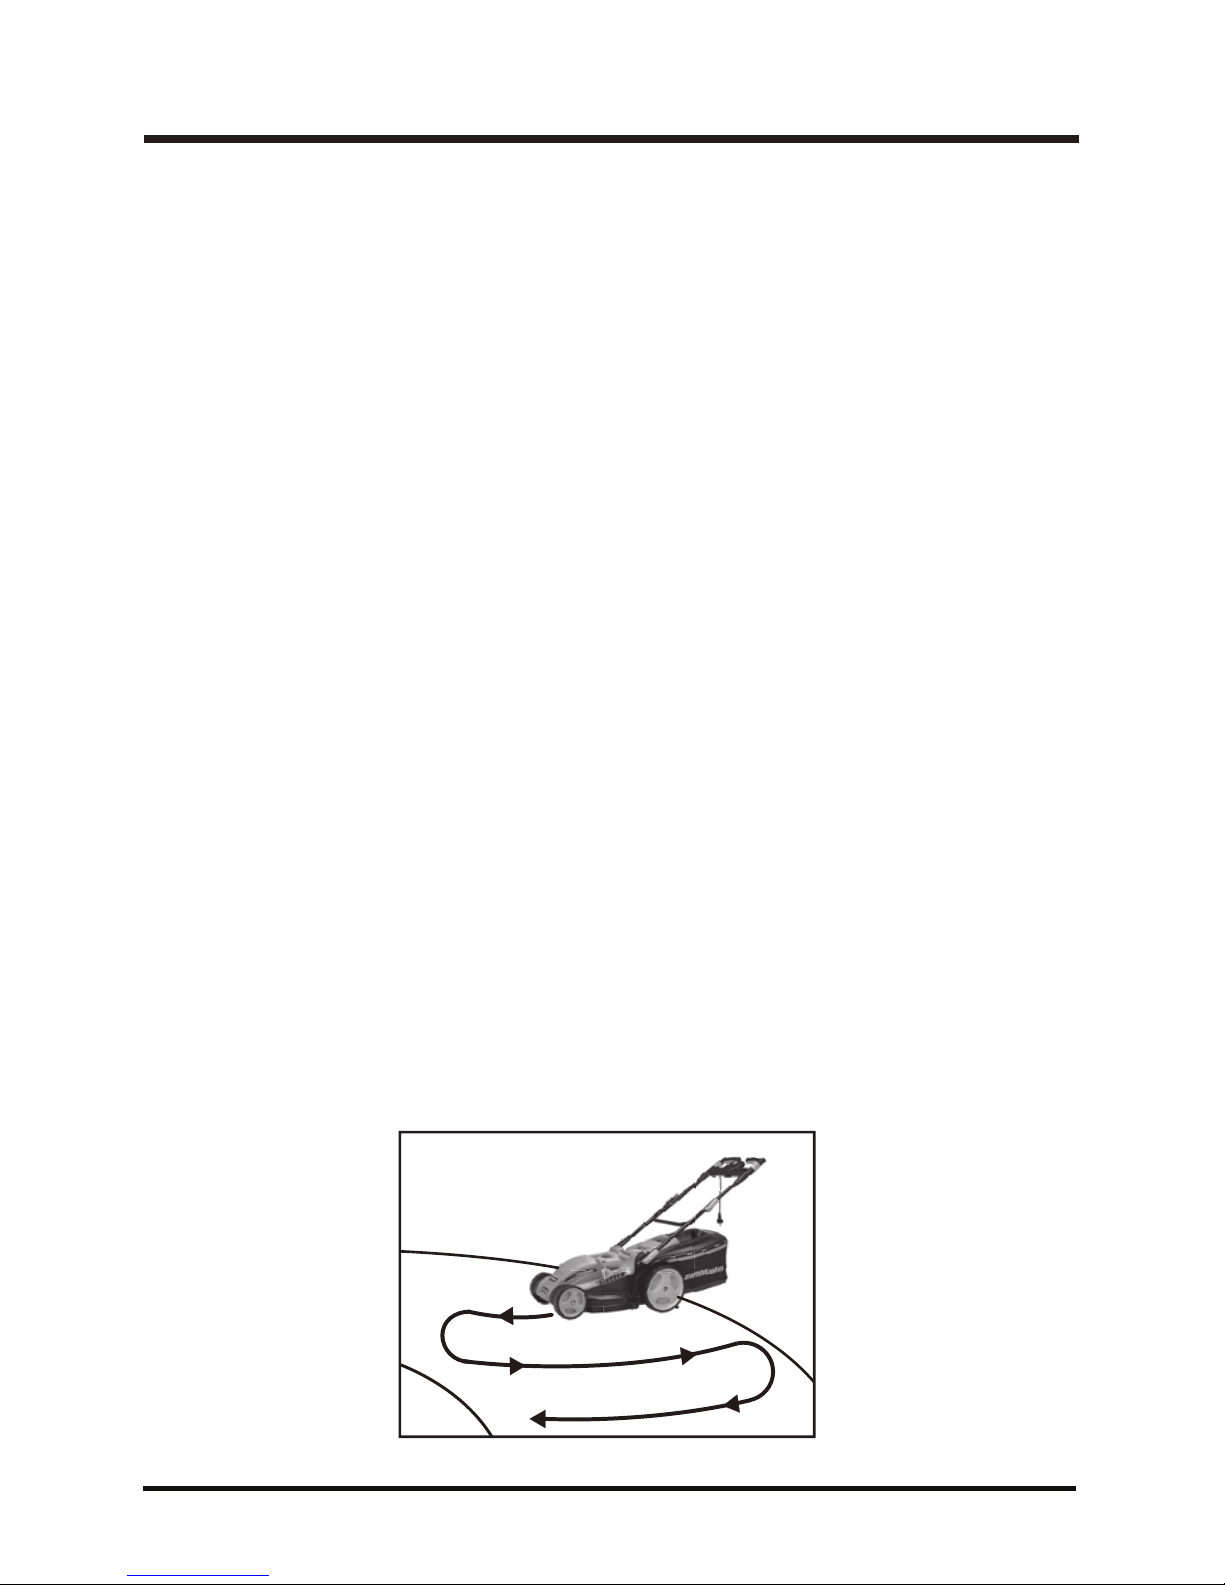
MOWING ON A SLOPE (See Fig. 15)
■ Slopes are a major factor related to slip and fall accidents that can result in severe injury. Mowing
on slopes requires extra caution. If yo u feel uneasy on a slope, do not mow it. For yo ur safety, do
not attempt to mow slopes greater than 15 degrees.
■ Mow across the face of slopes, not up and down. Exercise extreme caution when changing direction
on slopes.
■ Watch for holes, ruts, rocs, hidden objects, or bumps which can cause you to slip or trip.
Tall grass can hide obstacles. Remove all obj ects such as rocks, tree limbs, etc., which could be
tripped over or thrown by the blade.
■ Always be sure of your footing. A slip and fall can cause serious personal injury.
If yo u feel yo u are losing yo ur balance, release the bale switch immediately.
■ Do not mow near drop-offs, ditches, or embanments; you could lose your footing or balance.
Figs. 15
MOWING TIPS
■ Mae sure the lawn is clear of stones, stics, wires, and other obj ects that could damage the lawn
mower blades or motor. Such obj ects could be accidentally thrown by the mower in any direction
and cause serious personal inj ury to the operator and others.
■ To reduce the lielihood of disconnecting the lawn mower from the extension cord, be sure to use
the cord retainer provided.
■ For a healthy lawn, always cut off one-third or less of the total length of the grass.
■ When cutting heavy grass, reduce waling speed to allow for more effective cutting and a proper
discharge of the clippings.
■ Do not cut wet grass. It will stic to the underside of the deck and prevent proper mulching of grass
clippings.
■ New or thic grass may require a narrower cut.
■ Clean the underside of the mower dec after each use to remove grass clippings, leaves, dirt, and
any other accumulated debris.
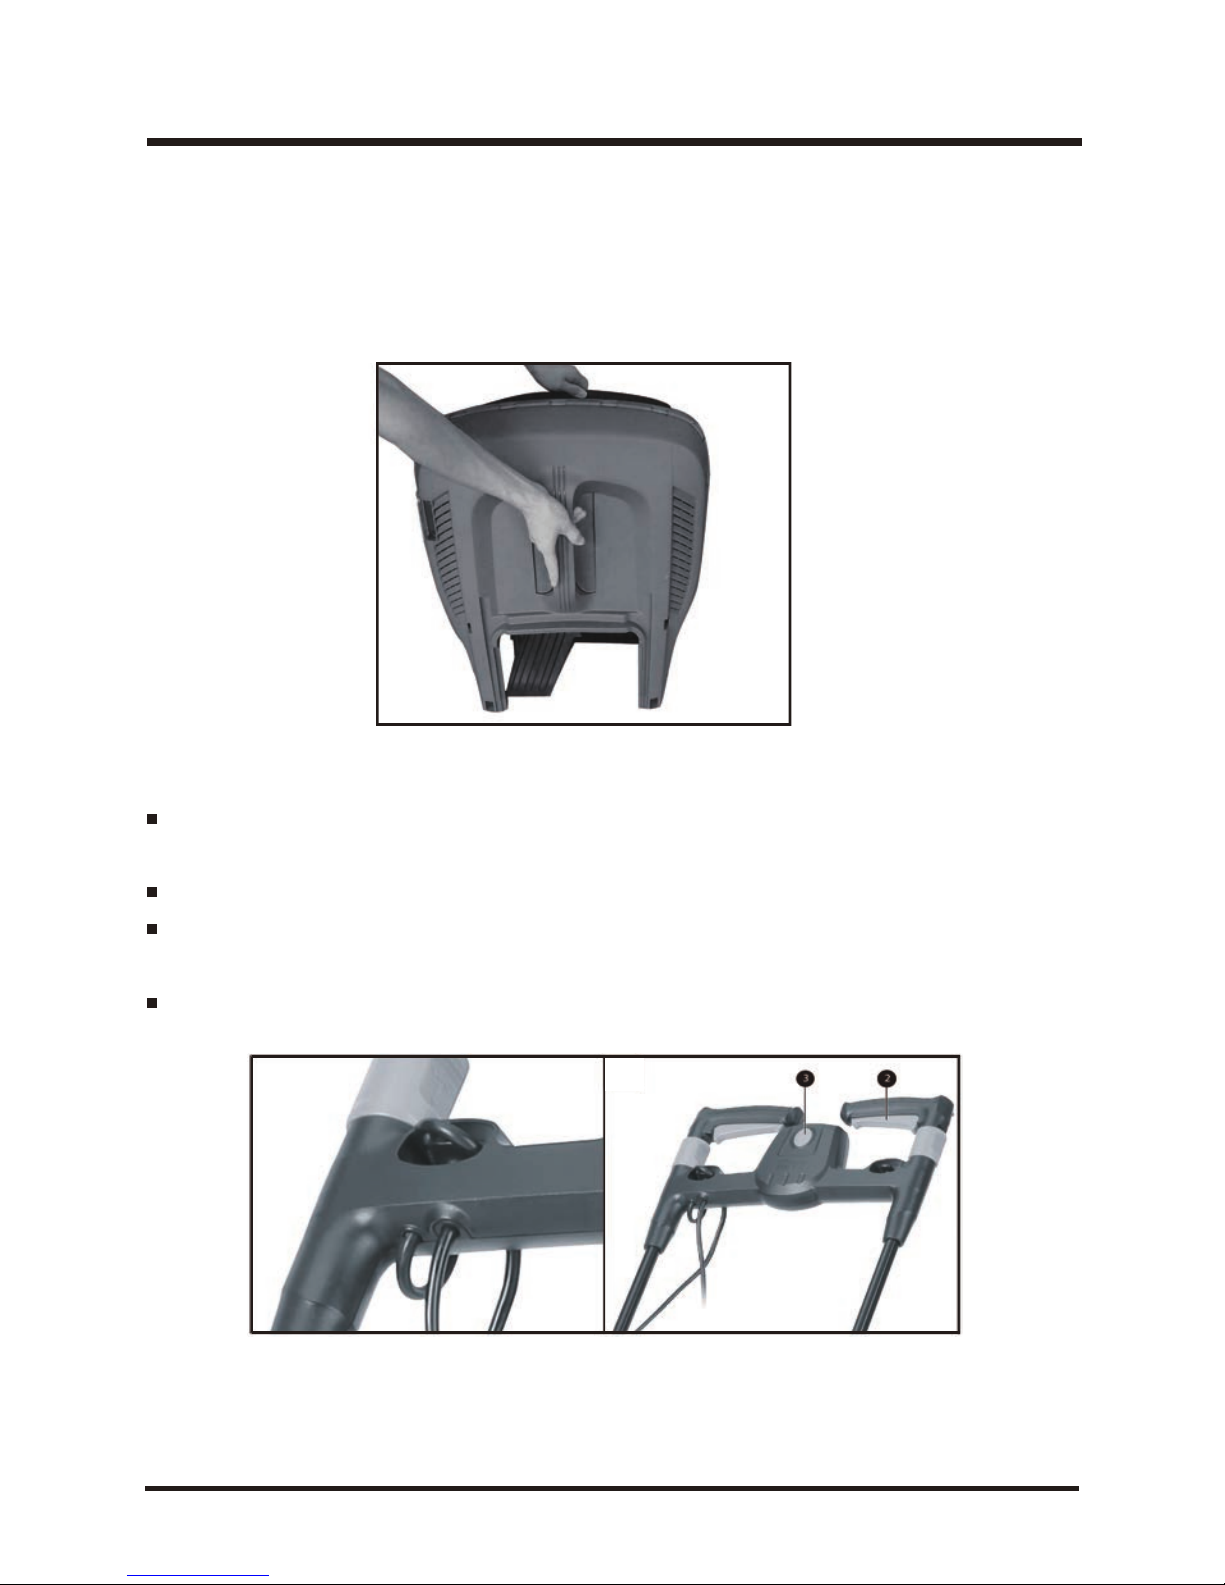
EMPTYING THE GRASS CATCHER (See Fig. 16)
■ Lift the grass catcher by its handle and lift to remove from mower.
■ Empty grass clippings.
■ Lift the rear discharge door and reinstall the grass catcher as described earlier in this manual.
Figs. 16
Make a loop at the end of the cable and hang the loop onto the strain relief on the cross bar.
Connect the mower to y our power supply socket.
Before switching on, ensure that the mower is not in contact with any foreign obj ects.
To Switch on, press the safety lock-off button on the handle, then activate either of the start/stop
switch levers . Release the lock-off button .
To Switch off, release the start/stop switch lever .
ON/OFF OPERATION (See Figs. 17-18)
17
OPERATION
Figs. 17 Figs. 18
 Loading...