

Page 1
FormNo.3379-226RevA
21inMulching/RearBaggingLawn
Mower
ModelNo.10730—SerialNo.314000001andUp
ModelNo.10732—SerialNo.314000001andUp
ModelNo.10734—SerialNo.314000001andUp
ModelNo.17730—SerialNo.314000001andUp
ModelNo.17732—SerialNo.314000001andUp
ModelNo.17734—SerialNo.314000001andUp
Operator'sManual
Receiveafreeside-dischargechuteby
completingtheDischargeChuteOrder
Formwhenyouregisteryourproductat
www.Lawn-Boy.com!Pleaseallowfourtove
weeksfordelivery.
Introduction
Thisrotary-blade,walk-behindlawnmowerisintended
tobeusedbyresidentialhomeowners.Itisdesigned
primarilyforcuttinggrassonwell-maintainedlawns
onresidentialproperties.Itisnotdesignedforcutting
brushorforagriculturaluses.
Readthisinformationcarefullytolearnhowtooperateand
maintainyourproductproperlyandtoavoidinjuryand
productdamage.Youareresponsibleforoperatingthe
productproperlyandsafely .
YoumaycontactLawn-Boydirectlyatwww .Lawn-Boy.com
forproductandaccessoryinformation,helpndingadealer,
ortoregisteryourproduct.
Wheneveryouneedservice,genuineLawn-Boyparts,or
additionalinformation,contactanAuthorizedServiceDealer
orLawn-BoyCustomerServiceandhavethemodeland
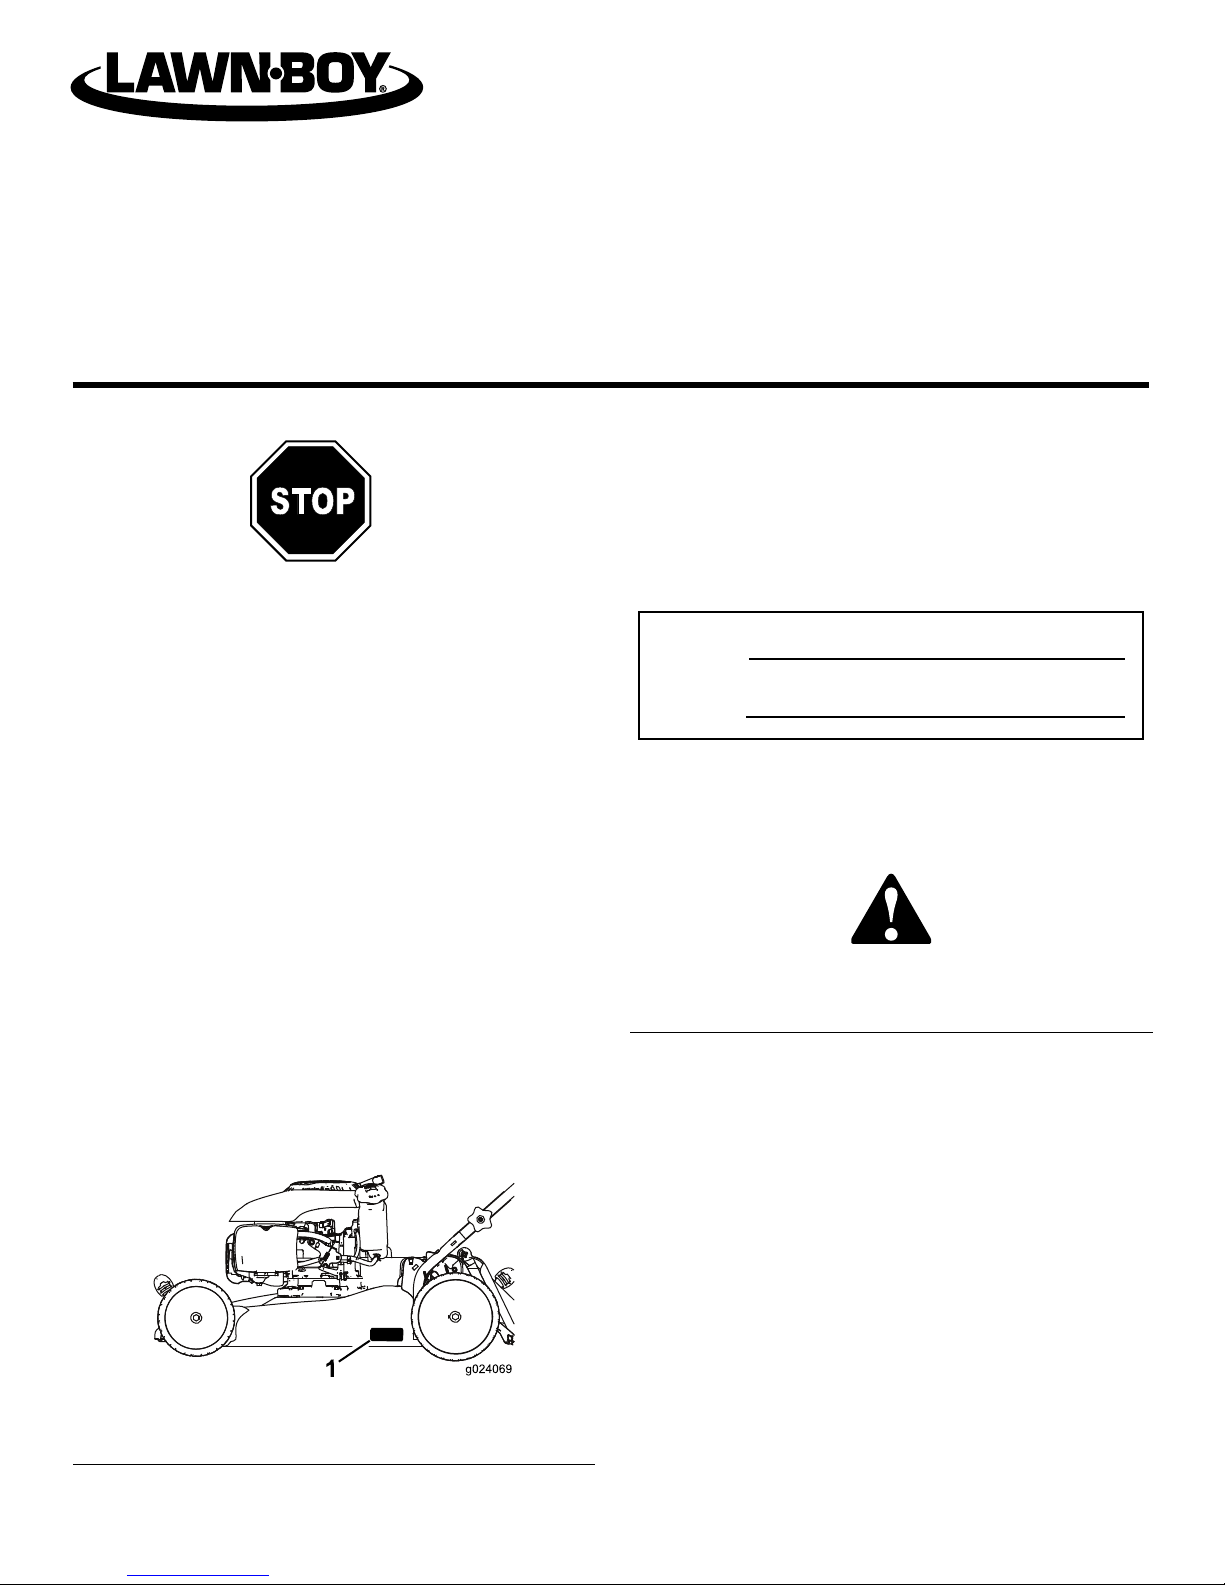
serialnumbersofyourproductready.Figure1identiesthe
locationofthemodelandserialnumbersontheproduct.
Writethenumbersinthespaceprovided.
g024069
1
Figure1
1.Modelandserialnumberplate
ModelNo.
SerialNo.
Thismanualidentiespotentialhazardsandhassafety
messagesidentiedbythesafetyalertsymbol(Figure2),
whichsignalsahazardthatmaycauseseriousinjuryordeath
ifyoudonotfollowtherecommendedprecautions.
Figure2
1.Safetyalertsymbol
Thismanualuses2wordstohighlightinformation.
Importantcallsattentiontospecialmechanicalinformation
andNoteemphasizesgeneralinformationworthyofspecial
attention.
©2013—Lawn-Boy®Inc.
8111LyndaleAvenueSouth
Bloomington,MN55420
Registeratwww.LawnBoy.com.
OriginalInstructions(EN)
PrintedintheUSA
AllRightsReserved
*3379-226*A
Page 2

WARNING
CALIFORNIA
Proposition65Warning
Thisproductcontainsachemicalorchemicals
knowntotheStateofCaliforniatocausecancer,
birthdefects,orotherreproductiveharm.
Theengineexhaustfromthisproduct
containschemicalsknowntotheStateof
Californiatocausecancer,birthdefects,
orotherreproductiveharm.
Important:Thisengineisnotequippedwithaspark
arrestermufer.ItisaviolationofCaliforniaPublic
ResourceCodeSection4442touseoroperatetheengine
onanyforest-covered,brush-covered,orgrass-covered
land.Otherstatesorfederalareasmayhavesimilarlaws.
ThissparkignitionsystemcomplieswithCanadianICES-002.
Theenclosed
Engine Owner's Man ual
issuppliedfor
informationregardingtheUSEnvironmentalProtection
Agency(EP A)andtheCaliforniaEmissionControl
Regulationofemissionsystems,maintenance,and
warranty.Replacementsmaybeorderedthroughthe
enginemanufacturer.
NetT orque
Thegrossornettorqueofthisenginewaslaboratoryrated
bytheenginemanufacturerinaccordancewiththeSocietyof
AutomotiveEngineers(SAE)J1940.Asconguredtomeet
safety,emission,andoperatingrequirements,theactualengine
torqueonthisclassofmowerwillbesignicantlylower.
Contents
Introduction..................................................................1
GeneralOperation..................................................2
SlopeOperation......................................................3
Children.................................................................3
Service...................................................................3
SafetyandInstructionalDecals.................................4
Setup............................................................................6
UnfoldingtheHandle..............................................6
InstallingtheRecoil-starterRopeintheRope
Guide.................................................................6
FillingtheEnginewithOil........................................6
ChargingtheBattery(Electric-startmodels
only)..................................................................7
ProductOverview..........................................................7
Operation.....................................................................8
Attachments/Accessories.........................................8
FillingtheFuelTank................................................8
CheckingtheEngine-oilLevel...................................8
AdjustingtheCuttingHeight....................................9
StartingtheEngine..................................................9
UsingtheSelf-propelDrive(Self-propelmodels
only).................................................................10
StoppingtheEngine...............................................10
MulchingtheClippings...........................................10
BaggingtheClippings.............................................10
OperatingTips......................................................11
Maintenance.................................................................12
RecommendedMaintenanceSchedule(s)......................12
PreparingforMaintenance.......................................12
ServicingtheAirCleaner.........................................13
ChangingtheEngineOil.........................................13
ChargingtheBattery(Electric-startmodels
only).................................................................14
ReplacingtheFuse(Electric-startmodels
only).................................................................14
ReplacingtheBlade................................................15
AdjustingtheSelf-propelDriveCable(Self-propel
modelsonly)......................................................16
CleaningtheUndersideoftheMachine......................16
Storage........................................................................17
PreparingtheMachineforStorage............................17
FoldingtheHandle.................................................17
RemovingtheMachinefromStorage.........................17
Safety
ThismachinemeetsorexceedstheCPSCbladesafety
requirementsforwalk-behindrotarylawnmowers.
Readandunderstandthecontentsofthismanualbefore
youstarttheengine.
Thesafetyalertsymbol(Figure2)isusedtoalertyouto
potentialpersonalinjuryhazards.Obeyallsafetymessages
thatfollowthissymboltoavoidpossibleinjuryordeath.
Improperlyusingormaintainingthismowercouldresultin
injuryordeath.Toreducethispotential,complywiththe
followingsafetyinstructions.
Thefollowinginstructionshavebeenadaptedfromthe
ANSI/OPEIstandardB71.1-2003.
Thiscuttingmachineiscapableofamputatinghands
andfeetandofthrowingobjects.Failuretoobserve
thefollowingsafetyinstructionscouldresultinserious
injuryordeath.
GeneralOperation
•Read,understand,andfollowallinstructionsonthe
machineandinthemanual(s)beforestarting.
•Donotputhandsorfeetnearorunderthemachine.
Keepclearofthedischargeopeningatalltimes.
•Allowonlyresponsibleadults,whoarefamiliarwiththe
instructions,tooperatethismachine.
•Cleartheareaofobjectssuchasrocks,wire,toys,etc.,
whichcouldbethrownbytheblade.Staybehindthe
handlewhentheengineisrunning.
2
Page 3

•Besuretheareaisclearofbystandersbeforeoperating.
Stopmachineifanyoneentersthearea.
•Donotoperatemachinebarefootedorwhilewearing
sandals.Alwayswearsubstantialfootwear.
•Donotpullmachinebackwardunlessabsolutely
necessary.Alwayslookdownandbehindbeforeand
whilemovingbackward.
•Neverdirectdischargedmaterialtowardanyone.Avoid
dischargingmaterialagainstawallorobstruction.
Materialmayricochetbacktowardtheoperator.Stopthe
bladewhencrossinggravelsurfaces.
•Donotoperatemachinewithouttheentiregrasscatcher,
dischargeguard,rearguard,orothersafetyprotective
devicesinplaceandworking.
•Neverleavearunningmachineunattended.
•Stoptheengineandwaituntilthebladecomestoa
completestopbeforecleaningthemachine,removing
grasscatcher,oruncloggingthedischargeguard.
•Operatemachineonlyindaylightorgoodarticiallight.
•Donotoperatethemachinewhileundertheinuence
ofalcoholordrugs.
•Neveroperatethemowerinwetgrass.Alwaysbesureof
yourfooting;walk;neverrun.
•Disengagethedrivesystem,ifsoequipped,before
startingtheengine.
•Ifthemachineshouldstarttovibrateabnormally,stop
theengineandcheckforthecauseimmediately .Vibration
isgenerallyawarningoftrouble.
•Alwaysweareyeprotectionwhenoperatingthemachine.
•Lightningcancausesevereinjuryordeath.Ifyousee
lightningorhearthunderinthearea,donotoperatethe
machine;seekshelter.
•Seethemanufacturer'sinstructionsforproperoperation
andinstallationofaccessories.Useonlyaccessories
approvedbythemanufacturer.
SlopeOperation
Slopesareamajorfactorrelatedtoslip-and-fallaccidents,
whichcanresultinsevereinjury.Operationonallslopes
requireextracaution.Ifyoufeeluneasyonaslope,donot
mowit.
•Mowacrossthefaceofslopes;neverupanddown.
Exerciseextremecautionwhenchangingdirectionon
slopes.
•Watchforholes,ruts,bumps,rocks,orotherhidden
objects.Uneventerraincouldcauseaslip-and-fall
accident.Tallgrasscanhideobstacles.
•Donotmowonwetgrassorexcessivelysteepslopes.
Poorfootingcouldcauseaslip-and-fallaccident.
•Donotmowneardrop-offs,ditches,orembankments.
Youcouldloseyourfootingorbalance.
Children
Tragicaccidentscanoccuriftheoperatorisnotalerttothe
presenceofchildren.Childrenareoftenattractedtothe
machineandthemowingactivity .Neverassumethatchildren
willremainwhereyoulastsawthem.
•Keepchildrenoutofthemowingareaandunderthe
watchfulcareofaresponsibleadultotherthanthe
operator.
•Bealertandturnmoweroffifachildentersthearea.
•Neverallowchildrentooperatethemachine.
•Useextracarewhenapproachingblindcorners,shrubs,
trees,orotherobjectsthatmayblockyourviewofachild.
Service
SafeHandlingofGasoline
Toavoidpersonalinjuryorpropertydamage,use
extremecareinhandlinggasoline.Gasolineisextremely
ammableandthevaporsareexplosive.
•Extinguishallcigarettes,cigars,pipes,andothersources
ofignition.
•Useonlyanapprovedgasolinecontainer.
•Neverremovethegascaporaddfuelwiththeengine
running.Allowtheenginetocoolbeforerefueling.
•Neverrefuelthemachineindoors.
•Neverstorethemachineorfuelcontainerwherethereis
anopename,spark,orpilotlight,suchasonawater
heateroronotherappliances.
•Neverllcontainersinsideavehicleoronatruckor
trailerbedwithaplasticliner.Alwaysplacecontainerson
thegroundawayfromyourvehiclebeforelling.
•Removegas-poweredequipmentfromthetruckortrailer
andrefuelitontheground.Ifthisisnotpossible,then
refuelsuchequipmentwithaportablecontainerrather
thanfromagasolinedispensernozzle.
•Keepthenozzleincontactwiththerimofthefueltank
orcontaineropeningatalltimesuntilfuelingiscomplete.
Donotuseanozzlelock-opendevice.
•Iffuelisspilledonclothing,changeclothingimmediately.
•Neveroverllfueltank.Replacethegascapandtighten
itsecurely .
WARNING
Exhaustcontainscarbonmonoxide,anodorless,
deadlypoisonthatcankillyou.
Donotruntheengineindoorsorinanenclosed
area.
3
Page 4
GeneralService
•Neveroperatethemachineinaclosedarea.
•Keepallnutsandboltstighttobesuretheequipmentis
insafeworkingcondition.
•Neverremoveortamperwithsafetydevices.Checktheir
properoperationregularly.Neverdoanythingtointerfere
withtheintendedfunctionofasafetydeviceortoreduce
theprotectionprovidedbyasafetydevice.
•Keepthemachinefreeofgrass,leaves,orotherdebris
buildup.Cleanupoilorfuelspillageandremoveany
fuel-soakeddebris.Allowthemachinetocoolbefore
storingit.
•Ifyoustrikeaforeignobject,stopandinspectthe
machine.Repairthemachine,ifnecessary,beforestarting
it.
•Nevermakeanyadjustmentsorrepairswiththeengine
running.Disconnectthespark-plugwireandground
againsttheenginetopreventunintendedstarting.
•Checkgrasscatchercomponentsandthedischarge
guardfrequently,andreplacethemwithmanufacturer's
recommendedparts,whennecessary.
•Mowerbladesaresharp.Wrapthebladeorweargloves,
anduseextracautionwhenservicingthem.
•Donotchangetheenginegovernorsettingoroverspeed
theengine.
•Maintainorreplacesafetyandinstructionlabels,as
necessary.
•Tobestprotectyourinvestmentandmaintainoptimal
performanceofyourLawn-Boyequipment,counton
Lawn-Boygenuineparts.Whenitcomestoreliability,
Lawn-Boydeliversreplacementpartsdesignedtothe
exactengineeringspecicationsofourequipment.For
peaceofmind,insistonLawn-Boygenuineparts.
Hauling
•Usecarewhenloadingorunloadingthemachineintoa
trailerortruck.
•Usefull-widthrampsforloadingthemachineintoa
trailerortruck.
•Tiethemachinedownsecurelyusingstraps,chains,cable,
orropes.Boththefrontandtherearstrapsshouldbe
directeddownandoutwardfromthemachine.
SafetyandInstructionalDecals
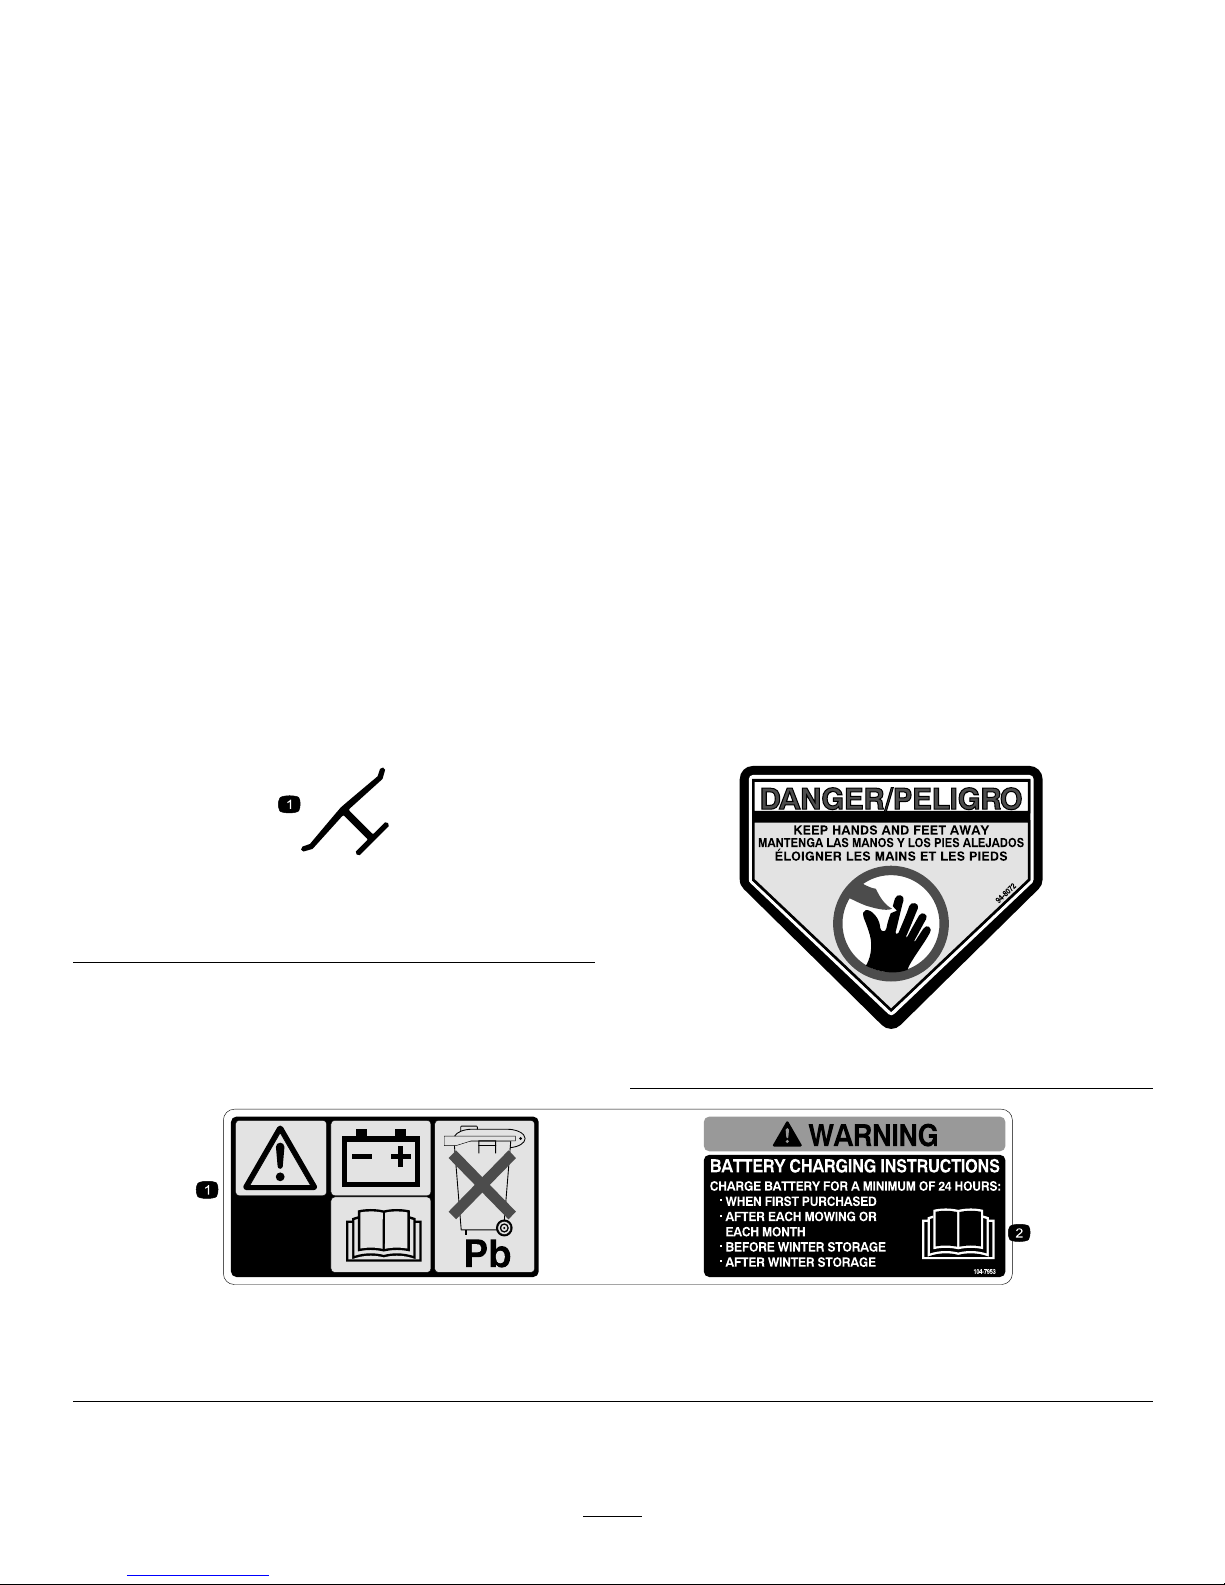
Important:Safetyandinstructiondecalsarelocatednearareasofpotentialdanger.Replacedamageddecals.
Manufacturer'sMark
1.Indicatesthatthebladeisidentiedasapartfromthe
originalmachinemanufacturer.
94-8072
104-7953(Electric-startmodelsonly)
1.Warning—readtheOperator'sManualforinformationonchargingthebattery;containslead;donotdiscard.
2.ReadtheOperator'sManual.
4
Page 5
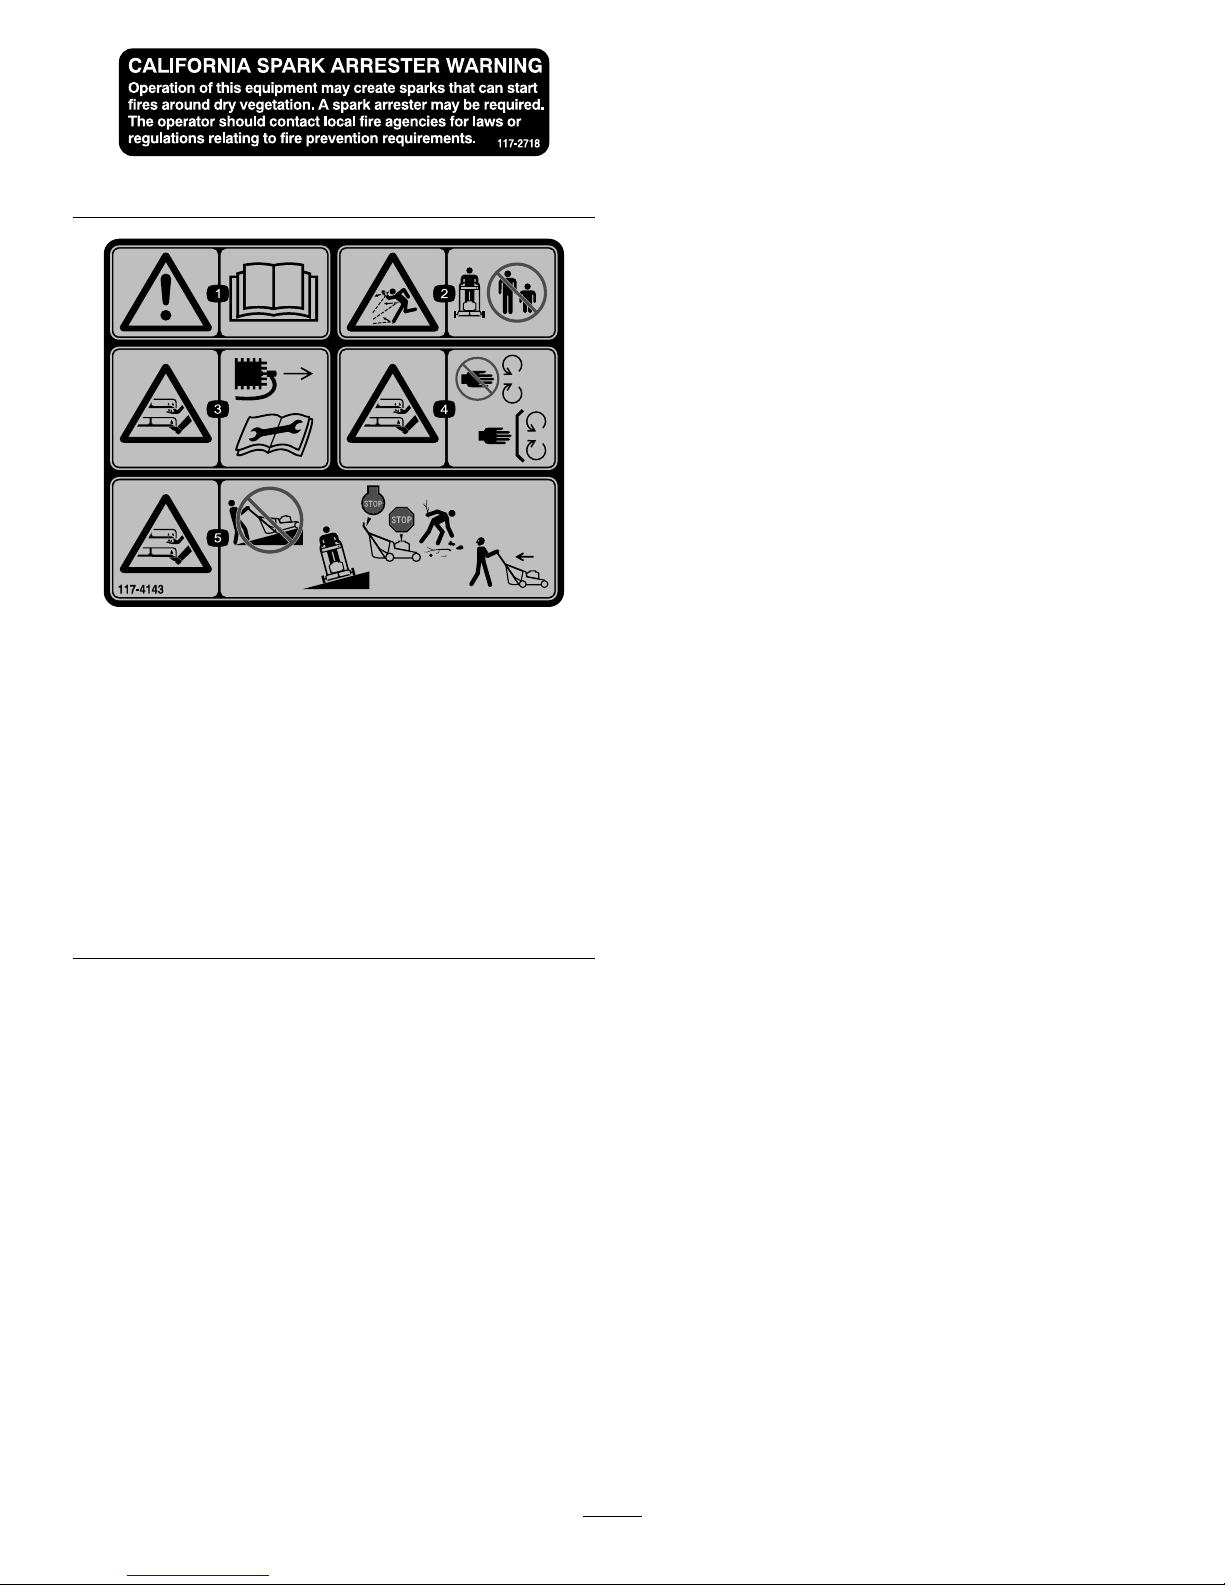
117–2718
117-4143
1.Warning—readtheOperator'sManual.
2.Thrownobjecthazard—keepbystandersasafedistance
fromthemachine.
3.Cutting/dismembermenthazardofhandorfoot,mower
blade—disconnectthespark-plugwireandreadthe
instructionsbeforeservicingorperformingmaintenance.
4.Cutting/dismembermenthazardofhandorfoot,mower
blade—stayawayfrommovingpartsandkeepallguards
andshieldsinplace.
5.Cutting/dismembermenthazardofhandorfoot,mower
blade—donotmowupanddownslopes,onlymowacross;
stopthemowerandengine,pickupdebrisbeforeoperating;
lookbehindanddownwhenreversing.
5
Page 6
Setup
Important:Removeanddiscardtheprotectiveplastic
sheetthatcoverstheengine.
UnfoldingtheHandle
WARNING
Foldingorunfoldingthehandleimproperlycan
damagethecables,causinganunsafeoperating
condition.
•Donotdamagethecableswhenfoldingor
unfoldingthehandle.
•Ifacableisdamaged,contactanAuthorized
ServiceDealer.
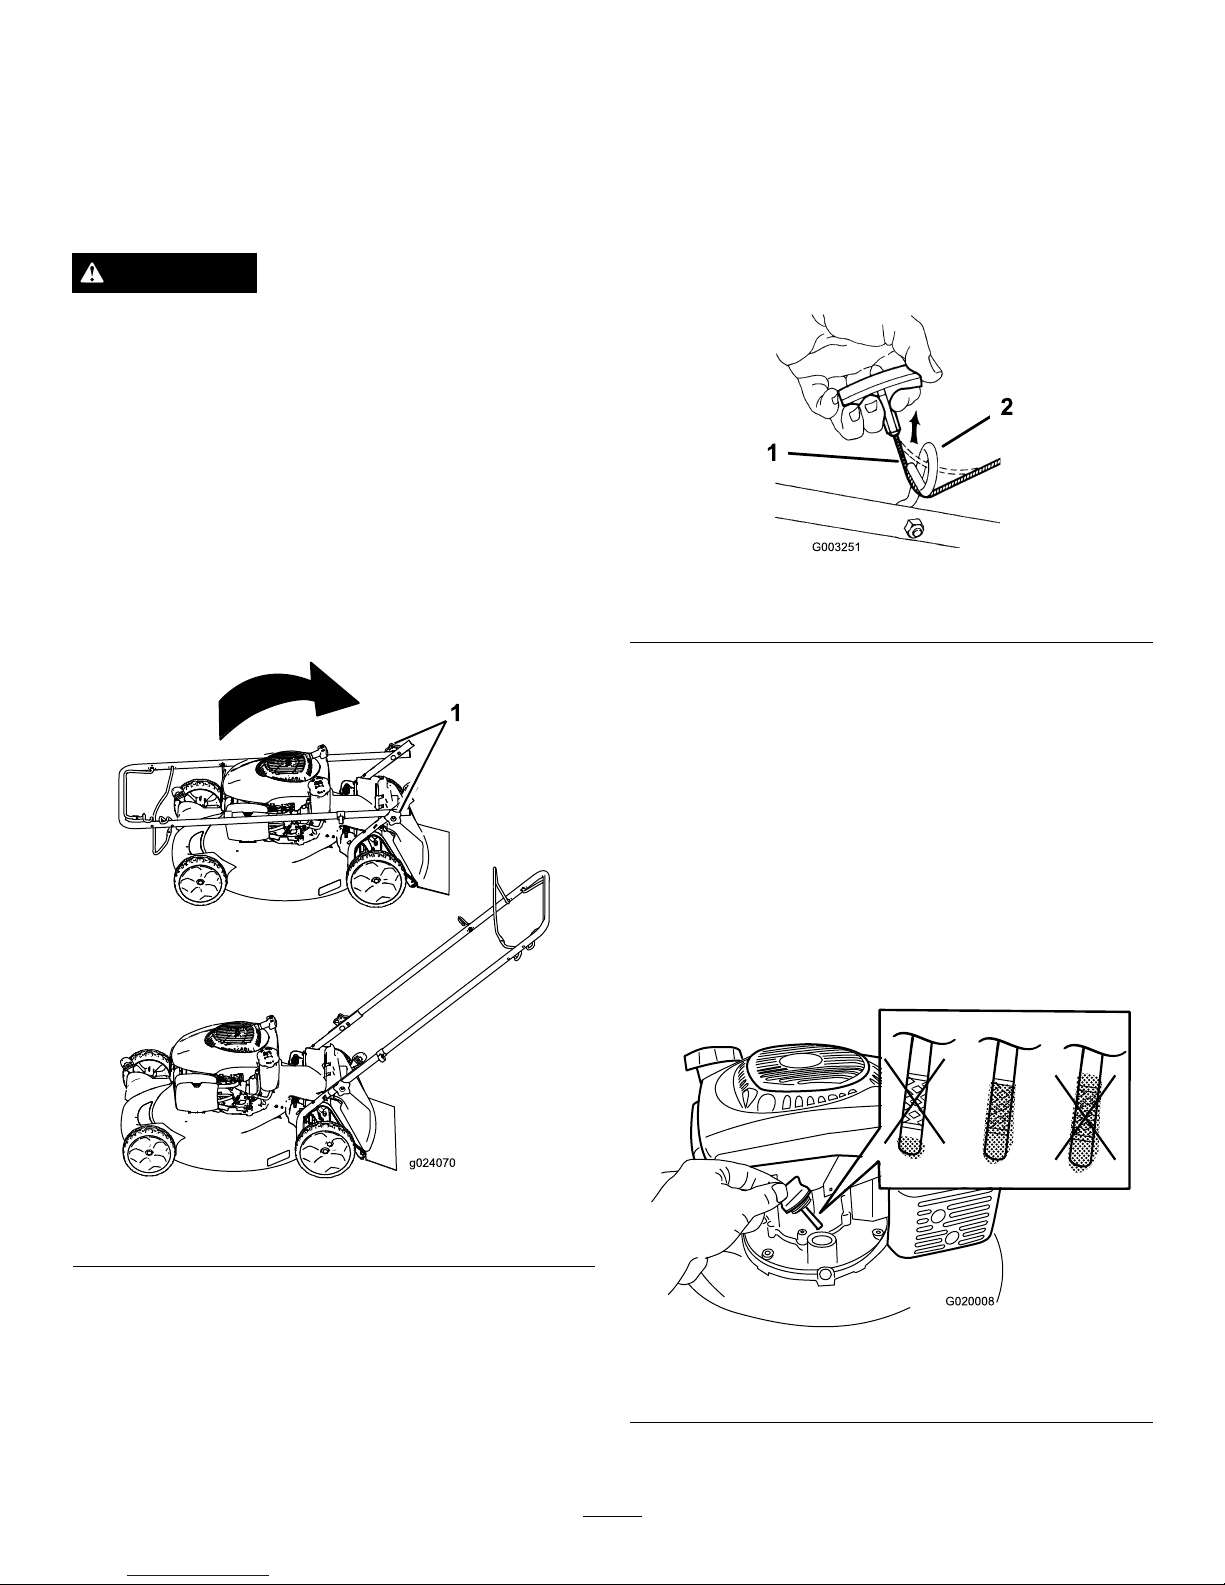
1.Removethehandleknobsfromthemachinehousing
(Figure3).
Important:Routethecablestotheoutsideofthe
handleasyouinstallthehandle.
Figure3
1.Handleknob(2)
2.Movethehandletotheoperatingposition(Figure3).
3.Installthehandleknobsandtightenthemrmlyby
hand.
InstallingtheRecoil-starter
RopeintheRopeGuide
Important:Tostarttheenginesafelyandeasily
wheneveryouusethemachine,installtherecoil-starter
ropeintheropeguide.
Holdtheblade-controlbartotheupperhandleandpullthe
recoil-starterropethroughtheropeguideonthehandle
(Figure4).
Figure4
1.Recoil-starterrope2.Ropeguide
FillingtheEnginewithOil
Important:Yourmachinedoesnotcomewithoilin
theengine.Beforestartingtheengine,lltheengine
withoil.
1.Movethemachinetoalevelsurface.
2.Removethedipstick(Figure5)andpourabout3/4of
thecrankcasecapacityofoilintotheoil-lltube.
Note:Max.ll:0.65L(22oz),type:10W-30orSAE
30detergentoilwithanAPIserviceclassicationof
SJorhigher.
G020008
Figure5
Engineforelectric-startmodelsnotshown
3.Wipeoffthedipstickwithacleancloth.
6
Page 7
4.Insertthedipstickintotheoil-lltube,butdonot
screwitin.
5.Removethedipstickandreadtheoillevelonthe
dipstick(Figure5).
•Iftheoillevelislow ,addasmallamountofoil
slowlytotheoil-lltube,andthenrepeatsteps
3through5untiltheoillevelonthedipstickis
correct.
•Iftheoillevelishigh,draintheexcessoiluntilthe
oillevelonthedipstickiscorrect.Todrainthe
excessoil,referto
ChangingtheEngineOil(page
13).
Important:Iftheoillevelinthecrankcaseis
toolowortoohighandyouruntheengine,
youmaydamagetheengine.
6.Installthedipsticksecurely.
Important:
Change the engine oil after the r st 5
operating hour s
;changeityearlythereafter.Refer
toChangingtheEngineOil(page13).
ChargingtheBattery
(Electric-startmodelsonly)
RefertoChargingtheBattery(Electric-startmodelsonly)
(page14)
.
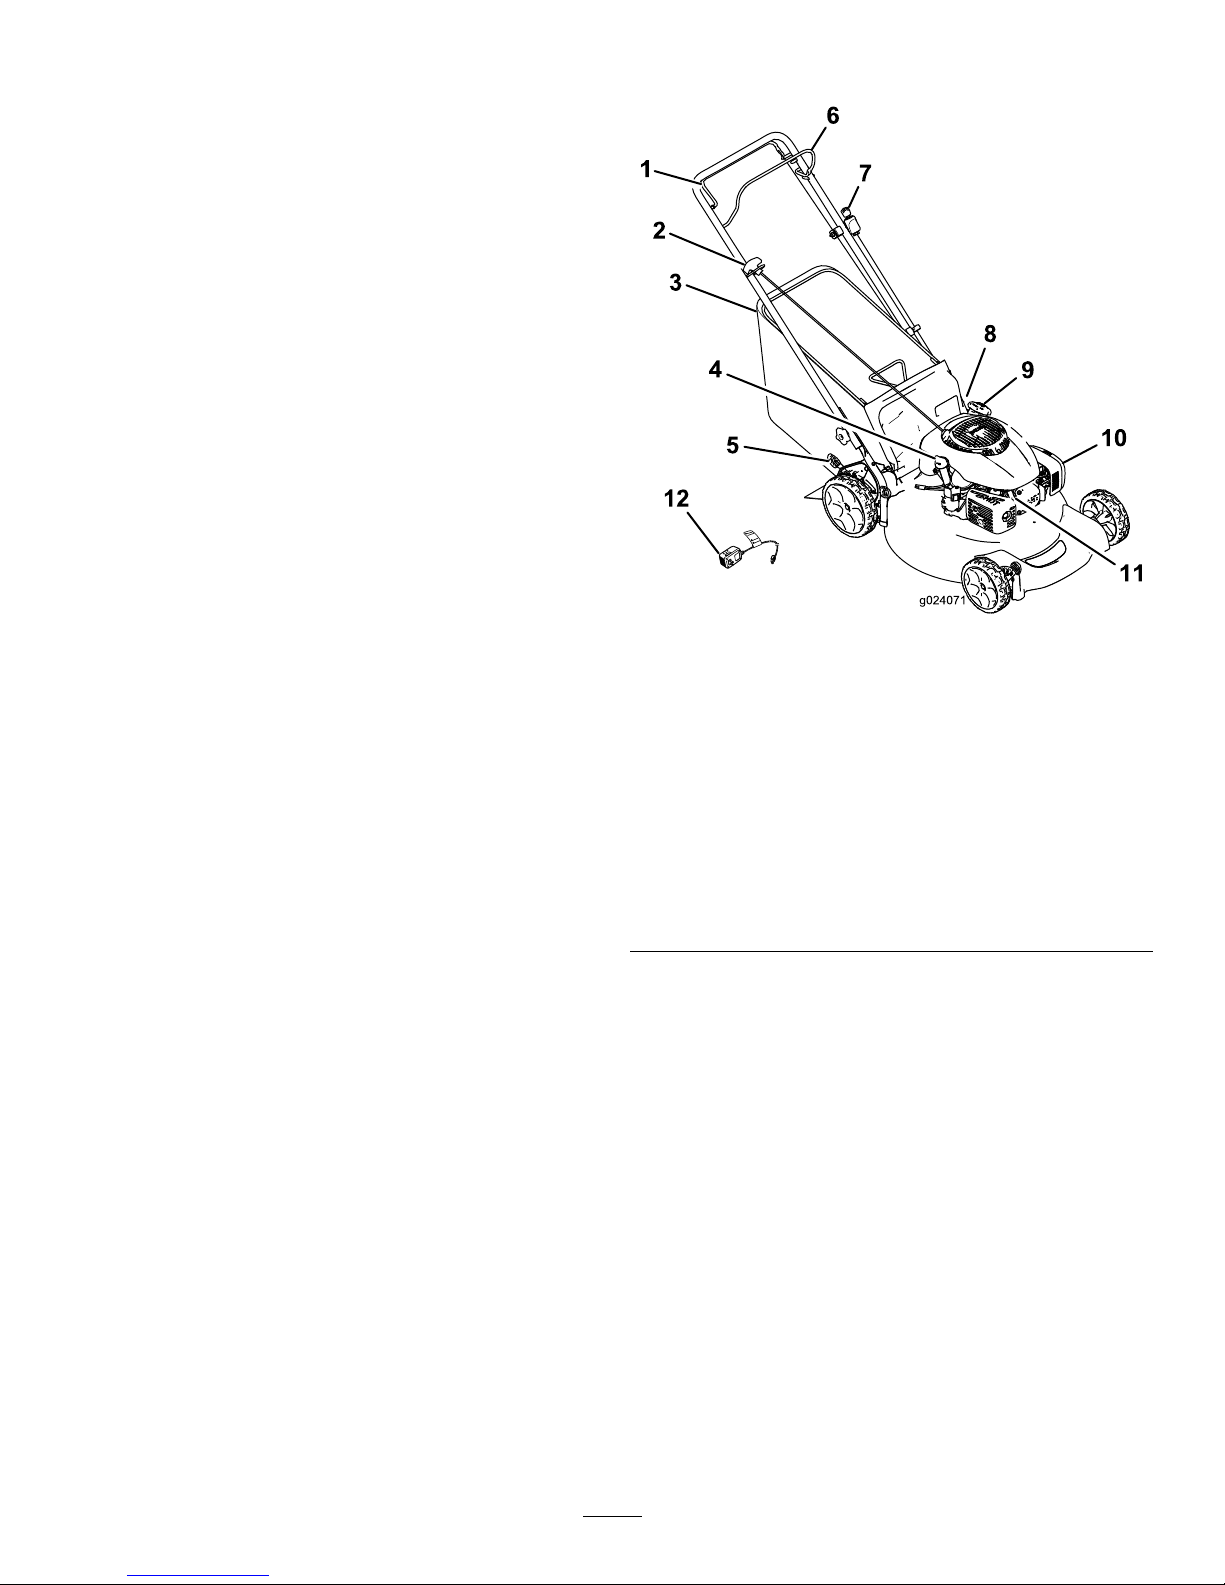
ProductOverview
12
Figure6
Electric-startmodelshown
1.Self-propel-drivebar
(self-propelmodelsonly)
7.Ignitionkey(electric-start
modelsonly)
2.Recoil-starthandle
8.Battery(notshown;
electric-startmodelsonly)
3.Grassbag
9.Fuel-tankcap
4.Oilll/Dipstick10.Airlter
5.Cutting-heightlever(2)11.Sparkplug
6.Blade-controlbar12.Batterycharger
(electric-startmodels
only)
7
Page 8
Operation
Attachments/Accessories
AselectionofLawn-Boyapprovedattachmentsand
accessoriesisavailableforusewiththemachinetoenhance
andexpanditscapabilities.ContactyourAuthorizedService
DealerorDistributororgotowww .Lawn-Boy .comforalist
ofallapprovedattachmentsandaccessories.
FillingtheFuelTank
DANGER
Gasolineisextremelyammableandexplosive.A
reorexplosionfromgasolinecanburnyouand
others.
•Topreventastaticchargefromignitingthe
gasoline,placethecontainerand/ormachine
directlyonthegroundbeforelling,notina
vehicleoronanobject.
•Fillthetankoutdoorswhentheengineiscold.
Wipeupspills.
•Donothandlegasolinewhensmokingoraround
anopenameorsparks.
•Storegasolineinanapprovedfuelcontainer,out
ofthereachofchildren.
•Forbestresults,useonlyclean,fresh(lessthan30days
old),unleadedgasolinewithanoctaneratingof87or
higher((R+M)/2ratingmethod).
•Oxygenatedfuelwithupto10%ethanolor15%MTBE
byvolumeisacceptable.
•Ethanol:Gasolinewithupto10%ethanol(gasohol)
or15%MTBE(methyltertiarybutylether)byvolume
isacceptable.EthanolandMTBEarenotthesame.
Gasolinewith15%ethanol(E15)byvolumeisnot
approvedforuse.Neverusegasolinethatcontains
morethan10%ethanolbyvolume,suchasE15
(contains15%ethanol),E20(contains20%ethanol),or
E85(containsupto85%ethanol).Usingunapproved
gasolinemaycauseperformanceproblemsand/orengine
damagewhichmaynotbecoveredunderwarranty.
•Donotusegasolinecontainingmethanol.
•Donotstorefueleitherinthefueltankorinfuel
containersoverthewinterunlessafuelstabilizerisused.
•Donotaddoiltogasoline.
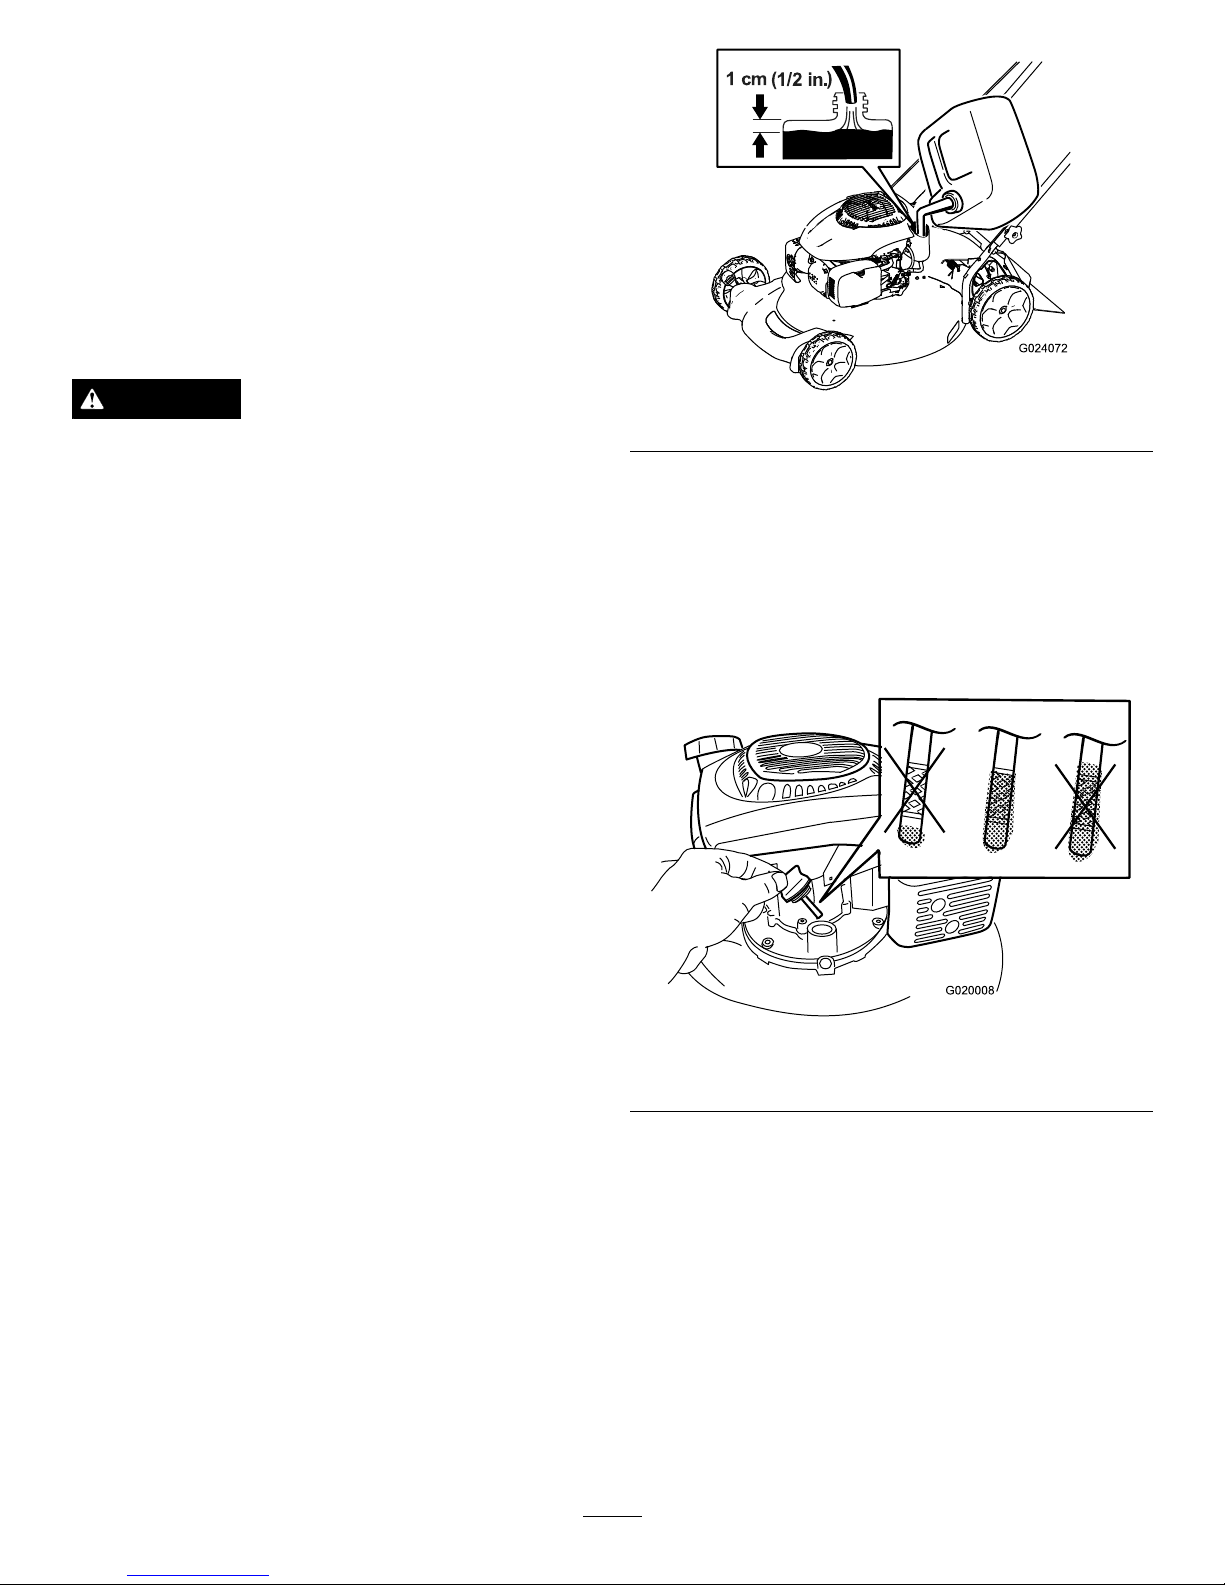
Important:T oreducestartingproblems,addfuel
stabilizertothefuelallseason,mixingitwithgasoline
lessthan30daysold.
Figure7
CheckingtheEngine-oilLevel
ServiceInterval:Beforeeachuseordaily
Max.ll:0.65L(22oz),type:10W-30orSAE30detergent
oilwithanAPIserviceclassicationofSJorhigher.
1.Movethemachinetoalevelsurface.
2.Removethedipstick(
Figure8).
G020008
Figure8
Engineforelectric-startmodelsnotshown
3.Wipeoffthedipstickendwithacleancloth.
4.Insertthedipstickintotheoil-lltube,butdonot
screwitin.
5.Removethedipstickandreadtheoillevel;referto
Figure8.
•Iftheoillevelislow ,addasmallamountofoil
slowlytotheoil-lltube,andthenrepeatsteps
3through5untiltheoillevelonthedipstickis
correct.
•Iftheoillevelishigh,draintheexcessoiluntilthe
oillevelonthedipstickiscorrect.Todrainthe
excessoil,refertoChangingtheEngineOil(page
13)
.
8
Page 9
Important:Iftheoillevelinthecrankcaseis
toolowortoohighandyouruntheengine,
youmaydamagetheengine.
6.Installthedipsticksecurely.
AdjustingtheCuttingHeight
WARNING
Adjustingthecuttingheightmaybringyouinto
contactwiththemovingblade,causingserious
injury.
•Stoptheengineandwaitforallmovingparts
tostop.
•Donotputyourngersunderthehousingwhen
adjustingthecuttingheight.
CAUTION
Iftheenginehasbeenrunning,themuferwillbe
hotandcanseverelyburnyou.Keepawayfromthe
hotmufer.
AdjustingtheCuttingHeight
(High-wheelmodelsonly)
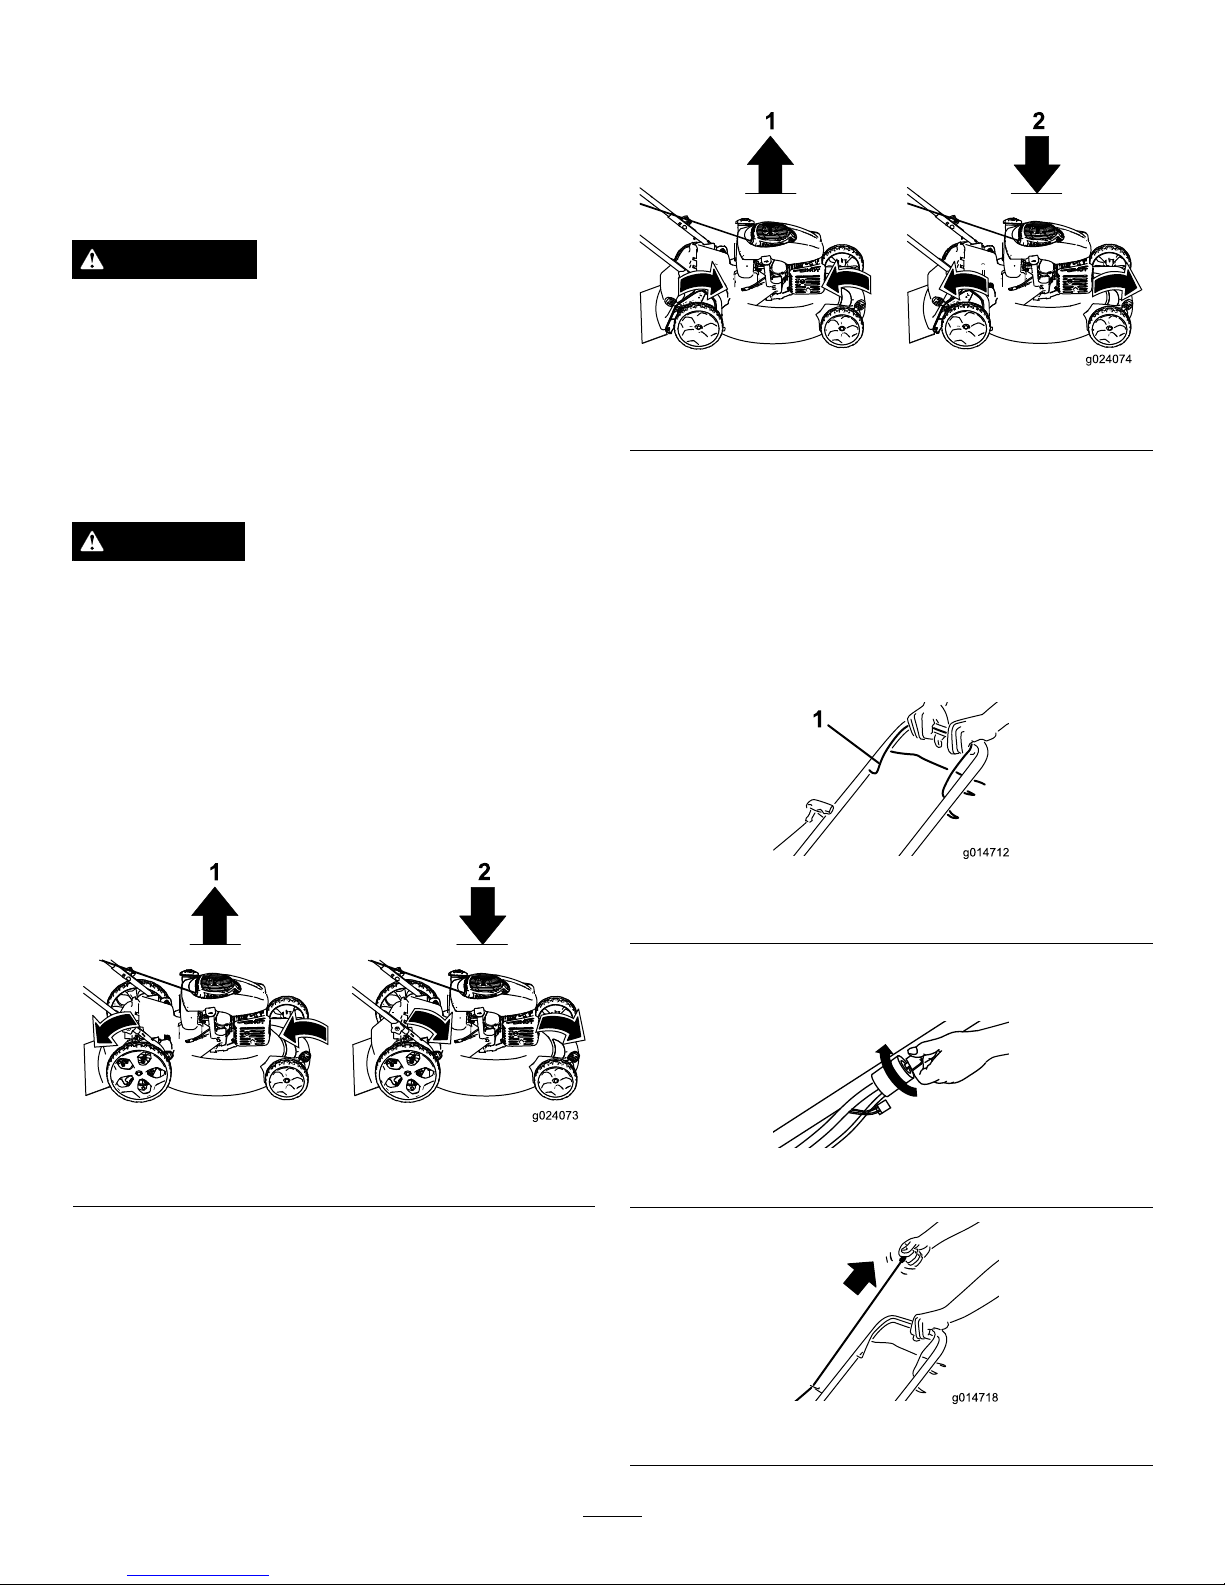
Adjustthecuttingheightasdesired.Setthefrontwheelsand
therearwheelstothesameheight.
Note:Toraiseorlowerthemachine,movethecutting-height
leversasshowninFigure9.
Figure9
1.Raisethemachine2.Lowerthemachine
Important:Thecuttingheightsettingsare32mm
(1-1/4inches);44mm(1-3/4inches);57mm(2-1/4
inches);70mm(2-3/4inches);83mm(3-1/4inches);
and95mm(3-3/4inches).
AdjustingtheCuttingHeight
(Regular-wheelmodelsonly)
Adjustthecuttingheightasdesired.Setthefrontwheelsand
therearwheelstothesameheight.
Note:Toraiseorlowerthemachine,movethecutting-height
leversasshownin
Figure10.
Figure10
1.Raisethemachine2.Lowerthemachine
Important:Thecuttingheightsettingsare32mm
(1-1/4inches);44mm(1-3/4inches);57mm(2-1/4
inches);70mm(2-3/4inches);83mm(3-1/4inches);
and95mm(3-3/4inches).
StartingtheEngine
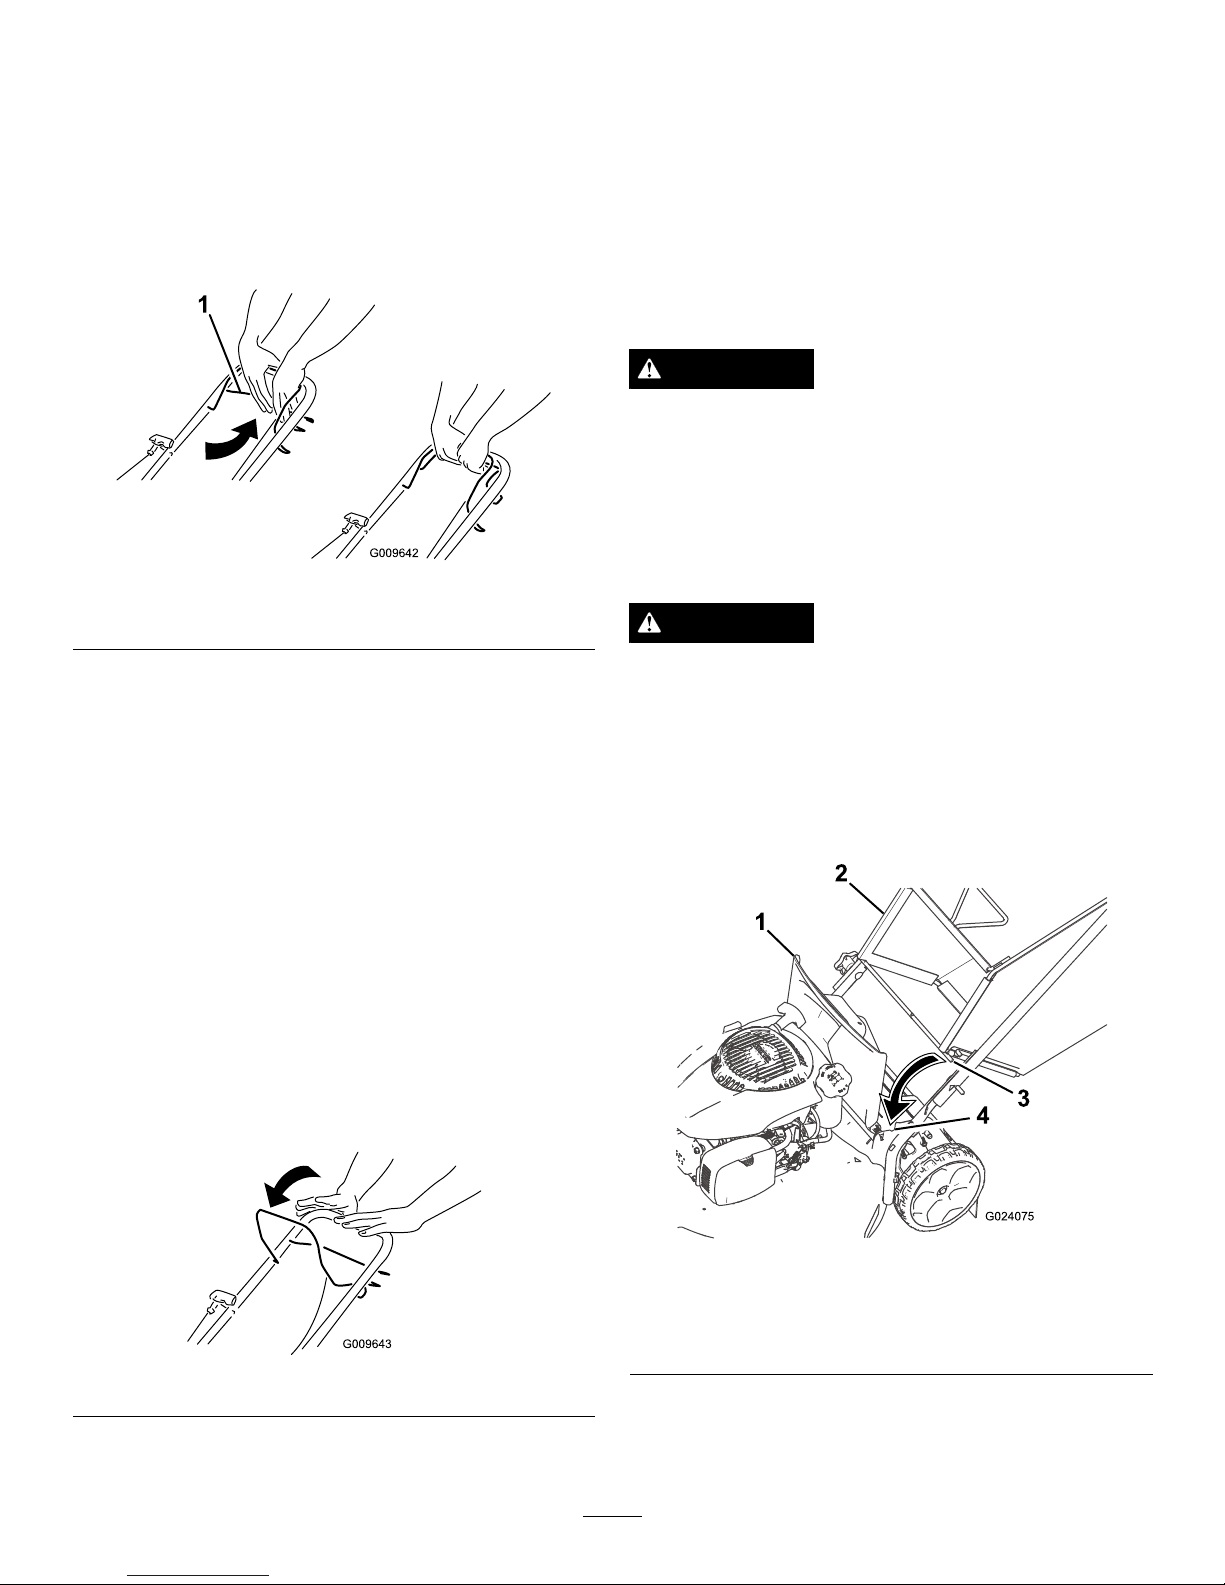
1.Holdtheblade-controlbar(Figure11)againstthe
handle.
Figure11
1.Blade-controlbar
2.Turntheignitionkey(electric-startmodelsonly;refer
toFigure12)orpulltherecoil-starthandle(Figure13).
Figure12
Figure13
9
Page 10
Note:Ifthemachinedoesnotstartafterseveral
attempts,contactanAuthorizedServiceDealer.
UsingtheSelf-propelDrive
(Self-propelmodelsonly)
Tooperatetheself-propeldrive,squeezetheself-propeldrive
bar(Figure14)towardthehandleandholdit.
Figure14
1.Self-propeldrivebar
Todisengagetheself-propeldrive,releasetheself-propel
drivebar.
Note:Themaximumself-propelgroundspeedisxed.To
reducethegroundspeed,increasethespacebetweenthe
self-propeldrivebarandthehandle.
StoppingtheEngine
ServiceInterval:Beforeeachuseordaily
Tostoptheengine,releasetheblade-controlbar(Figure15).
Note:Removetheignitionkeywhenyouleavethemachine
(electric-startmodelsonly).
Important:Whenyoureleasetheblade-controlbar,
boththeengineandbladeshouldstopwithin3seconds.
Iftheydonotstopproperly,stopusingyourmachine
immediatelyandcontactanAuthorizedServiceDealer.
Figure15
MulchingtheClippings
Yourmachinecomesfromthefactoryreadytomulchthe
grassandleafclippingsbackintothelawn.
Ifthegrassbagisonthemachine,removeitbeforemulching
theclippings.RefertoRemovingtheGrassBag(page11).
BaggingtheClippings
Usethegrassbagwhenyouwanttocollectgrassandleaf
clippingsfromthelawn.
WARNING
Aworngrassbagcouldallowsmallstonesandother
similardebristobethrownatyouorinthedirection
ofbystanders,resultinginseriouspersonalinjury
ordeathtoyouortobystanders.
Checkthegrassbagfrequently.Ifitisdamaged,
installanewLawn-Boyreplacementbag.
WARNING
Thebladeissharp;contactingthebladecanresult
inseriouspersonalinjury.
Stoptheengineandwaitforallmovingpartstostop
beforeleavingtheoperatingposition.
InstallingtheGrassBag
1.Liftupthereardeector(Figure16).
1
2
G024075
3
4
Figure16
1.Reardeector3.Rodend(2)
2.Notchinthehandle
bracket(2)
4.Grassbag
2.Inserttherodendsofthegrassbagintothenotches
inthehandlebrackets(Figure16).
3.Allowthereardeectortorestonthebag.
10
Page 11

RemovingtheGrassBag
1.Liftupthereardeector(Figure16).
2.Liftthegrass-baghandleoutfromthenotchesonthe
handlebracketsandremovethebagfromthemachine.
3.Closethereardeector.
OperatingTips
GeneralMowingTips
•Cleartheareaofsticks,stones,wire,branches,andother
debristhatthebladecouldhit.
•Avoidstrikingsolidobjectswiththeblade.Never
deliberatelymowoveranyobject.
•Ifthemachinestrikesanobjectorstartstovibrate,
immediatelystoptheengine,disconnectthewirefrom
thesparkplug,andexaminethemachinefordamage.
•Forbestperformance,installanewbladebeforethe
cuttingseasonbegins.
•ReplacethebladewhennecessarywithaLawn-Boy
replacementblade.
CuttingGrass
•Cutonlyaboutathirdofthegrassbladeatatime.Donot
cutbelowthe44mm(1–3/4-inch)settingunlessthegrass
issparseoritislatefallwhengrassgrowthbeginstoslow
down.RefertoAdjustingtheCuttingHeight(page9).
•Whencuttinggrassover15cm(6inches)tall,mowatthe
highestcuttingheightsettingandwalkslower;thenmow
againatalowersettingforthebestlawnappearance.If
thegrassistoolong,themachinemayplugandcause
theenginetostall.
•Mowonlydrygrassorleaves.Wetgrassandleavestend
toclumpontheyardandcancausethemachinetoplug
ortheenginetostall.
WARNING
Wetgrassorleavescancauseseriousinjuryif
youslipandcontacttheblade.Mowonlyindry
conditions.
•Alternatethemowingdirection.Thishelpsdispersethe
clippingsoverthelawnforevenfertilization.
•Ifthenishedlawnappearanceisunsatisfactory,tryone
ormoreofthefollowing:
–Replacethebladeorhaveitsharpened.
–Walkataslowerpacewhilemowing.
–Raisethecuttingheightonyourmachine.
–Cutthegrassmorefrequently.
–Overlapcuttingswathsinsteadofcuttingafullswath
witheachpass.
–Setthecuttingheightonthefrontwheelsonenotch
lowerthantherearwheels.Forexample,setthefront
wheelsat57mm(2-1/4inches)andtherearwheels
at70mm(2-3/4inches).
11
Page 12
Maintenance
Note:Determinetheleftandrightsidesofthemachinefromthenormaloperatingposition.
RecommendedMaintenanceSchedule(s)
MaintenanceService
Interval
MaintenanceProcedure
Aftertherst5hours
•Changetheengineoil.
Beforeeachuseordaily
•Checktheengineoillevel.
•Ensurethattheenginestopswithin3secondsafterreleasingtheblade-controlbar.
Aftereachuse
•Cleangrassclippingsanddirtfromunderthemachine.
Every25hours
•Checktheaircleanerfordirty,loose,ordamagedparts,andcleanorreplacethem
ifnecessary .
•Chargethebatteryfor24hours(electric-startmodelsonly).
Every100hours
•Replacetheair-cleanerelement(morefrequentlywhenoperatingthemachinein
dustyordirtyoperatingconditions).
•Cleanthecoolingsystem(refertoyourengineowner'smanual).
•Replacethesparkplug.
Beforestorage
•Emptythefueltankbeforerepairsasdirectedandbeforeannualstorage.
Yearly
•Changetheengineoil.
•Replacethebladeorhaveitsharpened(morefrequentlyiftheedgedullsquickly).
•RefertoyourEngineOperator'sManualforanyadditionalyearlymaintenance
procedures.
Important:Refertoyour
Engine Operator's Man ual
foradditionalmaintenanceprocedures.
PreparingforMaintenance
1.Stoptheengineandwaitforallmovingpartstostop.
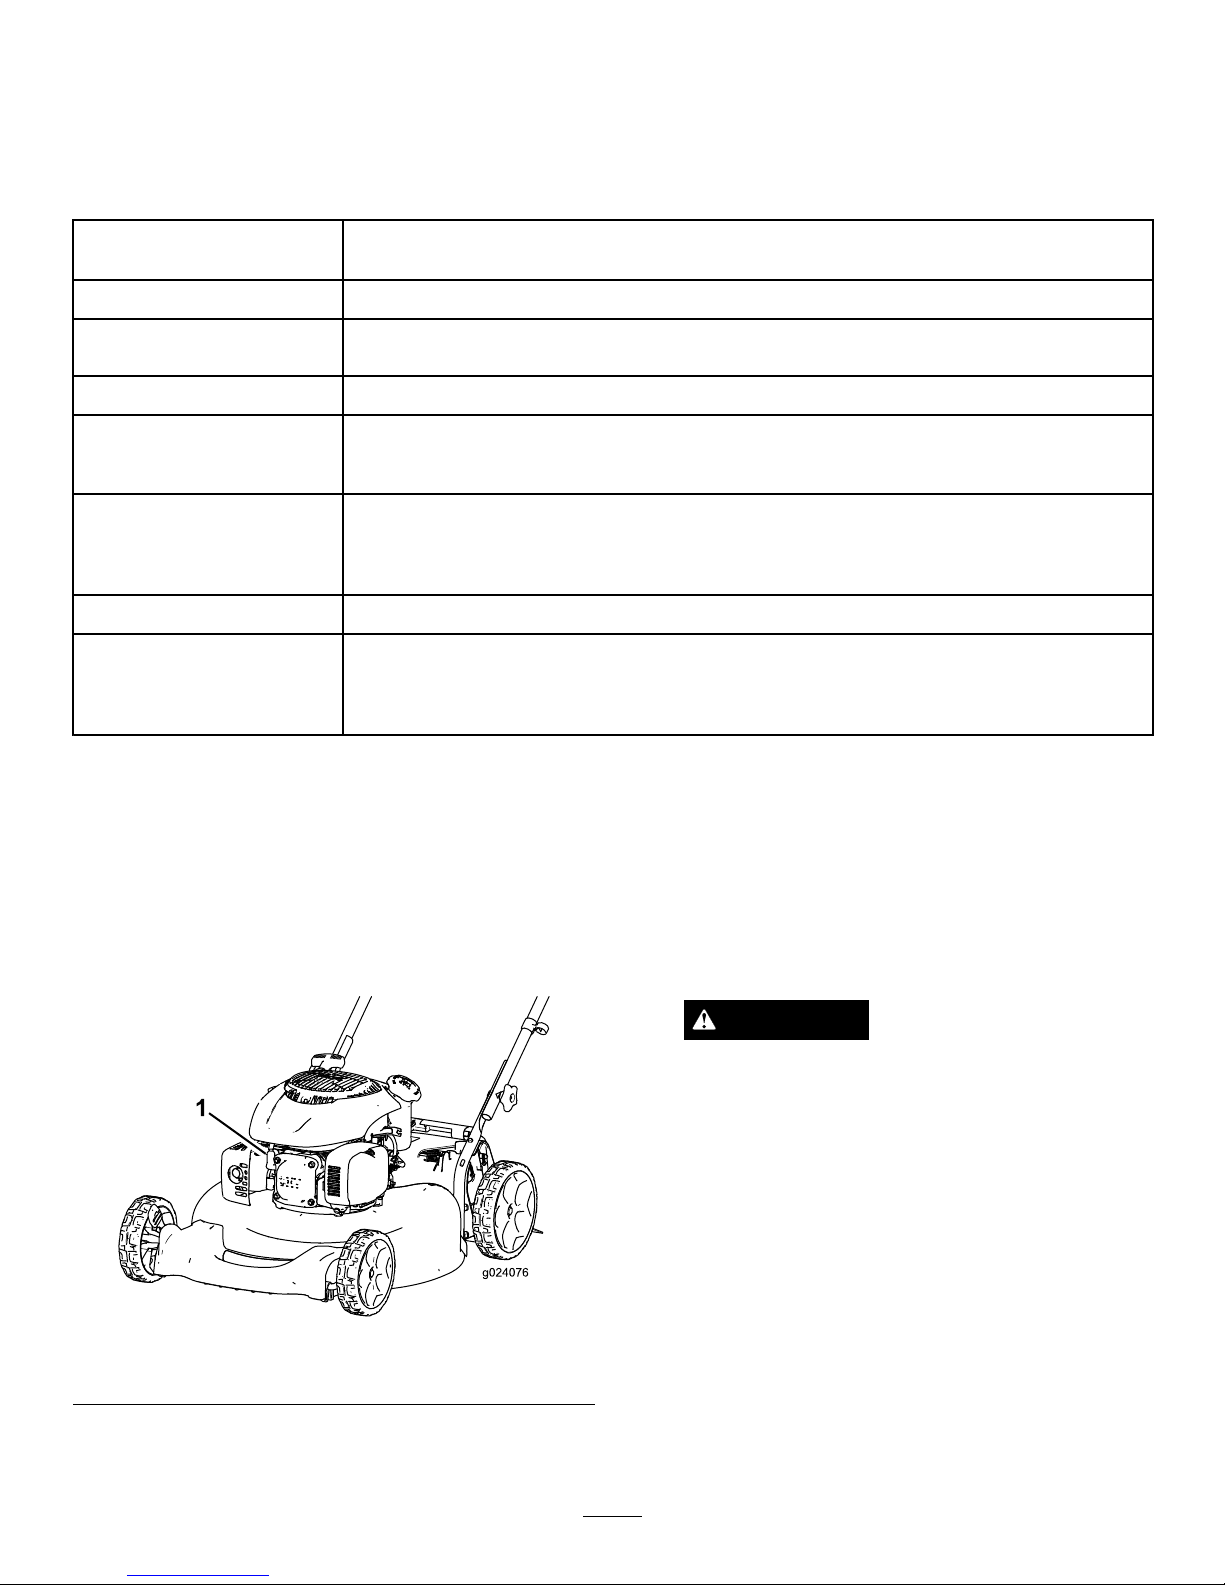
2.Disconnectthespark-plugwirefromthesparkplug
(Figure17)beforeperforminganymaintenance
procedure.
Figure17
1.Spark-plugwire
3.Afterperformingthemaintenanceprocedure(s),
connectthespark-plugwiretothesparkplug.
Important:Beforetippingthemachinetochange
theoilorreplacetheblade,allowthefueltankto
rundrythroughnormalusage.Ifyoumusttip
themachinepriortorunningoutoffuel,usea
handfuelpumptoremovethefuel.Alwaystipthe
machineontoitssidewiththedipstickdown.
WARNING
Tippingthemachinemaycausethefuelto
leak.Gasolineisammable,explosiveand
cancausepersonalinjury.
Runtheenginedryorremovethegasoline
withahandpump;neversiphon.
12
Page 13
ServicingtheAirCleaner
ServiceInterval:Every25hours/Yearly(whichevercomes
rst)—Checktheaircleanerfordirty,
loose,ordamagedparts,andcleanor
replacethemifnecessary.
Every100hours/Yearly(whichevercomes
rst)—Replacetheair-cleanerelement(more
frequentlywhenoperatingthemachineindustyor
dirtyoperatingconditions).
1.Performthepre-maintenanceprocedures;referto
PreparingforMaintenance(page12).
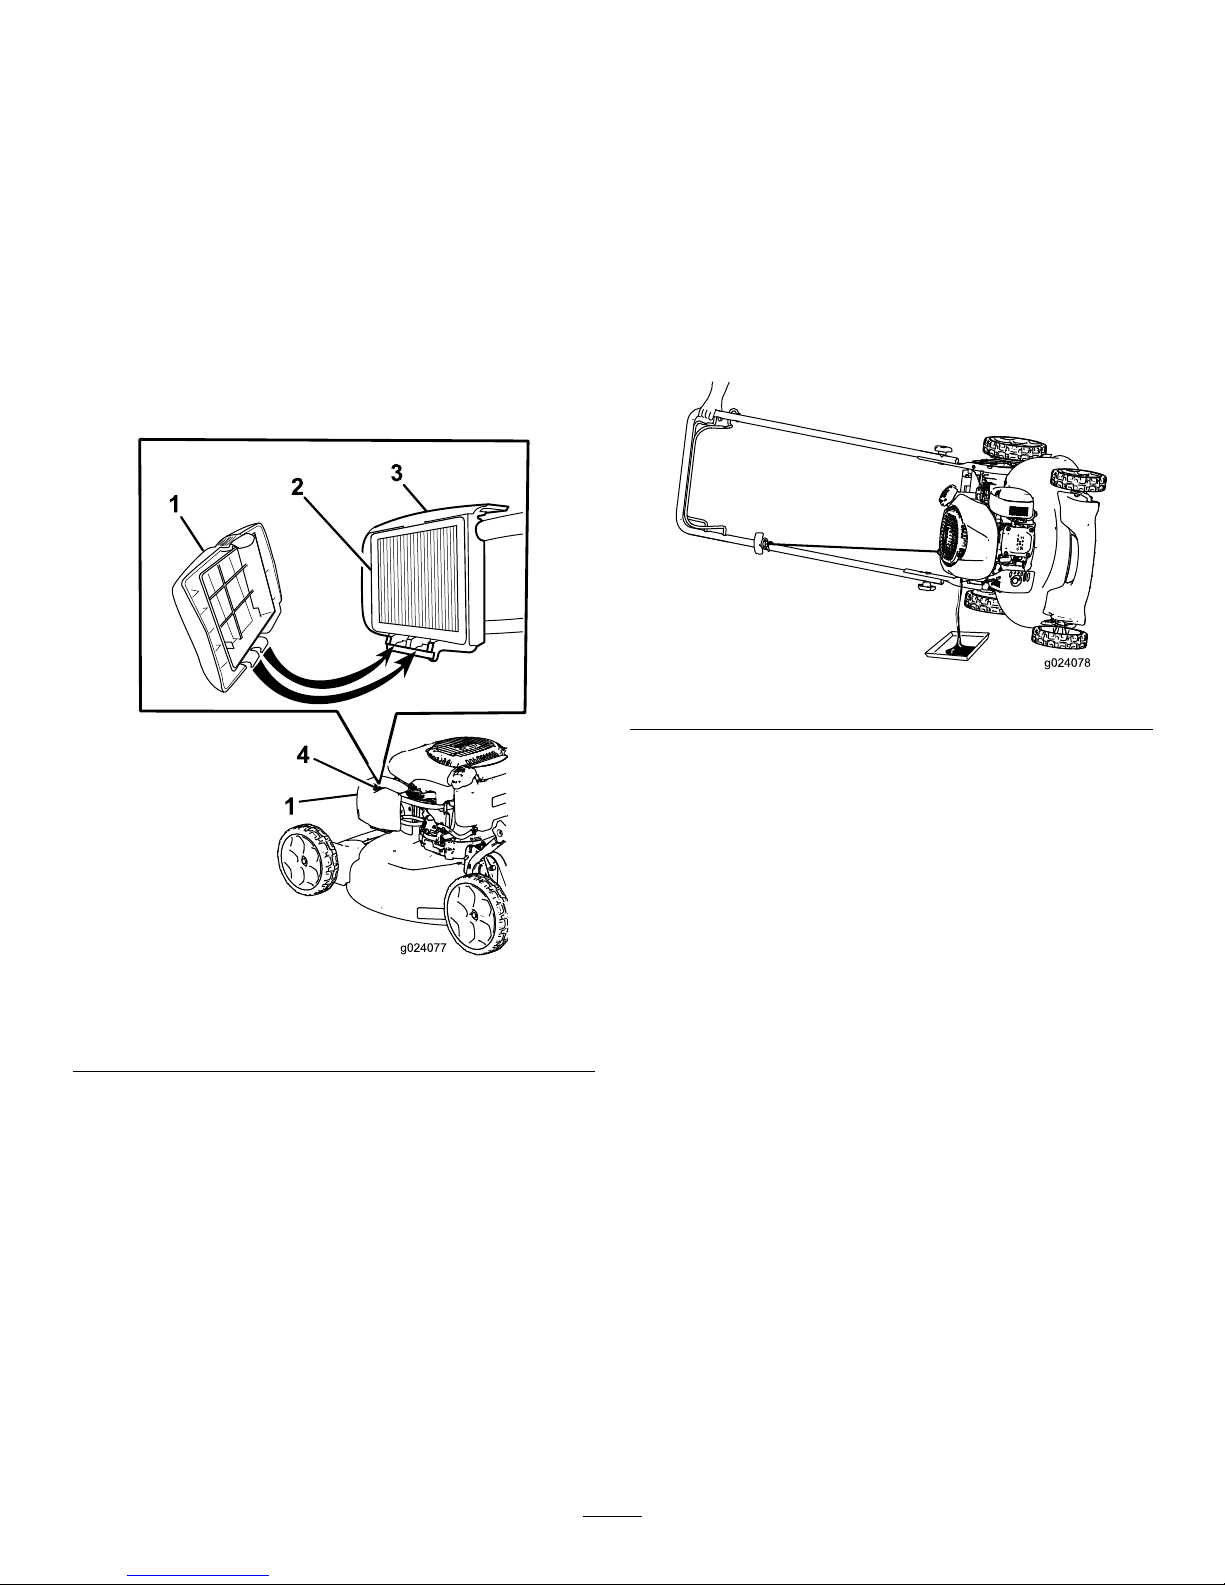
2.Pressthebuttonontheair-cleanercover(Figure18)
andopenthecover.
Figure18
1.Air-cleanercover3.Air-cleanerhousing
2.Paperelement4.Button
3.Removetheoldpaperelement.
4.Installthenewpaperelementintheair-cleanerhousing,
notinthecover.
5.Installtheair-cleanercover.
Note:Ensurethattheair-cleanercoverisfullylatched
intoplacebypullinggentlyontheuppercornersofthe
cover.Ifthecovercomesloose,repeatsteps4and5.
ChangingtheEngineOil
ServiceInterval:Aftertherst5hours
Yearly
Runtheengineafewminutesbeforechangingtheoiltowarm
it.Warmoilowsbetterandcarriesmorecontaminants.
1.Performthepre-maintenanceprocedures;referto
PreparingforMaintenance(page12).
2.Tipthemachineontoitsside,withthedipstickdown,
todraintheusedoiloutthroughtheoil-lltube(Figure
19).
Figure19
3.Removethedipstick.
4.Afterdrainingtheusedoil,returnthemachinetothe
normaloperatingposition.
5.Pourabout3/4ofthecrankcasecapacityofoilinto
theoil-lltube.
Note:Max.ll:0.59L(22oz),type:10W-30orSAE
30detergentoilwithanAPIserviceclassicationof
SJorhigher.
6.Wipeoffthedipstickendwithacleancloth.
7.Insertthedipstickintotheoil-lltube,butdonot
screwitin.
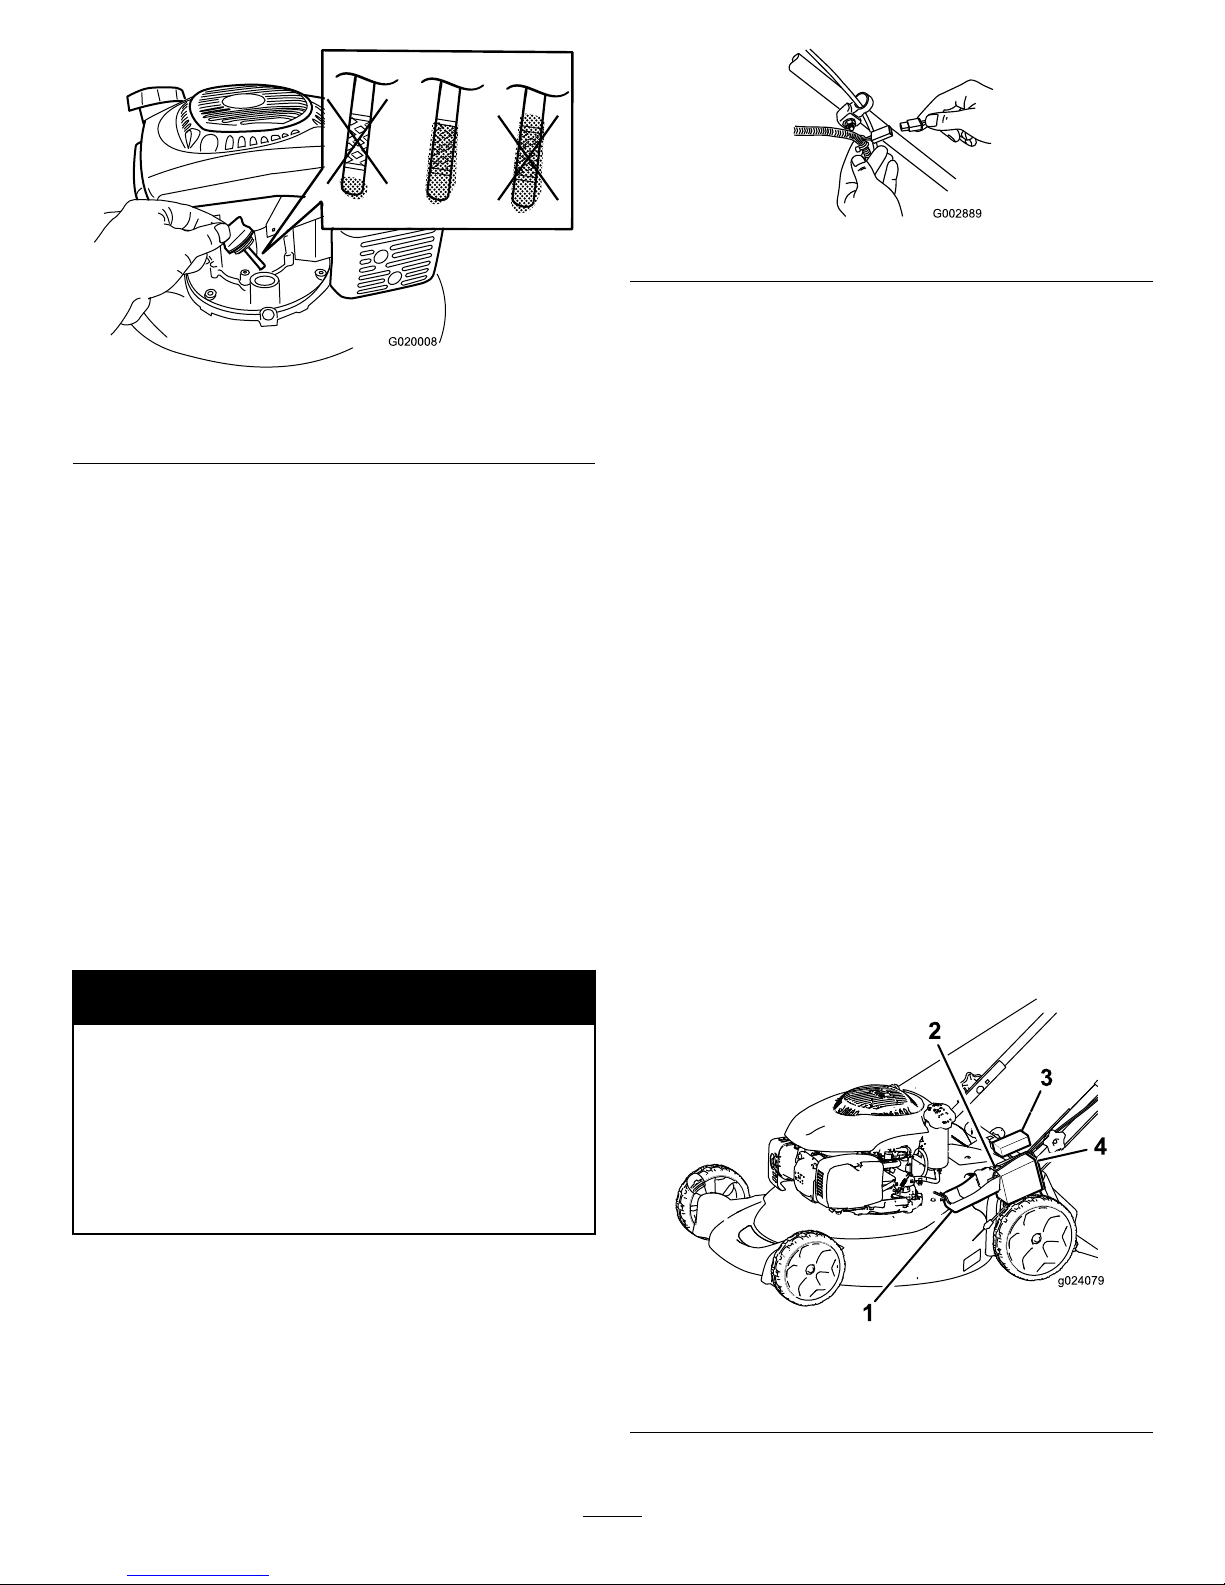
8.Removethedipstickandreadtheoillevelonthe
dipstick(Figure20).
13
Page 14
G020008
Figure20
Engineforelectric-startmodelsnotshown
•Iftheoillevelislow ,addasmallamountofoil
slowlytotheoil-lltube,andthenrepeatsteps
6through8untiltheoillevelonthedipstickis
correct.
•Iftheoillevelishigh,draintheexcessoiluntilthe
oillevelonthedipstickiscorrect.
Important:Iftheoillevelinthecrankcaseis
toolowortoohighandyouruntheengine,
youmaydamagetheengine.
9.Installthedipsticksecurely.
10.Recycletheusedoilproperly.
ChargingtheBattery
(Electric-startmodelsonly)
ServiceInterval:Every25hours
WARNING
CALIFORNIA
Proposition65Warning
Batteryposts,terminals,andrelated
accessoriescontainleadandleadcompounds,
chemicalsknowntotheStateofCalifornia
tocausecancerandreproductiveharm.
Washhandsafterhandling.
Chargethebatteryfor24hoursinitially ,thenmonthly(every
25starts)orasneeded.Alwaysusethechargerinasheltered
areaandchargethebatteryatroomtemperature(70°or22°
C)wheneverpossible.
1.Connectthechargertothewireharnesslocatedbelow
theignitionkey(Figure21).
Figure21
2.Plugthechargerintoawalloutlet.
Note:Whenthebatterynolongerholdsacharge,
recycleordisposeofthelead-acidbatteryaccording
tolocalcodes.
Note:Yourbatterychargermayhavea2-colorLEDdisplay
thatindicatesthefollowingstatesofcharging:
•Aredlightindicatesthatthechargerischargingthe
battery.
•Agreenlightindicatesthatthechargerisfullychargedor
thechargerisdisconnectedfromthebattery.
•Aashinglightthatalternatesbetweenredandgreen
indicatesthatthebatteryisnearlyfullycharged.Thisstate
lastsonlyafewminutesuntilthebatteryisfullycharged.
ReplacingtheFuse
(Electric-startmodelsonly)
Yourmachinecomeswithafusethatprotectstheelectric
starter.Ifthebatterydoesnotchargeortheenginedoesnot
runwiththeelectricstarter,thefusemaybeblown.Replace
itwitha40-ampplug-intypefuse.
Important:Youcannotstartthemachinewiththe
electricstarterorchargethebatteryunlessyouinstall
thefuse.
1.Unclipthebatterycoverandremoveit(Figure22).
Figure22
1.Batterycover3.Battery
2.Foam4.Fuseholder
2.Insertthefuseintothefuseholder(Figure23).
14
Page 15
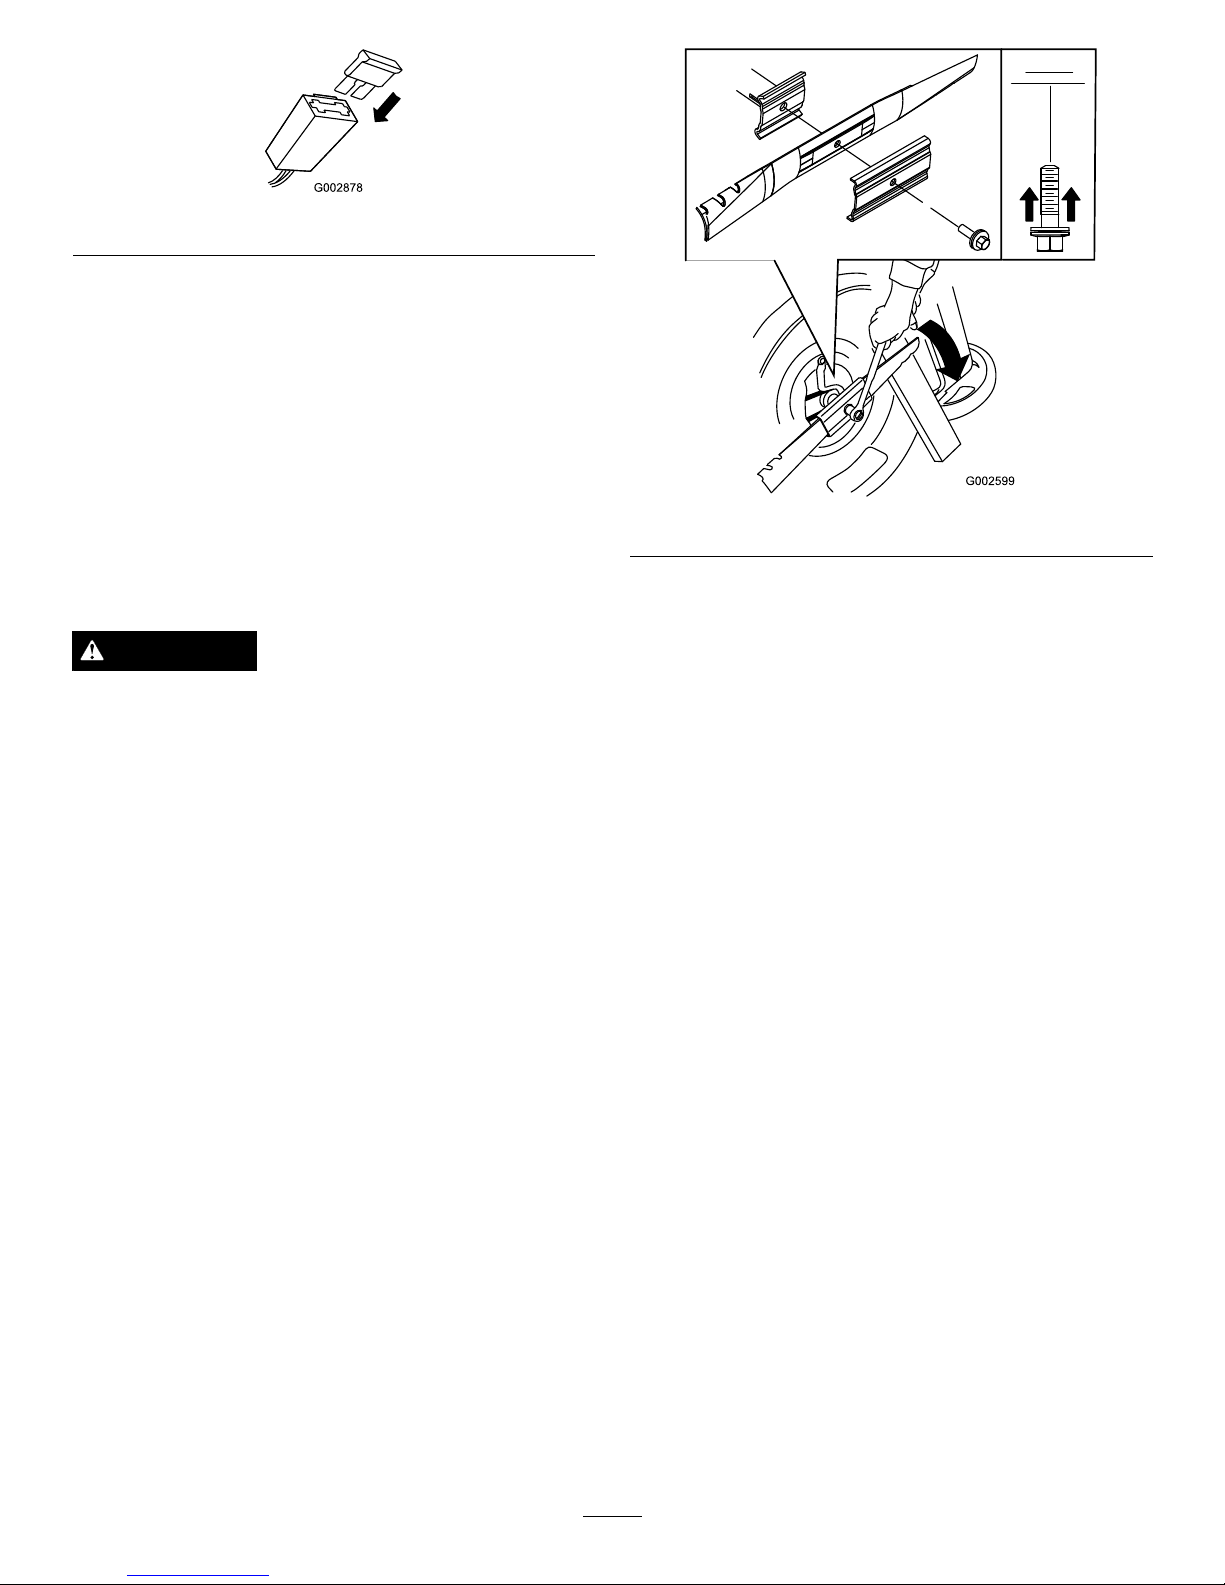
Figure23
3.Installthebatterycover.
ReplacingtheBlade
ServiceInterval:Yearly
Important:
Y ou will need a torque wr ench to install the
blade pr oper l y
.Ifyoudonothaveatorquewrenchor
areuncomfortableperformingthisprocedure,contact
anAuthorizedServiceDealer.
Examinethebladewheneveryourunoutofgasoline.Ifthe
bladeisdamagedorcracked,replaceitimmediately.Ifthe
bladeedgeisdullornicked,haveitsharpenedorreplaceit.
WARNING
Thebladeissharp;contactingthebladecanresult
inseriouspersonalinjury.
•Disconnectthewirefromthesparkplug .
•Weargloveswhenservicingtheblade.
1.Disconnectthespark-plugwirefromthesparkplug.
RefertoPreparingforMaintenance(page12).
2.Tipthemachineontoitsside,withtheairlterup.
3.Useablockofwoodtoholdthebladesteady.
4.Removetheblade(turnthebladebolt
counterclockwise),savingallthemounting
hardware.
5.Installthenewblade(turnthebladeboltclockwise)
andallmountinghardware(Figure24).
Figure24
Important:Positionthecurvedendsoftheblade
topointtowardthemachinehousing.
6.Useatorquewrenchtotightenthebladeboltto82
N-m(60ft-lb).
Important:Abolttorquedto82N-m(60ft-lb)is
verytight.Whileholdingthebladewithablock
ofwood,putyourweightbehindtheratchetor
wrenchandtightentheboltsecurely.Thisboltis
verydifculttoovertighten.
15
Page 16
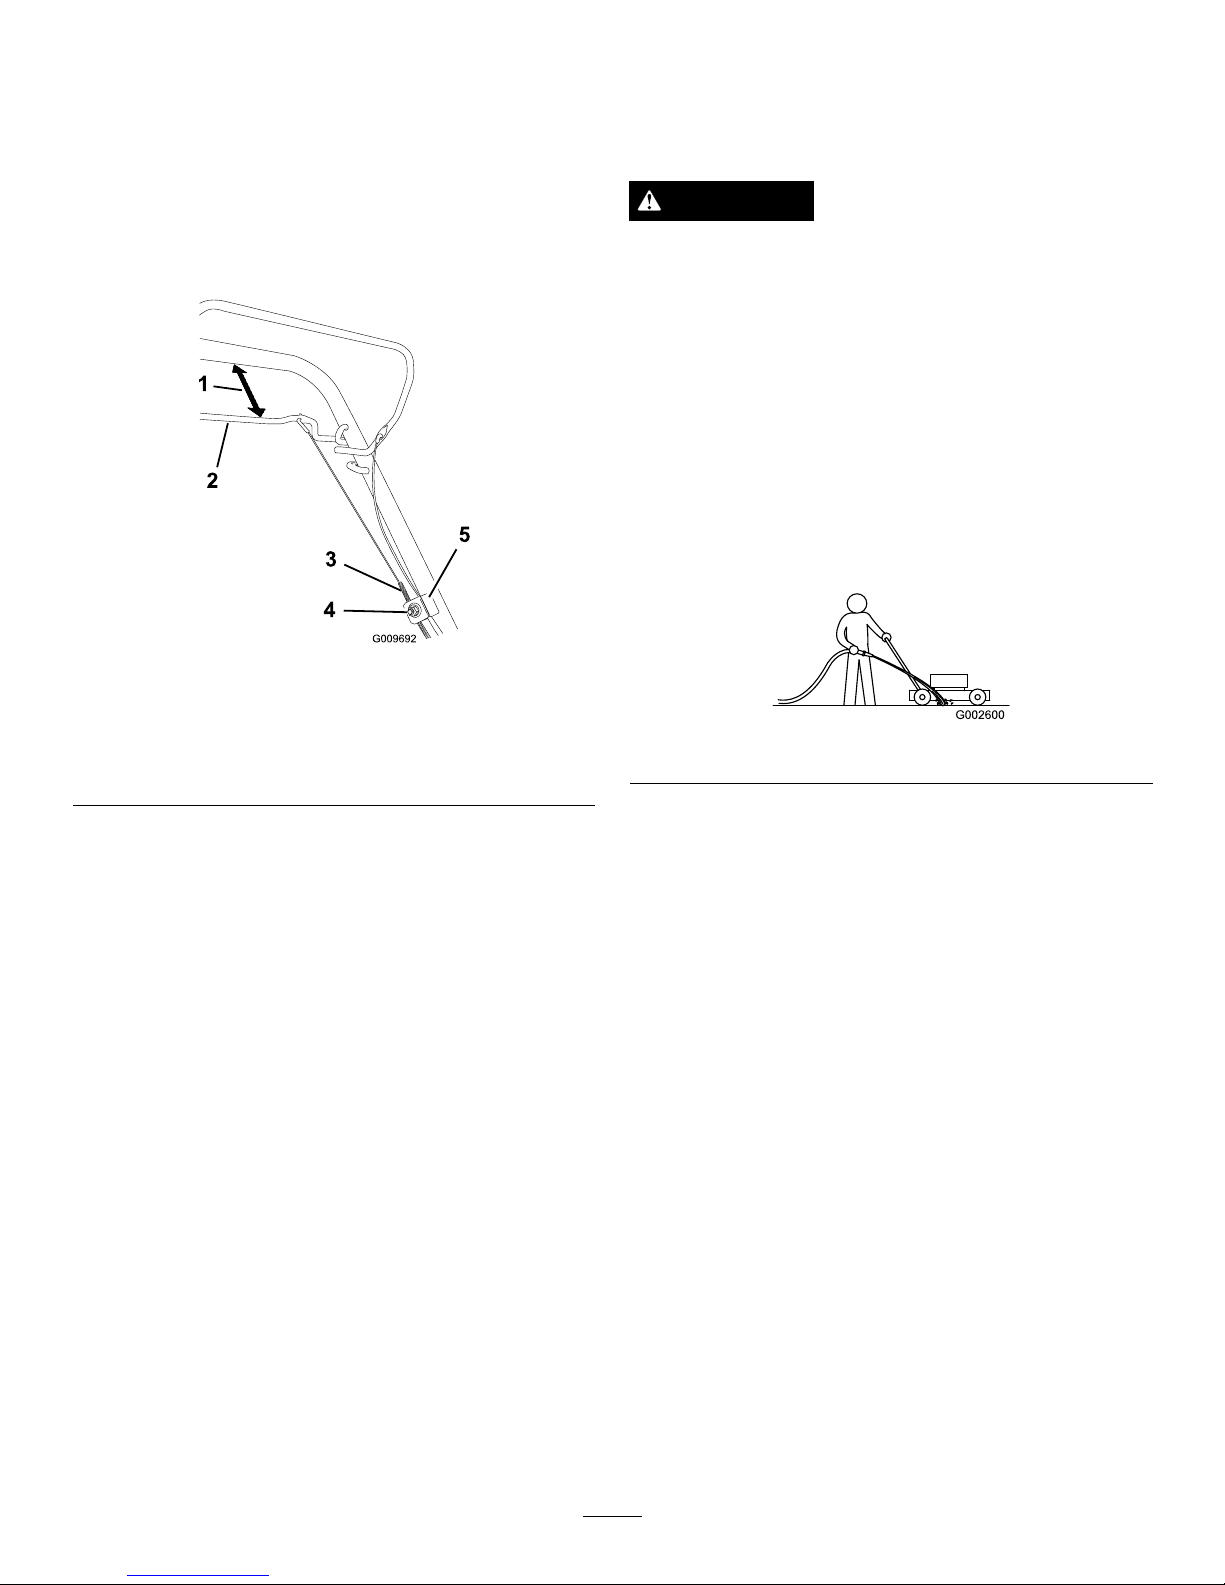
AdjustingtheSelf-propelDrive
Cable(Self-propelmodels
only)
Wheneveryouinstallanewself-propelcableorifthe
self-propeldriveisoutofadjustment,adjusttheself-propel
drivecable.
1.Loosenthecable-supportnut(Figure25).
Figure25
1.25to38mm(1to1-1/2
inches)
4.Cable-supportnut
2.Self-propeldrivebar5.Cablesupport
3.Cablejacket
2.Holdtheself-propelbail25to38mm(1to1-1/2
inches)fromthehandle(
Figure25).
3.Pulldownthecablejacket(towardthemachine)until
thereisnoslackinthecable(
Figure25).
4.Tightenthenutonthecablesupport.
5.Releasetheself-propeldrivebarandensurethatthe
cableisloose.
Note:Thecablemustbeloosewiththeself-propel
drivebarinthereleasedposition;otherwise,the
machinemaycreepwhenyoudisengagethebar.
CleaningtheUndersideofthe
Machine
ServiceInterval:Aftereachuse
WARNING
Themachinemaydislodgematerialfromunderthe
machinehousing.
•Weareyeprotection.
•Stayintheoperatingposition(behindthe
handle).
•Donotallowbystandersinthearea.
1.Withtheenginerunningonaatpavedsurface,spraya
streamofwaterinfrontoftherightrearwheel(
Figure
26).
Thewaterwillsplashintothepathoftheblade,
cleaningouttheclippings.
Figure26
2.Whennomoreclippingscomeout,stopthewaterand
movethemachinetoadryarea.
3.Runtheengineforafewminutestodrythehousing
topreventitfromrusting.
16
Page 17
Storage
Storethemachineinacool,clean,dryplace.
PreparingtheMachinefor
Storage
WARNING
Gasolinevaporscanexplode.
•Donotstoregasolinemorethan30days.
•Donotstorethemachineinanenclosurenear
anopename.
•Allowtheenginetocoolbeforestoringit.
1.Onthelastrefuelingoftheyear,addfuelstabilizerto
thefuelasdirectedbytheenginemanufacturer.
2.Runthemachineuntiltheenginestopsfromrunning
outoffuel.
3.Primetheengineandstartitagain.
4.Allowtheenginetorununtilitstops.Whenyoucan
nolongerstarttheengine,itissufcientlydry.
5.Disconnectthewirefromthesparkplug.
6.Removethesparkplug,add30ml(1oz)ofoilthrough
thesparkplughole,andpullthestarterropeslowly
severaltimestodistributeoilthroughoutthecylinder
topreventcylindercorrosionduringtheoff-season.
7.Installthesparkplugandtightenitwithatorque
wrenchto20N-m(15ft-lb).
8.Tightenallnuts,bolts,andscrews.
9.Chargethebatteryfor24hours,thenunplugthe
batterychargeranstorethemachineinanunheated
area.Ifyoumuststorethemachineinaheatedarea,
youmustchargethebatteryevery90days(electric-start
modelsonly).
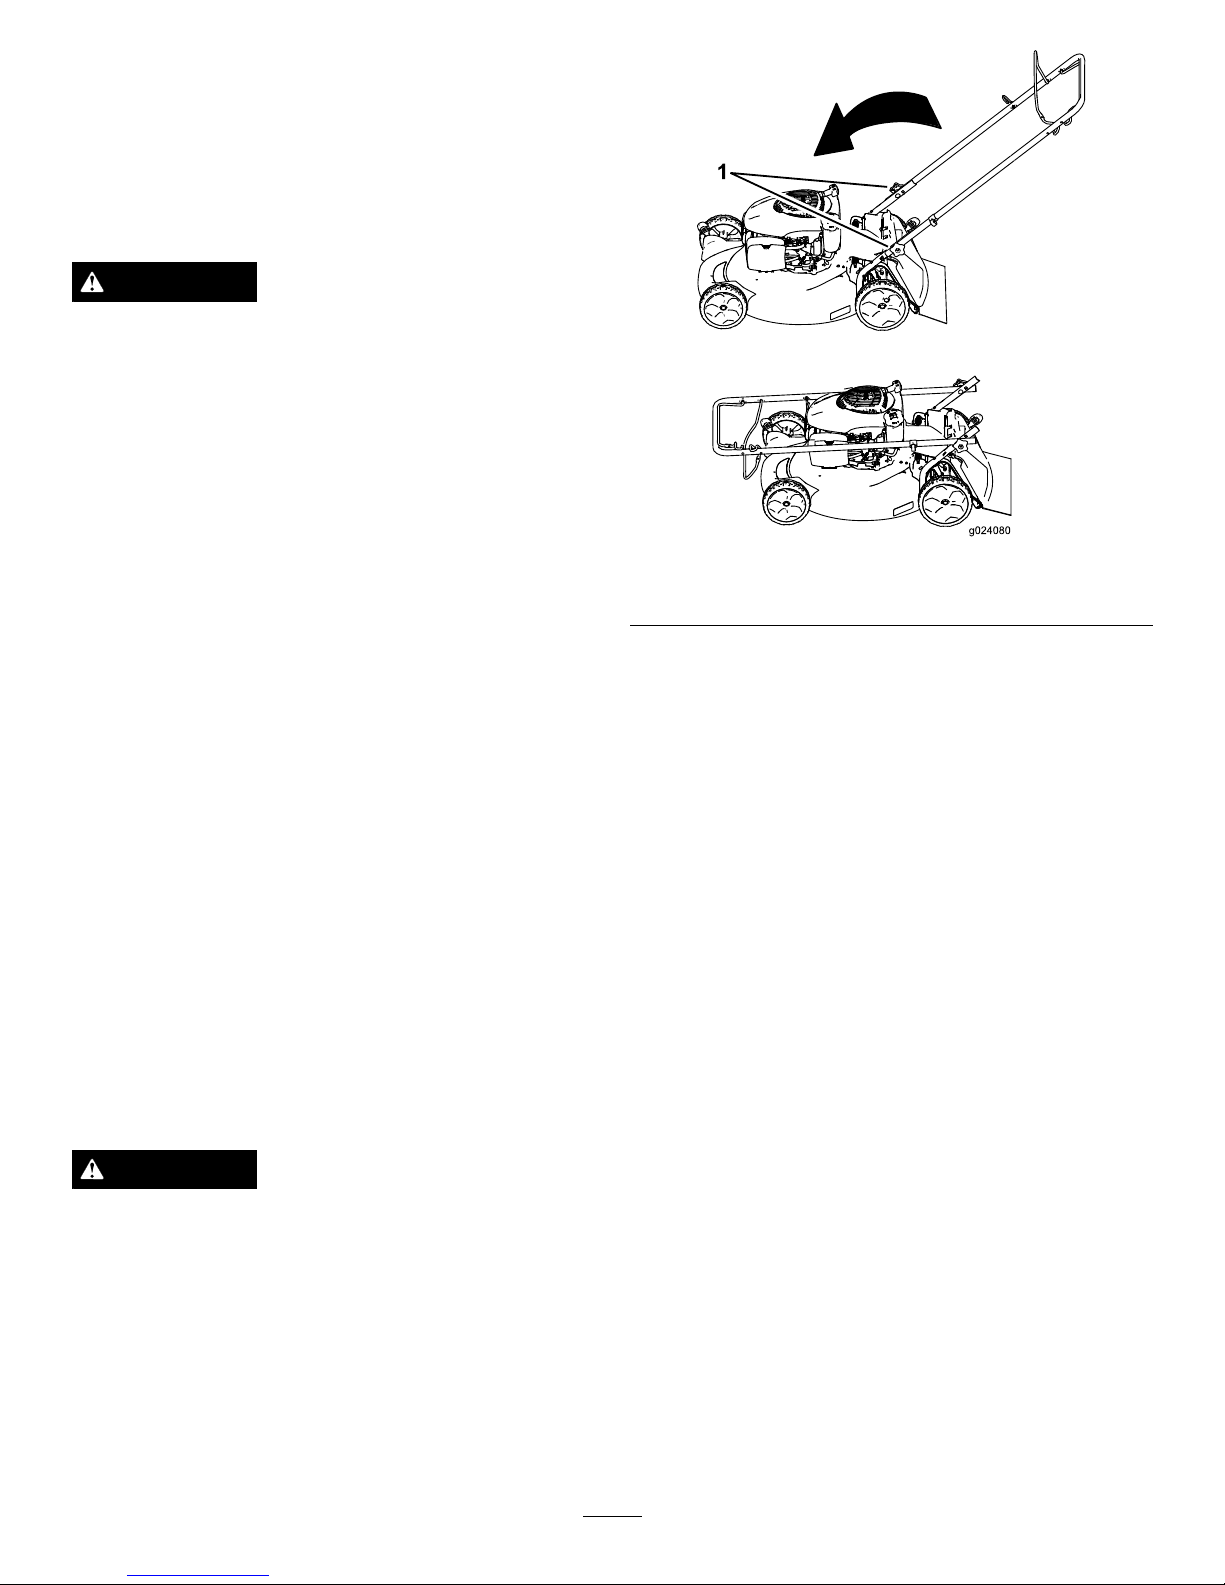
FoldingtheHandle
WARNING
Foldingorunfoldingthehandleimproperlycan
damagethecables,causinganunsafeoperating
condition.
•Donotdamagethecableswhenfoldingor
unfoldingthehandle.
•Ifacableisdamaged,contactanAuthorized
ServiceDealer.
1.Loosenthehandleknobsuntilyoucanmovethe
handlefreely(
Figure27).
Figure27
1.Handleknob(2)
2.MovethehandleforwardasshowninFigure27.
RemovingtheMachinefrom
Storage
1.Removethesparkplugandspintheenginerapidlyby
pullingtherecoil-starthandletoblowtheexcessoil
fromthecylinder.
2.Installthesparkplugandtightenitwithatorque
wrenchto20N-m(15ft-lb).
3.Chargethebatteryfor24hours(electric-startmodels
only).
4.Connectthewiretothesparkplug.
17
Page 18

Notes:
18
Page 19

Notes:
19
Page 20

TheLawn-BoyNo-WorryWarranty
21in.Mulching/RearBagging
A2-Y earFullWarranty(45DayLimitedWarrantyforCommercialUse)
WalkPowerMowers
TheLawn-BoyTrueStartCommitment
A3-YearFullWarranty(NotApplicableforCommercialUse)
ConditionsandProductsCovered
Lawn-BoyInc.anditsafliate,Lawn-BoyWarrantyCompany ,pursuant
toanagreementbetweenthem,jointlypromisetorepairtheLawn-Boy
Productlistedbelowifusedforresidentialpurposes*;ifitisdefectivein
materialsorworkmanshiporifitstopsfunctioningduetothefailureof
acomponent;oriftheLawn-BoyTrueStartenginewillnotstartonthe
rstorsecondpull,providedtheroutinemaintenancerequiredinthe
Operator'sManualhavebeenperformed.
Thiswarrantycoversthecostofpartsandlabor ,butyoumustpay
transportationcosts.
Thefollowingtimeperiodsapplyfromthedateofpurchase:
ProductsWarrantyPeriod
21in.Mulching/RearBagging
MowersandAttachments
2-yearfullwarranty
TrueStartCommitment3-yearfullwarranty
Engine
3-yearfullwarranty
Battery
1-yearfullwarranty
WearItems(Belts,blades,blade
adaptors,grassbags,cables,and
wheels)
90days
LimitedWarrantyforCommercialUse*
Gas-poweredLawn-BoyProductsusedforcommercial,institutional,or
rentaluse,arewarrantedfor45daysagainstdefectsinmaterialsor
workmanship.Componentsfailingduetonormalweararenotcovered
bythiswarranty.
TheTrueStartCommitmentdoesnotapplywhentheproductisused
commercially*.
InstructionsforObtainingWarrantyService
IfyouthinkthatyourLawn-BoyProductcontainsadefectinmaterialsor
workmanship,orifanormal,able-bodiedadultcannolongerstartyour
product'sengineinoneortwopulls,followthisprocedure:
1.ContactanyAuthorizedLawn-BoyServiceDealertoarrangeservice
attheirdealership.T olocateadealerconvenienttoyou,referto
theYellowPagesofyourtelephonedirectory(lookunder“Lawn
Mowers”)oraccessourwebsiteatwww .Lawn-Boy .com.Youmay
alsocallthenumberslistedinitem#3tousethe24-hourLawn-Boy
Dealerlocatorsystem.
2.Bringtheproductandyourproofofpurchase(salesreceipt)tothe
ServiceDealer.Thedealerwilldiagnosetheproblemanddetermine
ifitiscoveredunderwarranty.
3.IfforanyreasonyouaredissatisedwiththeServiceDealer’s
analysisorwiththeassistanceprovided,contactusat:
CustomerCareDepartment
Lawn-BoyInc.
811 1LyndaleAvenueSouth
Bloomington,MN55420-1196
Tollfreeat866-216-6032(U.S.customers)
Tollfreeat866-216-6031(Canadiancustomers)
OwnerResponsibilities
YoumustmaintainyourLawn-BoyProductbyfollowingthemaintenance
proceduresdescribedintheOperator'sManual.Suchroutine
maintenance,whetherperformedbyadealerorbyyou,isatyourexpense.
ItemsandConditionsNotCovered
Thereisnootherexpresswarrantyexceptforspecialemissionsystem
coverageandenginewarrantycoverageonsomeproducts.Thisexpress
warrantydoesnotcoverthefollowing:
•Costofregularmaintenanceserviceorparts,suchaslters,fuel,
lubricants,oilchanges,sparkplugs,airltersbladesharpening
orwornblades,cable/linkageadjustments,orbrakeandclutch
adjustments
•Componentsfailingduetonormalwear
•Anyproductorpartwhichhasbeenalteredormisusedorneglected
andrequiresreplacementorrepairduetoaccidentsorlackofproper
maintenance
•Pickupanddeliverycharges
•RepairsorattemptedrepairsbyanyoneotherthananAuthorized
Lawn-BoyServiceDealer
•Repairsnecessaryduetofailuretofollowrecommendedfuel
procedure(consultOperator'sManualformoredetails)
–Removingcontaminantsfromthefuelsystemisnotcovered
–Useofoldfuel(morethanonemonthold)orfuelwhichcontains
morethan10%ethanolormorethat15%MTBE
–Failuretodrainthefuelsystempriortoanyperiodofnon-use
overonemonth
•Repairsoradjustmentstocorrectstartingdifcultiesduetothe
following:
–Failuretofollowpropermaintenanceproceduresor
recommendedfuelprocedure
–Rotarymowerbladestrikinganobject
•Specialoperationalconditionswherestartingmayrequiremorethan
twopulls:
–Firsttimestartsafterextendedperiodofnon-useoverthree
monthsorseasonalstorage
–Cooltemperaturestartssuchasthosefoundinearlyspringand
lateautumn
–Improperstartingprocedures-ifyouarehavingdifcultystarting
yourunit,pleasechecktheOperator'sManualtoensurethat
youareusingthecorrectstartingprocedures.Thiscansavean
unnecessaryvisittoanAuthorizedLawn-BoyServiceDealer .
GeneralConditions
Allrepairscoveredbythesewarrantiesmustbeperformedbyan
AuthorizedLawn-BoyServiceDealerusingLawn-Boy-approved
replacementparts.RepairbyanAuthorizedLawn-BoyServiceDealeris
yoursoleremedyunderthiswarranty.
Lawn-BoyInc.norLawn-BoyWarrantyCompanyisliableforindirect,
incidental,orconsequentialdamagesinconnectionwiththeuseof
theLawn-BoyProductscoveredbythesewarranties,includingany
costorexpenseofprovidingsubstituteequipmentorserviceduring
reasonableperiodsofmalfunctionornon-usependingcompletionof
repairsunderthesewarranties.
Somestatesdonotallowexclusionsofincidentalorconsequential
damages,sotheaboveexclusionsmaynotapplytoyou.
Thiswarrantygivesyouspeciclegalrights,andyoumayalsohaveother
rightswhichvaryfromstatetostate.
CountriesOtherthantheUnitedStatesorCanada
CustomerswhohavepurchasedLawn-BoyproductsexportedfromtheUnitedStatesorCanadashouldcontacttheirLawn-BoyDistributor(Dealer)
toobtainguaranteepoliciesforyourcountry,province,orstate.IfforanyreasonyouaredissatisedwithyourDistributor'sserviceorhavedifculty
obtainingguaranteeinformation,contacttheLawn-Boyimporter .Ifallotherremediesfail,youmaycontactusatLawn-BoyW arrantyCompany.
AustralianConsumerLaw:AustraliancustomerswillnddetailsrelatingtotheAustralianConsumerLaweitherinsidetheboxoratyourlocal
Lawn-BoyDealer.
*Residentialpurposesmeansuseoftheproductonthesamelotasyourhome.Useatmorethanonelocation,orinstitutionalorrentaluse,isconsidered
commercialuseandthecommercialusewarrantywouldapply.
374-0256RevF
 Loading...