

Lawn-Boy 10797 Operator's Manual

Insight® Platinum Lawn Mower
Model No. 10797 —Serial No. 270000001 and Up
Operator's Manual
Introduction
R ead this infor mation carefully to lear n ho w to operate and
maintain y our product properly and to a v oid injur y and
product damag e . Y ou are responsible for operating the
product properly and safely .
Form No. 3358-257 Rev A
Warning
CALIFORNIA
Pr oposition 65 W ar ning
T he engine exhaust fr om this pr oduct contains
chemicals kno wn to the State of Calif or nia to cause
cancer , bir th defects, or other r epr oducti v e har m.
Y ou ma y contact La wn-Bo y directly at www .La wn-Bo y .com
for product and accessor y infor mation, help finding a
dealer , or to register y our product.
W henev er y ou need ser vice , g en uine La wn-Bo y par ts , or
additional infor mation, contact an A uthorized Ser vice
Dealer or La wn-Bo y Customer Ser vice and ha v e the
model and serial n umbers of y our product ready . Figure 1
identifies the location of the model and serial n umbers on
the product. W rite the n umbers in the space pro vided.
Figure 1
1. Model and serial number plate
Model No.
Serial No.
T his man ual identifies potential hazards and has safety
messag es identified b y the safety aler t symbol ( Figure 2 ),
whic h signals a hazard that ma y cause serious injur y or
death if y ou do not follo w the recommended precautions .
Important: T his engine is not equipped with a
spar k ar r ester muf fler . It is a violation of Calif or nia
Public R esource Code Section 4442 to use or operate
the engine on an y f or est-co v er ed, br ush-co v er ed, or
g rass-co v er ed land. Other states or federal ar eas may
ha v e similar la ws.
T his spark ignition system complies with Canadian
ICES-002
T he enclosed Engine Owner’ s Man ual is supplied
f or inf or mation r egarding the US En vir onmental
Pr otection Agency (EP A) and the Calif or nia Emission
Contr ol R egulation of emission systems, maintenance,
and w ar ranty . R eplacements may be order ed thr ough
the engine man uf actur er .
F or models with stated engine horse po w er , the g ross
horse po w er of the engine w as laborator y rated b y the engine
man ufacturer in accordance with SAE J1940. As configured
to meet safety , emission, and operating requirements , the
actual engine horse po w er on this class of la wn mo w er will
be significantly lo w er .
Do not tamper with the engine controls or alter the
g o v er nor speed; doing so ma y create an unsafe condition
resulting in personal injur y .
Safety
Figure 2
1. Safety alert symbol
T his man ual uses tw o w ords to highlight infor mation.
Impor tant calls attention to special mec hanical infor mation
and Note emphasizes g eneral infor mation w or th y of special
attention.
© 2007—Lawn-Boy® Inc.
8111 Lyndale Avenue South
Bloomington, MN 55420
T his la wn mo w er meets or ex ceeds the CPSC blade safety
requirements for w alk-behind rotar y la wn mo w ers and the
B71.1 specifications of the American National Standards
Institute in effect at the time of production.
R ead and under stand the contents of this man ual
bef or e y ou star t the engine.
T he safety aler t symbol ( Figure 2 ) is used to aler t y ou to
potential personal injur y hazards . Obey all safety messag es
that follo w this symbol to a v oid possible injur y or death.
Improperly using or maintaining this mo w er could result in
Register at www.Lawn-Boy.com. Original Instructions (EN)
Printed in the USA.
All Rights Reserved

injur y or death. T o reduce this potential, comply with the
follo wing safety instr uctions .
T he follo wing instr uctions ha v e been adapted from the
ANSI/OPEI standard B71.1-2003.
• Alw a ys w ear eye protection when operating mac hine .
• See man ufacturer’ s instr uctions for proper operation
and installation of accessories . Only use accessories
appro v ed b y the man ufacturer .
T his cutting machine is capa ble of amputating hands
and feet and of thr o wing objects. F ailur e to obser v e
the f ollo wing safety instr uctions could r esult in serious
injur y or death.
General Operation
• R ead, understand, and follo w all instr uctions on the
mac hine and in the man ual(s) before star ting .
• Do not put hands or feet near or under the mac hine .
K ee p clear of the disc harg e opening at all times .
• Only allo w responsible adults , who are familiar with the
instr uctions , to operate this mac hine .
• Clear the area of objects suc h as roc ks , wire , to ys , etc .,
whic h could be thro wn b y the blade . Sta y behind the
handle when the engine is r unning .
• Be sure the area is clear of b ystanders before operating .
Stop mac hine if any one enters the area.
• Do not operate mac hine barefooted or while w earing
sandals . Alw a ys w ear substantial footw ear .
• Do not pull mac hine bac kw ard unless absolutely
necessar y . Alw a ys look do wn and behind before and
while mo ving bac kw ard.
• Nev er direct disc harg ed material to w ard any one . A v oid
disc harging material ag ainst a w all or obstr uction.
Material ma y ricoc het bac k to w ard the operator . Stop
the blade when crossing g ra v el surfaces .
• Do not operate mac hine without the entire g rass
catc her , disc harg e guard, rear guard, or other safety
protecti v e devices in place and w orking .
Slope Operation
Slopes are a major factor related to slip and fall accidents ,
whic h can result in sev ere injur y . Operation on all slopes
require extra caution. If y ou feel uneasy on a slope , do
not mo w it.
• Mo w across the face of slopes; nev er up and do wn.
Ex ercise extreme caution when c hanging direction on
slopes .
• W atc h for holes , r uts , bumps , roc ks , or other hidden
objects . Unev en ter rain could cause a slip and fall
accident. T all g rass can hide obstacles .
• Do not mo w on w et g rass or ex cessi v ely stee p slopes .
P oor footing could cause a slip and fall accident.
• Do not mo w near drop-offs , ditc hes , or embankments .
Y ou could lose y our footing or balance .
Children
T ragic accidents can occur if the operator is not aler t to
the presence of c hildren. Children are often attracted to
the mac hine and the mo wing acti vity . Nev er assume that
c hildren will remain where y ou last sa w them.
• K ee p c hildren out of the mo wing area and under the
w atc hful care of a responsible adult other than the
operator .
• Be aler t and tur n mo w er off if a c hild enters the area.
• Nev er allo w c hildren to operate the mac hine .
• Use extra care when approac hing blind cor ners , shr ubs ,
trees , or other objects that ma y bloc k y our view of a
c hild.
• Nev er lea v e a r unning mac hine unattended.
• Stop the engine and w ait until the blade comes to a
complete stop before cleaning the mac hine , remo ving
g rass catc her , or unclog ging the disc harg e guard.
• Operate mac hine only in da ylight or g ood ar tificial light.
• Do not operate mac hine while under the influence of
alcohol or dr ugs .
• Nev er operate mo w er in w et g rass . Alw a ys be sure of
y our footing; w alk; nev er r un.
• Diseng ag e the dri v e system, if so equipped, before
star ting the engine .
• If the mac hine should star t to vibrate abnor mally ,
stop the engine and c hec k for the cause immediately .
Vibration is g enerally a w ar ning of trouble .
Service
Safe Handling of Gasoline
T o a v oid per sonal injur y or pr oper ty dama ge, use
extr eme car e in handling gasoline. Gasoline is
extr emel y flamma ble and the v apor s ar e explosi v e.
• Extinguish all cig arettes , cig ars , pipes , and other sources
of ignition.
• Use only an appro v ed g asoline container .
• Nev er remo v e g as cap or add fuel with the engine
r unning . Allo w engine to cool before refueling .
• Nev er refuel the mac hine indoors .
• Nev er store the mac hine or fuel container where there
is an open flame , spark, or pilot light suc h as on a w ater
heater or on other appliances .
2
• Nev er fill containers inside a v ehicle or on a tr uc k or
trailer bed with a plastic liner . Alw a ys place containers
on the g round a w a y from y our v ehicle before filling .
• R emo v e g as-po w ered equipment from the tr uc k or
trailer and refuel it on the g round. If this is not possible ,
then refuel suc h equipment with a por table container ,
rather than from a g asoline dispenser nozzle .
• K ee p the nozzle in contact with the rim of the fuel
tank or container opening at all times until fueling is
complete . Do not use a nozzle loc k-open device .
• If fuel is spilled on clothing, c hang e clothing
immediately .
• Nev er o v erfill fuel tank. R e place g as cap and tighten
securely .
Exhaust contains carbon mono xide, an odor less,
deadl y poison that can kill y ou.
Do not r un the engine indoor s or in an enclosed ar ea.
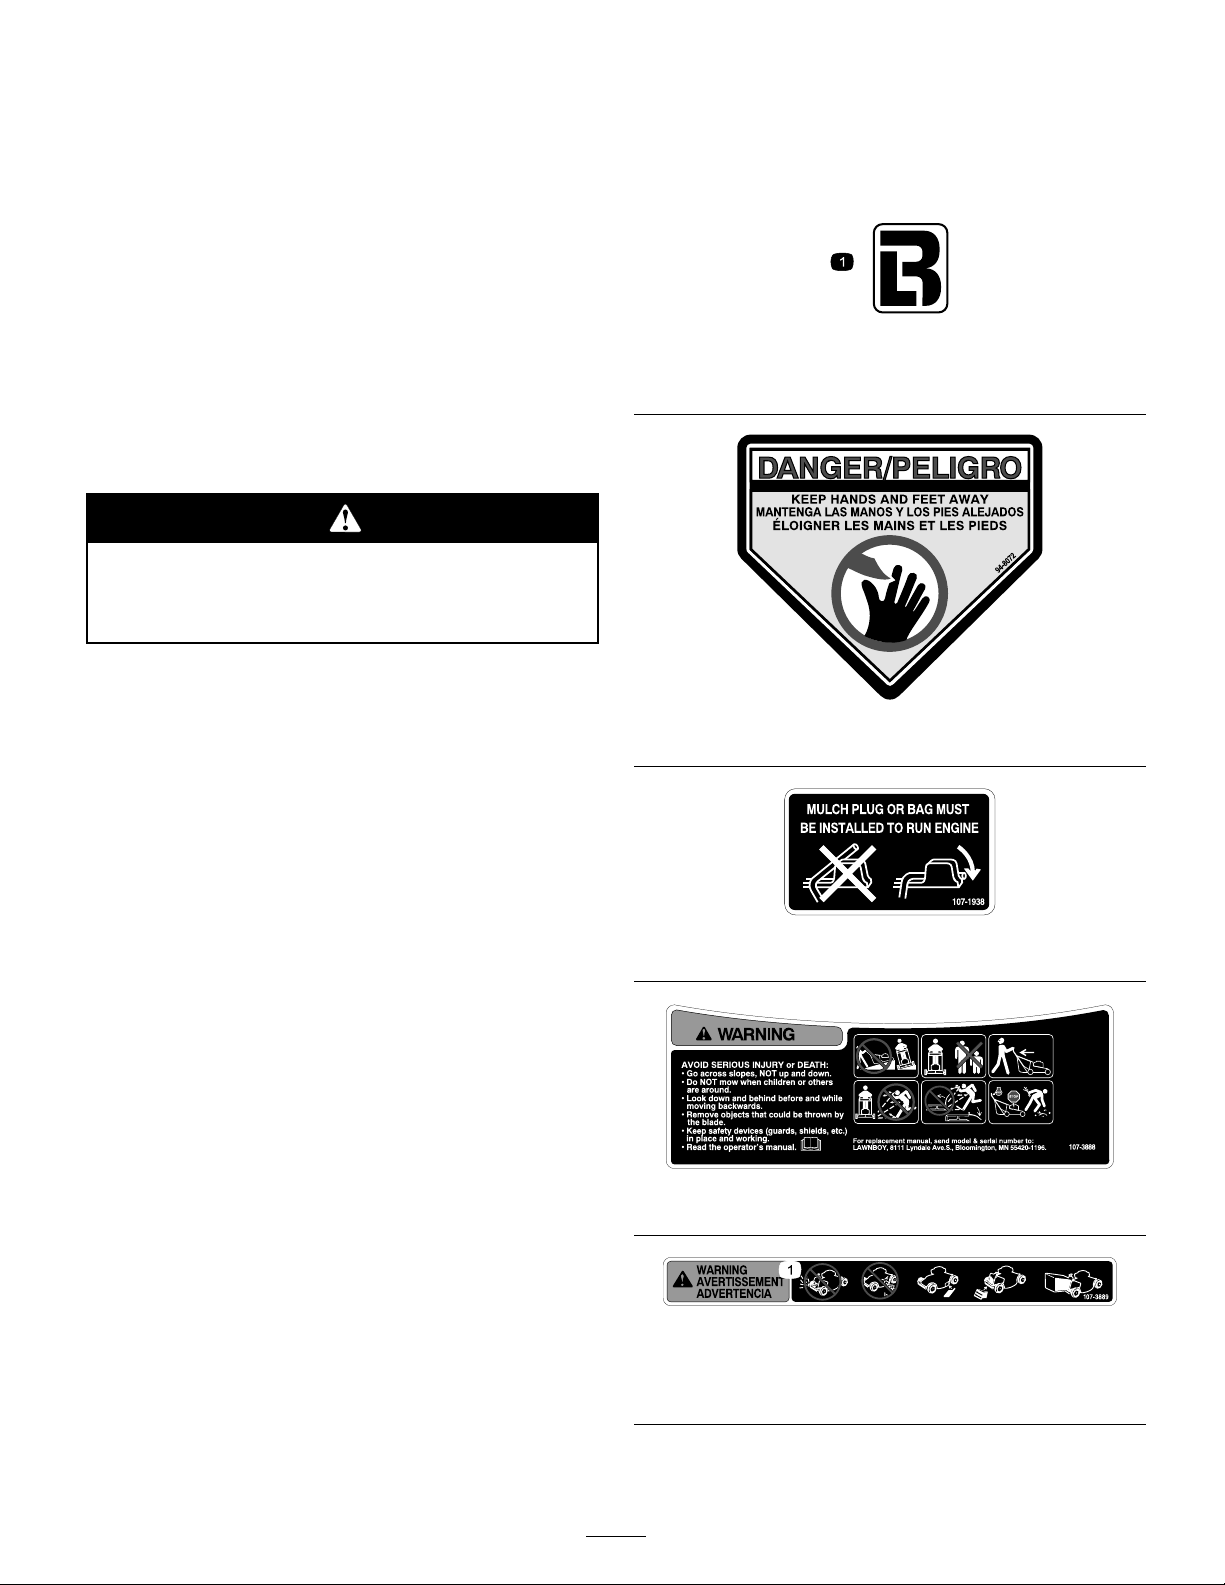
Safety and Instructional Decals
Important: Safety and instr uction decals ar e located
near ar eas of potential danger . R eplace dama ged
decals.
Manufacturer’s Mark
1. Indicates the blade is identied as a part from the original machine
manufacturer.
General Service
• Nev er operate mac hine in a closed area.
• K ee p all n uts and bolts tight to be sure the equipment is
in safe w orking condition.
• Nev er tamper with safety devices . Chec k their proper
operation regularly .
• K ee p mac hine free of g rass , lea v es , or other debris
build-up . Clean up oil or fuel spillag e and remo v e
any fuel-soak ed debris . Allo w mac hine to cool before
storing .
• If y ou strik e a foreign object, stop and inspect the
mac hine . R e pair , if necessar y , before star ting .
• Nev er mak e any adjustments or re pairs with the engine
r unning . Disconnect the spark plug wire and g round
ag ainst engine to prev ent unintended star ting .
• Chec k g rass catc her components and the disc harg e
guard frequently and re place with man ufacturer’ s
recommended par ts , when necessar y .
• Mo w er blades are shar p . W rap the blade or w ear glo v es ,
and use extra caution when ser vicing them.
94-8072
107-1938
107-3888
• Do not c hang e the engine g o v er nor setting or o v erspeed
the engine .
• Maintain or re place safety and instr uction labels , as
necessar y .
107-3889
1. Do not operate the mower without the rear discharge plug or bag
in place; do not operate the mower without the side discharge
cover or deector in place.
3
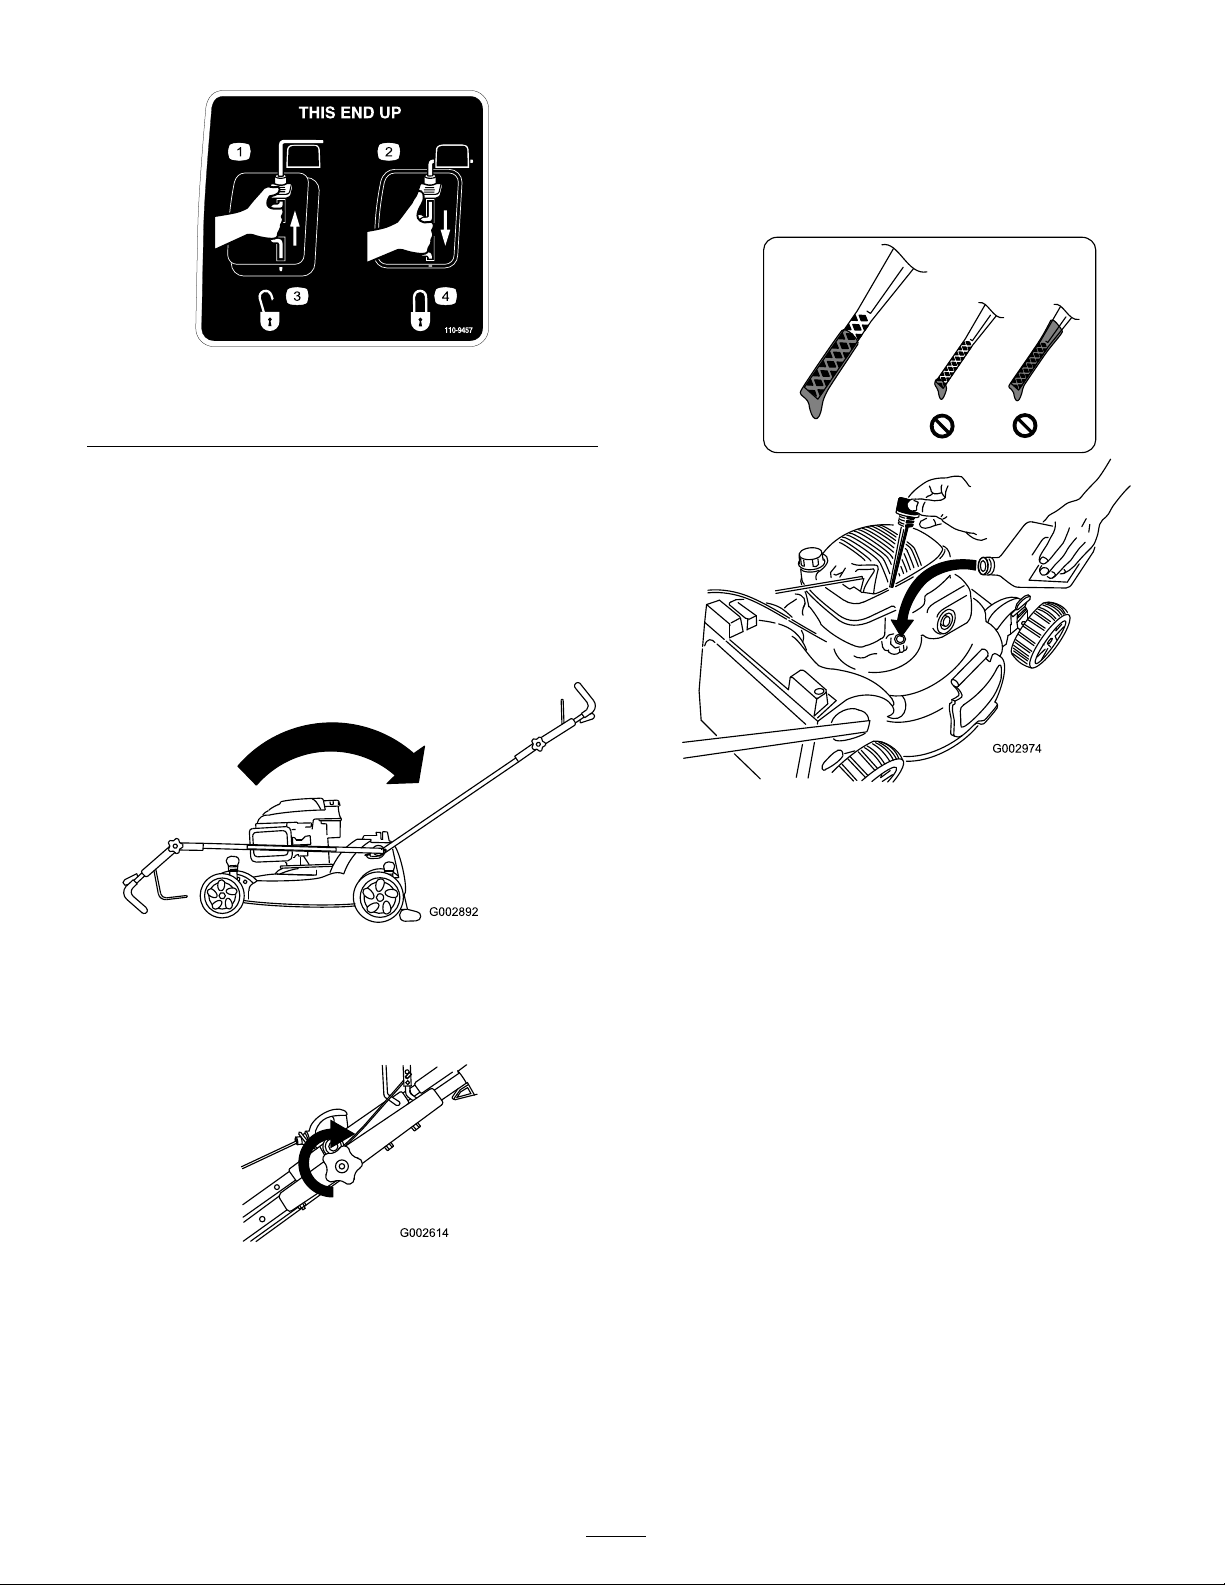
110-9457
1. Engine switch Off 3. Unlocked
2. Engine switch On 4. Locked
Setup
1. Unfolding the Handle
1. Mo v e the handle rearw ard and hold the upper handle in
place ( Figure 3 ).
2. Filling the Engine with Oil
Important: Y our mo w er does not come with oil in
the engine.
1. R emo v e the dipstic k ( Figure 5 ).
Figure 3
Note: T he handle will clic k into position.
2. Tighten the upper handle knob as tight as y ou can
( Figure 4 ).
Figure 4
Figure 5
2. Slo wl y pour oil into the oil fill tube , periodically
c hec king the lev el with the dipstic k, until the dipstic k
indicates that the engine is full as illustrated in Figure
5 . Do not o v erfill. (Max. fill: 0.58 quar t (0.55 l),
type: SAE 30W detergent oil with an API ser vice
classification of SH, SJ , SL, or higher .)
Note: Eac h time y ou c hec k the oil lev el, remo v e the
dipstic k and wipe it clean, inser t it into the oil filler nec k
(but do not screw it in), then remo v e it ag ain and c hec k
the lev el ( Figure 5 ).
Note: If y ou o v erfill the engine , pour some oil out of
it as directed in Changing the Engine Oil.
3. Install the dipstic k securely .
Important: Change the engine oil after the fir st 5
operating hour s ; change it y ear l y ther eafter . R efer
to Changing the Engine Oil.
4
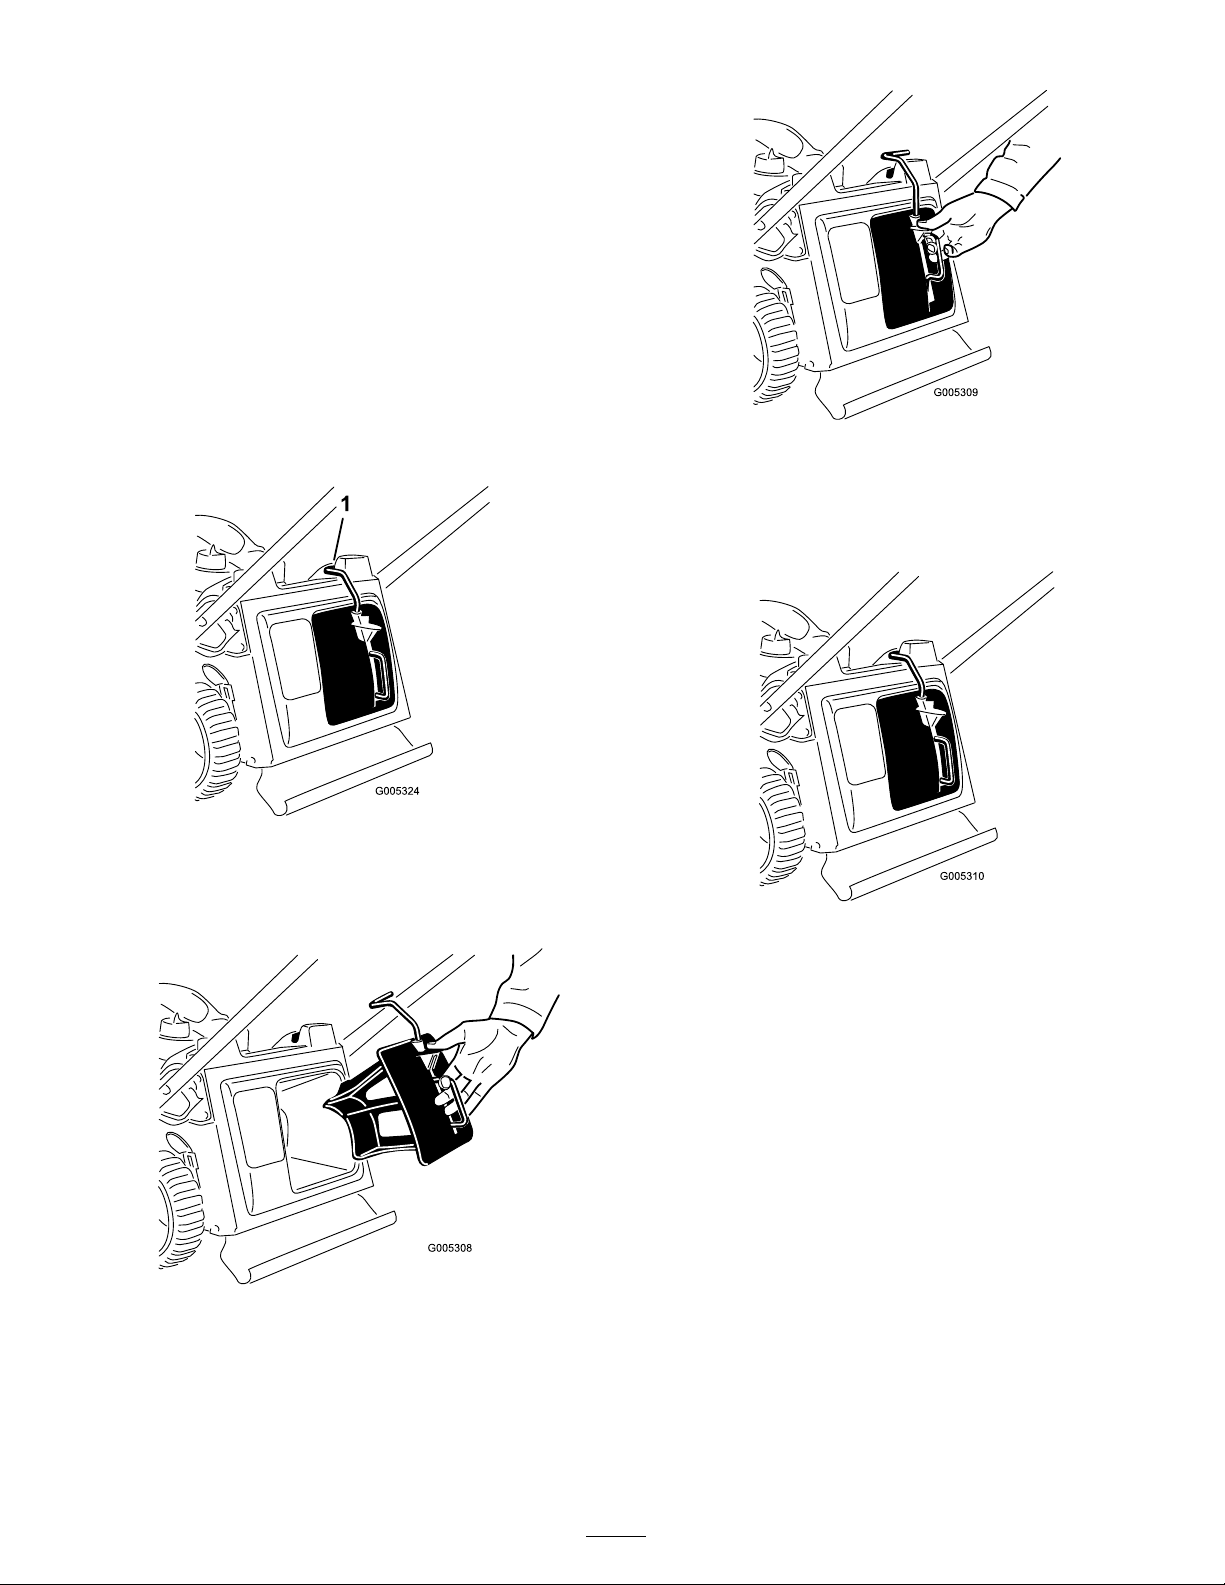
3. Install the Mulch Plug or
Grass Bag
Y ou m ust cor rectly install the m ulc h plug (for m ulc hing or
side-disc harging) or g rass bag (for bag ging) or the engine
will not star t .
T he mo w er has a safety switc h, located at the bottom of a
c hannel on the top , right rear of the mo w er , that prev ents
the mo w er from operating without a m ulc h plug or g rass
bag . T his prev ents the mo w er from thro wing debris at the
operator through the rear c hute .
F or the switc h to detect the presence of the m ulc h plug, the
top of the m ulc h plug lev er m ust lie full y in the bottom
of the channel ( Figure 6 ).
Figure 8
3. R elease the button on the lev er and ensure that the top
of the lev er is lies fully in the switc h c hannel ( Figure 9 ).
If the top of the lev er is not in the s witch channel,
y our mo w er will not star t!
Figure 6
1. Top of mulch plug lever in switch channel
1. Inser t the m ulc h plug into the mo w er , if it isn ’ t already
installed ( Figure 7 ).
Figure 7
2. Squeeze the button on the lev er with y our thumb and
fully inser t the m ulc h plug into the opening ( Figure 8 ).
Figure 9
Note: If the lev er does not latc h properly , disconnect
the wire from the spark plug and c hec k for and remo v e
any debris buildup in the tunnel.
5
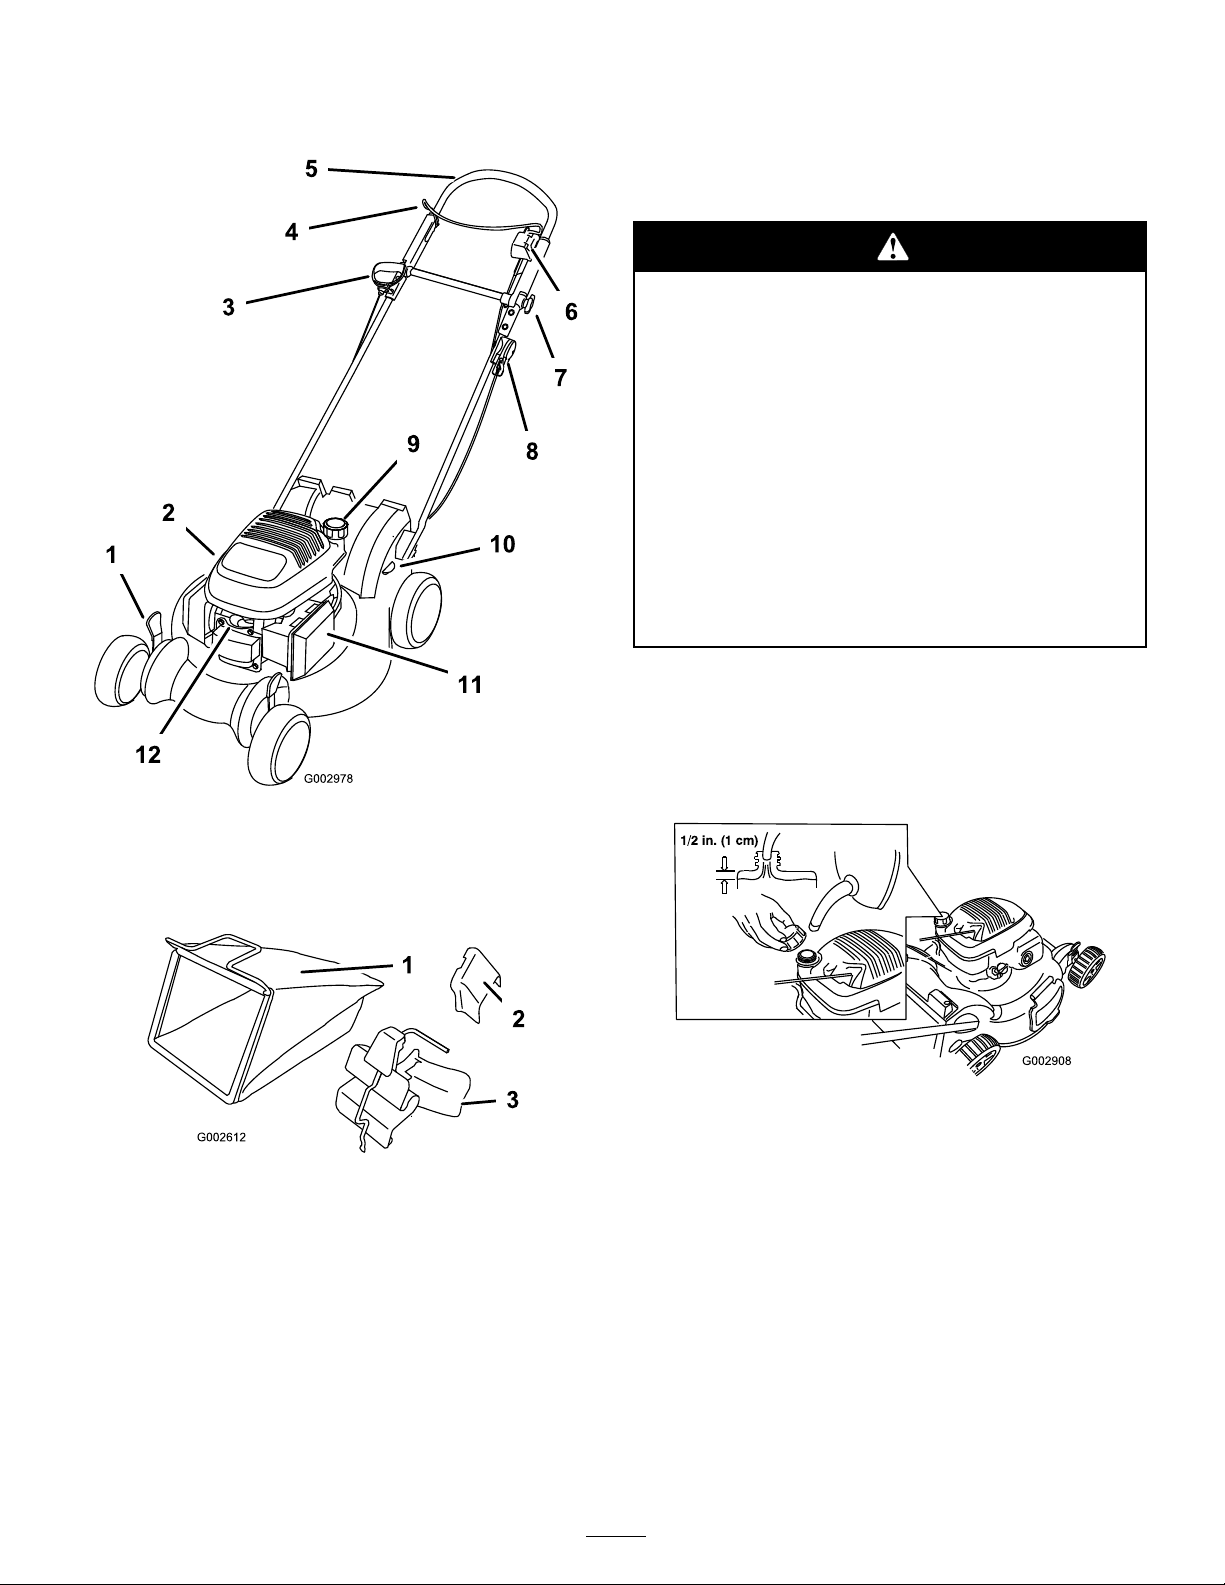
Product Overview
Operation
Filling the Fuel Tank
Gasoline is extr emel y flamma ble and explosi v e. A
fir e or explosion fr om gasoline can bur n y ou and
other s.
• T o pr ev ent a static charge fr om igniting the
gasoline, place the container and/or mo w er
dir ectl y on the g r ound bef or e filling , not in a
v ehicle or on an object.
• Fill the tank outdoor s when the engine is cold.
W ipe up spills.
• Do not handle gasoline when smoking or ar ound
an open flame or spar ks.
• Stor e gasoline in an appr o v ed fuel container , out
of the r each of childr en.
Fill the fuel tank with fresh unleaded regular g asoline from
a major name-brand ser vice station ( Figure 12 ).
Figure 10
1. Cutting height lever 7. Upper handle knob
2. Oil ll/Dipstick (not shown)
3. Recoil start handle 9. Fuel tank cap
4. Blade control bar 10. Foot pedal
5. Upper handle 11. Air lter
6. Blade control button 12. Spark plug
Figure 11
1. Grass bag
2. Side discharge chute
8. Throttle
3. Mulch plug (installed)
Important: T o r educe star ting pr oblems, add fuel
sta biliz er to the fuel all season, mixing it with gasoline
less than 30 days old.
Figure 12
6
 Loading...