

LaView Cube Series User Manual
Cube DVR
User Manual

User Manual of Cube DVR Series
1
Precautions
Please observe the following precautions, in order to avoid damaging or losing data caused by improper operation.
DVR should work at proper temperature and humidity.
Do not install DVR in humid, dusty or smoky environment.
Require a solid mounting surface for installation.
Do not block any ventilation openings. Install under the manufacturer's instructions.
Do not spill liquid of any kind on device.
Do not put any other equipment on device.
Do not dismantle the device.
Select specified HDD by manufacture.

User Manual of Cube DVR Series
2
Note
This user manual is for reference only, subject to available products.
This user manual may contain inaccurate data or printing error.
Updates to the manual or products themselves will occur without further notification.
The products and manual will be updated regularly without further notice
Pictures are not from the same machine, for illustrative purposes only.
Contact the customer service department if you have any question or want the latest software and file.

User Manual of Cube DVR Series
3
Content
Chapter 1 Product introduction ................................................................................................................ 4
1.1. Summary ..................................................................................................................................... 5
1.2. Features ....................................................................................................................................... 5
1.3. Installation .................................................................................................................................. 6
1.4. Mouse ......................................................................................................................................... 7
1.5. Put Method ................................................................................................................................. 8
1.6. Power ON/OFF ........................................................................................................................... 9
1.7. Icon ........................................................................................................................................... 10
Chapter 2 Getting Started ........................................................................................................................ 12
2.1. Wizard ...................................................................................................................................... 13
Chapter 3 Operation guide ...................................................................................................................... 14
3.1. Right Button Menu ................................................................................................................... 15
3.2. Main Menu Introduction ........................................................................................................... 18
3.3. Search ....................................................................................................................................... 19
3.4. Configuration ............................................................................................................................ 21
3.5. Storage ...................................................................................................................................... 33
3.6. Output ....................................................................................................................................... 43
3.7. Maintain .................................................................................................................................... 45
3.8. Shutdown .................................................................................................................................. 47
Chapter 4 Web & Client .......................................................................................................................... 48
4.1. WEB Operation ........................................................................................................................ 49
4.2. Client Operation ....................................................................................................................... 55
Chapter 5 Function ................................................................................................................................... 56
5.1. DDNS Function ........................................................................................................................ 57
5.2. Port Mapping ............................................................................................................................ 59
5.3. NTP Function ........................................................................................................................... 61
5.4. Voice Intercom ......................................................................................................................... 62
5.5. HDD Redundancy ..................................................................................................................... 62
5.6. HDD S.M.A.R.T ....................................................................................................................... 63
Chapter 6 Appendix .................................................................................................................................. 66
6.1. TERMS ..................................................................................................................................... 67
6.2. HDD Capacity Calculation ....................................................................................................... 68
6.3. Common Faults ......................................................................................................................... 70

User Manual of Cube DVR Series
4
Chapter 1 Product introduction

User Manual of Cube DVR Series
5
1.1. Summary
Our Embedded Digital Video Recorder is an excellent digital surveillance product which adopts H.264 video compression, hard disk
recording, TCP/IP transmission, and a Linux based OS in addition to some of the more advanced technologies in the information
technology industry. This enables a more stable, reliable and high picture quality.
These products support synchronized video and audio recording, playback, and monitoring. This series also supports network based
system control, as well as excellent network streaming capabilities.
1.2. Features
Live View
CVBS interface, TV, VGA/HDMI synchronous output.
Compression
H.264 video compression, G.711 audio compression, supports high definition, low bit-rate video coding and storage.
Recoding
Recording modes include manual, time, alarm, motion detection, etc.; Support SATA HDD and local disk S.M.A.R.T. technology,
Support USB backup and internet backup.
Playback
Playback search by various conditions, local and network playback; support multiple channel simultaneous playback , support fast,
slow, rewind and frame mode; support exact time playback.
Camera Control and Alarm
Remote camera control, Multi-channel alarm input interface for connecting various types alarm equipment; Motion detection alarm,
video loss alarm, masking alarm; Multi-channel alarm output, alarm linkage and on-site lighting control.
Communication Interface
USB 2.0 high speed interface connecting various backup devices; Standard Ethernet interface, work under various networks.
Network Protocol
Support TCP / IP, UDP, RTP / RTSP, DHCP, PPPoE, DDNS, NTP etc.; support network real-time live view, recording, playback,
control; built-in WEB Server, IE browser for direct access.
Operation Mode
Support the front panel, remote controls, mouse and so on many kinds of operating mode; With simple, intuitive graphical; With
simple, intuitive graphical interface.
User Manual of Cube DVR Series
6
1.3. Installation
1.3.1. Check DVR and Accessories
Please carefully check the contents as packing list. If any of the items are missing, please contact with your dealer.
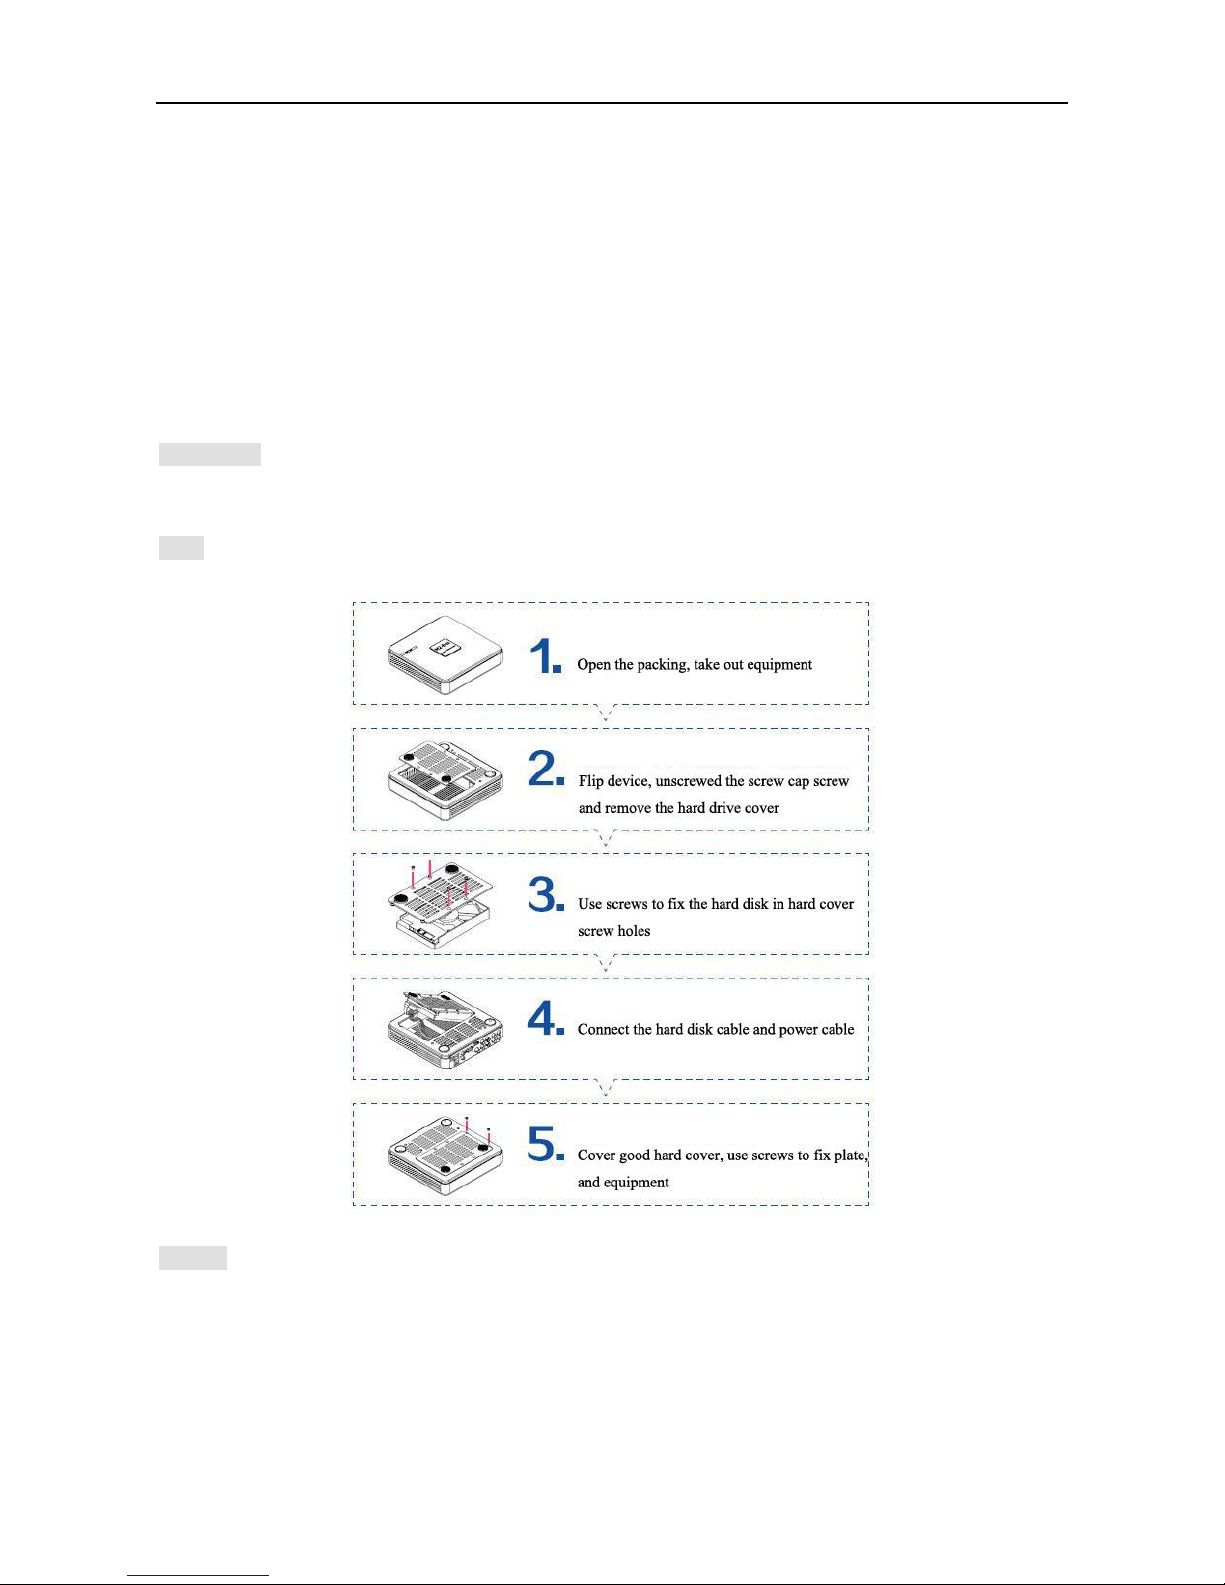
1.3.2. HDD Installation
Preparation
Prepare a Cross Screwdriver.
Steps
Caution
Only use HDD specified by the manufacturer.
HDD will be formatted automatically during startup, it may cause data loss.
Recording duration is decided by HDD capability and DVR parameters (recording setup, encoding setup).

User Manual of Cube DVR Series
7
1.3.3. Wiring Installation
Preparing for Installation
Camera, displayer, AV cable, cable, mouse, other kind‟s cables.
Steps
DVR in a horizontal position, connect camera to video input interface in back panel.
Connect video output to the displayer.
Connect cable to RJ45 interface when access network.
Mouse should be USB interface type, front or back panel USB interface both work.
Power supply.
Caution
For an external alarm device or PTZ, please refer to the relevant instructions.
DVR power lines should be under all lines connected correctly.
1.4. Mouse
In addition to front panel keys and remote control menu, the user can use mouse for menu functions. Insert mouse with USB interface
into machine panel.
Click Left Button
If the user does not log in, password box will pop up first; click the left mouse button to enter the main menu when real-time
monitoring.
Left click mouse the Options icon enter the menu.
Exact Instructions on control
Change the state of check box and dynamic detection block.
Click the combo box drop-down list will pop up.
Double Click Left Button
Select and confirm or open, for example, double-click playback video.
Under multi-screen double click one channel can make the picture full screen; double-click again to return to the previous
multi-screen.
Click Right Button
Pop-up context menu under monitor screen
User Manual of Cube DVR Series
8
Exit without saving under menu interface.
Turning Wheel
Increase or decrease value when fill digital box Switch combo box options.
Flip up and down for list box.
Mouse Move
Select controls in current coordinates to move.
Mouse Drag
Select motion detection area.
Set up regional coverage area.
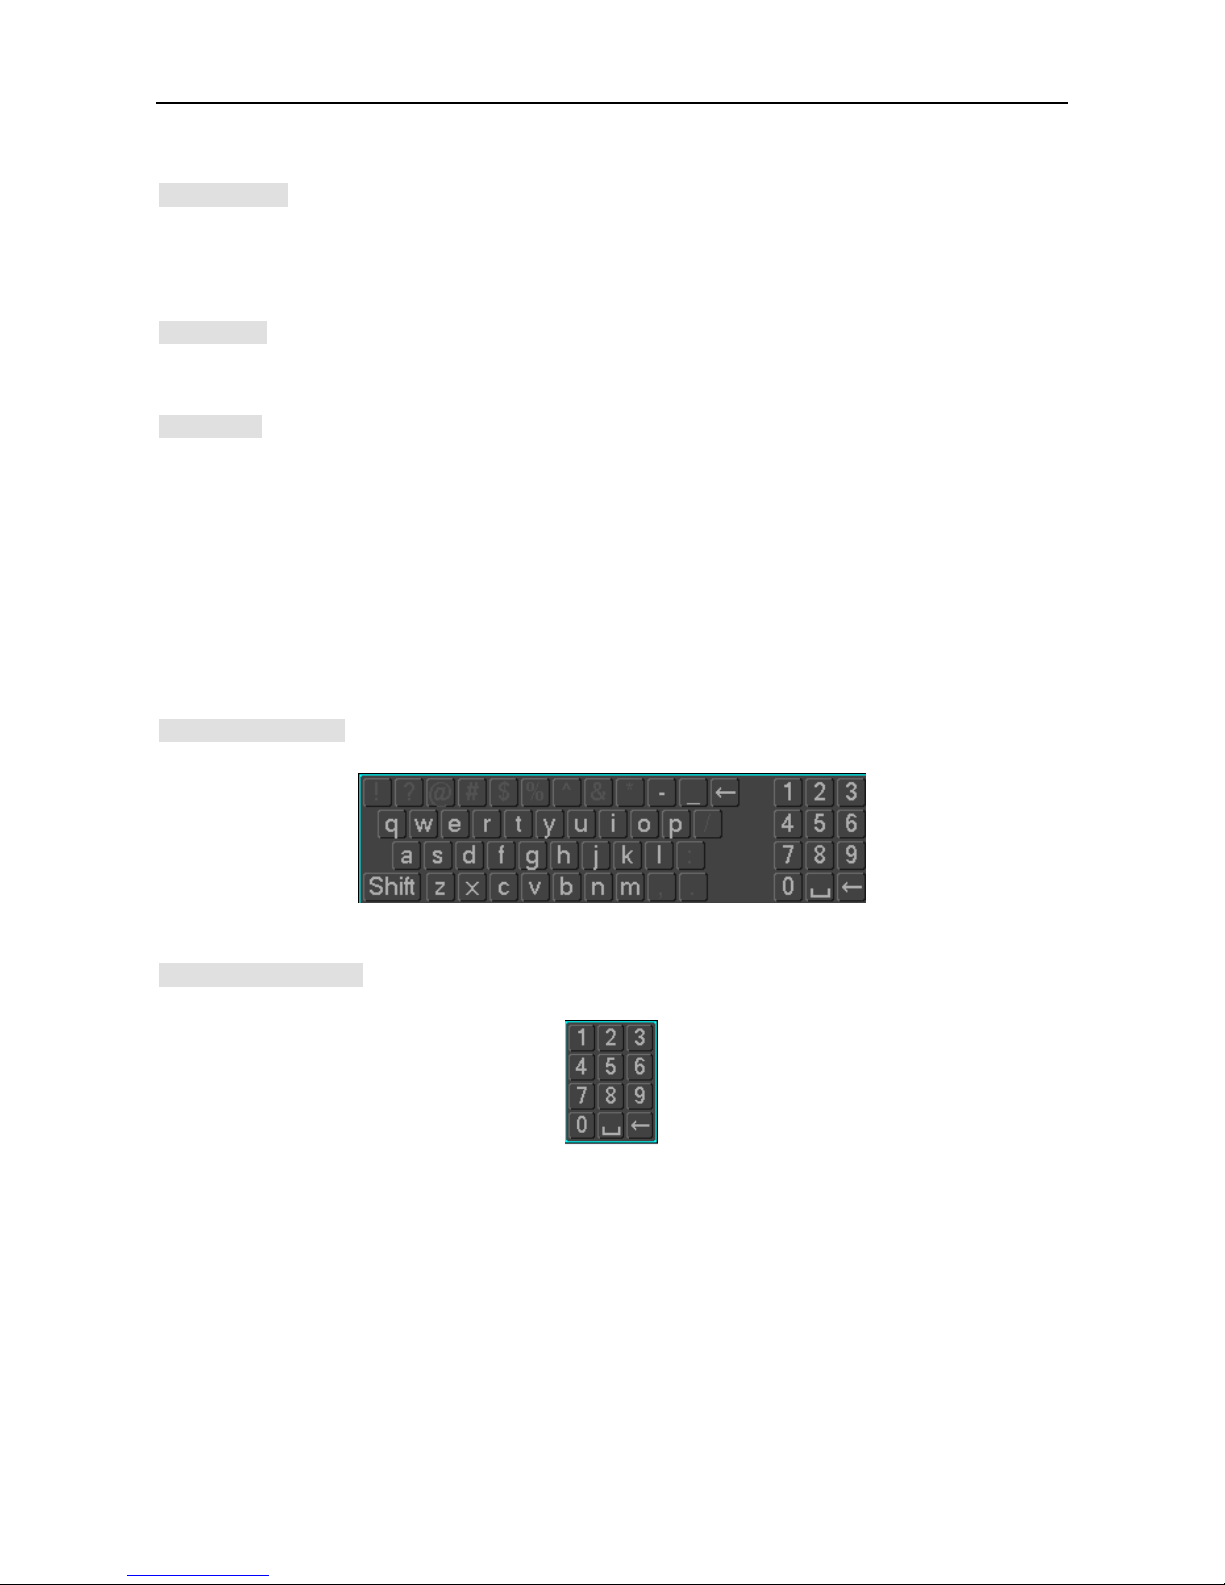
1.5. Put Method
In the input box, choose numbers, symbols, case in English input. Click left mouse button to select value; ←means backspace, _
means a space.
Letter Input Interface
Figure1.1 Front Panel
Number Input Interface
Figure1.2 Number Input Interface
User Manual of Cube DVR Series
9
1.6. Power ON/OFF
1.6.1. Power On
DVR installed correctly, switch on with power light is on, DVR will boot up automatically. Different model have different boot up
status, please refer to the Front-panel Introduction.
DVR will detect the hardware when power on, the process will last 20 seconds more or less. After the detection, DVR make a
“Buzzing” sound and enter into a multi-screen live view, user can operate now. Please refer to XXX. Main Menu Introduction and
Other Introduction.
If recording time contains power up time, DVR will automatically start timing recording when power on.
Figure1.3 Diagram
Note: Power supply has to match with DVR, any other substitutes are not allowed.
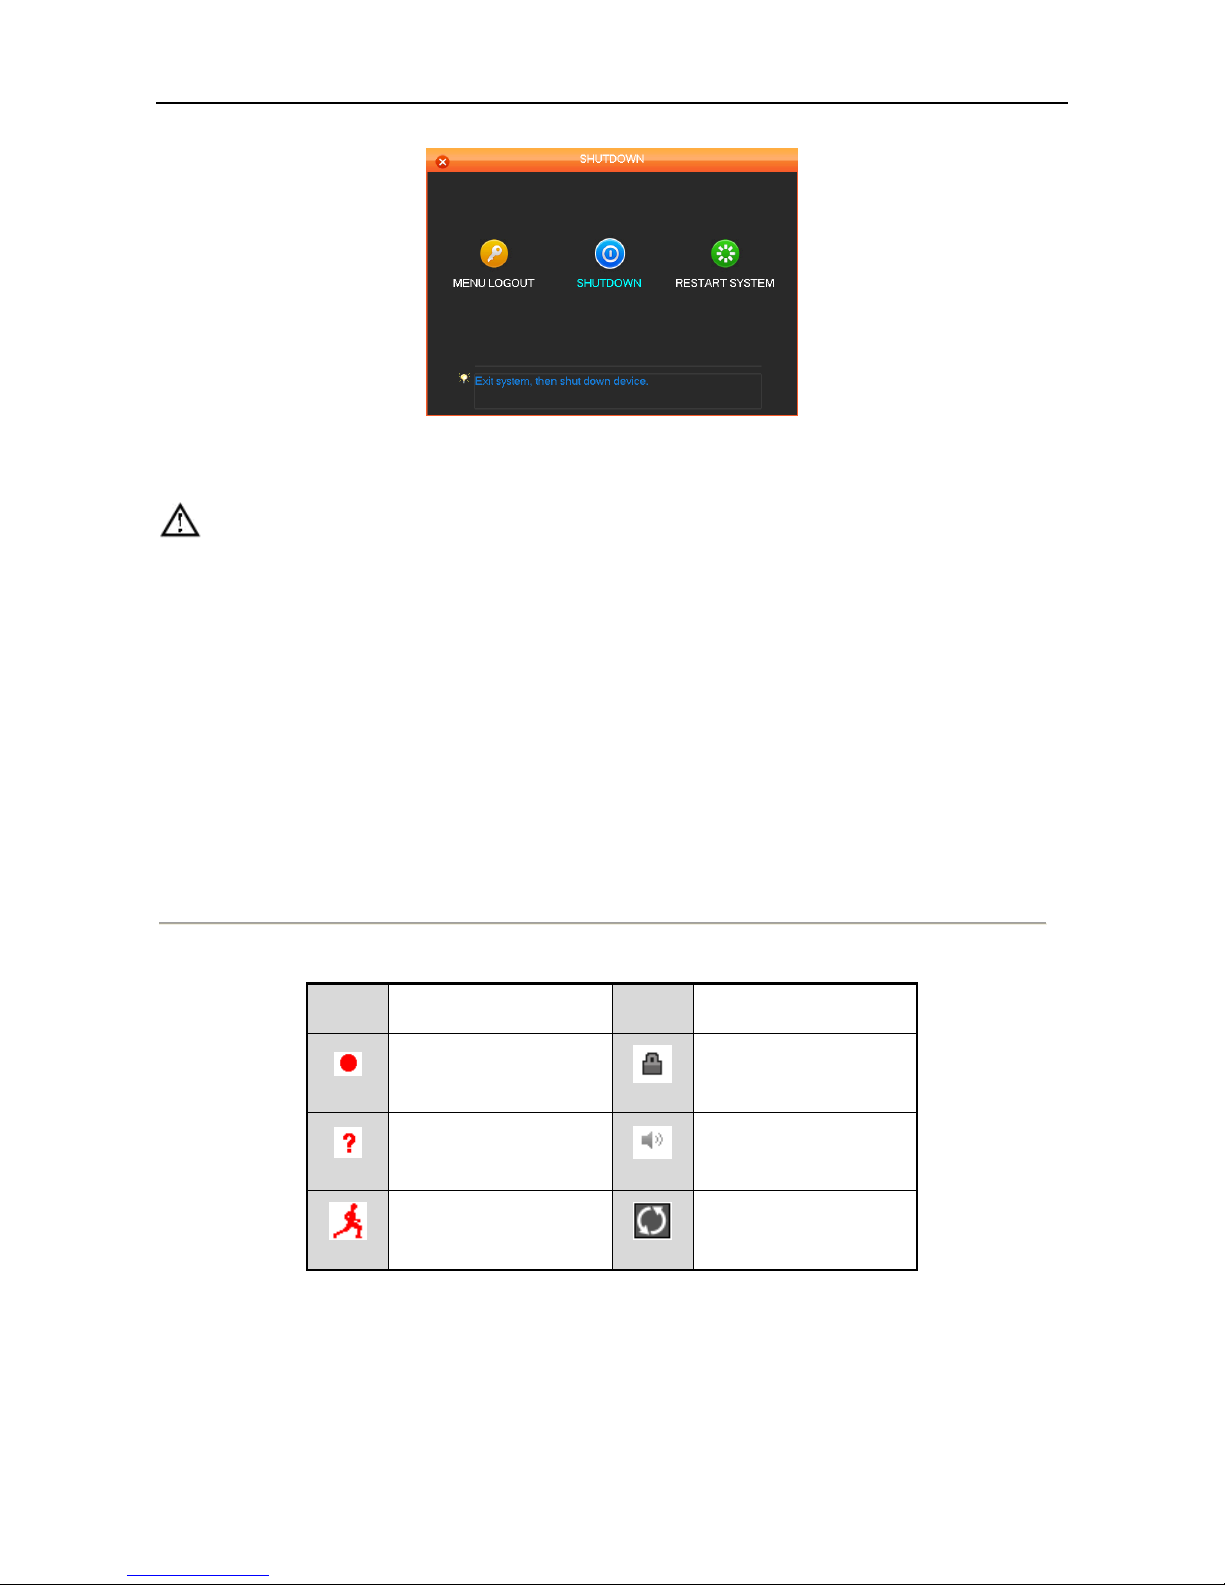
1.6.2. Power OFF
Hold down on-off key to turn off device.
【Main Menu】→【Power off】→【Power off】.
User Manual of Cube DVR Series
10
Figure1.4 Shutdown
Note: turn off device and switch off power when changing HDD.
1.6.3. Outage Recovery
Reboot after an outage or forceful shutdown, DVR will save the record before outage and return to normal operation mode.
1.7. Icon
1.7.1. Status Icons
Description of the status Icon
Table 1.1 Description of the Soft Keyboard Icons
Icons
Description
Icons
Description
Record
Channel lock
Video loss
Adjust the local audio output
Motion detection
Allows screen to switch
polling

User Manual of Cube DVR Series
11
1.7.2. Operation Icon
Description of the operation Icon as below
Table 1.2 Description of the Soft Keyboard Icons
Icons
Description
Icons
Description
Not Selected;
Save parameters
Selected
Restore factory settings, return to the last set
of parameters after the modified parameters
Down Menu
Apply current set to the system
Confirm revise/get into menu
Copy current set to other channels
Cancel revise /cancel get into menu
Enter the configuration menu
Set parameters
Config alarm, video detection trigger‟s
processing
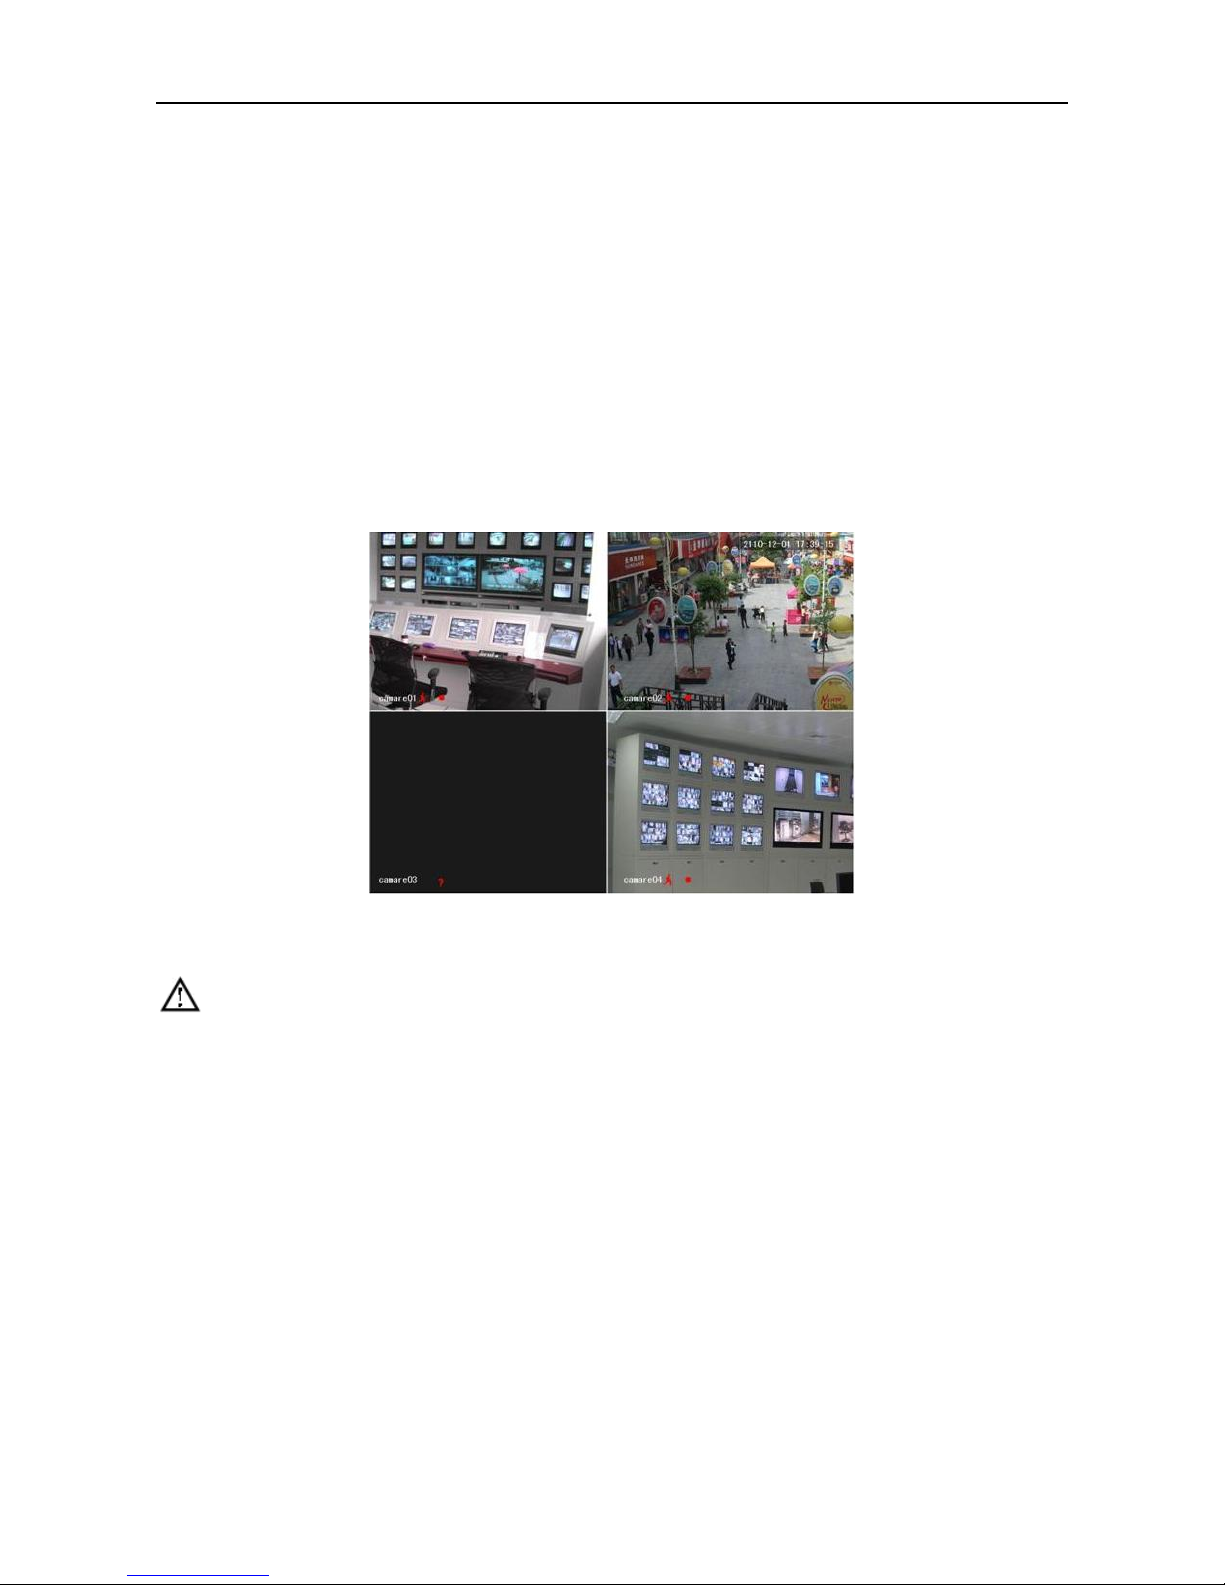
Live View
Power on DVR and entry into live view mode: there are date, time, channel names icons which indicate recording and alarm status
display on screen.
Switch display screens by the front panel, remote control or mouse control.
When enable the screen message for external alarm, video loss, masking, motion detection, network and IP conflict alarm, the below
interface would popup when those alarm occur. Shows as:
Figure1.5 Alarm Status

User Manual of Cube DVR Series
12
Chapter 2 Getting Started
User Manual of Cube DVR Series
13
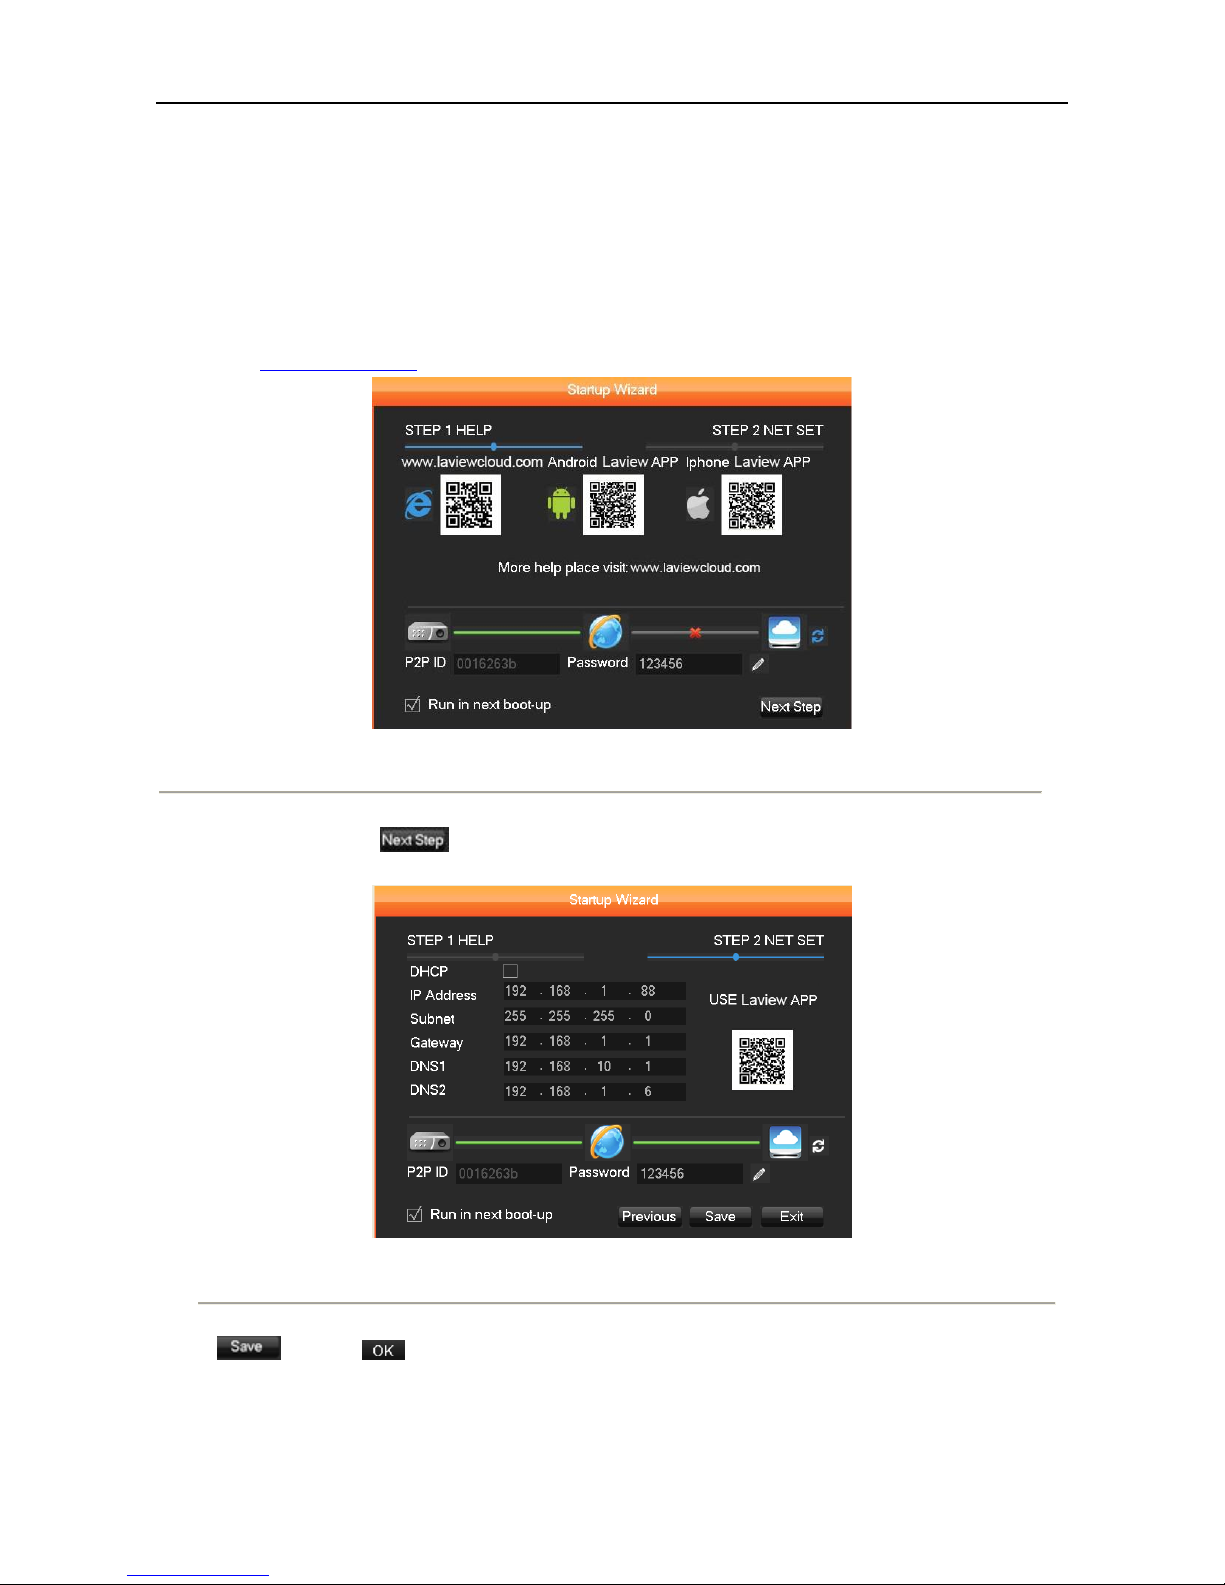
2.1. Wizard
By default, the Setup Wizard starts once the device has loaded, as shown in Figure 2.1.
Steps:
1. Help: Laview app QR code and cloud server address are list as below. For more information please visit
www.laviewcloud.com .
Figure 2. 1 Start Wizard Interface
2. After the step 1, click which takes you to the Network Start Wizard window, as shown in Figure 2.2.
Make sure you network settings correct and can connect to cloud server
Figure 2. 2 Network Configuration
Figure 5.1
3. and Click to complete the start wizard settings.

User Manual of Cube DVR Series
14
Chapter 3 Operation guide
User Manual of Cube DVR Series
15
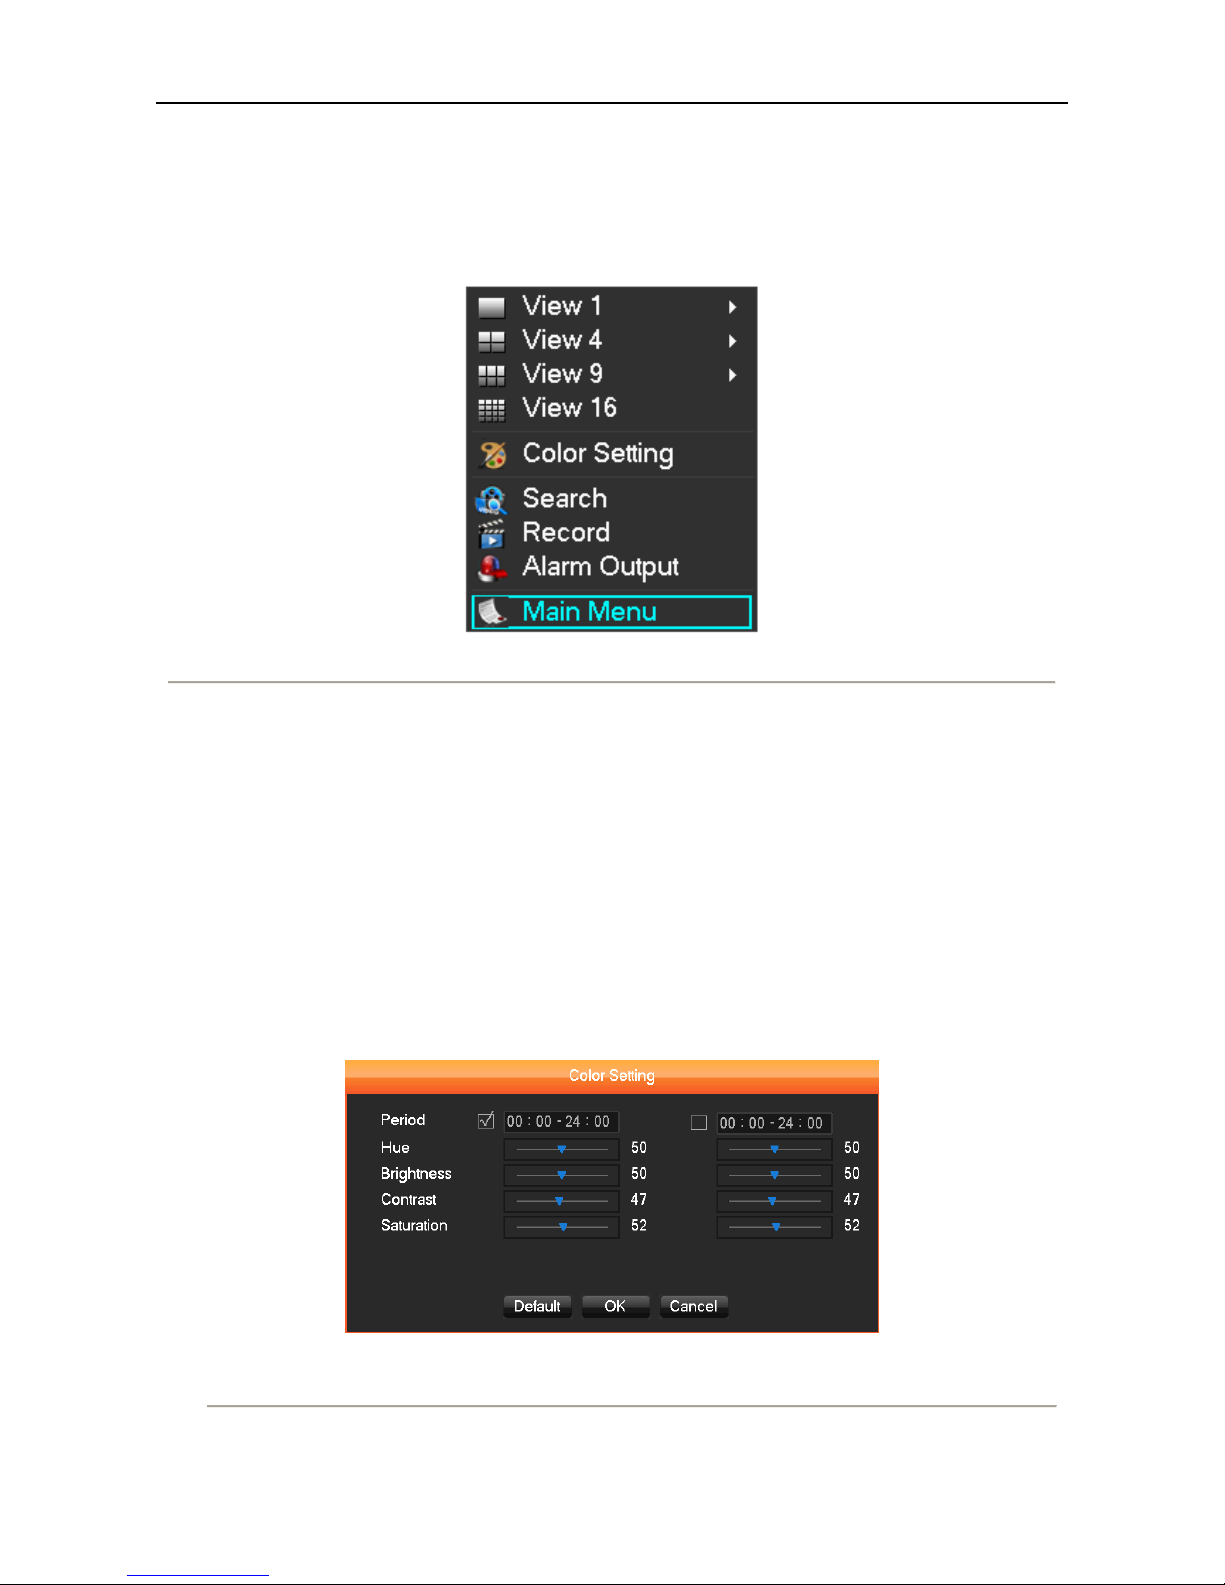
3.1. Right Button Menu
Click the right mouse button after booting into the real-time browser interface, action menu pop-up, shows as
Figure 3.1 Right Button Menu
3.1.1. Screen Switching
Max 16 channel in one screen, user can choose single, four, nine and sixteen channel.
3.1.3. Image
Adjust the specified screen (single screen) image color hue, brightness, contrast, saturation, gain and white-level parameters set two
time periods according to the local environment difference between day and night for each adjustment period set, the device will
automatically switch to the best video quality . As shown in.
Figure 3.2 Color Setting
User Manual of Cube DVR Series
16
【Period】 two periods can be set according to ambient light during the day and night; device will automatically switch configuration
time. Need to select the Enable box.
【Hue】 Adjust according to image color cast
【Brightness】 Visual image brightness, according to the environment, reduces or increases the brightness of the image brightness to
make the image relatively clear.
【Contrast】 Adjust image of black and white in proportion, the greater ratio, the brighter image.
【Saturation】 Image color purity, the greater value, the more colorful images.
【Gain】 Enlarge the image signal to improve signal quality.
【White Level】 Change the white level reference value, to improve the brightness of the image display.
Note: Different mode different function
3.1.4. Recording Search
Refer to 4.3 recording search.
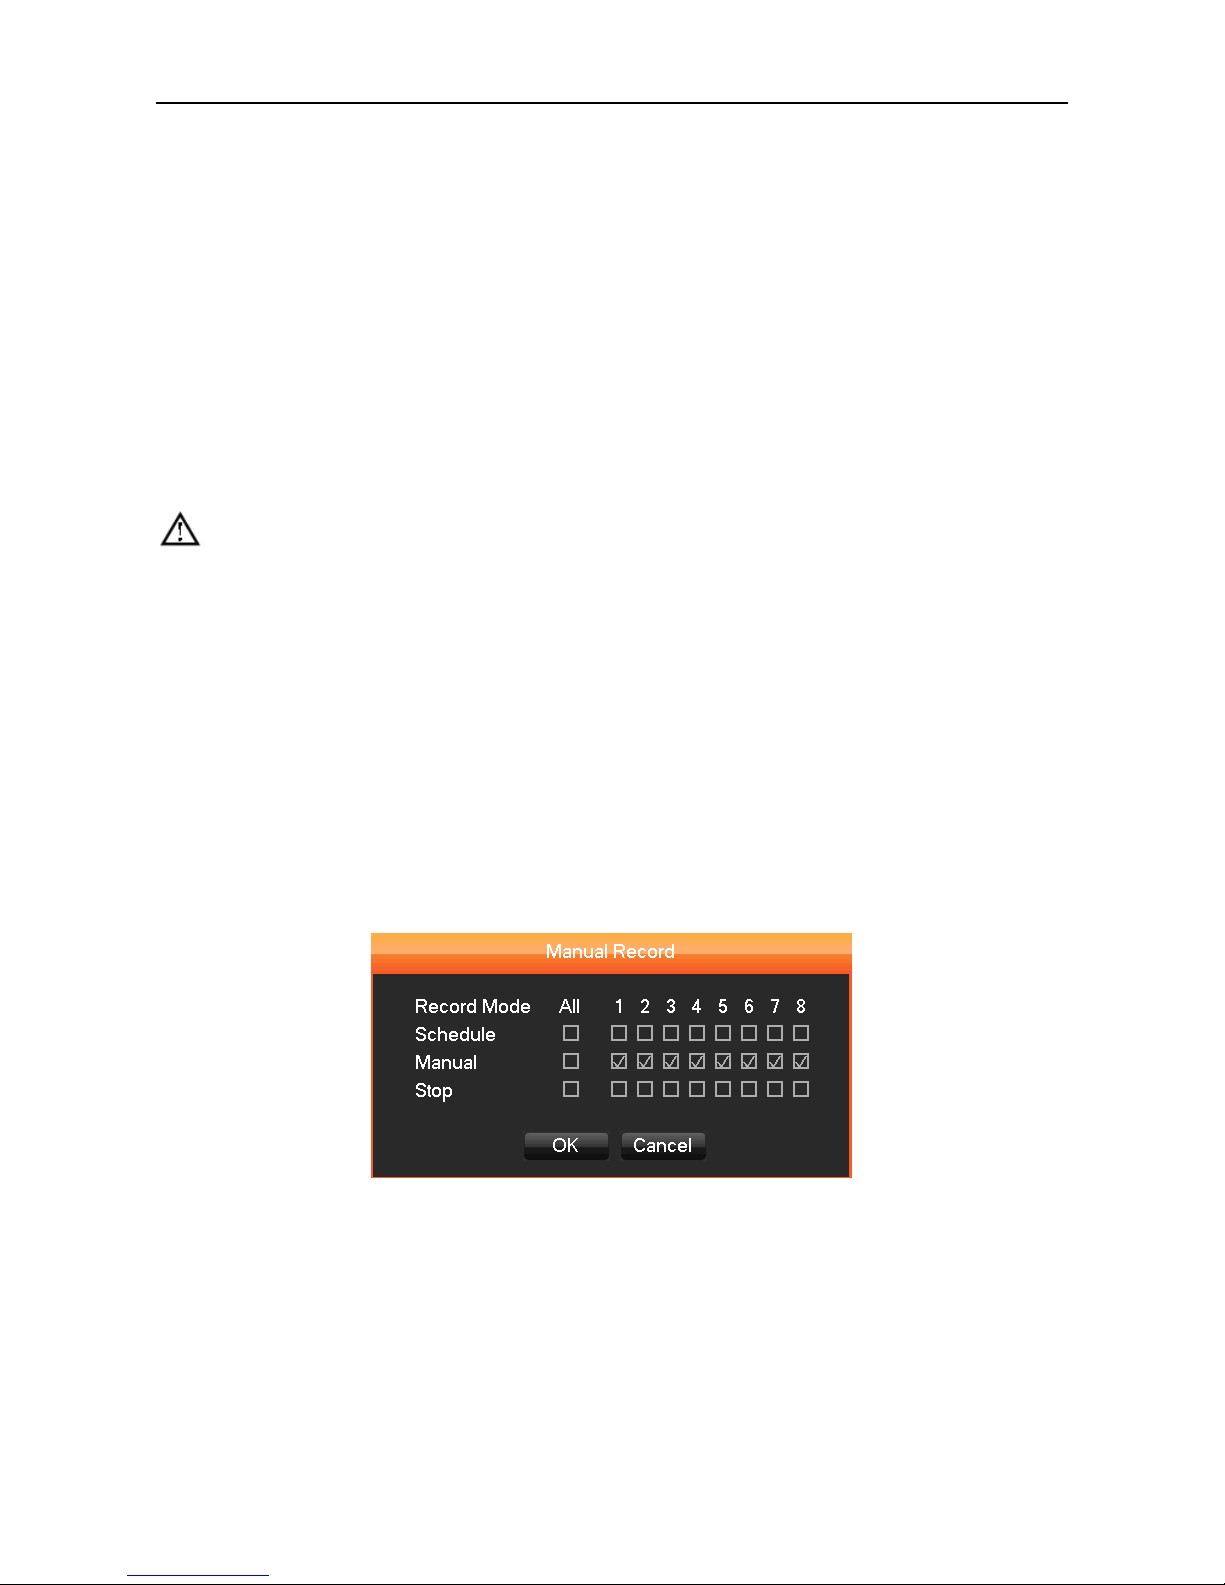
3.1.5. Manual Recording
Remark: manual user must have "RECORD" right
In live view screen, click on 【Manual Record】, or press the 【video】 key on remote control into manual recording interface, as
shown in.
Figure 3.3 Manual Record
【Manual】 The highest priority, no matter what the current status of each channel, the corresponding channels will make common
recording when press "Manual" button;
【Schedule】 Record according to recording type in recoding set. (Common motion Detection and alarm);
【Stop】 Stop all channel recording.
User Manual of Cube DVR Series
17
To change record status of one channel, firstly check the recording status of the channel is selected non-selected (non-selected
indicates that the channel is not recording; selected indicates the channel in recording mode).Then use mouse to click, or use【←】or
【→】arrow keys move the active box to the channel, then use 【↑】or【↓】arrow keys or corresponding number key to switch the
channel recording status.
Note: All selected can change record status for all channels/
3.1.6. Alarm Output
Refer to chapter 4.6.2 alarm output.
3.1.7. Main Menu
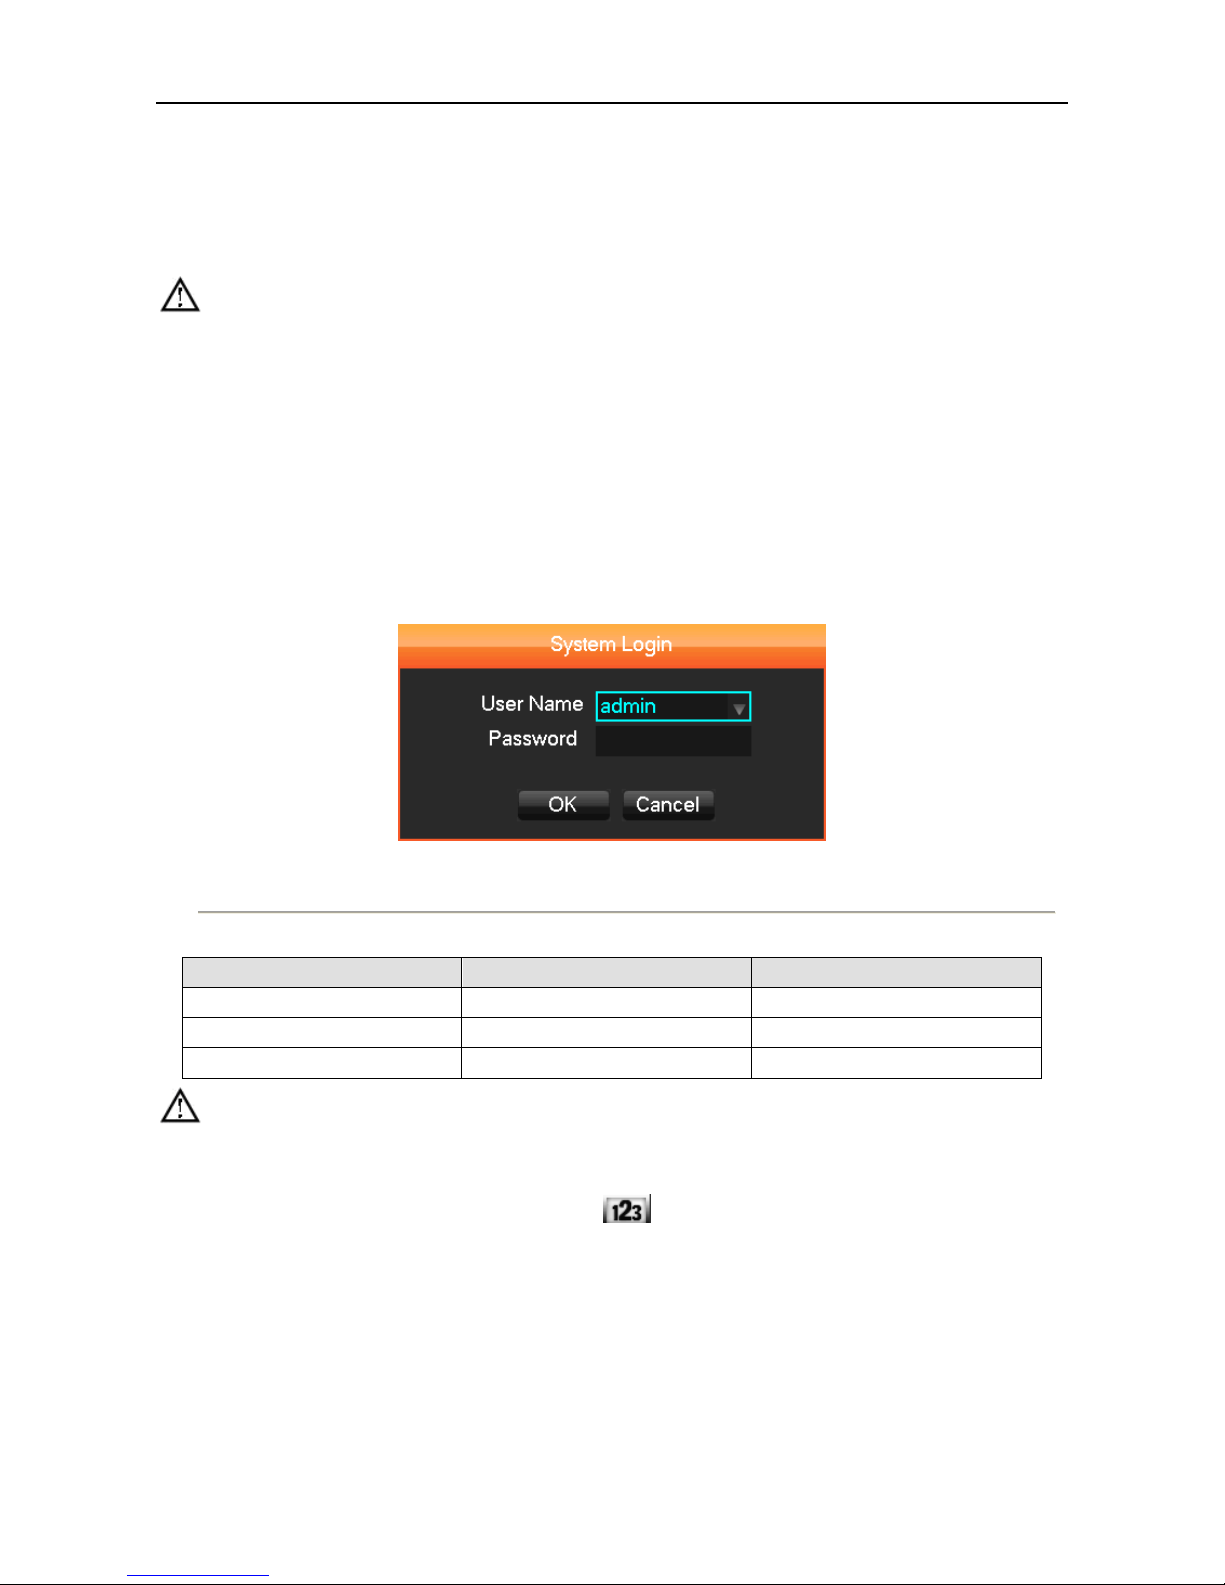
Click the 【Main Menu】, input user name and password, click【OK】to enter the system menu. As shown in.
Figure 3.4 System Login
Table 3.1 Default Users
User Type
User Name
Password
Administrator
Admin
123456
User
User
123456
Hidden
Default
Default
Note: Password security: occur alarm after three time’s wrong input and system lockout in 30 minutes after 5 unsuccessful
login. For security consideration, please modify the default password. For information on how to add groups, users and modify users
information, please refer chapter 4.4.5 Uses Management, Click to toggle the character input method in mouse mode.
User Manual of Cube DVR Series
18
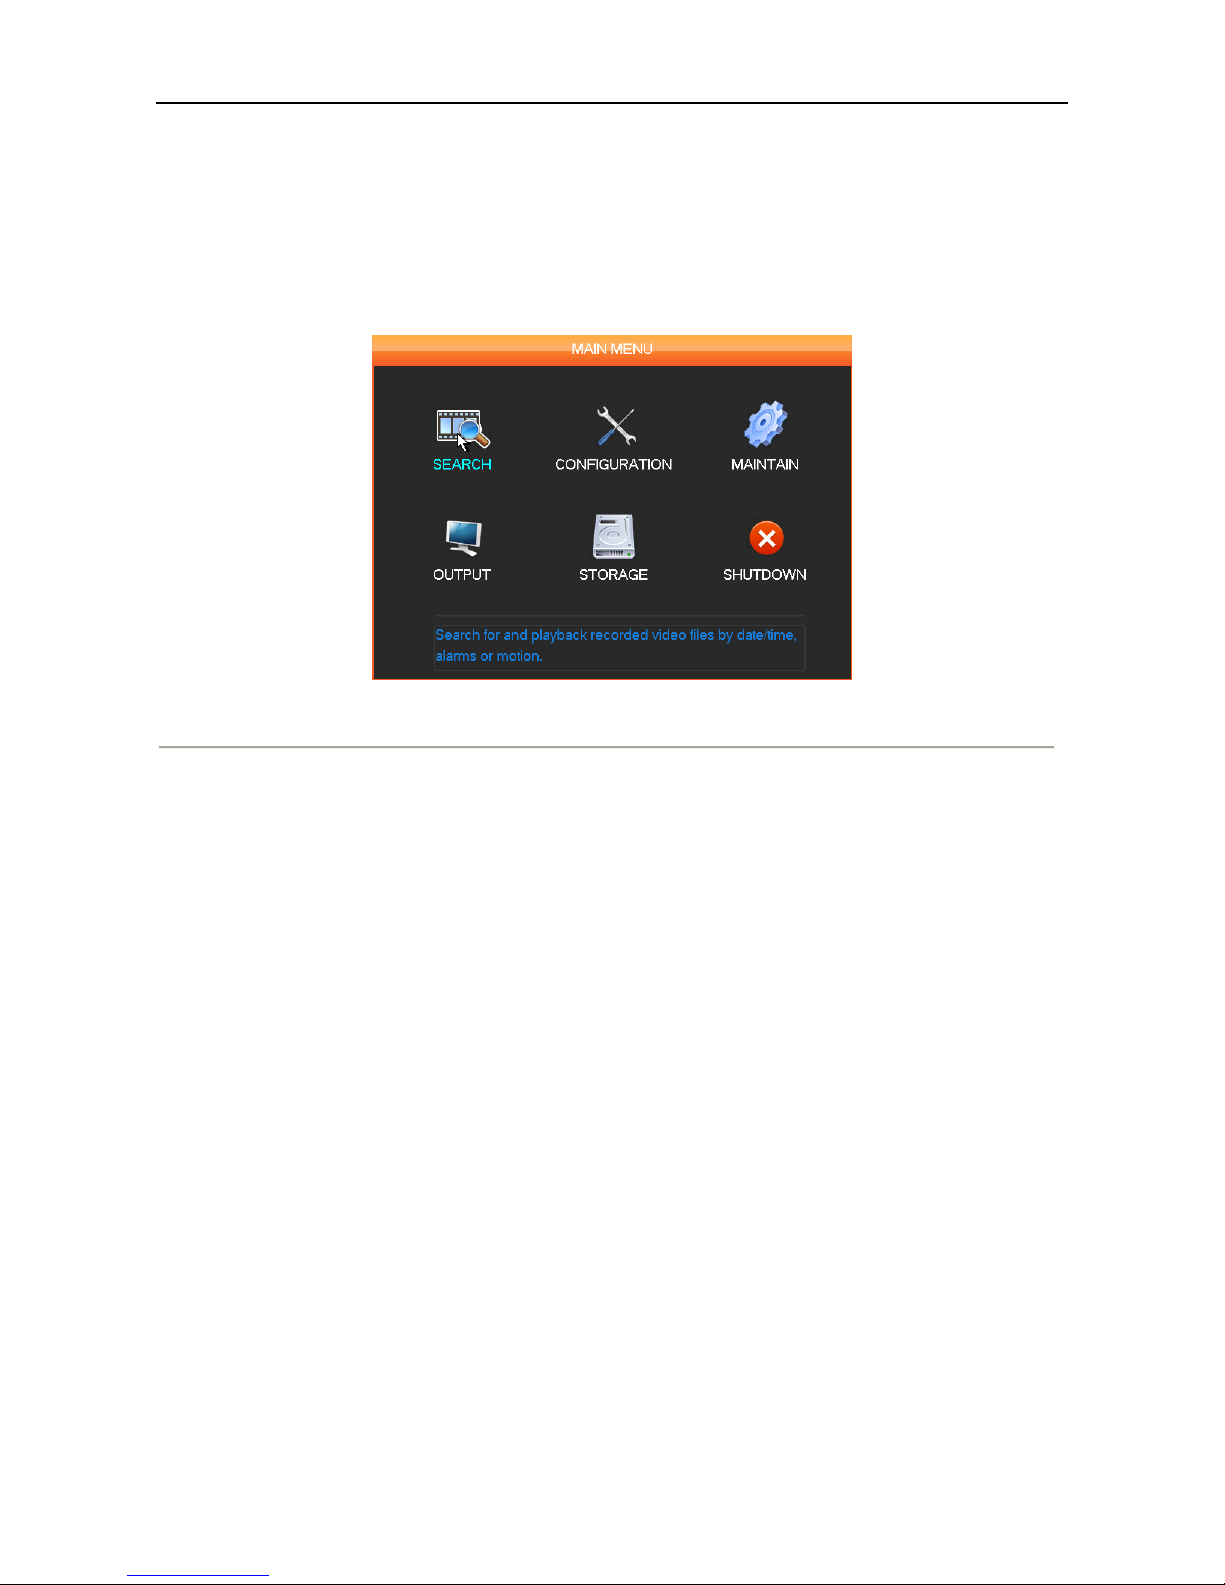
3.2. Main Menu Introduction
The main menu as shown, there are search, configuration, storage, output, maintain and shutdown.
Figure 3.5 Main Menu
【Search】 Search recoding by type, channel, time and playback.
【Configuration】 recording, motion detection, abnormal, alarm, system, network and user management configurations.
【Storage】 HDD management and backup management.
【Output】 PTZ, alarm output, serial and output mode configuration.
【Maintain】 to display the system log information, version information, stream statistics, and online user and set the factory default,
automatic maintenance.
【Shutdown】 Log off the user menu, turn off the machine, restart the system, and switch user and other operations.

User Manual of Cube DVR Series
19
3.3. Search
In real-time monitoring screen, click the right mouse button, click 【search】, or enter video playback via main menu interface, as
shown in.
Figure 3.6 Search
Figure 3.7 Search
User Manual of Cube DVR Series
20
Table 3.2 Description of Search
Index
Name
Description
1
Record
Record and Picture to choice.
2
Calendar
Select record search day
3
Channel
Choose searched channel
4
Play
Playback control: stop/play, pause, fast, slow, previous/next frame in pause.
5
Recoding mode
Choose searched recording mode, including whole, outside alarm, motive detection, whole alarm
recording.
6
Time bar
Green means Regular record; Red means alarm record; Yellow means MD record.
7
Syn
Implement each video playback channel in the process of playback time synchronization and
consistency of the operation.
8
Status
Display status information of function buttons, including fast forward, slow speed, etc.
9
List
Choose the start time, channel, and click “search” will display results in the list.
10
Time
Select record search start and end time.
11
Channel No.
Choose searched channel
12
Record List
128 video records shows in searching list choose file and press enter or double click mouse to view
record.
13
Record
information
Show single record file‟s start and end time, the size of the record file.
14
Backup
Tick “ “to choose backup file in file list box, click backup button cancel backup file ---click
“√”from backup menu “√”.
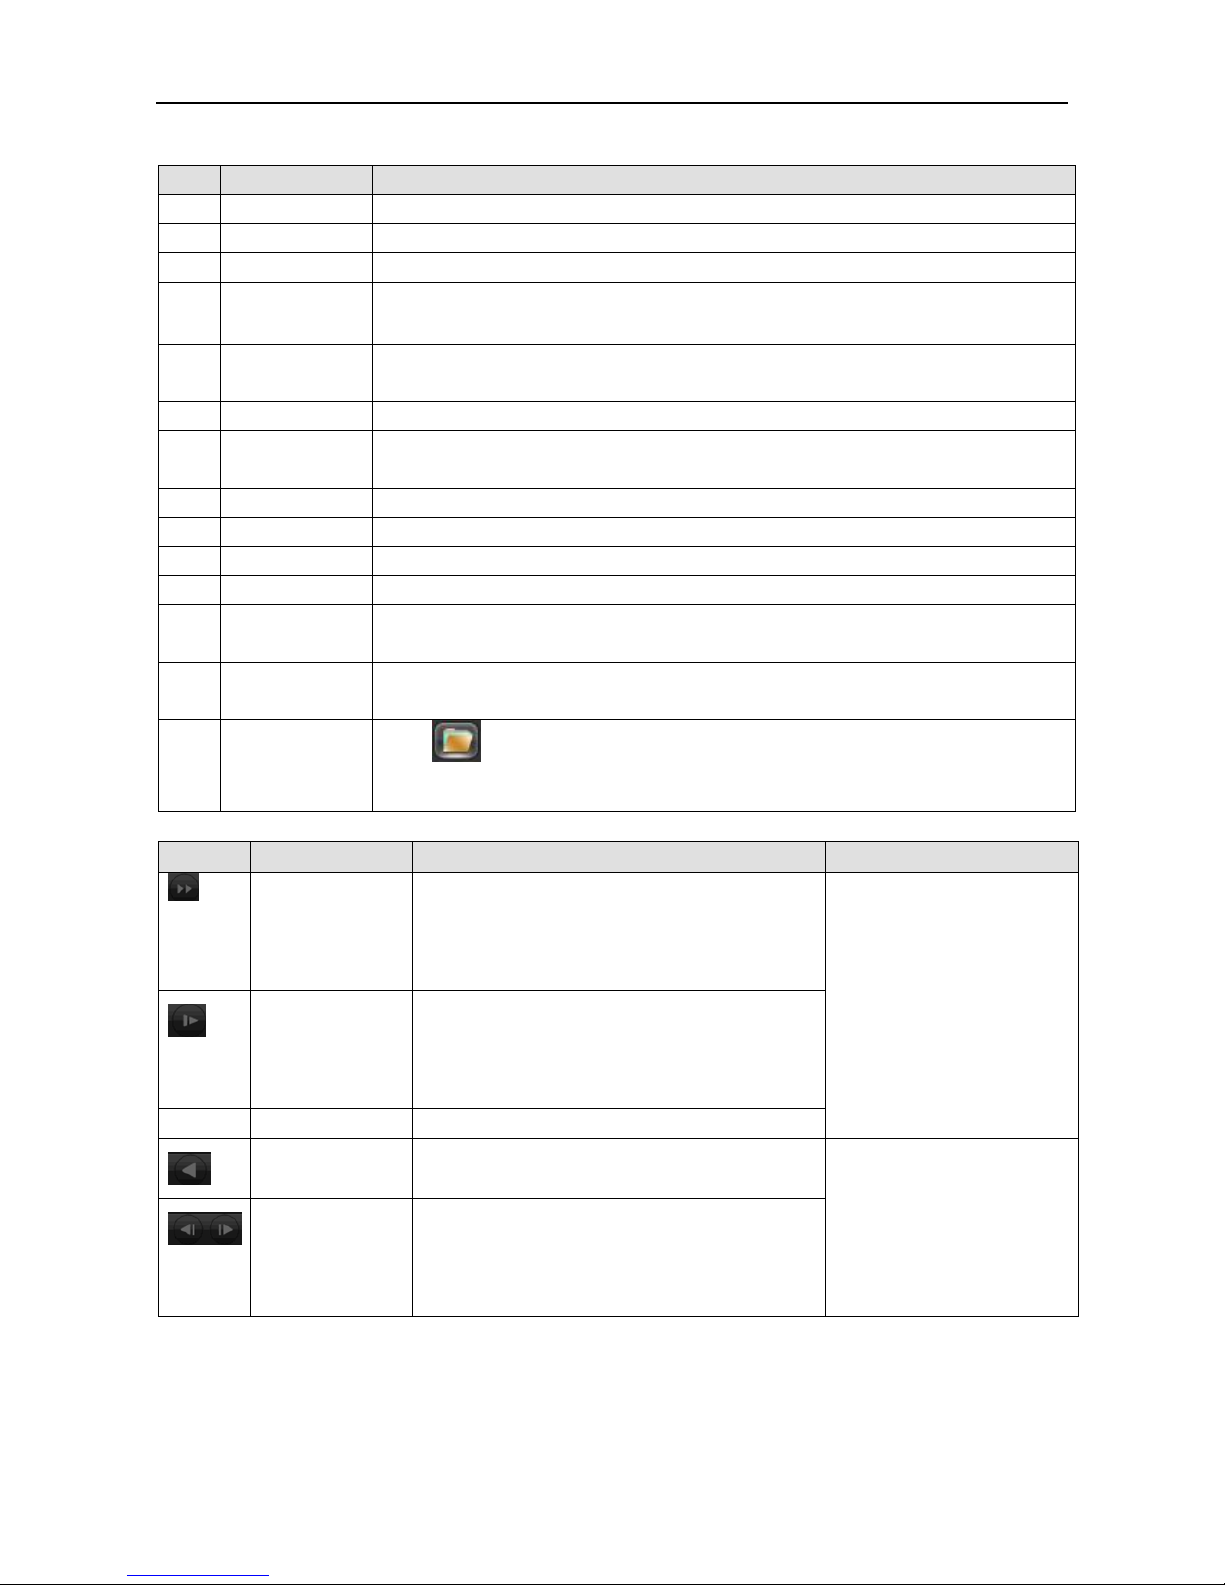
Table 3.3 Description of Playback Control
Icon
Key
Description
Remark
Video playback :
Fast-forward button
Under playback mode, pressing this key, you can get a
variety of fast cycle switching speeds; fast-forward
button can be used as slow-release button reverse switch
key.
Actual play rate based on version
Video playback :
Slow key
Under playback mode, pressing this key, switch
cyclically support a variety of slow-release rate, slow
release button can be used as fast-forward button reverse
switch key.
►/
Play/pause
Play/pause switch when slow-play
Video playback :
Slow key
Single left click backward key
To play backwards and single
click again to stop back run under
common playback Rewind or
single-frame playback, press the
play button ►/ to enter the
normal playback .
Manual single frame
playback
single frame playback by clicking │and│ when
common playback pause
Remark:
1. The player playback control bar show file playback speed, channel, time, playback progress and other information.
2. Playback speed and rewind function are related to DVR version, and please prompt on the player panel shall prevail.
User Manual of Cube DVR Series
21
3.4. Configuration
User can get into configuration through main menu; Function of system , record, network, alarm, account and abnormity as shown in.
Figure 3.8 Configuration
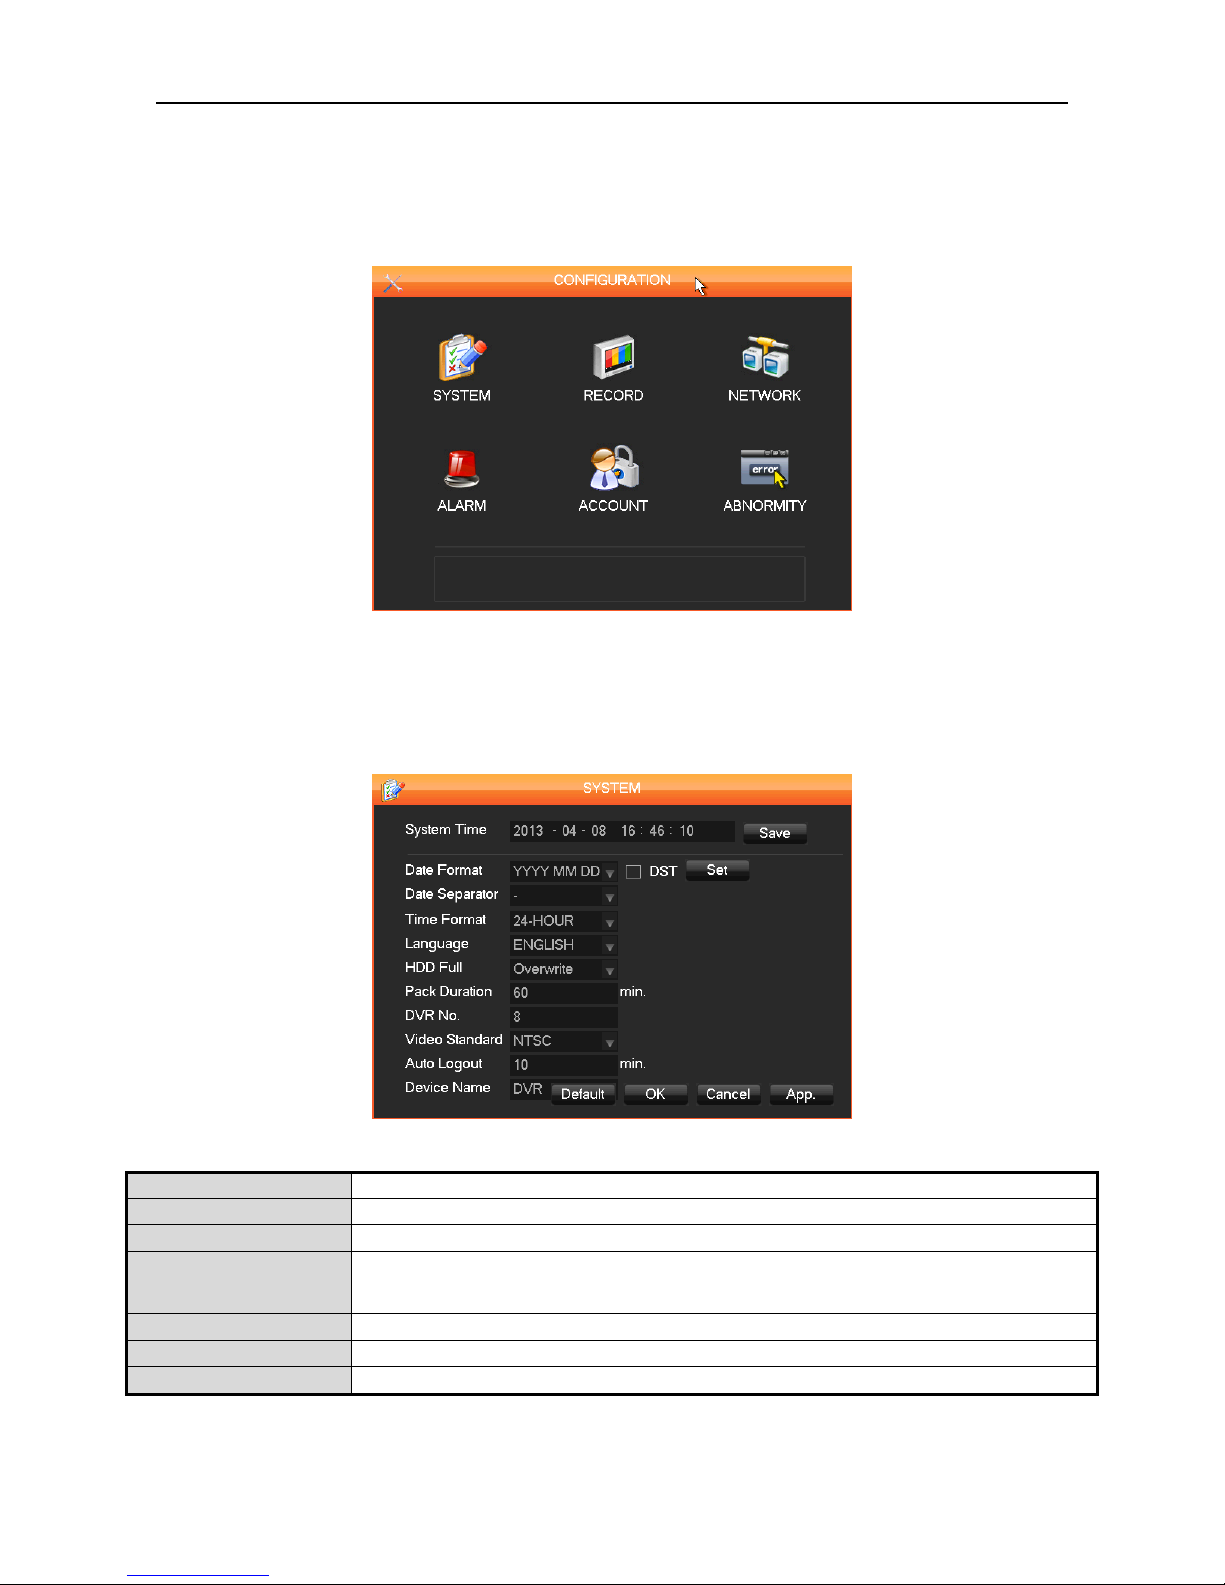
3.4.1. System
Figure 3.9 System Configuration
Item
Description
【Time】
Set the current time.
【Date Format】
To modify the date display format
【Snapshot Interval】
When caught in figure set, scratching figure mode to timing diagram, timing images crawl down at a
certain frequency can be uploaded to the FTP server (above maximum upload the latest four images )
【Daylight Saving Time
Click “DST” to enable the function, and enter the local DST starting and ending time
【Date Separator】
To select the separator for date
【Time Format】
24 hr or 12 hr display mode.
 Loading...