

Page 1

I
User Manual
Pixel V1
Page 2

II
1. PHONE LAYOUT ............................................................................ 1
Content
1.1. Key and Parts .............................................................................................. 1
2.2. Standby Screen & Icons ............................................................................... 2
2. GETTING STARED ........................................................................ 2
2.1. Inserting the SIM card and the Battery ......................................................... 2
2.2. Inserting Micro SD card .............................................................................. 3
2.3. Unlock the phone ........................................................................................ 3
2.4. Using the Touch screen ................................................................................ 4
2.5. Switch On/Off ............................................................................................. 4
2.6. Unlock SIM Card ........................................................................................ 4
2.7. Connection to Network ................................................................................ 5
2.8. Charging the Battery.................................................................................... 5
3. Basic Function .................................................................................. 5
3.1. Calculator.................................................................................................... 5
3.2. Calendar ...................................................................................................... 5
3.3. Camera........................................................................................................ 6
3.4. Clock .......................................................................................................... 6
3.5. Contacts ...................................................................................................... 6
3.6. Chrome ....................................................................................................... 7
3.7. Downloads .................................................................................................. 7
3.8. Docs ........................................................................................................... 7
3.9. Drive ........................................................................................................... 7
3.10. FM Radio .................................................................................................. 7
Page 3

III
3.11. Gmail ........................................................................................................ 8
3.12. Google ...................................................................................................... 8
3.13. Google Setting........................................................................................... 8
3.14. Google+ .................................................................................................... 8
3.15. Hangouts ................................................................................................... 8
3.16 Keep .......................................................................................................... 9
3.17. Maps ......................................................................................................... 9
3.18 News & Weather .......................................................................................10
3.19 Phone ........................................................................................................10
3.20 Photos ....................................................................................................... 11
3.21. Play Games ..............................................................................................12
3.22. Play Music ...............................................................................................12
3.23.Play Newsstand .........................................................................................12
3.24. Play Store .................................................................................................13
3.25. Setting ......................................................................................................13
3.26. Sheets ......................................................................................................15
3.27. Slides .......................................................................................................15
3.28. You tube ...................................................................................................16
4. Frequently Asked Questions and Troubleshooting ....................... 16
5. Safety Information and Notices ..................................................... 18
5.1. Emergency call ...........................................................................................18
5.2. For your safety ...........................................................................................18
Page 4
1
©2014. All rights are reserved. No part of this document may be reproduced
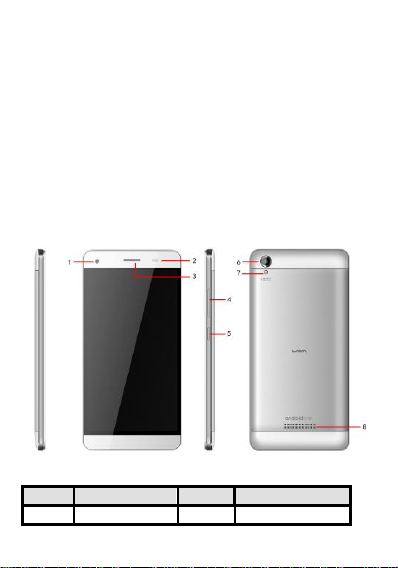
Label
Key
Label
Key
1
Front camera
5
Power Key/Lock key
without permission.
While all efforts have been made to ensure the accuracy of all the contents in this
manual, we assume no liability for errors or omissions or statements of any kind in
this manual, whether such errors or omissions or statements resulting from
negligence, accidents, or any other cause. The contents of this manual are subjected
to change without notice.3
Protect our environment! We strive to produce products in compliance with global
environmental standards. Please consult your local authorities for proper disposal.
Note: User Manual is just to guide the users about the functionality of the phone. It
is not a certificate of technology. Some functions may vary due to modifications
and upgrade of software, or due to print mistake.
1. PHONE LAYOUT
1.1. Key and Parts
Page 5
2
2
Light sensor
6
Back camera
3
receiver
7
Flash light
4
Volume Key
8
Speaker
2.2. Standby Screen & Icons
Status Icon
Description
Signal indicator for SIM
Using headset
Mute
Vibrate mode
Alarm
Media playing
Media pausing
Bluetooth on
Modem connecting
This phone provides multiple Standby screens. Through the instruction and various
icons on the screen, you can have the operating information needed.
2. GETTING STARED
Please read the safety instructions in the "Safety Information and Notices" section
before use.
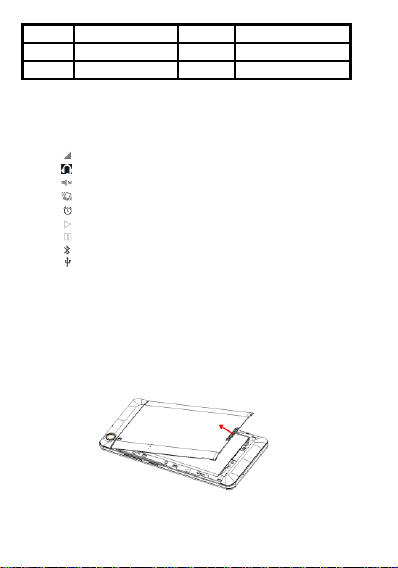
2.1. Inserting the SIM card and the Battery
Pixel V1 is a dual SIM mobile phone allowing you to use the facility of two
networks. To insert SIM card(s):
• Switch off the mobile phone and remove the rear cover and battery.
Page 6
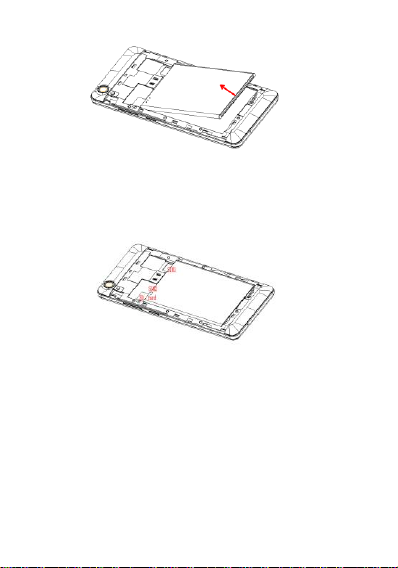
3
• Make sure that the clipped corner of the SIM card is facing the correct direction
and the metallic contacts are facing downwards. Slide the SIM card into the card
slot until it stops.
• Finally insert the battery and replace the rear cover of the mobile phone.
2.2. Inserting Micro SD card
With the metal interface facing down, gently slide the micro SD card into the slot
marked SD (near SIM2).
2.3. Unlock the phone
You may need to provide Swipe, PIN, and Password and draw a pattern to unlock
your phone.
To unlock the screen:
• Press the power key to wake up the phone.
• Slide up on the screen
You may be required to unlock your phone based on the unlock method in settings.
Page 7

4
To set the unlock method:
On the main menu, touch Settings > Security.
Touch Screen lock.
Choose the type of locking as desired. You can set your screen lock on the basis of
pattern, PIN, Swipe, Voice Unlock, password or none.
2.4. Using the Touch screen
You can use the touch screen in the flowing ways:
• Touch: Acts on items on the screen, such as application and settings icons, to type
letters and symbols using the on screen keypad, or to press on screen buttons.
• Touch and hold: Touch and hold an item on the screen until an action occurs.
• Drags: Touch and hold an item and move your finger on the screen until you
reach a target position.
• Swipe or slide: Quickly slide your finger across the surface of the screen,
(without dragging an item). For example, slide the screen up or down to scroll a
list.
• Double-tap: Quickly tap twice on a webpage, map, or other screen to zoom. For
example, double-tap a section of a webpage, map, or other screen of webpage in
Browser to zoom that section to fit the width of the screen. You can also double-tap
to control zoom, in Maps, and in other applications.
• Pinch: In some applications (such as Maps, Browser, and Gallery) you can zoom
in and out by placing two fingers on the screen at once and pinching them together
(to zoom out) or spreading them apart (to zoom in).
• Rotate the screen: On most screens, the orientation of the screen changes as you
rotate it. You can turn this feature on and off.
2.5. Switch On/Off
Long press the power key to switch on/off the phone.
After inserting the SIM card, the screen will show the notes in the following order
when the phone is switched on:
If you have already set the SIM code, please type in PIN.
Search— the handset will search for proper network connection.
2.6. Unlock SIM Card
To avoid illegal use, the SIM card is enciphered with PIN (personal identification
number) as a protection. When this function is ON and you have already set a PIN
code, you need to type in PIN code every time, the handset is switched on in order
to unlock SIM card and use the handset.
You can turn off the SIM PIN code. Yet in this situation, the SIM card can't prevent
illegal use.
Input PIN code, press arrowhead icon to erase typing error and press OK to end
typing. For example, if the PIN code is set to 1234, then input "1234". After that,
Page 8

5
press Return key.
The SIM card will be locked if you input in wrong code for three times
continuously. The handset will inform you to input in PUK code.
Attention: Your network provider will set a standard PIN code (four to eight
numbers) for your SIM card. It is recommended that you change the code into a
personal code as soon as possible.
2.7. Connection to Network
When the SIM card is successfully unlocked, the handset will automatically search
for available network (the lock screen shows searching). The handset will show the
information of the network provider; the status bar will show the signal strength
and the network condition once the handset is successfully connected to a network.
Note: If the lock screens shows "Emergency", it means that you're out of network
coverage (service coverage).
2.8. Charging the Battery
Ensure the battery inserted in the handset. To charge the battery, plug in the charger
connector at the top of your phone (USB interface) and then plug the other end into
an AC power socket.
The battery icon indicates the charging status. While charging, the charge indicators
will scroll.
Disconnect the charger from the phone.
Disconnect the charger from the AC power socket.
Note: If the battery is powerless, the battery icon will reappear after a few minutes
of charging.
3. Basic Function
3.1. Calculator
Calculator provides the 4 function calculator. It's simple and uncluttered, and gives
you access to functions with add, subtract, multiply and divide, and more are at
your fingertips, and only when you need them.
3.2. Calendar
Enter the calendar menu and there appear a calendar on the screen with current date
and month with special color background frame. Press current date you can see date
information like day, month and weeks. Also you can create your event and there is
one good function “events from Gmail “you can select event from Gmail. Calendar
setting has more new functions like ringtone, start of the week etc. There is one
right side option button for seclude, day, 5 day, search and refresh and calendar
information on the screen will be correspondingly update.
Page 9
6
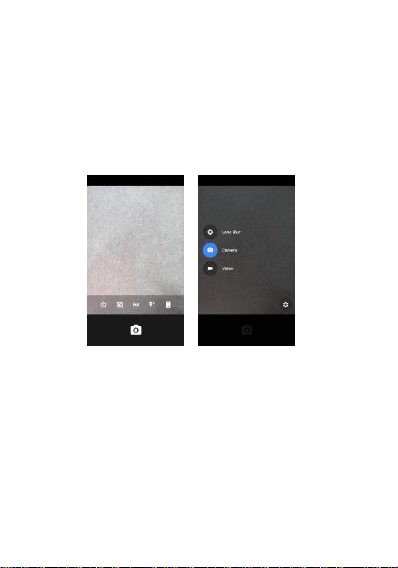
3.3. Camera
Google Camera captures quick and easy photos and videos, and takes advantage of
your Android device's computing power with image enhancing features like HDR+,
and Lens Blur.
Features
• Simple Interface - Capture photos and video quickly with Google Camera's
simple and intuitive interface
• Lens Blur - Manipulate the camera's depth of field using Lens Blur to focus on the
subject in the foreground and blur the background; great for portraits and selfies
• Video - Shoot video and simultaneously capture stills just by tapping on the
screen
3.4. Clock
Tap on clock icon for clock/alarm settings. You can see beautiful UI design. Click
on add alarm, about alarm there is on one page with smart UI design. Press alarm of
list to edit the activation, Time, Ringtone, vibrate and label. Now there is another
new function of stop watch. In this function second also available with number pad.
3.5. Contacts
Touch the people icon on the main menu of home screen, you can check all the
contacts, search for contacts or add new contact.
When adding a new contact, you can type in the name, address, phone number,
other phone number, work place, other email address and so on.
Page 10

7
3.6. Chrome
Browse fast on your phone with the Google Chrome browser that you love on
desktop. Pick up where you left off on your other devices with tab sync, search by
voice and save up to 50% of data usage while browsing.
• Sync Across Devices – seamlessly access and open tabs and bookmarks from your
laptop, phone or tablet
• Save Data – reduce mobile data usage by up to 50% while browsing
• Faster Browsing – choose from search results that instantly appear as you type
and quickly access previously visited pages
• Voice Search – use the magic of Google voice search to find answers on-the-go
without typing
• Translate – easily read webpages in any language
• Intuitive Gestures – open as many tabs as your heart desires and quickly flip
through them by swiping from side to side on the toolbar
• Privacy – use Incognito mode to browse without saving your history
3.7. Downloads
You can check the downloading or being-downloaded contents. Also can order by
name, size and date modified.
3.8. Docs
Create, edit and collaborate with others on documents from your Android phone or
tablet with the free Google Docs app. With Google Docs you can:
• Create new documents or edit any that were created on the web or on another
device.
• Share documents and work together with others in the same document at the same
time.
• Open, edit and save Microsoft Word documents.
• Get stuff done any time, even without an Internet connection.
• Add and respond to comments.
• Never worry about losing your work – everything is saved automatically as you
type.
3.9. Drive
Get started with Google Drive for free and have all your files within reach from any
smartphone, tablet, or computer. All your files in Drive – like your videos, photos,
and documents – are backed up safely so you can’t lose them. Easily in vite others
to view, edit, or leave comments on any of your files or folders.
3.10. FM Radio
For FM RADIO need headset first, which is used as the antenna, is plugged in
Page 11

8
before using the FM radio.
3.11. Gmail
Gmail is built on the idea that email can be more intuitive, efficient, and useful;
maybe even fun! Get your email instantly via push notifications, read and respond
to your conversations online & offline, and search and find any email.
Gmail also lets you:
• Manage multiple accounts
• View and save attachments
• Set up label notifications
3.12. Google
Google app for Android: The fastest, easiest way to find what you need on the web
and on your device.
• Quickly search the web and your phone
• Use your voice to search and more
• Get personalized results based on your location
3.13. Google Setting
In Google setting you can setting about Google application and edit Google
account
3.14. Google+
Go deep into what you love on Google+. Start exploring today!
• Explore topics that you’re interested in
• Delve into the things that you love with Collections
• Join communities to connect with people around all kinds of topics
• Connect with people who share your interests
• Follow your curiosity using search, trending topics and What’s Hot
Google+ Photos
• Back up all of your photos and videos
• Find the right photo quickly with image search
• Enhance photos in a flash and get creative with easy-to-use editing tools
• See moments brought to life as Stories, Movies, animations and more
3.15. Hangouts
Use Hangouts to keep in touch. Message friends, start free video or voice calls, and
hop on a conversation with one person or a group. Say more with photos, stickers,
and emoji.
Send and receive both Hangouts and text messages (SMS/MMS) and easily switch
between message types.
• Include all your friends with group chats for up to 100 people.
Page 12

9
• Say more with photos, maps, emoji, stickers, and animated GIFs.
• Call any phone number in the world (and all calls to other Hangouts users are
free!).
• Connect your Google Voice account for phone number, SMS, and voicemail
integration.
• Keep in touch with friends across Android, iOS, and the web, and sync chats
across all your devices.
• Message friends anytime, even if they’re offline.
3.16 Keep
Quickly capture what’s on your mind and get a reminder later at the right place or
time. Speak a voice memo on the go and have it automatically transcribed. Grab a
photo of a poster, receipt or document and easily organize or find it later in search.
Google Keep makes it easy to capture a thought or list for you, and share it with
friends and family.
Capture what’s on your mind
• Add notes, lists and photos to Google Keep. Pressed for time? Record a voice
memo and Keep will transcribe it so you can find it later.
Share ideas with friends and family
• Easily plan that surprise party by sharing your Keep notes with others and
collaborating on them in real time.
Find what you need, fast
• Color and add labels to code notes to quickly organize and get on with your life. If
you need to find something you saved, a simple search will turn it up.
Always within reach
• Keep works on your phone, tablet, computer and Android wearables. Everything
you add syncs across all of your devices so your thoughts are always with you.
The right note at the right time
• Need to remember to pick up some groceries? Set a location-based reminder to
pull up your grocery list right when you get to the store.
3.17. Maps
The Google Maps app for Android phones makes navigating your world faster and
easier. Find the best spots in town and the information you need to get there.
• Comprehensive, accurate maps in 220 countries and territories
• Voice-guided GPS navigation for driving, cycling and walking
• Public transport directions and maps for over 15,000 towns and cities
• Live traffic conditions, incident reports and automatic rerouting to find th e best
route
• Detailed information on more than 100 million places
• Street View and indoor imagery for restaurants, museums and more
Page 13

10
3.18 News & Weather
Your comprehensive and personalized view of headline stories and local news &
weather.
• Coverage from 65,000 publications
• Simple swipe-access to categories such as Top Stories, Technology, Sports &
Weather
• Tune your layout with any of 60 country-specific editions, home screen widgets
and personalized news sections such as 'Hollywood', 'NASA', 'Fashion', or anything
else that catches your fancy
• Tap any story for a deep selection of viewpoints, including in-depth articles,
Opinion, and local perspectives
3.19 Phone
Touch the phone icon on the main menu or the home screen to dial save contacts
number.
• Make Calls
Once phone has successfully attached to a network, touch the phone icon appears
on the standby screen (Home Screen), you can make calls or answer calls. Indicator
on the upper right part show the signal of strength
Quality of connection will be greatly influenced by obstructions. So movement of a
small range can effectively improve the quality of connection.
• Make Domestic Calls
Use virtual keyboard to enter phone numbers and then press Dial icon to make call.
If you need to change the phone number then press the backspace key for deletes.
When the call is answered, the screen will show the connection status.
• Phone Call Extension
Some of the extension phones can't be directly connect. Use of virtual keyboard
dial phone number click option menu and select " Add 2-sec pause", and then dial
the extension number.
Type in as follows to call extension phone:
Zone description > phone number >option> Add 2-sec pause > extension number >
call
• Make International Calls
For international call press long on 0 key from virtual keyboard until there appears
the sign "+" for international call code, which helps you call from any country
even if you don't know the ISD code of that country. You can make an international
call according to the following typing order: + › country code › complete phone
number › dialing icon (type in the prefix code, and then continue to enter the
country code and complete phone number). Country code usually follows
conventional practice: German is 49, Britain 44, Sweden 46 and so on.
When making international phone calls, the "0" in the city code should be emitted.
Page 14

11
• Make Listed Calls
Every dialed and received phone number is recorded in the call history list.
Recently dialed, answered and missed phone numbers are chronologically (newest
to oldest) listed in the "all" log. You can also choose and check missed calls,
answered and dialed list according as your need.
Listed phone numbers can be called out by pressing the respective log.
Press the small icon on the right side to enter the details screen of the log. In the
details screen, the phone number save function is preset.
• Emergency Calls
You can call for emergency service as long as you are in the network coverage
(check the signal strength indication bar on the upper right side of the handset
screen). If your network provider doesn't provide roaming service in this area, there
will be "Emergency Calls" on the lock screen. If you are in the network coverage,
you can have emergency calls even without a SIM card.
• Answer Calls
Slide the icon to answer an incoming call. If your earphone is connected to the
handset, you can use the earphone key on the earphone answer calls.
3.20 Photos
In the Photos interface, there are different folders. Select a folder and press to enter
it. Press image or video to view pictures or videos.
When viewing the picture, if you press the screen, a menu with "share, delete" will
pop out. Choose "share" to send the file through Bluetooth or via a message; Tap
menu key for further functions like Slide show, Edit, Print, Rotate left or right,
Crop, Set picture as and Details.
Page 15

12
3.21. Play Games
Games get more fun with the Google Play Games app. Compete with friends, track
your achievements and pick up wherever you left off, on any of your devices. As
you master more games across Google Play, show off your skills in your all-new
Game Profile. And whether you love puzzles, racing, sports or action games, you
can explore and choose from thousands of great games from right within the app.
Play the world, anywhere in the world, all from one place.
KEY FEATURES
• Achievements - Complete challenges, earn awards and track them all right from
the app.
• Leaderboards - See how you stack up against other players.
• Multiplayer - Play friends in real-time and turn-based matches.
• Immense selection - Choose from thousands of great games on Google Play –
puzzle, sports, strategy, action and more.
3.22. Play Music
Google Play Music makes it easy to discover, play and share the music you love on
Android.
With our new subscription service, you can play millions of songs on Google Play,
listen to radio with no limits, and enjoy playlists handcrafted by our music experts.
With both Unlimited and Standard, the Google Play Music app lets you listen to
your music collection anywhere. All your music is stored online, so no need to
worry about syncing, storage space or offline playback.
Unlimited features:
• Listen to unlimited songs
• Create custom radio from any song, artist or album
• Enjoy radio without skip limits
• Get smart recommendations based on your tastes
• Explore - Dig into categories like Arts & Photography, Business & Finance,
Food & Drink and more and subscribe to topics tagged to the articles that interest
you most.
• Go Offline - Access any news edition, topic or magazine offline without missing
a page. Bookmark news stories that you don't have time to read for later.
3.23.Play Newsstand
With Google Play Newsstand, discover more of the news and magazines that you
care about all in one app on your Android tablet or phone. Enjoy breaking news and
in-depth articles featuring audio, video and more. From sports, business, cooking,
entertainment, fashion and more – now get both free and paid news plus subscribe
to vibrant full HD magazines, all in one place. With hundreds of premier publishers
– it’s all there, easy to follow, read and share.
Page 16

13
• All in one - With one app and one tap, you have access to free and premium
content from news, magazines, blogs and more.
• Enjoy Read Now - Start reading right away with a home screen that quickly
learns what you’re into and highlights that adapt to your interests over time.
3.24. Play Store
It serves as the official app store for the Android operating. This is very important
function of Google. Google Play also serves as a digital media store, offering music,
magazines, books, movies, and television programs. It previously offered Google
hardware devices for purchase until the introduction of a separate online hardware
retailer
3.25. Setting
Your phone can connect to a variety of networks and devices, including Wi-Fi,
Bluetooth devices, such as headsets. You can also transfer files to/from your PC
through the data cable.
When you connect the device to PC, the screen will display the below picture.
In this case phone will be connected via MTP mode and “Connected as a media
device" notification will be shown.
Touch the notification, can select to change to other connect mode.
• Wireless & networks
Wi-Fi
To browse the Internet via Wi-Fi:
Go to Menu> settings> Under wireless & networks tab select Wi-Fi and then turn it
ON, select the WIFI connection listed under Wi-Fi networks with which you want
to connect> Enter the password of Wi-fi network with which you want to connect.
Page 17

14
Note: Make sure that Wi-Fi network with which you want to connect is in the range
and is active.
Bluetooth
Go to Settings > Wireless & networks> Bluetooth settings.
If Bluetooth is off, check Bluetooth to turn it on. Your phone scans and displays the
Bluetooth devices in range.
If the device you want to pair with is not in the list, make it discoverable.
If your phone stops scanning before you make the other device discoverable, touch
Scan for devices.
Touch the ID of the other device in the list Settings to pair them. If you are
prompted to for a password, enter any password on one device and enter the same
password you entered in the other device to be paired, If the pairing is successful,
your phone connects to the device.
SIM cards
The contents in this menu will differ according to different network providers. For
detailed information, please check inside the phone menu.
Data usage
Count the data you have used by displaying a map to show. To use the data usage
services, please follow below steps.
Menu> Go to Settings> Under Wireless & Networks tab> select the data usage>
Select the SIM with which you want to use data connection.
More
The contents in this menu will provide Airplane mode, Default SMS app, Tethering
& portable hotspot, VPN and Mobile networks service. To use the above services,
please follow the below steps.
Go to Settings> Wireless & Networks>More >select the above services
• Device
Display
You can set the level of brightness, Adaptive brightness, wallpaper, the sleeping
time, the daydreaming style, the font size of words, choose the auto-rotating screen
and cast screen.
Sound & notification
You can change the volumes and system sound, choose the ringtone and vibrate .
Storage
Include the SD card storage, available storage, insert SD card (If a SD card has
already been inserted, then this option will become "Unmount SD card "), format
SD card and all available storage in the internal storage space.
Battery
Show battery details by displaying map.
Apps
Include downloaded apps, running apps and all of the apps in the smartphone.
• Personal
Page 18

15
Location
Locate your position through tools like wireless network and GPS satellite.
Security
Change the settings of Screen security, Encryption, SIM card lock, Passwords,
Device administration and Credential storage.
Accounts
Manage the accounts for Facebook, Email, Google, and so on.
Language & input
Include Language, Keyboard &Input methods, Speech, Mouse Trackpad and so on.
Backup & reset
In this menu, including backup & restore and personal data, you can backup your
data, account and automatic restore. You also can reset to factory data in your
phone.
• System
Date & time
Include Automatic date & time, Automatic time zone, Set date, set time and so on.
Accessibility
Power button: press power button to end calls.
Printing
Connect printer to realize print function
About phone
Include System update, Status, Legal information, Model number, Android version,
Baseband version, Kernel version, and Build number.
Through Software Update you can download and install the latest Software for your
device.
3.26. Sheets
Create, edit and collaborate with others on spreadsheets from your Android phone.
With Google Sheets you can:
• Create new spreadsheets or edit any that were created on the web or on another
device.
• Share spreadsheets and work together with others in the same spreadsheet at the
same time.
• Open, edit and save Microsoft Excel files.
• Get stuff done any time, even without an Internet connection.
• Format cells, enter/sort data, view charts, and insert formulae, use find/replace
and more.
• Never worry about losing your work – everything is saved automatically as you
type.
3.27. Slides
Create, edit and collaborate with others on presentations from your Android phone
Page 19

16
or tablet with the free Google Slides app. With Google Slides you can:
Questions
Cause and Solution
Unable to turn
on
phone
Press the power on key for over 1 second.
Check if the battery is properly connected. Please remove
and install it again, retry to turn on
Check if battery is appropriately charged
• Create new presentations or edit any that were created on the web or on another
device.
• Share presentations and work together with others in the same presentation at the
same time.
• Open, edit and save Microsoft PowerPoint files.
• Get stuff done any time, even without an Internet connection.
• Add and rearrange slides, format text and shapes and more.
• Present straight from your device.
• Never worry about losing your work – everything is saved automatically as you
type.
3.28. You tube
Get the official YouTube app for Android phones. See what the world is watching --
from the hottest music videos to what’s trending in gaming, entertainment, news,
and more. Subscribe to channels you love, share with friends, and watch on any
device.
YouTube, your way
• Check out all the world’s videos and personalized recommendations
• Subscribe to your favorite channels to keep up-to-date
• Send videos from your phone or tablet to your Chrome cast, game console, or
smart TV
More music at your fingertips
• Easily find the artists you love and discover new recommendations on your
music homepage
• Jam to a YouTube Mix, an infinite playlist of songs with unlimited skips
• Enjoy all the music you love from your favorite artists, along with concerts,
remixes, parodies, covers, and one-of-a-kind collaborations you can only find on
YouTube
4. Frequently Asked Questions and Troubleshooting
Page 20

17
Unable to
connect to
network
Weak signal. Please Try and move to a location with strong
signal and try connecting to the network again;
Please ensure that you are not beyond the network
coverage of service providers;
Please ensure you have a valid SIM card. Please contact
your network provider for further information
Display
information
while turning
on
Check if the SIM card (insert the SIM card) is installed
correctly
Handset lock password: If the handset lock is activated,
you have to input handset password before using.
Input PIN: Inputting PIN while turning on each time is
activated, you have to input the PIN code.
Input PUK code: Having input wrong PIN code for 3 times
straight will lock the SIM card. You need to input the PUK
code provided by your network provider.
Poor quality of
calling
Please check if the sound volume is tuned improperly
In an area with poor receiving condition, example:
basement, the signal might be weak. Try reaching a
location with stronger signal reception and call again.
While using the mobile phone in the peak period of
communication, like commute time, you may be unable to
call because of line congestion.
Standby
duration
Shortened
The standby duration is relative to the system setting of
network. While the mobile phone is in an area with poor
signal strength and cannot receive the signal, the handset
will continuously search for a base station. This will
significantly reduce battery charge. It is recommended that
you turn off your mobile in area with no signal reception to
save battery.
Need replacing the battery. Please change a new battery.
SIM Card
Error
Dirt on the metal surface of an SIM card. Use clean cloth to
wipe the metal touch point on an SIM card.
The SIM card is not installed.
The SIM card is damaged. Please contact your network
service provider.
Unable to dial
out
Please confirm if you pressed the dial key after dialing.
Please confirm if calling is forbidden because of default
settings.
Please confirm if the SIM is valid.
Please confirm if the call barring is set.
Please confirm if the fixed dial function is set.
Page 21

18
Callers unable
to contact you
Please confirm if the mobile phone is on and connected
with the network.
Please confirm if calling is forbidden because of defaulting.
Please confirm if the SIM card is valid.
Please confirm if the call barring is set.
Unable to
charge handset
Poor contact. Please check if the plug is connected well.
Please confirm if the environment temperature is within the
range of 0ºC ~40ºC while charging.
The battery or charger is damaged. You need to replace it.
Unable to set
some functions
Wrong operation.
The network provider does not support the function, or you
have not applied for it.
Note: If the instruction above cannot help you solve problems, please note:
Mobile phone model and serial number
Specific content of warranty
Clear statement of problems
Then contact your local dealer or a LAVA authorized service center in your area.
5. Safety Information and Notices
5.1. Emergency call
If any emergency arises, dial 112 (or other emergency call number) for emergency
help.
Note:
Due to the nature of cellular networking, the success of emergency call is not
guaranteed.
5.2. For your safety
Switch off the phone in hospitals and aircraft. Obey any restrictions. Wireless
devices can affect the medical treatment and cause interference in aircraft.
Some medical devices such as hearing aids and pacemaker may be sensitive to
external radio frequency emissions. Consult the device manufacturers or your
doctor before using the phone around the medical devices.
Pay special attention to the ring tone volume and vibration settings if you have a
heart problem.
In areas with potentially explosive atmosphere, such as gas stations, fuel or
chemical transfer or storage facilities, obey all signs and instructions.
Your phone will emit radio frequency even in the standby mode. Turn off your
phone when so instructed.
Always obey all the local laws and regulations. Do not use your phone while
driving. Use Hands-free operation, if available, and give full attention to driving
Page 22

19
and to the road. Pull off the road and park before making or answering a call if
driving conditions so require.
If your phone is lost or stolen, notify your service provider immediately to stop
the SIM card from being used.
When you contact your service provider, they will need your IMEI number. It is
printed on the back of your phone set (you can find it when you remove your
battery), or call *#06# to look up your IMEI number. Copy this number and
save it for future need.
To prevent your phone from misuse, lock your SIM card or phone, and change
passwords when necessary.
Do not remove the battery without turning off the phone. Failure to follow this
instruction may result in data loss.
When you leave your vehicle, take the phone with you or place it in the glove
compartment to avoid theft.
Keep the phone, battery or charger out of reach of children.
Notes on phone usage
Your phone will give off electromagnetic waves. Do not place it near storage
medium such as floppy disk.
Using the phone near television, land phone, radio and office automatic
devices may cause interference and affect the function of the mobile phone.
Keep the phone dry; all kinds of liquid can erode electronic circuit.
Keep the phone away from extreme temperatures.
Keep the phone away from fire or a lighted cigarette.
Do not paint the phone.
Do not drop the phone or violently crush or shake the phone.
Do not keep the phone near magcards and other object with magnetism. The
phone’s magnetism may clear the information stored on floppy disk,
pre-paid phone card and credit card.
Keep the phone away from hot places where the temperature may exceed
60C, such as dashboard, windowsill, or areas exposed to direct sunlight.
Do not disassemble or modify your phone. This can damage the phone,
cause leakage and break the internal circuit.
Use only damp cloth or non-static cloth to clean your phone.
Do not use alcohol, thinner, benzene or other chemicals or abrasive cleaner
to clean your phone.
The phone will become warm under normal use and while in battery
charging.
Do not leave the phone with battery uninstalled or with the battery empty for
a long period of time. This may cause data loss.
The metal parts of the phone may irritate your skin depending on your
health condition.
Do not put the phone in the back pocket. Sitting on it may damage the phone.
Page 23

20
Do not put the phone at the bottom of a bag. You may crush it.
When the vibrate mode is on, place the phone carefully to prevent it from
being dropped from a height or being moved to a heat source due to the
vibrating.
Do not press the touch screen with needles, pen point or other sharp objects;
it can damage the LCD and violate the terms and conditions of the warranty.
Notes on battery usage
Do not short-circuit your battery. It can damage battery, and cause leakage,
over heat, fire or explosion.
Disposing battery in a fire can cause fire or explosion. Old batteries should
be returned to your dealer or be disposed according to local regulations. Do
not treat the battery as household waste.
Keep metal objects (such as coins or key rings) away from the battery to
avoid short circuit.
Do not remove the battery without turning off the phone.
Do not hold the battery in your mouth. The liquid of the battery can be toxic.
Embedded battery shall be replaced by authorized dealers. Use only
batteries approved by the phone manufacturer; otherwise, it may cause
explosion.
Damage resulting from using un-authorized batteries and chargers will not
be covered by the warranty.
Avoid contact with any leaked liquid of the battery. If it touches your skin,
wash your skin with fresh water and go to the hospital immediately.
Certification Information (RoHS)
We at LAVA take our social responsibility seriously and are committed to
the cause of saving our environment; it is in keeping with these
commitments that we are proud to state that LAVA phones are RoHS
complaint.
Certification Information (SAR)
Your phone is designed not to exceed the limits of emission of radio waves
recommended by international guidelines. These guidelines include safety
margins designed to assure the protection of all persons, regardless of age
and health.
SAR (specific absorption rate) is the unit of body-absorbed RF quantity
when the phone is in use. SAR value is ascertained according to the highest
RF level generated during laboratory tests.
The true SAR level during phone usage will be far lower than this level.
The SAR value of the phone may change depending on factors such as how
Page 24

21
close you are to a network tower, use of accessories and other
enhancements.
The highest SAR value of the device is less than 1.6W/Kg averaged over 1
gm of human tissue.
The SAR value may differ depending on national reporting, testing
requirements and the network band.
SAR Recommendations
Use a wireless hands-free system (headphone, headset) with a low power
Bluetooth emitter.
Please keep your calls short and use SMS whenever more convenient. This
advice applies especially to children, adolescents and pregnant women.
Prefer to use your cell phone when the signal quality is good.
People having active medical implants should preferably keep the cell phone
at least 15 cm away from the implant.
Maintain a preferable distance of 15 mm from the device.
Safety precautions:
Use cell phone when the signal quality is good
People having active medical implants should preferably keep the cell phone
at least 15cm away from the implant
Use a wireless hands-free system ( Headphone, headset) with a low power
Bluetooth emitter
Make sure the cell phone has a low SAR
Keep your calls short or send a text message (SMS) instead. This advice
applies especially to children, adolescents and pregnant women.
E-waste Disposal Mechanism
'E-waste' means waste electrical and electronic equipment (WEEE). In other words
E-waste is a popular, informal name for electronic products nearing the end of their
"useful life". For more details about e-waste please refer e-waste rules, 2011
www.moef.nic.in
Do’s and Don’ts for disposal e-waste
Do’s:
Ensure that an Authorized Person repairs your Lava products
Call Our Local Authorized Collection Centers to Dispose Lava products
Always drop your used electronic products, batteries or any accessories
thereof after the end of their life at nearest Authorized Collection Point or
Collection Center.
Separate the packaging material according to responsible waste disposal
options and sorting for recycling.
Always remove the battery from the product, when you do not intend to use
Page 25

22
the product anymore it in future.
Don’ts:
Do not Dismantle your Lava Product on your own
Do not give your e-waste to KabbadiWala / Scrap Dealer/ Rag Pickers.
Do not dispose-off the e-waste in landfills
Never dump E-waste in garbage bins.
Do not dispose of your product at municipal waste bins or rooms.
Do not throw used batteries into household waste.
Consequences of improper handling and disposal of E-Waste
Improper disposal of waste prevents natural resources from being re-used.
Some waste contains hazardous chemicals and if not disposed of properly
may release toxins into the soil and water, and also releases greenhouse
gases into the environment
If e-waste is not properly disposed of, it can be a threat to health and
well-being of humans and animals and it also has adverse effect on the
environment.
Placing of batteries or devices on or in heating devices, such as microwave,
ovens, stoves, or radiators and improper disposal of batteries may lead to
explosion.
If the battery terminals are in contact with metal objects, it may cause a fire.
For more details on how to dispose of your Lava products at the end of life, Please
refer the list of our Services Centers on Pan India basis on our website
www.lavamobiles.com or please view this link for the details of Service Centers
http://www.lavamobiles.com/support-services.
Service Center number: 1860-200-7500
Timings: Monday to Sunday, 10:00 AM to 7 PM
LAVA WARRANTY CERTIFICATE
Limited warranty:
LAVA international Ltd. (LAVA) provides limited warranty for your mobile phone
and original accessories delivered with your mobile phone (hereinafter referred to
as “product”)
The warranty period for the transceiver is one (1) year and for battery, charger and
Page 26

23
headset is six (6) months from the date of purchase.
LAVA Warranty
Subject to the conditions of this Limited Warranty, LAVA warrants a product to be
free from defects in design, material and workmanship at the time of its original
purchase by you, and for a subsequent period of one (1) year for transceiver and six
(6) months for battery & charger.
You shall have the coverage or benefits under this warranty in the event that any of
the following conditions are applicable:
The product has been subjected to abnormal use or conditions, improper
storage, exposure to excessive moisture or dampness, exposure to
excessive temperature, unauthorized modification, unauthorized repair
(including but not limited to use of unauthorized spare parts in
repairs),abuse, accidents, Acts of God, spills of food or liquids, improper
installation
You have not notified Lava of the defect in the product during the
applicable warranty period.
The product serial no. code or the accessories date code has been
removed, defaced or altered.
The product has been used with or connected to an accessory (i) Not
supplied by Lava or its affiliates, (ii) Not fit for use with the product or
(iii) Used otherwise than in manner intended.
The seals of the product’s battery enclosure h ave been broken or shown
evidence of tempering or the product’s battery has been used in
equipment other than that for which it has been specified usable by
LAVA.
All plastic surfaces and all other externally exposed part that is scratched
or damaged due to normal use.
To get maximum of your new product, we recommend you to:
Read the guidelines for safe and efficient use as mentioned in the
manual.
Read the terms and conditions of your Lava warranty in the manual.
Keep your original receipt; you will need it for warranty services if asked
to produce.
Present this Lava Warranty Certificate along with original proof of
purchase whenever you require any warranty services.
Page 27

24
In case Lava product needs service, please visit the nearest Lava service centers
given in the service guide. Please visit our Website www.lavamobiles.com for
updated list of Authorized Service Centers near to your location.
Important note: for your warranty to be valid, all information on the warranty
certificate has to be completed including the stamp from the authorized
distributor/retailer.
All warranty information, product features and specifications are subject to
change without notice.
IMEI No. ……………………………………………………….
Dealers Stamp ……………………………………………………….
Date of purchase ………………………………………………………..
Model No. ……………………………………………………….
 Loading...