

Page 1

Page 2

© 2014. All rights are reserved. No part of this document may
be reproduced without permission.
While all efforts have been made to ensure the accuracy of all
contents in this manual, we assume no liability for errors or
omissions or statements of any kind in this manual, whether
such errors or omissions or statements resulting from
negligence, accidents, or any other cause. The contents of this
manual are subject to change without notice.
Protect our environment! We strive to produce products in
compliance with global environmental standards. Please
consult your local authorities for proper disposal.
Note: User’s Manual is Just to guide the user about the
functionality of the phone. This does not substantiate any
certificate of technology. Some functions may vary due to
modifications and up-gradation of software or due to printing
mistake.
1
Page 3

Content
Welcome ......................................................................... 4
Your Phone ..................................................................... 7
Keypad Descriptions ....................................................... 7
Start to Use ................................................................... 10
Charge the Battery ........................................................ 11
Use Touch Screen ......................................................... 11
Make a Call ................................................................... 11
Answer a Call ................................................................ 12
Emergency Service ....................................................... 12
Input Method ................................................................. 12
1. Backup and Restore ................................................. 11
2. Browser ..................................................................... 11
3. Calculator .................................................................. 11
4. Calendar.................................................................... 11
5. Camera ..................................................................... 11
6. Clock ......................................................................... 12
7. Downloads ................................................................ 13
8. Email ......................................................................... 13
9. File Manager ............................................................. 13
10. FM Radio................................................................. 13
11. Gallery ..................................................................... 13
12. Google Service ....................................................... 14
13. Messaging ............................................................... 14
14. Music ....................................................................... 14
15. People ..................................................................... 14
16. Phone ...................................................................... 15
2
Page 4

17. Settings ................................................................... 15
18. SIM Toolkit……………………………………………..18
19. Sound Recorder……………………………………….17
20. Video Player ............................................................ 19
Widgets ......................................................................... 19
Care and Maintenance .................................................. 19
SAR Information ............................................................ 21
Troubleshooting ............................................................ 21
Lava warranty certificate ............................................... 27
3
Page 5

Congratulations on your purchase of the LAVA mobile phone. Your phone
Safe power on
Do not use your mobile phone where it is forbidden to use or it
might cause disturbance or danger.
provides many functions which are practical for daily use, such as a
hands-free loudspeaker, camera, MP3 player, video recorder, and more.
Your phone can also connect to a PC, laptop, or other device using a USB
data cable.
You can read the manual to understand how to use iris 370 mobile phone
and experience the well-established functions and simple operation
method. Please use the original accessory in order to achieve the best use
of effects. Use of non-original components results in of the damage caused
of by machinery, in which case Lava shall not be responsible.
LAVA support and contact Information
Welcome
Check www.Lavamobiles.com web site for additional information,
downloads, and services related to your LAVA product.
To check for the nearest LAVA service center location for maintenance
services, you may like to visit www.lavamobiles.com
For Your Safety
Before using your phone, please read the following important information
to eliminate or reduce any possibility of causing damage and personal
injury.
Lava Customer Care Service
No: 1860-200-7500
4
Page 6
Safe transportation first
Please observe all local laws and regulations.
Do not use your mobile phone while driving.
Safe transportation should be considered first when driving.
Disturbance
Mobile phone’s performances may fluctuate during a
disturbance.
Turn off when in the hospital
Please follow location-specific applicable limitations.
Please switch your mobile phone off when near a medical
instrument.
Turn off on an airplane
Please follow location-specific applicable limitations.
Do not use your mobile phone on an airplane.
Turn off when at a gasoline station
Do not use your mobile phone at a filling station or around fuels
or chemicals.
Turn off around exposure Area
Please observe location-specific applicable limitations
Do not use your mobile phone near an area where explosions
can occur.
Proper use
As described in this manual, your mobile phone can be used only
in the locations free from mobile phone usage restrictions.
Please do not touch the antenna area of your phone.
Use qualified after sales service
Only a qualified technician can install or repair your mobile
phone. Please contact LAVA authorized service center in case of
phone failure.
Accessories and batteries
Only use the authorized accessories and batteries.
Waterproof
Your mobile phone as well as battery is not waterproof. Please
keep it away from water.
Backup
Remember to make a backup or keep a written record of all
important information saved in your mobile phone.
5
Page 7

Connect to other devices
Please read the user manual of the device to get more detailed
security instructions before connecting to other devices and do
not connect to an incompatible product.
SOS emergency calls
Make sure your mobile phone is switched on and in a service
area. In idle mode, input the SOS number; then press the Dial
Key. Advise where you are and do not hang up without
permission.
Improper use will invalidate the warranty! These safety instructions also
apply to original accessories.
Backup Copies
Remember to make back-up copies or keep a written record of all
important information stored in your phone.
Use Notification Panel
As a new notification appears in the notification area, slide down in the
area to view the contents of the notification.
6
Page 8
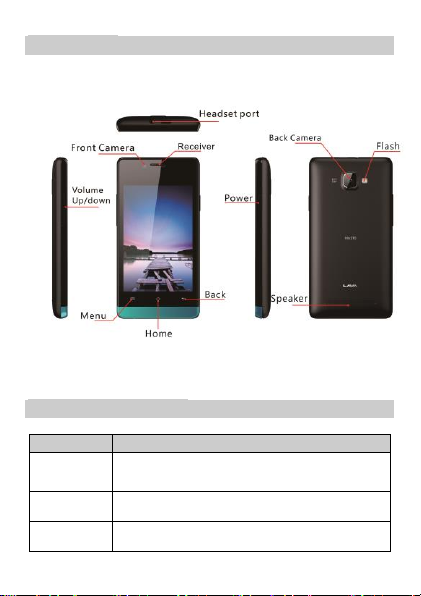
Your Phone
Key
Description
Power Key
Long press the key to turn on the phone.
In the power on status, press the key to lock keypad
and screen; long press the key to show phone options.
Back Key
In the menu mode, press the key to go back to upper
menu.
Home Key
Press the key to return to standby mode.
Long press the key to show recent applications list.
The phone appearance is shown as below. The picture is for reference only;
your phone may be different. Please take your actual phone as the
standard.
Keypad Descriptions
7
Page 9

Key
Description
Option Key
Press the key to enter option menu.
Volume Keys
To adjust incoming call ringtone volume.
During a call, playing music, video, or listening to radio,
press the keys to adjust volume.
Start to Use
Install Memory Card, SIM Card and Battery
When you apply for a network, you will get a plug-in SIM card. SIM
(Subscriber Identity Module) card that contains phone number, service
projects and can be used to store phone numbers and personal
information.
Attention: Do not bend or scratch SIM card, do not let it contact with static
electricity, dust or water.
Keep all SIM cards where children cannot reach or touch.
Note: Keep the SIM card chip contacts face downward. Make the SIM card
fits card slot.
Remove Memory Card, SIM Card and Battery
Note: If the phone is turned on, long press Power Key about 3 seconds
Until it tips phone options and selects Power off and then press OK to turn
off the phone. Then, remove the battery, SIM card and memory card.
Does not plug or remove memory card in boot state otherwise it will cause
damage to the file system.
Warning:Use only compatible memory cards
for use with this device. Incompatible memory
cards may damage the card or the device and
corrupt the data stored in the card.
Power ON/OFF
Press the power key to power-ON/OFF the phone.
When you turn your phone on, it’ll automatically check the SIM and show
the following information on screen
8
Page 10

Charge the Battery
1. Before charging, check the battery slot to ensure the battery has
been installed correctly.
2. Plug one end of the charger into phone.
3. Connect another end of the charger to the socket.
4. Start charging. It can be charged whether power on or power off.
▪ In power on state, when the battery icon on screen start rolling
means it is been charged. When the icon is full and stop rolling
means charge is completed.
▪ In power off state, the battery icon on screen start rolling means it is
been charged. When the icon is full and stop rolling means charge is
completed.
5. Unplug the charger from the socket.
6. Disconnect the charger and phone.
Use Touch Screen
Press: Use finger to press the desired option to confirm selection or
start an application.
Long press: Long press the screen in current operation interface,
icon, or input area; you can open the option menu in current
interface.
Slide: Slide the finger on screen horizontally or vertically. For
example, slide the screen in standby mode or main menu horizontally
to change menu page.
Drag: Use finger to long press desired item, drag it to anywhere on
screen. For example, you can drag the icon in main menu to standby
screen.
Make a Call
1. In standby mode or in main menu, press the dial icon to enter dial
panel, press numbers on screen to enter phone number.
2. Press dial icon at bottom, select SIM card to dial the number.
3. Press end icon to cancel the call.
9
Page 11

You need to unlock the phone if the keypad and screen is
locked.
You can make calls through call log, contacts, and
messages.
During a call, press Volume Keys to adjust the volume.
Answer a Call
When there is an incoming call, you can:
▪ Drag the icon toward right to answer the call.
▪ Drag the icon toward left to decline the call.
Emergency Service
You can call emergency service number directly without SIM card. Different
networks use different emergency numbers, Please query your network
operator.
Input Method
Your phone has the built-in input method. In edit mode, long press “,…” to
show Input options and set input languages and Android keyboard
settings.
Input English
Press the on-screen keypad to enter corresponding letters.
Input Number
10
Page 12

Press “?123”, you can input numbers directly by press the number icons.
Long press the letter icons with number, or after long press, slide finger to
the numbers to input.
Input Symbol
Press “?123” to enter symbol list. Press the desired symbol to input.
Long press “.…” to show symbol list, slide finger to the desired symbol to
input.
1. Backup and Restore
In this menu, you can choose to BACKUP and RESTORE application and
personal data.
2. Browse
Through a web browser, you can connect to the internet, Internet
settings are default to MTN SIM card.
Touch Brower can open the browser. Interface as shown in the diagram:
In the browser, you can open the page by the following methods:
1. Click on the browser address bar, input for the open web site. Click.
2. Touch the menu key-> bookmarks, choose need to open the bookmarks
or click on the most visited/history records label page to choose open other
web pages.
3. Calculator
The calculator can execute simple calculations. Slide the screen toward left
or right, you can change the calculator in Basic panel and Advanced panel.
4. Calendar
In the calendar, you can check schedules for current month. It has alarm
for the date with schedule. Select one date to check all schedules for that
day, or you can edit or delete the schedules.
5. Camera
Your mobile phone and camera with dual, it is equipped with a high vivid
camera picture which you can use to take pictures at any time or place and
then save them on your mobile phone, use them as your mobile phone
wallpaper or send them to your friends and colleagues via MMS and email.
11
Page 13

1. Open camera>Click on the camera can turn on the camera. Warm
prompt: in the camera's interface, you can click " " fast switching to
the camera to video camera, click to panoramic photo mode
2. Taking a photo
1. During the view-finding mode, adjust the lens to allow what is being
photographed to appear in the viewfinder.
2. After framing the picture you wish to take, keep the camera steady and
press” to take photo;
3. After taking photos will auto save to camera folders in picture;
4. Click “ ” return to camera interface.
Video recorder
The mobile-phone supports shoot function, the extent of film restrict
according as current memory space.
Recorder
1. During the view-finding mode, adjust the lens to allow what is being
photographed to appear in the viewfinder.
2. Press” “ to recorder.
3. 3. Press “ ” end recorder.
Complete recorder, you can click on the icon of the right, in the menu for
the following in operation:
1. Click delete, you can delete the video.
2. Click share, you can through the information, E-mail or Bluetooth, etc
and good friends share this video.
3. Click “ ” ,you can view the video.
4. Click more, You can view the video detailed information.
6. Clock
In the clock interface , you can check time and date. Press the alarm
icon, you can add new alarm clock or turn on/off existing alarms.
12
Page 14

In the clock interface, you can also press the icons to enter count down
function, stopwatch, cities settings, night mode, and settings.
7. Downloads
To check all downloads applications.
8. Email
You can use Email to send and receive emails.
Setup Email Account
According to the tips on screen to input email address and password, and
press Next. You can press Manual setup to setup server information
manually.
Check Emails
In the Inbox, select the email you want to check to enter. Press the icons to
do the options such as delete, reply, etc.
Compose and Send Email
In the Inbox, press new mail icon to create new email. Input receiver email
address, subject, and content, and then press send icon to send the email.
Delete Accounts
In the Inbox, press Option Key to select Settings. Select the account you
want to delete and then select Remove account in the option list. Press OK
to confirm and delete the account.
9. File Manager
In this menu, you can select to check Phone storage and SD card.
10. FM Radio
Select FM Radio in the main menu and plug earphone to enter. Press
Power icon to turn on/off the radio. Press setting icon and select
Search, the phone will search available channels and save in the list. Press
the icons on screen to operate the FM radio.
11. Gallery
You can use Gallery to view or manage photos and videos.
13
Page 15

12. Google Service
Availability of Google applications, services, and features may vary
according to your carrier.
When you turn on your mobile phone for the first time, touch Google
services such as Gmail, Google, Play Store and you may be prompted to
sign in to your Google account.
Ensure that your mobile phone has an active data connection before you
sign in to your Google account.
If you already have a Google account, select to enter your username and
password.
13. Messaging
Select Messaging in the main menu or standby mode to enter. Select new
message icon at left down corner to create new SMS or MMS and send.
1. Enter receiver’s number or add number from contacts .
2. Press “Type text message” to input message content.
3. If you want to send picture or video file, press “ ” to add pictures,
videos and audio. The message will shift to multimedia message
automatically.
4. Press send icon and select SIM card to send the message.
14. Music
Select Music in main menu. Press Artists, Albums, Songs, and Playlists at
the top of screen to change category. Select one audio file to play the
music. Press the icons on screen to operate the audio player.
15. People
In the People, press search icon to search contact, press add new icon to
add new contact. Press Option Key to enter:
Delete Contact
Select one or more contacts, then press OK to delete all selected contacts.
Contacts to Display
Select All contacts, contacts on SIM card, Phone, or Customize the
contacts to display.
Import/Export
Copy the contacts from SIM cards, phone, phone storage or SD card, and
then select location to copy.
Accounts
Select whether to Auto-sync app data.
14
Page 16

Settings
You can sorting your contacts
16. Phone
Press the icons on screen to input numbers in sequence. After inputting
numbers, press dial icon and select SIM card to dial. Press the icons at the
top of screen, you can enter call log or contact.
17. Settings
SIM information: Choose SIM card enabled or disabled.
Default: Set up voice call, messaging and data connection use the default
SIM card.
General setting: Set the SIM card roaming and contacts & SIM.
Wifi
To turn on the wifi the can scan the network to browse wap page or other
apps;
Wi-Fi: select on or off.
Wi-Fi settings: Set up and management wireless access points,
etc.
Wi-Fi Direct settings: Set up and management WLAN Direct.
Tethering & portable hotspot: Will you move data connection
through cell phone USB or as a portable WLAN hot share.
VPN settings: Setup and manage virtual private network.
Mobile networks: Check the mobile data usage, set access point
name and network operators.
GPRS transfer prefer: Will you move data connection through cell
phone USB to share.
Bluetooth
Open/close Bluetooth.
Bluetooth settings: Management connection, setting device name
and can detect the sex, etc.
Measured by your phone,Your carrier’s data usage according may
differ;
15
Page 17

More
Airplane mode: Disable all wireless connection.
VPN settings: Setup and manage virtual private network.
Tethering & portable hotspot: Will you move data connection
through cell phone USB or as a portable WLAN hot share.
Wi-Fi Direct settings: Set up and management WLAN Direct.
Mobile networks: Check the mobile data usage, set access point
name and network operators.
GPRS transfer prefer: Will you move data connection through cell
phone USB to share.
Audio Profile
General
Silent
Meeting
Outdoor
Display
Brightness: Set the brightness of the phone display
Scenes: to set the Scenes to default or work;
Wallpaper: Set up the wall paper of mobile phones
Theme: to set up the phone’s theme;
Auto-rotate screen: Set up if open automatically rotating screen.
Sleep: Automatic adjustment screen lock the delay time before
Font size: to set the phone’s font size;
Storage
SD card: view SD card total space and available space.
Mount SD card: After unloading SD card SD card will not display.
Erase SD card: Remove the SD card all the data.
Internal storage: Display size available space.
Battery
View Battery Condition
16
Page 18

Apps
Unknown sources: Setting is allowed to install the electronic
market to provide application.
Manage applications: Management and delete installation
applications.
Running services: Check and control the currently running
services.
Storage use: Check the application of storage space.
Security
You can configure settings that help secure your phone and its data.
Language settings: can select language and user dictionary.
Keyboard settings: choose the Android keyboard.
Input method: Choose input method way.
Backup and Restore
Back up my data: back up app data,WIFI passwords,and other
settings to Google Service;
Backup account: backing up to debug-only private cache
Automatic restore: When reinstalling an app,restore backed up
settings and data
DRM reset: Delete all DRM licenses
Factory data reset: Erases all data on phone;
Date and Time
Automatic: Use networks offer a time and date.
Set date: Manually edit date.
Select time zone: Manually choose time zone.
Set time: Manual set a time.
Use 24-hour format: set Open/close.
Select date format: Choose the date the format of the show.
Schedule Power ON/OFF
Each time, including the timing of the setup time and repeat way
17
Page 19

content, set up complete and checked open the alarm clock check
box, when the corresponding setting time, will be set according to
the switch machine operation and executive boot or shutdown
action.
Accessibility
Accessibility: set Open/close.
Power button ends call: Press power key words will end the call, not shut
down the screen.
Quick boot: set Open/close.
About phone
System updates
Status: Check the current state of the mobile phone.
About battery: View power consumption situation
Legal information: check the open source license
About version: Display model.
18. SIM Toolkit
If your SIM card supports STK (SIM Tool Kit) function, the phone can
display different first level menu according to different STK card. This
function needs the network provider support. If user finds STK function
can’t operate normally, please contact the network provider. If the network
provider does not support this function, we do not claim any responsibility
whatsoever.
19. Sound Recorder
The sound recorder is a simple recording tool that provides all of the
required functionalities for you to manage voice files.
Start Recording
1. In any mode, press Home Key, touch the application tab and then touch
Sound Recorder. Touch button to start recording.
2. During the recording, you can pause the voice recording anytime by
3. Touching button . Then choose to and touch Save to save the
18
Page 20

recording file.
4. To exit sound recorder, you can press Back Key.
20. Video Player
You can use Video player to view or manage videos.
1. Click to see the video of the choice in the folder.
2. Choose the video files to play, click open can use video player play.
Widgets
In the widgets list, you can select desired widget to add to idle screen.
Care and Maintenance
Battery Care
• Your device is powered by a rechargeable battery. When the power is
weak, please charge the battery. In order to extend the lifespan of the
battery, use all the battery's power before recharging.
• Unplug the charger from the electrical plug and the device when not in
use. Do not leave the battery connected to a charger more than a week.
Overcharging may shorten its lifespan.
• Extreme temperatures can affect the ability of your battery to charge.
Battery needs the fit temperature. If the surrounding temperature is over
40°C, the battery cannot be charged.
• Use the battery only for its intended purpose. Never use any charger or
battery that is damaged.
Do not short-circuit the battery. Accidental short-circuiting can occur when
a metallic object such as a coin, clip, or pen causes direct connection of the
positive (+) and negative (-) terminals of the battery. (These look like metal
strips on the battery.) Short-circuiting the terminals may damage the
battery or the connecting object.
• Leaving the battery in hot or cold places, such as in a closed car in
summer or a freezer in winter conditions, will reduce the capacity and
19
Page 21

lifetime of the battery. Always try to keep the battery between 59°F and
77°F (15°C and 25°C). A hot or cold battery may not function temporarily,
even when the battery is fully charged.
• Battery performance is particularly limited in temperatures below freezing.
• Do not dispose of batteries in a fire! Dispose of batteries according to
local regulations. Please recycle when possible. Cellphones are not
considered household waste.
Mobile phone maintenance
1. Keep the device dry. Precipitation, humidity, and all types of liquids or
moisture can contain minerals that will corrode electronic circuits. If
your device does get wet, remove the battery and allow the device
to dry completely before replacing it.
2. Do not use or store the device in dusty, dirty areas. Its moving parts and
electronic components can be damaged.
3. Do not store the device in hot areas. High temperatures can shorten the
life of electronic devices, damage batteries, and warp or melt
certain plastics.
4. Do not store the device in cold areas. When the device returns to its
normal temperature, moisture can form inside the device and
damage electronic circuit boards.
5. Do not attempt to open the device other than as instructed in this guide.
6. Do not drop, knock, or shake the device. Rough handling can break
internal circuit boards and fine mechanics.
7. Do not use harsh chemicals, cleaning solvents, or strong detergents to
clean the device.
8. Do not paint the device. Paint can clog the moving parts and prevent
proper operation.
9. Use only the supplied or an approved replacement antenna.
Unauthorized antennas, modifications, or attachments could
damage the device and may violate regulations governing radio
devices.
10. All of the above suggestions apply to your device, battery, charger, or
any enhancement. If any device is not working properly, take it to
the nearest authorized service facility for service.
11. If you don’t use your phone, it’s better to switch it off and remove
battery so as to save energy and avoid cellular radiation.
20
Page 22

12. Please don’t have the volume over loud while using the phone, which
might impair your hearing.
13. The unprofessional shouldn’t disassemble the terminal and battery of
the phone.
14. It is recommended that you should try not to use the holster with
magnet button, for the magnet may interfere with the phone signal,
and hard iron button may crush the LCD screen. Plastic phone
cover will lead to poor volatilization of vapor and have the internal
components corrupted, moreover, it can have the phone shell
oxidized and faded.
15. If you or your family has a medical record of dizziness or epilepsy,
please consult with the doctor first, if you want to play phone games
or use the flashlight (the flash doesn’t available in all phone
models).
16. Please don’t put the flashlight too close to the eyes of human beings
or animals, as this could do harm to the eyes.
Pacemaker
Pacemaker manufacturers advise the distance between your phone and
heart pacemaker should be 6 inches (15.3 cm) at least, otherwise the
phone could interfere with the pacemaker.
The personnel who wears pacemaker should do the followings:
Should always keep a distance (at least 6 inches) between the phone
and pacemaker, when the phone is switched on.
Should not have the phone in a upper pocket
Should listen to the phone closer to the ear which is farther from the
pacemaker
Should avoid the phone falling off from high places.
Caution: The manufacturer assumes no responsibility for the
consequences of the users does not comply with the above suggestions or
misuse of the phone.
SAR Information
The highest SAR value for this mobile phone is <1.6 W/kg, in accordance
with the requirements of the ICNIRP, which recommended the limit for
21
Page 23

exposure to radio waves is 1.6 watts/kilogram(W/kg) averaged over 1 gram
of tissue. For more information, please visit Lava’s website
www.lavamobiles.com to query Safety precautions:
a. Use a wireless hands-free system ( Headphone, headset) with a low
power Bluetooth emitter
b. Make sure the cell phone has a low SAR
c. Keep your calls short or send a text message (SMS) instead. This
advice applies especially to children, adolescents and pregnant
women
d. Use cell phone when the signal quality is good
e. People having active medical implants should preferably keep the
cell phone at least 15cm away from the implant
E-waste Disposal Mechanism
'E-waste' means waste electrical and electronic equipment (WEEE). In
other words E-waste is a popular, informal name for electronic products
nearing the end of their "useful life". For more details about e-waste please
refer e-waste rules, 2011 www.moef.nic.in
Do’s and Don’ts for disposal e-waste
Do’s:
a. Ensure that an Authorized Person repairs your Lava products
b. Call Our Local Authorized Collection Centers to Dispose Lava
products
c. Always drop your used electronic products, batteries or any
accessories thereof after the end of their life at nearest Authorized
Collection Point or Collection Center.
d. Separate the packaging material according to responsible waste
disposal options and sorting for recycling.
e. Always remove the battery from the product, when you do not intend
to use the product anymore it in future.
Don’ts:
a. Do not Dismantle your Lava Product on your own
b. Do not give your e-waste to KabbadiWala / Scrap Dealer/ Rag
Pickers.
c. Do not dispose-off the e-waste in landfills.
d. Never dump E-waste in garbage bins.
e. Do not dispose of your product at municipal waste bins or rooms.
f. Do not throw used batteries into household waste.
22
Page 24

g. Consequences of improper handling and disposal of E-Waste
h. Improper disposal of waste prevents natural resources from being
re-used.
i. Some waste contains hazardous chemicals and if not disposed of
properly may release toxins into the soil and water, and also
releases greenhouse gases into the environment
j. If e-waste is not properly disposed of, it can threat to the health and
well-being of humans and animals and it also has adverse effect on
the environment.
k. Placing of batteries or devices on or in heating devices, such as
microwave, ovens, stoves, or radiators and improper disposal of
batteries may lead to explosion.
l. If the battery terminals are in contact with metal objects, it may
cause a fire.
m. For more details on how to dispose of your Lava products at the
end of life, Please refer the list of our Services Centers on Pan
India basis on our website www.lavamobiles.com or please view
this link for the details of Service Centers
http://www.lavamobiles.com/support
23
Page 25

Troubleshooting
Check www.Lavamobiles.com web site for additional information,
downloads, and services related to your LAVA product.
To check for the nearest LAVA service center location for maintenance
services, you may like to visit www.lavamobiles.com
Lava Customer Care Service
No: 1860-200-7500
24
Page 26

Frequently Asked Questions
Frequently
Asked
Questions
Cause and Solution
Fail to turn
on
Press the power key for over 1 second.
Check if the battery is properly connected. Please remove
and install it again and retry;
Check if battery is appropriately charged.
Fail to
connect
network
In case of Weak signal, please try and move to a location with
strong signal and try connecting to the network again;
Please ensure that you are not beyond the network coverage
of service providers;
Please ensure you have a valid SIM card. Please contact
your network provider for further information.
Display
information
while
turning on
Check if the SIM card is installed correctly
When you enable the SIM security option.
Handset lock password: If the handset lock is activated, you
have to input handset password.
Input PIN: if Inputting PIN while turning the phone on each
time is activated, you have to input the PIN code.
Input PUK code: When you’ve input wrong PIN code for 3
times will lock the SIM card. You need to input the PUK code
provided by your network provider.
Poor
quality of
calling
Please check if the sound volume is tuned properly
In an area with poor network conditions, example: basement,
the signal might be weak. Try searching a location with
stronger signal reception and call again.
While using the mobile phone in the peak period of
communication, like commute time, you may not be able to
call because of line congestion.
Standby
duration
shortened
The standby duration is relative to the network systems.
While the mobile phone is in an area with poor signal strength
and cannot receive the signal, the handset will continuously
search for a base station. This will significantly reduce battery
charge. It is recommended that you turn off your mobile in
area with no signal reception to save battery.
Need replacing the battery: Please change to a new battery
as battery performance may decrease after prolonged usage.
25
Page 27

SIM Card
Error
Dirt on the metal surface of an SIM card: Use clean cloth to
wipe the metal touch point on an SIM card.
The SIM card is not installed.
The SIM card is damaged. Please contact your network
service provider.
Fail to dial
out
Please check if you press the dial key after typing the
number.
Please check if calling is forbidden because of default
settings.
Please check if the SIM is valid.
Please check if the call barring is set.
Please check if the fixed dial function is set.
Callers
cannot
contact you
Please check if the mobile phone is on and connected with
the network.
Please check if the Call barring or call divert is activated.
Please check if the SIM card is valid.
Fail to
charge
May be due to poor contact. Please check if the plug is
connected well.
Please confirm if the environment temperature is within the
range of 0ºC ~40ºC while charging.
The battery or charger is damaged in which case you need to
replace it.
26
Page 28

Lava warranty certificate
Limited warranty:
LAVA international Ltd. (LAVA) provides limited warranty for your mobile
phone and original accessories delivered with your mobile phone
(hereinafter referred to as “product”)
The warranty period for the transceiver is one (1) year and for battery,
charger and headset is six (6) months from the date of purchase.
LAVA Warranty
Subject to the conditions of this Limited Warranty, LAVA warrants a product
to be free from defects in design, material and workmanship at the time of
its original purchase by you, and for a subsequent period of one (1) year for
transceiver and six (6) months for battery & charger.
You shall have to coverage or benefits under this warranty in the event that
any of the following conditions are applicable:
• The product has been subjected to abnormal use or conditions, improper
storage, exposure to 1.excessive moisture or dampness, exposure to
excessive temperature, unauthorized modification, unauthorized repair
(including but not limited to use of unauthorized spare parts in
repairs),abuse, accidents, Acts of God, spills of food or liquids, improper
installation
• You have not notified Lava of the defect in the product during the
applicable warranty period.
• The product serial no. code or the accessories date code has been
removed, defaced or altered.
• The product has been used with or connected to an accessory (i) Not
supplied by Lava or its affiliates, (ii) Not fit for use with the product or (iii)
Used otherwise than in manner intended.
• The seals of the product’s battery enclosure have been broken or shown
evidence of tempering or the product’s battery has been used in equipment
other than that for which it has been specified usable by LAVA.
• All plastic surfaces and all other externally exposed part that is scratched
or damaged due to normal use.
To get maximum of your new product, we recommend you to:
Read the guidelines for safe and efficient use as mentioned in the
manual.
27
Page 29

Read the terms and conditions of your Lava warranty in the manual.
Keep your original receipt; you will need it for warranty services if asked
to produce.
Present this Lava Warranty Certificate along with original proof of
purchase whenever you require any warranty services.
In case Lava product needs service, please visit the nearest Lava
service centers given in the service guide. Please visit our Website
www.lavamobiles.com for updated list of Authorized Service Centers near
to your location.
Important note: for your warranty to be valid, all information on the
warranty certificate has to be completed including the stamp from the
authorized distributor/retailer.
All warranty information, product features and specifications are subject
to change without notice.
IMEI No. …………………………………….
Dealers Stamp …...……………………….……….
Date of purchase …...………………………………
Model No. …………………………………….
28
 Loading...