

Page 1

LAVA Discover 135
USER MANUAL
General Information
Thank you for using our mobile phone Discover 135. This user guide provides
general information and operation instructions.
Note:
Use only accessories approved by the phone manufacturer to ensure safety.
Failing to comply with this will violate the terms and conditions of the
warranty.
The phone set has been manufactured in strict compliance with various
national standards and requirements set by the authorities. If the contents
and displays described in this user guide do not match the actual operation
of the phone set, please follow the contents and displays of your phone set.
We reserve the rights to change any mechanisms of the phone without
notice.
This user guide is subject to change without notice.
WAP-GPRS-MMS-Internet Settings
For WAP Settings
Step1: Menu Settings Network & Connectivity Cellular network setting
Data Account
Step2: Select WAP Item or Click “Add” to create new profiles.
Step 3: After that enter the data settings as given on page 4-10 in detailed manual
taking care of following:
Account Name: Enter any name for connection
APN: Check from detailed menu according to operator
Username: Check from detailed menu according to operator
Password: Check from detailed menu according to operator
Authentication Type: Normal (in case of NA in detailed manual)
Advanced Settings: Edit required settings
1
Page 2

Step 4: After that enter the data settings as given on under Table1 on page 4-10 taking
care of following:
Homepage: Check from detailed menu according to operator
Connection Type: Check from detailed menu according to operator
Proxy: Check from detailed menu according to operator
Port: Check from detailed menu according to operator
DNS: Primary DNS as mentioned in detail menu
In case NA or Null in detailed menu– No need to enter any data
EXAMPLE
Changing Settings for Airtel Live
Step 1: MenuSettings Network & Connectivity Cellular network
settingsData Accounts
Step 2: Select Airtel Live or in case Airtel Live doesn’t exist Click Add
Step 3: Enter the details
Account Name: Airtel Live
APN: airtelfun.com
Username: Leave Blank
Password: Leave Blank
Authentication Type: Normal
DNS: 000.000.000.000
Step 4: Entering the details
Homepage: http://live.airtelworld.com
Connection Type: HTTP
Proxy: 100.001.200.099
Port: 8080
For MMS Settings
Step1: Menu Settings Network & Connectivity Cellular network setting
Data Account
Step2: Select MMS Item or Click “Add” to create new profiles.
Step 3: After that enter the data settings as given on page 4-10 in detailed manual
taking care of following:
Account Name: Enter any name for connection
APN: Check from detailed menu according to operator
2
Page 3

Username: Check from detailed menu according to operator
Password: Check from detailed menu according to operator
Authentication Type: Normal (in case of NA in detailed manual)
Advanced Settings: Edit required settings
Step 4: After that enter the data settings as given on under Table1 on page 4-10 taking
care of following:
Homepage: Check from the row titled MMSC in table 1 according to operator
Connection Type: Check from detailed menu according to operator
Proxy: Check from detailed menu according to operator
Port: Check from detailed menu according to operator
DNS: Primary DNS as mentioned in detail menu
In case NA or Null in detailed menu– No need to enter any data
EXAMPLE
Changing Settings for Airtel MMS
Step 1: MenuSettings Network & Connectivity Cellular network
settingsData Accounts
Step 2: Select Airtel MMS or in case Airtel MMS doesn’t exist Click Add
Step 3: Enter the details
Account Name: Airtel MMS
APN: airtelmms.com
Username: Leave Blank
Password: Leave Blank
Authentication Type: Normal
DNS: 000.000.000.000
Step 4: Entering the details
Homepage: http://100.1.201.171:10021/mmsc
Connection Type: HTTP
Proxy: 100.001.201.172
Port: 8799
IMPORTANT NOTE: By default there are WAP settings, change to internet profile
settings for accessing internet plans of operator.
3
Page 4
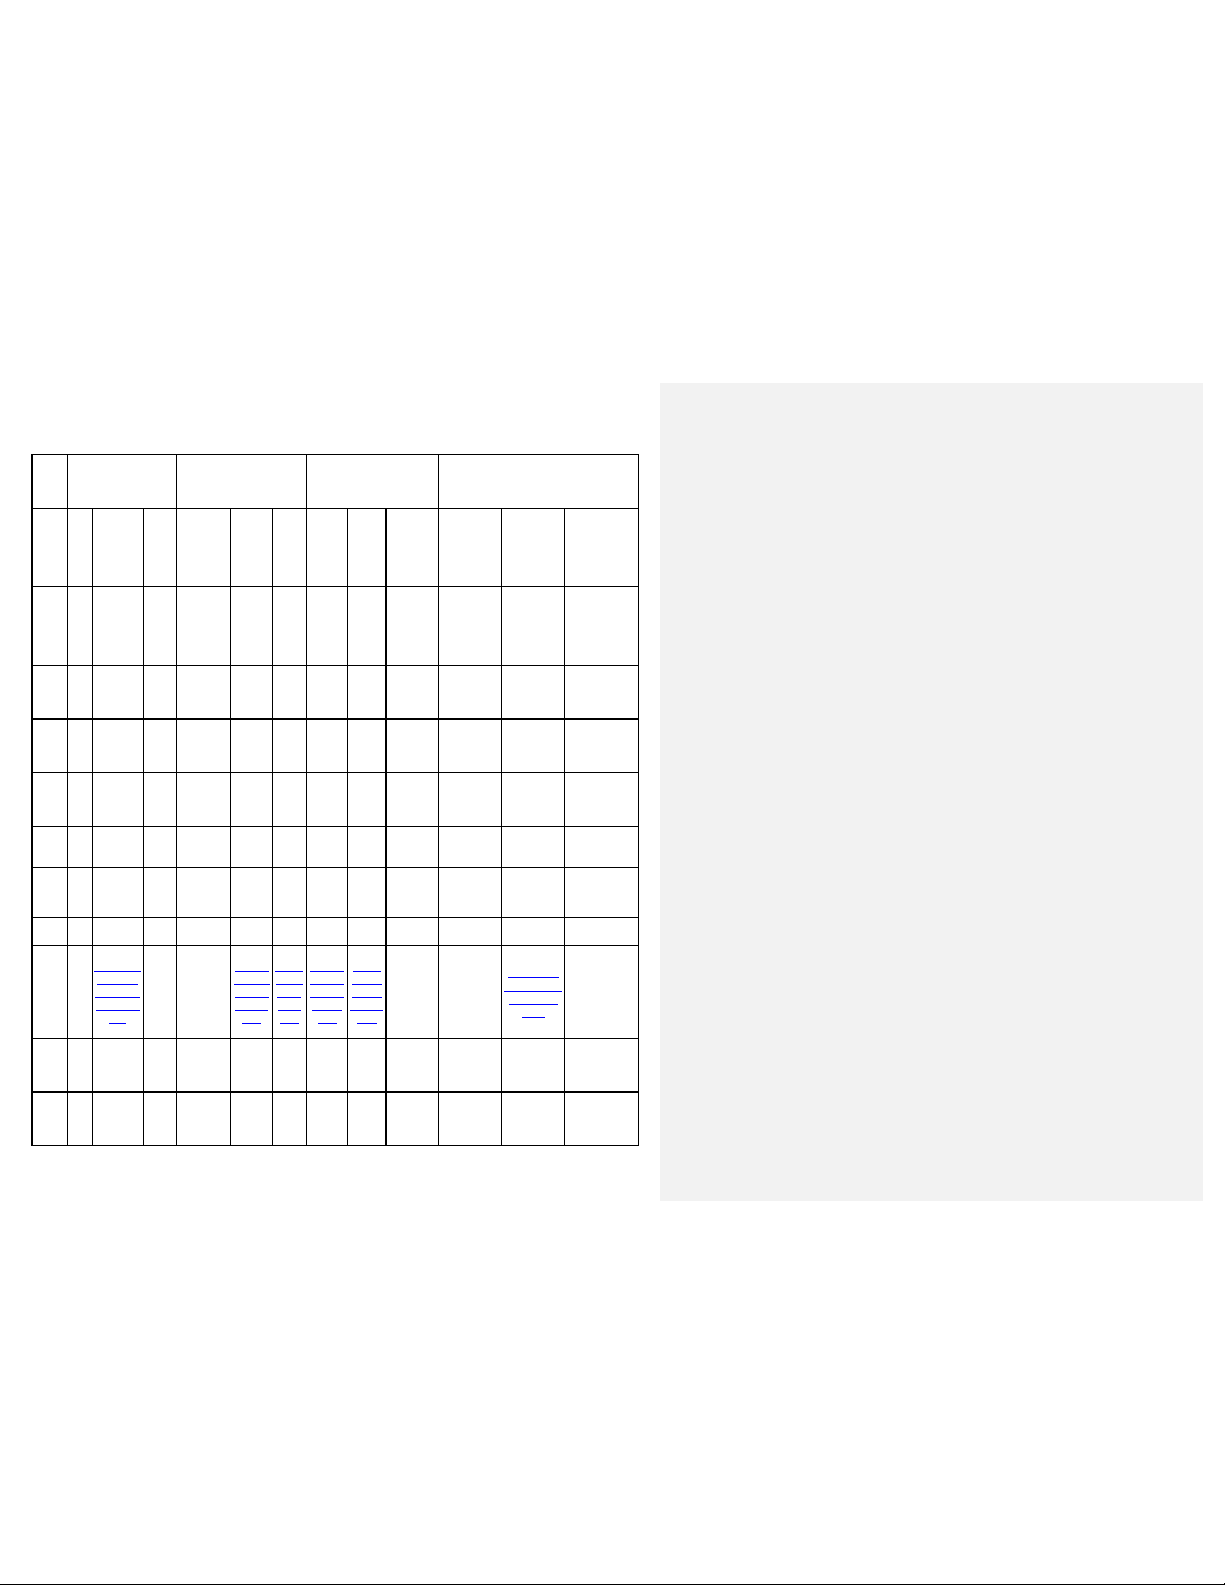
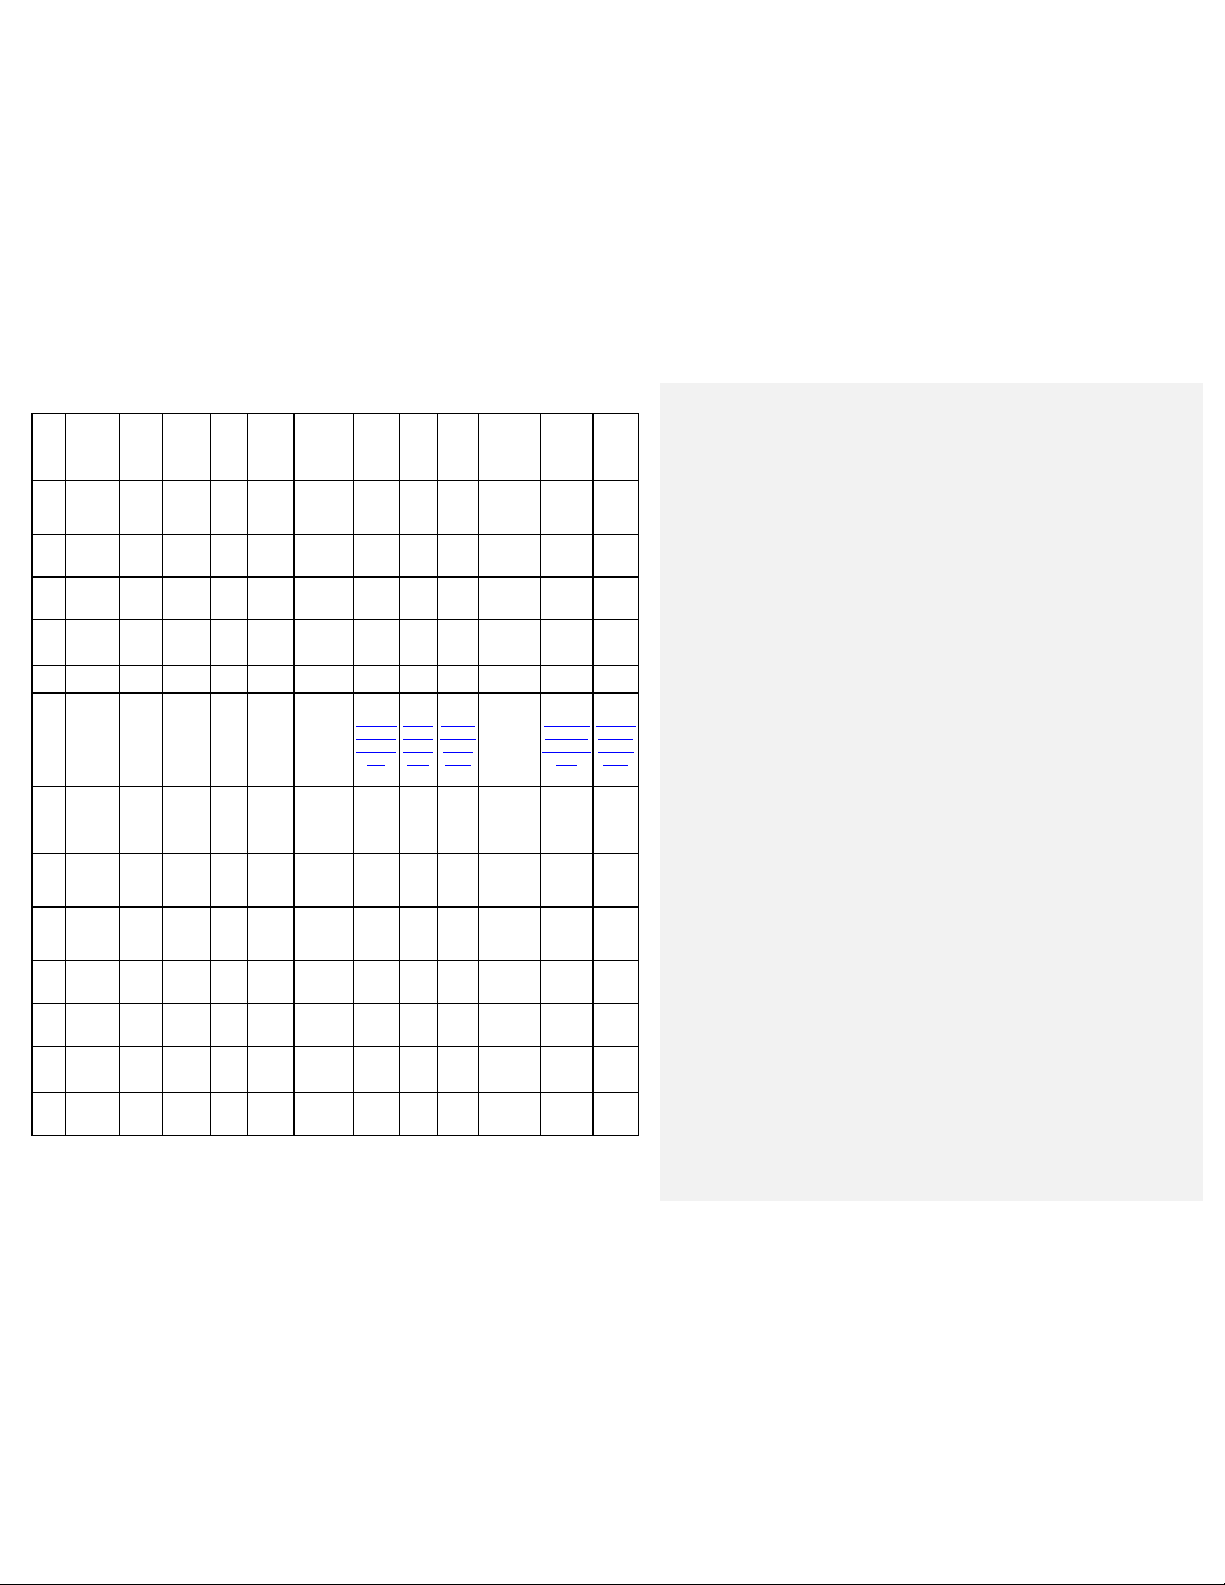
Table1: Detailed Manual for GPRS-WAP-MMS-Internet Settings common for all models
Oper
ls
RELIANCE
air
p
airte
com
Auth
n
Pass
d
Spee
d
htt
om
Con
type
Prox
le
ator
detai
Profi
nam
Appl
icati
type
APN
entic
atio
User
name NA NA NA NA NA NA NA NA NA NA NA NA
wor
Line
Type
AIRCEL
on
Po
le
cke
tW
e
AP
W
AP-
GP
RS
cel
wa
NO
NE
AIRCEL
MMS
MMS-G
PRS
aircel
mms
NONE
Airc
el
Inter
net
Inter
net
GPR
S
airc
el
gprs
NON
E
NA NA NA NA NA NA NA NA NA NA NA NA
NA NA NA NA NA NA NA NA NA NA NA NA
AIRTEL
AIRTEL
AIRTE
MMS
L LIVE
MMS-G
WAP-
PRS
GPRS
airtelf
airtelm
un.co
ms.com
NONE NONE
IDEA
AIRT
EL
IDEA
IDEA
Idea
Inter
WAP
WAPGPRS
Imis
NONE
MMS
MMS
-GPR
S
mms
c
NON
E
net
Inter
net
-GPR
S
l
gprs.
m
NON
E
R WORLD
Internet
Internet
WAP-GPRS MMS-GP
-GPRS
internet rcomwap rcommms rcomnet
NONE NONE NONE NONE
Reliance
MMS
RS
Netconnect
Internet
-GPRS
NA NA NA NA NA NA NA NA NA NA NA NA
p:/
http://1
http
http://1
http:/
http:
http:/
http:
Hom
epag
e
rce
/m
yai
l.c
0.50.1.
166/ser
vlets/m
ms
//10.
4.42.
21:80
02/
http://
www.id
eafresh.
com
http://wa
p.rworld.
://m
00.1.20
/live.a
//Air
yairc
1.171:1
0021/m
msc
irtelw
orld.c
om
el.co
m
/wap.
telLi
ideafr
ve.c
esh.c
om
om
co.in
http://m
msc.rcom
.co.in/m
ms/
http://wap.
google.com
necti
on
enab
HT
TP
y
Yes Yes No Yes Yes No Yes Yes No Yes Yes NA
HTTP
HTT
P
HTTP HTTP
HTT
HTTP HTTP HTTP HTTP HTTP HTTP
P
4
Page 5
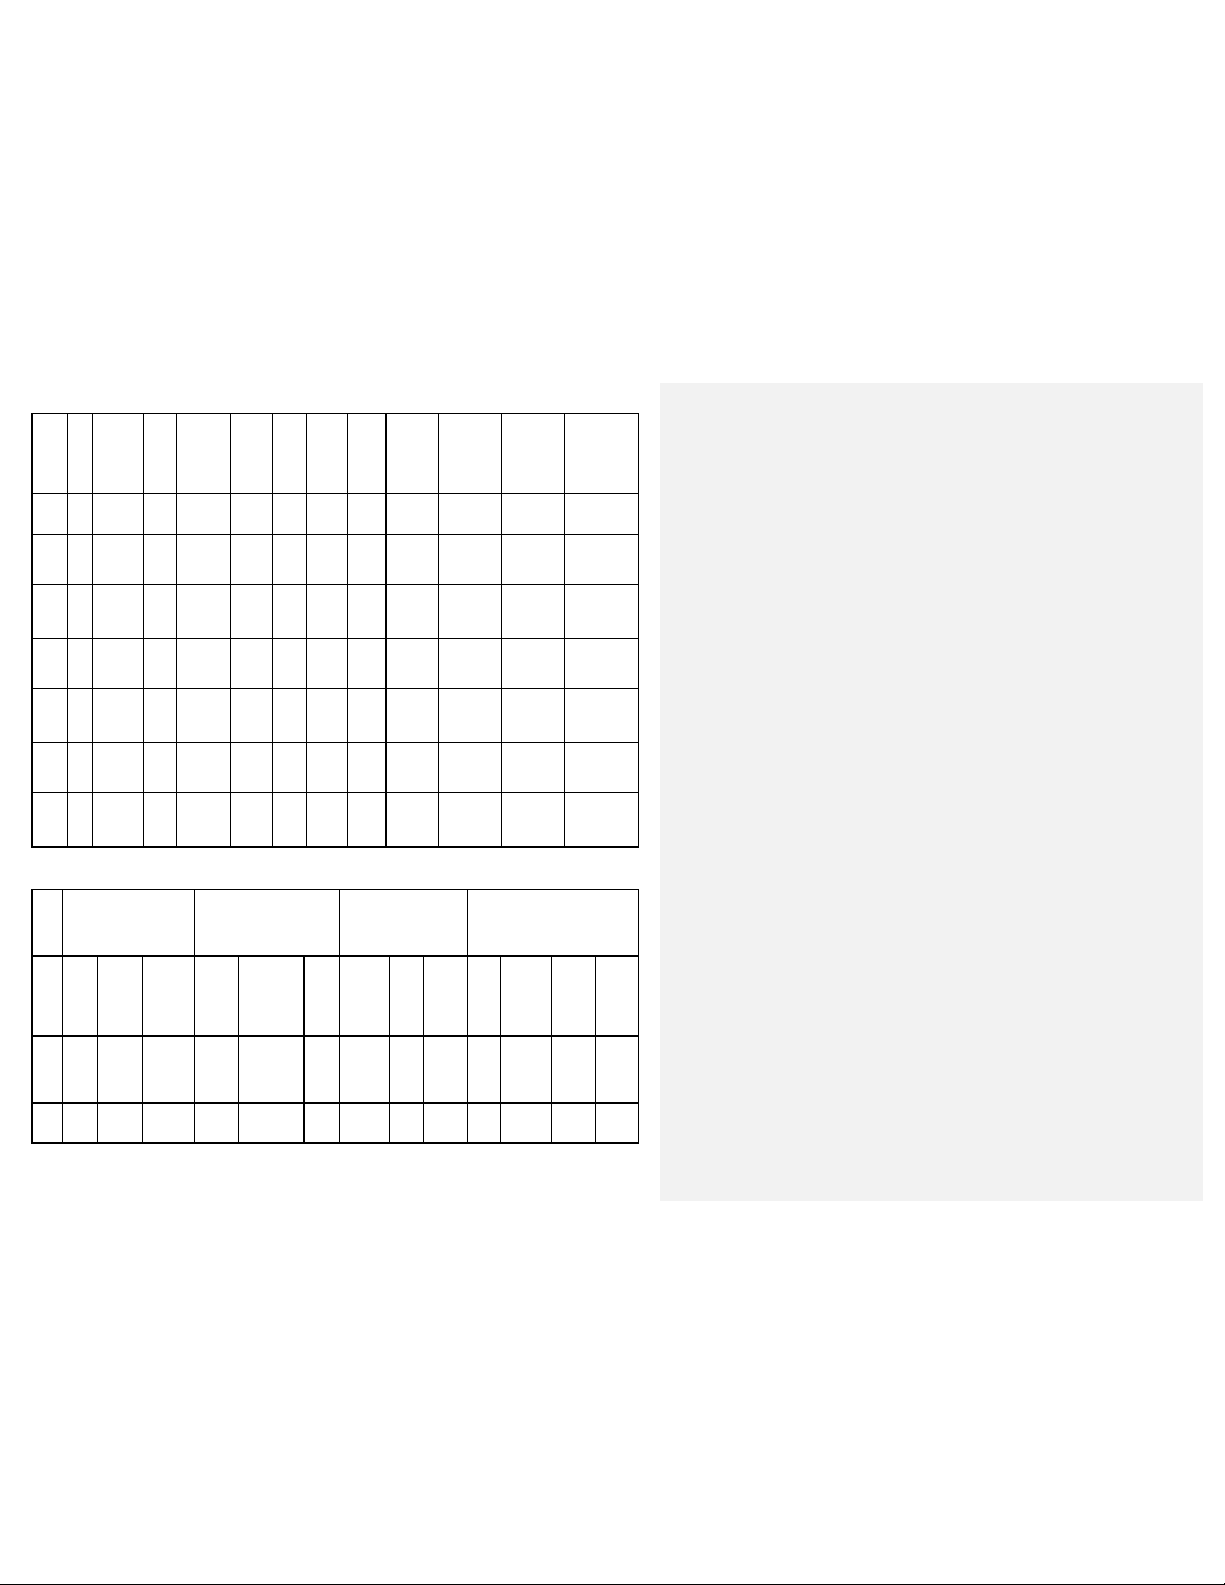
Prox
17
69
Prox
port
Seco
DNS
Ope
ails
Voda
ect
App
ion
e
2.0
y
17.
addr
08
ess
3.0
80
y
80
User
name NA NA NA NA NA NA NA NA NA NA NA NA
Pass-
word NA NA NA NA NA NA NA NA NA NA NA NA
Prim
nul
ary
l
DNS
n-
nul
dary
l
IP
nul
Addr
l
ess
Subn
nul
et
l
000
172.01
7.083.0
69
8080
null null null null null null null null
null null null null null null null null
null null null null null null null null
null null null null null null null null
100.001
00.0
.201.17
.000
2
.000
8799 8080 0 8080 8080 0 8080 8080 NA
100.0
01.20
0.099
000.
000.
000.
000
010.0
04.04
2.015
010.0
04.04
2.015
000.000
.000.00
0
010.239.2
21.005
000.000.0
00.000
000.000.0
00.000
000.000.0
00.000
000.000.0
00.000
010.239.2
21.005
null null
null null
null null
null null
NA
rato
det
Prof
ile
na
me
licat
typ
APN
r
Reliance Vodafone Dolphin Mumbai
Netc
onne
ct
Inter
net
-GPR
S
smar
tnet
R
World
WAP-
GPRS
smart
wap
MMS
MMS-G
PRS
MMS
VODA
FONE
LIVE
WAPGPRS
portal
nmms
VODAFON
MMS-GPR
Mobi
E MMS
Conn
INTE
S
T-GP
portal
nmms www
fone
le
RNE
RS
MTNL
WAP
WAP-G
PRS
mtnl.net mtnl
5
MTN
L
MM
S
MM
S-GP
RS
.net
MTNL
INTER
NET
INTER
NET-G
PRS
mtnl.n
et
Dolphin Delhi
MTN
L
MTNL
MM
WAP
S
MM
WAP-G
S-GP
PRS
RS
mtnl
mtnl.net mtnl3g mtnl.n
.net
MTNL
3G
INTER
NET-
GPRS
MTNL
INTER
NET
INTER
NET-
GPRS
et
Page 6

Aut
hen
tion
Use
me
Pass
Line
Spe
ed
Ho
e
http:
com
http://
co.in
http://1
mms/
http://
e.in/
http://m
n/mms/
http:
com
http://
bai.in
http:
ms/
http:/
.com
http:
ms/
http://l
.wml
http:/
.com
http:/
.com
Con
e
Pro
ble
Pro
ress
000.
000
010.
010
010.
010
Pro
Use
me
Pas
ord
Pri
DNS
Sec
DNS
NON
tica
na
NONE NONE NONE NONE
E
r
NA NA NA NA NA NA mtnl NA NA NA mtnl mtnl NA
NON
E
NONE
NON
E
NONE
NON
NONE NONE NONE
E
word NA NA NA NA NA NA
mtnl
123
NA NA NA
mtnl
123
mtnl
123
NA
Type NA NA NA NA NA NA NA NA NA NA NA NA NA
NA NA NA NA NA NA NA NA NA NA NA NA NA
me
//go
wap.r
0.239.2
live.vo
pag
ogle.
world.
21.47/
nec
t-
HTTP HTTP HTTP HTTP HTTP HTTP HTTP
ion
typ
xy
NA Yes Yes Yes Yes No Yes Yes No Yes Yes No No
ena
010.2
xy
NA
add
xy
NA 8080 8080 9401 9401 0 9401
port
r
NA NA NA NA NA NA NA NA NA NA NA NA NA
na
s-w
NA NA NA NA NA NA NA NA NA NA NA NA NA
mar
null null null null null null null null null null null null null
y
ondar
null null null null null null null null null null null null null
y
39.22
1.007
010.23
9.221.0
07
dafon
010.0
10.00
1.100
ms1.live.v
odafone.i
010.010.0
01.100
//go
ogle.
000.
000.
wap.mt
nlmum
010.01
0.010.0
10
//mt
nlm
HTT
P
010.
010.
940
1
/wap.
google
HTTP
000.0
00.00
0.000
0
//mt
ocalhos
nlm
t/home
HTT
HTTP HTTP HTTP
P
010.01
010.
0.010.0
010.
10
940
9401 0 0
1
/wap.
google
000.0
00.00
0.000
/wap.
google
000.0
00..00
0.000
6
Page 7
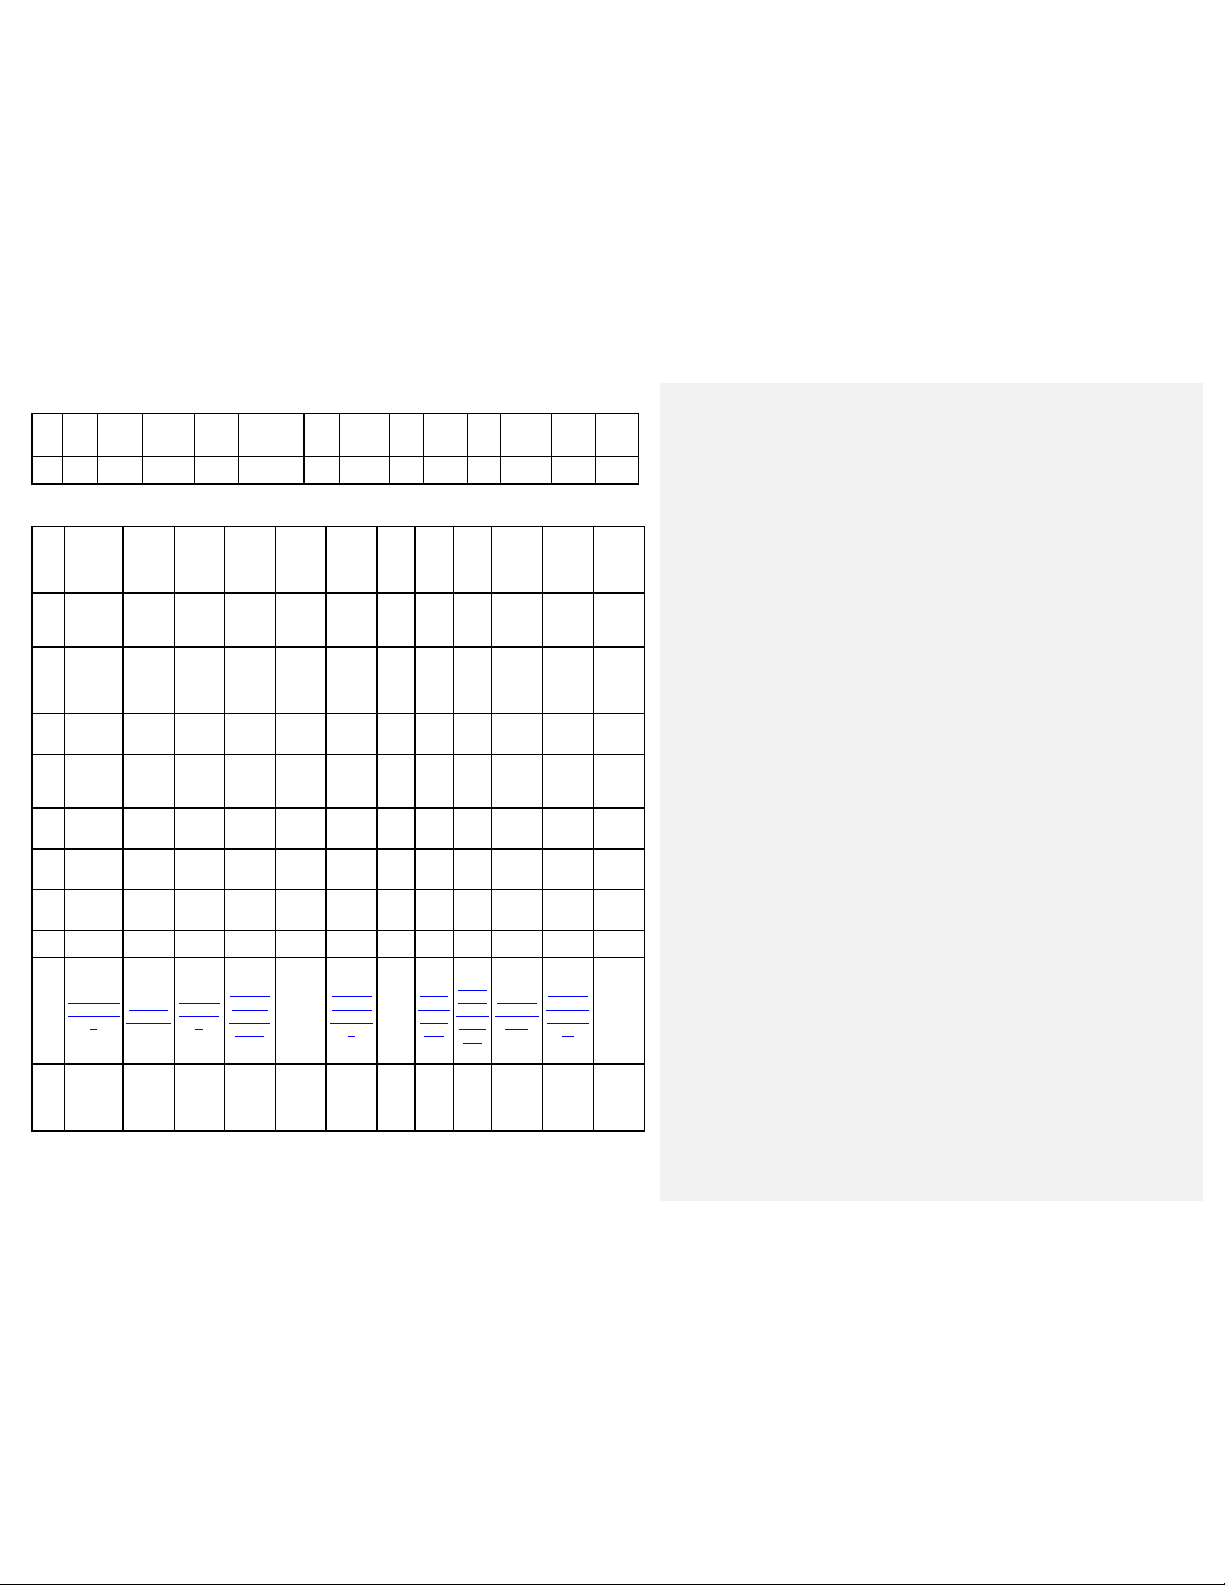
IP
Add
Sub
net
Ope
ils
CEL
th
Prof
e
BS
MS
Appl
on
type
bsn
ms
Aut
on
User
e
Pass
d
Line
e
Spe
ed
htt
14
Con
type
null null null null null null null null null null null null null
ress
null null null null null null null null null null null null null
rato
r
deta
ile
nam
i-
cati
APN bsnlmms bsnllive bsnlnet
hent
icati
nam
wor
Typ
Ho
mepag
e
nect
-
ion
CELLON
CELLONE
-North
BSNL
MMS
MMS
None None None None None None
NA NA NA NA NA NA NA NA NA NA NA NA
NA NA NA NA NA NA NA NA NA NA NA NA
NA NA NA NA NA NA NA NA NA NA NA NA
NA NA NA NA NA NA NA NA NA NA NA NA
http://bs
nlmmsc.i
n
HTTP HTTP NA HTTP HTTP HTTP HTTP HTTP HTTP HTTP NA
E-Nort
h
BSNL
LIVE
BSNL
LIVE
http://
bsnllive
CELLON
E-Nort
h
BSNL
GPRS
INTERN
ET
www.b
snl.co.i
n
CELLON
E-East
BSNL
MMS
MMS
bsnlm
ms
http://
bsnlm
msc.in:
8514
CELLON
E-East
BSNL
LIVE
BSNL
LIVE
bsnllive bsnlnet
http://
bsnllive
.net
CELLON
E-East
BSNL
NET
INTERN
ET
http://
www.c
ellone.i
n
CELL
CELL
ONEWest
BSNL
LIVE
BSNL
LIVE
bsnlli
ve
http:
//bsn
llive.
net
CELL
ONE-
West
BSNL
NET
INTE
RNET
bsnln
http:
//wa
p.goo
gle.c
om
ONEWest
BSNL
MMS
MMS
bsnl
mms
NONE NONE NON
http:/
/bsnl
mms
c.in
CELLON
E-
South
BSNL
LIVE
BSNL
LIVE
bsnllive bsnlnet
et
NONE NONE
E
http://
bsnllive
.net
CELLON
E-
South
BSNL
NET
Inter-n
et MMS
http://
wap.go
ogle.co
m
LO
NESou
NL
M
lm
NO
NE
p:/
/bs
nlm
ms
c.in
:85
HT
TP
7
Page 8
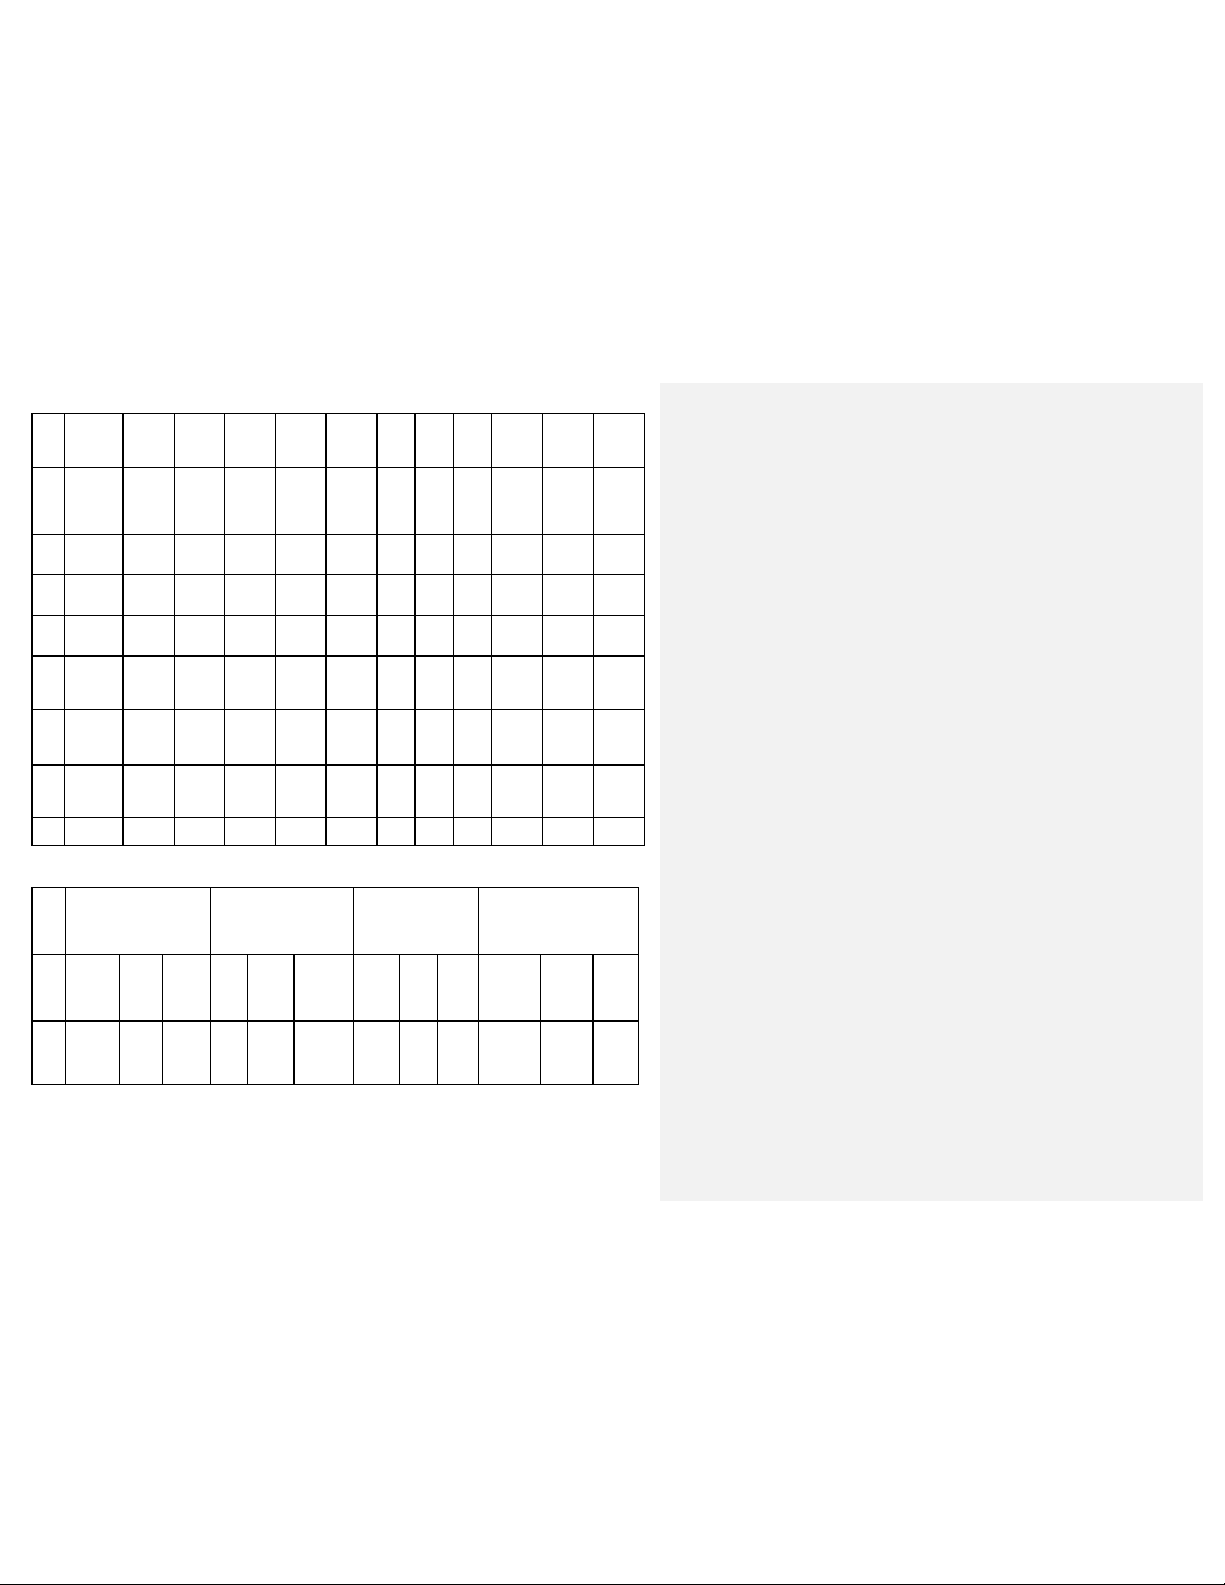
Prox
y
ble
010
011
Prox
port
User
e
Pass
d
Pri
DNS
Seco
dary
DNS
Sub
net
nul
l
Ope
ils
TATA
OMO
IN
Uninor
Yes Yes NO Yes Yes NA Yes Yes NA Yes NA
ena
es
Y
Prox
y
addr
ess
y
nam
-wor
mar
y
n-
IP
Add
ress
010.210.
010.22
0.067.1
010.011
8080 8080 NA 8080 8080 NA 8080 8080 NA 8080 NA
31
NA NA NA NA NA NA NA NA NA NA NA NA
NA NA NA NA NA NA NA NA NA NA NA NA
null null null null null null null null null null null null
null null null null null null null null null null null
null null null null null null null null null null null
null null null null null null null null null null null
NA
010.21
0.010.0
11
010.22
0.067.1
31
NA
010.2
10.01
0.011
010.2
20.06
7.131
NA
010.22
0.067.1
31
rato
r
deta
Profi
le
nam
e
Appl
icati
on
type
Videocon TATA DOCOMO Uninor Loop Mobile
Videoco
n MMS
MMS-G
PRS
Video
con
INTER
NET
INTER
NET-G
PRS
Videoc
on
WAP
WAP-G
PRS
DOC
DIVE-
WAPGPRS
TATA
DOCO
MO
MMS
MMS-
GPRS
TATA
DOCOM
O
INTERNE
INTERNE
T-GPRS
WAP
WAP-G
PRS
Unin
or
MMS
MMS
-GPR
S
UNIN
OR
Intern
et
INTER
NET-
GPRS
Loop
MMS
MMS-GP
RS
NA
Loop
WAP
WAP-G
PRS
.21
0.0
10.
808
0
Nul
l
nul
l
Loop
Intern
et
Intern
et-GPR
S
8
Page 9
vgprs.co
TATA.
.IN
Aut
on
User
e
Pass
Spe
ed
http:
m
Con
type
H
Prox
ble
Prox
ess
010.
007
Prox
User
e
Pass
Prim
APN
m
hent
NONE NONE NONE
icati
vinter
net.co
m
vgprs.c
om
TATA.D
DOC
OCOM
OMO
O.MM
.DIVE
NON
E
NTERNET
S
NONE NONE NONE
TATA.DO
COMO.I
uninor
unin
unino
or
NON
E
mizone mizone www
r
NONE PAP PAP PAP
nam
NA NA NA NA NA NA NA NA NA
DN
91M
91MDN
91MD
N
word NA NA NA NA NA NA NA NA NA mmsc mmsc loop
Line
Type
NA NA
NA
NA NA NA NA NA NA NA NA NA
NA NA NA NA NA NA NA NA NA NA NA NA
http://1
Hom
epag
e
nect
-
ion
y
ena
y
addr
y
port
nam
http:/
0.202.4.
/wap.
119:100
googl
21/mms
e.com
c/
HTTP HTTP
Yes No Yes Yes Yes No Yes Yes No Yes Yes no
000.0
10.202.
00.00
5.145
0.000.
8799 0 8799 8080 8799 0 8080 8080 0 9401 9401 0
NA NA NA NA NA NA NA NA NA NA NA NA
//div
http://
ein.t
wap.vli
atad
ve.in
ocom
o.co
HTTP HTTP HTTP HTTP HTTP HTTP WSP WSP HTTP
TTP
10.202.
124.
5.145
094.
http://
mmsc/
010.12
4.026.
094
http://di
vein.tata
docomo.
com
000.000.
000.000.
Http://
wap.m
yunino
r.in
010.05
8.010.
058
Http:
http:/
/www
0.000.
.unin
or.in
000.0
00.00
http://m
ms.loop
mobile.in
:8080
010.000.
000.010
//10.
58.2.
120
010.0
58.01
0.059
http://a
tcafe.lo
opmobil
e.in
010.000
.000.01
0
http://
wap.g
oogle.
com
000.00
0.000.
000
-word NA NA NA NA NA NA NA NA NA NA NA NA
ary
null null Null null null null null null null null null null
DNS
9
Page 10

Seco
dary
IP
Sub
net
n-
null null Null null null null null null null null null null
DNS
Add
null null Null null null null null null null null null null
ress
null null null null null null null null null null null null
All the configurations mentioned in this user manual is only for reference, please
refer to the actual phone.
Your phone & Key parts
10
Page 11

Label Key Description
Press and hold to turn on/off phone
1 Power Key/Lock key
Press to lock/unlock the screen
2 Charging/USB port Charging up/transfer files with PC.
3 Call Send Key Make a call/ special function
4 Home Key Return Home screen
5 Back key Press to back previous screen
6 Camera Camera shoot
7 3.5mm Earphone Jack Earphone jack
Standby Screen & Icons
This phone provides multiple Standby screen. Through the instruction and various
icons on the screen, you can have the operating information needed.
Status Icon Description
Signal indicator for SIM 1
Signal indicator for SIM 2
Using headset
Mute
11
Page 12

Vibrate mode
Alarm
Background playing / pausing
Airtel/ Airtel Network carrier of Card 1/ Card 2
Memory card installed
Bluetooth on
Modem connecting
SIM EDGE
Text Input Method
This phone provides various text input methods that allow you to use less key
strokes to input and search for text:
English input method
Hindi input method
Keypad description
To Upper or Lower :
To Insert symbol,digital, number :
To Hide Keypad :
To Switch Input method(tap and hold) :
To Switch Smart Input Method (tap and hold):
Security
Emergency call
If any emergency arises, dial 112 (or other emergency call number) for emergency
help.
Note:
Due to the nature of cellular networking, the success of emergency call is not
12
Page 13

guaranteed.
For your safety
Switch off the phone in hospitals and aircraft. Obey any restrictions. Wireless
devices can affect the medical treatment and cause interference in aircraft.
Some medical devices such as hearing aids and pacemaker may be sensitive to
external radio frequency emissions. Consult the device manufacturers or your
doctor before using the phone around the medical devices.
Pay special attention to the ring tone volume and vibration settings if you have a
heart problem.
In areas with potentially explosive atmosphere, such as gas stations, fuel or
chemical transfer or storage facilities, obey all signs and instructions.
Your phone will emit radio frequency even in the standby mode. Turn off your
phone when so instructed.
Always obey all the local laws and regulations. Do not use your phone while
driving. Use Hands-free operation, if available, and give full attention to driving
and to the road. Pull off the road and park before making or answering a call if
driving conditions so require.
If your phone is lost or stolen, notify your service provider immediately to stop
the SIM card from being used.
When you contact your service provider, they will need your IMEI number. It is
printed on the back of your phone set (you can find it when you remove your
battery), or call *#06# to look up your IMEI number. Copy this number and save it
for future need.
To prevent your phone from misuse, lock your SIM card or phone, and change
passwords when necessary.
Do not remove the battery without turning off the phone. Failure to follow this
instruction may result in data loss.
When you leave your vehicle, take the phone with you or place it in the glove
compartment to avoid theft.
Keep the phone, battery or charger out of reach of children.
Notes on phone usage
Your phone will give off electromagnetic waves. Do not place it near storage
medium such as floppy disk.
Using the phone near television, land phone, radio and office automatic
devices may cause interference and affect the function of the mobile phone.
13
Page 14

Keep the phone dry; all kinds of liquid can erode electronic circuit.
Keep the phone away from extreme temperatures.
Keep the phone away from fire or a lighted cigarette.
Do not paint the phone.
Do not drop the phone or violently crush or shake the phone.
Do not keep the phone near magcards and other object with magnetism. The
phone’s magnetism may clear the information stored on floppy disk, pre-paid
phone card and credit card.
Keep the phone away from hot places where the temperature may exceed
60°C, such as dashboard, windowsill, or areas exposed to direct sunlight.
Do not disassemble or modify your phone. This can damage the phone, cause
leakage and break the internal circuit.
Use only damp cloth or non-static cloth to clean your phone.
Do not use alcohol, thinner, benzene or other chemicals or abrasive cleaner to
clean your phone.
The phone will become warm under normal use and while in battery charging.
Do not leave the phone with battery uninstalled or with the battery empty for
a long period of time. This may cause data loss.
The metal parts of the phone may irritate your skin depending on your health
condition.
Do not put the phone in the back pocket. Sitting on it may damage the phone.
Do not put the phone at the bottom of a bag. You may crush it.
When the vibrate mode is on, place the phone carefully to prevent it from
being dropped from a height or being moved to a heat source due to the
vibrating.
Use only the stylus approved by the phone manufacturer.
Using stylus of unauthorized source will violate the terms and conditions of
the warranty and may damage the touch screen.
Handle the stylus with care. Place it back to its proper storing place when not
in use. Keep it away from children.
Do not press the touch screen with needles, pen point or other sharp objects;
it can damage the LCD and violate the terms and conditions of the warranty.
Notes on battery usage
Do not short-circuit your battery. It can damage battery, and cause leakage,
over heat, fire or explosion.
14
Page 15

Disposing battery in a fire can cause fire or explosion. Old batteries should be
returned to your dealer or be disposed according to local regulations. Do not
treat the battery as household waste.
Keep metal objects (such as coins or key rings) away from the battery to avoid
short circuit.
Do not remove the battery without turning off the phone.
Do not hold the battery in your mouth. The liquid of the battery can be toxic.
Embedded battery shall be replaced by authorized dealers. Use only batteries
approved by the phone manufacturer; otherwise, it may cause explosion.
Damage resulting from using un-authorized batteries and chargers will not be
covered by the warranty.
Avoid contact with any leaked liquid of the battery. If it touches your skin,
wash your skin with fresh water and go to the hospital immediately.
SAR
The highest SAR value for this mobile phone is < 1.6 W/Kg, in accordance with
the requirements of the ICNIRP, which recommended the limit for exposure to
radio waves is 1.6 watts/kilogram(W/kg) averaged over 1 gram of tissue. For
more information, please visit website
Safety precautions:
Use cell phone when the signal quality is good
People having active medical implants should preferably keep the cell phone
at least 15cm away from the implant
Use a wireless hands-free system ( Headphone, headset) with a low power
Bluetooth emitter
Make sure the cell phone has a low SAR
Keep your calls short or send a text message (SMS) instead. This advice
applies especially to children, adolescents and pregnant women.
E-waste Disposal Mechanism
'E-waste' means waste electrical and electronic equipment (WEEE). In other words
E-waste is a popular, informal name for electronic products nearing the end of their
"useful life". For more details about e-waste please refer e-waste rules, 2011
www.moef.nic.in
Do’s and Don’ts for disposal e-waste
Do’s:
Ensure that an Authorized Person repairs your Lava products
(www.lavamobiles.com)
15
to query
Page 16

Call Our Local Authorized Collection Centers to Dispose Lava products
Always drop your used electronic products, batteries or any accessories
thereof after the end of their life at nearest Authorized Collection Point or
Collection Center.
Separate the packaging material according to responsible waste disposal
options and sorting for recycling.
Always remove the battery from the product, when you do not intend to use
the product anymore it in future.
Don’ts:
Do not Dismantle your Lava Product on your own
Do not give your e-waste to Kabbadi Wala / Scrap Dealer/ Rag Pickers.
Do not dispose-off the e-waste in landfills
Never dump E-waste in garbage bins.
Do not dispose of your product at municipal waste bins or rooms.
Do not throw used batteries into household waste.
Consequences of improper handling and disposal of E-Waste
Improper disposal of waste prevents natural resources from being re-used.
Some waste contains hazardous chemicals and if not disposed of properly
may release toxins into the soil and water, and also releases greenhouse gases
into the environment
If e-waste is not properly disposed of, it can threat to the health and
well-being of humans and animals and it also has adverse effect on the
environment.
Placing of batteries or devices on or in heating devices, such as microwave,
ovens, stoves, or radiators and improper disposal of batteries may lead to
explosion.
If the battery terminals are in contact with metal objects, it may cause a fire.
For more details on how to dispose of your Lava products at the end of life, Please
refer the list of our Services Centers on Pan India basis on our website
www.lavamobiles.com or please view this link for the details of Service Centers
http://www.lavamobiles.com/support-services.
Getting Started
Batteries
The battery is included in the package. It is not fully charged out of factory but it
16
Comment [NJ1]: This link is incorrect, reports
error on browser, please check
Page 17

may still be able to power on your phone. Please completely use up the power of
the battery and then charge it for at least 12 hours with your phone turned off. You
battery will reach its optimal state after three cycles of charge and discharge.
Installing and uninstalling battery
To install the battery, remove the back cover from the phone by pressing firmly on
the cover and slide it down. Align the golden contacts of the battery to the contacts
in the phone, and then gently snap down the battery into place. Re-assemble the
back cover.
To uninstall the battery, flip the battery out from the bottom of the battery.
Charging battery
Plug the charger into the socket on the side of your phone. Connect the charger to
an AC wall socket. The blinking of the battery level icon indicates the battery is
being charged. When the blinking stops, it indicates the charging is finished.
During charging, the phone and charger will feel warm to the touch. This is normal.
Warning:
The operating ambient temperature range of the charger is 0°C-50°C. Do not use the
charger when the temperature exceeds this limit.
Use only chargers approved by the phone manufacturer to ensure safety. Failing to
comply with this will violate the terms and conditions of the warranty.
Using battery
The waiting time and calling time capacities specified by the phone manufacturer
are obtained under ideal operating environment. The actual values will vary with
the network condition, operating environment and operation method.
Please comply with the local regulations on battery disposal (such as recycling). Do
not dispose it as household waste.
Battery level indicator
When the phone is on, the battery level indicator is located at the upper right
corner of the screen.
Memory Card
To install the T-flash card, remove the back cover and battery from the phone. Pull
card deck and then put it up, then the T-Flash card can be installed
Make the same operations to uninstall the T-flash card.
Connecting to the Network
SIM Card
Please insert available Subscriber Identity Module (SIM) card into your phone
17
Page 18

before using it. SIM card is supplied by your network carrier.
All the information related to network connection is recorded on the SIM card, so is
the contact information such as names, phone numbers and SMSs that you set to
store on the SIM. You can take out the SIM card from the phone and insert it into
another GSM phone to use it. Most new phones will recognize the SIM card
automatically.
Do not touch the golden contacts of the SIM card; place it away from electricity and
magnetism to avoid damage. You will not be able to use the phone if the SIM card
is damaged.
Note:
Before inserting and taking out the SIM card, always make sure that the phone
is switched off and disconnected from any external power source; otherwise
both the phone and the SIM card may be damaged.
Installing and uninstalling SIM Card
The SIM card usually comes attached to a special card. The metal contacts of SIM
card can be easily damaged by scratching, so take it out carefully before assembling
it into the phone.
Switch off the phone, remove the back cover, battery and other external power
source. Fit the SIM card into the SIM card slot. Align the angled corner of the SIM
card with the slot. Slide in the SIM card, make sure it is in place, install the battery,
and restore the back cover.
Likewise, to remove the SIM card, switch off the phone, remove the battery and
then take out the SIM card.
Connecting to the Network
After the SIM card is unlocked, your phone will automatically search for the
registered network or other available local network. Once connected, the name of
the network carrier will appear on the top of the screen.
Your phone is now in Standby mode, ready for making and receiving calls.
Call Function
After the setup described in the previous sections is completed, you are ready to
make and receive calls using the basic information provided in this section.
Note:
When you are using headset, please plug/unplug the headset gently to avoid
damaging the headset jack.
18
Page 19

Dialing
When the network carrier is shown on the screen, your phone has entered the
Standby mode and you may make or receive calls. If you have installed two SIM
cards, the two network carriers will both appear on the screen.
To make phone calls, you may dial the number from the Dial screen or from your
phonebook.
Direct dial
Press the function key with respect to the dial icon on the Home screen.
Dialing from Contacts
Enter Phonebook from the Main Menu. You may use alphabet for quick search of
the names.
Unanswered call
If you have set up Auto Re-dial, your phone will automatically re-dial the last
unanswered number that you called.
Answering a call
When there is an incoming call, the phone will notify you through vibration, ringing,
vibration plus ringing, etc, according to your setting. The name and phone number
of the caller is shown on the screen if the network supports the service. You may
answer or reject the call.
If call waiting is on when you are on the phone and there is another incoming call,
your phone will notify you with a short tone. You may answer or reject that second
call. If you choose to answer the second call, the current call will be on hold.
Main Menu
On the Home screen, tap the icon to enter the Main Menu. You can then
access the various functions and operations.
Press the Call Send Key to add widgets, Shortcuts to the Home screen, and also you
can set others operations.
Phonebooks
This chapter describes the functions of the phonebooks.
Entering phonebooks/Contacts
1. On the Home screen, tap the icon to enter the dial screen, tap Contacts
item.
2. On the main menu screen, tap the icon to enter the dial screen, tap
19
Page 20

Contacts item.
3. On the main menu screen, tap the icon to enter the Contacts list
screen.
Create and delete a contact entry
1. On the dial screen, tap the Dialpad item, and then input the number and tap
the Add contacts to create a new entry.
2. On the dial screen, tap the Contacts item, a nd then press the Call Send Key
to create a new entry.
Note:
On the Contacts item, press Call Send Key for more operation. Such as: Add
contact, Groups, Share, Delete, Message, Settings.
Phonebook of SIM Card and your phone
There are two separate phonebooks, one stored on the SIM card and the other in
the phone.
Each entry in your SIM card’s phonebook consists of a phone number and a name.
When you change to another phone, the contact information can be transferred to
your new phone with the SIM card. The total number of entries allowed in a SIM
card varies with different SIM cards.
The contacts stored in the phone can include name, phone number, group, photo,
ring tone. This information will not be transferred with the SIM card to your new
phone.
Contact list
The contact list is arranged in alphabetical order. You can press Call Send Key for
more operations.
Contact
From the contact list you can select a contact and press Call Send Key to do the
following: Dial, Share, Edit, Delete, set up ring tone, and assign to group.
Group and blacklist
You may set up various groups to categorize your contacts. You may also put
contacts into the Blacklist to block all their calls and messages.
Call Log
Call history function logs all recent calls including missed calls, dialed calls and
answered calls.
Note:
20
Page 21

Refer to the Settings chapter for the phone password setup.
To access this function, you can refer to the Phonebooks chapter.
Message
This chapter introduces the messaging services provided by the network. Some
services may not be supported by the local network
Write messages
SMS
Press to enter the message screen, and then tap or press Call Send Key to
access the message editor screen. You may use virtual keypad to input English, Hindi,
digits and punctuation marks.
MMS
The MMS function allows you to send text and multimedia such as pictures, voice
and video to the other phone. Additionally, you can send the MMS message using
CC and BCC functions by pressing Call Send Key.
Note:
On the message screen, Press Call Send Key for more operations. Such as:
New msg., Delete, Settings, Backup SMS.
On the message editor screen, Press Call Send Key for more operations.
Such as: Send, Save, Insert, Add Subject, Cc/Bcc.
On the message view screen, Press Call Send Key for more operations. Such
as: Send, Call, Delete, Copy to, Insert. Also you can tap the icon on the
screen indicator.
Settings
You can adjust the various settings of the message functions including: Memory
status, SMS, MMS, Broadcast and Service message.
Multimedia
Camera
Before using Camera, make sure you have inserted a memory card. The photos will
be saved in JPG format to your memory card.
Note:
Taking pictures in dim lighting may result in poor picture quality.
After entering the Camera function, the Camera Preview screen will appear with
21
Page 22

the status icons. Tap to take the picture.
Camcorder
Before using Camcorder, make sure you have inserted a memory card. The video
will be saved in 3GP format to your memory card.
After entering the Camcorder function, the Camcorder Preview screen will appear
with status icons. Tap to start recording videos.
Recorded videos will be saved automatically. You can preview or delete them via
the related operations
FM radio
Make sure the headset, which is used as the antenna, is plugged in before using the
FM radio.
Play: Select it and then tap to play it.
Record: Select and then play it, Tap to record the channel.
Note:
Before recording, make sure you have inserted a memory card.
The following functions are available by taping :
Auto search: Auto search channels.
Favorite: You can set up favorite channels. In Favorite menu, you have the following
options: Add, Play, Edit, Delete, and Delete all.
Movie
Before using Movie, make sure you have inserted a memory card.
You can play the movies which stored on your memory card.
Recorder
Before using recorder, make sure you have inserted a memory card.
Enter the Recorder function, tap to start recording, and tap to stop.
Music
Upon entering the Music Player, Playlist will be displayed. Through All Music you
can look up all the music files. With the Add options, you can further create your
own playlists.
In the All Music screen, you have the following options: Play, Refresh playlist,
Repeat, Shuffle, Equalizer, Show lyrics, and Details.
Gallery
The Gallery provides a summary for all files stored in memory card.
File Manager
You can check and manage your documents which stored on your phone or
22
Page 23

memory card (when it is inserted).
Tools
The Tools includes the following functions: Calendar, Alarm, and so on. Any others
tools, you can download them by yourself.
Calendar
In addition to the western calendar, an India calendar is also provided. You can add,
edit and look up events on different dates.
Alarm
You can set up to 6 alarm clocks. The Alarm Clock settings include: Title, Time,
Status, Frequency and Ringtone. The frequency settings are: Once, Daily, Monday,
Tuesday, Wednesday, Thursday, Friday, Saturday and Sunday.
Alarm Dialog will be displayed when the alarm goes off. You can stop the alarm or
snooze for 5 minutes.
Notes
You can Add new Notes, and also edit or remove the stored notes.
EBook
The eBook function lists the eBooks in TXT format stored in your memory card.
Calculator
A basic calculator is provided
World Clock
You can view the local time of the different cities via this function.
Service
Opera Mini
It is a useful browser. Before use it, please make sure you have enabled GPRS
network.
Applications
Lava care
This function is used to display the address and number of after-sales service
center around the country.
Lava buddy
You can login the Twitter, MSN, Yahoo. The function is network dependent.
Lava zone
You can download Games, etc. from the Lava zone.
23
Page 24

The function is network dependent and downloading may have additional charges.
Please contact Network Operator for further details.
Facebook
You can login the facebook, this function is network dependent.
Face Talk
You can login the face talk, this function is network dependent.
Games
There are in-built games: Angry Bird, Fruit Ninja, Talk Cat. And also you can
download from mSpace, or Play the built-in games in the Game zone.
Settings
Enter Settings from the Main Menu. There are Network & connectivity,
Personalization, System and Applications Settings.
Network & connectivity
Flight mode
You can set on/off.
Connectivity settings
Bluetooth
You may do functions for your Bluetooth settings such as: Turn on/off, Paired
devices, Search devices, Settings.
Cellular network settings
You can set Data account, WAP account, MMS settings, please refer to the chapter
of the GPRS-WAP-MMS-Internet settings.
Personalization
Customization
Wallpaper: Set the wallpaper for Home and Lock screen.
Screen lock: Set different lock style.
Sound settings
Enter this feature, you can set ringtones for the different functions. Such as:
incoming call ringtone, new message tone, and so on.
Notification settings
Notification service: turn on/off.
Apps: Set the notification service for the default apps.
Security settings
You can set Phone lock, SIM lock here.
Phone lock: Turn the phone lock on/off and edit your phone password.
24
Page 25

The default is 4321.
SIM lock: Allow you to check the SIM card lock status and change password.
System
Display settings
Brightness: Set the brightness of the backlight.
Screen auto-lock: You can lock your phone manually, or select auto lock for the
phone to lock its screen automatically after some idle time in the Standby mode.
Date & Time settings
You can set the time, date, time zone, time format, date, date format and daylight
saving time. Also you can turn on/off the auto-update network time.
Language & input
Set Display language & Smart input and Soft keyboard.
This phone provides several languages including English, Hindi and more.
Advance settings
SIM Usage: you can check the GPRS usage of the SIM card.
Restore factory settings: Restore your phone to the factory or default settings
through this option. You need to input your phone password (default is 4321) for
this operation. All data will be deleted when your phone is restored to its factory
settings.
Applications
Call settings
You can customize the following features as per your preference.
Back list: You can add the contacts in the contact list to the blacklist thereby
blocking the voice calls from these contacts.
Auto redial: You can set whether or not to auto redial the number last called that
was unanswered.
Call time reminder: You can set the duration of the call for the phone to remind
you when the time is reached.
Auto quick end: Turn on/off
Additional call settings
Call waiting: You can activate/deactivate this function and also check its
status.
Call forwarding: You can set to divert the incoming calls in different
conditions/to different Numbers.
Call barring: Network support is required to activate this service.
25
Page 26

User group: Turn on/off.
Contacts settings
You can set the storage, backup, restore, import, export feature for the contacts.
Also you can set Speed dial list.
Messaging settings
Please refer to the Message chapter.
Extra Special Feature
Locks
You can set the different lock screen style.
Switch FX
You can set switching mode for the Home screen.
Downloads
You can look up downloading or completed apps, and also you can make the
related operations.
Appendix
FAQ
The phone cannot be turned on
When the battery is very low, the phone may not be turned on properly. Please
charge the battery.
Cannot make certain calls
Check if Call Barring is set. If it is set, you may not be able to make calls or only
certain calls are allowed.
My call is picked up by another phone
Check if call divert is set. If it is set, your incoming calls may be diverted to other
numbers or devices.
Error Messages
Please insert SIM card
Make sure you have inserted SIM card. If you have installed it but it cannot be
detected, please try clean the golden contacts of the SIM card by using a dry cloth.
If it still is not working, please contact your network carrier.
No service
If you are in an area not covered by your network, or if a physical obstacle is
present, such as in an enclosed area, the message “No service” will be displayed on
26
Page 27

your Standby screen and you will not be able to make or receive calls. You can try
move closer to a window for better reception.
For emergency only
When you are outside your network but inside other network, you can only make
emergency call.
No Valid SIM card
Your SIM card is locked or it has an error. Please insert the right SIM card or contact
your service provider.
Enter PUK code
After three consecutive incorrect PIN code entries, the code is blocked, and you
need the PUK code to unblock it. Contact your service provider to secure the 8-digit
PUK code. After ten consecutive incorrect PUK code entries, the SIM card cannot be
used any more. Please contact your service provider to buy a new SIM card
Care & Maintenance
Thank you for choosing our phone. Should you encounter any problem with the
phone, please contact our dealer or qualified service provider.
If your phone requires maintenance, send it to a local maintenance center near you.
Hand your phone to your dealer along with the relevant invoice if there is no local
maintenance center.
Your phone is a finely designed and crafted product. Please use it with care. The
following instructions will help you comply with the terms and conditions of the
warranty and prolong the life of this product:
Keep the phone and all its parts and accessories out of the reach of children.
Keep the phone dry; all kinds of liquid will erode the electronic circuit.
Do not use or store the phone in a dusty place to avoid damaging the
removable parts.
Keep the phone away from hot places. High temperature can shorten the life
of electronic device, damage batteries, and warp or melt certain plastic parts.
Do not place your phone in an extremely cold place, as the interior of your
phone can become damped and the circuitry damaged when the temperature
rises (to room temperature).
Do not attempt to open or disassemble the phone. Non-expert handling may
damage it.
Do not drop, crush or shake the phone to avoid damaging the internal circuit
board.
27
Page 28

Do not use harsh chemicals, cleaning solvents or strong detergents to clean
the phone.
Do not paint the phone or the paint may obstruct the removable parts and
affect operation.
Use only the supplied or an approved replacement antenna. Unauthorized
antennas, modifications, or attachments could damage the phone. In addition, use
of unauthorized antennas may result in non-compliance with the local regulatory
requirements in your country.
The above instructions apply to your phone, battery, charger and other accessories.
If any of them does not work properly, please send it to a qualified service provider.
Service center number
No: +919560394002
Kindly note please send area code of place through SMS to this No. and in return
you will get address of service center nearest to you by SMS.
28
 Loading...