

Page 1
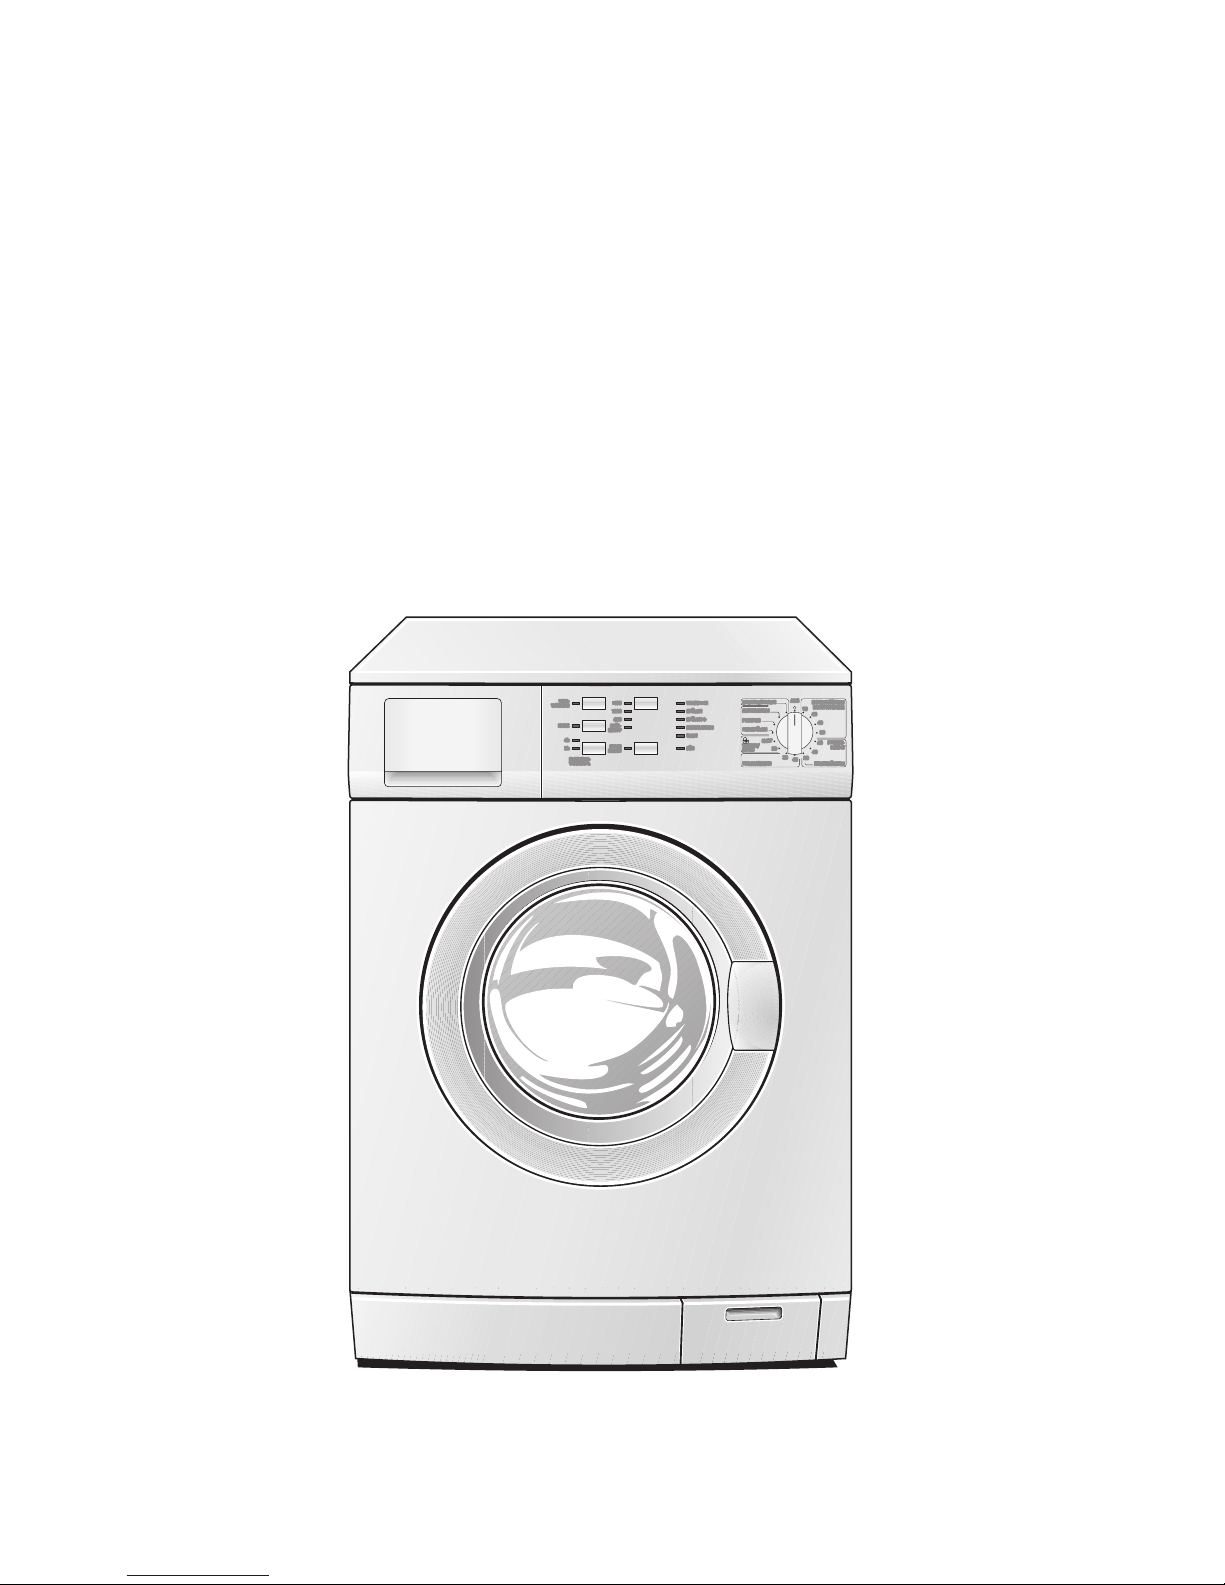
LAVAMAT 52810
Washing machine
User information
Page 2

2
Dear customer,
Please read this User Information carefully and keep it to refer to at a
later date.
Pass this User Information on to any subsequent owner of the appliance.
The following symbols are used in the text:
1 Safety instructions
Warning: Notes that concern your personal safety.
Attention: Notes that show how to avoid damage to the appliance.
3 Useful tips and hints
2 Environmental information
Page 3

3
Contents
Operating Instructions. . . . . . . . . . . . . . . . . . . . . . . . . . . . . . . . . . . . . 5
Safety . . . . . . . . . . . . . . . . . . . . . . . . . . . . . . . . . . . . . . . . . . . . . . . . . . . . . . . . . 5
Description of the appliance . . . . . . . . . . . . . . . . . . . . . . . . . . . . . . . . . . . . 7
Control Panel . . . . . . . . . . . . . . . . . . . . . . . . . . . . . . . . . . . . . . . . . . . . . . . . . 7
Programme overview. . . . . . . . . . . . . . . . . . . . . . . . . . . . . . . . . . . . . . . . . . . . 8
Before the first wash. . . . . . . . . . . . . . . . . . . . . . . . . . . . . . . . . . . . . . . . . . . . 10
Running a washing cycle . . . . . . . . . . . . . . . . . . . . . . . . . . . . . . . . . . . . . . . . 10
Opening the door/loading washing . . . . . . . . . . . . . . . . . . . . . . . . . . . . . . . . . 10
Adding detergent/additives . . . . . . . . . . . . . . . . . . . . . . . . . . . . . . . . . . . . . . . 11
Switching on the appliance/selecting a programme . . . . . . . . . . . . . . . . . . . 12
Changing spin speed/selecting rinse hold . . . . . . . . . . . . . . . . . . . . . . . . . . . . 12
Selecting the programme options . . . . . . . . . . . . . . . . . . . . . . . . . . . . . . . . . . 13
PRE-WASH . . . . . . . . . . . . . . . . . . . . . . . . . . . . . . . . . . . . . . . . . . . . . . . . . . 13
TIME SAVER. . . . . . . . . . . . . . . . . . . . . . . . . . . . . . . . . . . . . . . . . . . . . . . . . . 13
Switching RINSE + on and off . . . . . . . . . . . . . . . . . . . . . . . . . . . . . . . . . . . . . 13
Setting the delay timer . . . . . . . . . . . . . . . . . . . . . . . . . . . . . . . . . . . . . . . . . . . 14
Starting a programme . . . . . . . . . . . . . . . . . . . . . . . . . . . . . . . . . . . . . . . . . . . . 14
Interrupting a programme/adding washing . . . . . . . . . . . . . . . . . . . . . . . . . . 15
Washing cycle complete/removing the washing . . . . . . . . . . . . . . . . . . . . . . 15
Child safety device. . . . . . . . . . . . . . . . . . . . . . . . . . . . . . . . . . . . . . . . . . . . . . 16
Cleaning and maintenance . . . . . . . . . . . . . . . . . . . . . . . . . . . . . . . . . . . . . . 17
What to do if.... . . . . . . . . . . . . . . . . . . . . . . . . . . . . . . . . . . . . . . . . . . . . . . . . 18
Remedying small malfunctions . . . . . . . . . . . . . . . . . . . . . . . . . . . . . . . . . . . . 18
If the wash results are not satisfactory . . . . . . . . . . . . . . . . . . . . . . . . . . . . . . 20
Carrying out an emergency drain . . . . . . . . . . . . . . . . . . . . . . . . . . . . . . . . . . 21
Drain pump. . . . . . . . . . . . . . . . . . . . . . . . . . . . . . . . . . . . . . . . . . . . . . . . . . . . . 22
Disposal . . . . . . . . . . . . . . . . . . . . . . . . . . . . . . . . . . . . . . . . . . . . . . . . . . . . . . . 23
Technical data. . . . . . . . . . . . . . . . . . . . . . . . . . . . . . . . . . . . . . . . . . . . . . . . . . 24
Consumption values. . . . . . . . . . . . . . . . . . . . . . . . . . . . . . . . . . . . . . . . . . . . . 24
Page 4

4
Installation and connection instructions. . . . . . . . . . . . . . . . . 25
Safety information for the installation. . . . . . . . . . . . . . . . . . . . . . . . . . . . 25
Installing the appliance . . . . . . . . . . . . . . . . . . . . . . . . . . . . . . . . . . . . . . . . . 26
Transporting the appliance . . . . . . . . . . . . . . . . . . . . . . . . . . . . . . . . . . . . . . . . 26
Removing the transit packaging . . . . . . . . . . . . . . . . . . . . . . . . . . . . . . . . . . . 26
Where to install . . . . . . . . . . . . . . . . . . . . . . . . . . . . . . . . . . . . . . . . . . . . . . . . . 28
Making the appliance level. . . . . . . . . . . . . . . . . . . . . . . . . . . . . . . . . . . . . . . . 29
Electrical connection. . . . . . . . . . . . . . . . . . . . . . . . . . . . . . . . . . . . . . . . . . . . 29
Connecting to the water supply . . . . . . . . . . . . . . . . . . . . . . . . . . . . . . . . . . 29
Water inflow. . . . . . . . . . . . . . . . . . . . . . . . . . . . . . . . . . . . . . . . . . . . . . . . . . . . 30
Water drainage. . . . . . . . . . . . . . . . . . . . . . . . . . . . . . . . . . . . . . . . . . . . . . . . . . 31
Guarantee/Customer Service. . . . . . . . . . . . . . . . . . . . . . . . . . . . . . 32
Service . . . . . . . . . . . . . . . . . . . . . . . . . . . . . . . . . . . . . . . . . . . . . . . . . . . . . . 35
Page 5

5
Operating Instructions
1 Safety
Prior to using for the first time
• Follow the ”Instructions for installation and connection”.
• If the appliance is delivered in the winter months when there are mi-
nus temperatures: Store the washing machine at room temperature
for 24 hours before using for the first time.
Correct use
• The washing machine is only designed for the washing of normal domestic laundry at home.
• Additions or modifications to the washing machine are not permitted.
• Use only detergents and additives that are suitable for use in domestic washing machines.
• The washing must not contain any inflammable solutions. Danger of
explosion!
• Do not use the washing machine for dry cleaning.
• Dyes/colour removers may only be used in the washing machine, if
the manufacturer of these products expressly permits this. We cannot
be held responsible for any damage arising.
Child safety
• Keep packaging away from children. There is a risk of suffocation.
• Children often do not recognise the hazards associated with electrical
appliances. Don’t allow children to use the washing machine unsupervised.
• Make sure that children and pets don’t climb into the drum of the
washing machine. Could endanger life!
Page 6

6
General safety
• Repairs to the washing machine must only be carried out by qualified
service engineers.
• Never use the washing machine if the mains cable is damaged; or if
the control panel, work top or plinth area is damaged such that the
inside of the appliance is freely accessible.
• Switch off the washing machine before cleaning, maintenance and
servicing. In addition, pull the mains plug out of the socket or – in
the case of a permanent connection – switch off the cut-out in the
fuse box or remove the screw fuse completely.
• If operation is stopped, disconnect the appliance from the mains supply and shut off the water tap.
• Never unplug the appliance by pulling on the cable. Always pull the
plug.
• Multi-way plugs, connectors and extension cables must not be used.
This could constitute a fire hazard through overheating.
• Never wash the washing machine down with a water jet. Danger of
electric shock!
• In washing programmes with high temperatures the glass in the door
gets hot. Do not touch it.
• Before emergency emptying of the appliance, before cleaning the
drain pump or opening the door in an emergency, let the water cool
down.
• Small animals can nibble at the cables and water hoses. Danger of
electric shock and danger of water damage! Keep small animals away
from the washing machine.
Page 7
7
Description of the appliance
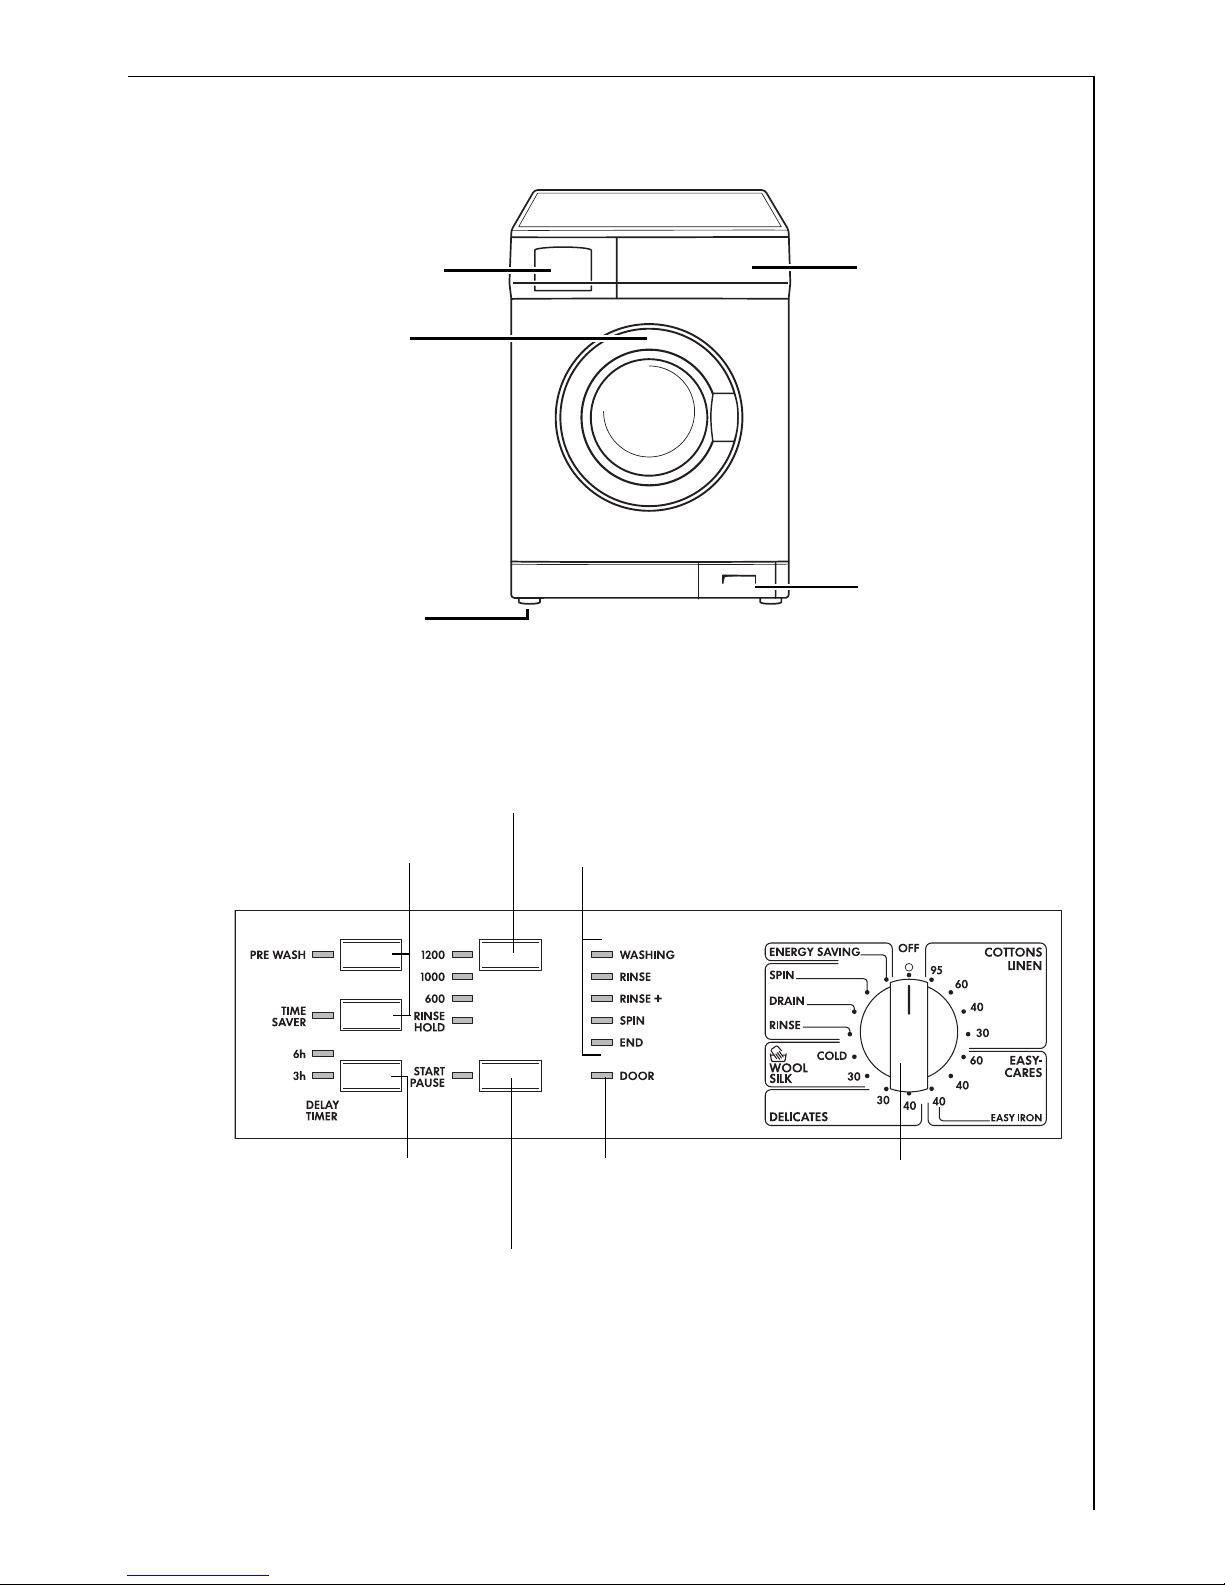
Control Panel
Detergent dispenser
drawer
Screw feet
(height adjustable)
Plinth flap/
Drain pump
Rating plate
(behind door)
Control panel
DELAY TIMER button
SPIN/RINSE HOLD button
Programme Progress display
Programme knob
START/PAUSE button
DOOR indicator
Programme option buttons
Page 8
8
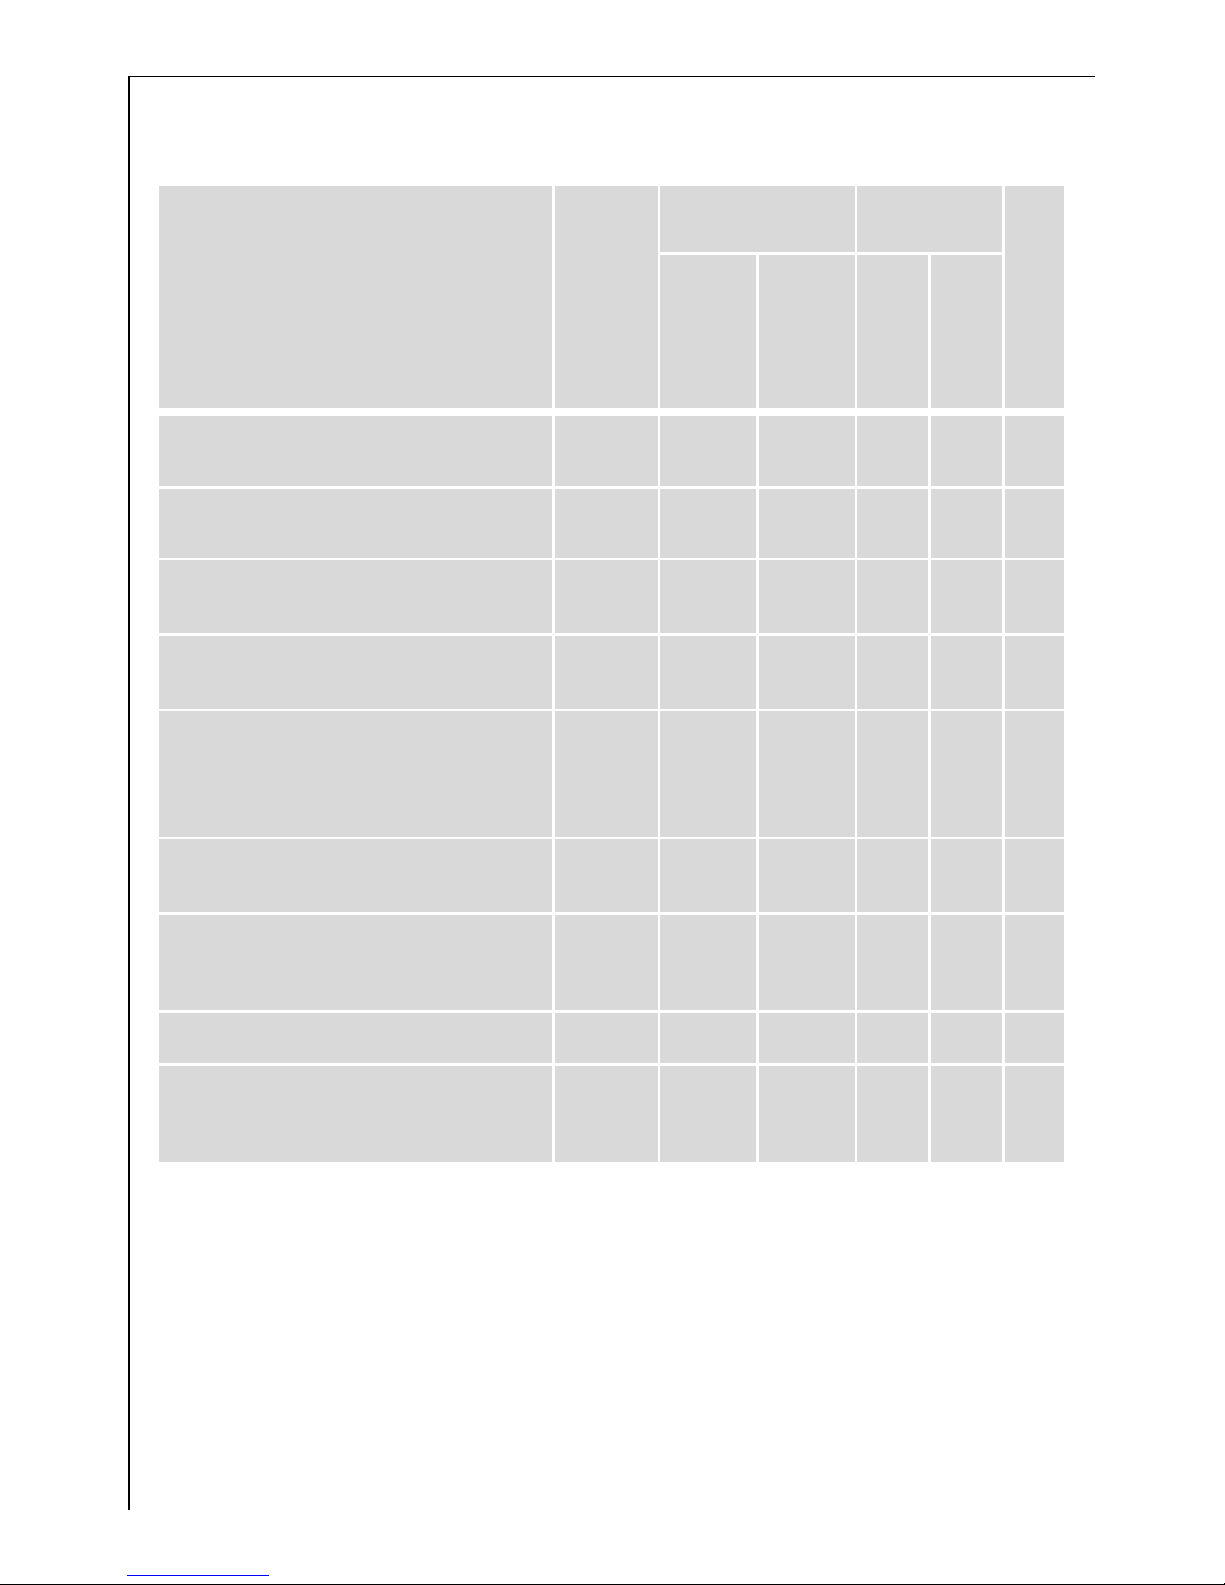
Programme overview
Programme
max. load
1)
(dry washing)
1) A 10 litre bucket contains approx. 2.5 kg of dry washing (cotton)
Additional
programmes
Spin speed
RINSE HOLD
PRE WASH
TIME SAVER
1200
1000/600
ENERGY SAVING
2)
2) Programme settings for tests in accordance with or in support of EN 60 456 and IEC 60 456 are described in the section “Consumption values”.
6kg • • • •
COTTONS/LINEN
95, 60, 40, 30
6kg • •
3)
3) Recommended load for short progammes is 3kg; full loading is possible however with somewhat reduced
cleaning results.
• • •
EASY-CARES
60, 40
3kg • • • •
EASY IRON 40 1kg • • • •
DELICATES
40, 30
3kg • • • •
WOOL/SILK H (Hand-washing)
30, COLD
2kg • •
RINSE 3kg • • •
DRAIN
SPIN 6kg • •
Page 9
9
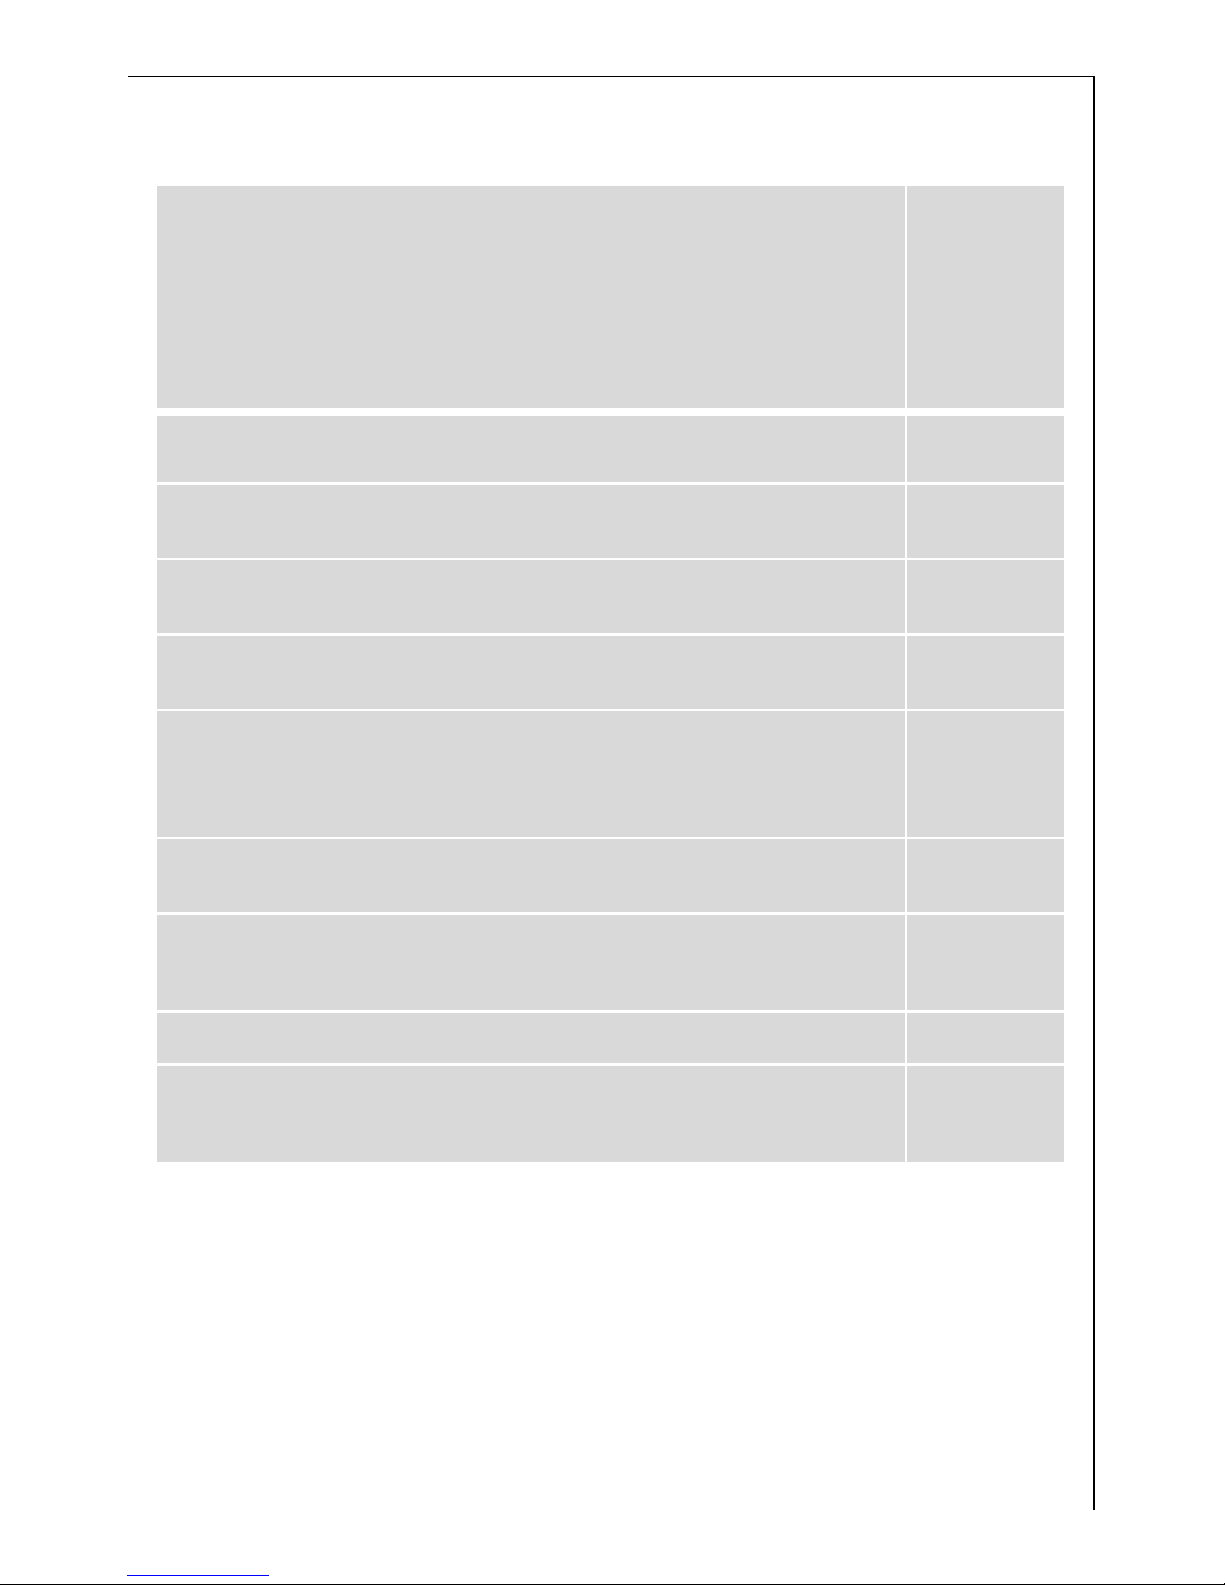
Application/Features
Care
symbols
1)
1) The figures in the care symbols indicate the maximum temperatures.
Energy-saving programme at 60°C for lightly to normally soiled whites/coloureds made of cotton/linen.
M O
Programme for normally to heavily soiled coloureds/whites made of cotton/
linen.
J M O
Programme for easy-care mixed fibres and synthetics.
I K N
Special programme at 40°C for easy-care fabrics which after being washed
using this programme need to be ironed only lightly or not at all.
K N
Gentle programme for delicate fabrics such as bonded fibres, micro-fibres,
synthetics, net curtains (load max. 20 to 25 m
2
net curtains). With RINSE
HOLD also suitable for materials that have climatic membranes, e.g. outdoor
clothing.
I K
Specially gentle programme for machine and hand-washable wool/silk.
Q L H
Separate gentle rinse (3 rinse cycles, liquid conditioner is washed in from the
compartment
&
, spin). Not suitable for wool. When loading easy-care or del-
icate items, reduce the spin speed.
J M O
Draining following a rinse hold.
Draining and spinning, e.g. following a rinse hold, or separate spinning of
hand-washed cottons/linen. Reduce the spin revolution speed if spinning
easy-care, delicate or woollen items.
J M O
Page 10
10
Before the first wash
1. Open the detergent dispenser drawer.
2. Pour about 1 litre of water through the detergent dispenser drawer into
the washing machine.
This closes the water container when the next programme is started
and the economy valve can function properly.
3. In order to remove any residues from the drum and water container
which may have been left during manufacturing, perform the first
wash cycle without any washing in the machine. Programme: COTTONS/LINEN 60, press TIME SAVER, add 1/4 of a measuring cup of
washing powder.
Running a washing cycle
Opening the door/loading washing
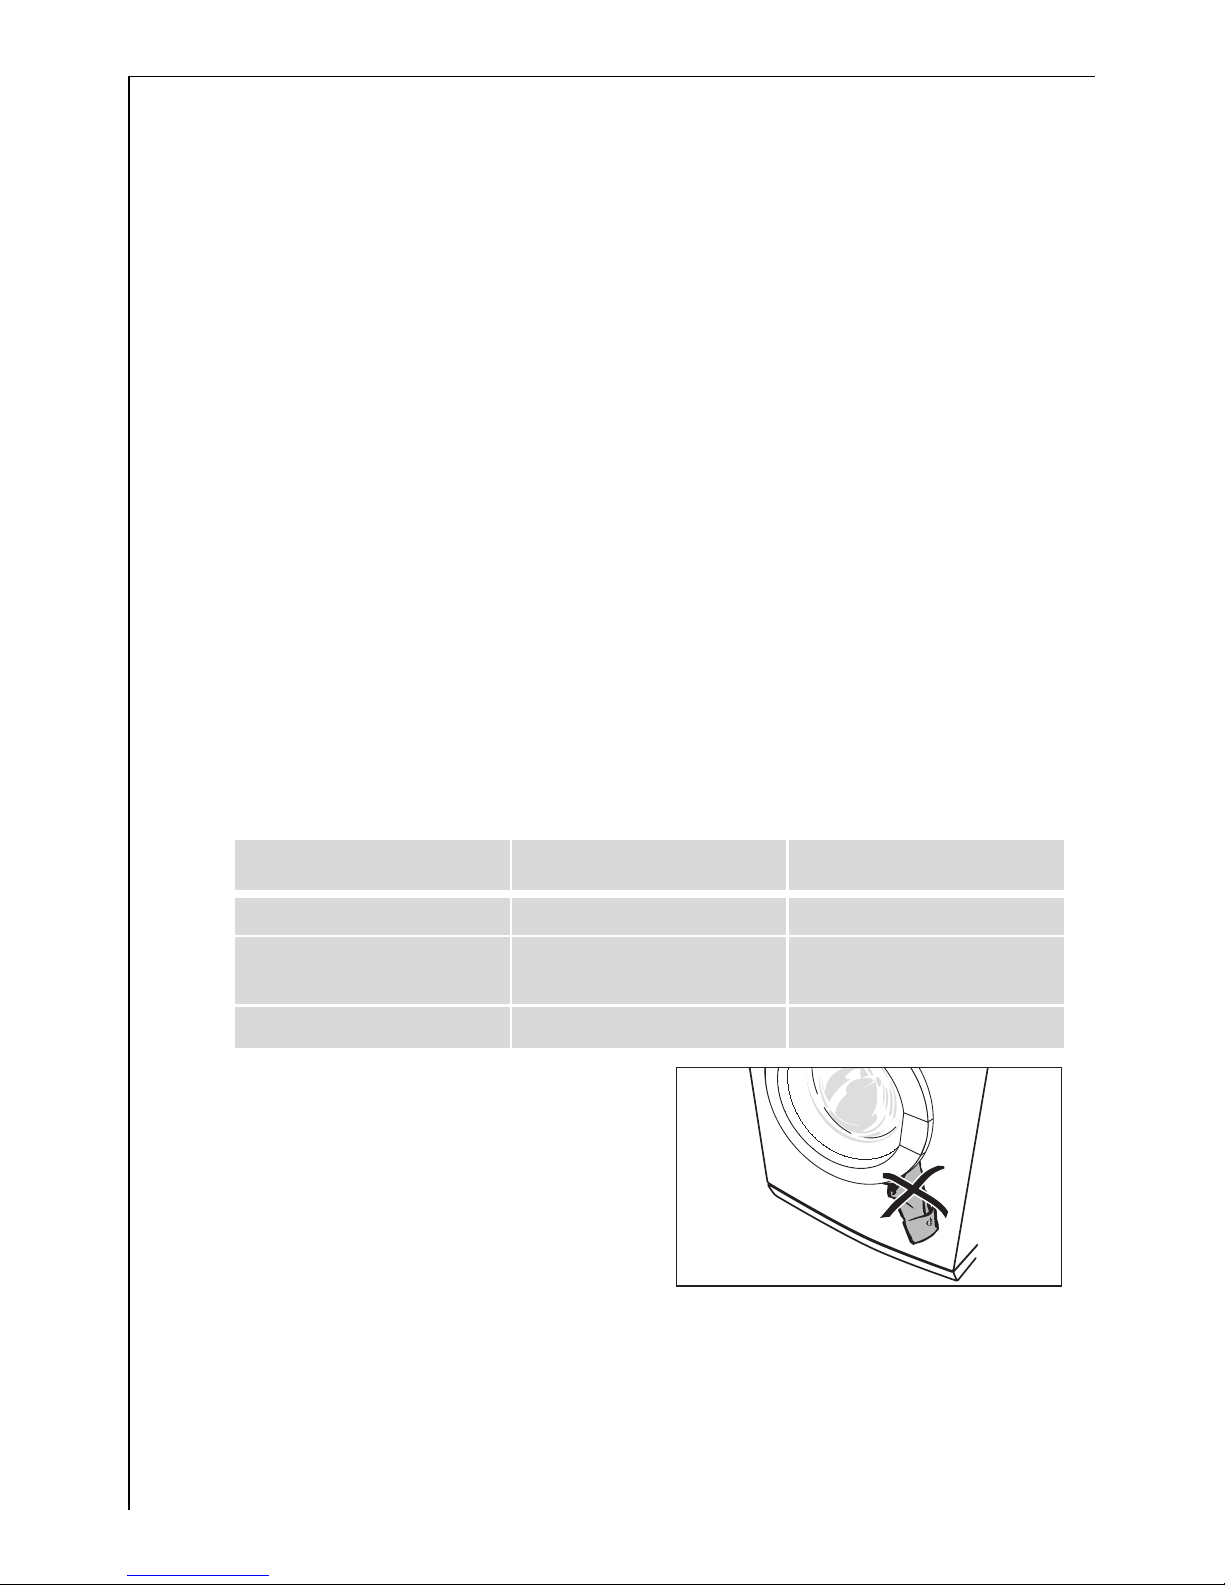
1. To open the door: pull the door by the handle.
When the machine is switched on, the DOOR light and the START/
PAUSE light indicate whether the door can be opened:
2. Unfold washing and load it loosely
into the machine. Mix large and
small items.
Important! Do not get any washing
caught between the door and the
rubber seal.
3. Push the door shut firmly. Door
catch must audibly click shut.
DOOR indicator START/PAUSE indicator Can the door be opened?
flashes flashes yes, after about 2 minutes
lit lit
no, water level and/or
temperature too high
is off flashes yes
Page 11
11
Adding detergent/additives
Warning! Use only detergents and additives that are suitable for use in
domestic washing machines.
1 For USA and Canada only!
Important! Only LOW-SUDSING detergent suitable for a front-loading
washing machine can be used in this machine. This machine can heat
the water up to 95 degrees celsius, or 200 degrees fahrenheit, and care
should be taken to ensure that the correct washing powder is used. If
you have any doubt, check with your dealer or the distributor.
WARRANTY AND CONSEQUENTIAL DAMAGES ARE VOIDED IF A LOW
SUDSING DETERGENT IS NOT USED.
Dose detergent and additives according to the instructions of the detergent and additive manufacturers. Follow the advice on the packaging.
Dosing depends upon:
– the washing’s degree of soiling,
– the size of the load
– the degree of hardness of the water supply.
• If the manufacturer does not give instructions for small loads: for a
half load, use a third less, for a very small load, use only half of the
detergent that is recommended for a full load.
• From water hardness 2 (= medium) upwards, water softener should
be used. Detergent can then always be dosed for water hardness 1
(= soft). Your local water company will be able to give you information about the water hardness in your area.
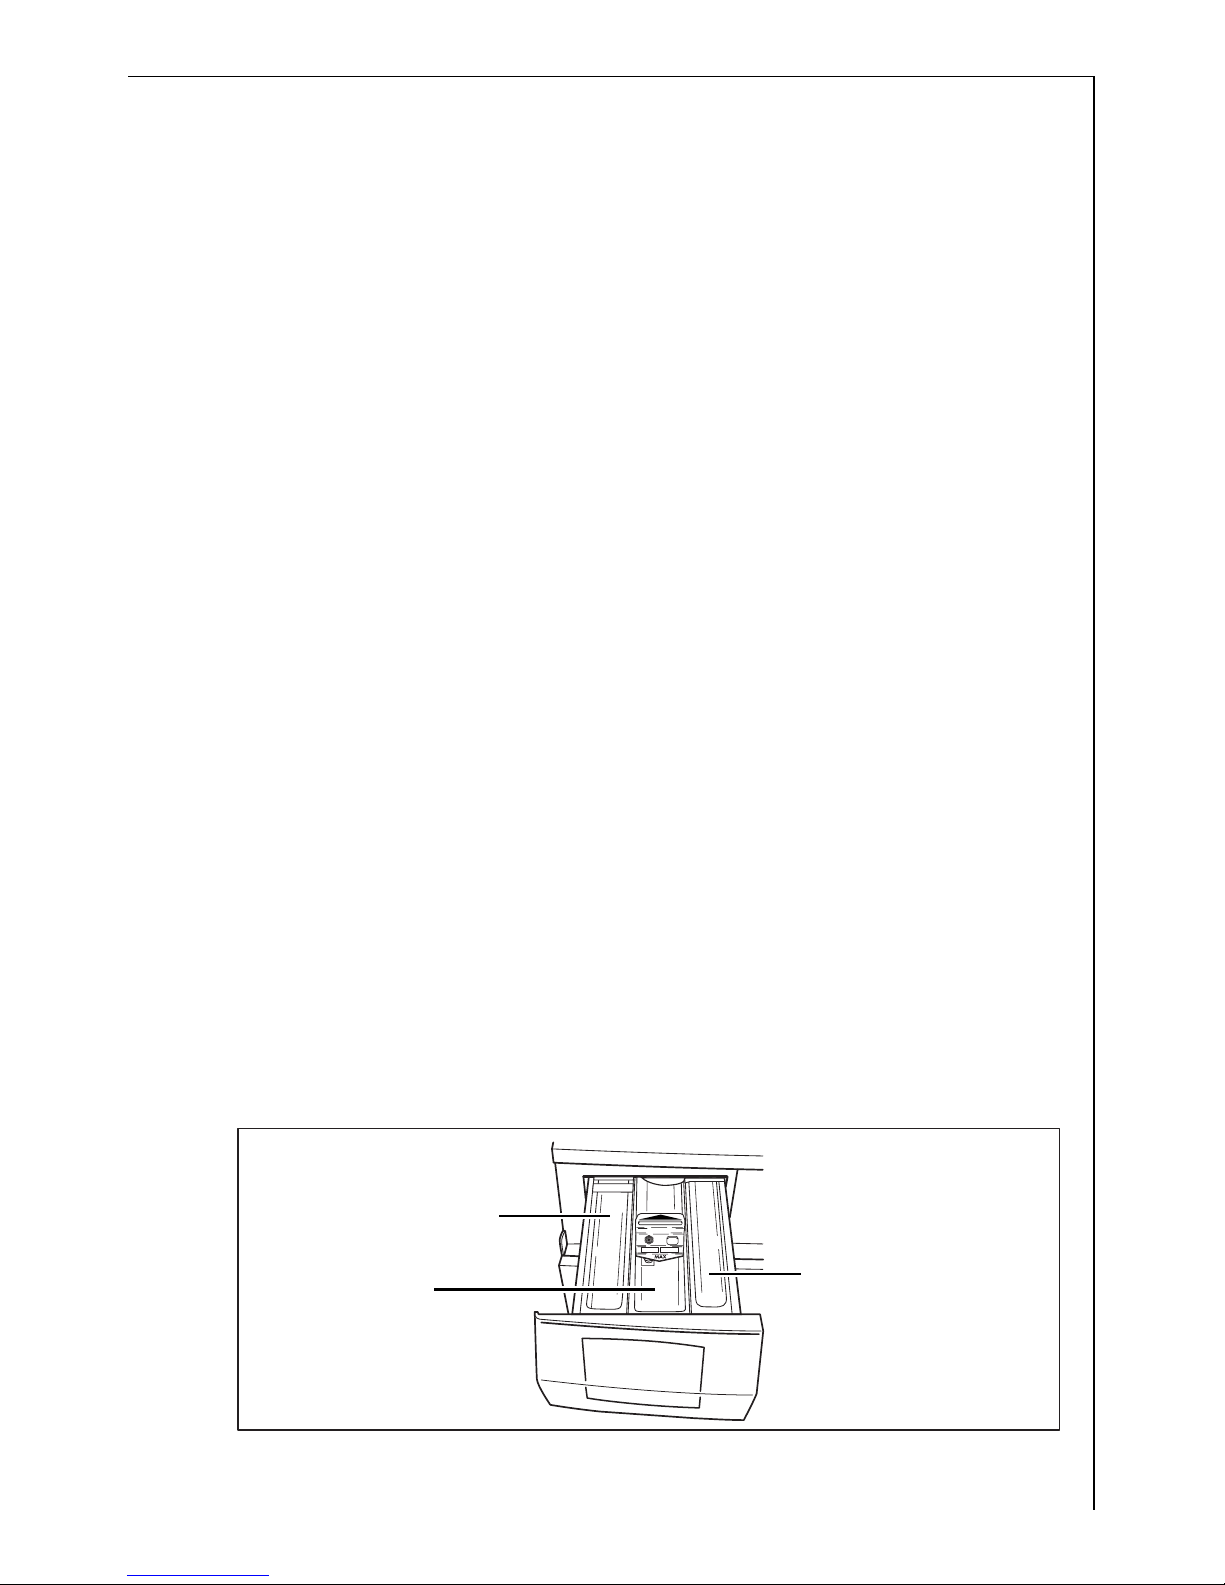
1. Pull the detergent dispenser drawer out as far as the stop.
2. Add the detergent/additives.
3. Push the drawer in fully.
Washing powder/tablets
for the main wash
Softeners/
wash-care products to
preserve the shape of
garments/
starch
Washing powder/tablets
for the pre-wash or inwash stain treatment
Page 12
12
Washing powder/tablets for the main wash
If you are using water softener and need the right-hand compartment
for the pre-wash/stain treatment agent, add the water softener to the
main wash detergent in the left compartment.
Softeners, wash-care products to preserve the shape of garments,
starch
Do not fill the compartment beyond the MAX mark. Dilute thick liquid
concentrates according to the manufacturer’s instructions before
putting them into the drawer. Dissolve powder starches.
If you use liquid detergents:
Add liquid detergent using the dosage containers provided by the detergent manufacturer.
Switching on the appliance/selecting a programme
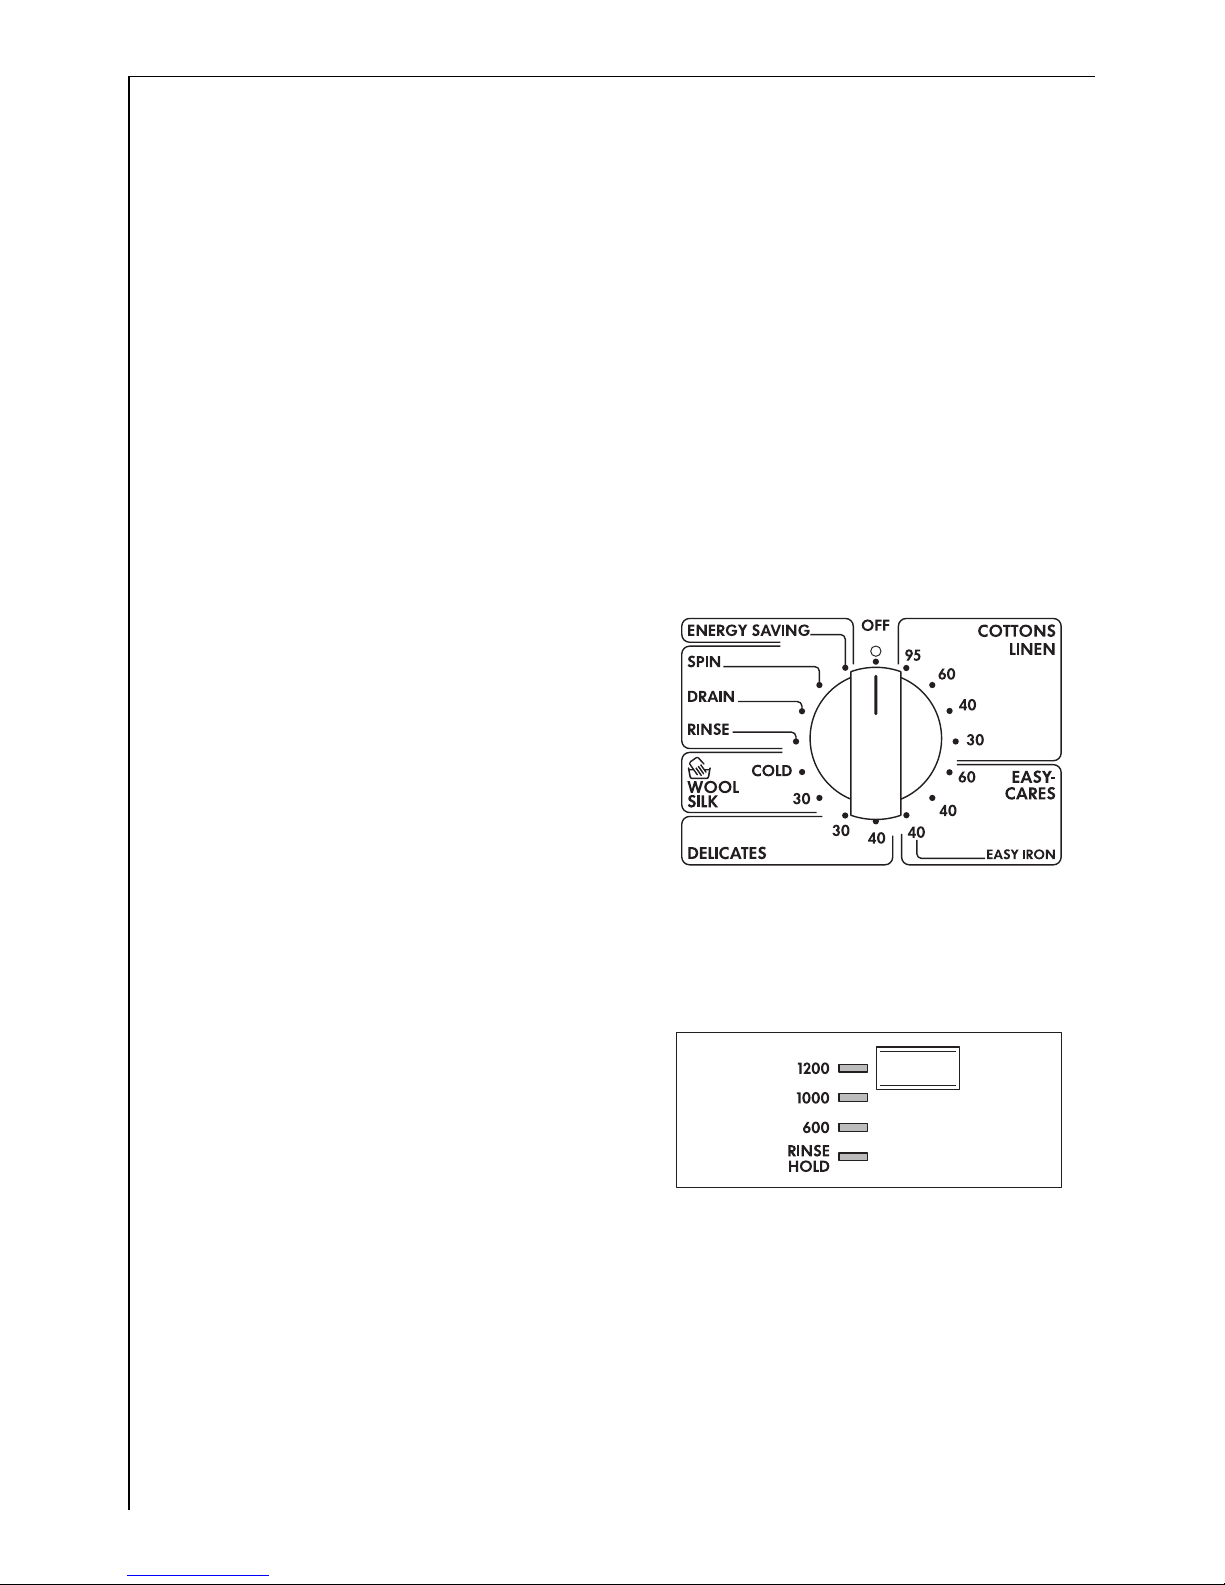
Set the programme and temperature using the programme knob.
3 By selecting a programme, you
switch the appliance on at the
same time.
The programme progress display
indicates the programme steps
that the selected programme will
perform.
Changing spin speed/selecting rinse hold
The washing machine suggests the
maximum permitted speed that is
suitable for the selected programme. You can reduce this
speed:
Press the SPIN/RINSE HOLD button
repeatedly until the desired display
lights up.
3 The speed for the final spin can still be altered during the programme.
To do this:
1. Press the START/PAUSE button.
2. Change speed.
3. Press the START/PAUSE button again.
Page 13
13
RINSE HOLD
If RINSE HOLD is selected, the washing is left to soak in the last rinse
water. There is no final spin after the intermediate spin(s). Intermediate
spins are programme-dependent and cannot be altered.
Selecting the programme options
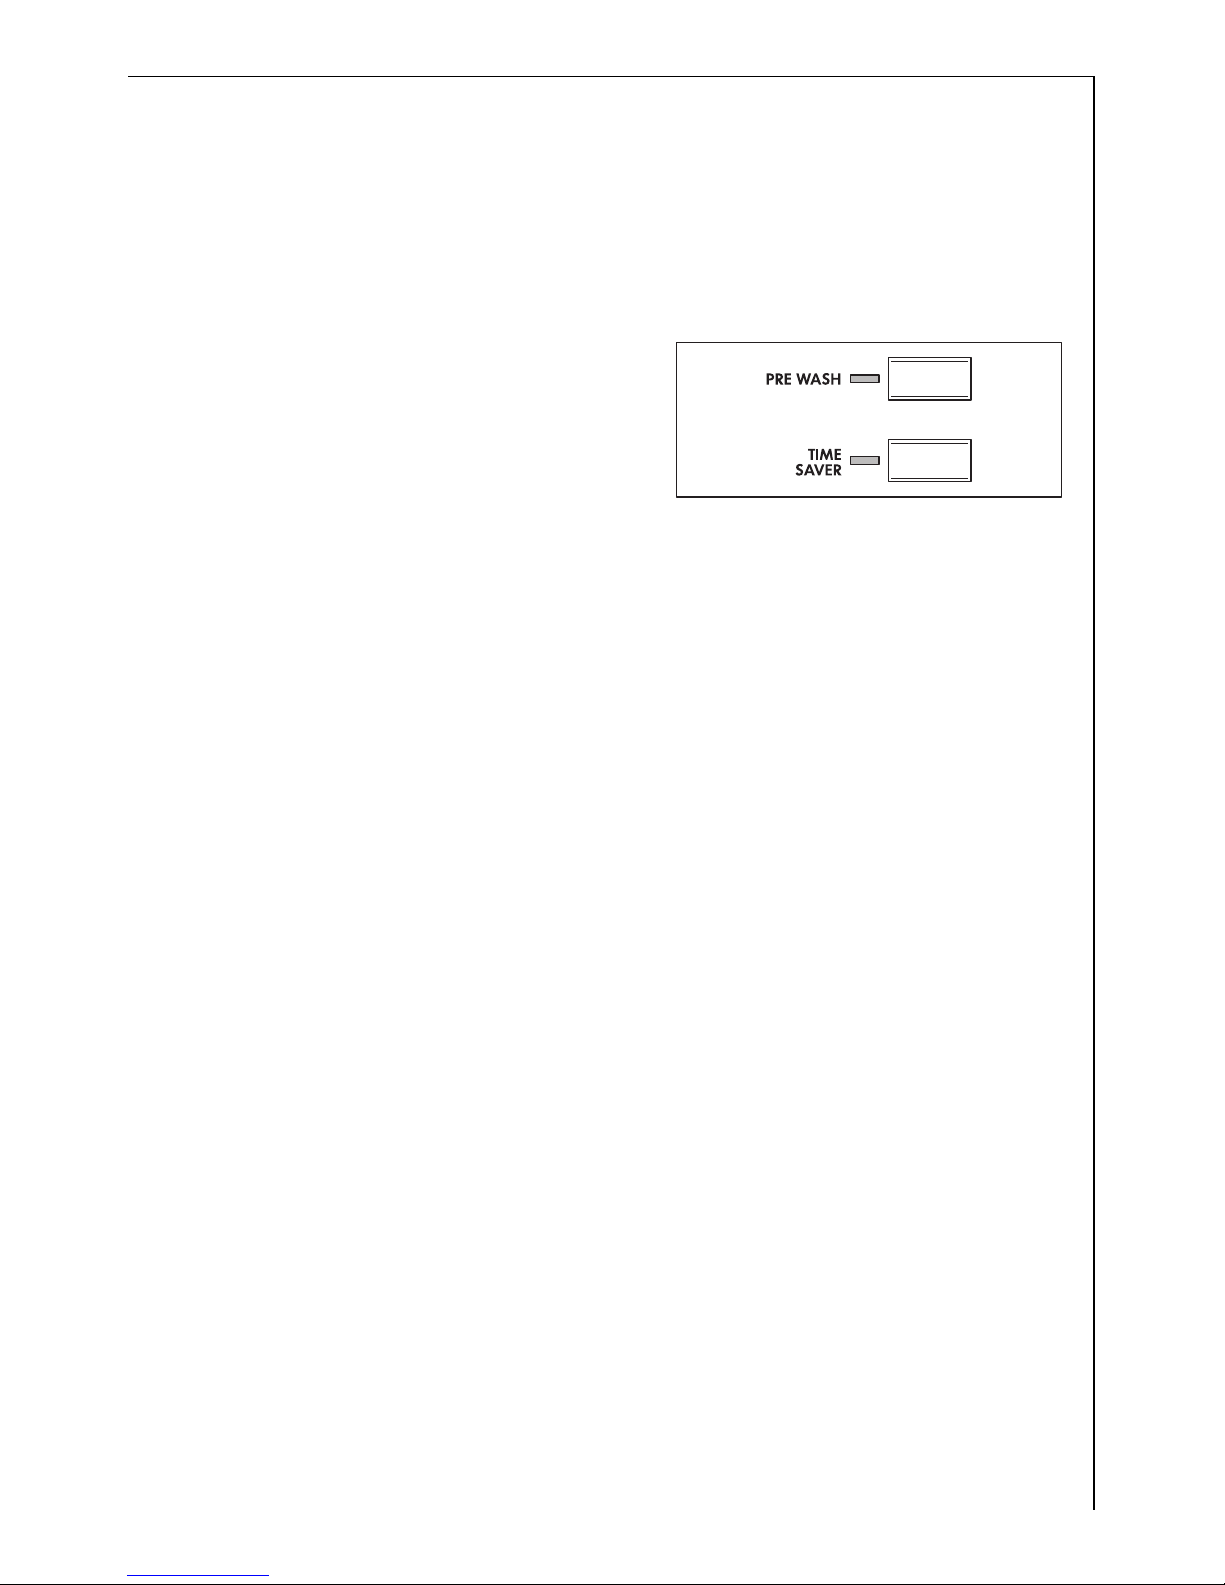
If desired, press the programme option button(s). The corresponding
light lights up.
PRE-WASH
Warm pre-wash before the main wash, which follows automatically; intermediate spin in the COTTONS/LINEN and EASY-CARES/EASY IRON
programmes; no intermediate spin in the DELICATES programme.
TIME SAVER
Short wash cycle for lightly soiled washing.
Switching RINSE + on and off
When RINSE + is switched on, there are two additional rinses in the
COTTONS/LINEN, EASY-CARES/EASY IRON, DELICATES and GENTLE
RINSE programmes. RINSE + remains permanently saved – even after
the appliance is switched off.
To switch on RINSE +:
1. Turn the programme knob to COTTONS/LINEN, EASY-CARES/EASY IRON
or DELICATES (at any temperature).
2. Hold down the buttons PRE-WASH and DELAY TIMER at the same time,
until RINSE and RINSE + light up on the programme progress display.
RINSE + is now permanently switched on.
RINSE + is lit on the programme progress display before the start of the
programme and during the additional rinses.
Page 14

14
To switch off RINSE +:
1. Turn the programme knob to COTTONS/LINEN, EASY-CARES/EASY IRON
or DELICATES (at any temperature).
2. Hold down the buttons PRE-WASH and DELAY TIMER at the same time,
until RINSE + goes out on the programme progress display.
RINSE + is now permanently switched off.
Setting the delay timer
The DELAY TIMER button allows the start of a programme to be delayed.
1. Select programme.
2. Press DELAY TIMER button once, if the wash programme is to start after
6 hours. The display 6h lights up.
Press DELAY TIMER button twice, if the wash programme is to start after 3 hours. The display 3h lights up.
3 If you press the DELAY TIMER button again, the time delay is cancelled.
The display goes out.
3. To activate the time delay, press the START/PAUSE button.
Note: If a time delay of 6 hours is selected, the display 6h is lit. After
3 hours the display changes and 3h is lit. After a total of 6 hours the
wash programme then starts.
Starting a programme
1. Check that the water tap is open.
2. Press the START/PAUSE button. The programme is started or starts after
the time delay set has elapsed.
During the wash programme, the current programme step is displayed
on the programme progress display.
3 If the START/PAUSE button is pressed and the END indicator flashes 4
times, the door is not closed properly. Push the door firmly closed and
press the START/PAUSE button again.
Page 15

15
Interrupting a programme/adding washing
Interrupting a programme
• A washing programme can be interrupted at any time by pressing the
START/PAUSE button. It is then re-started by pressing the START/
PAUSE button again.
• To stop the washing machine before the programme has ended, turn
the programme knob to OFF. Important! Be careful if there is water
in the appliance!
Adding washing
It is possible to add washing, as long as the DOOR light is not lit.
1. Press the START/PAUSE button. The door can be opened.
2. Shut door and press the START/PAUSE button again. The programme
continues.
Washing cycle complete/removing the washing
At the end of the programme, END lights up on the programme
progress display. The door can be opened as soon as the DOOR light
goes off and the END light has come on.
1. Open the door and remove the washing.
2. Turn the programme knob to OFF.
3. Close the water tap.
4. After the wash, pull out the detergent dispenser drawer slightly to al-
low it to dry. Leave the door slightly open to air the inside of the washing machine.
If RINSE HOLD was selected:
After a rinse hold, DOOR and END light up on the programme progress
display.
The water must first be drained:
– Either turn the programme knob to OFF, then to DRAIN and press the
START/PAUSE button (the water is drained without spinning),
– or turn the programme knob to OFF and then to SPIN. Depending
upon the type of washing, reduce the spin speed if necessary and
press the START/ PAUSE button (the water is drained and the washing
spun).
Page 16
16
Child safety device
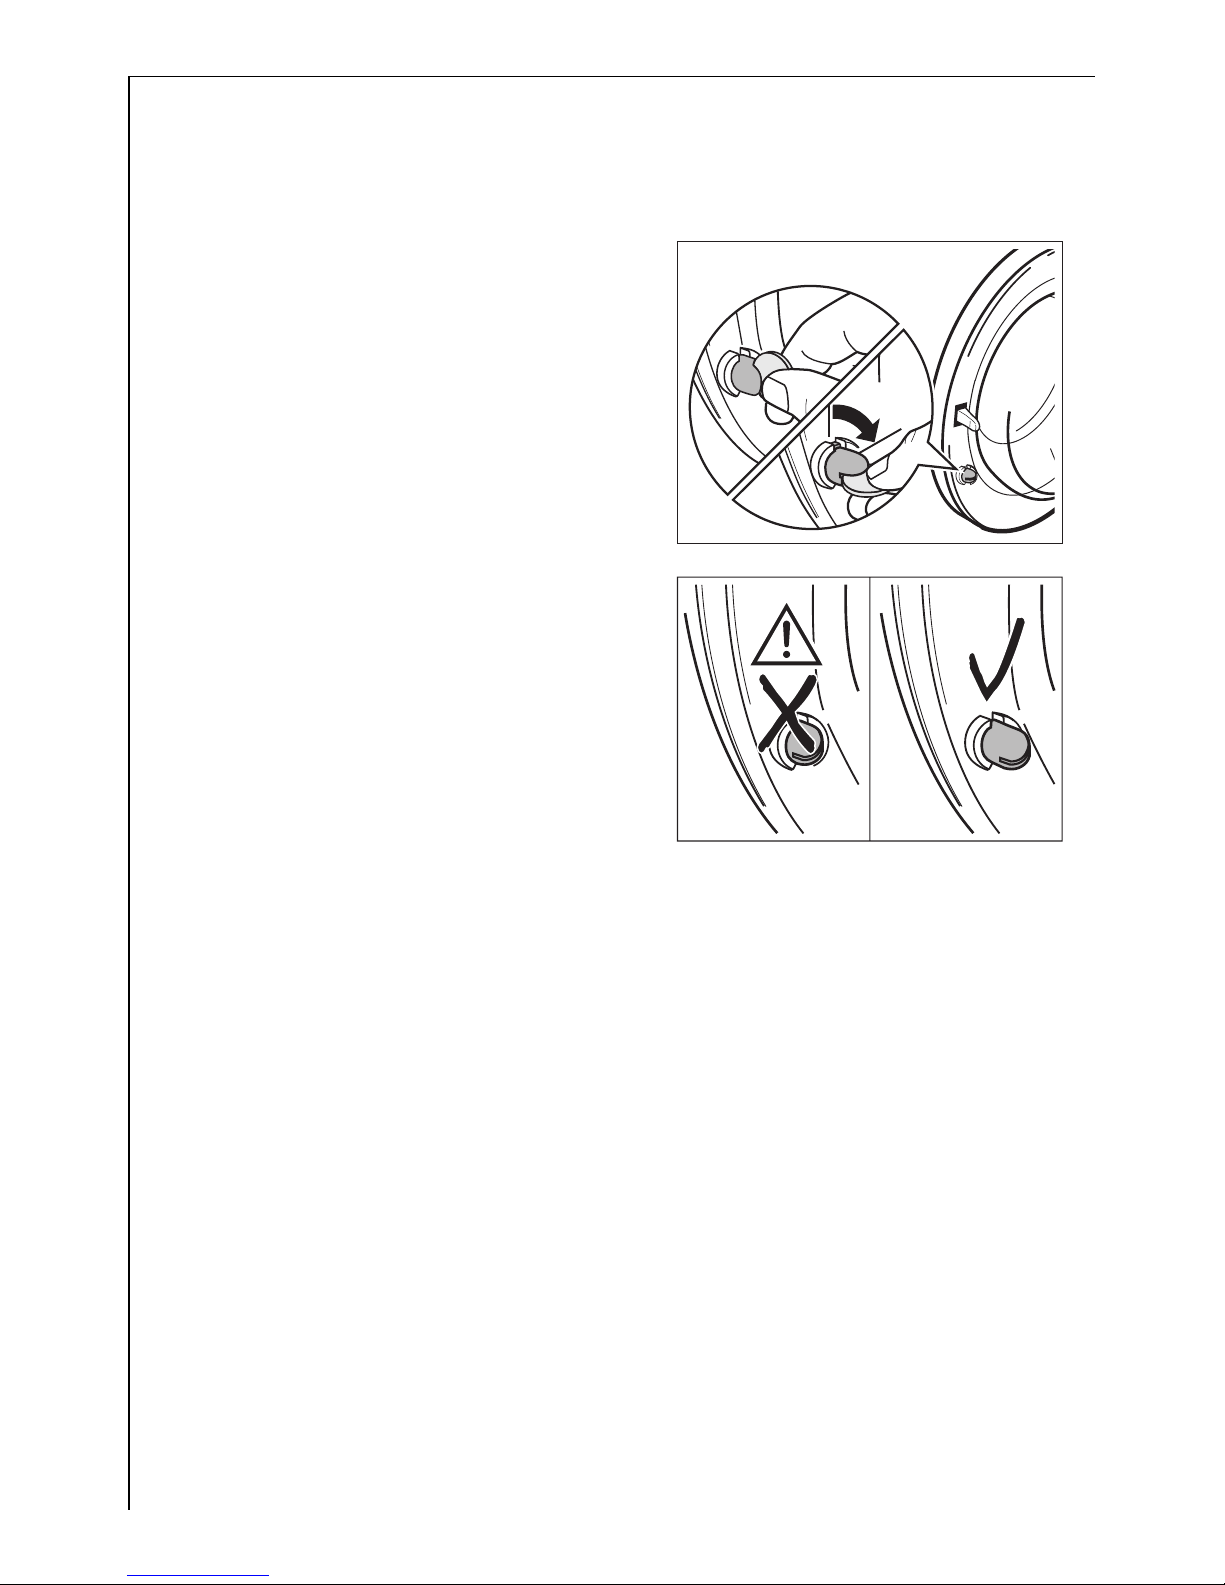
When the child safety device is set, the door can no longer be closed.
Setting the child safety device:
Use a coin to turn the knob (on the
inside of the door) in a clockwise direction as far as it will go.
1 Warning! The knob must not be
sunk-in after being set, otherwise
the child safety device is not active.
The knob must stand proud as
shown in the illustration.
Releasing the child safety device:
Turn the knob anti-clockwise as far
as it will go.
Page 17
17
Cleaning and maintenance
Important! Do not use furniture care products or aggressive cleaners to
clean the appliance.
Wipe control panel and body with a damp cloth.
Cleaning procedure
If you plan to wash mainly at low temperature, you should run a hot
programme from time to time. This will reduce any deposits and clean
the appliance from the inside.
Detergent dispenser drawer
The detergent dispenser drawer should be cleaned regularly.
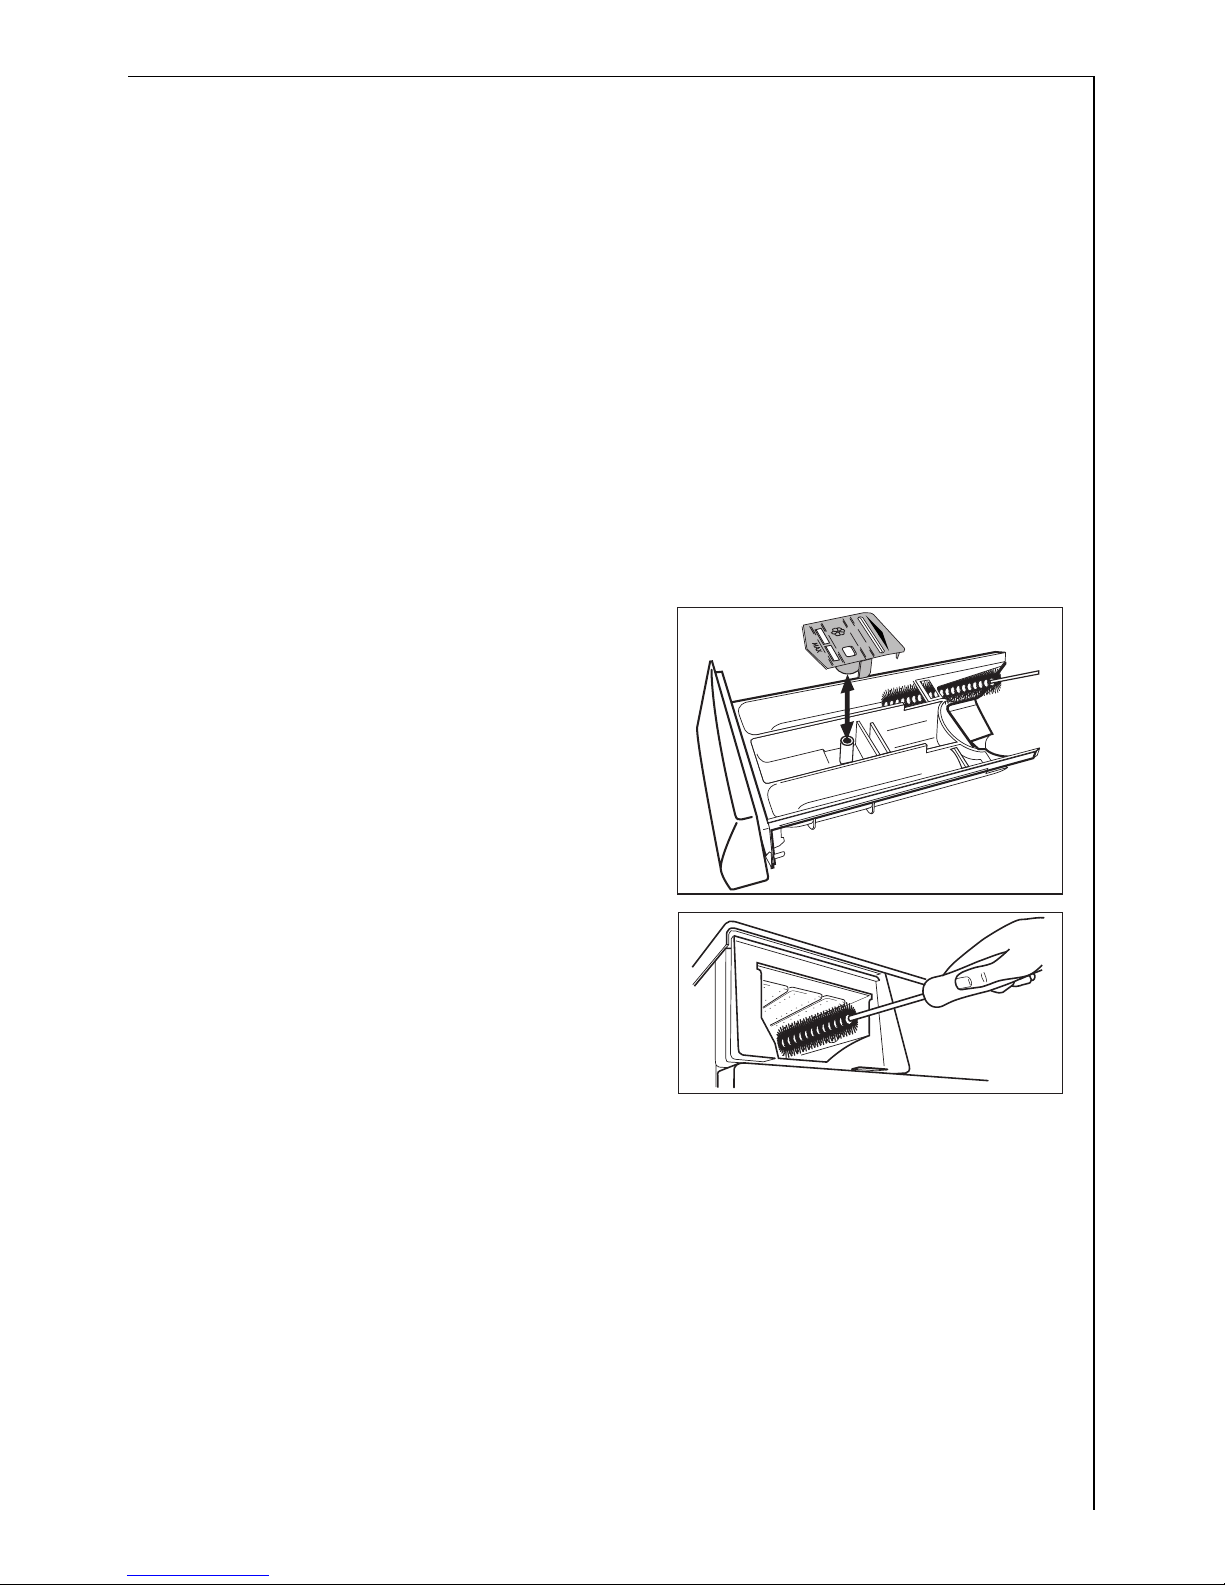
1. Remove the detergent dispenser drawer by pulling it firmly.
2. Remove the conditioner insert from
the middle compartment.
3. Clean all parts with water.
4. Put the conditioner insert in as far as
it will go, so that it is firmly in place.
5. Clean all parts of the washing machine, especially the nozzles in the
top of the washing-in chamber, with
a brush.
6. Insert the detergent dispenser drawer in the guide rails and push it in.
Washing drum
Rust deposits in the drum may occur due to rusting foreign bodies in
the washing or tap water containing iron.
Important! Do not clean the drum with acidic descaling agents, scouring agents containing chlorine or iron or steel wool.
1. Remove any rust deposits on the drum with a cleaning agent for stainless steel.
2. Run a washing cycle without any washing to clean off any cleaning
agent residues. Programme: COTTONS/LINEN 60, press TIME SAVER button, add approx. 1/4 of a measuring cup of washing powder.
Page 18
18
Door and rubber collar
Regularly check whether deposits or foreign bodies are present in the
folds of the rubber collar or on the inside of the glass door.
Clean the glass in the door and the rubber collar regularly.
What to do if...
Remedying small malfunctions
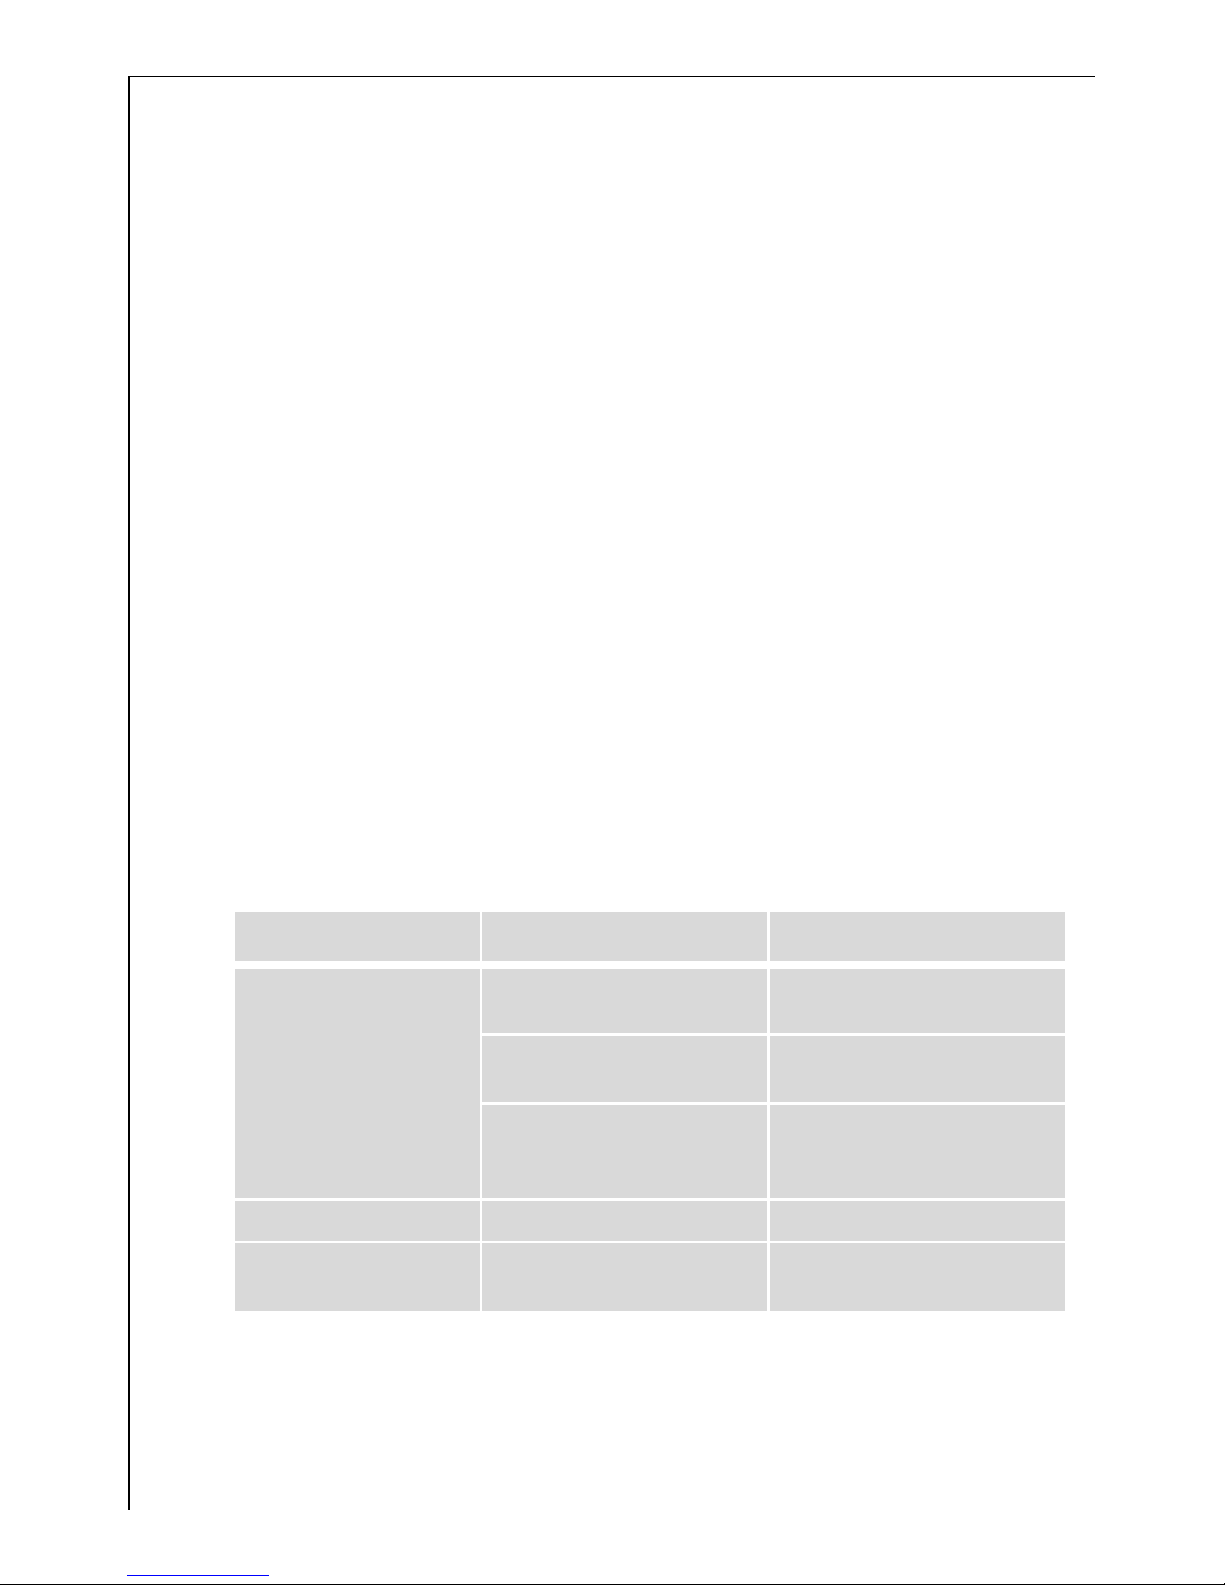
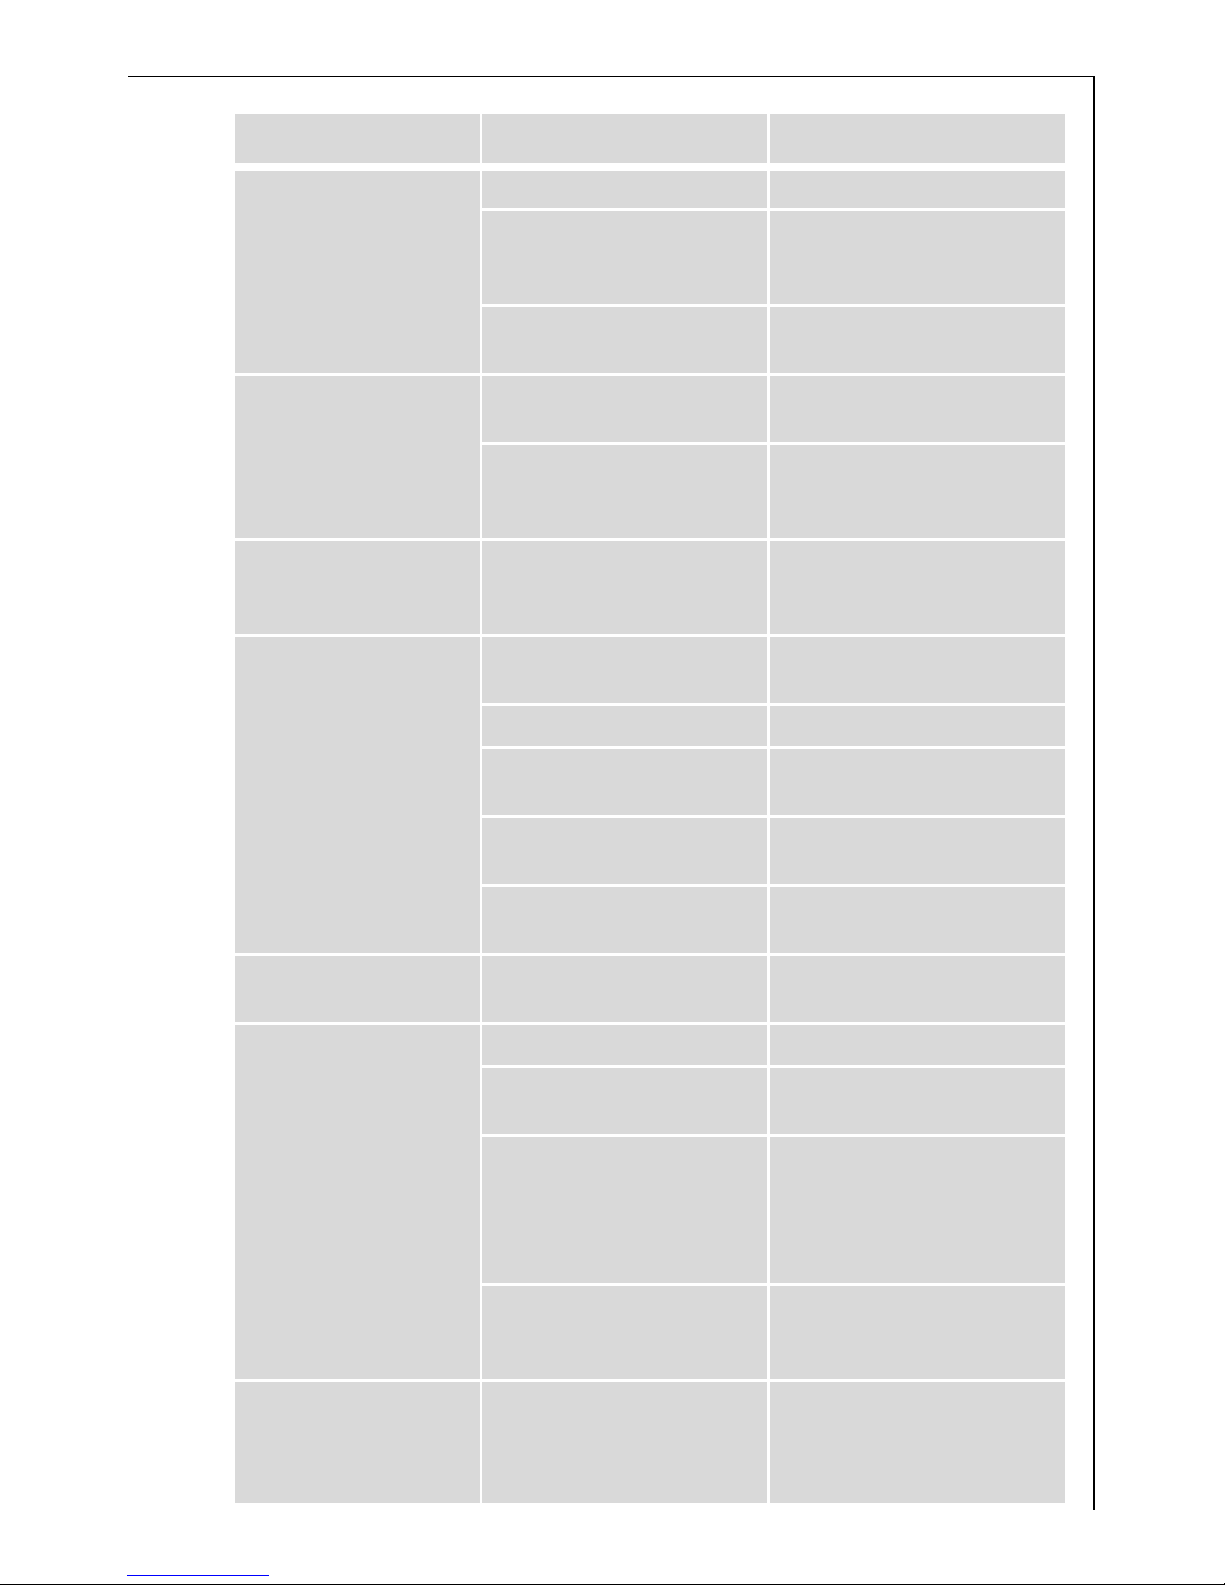
If the programme progress display indicates one of the following fault
codes during operation:
– END flashes 1x (problem with water intake),
– END flashes 2x (problem with water drainage),
– END flashes 4x (door open),
please look at the following table.
When the fault is remedied, press the START/PAUSE button.
If there are other fault codes (one or more flashing lights on the programme progress display):
Switch the appliance off and on again. Re-set the programme. Press the
START/PAUSE button.
If the fault is displayed again, please contact the Customer Care Department.
Problem Possible cause Remedy
Washing machine does
not work.
Mains plug not plugged in
or fuse not working.
Plug in mains plug. Check
fuse.
Door not closed properly.
Close door – there should be
an audible click.
START/PAUSE button was
not pressed for long
enough.
Press START/ PAUSE button
for longer.
Door cannot be closed. Child safety device engaged. Release child safety device.
END display flashes 4x. Door is not closed properly.
Close door properly. Start
programme again.
Page 19
19
END display flashes 1x.
(Problems with water
inflow)
Tap turned off. Turn tap on.
Filter in the screw connection of the inlet hose is
blocked.
Turn off the water tap. Unscrew hose, take out filter
and clean it.
Water tap is blocked with
limescale or faulty.
Check the water tap and
have it repaired if necessary.
The washing machine
vibrates when operating
or is not stable.
The transit packaging has
not been removed.
Removing the transit packaging.
The screw feet not correctly
adjusted.
Adjust the feet as described
in the installation and connection instructions.
Washing has not been
spun.
Only a few large items of
washing in the drum.
Always load the drum as full
as possible. Mix large and
small items.
Water is leaking out underneath the washing
machine.
Screw connection on the inlet hose is leaking.
Tighten inlet hose.
Drain hose is leaking. Replace drain hose.
Drain pump cover is not
closed properly.
Close cover properly.
Washing was caught in the
door.
Load washing carefully for
the next wash.
Emergency drain hose is
leaking.
Close off emergency drain
hose properly.
Washing water is foaming excessively.
Probably too much detergent has been used.
Dose detergent exactly as instructed by manufacturer.
END display flashes 2x.
(Problems with water
outflow.)
Kink in drain hose. Remove kink.
Maximum pumping height
of 1m exceeded.
Please contact Customer
Care Department.
Drain pump is blocked.
Switch off appliance. Pull out
mains plug.
Clean drain pump. Remove
foreign bodies from pump
housing.
With connection to sink
outlet: sink outlet is
blocked.
Clean sink outlet.
Fabric softener not
rinsed in, w compartment for additives is
filled with water.
Conditioner insert in the
compartment for additives
is not correctly attached or
is blocked.
Clean detergent dispenser
drawer, insert conditioner insert firmly.
Problem Possible cause Remedy
Page 20

20
If the wash results are not satisfactory
Washing is grey and scale is being deposited in the drum
• Too little detergent is being used.
• The right detergent was not used.
• Special soiling was not pre-treated.
• Programme or temperature was not correctly set.
There are grey stains on the washing.
• Washing soiled with ointment, grease or oil was washed with too lit-
tle detergent.
• It was washed at too low a temperature.
• A common cause is that fabric conditioner – especially a concentrate
– has got onto the washing. Such stains should be washed out as
quickly as possible and make sure that you are careful when using
fabric conditioner.
After the last rinse foam can still be seen.
• Modern detergents may create foam even in the last rinse cycle. The
washing is however sufficiently rinsed.
There are white residues on the washing.
• This is due to the insoluble ingredients in modern detergents.
They are not caused by insufficient rinsing.
Shake or brush the washing. If possible turn the washing inside out
before washing. Check your choice of detergent. Especially with dark
colours it is advisable to use liquid detergents.
Door cannot be opened
when appliance is
switched on.
Door locked.
Wait until DOOR light goes
off and END light comes on.
Power cut. (All display indicators are off.)
Door remains locked for approx. 2 minutes.
Programme continues, when
power cut is over.
To remove washing:
If water can be seen in the
appliance, before opening
the door, first drain off the
water. (See section “Carrying
out an emergency drain”.)
Washing is heavily
creased.
Possibly too much washing
was loaded.
Observe maximum loads.
Problem Possible cause Remedy
Page 21
21
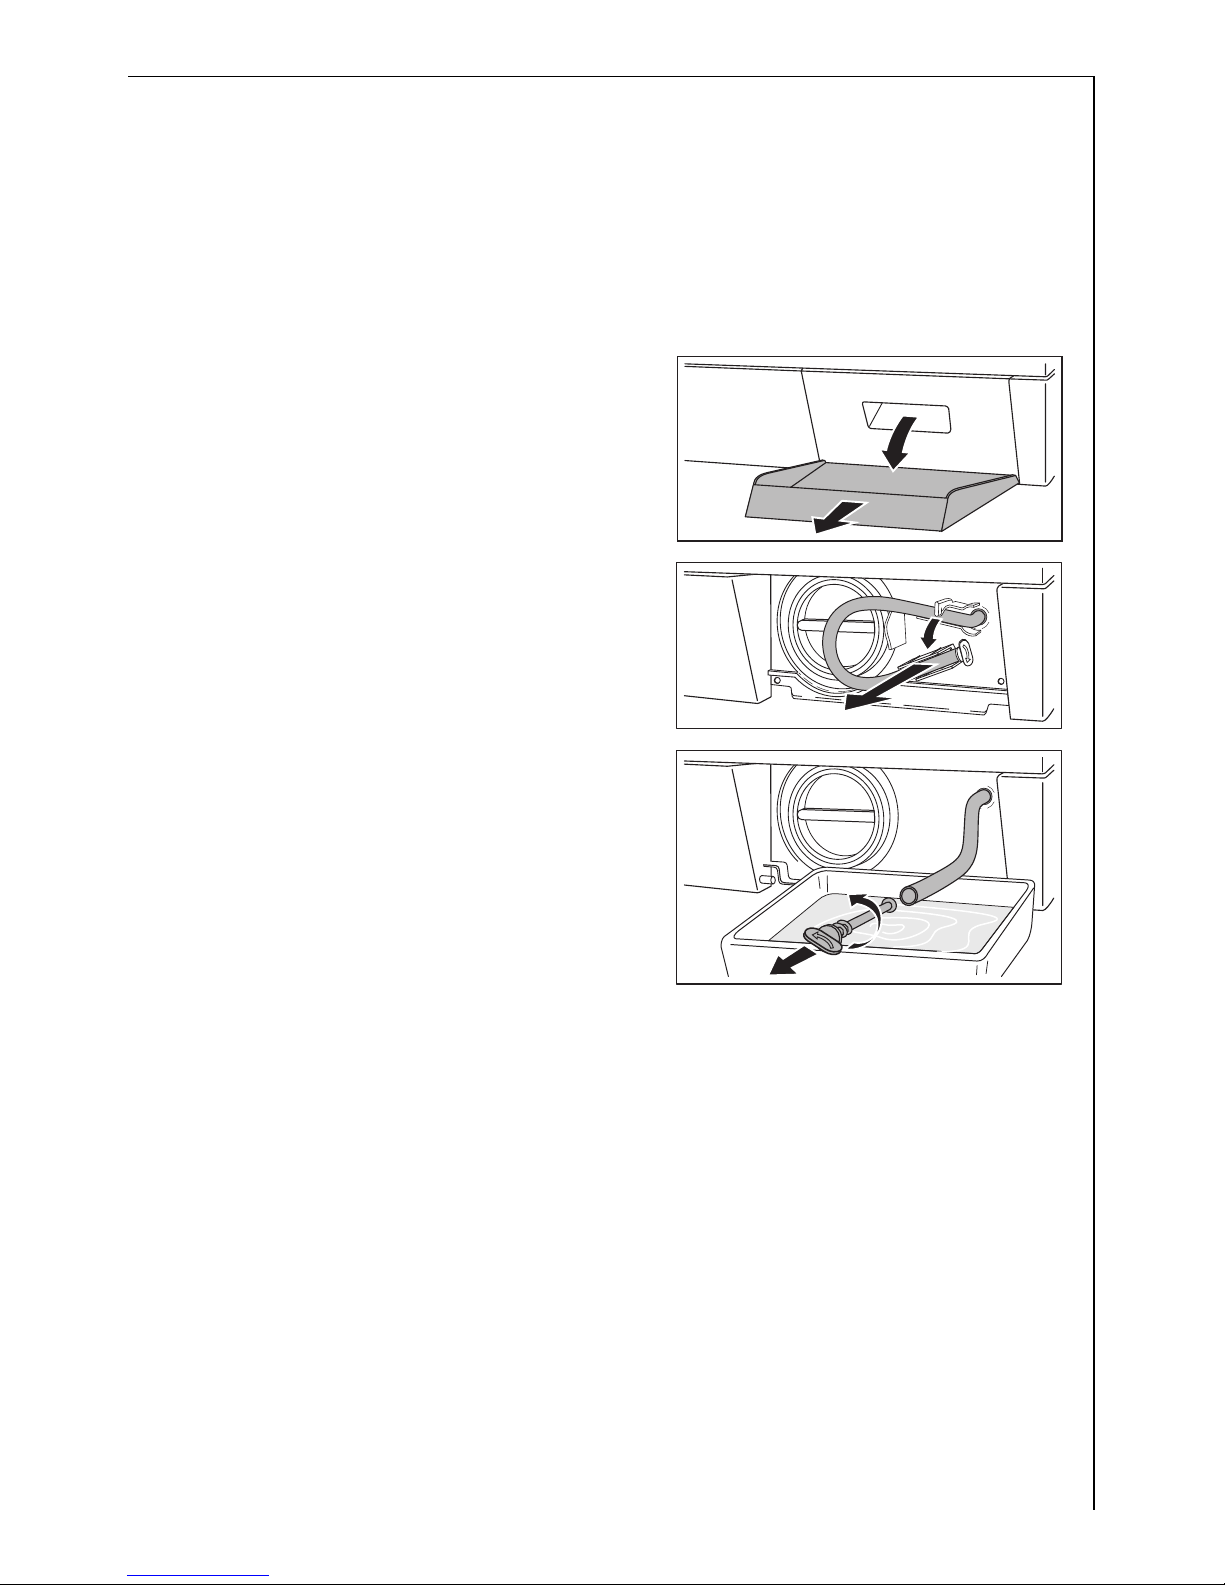
Carrying out an emergency drain
1 Warning! Before emergency draining, switch off the washing machine
and remove the mains plug from the socket.
Warning! The water that comes out of the emergency drain hose may
be hot. There is a risk of scalding. Let the water cool before performing
an emergency drain.
1. Open the plinth flap and remove it.
2. Take out the emergency drain hose.
3. Place a shallow container under-
neath it. Then loosen the drain plug
by turning it in an anti-clockwise
direction and pull it out.
4. The water runs out. If it is necessary
to empty the container more than
once, seal up the emergency drain
hose with the drain plug while you
are doing so.
When the water has all drained away:
5. Push the drain plug firmly into the emergency drain hose and screw it
tight in a clockwise direction.
6. Place the emergency drain hose back in the support.
7. Insert the plinth flap and close it.
Page 22
22
Drain pump
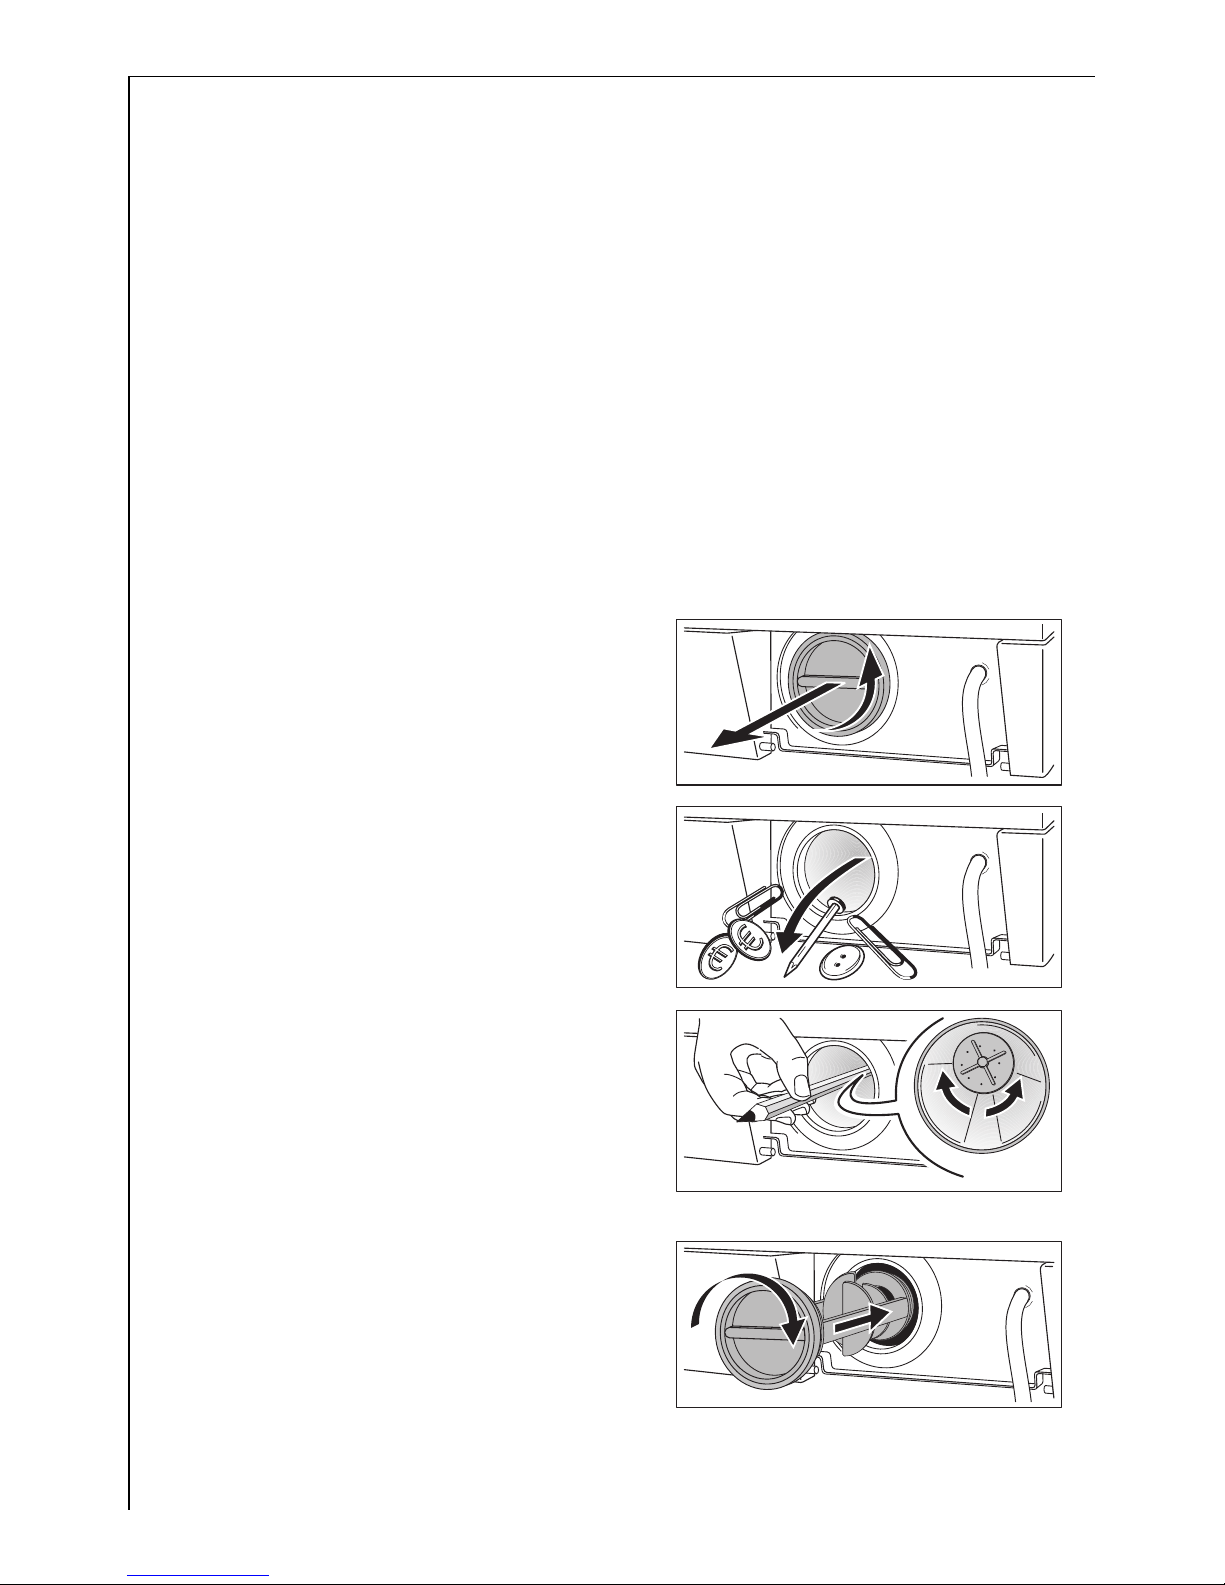
The drain pump is maintenance-free. It is only necessary to open the
pump cover if there is a malfunction and water is no longer being
pumped out, e. g. if the pump wheel is blocked.
Please make sure before loading the washing that there are no foreign
bodies in the pockets or caught between the washing. Paperclips, nails,
etc. that may have got into the washing machine with the washing remain in the pump housing (foreign body trap that protects the pump
wheel).
1 Warning! Before opening the pump cover, switch off the washing ma-
chine and remove the mains plug from the socket.
1. First carry out an emergency drain.
2. Place a cloth on the floor in front of the drain pump cover.
Residual water runs out.
3. Unscrew the pump cover in an anticlockwise direction and remove it.
4. Remove foreign bodies and fluff
from the pump housing and from
the pump wheel.
5. Check whether the pump wheel
right at the back of the pump housing can turn. (It is normal for the
pumping wheel to turn jerkily.) If
the pumping wheel cannot be
turned, please contact the Customer
Care Department.
6. Insert the pump cover. Insert the
guides at the sides of the cover into
the guide slots and tighten the cover by turning in a clockwise
direction.
7. Close off the emergency drain hose
and place it in the support.
8. Close plinth flap.
Page 23

23
Disposal
2
Packaging material
The packaging materials are environmentally friendly and can be recycled. The plastic components are identified by markings, e.g. >PE<,
>PS<, etc. Please dispose of the packaging materials in the appropriate
container at the community waste disposal facilities.
2 Old appliance
The symbol
W on the product or on its packaging indicates that this
product may not be treated as household waste. Instead it shall be
handed over to the applicable collection point for the recycling of electrical and electronic equipment. By ensuring this product is disposed of
correctly, you will help prevent potential negative consequences for the
environment and human health, which could otherwise be caused by
inappropriate waste handling of this product. For more detailed information about recycling of this product, please contact your local city
office, your household waste disposal service or the shop where you
purchased the product.
1 Warning! When an appliance is finished with, remove the plug from
the mains socket. Cut off the cable and plug and dispose of them.
Destroy the door lock. This prevents children from trapping themselves
inside and endangering their lives.
Page 24
24
Technical data
5
This appliance conforms with the following EU Directives:
– 73/23/EEC dated 19.02.1973 Low Voltage Directive
– 89/336/EEC dated 03.05.1989 EMC Directive inclusive of Amending
Directive 92/31/EEC
– 93/68/EEC dated 22.07.1993 CE Marking Directive
Consumption values
The consumption values were obtained under standardised conditions.
They may vary when operating in domestic conditions.
Height x Width x Depth 850 x 598 x 603 mm
Depth when door is open 980 mm
Height adjustment approx. +10/-5mm
Load (depending on programme) Max. 6kg
Area of use Domestic
Drum spin speed see Rating Plate
Water pressure 1-10bar (=10–100N/cm2=0.1–1.0MPa)
Programme knob
(Temperature)
Load
in kg
1)
1) The load is determined in accordance with EN 60456 Standard Loads.
Water
in litres
Energy
in kWh
Time in
minutes
COTTONS/LINEN 95 6 62 2,20 146
ENERGY SAVING
2)
2) Note: Programme setting for tests in accordance with or supporting EN 60 456 and
IEC 60 456.
Actual consumption will vary from the indicated values depending on water pressure,
water hardness, water temperature at filling, room temperature, type and quantity of
washing, detergent used, variations in mains voltage and any additional programme
functions selected.
6 49 1,12 125
COTTONS/LINEN 40 6 58 0,70 129
EASY-CARES 40 3 58 0,52 80
DELICATES 30 3 58 0,42 66
WOOL/SILK H (Handwashing) 30 2 54 0,45 54
Page 25

25
Installation and connection instructions
1 Safety information for the installation
• This washing machine cannot be built-in.
• Before using for the first time, check the appliance for damage sus-
tained while it was being transported. Do not under any circumstances connect an appliance that is damaged. In the case of damage,
please contact your supplier.
• Before using for the first time, all parts of the transit packaging must
be removed. Otherwise when spinning damage may be caused to the
appliance or to neighbouring units or furniture.
• Before using the appliance for the first time, splash protection must
be completed. (See “Removing the transit packaging”.)
• Always plug the mains plug into a correctly installed shockproof
socket.
• Permanent connection: a permanent connection must only be in-
stalled by a trained electrician.
• Prior to using the appliance for the first time, ensure that the rated
voltage and type of supply on the rating plate match that of the supply where the appliance is to be installed. The fuse rating is also to be
found on the rating plate.
• If work on the plumbing is required for the proper connection of the
washing machine to the water supply, this must be undertaken by a
registered plumber.
• If work on the electricity supply system is required for the proper
connection of the washing machine to the electricity supply, this
must be undertaken by a registered electrician.
• The washing machine’s cable must only be replaced by the Customer
Care Department or a registered electrician.
Page 26
26
Installing the appliance
Transporting the appliance
1 Warning! The washing machine is very heavy. Risk of injury. Be careful
when lifting.
• Do not lay the appliance on its front nor on its right side (as seen
from the front). Electrical components may get wet.
• Never transport the appliance without its transit packaging. Only re-
move the transit packaging when the appliance is in its place of installation. Transporting the appliance without its transit packaging
can lead to damage to the appliance.
• Never lift the appliance by the door when it is open nor by the plinth.
When moving using a sack trolley:
• Only use the sack trolley on the side of the appliance.
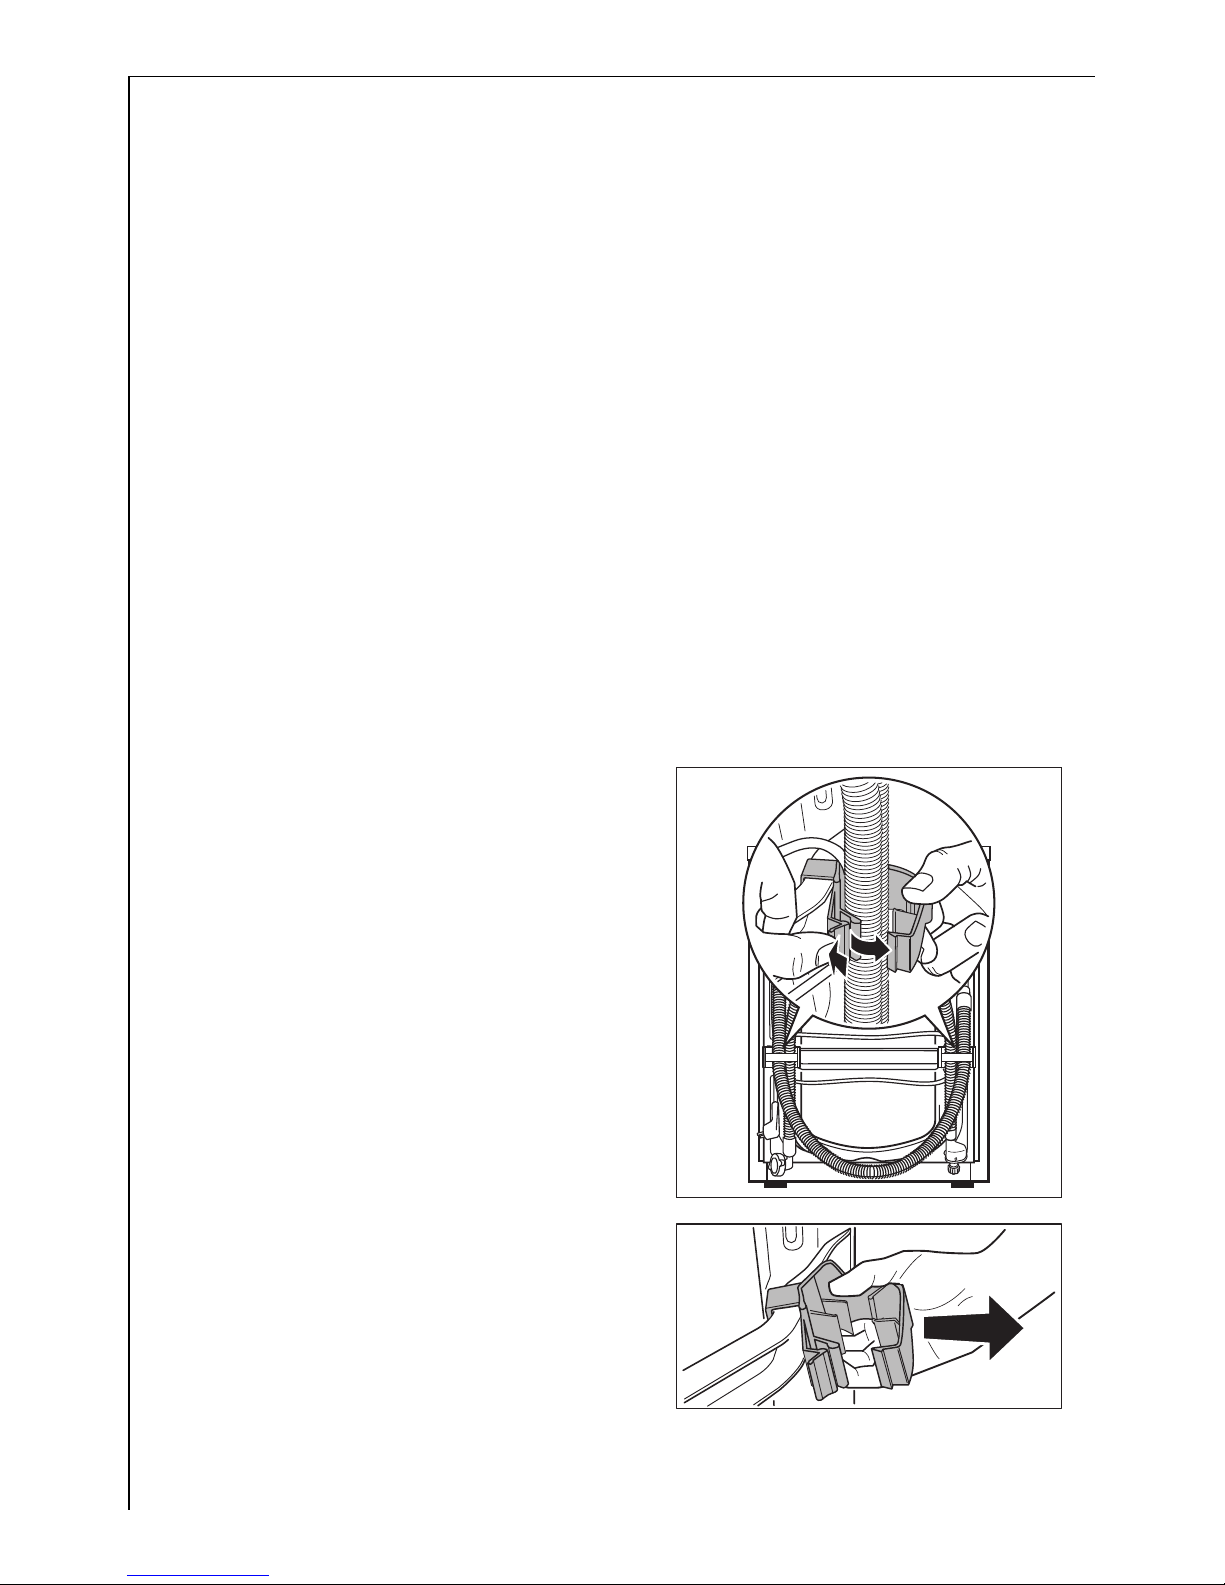
Removing the transit packaging
Important! Before using the appli-
ance for the first time, all parts of
the transit packaging must be removed! Keep the transit packaging
in a safe place, in case it is needed at
a later date when the appliance is to
be moved (e.g. moving house).
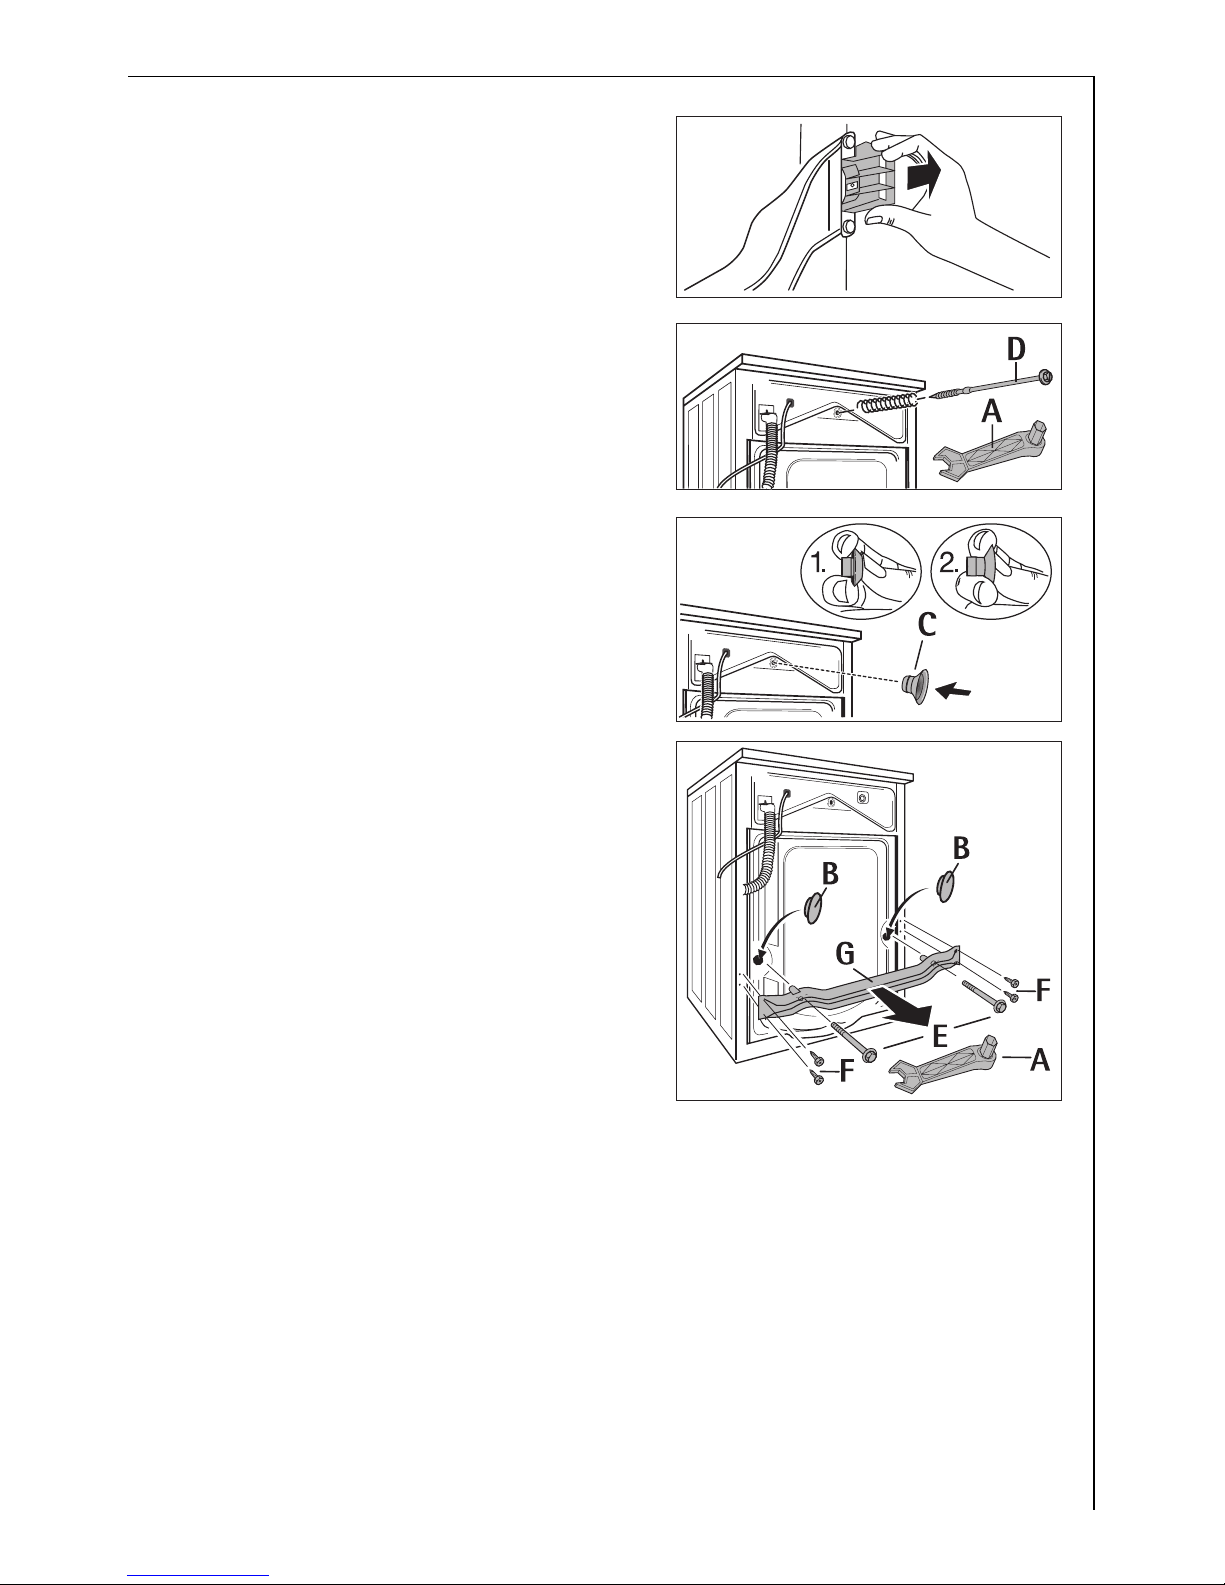
1. At the back of the appliance, open
both hose clips and remove both
hoses and mains cable.
2. Remove both hose clips from the appliance by jerking them hard.
Page 27
27
3. Remove both plastic caps sideways.
3 Special spanner A and sealing caps B
(2 off) and C (1 off) are supplied
with the appliance.
4. Remove screw D with its compression spring using special spanner A.
5. Turn sealing cap C upside down as
shown in the illustration.
6. Seal hole using sealing cap C.
7. Unscrew and remove two screws E
using special spanner A.
8. Unscrew and remove four screws F
using special spanner A.
9. Remove transit bar G.
10. Screw in the four screws F again.
11. Seal the two big holes using sealing
caps B.
Important! Press all sealing caps B
(2 off) and C (1 off) in firmly, so that
they snap into place. (Splash protection).
Page 28
28
Where to install
Important! The appliance must not be used in a room where there is a
danger of frost. Frost damage or impaired operation! Frost damage is
not covered by the warranty.
• The surface on which the appliance is to be installed must be firm
and level. Do not install the appliance on carpets or on soft floor coverings.
• The surface on which the appliance is to be installed must be clean
and dry and free from coverings that move, so that the appliance
does not slide.
• If the location in which the appliance is to be installed is fitted with
small-format tiles, put a rubber mat (available in the shops) under
the appliance.
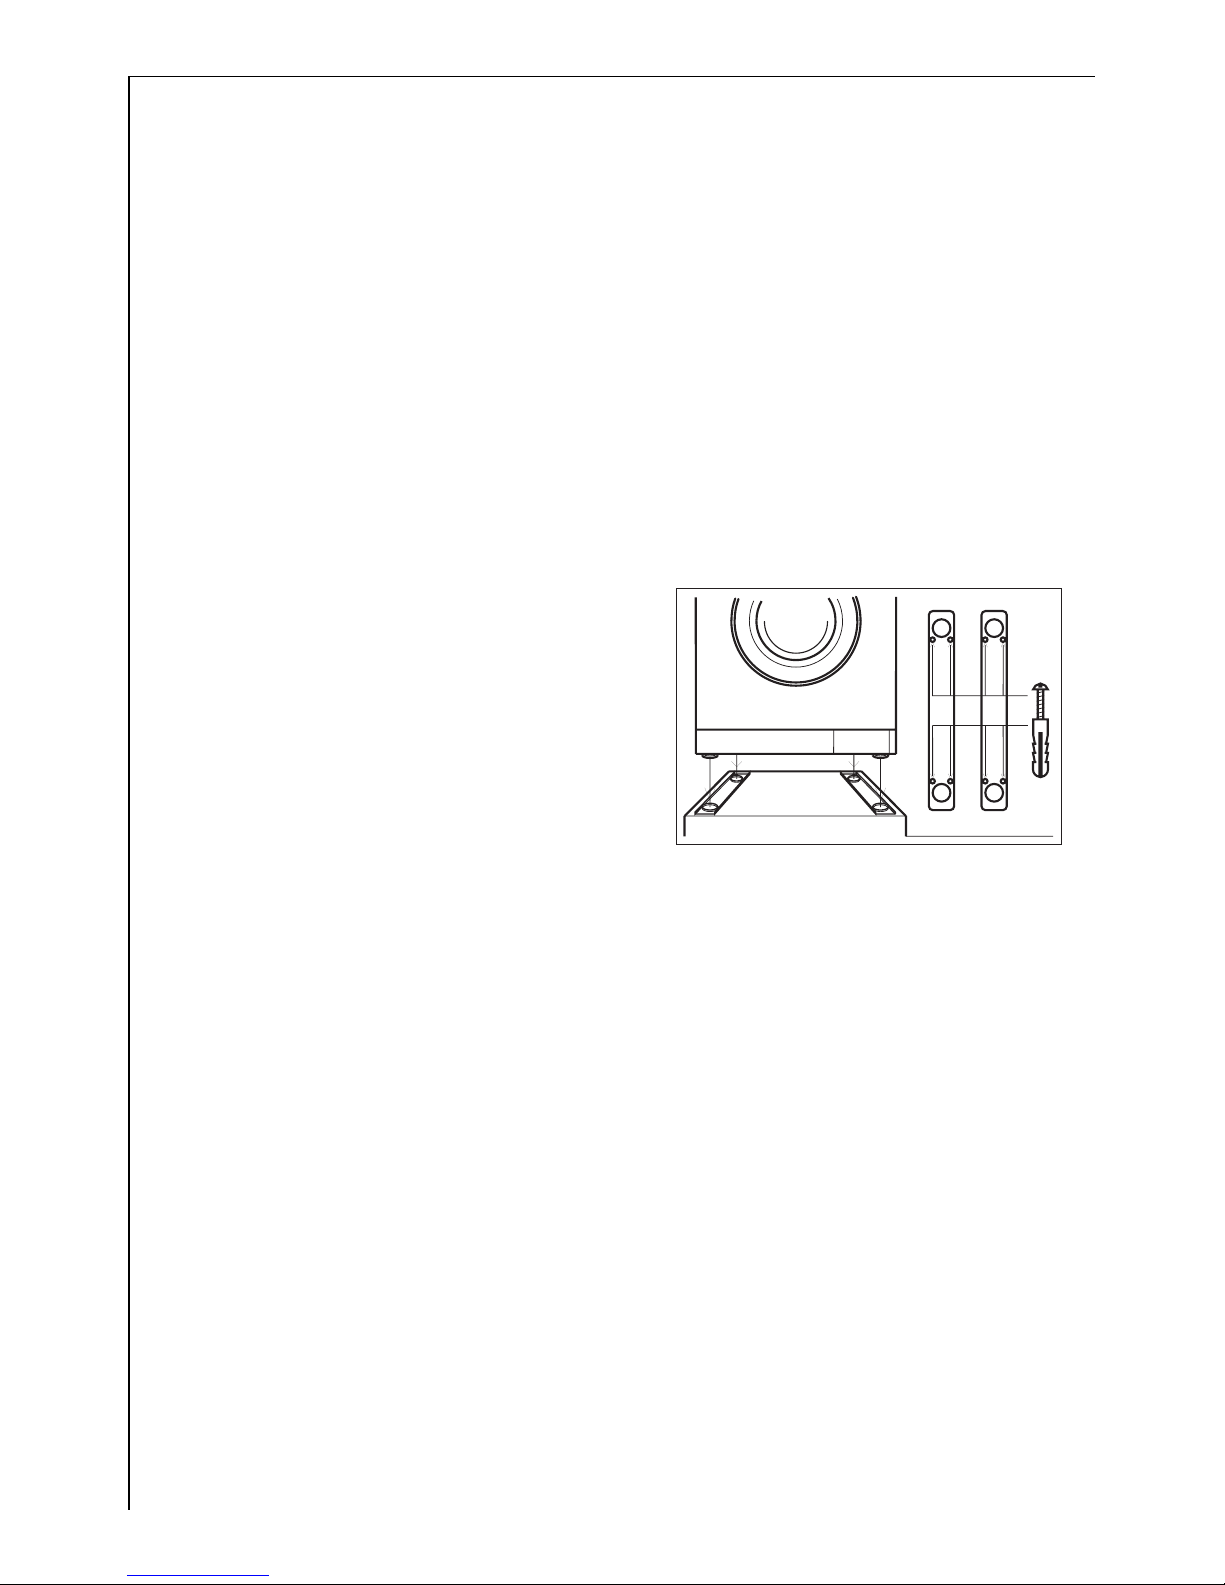
If the appliance is to stand on a
plinth:
In order for the appliance to be secure on the plinth, fixing plates*)
must be mounted, into which the
appliance is inserted.
If the appliance is to stand on floors that vibrate, e. g. floors of
wooden joists with deal boards:
If possible, install the appliance in one corner of the room.
1. Screw a water-resistant wooden board (at least 15 mm thick) onto at
least 2 of the floor joists.
2. Affix fixing plates *) onto the wooden board, into which the appliance
is inserted.
*) The fixing plates can be obtained from the Customer Care Department.
Page 29
29
Making the appliance level
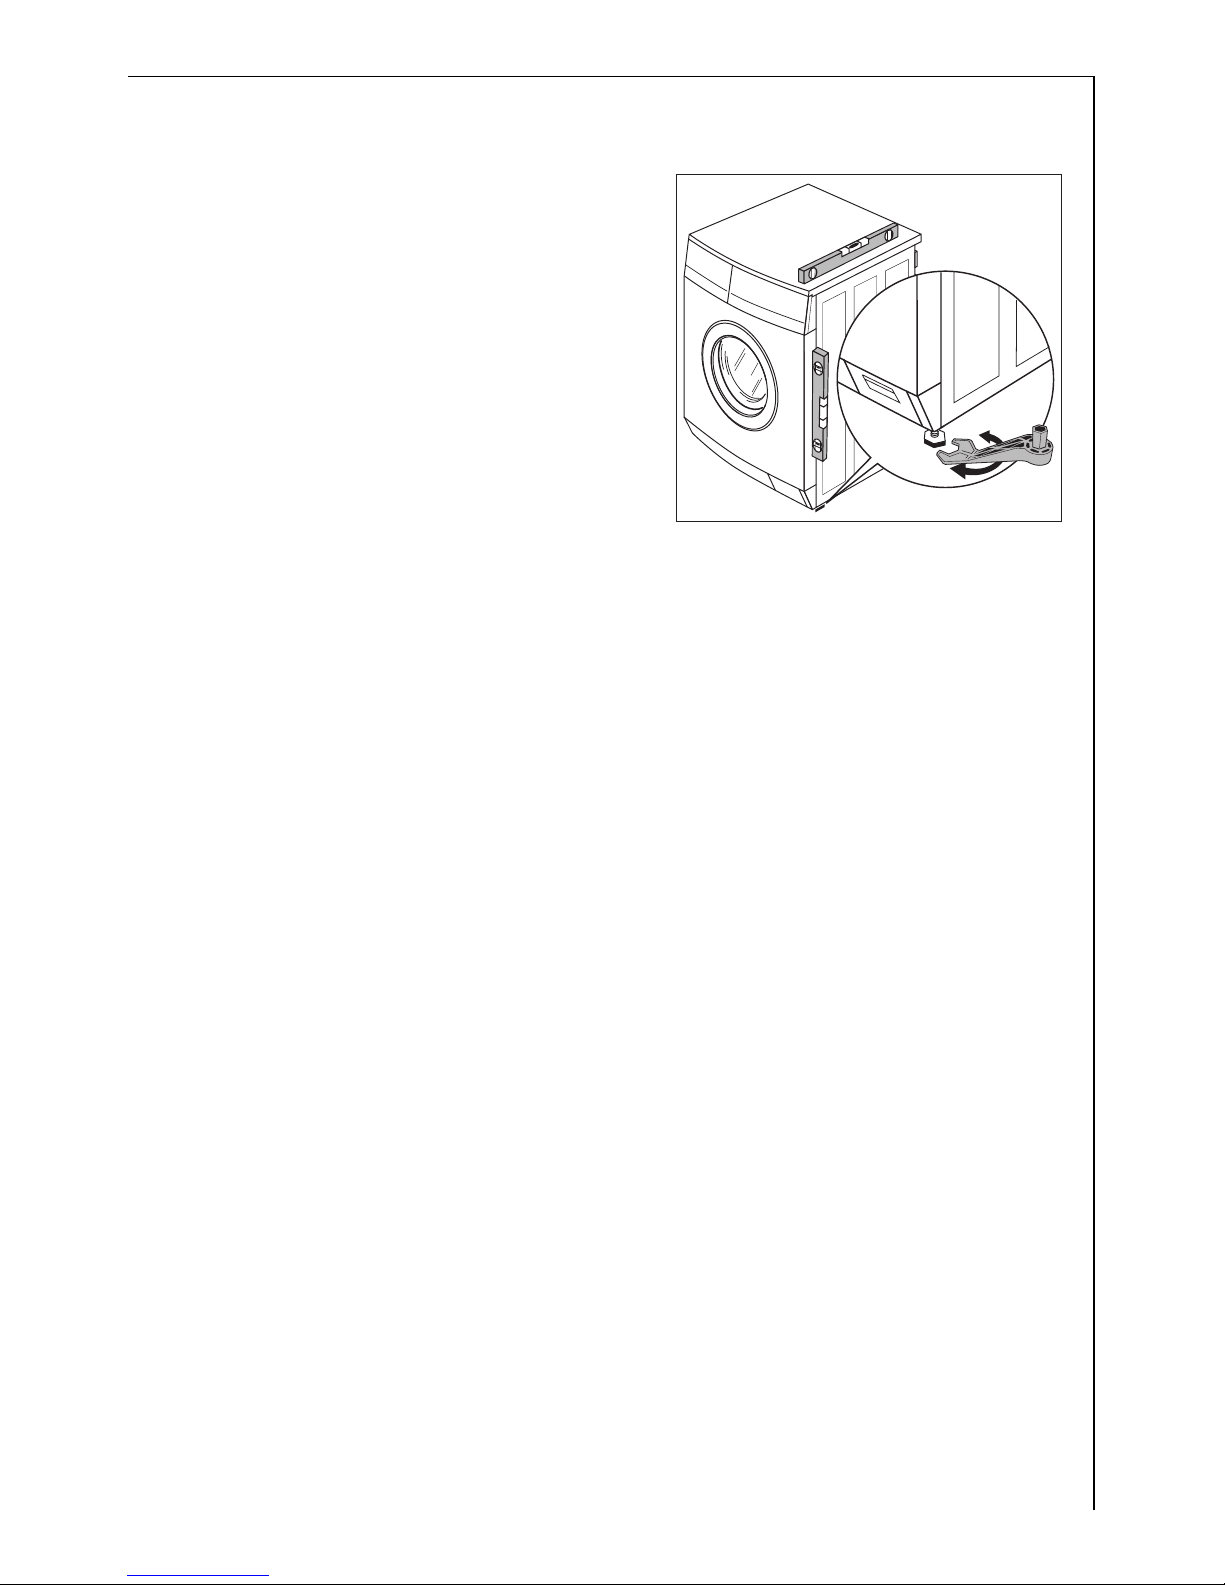
The four feet of the appliance are
pre-adjusted.
Large degrees of unevenness can be
compensated for by individually adjusting the height adjustable screw
feet.
Use the special spanner supplied to
do this.
Important! Do not use pieces of
wood, cardboard or such like to level out unevenness in the floor, but
adjust the height adjustable screw
feet instead.
Electrical connection
Details about the voltage, type of supply and the fuses required are to
be found on the rating plate. The rating plate is next to the doorway.
Connecting to the water supply
Important!
• This appliance must not be connected to the hot water system.
• When connecting it, use only new hose kits.
• Only connect the appliance to the drinking water supply. Rain water
or water for industrial use may only be used if it fulfils the requirements of DIN1986 and DIN1988.
• Do not kink or crush the water inlet hose or drain hose.
Permitted water pressure
The water pressure must be at least 1bar (=10 N/cm2=0.1MPa) and may
be a maximum of 10bar (=100N/cm
2
=1MPa).
– If more than 10bar: Connect a pressure reduction valve.
– If less than 1bar: Disconnect the appliance end of the inlet hose from
the solenoid inlet valve and remove the flow meter. (In addition remove the filter using pointed pliers and take out the rubber gasket
behind it.) Re-insert the filter.
Page 30
30
Water inflow
A 1.50 m long pressure hose is supplied with the appliance.
If a longer water inlet hose is required, only original hoses are to be
used. The Customer Care Department stocks hose kits of different
lengths.
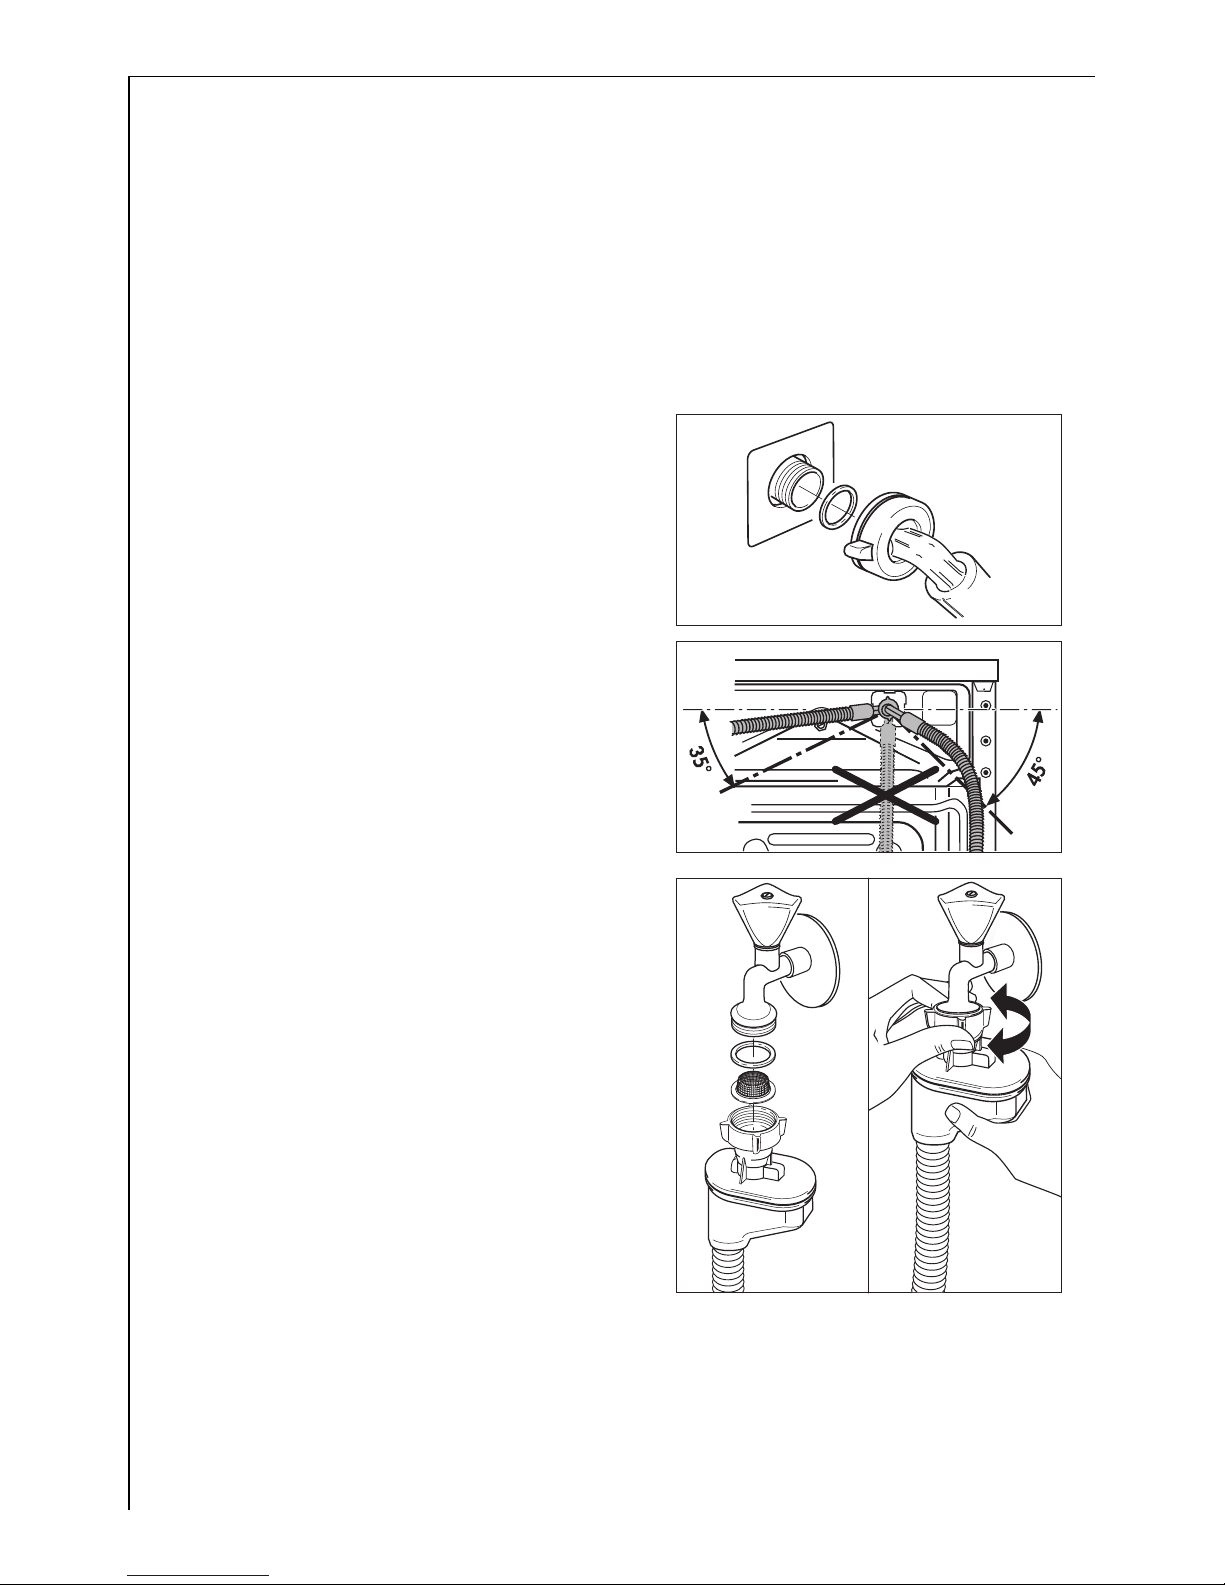
3 Sealing rings are either inserted in the nuts of the threaded hose fitting
or are included as spare parts . Do not use any other type of sealing
rings.
Important! All threaded hose fittings must only be tightened by
hand.
1. Connect the hose with the right-angle connector to the machine.
Important! Do not position the inlet
hose vertically downwards. Position
it to the right or the left as shown in
the illustration.
2. Connect the hose with the straight
connector to a water tap with an R
¾ (inch) screw thread.
3. To tighten or loosen the threaded
hose fitting, only the metal nuts
must be turned. When doing this,
keep a firm hold on the housing of
the safety valve with one hand, so
that it does not turn at the same
time.
Important! To tighten or loosen the
threaded hose fitting, never turn the
housing of the safety valve, as otherwise the inner hose will be damaged.
4. Open the water tap slowly and check all connections for water tightness.
Page 31
31
Water drainage
The maximum permitted difference between the height of the surface
on which the appliance is installed and the water outlet is 1 metre.
Only original hoses may be used to extend hoses. (A maximum of 3 m
laid on the floor and then 80 cm vertically). The Customer Care Department stocks outlet hoses of different lengths.
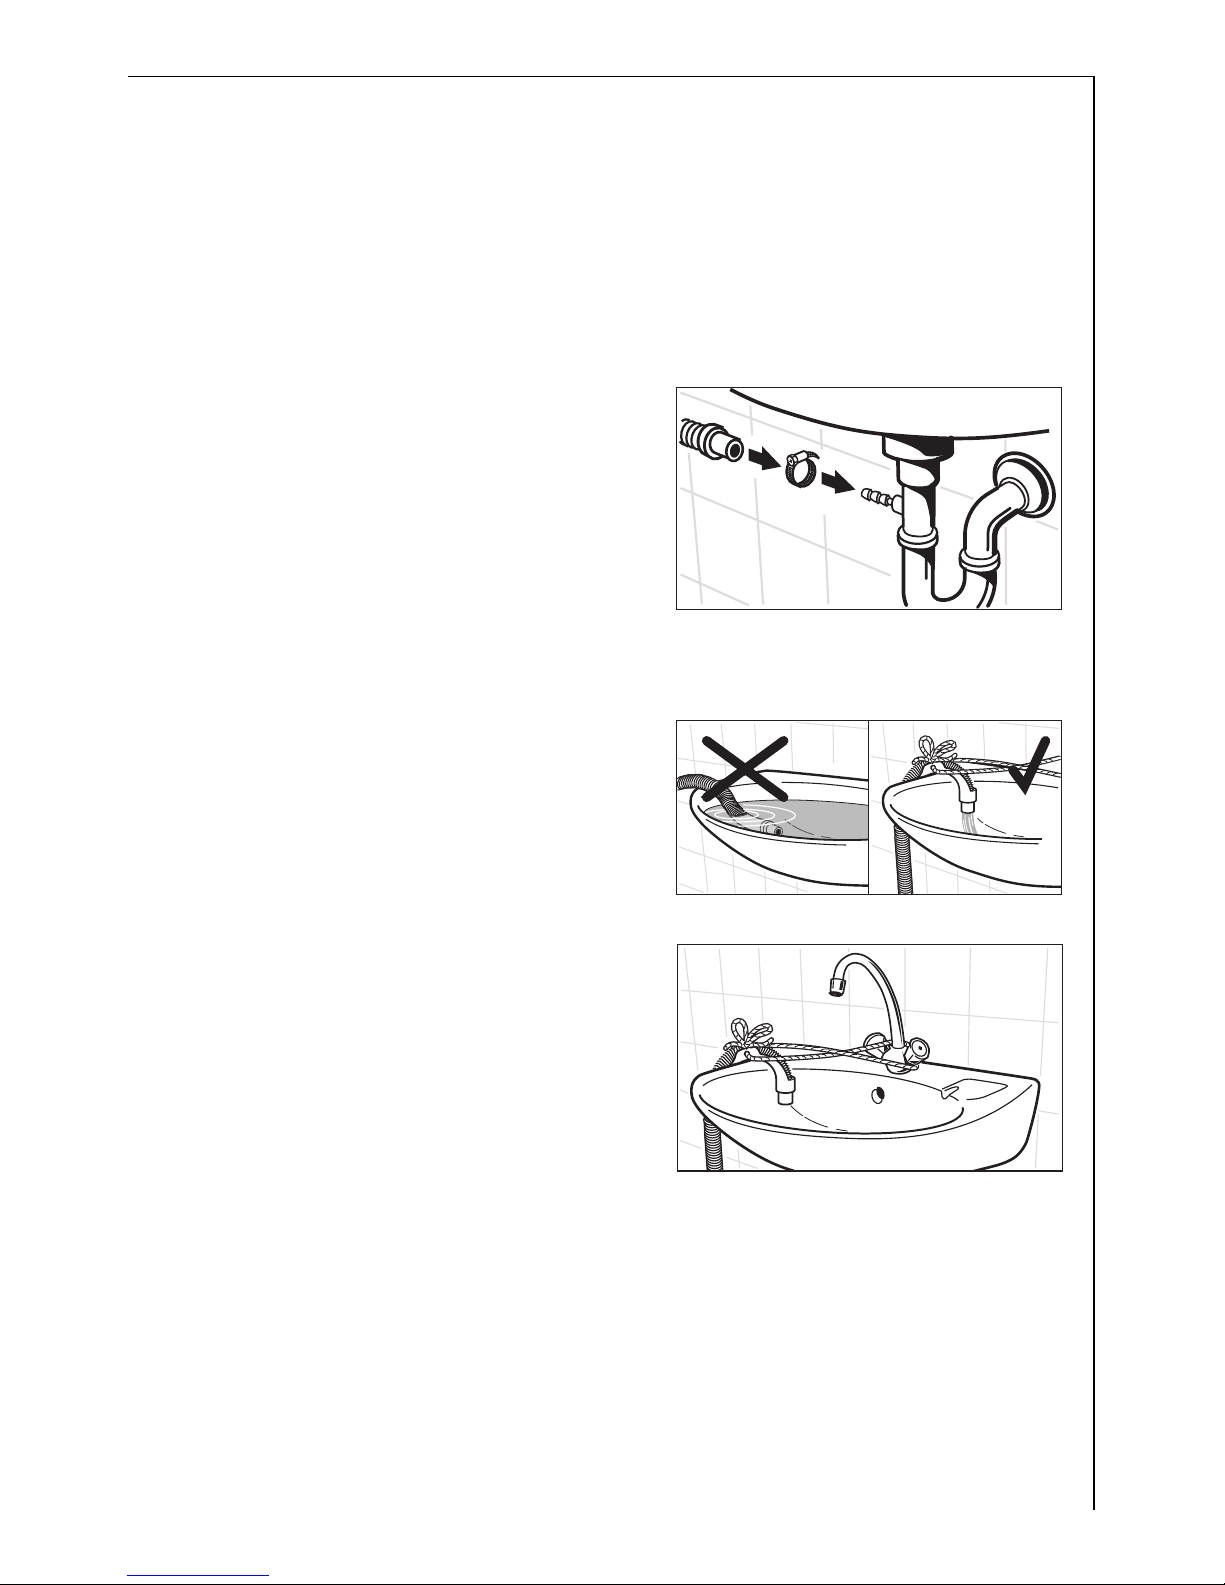
Draining water into a sink outlet
Secure the outlet/sink outlet joint
with a hose band clip (available from
your dealer).
Draining water into a wash basin/bath
1 Important!
– Small basins are not suitable. Wa-
ter may overflow.
– The end of the drain hose must
not be in the water that has been
pumped out. Otherwise water
could be sucked back into the appliance.
– When draining into a wash basin
or a bath, secure the drain hose
with the supplied elbow to stop it
slipping. Otherwise the water running out can force the hose out of
the basin.
– When pumping the water out,
check that the water is running
away fast enough.
Pumping heights over 1 m
The washing machine’s drain pump is able to pump water to a height of
1meter, calculated from the surface on which the appliance is installed.
Warning! If pumping height is over 1 metre, malfunctions and damage
to the appliance may arise.
For pumping heights over 1metre a conversion kit can be obtained.
Please contact the Customer Care Department.
Page 32
32
Guarantee/Customer Service
Weitere Kundendienststellen im Ausland
In diesen Ländern gelten die Garantiebedingungen der örtlichen Partner. Diese können dort eingesehen werden.
Further after-sales service agencies overseas
In these countries our AEG-Electrolux agents’ own guarantee conditions are applicable. Please obtain further details direct.
Autres agences étrangères assurant le service après-vente
Dans ces pays, les conditions de garantie des concessionnaires de la région sont valables. Vous pouvez les consulter sur place.
Otros puntos de Postventa en el extranjero
En estos países rigen las condiciones de nuestros representantes locales.
las cuales pueden ser consultadas allí mismo.
Ulteriori uffici del servizio tecnico assistenza clienti all’estero
In questi paesi sono valide le condizioni di garanzia dei partner locali.
Queste condizioni possono essere esaminante sul luogo.
Serviços de assistência técnica no estrangeiro
Nestes países são válidas as condições de garantia dos concessionários
locais, podendo aí ser consultadas.
További vevöszolgálati irodák külföldön
Ezekben az országokban a mi AEG-Electrolux vevöszolgálatainknál
saját jótállási feltételek alkalmazhatók. A további adatokat kérjük
közvetlenül szerezzék be.
Servisne službe
Na garancijskem listu boste našli seznam pooblašèenih servisnih
služb AEG-Electrolux.
U.A.E. Abu Dhabi
Universal Trading Company
P.O. Box 43 99
Tel.: 6335331
Service Center 6733974
Jordan
Jordan Household
Supply Co. Ltd.
P.O. Box 3/68
Amman/Tel.: 69 70 50
Malta
ITC
International Trading Company
White House Building
Mountbatte Street
Blata L-Bajda/Tel.: 220644
Egypt
Middle East Commercial
Center
4 Salah El Dein St. - 2nd floor
Heliopolis, Kairo
Egypt
Tel.: 2024181719
Canada
EURO-LINE Appliances
2150 Winston PARK Drive 20
Oakville, Ontario L6H 5V1
Tel.: 905 829 3980
Fax: 905 829 3985
Mauritius
Happy World Centre Ltd.
P.O. 7 54
1 Chausee Street
Port Louis
Tel.: 25355
Page 33
33
Australia
The Andi-Co Group
1 Stamford Road
Oakleigh VIC 3166
Tel.: (03) 9569 1255
Fax: (03) 9569 1450
www.andico.com.au
Korea (South)
Core Incorp.
3/F Chewoo Bldg.
200 Nonhyun-Dong
Kangnam-Ku 135-010
Seoul
Telefon 82 2 549 89 61
Namibia
AEG NAMIBIA (PTY)
LIMITED-Jeppe Street
Northern Industrial Area
Windhoek
Tel.: (061) 21-6082/4
Fax: (061) 217838
Bahrain/Arabian Gulf
A.A. Zayani & Sons
P.O. Box 9 32
Bahrain
Tel. : 1 7311124
Croatia
Electrolux D.O.O.
Suplova 7
10000 Zagreb
Tel.: 1 61 19512
Fax: 1 61 19513
New Zealand
Monaco Corporation Ltd.
10 Rothwell Avenue
Albany - Auckland
4399 Auckland 1
New Zealand
Tel.: 00 64-92 59 11 11
Fax: 00 64-92 59 11 12
Bulgaria
Electrolux Bulgaria E.O.O.D.
91 Levski Blvd.
1000 Sofia
Tel.: 2 806676
Fax. 2 980 5276
Kuwait/Arabian Gulf
Ali Al-Ghanim Est.
P.O. Box 21540 - Safat
Tel.: 4822190
Fax: 4820116
Syria
WATTAR CO.
P.O. Box 3610 9
Mazzeh - Damascus
Direct Phone: 00963116132649
Fax: 00963116119537
Cyprus
Hadjikyrlakos & Sons Ltd.
Prodromou 121
P.O. Box 21587
Nicosia 1511
Service Telephones:
Nicosia 02 481226
Limassol 05 562182
Larnaca 04 633929
Paphos 06 932 699
Lebanon
Adib & Assaferi
P.O. Box 539
Tripoli
Iran
ARIAN International Development Co.
AEG Showroom
Shariati, Balatar as Safar
Teheran / Iran
Phone No. Showroom:
021 / 285 513 / 4
Phone No. Service:
021 / 312 27 67 / 8
Estonia
Electrolux Estonia Ltd.
Mustamäe tee 24
EE0006 Tallinn
Tel.: (372) 6 650 090
Fax: (372) 6 650 092
Latvia
Electrolux Latvija Ltd.
Kr.Barona iela 130/2
Riga, LV-1012
Tel.: 371 7313626
Fax: 371 7845954
Poland
Electrolux Poland Sp. zo.o.
ul. Domaniewska 41
02-034 Warszawa
tel.: 022 874 33 33
fax: 022 874 33 00
Hong Kong
Dah Chong Hong Ltd.
20 Kai Cheung Road
Kowloon Bay
Kowloon - Hong Kong
Tel.: 0085222621620
Fax: 0085227550333
Lithuania
Electrolux Lithuania
Verkui 29
2600 Vilnus
Tel.: 372 272 3326
Fax: 372 272 3366
Russia
Electrolux Russia Ltd.
16 Olympiysky prospekt
129090 Moscow
Tel.: (095) 937 7837
Fax: (095) 926 5513
Israel
Evis Ltd.
Tadiran-Ampa Service
10 Gibonay Israel Street
New Industrial Zone
Netanya, 42504
Israel
Malaysia
Arzbergh Engineering
No. 49A/B, Jalan Petaling
Utama 7
4600 Petaling Jaya
Tel.: 3 795 1084
Fax: 3 795 1082
Saudi Arabia
Awad Badi Nahas Est
Shara Siteen
Jeddah 21463
Phone: 6646583
Alia Trading Co
Mecca Road
Riyadh 11491
Phone 4645977
Page 34

34
Japan
Electrolux Japan Ltd.
Domestic Appliances
Department
Maruzen Showa Warehouse
Building
Tookai 4-5-12, Ota-ku
143-006 Tokyo
Tel.: 0120-13-7117
Fax: 03-3790-5257
Singapore
Group Pte Ltd.
833 Bukit Timah Road
Unit no. 01-11 Royalville
279887 Singapore
Tel.: 0065 64638484
Fax: 0065 64638488
Slovenia
Electrolux Slovenia D.O.O.
Traska Ul. 132
1000 Ljubljana
Tel.: 61 1234 137
Fax: 61 1234 238
Thailand
Olympia Thai Tower, 444
Rachadapiser Road
Samsennok- Huaykwang
10320 Bangkok
Thailand
Tel.: 006625136111
Fax: 006625136334
Slovakia Rep.
Electrolux Slovakia S.R.O.
Seberiniho 1
821 03 Bratislava
Tel.: 02 4333 4322, 4355
Fax: 02 4333 6976
South Africa
AEG (Pty) Ltd.
55, 12th Road
P.O. Box 1 02 64
Kew/Johannesburg 2000
Tel.: 8069111
Hungary
Electrolux Lehel KFT
Erzsébet Királyné útja 87.
1142 Budapest
Tel.: 00361/467-3200
Czech Rep.
ELECTROLUX DOMÁCå
SPOTØEBIÈE CZ
DIVIZE ELECTROLUX S.R.O.
Customer Centre
Hanusova ul.
140 21 Praha 4
Tel.: 2 6112 6112
Telefax: 2 6112 3504
Page 35
35
Service
In the event of technical faults, please first check whether you can
remedy the problem yourself with the help of the operating instructions (section “What to do if…”).
If you were not able to remedy the problem yourself, please contact the
Customer Care Department or one of our service partners.
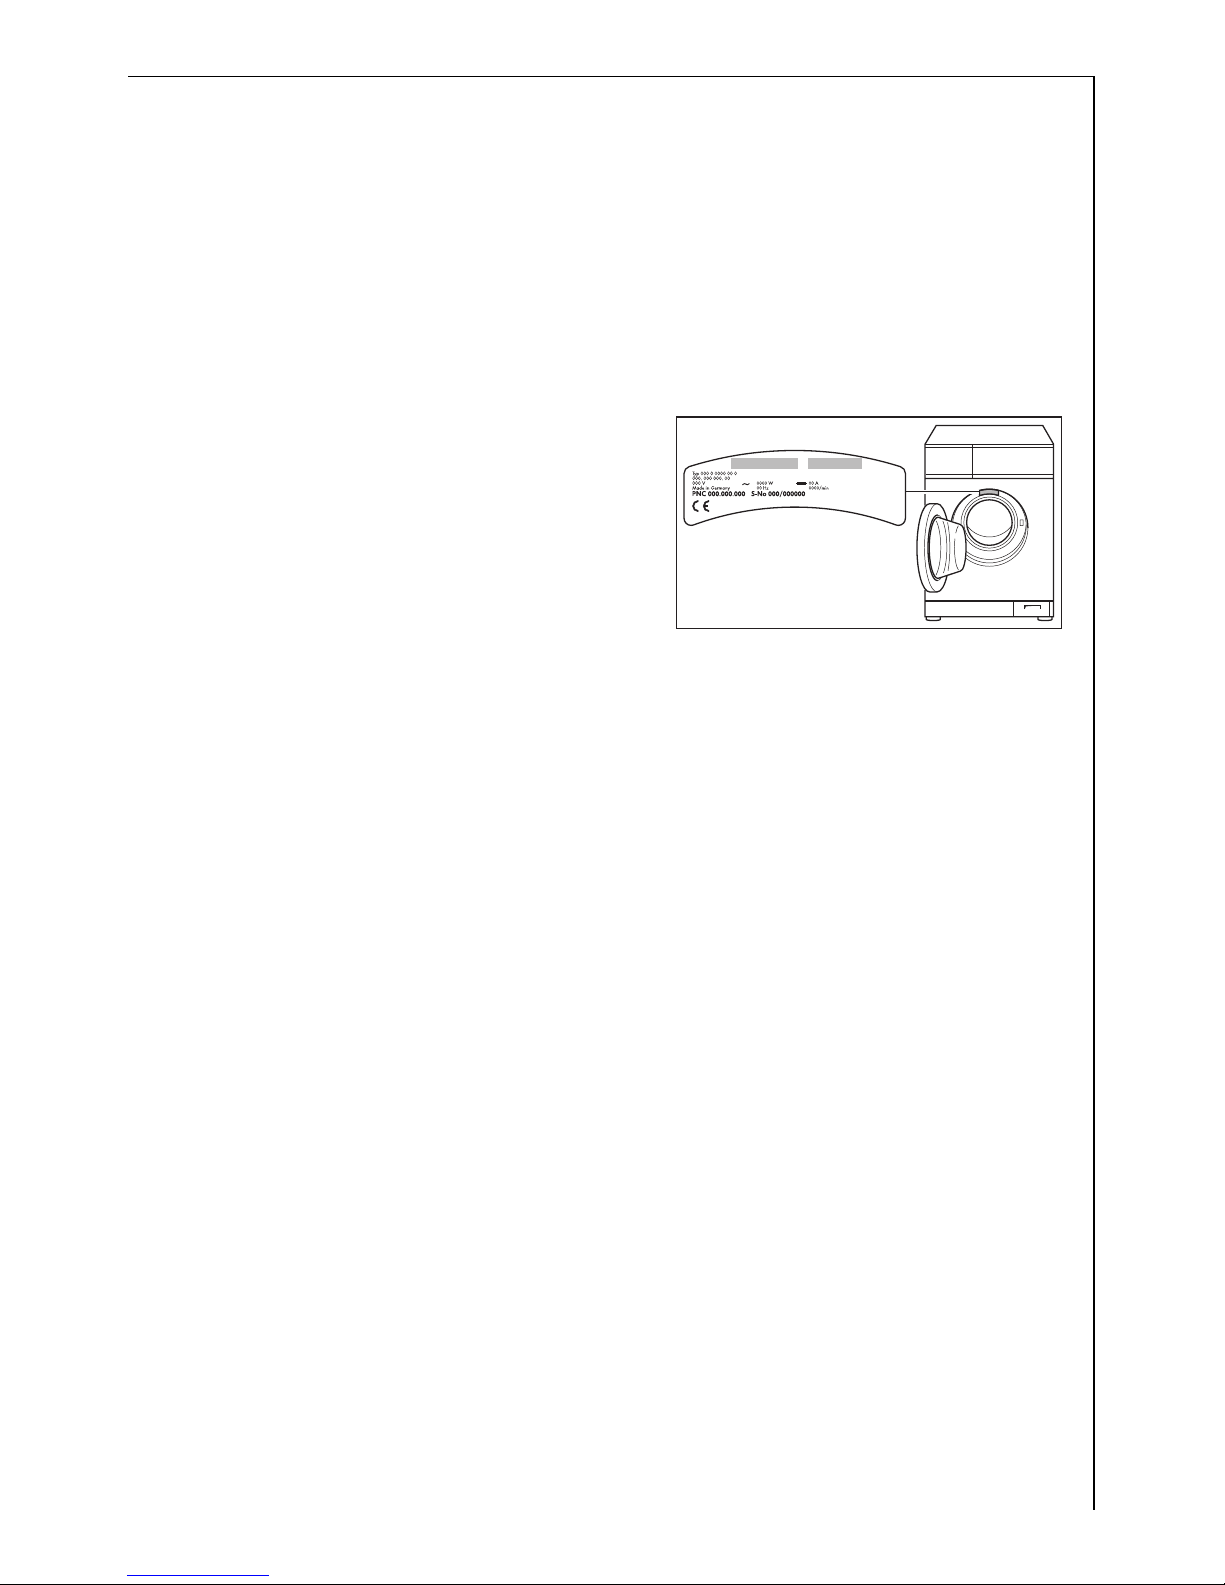
In order to be able to assist you
quickly, we require the following
information:
– Model description
– Product number (PNC)
– Serial number (S No.)
(for numbers see rating plate)
– Type of fault
– Any error messages displayed by
the appliance
So that you have the necessary reference numbers from your appliance
at hand, we recommend that you write them in here:
Model description: .....................................
PNC: .....................................
S No: .....................................
Page 36

From the Electrolux Group. The world´s No.1 choice.
The Electrolux Group is the world´s largest producer of powered appliances for kitchen, cleaning and outdoor
use. More than 55 million Electrolux Group products (such as refrigerators, cookers, washing machines,
vacuum cleaners, chain saws and lawn mowers) are sold each year to a value of approx. USD 14 billion in more
than 150 countries around the world.
AEG Hausgeräte GmbH
Postfach 1036
D-90327 Nürnberg
http://www.aeg-electrolux.de
© Copyright by AEG
105 177 034-01-241105-01
Subject to change without notice
 Loading...