

Page 1
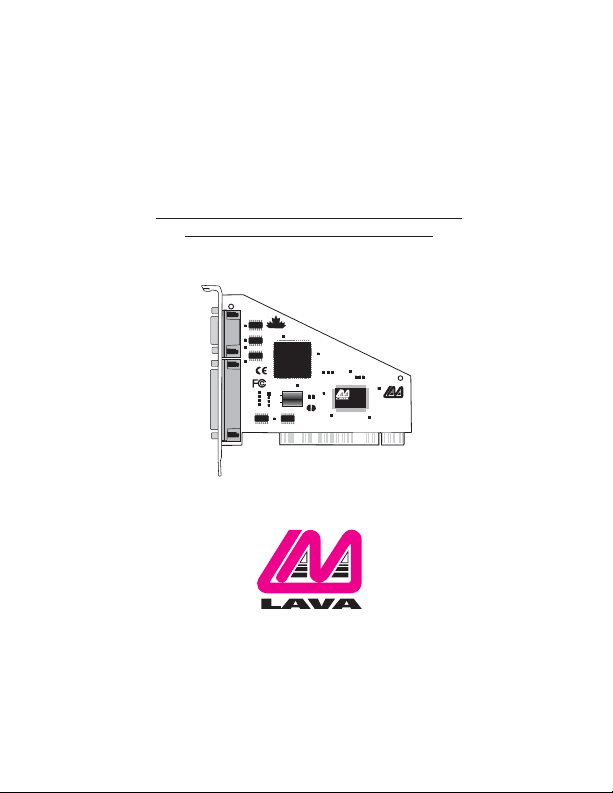
Lava SP-PCI
Installation Manual
SP PCI
MADE
IN
CANADA
P.N.MOKO L82.0
PNMOKOS-1
LAVA
MADEINJAPAN
0255351
COMPUTERS
Rev.B00
Page 2
Windows Hardware and
Driver Installation
1. Before opening the casing of your computer,make sure that all
power is off.
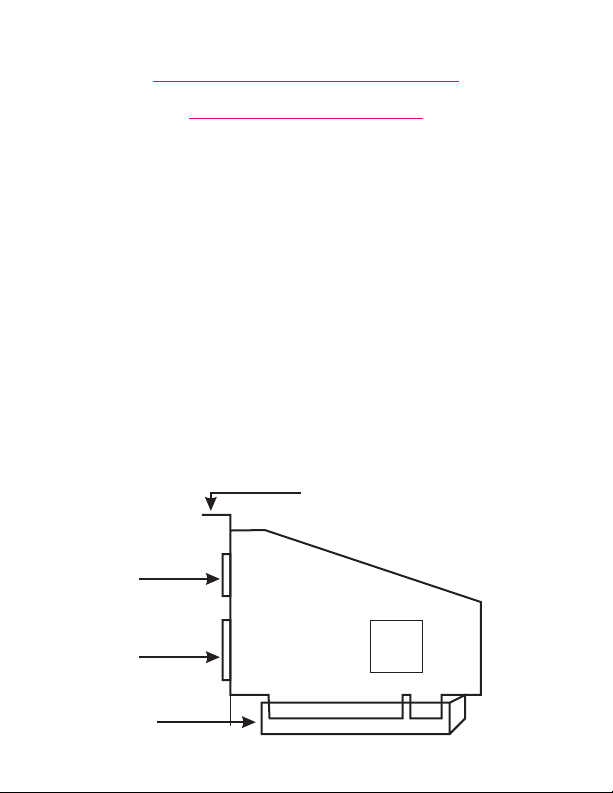
2. Locate an unused PCI slot and insert the SP-PCI card into it. Ensure
that the card is well seated.
3. Screw the metal bracket of the SP-PCI card to your PC’s casing and
replace the machine’s cover.
4. Turn the PC on.
5. When Windows starts,it will find an SP-PCI Controller and will ask
you for a driver for this device.When prompted, insert the
installation diskette into your floppy drive.After copying the
necessary files from the diskette,Windows may restart your PC in
Screw for attaching card bracket
to PC casing
Serial Port
Parallel Port
PCI Slot
Page 3
order to complete the installation of the SP-PCI card.Any Plug and
Play devices attached to the SP-PCI will now also be detected and
installed.Windows XP may display a message to the effect that the
drivers are not digitally signed.This warning can be ignored.
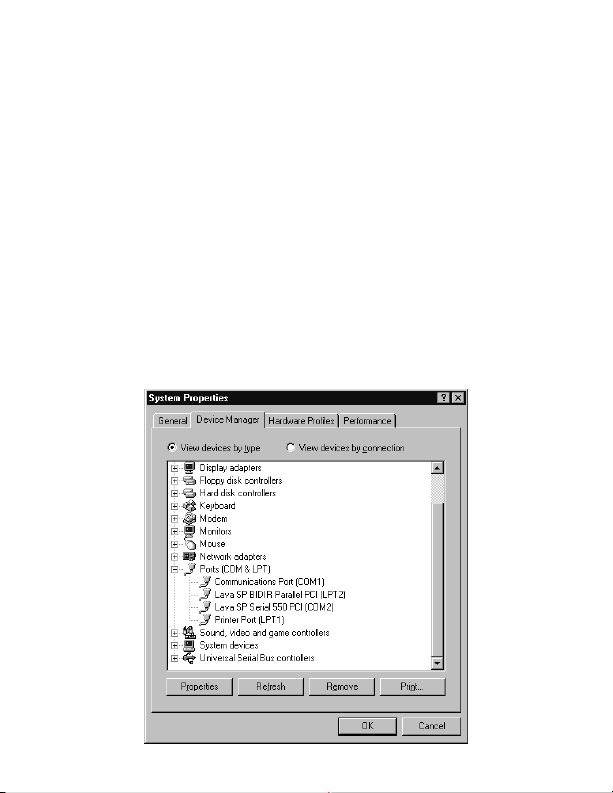
6. To view howWindows has installed the SP-PCI, openWindows'
Device Manager.Please note that the SP-PCI will appear in Device
Manager under two separate entries.The serial port will appear both
under the Multifunction Adapters tree and under the Ports tree,
while the Parallel port will appear under Ports only (see example
below). Please use the appropriate listings if you wish to customize
any of the SP-PCI card’s settings.Please note that changes to default
settings may be required by users connecting the SP-PCI card to a
non-printer peripheral (see reverse).Users connecting a printer
should use default settings.
Page 4

Connecting a non-printer device
(e.g.external drive or parallel scanner)
to the SP-PCI's parallel port
In Windows 95/98/ME (not Windows 2000/XP) some parallel port
devices require parallel ports that use standard (legacy) ISA LPT
addresses (0278h or 0378h). Because the SP-PCI card is a fully compliant
PCI device,its default address (Input/Output Range) is beyond the
standard range of ISA I/O addresses.In order to connect such a
peripheral to the SP-PCI card,the I/O address range of the card must
therefore be changed manually.This section describes how this is done.
1. Open Control Panel|System|Device Manager and find the SP BIDIR
Parallel-PCI listing under Ports.Click Properties, and proceed to the
Resources tab.The following screen will appear (Note: the
Input/Output Range and Interrupt of your particular configuration
may differ from the one below).
Page 5

2. Remove the check mark from the Use Automatic Settings box.
Note: In some cases Windows will give an error message to the effect
that "Windows cannot modify this resource" at this point.If you are
unable to access the settings for changing system resources,reboot the
system in Safe Mode to make changes to resource settings.(To enter
Safe Mode,press the F8 key while the system is rebooting.)
3. Double-click on the words Input/Output Range.The following
screen will appear:
4. Use the up/down arrows to scroll to one of the following range
settings, or type them in manually:
0278 – 027F 0378 – 037F
0238 – 023F 02B8 – 02BF
5. After one of these has been entered,click OK.Windows will verify
whether you would like to force this particular configuration rather
than the automatic one that it had previously chosen. Click Yes.
6. Verify that there are no conflicts with addresses being used by other
devices already in your PC.If no conflicts are found, restart Windows.
0338 – 033F
Page 6

Changing the Com numbering of your SP-PCI
port (Windows 95/98/Me only)
Unless you already have more than 4 Com Ports installed in your PC,
Windows will by default configure the SP-PCI as Com 5.If you wish to
change this assigned Com number (e.g.reassign Com 5 to be Com 3),
please use the Lava Com Port Redirect Utility included in the
“Utils\Redirect“ subdirectory of your Installation Diskette. Such a
reassignment may be necessary because some communications
applications programs do not recognize port designations beyond Com
4.The Com Port Redirect utility will allow you to change the Com
numbering of your ports .
To install the Port Redirect Utility on your hard drive,insert the
Installation Diskette into your floppy drive,click Start, Run and type
A:\Utils\Redirect\Setup.
without changing I/O address resources
Changing the Com numbering of your SP-PCI
port (Windows 2000/XP only)
In Windows 2000,Com port numbering can be changed by doubleclicking the serial port entry displayed in Windows' Device Manager (as
described earlier). Go to Port Settings | Advanced, and choose Com Port
#.
Page 7

Using Zip Drives with the SP-PCI
NOTE:The default input/output range for the SP-PCI card works with
Zip™ drives using new Iomegaware™ software.The instructions
"Connecting a non-printer device" given above apply to Zip™ drive
users using old versions of Iomegaware™.For best results with Windows
2000 and XP,we recommend downloading the latest "Iomegaware"
from Iomega. Additional instructions on optimizing Zip Drive
performance with the SP-PCI can be found at www.lavalink.com.
Release Notes:
A. This documentation describes installing the SP-PCI on a
Windows95/98/Me/2000/XP PC. Instructions and software for DOS,
Windows 3.x, and Windows NT 4.0 may be found in the NT4.0
subdirectory of the SP-PCI card Installation diskette. Instructions for
Linux installation are available at www.lavalink.com.
B. Because the SP-PCI card uses PCI (not ISA) I/O address ranges, it will
never be seen by your BIOS at boot-up as a standard port even if the
address has been changed in Windows using the above procedure.
This is normal, and does not indicate a fault in your SP-PCI card.
C. The parallel port of the SP-PCI card will not work at address 0278h or
0378h if it is installed in a PCI slot that is behind a PCI-to-PCI bridge.
If you have trouble installing the SP-PCI card,try seating it in a
different slot.
D. In standard installations ofWindows 2000/XP,the I/O address cannot
be changed to a legacy address.
E. Some devices (like external CD writers) default to "word mode" (ie:
16-bit data transfer) for fastest performance.Such devices need to
operate in "byte mode" (8-bit data transfer) to work with the SP-PCI.
Look in your device software for a "byte mode" setting,and enable
it.
Page 8

Lava
Technical Support
9:00 am to 5:30 pm Monday to Friday (Eastern Time)
Tel: +416 674-5942
Fax:+ 416 674-8262
E-mail: tech@lavalink.com
Internet: www.lavalink.com
Lava Computer MFG Inc.
This device complies with part 15 of the FCC Rules. Operation is subject
to the following conditions: (1)This device may not cause harmful interference,
and (2) this device must accept any interference received,including interference
Lava Computer MFG Inc.908 Niagara Falls Blvd. #629.North Tonawanda NY 14120-2060
that may cause undesired operation.
 Loading...