

Page 1

I
LAVA MOBILE PHONE
Flair S1
User Manual
Page 2

II
©2015. All rights are reserved. No part of this document may be reproduced
without permission.
While all efforts have been made to ensure the accuracy of all the contents in this
manual, we assume no liability for errors or omissions or statements of any kind in
this manual, whether such errors or omissions or statements resulting from
negligence, accidents, or any other cause. The contents of this manual are subjected
to change without notice.
Protect our environment! We strive to produce products in compliance with global
environmental standards. Pleaseconsult your local authorities for proper disposal.
Note: User Manual is just to guide the users a bout the functionality of t he phone. It
is not a certificate of technology. Some functions may vary due to modifications
and upgrade of software, or due to print mistake.
Page 3

III
Content
1. Welcome......................................................................................................1
1.1. Exciting feature................................................................................ 2
1.2. For your safety..................................................................................3
2. PHONE LAYOUT.................................................................................... 4
2.1. Key and Parts....................................................................................4
2.2. Standby Screen & Icons..................................................................4
3. GETTING STARTED..............................................................................5
3.1. Inserting the SIM card..................................................................... 5
3.2. Inserting Micro SD card..................................................................6
3.3. Unlock the phone............................................................................. 6
3.4. Using the Touch screen....................................................................7
3.5. Connection to Network....................................................................7
3.6. Charging the Battery........................................................................7
3.7. Notifications panel...........................................................................7
4. Basic Function........................................................................................... 8
4.1. Make Calls........................................................................................ 8
4.2. Answer Calls.....................................................................................9
4.3. Phone................................................................................................. 9
4.4. Contacts.............................................................................................9
4.5. Messages...........................................................................................9
Page 4

IV
4.6. Email
..................................................................................................
9
4.7. Calculator
..........................................................................................
9
4.8. Calendar
..........................................................................................
10
4.9. Clock
...............................................................................................
10
4.10. Camera
..........................................................................................
10
4.11. FM Radio
......................................................................................
11
4.12. Sound Recorder
............................................................................
11
4.13. Gallery
...........................................................................................
11
4.14. File Manager
.................................................................................
11
4.15. SIM Toolkit
...................................................................................
11
4.16. Downloads
....................................................................................
11
4.17. Backup and Restore
.....................................................................
11
4.18. Settings
..........................................................................................
11
5. Frequently Asked Questions and Troubleshooting
..........................
15
6. Safety Information and Notices
...........................................................
16
6.1. Emergency call
...............................................................................
16
6.2. For your safety
................................................................................
17
Page 5

1
1. Welcome
Congratulations on your purchase of the LAVA mobile phone. Your phone provides
many functions which are practical for daily use, such as a hands‐free loudspeaker,
camera, MP3 player, internet and much more. You can read the manual to
understand how to use Flair S1 Mobile phone and experience the well
‐
established functions and simple operation method. Please use the original
accessory in order to achieve the best use of effects. Use of non-original
components may lead to damage caused to t hem achinery, in which case Lava shall
not be responsible. LavaWarranty Certificate enclosed at the end.
LAVAsupport and contact Information
Check www.lavamobiles.com web site for additional Information, downloads, and
services related to your LAVA product.
To check for the nearest LAVA service center location for Maintenance services,
you can visit link:www.lavamobiles.com/support
Customer Carenumber
No: 1860 200 7500
Availablefrom Monday to Sunday, between10:00AM to 7:00PM
“It is advisable to charge battery to 100% before start using phone for better
battery life”
Page 6

2
1.1. Exciting feature
Android L 5.1
4.5 inch screen
1.3GHz Dual Core Processor
External Memory(Expandable to 32)
Dual SIM
Multimedia player
Wi-Fi
Battery 1750mAh
Page 7
3
1.2. For your safety
Read this simple guideline. Avoiding them may be dangerous or illegal. Read the
complete user manual for furtherinformation.
Do not switch your phone on when t he use of wireless
devices is prohibited or when the wireless device may
cause interference or danger.
Do not use your phone while driving.
Follow relevant rules or regulations in hospitals and health
care facilities. Switch yourphone off near medical devices.
Switch your phone off in an aircraft. The radio signal from
it may cause interference insignals of the aircraft.
Switch your phone off near high ‐ precision electronic
devices. It may affect theper formance of these devices.
Do not attempt to disassemble your phone or i ts
accessories. Only qualified personnel m ay service or repair
the phone.
Do not place your phone and its accessories in containers
with strong electromagnetic field.
Do not place magnetic storage media near your phone.
Radiation from the phone may erase the information stored
on them.
Do not put your phone in a high‐temperature place or use
it in a place with flammable gassuch as a petrol pumps.
Keep your phone and its accessories away from ch ildren.
Do not allow children to useyour phone without guidance.
Respect others' privacy and legal rights when using your
phone.
Page 8
4
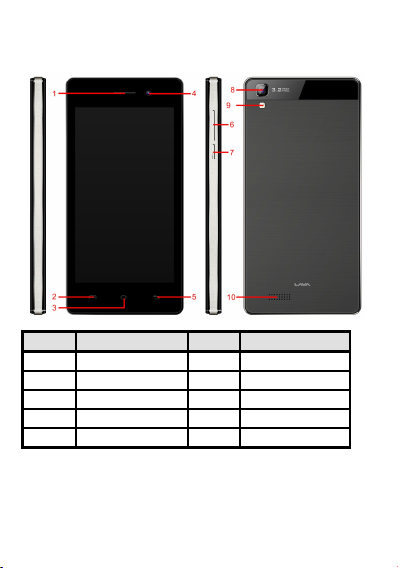
2. PHONE LAYOUT
2.1. Key and Parts
Label
Key
Label
Key
1
Receiver6Volume key
2
Menu key
7
Power key/Lock key
3
Home key
8
Rear camera
4
Front camera
9
Rear flash light
5
Back key
10
Speaker
2.2. Standby Screen & Icons
This phone provides multiple Standby screens. T hrough the i nstruction and various
icons on the screen, you can have the operating information needed.
Page 9

5
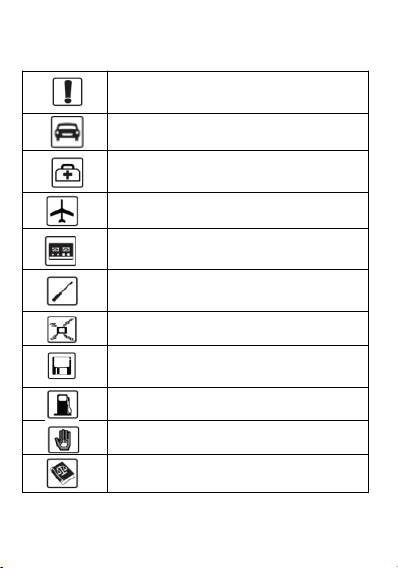
Status Icon
Description
Signal indicator for SIM
Using headset
Mute
Alarm
Bluetooth on
Device connected USB
3. GETTING STARTED
Please read the safety instructions in the "Safety Information and Notices" section
before use.
3.1. Inserting the SIM card
Flair S1 is a dual SIM mobile phone allowing you to use the facility of two
networks. Toinsert SIM card(s):
Switch off the mobile phoneand remove the rear cover and battery.
Make sure that the clipped corner of the SIM card is facing the correct direction.
Slide the SIM card into the card slot.
Page 10

6
Replace battery and the rear cover of the mobile phone.
3.2. Inserting Micro SD card
Remove t he battery of t he handset, gently slide the micro SD card into the slot
marked SD .
3.3. Unlock the phone
You may need to provide Swipe, Voice Unlock, PIN, and Password and draw a
pattern to unlock your phone.
To unlock the screen:
Press the power key to wake upt hephone.
Slide on the screen.
Page 11

7
Youcan unlock your phone based on the unlock method in settings.
To set theunlock method:
On the main menu, touch Settings > Security. Touch Screen lock.
Choose the type of locking as desired. You can set your screen lock on the basis of
Swipe, Voice Unlock, PIN, and Password,Pat tern or None.
3.4. Using the Touch screen
Youcan use the touch screen in the following ways:
Touch: Acts on items on the screen, such as application and settings icons, to
type letters an symbols using theon screen keypad, or to press on screen buttons.
Touchand hold: Touch and hold anit emon the screen until an action occurs.
Drags: Touch and hold an item and move your finger on the screen until you
reach and target position.
Swipe or slide: Quickly slide your finger across the surface of the screen. For
example, slide the screen up or down to scroll a list.
Rotate the screen: On most screens, the orientation of the screen changes as
you rotate it. You can turn this feature on andoff.
3.5. Connection to Network
When the SIM card is successfully unlocked, the handset will automatically search
for available network. The handset will show the information of t he network
provider; t he status bar will show the signal strength and the network condition
once the handset is successfullyconnected to a network.
3.6. Charging the Battery
To charge the battery, plug in the charger connector at the top of your phone (USB
interface) and then plug the other line end into an AC power socket.
The battery icon indicates the charging state. While charging, the charge indicate
lightning icon.
3.7. Notifications panel
Drag the status bar downfrom t hetop of the screen as shown below:
Page 12

8
The Notifications panel displays your network provider na me and a list of your
current notifications.
4. Basic Function
4.1. Make Calls
When the network provider is valid, touch the phone icon a ppears on the standby
screen, you can call out or answer calls. The indicator on the upper right part shall
show the signal strength.
Make Domestic Calls
Use virtual keyboard to enter phone numbers and then press Dial icon to call.
Call Extension Phone
Type ina sfollows to call extension phone:
Area code > switchboard number > Add 2-sec pause > extension phone number>
callMake International Calls
Type ina sfollows to call international phone:
+ > country code > complete destination number > dialing icon.
Make Listed Calls
Listed phone numbers can be called out by pressing the phone number or sliding
the phone number to right.
Emergency Calls
You can call for emergency service as long as you are in the network coverage. If
your network provider doesn't provide roaming service in this area, there will be
"Emergency Calls only"on the lock screen.
Page 13

9
4.2. Answer Calls
Press the icon to answer ani ncoming call.
4.3. Phone
Touch the phone i con on the main menu or the home screen to dial t he desired
number.
4.4. Contacts
Touch the Contacts icon on the main menu or the home screen , you can check all
the contacts, search for contacts or add new contact.
When adding a new contact,you can type in the name, address, phone number etc.
4.5. Messages
Touch the Messages icon on the main menu or the home screen , you can cr eate a
new message to other people. Input phone number or select the number from
contacts. When tap thecontent, you can add picture, video, audio etc attachments.
4.6. Email
The handset provide the email function. You can use the email conveniently. You
need input the email account,a ddress and password.
4.7. Calculator
The handset is facilitated with a calculator with basic functions. You can carry out
the operation for plus, minus, multiply, and divide by pressing the screen. You can
use some functions in thea dvanced panel.
Page 14
10
4.8. Calendar
Enter the calendar menu and there shall appear a calendar on the screen with the
current date market out by background frame with a special color. Press the touch
screen to browse date and the calendar information on the screen shall be
correspondingly updated.
4.9. Clock
Enter t he clock application, press alarm icon and press Add alarm to add a new
alarm. Scroll the scrollbar to set alarm time. Press alarm of l ist to edit the activation,
Time, Ringtone, vibrate and label. If you want to delete the alarm, long press on the
list and choose the alarms thatneeds to be deleted and click in Delete icon.
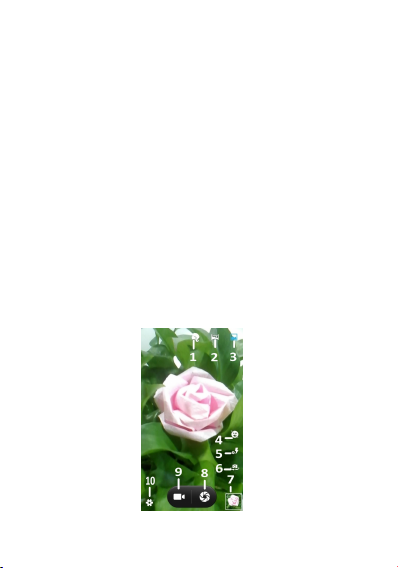
4.10. Camera
Under viewing condition, press the top icons to do the following operations.
1——Face beauty mode
2——Panorama mode
3——Normal mode
4——Smile detected
5——Change the modeof flash light:auto mode, off mode, on mode
6——Switch the camera between front and back
7——Thumbnail icon shows the currently captured picture or video
8——Press the Capturei con to take a picture/video
9——Videomode
10——Setting icon
Page 15

11
4.11. FM Radio
Make sure the headset, which is used as the antenna, is plugged in before using the
FM radio.
4.12. Sound Recorder
Press Recording icon to start recording. In the m iddle of the screen is a timer. Press
Stop Key to stop recording and select "Save" in the popped out "OK/Discard”
option to save the record.
4.13. Gallery
In the gallery interface, there are different folders. Select a folder and press to enter
it. Press image or video to view pictures or videos.
When opening one picture, in the upper right of the screen displays the "share" icon.
Choose "share" to send the file through Bluetooth, message etc ways. You also can
use the further functions like Delete, Slideshow, Edit, Detailetc.
4.14. File Manager
You can manage file, including Download, Music, and Received File. Tap to create
a new folder or select folders to copy, move and delete.
4.15. SIM Toolkit
The contents in this menu will differ according to different network providers. For
detailed information, please check inside the menu.
4.16. Downloads
Youcan check the downloaded or being-downloaded contents.
4.17. Backup and Restore
Youcan take back up of your phones data and restore them.
4.18. Settings
Your phone can connect t o a variety of networks and devices, including Wi-Fi,
Bluetooth devices, such as headsets. You can also transfer files to/from your PC
through the data cable.
Transferdata between Phone and PC
Youcan connect the phone to PC via 2 options:
Case 1: When NOSD card present.
In this case phone will be connected via MTP mode and “Connected as a media
device" notification will be shown.
Page 16

12
Touch the notification, can select to change to other connect mode. The mode has
Media device(MTP), Camera(PTP),Charge only and Built-in CD-ROM.
Case 2: When SDcard is present
In this case the phone will connect via MTP mode and will add the new mode i s
USB storage. You can select t he option of USB storage if you want t o access only
the SD card.
Once that is done, you can exchange/manage data between your phone and PC
now.
Once finished, for USB storage mode, click again (“Turn off USB storage”) to
unmount storage from computer and use it with phone again.
Page 17

13
Use data services onyour phone
Ensure t hat your device has an active data connection. To use the data services
please follow below steps.
Menu> Go to Settings> SIM cards > Tap Cellular data> Select the SIM with which
you want to use data connection.
Note: You now need not to worry about the operator setting of your device. Your
device detects and install the operator settings a utomatically as soon as you insert
your SIM card.
WARNING: To avoid any over cost contact your operator to know more about
best plans.
Connect to Wi-Fi Networks
To browse the Internet via Wi-Fi:
Go to settings> Wi-Fi > turn it ON, select the WIFI connection listed under Wi-Fi
networks with which you wantt oconnect> Enter the password.
Note: Make sure that Wi-Fi network with which you want to connect is in the range
and is active.
Pair With Bluetooth Devices
Go to Settings > Bluetooth.
If Bluetooth is off, check Bluetooth to turn it on. Your phone scans and displays the
Bluetooth devices in range.
If the device you want to pairwith is not in the list, make it discoverable.
If your phone stops scanning before you make the other device discoverable, touch
Refresh.
Touch the ID of the other device in t he list Settings to pair them. If the pairing is
successful, your phone connects to the device.
Connect to Internet on your PC via Phone
Youcan browse the Internet on your PC using your mobile phone. This can be done
in 2 ways:
To access both the options make sure your phone has an a ctive data plan and
mobile data is “ON”.
USB Tethering:Connect your mobile phone toyour PC via the USB cable.
Go to Settings> More>Tethering & portable hotspot > USB tethering.
YourPC will then read the necessary drivers of your phone and you canthen
access internet on your PC.
Wi-Fi Hotspot:Go to Settings> More >Tethering & portable hotspot> Turn ON Wi-Fi Hotspot.
Once the device Wi-Fi Hotspot is active you can see a white icon denoting
wireless network on the notification pane.
Note: You can select the desired security settings for your hotspot network by
Page 18

14
following below steps:
Go to Settings>More >Tethering & portable hotspot> Wi-Fi hotspot >Set up
Wi-Fi hotspot>Security> Select desired security and configure your password
Now go to your PC(with WIFI) and check for the Hotspot network createdby
your device.
Select the network and input thepassword configured for the hotspot network
on your device.
Youcan now browse internet on your PC(with WIFI) with the help of data
connection on your phone..
Display
Go to Settings > Device > Display. You can set the brightness of time, choose the
auto-rotating screen, adjust the delay before the screen automatically turns off,
choose the display when the screen locked and adjust the front size.
Sound & notification
Go to Settings > Device > Sound & notification, you can set Notification, Interruptions
and Sound enhancement in thismenu.
Storage
Go to Settings > Device > Storage. Include the SD card storage, available storage,
insert SD card (If a SD card has a lready been inserted, then this option will become
"Unmount SD card "), Erase SD card and all available storage in the internal
storage space.
Battery
Go to Settings > Device > Battery manager. Show the battery details and you can
turn ON the Power saver modeor Super power saver mode.
Apps
Go to Settings >Apps. Include downloaded apps, running apps and all of the apps
in the smartphone.
Security
Go to Settings > Personal > Security. Change the settings of Screen lock,
Encryption, SIM card lock, Passwords visible, Device a dministrators and Trusted
Credentials.
Accounts
Go to Settings > Personal > Accounts > Add account. Manage the accounts for
Facebook, Email, Google, and so on.
Language & input
Go to Settings > Personal > Language & input. Include Language, Keyboard
&Input methods, Spell checker and so on.
Backup & reset
Go to Settings > Personal > Backup & reset, backup your data & a ccount a nd set
the phone restore automatically. You also reset t he DRM and reset the phone to
factory data.
Date & time
Page 19

15
Go to Settings > System > Date & time. Include Automatic date & time, Automatic
time zone, Set date, set timea ndso on.
Scheduled poweron &off
Go to Settings > System > Scheduled power on & off, set the time of power on &
off, the handset will power on & off according to the set time.
Printing
Go to Settings > System > Printing.Connect printer to realize print function
About phone
Go to Settings> About phone. Include System & System software updates, Status,
Legal information, Model number, Android version, Baseband version, Kernel
version, Build number andCustom build version.
Through Software Update you can download and install the latest Software for your
device.
5. Frequently Asked Questions and Troubleshooting
Questions
Cause and Solution
Unable to turn
on phone
Press the power on key for over 1 second.
Check if battery is appropriatelycharged
Unable to
connect to
network
Weak signal.Please Try and move to a location with strong
signal and try connecting to thenetwork again;
Please ensure that you are notbeyond the network
coverage of service providers;
Please ensure you have a valid SIM card. Please contact
your network provider for further information
Display
information
while turning
on
Check if the SIM card (insertt heSIM card) is installed
correctly
Handset lock password: If the handset lock is activated,
you have to input handset password before using.
Input PIN: Inputting PIN while turning on each time is
activated, you have to input thePIN code.
Input PUK code: Having inputwrong PIN code for 3 times
straight will lock the SIM card.You need to input the PUK
code provided by your network provider.
Poor quality of
calling
Please check if the sound volume is tuned improperly
In an area with poor receiving condition, example:
basement, the signal might beweak. Try reaching a
location with stronger signalreception and call again.
While using the mobile phonein the peak period of
communication, like commutet ime, you may be unable to
call because of line congestion.
Page 20

16
Standby
duration
Shortened
The standby duration is relative to the system setting of
network. While the mobile phone is in an area with poor
signal strength and cannot receive the signal, the handset
will continuously search for a base station. This will
significantly reduce batterycharge. It is recommended that
you turn off your mobilein area with no signal reception to
save battery.
Need replacing the battery. Please change a new battery.
SIM Card
Error
Dirt on the metal surface ofa nSIM card. Use clean cloth to
wipe the metal touch point on an SIM card.
The SIM card is not installed.
The SIM card is damaged. Pleasecontact your network
service provider.
Unable to dial
out
Please confirm if you pressedt hedial key after dialing.
Please confirm if calling isforbidden because of default
settings.
Please confirm if the SIM isvalid.
Please confirm if the call barring is set.
Please confirm if the fixed dialfunction is set.
Callers unable
to contact you
Please confirm if the mobile phone is on and connected
with the network.
Please confirm if calling isforbidden because of defaulting.
Please confirm if the SIM card isvalid.
Please confirm if the call barring is set.
Unable to
charge handset
Poor contact. Please check ift heplug is connected well.
Please confirm if the environmenttemperature is within the
range of 0ºC ~40ºC while charging.
The battery or chargeri s damaged. Youneed to replace it.
Unable to set
some functions
Wrong operation.
The network provider does not support the function, or you
have not applied for it.
Note: If the instruction above cannot help you solve problems, please note:
Mobile phone model andseri alnumber
Specific content of warranty
Clear statement of problems
Then contact your local dealer or a LAVA authorizedservice center in your area.
6. Safety Information and Notices
6.1. Emergency call
If any emergency a rises, dial 112 (or other emergency call number) for emergency
Page 21

17
help.
Note:
Due to the nature of cellular networking, the success of emergency call is not
guaranteed.
6.2. For your safety
Switch off the phone inhospitals and aircraft. Obey any restrictions. Wireless
devices can affect the medical treatment and cause interference in aircraft.
Some medical devices sucha shearing aids and pacemaker may be sensitive to
external radio frequency emissions. Consult the device manufacturers or your
doctor before using the phone aroundthe medical devices.
Pay special attention to the ring tonevolume and vibration settings if you have a
heart problem.
In areas with potentially explosive atmosphere, such as gas stations, fuel or
chemical transfer or storage facilities, obey all signs and instructions.
Yourphone will emit radio frequency even in the standby mode.Turn off your
phone when so instructed.
Always obey all the local lawsand regulations. Do not use your phone while
driving. Use Hands-free operation, if available, and give full attention to driving
and to the road. Pull offt he road and park before making or answering a calli f
driving conditions so require.
If your phone is lost or stolen,notify your service provider immediately to stop
the SIM card from being used.
To prevent your phone from misuse, lock your SIM card or phone, and change
passwords when necessary.
When you leave your vehicle, taket hephone with you or place it in the glove
compartment to avoid theft.
Keep the phone or chargerout of reach of children.
Notes on phone usage
Yourphone will give off electromagnetic waves. Do not place it near storage
medium such as floppy disk.
Using the phone near television, land phone, radio and office automatic
devices may cause interferenceand affect the function of the mobile phone.
Keep the phone dry; all kinds of liquid can erode electronic circuit.
Keep the phone away from extreme temperatures.
Keep the phone away from fire or a lighted cigarette.
Do not paint the phone.
Do not drop the phone or violently crush or shake the phone.
Do not keep the phone near magnets and other object with magnetism. The
phone’s magnetism may clear the information stored on floppy disk,
pre-paid phone card and creditcard.
Keep the phone away from hot places where t he temperature may exceed
Page 22

18
60C, such as dashboard, windowsill, or areas exposed to direct sunlight.
Do not disassemble or modify your phone. This can damage the phone,
cause leakage and break the internal circuit.
Use only damp cloth or non-staticcloth to clean your phone.
Do not use alcohol, thinner, benzene or other chemicals or a brasive cleaner
to clean your phone.
The phone will become warm under normal use and while in battery
charging.Do not leave the phone with the battery empty for a long period of time.
This may cause data loss.
The metal parts of the phone may irritate your skin depending on your
health condition.
Do not put the phone in the back pocket. Sitting on it may damage the phone.
Do not put the phone at the bottom of a bag. Youmay crush it.
When the vibrate mode is on, place the phone carefully to prevent it from
being dropped from a height or being moved to a heat source due to the
vibrating.Do not press the touch screen with needles, pen point or other sharp objects;
it can damage the LCD and violate the terms and conditions of the warranty.
Notes on battery usage
Keep metal objects (such as coins or key rings) away from the battery to
avoid short circuit.
Do not remove the battery without turning off the phone.
Do not hold the battery in your mouth. The liquid of the battery can be toxic.
Embedded battery shall be replaced by authorized dealers. Use only
batteries approved by the phone manufacturer; otherwise, it may cause
explosion.
Damage resulting from using un-authorized batteries and chargers wil l not
be covered by the warranty.
Avoid contactwith any leaked liquid of the battery. If it touches your skin,
wash your skin with fresh watera ndgo to the hospital immediately.
Certification Information (SAR)
Your phone is designed not to exceed the limits of emission of radio waves
recommended by international guidelines. These guidelines include safety
margins designed to assure the protection of all persons, regardless of age
and health.
SAR (specific absorption ra te) is the unit of body-absorbed RF quantity
when the phone is in use. SAR value is ascertained according to the highest
RF level generated during laboratory tests.
The true SAR level during phone usage will be far lower than this level.
Page 23

19
The SAR value of t he phone may change depending on factors such as how
close you are to a network tower, use of accessories and other
enhancements.
The highest SAR value of the device is less than 1. 6W/Kg averaged over 1
gm of human tissue.
The SAR value may di ffer depending on national reporting, testing
requirements and the network band.
SAR Recommendations
Use a wireless hands-free system (headphone, headset) with a low power
Bluetooth emitter.
Please keep your calls short and use SMS whenever more convenient. This
advice applies especially to children,adolescents and pregnant women.
Prefer to use your cell phonewhen the signal quality is good.
Maintain a preferable distance of 15 mm from the device.
Safety precautions:
Use cell phone when the signalquality is good
Use a wireless hands-free system ( Headphone, headset) with a low power
Bluetooth emitter
Make sure the cell phone has a low SAR
Keep your calls short or send a text m essage (SMS) instead. This advice
applies especially to children,a dolescents and pregnant women.
E-waste Disposal Mechanism
'E-waste' means waste electrical a nd electronic equipment (WEEE). In other words
E-waste is a popular, informal name for electronic products nearing the end of their
"useful life". For more details about e-waste please refer e-waste rules, 2011
www.moef.nic.in
Do’s and Don’ts for disposal e-waste
Do’s:Ensure that anAuthorized Person repairs your Lava products
Call Our Local Authorized Collection Centers to Dispose Lava products
Always drop your used electronic products, batteries or any a ccessories
thereof after the end of their life at nearest Authorized Collection Point or
Collection Center.
Separate the packaging material according to responsible waste disposal
options and sorting for recycling.
Always remove the battery from the product, when you do not intend to use
the product anymore it in future.
Don’ts:Do not Dismantle your Lava Product on your own
Page 24

20
Do not give your e-waste to Scrap Dealer/ Rag Pickers.
Do not dispose-off the e-waste in landfills
Never dump E-waste in garbagebins.
Do not dispose of your product at municipal waste bins or rooms.
Do not throw used batteries intohousehold waste.
Consequences of improper handling and disposal of E-Waste
Improper disposal of wasteprevents natural resources from being re-used.
Some waste contains ha zardous chemicals and if not disposed of properly
may release toxins i nto the soil and water, and also releases greenhouse
gases into the environment
If e-waste is not properly disposed of, it can be a threat t o health and
well-being of humans and animals and it also has adverse effect on the
environment.
Placing of batteries or devices on or in heating devices, such as microwave,
ovens, stoves, or radiators and improper disposal of batteries m ay lead to
explosion.
If the battery terminals are in contactwith metal objects, it may cause a fire.
For more details on how to dispose of your Lava products at the end of life, Please
refer the list of our Services Centers on Pan basis on our website
www.lavamobiles.com.
LAVAWARRANTY CERTIFICATE
Limited warranty:
LAVA international Ltd. (LAVA) provides limited warranty for your mobile phone
and original accessories delivered with your mobile phone (hereinafter referred to
as “product”)
The warranty period for the transceiver is one (1) year and for battery, charger and
headset is six (6) months from the date of purchase.
LAVAWarranty
Subject to the conditions of this Limited Warranty, LAVA warrants a product to be
free from defects in design, material and workmanship at the time of i ts original
purchase by you, and for a subsequent period of one (1) year for transceiver and six
(6) months for battery & charger.
You shall have the coverage or benefits under this warranty in t he event that any of
the following conditions areapplicable:
The product has been subjected to abnormal use or conditions, improper
Page 25

21
storage, exposure to excessive moisture or dampness, exposure to
excessive temperature, unauthorized modification, unauthorized repair
(including but not limited to use of unauthorized spare parts in
repairs),abuse, accidents, Acts of God, spills of food or liquids, improper
installation
You have not notified Lava of the defect in the product during the
applicable warranty period.
The product serial no. code or the accessories date code has been
removed, defaced or altered.
The product has been used with or connected to an accessory (i) Not
supplied by Lava or its affiliates, (ii) Not fit for use with the product or
(iii) Used otherwise than in manner intended.
The seals of the product’s battery enclosure have been broken or shown
evidence of tempering or the product’s battery has been used in
equipment other than that for which it has been specified usable by
LAVA.
All plastic surfaces and all other externally exposed part that is scratched
or damaged due to normal use.
To get maximumof your new product, we recommend you to:
Read the guidelines for safe and efficient use as mentioned in the
manual.
Read the terms and conditions of your Lava warranty in the manual.
Keep your original receipt; you will need it for warranty services if asked
to produce.
Present this Lava Warranty Certificate along with original proof of
purchase whenever you requirea nywarranty services.
In case Lava product needs service, please visit the nearest Lava service centers
given in the service guide. Please visit our Website www.lavamobiles.com for
updated list ofAuthorized Service Centers near to your location.
Important note: for your warranty to be valid, all information on the warranty
certificate has to be completed including the stamp from the authorized
distributor/retailer.
Page 26

22
All warranty information, product features and specifications are subject to
change without notice.
IMEI No. ……………………………………………………….
Dealers Stamp ……………………………………………………….
Date of purchase ………………………………………………………..
Model No. ……………………………………………………….
 Loading...