

Page 1

i 810
Page 2

IRONING SYSTEM i810
USER MANUAL
Page 3

LIGHT PROFESSIONAL DEVICE FOR PERFECT IRONING
The supplied steam cleans clothes, destroys bacteria and prevents their
reproduction. Compact storage and transportation system.
My BORK by Laurastar
Register your BORK by Laurastar equipment in your account on the bork.ru website.
You will get quick access to instructions, accessories, spare parts and reminders
for consumables replacement.
2 3
Page 4

SENSTEAM FUNCTION RECOGNIZES IRON MOVEMENTS
ANDACTIVATES THE SUPPLY OF STEAM AT RE QUIRE D MOM ENTS
CONTROL OF SYSTEM BASIC FUNCTIONS WITHA SMARTPHONE
Video tutorials on ironing and folding of clothes. Guidelines on perfect folding.
The steam is supplied in the form of pulses and penetrates deeply between
fibers. Itsmoothes the fabric as efficiently as possible. A powerful fan straightens
thefabric for comfortable ironing. It operates inthemode of inflation or tightly fixes
clothes for creation of even folds in the vacuum mode.
4 5
Page 5
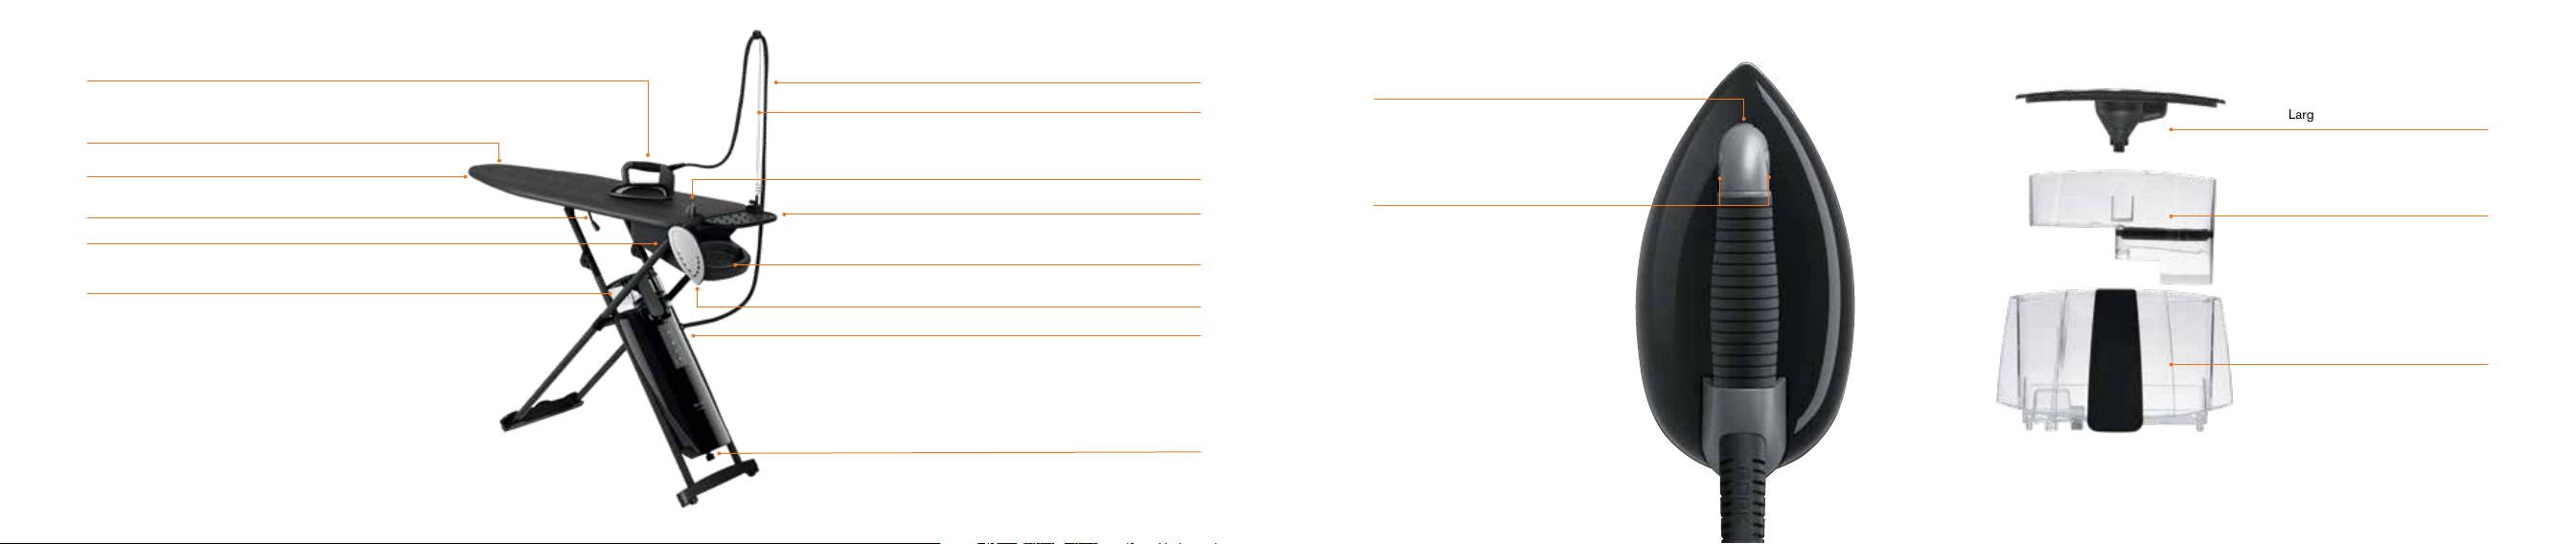
Iron
Ironing table
Steam hose
Steam hose holder
Aspiration/blowing function button
Large and small water tank covers
Special cover Laurastar
Height adjustment knobs
Fan
Water tank
6 7
Hook for a protective cap
Removable iron stand
Box for safe storage of the iron
Protective cap for the soleplate
Steam generator
Drain plug
Steam supply buttons
Scale filter compartment
Water tank
Page 6

Main switch button with a light indicator
Light indicator, indicating the lack of water
8
SenSteam function button (optional)
Pulse steam button (optional)
Fan speed switch button (4 speeds)
PREPARATION FOR THE FIRST USE
Please read this manual before application
ofthedevice.
• Remove and safely dispose all packaging materials.
• Perform primary cleaning of the steam generation
system.
RULES OF CONNECTION
TO A POWER OUTLET
• Do not touch a plug with wet hands.
• Connect the device to a grounded outlet only.
• When disconnecting the device from mains:
do not pull the cord, rather pulling the plug.
Page 7

SETTING OF THE IRONING SYSTEM
• Remove the device from the box and place
itvertically on the floor in a closed state.
• Take the table with one hand from the side part
ofthe iron stand. Take the centre edge ofthetable
with the other hand and install it properly
ina horizontal position at the maximum height.
• Open the stand intended for the iron.
• Remove the iron from the box for safe storage
andplace it on the stand. The stand can
bemounted closer if necessary.
• Install the steam hose holder in one of the holes
on the side part of the iron stand, insert the steam
hose into it.
• Fasten the hook intended for the soleplate
protective cap in another hole of the table.
• Clamp adjustment knobs in order to lower the table.
• If it is necessary to set the table back to the top
position – simply lift it.
• If it is necessary to move the ironing system –
liftthe table using the pointed end and roll it.
A cover supplied with this device was specifically
designed to distribute air evenly in the course
ofvacuum processing and blowing over the entire
surface of the table.
Apply only officially certified covers in order
toensure their full effectiveness. The cover
canbewashed at 30
10 11
°C, without pressing.
• Install the protective cover, beginning from the side
part of the iron stand and stretch it to the pointed
end of the table, correcting a cover position.
Page 8

DEVICE PREPARATION
It is recommended to rinse the steam generator
prior to the first use.
• Make sure the device’s power plug is unplugged.
• Secure the table in the highest position, remove
thewater tank.
• Place the drain tank under the drain plug.
• Unscrew the steam generator plug, remove
thedrain plug.
• Remove the small and large water tank covers.
Remove the filter compartment and filter itself.
• Fill the tank with hot tap water to the maximum level
(MAX).
• Place a large funnel-shaped cover in a position
of the water tank above the steam generator
andlocate the tank itself on the top.
• Drain all water.
• Install both covers back after all water is drained.
• Remove the drained water.
Do not use water with various additives
(forexample, flavoured), chemicals or water
fromdrying machines, since such liquid may affect
operation of the device.
The device is intended to work with tap water.
Besure to use the supplied scale filter for effective
INSTALLATION OF THE SCALE
PROTECTION CARTRIDGE FILTER
• Make sure that the device’s power plug
isunplugged.
• Secure the table in the highest position.
• Remove the water tank. Remove water tank covers.
Install the scale filter.
• Fill the tank with tap water.
• Filtered water shall reach the maximum level
(MAXmark).
• Close covers and place the tank back onto
thesteam generator.
• If water does not flow – immerse the anti-scale filter
cartridge into cold water for 3 minutes.
MOBILE APP
Download «BORK by Laurastar» mobile app and get
access to step-by-step instructions, video tutorials
and settings for your ironing systems.
The application is available in the App Store
andGoogle Play.
and long-term operation of the device.
12 13
Page 9

14
STORAGE OF THE IRONING SYSTEM
• Turn the device off using the main switch button.
• Remove the power plug and wind the power cord
around table supports. Pull the cable in order
toactivate the automatic winder.
• Install the hose holder in a horizontal position
inthehole provided for this purpose.
• Place the iron into the box for safe storage.
Foldthestand intended for the iron to the closest
position Grab a side containing the stand with one
hand. Grab the edge of the table with the other
hand and fold it vertically.
• Place the system to a storage location
intheupright position Water in the tank can be left
until its next use.
If the device is stored in a horizontal position,
thenwater shall be drained from the tank.
Be sure to fill the tank with water before device
activation. Device activation without water may
cause damage. Activation of heating functions
without water may void the warranty provided
forthe device.
USER INTERFACE
• Turning on/off
The light indicator flashes until the device is ready
for operation.
•
SenSteam
The white light indicates activation of the SenSteam
function.
•
Impulse steam supply
The white light indicates activation of the pulse
steam function
• Fan speed switching
4 speed values are available. The white indicator
light indicates one of 4 speed values.
• Water light indicator
A red water light indicator implemented in the form
of a drop indicates absence of water in the tank.
TURNING THE DEVICE ON
• Connect the device to mains.
• In order to activate the automatic winding
function– pull the power cord until the end
ofthecable is visible at the output of the coiler.
• Press the on/off button. The green indicator light
will flash for 3–5 minutes.
• The device is ready for operation when the green
indicator is lit continuously.
The system is turned off after 10 minutes
ofinactivity for convenience and safety.
Press the steam button 2–3 times at a distance
from clothes before ironing or after a long pause.
This measure will remove condensation in the iron
and will help to avoid moisture stains on clothing.
Page 10

IRONING
SENSTEAM FUNCTION
PULSE STEAM SUPPLY
SOLEPLATE PROTECTIVE CAP
Two ironing modes are available in order
tomaximize iron application.
• Blowing mode
Press the aspiration/blowing function button
inorder to activate the fan in the blowing mode.
Air will be supplied under a processed fabric,
thuspreventing formation of extra folds.
• Aspiration mode
The fan is transferred into the aspiration mode
when the aspiration/blowing function button
ispressed again. Air will be aspirated, fitting
a fabric to the table and making it easier to smooth
out all folds.
16 17
Switching from one mode to another is carried out
by pressing the aspiration/blowing function button.
The necessary supply intensity is adjusted using
thefan setting button.
The SenSteam technology provides automatic
steam generation without the need for pressing
ofthe steam supply button.
Steam supply is turned on automatically when
theiron is moved forward, and is deactivated
when it does not move or moves backwards.
PresstheSenSteam function button again in order
to switch to the manual mode.
Function activation is carried out by pressing
thepulse steam supply button.
Press the steam supply button after activation in order
to allow steam to be supplied continuously in small
portions. Press the steam supply button again in order
to turn the function off.
STEAMING PRINCIPLE
Quality smoothing requires passage of steam
through the fabric which softens fibers and fixes them
bymeans of drying. This condition involves complete
absence of folds.
Iron a fabric with steam firstly and without steam
forthe second time in order to dry it and improve
theoverall quality of ironing, also increasing the life
ofthe device.
A protective cap is necessary for processing ofdark
fabrics which are sensitive to glossing, aswell
asfordelicate fabrics (silk, synthetics) sticking
totheiron.
The protective cap and iron soleplate get hot.
Becareful when removing the protective cap intended
for the soleplate.
Be sure to remove the protective cap intended
forthesoleplate after use.
• Place the tip of the iron in front of the cap,
thenlower it and fix the rest part of the iron.
• Wait for about 2 minutes in order to make
theprotective cap reach the desired temperature.
• Pull the tab and move the hot iron in order
toremove the protective cap for the soleplate.
Page 11

In case of ironing of mohair, cashmere, velvet
andangora it is necessary to avoid contacts with
theprotective cap intended for the soleplate.
Such materials shall be ironed at a distance of about
10 cm with constant steam supply in order to avoid
linting.
Take ironed clothes with your hands after
ironing andshake them in order to bring some
volume. Clothes made of velure, velvet and
jersey arerecommended to be steamed without
theprotective cap at a distance of 2–3 fabric sections
with subsequent manual flattenning
VERTICAL STEAMING
• Hang clothes on hangers or apply a stand intended
for vertical steaming.
• Move the device from top to bottom, lightly
touching the fabric and supplying small portions
ofsteam.
Almost all fabrics can be steamed easily, except
forcotton, flax and some types of silk.
• If a fabric is steamed hardly, then it is necessary
toput it on the table and iron in the usual way.
It shall be prohibited to iron or steam clothes
onpeople. It shall be prohibited to direct the iron
FILLING OF THE WATER TANK
A sound signal is provided and a corresponding
indicator flashes when water runs out in the tank.
The steam supply is stopped after issuing
ofa sound signal. It is necessary to fill the water
tank thereafter.
• Remove the water tank from the steam generator.
Remove tank covers.
• Fill the tank with tap water.
• Filtered water shall reach the maximum level
(MAX mark).
• Close covers and place the tank back onto
thesteam generator.
Rinse the steam generator and clean the iron
every 10 operating hours or once a month in order
toprolong its life.
The device shall be turned off, unplugged
andcooled before cleaning. Allow the device
tocool for at least 2 hours. Cleaning shall always
be carried out only after the device has cooled
down completely!
Do not use descaling agents or other chemicals.
Rinse the device with water only.
CLEANING OF THE IRON
• Use the cleaning mat if the soleplate is dirty.
• Unresponsive stains can be cleaned using
anabrasive sponge intended for washing
ofutensils. Remove the aluminium oxide from
thesoleplate, wiping it with a damp cloth after
device operation.
• In case of scaling generation in steam outlets –
clean them with a special cleaning tool.
Abrasive sponges can only be used to remove
stains from the soleplate.
onpeople or animals.
18 19
Page 12

SCALE FILTER REPLACEMENT
STEAM GENERATOR WASHING
STORAGE
TROUBLESHOOTING
The scale filter shall be replaced when its granules
become completely brown.
• Remove the water tank from the steam generator.
Remove water tank covers. Remove the scale filter.
The scale filter can be disposed of with
thehousehold waste.
• Wash the filter compartment. Install a new scale
filter into the water tank.
• Fill the tank with tap water.
• Filtered water shall reach the maximum level
(MAX mark). Place the tank back onto the steam
generator.
Plastic parts of the water tank can be washed
inthedishwasher.
20 21
In order to extend the term of effective operation
ofthe device and in order to avoid scale marks –
rinse the steam generator regularly.
Rinse parts with water only. Do not apply descaling
agents or other chemicals.
• Follow the steps outlined in the «Device
preparation» section for flushing.
• Repeat stated steps until all scaling elements
disappear and are not contained in water leaving
the steam generator. Contact the service centre
ifwater does not flow out through the drain hole.
• Install both covers back after all water runs out.
Remove the drained water. Put the filter back into
the water tank, close covers and place the tank
onto the steam generator.
The device is recommended to be stored
intheassembled condition in a cool dry place,
isolated from places of storage of acids and bases,
atthetemperature from 5 to 30
humidity of 65
%.
°C and relative
The iron supply kit includes a silicone stand
forease of use. If necessary, take a break
in operation and place the iron on the stand
horizontally.
Problem Possible cause Troubleshooting
Humming in the course of steam release
fromtheiron
Crackling in the course of device
operation
The iron does not release steam.
Pressure drop
The soleplate is leaking • The device has not been washed for a long time.
The iron does not heat up • The power plug was removed from
The fan makes no sounds The fan plug has not been connected. Connect the fan plug.
The pointed end of the table gets wet
inthestorage position
Device vibration. Presence of such sound is normal for a new device, it will disappear with further
Heating is activated for the device not filled
withwater.
• Empty the steam generator.
• The device is turned off.
• The power plug was removed from
acorresponding outlet.
• The steam generator was rinsed not with water,
butwith another means.
acorresponding outlet.
• The device is turned off.
Condensate in the table body. • Leave the device open until the moisture evaporates fully.
application.
Fill the water tank.
• Fill the water tank.
• Press the instrument’s main switch button.
• Connect the power plug.
• Rinse the steam generator until scaling elements disappear from water.
• Contact the customer service.
• Connect the power plug.
• Turn the device on.
• Apply less steam. Read contents of the manual, paragraph «STEAMING PRINCIPLE».
Page 13

SAFETY MEASU RES
• The device is intended solely for private use.
• Use the device only indoors and only for ironing
oftextiles in compliance with this manual.
• Do not immerse the device and its parts into water
or any other liquid.
• The device shall be plugged in an outlet
completed with grounding means.
Itisrecommended to use protective disconnection
devices (PDD).
• Do not use portable sockets, multi-outlet units
orany other extension cords. The power plug shall
be accessible easily in case of an emergency.
• The iron soleplate and the steam jet become
very hot. It shall be prohibited to steam clothes
onpeople.
• Do not direct the iron on people or animals.
• The device represents a source of high
temperature. When using the device, keep your
hands and body at a distance from the soleplate
and steam jets. Contacts with metal parts
ofthedevice, hot water or steam can cause
burns. Becareful in the course of iron installation
onthestand.
• Stay at the distance from the device while
unscrewing its covers.
• Do not leave the device unattended when
itisturned on.
• Turn the device off before its connection
ordisconnection. Be sure to let the device cool
down for at least 2 hours before its draining.
• Keep the device out of reach of children.
• The device is not intended for use by children
ormental abilities or people not having have
sufficient experience, except when they stay
under supervision of a person responsible for their
safety.
• The device put in the standby mode or non-used
by anyone shall always be kept on a flat and stable
stand. Do not place the iron on the ironing table
cover or on personal belongings. Place the iron
on a special stand only in order to avoid the risk
of a fire.
• Be careful when removing the protective soleplate
cover after device application. Place the hot
soleplate on a heat-resistant mat.
• Cleaning, maintenance and servicing of thedevice
shall be carried out only when it is turned off
andhas been cooled for at least 2 hours.
• Unscrewplugs carefully: the remaining steam will
begin to be discharged under pressure after a few
turns.
• The device cable shall not come into contact
withhot surfaces. Cool the device completely
prior toits storage.
• Do not use the device if it has been damaged
by falling, if there are visible signs of damage
orif defects are visible on the steam hose
ortheelectrical cable.
• Do not attempt to repair the device on your own!
• Do not turn the device on without filling it with
water.
• Wipe external parts of the device with a soft, damp
cloth. Do not use solvents, oil or abrasive cleaners.
and people with limited physical, sensory
22 23
• Do not turn other power-consuming devices
onsimultaneously in order to avoid overloading
ofthe electricity supply network.
• Do not open the drain plug or the steam
generator plug in the course of device operation.
Carefullyunscrew the drain plug/cover
ofthesteam generator after the device has cooled
down completely: the remaining steam under
pressure will begin to be discharged after a few
turns.
• Do not insert foreign objects in holes
ofthedevice. In case of water ingress or a contact
of internal device elements with foreign objects –
unplug the plug from the outlet immediately.
• Place the electrical cable and steam hose
ina way that they cannot be removed or hooked.
Makesure that no one trips over cables.
• If it is necessary to avoid the risk of electric
discharge – do not pull the cable in the course
of unplugging from the outlet; hold it firmly
andremove the power plug.
• Do not dispose of the used device together
withother household waste!
Page 14

CORRECTIVE MEASURES
SPECIFICATIONS
EQUIPMENT KIT
• In case of faults in device functioning,
itisnecessary refer to the section
«Troubleshooting». If a fault of the device persists,
then it is necessary to stop its application
immediately and send it tothe nearest BORK
service centre for testing, repair or replacement.
Dear customers, if you have any questions related to purchase, operation and maintenance of BORK equipment, you can use the phone number
24
• For safety reasons, all procedures on repair
andmaintenance of the device shall be performed
only in authorized BORK service centres.
Addresses and telephone numbers of service
centres can be found on the site www.bork.ru
orusing the phone number 8 800 700 88 99.
8 800 500 88 99 (Information support service) .
Voltage: 220–240 V
Frequency: 50/60 Hz
Power consumption: 800 W
Steam generator power: 1400 W
Dimensions (H
× W ×
D): 1320 × 424 × 218 mm
Iron weight: 1.1 kg
Total weight: 23.1 kg
Made in Portugal.
Information on the purpose of the product:
the device is intended for steaming and ironing
ofclothes.
Special conditions for sale have not been established.
Ironing system: 1 pc.
User manual with the warranty card: 1 pc.
Attention! Due to continuous product improvement
we reserve the right to make changes in design,
packaging and specifications of the device.
The latest version of this manual can be checked
onthe website www.bork.ru.
Page 15

Grill G 802
Coffee station C 804
Blender B 802
Kettle K 810
5 automatic modes
•
4 roasting degrees
•
Detachable panels with the non-stick coating Quantanium
•
Thermostat for roasting control
•
26 27
8 grinding degrees
•
Manometer for pressure monitoring
•
Steam and hot water supply function
•
Possibility of programming
•
12 operating speeds
•
5 automatic programs
•
ProKinetix's patented knife system
•
Possibility of mixture heating
•
5 automatic modes
•
3 degrees of cooked tea strength
•
Brewing function
•
Delayed start function
•
Page 16

CERTIFICATION INFORMATION
The product is certified. The term set by the manufacturer in accordance with paragraph 2
of Art. 5 of the Law "On Protection of Customer Rights" amounts to 3 years from the date
ofpurchase provided that the product is used according to rules and guidelines outlined in this
manual andapplicable technical standards. Information on correspondence can be found at:
http://www.bork.ru.
Certification data changes shall occur in a period of not more than 1 time per 2 years and shall be reflected
inthe updated certificate of conformity.
WARRANTY CARD
The BORK company provides a one-year warranty from the date of purchase of this product The service life determined by BORK representatives for this product amounts to 3 years from the date
of sale, provided that the product is used in accordance with rules and recommendations set out in the operating manual attached to it and applicable technical standards.
In order to avoid misunderstandings, we ask you kindly to carefully study the user manual, terms
of the warranty, check correctness of the warranty card. The warranty card is valid ifa user
has a correct and legible specification of the following information: model, serial number
oftheproduct, date of sale, clearly visible seals of the seller, buyer's signature. The model
andserial number ontheproduct shall comply with those indicated in the warranty card.
Product
Model
Sserial number
Date of purchase
Information
on the seller company
(name, legal address)
Name and address of the manufacturer (person authorized by the manufacturer), importer and information intended to contact with them is indicated on packaging of the product.
IRONING SYSTEM
i810
The warranty shall be deemed null and void if any of these conditions are violated and when
data, specified in the warranty card, is altered, deleted or overwritten. If the date of sale can
notbeestablished in accordance the warranty period and lifetime shall be calculated from
thedateofproduct manufacture in accordance with the Consumer Protection Act.
The date of manufacture is encoded in the serial number, for example
1st and 2nd characters – week of manufacture; 3rd and 4th characters – year of manufacture;
last 5 characters – serial number.
The product is tested, completed and has no mechanical damage.
The customer agrees with terms of the warranty and service agreement.
Customer signature Seller signature
Stamp here
Page 17

TERMS OF SERVICE
The manufacturer reserves the right to refuse satisfaction of customer demands for warranties in case of non-compliance with operating conditions, terms of installation of the product,
intentional or careless actions of the purchaser (customer) or a third party, which caused damage to the product.
The warranty does not cover:
• elements, characterized by natural wear and tear. Thus, normal wear and tear includes
consequences of product application which caused deterioration of the technical condition
and appearance due to prolonged use of this product.
The warranty does not cover products with the damage caused by:
• improper operation, careless handling, improper storage, improper connection, failure
toobserve supplied operating instructions;
• contact with foreign objects, substances, liquids, insects or animals, which takes place inside
the unit s housing;
• impact of high and low ambient temperatures on heat sensitive parts of the product;
• mechanical effects;
• improper repair and any other intervention, which resulted in changes in the product design;
• application of the product with industrial and/or commercial purposes;
• damage of the power cord;
• application of detergents, not provided in the manual;
• application of non-standard (non-original) consumables, accessories, spare parts;
• connection to mains with a voltage value other than that specified in instructions
foruseofthe product or non-correspondence with state standards of the Russian
Federation;
• force majeure circumstances (fire, flood, lightning).
Replacement of faulty parts of the product (parts, components, assembly units) during
the warranty period shall not lead to establishment of a new warranty period for the entire
product, or a part replaced.
Service centre address
LLC «Premium Service», Moscow, Bolshaya Sadovaya 10.
Current information on availability of service centres in your area can be found on the site
www.bork.ru or using the phone number 8 800 500 88 99.
Page 18

 Loading...