

Page 1
Qu ick Start Guide
Note: To make sure the to ol is running the l ate st av ail able software,
it is adv isa ble t o check for updat es on a frequent basis. Ref er to
Se ction 3 “Regi ster & Updat e” fo r detail s.
1. P repar ati on
2. Ve hicle C onnec tion
Turn the vehicle ig nition on.
Veh icle battery voltage range should be 9-14Volts.
Throttle should be in a closed position.
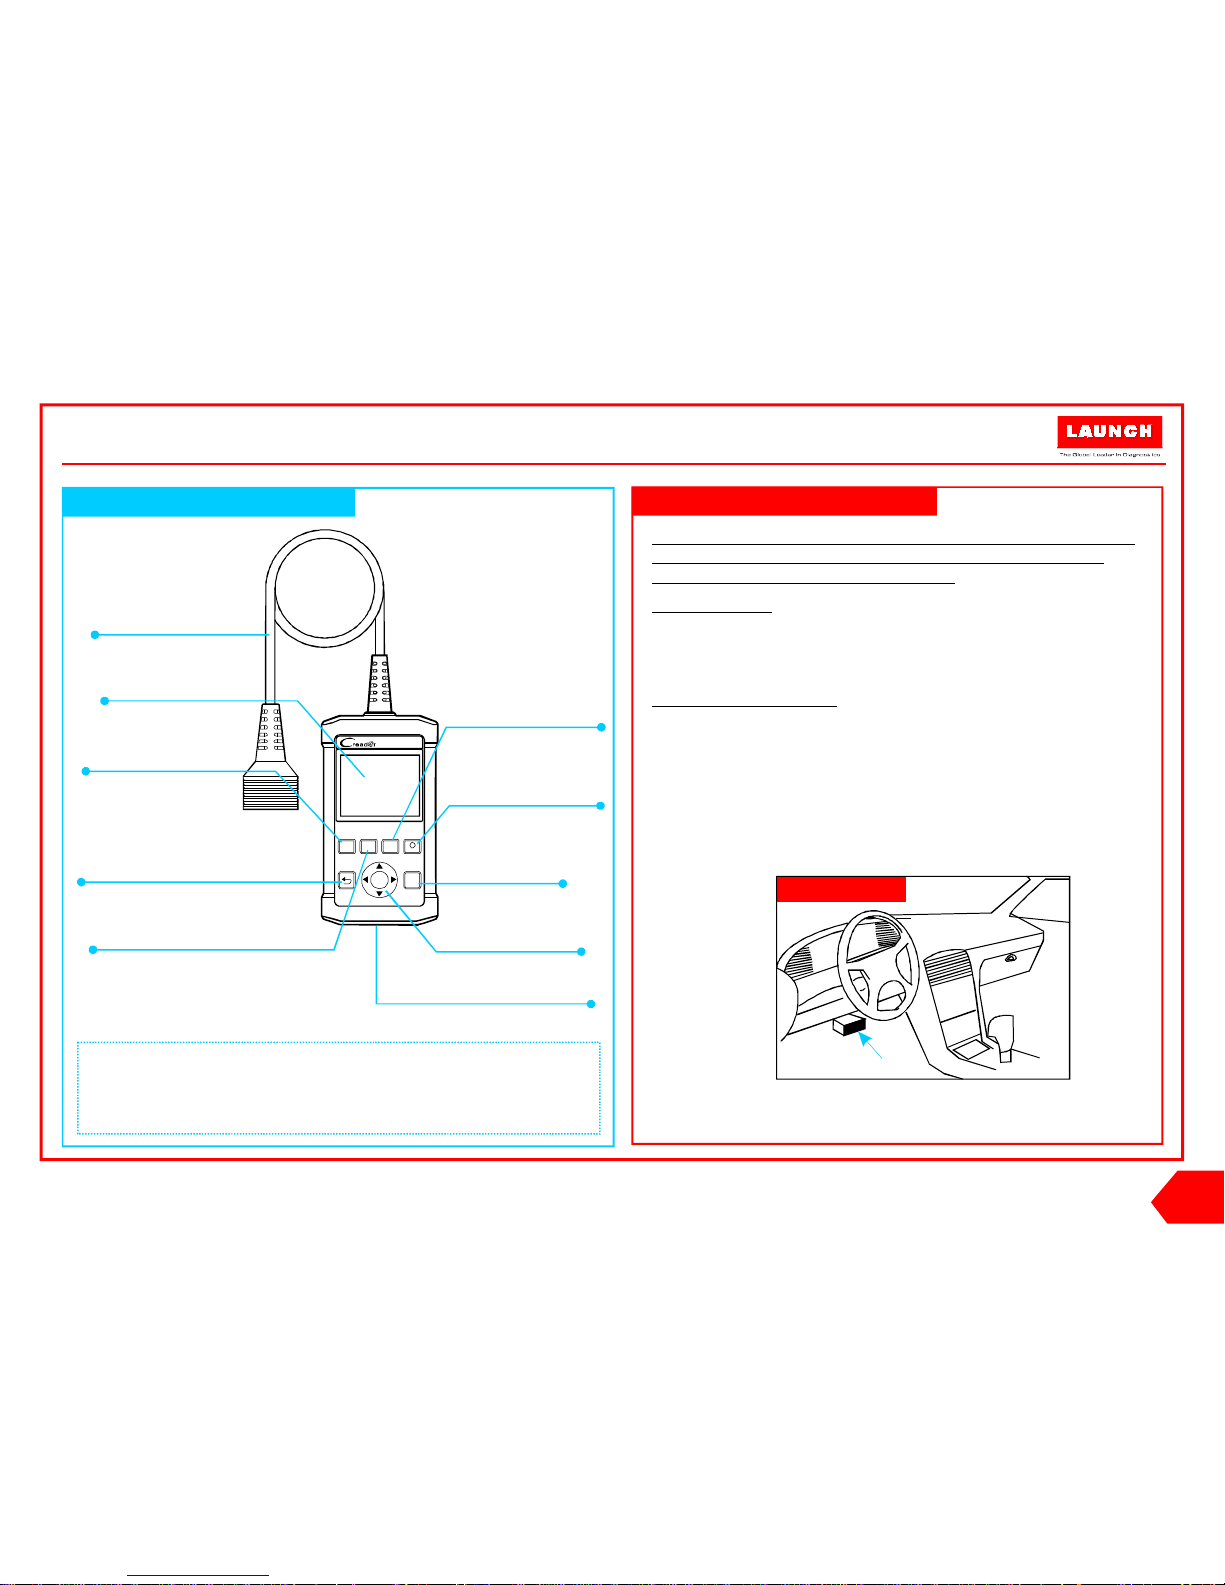
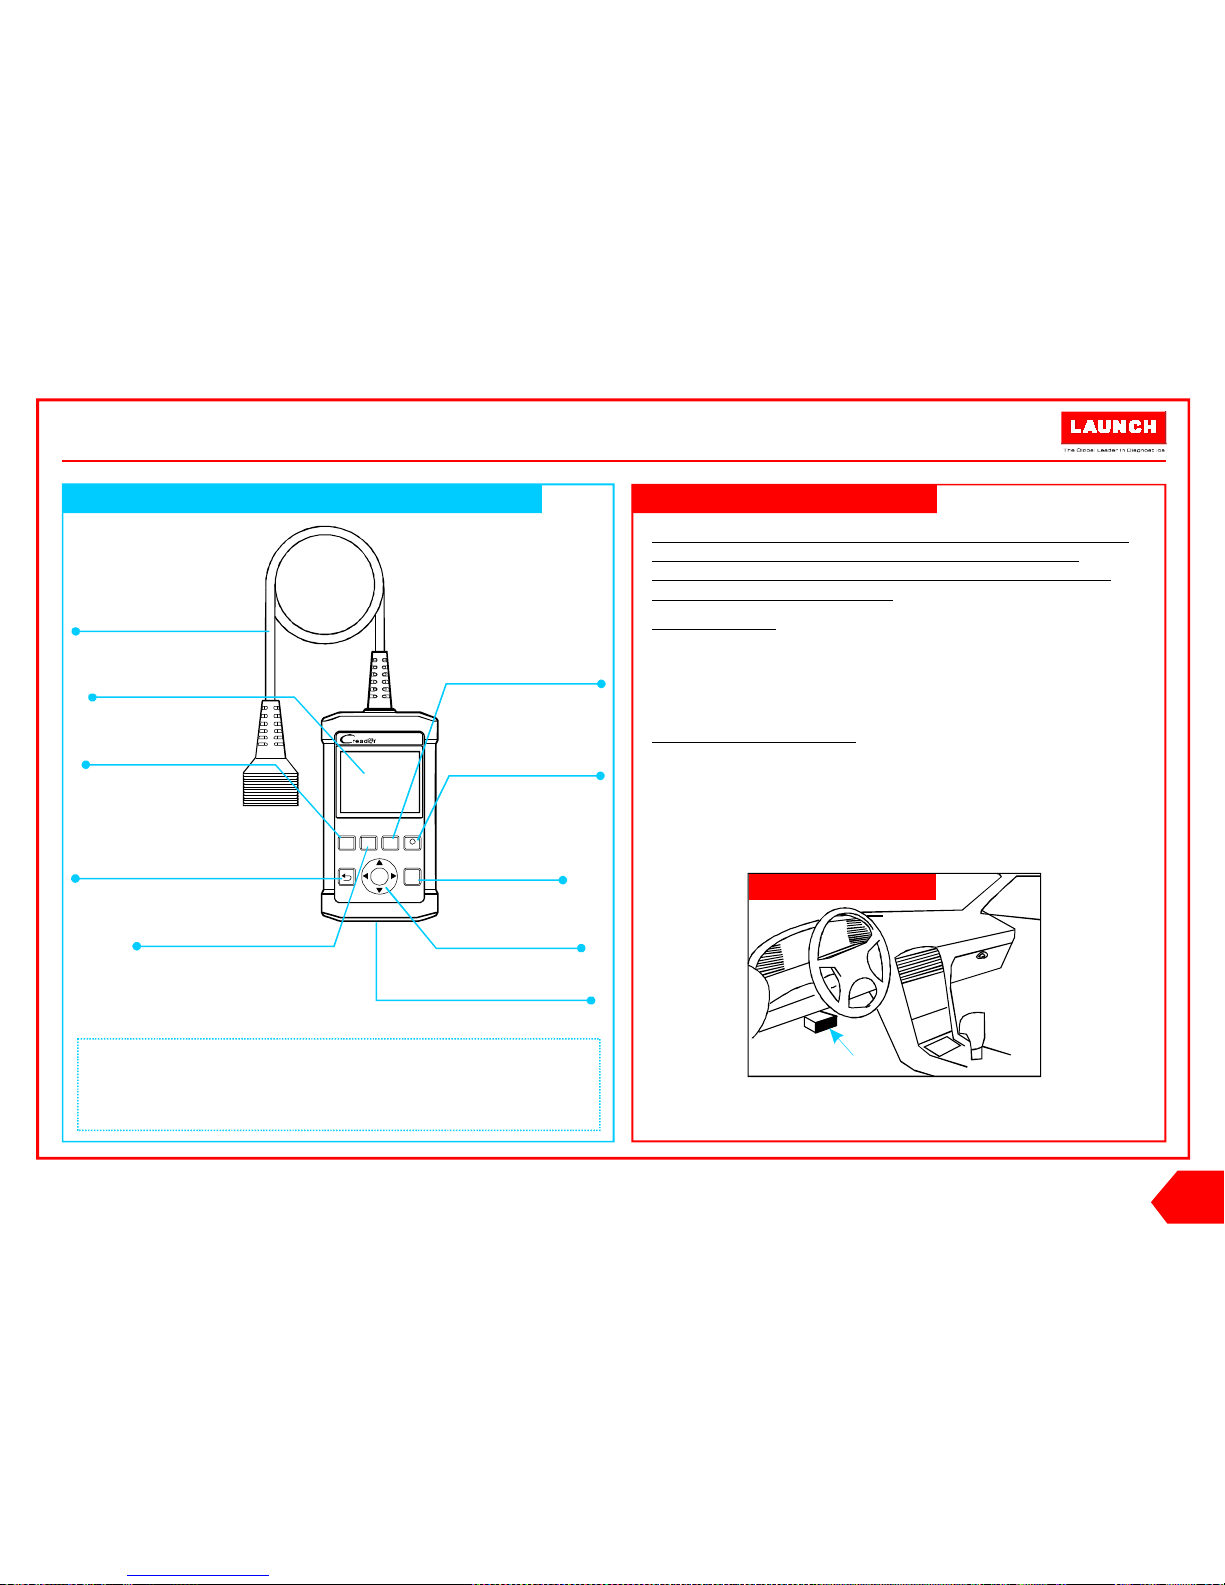
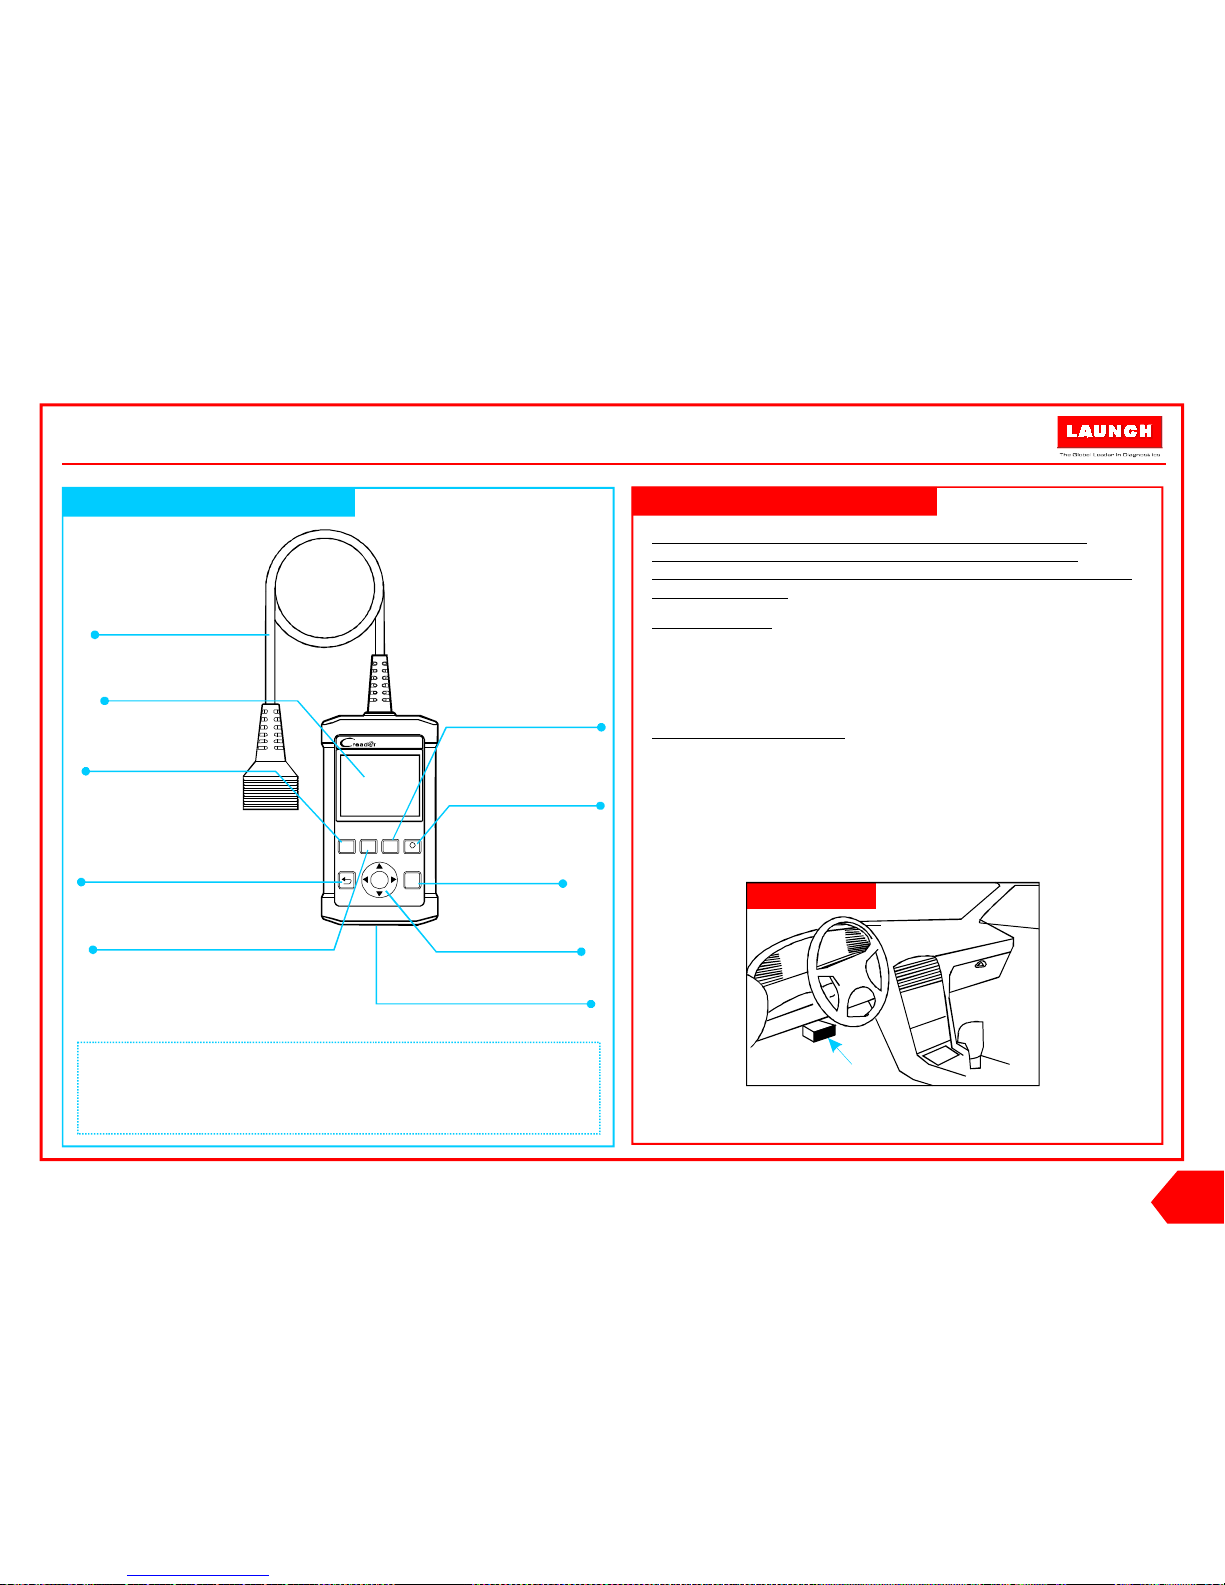
1. L oca te vehicle's DLC socket: The DLC (Diagnostic Link
Co nnector) is typically a standard 16-pin connector where
diagnostic c ode readers in terface with a vehicle's on-board
computer. It is usually located 12 inc hes from the cen ter of
the steering wheel, under or around the driver's side for
most vehicles.
2. Connect the diagnostic cable into the veh icl e's DLC
socket.
If the DLC cannot be found, refer to the vehicle's service
manua l for the location.
Creader 519
1. Preparation & Connections
LA UNCH
DTC
F1 F2 F 3 F4
ER
I/MOK?
DL C Location
Diagnostic Cable
LCD Screen
OK Butt on
USB Port
(To update your tool via USB cab le.)
Creader 519 Handset
Selection Bu tton
ESC Button
(To r eturn to the previous screen.)
DTC Button*
Erase Butto n*
I/M Button*
Help Button*
(To read the di agn ost ic
tr oub le co des .)
(To clear the d iagnostic
tr oub le co des .)
(Quick access to I/M
re adines s fun ction.)
(Provides onl ine t ips
for diagno sti cs. )
Note:
The but tons marked wi th * indic ate the func tio n hot k eys (namel y,
F1 , F2, F 3 and F4) a nd only ap ply to D iagnostic s.
This Quick S tar t Guide is subject to ch ange withou t written no tic e.
EN
Page 2
1~ 4/ 10
I/M Rea diness
Mis fire M onit or
Fue l syst em
com pone nt mon ito r
Cat alys t moni tor
N/A
OK
INC
N/A
DTC
C13 8F 1 13
GM Pen ding
/
The faul t code i s not fo und i n the d atab ase
?
Mo nito r St atus
MIL Statu s
DTC s i n th is E CU
Rea dine ss C ompl eted
D
I
Rea dine ss N ot Comp let ed
Rea dine ss N ot Sup port ed
ata stre am S uppo rted
gnit ion
Pro toco l Type
OFF
108
5
2
3
119
Spa rk
CAN
?
Product S erial Num ber
Dev ice Upg rade
Select Langua ge English
B
LA UNCH
3. Register & Update
2. Basic Operations
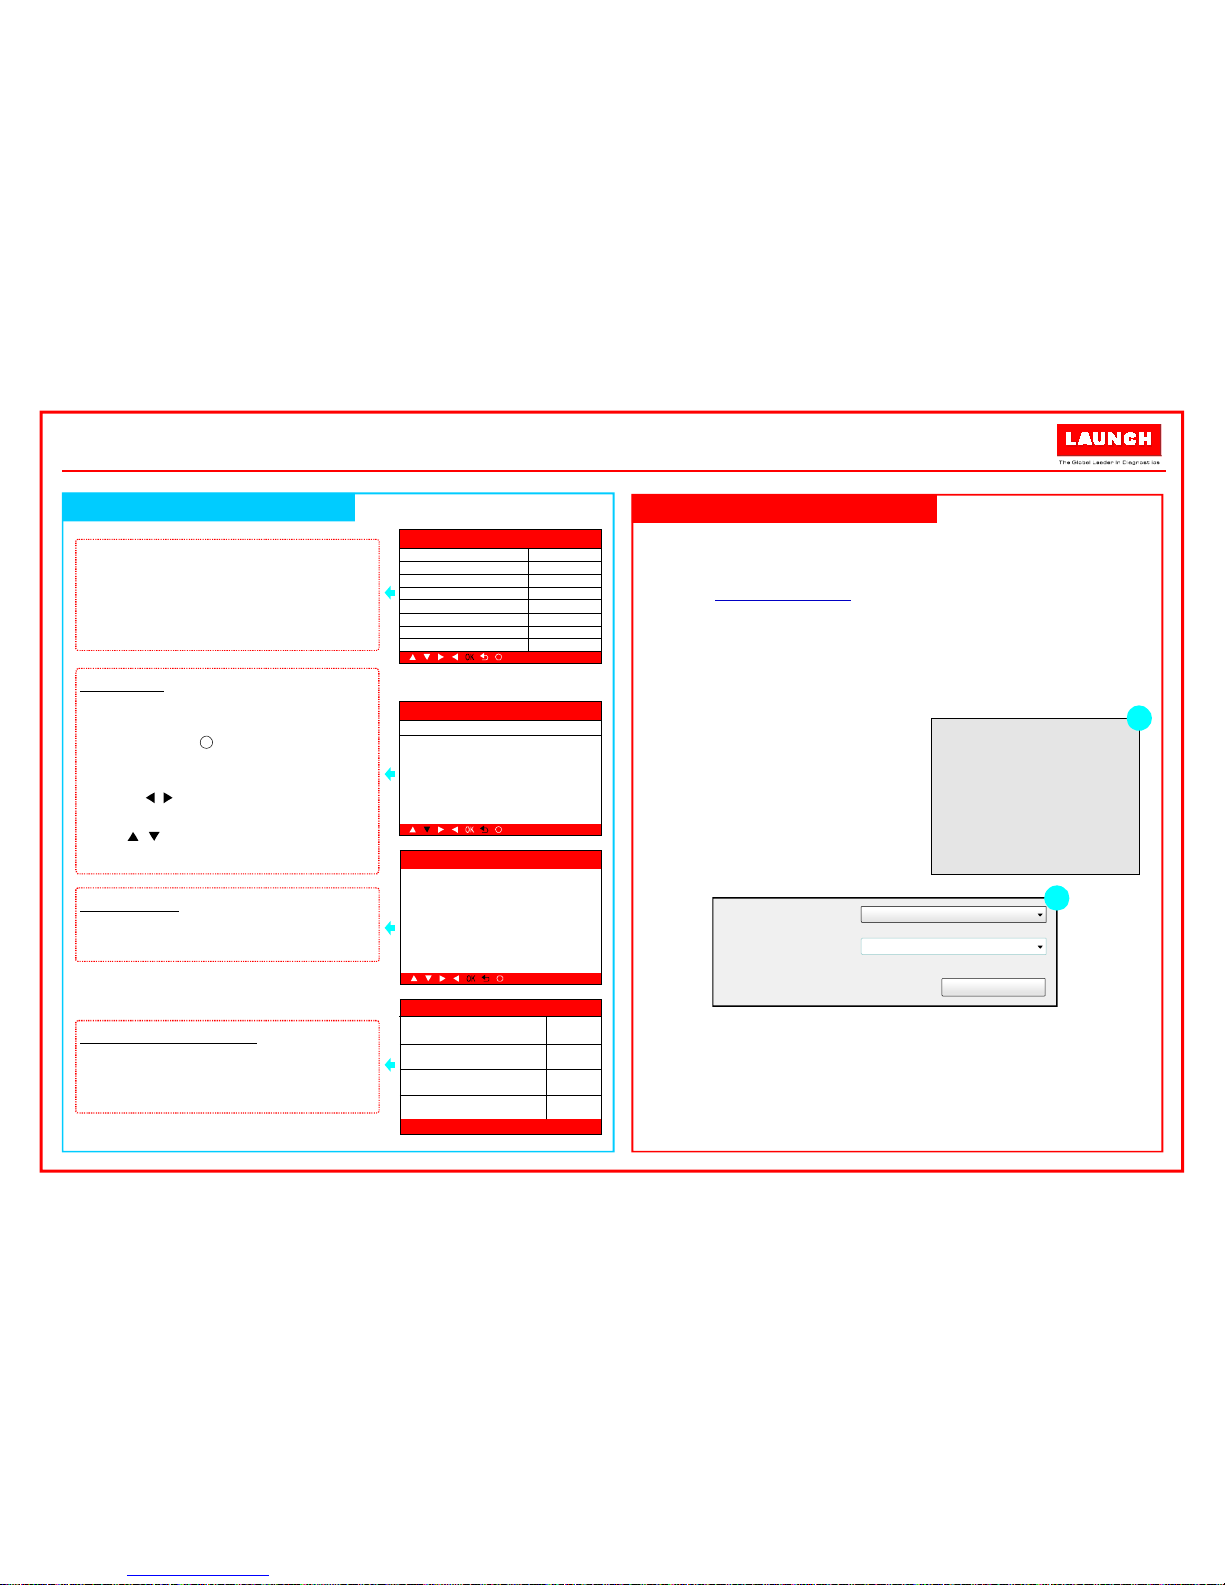
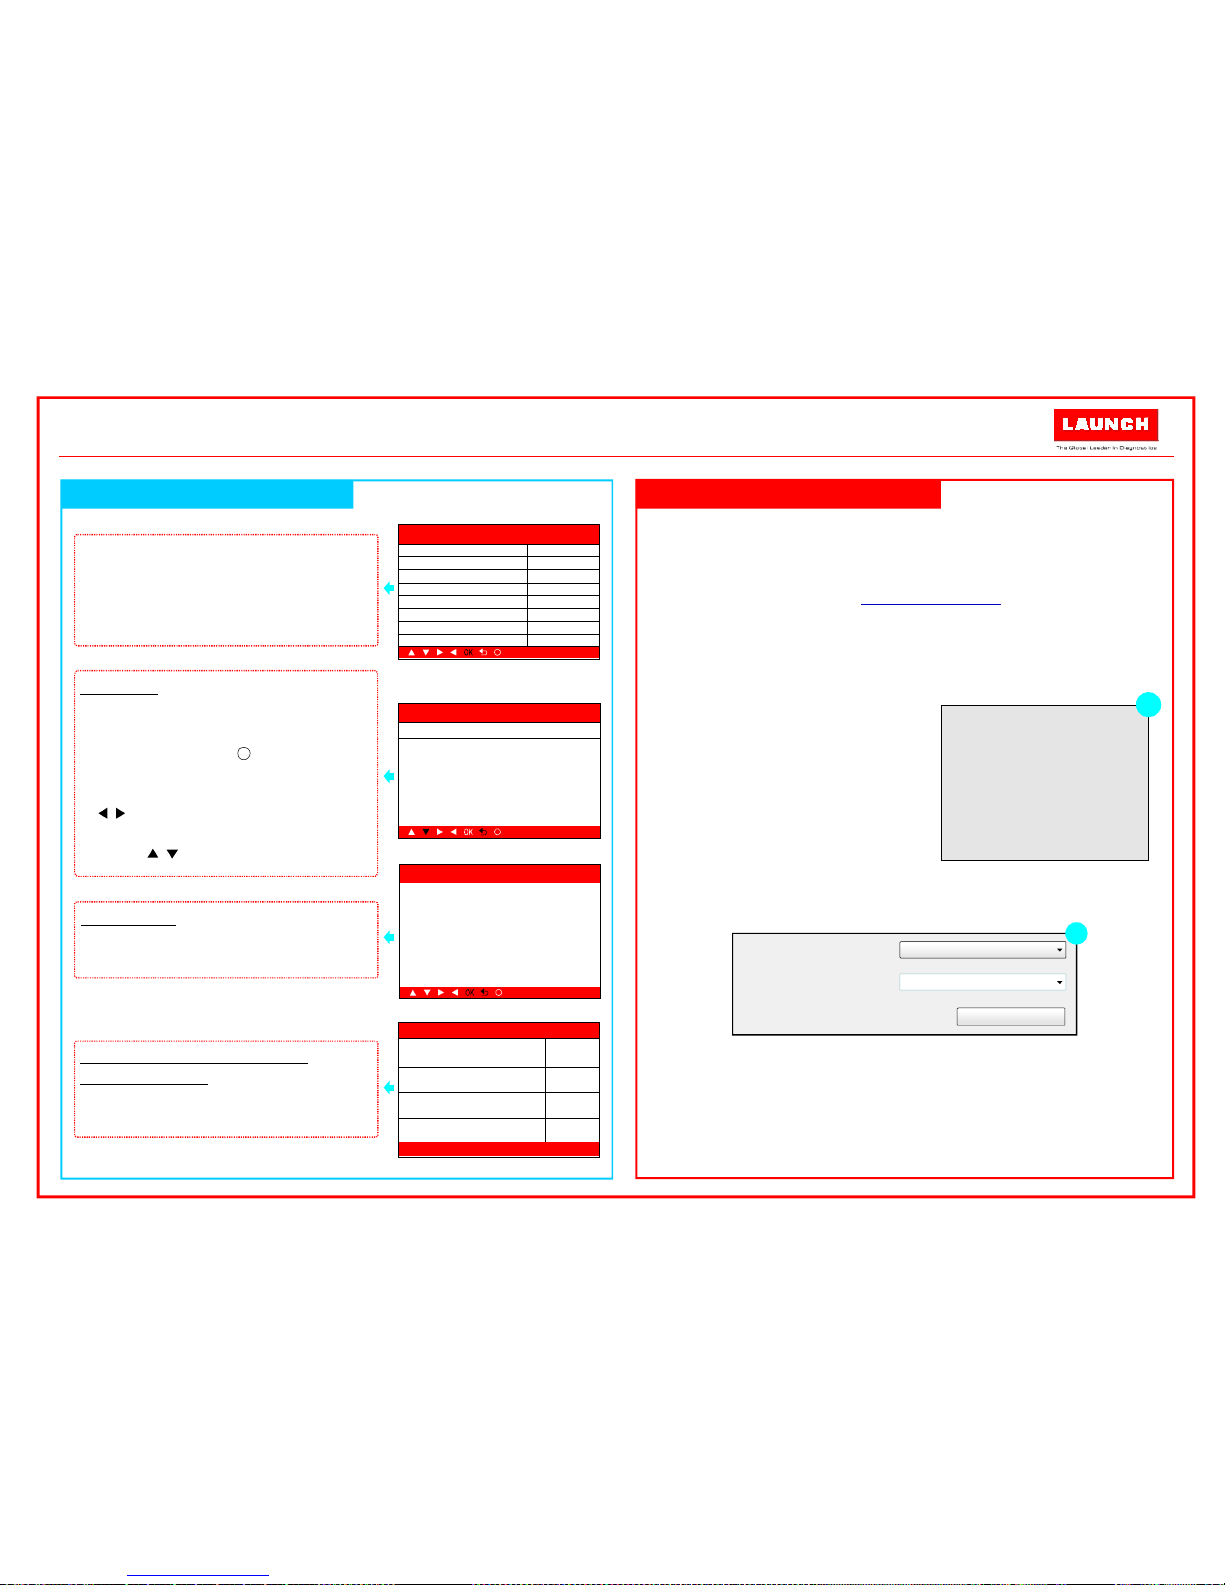
The tool can be updated via USB cable.
1. G o to and dow nload the update tool to the
compu ter.
2. Decompres s and ins tall it on your co mpute r(c ompatible with
Windows XP, Windows 7, Windows 8 & Windows 10).
3. After installation, connect one end of the USB cable to the
USB port of PC, and the other end to the tool.
4. If a newer version is found, a
scree n simil ar to Fig. A will
ap pear.
5. Launch the up date tool on
your PC, Fi g. B will appear.
6. Choose the desired interf ace
la ngu age and then cli ck [Device
Update] to enter update cent er.
7. Choose the softwar e version and th en click [Up date] to start
updat ing.
8. O nce upd ate is complete, a “U pgrad e success” message
box will pop up.
9. The update process i s compl ete, your tool is now ready for
use.
Note: M ake s ure the PC has a n Intern et connection.
www.dbscar.com
Boot Versi on:
V1. 00.0 00
Serial Number:
972 890000029
Reg ister Code:
36F FDB0 54753
1. USB Conn ected for Upgrade .
2. Pr ess [E XIT] key to Ent er
Nor mal Mod e.
A
The icons in black at the bottom of
the screen indicate the available
actions, which can be done by
pressing the corresponding buttons
on the tool.
Press the button to chec k the
I/M(Inspection & Maintenance)
readiness.
F3/I/M
Press the button to retrieve
the DTC.
Press the button to get more
details about the DTC.
If more than one DTC was retrieved,
press / to view different DTCs.
In the case of long code definitions,
use / to view the additional
information.
F1/ DTC
F4/
?
Read DTC
Er ase DTC s
Ch eck I/M R eadiness
Once DTCs have been retrieved,
press the button to erase.F2/ ER
Era se Co des
Cle ar/R eset E miss ion- Rela ted D iagno stic
Inf orma tion . Are yo u sure ?
?
Qu ick Start Guide
Creader 519
Page 3
Nota: P ara aseg urarse de que se equip o est á ejecutando el s oft war e
dispo nible má s reciente, es recomend able com probar si hay
actua liz aci one s frecue ntemen te. Acu da la Sección 3 "Re gistro y
Actua lizaci ón" para m ás detalles.
1. P repar aci ón
2. C onexión de Vehí culo
Dé el contacto en el vehículo.
El ra ngo de voltaje de la batería del vehículo debe estar
entre 9-14V.
El acelerador no debe estar pis ado.
1. L oca lice la toma de diagnosis del veh ículo: El DL C
(Conector de Enlace de Diagnóstic o) es típicamente un
conector estándar d e 16-pin. Está l ocalizad o generalmente
30 centímetros desde el centro del vo lante e n la mayo ría de
vehículos. Si no encuentra la toma, bu squ e en el manual de
servicio del vehículo para su localización.
2. Conecte el cable de diagnós tico en la toma de diagnosis
del vehículo.
1. Preparación & Conexiones
DTC
F1 F2 F 3 F4
ER
I/MOK?
Cable de Diagnóstico
Pa ntalla de LCD
OK
Puerto de USB
Configuración de CReader 519
Selección
ESC
(Para v olv er a la pantalla an ter ior. )
DTC Button*
Borrar*
I/M*
Ayuda*
(To read the di agn ost ic
tr oub le co des .)
(B orrado d e cód igo s.)
(Acce so rá pid o a la
funci ón de
preparac ión d e I/M.)
(Proporcionan
de talladas descripci one s
/c onsejos para el
di agn óstico.)
Notas:
Los botone s mar cad os co n * indic an la s tec las r ápidas de fu nción
(es dec ir, F1, F2, F3 y F4) y sól o se a pli ca al D iag nós tico.
Esta Guía pu ede ser modificada sin previ o avi so.
L AUNCH
ES
Creader 519
Guía de Inicio Rápido
(Para a ctu ali zar s u equipo a
través del c able USB .)
Local izaci ón de DLC
Page 4
1~ 4/ 10
I/M Rea diness
Mis fire M onit or
Fue l syst em
com pone nt mon ito r
Cat alys t moni tor
N/A
OK
INC
N/A
DTC
C13 8F 1 13
GM Pen ding
/
The faul t code i s not fo und i n the d atab ase
?
Mo nito r St atus
MIL St atus
DTC s i n th is E CU
Rea dine ss C ompl eted
D
I
Rea dine ss N ot Comp let ed
Rea dine ss N ot Sup port ed
ata stre am S uppo rted
gnit ion
Pro toco l Type
OFF
108
5
2
3
119
Spa rk
CAN
?
LA UNCH
3. Registro y Actual ización
2. Operaciones Básicas
Podrá conectar su equipo para actualiz arlo con un cable de USB
a un ordenador.
1. Teclee en el navegador y descargue la
herra mie nta de actuali zación para su o rdenador.
2. Descomprima e instálela (compatible con Windows XP,
Windows 7, Windows 8 & Windows 10).
3. Tras la instalación, conecte el cable USB al ordenador y a su
CRead er.
4. Si el sistema detecta una
versi ón más reciente,
ap arecerá una pantalla similar
a la Figura A.
5. Inicie la herramie nta de
actua lizac ión en su ordena dor
(Figura B).
6. Elija el idioma deseado de interfaz y haga clic en
[Actualización de Dispositivo] para ent rar en el centro de
actua lización .
7. Seleccione la versión de software y pulse en [Actualizar] para
inici ar la actualización.
8. Una vez co mpletada , apare cerá una ventana con el mensaje
"Actu alizado" .
9. El proceso de actualización está completado, su equ ipo está
listo para ser u tilizado.
Nota: As egú res e de que el orde nad or tiene conexió n a Internet .
www.db scar.com
Boot Versi on:
V1. 00.0 00
Serial Number:
972 890000029
Reg ister Code:
36F FDB0 54753
1. USB Conn ected for Upgrade .
2. Pr ess [E XIT] key to Ent er
Nor mal Mod e.
A
Los iconos de la parte inferior de la
pantalla indican que las acciones
disponibles, que podrán ser
realiz adas presionando los botones
correspondientes en la herramienta.
Pulse sobre para acceder a
I/M (Inspección & Mantenimiento).
F3/I/M
Presione el botón para leer
los DTCs.
Pulse el botón para más
información acerca de ese DTC .
Si existe más de un DTC, presione
/ para verlos todos.
En el caso de descripciones largas,
utilice / para verlas completas.
F1/DTC
F4/
?
Le er DTC
Bo rrar DT C
Co mprobar la Inspecc ión y
Ma ntenimie nto
Una vez leídos los DTCs, pulse el
botón para borrar.F2/ ER
Era se Co des
Cle ar/R eset E miss ion- Rela ted D iagno stic
Inf orma tion . Are yo u sure ?
?
Creader 519
Guía de Inicio Rápido
Núm ero de s erie del prod ucto
Act ualizació n equ ipo
Selecci onar idioma Spanish
B
Page 5
Guide de démarrage rapi de
Re marque: Pour s'as sur er qu e l'outil fait fonctio nne r les d erniers
logici els d isp oni bles, il e st conseillé d e vérifi er les mises à jo ur
fréquemment. Repor tez-vou s à la section 3 «S 'in scr ire & M ettre à jo ur»
pour plus de détails.
1. P répar ati on
2. C onnex ion véhicu le
Mettez le contact du véhicule.
Plage de tensio n de la batter ie du véhicule doit être comprise
entre 9-14Volts.
Le Papillon doi t être dans une position fermée.
Localisez la prise DLC du véhicule : Le DLC e st typiquement un
connecteur 16 broches standard où interface de lecteurs de
code de diagnostic ave c un or dinateur de bord. Il est
gé néralement situé à 12 pouces soit 30 cms du centre du
volant, sous ou autour du côt é conducteur pour la plupart des
véhicules. Si le DLC ne peut pas être trouv é, ré férez-vous au
manue l d'entretien du véh icule pour situer l'emplacement.
Branchez le câbl e de diagnostic sur la prise DLC du véhicule
1.
2. .
Creader 519
1. Préparation & Connexions
LA UNCH
DTC
F1 F2 F 3 F4
ER
I/MOK?
Empl ace me nt DLC
Câble de diagnosti c
Écran LC D
Bouton OK
Port USB
( .) Pour mett re à jour vo tre ou til v ia un câble USB
Creader 519 C ombiné
Bouton Sélec tion
Bouton ESC
( .)Pour revenir à l'écr an précédent
Bo uton DT C*
Bouton d'effacement*
Bouton I/M*
Bouton d'aid e*
(Pour l ire l es codes
défauts de d iag nos tic .)
(Pour effacer les co des
défauts de d iag nos tic .)
(A ccès rapide à la f onc tion
de prépara tio n I/M.)
(Fournit des de script ions dét ai llées/
conseils pour les di agnost ics.)
Remarque:
Les bou ton s marqués av ec * in diq uen t les touches de racco urc i (à
savoi r, F1, F2, F3 et F4 ) s'appliqu ent un iquement aux Diagnost ics .
Ce g uide de démarrage rapid e est s uje t à changement sa ns av is éc rit .
FR
Page 6

1~ 4/ 10
I/M Rea diness
Mis fire M onit or
Fue l syst em
com pone nt mon ito r
Cat alys t moni tor
N/A
OK
INC
N/A
DTC
C13 8F 1 13
GM Pen ding
/
The faul t code i s not fo und i n the d atab ase
?
Mo nito r St atus
MIL St atus
DTC s i n th is E CU
Rea dine ss C ompl eted
D
I
Rea dine ss N ot Comp let ed
Rea dine ss N ot Sup port ed
ata stre am S uppo rted
gnit ion
Pro toco l Type
OFF
108
5
2
3
119
Spa rk
CAN
?
LA UNCH
3. S'inscrire&Mettre à jour
2. Opérations de base
L'out il peut être mis à jo ur via un c âble US B.
1. Allez à www.dbscar.com et téléchargez l'outil de mi se à jour
sur l'o rdinateur.
2. Décompres sez et installez-lui sur v otre ordinateur
(compatible avec Windo ws XP, Windo ws 8 & Windows 10) .
3. Ap rès l'inst allation, conne ctez une extrémit é du câble USB
au port USB du PC et l'autr e extrémité à l' outil.
4. Si une version plus récente es t trouvée,
un écran semblable à Fig. A s'affichera.
5. Lancez l'outil de mise à jour sur votr e
ordinateur, Fig. B apparaîtra..
6. Choisissez la langue de l'i nterface
souhaitée et puis cli quez su r [Mise à jour du dispositif] pour
entrer dans le ce ntre de m ise à jour.
7. Choisissez la version du lo giciel, puis cliquez sur [Mise à
jour] p our lancer la mise à jour.
8. Une fois que la mis e à jour es t termi née, une boîte de
message « Succès d e mise à niveau» s'affichera.
9. Le processus de mise à jour est termin é; votre outil e st
maintenant prêt à l'emploi.
Remarque: Assurez- vou s que le PC dispose d'un e connexion
Internet.
B
A
Les icônes en noir au bas de l'écran
indiquent les actions disponibles, ce
qui peuvent être faites en appuyant
sur les touches correspondantes sur
l'outil.
Appuyez sur la touche F3/I/Mpour
vérifier la préparationI/M(Inspection
& Maintenance).
Appuyez sur la touche F1/DTC pour
récupérer le DTC.
Appuyez sur la touche F4/ pour
obtenir plus d'informations sur le
DTC.
Si plus d'un DTC a été extrait,
appuyez sur le / pour afficher
DTCs différents.
Dans le cas des définitions de code
long, utilisez / pour voir les
informations complémentaires.
?
Lire DTC
Ef fac er DTC
Vérif ication de Préparation I/M
Une fois que DTCs ont été récupérés,
appuyez sur la touche F2/ER pour
effacer.
Era se Co des
Cle ar/R eset E miss ion- Rela ted D iagno stic
Inf orma tion . Are yo u sure ?
?
Guide de démarrage rapi de
Creader 519
Boot Versi on:
V1. 00.0 00
Serial Number:
972 890000029
Reg ister Code:
36F FDB0 54753
Product S erial Num ber
Dev ice Upg rade
Select Langua ge Fren ch
Page 7

Schnell startan leitung
Hinweis: Um sicherzust ellen, d ass das Werk zeug die aktuellste
ve rfügbare Sof tware au sführt , emp fieh lt es sich , reg elm äßi g nach
Updates zu suchen. Fü r wei ter e Inf orm ationen find en Si e in Abschn itt 3
"R egistriere n & Ak tua lisiere n".
1. Vo rbereitu ng
2. F ahrzeuganschl uss
Die Fahrzeugzündung einschalten.
De r Batteriespannungsbereic h der Batterie soll 9- 14 Volt
betragen.
Die Drosselklappe so ll si ch in einer geschlossenen Stellung
befinden
DLC-Steckpl atz des Fahr zeugs finden: Der DL C (Di agnostic
Link Connector) ist typis cherweise ein 16-poli ger
Standardstecker, bei dem Diagnosecodeleser mit dem
Bordrechner eines Fa hrzeug s verbunden ist . Es ist in der Re gel
12 Zoll s von der Mitte des Lenkrads, unter oder um die
Fahrerse ite für die meisten Fa hrzeuge. Wenn das DLC nicht
ge funden werden kann, nachschlagen Sie in der
Bedie nun gsanleitung des Fahrzeugs.
Schli eßen Sie das Diagnosekabel an die DLC -Buchse des
Fahrzeug s an
.
1.
2.
.
Creader 519
1. Vorbereitung & Anschlüsse
LA UNCH
DTC
F1 F2 F 3 F4
ER
I/MOK?
DL C Locatio n
Diagnoseleitu ng
LCD Bildschirm
OK-Taste
USB-Anschluss
Creader 519 Hörer
Auswahltaste
ESC-Tast e
(.)Um z um vorherigen
Bildschirm zu rückzu keh ren
DTC-Taste*
Lös chtaste*
I/M-Tas te*
Hilfe -Taste*
(Z um Lesen des
Di agn osefeh ler cod es. )
(Z um Lösch en des Fe hle rco des .)
(Schnellzugriff auf
I/M-B ere itscha fts funktion. )
(Bi etet de tailli erte Beschr eib ungen /
Tip ps für die Diagnose.)
Hi nweis:
Di e Tasten * kennzeichnen die Fu nkt ion Hot Key (nämlich F 1, F2, F3
un d F4) und gelten nur für die Di agn ose .
Di e Sch nellst art anl eit ung kann ohne sch rif tli che Ankündigung
ge änd ert werden.
DE
Page 8

1~ 4/ 10
I/M Rea diness
Mis fire M onit or
Fue l syst em
com pone nt mon ito r
Cat alys t moni tor
N/A
OK
INC
N/A
DTC
C13 8F 1 13
GM Pen ding
/
The faul t code i s not fo und i n the d atab ase
?
Mo nito r St atus
MIL St atus
DTC s i n th is E CU
Rea dine ss C ompl eted
D
I
Rea dine ss N ot Comp let ed
Rea dine ss N ot Sup port ed
ata stre am S uppo rted
gnit ion
Pro toco l Type
OFF
108
5
2
3
119
Spa rk
CAN
?
Product S erial Num ber
Dev ice Upg rade
Select Langua ge Germ an
B
LA UNCH
3. Registrieren & Aktualisieren
2. Grundfunktionen
Das Gerät ist über USB-Kabel aktualisierbar.
1. Au f www.dbscar.com gehen und das Update-Tool auf PC
laden.
2. Das Tool auf PC dekom primiere n und installieren
(kompatibel mit Windows XP, Windows 8 & Windows 10).
3. Nach Installation ein Ende des USB-Kabels an den USBAnschluss des PCs und das andere Ende ans Gerät
ansch ließen.
4. Bei einer neueren Version erschei nt
ei ne Anzei ge gleich wie Abb. A.
5. Das Update-Tool auf Ihrem PC
starten, Abb. B erscheint.
6. Die gewünschte Spr ache der
Be nutzeroberfläche auswäh len
un d anschlie ßend auf [Gerät aktua lis ieren] zum Gelangen
in Update-Ce nter klicken.
7. Die Softwarevers ion auswählen und anschl ießend auf
[Aktualisiere n] zum St art der Aktualisierung klicken.
8. Beim Abschlus s der Aktua lisierung ersch eint ein
Nachr ichtenfe ld "Aktualisierung erf olgreich".
9. Der Aktualisierun gsvorgan g endet, Ihr Gerät ist jetzt bereit
für den Einsatz.
Hi nweis: S ich erstellen, dass PC a ns In ter net angeschlossen ist .
Boot Versi on:
V1. 00.0 00
Serial Number:
972 890000029
Reg ister Code:
36F FDB0 54753
1. USB Conn ected for
Upg rade.
A
Die schwarzen Symbole am unteren
Bildsc hirmende zeigen die
verfügbaren Handlungen an, die
durch Drücken der entsprechenden
Tasten am Gerät durchgeführt
werden können.
Taste F3/I/M zur Prüfung der I/M
(Prüfung & Wartung) Bereitschaft
drücken.
Taste F1/DTC zum Empfang des
DTCs drüc ken.
Taste F4/ zum Erfahren von mehr
Details über DTC drücken.
Beim Empfang von mehreren DTCs
/ zur Überprüfung der
verschiedenen DTCs drücken.
Für lange Codedefinitionen / zur
Überprüfung der zusätzlichen
Informationen benutzen.
DT C lesen
DT C lösch en
I/M Bereitsc haft pr üfen
Nach Empfang der DTCs die Taste
F2/FR zum Löschen drücken.
Era se Co des
Cle ar/R eset E miss ion- Rela ted D iagno stic
Inf orma tion . Are yo u sure ?
?
Schnell startan leitung
Creader 519
?
Page 9

Краткое руководство пользователя
Примечание Убед итесь чт о у вас установлена по сле дня я версия
пр огр амм ного обе спе чен ия Рекомен дуе м Вам проверить
наличие об новлений программно го обесп ечения Д ля
дополнитель ной информаци и обрати тесь к ра зде лу 3
'Ре гистраци я и обн овл ение
: ,
.
.
'.
1.
2.
Подготовка к работ е
Подкл ючение к автомобил ю
Включите зажига ние автомобил я
Но рмальное напряжение ак кумулятора автом обиля
должно быть от до В
Дросс ельная заслонка двигателя должна быть закрыта
Найдите диагностическое гнездо Разъём для
пе редачи диагно стически х данных зач астую
пр едставляет собой станд артный контактный
разъем На большинстве автомобилей об ычно
установлен в дю ймах от центральной части
пр иборной панел и в водительской зоне
Если не обнаружен обратитесь к Ин струкции по
ремонту автомобиля чтобы найти его местоположение
Подключи те один конец диагностич еского кабеля к
диагностическому разъему
.
9 14 .
.
1. : DLC (
)
16-
. DLC
12
.
DL C ,
, .
2.
DLC.
Creader 519
1. Подготовка и подключение
LA UNCH
DTC
F1 F2 F 3 F4
ER
I/MOK?
Ра спол ожен ие DL C
Диагностический к абель
LCD дисплей
Кнопк а OK
Порт USB
Creader 519 Серия
Кнопка вы бора
Кнопка ES C
( .)Дл я воз врата к преды дущему эк ран у
Кнопка DTC*
Кнопка Удалить ' '*
Кнопка I/M*
Кнопка Помощь « »*
(
.)
Чтобы сч итать код ы
неисправ ностей
(
. )
Чтобы оч ист ить диагностические
коды н еисправно стей
(
I/M.)
Бы стр ый доступ к
фун кци и готовност и
(
,
.)
Если у Вас возникли какие ли бо
воп росы для диагн остики
вам поможет кнопка
Кнопк и от меченные о знач ают ф ункцио нальные клавиши То
ес ть кн опки и они тол ько ис пользу ются для
диагностики
Информация с одержащаяся в данно м руко водстве
пользователя может быть изменена без пр едварительно го
ув едом лен ия
, * (
F1, F2, F3 F4),
.
,
,
.
RU
Page 10

1~ 4/ 10
I/M Rea diness
Mis fire M onit or
Fue l syst em
com pone nt mon ito r
Cat alys t moni tor
N/A
OK
INC
N/A
DTC
C13 8F 1 13
GM Pen ding
/
The faul t code i s not fo und i n the d atab ase
?
Mo nito r St atus
MIL St atus
DTC s i n th is E CU
Rea dine ss C ompl eted
D
I
Rea dine ss N ot Comp let ed
Rea dine ss N ot Sup port ed
ata stre am S uppo rted
gnit ion
Pro toco l Type
OFF
108
5
2
3
119
Spa rk
CAN
?
B
LA UNCH
3. Регистрация и обновление
2. Основные операции
Product S erial Num ber
Dev ice Upg rade
Select Langua ge Russ ian
A
Вы можете обновить свой прибор с помощью USB-кабеля
Посетите и нтернет сайт и загрузите
средство обновления на компьютер
Рас пакуй те и установите его на свой компьютер Режим
совместимости с и
После установки подключите один к онец кабеля к
устройству а другой к компьютеру
Если новая версия найдена на
экране появится окно как рисун ок
Запустите средство о бновлени я на
экране появится окно показанное на
рисунке B
Выберите нужн ый язык и нтерфейса в
списк е и на жмите Обновление устройств
чтобы перейти в центр обновления
Выберите ве рсию пр ограм много обеспечени я а затем
нажми те Обнов ить чтобы начать обновление
После заверш ения пр оцесса обновления появитс я
всплы ваю щее окно Обновление выполнено успешно
Процесс обновления завершен данное устро йство может
использоваться
.
.
1. - www.dbscar.c om
.
2. (
Windows XP, Windows 8 Windows 10) .
3. USB
, - .
4. ,
, A.
5. ,
,
.
6.
[ ],
.
7. ,
[ ], .
8. ,
' '.
9. ,
.
Примечание Убед итесь чт о компьют ер подкл ючен к Ин тер нет у: ,
Чёрные значки в нижней части
экрана обозначают операции
которые вы можете выполнить
нажмите соответствующие кнопки
на устройстве чтобы осуществить
эти функции
,
,
,
.
Нажмите кнопку чтобы
проверить готовность осмотр и
техобслуживание
F3/I/M,
I/M (
).
F1/DTC,
.
F4/ ,
DTC.
.
, / ,
.
Нажмите кнопку чтобы
извлечь коды неисправностей
Нажмите кнопку чтобы
получить более подробную
информацию о
Если несколько кодов неиспр
были извлечены нажмите
чтобы просмотреть различные
коды неисправностей
Считы вание кодов неи справ ностей
Уда лен ие кодов ошибок
Пр ове рка гото вности I/M
Если коды неисправностей
извлечены нажмите кнопку F2/ER,
чтобы удалить
,
.
Era se Co des
Cle ar/R eset E miss ion- Rela ted D iagno stic
Inf orma tion . Are yo u sure ?
?
Краткое руководство пользователя
Creader 519
Boot Versi on:
V1. 00.0 00
Serial Number:
972 890000029
Reg ister Code:
36F FDB0 54753
1. USB Conn ected for
?
Page 11

取扱説明書
注意:デバ イス が最新 のソ フトウ ェア を利 用する ため 、頻繁 に更 新を
チェッ クす るこ と をお 勧め します 。詳 しく は セク ション 「 登録&ア ッ
プデー ト」 を参 照 して くだ さい。
イ グニ ッシ ョンを に しま す 。
車 両バ ッテ リーの 電圧 範囲 は - で す。
スロッ トル が閉位 置で す。
車両 ソケ ット の位置 を見つ けま す: (診 断リン クコ ネク
タ)は 通常 、標準 的な ピ ンコネ クタ です。 それ は診 断デバ イス が
車載コ ンピ ュータ ーと 整合 させる コネク タで す。 ほとん どの 車両
では、 が ステ ア リン グホイ ール の中 央から イ ンチ の位置 にあ
ります 。
を見つ けな い場合 、車 両の サービ スマニ ュア ルを 参照し てく だ
さい。
診断ケ ーブ ルの 一 方の 端を 車両 ソケ ットに 接続 しま す 。
3
O N
9 1 4V
D LC D LC
1 6
DL C 12
DLC
D LC
12..準 備
車 両接 続
1.
2.
Creader 519
1. 準 備 接続&
LA UNCH
DTC
F1 F2 F 3 F4
ER
I/MOK?
診断ケ ーブ ル
LC D スク リーン
OK ボ タン
USB ポート
ケーブ ルを 通じ て デバ イス
をアッ プデ ート す る
(USB )
Creader 519 端末
選択ボ タン
ESC ボタン
前の画 面
に戻り
( )
DTC *ボ タン
消去ボタン*
I M */ ボ タン
ヘ ルプ ボタ ン*
(D TC )読取用
(D TC )消去用
(I M
)
/ レ ディ ネス機 能
にアク セス する
(
)
詳 細説 明 診断ヒ ン
ト を提 供す る
/
注意
付きボ タン は機能 ホット キー (すな わち )を 指し 、
診断し か使 いませ ん。
この取 扱説 明書は 予告な しに 変更 す る場 合が ご ざい ます 。
:
「*」 、 、 、F1 F2 F3 F4
JP
DLC 位置
Page 12

1~ 4/ 10
I/M Rea diness
Mis fire M onit or
Fue l syst em
com pone nt mon ito r
Cat alys t moni tor
N/A
OK
INC
N/A
DTC
C13 8F 1 13
GM Pen ding
/
The faul t code i s not fo und i n the d atab ase
?
Mo nito r St atus
MIL St atus
DTC s i n th is E CU
Rea dine ss C ompl eted
D
I
Rea dine ss N ot Comp let ed
Rea dine ss N ot Sup port ed
ata stre am S uppo rted
gnit ion
Pro toco l Type
OFF
108
5
2
3
119
Spa rk
CAN
?
Product S erial Num ber
Dev ice Upg rade
Select Langua ge Japanese
B
LA UNCH
3.登 録&アップ デート
2. 基本操作
USB
Windows X P
Window s 7 Windows 8 Windo ws 10
USB
A
B
ケーブ ルを 通じて デバ イス をアッ プデー トす るこ とはで きま す。
注意:コン ピュ ーター がイ ンター ネッ トに 接続さ れて いるこ とを 確認
してく ださ い。
にアク セス しコン ピュ ータ ーにア ップデ ート ツー
ルをダ ウン ロー ドしま す。
.解 凍し てコ ンピュ ータ にイン スト ール します ( 、
、 & 対応) 。
.イ ンス トー ルした 後、 ケ ーブ ルの一 方の 端を コンピ ュー ターに
接続し 、も う一 方の端 をデ バイス に接 続し ます。
.新 しい バー ジョン が見 つかっ た場 合、
画 像 の ような 画面 が表 示され ます 。
.コ ンピ ュー ター で アッ プデー トツ ー
ル を作 動さ せ、画 像 の よう な画面
が 表示 され ます。
.希 望の イン ターフ ェー ス言語 を選 択
し 、「 デバ イスア ップ デート 」を ク
リ ック しア ップデ ート センタ ーに 入
り ます 。
.ソ フト ウェ アバ ー ジョ ンを選 択し 、「 アップ デー ト」を クリ ック し
アップ デー トを 開 始し ます 。
.ア ップ デー トが完 了し た際に 、「 アッ プグレ ート に成功 」と いう
メッセ ージ がポ ッ プア ップ されま す。
.そ れか らア ップデ ート プロセ スが 完了 し、デ バイ スが使 用可 能に な
ります 。
1.
2
3
4
5
6
7
8
9
www dbsca r com. .
Boot Versi on:
V1. 00.0 00
Serial Number:
972 890000029
Reg ister Code:
36F FDB0 54753
1. USB Conn ected for Upgrade .
2. Pr ess [E XIT] key to Ent er
Nor mal Mod e.
A
画面の 底部 の黒 い アイ コン は利用 可能 な
操作を 指し 、こ れ らの 操作 はデバ イス 上
の対応 する ボタ ン を押 して 完了す るこ と
ができ ます 。
F3 I M I M/ / ボタ ンを押 し / (点検&メ イン テ
ナンス )レ ディ ネ スを チェ ックし ます 。
/ ボタ ンを押 し、 を検 索しま
す。
/ ボ タン を押し 、 につ いても っ
と詳細 な情 報を 取得し ます 。
一 つ以 上の が検 索され た場 合、 「
/ を押 し異 な る をチ ェ ック しま
す。
コード 定義 が長 い場合 、 / を押し 追
加情報 をチ ェッ クしま す。
F1 D TC DT C
F4 DT C
D TC
DT C
」
?
DT C 読取り
DT C 消去
I M / レ ディ ネスチ ェッ ク
DT C F2 E Rが検出 され た際 に、 / ボ タン を押
し消去 しま す。
Era se Co des
Cle ar/R eset E miss ion- Rela ted D iagno stic
Inf orma tion . Are yo u sure ?
?
取扱説明書
Creader 519
Page 13

Guia de Início Rápido
Nota: P ara se cer tificar de que o so ftw are mais recente dis pon ível é
utilizado, é re com entado a buscar a tua liz açõ es co m freqü ência.
Consu lte a Seção 3 " Inscri ção e Atu alização" para obter detalhes .
1. P repar açã o
2. C onexão do Ve ícu lo
Ligue a ign ição do veículo.
A faixa de ten são da bateria do veículo deve ser de 9-14Volts.
O acelerador deve estar em posição fe chada.
1. L oca lize o tomada de DLC do veículo: Nos maiora dos
casos, o DLC (Cone ctor de Diagnóstico) é um conector
standard de 16 pinos onde os leitores de código de
diagnóstico interagem com o computador de bordo no
veículo. O DLC é geralmente localizado a 12 po legad as do
centro do volante, so b ou ao redor d o lado do motorista
para a maioria dos v eículos.
Se o DLC não for encon trado, consulte o manual de serviço do
veículo para a locali zação.
2. L igue o cabo de dia gnóstico à tomada do DLC do veíc ulo.
Creader 519
1. Preparação e Conexão
LA UNCH
DTC
F1 F2 F 3 F4
ER
I/MOK?
Cabo de diagnóstico
Ecrã LCD
Bo tão OK
Porta USB
(Para atual iza r sua fe rra menta vi a cabo US B.)
Creader 519 Aparelho
Botão Seleçã o
Botão ESC
(Para r eto rna r à página anteriora .)
Botão DTC *
Botão Apagar *
Botão I/M *
Botão Ajuda *
(Pa ra ler os c ódigos d e
probl emas
de d iagnós tic o.)
(Para limp ar os códigos de
pr obl ema s de diagnóstico.)
(A cesso rápid o à função
de p rep aração d e I / M)
(Forn ece desc riç ões/
dicas d eta lhadas para
di agn óst icos.)
Nota:
Os botõ es marcados com * indi cam as tec las de atalho da função (ou
seja, F1, F2, F3 e F4) e só se apl icam aos Diagnósti cos.
Este Guia de Início Ráp ido e stá sujei to a al terações sem aviso prévio
po r esc rito.
PU
Lo ca lizaçãode DL C
Page 14

A ferram enta pode ser atualizada via c abo USB.
1. Vá para www.dbscar.com e faça o download da ferramenta
de atualização para o computador.
2. Descompacte e inst ale-o n o seu com putador (compat ível
com Windows XP, Windows 7, Windo ws 8 e Windows 10).
3. Ap ós a instalação, co necte uma extremidade do cabo USB
à porta USB do PC e a outra extre midade à ferramenta.
4. Se for encontrada uma versão mais recente, uma pág ina
semelhante à Fig. A aparecerá.
5. Inicie a ferramenta de atua lização
no s eu PC, Fig. B aparecerá.
6. Escolha o idioma de interface
de sejado e clique em
[Actualização da Fe rramenta ]
pa ra entrar no cen tro de atualização.
7. Escolha a versão do software e clique em [Actualização]
para iniciar a atualização.
8. Q uan do a atualização esti ver concluída, um a caixa de
mensagem "Actualização Feita " será exibida na ecrã.
9. O processo de actualização está completo. Sua ferramenta
está pronta pa ra uso.
Nota: C ert ifi que -se d e que o PC te m uma ligação à Int ernet.
1~ 4/ 10
I/M Rea diness
Mis fire M onit or
Fue l syst em
com pone nt mon ito r
Cat alys t moni tor
N/A
OK
INC
N/A
DTC
C13 8F 1 13
GM Pen ding
/
The faul t code i s not fo und i n the d atab ase
?
Mo nito r St atus
MIL St atus
DTC s i n th is E CU
Rea dine ss C ompl eted
D
I
Rea dine ss N ot Comp let ed
Rea dine ss N ot Sup port ed
ata stre am S uppo rted
gnit ion
Pro toco l Type
OFF
108
5
2
3
119
Spa rk
CAN
?
Product S erial Num ber
Dev ice Upg rade
Select Langua ge Port uguese
B
LA UNCH
3. Inscrição e Actualização
2. Opera ções Básicas
Boot Versi on:
V1. 00.0 00
Serial Number:
972 890000029
Reg ister Code:
36F FDB0 54753
1. USB Conn ected for
Upg rade.
A
Os ícones em preto na parte inferior
da tela indicam as operações
disponíveis, o que podem ser feitas
pressionando os botões
correspondentes na ferramenta.
Pressione o botão F3/I/M para
verificar a disponibilidade de I/M
(Inspeção e Manutenção).
Pressione o botão F1 / DTC para
recuperar o DTC;
Pressione o botão F4 / para obter
mais detalhes sobre o DTC;
Se mais de um DTC foi recuperado,
pressione / para visualizar
diferentes DTCs;
No caso de definições de código
longas, utilize / para visualizar
as informações adicionais.
?
Le ia do DTC s
Ap agar DT Cs
Verificar a Dis ponibilida ded e I/ M
Quando os DTCs tiver sidos
recuperados, pressione o botão F2 /
ER para apagar.
Era se Co des
Cle ar/R eset E miss ion- Rela ted D iagno stic
Inf orma tion . Are yo u sure ?
?
Guia de Início Rápido
Creader 519
Page 15

制作 要求 :
装订方式:原始为 横向纸张大小,
按 比例输出
印刷要求:彩色印刷, 书写纸
210mmx148mm
1:1
80g
,骑马钉装订
 Loading...