


]hjkiiuu7
User’s Manual
Digital Audio Player
LATTE M1
V ersion : 1.0
Please read this manual carefully before using your new player.
Latte Communications Inc. reserves the right to modify specifications and other information
without prior notice.
Please respect all copyright laws.
Shape and color of actual product may be different from the picture shown.
Display screen in default setting may be different to the screen contents used here.

Contents
Main Specifications ……………………………………………………………………………… 03
Precautions ………………………………………………………………………………………. 04
About the Player …………………………………………………………………………………. 06
LED Description ………………………………………………………………………………….. 07
Basic Operations ……………………………… …………………………………………………. 09
2

Main Specifications
Supports MP3 / WMA / WA V / FLAC / APE musi c formats
Can be used as a portable file storage (USB 2.0 high-speed data transmission)
Supports voice recording function (Built-in Microphone)
Audio playing time: approximately 8 hours
Recording time: approximately 9 hours
Note:
All warranty information and product specifications are subject to change without notice.
3

Precautions
1. Do not use the player in extremely hot, cold, dusty or damp environments.
2. Do not drop the player when using it.
3. The life of the battery is subject to the use of the player and production date.
4. Please charge the battery when the following occurs:
A. The red LED light under the panel flashes.
B. The player turns off automatically and turns off again after restarting.
5. When formatting the player, uploading or downloading files, do not disconnect the
player from the PC. Disconnection during updates or transfers of data may damage
files or the player itself.
6. The player is automatically charged when connected to the PC via the USB cable
included.
4

Precautions
7. It is recommended that the player be charged for more than 12 hours straight for the
first 3 charges with the power off. This will help the battery life.
8. This player contains no user serviceable parts. Disassembling the player may damage
the player and will void the warranty.
9. Our company reserves the right to improve the product. Different software and
hardware versions might influence the product performance and functions. The
product shall be subject to change without notice.
10. The images in this manual may vary slightly from actual product.
11. Please respect all copyright laws.
5
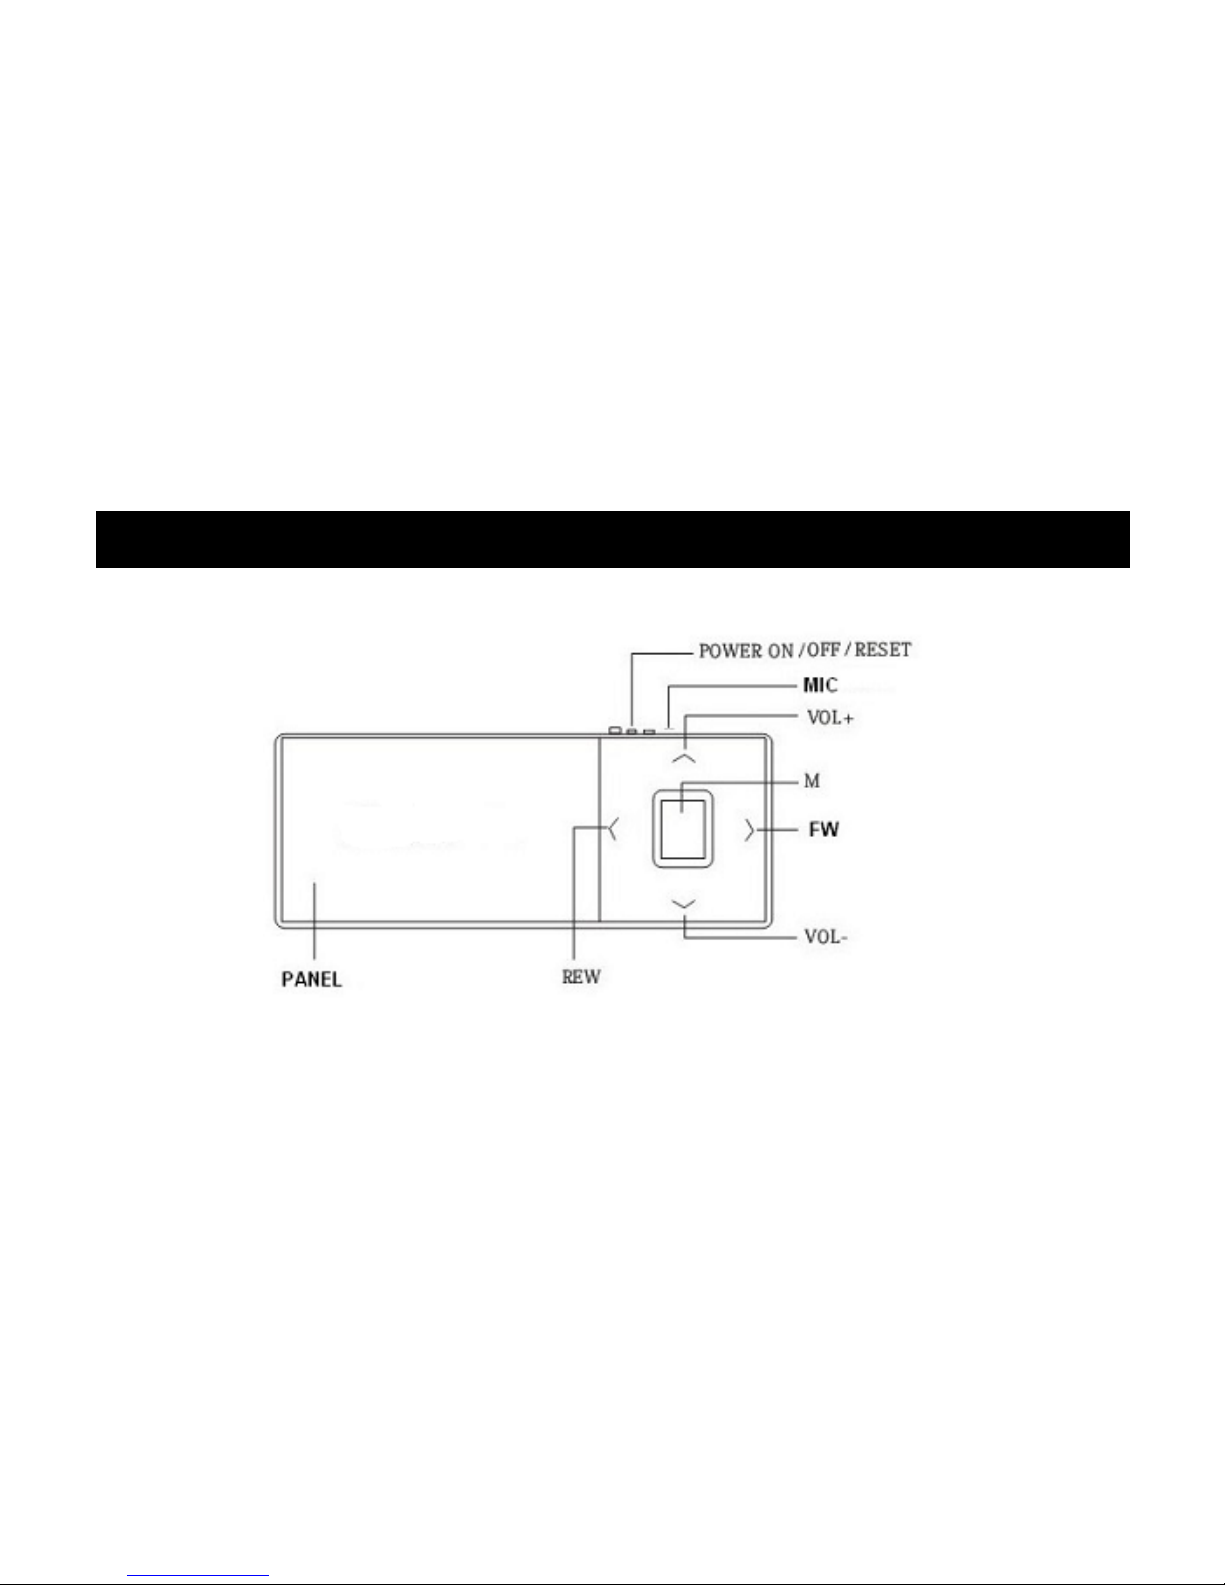
About the Player
6

LED Description
1. There are 4 blue LED lights under each VOL+, VOL-, REW, and FW key. There are 2
LED lights under the main panel (Blue and Red).
2. All of the LED lights under each VOL+, VOL-, REW, and FW key will light on when the
player turns on.
3. The music playing mode: All of the LED lights under each VOL+, VOL-, REW, and
FW keys will turn of f and at the same ti me, the blue LED light un der the main p anel w ill
flash every 5 seconds.
4. The music pause mode: The blue LED light under the main panel will light on.
5. The recording mode: The red LED light under the main panel will flash.
6. The record pause mode: The red LED light under the main panel will light on.
7. The recorded file playing mode: All of the LED lights under each VOL+, VOL-, REW,
and FW keys will flash.
7

LED Description
8. The recorded file pause mode: All of the LED under each VOL+,VOL-,REW, and
FW keys will light on.
9. The player lock mode: Under the lock mode, the purple LED light under the main
panel will light on when you press any key.
8

Basic Operations
1. Turn On/Off
- Turn on: Press the power button on and press the M button for 3 seconds
- Turn off: Press the M button for 3 seconds while the player is on.
2. Play/Pause/Skip/Rewind/Forward
- Play: Briefly press the M button while the player is on.
- Pause: Briefly press the M button while a music file is playing.
- Skip: Briefly press REW/FW key to play the previous or next file while a music file is
playing.
- Rewind/Forward: Press and hold REW/FW key to fast-rewind/forward through the music
file while a music file is playing.
9

Basic Operations
3. Recording
Press and hold VOL + key for 2 seconds to go into the recording mode. When the red LED
light flashes under the main panel, you can start recording. Briefly press the M key to pause
recording. Press and hold VOL + key again for 2 seconds to save the recorded file and exit
the recording mode.
4. Playing the recorded file
Press and hold the VOL- and M key at the same time for 2 seconds to go into the recorded
file playing mode from the music playing mode. Briefly press the M key to start playing the
recorded file.
10

Basic Operations
5. Changing the music playing mode to/from the recorded file playing mode
Press and hold VOL – and M key at the same time to change the music playing mode
to/from the recorded file playing mode. The blue LED light under the main panel will flash
In the music playing mode w hile the 4 blue L ED l ight s und er V OL+,V OL-,REW, and FW keys
will flash in the record file playing mode.
11
6. V
olume adjustment
Press VOL +/- keys to increase/decrease the volume.
7. Lock/Unlock player
Press and hold VOL- key for 2 seconds to lock the player and press and hold VOL- key
again for 2 seconds to unlock the player

Basic Operations
8. Transferring files
Connect the player to your PC using the USB cable included. Once the player is connected
to your PC, a window will automatically pop-up on your screen and show as a removable
disk. This removable disk will be assigned a name with the next available drive letter in your
PC, such as (E:). You can also go to My Computer and find this removable disk. You can
delete/add files to/from this folder.
This player will not require driver installation and will be automatically detected if your PC
uses Windows 2000/XP/Vista OS.
9. Charging the player
The player can be charged by connecting to your PC via the USB cable included. The red
LED of the panel will light on while the player is being charged. When fully charged, the
player will show the blue light.
12

For
product information or technical support,
please visit www.lattefone.com or contact us at support@latteglobal.com
13
For Latte genuine accessories, please visit www.lattezone.com
 Loading...