


Solar Tracking Unit (STU)
Website Users Manual
Version 2.01
April 6, 2009
LAT-LON, LLC
4251 S. Natches Court, Unit C
Sheridan, CO 80110
877-300-6566 Phone 303-531-5754 Fax
www.lat-lon.com
Lat-Lon, LLC STU Website Users Manual Page 1

LEGAL INFORMATION
Version 2.01
Copyright © 2008 Lat-Lon, LLC. All rights reserved.
Lat-Lon, RailRider, Rail Tough are trademarks or registered trademarks of Lat-Lon, LLC. All other
product and company names mentioned herein may be trademarks or trade names of their respective
owners.
US patent No 6,339,397 and other pending patents associated with this product’s hardware and
software copyright © 1999-2007. Lat-Lon, LLC. All rights reserved.
The information in this manual was written for version 4 of the Lat-Lon customer data website. LatLon operates a policy of ongoing development. Lat-Lon reserves the right to make changes and
improvements to any of the products described in this document without prior notice.
UNDER NO CIRCUMSTANCES SHALL LAT-LON BE RESPONSIBLE FOR ANY LOSS OF
DATA OR INCOME OR ANY SPECIAL, INCIDENTAL, AND CONSEQUENTIAL OR INDIRECT
DAMAGES HOWSOEVER CAUSED.
THE CONTENTS OF THIS DOCUMENT ARE PROVIDED “AS IS”. EXCEPT AS REQUIRED BY
APPLICABLE LAW, NO WARRANTIES OF ANY KIND, EITHER EXPRESS OR IMPLIED,
INCLUDING, BUT NOT LIMITED TO, THE IMPLIED WARRANTIES OF MERCHANTABILITY
AND FITNESS FOR A PARTICLAR PURPOSE, ARE MADE IN RELATION TO THE
ACCURACY AND RELIABILITY OR CONTENTS OF THIS DOCUMENT. LAT-LON
RESERVES THE RIGHT TO REVISE THIS DOCUMENT OR WITHDRAW IT AT ANY TIME
WITHOUT PRIOR NOTICE.
FCC NOTICE: This equipment has been tested and found to comply with the limits for a class B
digital device, pursuant to part 15 of the FCC Rules. These limits are designed to provide reasonable
protection against harmful interference in a residential installation. This equipment generates, uses and
can radiate radio frequency energy and if not installed and used in accordance with the instructions,
may cause harmful interference to radio communications. However, there is no guarantee that
interference will not occur in a particular installation. If this equipment does cause harmful interference
to radio or television reception, which can be determined by turning the equipment off and on, the user
is encouraged to try to correct the interference by one or more of the following measures:
• Reorient or relocate the receiving antenna.
• Increase the separation between the equipment and receiver.
• Connect the equipment into an outlet on a circuit different from that to which the receiver is
connected.
• Consult the dealer or an experienced radio/TV technician for help.
• It is strongly recommended that the TV be plugged into a separate wall outlet.
This equipment has been verified to comply with the limits for a class B computing device, pursuant to
FCC Rules. In order to maintain compliance with FCC regulations, shielded cables must be used with
this
equipment. Operation with non-approved equipment or unshielded cables is likely to result in
interference to radio and TV reception.
The user is cautioned that changes and modifications made to the equipment without the approval of
manufacturer could void the user’s authority to operate this equipment.
Lat-Lon, LLC STU Website Users Manual Page 2

CONTENTS
CONTENTS ............................................................................................................................................................................. 3
INTRODUCTION ................................................................................................................................................................... 4
LOGIN ...................................................................................................................................................................................... 5
L
OGGING-IN
M
AIN MENU FUNCTIONS
REPORT – VIEWING DATA / MAPS.................................................................................................................................. 6
S
TANDARD REPORTS
Fleet Report ...................................................................................................................................................................... 6
History Report .................................................................................................................................................................. 6
R
EPORT DISPLAY
Mapping functions ............................................................................................................................................................ 9
Map Icons ......................................................................................................................................................................... 9
Report Functions .............................................................................................................................................................. 9
Save to Excel, Save to Text, Print Page............................................................................................................................ 9
C
USTOM REPORTS
S
PECIALTY REPORTS
ADMINISTRATION ............................................................................................................................................................. 10
A
CCOUNT SETUP
A
DMINISTRATION ACCOUNT MENU
Users .............................................................................................................................................................................. 11
Dispatch Page ................................................................................................................................................................ 12
Alerter Page ................................................................................................................................................................... 13
Units ............................................................................................................................................................................... 14
Reports ........................................................................................................................................................................... 15
Maps ............................................................................................................................................................................... 17
Alerts .............................................................................................................................................................................. 18
GeoItems ........................................................................................................................................................................ 21
A
DMINISTRATION TIPS
.......................................................................................................................................................................... 5
....................................................................................................................................................... 5
............................................................................................................................................................. 6
................................................................................................................................................................... 8
............................................................................................................................................................... 10
............................................................................................................................................................ 10
................................................................................................................................................................. 10
..................................................................................................................................... 10
........................................................................................................................................................ 25
PREFERENCES .................................................................................................................................................................... 26
LOGOUT ................................................................................................................................................................................ 27
APPENDIX I: DATABASE FIELD DEFINITIONS .......................................................................................................... 28
APPENDIX II: SPECIALTY REPORT DEFINITIONS ................................................................................................... 29
Lat-Lon, LLC STU Website Users Manual Page 3

INTRODUCTION
Welcome to the Lat-Lon tracking and monitoring service! The Lat-Lon website is your portal to view
the data that your GPS units send out. You now have the ability to track and manage your mobile
assets from anywhere in the world using only Microsoft Internet Explorer and an Internet connection.
The website has mapping capability, reporting capability, and administration capabilities.
This document explains the structure and functionality of the Lat-Lon website. The document is
divided into four main sections that mirror the menu structure of the website:
1. Login
2. Reports – Viewing data / maps
3. Administration
4. Preferences
Lat-Lon will keep one year of data on hand. If your intent is to have a historical record of your GPS
units then you need to off load data or contract with Lat-Lon to maintain the data.
Lat-Lon, LLC STU Website Users Manual Page 4

LOGIN
Logging-In
To access the website, go to www.lat-lon.com and press the “LOGIN” button on the left of the LatLon home page. The next page you will see a place to enter your username and password as shown
below:
Main Menu Functions
Once logged in the account, there will be a menu bar along the top that has the following options:
Report | Administration | Preference | Logout
Lat-Lon, LLC STU Website Users Manual Page 5

REPORT – VIEWING DATA / MAPS
As a user you are able to go directly to viewing reports and maps by selecting Report on the menu bar
as shown below.
Report | Administration | Preference | Logout
On the left side of the next page you will see a drop down menu that is labeled “Select a Report”.
There are two standard reports with each account. An administrator may setup or add as many custom
reports as desired. This is explained in more detail in the administration section.
Standard Reports
Fleet Report
The Fleet Report is for viewing the latest message from your fleet of units. The Time Zone drop
down box allows you to see the report times in any time zone.
You have a choice to view MAP ONLY, DATA ONLY or BOTH
You also have a choice to view your Geofences or Geopoints (“Geoitems”) on the map or not by
checking the “Show Geoitems” box.
See the GeoItems section for more information on how to set up geofences and geopoints.
History Report
The Unit History Report is for viewing specific units for specific dates. More than 1 unit can be
viewed at the same time by clicking and dragging, clicking while holding the “shift” key, or
clicking while holding the “ctrl” key.
Choose your Time Zone, Unit Number(s) and Date Range
You have a choice to view MAP ONLY, DATA ONLY or BOTH. Also, check or uncheck the
“Geoitems” box.
Lat-Lon, LLC STU Website Users Manual Page 6

Lat-Lon, LLC STU Website Users Manual Page 7

Report Display
MAP Display: This choice is for a full page map
DATA Display: This choice is for a full page of data
BOTH Display: This choice gives you a split screen and shows you both the map and the data.
Show Geoitems: This check box allows you to see any geopoints or geofences that you set up
on the map. Please see the GEOITEMS section below for more information on setting up
geofences and geopoints.
See example below.
Lat-Lon, LLC STU Website Users Manual Page 8

Mapping functions
The map has a menu bar in the upper left corner of the map. The + or - icons can be used to
zoom in and out. Double clicking on the map will center that point and zoom in one level. The
map can be panned by clicking and dragging the map.
The Road map is the default display but aerial views can be shown by selecting the Aerial
button. Bird’s Eye view is also available in some areas.
At the bottom of the map is a drop down box with the valid map views. The administrator can
set up these views to quickly zoom into particular areas (See Maps).
The map scale in shown in the lower right corner.
Map Icons
Some icons may not be applicable to your unit.
Report Functions
Each row can be sorted by clicking on the column heading. Heading names and column order
can be controlled by the administrator.
The size of the columns can be manipulated by clicking and dragging them to be larger or
smaller.
If your report is longer than 100 records, you will see paging options at the bottom of the report.
See example below.
Save to Excel, Save to Text, Print Page
The above options are given after you run your report.
Click on any of the above and the entire report (including multiple pages) will be saved or
printed.
Lat-Lon, LLC STU Website Users Manual Page 9

Custom Reports
Custom reports can be setup by the account administrator. If you need the data displayed in a
different way then contact the administrator.
Specialty Reports
Specialty Reports are reports designed to help productivity and the management of assets.
SEE APPENDIX II for descriptions of specialty reports available
***Specialty Reports show up under the Users Section and can be added to any user.
ADMINISTRATION
Report | Administration | Preference | Logout
Account Setup
An administration account will be established by Lat-Lon when the unit(s) is activated. The
administration account will be assigned a username and password and allows complete
administration authority to the account. The administrator will be able to perform the following
functions:
1. View all data
2. Name units
3. Set up additional users
4. Assign user names and passwords
5. Set up groups within your company to view data.
6. Create reports
7. Set up alert templates
8. Manage map views
9. Create Geofences and Geopoints through “GeoItems”
PLEASE WRITE DOWN THE LOGIN AND PASSWORD FOR THE ADMINISTRATION
ACCOUNT AND STORE IN A SAFE PLACE. If it is lost, call Lat-Lon at 303-937-7406 to
retrieve it.
Administration Account Menu
The Administration tab displays 6 functions that will be discussed in detail in the following
sections:
Lat-Lon, LLC STU Website Users Manual Page 10

Users
Setting up “users” is an important part of using the Lat-Lon website to its full potential. Users can
be set up to restrict the data that is displayed. This is useful not only in terms of security, but also
when it comes to accessibility and data management. With “users” you can set up areas for specific
fleets of cars. Used properly, creating new users can be valuable in terms of both time and data
management.
Under the Users section click “Add New User”:
Enter the Username, Login, Password, Email address (FOR ALERTS) and any Notes you would
like to have (notes are only viewable to the administrator). Click “Insert”.
Once you have “inserted” the new user you will see the user information on the screen.
Click the “Edit” button on the right side of the “User” login information. With “Edit” you will be
able to add units to this users group, set the default time zone for the user, set a start date for the
user to view report data, add specific email templates* and add specific reports for the user to view.
Make sure to click “update” when you are finished.
Column Heading Descriptions:
User Name: name of group or user
Login: user login
Lat-Lon, LLC STU Website Users Manual Page 11

Password: user password
Report Begin Date: user will not be able to see data in a report before the date that you assign here.
If no date is assigned then the user will see data history.
Email: email address that you want alarms to be sent to (see Manage Alerts for more info).
Units: unit(s) seen by the user
Time Zone: default time zone for the user
Alerts: alert templates assigned to the user (for email alarms)
Reports: reports assigned to the user
SEE APPENDIX II FOR DESCRIPTIONS OF CUSTOM REPORTS
Enable Dispatch: check this box if you want your user to see the Dispatch Page.
The Dispatch Page is a map of your Fleet that updates automatically.
SEE THE DISPATCH PAGE SECTION BELOW
Enable Alerter: check this box if you want your user to see the Alerter Page.
The Alerter Page is a Fleet History Report that updates automatically.
SEE THE ALERTER PAGE SECTION BELOW
*Note: See “Alerts” below to set up your Email Alert Templates. If you do not add an Alert
Template to a user then no ALERT emails will be sent to that user’s email address.
ADMINISTRATORS MUST SET THEMSELVES UP AS USERS IF THEY WANT TO ADD
EMAIL ADDRESSES AND ALERT TEMPLATES FOR THEMSELVES.
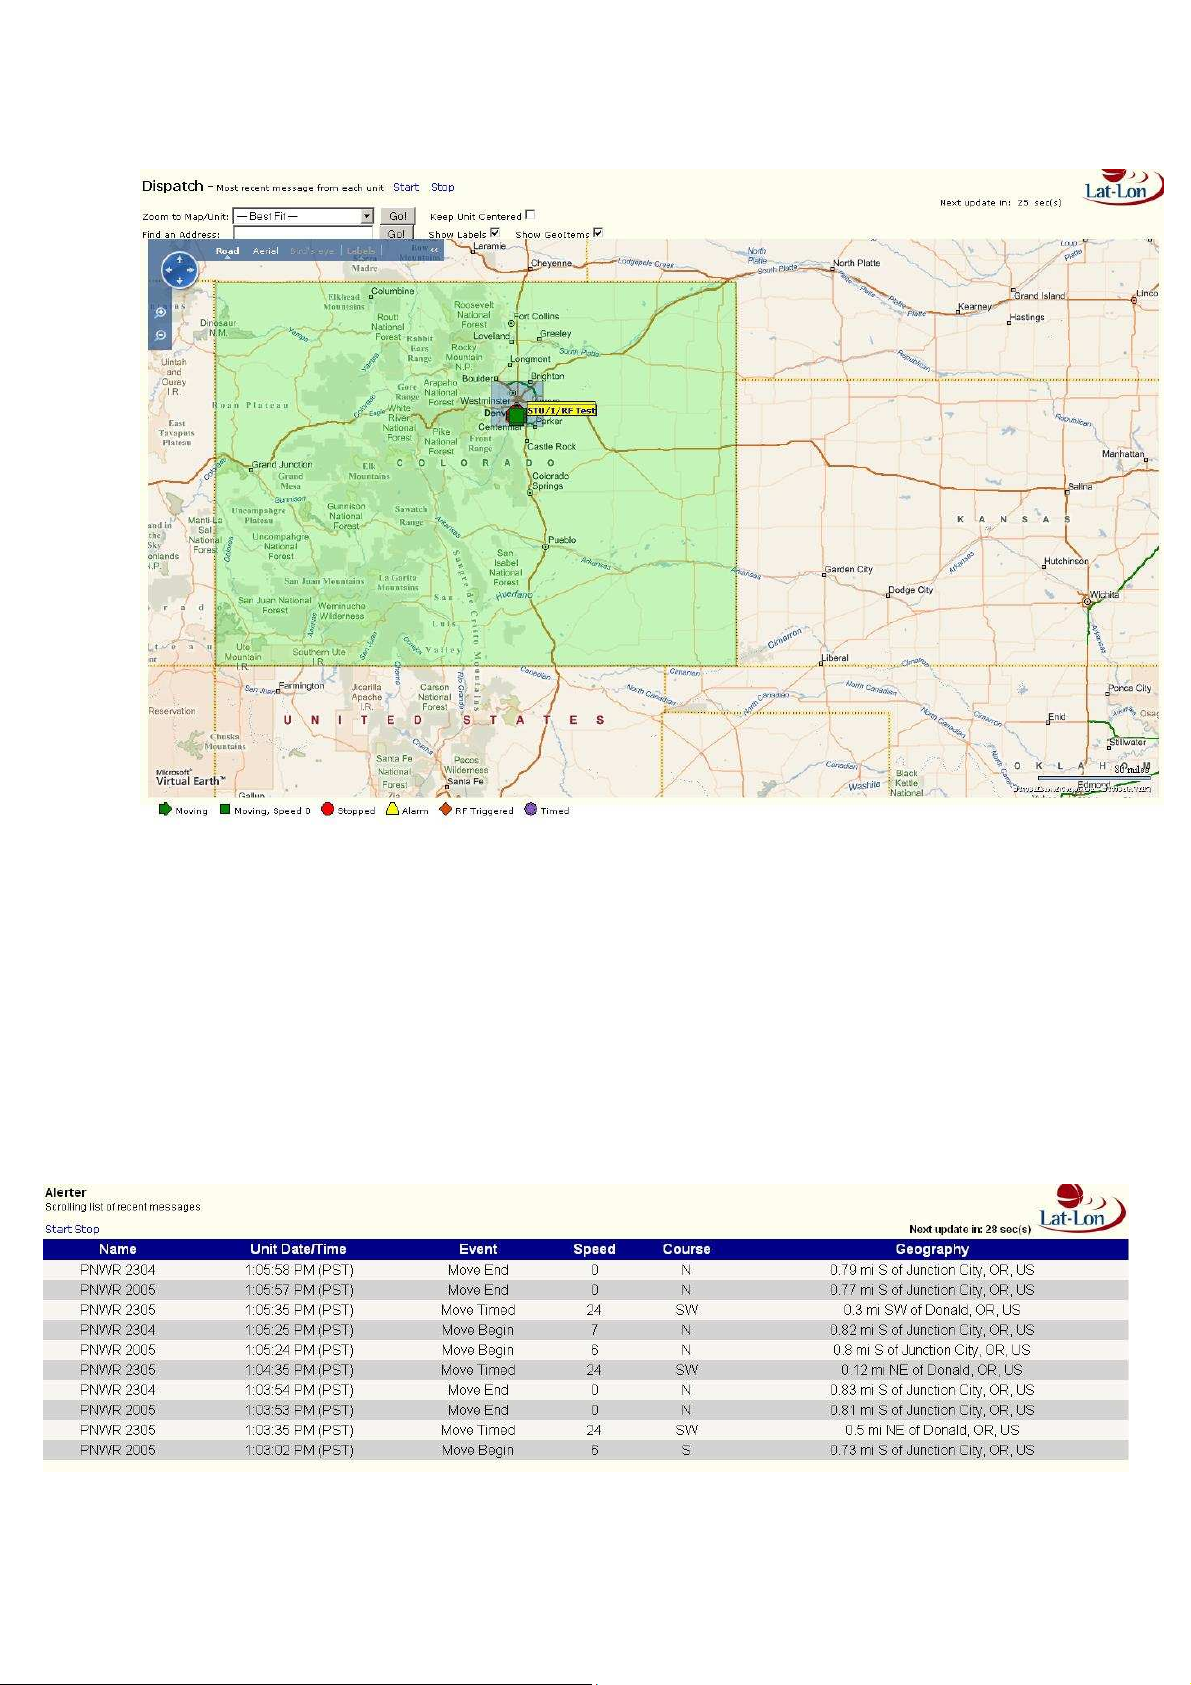
Dispatch Page
The Dispatch Page can be a great tool for anyone that owns more than 1 DPU. The Dispatch Page is
a map of your fleet that automatically updates every minute. Icons on the page help you determine
if your asset is moving, stopped or has had an alarm. When you open the Dispatch Page make sure
to click the “START” button. The Dispatch Page has options to:
1. Zoom into a specific unit on the map
2. A “Best Fit” choice so that all of your assets show on the map
3. Find an address: if you want to zoom directly into a specific state, city, zip code or street
address
4. Show Labels
5. Show Geoitems
6. Keep Unit Centered on page even while moving
See the picture below:
Lat-Lon, LLC STU Website Users Manual Page 12
Alerter Page
The Alerter Page can be a great tool for anyone that owns more than 1 DPU. The Alerter Page is a
scrolling fleet report of your data that automatically updates every minute. During Alarm Type
Events (*temperature, *digital alarms) a sound will be heard. You must have speakers and a sound
card in your computer. You must click “acknowledge” to stop the sound.
*you must have purchased a temperature sensor or digital wiring for these 2 alarms to sound.
Lat-Lon, LLC STU Website Users Manual Page 13

Units
The first column listed is “Unit Id”. This is the Lat-Lon serial number(s). To rename the Unit Id to
an asset number or a name click the EDIT button displayed on each line. This will allow you to
update the Unit Name and also add a note as shown below. Once finished, press the Update button
to save changes.
How to Change Move-time Reporting frequencies:
You are able to submit configuration changes anytime, but STUs are only listening for
configuration changes when they are reporting. So, if your unit is not moving and reporting Timed
Reports every 2 hours, then it will accept the configuration changes when it reports the Timed
Report.
Click “Configure” on the right side of each unit’s line.
Administrators are able to change the “Time between Move-timed Reports” up to every 10 minutes
or 600 seconds.
See picture below.
Lat-Lon, LLC STU Website Users Manual Page 14

Reports
Lat-Lon gives you 2 standard reports “Unit History Report” and “Fleet Report”. Each of these
reports can be edited under Manage Reports. The administrator can create new customized reports
here.
Click on one of the following:
Add
The Add button displays a screen that walks the administrator through the process of creating a
report.
Lat-Lon, LLC STU Website Users Manual Page 15

Step 1: Name your report and then click on whether you want ONLY the last message from each
unit.
Step 2: Select the fields you would like displayed in the report. Report Fields can be sorted by
clicking on the field and clicking the Move Up or Move Down button. The fields can also be
renamed by selecting the field and then entering a new name for the field.
Step 3: Select criteria for any of the fields: The example shown is to display the reports where the
speed is greater than 75 miles per hour.
Step 4: Select a Map. If you have set up a customized map view under “Manage Maps” (next
section), then you can select your customized map view for this report. Otherwise it remains at
“Best Fit”.
Step 5: Click SAVE when finished. See Appendix I for a detailed description of fields.
Because you are able to Manage/Customize Reports as an administrator, each Unit History Report
may contain different information or data. See Appendix 1 for description of fields.
Lat-Lon, LLC STU Website Users Manual Page 16

Maps
Managing maps will allow you to set up standard map displays for you assets. If you are interested
in seeing the units just at your facility, then a custom map display can be setup to zoom into that
area.
If no custom map is available or chosen then the “Best Fit” will automatically show along with your
data.
Click on one of the following:
Zoom into the map to the area you would like to save, name it and click SAVE.
Lat-Lon, LLC STU Website Users Manual Page 17

Alerts
Lat-Lon defines an Alert as an e-mail message generated by Lat-Lon’s server computers that can be
sent to a user’s e-mail, pager, or as a text message to their cell phone. It is up to the customer to
research or call their cellular provider so that their cell phone number can be typed as an email
address (for text messaging).
There are several components to Alerts. The Administrator must define what triggers an alert
email. This trigger definition process is called an Alert Template. The other component of the
Alert is defining which User accounts will have Alerts activated and to whom the alerts will be sent.
Within Manage Users, the Administrator will assign an Alert Template to that User and will fill in
the e-mail address (or multiple addresses) to which the e-mails will be sent.
An Alert Template must be set up for an email alert to be sent to a User’s email address.
After clicking on Manage Alerts, click on one of the following:
The Manage Alerts wizard will walk you through each of the following steps:
Step 1 of 5: select units that will be a part of that particular template. For example, if you want all
of your STUs to send the same type of alert email then add all of your STUs to the template.
Step 2 of 5: select the fields to set your criteria. For example, if you want the email alarm to be sent
on the criteria of Message Type then add that “field” in this step.
Lat-Lon, LLC STU Website Users Manual Page 18

Step 3 of 5: enter the conditions for your selected field. The condition set in the example below
is to send an alert email if the Message Type is equal to Move Begin. The reason I have used
Message Type in this example is because the STU is the one that detected the change in GPS
and created an additional message “Move Begin” because of that change of GPS.
The logic for the conditions is “OR”. This means that if you set more than 1 condition, the
system will send out an alert email for either of the conditions.
HIGHLIGHT the field you are setting the criteria for, choose the criteria in the drop down
menu, enter the value, and click the “Save” button. If you want to remove the criteria then
highlight the field and click the “Remove” button. If you have done this correctly you will see
your “conditions” show up on the right side of the page under “Conditions”.
Lat-Lon, LLC STU Website Users Manual Page 19

Step 4 of 5: layout your email by selecting what you want in your subject line as well as the
body of the email. Remember that some email software applications may have a limit to the
number of characters allowed in the subject line.
You can change the order of the fields on the right by highlighting the appropriate field and
pressing the “Move Up” or “Move Down” button.
Step 5 of 5: confirm that everything is correct. If there is an error please use the “previous”
button to go back and change it. Name your “template” and click the “Save” button.
Lat-Lon, LLC STU Website Users Manual Page 20

*Note: After saving the Alert Template you should now go to the Manager Users section
(above) and add an email address and your Alert Template to a User.
*ADMINISTRATORS MUST SET THEMSELVES UP AS USERS IF THEY WANT TO
ADD EMAIL ADDRESSES AND ALERT TEMPLATES FOR THEMSELVES.
GeoItems
The GeoItems section is to be used to set up Geofences and Geopoints.
GEOFENCE: This allows a customer to receive extra information during a regular message in an
additional column called Geofence. A unit is either within a geofence or it is not.
There is no limit the number of geofences that you can create in this section.
Step 1: Zoom into the area on the map where you want to place your geofence. Note that you can
use the road view, aerial view or bird’s eye view.
You may also enter a state, city, zip code or address to zoom quickly into that area.
Step 2: Click on the “Add” button to see the “geofence” box on the map.
Lat-Lon, LLC STU Website Users Manual Page 21

Step 3: Manipulate the box by dragging the top left or bottom right corners until the geofence is
exactly where you want it.
Step 4: Name the geofence
Lat-Lon, LLC STU Website Users Manual Page 22

GEOPOINTS: This allows a customer to receive extra information during a regular message in an
additional column called Geopoint. You will receive information as a unit approaches within 60
miles of a geopoint. For example: “Unit2 is 2.5 miles NW of Milepost 50”.
Step 1: After going to GeoItems, make sure to choose the “Points” button (see picture above)
Step 2: Zoom into the area on the map where you want to add your “point”. Note that you can use
the road view, aerial view or bird’s eye view.
You may also enter a state, city, zip code or address to zoom quickly into that area.
Step 3: Click the Add button to see the Geopoint show up on the map
Lat-Lon, LLC STU Website Users Manual Page 23

Step 4: Move the geopoint as needed
Step 5: Name the geopoint
Lat-Lon, LLC STU Website Users Manual Page 24

Administration Tips
1. For security, keep the administration password in a safe place. Lat-Lon can change the
password if required.
2. Remember to logout of the administration website to prevent unwanted visitors. As a
security precaution, the program will automatically logoff after 60 minutes of inactivity.
3. Set up groups to control the information displayed.
Lat-Lon, LLC STU Website Users Manual Page 25

PREFERENCES
Report | Administration | Preference | Logout
Preferences are designed to save steps or control the look of your website. The parameters that you can
set are listed below:
Parameter Valid Entries
Time Zone
(Time is automatically changed from Standard
Time to Daylight Savings Time)
Show Geoitems Default Checkbox Checked or Unchecked Box
Future Parameter
Future Parameter
Greenwich Mean Time (GMT)
Eastern Time (EST)(EDT)
Central Time (CST)(CDT)
Mountain Time (MST)(MDT)
Pacific Time (PST)(PDT)
Lat-Lon, LLC STU Website Users Manual Page 26

LOGOUT
Report | Administration | Preference | Logout
Remember to logout. The program will automatically logoff after 60 minutes to prevent unwanted
visitors to the website. You can also logout by pressing the “Log Out” link at the top right of the
page.
Lat-Lon, LLC STU Website Users Manual Page 27

APPENDIX I: DATABASE FIELD DEFINITIONS
Field
Description
Valid Entries
/ units
UNIT_ID
UNIT_NAME Unit Name
UNIT_DATE/TIME Unit Date and Time
RECEIVE DATE/TIME
DECODER DATE/TIME Date and Time Messages was Decoded
LATITUDE
LONGITUDE
GEOGRAPHY Miles and direction from nearest town
SPEED
COURSE
TIME_TO_FIX
SATELLITE IN VIEW Number of GPS satellites in view by unit
MESSAGE_IN_QUEUE
BUS_VOLTAGE
FIRMWARE
MESSAGE_TYPE
MILE FROM PREV MSG Miles from previous message
TIME SINCE MOVE BEGIN Hours unit has been moving Hours
TIME SINCE MOVE END Hours unit has not moved Hours
GEOFENCE Geofence
GEOPOINT Geopoint
Unit Serial Number
Date and Time Servers Received
Message
Latitude of fix
Longitude of fix
Speed of unit at fix
Course or direction unit is moving 1-360
Time between event and GPS fix Time in seconds
Number of stored messages not yet sent
Voltage of unit after GPS fix Volts
Version of firmware
Reason the message was generated by
the unit
Timed
Move Timed
Move Begin
Move End
Lat-Lon, LLC STU Website Users Manual Page 28

APPENDIX II: SPECIALTY REPORT DEFINITIONS
Start Stop Report
Features:
The Start Stop Report has a list of each start and stop the unit makes during a trip with summary
data of moving time, and stopped time between cycles. The report can be adjusted to show stops
greater than “x” minutes to help managers filter out traffic stops or other short delays in transit.
Key Benefits:
This report provides managers a Detailed Time Card for employees. This report can also be
used as an auditing tool for verifying deliveries or billable service hours. This report can also be
used to verify route deliveries.
Begin - End Report
Features:
The Begin / End Report lists the first movement and last movement of the timeframe for a unit
or fleet along with elapsed time, total mileage, and engine run hours.
Key Benefits:
This report provides managers a Detailed Time Card for employees. This report allows
managers to monitor trends in employee hours.
Pooling Report
Features:
The Pooling Report lists the number of units at a given location with summary data of oldest
and average hours the units have been at that location. This is best used along with geofences.
Key Benefits:
This report provides managers a list of units available at a location or can identify units a
customer has not released.
Dwell Report
Features:
The Dwell Report is a Fleet Report showing units that have been sitting (stopped) over a
specified amount of time. The amount of time is input by user. For example show me all the
cars that have been stopped more than 24 hours.
Key Benefits:
This report provides managers a list of units not moving and how long they have been sitting.
Over-Speed Report
Features:
The speed report displays all occurrences of speeding past a defined speed threshold.
Key Benefits:
Managers can quickly and easily run reports and check for speeding for the fleet for safety
reasons.
Lat-Lon, LLC STU Website Users Manual Page 29

Email Alerts Report
Features:
The alert report is a detailed list of all of the alerts that were generated.
Key Benefits:
This is an easy report for a summary of all alert emails that have been sent out.
GeoFence Report
Features:
The GeoFence report shows you which of your units/assets have visited saved locations set up
in the administration website. Select any saved location (geofence), timeframe, unit or fleet, and
run the report.
Key Benefits:
The GeoFence report can help track activity at delivery sites to show who and for how long
workers were at that location. This report can also aid in detecting side jobs. The location report
can show companies when their locomotive, railcar, truck, trailer, van made their deliveries.
Lat-Lon, LLC STU Website Users Manual Page 30
 Loading...