

Lastolite 8990 User Manual
Setting up your HiLite Background
1 2 3
4 5 6
7 8 9
10 11 12
13 14
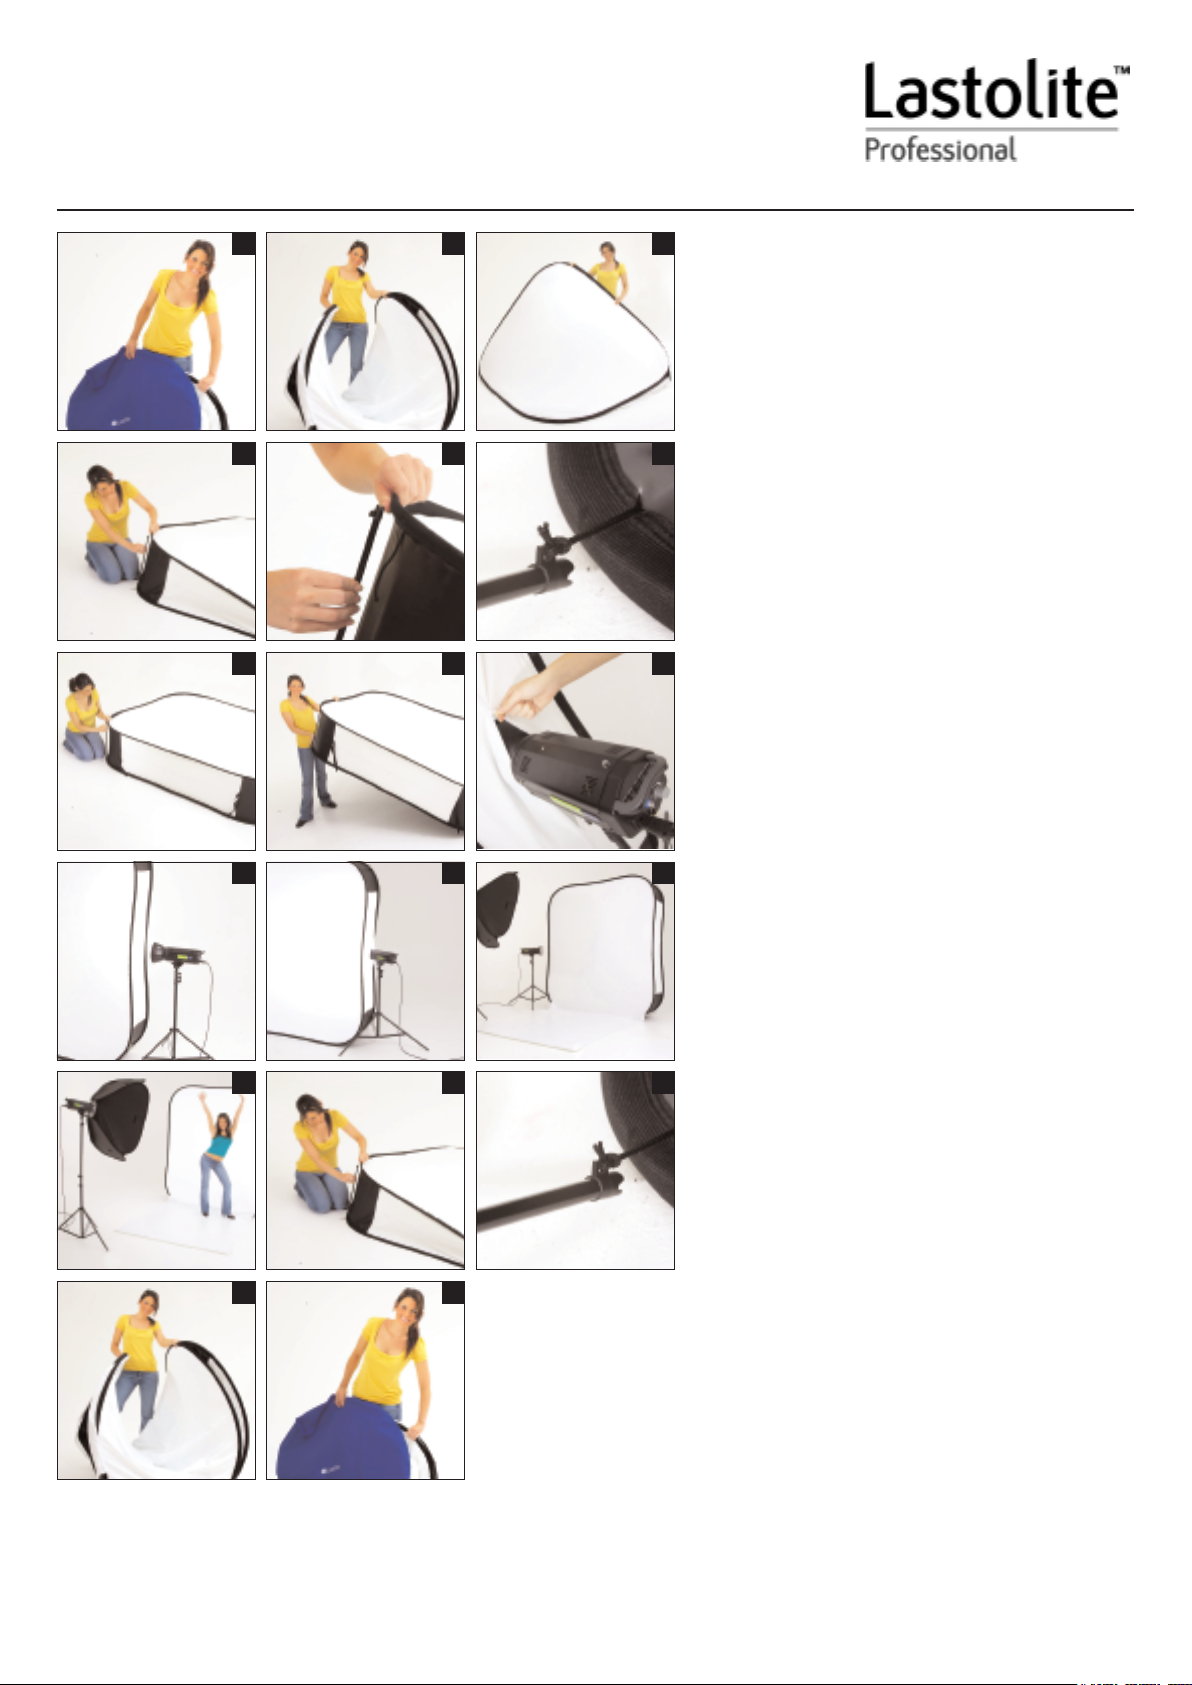
Setting up the HiLite
1. Remove the HiLite from the carry case and check the
contents. There should be 1 x HiLite and 4 x Rods.
2. Hold the two outer rims of the HiLite and allow the
centre rim to unfold. WARNING - The HiLite is quite
strong and can ‘pop’ out suddenly. Take care with
people and furniture in close proximity.
3. Allow the HiLite to completely unfold.
4. Lay the HiLite on the floor and position one end of the
rod on the corner of the lower steel rim. Ensure the
steel rim locates into the jaws of the tip at the end of
the rod.
5. Pull the two steel rims away from each other and locate
the jaws of the tip at the other end of the rod into the
upper rim.
6. If you wish you can secure the rod in place by tying
one end of the rod to the black cords located on each
corner of the HiLite. Use these cords as guidance on
where to position the rods.
7. Repeat steps 4-6 for the remaining three corners,
closing any open zips as you work your way round..
8. Stand the HiLite upright (portrait) with the velcro edge
on the white side at the bottom and running up the right
hand side (as you look at the HiLite).
9. Open one of the side zips and insert the head of your
flash unit. Close the zips around the flash head.
10. Alternatively, leave the zips closed and position the
flash head on the outside for a more diffused light. (you
may need to flag off the light to prevent flare).
11. Position the flash head centrally at the side of the
HiLite and point it towards the back panel for an even
illumination. You can experiment with different positions
for different lighting effects.
12. If you purchased the Superwhite vinyl train, attach the
velcro at the base of the HiLite to the velcro on the
train. The Hilite can also be rot
ated 90 degrees so it
sits on its long edge creating a landscape background.
In this case attach the velcro on the longer edge of the
15
Superwhite vinyl.
13. The HiLite is ready to use.
Breaking down the HiLite
14. Remove the vinyl train (if attached), roll it up and return
it to the protective tube. Open all zip
s to allow the air to
escape. Lay down the HiLite and release the jaws on
the tips of each rod from the two steel rims.
15. If you chose to secure the tips with the cords, the rods
ached to the HiLite (When folding make
16
17
can be lef
sure these are not trapped between the two outer
t att
rims).
16. To Fold, stand at one corner and grip the two outer
rims as far down each edge as you can so the HiLite
forms a diamond shape in front of you. Whilst still
holding the rims firmly, lift your hands and bring them
together in a similar motion to closing a book. The
HiLite will form a ‘crisp’ shape.
17. As your hands get closer together the opposite corner
to where you are standing will start to curl under
towards your feet. As you continue the motion of
closing a book pass one hand over the other. The
HiLite will automatically fold to form three circles. Bring
the three circular shapes together expelling any
trapped air and return the HiLite to the carry case.

Setting up your HiLite Background
Montaje del HiLite
1. Retirar el HiLite de la maleta de transporte y controlar el contenido.
La maleta debe incluir 1 HiLite y 4 barras.
2. Sujetar ambos aros externos del HiLite y dejar que se despliegue
el aro central. ADVERTENCIA - El HiLite se encuentra bajo una
tensión relativamente fuerte y puede desplegarse repentinamente.
Es absolutamente necesario prestar atención a las personas y
muebles que se encuentren las cercanías.
3. Dejar desplegar totalmente el HiLite.
4. Colocar el HiLite en el suelo y pasar un extremo de la barra por la
esquina del aro de acero inferior. Asegurarse que el aro de acero
se encaje en los ganchos de la punta del extremo de la barra.
5. Estirar ambos aros de acero en la dirección opuesta y llevar los
ganchos de la punta del otro extremo de la barra hasta el aro
superior.
6. Se puede asegurar la posición de la barra fijando un extremo de la
barra con las cintas negras que se encuentran en las respectivas
esquinas del HiLite. Estas cintas además sirven como punto de
referencia para la posición correcta de las barras.
7. Repetir los pasos 4-6 para las otras tres esquinas. Durante el
montaje cerrar todos los cierres de cremallera abiertos.
8. Colocar el HiLite derecho (retrato) de forma que el cierre de velcro
se encuentre abajo en el lado blanco y que se extienda hacia
arriba por el lado derecho (cuando se mira para el HiLite).
9. Abrir una de las cremalleras a un costado e introducir el cabezal
del flash. Cerrar la cremallera alrededor del cabezal del flash.
10. Como alternativa las cremalleras pueden permanecer cerradas y el
cabezal del flash se puede posicionar fuera para obtener una luz
más difusa. (Eventualmente se deberá proteger la iluminación para
evitar spots de reflexiones.)
11. Posicionar el cabezal del flash en el centro al costado del HiLite y
dirigirlo hacia el campo trasero para garantizar una iluminación
uniforme. Se recomienda probar diversas posiciones para obtener
diferentes efectos luminosos.
12. Si el faldón de vinilo súper blanco se encuentra dentro de los
accesorios, fijar la cinta de velcro en la base del HiLite con la cinta
de velcro del faldón. El HiLite también se puede girar a 90 grados
de forma que asiente a lo largo para obtener un fondo de paisaje.
En este caso fijar la cinta de velcro en el canto más largo del
faldón de vinilo súper blanco.
13. Ahora el HiLite está listo para ser utilizado.
Desmontaje del HiLite
14. Retirar el fondo de vinilo (dado el caso), enrollarlo y colocarlo en
el tubo de protección.
salir el aire. Acostar el HiLite y soltar los ganchos en cada una de
las puntas de las barras de ambos aros de acero.
anto que las puntas se hayan fijado con las cintas las barras
15. En t
pueden permanecer en el HiLite. (Al plegar prestar atención que
no se queden aprisionadas entre los dos aros externos.)
16. Al plegar colocarse en una esquina y coger ambos aros externos
lo más abajo posible de los cantos, de manera que el HiLite tome
la forma un romboide delante de usted. Continuar sujetando bien
los aros, levant
cerrando un libro. El HiLite tendrá una forma "enrollada".
17. Al juntar más las manos la esquina opuesta se enrollará a sus
pies. Mientras se continua realizando el movimiento t
cerrara un libro, colocar una mano encima de la otra. El HiLite se
pliega automáticamente formando tres círculos. Doblar las tres
formas circulares y al hacerlo extraer el aire. Luego colocar
nuevamente el HiLite en la maleta de transporte.
Abrir todas las cremalleras para que pueda
al como si estuviera
ar las manos y junt
arlas t
al como si se
Montieren des HiLite
1. Den HiLite aus dem Transportkoffer nehmen und den Inhalt
kontrollieren. Der Koffer muss 1 x HiLite und 4 x Stangen
enthalten.
2. Die beiden äußeren Einfassungen des HiLite festhalten und die
mittlere Einfassung aufklappen lassen. WARNUNG - Der HiLite
steht unter relativ starker Spannung und kann plötzlich aufklappen.
Unbedingt auf Personen und Möbelstücke in unmittelbarer
Umgebung achten.
3. Den HiLite komplett aufklappen lassen.
4. Den HiLite auf den Boden legen und ein Ende der Stange in die
Ecke der unteren Stahleinfassung führen. Sicherstellen, dass die
Stahleinfassung in die Klauen der Spitze am Ende der Stange greift.
5. Die beiden Stahleinfassungen in entgegengesetzte Richtung
ziehen und die Klauen der Spitze am anderen Ende der Stange in
die obere Einfassung führen.
6. Die Stange kann in ihrer Position gesichert werden, indem ein Ende
der Stange mit den schwarzen Bändern befestigt wird, die sich
jeweils in den Ecken des HiLite befinden. Diese Bänder dienen
außerdem als Anhaltspunkt für die korrekte Position der Stangen.
7. Die Schritte 4-6 für die anderen drei Ecken wiederholen. Während
der Montage alle geöffneten Reißverschlüsse schließen.
8. Den HiLite aufrecht hinstellen (Portrait), so dass sich der
Klettverschluss an der weißen Seite unten befindet und an der
rechten Seite nach oben verläuft (wenn man auf den HiLite schaut).
9. Einen der Reißverschlüsse an der Seite öffnen und den Kopf des
Blitzgeräts einführen. Den Reißverschluss um den Blitzkopf schließen.
10. Alternativ können die Reißverschlüsse geschlossen bleiben und
der Blitzkopf außen positioniert werden, um ein diffuseres Licht zu
erhalten. (Eventuell muss die Beleuchtung abgeschirmt werden,
um Reflexionsflecken zu vermeiden.)
11. Den Blitzkopf mittig an der Seite des HiLite positionieren und auf das
hintere Feld richten, um eine gleichmäßige Beleuchtung zu
gewährleisten. Es empfiehlt sich, verschiedene Positionen
auszuprobieren, um unterschiedliche Beleuchtungseffekte zu erhalten.
12. Wenn die Superwhite Vinyl-Schleppe zur Ausstattung gehört, das
Klettband an der Basis des HiLite am Klettband an der Schleppe
befestigen. Der HiLite kann auch um 90 Grad gedreht werden, so
dass er auf der langen Kante ruht, um einen Landschaftshintergrund
zu erhalten. In diesem Fall das Klettband an der längeren Kante der
Superwhite Vinyl-Schleppe befestigen.
13. Der HiLite ist jetzt einsatzbereit.
Zerlegen des HiLite
14. Die V
15. Sofern die Spitzen mit den Bändern befestigt wurden, können die
16. Beim Zusammenfalten auf einer Ecke stehen und die beiden äußeren
17. Wenn die Hände weiter zusammengeführt werden, rollt sich die
inyl-Schleppe (sofern angebracht) entfernen, aufrollen und in
die Schutzrolle führen. Alle Reißverschlüsse öffnen, damit die Luft
entweichen kann. Den HiLite hinlegen und die Klausen an den
Spitzen der einzelnen Stangen von den beiden Stahleinfassungen
lösen.
angen am HiLite verbleiben. (Beim Zusammenfalten darauf
t
S
achten, dass sie nicht zwischen den beiden äußeren Einfassungen
eingeklemmt werden.)
Einfassungen so weit wie möglich unter den Kanten anfassen, so dass
der HiLite vor Ihnen eine Rautenform annimmt. Die Einfassungen
weiterhin gut festhalten, die Hände anheben und wie beim Schließen
eines Buchs zusammenführen. Der HiLite bildet eine "aufgerollte"
Form.
gegenüberliegende Ecke zu Ihren Füßen hin auf. Während die
Bewegung wie beim Schließen eines Buchs fortgesetzt wird, eine
Hand über die andere führen. Der HiLite faltet sich automatisch so
zusammen, dass er drei Kreise bildet. Die drei Kreisformen
zusammenlegen und dabei die Luft herausdrücken. Den HiLite dann
wieder in den Transportkoffer legen.
 Loading...