

La Spaziale S1Dream-T Owner's Manual

Owner’s Manual
Espresso Machine
Made In Italy
By

S1 Dream-T Espresso Machine
Diagrams ....................................................................................................................................................................2
Introduction .................................................................................................................................................................3
First Time Set Up ........................................................................................................................................................3
Basic machine operation ............................................................................................................................................4
Pulling Shots ...............................................................................................................................................................4
Accessing The Menu ..................................................................................................................................................5
Understanding The Display ........................................................................................................................................5
Features ......................................................................................................................................................................6
User Profiles ...............................................................................................................................................................6
Coffee Temperature....................................................................................................................................................7
Boiler Temperature .....................................................................................................................................................7
Coffee Doses ..............................................................................................................................................................7
Hot Water ....................................................................................................................................................................7
Pre-Infusion ................................................................................................................................................................8
MAT ............................................................................................................................................................................8
Multiprofiles .................................................................................................................................................................8
Changing User Profiles ...............................................................................................................................................8
Calendar .....................................................................................................................................................................8
Time ............................................................................................................................................................................8
Beep ...........................................................................................................................................................................8
Language ....................................................................................................................................................................8
Backlight LCD .............................................................................................................................................................9
Timer ...........................................................................................................................................................................9
Counters .....................................................................................................................................................................9
Program. .....................................................................................................................................................................9
Service ........................................................................................................................................................................9
Filter ............................................................................................................................................................................9
Alarms .........................................................................................................................................................................9
Read ...........................................................................................................................................................................9
Write............................................................................................................................................................................9
LED .............................................................................................................................................................................9
Grinding ......................................................................................................................................................................9
EGS ......................................................................................................................................................................... 10
Auto Shutdown ........................................................................................................................................................ 10
Group Cleaning ........................................................................................................................................................ 10
Screensaver ............................................................................................................................................................. 10
Time Update ............................................................................................................................................................ 10
Contrast ................................................................................................................................................................... 10
Deact Pres Sens ...................................................................................................................................................... 10
Password ................................................................................................................................................................. 10
SW Update .............................................................................................................................................................. 10
Default Settings ....................................................................................................................................................... 10
Factory ..................................................................................................................................................................... 10
Set Calibrate T ......................................................................................................................................................... 10
Full Power ................................................................................................................................................................ 10
Offset ....................................................................................................................................................................... 11
PID ........................................................................................................................................................................... 11
Brewing Espresso .................................................................................................................................................... 11
Steaming Milk .......................................................................................................................................................... 13
Maintenance ............................................................................................................................................................ 16
Backflushing ............................................................................................................................................................ 16
Alarms.....................................................................................................................................................................17
Pump Pressure Adjustment.....................................................................................................................................19
Technical Diagrams.................................................................................................................................................20
Warranty .................................................................................................................................................................. 21
We Are Here To Help .............................................................................................................................................. 21
Owner’s Manual Page 1
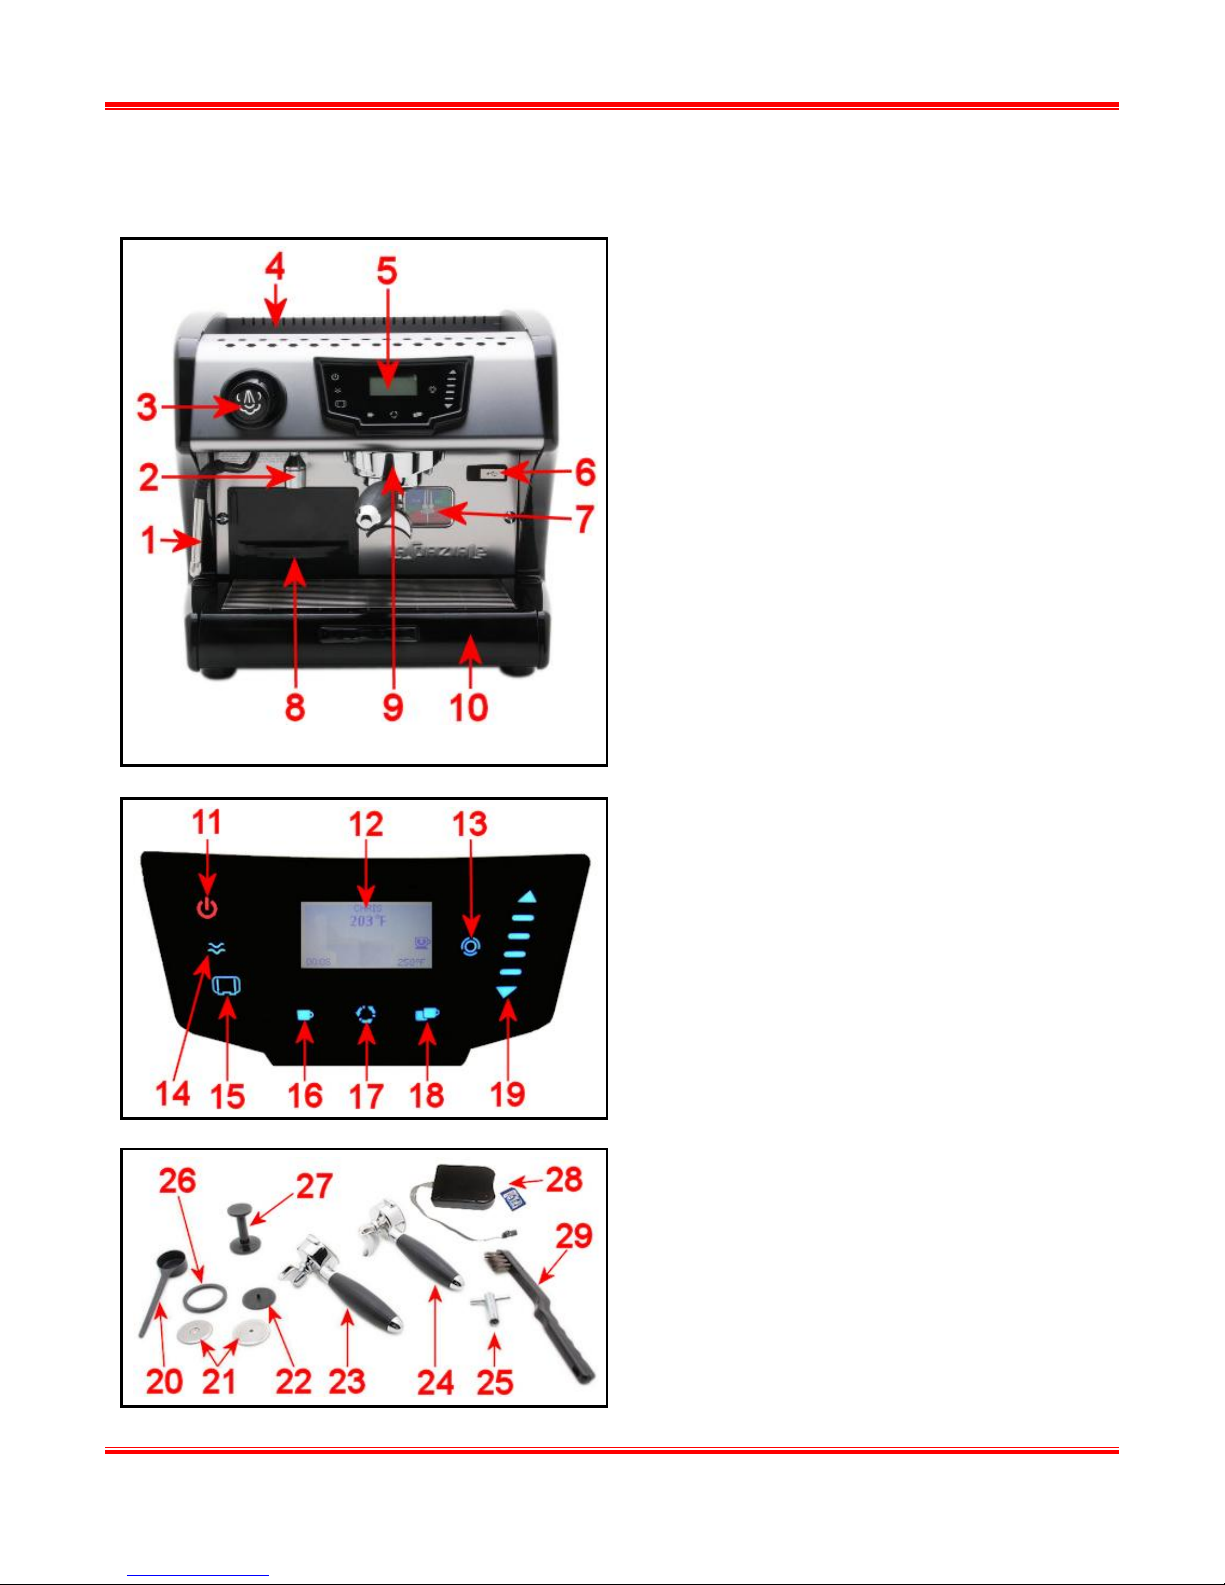
1. Steam Wand
2. Hot Water Faucet
3. Steam Knob
4. Cup Warming Tray
5. Touchpad/Display
6. Card Reader Interface
7. Pressure Gauge
8. Water Reservoir
9. Grouphead
10. Drip Tray
11. Power Button
12. Display
13. Menu/Ok Button
14. Hot Water Button
15. Steam Boiler Button
16. Single Shot Button
17. Manual Shot Button
18. Double Shot Button
19. Menu Navigation Button
20. Coffee Scoop
21. Shower Screen Set
22. Backflush Disc
23. Single Portafilter
24. Double Portafilter
25. Shower Screen Removal Tool
26. Group Gasket
27. Tamper 53mm
28. Card Reader/Memory Card
29. Cleaning Brush
Diagrams
S1 Dream-T Espresso Machine
Owner’s Manual Page 2

S1 Dream-T Espresso Machine
Introduction
First of all, thank you for your business! You are going to love your new S1 Dream-T
espresso machine. It combines classic beauty, value, and great performance for making
the best espressos, cappuccinos, and lattes you’ve ever tasted! These instructions include
tips that will help bring out the Barista that’s hidden within! Enjoy your new machine!
First Time Set Up
Remove the machine from the box and then tighten the legs on the bottom of the
machine if they have loosened in shipping.
Remove the water reservoir and rinse it thoroughly. It may be cleaned with mild dish
detergent, but it is not recommended for dishwasher use.
Before filling the reservoir, test your water for hardness with the provided test strips.
Fill a glass with cold tap water; dip the tip of the test strip into the water for one second,
then pull the strip out of the water and hold it horizontally for fifteen seconds.
Fill the reservoir with cold water making sure the in-tank softener pouch is laying on the
bottom of the reservoir.
Return the reservoir to the machine being careful not to spill any water inside. Then
push the drip tray into place and then it will lock down into notches on each side of the
frame so the reservoir does not back out.
Warning: Do not turn the machine on until following the procedure on the next page or
damage to the machine will occur and will not be covered under warranty.
First Time Set Up - Filling the coffee boiler
WARNING: DO NOT turn the machine on until the steps below have been completed.
Failure to do so will damage the machine and will not be covered under warranty.
Plug the machine into the electrical outlet, but do NOT turn it on. A GFI outlet is
recommended to better protect the machine, but is not necessary.
With the machine turned off press and hold the
button for approximately 5 seconds. The display will
then show the message shown to the right.
Press and hold either the single or double shot
Owner’s Manual Page 3

S1 Dream-T Espresso Machine
button to start filling the coffee boiler.
Keep holding the button until you have water coming out of the group head for at least
20 seconds. When done press the button to return to standby mode.
After filling the coffee boiler then refill the water reservoir before turning the machine on
so there will enough water to fill the steam boiler.
Turning the machine on for the first time
WARNING: DO NOT turn the machine on until the steps above have been completed.
Failure to do so will damage the machine and will not be covered under warranty.
Press and hold the button for approximately 3 seconds until the display lights up. The
pump will come on to start filling the steam boiler and will turn off once it is filled.
Whichever portafilter you intend to use then lock it into the grouphead so it will warm up
with the machine.
If you plan on using the steam boiler for steaming milk then press the button.
Allow the machine to heat up for at least 30 minutes for optimal performance and
temperature stability. It is very important to keep the portafilter in the grouphead and
also keep the cups on the cup warming tray. Failure to do so will result in a cold and
sour shot.
Set the grind particle size on your grinder. This is very important to achieve good
results. Set the grind so that a 2oz double shot comes out in about 25 seconds.
The grind should be finer than salt, but coarser than powder.
For grinder set up tips check out our video here: http://vimeo.com/48806806
Basic machine operation
Turning The Machine On And Off To turn the machine on press and hold the button for
approximately 3 seconds until the machine turns on.
To turn the machine off quickly press the button. (Do not hold button down)
Pulling Shots There are a few ways you can pull a shot with the S1 Dream-T. You can use one
of the two programmable shot buttons, single or double . These buttons can be
individually programmed for volume and temperature. The shots will automatically stop
dispensing at the desired level or you can press the same button again to stop the shot at any
time.
Owner’s Manual Page 4
S1 Dream-T Espresso Machine
You can also pull a shot using the manual button The manual button will use the existing
temperature setting, but will not turn off on its own. To pull a shot with the manual button press
the button to start the shot and then press the button again to stop the shot when it has
reached the desired level. This button is also useful for cleaning the group, backflushing, and
rinsing or pre-heating the portafilter.
Note: After pulling a shot the shot timer will display the previous shot length for 3 seconds.
During this time the shot and manual buttons will not be active. In version 1.19 the shot timer
will be displayed for 10 seconds and the shots buttons can be used while being displayed.
Turning The Steam Boiler On And Off The steam boiler can be turned on/off independently
from the coffee boiler. This is helpful if you will not be steaming milk and want to save on
energy consumption. To turn the steam boiler on press the button. Press the button
again to turn the steam boiler off.
Using The Hot Water Faucet To use the hot water faucet the steam boiler must be on and up
to pressure. Under the menu in profiles the hot water faucet can be set up to work as a manual
button or can be programmed to discharge a set amount of water each time. For manual mode
if you press the button, the water will start to flow and then press the button again to
stop the flow of water. It is not recommended to remove more than 6oz of water at any given
time until the boiler has had time to refill.
In automatic mode the button can be programmed to give a pre-set amount of water and
will automatically stop dispensing without having to press the again to stop dispensing.
Accessing The Menu To access the menu press and hold the button for approximately 3
seconds until the menu appears on the display. Then use the up/down arrow keys to cycle
through the menu and then press the button to select a menu item to view or change.
To exit the menu press the up arrow key until “Home” is displayed at the top of the screen and
then press the button to return to normal operation.
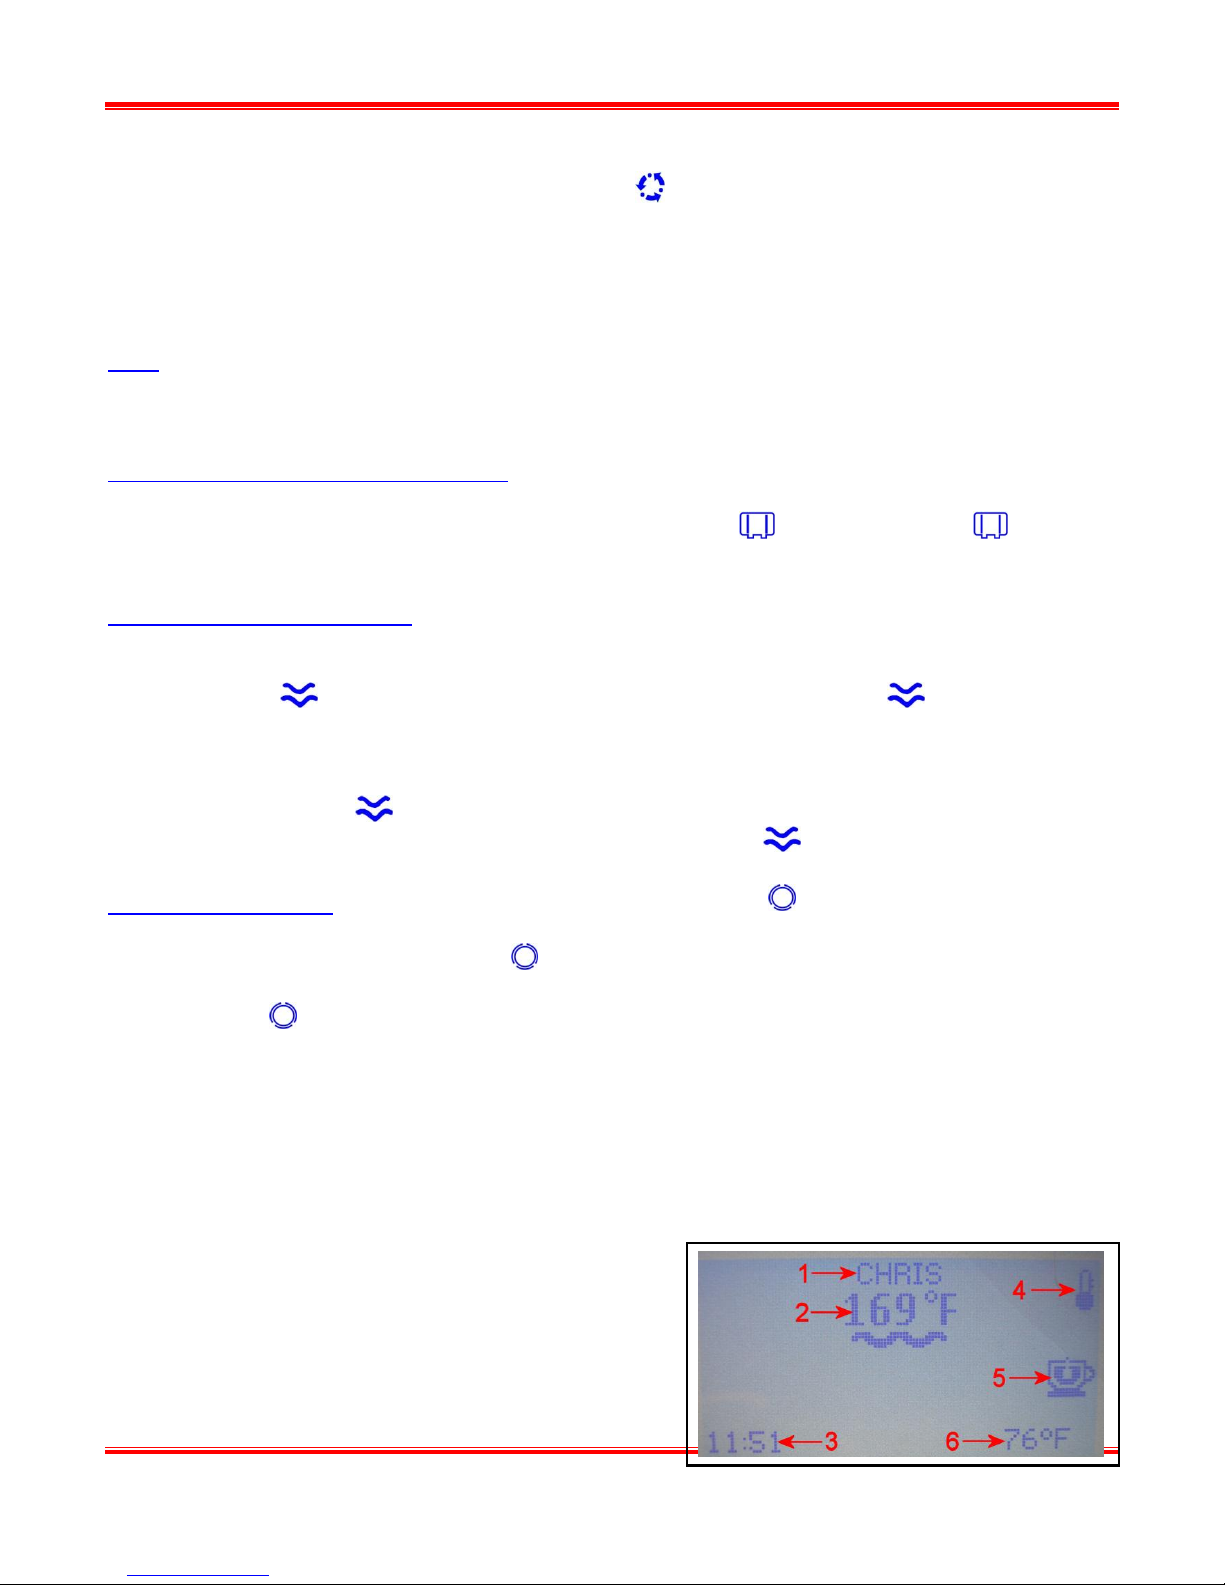
Understanding The Display
The display is the information center for the S1 Dream-T. It will tell you the machine status,
time of day, boiler temperatures, and will also give you an alarm message in the event of a
component failure. The diagram below shows the display in normal operation mode.
1. Current Active User Profile
2. Coffee Boiler Temperature
3. Time Of Day
4. Icon Is Shown When Steam Boiler Refills
5. Icon Indicates Steam Boiler Is Turned On
6. Steam Boiler Temperature (Steam boiler must be on)
Owner’s Manual Page 5

S1 Dream-T Espresso Machine
Power Modes
The S1 Dream-T can be set up to work in full power mode. In full power mode the machine
draws 20amps of power so a 20 amp receptacle and breaker must be used. If one is not
available then full power mode MUST be turned off.
In full power mode the machine is able to heat both boilers at the same time. This is helpful if
you want to be able to pull a shot and steam milk at the same time.
When full power mode is turned off then it is only able to heat one boiler at a time and will
always give priority to the coffee boiler. In this mode it is recommended to pull a shot and
steam milk separately or the machine may lose steam pressure if done at the same time.
The power mode can be easily changed in the “Factory” menu.
The password for the factory menu is J73MZ
Note: In version 1.19 the Factory menu has been removed and the full power mode can be
accessed without a password.
Warning: Using the machine in full power mode in a 15 amp outlet should never be done.
Failure to follow this warning could pose a fire hazard and is not recommended.
Information Center With the machine turned on, press and hold the up arrow key. The display
will then show the serial # and current firmware version. Then press the down arrow key to
cycle through the machine settings and alarms. To exit out of the information screen press the
ok/menu button.
Features
User Profiles
The S1 Dream-T is capable of storing 4 different user profiles. This enables the machine to be
programmed for different shot volumes, brew temperature, steam boiler water temperature,
and hot water delivery method. The machine can easily be switched between different user
profiles to meet the discriminating demands of everyone that uses it. Profiles can also be used
for different coffee blends that require different temperatures so use your imagination and the
possibilities are endless.
Creating User Profiles
Owner’s Manual Page 6
 Loading...