

Page 1

The MP3 player is a new generation of digital portable device, supporting multiple music formats including
MP1, MP2, MP3, WMA, WMV, ASF and WAV, etc. Its perfect sound quality, great reliability and exquisite
appearance make it a masterpiece. Devoutly hope to bring you great enjoyment in this digital age.
Unique Features
● MTV film function
● Function of browse of JPEG picture
● Exquisite Appearance
Unique appearance designed as a gold brick and comfortable for handling
● Multi-Code Player
Supporting MP1, MP2, MP3, WMA, WMV, ASF and WAV formats
● Firmware Upgrade
Providing the latest updated features via firmware upgrade from the website
● FM Function (Only In Certain Models)
You may easily listen to FM stations and set your favorite stations by using Auto Preset or Manual Preset. The
player can save 40 (20 for each Band) local stations at different frequency.
● Drive Free U Disk
You may manage your files directly through “Portable Disk” in “My Computer” on Winows2000 Operating
System or above without driver.
● “Private Space” Disk Mode
The flash memory can be divided into two parts by using the accessory tools and one is encrypted to hide the
contents saved inaccessible by others. Keep Your Secret!
● Record/ Replay
The player supports recording through built-in microphone and saves as WAV and ACT formats. Meanwhile it
supports real digital A-B replay or comparison replay.
● 7 Preset EQ
Normal, Rock, Pop, Classic, Soft, Jazz and DBB
● Multiple Repeat Mode
Normal, Repeat One, Folder, Repeat Folder, Repeat All, Random, Intro.
● Power Off
You may set Sleep Timer or Off Time mode in your own convenience.
● GUI (Graphic User Interface) Menu
Vivid animation menu with corresponding characters make it easy to operate.
Page 2

Declaration
Thank you for your purchase.
Please read this manual carefully before using your new player.
Contents in this manual may change possibly for better service.
We have the right to make changes to this manual without notice.
If the actual operations of your player is not the same as the instruction in this manual, please visit our website for
latest product information.
1. Locating the Controls
● Appearance & Keys
Page 3
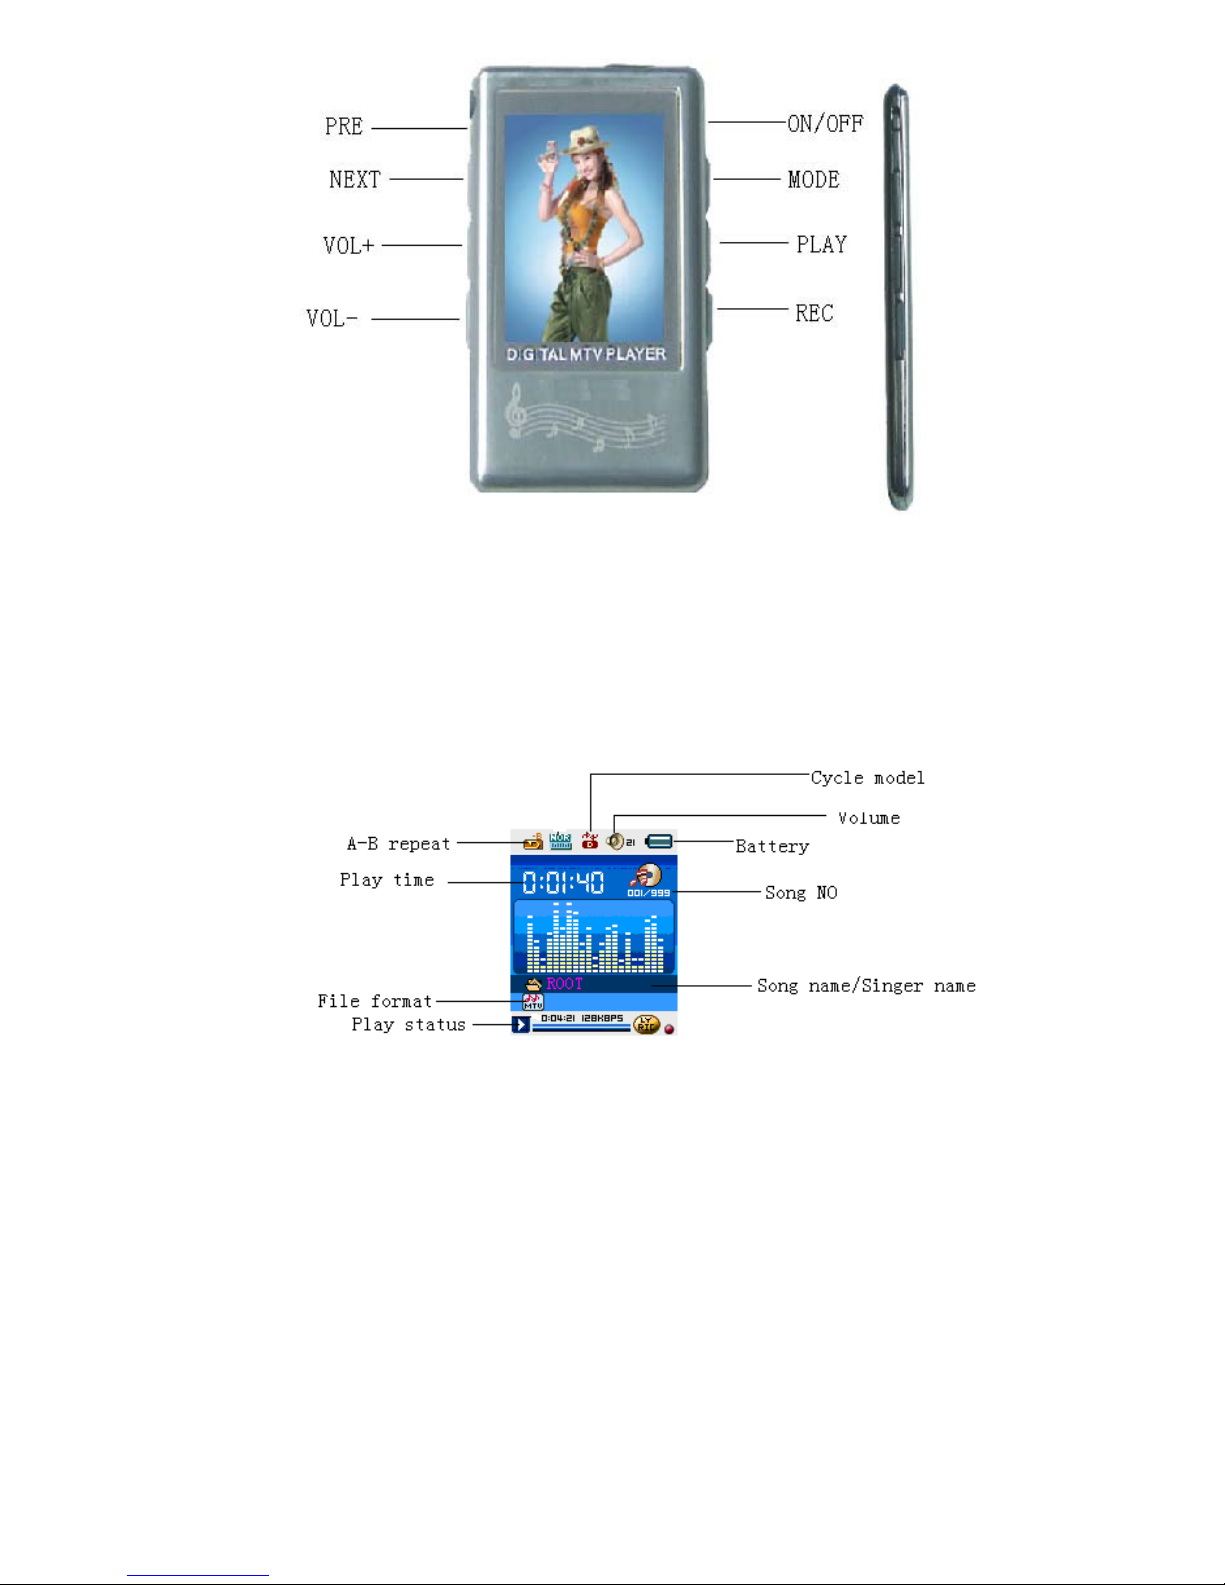
● Display screen
2. Basic Operation
z Entering Menu System
Pressing Mode button may enter the menu system, including main menu (long press of mode key at Stop
mode), submenu at Play mode (press to enter) and submenu at stop mode (press to enter).
Browsing
z
○ Fast forward or fast backward when playing music
z Entering Different Modes
You may enter different modes from the main menu.
Main menu: (long press Mode button)
Page 4
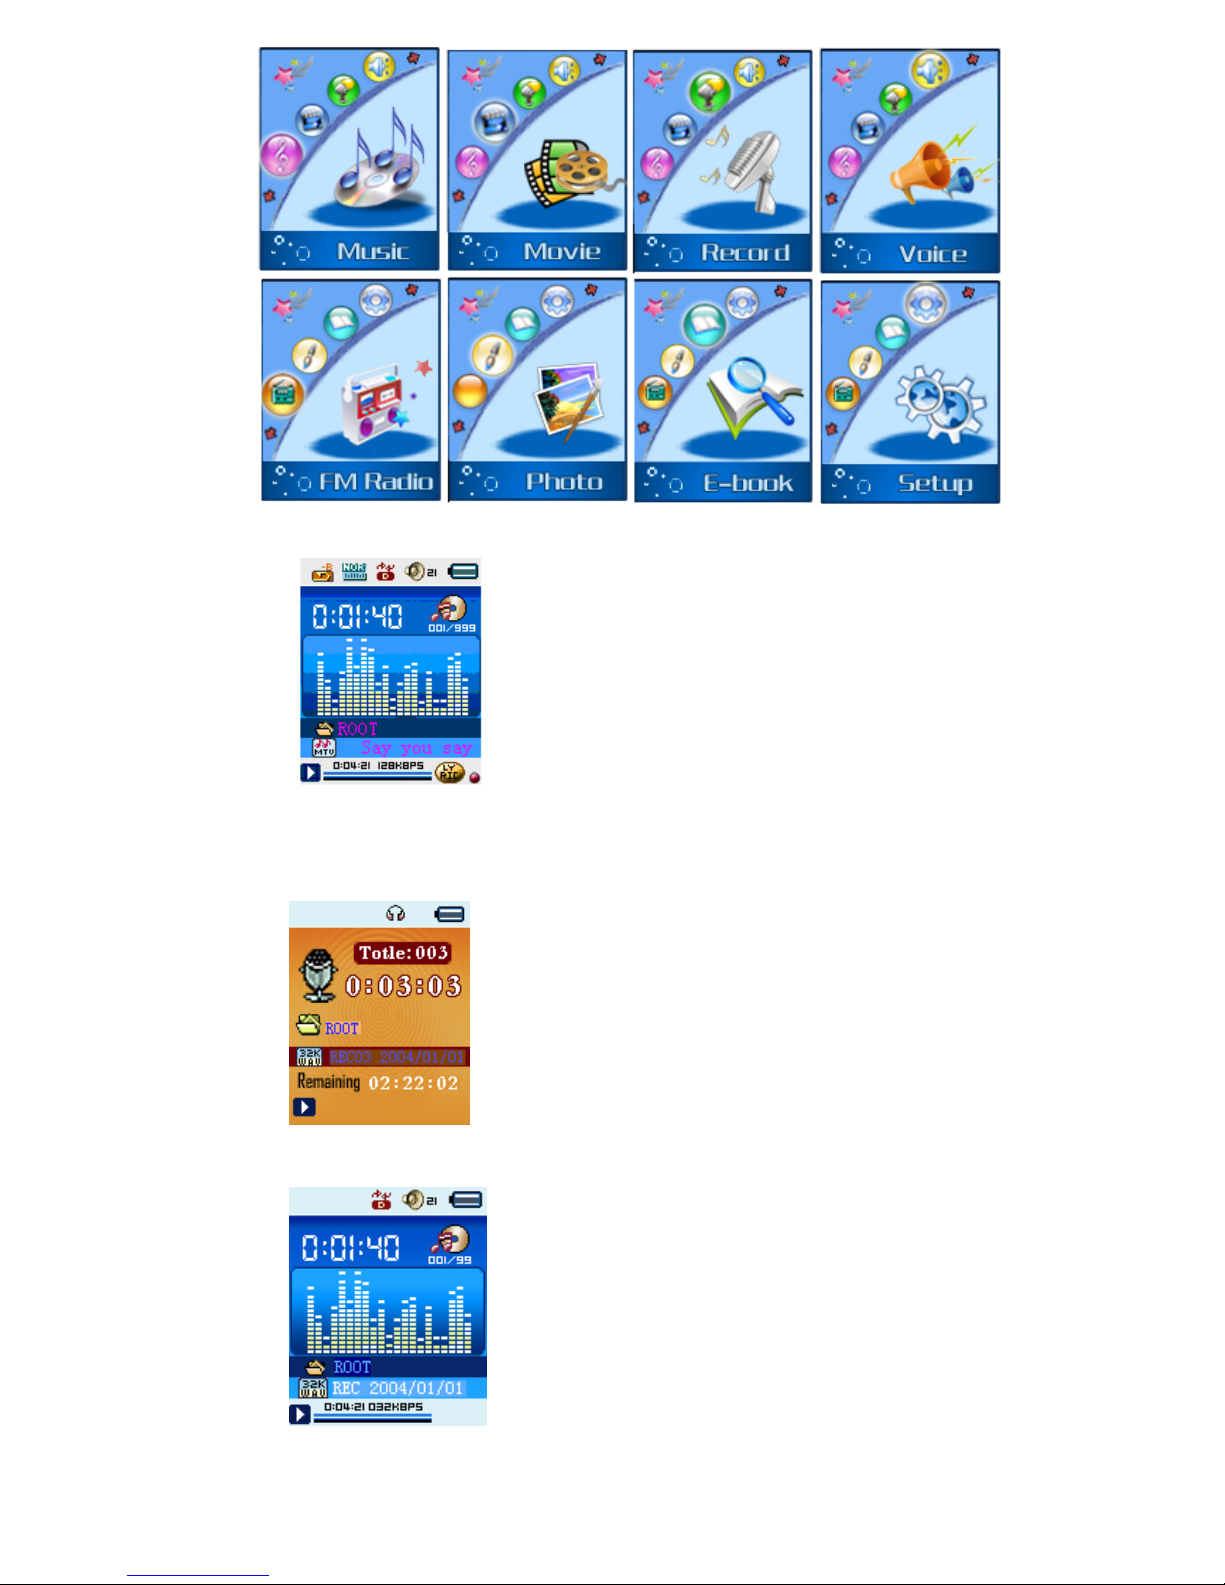
Music mode:
Record mode:
Voice mode:
FM mode:
Page 5
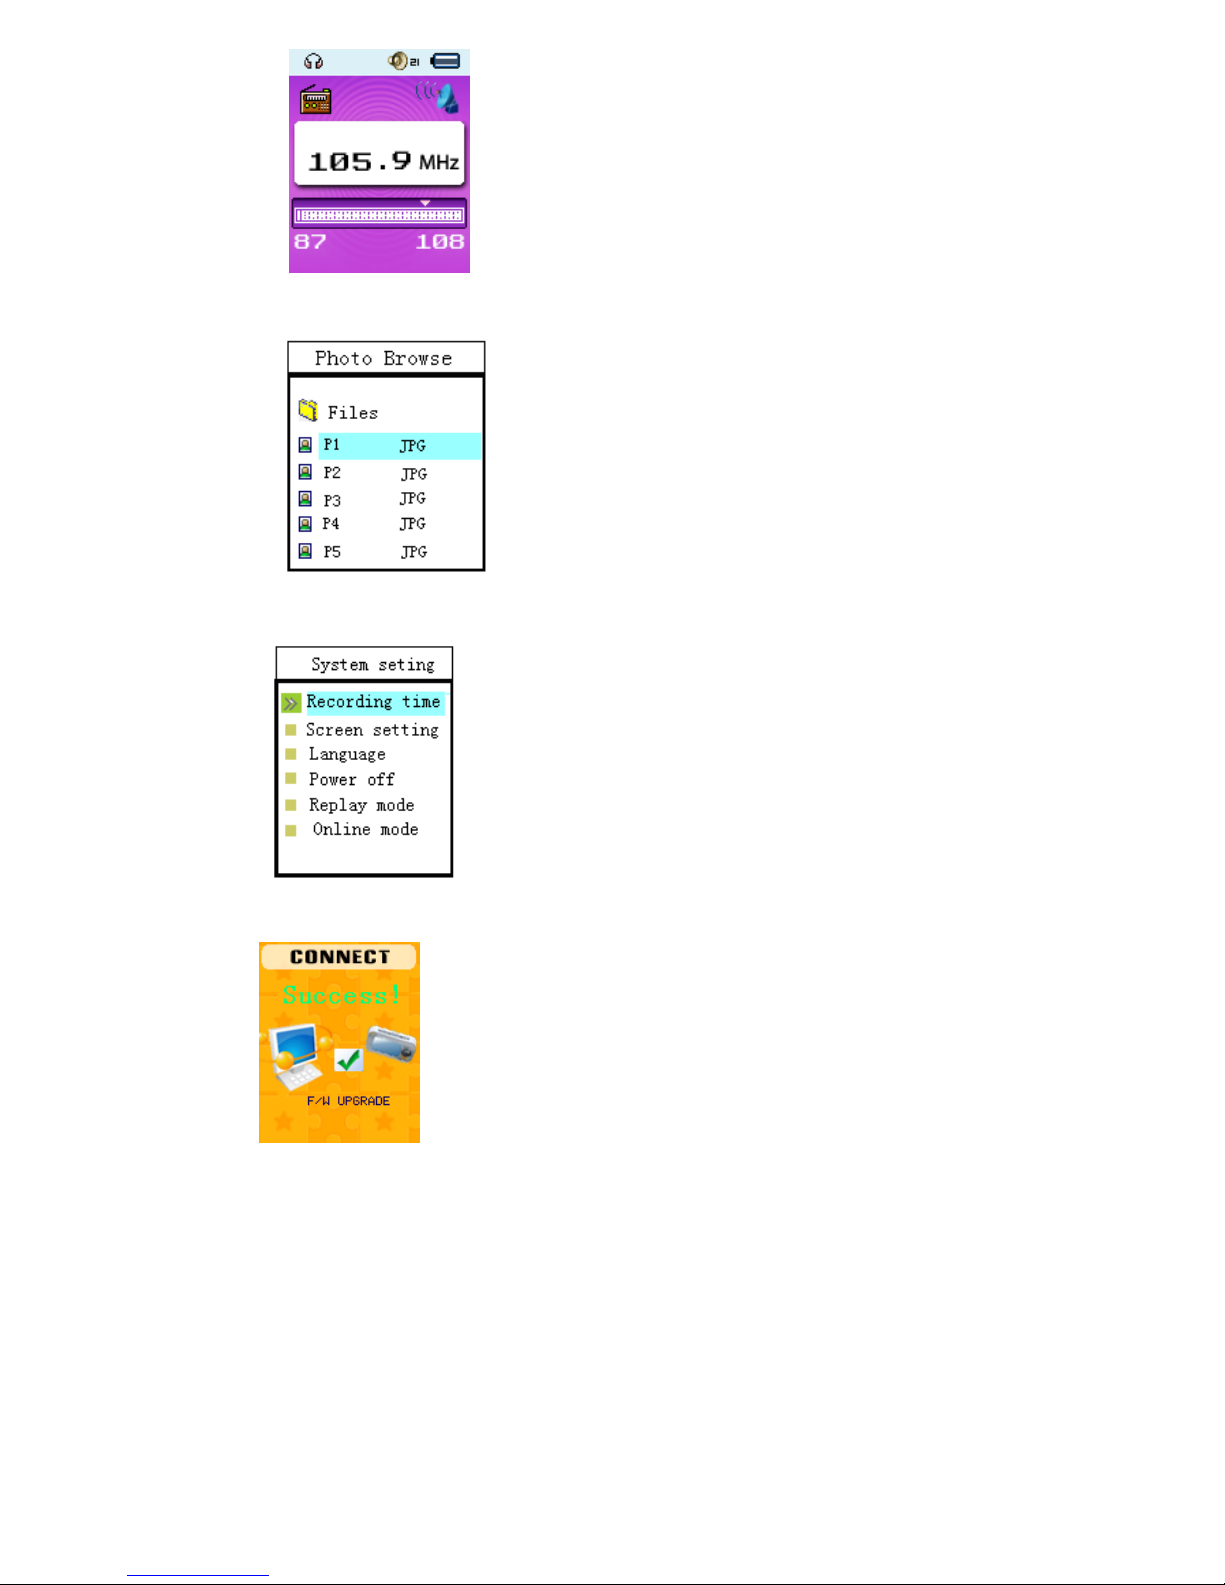
Browsing Pictures:
System Setting:
USB Mode when connecting to PC:
z Volu m e C o nt ro l
Press “VOL-” button to decrease Volume.
Press “VOL+” button to increase Volume.
z
Tur n O n /O ff
Long press “Play”
Note: turn on/off the power
z Play& Stop (Pause when recording)
Press “Play”
You may press Play button to fast exit from any menu or option interfaces.
Page 6

3. Keys Operation
1. Star/Play/Pause/Stop, press “Play” button.
2. “Mode” enters in the main menu or submenu.
3. “ON/OFF”: take on or take off the mp3 player.
4. “VOL+/VOL-”: Increase or decrease the volume.
5. Next: to the next or speed play
6. Pre: the previous or skip backward.
7. “REC”: recording mode.
4. Play Music
z Basic Operation
1. Connect the earphones
2. Push the Power switch to ON
Long press PLAY button to turn on the player and enter Music mode. Press button again to play
music.
3. To select music
Pre: to select previous music
Next: to select next music
4. To adjust the volume
Press “VOL-” button to decrease Volume.
Press “VOL+” button to increase Volume.
z EQUALIZER Mode
1.
Playing music status
2. Press Mode button to enter Play Submenu
3. Push Next switch to select Equalizer menu
4. Press Mode button to enter EQUALIZER selection Menu.
5. Push Next button to select, and press Mode button to confirm selection.
z Lyric Display (Kara-OK Function)
This player supports “*.LRC” lyric files (users may download from http://www.51lrc.com), and lyrics may
be displayed isochronously while playing music.
How to use lyric files?
Save the lyric file with the same name as that of the corresponding music file.
e.g.: Music file name: Andy-Water.mp3
Page 7

Lyric file name: Andy-Water.mp3.lrc
1 the current song has matching lyric file, but don’t display.
2 Long presses Mode to enter the Lyric Interface.
3. Press Mode to return to Music play mode.
4. Browse lyrics manually.
Press VOL to browse lyrics.
5. Record Voice
Make sure that the battery is not in the status of “low battery”.
The player may save 99 recording files under each directory.
z Start recording in Record Mode
1. Enter main menu.
2. Push Next switch to select recording mode.
3. Press Mode button to enter Record mode.
4. Press Play button to start recording.
5.Press Play button to pause recording. (The time icon flickers)
Press Play button to continue recording.
Long press Play button to stop recording.
NOTE:
The recorded file is saved in the current folder set in “Recording Stop submenu/ /Local Folder”.
If “Overflow” is displayed on the screen, the player’s memory is full. Please delete other files to make some
space available.
If “over record” is displayed on the screen, the current directory has already had 99 recording files. Please switch
to another directory.
z Select Recording Type
1. On the status of Stop Recording
2. Press Mode to enter Record Submenu.
3. Push Next to select REC Type option
4. Press Mode to enter this option
5.Push Next to select desired recording type
Page 8

6.Press Mode to confirm the type selected
7. Press Play to start recording
Recording Type:
6.Play Recorded Files
1. Enter main menu.
2. Push Next to select “Voice mode”.
3. Press Mode to enter Voice mode interface.
4. Press Play to start playing.
5. Select recorded files:
Pre: to select the previous recorded file
Next: to select the next recorded file
z Convert ACT Files to WAV Format Files
The ACT format files can be converted to WAV format files through the accessory installation tools.
1. Run “Sound Converter” program, and click “Open” button.
2. Choose the ACT files for format conversion.
3. Click “Convert” button, the conversion starts.
Besides the conversion from ACT to WAV, the accessory tool can also play WAV and MP3 files.
7. How to use FM(Only In Certain Models)
1.Enter main menu.
2.Push Next switch to select FM Mode.
3. Press Mode button to enter FM mode
4.Press Mode button to enter FM mode submenu
5.FM submenu
¾ Search mode
Select Search mode icon at the FM mode menu, and then press Mode to enter Search mode interface.
Freq Mode function:
Search station function:
If the player exist more than one station, Push Last/Next button to listen to the station.
options Introduction
Push Last/Next button and the player forward or backward single step 100KHZ to manual search
station;Push on Last / Next button for about 2 seconds, and the player scans forward or backward per
100KHz, and stops at the scanned station. If you want to stop scanning, push Last / Next switch to
stop.
Auto Search function:
When selecting Auto search function, the player can auto scanned frequency between 87.5MHZ
and 108MHZ
and save to scanned station
Page 9
¾ Search level
There has eight grade, Auto search starch station demand to signal intensity more high when the grade
more high
¾ Save
Save station is manual scanned in sequence, US Band and Japan Band can save maximum 20
stations respectively.
¾ Delete
Delete station is exit。
¾ Select band
At the FM submenu, select the icon and press Mode button to enter the Select band interface, then
push Next button to choose US Band (FM87 - 108MHz) or Japan Band (FM76-90MHz) , again press
Mode button to confirm finally.
8. Browse of JPEG
a. File selection:
Enter the file selection
Press the “play” button and browse JPEG
Press the “Next/Last” button to selects the next/last file.
Press the “mode” button, enter the stop submenu:
1.local folder 2.play set 3.delete 4.exit
Play set: manual play and auto play
Auto play: you can set the page turning time from 1 sec. to 8sec.
b. Browse picture
Enter the browsing picture:
Press the “Next/Pre” button to play the next/Pre picture
Long press the “mode” button to enter pervious menu
9. System Setting
Page 10
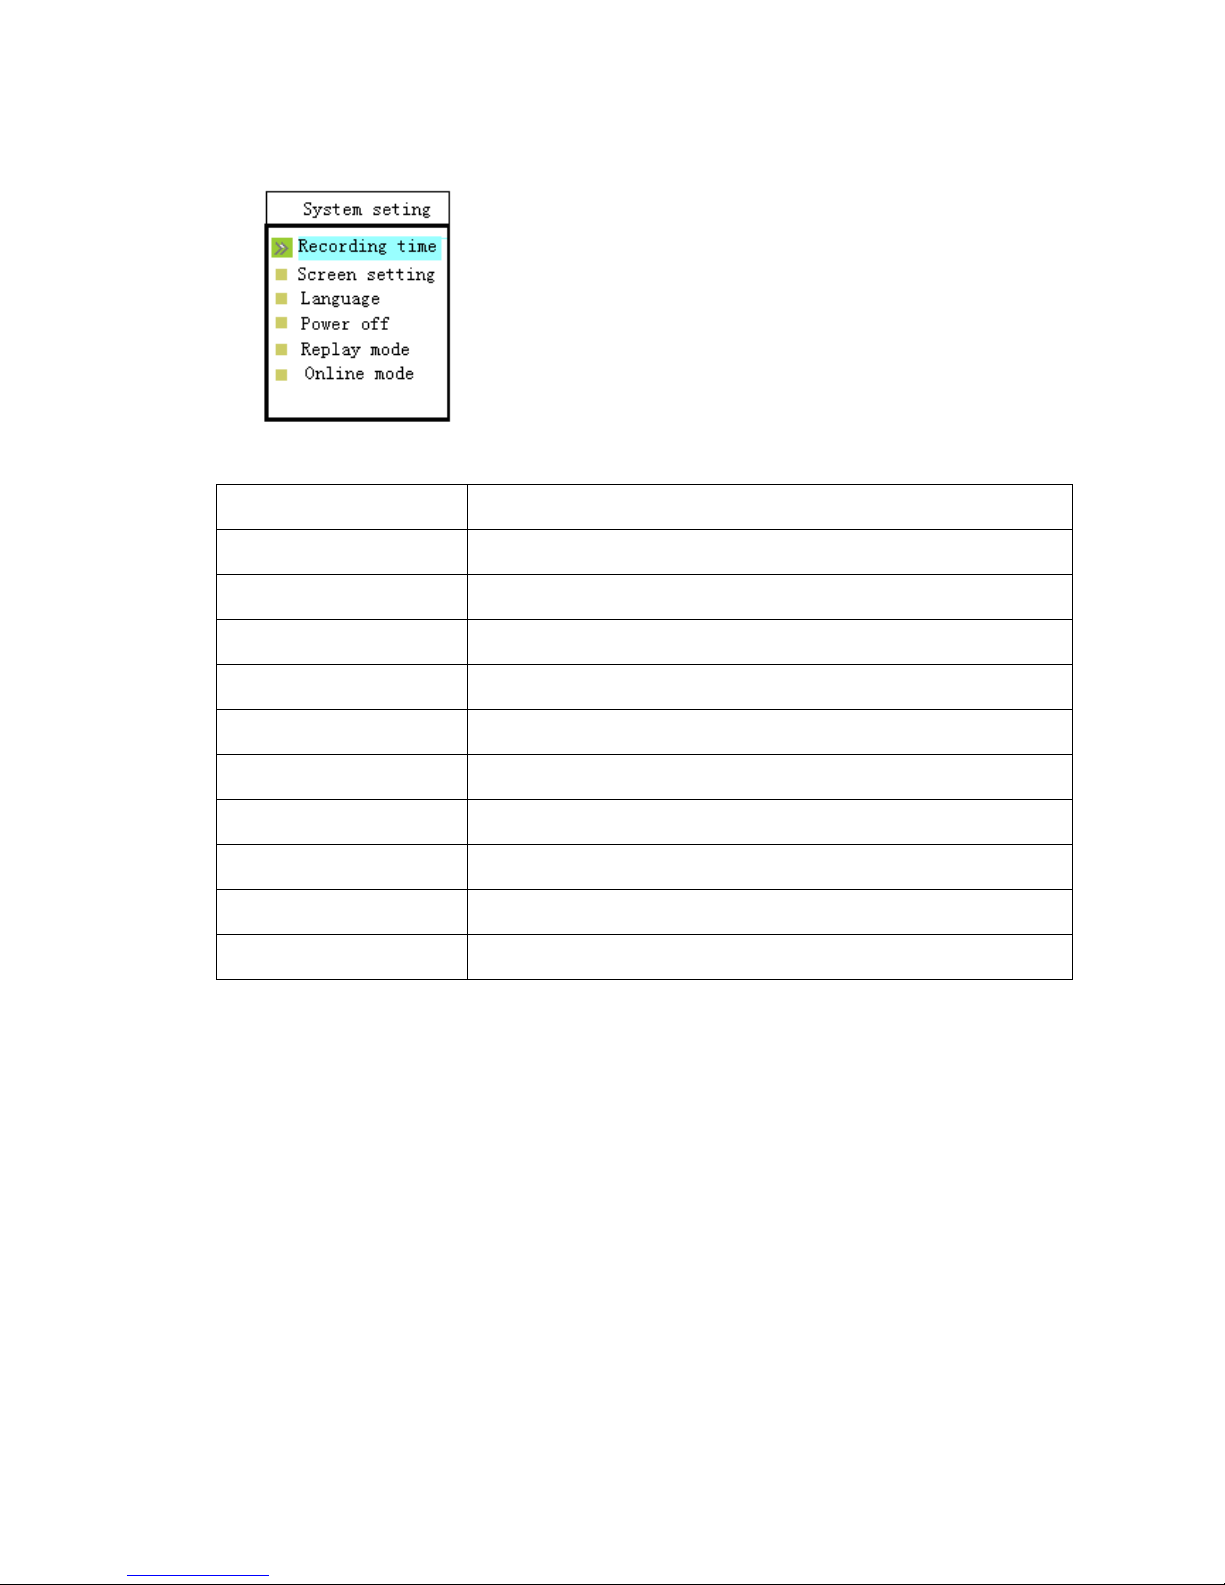
System parameters can be set here and every option varies according to firmware upgrading.
Enter main menu, push Next button to select System setting icon, and then press Mode button to enter
System Setting submenu interface is as follows:
z Parameters Introduction
(Record time)
(Screen set) Set the LCD light
(Language)
(Power off)
(Charge set) Set to charge or not
(Replay mode)
(Online Mode)
(Memory info.)
(F/W version)
(F/W upgrade)
(Exit)
Set the time and date when recorded files are saved
Set different languages displayed
Set a fixed time after which the player may turn power off automatically
Set working status on Replay Mode
An option specially designed for “Private Space” function
Show memory capacity and percentage that has been used
Show firmware version
Special for firmware upgrading
Exit from current interface
Instruction
z
○ Language
1.At System setting interface, push Next/Pre button to select “Language” icon:
2.Press Mode button to enter “Language” setting interface:
3.Push Next/Pre button to select desired language.
The icon correspond language: Simple Chinese; English; Trad Chinese; Japanese; Korean; French; Italian;
German; Spanish; Swedish; Portugal; Denmark; Dutch
4.Press Mode to confirm to exit.
○ LCD Set
1. Brightness: accommodate the brightness.
2. Black mode (0-30): Set up in how long have not button operate, screen darken.
Page 11

3. Exit
○ Power Off
Operating steps refer to Language setting.
Off Time mode refers that after a fixed period of time (unit: second) when no operation on keys
at Stop mode, the player may turns off automatically to save power. If “0” is selected, power saving
function is invalid.
Sleep Timer refers that you may set a fixed period of time (unit: minute) for the player to turn off
automatically when no keys operation no matter which mode it is at. This function is specially
designed for listening to music before sleep.
Note: Setting of Sleep Timer is valid only once and the set time will be cleared after power off.
The time needs to be set again next time.
○ Replay Mode
Operating steps refer to Equalizer Setting
Manual Replay means that at A-B Replay Mode the endpoint B can be set manually only.
Auto Replay means that at A-B Replay Mode the endpoint B can be set automatically.
(Especially for English Reading files without music)
○ Contrast
Operating steps refers to Backlight setting.
○ Online Mode
Operating steps refers to Equalizer setting.
Some operating systems (under Windows 2K SP4) can not support two driver letters in one USB disk.
Thus, if “Private Space” function is on, choose which disk you are going to use, i.e., “single ordinary disk”
or “single encrypted disk”, in order for correct display of selected disk after connecting to PC.
○ Memory Info.
The number displayed represents total memory capacity and the percentage refers the capacity used.
○ F/W Version
Operating steps refers to Language setting..
○ F/W Upgrade
It is specially designed for Firmware Upgrade.
Tips: After pressing Mode button to select options, you may press Play button to exit from menu
directly. The operation on Play button for direct exit is valid to all menus.
10. USB Disk
The player supports standard USB disk function with operating system of Windows98 (driver needed),
Page 12

Windows 2K and above (driver free), Mac OS 10.3 and above, Linux Redhat 8.0 and above.
The player supports power supply through USB. At Standby Mode, press Mode to quit to main menu, then
select to enter desired mode.
The player also supports Suspend Mode.
How to connect to PC? Turn on the player and plugs the USB cable to enter the following Mode 1.
The player may display three modes after connecting to PC:
1.Standby State
2.Downloading state
3.Uploading Mode
11、Firmware Upgrade
The player supports firmware upgrading or maintenance through installing special tools on PC.
1. Enter main menu.
2.Push Next to select “System Setting”
3. Press Mode to enter System Setting
4. Push Next to select Firmware Upgrade.
5.Press Mode to enter Firmware Upgrade interface
6. Connect player to PC
7. Run the upgrading tools “MP3 Player Update” on PC, then press “choose firmware of new version”
button.
8. Choose new firmware program (You may find it in accessory CD or download form our website.)
9. Press “Start” button, the system starts upgrading.
10. If upgrading successfully, screen will display.
Caution:
Firmware upgrade is an operation to promote and optimize the performance of the player. Even if the
firmware works without upgrading, there is no any influence on the normal operation of the player.
Incorrect operation of firmware upgrading may cause the player working abnormally. Please read the
manual carefully before operation and the people should operate firmware upgrading with basic
knowledge in computer operation.
The upgrading firmware is specially programmed for this player only and not suitable for other serial
players, and other firmware is not suitable for this player as well.
12、Select Folders
z Select Folders (At Stop Submenu)
Users can save files in different folders (folders should be set up on PC in advance), to manage and play
files according to different types. The player supports identification of 99 subdirectories.
Page 13

1. At Stop interface. (Current example is at Music Mode, and folders can be selected at both Record and
Voice Mode as well.)
2. Press Mode to enter Stop Submenu.
3. Press Mode again to enter Select Folder interface.
4. Press Next or Pre to select folders.
5. Press Mode to confirm the folders selected
Note: Independent folders can be set at corresponding modes as Music Mode, Record Mode and Voice Mode,
i.e., three modes are not bound to correspond with the same folder.
z Delete File (At Stop Submenu)
Files and FM stations can be deleted at corresponding modes as Music Mode, Voice Mode and FM Mode.
1. At Stop Interface.(No Stop Interface exists at FM Mode.)
2. Press Mode to enter Stop Submenu.
3. Press Next/Last to select “Delete” or “Delete All”.
4. Press Mode to enter Delete Interface.
5. Push Next to switch between “NO” and “YES”.
6. Press Mode to confirm and deletion starts.
“Delete all” means to delete all the relevant files at current mode in current folder. (For example, at Music
Mode executing “Delete All”, all the music files in current files may be deleted, while recorded files without
change.)
The deleting interface is much simpler at FM Mode, only to the 3
rd
step. It is the saved stations to be deleted.
When deleting files on PC, please take care to eject the player safely before pulling out USB cable, otherwise
files may not be deleted.
z Play Mode (Play Submenu)
When playing music and recorded files, different play modes can be selected. (such as Repeat, shuffle,
etc.)
The first option in Play Submenu is Play Mode. The player will play files according to the mode selected.
Page 14

z Tempo Rate (Play Submenu)
When playing music (Only for MP3 formats) or recorded files, different tempo rate can be set (faster or slower)
without changing the tone and sound.
1. When playing music files
2. Press Mode to enter Play Submenu
3. Push Next to select Tempo Rate
4. Press Mode to enter Tempo Rate
5. Push Next to quicken tempo rate and push Pre to slow down tempo rate.
6.Press Mode button to confirm desired tempo rate to exit the current interface.
Note: Tempo Rate set is suitable to each music file till it is changed.
z Replay Mode
Enter Play Submenu to enter.
○ A-B Replay
1. At Music Mode or Voice Mode
2. Press Mode to enter Play Submenu.
3. Push Next to select “Replay”.
4. Press Mode to enter Replay.
“A” flickers in Replay Mode icon
5. Push Next to set “A”.
After “A” set, “B” flickers in icon , and endpoint B needs to be set.
6. Push Next to set “B”.
and start point is to be set.
Replay icon is fixed and A-B segment replay begins. When replay times count up to times set in
advance, the player will quit from Replay Mode. At Replay Mode, pushing Pre can set “A” again to select
another segment. (Setting of replay times refers to “Replay Times” in the next section.
○ Follow Read (This function does not exist at Voice Mode)
1. Replaying A-B segment, Push Next to enter Follow Read Mode.
2. Replay icon changes to Follow Read icon , and record sound of users is recorded. The
Page 15

recording time is as long as A-B segments.
3. After recording time, the icon changes to , and original sound is played. Push Next button to enter
Comparison.
At this mode, pushing Last button may return to A-B Replay Mode.
○ Comparison (This function does not exist at Voice Mode)
1. Enter this mode, Replay icon changes to and the recorded sound of users is played.
2. After playing the recorded sound, the icon changes to , and original sound is played
3. After playing the original sound, the recorded sound is played again. The whole procedure will not stop
(without limitation by Replay Times) until press Mode to exit.
At this mode pushing Pre may return to Follow Read Mode.
At the three modes above, pressing Mode may exit from Replay Mode directly.
z Replay Times (Play Submenu)
Operating steps refer to Backlight setting.
Replay times mean that after A-B segment has been replayed up to fixed times, it will exit from Replay
Mode.
z Replay Gap (Play Submenu)
Operating steps refer to Backlight setting.
Replay gap means the break period between different playing times (unit: second).
13.Strong Recommendation
z Private Space function
Many MP3 users are puzzled by the problem of information disclosure and private data accessed by others.
When others borrow MP3, you may have to delete the private information, which may cause big bother.
However, the “Private Space” function provided by this player completely solves the bothering problem.
Users may divide USB disk of this player by its accessory tools into two parts in any proportion (users may see
two driver letters on PC. But SP4 should be installed on operating system of Windows 2K, otherwise only one driver
letter can be seen. Without such installation, users must choose “single ordinary disk” or “single encrypted disk” in
“Online Mode” of “Sys Setting” menu.), and one part can be encrypted as private space which needs password to
access to. (If users do not encrypt both parts, USB memory may be treated as two disks.) Such is the great “Private
Space” function.
1. Connect the player to PC.
2. Run the accessory installation tools “MP3 Player Disk Tool”.
3.The first is format tool. Choose “Partition and encrypt” option, and set a desired capacity for the encrypted
disk, then choose the setting of username or password. Fill the username in the blank “New username”, and
password in the blank “New password”, then input the same password again in the blank “New password Confirm”.
After the above operation, click “Start” button, and partition starts.
4.Partition finishes with hints as follows:
Press “OK”, then PC may restart.
Page 16
Two disks may be displayed after restarting (only one driver letter may be displayed when under Windows 2K
SP4). Click to access the encrypted disk (the second one), and there are three files in it, two private files and one
executable file with only 300K memory space.
Run the executable file “R disk Decrypt.exe”, and input username and password in dialog box. If they are
correct, disk can be accessed and files can be copied.
Username and password is required to access to the encrypted disk in every connection to PC.
Note: Dividing one disk into two parts may erase the data in it. Please backup the data in disk before
division. And merging two parts to one may also erase the data.
Warni ng: Do not lose the user name and password you’ve input, otherwise you can not access to the
encrypted disk and you have to merge the two parts to cancel the encrypted disk with files in it losing.
Trouble Shooting
Check whether the battery have been inserted properly.
No Power
Check whether the player is turned ON.
Check whether Volume is set “0” and connect the headphone
No sound is heard from
headphone.
Characters in LCM are
corrupted
FM Reception is poor.
Download of music files
fails.
plugs firmly.
Check whether the headphone plug is dirty.
Corrupted MP3 may make a static noise and the sound may cut
off. Make sure that the music files are not corrupted.
Check whether the right language has been selected.
Adjust the position of the headphone and player.
Turn off the power of other electric devices near the player.
The headphone may be used as the antenna.
Check whether USB cable is damaged and is connected
properly.
Check whether driver is installed correctly.
Check whether the player’s memory is full.
Specification
Dimension
Weight
LCM Window 1.5” really applauses
PC connection Full-speed USB2.0
Flash memory
Battery Max Play time: hours
Record Sample rate 8KHz
128M-1GB
Page 17
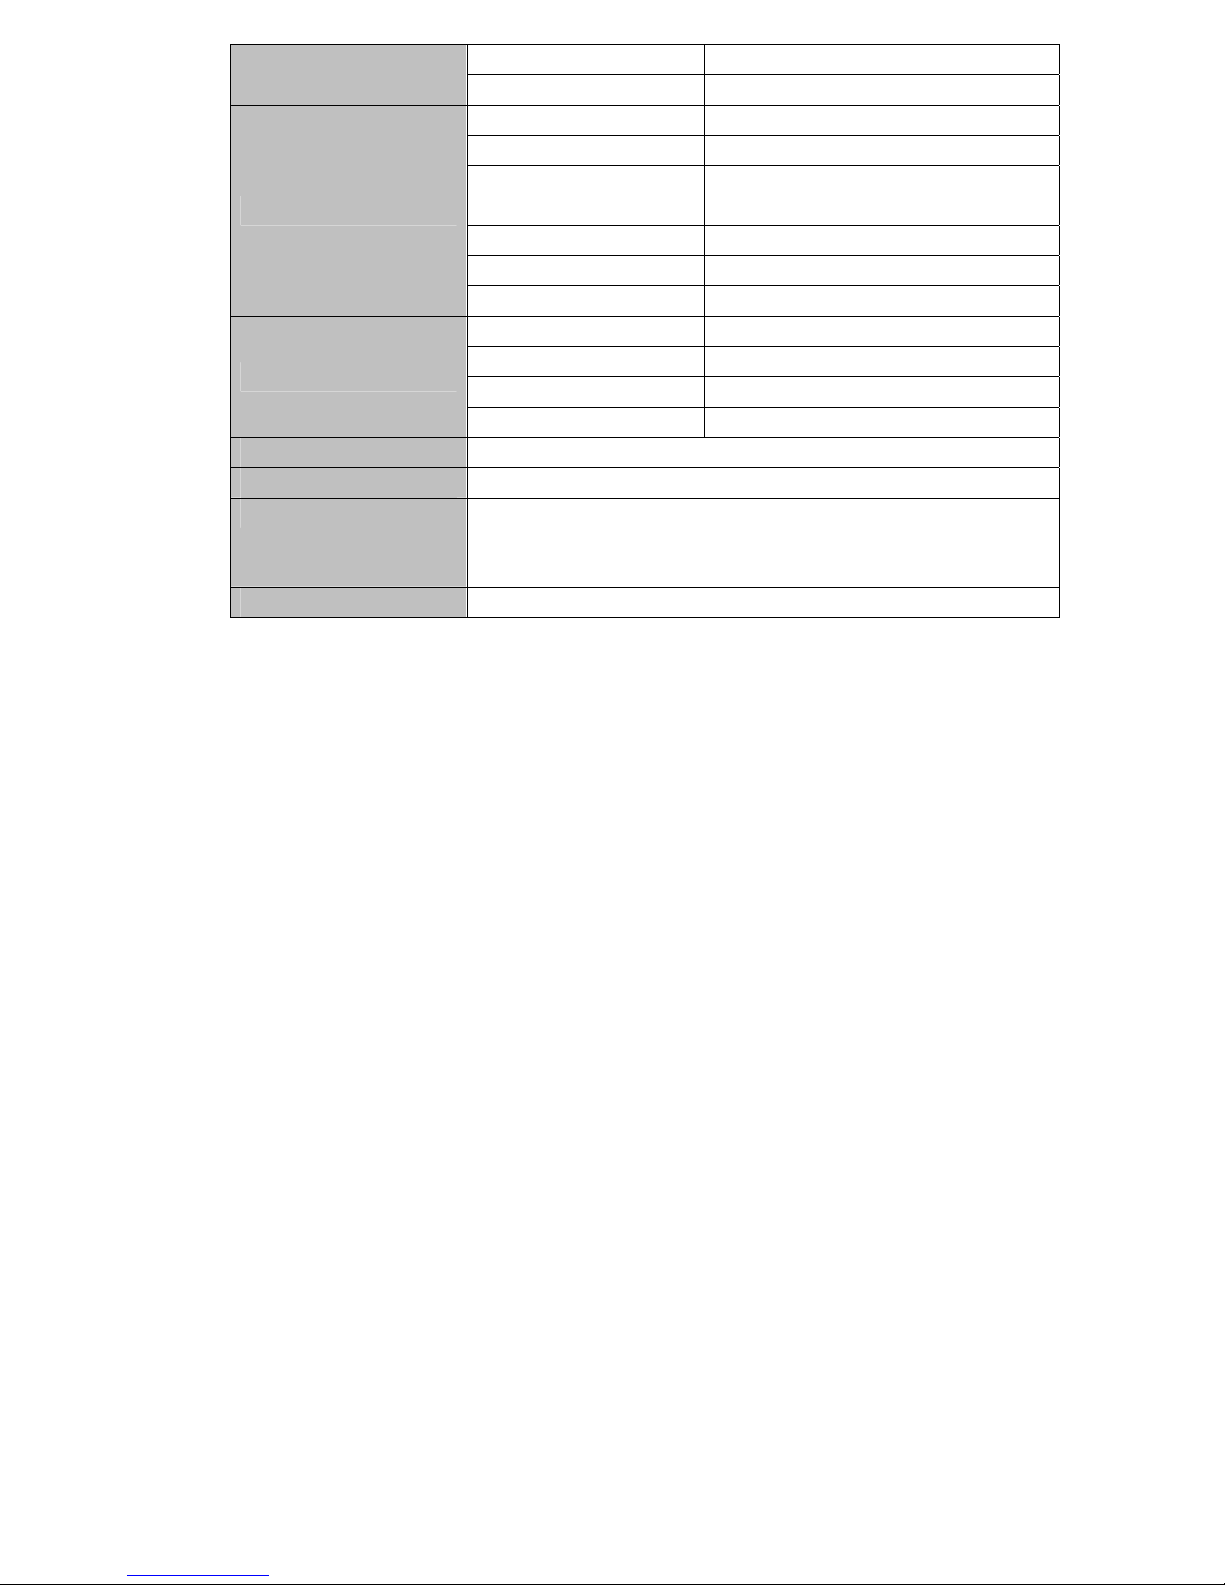
Recording format
Recording time
Max output of headphone
MP3 bit rate 8K bps – 320K bps
WMA、WMV、 ASF bit
MP3、WMA、WMV、ASF
FM radio
Music format
Working temperature -5 to 40
multi- language show
Operating System
rate
Frequency response 20Hz to 20KHz
SNR 85dB
Distortion
Receiving frequency range 76MHz – 96MHz / 87MHz – 108MHz
Stations saved
Max output of headphone
SNR 45dB
MP1、MP2、MP3、WMA、WMV、ASF、WAV
Simple Chinese ,Trad Chinese ,Japanese ,Korean ,English ,
French ,Italian, German ,Spanish ,Swedish ,Portugal ,Denmark ,
Dutch, Russian, Czech
Windows98/SE/ME/2K/XP、Mac OS 10、Linux 2.4.2
WAV(32K bps)、ACT(8K bps)
35 hours(ACT,128M Flash)
(L)10mW+(R)10mW(32Ohm)
5K bps – 384K bps
<0.05%
20+20
(L)10mW+(R)10mW(32Ohm)
Note: Product design and spec may change without notice.
 Loading...