

Page 1
MODELO 5910
CONSEJOS DE SOLUCIÓN DE PROBLEMAS
Si su calefactor se apaga inesperadamente o no funciona, el elemento de seguridad arriba mencionado podría haber sido activado para evitar
el sobrecalentamiento.
1. Asegúrese que el cable eléctrico esté conectado a un tomacorriente eléctrico en funcionamiento.
2. Verifique la posición de su Termostato. El Calefactor puede haberse apagado por haber alcanzado la posición de temperatura deseada.
Si usted tiene un problema que no pueda ser resuelto siguiendo los pasos enumerados arriba, comuníquese con Asistencia Técnica al 800-
233-0268, de lunes a viernes, entre las 8 a.m. y las 5 p.m. EST.
MANTENIMIENTO
ADVER TENCIA: SIEMPRE DESCONECTE EL CABLE ELÉCTRICO ANTES DE MOVER, REPARAR o LIMPIAR
EL CALEFACTOR.
ADVER TENCIA: ¡NO SUMERJ A EL CALEFACT OR EN AGUA!
LIMPIEZA: ¡IMPORTANTE! Limpie la parrilla del Calefactor con el accesorio de cepillo de aspiración de su aspiradora. Esto quitará pelusas y
suciedad del interior del Calefactor. Limpie el cuerpo del Calefactor con un trapo suave .
NO INTENTE DESARMAR EL CALEF A CTOR.
PRECAUCIÓN: No use gasolina, bencina, diluyente, limpiadores duros, etc., ya que dañarán el Calefactor .
NUNCA use ALCOHOL O SOLVENTES.
REPARACIONES: Toda otra reparación, con excepción del mantenimiento general del usuario, debe ser realizada por un representante
autorizado de reparaciones. Llame al 1-800-233-0268, de lunes a viernes, entre las 8 a.m. y las 5 p.m. EST para conocer la ubicación de su
centro de reparaciones más cercano.
OPERATING INSTRUCTIONS
IMPORTANT INSTRUCTIONS -
OPERATING MANUAL
PIVOTING CERAMIC HEATER
MODEL 5910
This Heater is for residential use only.
It is not intended to be used in commercial or industrial settings.
ALMACENAMIENTO: Almacene el Calefactor con estas instrucciones en la caja original en un lugar fresco y seco.
GARANTÍA LIMITADA
EN CASO DE NECESIT AR PIEZAS, COMUNÍQ UESE CON EL F ABRICANTE P ARA PIEZAS DE REPUEST O AMP ARAD AS
POR LA GARANTÍA. SE DEBE INCLUIR UNA COPIA DEL RECIBO DE COMPRA CON EL TIPO Y ESTILO DEL
CALEFACTOR, UBICADOS EN LA PARTE INFERIOR DEL APARATO.
Este producto está garantizado por tres años a partir de la fecha de compra contra defectos de fabricación y/o de
materiales. A nuestra discreción, las piezas que resulten defectuosas se reemplazarán o se repararán, o bien se
reemplazará el producto entero.
Si se necesita reparación eléctrica o mecánica durante el período de garantía, envíe el producto completo, con porte
pagado, al centro de servicio más cercano. Llame al número que se indica más adelante para encontrar el centro de
servicio más cercano.
Si necesita una pieza de repuesto, debe especificar el tipo y el estilo del aparato . Esta información puede encontrarse en la
parte inferior del aparato. En cualquiera de los casos, es necesario que envíe una copia del recibo de compra.
Esta garantía no tiene validez si el daño se debe a un accidente, manejo o uso indebido, daños de transporte, abuso, mal
uso, reparaciones o intentos de reparación no autorizados, o al uso comercial del producto.
TODAS LAS GARANTÍAS, MANIFIESTAS O IMPLÍCIT AS, RIGEN DURANTE TRES AÑOS A PARTIR DE LA FECHA DE
COMPRA ORIGINAL. ESTA GARANTÍA NO CUBRE EN NINGÚN CASO RESPONSABILIDAD POR DAÑOS DIRECTOS
O INDIRECTOS POR CAUSA ALGUNA.
En algunos estados no se permiten limitaciones de la duración de una garantía implícita, ni la exclusión o limitación de
daños directos o indirectos, por lo cual las limitaciones y exclusiones anteriores pueden quedar sin vigencia en su caso.
Esta garantía le otorga derechos legales específicos. Usted podría tener otros derechos que varían de un estado a otro.
Para piezas de repuesto, favor de llamar al 1-800-233-0268, DE LUNES A VIERNES, DE 8:00 A.M. a 5:00 P.M., HORA
ESTÁNDAR DEL ESTE. “POR FAVOR, NO ENVÍE EL APARATO AL LUGAR DONDE LO COMPRÓ.”
Mencione el tipo y el estilo del producto (ubicados en la parte inferior del aparato) al llamar.
PARA APOYO TÉCNICO Y UBICACIONES DE CENTROS DE SERVICIO:
Para cualquier pregunta o comentar io, o para solicitar información sobre el centro de servicio más cercano a su domicilio,
FAVOR DE LLAMAR A NUESTRA “LÍNEA GRATUITA” AL 1-800-233-0268, DE LUNES A VIERNES,
DE 8:00 A.M. A 5:00 P.M., HORA ESTÁNDAR DEL ESTE.”
Mencione el nombre y el número de modelo del producto al llamar.
Appliance Service Dept. 300 Confederate Drive Franklin, TN 37064.
¡POR FAVOR, NO ENVÍE EL PRODUCTO A ESTA DIRECCIÓN!
Para más información, visite nuestro sitio en la Web: www.laskoproducts.com
Rev. A 6/05
PARA PIEZAS DE REPUESTO:
El manual imprimió en la China
8
5910ES
READ AND SAVE THESE INSTRUCTIONS
READ CAREFULLY BEFORE ATTEMPTING T O ASSEMBLE, INSTALL,
OPERATE OR MAINTAIN THE PRODUCT DESCRIBED . PRO TECT
YOURSELF AND O THERS BY OBSER VING ALL SAFETY
INFORMATION. FAILURE T O COMPLY WITH
INSTRUCTIONS COULD RESULT IN PERSONAL INJUR Y AND/OR
PROPERTY DAMAGE!
RETAIN INSTRUCTIONS FOR FUTURE REFERENCE.
SAVE THESE INSTRUCTIONS
Rev. A 6/05
1
5910ES
Page 2
MODEL 5910
MODELO 5910
GENERAL SAFETY INFORMATION
When using electrical appliances, basic precautions should always
be followed to reduce the risk of fire, electric shock and injury to persons,
including the following:
1. Read all instructions before using this Heater.
2. Use this Heater only as described in this manual. Any other use not recommended by the manufacturer may cause fire,
electrical shock, or injury to persons.
3. Make certain that the power source conforms to the electrical requirements of the Heater.
4. Extreme caution is necessary when any Heater is used by or near children or invalids and whenever the Heater is
left operating unattended.
5. This appliance has a polarized plug (one blade is wider than the other). To reduce the risk of electric shock, this plug is
intended to fit in a polarized outlet only one way. If the plug does not fit fully in the outlet, rev erse the plug. If it still does not
fit, contact a qualified electrician. Do not attempt to defeat this safety feature.
6. DO NO T plug Heater into any other cord connected device , such as a power strip, surge protector , multiple outlet adapters or
outlet-type air fresheners. The use of such devices may create a fire hazard. Plug unit directly into a 120V wall outlet only.
7. Avoid the use of extension cords because the extension cord ma y o v erheat and cause a risk of fire. However , if y ou ha v e
to use an extension cord, minimize the risk of ov erheating by ensuring that they are UL listed. The cord shall be a 3-wire,
grounding type, with No. 14 AWG minimum size and rated not less than 1875 watts. NEVER use a single extension cord
to operate more than one Heater.
8. Do not operate an y Heater with a damaged cord or plug or after the Heater malfunctions, has been dropped or damaged in any
manner. Return Heater to authorized service facility for examination, electrical or mechanical adjustment or repair .
9. To disconnect Heater, turn controls to OFF, then remove plug from outlet.
10. Always unplug Heater when not in use. Unplug power cord before servicing or moving the Heater.
WARNING: DO NO T DEPEND ON THE ON/OFF SWITCH AS THE SOLE MEANS OF DISCONNECTING POWER
WHEN SERVICING OR MOVING THE HEATER. ALWAYS UNPLUG THE POWER CORD.
11. Do not insert or allow fingers or foreign objects to enter any v entilation or e xhaust opening as it may cause an electric shoc k,
fire, or damage the Heater . Do not block or tamper with the Heater in any manner while it is in operation.
12. To prevent a possible fire, do not block air intakes or exhaust in any manner. Do not place on soft surfaces, like a bed,
where openings may become blocked.
13. Always place the Heater on a stable, flat, level surface when operating, to avoid the chance of the Heater overtur ning.
Locate the Pow er Cord so the Heater or other objects are not resting on it. Do not run Po wer Cord under carpeting. Do not
cover P ow er Cord with throw rugs, runners, or the like . Arrange P ow er Cord awa y from room traffic and where it will not be
tripped over.
14. This Heater is hot when in use. To avoid burns, do not let bare skin touch hot surfaces. Always use handle when moving
this Heater. Keep combustible materials, such as furniture, pillows, bedding, papers, clothes and curtains at least 3 feet
(0.9 m) from the front of the Heater and keep them at least 1 foot (0.3 m) from the sides and rear.
15. A Heater has hot and arcing or sparking parts inside. Do not use the Heater in areas where gasoline, paint, or flammab le
liquids are used or stored. It m ust NOT be used in potentially dangerous locations such as flammab le, explosiv e, chemicalladen or wet atmospheres. This Heater is intended for general use ONLY.
16. This Heater is not intended for use in wet or damp locations. This Heater is not intended for use in bathrooms, laundry areas
and similar indoor locations. Never locate a Heater where it may fall into a bathtub or other water container.
17. Do not use Heater outdoors.
WARNING: REDUCE THE RISK OF FIRE OR ELECTRIC SHOCK – DO NOT USE THIS HEATER WITH ANY
SOLID STATE SPEED CONTROL DEVICES.
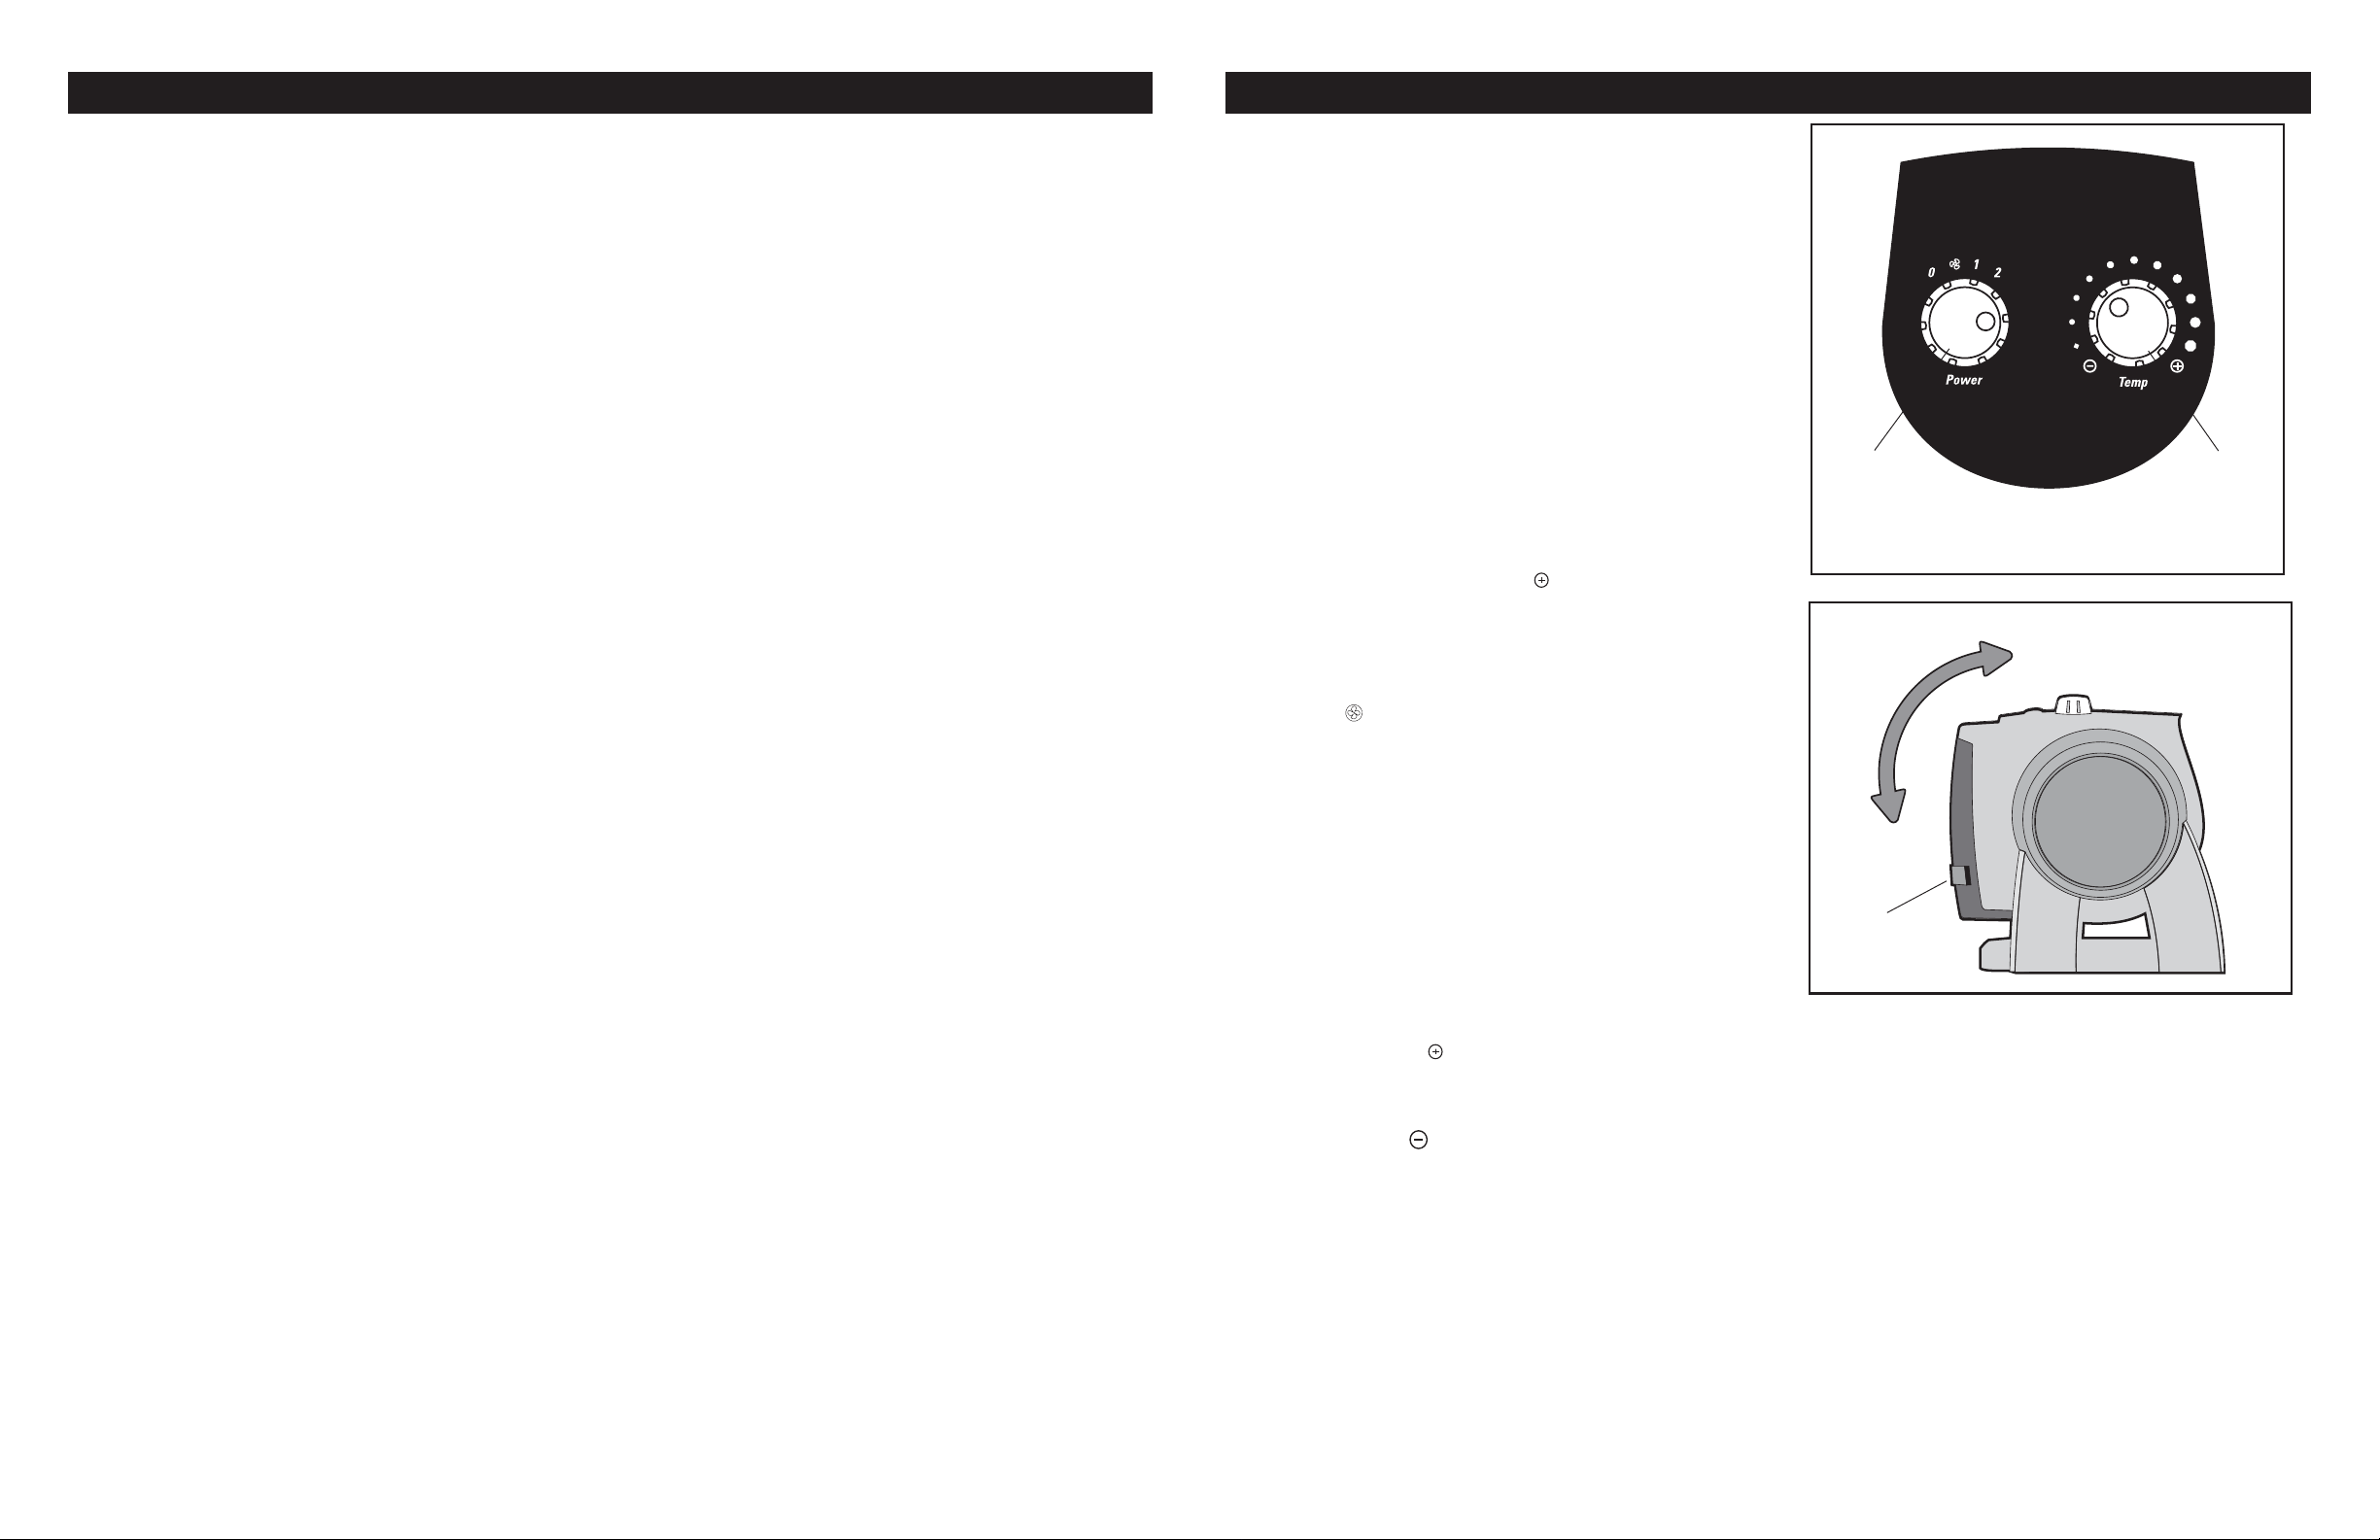
FUNCIONAMIENTO
1. Cuidadosamente retire el Calefactor de la bolsa y de la caja.
2. Coloque el Calefactor sobre una superficie firme y plana.
(Figuras 1 y 2)
ADVERTENCIA: Los tacos de plástico o hule, tales como las
patas de esta unidad, pueden pegarse a la superficie de los muebles
y/o a los pisos de madera. La unidad podría dejar un residuo capaz
de oscurecer, manchar o dejar marcas permanentes en el acabado
de ciertas superficies de muebles, incluyendo superficies de madera
y/o pisos de madera.
3. Asegúrese que la unidad esté en la posición AP A GADO (0) antes
de conectar el Calefactor al tomacorriente.
4. Conecte el cable eléctrico a un tomacorriente eléctrico
de 120V~. Asegúrese que el enchufe encaje firmemente
en el tomacorriente.
5. Cuando el Calefactor se conecte por primera vez, se oirá un
“bip” y la
electricidad en la unidad. La
encendida hasta que el Calefactor sea desconectado del
tomacorriente eléctrico.
6. Para el Funcionamiento del Calefactor, lleve la
Termostato
7. Mueva la
deseada. El Calor Alto (1500W) está representado por el (2) y
el Calor Bajo (900W) por el (1).
8. Para el Funcionamiento del Ventilador Solamente, sin ninguna
salida de calor, gire la
Ventilador ( ).
9. Para ajustar el ángulo del flujo de aire del Calefactor, rote el
cuerpo del Calefactor hacia delante o hacia atrás hasta la
posición deseada.
10.La
el funcionamiento.
11.Para desconectar el Calefactor, gire la
Encendido
enchufe del tomacorriente.
Luz de Encendido
a la Posición Máxima ( ).
Perilla de Encendido
(Figura 2)
Luz de Encendido
a la posición APAGADO (0), luego retire el
se encenderá indicando que hay
Luz de Encendido
hasta la posición de calor
Perilla de Encendido
permanecerá encendida durante
permanecerá
Perilla del
a la Posición de
Perilla de
ADVERTENCIA: EL TEJIDO DE ALAMBRE ESTÁ CALIENTE
CUANDO EL CALEFACTOR ESTÁ EN FUNCIONAMIENTO.
FUNCIONAMIENTO DEL TERMOSTATO
1. Antes de fijar la posición del termostato, permita que el Calefactor
funcione y caliente la habitación. Lle ve la
a la posición Máxima ( ) para encender el Calefactor.
2. Cuando se alcance el nivel de confort de temperatura deseado,
baje la posición del termostato hasta que el Calefactor deje de
funcionar. Esto se hace moviendo la
la posición Mínima ( ).
3. El Calefactor ahora mantendrá automáticamente el nivel de
temperatura pre-fijado alternando el Calefactor entre las
posiciones de ENCENDIDO y APAGADO.
4. Es normal que el Calefactor alterne entre las posiciones de
ENCENDIDO y APAGADO mientras mantiene la temperatura
actual. P ara e vitar que la Unidad alterne entre estas posiciones,
ajuste la posición del termostato.
Perilla del T ermostato
Perilla del T ermostato
hacia
Perilla de
Encendido
Figura 1
Vista Lateral del Calefactor
Luz de
Encendido
Figura 2
Perilla del
Termostato
ELEMENTOS DE SEGURIDAD
1. Hay un protector de sobrecarga térmica incorporado para evitar
el sobrecalentamiento.
2. Cuando se alcance una temperatura de sobrecalentamiento, el
Calefactor se apagará automáticamente. Sólo podrá retomar el
funcionamiento cuando el usuario reinicie la unidad.
Para Reiniciar el Calefactor:
1. Gire la Perilla de Encendido a la posición de APAGADO (0).
2. Desconecte el Calefactor y espere 10 minutos hasta que el
Calefactor se enfríe.
3. Después que el Calefactor se haya enfriado, conecte la unidad al
tomacorriente y siga las INSTRUCCIONES DE FUNCIONAMIENTO
descriptas en este manual.
(Figura 1)
Rev. A 6/05
SAVE THESE INSTRUCTIONS
2
5910ES
Rev. A 6/05
7
5910ES
Page 3
MODELO 5910
MODEL 5910
INFORMACIÓN GENERAL DE SEGURIDAD
Al usar aparatos eléctricos, las precauciones básicas de seguridad
deberan siempre de seguirse para reducir el riesgo de incendio, choque
eléctrico, y daño a personas, incluyenda las siguientes.
1. Lea todas las instrucciones antes de usar este Calefactor.
2. Use este Calefactor solamente como se describe en este manual. Cualquier otro uso no recomendado por el fabricante
podría causar incendio, choque eléctrico o lesiones a personas.
3. Asegúrese que la fuente de alimentación eléctrica sea la adecuada para los requerimientos eléctricos del Calefactor.
4. Es necesario tener extremo cuidado cuando se utiliza cualquier Calefactor junto a o cerca de niños o discapacitados y
siempre que el Calefactor esté en funcionamiento sin atención de otras personas.
5. Este aparato tiene la clavija polarizada (un diente es más ancho que el otro). Esta clavija está diseñada para ser insertada
en un tomacorriente polar de una sola forma a fin de reducir el riesgo de choque eléctrico. Si la cla vija no encaja totalmente
en el tomacorriente, dele vuelta. Si aun así no encaja, consulte a un técnico electricista. No trate de modificar estas
características de seguridad.
6. NO enchufe el Calefactor en ningún otro dispositivo que tenga cables conectados, tales como distribuidores de electricidad,
disyuntores de electricidad, adaptadores de tomacorrientes múltiples o refrescadores de aire enchufables. El uso de tales
dispositivos podría crear un riesgo de incendio. Conecte la unidad directamente a un tomacorriente de pared de 120V únicamente.
7. Evite el uso de cables de alargue porque el cable de alargue podría sobrecalentarse y provocar un riesgo de incendio . Sin
embargo, si tiene que usar un cable de alargue , minimice el riesgo de sobrecalentamiento garantizando que el mismo esté
aprobado por la UL. El cable deberá ser uno de 3 alambres, con conexión a tierra, con un tamaño mínimo N° 14 AWG y
clasificado para no menos de 1875 vatios. NUNCA use un solo cable de alargue para operar más de un Calefactor.
8. No opere ningún Calefactor con un cable o enchufe dañados o después que el Calefactor funcione mal, se haya caído o
haya sido dañado de alguna manera. Lleve el Calefactor a la empresa de reparaciones autorizada para su revisión, ajuste
eléctrico o mecánico o reparación.
9. P ara desconectar el Calefactor, coloque los controles en la posición APAGADO, luego retire el enchuf e del tomacorriente.
10. Siempre desconecte el Calefactor cuando no esté en uso. Desconecte el cable eléctrico antes de reparar o mov er el Calefactor.
ADVERTENCIA: NO DEPENDA DEL INTERRUPTOR DE ENCENDIDO / APAGADO COMO ÚNICO MEDIO
PARA DESCONECTAR LA ELECTRICID AD CUANDO ESTÉ REPARANDO O TRASLAD ANDO EL CALEF ACT OR.
SIEMPRE DESCONECTE EL CABLE ELÉCTRICO.
11. No inserte ni permita que alguien introduzca dedos u objetos extraños en cualquier abertura de ventilación o de escape ya
que podrían causar un choque eléctrico o un incendio, o dañar el Calefactor. No bloquee ni toque indebidamente el
Calefactor de ninguna manera mientras esté en funcionamiento.
12. Para evitar un posible incendio , no bloquee las tomas o los escapes de aire de ninguna manera. No coloque sobre superficies
suaves, como una cama, donde las aberturas podrían resultar bloqueadas.
13. Siempre coloque el Calefactor sobre una superficie estable, lisa y nivelada cuando esté en funcionamiento, par a evitar la
posibilidad de que el Calefactor se caiga. Coloque el Cable Eléctrico de modo tal que el Calefactor u otros objetos no estén
apoyados sobre él. No introduzca el Cable Eléctrico debajo de alfombras . No cubra el Cab le Eléctrico con tapetes, alfombrillas
u objetos similares. Coloque el Cable Eléctrico lejos de los lugares transitados de la habitación y donde nadie pueda
tropezarse con el mismo.
14. Este Calefactor está caliente cuando se lo utiliza. Para evitar quemaduras, no permita que la piel desnuda toque las
superficies calientes. Siempre use la agarr adera cuando traslade este Calefactor. Mantenga los materiales combustibles,
tales como muebles, almohadas, ropa de cama, papeles , ropa y cortinas a una distancia de por lo menos 3 pies (0.9 m) del
frente del Calefactor y manténgalas a una distancia de por lo menos 1 pie (0.3 m) de los laterales y de la parte posterior.
15. Un Calefactor tiene partes calientes y con arcos o chispas en su interior. No use el Calefactor en áreas donde se utilice o
almacene gasolina, pintura o líquidos inflamables. NO debe ser usado en lugares potencialmente peligrosos tales como
atmósferas inflamables, explosivas, cargadas de sustancias químicas o húmedas. Este Calefactor está diseñado SÓLO
para uso general.
16. Este Calefactor no está diseñado para ser usado en lugares húmedos o mojados. Este Calefactor no está diseñado para
usarse en baños, áreas de lavandería y similares emplazamientos interiores. Nunca coloque un Calefactor donde podría
caer dentro de una tina de baño o cualquier otro contenedor de agua.
17. No use el Calefactor al aire libre.
ADVERTENCIA: REDUZCA EL RIESGO DE INCENDIO O CHOQUE ELÉCTRICO – NO USE ESTE
CALEFACTOR CON NINGÚN DISPOSITIVO DE CONTROL DE VELOCIDAD DE ESTADO SÓLIDO.
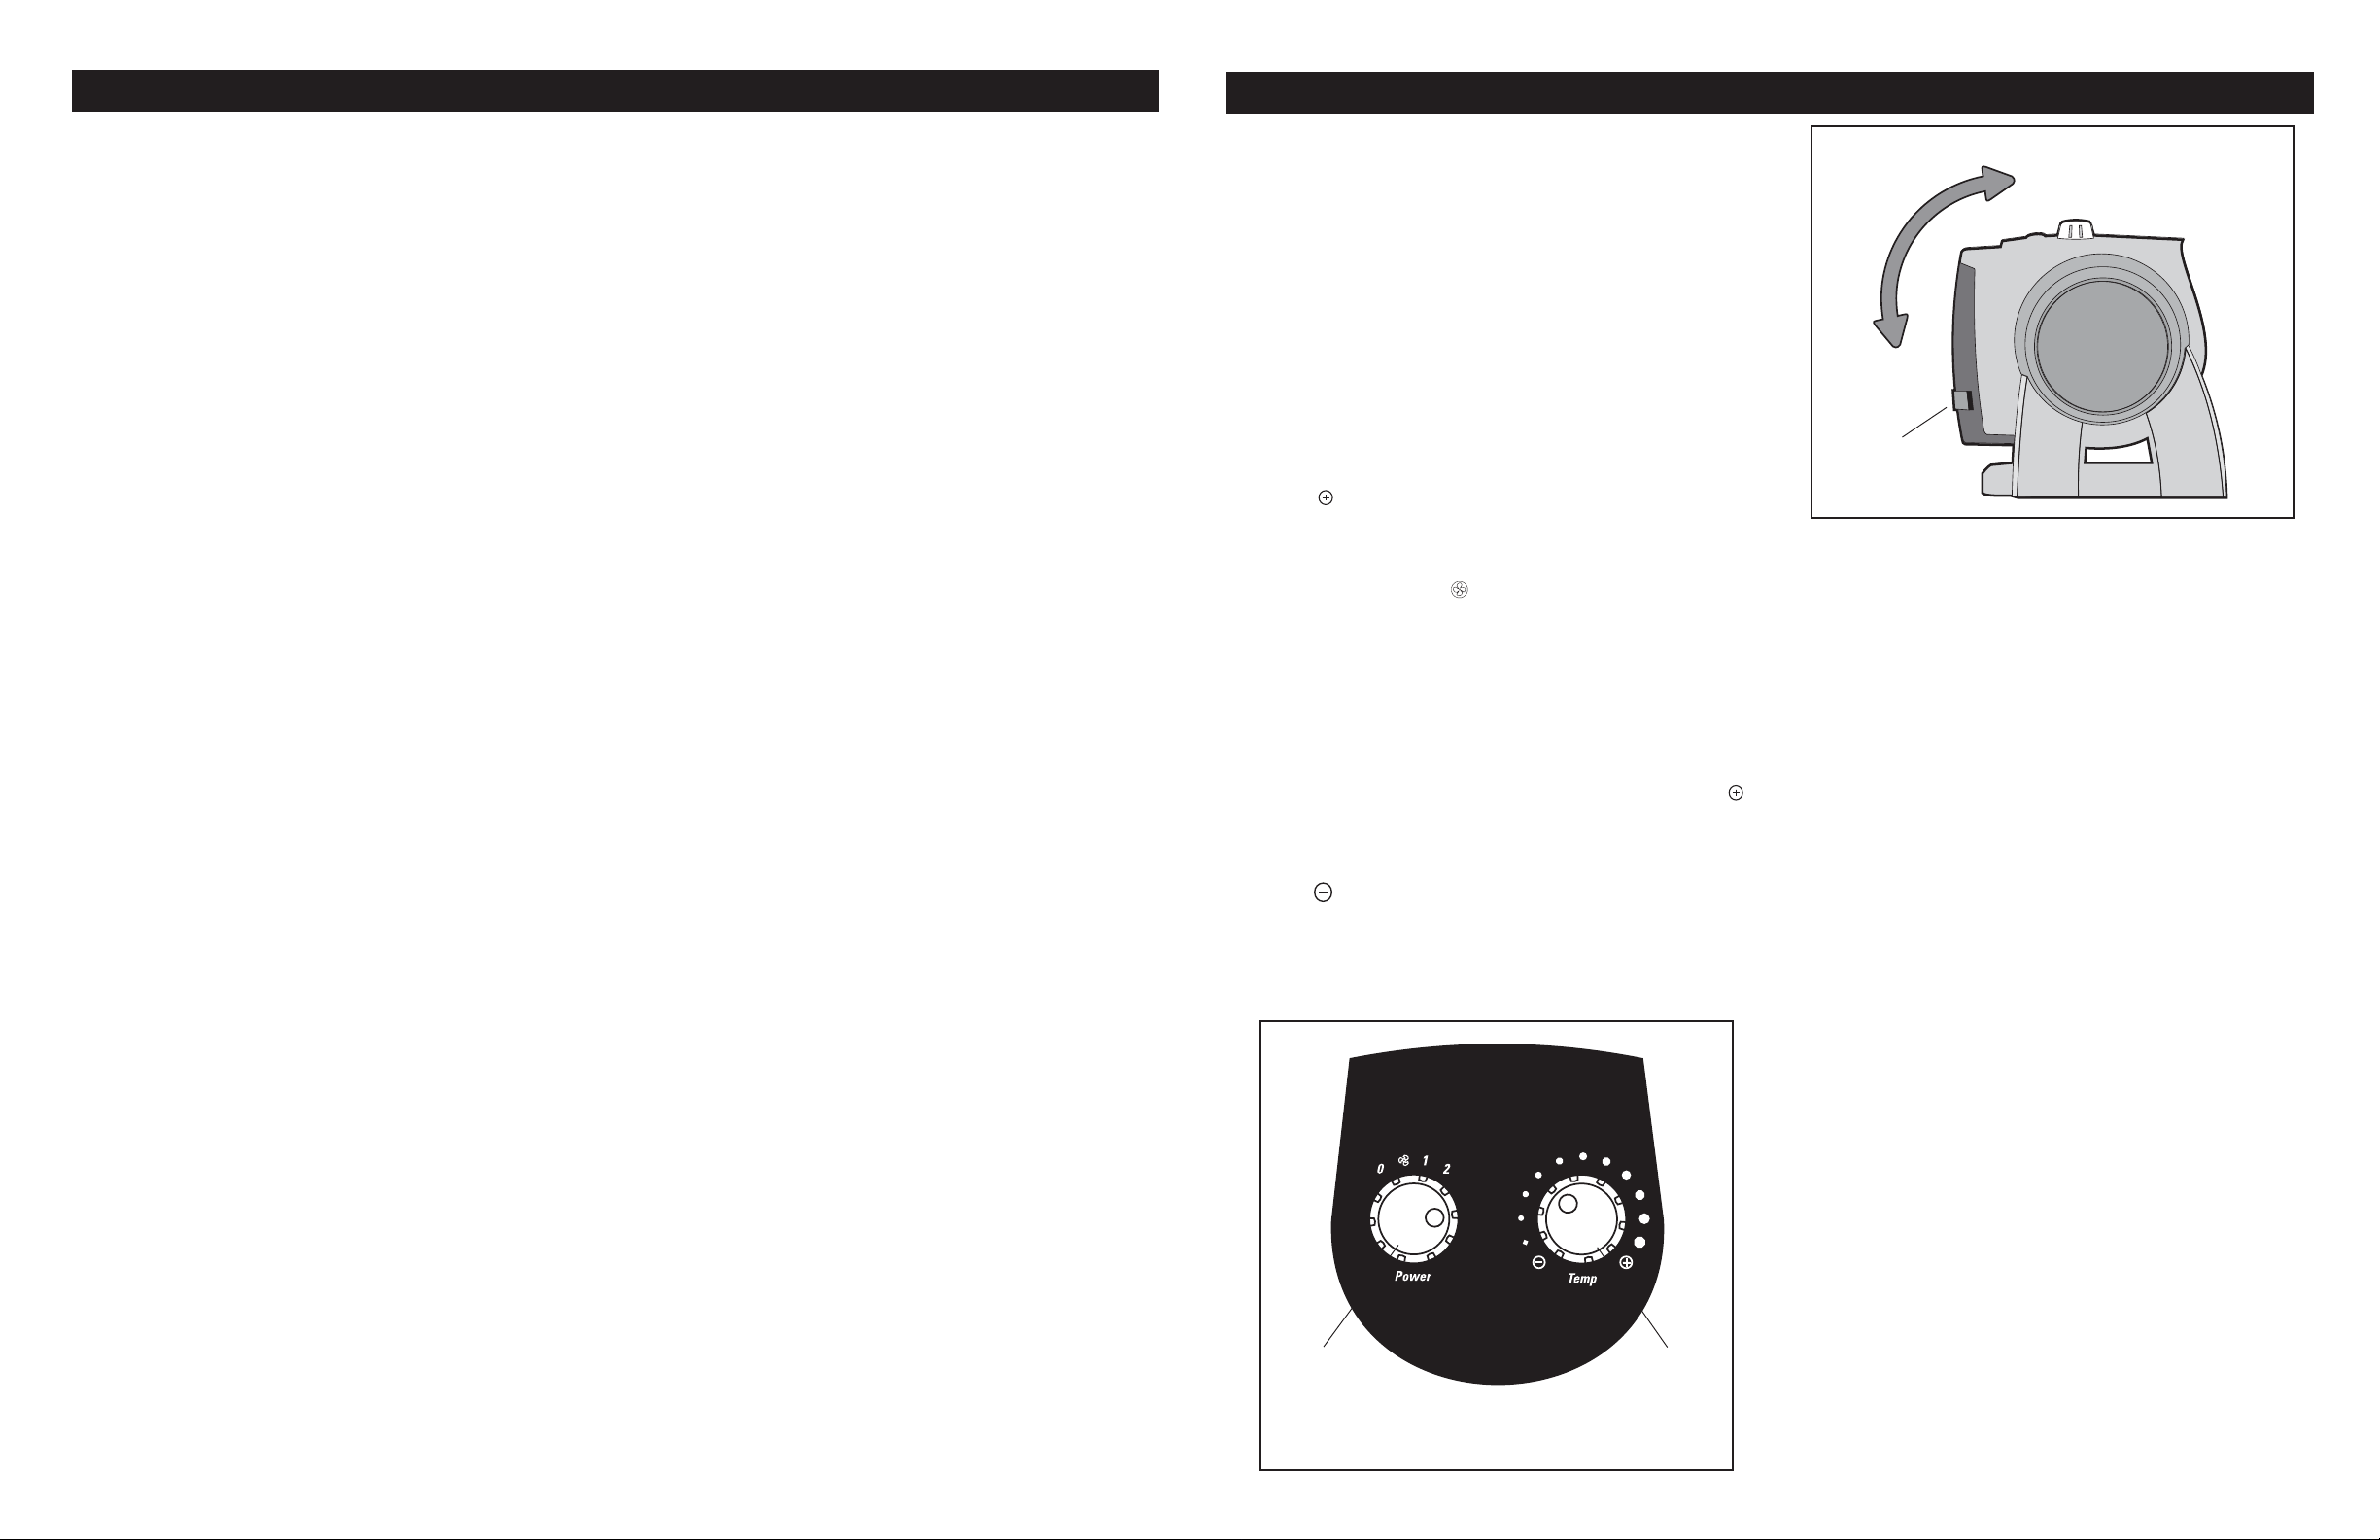
OPERATION
1. Carefully remove your Heater from the carton and bag.
2. Place the Heater on a firm, level surface.
(Figure 1 and 2)
WARNING: Plastic or rubber tabs, like the feet on this unit, may
stick to furniture surfaces and/or hardwood floors. The unit ma y leav e
a residue that could darken, stain or leave permanent blemishes on
the finish of certain furniture surfaces, including wood surfaces, and/
or hardwood floors.
3. Make sure that the Heater is in the “OFF” position (0) before
plugging the Heater into the outlet.
4. Plug the cord set into a 120 V~ electrical outlet. Be sure plug fits
tightly in outlet.
5. When the Heater is initially plugged in, the
on indicating that there is power to the unit. The
remain lit until the Heater is unplugged from the electrical outlet.
6. For Heater Operation, set the
Setting ( ).
7. Move the
(1500W) is represented by the (2) and Low Heat (900W) by the (1).
8. For Fan-Only Operation, without an y heat output, turn the
Knob
9. To adjust the angle of the Heater air flow, rotate the Heater body
forward or backward to the desired position.
10.The
11.T o disconnect Heater , turn
then remove plug from outlet.
Power Knob
to the Fan Setting ( ).
Power Light
will remain lit during operation.
Thermostat Knob
to the desired heat setting. High Heat
Power Knob
Power Light
(Figure 2)
to the “OFF” position (0),
will come
Power Light
to the Maximum
will
Power
WARNING: WIRE MESH IS HOT WHEN HEA TER IS IN OPERA TION.
THERMOSTAT OPERATION
1. Before setting the thermostat, allow Heater to operate and warm
up the room. Set
to start the Heater.
2. When the desired temperature comfort level is reached, lower
the thermostat setting until the Heater stops operating. This is
done by moving the
setting (
3. The Heater will now automatically maintain the pre-set tem-
perature level by cycling the Heater ON and OFF.
4. It is normal for the Heater to cycle ON and OFF as it maintains
the present temperature. To prevent the Unit from cycling, adjust the thermostat setting.
Thermostat Knob
).
to the Maximum setting ( )
Thermostat Knob
towards the Minimum
Side View of Heater
Power
Light
Figure 2
SAFETY FEATURES
1. A thermal overload protector is built in to the Heater to
prevent overheating.
2. When an overheat temperature is reached, the Heater will be automatically shut off. It can only resume operation when the user
resets the unit.
To Reset The Heater:
1. Turn the
2. Unplug the Heater and wait 10 minutes for the Heater to cool down.
3. After the Heater has cooled down, plug the Heater into the
outlet and follow the OPERATION INSTRUCTION described in
this manual.
Power Knob
(Figure 1)
to the OFF position (0).
TROUBLE SHOOTING TIPS
If your heater shuts off unexpectedly or fails to operate, the
above-mentioned safety feature may have been activated to
prevent overheating.
1. Be sure the power cord is plugged into a working electrical outlet.
2. Check your Thermostat setting. The Heater may be off because
it has reached the desired temperature setting.
If you have a problem that can not be resolved by the steps listed
above, contact Technical Assistance at 1-800-233-0268, Monday
through Friday, between the hours of 8am and 5pm EST.
Rev. A 6/05
CONSERVE ESTAS INSTRUCCIONES
6
5910ES
Power
Figure 1
Rev. A 6/05
Knob
Thermostat
Knob
3
5910ES
Page 4
MODEL 5910
MAINTENANCE
WARNING: ALWAYS UNPLUG THE CORD BEFORE MOVING OR SERVICING.
WARNING: DO NOT IMMERSE HEATER IN WATER.
CLEANING:
will remove lint and dirt from the inside of the Heater. Clean the body of the Heater with a soft cloth.
CAUTION: Do not use gasoline, benzine, thinner, harsh cleaners, etc., as they will damage the Heater. NEVER use
ALCOHOL OR SOLVENTS.
SERVICING: All other ser vicing, with the exception of general user-maintenance, should be performed by an authorized service
representative. Call 1-800-233-0268, Monday through Frida y, between the hours of 8am and 5pm EST for the location of your nearest
service center.
STORAGE: Store the Heater with these instructions in the original carton in a cool, dry place.
IMPORTANT! Clean the Heater grill and side intakes with the vacuum brush attachment of your vacuum cleaner. This
DO NOT ATTEMPT TO TAKE APART THE HEATER.
INSTRUCCIONES IMPORTANTES -
MANUAL DE USO
CALEFACTOR CERÁMICO PIVOTANTE
MODELO 5910
Este Calefactor es para uso residencial únicamente.
No está destinado para uso en ambientes comerciales o industriales.
LIMITED W ARRANTY
SHOULD ACCESSORY PARTS BE NEEDED, CONTACT THE MANUFACTURER FOR IN-WARRANTY REPLACEMENT
PARTS. A COPY OF PROOF-OF-PURCHASE MUST BE INCLUDED ALONG WITH THE TYPE AND STYLE, WHICH IS
LOCATED ON THE BOTTOM OF YOUR APPLIANCE.
This product is warranted for three y ears from the date of purchase against defects in workmanship and/or materials. At our
option, parts that prove to be defective will either be repaired or replaced or the whole product will be replaced.
Should electrical or mechanical repair become necessary during the warranty period, send your complete product, postage or
freight pre-paid to the nearest service center. Call the number below for the service station nearest you.
Should a part need replacement, you must give us the type and style of your appliance. You will find this at the bottom of the
appliance. In either case, a copy of your proof-of-purchase is requested.
This warranty does not apply if the damage occurs because of accident, improper handling or operation, shipping damage,
abuse, misuse, unauthorized repairs made or attempted, of the use of the product for commercial service.
ALL W ARRANTIES, EXPRESSED OR IMPLIED , LAST FOR THREE YEARS FR OM THE D A TE OF ORIGINAL PURCHASE.
THIS W ARRANTY DOES NOT CO VER LIABILITY FOR INCIDENT AL OR CONSEQ UENTIAL DAMA GES FOR ANY CA USE
WHATSOEVER.
Some states do not allow limitations on how long any implied warranty lasts, or the exclusion or limitation of incidental or
consequential damages, so that the above limitations and exclusions may not apply to you. This warranty gives you specific
legal rights. You may also have rights which vary from state to state.
FOR PARTS:
For Replacement parts please call: 1-800-233-0268, MONDAY THROUGH FRIDAY, BETWEEN THE HOURS OF 8 AM
and 5 PM EST. “PLEASE DO NOT RETURN PRODUCT TO PLACE OF PURCHASE”
Reference the type and style of product (located on the underside of the product) when you call.
FOR TECHNICAL ASSISTANCE AND SERVICE CENTER LOCATIONS:
For any questions, comments or the location of your nearest service center, PLEASE CALL OUR TOLL-FREE “HOTLINE”
AT 1-800-233-0268, MONDAY THROUGH FRIDAY, BETWEEN THE HOURS OF 8 AM and 5 PM EST.
Please reference product name and model no. when you call.
Appliance Service Dept. 300 Confederate Driv e Franklin, TN 37064.
PLEASE DO NOT SEND PRODUCT TO THIS LOCATION!
For more information please visit our website: www.laskoproducts.com
LEA Y GUARDE ESTAS INSTRUCCIONES
LEA CUID ADOSAMENTE LAS INSTRUCCIONES ANTES DE
INTENTAR ARMAR, INSTALAR, USAR O DAR MANTENIMIENTO
AL PRODUCTO DESCRIT O.
PROTÉJASE A SÍ MISMO Y A LOS DEMÁS CUMPLIENDO CON
TODA LA INFORMA CIÓN DE SEGURIDAD. EL NO SEGUIR LAS
INSTRUCCIONES PODRÍA RESULTAR EN LESIONES
PERSONALES Y/O DAÑOS A LA PROPIEDAD.
CONSERVE LAS INSTRUCCIONES COMO FUTURA REFERENCIA.
CONSERVE ESTAS INSTRUCCIONES
Rev. A 6/05
Manual printed in China
4
5910ES
Rev. A 6/05
5
5910ES
 Loading...