

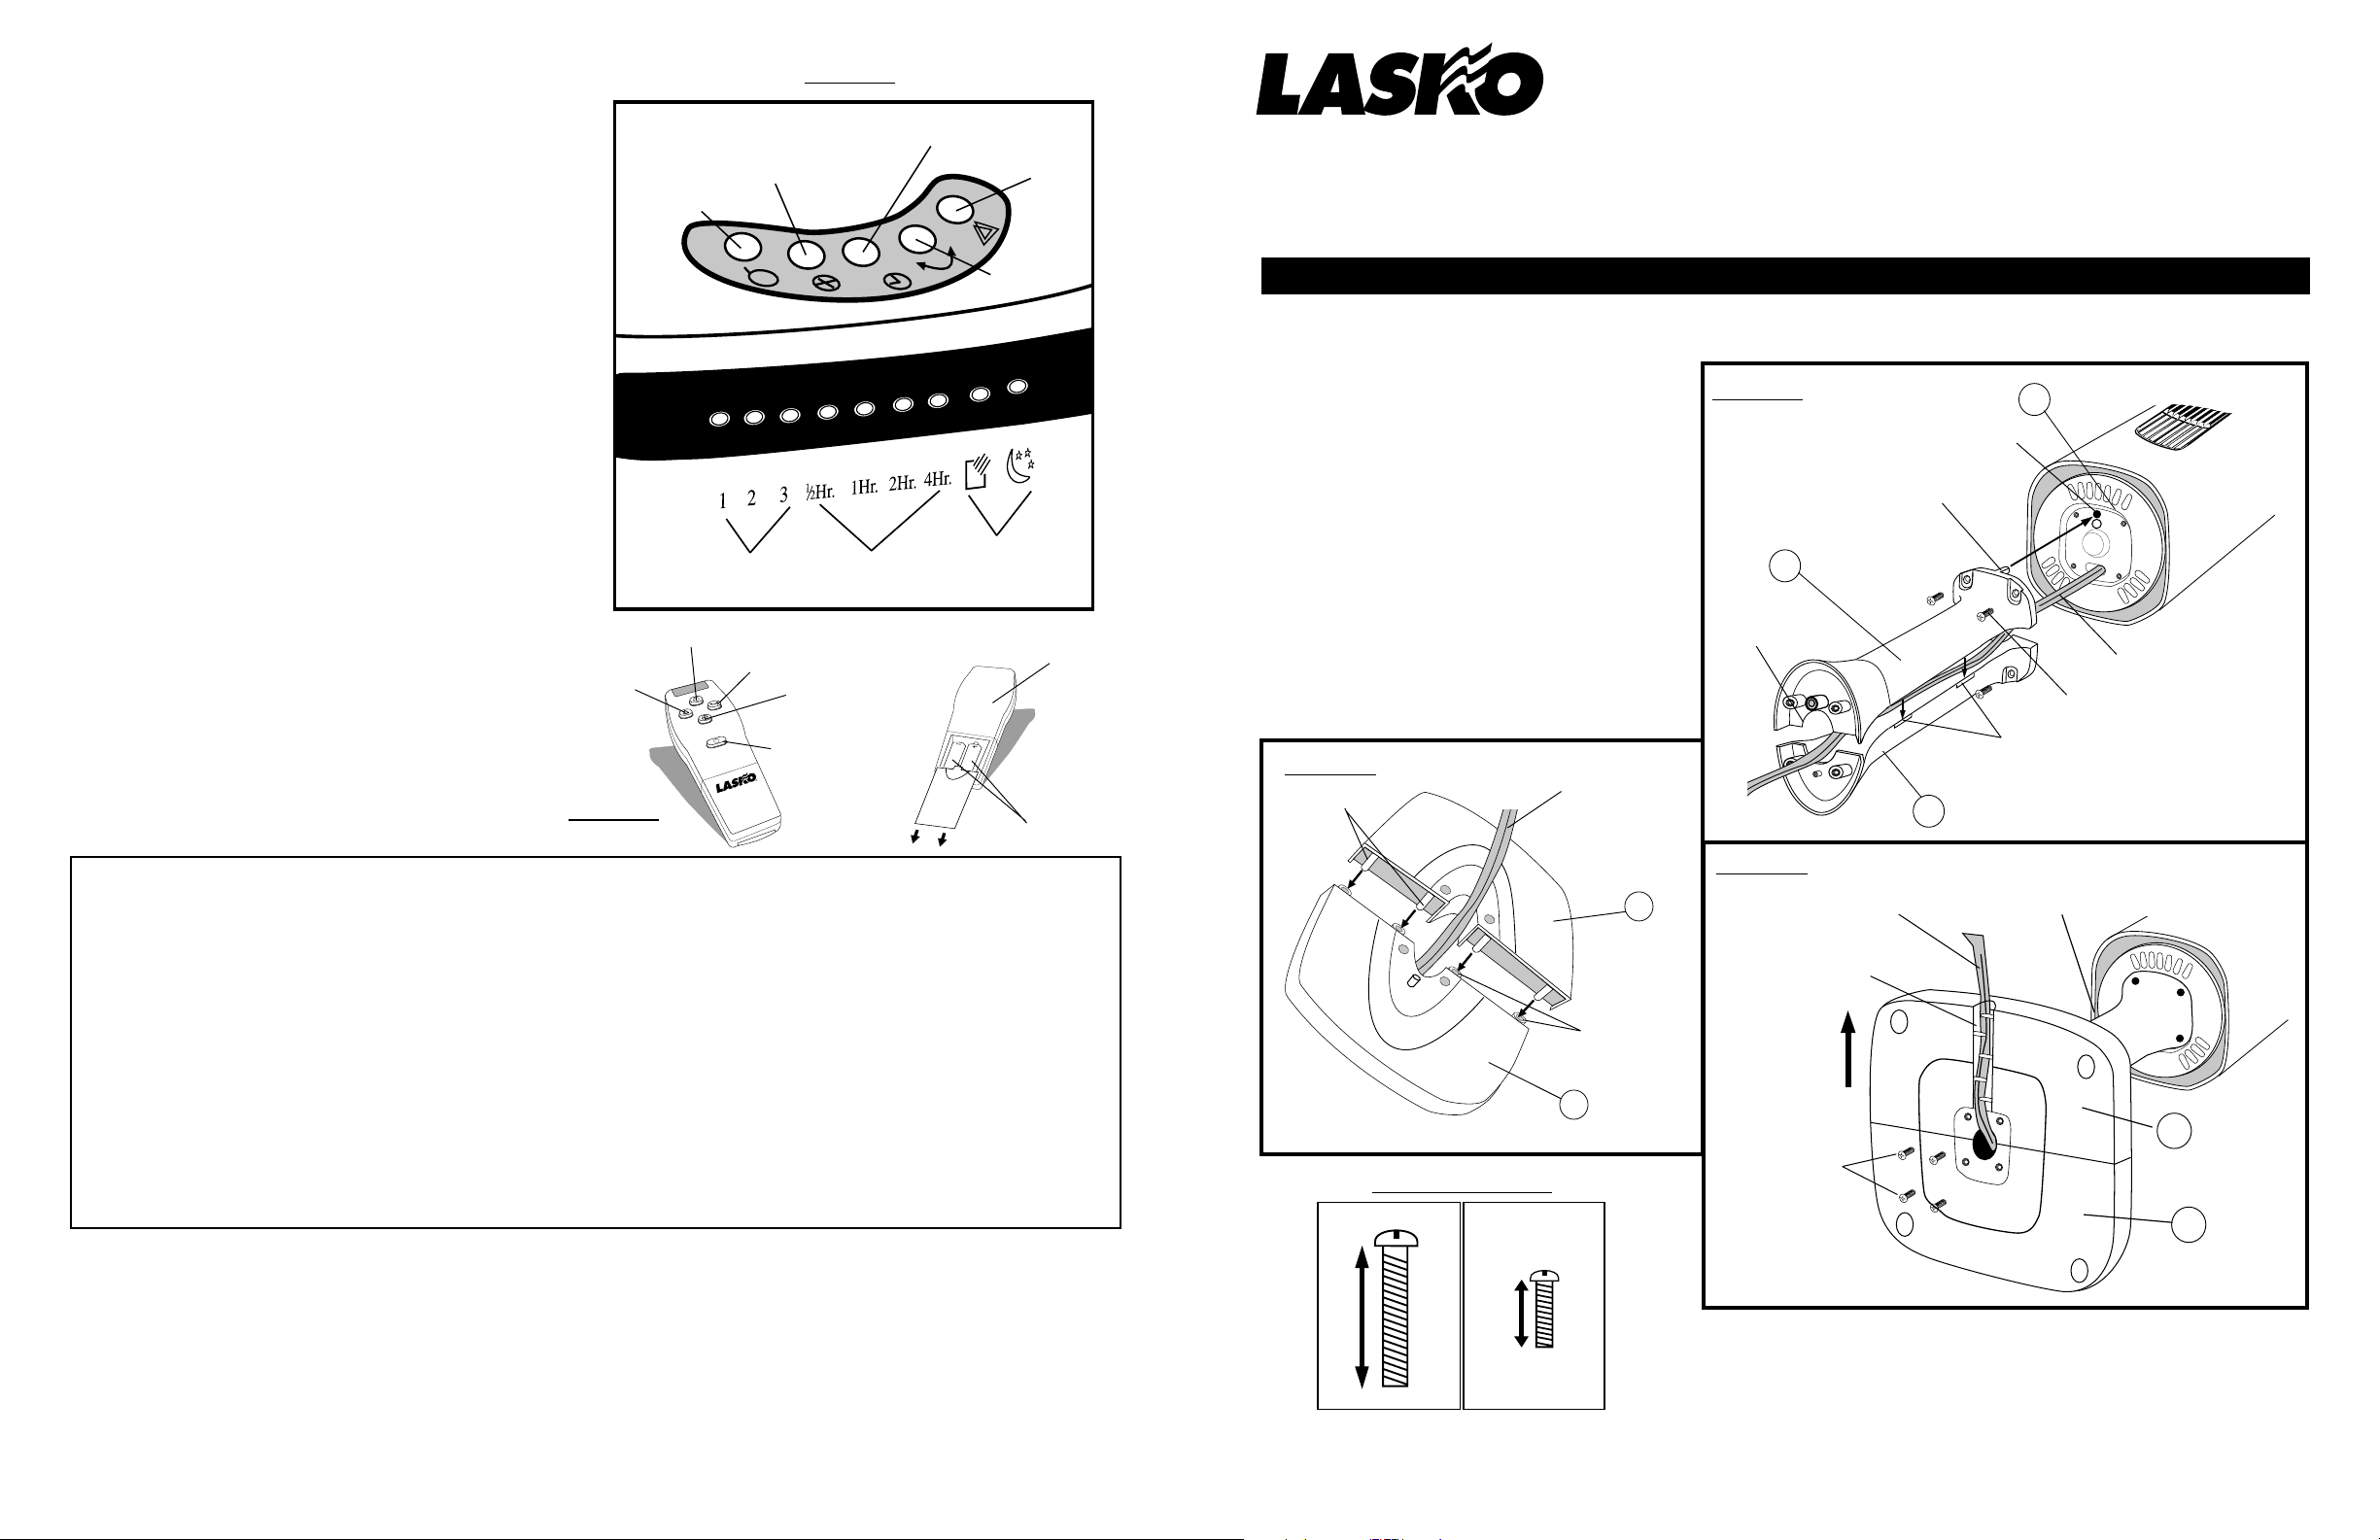
FUNCIONAMIENTO
El ventilador de pedestal oscilante Wind Tower puede activarse
mediante los controles manuales ubicados en la parte superior del
ventilador (ilustrados en la Figura 4) o con el control remoto Feather
Touch (Figura 5).
1. Instale las dos baterías AAA suministradas de la manera
indicada en la Figura 5.
2.
Enchufe el cordón de alimentación en un tomacorriente de 120 VCA, 60 Hz
3. Encienda el ventilador apretando el botón de encendido/apagado.
Esto activa el control de velocidad de su ventilador.
4. Velocidades - Ahora puede ajustar la velocidad del ventilador al nivel
deseado - baja (1), mediana (2), o alta (3) - apretando el botón de
velocidad del ventilador. El presionar el botón de encendido/apagado
activa y desactiva su ventilador. Con el ventilador encendido, puede
activar las demás funciones disponibles.
5. Funciones de oscilación - Con el ventilador encendido, presione el
botón de oscilación para activar o desactivar la función de oscilación.
Además de la oscilación de lado a lado, el ventilador tiene un
mecanismo de oscilación de 5 posiciones. Al sujetar el cabezal y
girarlo suavemente de lado a lado, puede encontrar el ángulo que prefiera.
6. Funciones de temporizador - El ventilador tiene un temporizador
que le permite fijar el tiempo de funcionamiento de 1/2 hora hasta 71/2 horas en incrementos de 1/2 hora. El tiempo de funcionamiento
aumenta en 1/2 hora cada vez que se presione el botón de la función
de temporizador, hasta un máximo de 7-1/2 horas. Si se vuelve a
presionar el botón de temporizador después de llegar al ajuste de 71/2 horas, el ventilador vuelve al modo de funcionamiento continuo.
7. Control de brisa - El ventilador tiene una función que permite
escoger entre tres tipos de brisa - continua, natural y sueño.
Inicialmente el ventilador funciona en el modo continuo. Puede
apretar el botón de modo de brisa para seleccionar la velocidad de
brisa deseada. En el modo Natural o Sueño, la fuerza de la brisa
del ventilador variará automáticamente. Ajuste el ventilador a la
velocidad baja para una brisa más suave y escoja la velocidad
mediana o alta para una brisa más fuerte.
controles tipo almohadilla de toque
velocidad del ventilador
.
encendido/apagado
función de temporizador
modo de brisa
velocidad del
ventilador
oscilación
Figura 4
intervalo del
temporizador
velocidad del
ventilador
función de temporizador
control de viento
oscilación
control de viento
parte posterior del
control remoto
MODEL 2115
Innovators in Home Comfort
TM
Wind Tower
Oscillating Pedestal Fan
Check package contents. If parts are missing, or replacement parts required, please call our PARTS DEPARTMENT TOLL-FREE AT
1-800-966-2028. MONDAY THROUGH FRIDAY, BETWEEN THE HOURS OF 8 AM AND 4 PM EST. "PLEASE DO NOT RETURN PRODUCT
TO PLACE OF PURCHASE." Reference the type and style of product (located on the bottom of the product) when you call.
IMPORTANT SAFETY INSTRUCTIONS • READ AND SAVE THESE INSTRUCTIONS
This F an is for residential use only. It is not intended to be used in commercial or industrial settings.
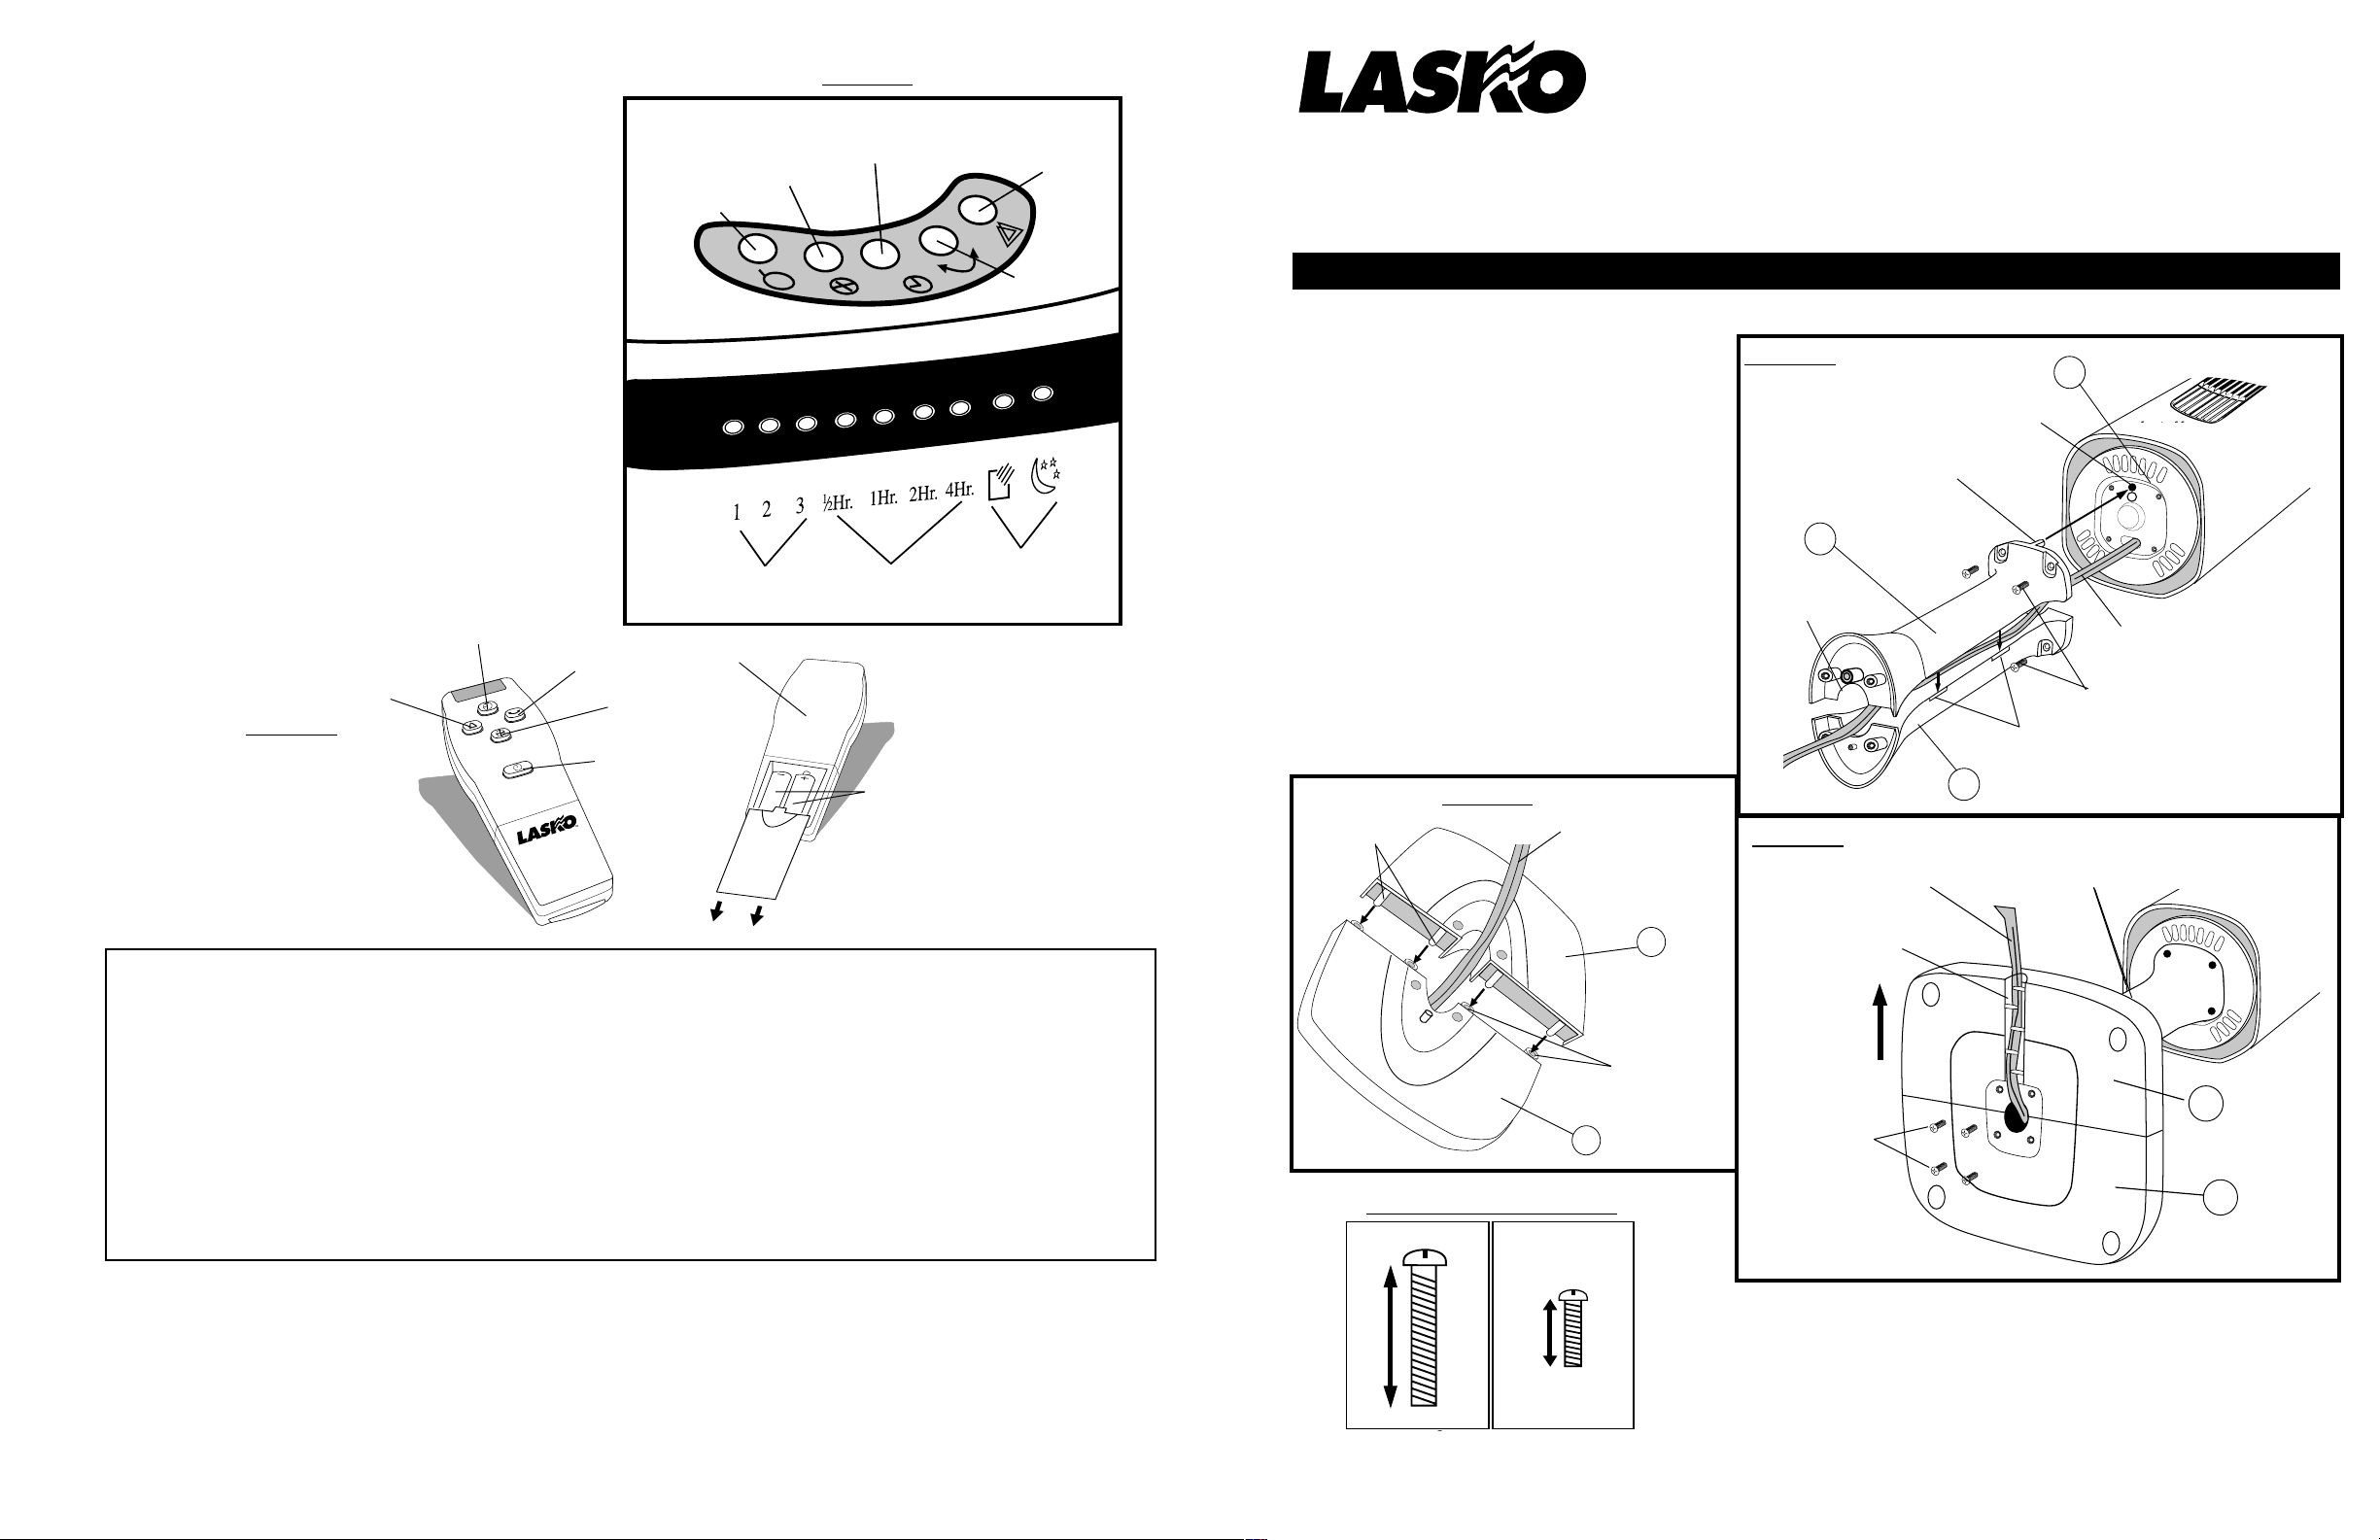
ASSEMBLY
1. Locate the power supply cord and place it in the cord
channel of column supports #2a and #2b. Snap column
supports #2a and #2b firmly together to form column
support assembly #2.
2. Attach column support assembly (#2) to motor base #3
with four 1/2" long M5 screws, making sure to align the
boss/tab on the support column assembly with the
locating hole on the motor base.
3. Assemble the support base back #1A by interlocking the
bosses to the boss holes of support base front #1B.
Thread the power supply cord plug through the large
hole in the center.
4. Align the support base assembly #1 with column support
assembly #2 noting that the cord channel on the bottom of
the support base #1 should be towards the back of the fan.
Assemble the support base to the column support
assembly with four 1" M5 screws. Gently pull any excess
slack out of the power supply cord and locate the cordset
in the wire locating trough.
(figure 1)
(figure 1)
(figure 2)
(figure 3)
Figure 1
#2A
cord channel
boss
column support
locating hole
#3
motor base
M5 x 1/2" screws
front of fan
power supply cord
encendido/apagado
de alimentación
Figure 5
baterías AAA
GARANTIA LIMITADA
SI NECESITA PIEZAS ADICIONALES FAVOR DE COMUNICARSE CON EL FABRICANTE POR LA GARANTIA DEL REMPLAZO DE PIEZAS.
INCLUYA UNA COPIA DE LA PRUEBA DE COMPRA, EL TIPO Y ESTILO DEL VENTILADOR, ESTA INFORMACION PUEDE LOCALIZARLA EN
LA PARTE DE ABAJO DE LA UNIDAD.
ESTE PRODUCTO ESTA GARANTIZADO CONTRA DEFECTOS DE FABRICACIONY/O MATERIALS POR UN AÑO A PARTIR DE LA FECHA DE COMPRA.
A NUESTRA OPCION, PIEZAS QUE SE COMPRUEBEN QUE ESTEN DEFECTUOSAS SERAN REPARADAS. REMPLAZADAS O SE REMPLAZARA EL
PRODUCTO POR COMPLETO.
SI NECESITA REPARACIONES ELECTRICAS O MECANICAS DURANTE EL PERIODO DE GARANTIA, ENVIE LA UNIDAD POR CORREO O FLETE
PAGADO AL CENTRO DE SERVICIO MAS CERCANO, LISTADO EN ESTA TARJETA.
SI SOLAMENTE NECESITA REMPLAZAR UNA PIEZA, TIENE QUE INDICAR EL TIPO Y ESTILO DEL VENTILADOR, ESTA INFORMACION SE ENCUENTRA
EN LA PARTE DE ABAJO DE LA UNIDAD. DE CUALQUIER FORMA, SE SOLICITA UNA COPIA DE LA PRUEBA DE COMPRA.
ESTA GARANTIA NO ES VALIDA SI EL DANO OCURRE DEBIDO A UN ACCIDENTE, MANEJO, INSTALACION, OPERSCION INCORRECTA, DANO
DURANTE EL TRANSPORTE, MALTRATO, USO INDEBIDO, REPARACIONES HECHAS O INTENTADAS NO AUTHORIZADAS, O EL USO DEL PRODUCTO PARA
FINES COMERCIALES. TODAS LAS GARANTIAS EXPRESAS O IMPLICITAS, TIENEN UNA DURACION DE UN ANO A PARTIR DE LA FECHA DE COMPRA
ORIGINAL. ESTA GARANTIA EXPRESAS O IMPLICITAS, TIENEN UNA DURACION DE UN ANO A PARTIR DE LA FECHA DE COMPRA ORIGINAL. ESTA
GARANTIA NO CUBRE RESPONSABILIDADES POR DANOS PORTUITOS O CONSECUENTES POR NINGUNA CAUSA. DADO QUE ALGUNOS ESTADOS NO
PERMITEN NINGUNA LIMITACION EN LA DURACION DE UNA GARANTIA IMPLICADA, O LA EXCLUSION O RESTRICCION DE DANOS FORTUITOS O
CONSECUENTES. LA LIMITACION O EXCLUSION ANTES MENCIONADA PODRIA SER NO VALIDA. ESTA GARANTIA EXTIENDE AL COMPRADOR ORIGINAL
DERECHOS LEGALES ESPECIFICOS Y USTED PODRIA TENER OTROS DERECHOS, LOS CUALES VARIAN DE UN ESTADO A OTRO.
PARA PIEZAS:
Para Repuestos Llame al: 1-800-966-2028. DE LUNES A VIERNES, DESDE LAS 8 DE LA MAÑANA A LAS 4 DE LA TARDE, HORA DEL ESTE. "POR
FAVOR NO DEVUELVA EL PRODUCTO AL SITIO DONDE LO COMPRÓ". Cuando llame, refiérasa al tipo y estilo del producto (situados en la base del producto).
Figure 2
bosses
power supply cord
support base front
Actual screw size
base back
boss holes
#1B
#1A
support
Figure 3
power supply cord
wire locating trough
back of fan
M5 x 1" screws
#2B
column support
column support
snaps
assembly
back of fan
#1A
support base back
#1B
support base front
PARA OBTENER ASISTENCIA TÉCNICA Y
Para cualquier pregunta, comentarios o para obtener la dirección de su centro de servicio más cercano, SÍRVASE LLAMAR A NUESTRO "TELÉFONO
LAS DIRECCIONES DEL CENTRO DE SERVICIO:
DE EMERGENCIA" GRATUITO AL 1-800-233-0268, DE LUNES A VIERNES, DESDE LAS 8 DE LA MAÑANA A LAS 4 DE LA TARDE, HORA DEL ESTE.
Cuando llame, refiérasa al nombre y número de modelo del producto
Departamento de Servicio para Equipos • P.O. Box 569 Franklin, TN 37065-0569
¡POR FAVOR, NO ENVÍE EL PRODUCTO A ESTA DIRECCIÓN!
New 4/00 4 New 4/00 1
M5 x 1”
4 per fan
M5 x 1/2”
4 per fan
OPERATION
The Wind Tower Oscillating Pedestal Fan may be operated by the
manual controls located on top of the fan (as shown in Figure 4)
or by your Feather Touch Remote Control (Figure 5)
1. Install the two AAA batteries supplied as shown in figure 5.
2. Plug the power supply cord into a 120V. AC 60HZ. outlet.
3. Apply power to your fan by pushing the on/off key. This will
activate your fans speed.
4. Speeds - You may now adjust the fan speed to the desired level,
low (1), medium (2), or high (3) by pressing the Fan Speed Key.
Pressing the On/Off Key will start and stop your fan. With the fan
energized you may now activate the other availiable functions.
5. Oscillation Functions- With the fan on pressing the Oscillation
Key will start and stop the oscillation function. As well as
oscillating from side to side the fan is equipped with a 5 position
oscillation mechanism. By grabbing the head and gently turning
from side to side you may locate the angle most desired.
6. Timer Functions - The fan is equipped with a timer that allows
you to set it's length of operation from 1/2 hour to 7 1/2 hours in
increments of 1/2 hour. Depressing the Timer Function Key will
increase the length of Operation by 1/2 hour each time it is
pressed up to 7 1/2 hours. At 7 1/2 hours, depressing once more
will reset the fan to continuous running.
7. Breeze Control - The fan is equipped with a function to choose
three types of breeze speeds, Continuous, Natural, and Sleep.
Initially the fan will operate in the continuous mode. You may
depress the Breeze Mode button to select the desired breeze
speed function. In the Natural or Sleep mode, the breeze from
your fan will vary up and down automatically. Set your fan on
low speed for a lighter breeze and medium or high for a
stronger breeze.
timing function
oscillation
breeze mode
Figure 5
touch pad controls
fan speed
on/off
fan speed
back of remote
fan speed
power
on/off
Figure 4
timing function
timer length
AAA batteries
breeze mode
oscillation
breeze mode
MODELO 2115
Innovadores en el confort doméstico
Innovators in Home Comfort
TM
Wind Tower
Ventilador de Pedestal Oscilante
Revise el contenido del paquete. Si faltan piezas, o si se requieren piezas de repuesto, favor de comunicarse con nuestro
DEPARTAMENTO DE PIEZAS AL 1-800-966-2028 (LLAMADA SIN CARGO) DE LUNES A VIERNES, DE 8:00 A.M. A 4:00 P.M., HORA
ESTANDAR DEL ESTE. “POR FAVOR, NO DEVUELVA EL PRODUCTO AL LUGAR DONDE LO COMPRO.” Cuando llame mencione
el tipo y el estilo del producto (ubicados en la parte posterior del producto).
INSTRUCCIONES IMPORTANTES DE SEGURIDAD • LEA Y GUARDE ESTAS INSTRUCCIONES
Este ventilador es sólo para uso residencial. No está destinado para uso comercial o industrial.
ARMADO
1. Encuentre el cordón de alimentación y colóquelo en el
canal correspondiente de los soportes de columna N°
2a y 2b. Presione los soportes de columna N° 2a y 2b
de modo que encajen firmemente, formando el
conjunto de soporte de columna N° 2.
2. Fije el conjunto de soporte de columna (N° 2) a la base de
motor N° 3 con cuatro tornillos M5 de 1/2 pulg de largo,
asegurándose de alinear el saliente/lengüeta del
conjunto de soporte de columna con el agujero
localizador en la base de motor.
3. Arme la parte posterior de la base de soporte N° 1A
insertando los salientes en los agujeros para salientes de
la parte delantera de la base de soporte N° 1B. Pase el
enchufe del cordón de alimentación por el agujero grande
en el centro.
4. Alinee el conjunto de base de soporte N° 1 con el conjunto
de soporte de columna N° 2; obsérve que el canal para el
cordón en la parte inferior de la base de soporte N° 1 debe
quedar hacia la parte posterior del ventilador. Fije la base
de soporte al conjunto de soporte de columna con cuatro
tornillos M5 de 1 pulg de largo. Tire suavemente el cordón
de alimentación para eliminar cualquier holgura excesiva
y colóquelo en la ranura guía de cable.
(Figura 2)
(Figura 1)
(Figura 1)
(Figura 3)
Figura 2
saliente
cordón de
alimentación
Figura 1
agujero localizador
soporte de columna
#2A
canal de cordón
Figura 3
cordón de alimentación
base de motor
saliente
#2B
soporte de columna
#3
front of fan
parte delantera del ventilador
cordón de alimentación
tornillos M5 x 1/2 pulg
puntos de encaje a presión
conjunto de
suporte de
columna
parte posterior
del ventilador
LIMITED WARRANTY
SHOULD ACCESSORY PARTS BE NEEDED, CONTACT THE MANUFACTURER FOR IN-WARRANTY REPLACEMENT PARTS. A COPY OF
PROOF-OF-PURCHASE MUST BE INCLUDED ALONG WITH THE TYPE AND STYLE, WHICH IS LOCATED ON THE BOTTOM OF YOUR
APPLIANCE.
This product is warranted for one year from the date of original purchase against defects in workmanship and/or materials. At our option, parts that prove
to be defective will either be repaired or replaced or the whole product will be replaced.
Should electrical or mechanical repair become necessary during the warranty period, send your complete product, postage or freight pre-paid to the
nearest service center. Call the number below for the service station nearest you.
Should a part need replacement, you must give us the type and style of your appliance. You will find this at the bottom of the appliance. In either case,
a copy of your proof of purchase is requested.
This warranty does not apply if the damage occurs because of accident, improper handling or operation, shipping damage, abuse, misuse, unauthorized
repairs made or attempted, or the use of the product for commercial service.
ALL WARRANTIES, EXPRESSED OR IMPLIED, LAST FOR ONE YEAR FROM THE DATE OF ORIGINAL PURCHASE. THIS WARRANTY DOES
NOT COVER LIABILITY FOR INCIDENTAL OR CONSEQUENTIAL DAMAGES FOR ANY CAUSE WHATSOEVER.
Some states do not allow limitations on how long any implied warranty lasts, or the exclusion or limitation of incidental or consequential damages, so that
the above limitations and exclusions may not apply to you. This warranty gives you specific legal rights. You may also have other rights which vary from
state to state.
FOR PARTS:
For Replacement parts please call: 1-800-966-2028. MONDAY THROUGH FRIDAY, BETWEEN THE HOURS OF 8 AM AND 4 PM EST. "PLEASE DO NOT
RETURN PRODUCT TO PLACE OF PURCHASE." Reference the type and style of product (located on the bottom of the product) when you call.
FOR TECHNICAL ASSISTANCE and SERVICE CENTER LOCATIONS:
For any questions, comments or the location of your nearest service center, PLEASE CALL OUR TOLL-FREE "HOTLINE" AT 1-800-233-0
THROUGH FRIDAY, BETWEEN THE HOURS OF 8 AM AND 5 PM EST. Please reference product name and model no. when you call.
Appliance Service Dept. • P.O. Box 569 Franklin, TN 37065-0569 PLEASE DO NOT SEND PRODUCT TO THIS LOCATION!
New 4/00
2
268.
MONDAY
Tamaño real de tornillos
M5 x 1”
4 por ventilador 4 por ventilador
4 per fan
New 4/00
#1A
parte posterior de
la base de soporte
agujeros para salientes
parte delantera de
#1B
la base de soporte
M5 x 1/2”
4 per fan
ranura guía de cable
parte posterior
del ventilador
#1A
tornillos M5 x 1 pulg
parte delantera de
la base de soporte
#1B
parte posterior de
la base de soporte
3
 Loading...