

Page 1
Innovators in Home Comfort
TM
TM
16" Electronic Window Fan
with
Comfort Select™ Thermostat
(Model 1600)
OPERATING INSTRUCTIONS & PARTS MANUAL
READ AND SAVE THESE INSTRUCTIONS
GENERAL SAFETY INSTRUCTIONS
When using electrical appliances, especially where children
are present, basic safety precautions should always be followed in order to reduce the risk of fire, electrical shock
and injury to persons... including the following:
1. Use Fan only for intended use as described in this
manual.
2. To protect against electrical shock, do not immerse Fan,
Plug or Cord in water or spray with liquids.
3. Unplug Fan from outlet when not in use and when mov-
ing Fan to another location or before cleaning.
4. Do not operate Fan with a damaged Cord or Plug,
after a malfunction, or if it has been dropped or
damaged in any manner.
5. This appliance is equipped with a polarized Plug (one
blade is wider than the other). To reduce the risk of
electrical shock, this Plug is designed to fit in a
polarized outlet only one way. If the Plug does not fit,
contact a qualified electrician. Do not attempt to
defeat this safety feature.
6. To disconnect Plug from outlet, always grip Plug and
pull it away from outlet, never pull with Cord.
7. Do not operate in the presence of explosive and/or
flammable fumes.
8. Do not place Fan or any parts near an open flame,
cooking or other heating appliances.
9. The use of attachments not recommended or sold by
the manufacturer may be hazardous.
10. Avoid contact with any moving Fan parts.
11. Close supervision is necessary when any appliance is
used near children.
12. Do not operate without Fan Grills properly in place.
13. This product is intended for household use only and
not for commercial or industrial use.
WARNING: To reduce the risk of fire or electrical shock,
DO NOT USE THIS FAN with any SOLID STATE speed
control device.
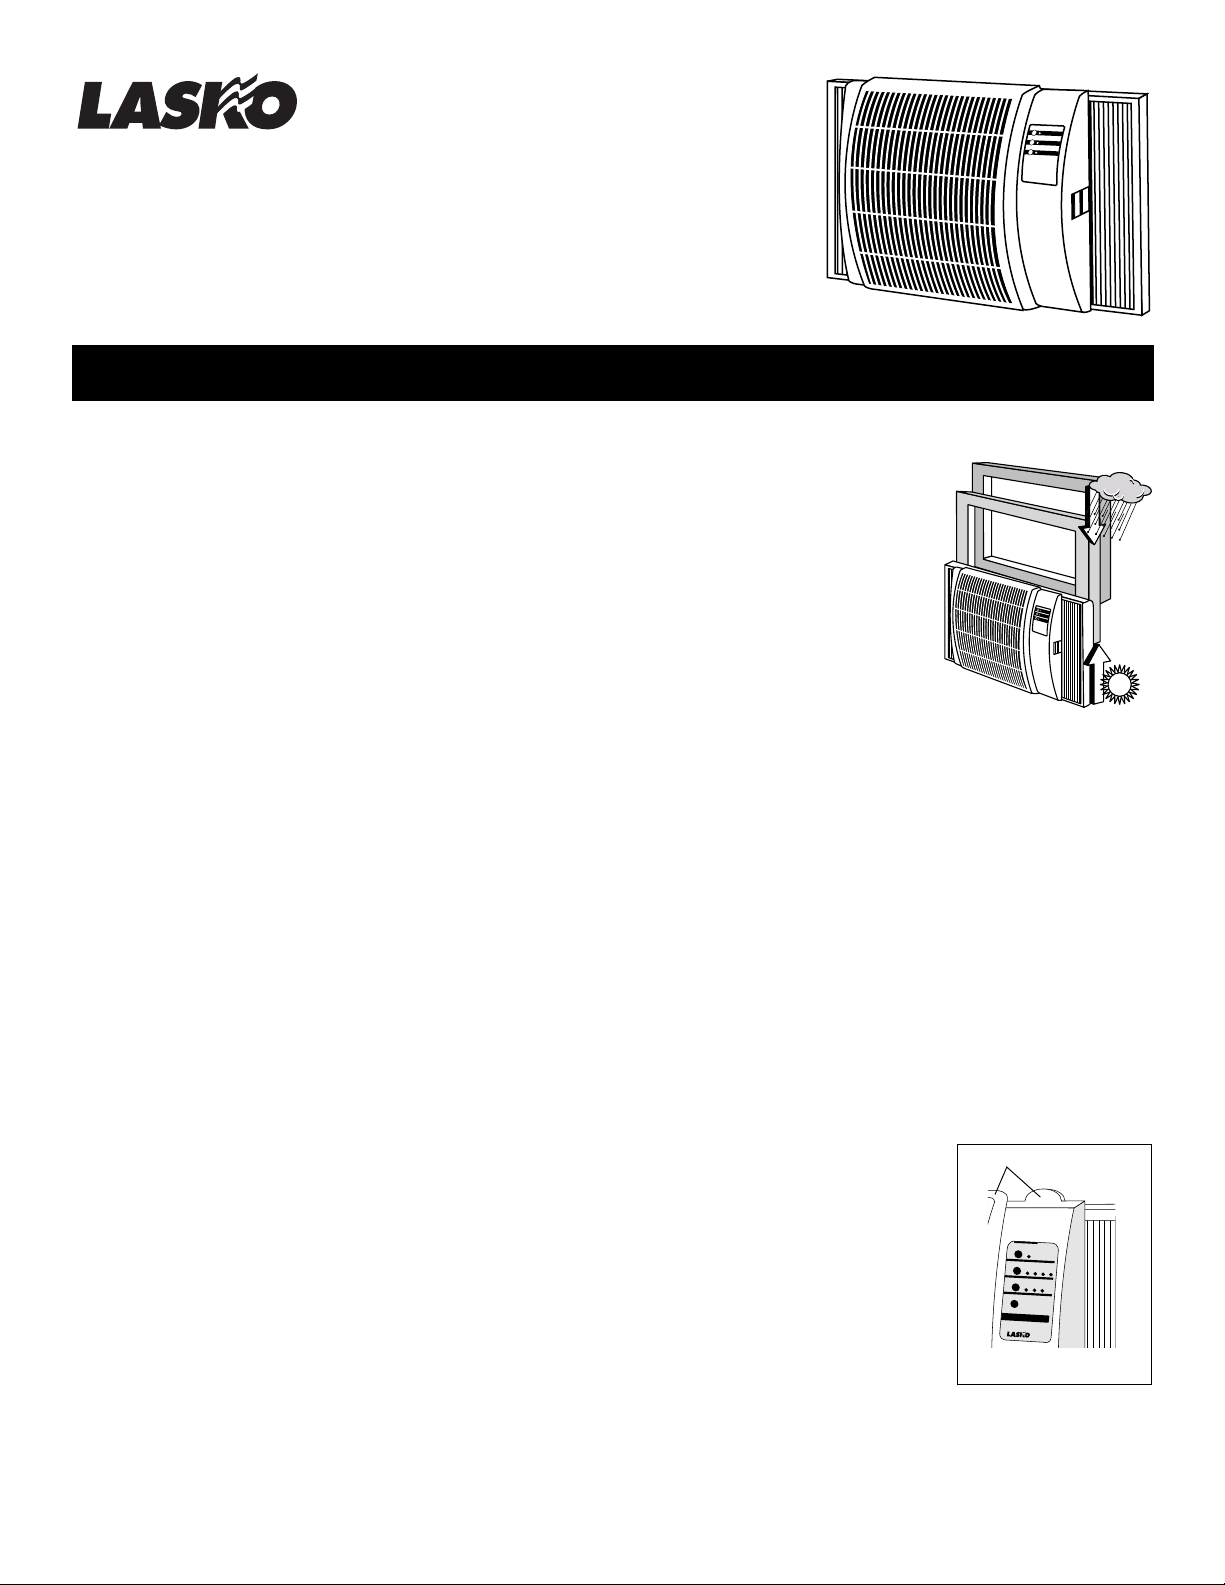
STORM GUARD
Your new 16" Electronic Window
Fan includes Lasko's exclusive
STORM GUARD™ feature.
STORM GUARD allows you to
close the window without
removing the Fan and is ideal
for unexpected storms and
home security.
Installation with this feature is
optional.
INSTALLATION INSTRUCTIONS
Fan is fully assembled and ready for installation. It has been
designed to fit double hung windows with minimum
openings of 18" High and 25-1/2" Wide.
DETERMINING THE CORRECT INSTALLATION PROCEDURE: The large number of window styles and types make
it impossible to describe one universal installation procedure. The following procedures are for the most common
types of double hung windows.
If you are installing the fan utilizing the STORM GUARD
consider one which will allow the window to be closed easily
behind the Fan.
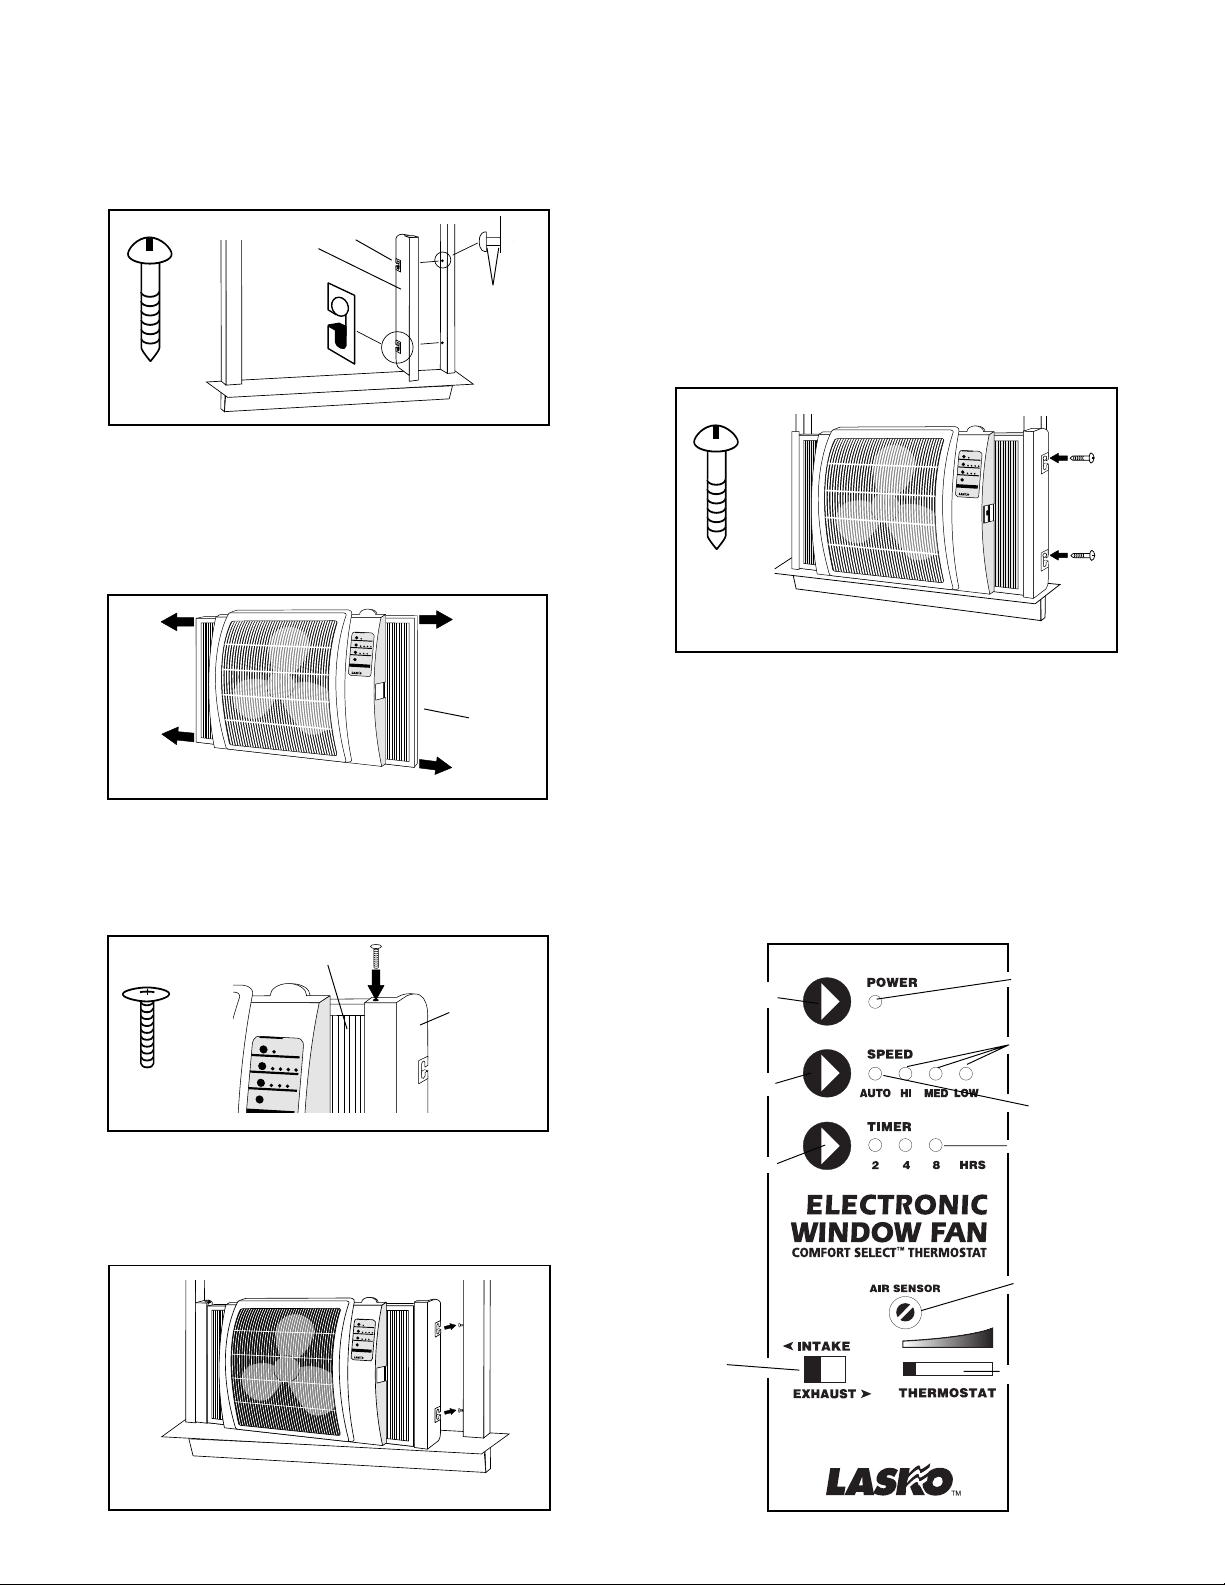
INSTALLATION
1. Open the window at least 18-1/2".
2. Turn Fan so that the front
faces you. Place the bottom
of the Fan onto the lower window sill. Be sure that the Cord
is inside the house and hanging freely over the inside window sill cap.
3. Holding the Fan in place from
the front, lower the window
sash slowly until it fits between
the Window Grabbers on the top of the Fan.
4. Once the Fan is secure, pull out both Side Panels until
the open space on the sides are fully blocked. These
Side Panels will automatically hold at the desired length.
WITHOUT
the STORM GUARD
Window Grabbers
Figure 1
(Figure 1)
Rev. A 5/97
1
2084435
Page 2
INSTALLATION
TM
TM
TM
WITH
the STORM GUARD
For INSTALLATION INSIDE EDGES of WINDOW
1. Using the STORM GUARD Panel as a template, place
in desired position, and mark Screw locations at top of
Slots.
(Figure 2)
Slot
1/8"
Figure 2
Actual
Size
STORM
GUARD
Panel
2. Remove Panel and drive four (4) Screws (found in Parts
Bag) into marks (2 per side). DO NOT TIGHTEN FLUSH.
Leave 1/8" space between Screw Head and window trim.
(Figure 2)
INSTALLATION for OUTSIDE EDGES of WINDOW
1. Pull out the Side Panels to desired length.
(Figure 3)
2. Align the Holes in STORM GUARD Panel with Holes in
Side Panel. Attach both Panels together with supplied
Screws. Two (2) per STORM GUARD.
(Figure 4)
As-
semble both sides of Fan.
3. Rest Fan on window sill with Flange of STORM GUARD
Panels over trim. Push in Side Panels tight against outer
edge of trim.
4. With Panels in position, mark Screw locations at top of
Slot and drive in the four (4) Screws (found in Parts
Bag) until tight.
(Figure 6)
3. Pull out the Side Panels to desired length.
(Figure 3)
Side
Panels
Figure 3
4. Align the Holes in STORM GUARD Panel with Holes
in Side Panel. Attach both Panels together with supplied Screws. Two (2) per STORM GUARD.
(Figure 4)
Assemble both sides of Fan.
Side Panels
STORM
GUARD
Actual
Size
Figure 4
Actual
Size
Figure 6
OPERATING INSTRUCTIONS
1. Plug the Power Cord into a polarized 120 Volt AC outlet.
The Power Indicator Light (A) will automatically come
on. This will remain on as long as the Fan is plugged
into the outlet.
2. Set the Fan to INTAKE or EXHAUST (B). The INTAKE
Setting brings fresh outside air into the home, and the
EXHAUST Setting pulls indoor air out of the room.
WARNING: Always turn Fan off before switching
direction from Intake or Exhaust
(D) POWER Button
(G) SPEED Button
(A) POWER Light
(C) SPEED Lights
(E) AUTO Light
(I) TIMER Settings
5. Mount Fan in window by hooking Slots in STORM
(J) TIMER Button
GUARD Panel over the Screws on inside edge of trim
you installed in Step 1.
(Figure 5)
Fan should rest on
window sill or sash moulding.
(H) AIR SENSOR
(B) INTAKE /
EXHAUST
Switch
Figure 5
Rev. A 5/97
2
WARM
COOL
(F) THERMOSTAT
Lever
2084435
Page 3

FOR MANUAL OPERATION
When the Fan is operating in Manual Mode, the 'Speed'
Setting that you have chosen will remain at this Setting until
you turn your Fan off or change the Speed.
1. To set Fan to desired Speed press the 'SPEED' button (G);
Press one time - Fan will go to LOW Speed
Press two times - Fan will go to MED Speed
Press three times - Fan will go to HI Speed
2. To turn the Fan off, press the 'POWER' Button (D) once.
FOR 'AUTO' OPERATION
In 'AUTO' (E) Setting, your Fan will sense the air
temperature of the room and change speeds
CALLY
be most desired in the evening while you are sleeping. When
the room temperature has dropped due to cool night air the
Fan will
itself back on when the temperature begins to rise.
1. Slide the THERMOSTAT Lever (F) to the WARM
2. Push the 'SPEED' (G) Button four times. On the fourth
NOTE: As you are pressing the 'SPEED' Button, the
Fan will turn on through the LOW, MED and HI Speeds.
If your THERMOSTAT is set to warm, your Fan will turn
off in the AUTO Setting when the room temperature is
less than approximately 85°F.
3. You may now set the Fan to the desired Speed by
4. You may turn your Fan off at any time by pressing
to maintain the desired temperature. This mode may
AUTOMATICALLY
Setting (all the way to the left).
time the green light above the AUTO Setting will come
on.
sliding the THERMOSTAT Lever (F) towards the COOL
Setting (to the right). As you slide the Lever, the Red
Lights over LOW, MED or HI will come on to indicate
what Speed the Fan is operating at. Once the Fan is
set to desired Speed, the AIR SENSOR (H) will read
the air temperature and
Speed Settings to maintain this temperature.
the 'POWER' Button once.
turn itself off and will again turn
AUTOMATICALLY
AUTOMATI-
change
FOR 'TIMER' SETTING
Your Fan also includes a 'TIMER' Setting. In this mode,
you can set your Fan to
Hours, 4 Hours or 8 Hours. The Timer mode will operate in
either 'MANUAL' or 'AUTO' Settings.
AUTOMATICALLY
turn off in 2
TO OPERATE 'TIMER' IN MANUAL SETTING
1. Press SPEED Button (G) to desired Fan Speed.
2. Press TIMER Button (J) until desired length of Time is
indicated by the 2,4 or 8 Hour Light (I).
Your Fan will now operate at the Speed you have selected
for the length of time you set. Once that length of time has
been reached, the Fan will
AUTOMATICALLY
shut off.
desired Speed Setting.
3. Press 'TIMER' Button (J) until desired length of Time is
indicated by the 2,4 or 8 Hour Light (I).
Your Fan will operate in 'AUTO' mode until Fan has reached
length of Time you set if the room temperature has dropped
below the Thermostat Setting.
NOTE: While in Auto/Timer mode, it is possible for the
Fan to turn itself off and back on again within the time
you have it set for.
WARNING: To prevent personal injury and/or damage
to the Fan, never lean or push on the Fan while it is
seated in the window or during operation. Do not lift
the sash on a double hung window while the Fan is
operating. Be sure that the Fan is secure in the window
at all times.
MAINTENANCE
CLEANING
TO CLEAN OUTSIDE OF FAN
1. Unplug Fan from outlet.
2. Use only a soft, damp cloth to gently wipe the Fan
clean.
TO CLEAN INSIDE OF FAN
1. Unplug Fan from outlet.
2. Remove Fan from window and carefully place Fan
face down.
3. Remove the three (3) Screws located on Smaller Grill
Cover, indicated by arrow heads.
4. Remove Smaller Grill Cover.
5. Carefully swing Rear Grill upward.
6. Use a soft, damp cloth to gently wipe the Fan clean.
Reverse steps 1 - 5 to reassemble Fan.
DO NOT OVER TIGHTEN SCREWS.
DO NOT immerse the Fan in water and never allow water
to enter the motor housing.
DO NOT use gasoline, paint thinner or other chemicals to
clean Fan.
(Figure 7)
Rear Grill
Smaller Grill
Cover
Figure 7
TO OPERATE 'TIMER' IN AUTO SETTING
1. Press 'SPEED' Button (G) until you've reached the Auto
Setting.
2. Slide the THERMOSTAT Lever (F) until you've reached
Rev. A 5/97 2084435
STORAGE
Clean Fan as instructed and store in a clean, dry place.
MOTOR IS PERMANENTLY LUBRICATED.
3
Page 4

LIMITED WARRANTY
SHOULD ACCESSORY PARTS BE NEEDED, CONTACT THE MANUFACTURER FOR IN-WARRANTY REPLACEMENT PARTS. A COPY OF PROOF-OF-PURCHASE MUST BE INCLUDED ALONG WITH THE TYPE AND STYLE,
WHICH IS LOCATED ON THE BOTTOM OF YOUR APPLIANCE.
This product is warranted for one year from the date of original purchase against defects in workmanship and/or materials.
At our option, parts that prove to be defective will either be repaired or replaced or the whole product will be replaced.
Should electrical or mechanical repair become necessary during the warranty period, send your complete product, postage
or freight prepaid to the nearest service center. Call the number below for the service station nearest you.
Should a part need replacement, you must give us the type and style of your appliance. You will find this at the bottom of
the appliance. In either case, a copy of your proof of purchase is requested.
This warranty does not apply if the damage occurs because of accident, improper handling or operation, shipping damage,
abuse, misuse, unauthorized repairs made or attempted, or the use of the product for commercial service.
ALL WARRANTIES, EXPRESSED OR IMPLIED, LAST FOR ONE YEAR FROM THE DATE OF ORIGINAL PURCHASE. THIS WARRANTY DOES NOT COVER LIABILITY FOR INCIDENTAL OR CONSEQUENTIAL DAMAGES
FOR ANY CAUSE WHATSOEVER.
Some states do not allow limitations on how long any implied warranty lasts, or the exclusion or limitation of incidental or
consequential damages, so that the above limitations and exclusions may not apply to you. This warranty gives you specific
legal rights. You may also have other rights which vary from state to state.
FOR PARTS:
Check package contents. If parts are missing or you need to order replacement parts, please call
our PARTS DEPARTMENT TOLL-FREE AT 1-800-966-2028. MONDAY THROUGH FRIDAY,
BETWEEN THE HOURS OF 8 AM AND 4 PM EST. "PLEASE DO NOT RETURN PRODUCT
TO PLACE OF PURCHASE." Reference the type and style of product (located on the underside
of the product) when you call.
FOR TECHNICAL ASSISTANCE and SERVICE CENTER LOCATIONS:
For any questions, comments or the location of your nearest service center, PLEASE CALL OUR
TOLL-FREE "HOTLINE" AT 1-800-233-0268. MONDAY THROUGH FRIDAY, BETWEEN THE
HOURS OF 8 AM AND 5 PM EST. Please reference product name and model no. when you call.
Appliance Service Dept. • P.O. Box 569 Franklin, TN 37065-0569 PLEASE DO NOT SEND PRODUCT TO THIS LOCATION!
NOTES
Rev. A 5/97
4
2084435
 Loading...