

Laserworld Showcontroller Software, Showcontroller Plus Software Upgrade Quickstart Guide [EN]

Showcontroller Quickstart Guide
- English -
Copyright © 2018 by www.showcontroller.com. All Rights Reserved.

Showcontroller Quickstart Guide
Index
1. Hardware and Installation ........................................................................ 3
2. Showcontroller LIVE .................................................................................. 4
3. Showcontroller RealTime .......................................................................... 5
a. General Principle ........................................................................................ 5
b. Add a Laser Frame from CAT ...................................................................... 5
c. Add Effects ................................................................................................ 7
d. Add Own Logo .......................................................................................... 7
e. Add Custom Text ....................................................................................... 8
4. Showcontroller T racer ............................................................................... 9
5. Help and Support ..................................................................................... 10
Legal Information ........................................................................................ 11
2 / 11

Showcontroller Quickstart Guide
1. Hardware and Installation
Showcontroller is compatible to several hardware interfaces in the PLUS version, but it mainly supports the
Laserworld ShowNet network interface.
To get started, it is important that the Showcontroller Software is allowed to communicate through the
firewall with the ShowNet LAN interface.
As the ShowNet hardware is a network interface, no drivers are required. There are different configuration
options for ShowNet which affect the possibility to identify the ShowNet interface.
Steps to connect and use the ShowNet interface:
1. Set connection mode:
Dip Switch setting at the interface for AutoIP:
sw itch 1 2 3 4 5 6 7 8 9 10
On (1) / Off (0) 0 0 0 0 0 1 0 0 0 0
Unplug power supply and reconnect it after having set the Dip switches. Other connection modes are
described in the ShowNet manual.
2. Plug the Showcontroller license dongle to the USB port
3. Open Showcontroller LIVE and then "View"->"Show Control Center"
If the interface has been correctly detected, it is displayed as "ShowNet "+ the number of the interface.
If the interface has not been detected, make sure the firewall does not block Showcontroller from
accessing the ShowNet interface.
To test if this is the case, completely deactivate the firewall, close Showcontroller and repeat step 3. If it's
successful, reactivate the firewall and add exceptions for the Showcontroller software.
In 99% of the cases where the ShowNet interface could not be detected by
Showcontroller it is due to the firewall blocking the software!
3 / 11

Showcontroller Quickstart Guide
2. Showcontroller LIVE
Showcontroller LIVE has been designed as very easily and intuitively useable laser control software. After
having started Live and checked, if the hardware interface(s) has/have been properly connected (see 1.
Hardware and Installation), click on "Start" and then select one of the Scenes (the pictures and animations).
Laser output should already be visible.
If several interfaces have been connected, it may be necessary to adapt the behavior of the scenes to output
to all interfaces at the same time. There are several methods how to do so (please read the full manual), but
one should be explained here:
Select the "Output" tab in the upper right area. Select Scanner 1,2,3 for testing, and the very Scene outputs
to hardware interface 1+2+3
4 / 11

Showcontroller Quickstart Guide
3. Showcontroller RealTime
Showcontroller RealTime is the timeline-based, main part of the Showcontroller laser software suite.
a. General Principle
Laser show programming in RealTime is intuitive and many operations can be done in a drag-and-drop way.
RealTime allows for real-time programming - every programming step can be seen in real time, which eases
the programming process a lot.
The elements on the timeline are in dependance to each other: The effects events always relate to a
Trickfilm event and are placed on tracklines under it. It is possible to assign several effects events to one
trickfilm event.
b. Add a Laser Frame from CAT
There are several ways of programming with RealTime, this is just one example to quickly get going with the
own laser output.
Click on the "Set CAT file icon"
Load the default.cat
Confirm with OK, so the dialog closes.
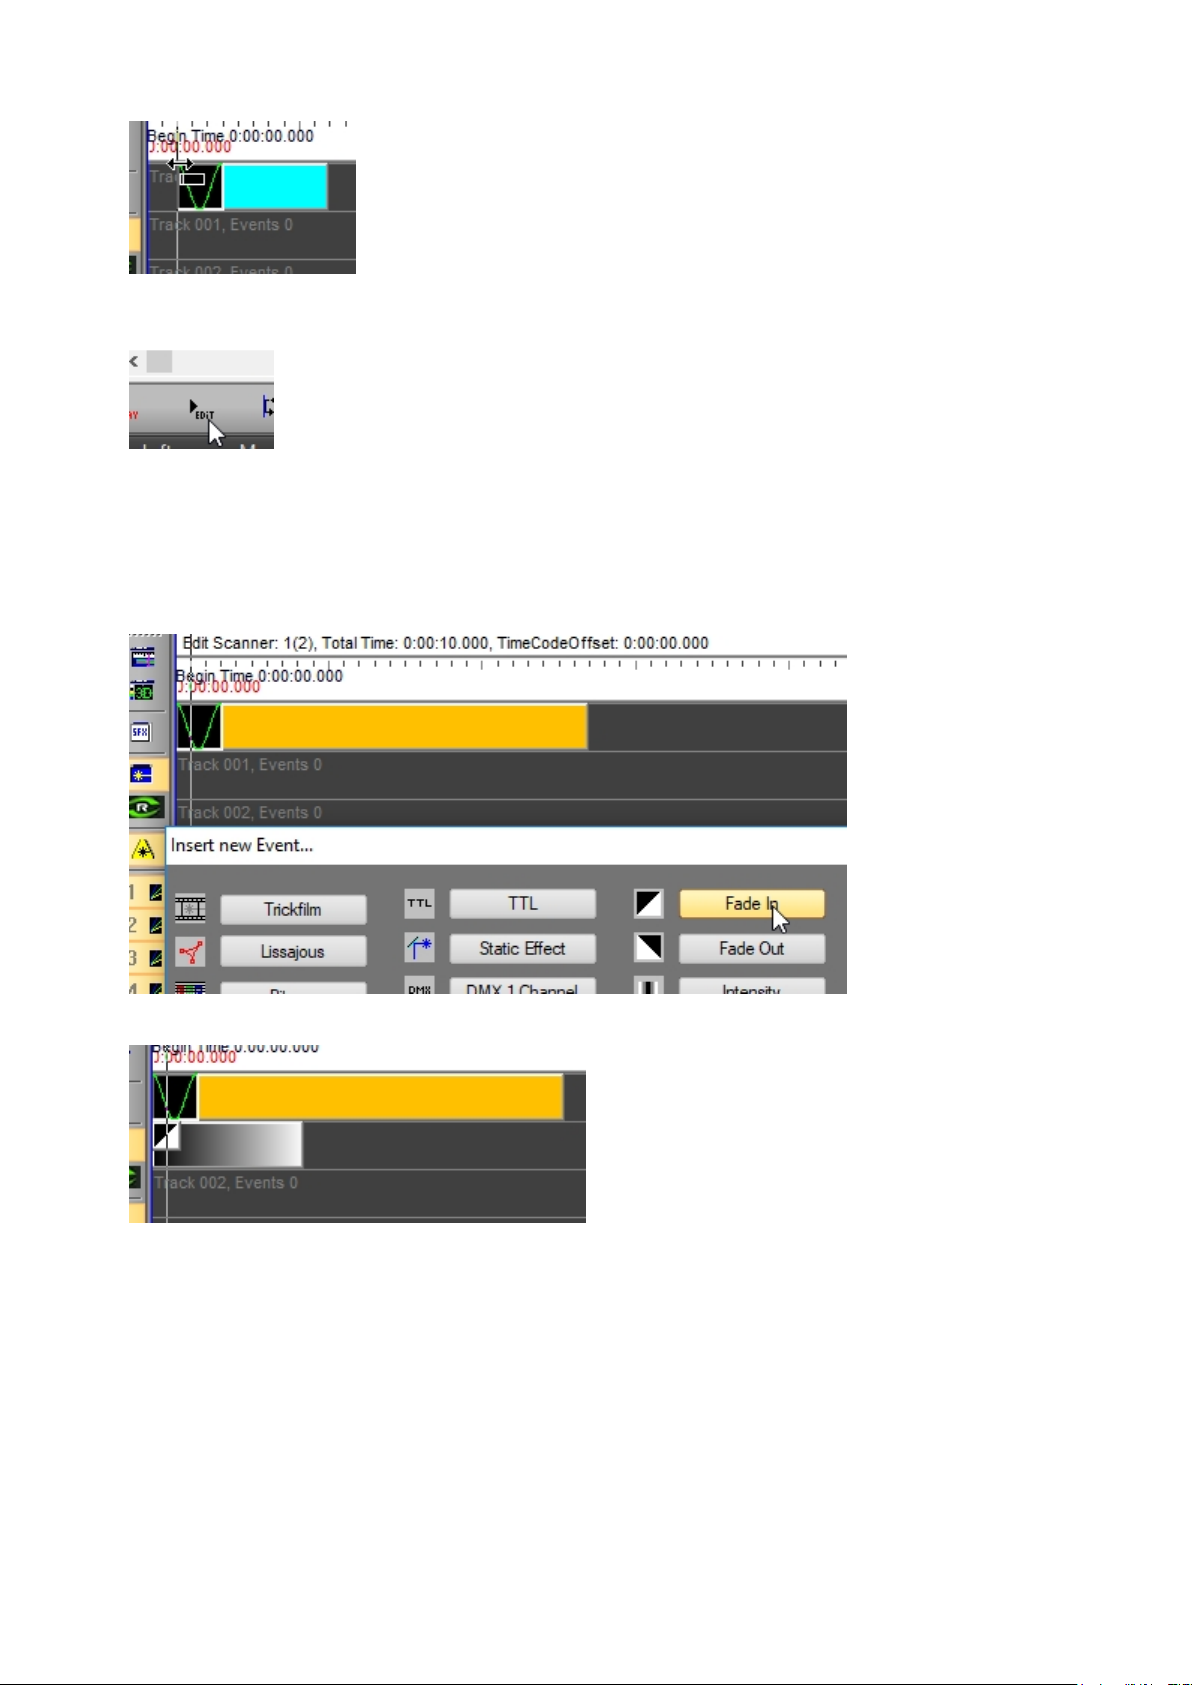
Double click to an empty area of the timeline, the events dialog opens:
5 / 11

Showcontroller Quickstart Guide
Select "Trickfilm"
A Trickfilm event is added to the timeline. Doubleclick on the event.
A dialog opens, where a begin and an end picture can be selected. Select the same begin and end picture
Confirm with OK.
Use the mouse to adjust the Trickfilm duration
6 / 11
Showcontroller Quickstart Guide
Use the black "Play Edit" button in the bottom left corner to plaxback the Trickfilm event:
It is already shown in the preview window.
c. Add Effects
Effects events can be added to Trickfilm events by placing them in the trackline just below the Trickfilm.
Doubleclick an empty line below the trickfilm (e.g. Track 001) and select an effect, e.g. the fade in effect:
This is how it looks like:
Further effects can be added in the tracklines below. Modifications to the effects and how to adjust them to
different requirements are explained in the main manual.
d. Add Own Logo
To add an own logo it must be available in a laser-format. There are several ways to create or import a logo
to Showcontroller.
With Showcontroller PicEdit it is possible to draw a logo by hand or construct it as vectors with the available
tools.
Showcontroller Tracer allows for transforming JPG pictures to laser vectors (See 4. Showcontroller Tracer).
The SVG Tool allows for importing Vector logos, e.g. from Blender or Adobe Illustrator (see details on the
Showcontroller website)
7 / 11
Showcontroller Quickstart Guide
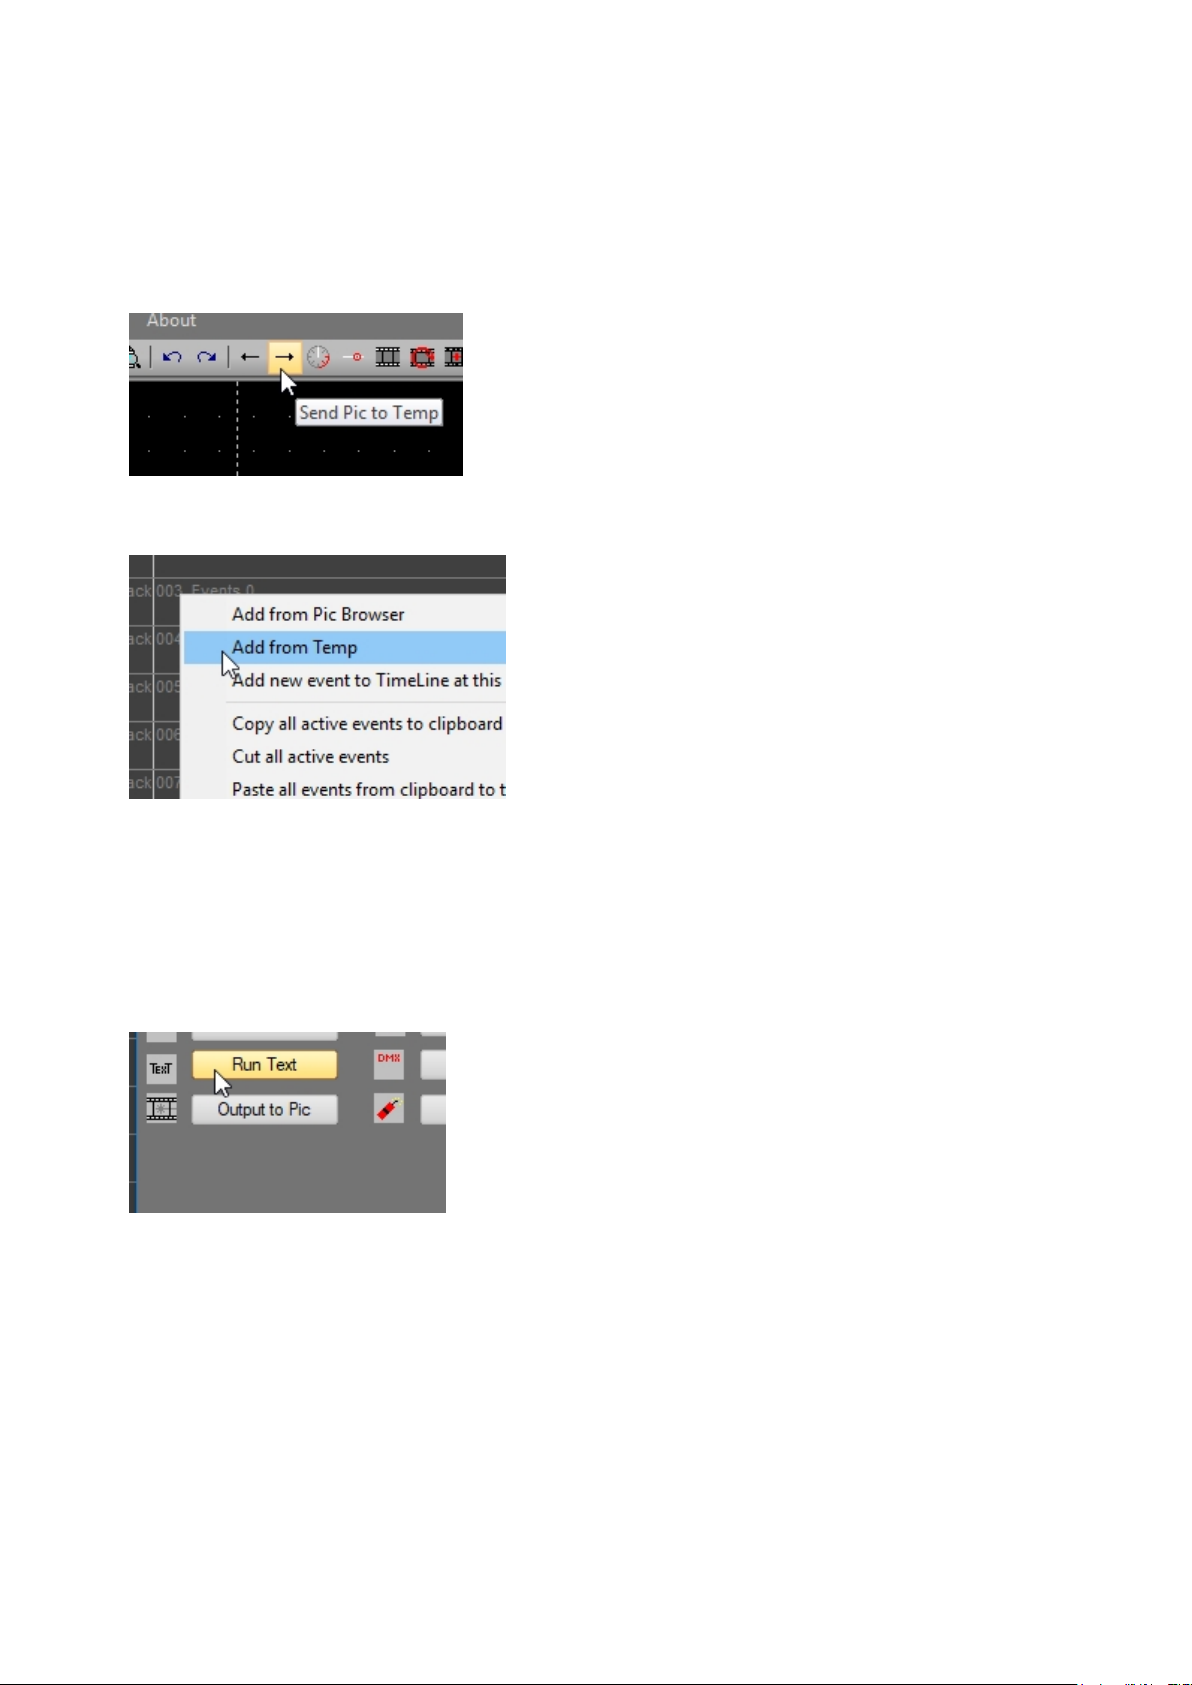
There are several ways to getting a logo from one of the different program parts to the RealTime timeline, we
explain the quick one with the temporary buffer here.
Each program part has the option to "Send Pic to Temp", meaning sending the current frame to the
temporary buffer for the use in another program part.
This can also be just Icons with arrows:
If a Pic has been sent to temp, it can be recalled as an Event fpor the timeline:
Right click to an empty area in the timeline, the select "Add from temp":
This directly imports the pic to the timeline and it is added to the show.
e. Add Custom Text
Custom text can be added as event directly from the events dialog.
Doubleclick an empty area in the timeline, then select "Run Text"
Doubleclick the just created event ...
... and enter the running text to be displayed.
It is possible to adjust some parameters in the dialog, but it's recommended to use a font type that can
easily be drawn by laser - the more complex, the more flickering the projection will be.
Ideal fonts for laser display are single line fonts.
8 / 11

Showcontroller Quickstart Guide
4. Showcontroller Tracer
Showcontroller Tracer is the program part especially designed for importing logos/graphics to a laser-vector
format.
Tracer can handle JPG and BMP files.
To trace a picture, simply select it and click on "Trace". The left window shows the result, including the
points.
To reduce the flickering of a laser image it is essential to use as few points as possible, so Tracer provides
the option to "Reduce Points". This, however, can also reduce the points too much, so the picture becomes
distorted. Try out the different optimization options to find the best possible result. It is recommended to
keep a picture below 1000 points.
9 / 11

Showcontroller Quickstart Guide
5. Help and Support
Detailed descriptions of the Showcontroller laser software suite are available in the Manual, which can be
found on the Showcontroller website:
https://www.showcontroller.com
The FAQ section provides replies to common questions: https://www.showcontroller.com/en/faq
If you have any questions, please use the Forum on the website for further support:
https://www.showcontroller.com/en/forum
The FAQ section provides replies to common questions.
10 / 11

Showcontroller Quickstart Guide
Legal Information
Legal Information:
Laserworld (Switzerland) AG
Kreuzlingerstrasse 5
8574 Lengwil / Switzerland
www.showcontroller.com
Ph +41-71-67780-80
Headquarters: 8574 Lengwil / Switzerland
Company Nr.: CH-440.3.020.548-6
CEO: Martin Werner
Tax Nr. CH: 683 180
VAT ID: DE258030001
UID: CHE-113.954.889
WEEE-Reg.-Nr.: DE 90759352
11 / 11
 Loading...