

Page 1
Manual / Bedienungsanleitung /
Mode d´emploi
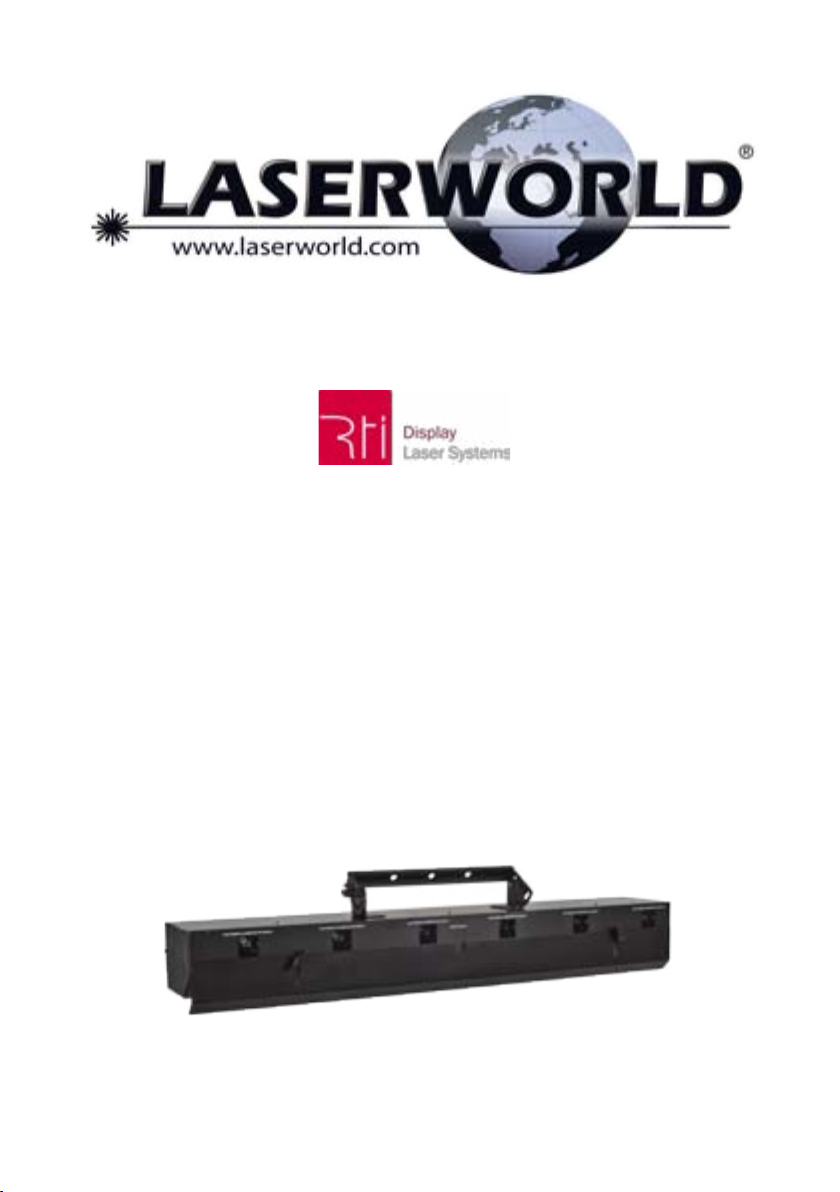
RTI NEO SIX RGB 2
Please spend a few minutes to read this manual fully
before operating this laser!
Bitte lesen Sie diese Bedienungsanleitung sorgfältig
vor Inbetriebnahme dieses Showlasersystems!
English
Deutsch
06/2017
Page 2

Manual: RTI NEO SIX RGB 2
Legal Notice:
Thank you for purchasing this Laserworld product.
Due to continual product developments and technical improvements, Laserworld (Switzerland) AG reserves the right to make modications to its products.
This manual and its content have been made with due care but Laserworld (Switzerland) AG
cannot however, take any responsibility for any errors, omissions or any resulting damages
forthwith.
The brands and product names mentioned in this manual are trade marks or registered trade
marks of their respective owners.
Rechtlicher Hinweis:
Die Firma Laserworld (Switzerland) AG behält sich das Recht vor, Änderungen an ihren Produkten vorzunehmen, die der technischen Weiterentwicklung dienen. Diese Änderungen
werden nicht notwendigerweise in jedem Einzelfall dokumentiert.
Diese Betriebsanleitung und die darin enthaltenen Informationen wurden mit der gebotenen
Sorgfalt zusammengestellt.
Die Firma Laserworld (Switzerland) AG übernimmt jedoch keine Gewähr für Druckfehler, andere Fehler oder daraus entstehende Schäden.
Die in dieser Bedienungsanleitung genannten Marken und Produktnamen sind Warenzeichen
oder eingetragene Warenzeichen der jeweiligen Titelhalter.
page 2 / 30
Page 3

Manual: RTI NEO SIX RGB 2
Content:
1. Product and Package Contents
2. Preliminary Warning Notices
3. Initial Operations, Safety Instructions
4. Working on the Device
5. Service Notes
6. Warnings and other Notices on the Device
7. Device & Connections
8. Operation
Final Statement
Technical Data Sheet
Laser Specications
page 3 / 30
Page 4

Manual: RTI NEO SIX RGB 2
1. Product and Package Contents
Please check if all listed parts are included and undamaged. Included in delivery:
1 x laser projector 1 x key (for key switch) 1 x Interlock connector
1 x powercon power cable 1 x manual
2. Preliminary Warning Notices
1. Please use this device only according to these operating instructions.
2. Do not use the device if there are any visible damages on housing, connector panels,
power supplies or power cords.
3. Never look directly into the light source of a laser projector. Danger of damage to the
eyes or even blindness in extreme circumstances!
4. Do not operate the device at high humidity or in the rain.
5. Protect device against dripping or splashing water. Do not place any liquid lled con-
tainers near to this device.
Any warranty claims are void if the warranty label is removed or tampered
with in any way.
3. Initial Operations, Safety Instructions
1. Make sure to use correct voltage; see in-
formation on device & in this manual.
2. Make sure that the device is not connec-
ted to mains during installation.
3. Installation has to be done by technical
experienced and qualied persons according to safety regulations of the respective country.
4. Always ensure that maximum permis-
sible exposure (MPE) is not exceeded
in areas accessible to the public or
members of sta.
5. In some countries an additional inspection by technical control institutes
could be necessary.
6. Connect an easily accessible inter-
lock connector or circuit breaker
to the projector.
7. The power supply should be easily accessible.
page 4 / 30
8. When installing the laser mount it with
a minimum distance of 15 cm from walls
and objects.
9. For safe setup e.g. on walls or ceilings
please use a safety cord. The safety cord
should be able to withstand tenfold the
weight of the device. Please follow the
accident prevention regulations of professional associations and/or comparable
regulations for accident prevention.
10. If the device has been exposed to great
temperature changes, do not switch it
on immediately. Condensation (or any
moisture/water formed) may damage
this device.
11. Never use dimmer, RC or other electronically switched sockets. Whenever possible, do not use the laser projector together
with large appliances (especially fog machines) on the same mains!
Page 5
Manual: RTI NEO SIX RGB 2
12. Ensure sucient ventilation and do not
place the device on any warm or heat radiating surface. Especially the ventilati-
on openings must not be covered!
13. Ensure that device does not get over-
heated. Make sure that the device is not
exposed to spotlights (especially moving
heads). Heat of spotlights could overheat
laser in a little while and leads to a degra-
dation of performance.
4. Working on the Device
1. This product has no user serviceable parts inside and should only
be maintained and serviced by a qualied engineer.
2. Be sure that the mains plug is not connected to the power
supply while installing the device.
3. Take o all reecting things like rings, watches etc. before starting to work with or at the projector.
4. Only use non-reecting tools to work on device. Wear protective clothing (like goggles, gloves etc.) according to laser power and wave-
length of the laser.
5. Service Notes
• Moisture and heat can reduce lifetime of
the laser system dramatically and expires
any warranty claim.
• Quick on/o switching of this device will
reduce durability of the laser diode dramatically.
• Avoid sharp knocks and shocks to this
device and ensure sucient protection
during transportation. Look after your Laserworld product.
• To increase durability of your laser,
protect device against overheating:
- Always ensure sucient ventilation.
- Do not face spotlights (especially moving heads) to the device.
- Check temperature after approx. 30
minutes with each new installation.
If necessary install the projector at a
place with dierent temperature.
- Keep the device dry. Protect it from
moisture, rain and damp.
- Switch o device when it is not needed. Diodes are switched on and can
wear out even if there is no visible laser output.
• Removal of the warranty label as well
as damages to the device caused by
improper handling, neglect of the safety instructions and service notes will
void the warranty.
page 5 / 30
Page 6
Manual: RTI NEO SIX RGB 2
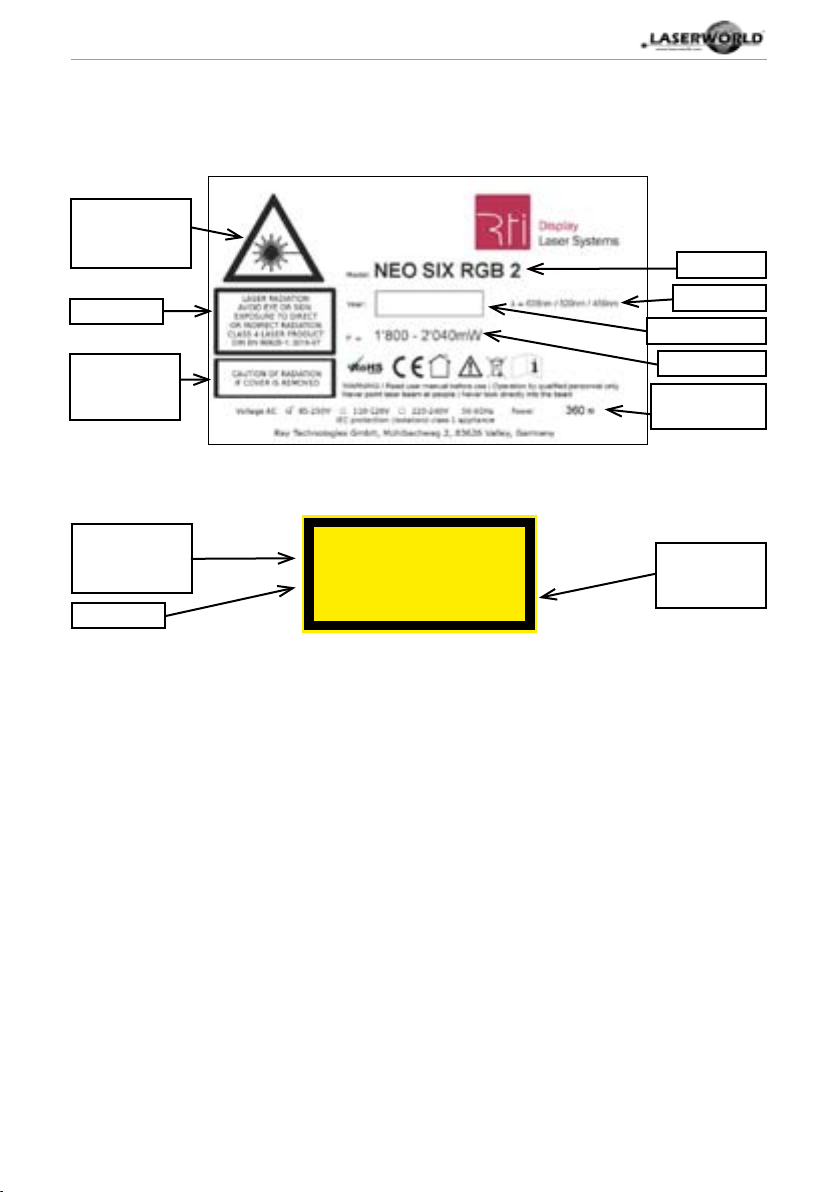
6. Warnings and other Notices on the Device
Please read manual before operation
Laser radiation!
Avoid exposure
to beam
Laser class 4
Caution of
radiation if cover is removed
Only for indoor use!
Model type
Wavelength
Production year
Output power
Power supply
& consumption
Laser radiation!
Avoid exposure
to beam
Laser class 4
laser radiation
avoid eye or skin exposure
to direct or indirect radiation
class 4 laser product
din en 60825-1: 2015-07
caution of radiation
if cover is removed
Caution of
radiation if cover is removed
page 6 / 30
Page 7

Manual: RTI NEO SIX RGB 2
7. Device & Connections
Emission LED
Beam Block Panel
Loops for safety cord
Serial number
Laser apertures
Key switch
RJ45 for Interlock
out / in
Display
& setting
buttons
Fuse, 2.5AT
DMX out / in &
LED for signal
status
Power supply
in / out
page 7 / 30
Page 8
Manual: RTI NEO SIX RGB 2
8. Operation
1. Power
Make sure that your device is provided with the correct voltage. Wrong voltage could lead
to irreparable damages. Please nd the correct voltage data in the synoptical table at the
end of this manual as well as at the rear side of the device. It must be ensured that the
device is not directed to people or inammable objects during installation.
Connect the power cable to ‚Power in‘ at the device and then to the mains.
2. DMX in / DMX out
The device can be controlled via DMX. There are a ‚DMX in‘ (DMX input) and a ‚DMX out‘
(DMX through) interface on the rear side of the device. Connect ‚DMX in‘ via a DMX cable
to a DMX controller. ‚DMX out‘ is intended to Daisy Chain the control signal to the ‚DMX
in‘ interface of a further RTI NEO device. The LED shows if there is any signal present. It
does not ash if there is a corrupt signal coming in.
The device oers 60 channels, starting from the selected start address. Each universe can
control a maximum of 8 devices and each of the 6 outputs can be controlled individually.
Each output of the device uses 10 channels as shown here:
Channel Value Eect Comment
1 Red 0 - 255 Red: 0 - 100%
2 Green 0 - 255 Green: 0 - 100%
3 Blue 0 - 255 Blue: 0 - 100 %
4 Pan Coarse 0 - 255 Pan MSB
5 Pan Fine 0 - 255 Pan LSB
6 Tilt Coarse 0 - 255 Tilt MSB
7 Tilt Fine 0 - 255 Tilt LSB
8 O / Dot / Gobo 0 Blackout Safety channel
1 - 10 Dot
11 - 20 Rectangle
21 - 30 Triangle
31 - 40 Line horizontal
41 - 50 Line vertical
51 - 60 2 dots horizontal
61 - 70 2 dots vertical
71 - 80 3 dots horizontal
81 - 90 3 dots vertical
91 - 100 Circle
101 - 110 4 quarter circle
111 - 120 Test picture
121 - 130 Rectangle with grating
page 8 / 30
Page 9
Manual: RTI NEO SIX RGB 2
131 - 140 Triangle with grating
141 - 150 Line horizontal with grating
151 - 160 Line vertical with grating
161 - 170 2 dots horizontal with grating
171 - 180 2 dots vertical with grating
181 - 190 3 dots horizontal with grating
191 - 200 3 dots vertical with grating
201 - 210 Circle with grating
211 - 220 4 quarter circle with grating
221 - 230 Test picture with grating
231 - 240 1 dot with grating
241 - 255 Blackout
9 Zoom 0 - 255 Gobo size active, if value
of channel 8
between 11
and 110
10 Strobe 0 Stobe o Strobe eect
1 - 127 Strobe speed 2Hz - 12Hz
128 - 255 Grow eect 256 points - 0
points
3. Interlock (RJ45 Interlock)
There are a ‚Interlock in‘ and a ‚Interlock out‘ (Interlock loop) interface on the rear side of
the device. The RJ45 interlock connector is provided for testing purposes. If the ‚Interlock
in‘ is plugged in the laser sources of the devices get enabled (if key switch is in ‚ON‘ position). Always use the Interlock connector located on the left of the ‚DMX active‘ LED as an
input. ‚Interlock out‘ can be used as interlock loop to switch all connected devices simultaneously with only one E-Stop.
4. Key Switch
There is a key switch on the rear side of the device. Please insert the key into the key
switch and turn it to ‚Laser on‘ position to enable laser output. Turn the key to ‚Laser o‘
to switch o the device. Please remove the key to avoid unauthorized access.
5. Fuse
There is a fuse at the rear side of the device. If the fuse should blow, please change it by
a new 2.5AT fuse. If the problems recurs, please contact your dealer or the Laserworld
service department.
6. Display / Settings at the device
It is possible to do settings directly at the device by means of the integrated 16 digit
display and the 5 buttons next to it:
page 9 / 30
Page 10

Manual: RTI NEO SIX RGB 2
The arrow buttons (up/down) navigate you through the menu.
The + / - buttons change the value of the selected mode and the button in the middle
changes the channel (1-6).
By switching on the device for the very rst time, menu 1 appears on the display:
Press the down button (arrow down) and change the DMX address by using the + /buttons:
page 10 / 30
Page 11

Manual: RTI NEO SIX RGB 2
By pressing the down button (arrow down) again the mode can be changed by using the
+ / - buttons.
In ‚normal‘ mode the device is in the hanging position or inverted as a oor stand:
In ‚inverted‘ mode the X and Y axis are inverted and the output channels are changed to
the inverted order 6 to1.
So the output channel 1 is always on the left side from the front direction of the device if
this option is chosen:
Advanced settings - Attention: For expert use only!
If the device needs to be reset, the middle button has to be pressed when powering up the
device. It enables access to advanced (main) settings.
By pressing the button + and the button - at the same time all previous saved settings are
deleted and the device is running factory settings now.
Be aware that you can easily destroy a diode when changing these settings!
Some green diodes can reach a maximum power of 120mW at 300mA, some only at
460mA. These ones using 300mA won‘t increase power if they are turned on to 460mA.
The diodes just get destroyed.
This setting should only be used by professionals, trained in Thd and Iop . All settings are
given in 16bit (0-65535).
The oset for red changes the threshold current owing when the DMX value for red modulation becomes greater than 0. The possible value is limited to the range of 57600 –
59000. It changes the maximum Iop at the same time since the whole current frame will
be shifted up or down.
By pressing the middle button the channels can be switched from 1 to 6 depending on
what output needs to be changed:
page 11 / 30
Page 12

Manual: RTI NEO SIX RGB 2
The oset for green changes the threshold current owing when the DMX value for green
modulation becomes greater than 0. The possible value is limited to the range of 57600
– 63000. Green is the most sensitive diode and the threshold current varies a lot bet-
ween the diodes. It changes the maximum Iop at the same time since the whole current
frame will be shifted up or down.
By pressing the middle button the channels can be switched from 1 to 6 depending on
what output needs to be changed:
The oset for blue changes the threshold current owing when the DMX value for blue
modulation becomes greater than 0. The possible value is limited to the range of 52600 –
60000. It changes the maximum Iop at the same time since the whole current frame will
be shifted up or down.
By pressing the middle button the channels can be switched from 1 to 6 depending on
what output needs to be changed:
The gain for red changes the maximum current owing when the DMX value for red is set
to 255. The possible value is limited to the range of 6500 - 9500. Always use a power meter
when changing this value and start with a low DMX channel value like 100.
By pressing the middle button the channels can be switched from 1 to 6 depending on
page 12 / 30
Page 13

Manual: RTI NEO SIX RGB 2
what output needs to be changed:
The gain for green changes the maximum current owing when the DMX value for green
is set to 255. The possible value is limited to the range of 6000 - 10500. Always use a power
meter when changing this value and start with a low DMX channel value like 100.
By pressing the middle button the channels can be switched from 1 to 6 depending on
what output needs to be changed:
The gain for blue changes the maximum current owing when the DMX value for blue is
set to 255. The possible value is limited to the range of 9000 - 13000. Always use a power
meter when changing this value and start with a low DMX channel value like 100.
By pressing the middle button the channels can be switched from 1 to 6 depending on
what output needs to be changed:
page 13 / 30
Page 14

Manual: RTI NEO SIX RGB 2
The range for oset is between 0 and 34800:
The range for gain is between 0 and 39949:
After completing the advanced settings a test is shown. If the key switch is on, interlock
closed and a valid DMX signal is present, the digital analog converter generates a signal
which is converted back via an analog digital converter and compared to the internal reference. The deviation is shown here.
For example: a deviation of -2 at 5Vdc full range with 16bit resolution results here in a deviation of 0.000152Vdc. Even a deviation of 10 (still <1mV) does not aect the precision of
the device. The deviation of the DAC can also reach values up to 50 without aecting the
overall precision of the device:
7. Beam Block Panel
The Beam Block Panel is meant as additional protection to prevent laser emission, e.g. into
the audition area. To prevent laser emission please loosen the screws and slide the panel in
front of the beam outlets. Fasten the screws again. Loosen the screws, slide the Beam Block
Panel down and fasten the screws to enable laser emission.
Attention: Do not open or close the Beam Block Panel while the device emits laser
beams!
8. Turn o
To turn o the device, switch the key switch to o and disconnect the power cable from
the mains.
page 14 / 30
Page 15

Manual: RTI NEO SIX RGB 2
Final Statement
Laserworld products are tested and product packaging is inspected before leaving our
warehouse.
Users must to follow the local safety regulations and warnings within this manual and adhere
to any regulations within its place of use. Damages through inappropriate use will void any
liability or warranty of our products.
Due to continual product developments, please check for the latest update of this product
manual at www.laserworld.com. If you do have any further questions, then please contact
your dealer/place of purchase or use our contact section on our website.
For service issues, please contact your dealer/place of purchase and ensure only genuine
Laserworld spare parts are used in any service repairs.
Errors and Omissions excepted and products are subject to change.
Laserworld (Switzerland) AG
Kreuzlingerstrasse 5
8574 Lengwil
Switzerland
Registered oce:
8574 Lengwil / Switzerland
Company number: CH-440.3.020.548-6
Commercial Registry Kanton Thurgau
CEO: Martin Werner
VAT no. (Switzerland): 683 180
UID (Switzerland): CHE-113.954.889
VAT no. (Germany): DE 258030001
WEEE-Reg.-No. (Germany): DE 90759352
www.laserworld.com
info@laserworld.com
Representative according to EMVG:
Ray Technologies GmbH
Managing Director: Martin Werner
Mühlbachweg 2
83626 Valley / Germany
page 15 / 30
Page 16

Manual: RTI NEO SIX RGB 2
Inhaltverzeichnis:
1. Lieferumfang & Hinweise
2. Einleitende Warnhinweise
3. Schritte zur Inbetriebnahme, Sicherheitshinweise
4. Sicherheitshinweise für Arbeiten am Gerät
5. Pege- und Wartungshinweise
6. Warnhinweise und Spezikationen am Gerät
7. Geräteanschlüsse & Bedienelemente
8. Bedienung
Abschließende Erklärung
Technische Daten
Laserleistungsdaten
page 16 / 30
Page 17

Manual: RTI NEO SIX RGB 2
1. Lieferumfang & Hinweise
Bitte den Lieferumfang zunächst auf Vollständigkeit und eventuelle Beschädigungen prüfen.
Im Lieferumfang enthalten sind:
1 x Laserprojektor 1 x Powercon Stromkabel 1 x Interlock-Stecker
1 x Bedienungsanleitung 1 x Schlüssel (für den Schlüsselschalter)
2. Einleitende Warnhinweise
1. Betreiben Sie das Gerät nur gemäß dieser Bedienungsanleitung.
2. Benutzen Sie das Gerät nicht, wenn sichtbare Beschädigungen am Gehäuse, den An-
schlussfeldern oder vor allem an den Stromversorgungsbuchsen oder -kabeln vorliegen.
3. Niemals direkt in den Strahl des austretenden Lasers blicken. Dies könnte zu irreparab-
len Schäden an den Augen und der Netzhaut führen. Erblindungsgefahr!
4. Gerät nicht bei hoher Luftfeuchtigkeit oder Regen betreiben.
5. Vor Tropf-/Spritzwasser schützen, keine mit Flüssigkeit gefüllten Gefäße auf oder neben
dem Gerät abstellen.
Bei Entfernung oder Manipulation des Garantielabels erlischt jeglicher
Anspruch auf Gewährleistung!
3. Schritte zur Inbetriebnahme,
Sicherheitshinweise:
1. Stellen Sie sicher, dass Sie das Gerät mit
der richtigen Spannung betreiben
(siehe Angaben auf dem Gerät bzw. in
dieser Bedienungsanleitung).
2. Stellen Sie sicher, dass das Gerät während
der Installation nicht mit dem Strom-
netz verbunden ist.
3. Der Laser darf nur von technisch versier-
tem Fachpersonal gemäss der im jeweiligen Land geltenden Sicherheitsbestimmungen installiert werden.
4. Die am Betriebsort geforderten Sicher-
heitsabstände zwischen Gerät und
Publikum, bzw. maximal zulässige Be-
strahlungswerte (MZB), müssen immer
eingehalten werden.
5. In bestimmten Ländern kann zusätzlich
eine Abnahme durch ein technisches
page 17 / 30
Überwachungsinstitut erforderlich sein.
6. Verbinden Sie einen leicht zugänglichen
Interlock-Stecker bzw. Notausschalter
mitdem Interlockanschluss.
7. Die Stromversorgung zugänglich halten.
8. Halten Sie bei der Installation einen Mindestabstand von 15 cm zur Wand und anderen Objekten ein.
9. Bei einer Festinstallation an Wand, Decke
o.ä., sichern Sie den Laser zusätzllich mit
einem Sicherheitsfangseil. Das Fangseil sollte mindestens dem 10-fachen
Gewicht des Geräts standhalten können.
Im Übrigen beachten Sie die Unfallverhütungsvorschriften der Berufsgenossenschaften und/oder vergleichbare Regelungen zur Unfallverhütung
10. Wenn das Gerät großen Temperatur-
schwankungen ausgesetzt war, schalten
Sie es nicht unmittelbar danach an. Kondenswasser (Nebel, Haze, usw.) kann zu
Schäden am Gerät führen.
Page 18

Manual: RTI NEO SIX RGB 2
11. Benutzen Sie niemals Dimmer-, Funkoder andere elektronisch gesteuerten
Steckdosen! Falls möglich benutzen Sie
den Laser nicht zusammen mit anderen
großen elektrischen Verbrauchern (insbesondere Nebelmaschinen) auf derselben Leitung/Phase!
12. Sorgen Sie immer für eine ausreichende
Belüftung und stellen Sie das Gerät auf
keine warmen oder wärmeabstrahlenden Untergründe. Die Belüftungsönungen dürfen nicht verdeckt sein.
13. Stellen Sie auch sicher, dass das Gerät
nicht zu heiß wird und dass es nicht dem
Strahl von Scheinwerfern ausgesetzt wird
(insbesondere bei beweglichen Scheinwerfern!). Die Wärme dieser Strahler kann
den Laser überhitzen.
4. Sicherheitshinweise für Arbeiten am Gerät
1. Service- und Reparaturarbeiten sollten ausschließlich von qualiziertem Fachpersonal durchgeführt werden.
2. Stellen Sie sicher, dass der Netzstecker gezogen ist, wenn
Sie am Gerät hantieren bzw. es installieren.
3. Vor Arbeiten am Gerät alle reektierenden Gegenstände
wie Ringe, Uhren etc. ablegen.
4. Verwenden Sie für Arbeiten am Gerät ausschließlich nicht
reektierendes Werkzeug. Tragen Sie auf die Laserstärke und -wellenlängen angepasste Schutzbekleidung (Schutzbrille, Handschuhe, etc.).
5. Pege- und
Wartungshinweise
• Feuchtigkeit und Hitze können die Lebensdauer des Lasersystems stark verkürzen und führen zum Erlöschen des
Gewährleistungsanspruchs.
• Das Gerät nicht schnell hintereinander
Ein- und Ausstecken/-schalten, da dies
die Lebensdauer der Laserdiode erheblich verkürzen kann!
• Beim Transport des Lasers jegliche Erschütterung oder Schläge vermeiden.
Bitte das Produkt bestmöglich schützen.
Laserworld bietet entsprechendes Equipment an.
• Um die Lebensdauer Ihres Lasers zu erhöhen, schützen Sie das Gerät vor Über-
page 18 / 30
hitzung:
- Immer für ausreichende Belüftung
sorgen.
- Keine Scheinwerfer (insbesondere
kopfbewegte) auf das Gerät richten.
- Bei jeder Neuinstallation nach ca. 30
Minuten die Gerätetemperatur prüfen und gegebenenfalls das Gerät an
einem kühleren/besser belüfteten
Standort platzieren.
- Halten Sie das Gerät trocken und
schützen Sie es vor Nässe, Regen und
Spritzwasser.
• Schalten Sie das Gerät aus, wenn es nicht
benutzt wird. Trennen Sie hierzu das
Netzteil von der Stromversorgung. Auch
wenn die Diode nicht leuchtet: Sie ist in
Betrieb, solange das Gerät angeschaltet
ist.
Page 19

Manual: RTI NEO SIX RGB 2
• Lüfter und Kühlkörper (Kühlrippen usw.)
müssen frei von Staubansammlungen
und Ablagerungen sein, da sonst die Gefahr des Überhitzens droht und jegliche
Gewährleistung erlischt. Bitte wenden Sie
sich an qualizierte Fachpersonen.
• Durch das Entfernen des Garantiela-
bels erlischt jeglicher Anspruch auf
Gewährleistung. Schäden am Gerät,
die durch unsachgemäßer Handhabung, Nichtbeachtung der Sicherheits-, Pege- und Wartungshinweise
entstehen besteht kein Gewährleistungsanspruch.
6. Warnhinweise und Spezikationen am Gerät
Vor Inbetriebnahme Bedienungsanleitung lesen
Laserstrahlung!
Nicht dem
Strahl
aussetzen.
Laserklasse 4
Laserstrahlung bei
geönetem
Gehäuse
Nur in geschlossenen Räumen betreiben!
Produktname
Wellenlänge
Produktionsjahr
Ausgangsleistung
Stromversorgung- und
verbrauch
Laserstrahlung!
Nicht dem
Strahl
aussetzen.
Laserklasse 4
page 19 / 30
laser radiation
avoid eye or skin exposure
to direct or indirect radiation
class 4 laser product
din en 60825-1: 2015-07
caution of radiation
if cover is removed
Laserstrahlung bei
geönetem
Gehäuse
Page 20

Manual: RTI NEO SIX RGB 2
7. Geräteanschlüsse & Bedienelemente
Laserausgabe-LED
Beam Block Panel
Öse zur Befestigung eines Sicherheitsfangseils
Seriennummer
Schlüsselschalter
Laseraustrittsfenster
Display & Tastenelemente
für Geräteeinstellungen
RJ45 für Interlock
out / in
Stromversorgung
Eingang / Ausgang
Netzsicherung, 2.5AT
DMX Ausgang / Eingang & StatussignalLED
page 20 / 30
Page 21

Manual: RTI NEO SIX RGB 2
8. Bedienung
1. Stromversorgung
Es muss darauf geachtet werden, dass das Gerät mit der richtigen Spannung versorgt wird,
da die falsche Spannung zu irreparablen Schäden am Gerät führen kann. Die Spannungsdaten sind in der Übersichtstabelle am Ende dieser Bedienungsanleitung aufgeführt.
Während des Anschließens an die Stromversorgung darf die Laseraustrittsseite nicht auf
Personen oder entammbare Objekte gerichtet sein.
Bitte zunächst das Stromkabel mit dem Gerät ‚Power in‘ und anschließend mit der Stromversorgung verbinden.
DMX in / DMX through
2.
Das Lasersystem muss über DMX angesteuert werden. Auf der Rückseite des Gerätes benden sich eine ‚DMX in‘-Schnittstelle (DMX-Eingang) und eine ‚DMX out‘-Schnittstelle
(DMX-Signal durchschleifen). Bitte die DMX-in-Schnittstelle mit Hilfe eines DMX-Kabels mit
einem DMX-Controller verbinden. Die DMX-out-Schnittstelle ist dazu gedacht, das Kontrollsignal zur DMX-in-Schnittstelle eines weiteren RTI NEO-Gerätes weiterzuleiten (Daisy
Chain). Die LED zeigt an, ob ein Signal vorhanden ist. Bei fehlerhaften Signalen leuchtet
die LED nicht.
Das Gerät besitzt 60 Kanäle, beginnend mit der ausgewählten Startadresse. Jedes DMXUniversum kann maximal 8 Geräte steuern, wobei jeder der 6 Laseraustritte individuell
angesteuert werden kann.
Jeder Strahlaustritt des Geräts nutzt, wie folgend, 10 Kanäle:
Kanal Wert Eekt Kommentar
1 Rot 0 - 255 Rot: 0 - 100%
2 Grün 0 - 255 Grün: 0 - 100%
3 Blau 0 - 255 Blau: 0 - 100 %
4 Pan Coarse 0 - 255 Pan MSB
5 Pan Fine 0 - 255 Pan LSB
6 Tilt Coarse 0 - 255 Tilt MSB
7 Tilt Fine 0 - 255 Tilt LSB
8 Blackout /
Punkte / Gobo
page 21 / 30
0 Blackout Safety-Kanal
1 - 10 1 Punkt
11 - 20 Rechteck
21 - 30 Dreieck
31 - 40 horizontale Linie
41 - 50 vertikale Linie
51 - 60 2 Punkte, horizontal
61 - 70 2 Punkte, vertikal
Page 22

Manual: RTI NEO SIX RGB 2
71 - 80 3 Punkte, horizontal
81 - 90 3 Punkte, vertikal
91 - 100 Kreis
101 - 110 4 Viertelkreise
111 - 120 Testbild
121 - 130 Rechteck mit Grating
131 - 140 Dreieck mit Grating
141 - 150 horizontale Linie m. Grating
151 - 160 vertikale Linie m. Grating
161 - 170 2 Punkte, horizontal m.
Grating
171 - 180 2 Punkte, vertikal m. Grating
181 - 190 3 Punkte, horizontal m.
Grating
191 - 200 3 Punkte, vertikal m. Grating
201 - 210 Kreis mit Grating
211 - 220 4 Viertelkreise m. Grating
221 - 230 Testbild mit Grating
231 - 240 1 Punkt mit Grating
141 - 255 Blackout
9 Zoom 0 - 255 Gobo-Größe aktiv, wenn
Wert von Kanal
8 zw. 11 und
110 liegt
10 Strobo 0 Stobo aus Strobo-Eekt
1 - 127 Strobo-Geschwindigkeit 2Hz - 12Hz
ansteigend
128 - 255 Zoom-Eekt 256 Punkte - 0
Punkte
page 22 / 30
Page 23

Manual: RTI NEO SIX RGB 2
3. Interlock (RJ45 Interlock)
Auf der Rückseite des Systems benden sich eine ‚Interlock in‘- und eine ‚Interlock out‘Schnittstelle (Interlock loop). Der mitgelieferter RJ45-Interlock-Stecker ist für Testzwecke
gedacht. Nur wenn die Interlock-in-Schnittstelle angeschlossen ist (und der Schlüssel auf
‚ON‘ steht), kann eine Laserausgabe erfolgen. Bitte immer den Interlock-Connector links
neben der DMX-Signal-LED als Eingang verwenden. Die Interlock-out-Schnittstelle kann
als ‚Interlock loop‘ genutzt werden, um alle angeschlossenen RTI NEO-Geräte gleichzeitig
mit nur einem E-Stop zu bedienen.
4. Schlüsselschalter
Auf der Rückseite des Gerätes bendet sich ein Schlüsselschalter. Eine Laserausgabe kann
nur erfolgen, wenn der Schlüssel (im Lieferumfang enthalten) mit dem Schlüsselschalter
verbunden und auf ‚Laser on‘ gedreht wird. Bitte den Schlüssel auf ‚Laser o‘ drehen, um
das Gerät auszuschalten und den Schlüssel anschließend abziehen um unauthorisierten
Zugri zu verhindern.
Sicherung
5.
Auf der Rückseite des Projektors bendet sich eine Schutzsicherung. Sollte die Sicherung
defekt sein, muss diese mit einer neuen 2,5AT-Sicherung ausgetauscht werden. Wenn die
ausgetauschte Sicherung erneut den Stromkreis unterbricht, sollte der Händler oder die
Serviceabteilung von Laserworld kontaktiert werden.
6. Display / Tastenelemente für Geräteeinstellungen
Über das Displays und mit Hilfe der angrenzenden 5 Tasten können Einstellungen direkt
am Gerät vorgenommen werden:
Die Pfeiltasten (auf/ab) führen durch das Menü.
Die + / - Tasten ändern den Wert im ausgewählten Modus, die mittlere Taste wechselt den
Kanal (1-6).
page 23 / 30
Page 24

Manual: RTI NEO SIX RGB 2
Wird das Lasersystem zum ersten Mal angeschaltet, erscheint Menü 1 auf dem Display:
Durch Drücken der Pfeil-nach-unten-Taste und der + / - Tasten kann die DMX-Adresse
abgeändert werden:
Durch erneutes Drücken der Pfeil-nach-unten-Taste sowie der + / - Tasten kann der
Modus ausgewählt werden. Im ‚normalen‘ Modus bendet sich das Gerät in hängender Position, im ‚invert‘ Modus wird der RTI NEO in der auf dem Boden liegenden Lage
eingesetzt:
Im ‚invert‘ Modus sind X- und Y-Achsen in sich umgekehrt (invertiert) und die Ausgabekanäle funktioniern in umgekehrter Reihenfolge von Kanal 6 bis 1.
page 24 / 30
Page 25

Manual: RTI NEO SIX RGB 2
Ist dieser Modus gewählt, bendet sich beispielsweise der Ausgabekanal 1 immer auf der
linken Seite (ausgehend von der Gerätevorderseite):
Erweiterte Einstellungen - Achtung: Anwendung nur für Experten empfohlen!
Um das Gerät zurückzusetzen (reset) muss die mittlere Taste gedrückt werden während
das Gerät eingeschaltet wird. Dies ermöglicht den Zugri auf die ‚Erweiterten Einstellungen‘ (Haupteinstellungen).
Durch das gleichzeitige Drücken der + und - Tasten werden alle zuvor gespeicherten Einstellungen gelöscht und das Gerät läuft wieder mit den Werkseinstellungen.
Achtung! Durch Ändern der Einstellungen können eine oder mehrere Dioden zerstört werden!
Einige grüne Dioden erreichen deren maximale Leistung von bis zu 120mW bei 300mA Diodenstrom, andere dagegen erst bei 460mA. Werden Dioden mit 300mA betrieben, kann
die Leistung nicht dadurch gesteigert werden, indem diese auf 460mA gefahren werden.
Die Dioden werden dadurch lediglich zerstört.
Die Einstellungen sollte nur durch Fachkundige erfolgen, die sich in Thd und Iop auskennen. Alle Einstellungen werden bei 16bit Auösung (0-65535) gemacht.
Das Oset für Rot ändert die Schwellenspannung wenn der DMX-Wert für die Modulation
von Rot größer gleich 0 wird. Der mögliche Wert ist auf den Bereich von 57600 – 59000
limitiert. Dies ändert gleichzeitig den maximalen lop, da der gesamte Spannungsbereich
nach oben oder unten verlagert wird.
Durch Drücken der mittleren Taste können die Kanäle von 1 bis 6 durchgewechselt werden, je nachdem welche Ausgabe angepasst werden soll:
Das Oset für Grün ändert die Schwellenspannung wenn der DMX-Wert für die Modu-
page 25 / 30
Page 26

Manual: RTI NEO SIX RGB 2
lation von Grün größer gleich 0 wird. Der mögliche Wert ist auf den Bereich von 57600
– 63000 limitiert. Die Sensitivität ist bei grünen Dioden am höchsten und der Schwel-
lenstrom zwischen den Dioden kann stark schwanken. Dies ändert gleichzeitig den
maximalen lop, da der gesamte Spannungsbereich nach oben oder unten verlagert wird.
Durch Drücken der mittleren Taste können die Kanäle von 1 bis 6 durchgewechselt werden, je nachdem welche Ausgabe angepasst werden soll:
Das Oset für Blau ändert die Schwellenspannung wenn der DMX-Wert für die Modulation
von Blau größer gleich 0 wird. Der mögliche Wert ist auf den Bereich von 52600 – 60000
limitiert. Dies ändert gleichzeitig den maximalen lop, da der gesamte Spannungsbereich
nach oben oder unten verlagert wird.
Durch Drücken der mittleren Taste können die Kanäle von 1 bis 6 durchgewechselt werden, je nachdem welche Ausgabe angepasst werden soll:
Der Gain für Rot ändert den maximalen Stromuss wenn der DMX-Wert für Rot auf 255
eingestellt ist. Der mögliche Wert ist auf den Bereich von 6500 - 9500 limitiert. Wenn der
Wert verändert wird, sollte zusätzlich immer ein Lasermeßgerät eingesetzt werden und
mit einem niedrigen DMX-Kanalwert, wie z.B. 100, begonnen werden.
page 26 / 30
Page 27

Manual: RTI NEO SIX RGB 2
Durch Drücken der mittleren Taste können die Kanäle von 1 bis 6 durchgewechselt werden, je nachdem welche Ausgabe angepasst werden soll:
Der Gain für Grün ändert den maximalen Stromuss wenn der DMX-Wert für Grün auf 255
eingestellt ist. Der mögliche Wert ist auf den Bereich von 6000 - 10500 limitiert. Wenn der
Wert verändert wird, sollte zusätzlich immer ein Lasermeßgerät eingesetzt werden und
mit einem niedrigen DMX-Kanalwert, wie z.B. 100, begonnen werden.
Durch Drücken der mittleren Taste können die Kanäle von 1 bis 6 durchgewechselt werden, je nachdem welche Ausgabe angepasst werden soll:
Der Gain für Blau ändert den maximalen Stromuss wenn der DMX-Wert für Blau auf 255
eingestellt ist. Der mögliche Wert ist auf den Bereich von 9000 - 13000 limitiert. Wenn der
Wert verändert wird, sollte zusätzlich immer ein Lasermeßgerät eingesetzt werden und
mit einem niedrigen DMX-Kanalwert, wie z.B. 100, begonnen werden.
Durch Drücken der mittleren Taste können die Kanäle von 1 bis 6 durchgewechselt werden, je nachdem welche Ausgabe angepasst werden soll:
page 27 / 30
Page 28

Manual: RTI NEO SIX RGB 2
Der Bereich des Osets liegt zwischen 0 und 34800:
Der Bereich für den Gain liegt zwischen 0 und 39949:
Nachdem die Erweiterten Einstellungen abgeschlossen wurden, wird ein Test angezeigt.
Bendet sich der Schlüssel auf ‚Laser on‘-Position, der Interlock verbunden ist und ein gültiges DMX-Signal empfangen wird, generiert der Digitalconverter ein Signal, das mit Hilfe
eines analogen Digitalconverters zurückgewandelt und mit den internen Werten verglichen wird. Abweichungen werden hier angezeigt.
Beispiel: Eine Abweichung von -2 bei 5 V / DC Full Range mit einer Auösung von 16bit
ergibt hier eine Abweichung von 0.000152 V / DC. Selbst ein Abweichung von 10 (immer
noch <1mW), beeinusst die Präzision des Gerätes nicht. Die Abweichung des DAC kann
Werte von bis zu 50 erreichen, ohne dass die Gesamtpräzision des Gerätes beeinusst wird:
7. Beam Block Panel
Das Beam Block Panel ist als zusätzliche Sicherungsvorrichtung gedacht, um Laserstrah-
lung, etwa im Zuschauerbereich, zu verhindern. Um Laserstrahlung bereichsweise oder
ganz zu verhindern, müssen die Flügelschrauben gelöst und das Panel teilweise oder
ganz vor die Strahlaustrittsönungen geschoben werden. Anschließend müssen die Flügelschrauben wieder festgezogen werden. Umgekehrt kann das Panel auch wieder nach
unten geschoben werden, damit die Strahlaustrittsönungen freiliegen.
Achtung: Das Beam Block Panel niemals önen oder schließen während das Gerät
Laserstrahlung ausgibt!
8. Ausschalten
Schlüssel auf ‚Laser o‘-Position drehen, abziehen und das Gerät von der Stromversorgung
trennen um dieses auszuschalten.
page 28 / 30
Page 29

Manual: RTI NEO SIX RGB 2
Abschließende Erklärung
Sowohl Produkt als auch Verpackung sind beim Verlassen der Fabrikation einwandfrei.
Der Benutzer des Geräts muss die lokalen Sicherheitsbestimmungen und die Warnhinweise in
der Betriebsanleitung beachten. Schäden, die durch unsachgemäße Handhabung entstehen,
unterliegen nicht dem Einussbereich der Herstellers und des Händlers. Somit wird keine Haftung bzw. Gewährleistung übernommen.
Sollten Änderungen an dieser Bedienungsanleitung vorgenommen werden, können wir Sie
darüber nicht in Kenntnis setzen. Bitte kontaktieren Sie für Fragen Ihren Händler.
Für Servicefragen wenden Sie sich bitte an Ihren Händler oder aber an Laserworld. Verwenden
Sie auschließlich Laserworld-Ersatzteile. Änderungen vorbehalten. Aufgrund der Datenmenge
kann keine Gewähr für die Richtigkeit der Angaben gegeben werden.
Laserworld (Switzerland) AG
Kreuzlingerstrasse 5
CH-8574 Lengwil
Schweiz
Verwaltungsrat: Martin Werner
Sitz der Gesellschaft: Lengwil / Schweiz
Firmennummer: CH-440.3.020.548-6
Verwaltungsrat: Martin Werner
MWSt. Nummer Schweiz: 683 180
UID: CHE-113.954.889
UST-IdNr: DE 258030001
WEEE-Reg.-Nr.: DE 90759352
www.laserworld.com
info@laserworld.com
representative according to EMVG:
Ray Technologies GmbH
Managing Director: Martin Werner
Mühlbachweg 2
83626 Valley / Deutschland
page 29 / 30
Page 30

Manual: RTI NEO SIX RGB 2
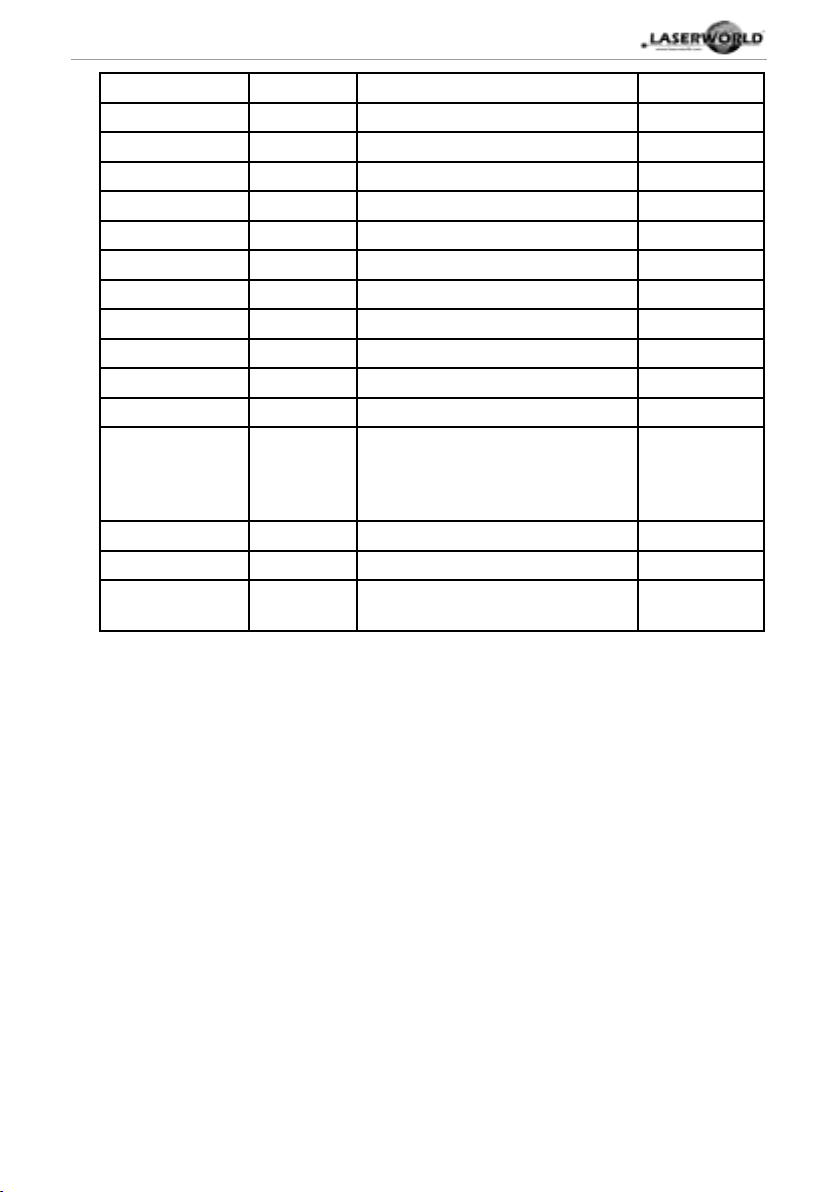
Technical data / Technische Daten / caractéristiques techniques
Laser sources:
Laserquellen:
Sources laser:
Laser class:
Laserklasse:
Classe laser
Scanner: 45 kpps @ 8° ILDA
Scan angle:
Strahlauslenkung:
Angle max de balayage:
Operation modes:
Betriebsmodi:
Mode de fonctionnement:
Beam: ca. 2.0 mm / 0.7 mrad (full angle)
Power supply:
Stromversorgung:
Alimentation:
Power consumption:
Stromaufnahme:
Consommation:
Operating temperature:
Betriebstemperatur:
température d‘opération:
Dimensions:
Abmessungen:
Weight:
Gewicht:
Poids:
Diode (red / green / blue)
Diode (rot / grün / blau)
diode (rouge / vert / bleu)
4
45° (@30 kpps)
DMX, Display
110VAC - 265 VAC, 50 - 60Hz
360 W
+10° to +30°C
1000 x 152 x 118 mm (without bracket) (L x W x H)/(B x T x H)/(H x L x P)
8 kg
Power specications (at laser module) / Laserleistung
(am Modul) / Puissance (au module)
guar. output
power
RTI NEO SIX RGB 2 1‘800 mW RGB 6 x 120 mW 6 x 80 mW 6 x 100 mW
page 30 / 30
Red / Rot / Rouge
(638nm)
Green / Grün /
Vert (520nm)
Blue / Blau /
Bleu (450nm)
 Loading...