

Page 1

SilverFast 8 First Steps
SilverFast - Pioneer & Expert in Digital Imaging
Professional Scanner and
Image Processing Software
by LaserSoft Imaging
ENGLISH
Page 2

SilverFast - First Steps
Content
1 Connecting the scanner and setting up the software............................................................... 1
2 Activating and registering SilverFast........................................................................................3
3 Quick start................................................................................................................................... 3
4 Basic settings................................................................................................................................4
5 Preview and high-resolution preview........................................................................................ 7
6 Frame .......................................................................................................................................... 8
7 Scan size and resolution............................................................................................................11
8 Automatic optimizations.......................................................................................................... 12
9 Zoom and 1:1 or HQ preview.................................................................................................. 14
10 Scan and batch scan..................................................................................................................15
Page 3

These instructions are intended to help you, the user, to take the first steps along the path from
analog to digital images. It is intended as a practical guideline for the initial uses of the application.
Particular emphasis is therefore given to explaining the steps that will simplify your introduction to
the software.
The example pictures are taken from the Ai Studio version. Lower versions offer a smaller scope of
settings so that description may differ from what you see on your screen in some points.
1 Connecting the scanner and setting up the software
Connect your scanner to your computer. We recommend a direct connection to your computer using a short cable, without an extension or USB/FireWire splitter.
Now install SilverFast. If you have received SilverFast on DVD or a USB stick, you can install it
from there. If you have bought SilverFast online, you will receive a download link via e-mail. The
same applies to both: Using your registered e-mail address, you can at any time download from our
web site the latest (full) version of SilverFast for your product generation.
Particularly if you have received SilverFast on DVD or a USB stick, we recommend that you use
the download link provided later on in these instructions to install the current version before you
start. As soon as you have installed the update, you also have the possibility of manually searching
for updates with the aid of the service dialog via the Welcome screen. In current versions however,
the program will automatically search for updates at regular intervals.
Connecting the scanner and setting up the software 3
Page 4
Registration
You can register your e-mail address using the following link:
www.silverfast.com/reg/en.html
After you have registered on our web site, you will receive an e-mail with a confirmation link. Click
on this link to confirm and to complete the registration process.
Download / update
You can find the SilverFast download at:
www.silverfast.com/show/downloads-start/en.html
The updates are full versions and do not require previous version to be installed, but you need to
install SilverFast from separate installers for each scanner if you have two or more software
licences for scanners from different manufacturers. These installations will behave as modules to
the main program and they will add your scanner as additional image source to the Welcome
Screen.
If you decide to buy the software, after already having installed a demo version, you can activate
the software as full version without having to re-install, as described in the next chapter.
If you have received SilverFast on DVD but your computer lacks a DVD-drive, be sure to register
your e-mail address in the Support section of our web site via the provided link and download the
software as described above. As a second step you can request a new serial number which can be
activated without the DVD:
After registering, a new serial number can be requested via the following link:
www.silverfast.com/bundle
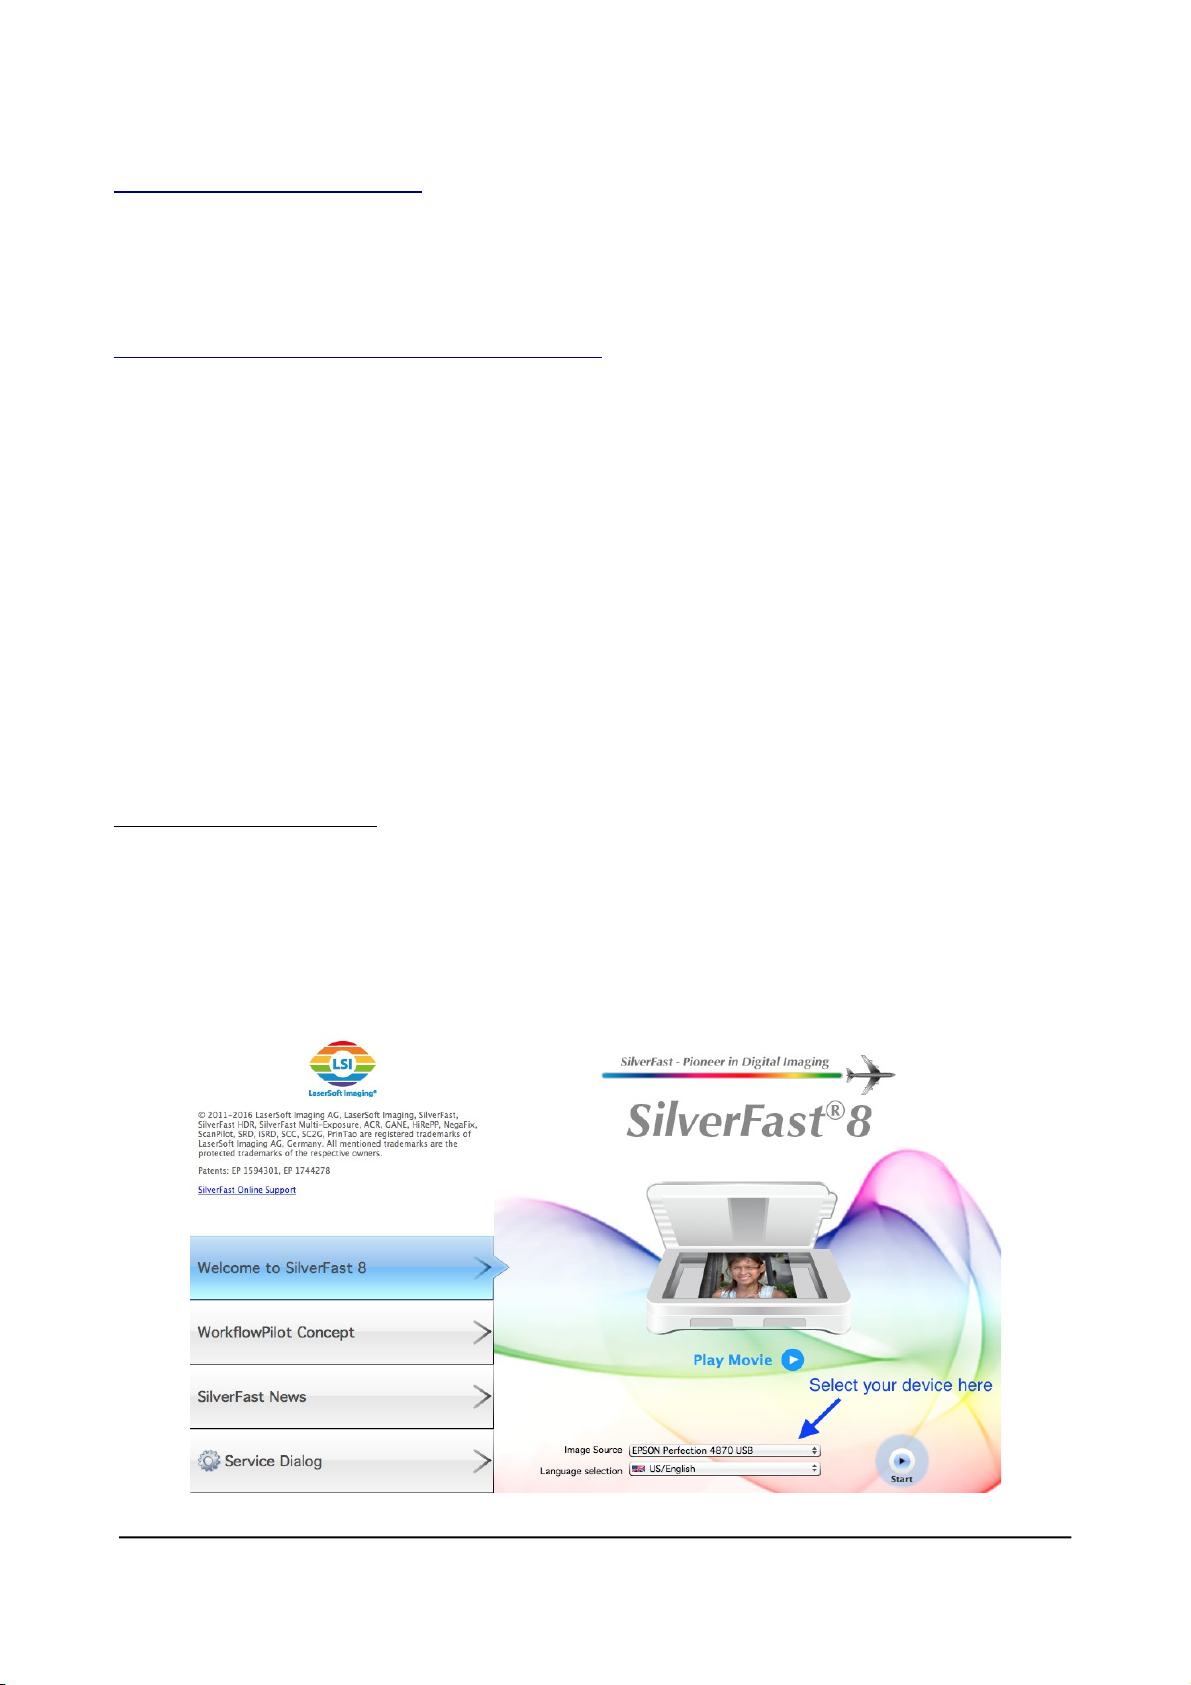
Always switch on your scanner before starting SilverFast. Only in this way can SilverFast recognize
your scanner when you start up the software. Start SilverFast 8 via the shortcut on your desktop
(Windows) or in your dock (OSX). The SilverFast Welcome screen is opened. It provides access to
the Service dialog with functions for administering the software, along with a menu for selecting the
image source.
Connecting the scanner and setting up the software 4
Page 5
If you have several supported scanners and licenses, you can select the desired device under "Image
source". Click on "Start" to start the software.
2 Activating and registering SilverFast
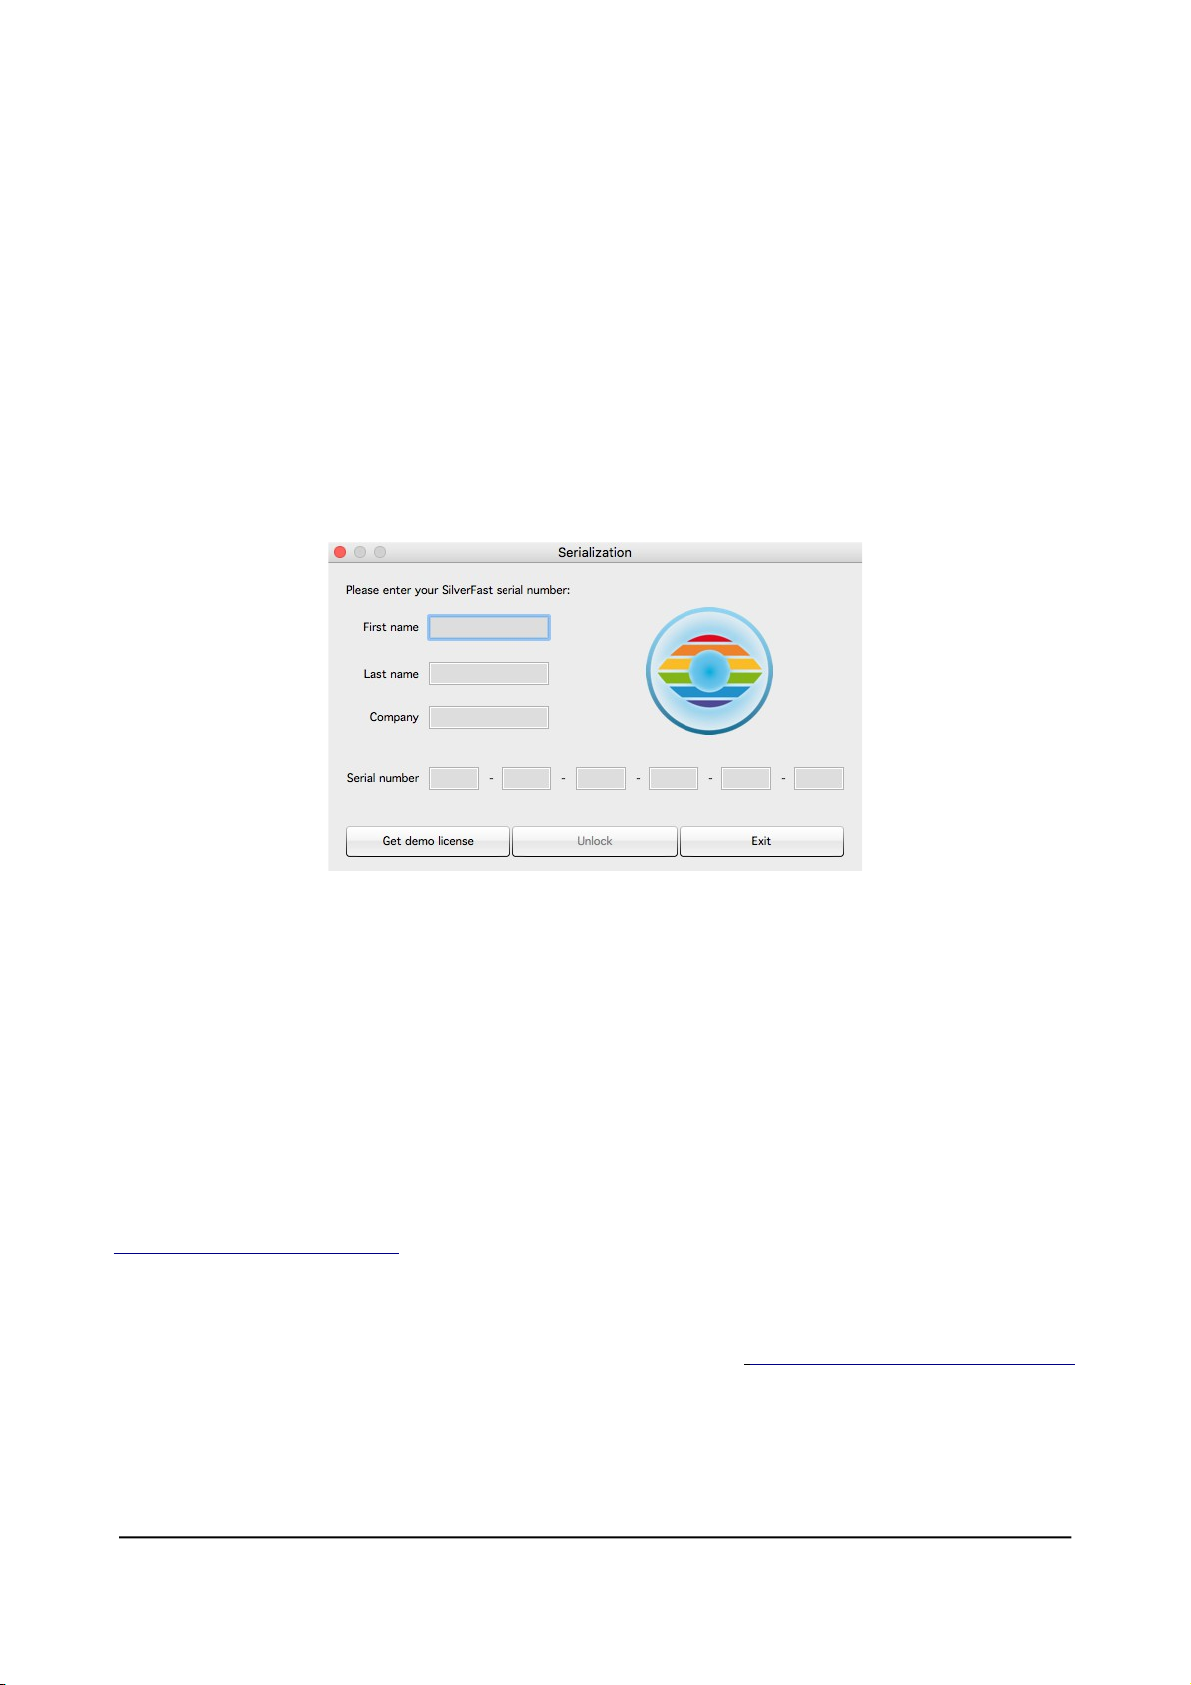
The serialization dialog appears when a SilverFast version that has not yet been enabled is started
up for the first time. There you enter your first name, last name, your company name (if applicable)
and your serial number. The "Enable" button is activated as soon as you have entered your data.
If you have purchased SilverFast online, make sure that you enter your first and last names in
exactly the same way as confirmed via e-mail, for example without umlauts.
If you have received SilverFast on DVD, place the DVD into your drive while you unlock the
program.
The "Demo license" button allows you to request a demo serial number to test the software for 30
days without obligation. Only use this option if you don't have a serial number for SilverFast and
want to try out the software.
The registration window is loaded after activation. If your SilverFast version is not yet registered,
you now have the opportunity to do so. The serial number is automatically registered when
purchased online. The registration not only enables you to download updates from our download
section but also ensures that your serial number is saved to our database. If you lose your serial
number at any time, we can send it to your registered e-mail address via the following link:
www.silverfast.com/lostserial
Note:
If you return or exchange your device, or if you give it away or sell it privately, please remember to
have your SilverFast registration cancelled via the following link: www.silverfast.com/support-form
Activating and registering SilverFast 5
Page 6

3 Quick start
Tired of reading and want to get straight to the action? The following quick-start instructions
provide a general overview of the key points and the course of action.
1. Start and activate SilverFast
2. Select Transparent / Reflective
3. Select Positive /Kodachrome / Negative
4. Change the color depth if necessary
5. Set the resolution
6. Start preview scan
7. Activate tools (iSRD, Multi-Exposure)
8. Select Frame > Frame search > Film holder type
9. Start Automatic image
10. Accept settings for all frames if necessary
11. Start scan (long click for batch scan)
4 Basic settings
SilverFast has a series of settings that you should define before launching the preview scan. These
instructions refer to Manual mode in SilverFast, which you can recognize by the red icon of the
WorkflowPilot. If you see the blue WorkflowPilot symbol after start-up, click on it to change to
Manual mode (red icon).
A flat-bed scanner with a transparency unit gives you a choice between transparency and reflective
scans. In this case, ”Reflective" refers to the scanning of photos on paper. Select "Transparency" for
scanning slide positives, Kodachrome images and negatives, either framed or on film strips. For
transparency scans on a flat-bed scanner, it is important to remove the cover of the transparency
Basic settings 6
Page 7

unit.
On a pure film scanner, it is only possible to scan transparent material, and the reflective mode is
not available. On some film scanners, the film holder type can be selected in the software instead.
Next, select either positive, negative, or, Kodachrome; the "Kodachrome" setting being reserved for
the SE Plus and Ai Studio versions.
"Positive" is the setting used for normal positive slides. Select "Kodachrome" for the special slide
film from Kodak – often identified by the “card frame”. The selection automatically loads a special
color profile which prevents the usual blueness that Kodachrome images would otherwise acquire
when scanned without this special feature.
If you have selected the "Negative" setting to scan your negatives, the NegaFix dialog will have
opened simultaneously as an additional tool. In the NegaFix dialog you can choose a film from a
wide selection of manufacturers and different film types with different ISO values. This ensures that
the orange mask of your film strip is correctly removed during its transformation from negative to
positive. When using our HDR and HDRi raw data formats, this information is saved for later
processing. If your film type is not listed, select a similar film type or use the standard profile:
Manufacturer: other, film type: other, ISO/ASA: Standard. In the Expert section of the dialog in Ai
Studio, you can also edit the profiles or create your own profiles. Open the dialog's Expert section
by clicking on the mortarboard. Manufacturer: other, film type: other, ISO/ASA: Standard. In the
Expert section of the dialog in Ai Studio, it is possible to both edit or create your own profiles.
Open the dialog's Expert section by clicking on the mortarboard.
Select the color depth as the final step before the preview scan. The color depth describes the
number of bits per color channel. Color images are comprised of the three color channels R(ed),
G(reen) and B(lue), each with 8-bit data or 16-bit data. Black-and-white images are managed with
one channel with 8-bit or 16-bit data. This delivers the different color depths that can be set in
SilverFast. The greater the color depth the larger the resulting file.
SilverFast internally always uses the greatest possible color depth offered by the scanner.
Depending on the SilverFast version, an output is with 16 bits per channel or with 8 bits per channel
is possible. The SE version and the SE Plus version offer 16-bits for raw data. Ai Studio, on the
other hand, allows 16-bit for both raw data and edited images.
16-bit data provides a higher range of color gradations (65536 per color channel) in comparison to
8-bit data (256 per color channel). SilverFast therefore handles your images with 16 bits per
channel. If you wish to continue editing your images after scanning, select 48-bit color depth for 16
Basic settings 7
Page 8

bits per color channel so that you can also still access the full range of color gradations later on.
Once the settings are to your satisfaction, output the images with a 24-bit color depth for an 8 bits
per color channel. For digital images that are not going to be edited further, 24-bits is the most
common color depth.
An example:
48>24bit is the standard setting in SilverFast. This setting reflects that SilverFast fetches the
maximum data (48 bits total, 16 bits per color channel) from the scanner, processes it in 48-bit
and then outputs the image with a total of 24 bits (8 bits for each of the three color channels Red,
Green and Blue).
The 16 bits per channel output from the Ai Studio version is available for the file formats that
support 16 bits: TIFF, PSD and JP2. Please note that not every image editing program can process
48-bit images.
For color images, select the 48-bit option in order to obtain 16 bits per color channel. Select 48>24
bits for images with an 8 bits per color channel, which all image editing programs can read as
standard.
For your black-and-white images, select 16 bits accordingly for the maximum output, select 16
bits accordingly for the maximum output data and 16>8 bits for data with maximum compatibility.
SilverFast offers the 16>1 bit option for line art.
The SE Plus version and the Ai Studio version of SilverFast also offer HDR and HDRi raw data
formats. If you select one of these raw data formats for the output, your image is saved with the full
48-bit data volume without loss of quality. No optimizations are performed for this, and all
functions for editing your images are deactivated for the scan. Your images reach your computer as
unchanged and as original as possible. This means that negatives are saved as negatives without
being converted and slides look much too dark in basic image viewing programs. These HDR and
HDRi images are intended for later processing in SilverFast HDR (Studio), which is able to access
the full data volume of these raw data images. Furthermore, this original data remains unchanged by
the HDR (Studio) software during editing: The HDR (Studio) software saves the settings you have
made for each image in addition to the image data, without affecting the actual original data. This
workflow can therefore be described as "non-destructive" or lossless.
In comparison to the HDR format, files in HDRi format contain additional data from the hardwarebased infrared channel that the HDR (Studio) software can use to remove dust and scratches with
precision. This allows complete image processing to be performed on another device, at a later time
and irrespective of the scanner. The full 16-bit data is always used for the raw data format: 64-bit
HDRi for raw data of color images including the data from the infrared channel or 48-bit HDR for
raw data without infrared channel. 32-bit HDRi is used for black-and-white images with infrared
channel and 16-bit HDR is used for raw data without infrared channel.
This lossless raw data format can be accessed via the WorkflowPilot by choosing the archive
workflow. Accordingly, the combination of the Ai Studio software and the HDR Studio software is
known as "Archive Suite". There is a smaller package that offers the archive workflow with a
narrower scope of functions; the "Archive Suite SE" version which is a combination of the SE Plus
Basic settings 8
Page 9

software and the HDR software.
Some of the basic settings have now been made, and the preview can be launched.
5 Preview and high-resolution preview
The way in which you can work with the preview differs slightly, depending on whether you use a
flat-bed scanner or a film scanner without automatic feed or a film scanner with automatic feed.
In the case of a flat-bed scanner, you call up the preview via the Preview Scan button in the bar
above the preview. For the preview, the entire flat-bed is scanned in low resolution and is shown in
the preview window.
In Ai Studio, a high-resolution preview can be activated for flat-bed scanners under OSX via the
menu SilverFast 8 > Settings > General and under Windows via the menu Image > Settings >
General. This is then performed with a multiple of the selected resolution. This takes slightly longer
initially, but subsequently saves a great deal of time. Without getting too far ahead of ourselves, it is
important to point out that both the automatic image optimization and the frame search IFF+
(Intelligent Frame Finding) work all the more precisely the more data is available. If you want to
use the high-resolution preview, you must define the scan resolution before the preview scan. See
Chapter 7 for more about resolution.
Preview and high-resolution preview 9
Page 10

In the case of a flat-bed scanner without automatic feed also, you call up the preview via the
Preview Scan button in the bar above the preview. The current image is then scanned for the
preview.
For film scanners with automatic feed there is an additional function: the overview. The button for
the overview scan is in the vertical tool bar, on the left next to the preview image. The overview
scan creates an overview of the images in the inserted holder in an additional window. In this
overview you can mark the images that you want to select for the final scan.
In addition to the markings, there is also a frame which you can use to select the image for the
preview. The overview dialog is therefore also the tool for switching between the previews of the
inserted images.
In SilverFast Ai Studio, there is also the possibility of transferring a selection of images directly into
the JobManager ("Add selection" button), where you can then edit each image with individual
optimizations before starting the batch processing.
Note:
Nikon 35mm scanner with SF-200 and SF-210 holder: No overview dialog is available for this
holder, because the holder can transport the images in one direction only.
In the case of the Reflecta DigitDia 5000 and 6000, the overview dialog also offers configurations
to set up the slide tray. With this device, the overview scan is not automatically started because this
would take considerable time - depending on the slide tray used. The automatic overview scan can
be activated and deactivated again via Settings > Special if you want to make use of it.
Preview and high-resolution preview 10
Page 11

6 Frame
A red frame is always visible in the preview. This frame marks the area that is being scanned and
the frame on which you are currently working. The red frame is therefore equivalent to the image
being scanned.
You can move a frame with the mouse, or you can shrink or enlarge it by clicking on and dragging
one of the four sides of the frame. If you click on and drag the frame's corners with the mouse, you
can change two sides at the same time. You can rotate the frame by clicking on and rotating the
semicircles at the halfway points of the sides.
You can change the frame in the preview and in the zoomed preview, whereas in the 1:1 and HQ
preview it is fixed and cannot be adapted. The fine rotation is not available if you have selected one
of the HDR or HDRi formats. Go ahead and adapt the red frame to your image.
For negatives in particular, it is important to set up the frame precisely because all information in
the red frame is taken into account for the conversion. In the case of a negative, a black edge around
the actual image would make the converted image brighter than it actually is.
With a film scanner, you only have one image per preview in most cases. The holder is moved to
the corresponding position for the next image.
The situation is different with a flat-bed scanner, on which the film holders can in most cases
accommodate several slides or film strips. In this case, you can use the frame search IFF+ for the
corresponding holder in the software. The frame search creates a frame for you for each image
recognized. In particular, the frame search IFF+ saves a lot of time when a flat-bed scanner is used.
Here too, the red frame is always the active frame for which you set changes. In a batch scan of
Frame 11
Page 12

course, all frames are scanned including the non-active ones.
For the frame search, click on "Frame" and then on "Find frame". Now select the matching holder
that you have inserted. If you are using the 35mm slide holder, select "Slide holder 35mm". The
frame search now creates all the necessary frames for you itself.
As explained in the section about the preview, in Ai Studio you can activate the high-resolution
preview before you perform a preview scan. This provides more exact data for the most precise
detection of frames possible.
Tip:
When you configure the active frame and only then start the frame search, the frames are created
with the configuration of the first frame. This means that the same settings do not have to be made
for each frame over and over again. There are some tools that work automatically and that are
optimally suited to be copied. See Chapter 8 for more details.
If you have first used the frame search, you can also accept the active frame's settings for all frames
in the frame menu. Both of these require you to be in the unzoomed view for the entire flat-bed.
On most scanners, you can create new frames manually in addition to the frame search.
Draw frame: To do this, click with the mouse in an area of the preview without a frame, and draw
Frame 12
Page 13

a new frame while keeping the mouse button pressed. Release the mouse button to create the new
frame.
Copy frame: However, you can also move an already existing frame while keeping the ALT key on
your keyboard pressed. When you release the frame, a copy of the frame is created at the new
position. The new frame takes over the settings that were made for the original frame.
7 Scan size and resolution
You can find a very important dialog for configuring your scan in the very first place in your tool
dock:
In this dialog, enter the name for your image along with the file path, select the file format and
define the resolution for the scan. "Format" defines the dimensions for the output. If you select
"user-defined", the output format conforms to the format of the red frame in the preview.
The resolution is influenced by several factors:
The preset: The preset indicates the desired output resolution, particularly for printing later on. A
conventional home printer is capable of up to 300 ppi, and this value is therefore set as standard.
The resolution slider: The resolution slider addresses the resolutions supported by the scanner so
that you can work without interpolation. The very last resolution offered is an interpolated one.
Next to the resolution slider, you can see the resolution actually used for the scan.
One example of how these factors work together: you want to scan a slide and print it out enlarged.
You have a good home printer that can print 300 ppi.
You select your slide in the preview and set 300 ppi as the output preset. You click on the cog wheel
right at the bottom of the dialog to display the extended options. Now move the resolution
controller to the right to see the output size in Expert mode. The output size is the value up to which
you can print out your image with 300 ppi without loss of quality. You now move the resolution
slider further until the desired image size is reached. The output size and the resolution are linked,
and SilverFast automatically adapts the other value respectively when you change the resolution or
the output size.
Scan size and resolution 13
Page 14

However, it is recommended to enter the desired resolution manually in the box next to the Preset
menu if you already know the resolution that you want to work with. To do this, leave the resolution
slider at 300 ppi and the zoom at 100%. If you now enter a value manually, this is displayed as a
user-defined value in the Preset menu. The value given as the preset is also the one that is displayed
when you open your image with another program following the scan.
If you work with the preset and the resolution slider (left screen), SilverFast saves the set print
resolution for this in the file's metadata so that programs with which the image is later opened
display the selected print resolution and output size. If you enter the value for the resolution
manually (right screen), this value is stored in the metadata and is displayed later as the resolution
when the images are opened.
Both variants create an image file of the same quality and with the same number of pixels for which
scanning is performed at the same resolution.
8 Automatic optimizations
SilverFast provides a series of automatic optimizations that can already perform part of the image
optimization for you.
Automatic image adjustment:
The automatic image adjustment function is located in the bar of the color-modifying tools next to
the preview scan button above the preview. There are two general optimizations, "Auto" and "Auto
CCR" (Color Cast Removal) as well as various automatic functions that are adapted for typical and
frequent scenarios. A long click on the button for automatic image adjustment opens the menu in
which you select the appropriate optimization for your image. You can also reset the automatic
image optimization in this selection menu.
Automatic optimizations 14
Page 15

The triangle shows additional options that
become visible with a long click on the icon.
The red dot indicates that the tool has been
activated and is being used for the editing.
The automatic image adjustment makes changes to the histogram and gradation so that these tools
are opened and, by way of a red dot in the icon, indicate that they are active.
The automatic image optimization by default doesn’t optimize the contrast. If the automatic
optimization is also supposed to adapt the contrast, simply activate this option in Preferences >
Auto. The human eye perceives contrast as sharpness. If you have the impression that your images
are too flat or blurred, try using some contrast.
Also under Preferences > Auto, you can define an automatic image adjustment that is automatically
performed on every image individually in every frame search. This is particularly important for
batch scans in which not every image is individually adapted via the JobManager (in Ai Studio).
Dust and scratch removal with iSRD:
Thanks to an additional infrared lamp installed in the scanner, the infrared-based dust and scratch
Automatic optimizations 15
Page 16

removal function “iSRD" (infrared Smart Removal of Defects) allows very precise recognition and
removal of dust and scratches. It is not available in Reflective mode or on scanners without an
infrared channel. This function works automatically, but can of course also be adapted manually.
Activate this function by clicking once on the "iSRD" button in the vertical toolbar. The red dot in
the center of the button indicates that the tool is switched on and is being used.
Note:
You should not use the infrared-based dust and scratch removal function if you want to scan blackand-white negatives, and you should use it only with caution when scanning Kodachrome images.
The silver halide in the film material can reflect the scanner's infrared light and cause artefacts in
the image. An adjusted correction is already performed for Kodachrome images. It is however
nevertheless advisable to work with low defect detection.
Multi-Exposure
Multi-Exposure combines an under-exposed scan of your image with a normally-exposed one.
Most slides, negatives or Kodachrome images have a very high dynamic range (also called density
range), and only an increase in your scanner's dynamic range via Multi-Exposure enables the full
dynamic range of the original to be obtained. This picks up more details in the dark and light
ranges and reduces image noise. With Multi-Exposure, the scanner picks up far more different
color gradations that SilverFast can utilize for image optimization, even if they cannot be
perceived by the naked eye. This makes Multi-Exposure one of the most important digitizing tools,
particularly in the case of extreme dense film types such as Kodachrome films.
Activate the "ME" button in the vertical tool bar. The red button indicates that Multi-Exposure is
active. On some devices, the Multi-Exposure scan and the normal scan are performed in one pass.
Multi-Exposure is available in the SE Plus and Ai Studio version. Multi-Exposure is available only
for transparency scans and is hidden when you use Reflective mode. Multi-Exposure is also
available for our raw data formats HDR and HDRi and, together with the 48-bit data, offers the
greatest possible data volume.
9 Zoom and 1:1 or HQ preview
You can now use the magnifying glass symbol to zoom in and out in the individual frames.
You can also press the button for slightly longer in order to select zoom functions from the menu.
Here too, the small triangle next to the icon shows that additional options are available.
In the zoomed preview, sufficient data is available to adapt your image manually with a very high
degree of precision and to optimize it with the automatic image function.
If you have activated the high-resolution preview beforehand, you can now call up this enlarged
preview of your images without scanning again. In the Navigator, you can change between the
frames in the preview without having to exit the Zoom view every time.
The 1:1 preview and the HQ preview
The 1:1 preview and the HQ (High Quality) preview both start a Zoom preview with a 100% view.
Zoom and 1:1 or HQ preview 16
Page 17

This means that a preview scan is performed with the set scan resolution In the preview, you now
see a section of the image (in its original size at the set resolution) that you can move via the yellow
frame in the Navigator, or by pressing the space bar while simultaneously moving the preview with
the left mouse button pressed.
The effect of most tools is best assessed at the resolution that you will also scan with. Sharpening
using the unsharp masking for example depends greatly on the resolution used. The 1:1 and HQ
preview provide reliable and predictable results. Since the image can be directly saved after a 1:1 or
HQ preview for which all the required data has been collected from the scanner, this function
requires no additional time.
The 1:1 preview and the HQ preview both allow precise adaptation of your image. They differ in
the fact that for the 1:1 preview, the selected tools are initially calculated only for the area that you
have currently got selected with the yellow frame in the Navigator. The HQ preview on the other
hand immediately calculates the tools for the entire image, so that the yellow frame can be moved
back and forth without a renewed filter calculation.
10 Scan and batch scan
After having made your most important settings, you are ready to commence with the actual scan.
The horizontal bar above the preview contains the Scan button that performs two functions: If your
scanner can perform batch scans, a long click opens a menu for selecting Scan mode. From this
menu, you then choose between an individual scan or a batch scan. The button always shows the
last activated scan mode and a brief click on the button starts the displayed scan mode.
If you start a batch scan, the automatic numbering dialog opens before the scan is performed. Here
you can define a memory path for the batch and names for the files. If you leave these entries blank,
the names and paths that you defined for the individual frames are maintained.
Scan and batch scan 17
Page 18

To adapt the file name, you can activate an index that is appended to the file name with or without
spaces. Your images are then numbered automatically.
If you want to continue an existing numbering system, you can enter a number at which the
numbering should be continued.
You can also cut off existing digits at the end of a file name to prevent a file being given two
numbers.
One click on "Scan" then starts the batch scan.
We hope that these brief instructions have helped you to familiarize yourself with our software, and
we hope that you enjoy trying out all of the many functions that now await you!
Scan and batch scan 18
Page 19

LaserSoft Imaging AG
Luisenweg 6-8 • 24105 Kiel • Deutschland
Tel.: (+49) 431-56009-0
Fax: (+49) 431-56009-96
Support: www.SilverFast.de/support
Info: www.SilverFast.de
LaserSoft Imaging, Inc.
7441 N. Tamiami Trail • Sarasota, FL 34243 • USA
Phone: (+1) 941-351-9400
Fax: (+1) 941-351-9402
Support: www.SilverFast.com/support
Info: www.SilverFast.com
Systemanforderungen:
SilverFast ab 8.8:
• Apple® Mac OS X ab 10.7
• Microsoft® Windows 10, 8,7 oder Vista (64 Bit)
• Prozessor: Minimum 2 GHz
• 4 GB RAM (8 GB RAM empfohlen)
• 20 GB freier Festplattenspeicher
• 1024 x 768 Bildschirmauösung
• DVD-ROM-Laufwerk oder Internet-Verbindung
• QuickTime®-Player, PDF-Reader
*SilverFast wird individuell an Scanner und Betriebssys
teme angepasst. Bitte überprüfen Sie die Verfügbarkeit
der Software und Features für Ihr Gerät und Betriebssys
tem unter:
www.SilverFast.de/sf/product
-
*SilverFast is individually adjusted to scanners and
operating systems. Please check the availability of
-
software and features for your device and operating system at:
www.SilverFast.com/sf/product
System Requirements:
SilverFast from 8.8:
• Apple® Mac OS X from 10.7
• Microsoft® Windows 10, 8,7 or Vista (64 Bit)
• Processor: Minimum 2 GHz
• 4 GB of RAM (8 GB of RAM recommended)
• 20 GB of available hard-disk space
• 1024 x 768 display resolution
• DVD-ROM drive or internet connection
• QuickTime® Player, PDF Reader
SilverFast® and LaserSoft Imaging™ are registered trademarks of LaserSoft Imaging AG, Germany. All mentioned trademarks
are the protected trademarks of the respective owners (Patents: EP 1594301, EP 1744278).
 Loading...