

Page 1

100503.5
LaserShield®Instant Security System
OWNER’S MANUAL
Page 2

TABLE OF CONTENTS
Page 2 LaserShield®Instant Security System OWNER’S MANUAL
Section ONE - Your System and its Parts
Safety and Regulatory Information. . . . . . . . . . . . . . . . . . . . . . . . . . . . . . . . . . . . . . . . 4
CUSTOMER CARE
Answering your questions, Expanding your System, and Ordering additional parts . 4
INTRODUCTION
How LaserShield®Works . . . . . . . . . . . . . . . . . . . . . . . . . . . . . . . . . . . . . . . . . . . . 5
GETTING STARTED
Alarm Permits . . . . . . . . . . . . . . . . . . . . . . . . . . . . . . . . . . . . . . . . . . . . . . . . . . . . 6
LASERSHIELD STARTER KIT
Master Alarm Unit . . . . . . . . . . . . . . . . . . . . . . . . . . . . . . . . . . . . . . . . . . . . . . . . . 7
Wireless Detection Unit . . . . . . . . . . . . . . . . . . . . . . . . . . . . . . . . . . . . . . . . . . . . . 7
Keychain Remotes. . . . . . . . . . . . . . . . . . . . . . . . . . . . . . . . . . . . . . . . . . . . . . . . . 7
Emergency Card . . . . . . . . . . . . . . . . . . . . . . . . . . . . . . . . . . . . . . . . . . . . . . . . . . 7
Section TWO - Setting up Your LaserShield
®
HOW TO SET UP YOUR SYSTEM
Remove the Battery Protection Strip . . . . . . . . . . . . . . . . . . . . . . . . . . . . . . . . . . . 8
Position the LaserShield
®
Master Alarm Unit . . . . . . . . . . . . . . . . . . . . . . . . . . . . . 8
Connect the Telephone Line. . . . . . . . . . . . . . . . . . . . . . . . . . . . . . . . . . . . . . . . . . 8
Connect the Power . . . . . . . . . . . . . . . . . . . . . . . . . . . . . . . . . . . . . . . . . . . . . . . . 9
Activate the Wireless Detection Unit. . . . . . . . . . . . . . . . . . . . . . . . . . . . . . . . . . . . 9
Position the Wireless Detection Unit . . . . . . . . . . . . . . . . . . . . . . . . . . . . . . . . . . . . 9
LINKING YOUR UNITS WIRELESSLY . . . . . . . . . . . . . . . . . . . . . . . . . . . . . . . . . . . . 10
ACTIVATING 24/7 MONITORING. . . . . . . . . . . . . . . . . . . . . . . . . . . . . . . . . . . . . . . . 11
TESTING YOUR SETUP . . . . . . . . . . . . . . . . . . . . . . . . . . . . . . . . . . . . . . . . . . . . . . 12
"UNLINKING" or DEACTIVATING DEVICES . . . . . . . . . . . . . . . . . . . . . . . . . . . . . . . 13
Section THREE - Using Your System
YOUR PERSONAL PASSCODE . . . . . . . . . . . . . . . . . . . . . . . . . . . . . . . . . . . . . . . . 14
ARMING AND DISARMING THE SYSTEM
Arming the System When You Leave the Premises
Using a Keychain Remote . . . . . . . . . . . . . . . . . . . . . . . . . . . . . . . . . . . . . . . . . . 15
Disarming the System When You Enter the Premises
Arming the System at Night . . . . . . . . . . . . . . . . . . . . . . . . . . . . . . . . . . . . . . . . . 15
Checking the System Status . . . . . . . . . . . . . . . . . . . . . . . . . . . . . . . . . . . . . . . . 15
Page 3

TABLE OF CONTENTS
LaserShield®Instant Security System OWNER’S MANUAL Page 3
ABOUT ALARMS AND EMERGENCIES
What Happens During an Alarm. . . . . . . . . . . . . . . . . . . . . . . . . . . . . . . . . . . . . . 16
Using the Panic Button. . . . . . . . . . . . . . . . . . . . . . . . . . . . . . . . . . . . . . . . . . . . . 16
Canceling an Accidental Alarm. . . . . . . . . . . . . . . . . . . . . . . . . . . . . . . . . . . . . . . 16
In Case of Intrusion or Actual Emergency. . . . . . . . . . . . . . . . . . . . . . . . . . . . . . . 16
Emergency Disarming WITHOUT the Keychain Remote . . . . . . . . . . . . . . . . . . . 17
Section FOUR - Additional Features
Household Pets - the LaserShield®Pet Shield . . . . . . . . . . . . . . . . . . . . . . . . . . . 18
Managing the System by Telephone When You Are Away . . . . . . . . . . . . . . . . . . . 19
False Alarm Protection Features . . . . . . . . . . . . . . . . . . . . . . . . . . . . . . . . . . . . . 20
Loss of AC Power and Low Battery Power . . . . . . . . . . . . . . . . . . . . . . . . . . . . . . 20
Section FIVE - System Maintenance
Monthly Testing. . . . . . . . . . . . . . . . . . . . . . . . . . . . . . . . . . . . . . . . . . . . . . . . . . 21
Replacing Batteries . . . . . . . . . . . . . . . . . . . . . . . . . . . . . . . . . . . . . . . . . . . . . . . 22
Section SIX - Trouble Shooting . . . . . . . . . . . . . . . . . . . . . . . . . . . . . . . . . . . . . . . . 23
Section SEVEN - Frequently Asked Questions . . . . . . . . . . . . . . . . . . . . . . . . . . . 24
Section EIGHT - Warranty and Liability Information
Limited Warranty and Liability Information. . . . . . . . . . . . . . . . . . . . . . . . . . . . . . . 26
Specifications. . . . . . . . . . . . . . . . . . . . . . . . . . . . . . . . . . . . . . . . . . . . . . . . . . . . 27
Page 4

CUSTOMER CARE
Page 4 LaserShield®Instant Security System OWNER’S MANUAL
SECTION ONE
Safety Information Customer Care
To prevent a fire hazard or electrical shock,
do not expose this product to moisture or
operate it when you are wet or standing in
water.
Locate your LaserShield®so that electrical
and telephone cords are not frayed, walked
over, or pinched by other objects.
Recycle used batteries from your
LaserShield
®
alarm products. Contact your
local Recycling Center for more
information.
Opening the case (except to replace the
batteries) or otherwise tampering with your
LaserShield
®
Instant Security System or
Keychain Remotes will void your limited
warranty.
!
!
!
!
To Expand Your System and Order
Additional Parts
Many single-room apartments,
condominiums, or offices may only
need the LaserShield®Starter Kit to
achieve adequate protection.You
may expand your LaserShield
®
Instant Security System to other
rooms with additional Wireless
Detection Units.
For more information about
purchasing Wireless Detection Units
and other LaserShield
®
products,
please visit:
www.lasershield.net
Customer Assistance
If you have questions about setup,
use, repair, or replacement of your
LaserShield
®
device or accessories,
please check the "Troubleshooting"
section first. If your problems are
still unresolved, contact Customer
Care at:
1-866-618-4336
The phone line connected to your Master Alarm Unit must not be connected to
telephones outside the building. For example the phone line must not be connected to
outdoor telephones, and must not be connected to telephone(s) in a separate building.
SAFETY NOTE
Use the phone cord supplied or any other standard phone cord, 26AWG or more.
Page 5

INTRODUCTION
LaserShield®Instant Security System OWNER’S MANUAL Page 5
SECTION ONE
When the System is Armed and
Motion is Detected:
The System watches for motion from a
potential intruder within its coverage
area. If motion is detected by the WDU
the MAU will quickly countdown to an
alarm condition, unless disarmed.
Once an Alarm condition is detected, the
MAU sends a message to RRMS using
your telephone line. RRMS will attempt
to notify responsible parties and local
authorities in accordance with your
Monitoring Service Agreement.
The Master Alarm Unit, Keychain
Remotes, and Wireless Detection Units
include a "Panic Button" feature that lets
you signal an emergency at any time.
The Panic Alarm sounds the siren and
triggers a phone call to RRMS.
Not for use outdoors.
Thank you for choosing the LaserShield
®
Instant Security System. It is easy to set up
and easy to operate. With just a few simple
steps, your System will be ready to protect
your home or business from intruders.
This LaserShield®Owner’s Manual
Shows You How to:
Properly position the LaserShield®Master
Alarm Unit (MAU) and Wireless Detection
Units (WDUs) in your home or business.
Set up the MAU and activate the 24/7
Monitoring Service that monitors your
alarm for round-the-clock protection.
Operate your LaserShield®Instant
Security System, using the Keychain
Remote or by phone.
Test your System with Rapid Response
Monitoring Service (RRMS) the 24/7
monitoring service.
How Does LaserShield®Work?
The LaserShield®Instant Security System is
complete and ready to use, with batteries
already installed. The Master Alarm Unit can
be set up anywhere near a telephone jack.
The Wireless Detection Unit (WDU) should
be located near a corner or wall with a clear
view of the front door or main entry and
positioned approximately 4 to 6 feet from the
floor. A motion sensor on the front panel of
the WDU scans an area of up to
approximately 1100 sq. ft., but does not
penetrate walls or windows.
When you activate the System and connect
to RRMS, the monitoring service responds to
alarm signals from your System. If an alarm
signal is received from your premises, RRMS
will attempt to notify you and/or any
responsible parties to initiate a response.
Each Wireless Detection Unit includes an
optional Pet Shield to block portions of the
motion sensor so your pet is less likely to
trigger an alarm.
“Armed” and “Disarmed”
When the System is “Armed,”
LaserShield®Instant Security
System
is actively monitoring the
protection area and ready to take
action if an intruder enters.
When the System is “Disarmed”
you can move about the house
freely without triggering an alarm.
•
•
•
•
•
•
•
Page 6

GETTING STARTED
Page 6 LaserShield®Instant Security System OWNER’S MANUAL
SECTION ONE
Alarm Permits
Some communities or local law
enforcement agencies may require an
alarm permit. If your community or local law
enforcement agency requires an alarm
permit, and you operate your alarm without
a permit, you could be subject to fines, law
enforcement non-response and/or
deactivation of service.
To find out if you need an alarm permit,
please contact your local law
enforcement agency for details.
Please DO NOT DIAL 911 for alarm
permit information.
•
•
Page 7
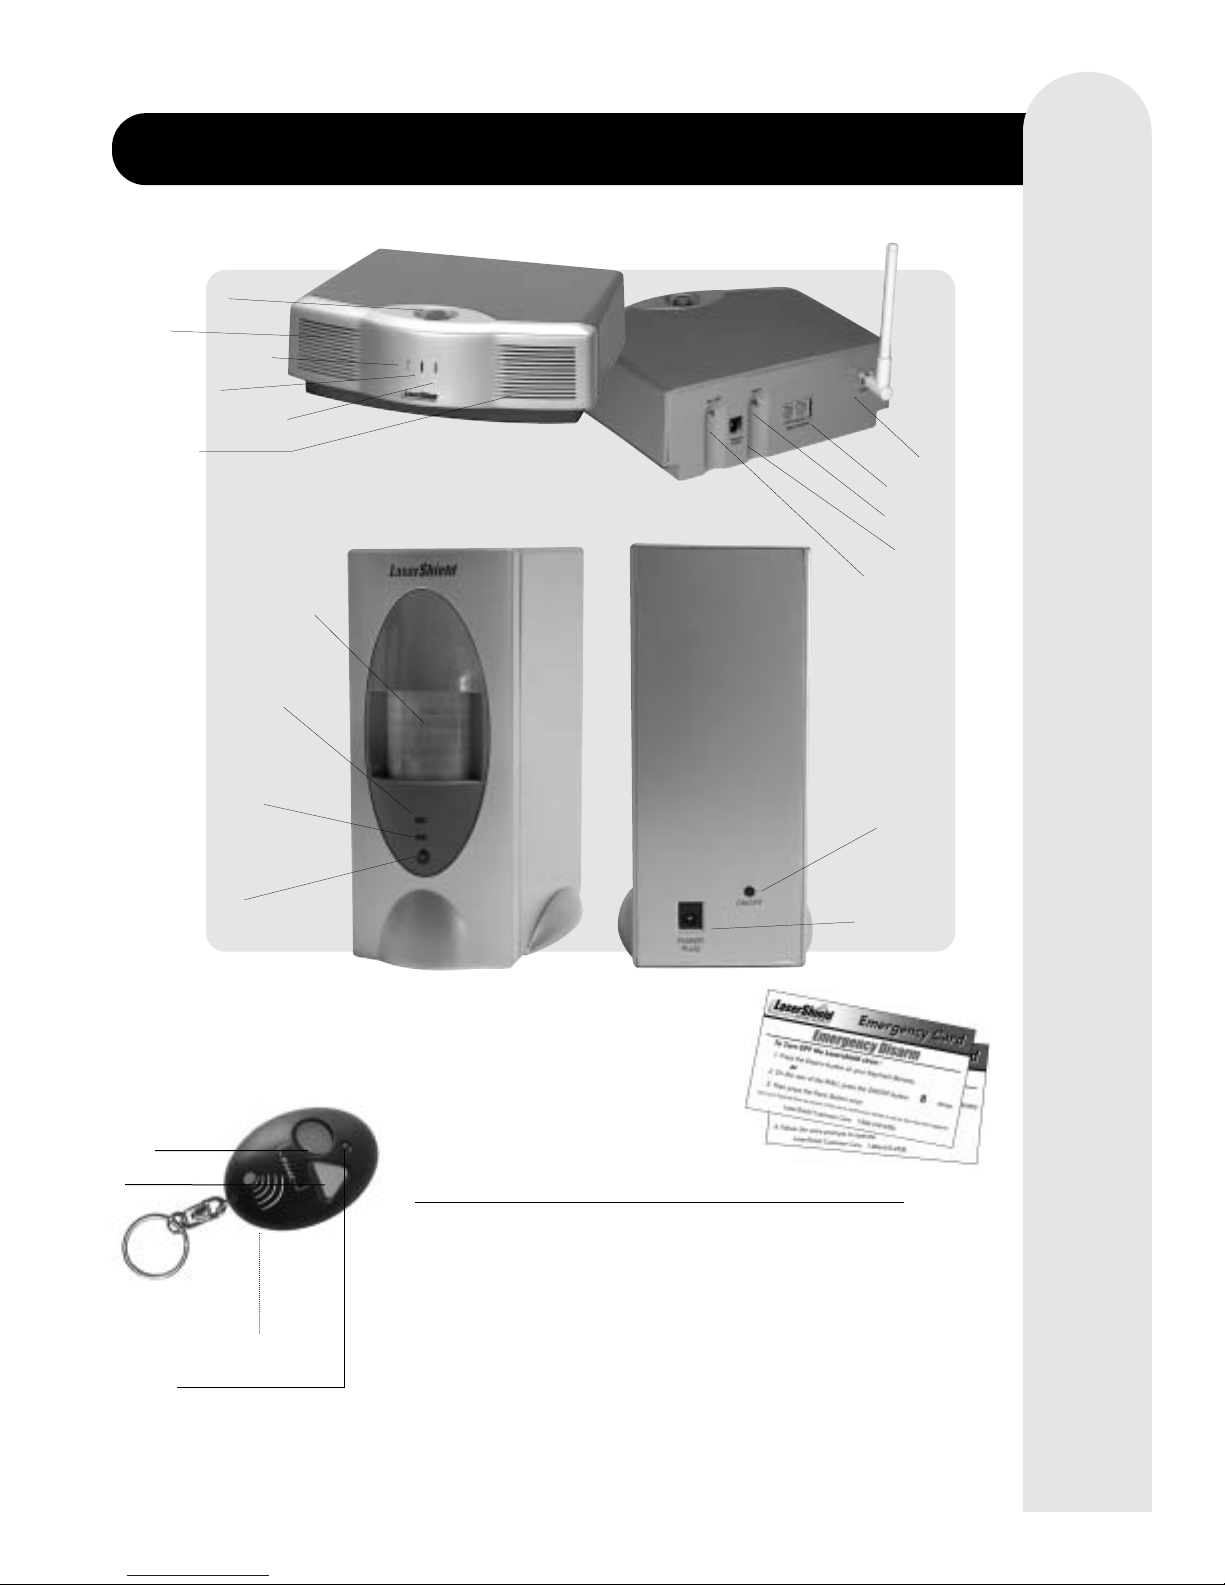
Keychain Remote
DISARM
ARM
Battery Compartment
(underneath)
Status Light
LASERSHIELD STARTER KIT
LaserShield®Instant Security System OWNER’S MANUAL Page 7
SECTION ONE
LaserShield®Master Alarm Unit
2 Keychain Remotes
8’ foot Telephone Cord
2 AC Power Adapters
Rapid Response Monitoring Service
Agreement
Rapid Response Information Form
Owner’s Manual
Product Registration Card
2 Emergency Cards
Pet Shield
Quick Start Guide
Activation Incentive Card
Additional Keychain Order
Form
•
•
•
•
•
•
•
•
•
•
•
•
•
LASERSHIELD INSTANT SECURITY SYSTEM INCLUDES:
Wireless Detection Unit (WDU)
Emergency Card
Remote Passcode & Tap Count
Customer Care Telephone Number
Master Alarm Unit (MAU)
Panic Button
Siren
Red Warning Light
Microphone
Amber Status Light
Speaker
Motion Sensor Window
Amber Status Light
Red Power Light
Bypass Button
Antenna
Wall / Phone
Learn Button
Power Cord
On / Off Button
On / Off
Power Plug
Page 8
HOW TO SET UP YOUR SYSTEM
Page 8 LaserShield®Instant Security System OWNER’S MANUAL
SECTION TWO
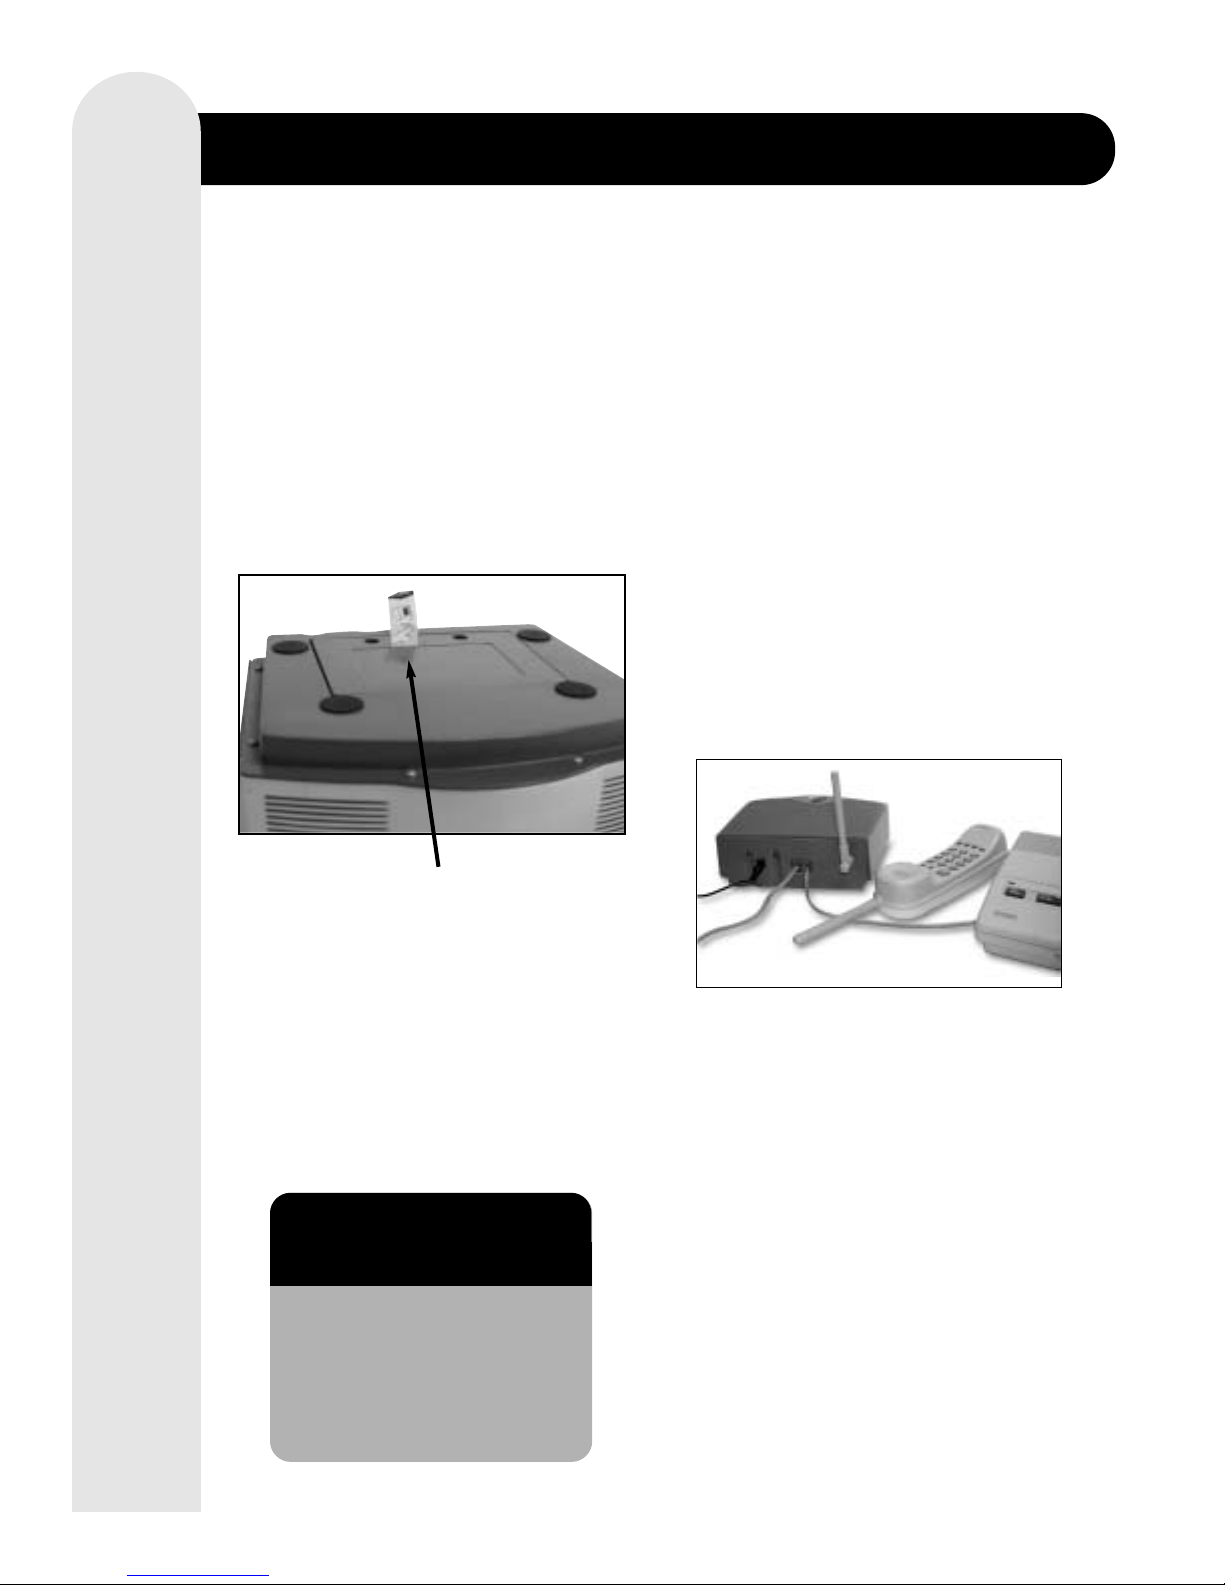
PULL
Positioning the Master Alarm Unit
Place the MAU in a location that is close to a
wall telephone jack and also where the voice
announcements can be heard. It can be
placed anywhere in your home or office where
you can see its signal lights and reach it
conveniently for, among other things, to
access the panic button.
The removable battery protection strip is
the same for the MAU and Wireless
Detection Units
Connect devices in the following
sequence, with the LaserShield
®
closest to the wall outlet:•
LaserShield®MAU
• Fax Machine
(plugs into
LaserShield®MAU)
• Caller ID Box
• Answering Machine
• Telephone
Set up is fast and easy. Basically, you need to
plug in your units, position and link them, and
make a phone call to activate 24/7 monitoring
for better protection. A voice annunciator not
only talks you through the setup, but also will
advise you of System status or abnormal
conditions.
Plug MAU into a Telephone Line
Your LaserShield®Master Alarm Unit must be
connected to a telephone line to contact
RRMS when it detects a security threat.
Always connect the MAU directly into the wall
telephone jack.
The MAU works best with a direct
connection to the wall telephone jack. To
connect it through a PBX, please contact
LaserShield
®
Customer Care for
assistance. Connecting through a PBX or
other telephone switching system may
prevent or reduce reliability in reporting
alarm events to RRMS.
Plug the included telephone cord into the
connector marked "to wall" on the back of the
MAU. Then plug the other end into the wall
telephone jack. If your telephone jack is
occupied by another phone or device, simply
plug that phone or device into the jack in the
rear of the MAU marked "to phone".
Remove the Battery Protection Strips
The LaserShield®Master Alarm Unit (and
Wireless Detection Units) are shipped with
removable battery protection strips. You do not
need to open the battery door to remove the
strip. Just carefully pull out the protective strip
tabs located on the bottom of each unit.
Your System cannot contact RRMS if the
line is busy or not connected, or if a phone
is left off the hook.
The use of DSL or other broadband telephone
service may prevent your System from
transmitting alarm signals to RRMS. Your
System should be connected to a line not
used for DSL. IMMEDIATELY AFTER
INSTALLING DSL OR BROADBAND
TELEPHONE SERVICE, YOU MUST TEST
THE SYSTEM’S SIGNAL TRANSMISSION
WITH RRMS.
If you have "Privacy Manager" as a feature on
your telephone, you must do one of two things
to assure that RRMS can call you in event of
an alarm. Either disable or cancel Privacy
Manager with your phone company, or provide
us with a different phone number for RRMS to
contact you at your premises.
Page 9
HOW TO SET UP YOUR SYSTEM
LaserShield®Instant Security System OWNER’S MANUAL Page 9
SECTION TWO
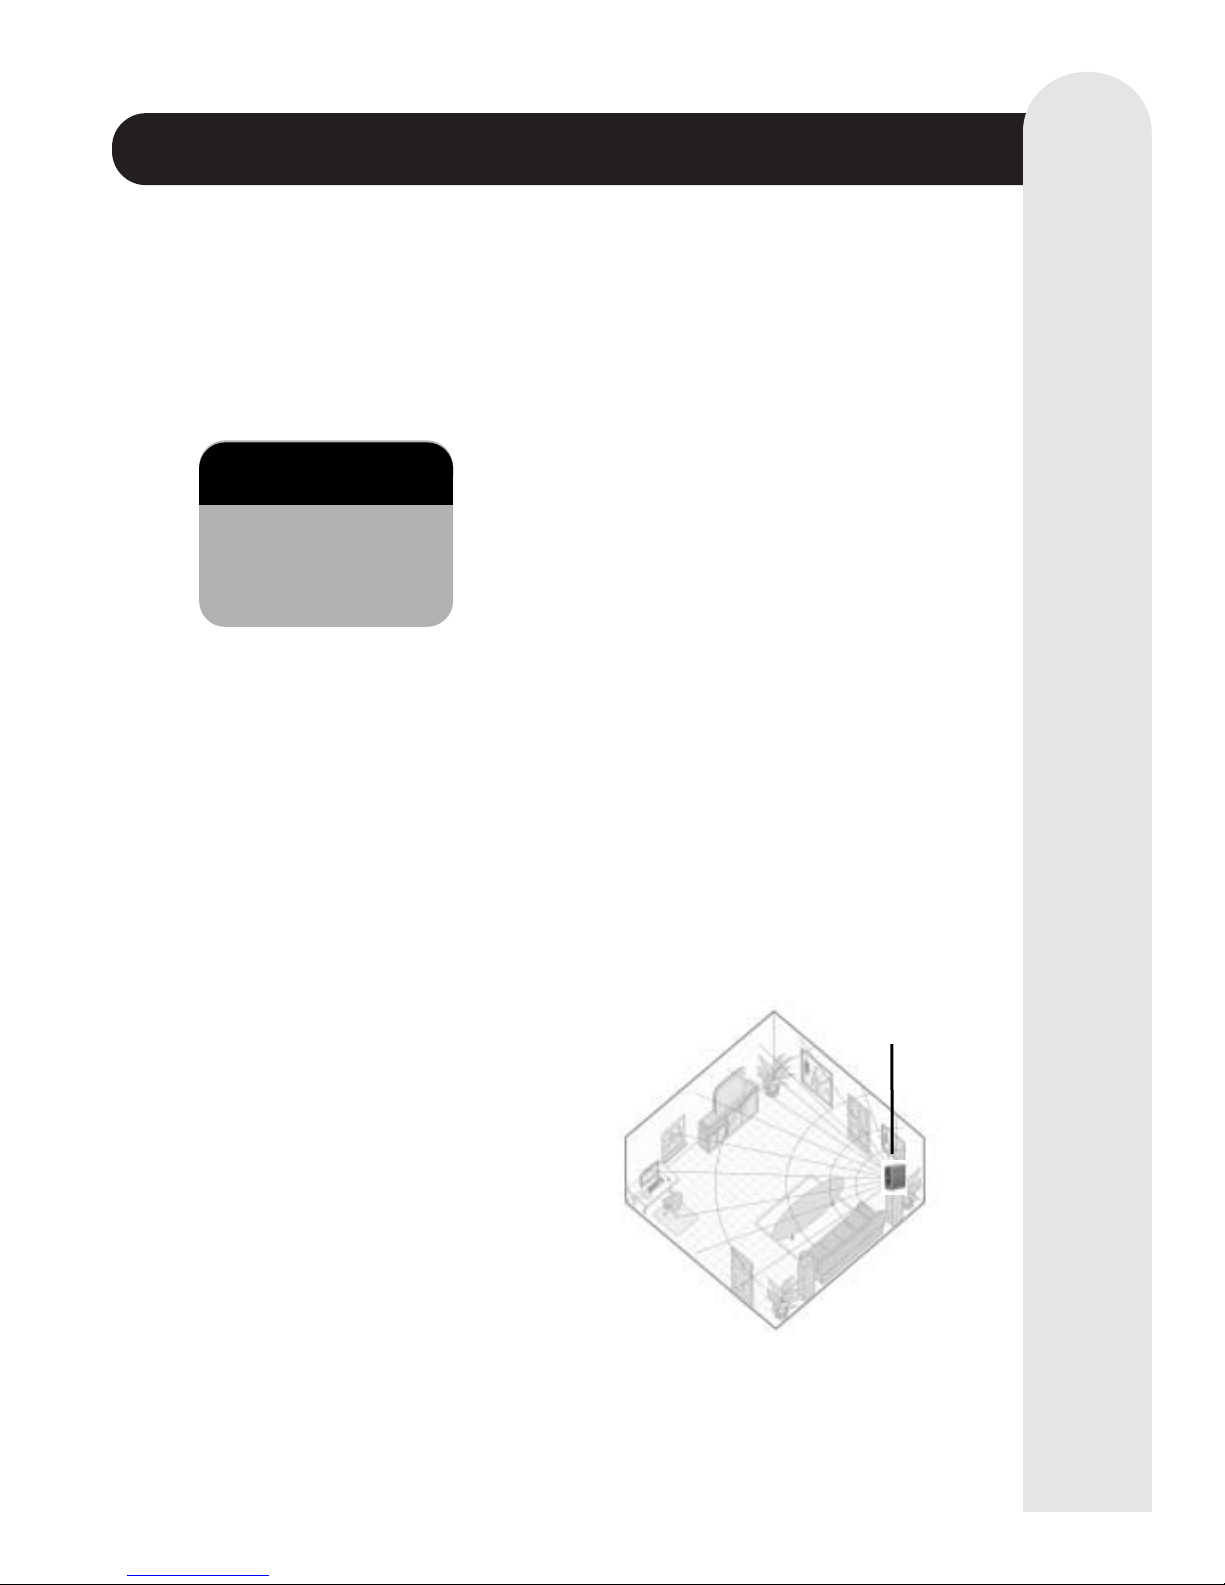
Where to Position the
Wireless Detection Unit
• Across from the
main entry area
• 4-6 feet off the floor
(optimal height is 5 feet)
• Unobstructed view
Position Your Wireless Detection Unit
Positioning the Wireless Detection Unit
Place the WDU in a corner, aimed in the
direction a burglar would have to pass to enter
areas of your home or business. Optimum
height for the WDU is 4-6 feet. Typically,
higher placement of the WDU increases range
and distance. Obstructions such as furniture,
columns or narrow corridors can impair the
range of detection. Place an additional WDU
in a master bedroom, as burglars tend to
frequent this room.
You can check the area of coverage by
watching the red light in the motion sensor
window, which will flash on and off as you
move.
Adjust the location and position of the WDU to
obtain the best coverage. Avoid aiming motion
sensors directly at heating or air conditioning
registers or large panes of non-draped glass.
Large glass areas that receive direct sunlight
can trigger an alarm condition. Do not arm the
System when it is placed in a room with
windows left open. Motions sensors do not
see through glass so if windows are closed
the System will not be disturbed by outside
activities, such as pets, and gardeners.
Pet Owners: Please refer to page 18 "Using
LaserShield
®
with Pets".
Plug MAU into Power
Plug the AC Power Adapter (supplied) into the
wall and insert the DC connector into the
power jack located on the back of the Master
Alarm Unit.
Push and hold the Power Button on the MAU
until the voice says "LaserShield on."
Setting up the Wireless Detection Unit
(WDU)
The WDUs communicate wirelessly with the
Master Alarm Unit. They require only an AC
Power connection (supplied). They do not
require a telephone connection. WDUs can be
placed on nightstands, tables, bookshelves or
anywhere you have a convenient nonswitched power receptacle. All WDUs offer the
best coverage pattern when placed in a
corner of a room.
Note: The annunciator may refer to the WDUs
as "satellite units."
The Wireless Detection Unit features include:
Motion Sensor
Bypass Button to deactivate an individual unit
Panic Button
Battery Back-up
Activating your Wireless Detection Unit
Plug unit into a non-switched power
receptacle.
Press the power button until the red power
light goes on and remains on.
Follow instructions linking your WDU in
the "Using Learn Mode to Link Devices" on
page 13.
•
•
•
•
1.
2.
3.
Recommended Placement
for the WDU
Page 10

LINKING YOUR UNITS WIRELESSLY
Page 10 LaserShield®Instant Security System OWNER’S MANUAL
SECTION TWO
You must teach your MAU to respond to the
Keychain remote and detection units. You can do
this easily and quickly by using the "Learn" mode.
Using Learn Mode to Connect Devices
Each LaserShield®device has a unique
identification code that the MAU learns. This
code allows the MAU to respond to and report
on the status of each device. Follow these few
simple steps to connect your devices using
"Learn" mode:
Press the "Learn" button on the rear of the
MAU. The MAU will verbally announce,
"Learn mode."
Next, on each Keychain Remote and WDU,
press the Panic Button to link the unit. The
MAU will announce each unit linked. When
the MAU has announced a unit is linked, you
may move on to the next device.
When you have learned all remote devices into
the MAU, press the "Learn" mode button again.
The MAU will verbally announce the number of
devices linked. Make certain each device is
verbally announced.
Note: There may be a brief delay before the
Master Alarm Unit responds to signals from
remote devices.
1.
2.
If the MAU does not receive
a signal to activate another
Remote Device within 60
seconds, it will exit “Learn Mode”
automatically. A voice prompt will
announce that the MAU is leaving
“Learn Mode”.
Page 11

ACTIVATING 24/7 MONITORING
LaserShield®Instant Security System OWNER’S MANUAL Page 11
SECTION TWO
You will only have limited protection (siren
only) until you have activated monitoring by
RRMS, one of America’s biggest and best
monitoring companies.
There are 3 ways to activate your monitoring
service:
1) Internet
2) Fax
3) Mail
24/7 monitoring service for your System
begins most quickly when you use the
internet. Just go to:
www.lasershield.net
Click on "Activate LaserShield". Be prepared
to enter the device ID number located on the
bottom of your MAU. Next complete the
online Rapid Response Service Monitoring
Agreement and Information Form.
If you don’t have access to the Internet, you
may Fax or Mail the enclosed Rapid
Response Monitoring Service Agreement
and Information Form. Fax is generally faster
than the U.S. Mail.
Faxes should be sent toll-free to
1-800-258-4772.
If you wish to activate by mail, complete the
form and send in the enclosed business
reply envelope to:
LaserShield®Customer Care,
c/o Accent,
645 Park East Boulevard,
New Albany, IN 47150
You will receive telephone confirmation
within 24 hours of receipt of your agreement,
and you will be instructed to test your
System. You may use your alarm with partial
local protection (siren only) until you are
contacted by a LaserShield®Customer
Care Representative, and have completed
your System testing.
Page 12

TESTING YOUR SETUP
SECTION TWO
Page 12 LaserShield®Instant Security System OWNER’S MANUAL
Testing your LaserShield®and RAPID
RESPONSE MONITORING SERVICE
Until you have completed this test process, your
alarm monitoring will not be in effect. Follow
these simple steps to complete a successful
test:
If you receive an immediate confirmation for
service using the Internet, you may test your
service immediately. If you use fax or mail to
activate your monitoring service, wait until a
LaserShield
®
Customer Care representative
calls you to begin your test.
Press a panic button on your Keychain
Remote, MAU or WDU. Allow the siren to ring
for 10 seconds before disarming.
RRMS will call you to confirm the successful
communication between your System and
Rapid Response. You will be asked to provide
your 5 digit Passcode (located on your
emergency card) and to verify that you are
ready to begin fully active monitored alarm
service. Please contact LaserShield
®
Customer Care if your test was not
successful.
1.
2.
3.
Page 13

'UNLINKING' OR DEACTIVATING DEVICES
LaserShield®Instant Security System OWNER’S MANUAL Page 13
SECTION TWO
Deactivating or “Unlinking” a Single
Remote Device
If you want to stop using a Keychain
Remote or a WDU, you must unlink it. This
will remove the device from the MAU’s
memory and prevents unauthorized use or
accidental alarms.
To Deactivate a Single Device:
Press the "Learn" button on the back of
the MAU to enter "Learn" mode.
Press the "Panic" button on the specific
remote device you want to deactivate.
On a Keychain Remote, press both
buttons at the same time. The MAU will
announce that the device is already
stored in memory and then will ask
you to press the Panic button again
to erase it.
Press the Panic button again. The MAU
will announce that the device has been
erased.
Repeat this process to deactivate other
remote devices you may wish to remove.
Exit Learn Mode by pressing the Learn
button on the rear of the MAU.
Deactivating or Unlinking ALL Your
Remote Devices
A lost Keychain Remote could allow an
intruder who finds it to enter your home or
business without triggering the alarm. If a
Keychain Remote is lost, you will need to
deactivate all your remote devices, and
then re-link the devices you still have.
How to Unlink All Your Remote
Devices
Press the "Learn" button on the back of
the MAU. The MAU will enter the "Learn"
mode.
Press the Panic button on the MAU. The
MAU will prompt you to push the panic
button again to erase all devices.
Press the Panic button again within 10
seconds. This erases all devices from the
MAU’s memory.
Proceed directly to the next section for
Re-linking.
Re-linking the Remaining Remote
Devices
Press the Panic button combination (arm
and disarm simultaneously) on each
Keychain Remote. This will reactivate
each Keychain Remote.
Press the Panic Button on each WDU in
your System to reactivate them.
Listen to the announcement from the
MAU for each device before moving on to
the next one.
For other LaserShield
®
devices in your
System, press the Panic Button on each to
reactivate it. When you have re-linked all
remaining devices press the learn button to
exit learn mode.
Note: If you wait longer than 60 seconds
between re-linking devices, the MAU will
automatically exit the Learn mode. You can
always press the Learn button to pick up
where you left off. Press the learn button to
exit learn mode.
1.
2.
3.
4.
5.
1.
2.
3.
4.
1.
2.
3.
Page 14

YOUR PERSONAL PASSCODE
Page 14 LaserShield®Instant Security System OWNER’S MANUAL
SECTION THREE
A 5-digit Passcode is located on your
Emergency Card. Your Passcode confirms
your identity to RRMS so they know
whether there is a genuine emergency or
an accidental alarm. In case of an alarm,
RRMS will ask you for your personal
Passcode. Every authorized person in your
household or business must have a copy of
the Passcode. It is also required to activate
your monitoring service.
When to use your Passcode:
The first time you test your System.
To verify your identity when canceling a
response to an accidental alarm.
For monthly testing you will provide your
Passcode to verify your identity.
When you access your System by
remote telephone.
•
•
•
•
Page 15

ARMING AND DISARMING YOUR SYSTEM
LaserShield®Instant Security System OWNER’S MANUAL Page 15
SECTION THREE
Arming at Night
You can arm the System from your bedside at
night. If you have a Wireless Detection Unit in
your bedroom you should bypass it while you
sleep. You can do this by pressing its Bypass
button before arming. You may then move
about your bedroom at night, but you must
avoid walking into areas protected by other
WDUs.
If you have bypassed a WDU, you must press
the Arm button twice to arm it in bypass
mode. The MAU will announce the bypassed
status and will prompt you to fix the condition
or "press the Arm button again to force
arming". The WDU amber bypass light and
the MAU amber status light will flash during
bypass mode. Panic button will still be
functional on WDUs in bypass mode.
Disarm the System when you wake in the
morning, or when you wish to walk about your
premises. The MAU will always remind you
about a bypass condition at the time of
arming to prevent you from exiting the
following day without removing the bypass
condition. To remove the bypass status simply
press the bypass button.
Force Arming
If an abnormal condition exists with your
System, such as a low battery, loss of AC
power, etc., the MAU will announce the
condition during arming or disarming. It will
always ask you to fix the condition or press
the Arm button a second time to force arming,
overriding the condition.
Checking the MAU System Status
If the amber status light on the MAU is
blinking, it means there is an abnormal
system condition. You can use your Keychain
Remote to check the System status. Merely
press either the Arm or Disarm button to hear
a verbal status report.
Use your Keychain Remote to:
Arm and disarm the System.
Activate a Panic Alarm.
Announce System status.
Arming with Your Keychain Remote
When the System is "armed" LaserShield
®
protects your residence or business by
triggering an alarm when it senses motion.
Arm the System when you leave the premises
or go to bed. An exit delay allows you time to
leave.
Press and release the "Arm" button on your
Keychain Remote. The MAU will verbally
announce, "LaserShield Arming."
You then have 60 seconds to leave the
premises after arming the System (the exit
delay period). The green status light on the
front panel of the MAU will blink rapidly during
the exit-delay period, and the MAU will
announce the time remaining in the exit-delay
period.
At the end of the delay period, the MAU will
announce, "LaserShield is armed," and the
amber status light will blink.
Do not move in front of the motion sensor
while it is armed, or you will trigger the
alarm.
•
•
•
Disarming the System When You Enter
the Premises
You have 20 seconds to disarm your System
after entering the protected area. This is the
"entry delay" period. The MAU starts beeping
loudly as a reminder to disarm your System.
Press the Disarm button on the Keychain
Remote. The MAU will announce,
"LaserShield disarmed."
•
Page 16

ABOUT ALARMS AND EMERGENCIES
Page 16 LaserShield®Instant Security System OWNER’S MANUAL
SECTION THREE
A burglar alarm is triggered when the
motion detector senses motion while the
System is armed.
A panic alarm is triggered when a Panic
button is pressed manually.
What Happens When the
LaserShield
®
Alarm Sounds:
A 105-decibel siren sounds and will
automatically turn off and reset after 5
minutes. The System will remain armed and
will continue to watch for another sign of
intrusion. If a second intrusion is detected
the System will trigger the siren for an
additional 5 minutes before resetting. The
System will not trigger again until you
disarm which resets the MAU to receive
more alarms.
This feature is called the swinger
shutdown, and is effective in reducing false
alarms.
The Panic Button - How to Signal an
Emergency
You can signal an emergency which will set
off your siren and dial RRMS (if you have
activated monitoring) from your Keychain
Remote, the MAU or any WDU.
MAU – press RED Panic Button on top of
unit until the siren sounds.
Wireless Detection Units - press RED
Panic Button on top of unit until the siren
sounds.
Keychain Remotes – Press BOTH ARM
and DISARM BUTTONS at the same
time until the siren sounds
•
•
Do not leave your phone off the
hook. If a phone is off the hook,
the System will not be able to
contact the Monitoring Service to
report an alarm signal.
Canceling an Accidental Alarm
To disarm your System if it was triggered by
mistake:
Disarm the alarm using your Keychain
Remote.
Prepare to give your Passcode when
RRMS phones to verify the alarm.
Intrusion or Real Emergency
Your alarm is treated as a genuine and real
emergency if:
You do not disarm the System.
RRMS cannot contact you at your
premises to cancel the alarm.
RRMS cannot confirm your identity with
your 5 digit Passcode.
When you incorrectly enter your
passcode two times in a row when
RRMS phones to verify an alarm signal.
•
•
•
•
•
•
•
•
•
Page 17

ABOUT ALARMS AND EMERGENCIES
LaserShield®Instant Security System OWNER’S MANUAL Page 17
SECTION THREE
When an Alarm Signal is Received
RRMS will:
Electronically phone the premises of the
alarm to attempt to verify a real
emergency and thus avoid a false alarm
dispatch. This call is usually received
within 30 seconds of the siren activation.
If someone at the premises does not use
the 5 digit Passcode from your
emergency card to cancel the alarm, a
live operator will attempt to notify to
notify the appropriate authorities or
Responsible Parties.
As the live operator contacts the
authorities, RRMS will phone you and/or
a Responsible Party that you have
designated on your Rapid Response
Information Form.
Important- If after 60 seconds you have
not been contacted by RRMS and the
alarm activation was accidental, contact
Customer Care immediately. You may not
have heard the phone over the alarm siren
and law enforcement may have been
notified.
24/7 monitoring is an important precaution
as a method to notify and deter you from
walking in on an intruder or dangerous
situation. In some cases, law enforcement
may remain at the location until the location
can be secured, or until a responsible party
arrives to relieve them. Notification is also
an important precaution to avoid leaving a
premise with a broken door or window
vulnerable to vandalism, weather, and other
unwanted intruders.
Note- You may update your emergency
contact information at anytime using the
Internet or by contacting Customer Care.
Remember, you may require a police permit
to qualify for law enforcement response. In
some areas law enforcement will not
respond to private alarms.
Check with local authorities regarding law
enforcement response to Alarm Systems.
Do not call 911 for this
information.
1.
2.
3.
Emergency Disarming WITHOUT the
Keychain Remote, Using a Tap Count
on the Master Alarm Unit
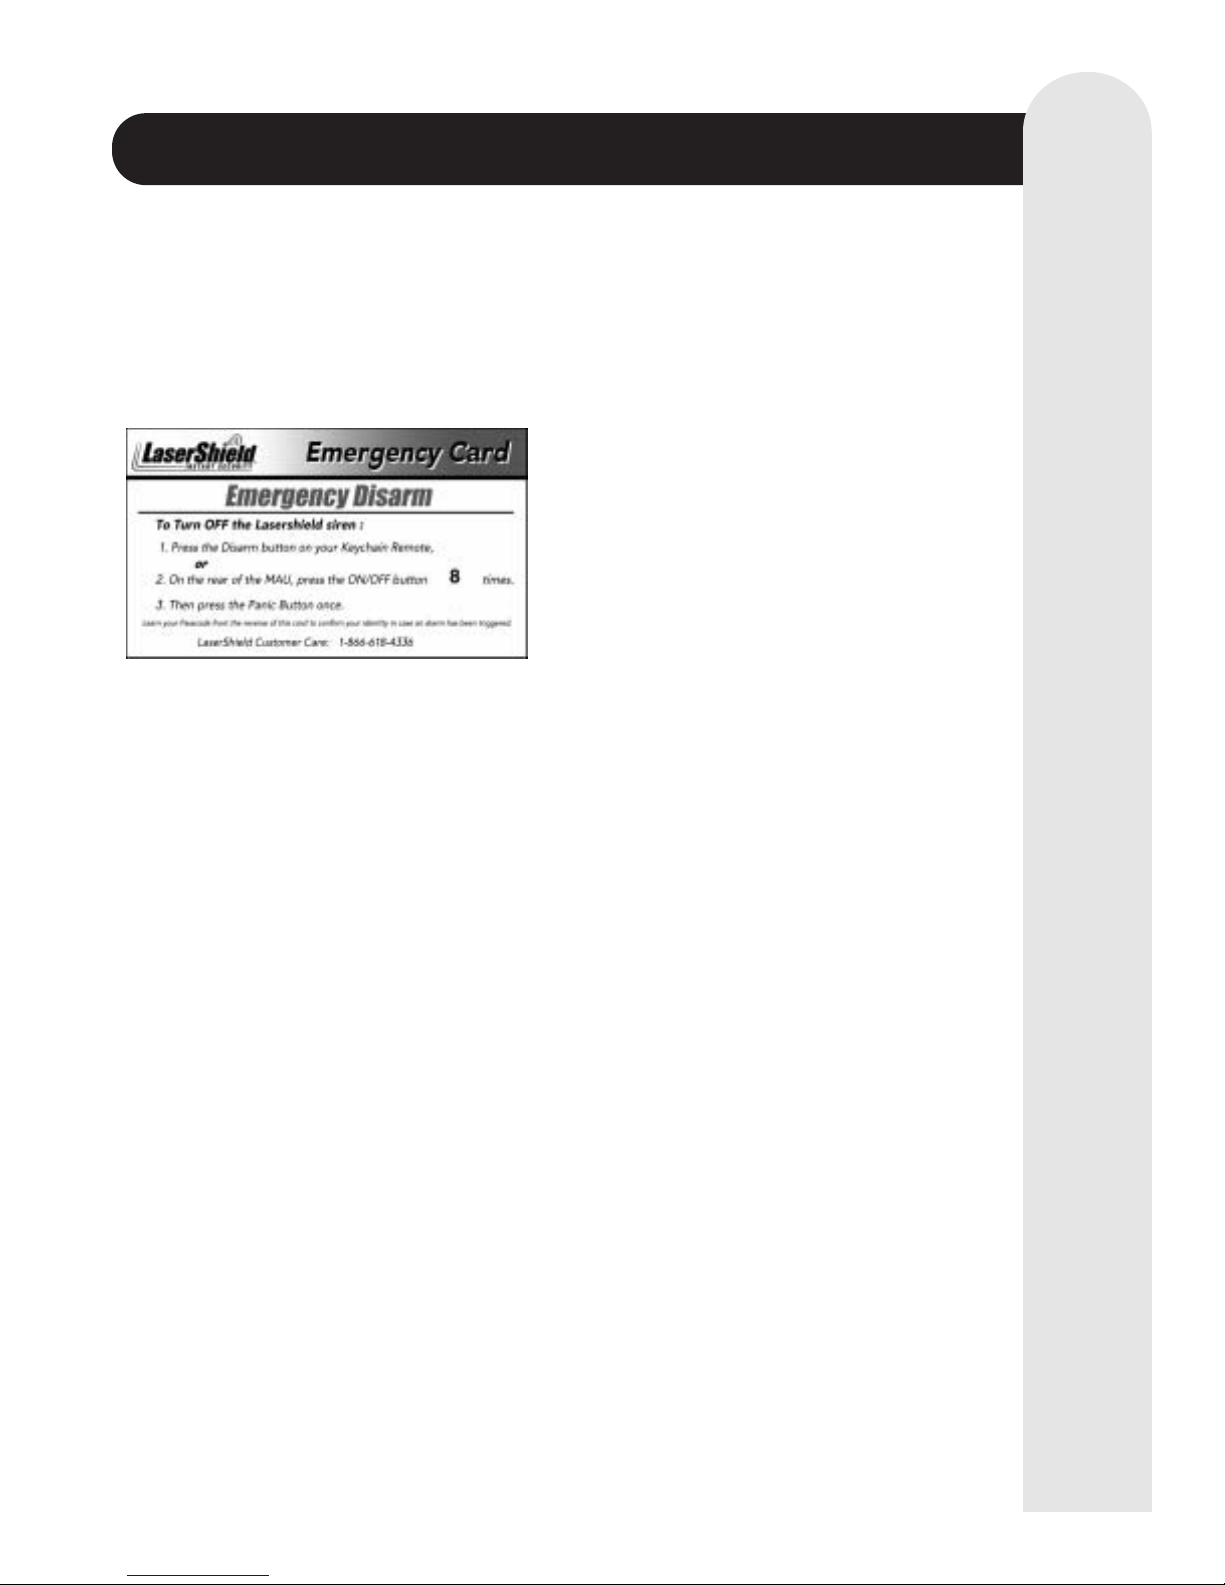
If your siren is sounding and you cannot
disarm your System, you can use the Tap
Count feature to silence the siren. Locate
your Tap Count number printed on your
LaserShield
®
Emergency Card. Go to the
Master Alarm Unit and tap the On/Off
button the same number of times equal to
your Tap Count Number, and then press the
MAU Panic Button to silence the siren.
For example - if your Tap Count number is
7, then press the ON/OFF button 7 times,
and then press the Panic button on the
MAU.
If you forget how many times you have
pushed the ON/OFF button, pause for one
second and the Master Alarm Unit will
verbally announce the number of taps you
have entered. If you pause for 5 seconds or
more between taps during the count, you
must start over.
Avoid any potential false alarm
fines: Only press the Panic Button
if there is an actual emergency
situation.
Some communities may charge a
fee for each time law enforcement
officers are dispatched for a false
alarm.
Page 18
USING LASERSHIELD WITH PETS
Page 18 LaserShield®Instant Security System OWNER’S MANUAL
SECTION FOUR
Pet Shield
Pets can trigger false alarms by moving in
front of the motion sensor while the System
is armed.
LaserShield
®
provides a Pet Shield that
narrows the coverage area of the motion
sensor window, both vertically and
horizontally, thus creating pet "safe zones"
where animals can pass.
Using the Pet Shield reduces the coverage
pattern of your motion sensor. We
recommend pets be isolated to a
non-protected area. If your pet must be
allowed to freely roam your premises then
using the Pet Shield allows you to set up a
basic coverage pattern for the motion
sensor.
Because cats and dogs jump on furniture,
place your WDU at a height where pets can
move safely beneath the detection area.
You can aim the coverage of your WDU by
watching the test light inside the motion
sensor window, while moving about or
allowing pets to move through the protected
area. You may have to rotate your WDU left
or right a bit to move detection coverage
away from the backs of furniture or areas
pets may access or frequent. Adjust the
position and height of the Wireless
Detection Unit so that your pets can move
about freely without triggering an alarm.
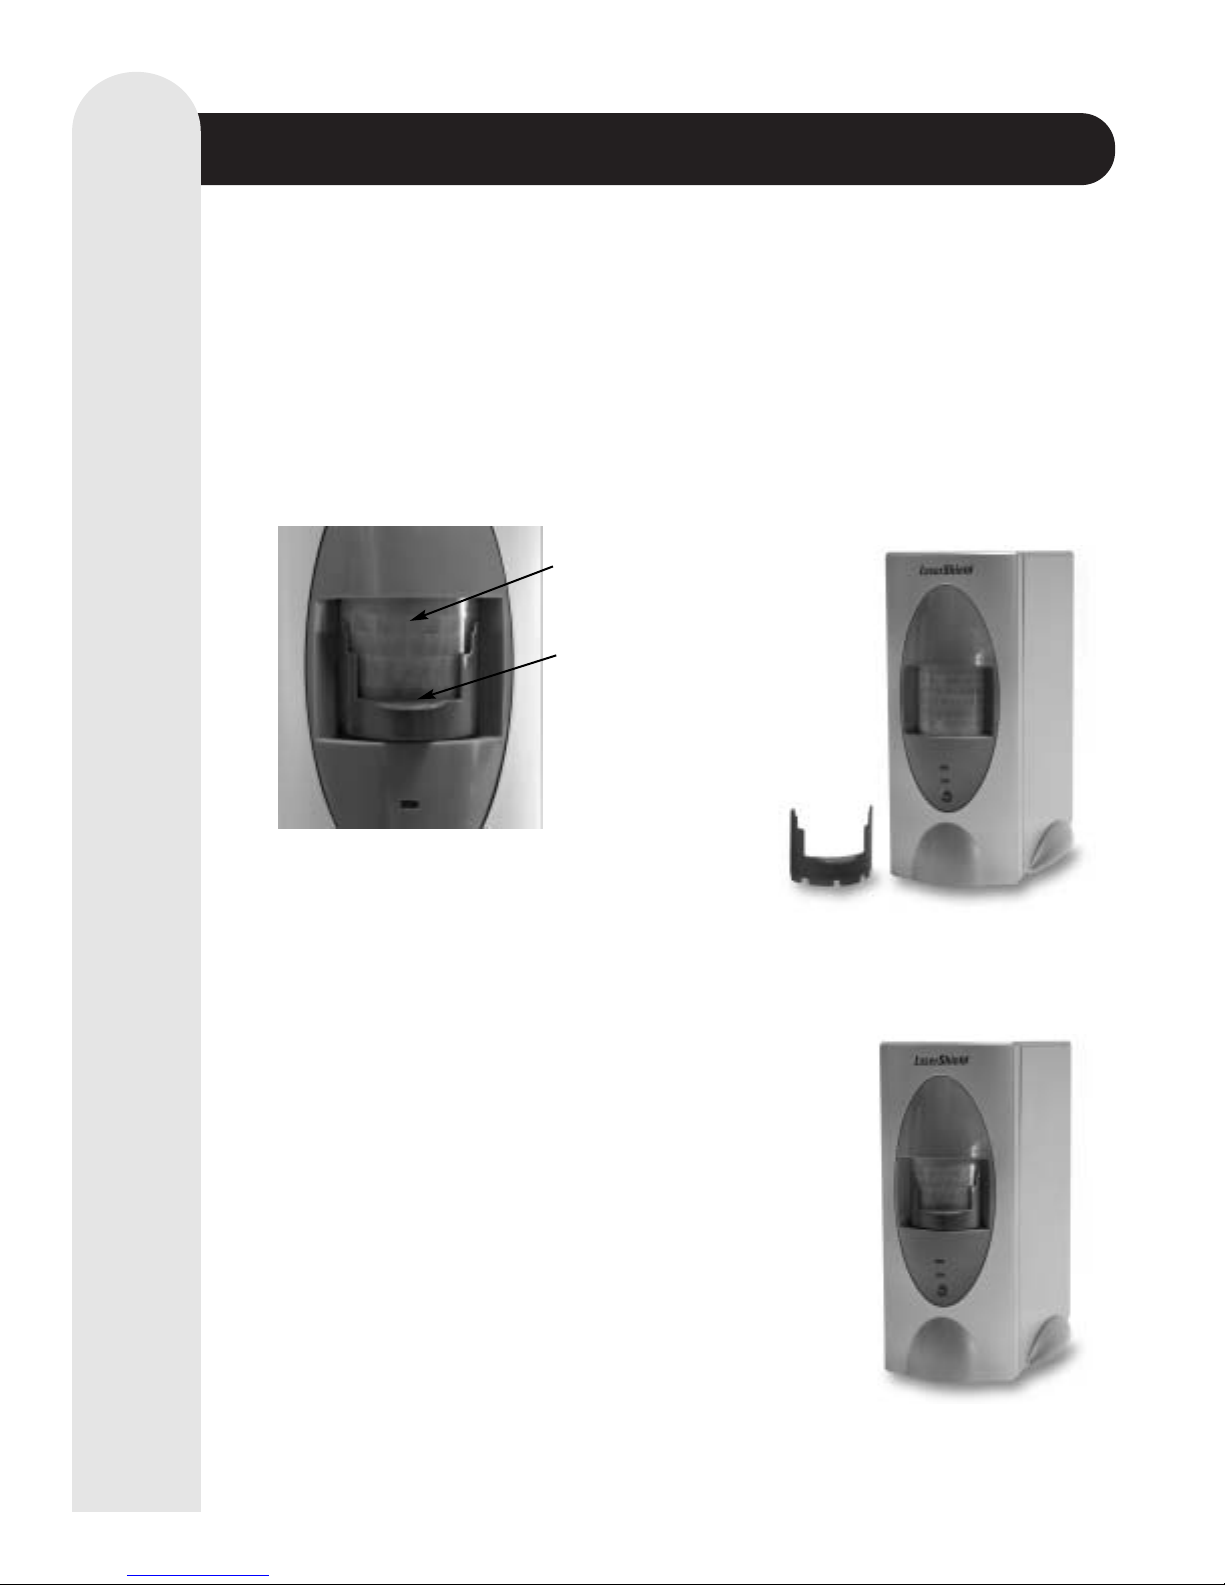
To Install your Pet Shield
Slide the Pet Shield into the groove at the
bottom of the motion sensor window on the
Wireless Detection Unit. The Pet Shield
should slide snugly into place and against
the motion sensor window.
Pet Shield attaches here
over Motion Sensor Window
Motion Sensor Window
Pet Shield Off
Pet Shield On
Page 19
CONTROLLING WHILE AWAY
LaserShield®Instant Security System OWNER’S MANUAL Page 19
SECTION FOUR
You can manage your System from a
touch-tone telephone or cell phone when
you are away from your property. You will
need to use the 5 digit Passcode printed on
your LaserShield
®
Emergency Card for this
process.
Accessing the Master Alarm Unit by
Phone
This feature requires touch-tone
telephone service. Dial the same
telephone number to which your MAU is
connected. Do not call from a telephone
that is connected to the same line as the
MAU.
Allow it to ring once, and then hang up.
Wait 5 seconds, and then redial the
number. The MAU should answer on the
first ring.
Follow the voice instructions to enter
your 5-digit Passcode by pressing the
keys on the telephone touch pad.
You can do the following by telephone:
to Arm the System
to Disarm the System
to change the volume of the MAU
speaker
to listen to the System status
to turn on the room monitoring
microphone to listen to activity in
the room
You can also make some refinements in how
your System works via touch tone phone.
You can disable Call Waiting, and set your
System to dial "8" or "9" for an outside line
as it dials RRMS.
To activate each of these features, you must
dial your MAU, allow it to ring once, and then
hang up.
Wait 5 seconds, and then redial the number.
The MAU will answer on the first ring.
Follow the voice instructions to enter your 5digit Passcode by pressing the keys on the
telephone touch pad. Then,
To disable Call Waiting, touch "7." If you
have call waiting, and if RRMS is calling
you back to verify an alarm, there is a
possibility that Call Waiting could interfere
with their call-back.
To dial 8 as part of your outgoing call
dialing, touch "8."
To dial 9 as part of your outgoing call
dialing, touch "9."
IMPORTANT- It is imperative that after
making changes that may affect the alarm’s
communication, you test the alarm’s
connection to RRMS by placing the MAU in
test, and triggering the System as indicated
on page 21.
5.
1.
2.
3.
4.
Press 1
Press 2
Press 3
Press 4
Press 5
•
•
•
Page 20

ADDITIONAL FEATURES
Page 20 LaserShield®Instant Security System OWNER’S MANUAL
SECTION FOUR
False Alarm Reduction
The System relies on a 4-point false alarm
reduction strategy:
No complex keypad codes to remember.
No installed wires and connectors that may
lead to short circuits.
The Swinger shutdown helps protect you
from excessive false alarm penalties. The
alarm can be triggered only twice within a
single arming period (the time period
between arming and disarming a unit).
No door/window sensors that may trigger a
false alarm from strong wind, misalignment,
warped wood, or other forms of weather
and environmental conditions.
Low Battery Detection
The System will attempt to report a MAU low
battery condition to Rapid Response
Monitoring Service (RRMS). You may be
contacted by e-mail or mail if your alarm
reports multiple low battery alarms.
Wireless Detection Units and the Keychain
Remote batteries do not recharge and do not
report low batteries to RRMS, but their status
will be reported to you verbally by the MAU
each time the MAU is armed or disarmed.
The Status light will flash on the MAU when
low battery conditions exist.
Loss of AC Power and Low Battery
Power
The MAU contains a rechargeable backup
battery. If there is a loss of AC power, the
backup battery will operate the MAU for up to
12 hours.
The Status light will blink if there is a power
outage or low battery power. When power is
restored after an outage, the battery will
recharge automatically.
1.
2.
3.
4.
Page 21

MONTHLY TESTING
LaserShield®Instant Security System OWNER’S MANUAL Page 21
SECTION FIVE
We recommend you test your System
monthly to assure it is working properly.
You must place your System in test mode
before testing so that RRMS does not
notify authorities. You can place your
account in test mode one of two ways:
Go the LaserShield
®
website at
www.lasershield.net and click on "My
Account". You will be asked to enter your
web user ID and web passcode you
chose when you activated your
monitoring service. Follow the
instructions to manage your account and
place your System in one hour test
mode. Then follow the procedure listed
immediately below titled "To test your
System".
You may contact LaserShield
®
Customer
Care to place your System in one hour
test mode. You will need your 5 digit
passcode to place your System in test
mode. The LaserShield
®
Customer Care
number is located on your emergency
card with your passcode.
To Test Your System
Press the Arm Button on the Keychain
Remote to arm the System.
Allow the exit delay to expire and walk
through the protected area. Allow the
entry delay beeps to beep until the siren
sounds. Let the siren sound for a full 10
seconds.
Disarm the alarm using your Keychain
Remote.
To test panic button simply press the
panic button on any device you wish to
test, allow the sound to ring for 10
seconds, and disarm the System.
You should repeat this test for each WDU.
Each time you trigger an alarm you will
receive an immediate call back from RRMS
and you will be asked to enter your 5 digit
passcode. The most critical test is to
confirm successful communication to
RRMS. We recommend you repeat the test
process for each device.
After completing a full test of the System,
go back to the Internet, or contact
LaserShield®Customer Care to place your
System back on active monitoring. If you do
not remove your account from test mode
your account will automatically return to
active, monitored status after 1 hour.
Your LaserShield
®
will conduct its own
internal tests on power and battery
functions on a regular basis and will notify
you of any abnormal conditions during
arming or disarming.
Care and Maintenance
To clean, unplug the unit and wipe with a
slightly damp soft cloth. Be careful not to
scratch the delicate motion sensor
windows. Do not place the MAU or WDUs
in water or allow water to get inside them.
Do not use commercial cleaning
solutions.
1.
2.
1.
2.
3.
4.
Page 22

REPLACING BATTERIES
Page 22 LaserShield®Instant Security System OWNER’S MANUAL
SECTION FIVE
Replacing the WDU Batteries
Battery type: CR123A Lithium Batteries
(available at most electronic and camera
stores)
Remove the two screws from the battery
compartment door on the back of the WDU
and remove the door.
Remove the old batteries and insert the
new batteries.
Replace the battery compartment door and
screws.
Replacing the Keychain Remote
Battery
Battery type: C2032 coin cell (available at
most electronic and camera stores)
Press down on the batter compartment
door and press sideways to gain access to
the battery.
Remove the old battery.
Insert the new battery with the positive (+)
side facing you.
Replace the battery compartment door.
Using your LaserShield®System near
electronic household or medical
devices
Your LaserShield®Instant Security System is
environmentally safe. It uses passive infrared
motion detection and low-power transmitters
that are similar to garage-door openers.
Replacing Batteries
Replacement batteries for the MAU can be
purchased from the LaserShield
®
web site.
Please recycle old batteries. They may be
recycled at retail electronics stores or at a
local battery recycling location. Do not
dispose of batteries in landfills.
For more information on recycling the leadacid battery in the MAU, go to the following
web site:
http://www.rbrc.org/consumer/index.html
Replacing the MAU Battery
For MAU replacement batteries please
phone or contact LaserShield®Customer
Care via the internet. You must use
LaserShield®approved replacement
batteries for the MAU. Installing the
incorrect battery into the MAU can cause,
irreparable damage, failure to function, and
will void your warranty.
Remove the two screws from the battery
compartment door and remove the door.
Gently lift the battery about 1 inch out of
the battery compartment.
Disconnect the red and black battery
cables.
Connect the battery cables to the
replacement battery. Connect the red
cable to the red terminal and the black
cable to the black terminal. IMPORTANTreversing the connectors can damage
your MAU and void your warranty.
Gently slide the replacement battery into
the battery compartment. Make sure the
battery wires do not extend outside the
battery compartment.
Replace the battery compartment door
and screws.
1.
2.
3.
4.
1.
2.
3.
4.
5.
6.
1.
2.
3.
Battery
Compartment Door
Two Screws
Page 23
TROUBLE SHOOTING
LaserShield®Instant Security System OWNER’S MANUAL Page 23
SECTION SIX
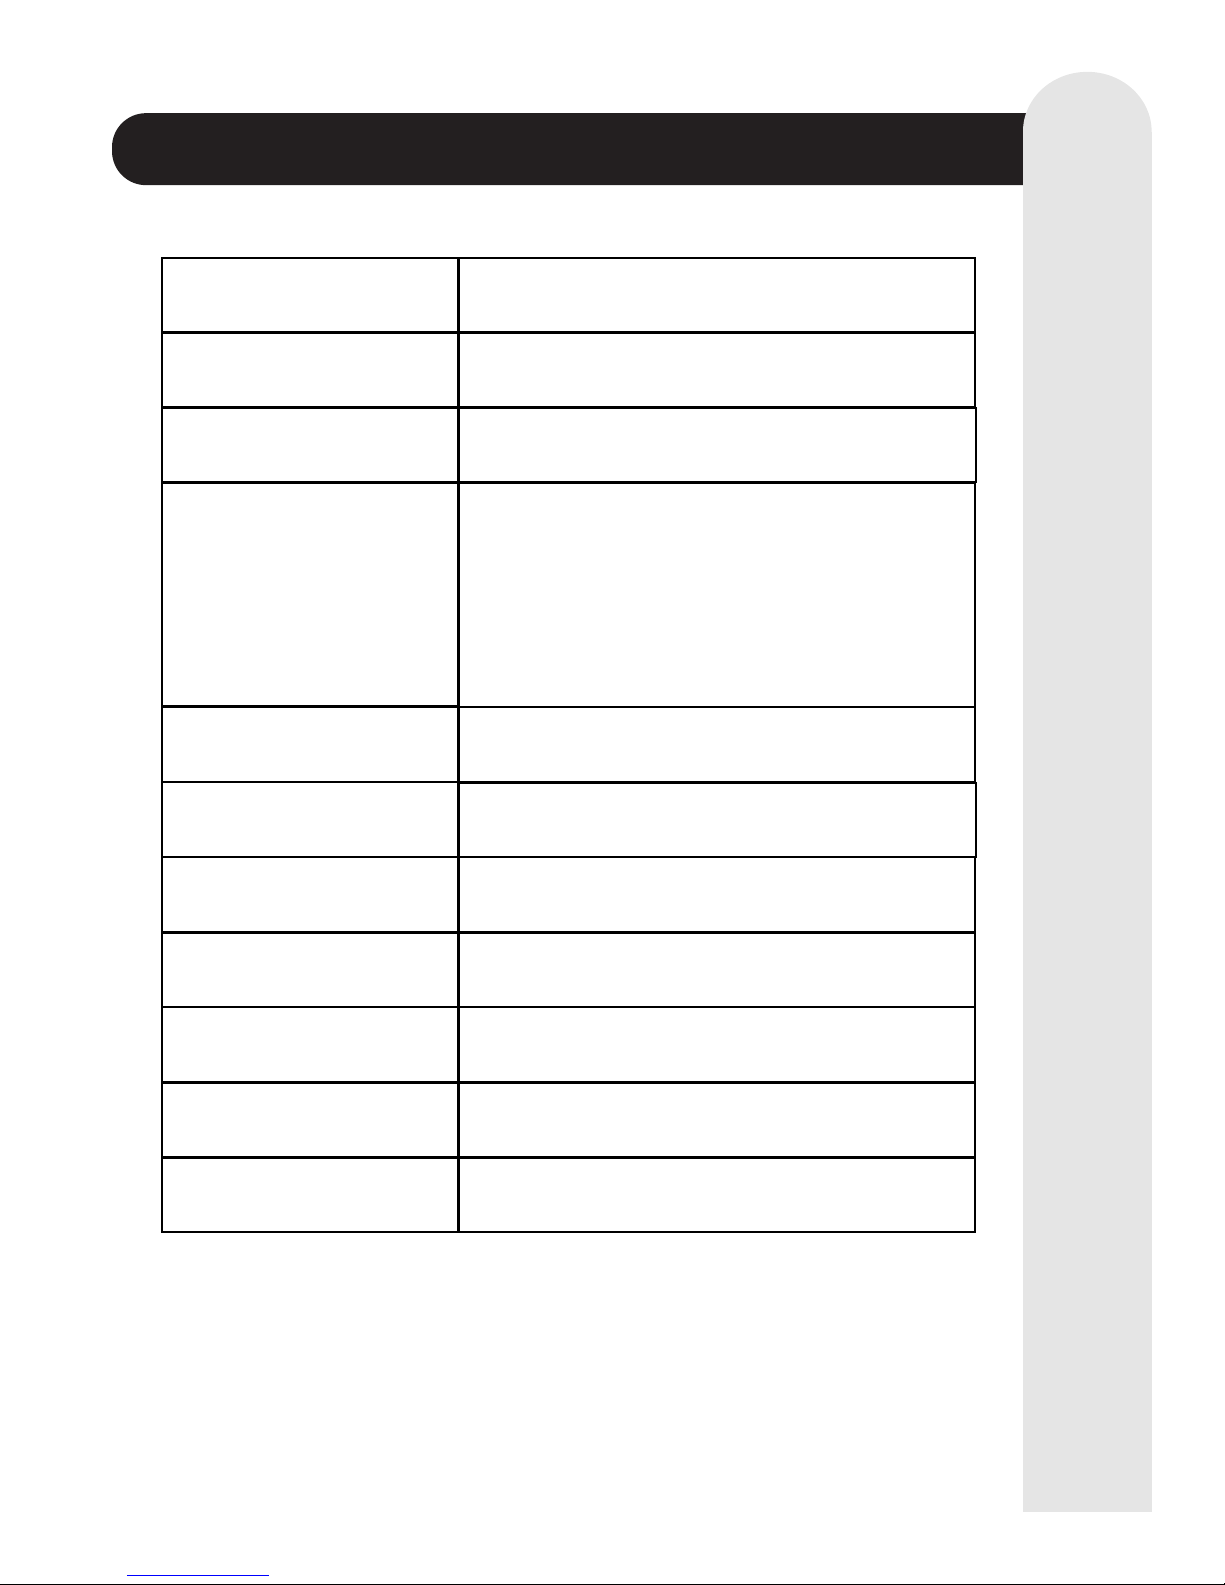
PROBLEM OR
CONDITION
SOLUTION
Master Alarm Unit
Low Battery
Check AC Power; Check circuit breakers; Check
Connections; Order new battery if AC Power is OK
Master Alarm Unit
No AC Power
Check AC Power; Check circuit breakers; Check
Connections; Order new battery if AC Power is OK
The MAU says "THERE WAS
AN UNREPORTED ALARM"
Press DISARM button to get system status. If you hear
"NO PHONE LINE, FIX THE CONDITION", check
premises phones for dial tone.
Check that the phone jack is securely connected to the
wall and that the other end is plugged into the back of
the MAU. Check for phones off hook. Repeat the
DISARM command. If the problem continues, please
contact Customer Care.
The MAU reports
"NO PHONE LINE"
Repeat steps for unreported alarm.
The MAU announces a device
is "NOT REPORTING"
Wireless Detection
Powered Off
Check circuit breakers; make certain unit is plugged into
wall, check connections. Press power button. Otherwise
phone Customer Care.
Wireless Detection
Low Battery
Replace battery
Wireless Detection
Unit is Bypassed
Press Bypass Button to restore to system
Check all devices. Make sure connections are good.
Check for lights. If no lights on a WDU check the power
connection and press the on/off power button.
Wireless Detection
No AC Power
Press ON/OFF Button; Check power connections
Keychain Remote
Low Battery
Replace with new battery
Page 24

FREQUENTLY ASKED QUESTIONS
Page 24 LaserShield®Instant Security System OWNER’S MANUAL
SECTION SEVEN
Can I use the LaserShield®alarm without the monthly Monitoring Service?
Yes, but it is not recommended. The most important aspect of owning an alarm is obtaining a
reliable service that can notify you at work or by cellular phone, and prevent you from
walking in on an intruder or dangerous situation. LaserShield
®
transmits signals to a
professional monitoring station to provide immediate emergency support. But this won’t
happen if you have not activated monitoring. The System also reports important diagnostic
information to the monitoring facility that can be critical to the successful operation of your
System. Additionally, if law enforcement is dispatched and finds a sign of forced entry and
cannot secure the premises (such as a broken sliding door window) while you are away or
on vacation, RRMS will phone Responsible Parties (friends, neighbors, family) who you
designate to respond when you cannot be reached and who may assist in securing your
home or business after vandalism or damage.
I live in an apartment. Do I need to notify my landlord that I have an alarm
system?
Anyone who is legally allowed to enter your premises for the purpose of emergency or
service should be notified that you have an alarm system. LaserShield
®
offers remote
control of your alarm using a secret passcode included with your unit, and any remote
telephone or cellular phone. This passcode allows you to phone your premises and disarm
the System by remote to allow access for maintenance or landlords.
What if I move or relocate?
LaserShield®is completely portable and can easily be relocated. Simply power off your
System and pack for relocation.You must inform the LaserShield®Customer Care
department of your new location so they may update RRMS with new contact information.
Power up LaserShield
®
at your new location, test the unit with your new telephone line, and
your alarm service and protection is immediately restored. You may also log in through the
internet at www.lasershield.net and manage your account by editing your address and new
phone numbers when you are ready to operate your System at your new location. You may
also fax and notify Customer Care to update your information.
Can the alarm be used while I’m at home?
You can use the alarm while retiring for rest at home. If you have a WDU in your bedroom,
and additional sensors in other areas, the bedside unit/s can be bypassed while sleeping.
This feature allows you to move freely in the bypassed areas. Even though the WDUs are
bypassed, panic buttons remain active.
Will I be charged for a toll call when the LaserShield®sends a signal to the
monitoring station?
No. LaserShield®uses a proprietary toll free 800-phone number to contact RRMS.
Page 25

FREQUENTLY ASKED QUESTIONS
LaserShield®Instant Security System OWNER’S MANUAL Page 25
SECTION SEVEN
What if my unit loses power?
LaserShield®alarms are equipped with back up battery systems. If the System loses power
and switches to emergency battery power, RRMS will be notified and the company will
contact you to inquire about the condition. MAU batteries are rechargeable. WDU batteries
do not recharge but last for several years and are easy to replace. The MAU will verbally
announce a low battery condition if battery replacement is required.
Will the LaserShield®System work with my answering machine?
Yes. LaserShield®is designed for use with most answering machines. The LaserShield
®
MAU has a built in telephone splitter that allows you to operate with a telephone and an
answering machine from the same connection point.
What are the features for the seeing and hearing impaired?
LaserShield®has a unique system of verbal annunciation reporting conditions such as arm,
disarm, entry/exit delay, and alarm conditions, for those with sight difficulties. There is also a
protruding dot in the plastic over the WDU and MAU on/off power buttons to make them
simple to find by touch. Keychain Remote buttons are shaped differently to help differentiate
Arm and Disarm buttons. LaserShield
®
also has lights which flash differently on the MAU
and WDU to alert the deaf of various system conditions. RRMS is fully equipped with TTD for
the hearing impaired.
Does the alarm siren ring indefinitely? Will it disturb my neighbors?
No. The siren turns off after 5 minutes automatically. The unit resets itself and watches
quietly for another indication of intrusion. If another is detected the siren will activate for an
additional 5 minute cycle time.
What if I lose my Keychain Remote?
LaserShield®can be armed or disarmed by remote using a five-digit passcode using any
remote telephone or cellular phone. You can purchase replacement remotes by contacting
the LaserShield
®
Customer Care department. If you lose your remote you can also use a
secret emergency shutdown feature to disarm the alarm. The emergency shut down feature
is different for every LaserShield
®
unit and is described on your LaserShield®emergency
cards included with your System.
Page 26

LIMITED WARRANTY & LIABILITY
Page 26 LaserShield®Instant Security System OWNER’S MANUAL
SECTION EIGHT
LaserShield’s Warranty and Limitation of Liability are set forth on the Limited Warranty
provided in this package with your System.
Page 27

SPECIFICATIONS
LaserShield®Instant Security System OWNER’S MANUAL Page 27
SECTION EIGHT
Operating Environment
Temperature +41º F to +122º F (+5º to +50º C)
Humidity 0% to 95% relative humidity (non-condensing)
Storage Environment
Temperature +32º F to +140º F (+0º to +60º C)
Humidity 0% to 95% relative humidity (non-condensing)
Communications
Telephone jacks RJ-11
Dialing capability Tone
Power Supply
Batteries Master Alarm Unit: 6 V 1.2 Ah, sealed lead-acid, rechargeable
Wireless Detection Unit: WDU: CR123A Lithium
Keychain Remote Control: CR2032 Lithium
Power adapter Input: 100-240VAC, 50-60 Hz.
Output: 10 V DC, 500mA
Safety
Approvals FCC Part 68 FCC Part 15
Use only supplied UL approved power adapter
Manufacturer’s Declaration of Conformity
We declare under our sole responsibility that LaserShield®, to which this declaration relates, is in conformity with the
following standards or other normative documents:
Federal Communications Commission (FCC) Compliance Notice: Radio frequency Notice:
DECLARATION OF CONFORMITY
We, Lasershield Systems, Inc.
5931 Sea Lion Place, Suite 114
Carlsbad, CA 92008 USA
+1 (760) 930-1908
declare under our sole responsibility that the Master Alarm Unit, model number BSK-0013101 complies with Part 15 of FCC
Rules.
Operation is subject to the following two conditions:
(1) this device may not cause harmful interference, and
(2) this device must accept any interference received, including interference that may cause undesired operation.
The devices
• Wireless Detection Unit, model number WDU-0013301
• Keychain Remote, Model, model number KCR-0011501
comply with Part 15 of the FCC Rules. Operation is subject to the following two conditions: (1) This device may not cause
harmful interference, and (2) this device must accept any interference received, including interference that may cause
undesired operation.
NOTE: This equipment has been tested and found to comply with the limits for a Class B digital device, pursuant to Part 15
of the FCC Rules. These limits are designed to provide reasonable protection against harmful interference in a residential
installation. This equipment generates, uses, and can radiate radio frequency energy and, if not installed and used in
accordance with the instructions, may cause harmful interference to radio communications. However, there is no guarantee
that interference will not occur in a particular installation. If this equipment does cause harmful interference to radio or
television reception, which can be determined by turning the equipment off and on, the user is encouraged to try and correct
the interference by one or more of the following measures:
— Reorient or locate the receiving antenna.
— Increase the separation between the equipment and receiver.
— Connect the equipment into an outlet on a circuit different from that to which the receiver is connected.
— Consult the dealer or an experienced radio/TV technician for help.
Any modifications to the unit, unless expressly approved by LaserShield®Systems, Inc., could void the user's authority to
operate the equipment.
Consumer Information and FCC Requirements
Telephone connection:
This equipment complies with Part 68 of the Federal Communications Commission rules. These rules permit this device to
be directly connected to the telephone network. Standardized jacks are used for these connections. This equipment
should not be used on party lines or coin lines.
If the device is malfunctioning, it may also cause harm to the telephone network; this device should be disconnected until
the source of the problem can be determined and until it has been repaired. If this is not done, the telephone company
may temporarily disconnect your service.
If the telephone company requests information on what equipment is connected to their lines, inform them of:
• The telephone number this unit is connected to
• The ringer equivalence number, for the Master Alarm Unit is 1.
• The FCC registration number that appears on the bottom of the unit.
•
•
•
•
•
•
•
•
Page 28

Please contact LaserShield®Customer Care at 1-866-618-4336 if you have any
questions.
LaserShield®Security Systems, Inc.
LaserShield Customer Care,
c/o Accent,
645 Park East Boulevard,
New Albany, IN 47150
Visit us on the Internet:
www.lasershield.net
© 2003 by LaserShield®Systems, Inc. All Rights Reserved.
 Loading...