

Page 1

SUNFISH SUNFISH RACE
SUNFISH
Rigging Manual
1 Parts of the Hull
Go-fast tip number one:
Read this rigging guide fi rst.
2 Parts of the Sail
3 Sunfi sh Mast Kit
4 Bailer Installation
5 Ratchet Block Installation
6 Attaching the Sail to the Booms (Standard)
7 Attaching the Sail to the Booms (Race)
8 Rigging the Outhaul (Race)
9 Rigging the Cunningham (Race)
10 Stepping the Mast: Standard and Race
11 Attaching the Main Halyard: Standard and Race
12 Raising the sail: Standard and Race
13 Rigging the Mainsheet
14 Assembling the Rudder and Tiller
15 Attaching the Rudder: Standard and Race
16 Daggerboard Assembly: Standard and Race
17 De-rigging
18 Sail Care
Page 2
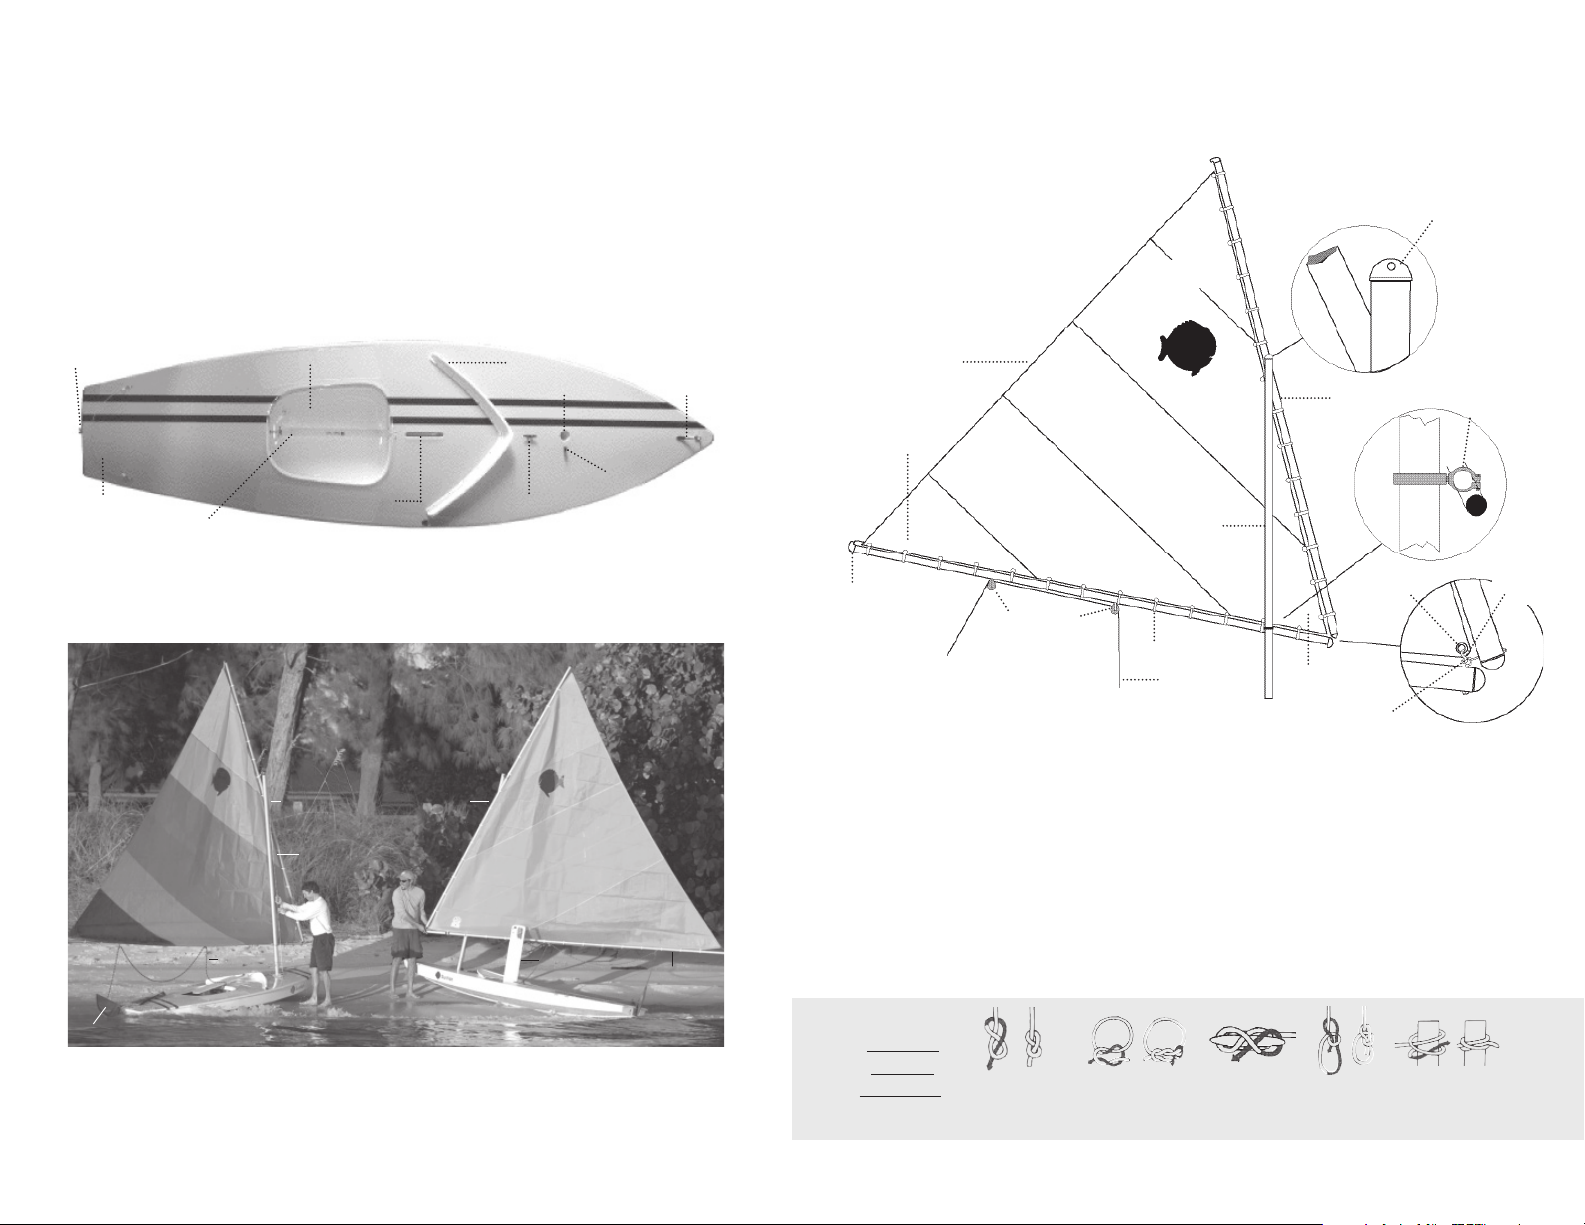
Congratulations on the purchase of your new Sunfi sh!
We suggest that you read through this guide to better familiarize yourself with
the parts and rigging of your Sunfi sh. If you have any questions please contact your
dealer or call LaserPerformance customer ser vice at 1-800-966-SAIL.
2. Parts of the Sail
Mast Cap
1. Parts of the Hull
Gudgeon
STERN
Traveler
Hiking Strap
Automatic Bai ler
COCKPIT
Daggerb oard Wel l Horn Cleat
Mast
Halyard
Upperboom
Coaming
Mast Step
Bow Handle
Bullseye Fairlead
BOW
Head of sail
Leach
Clew of
the Sail
Outhaul and
Corner Ties
(Corner Ties o n
Sunfi sh Ra ce Only)
Boom Blocks
Sail
Foot of the Sail
Sail Rings
Nautical Terminology
Port: Left side of the boat when looking forward
Starboard: Right side of t he boat when looking forward
Gunwale: Upper edge of a boat’s side
Leeward: Direction away from the wind
Windward: Direction from which the wind is coming
Mast
Mainsheet
Tack of
the Sail
Interlocking
Eye Bolts
Lu
Grommet
Gooseneck
S-hook
Rudder
Mainsheet
Daggerboard
Lower Boom
Useful
knots
to know
FIGU RE 8 OR
STOPPER KNOT
SQUARE KNOT
CLEAT
CLOV E HITCHBOWLINE
Page 3
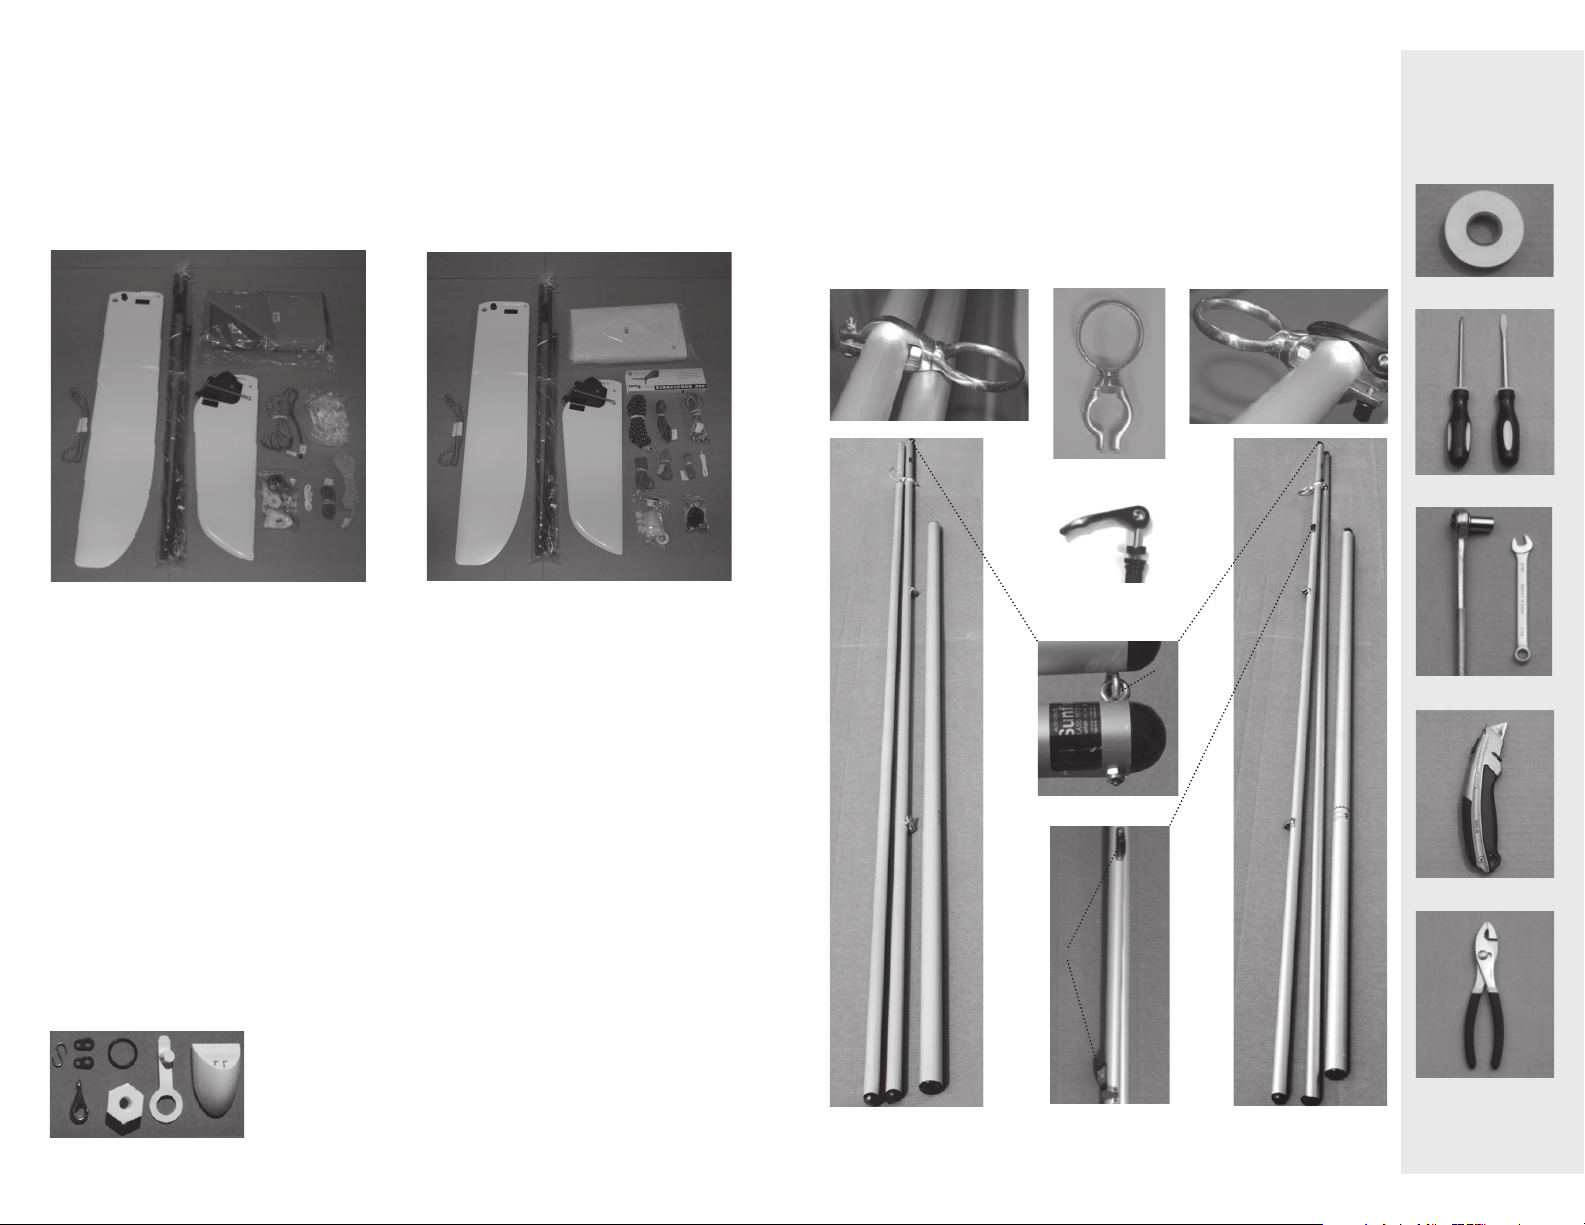
e Sunfi sh is available in two models; Standard and R ace. e Race model comes with
equipment most commonly used for racing.
First: Locate your del ivery k it. Depending on wh ich model you have purchased (Race or Standard)
there will be a few di erences in some of the hardware. Using Figure 1 or 2, ident ify the contents of
your kit. To avoid damaging the contents, be sure not to cut into the packag ing inside the b ox.
Standard Sunfi sh Delivery Kit Race Sunfi sh Delivery Kit
3. Sunfi sh Mast Kit
Locate the mast, upper and lower boom. e upper and lower boom w ill be connec ted
at one end with two interlocking eye bolts (fi gure 3). e gooseneck (fi gure 4) will come
assembled on the lower boom. Depending on the model that you purchased, the gooseneck bolt may di er in appearance. On the Sunfi sh Race model the gooseneck comes
equipped with a qu ick adjust lever (fi gure 5). is lever can easily be released in order to
adjust the positioning of the gooseneck on the lower boom. Also located on the Sunfi sh
Race lower boom are two outhaul cla m cleats (fi gure 6).
Here is a list
of tools needed
to assemble your
new Sunfi sh:
4.
1.
2.
fi gure 1
1. Daggerboard line
2. Daggerboa rd
3. Til ler wit h extension (3 6”),
Rudder bolt, Tiller end caps (4)
4. Colored sail
5. Rudder
6. Mainsheet
7. O uth aul
8. Sail r ings
9. Bailer parts, Brummel hook s (2), Snap shack le,
Main sheet ratchet block
10. Daggerboard retaining line
11. Daggerboard shockcord
12. Halyard
5. 1. 2.
3.
8.
7.
12.
10.
11.
9.
4.
5.
7. 8.
6.
3.
10.
fi gure 2
1. Daggerboard line
2. Daggerboa rd
3. Til ler wit h extension (3 6”),
Rudder bolt, Tiller end caps (4)
4. White Race sail
5. Wind indicator
6. Rudder
7. M ain she et
8. Sail t ies
9. Halyard
10. Daggerboard shockcord
11. Outhaul
12. Cunningham
13. Daggerboard retaining line
14. Ba iler parts, Brummel hooks (2), Snap shack le
15. Mainsheet ratchet block
14.
11.
12.
9.
13.
15.
Sunfi sh Mast Kit Standard Sunfi sh Mast Kit Race
fi gure 4
fi gure 5
INTERLOCKING
EYE BO LTS
fi gure 3
CLEATS
ELECTRICAL TAPE
SCREWDRIVERS
WRENCHES
UTILITY KNIFE
Contents of item # 8
4.
2.
1.
5. 6.
3.
1. S-hook
2. Brummel hook (2)
7.
3. Snap shackle
4. Bailer O-ring
5. Bailer cap
6. Bailer plug
7. B ail er h ou sing
STAN DARD MAS T AND BOOM SE T
Be sure to remove any bubble wrap and plastic coating before rigging.
fi gure 6
RACE M AST AND B OOM SET
PLIERS
Page 4
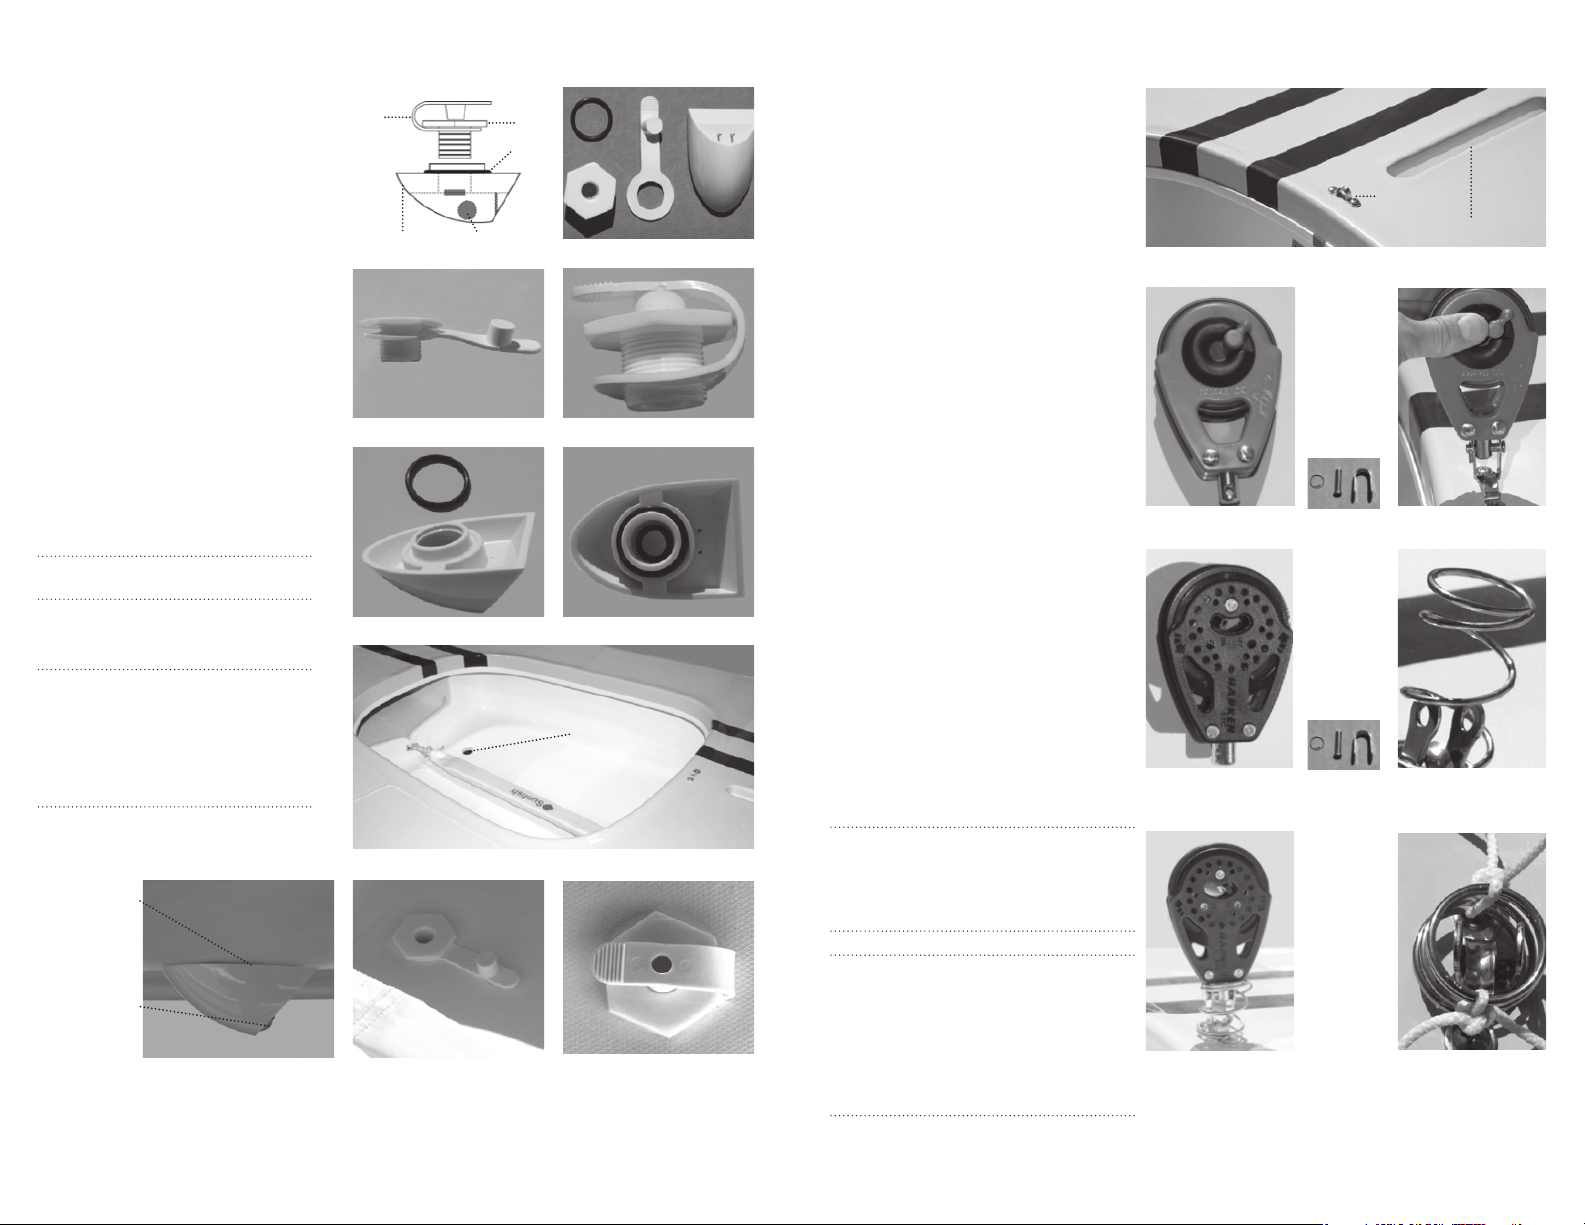
4. Bailer Installation
1. Locate t he bailer O-r ing (A), cap (B), plug
(C) and housing (D) from the deliver y kit
(fi gure 7).
2. Fit the ba iler cap into the hole of the
plug so that the plug stopper faces upward
(fi gure 8). Fold t he rubber plug over the cap
to close (fi gure 9).
3. Locate the bai ler housing and O -ring
(fi gure 10). Place the O-ring over the nec k
of the bai ler and push it down completely
(fi gure 11).
4. Locate the bailer opening in the cockpit
(fi gure 1 2). Take the bailer housing with
O-ring and place it under the hul l, sliding
it up through the cockpit. Make sure that
the bal l in the housing is facing towards
the ster n of the boat (fi gure 13).
5. While holding the housing in place,
thread the bailer cap t hrough the cockpit
hole and into the bailer housing. Tighten
the bailer so that it is hand tight.
Note: e bai ler will not sit fl ush to the b ottom of
the hull.
6. When open, the stopper of the bailer
plug should l ie on the cockpit fl oor pointing towa rds the bow (Fig ure 14).
Reminder: e b ailer let s water out of the co ckpit
while yo u are sailing. In sert the ba iler plug in the
cap be fore launching a nd during sai ling (Figure 15).
If the coc kpit begin s to collect wat er open the bai ler
to relea se the water. Note: th e boat needs to b e
moving q uickly in orde r to allow the wat er to release
and not ta ke on more water at t he same time.
SPACE BET WEEN
HUL L AND BAIL ER
PLUG
CAP
O-RING
A
B
BAILER BA LLBAILER HOUSING
fi gure 8 fi gure 9
fi gure 12
fi gure 7
fi gure 11fi gure 10
BAILER OPENING
5. Ratchet Block Installation
Depend ing on which model Sunfi sh you have
purchased the ratchet block will be d i erent
C
D
in appearance. Fol low the instr uctions below
for your model Sun fi sh. Find the mainsheet
eyestrap located on the deck forward of the
cockpit, aft of the daggerboard well (Figure 16).
is is where you wil l attach the mainsheet
ratchet block.
Standard Kit
1. In the delivery k it locate the ratchet block
(fi gure 17), shackle, pin a nd ring
(fi gure 18).
2. Loop the shack le through the eyestrap a nd
alig n the hole in the shac kle with the
hole in the bottom of the mainsheet bloc k.
Inser t the pin and secure wit h
the ring (fi gure 19).
Race Kit
1. In the delivery k it locate the ratchet block
(fi gure 20), compression spring
(fi gure 2 1), shackle, pin and ring (fi gure 21).
2. Take the shack le and loop it through the
eyestrap. Place the compression spring
over the eyestrap (fi gure 22).
3. While compressing the spring, place the
mainsheet ratchet block at the top of the spring
and align the hole in the bottom of the block
with the holes in the shack le.
4. Secure the R atchet block to the shackle using
the pin and ring
(fi gure 23).
Tip: To assist i n keeping th e spring compr essed while
attach ing the block t o the shackle, tr y compress ing the
spring a nd tie with str ing. Place the t ied spring ove r the
eyes trap and attac h the block. e n untie the str ing and
releas e the spring.
EYESTRAP
DAGGE RBOAR D WELL
fi gure 16
fi gure 18fi gure 17 fi gure 19
fi gure 21fi gure 20 fi gure 22
BALL TOWARD
STERN
Tip: After ri gging the mai nsheet blo ck some racer s prefer
to raise t he height of th e hiking stra p in order to more
easil y get their fee t under aft er a tack. Using a s mall
piece o f line or shockc ord, thread one e nd through the
forward lo op of webbing i n the hiking s trap. Continue th e
fi gure 15fi gure 14fi gure 13
line thro ugh the main sheet block e yestrap (fi gure 21). Be
sure to ti e the line tight ly in order to kee p the strap in th e
fi gure 23 fi gure 24
lifted positio n.
Page 5
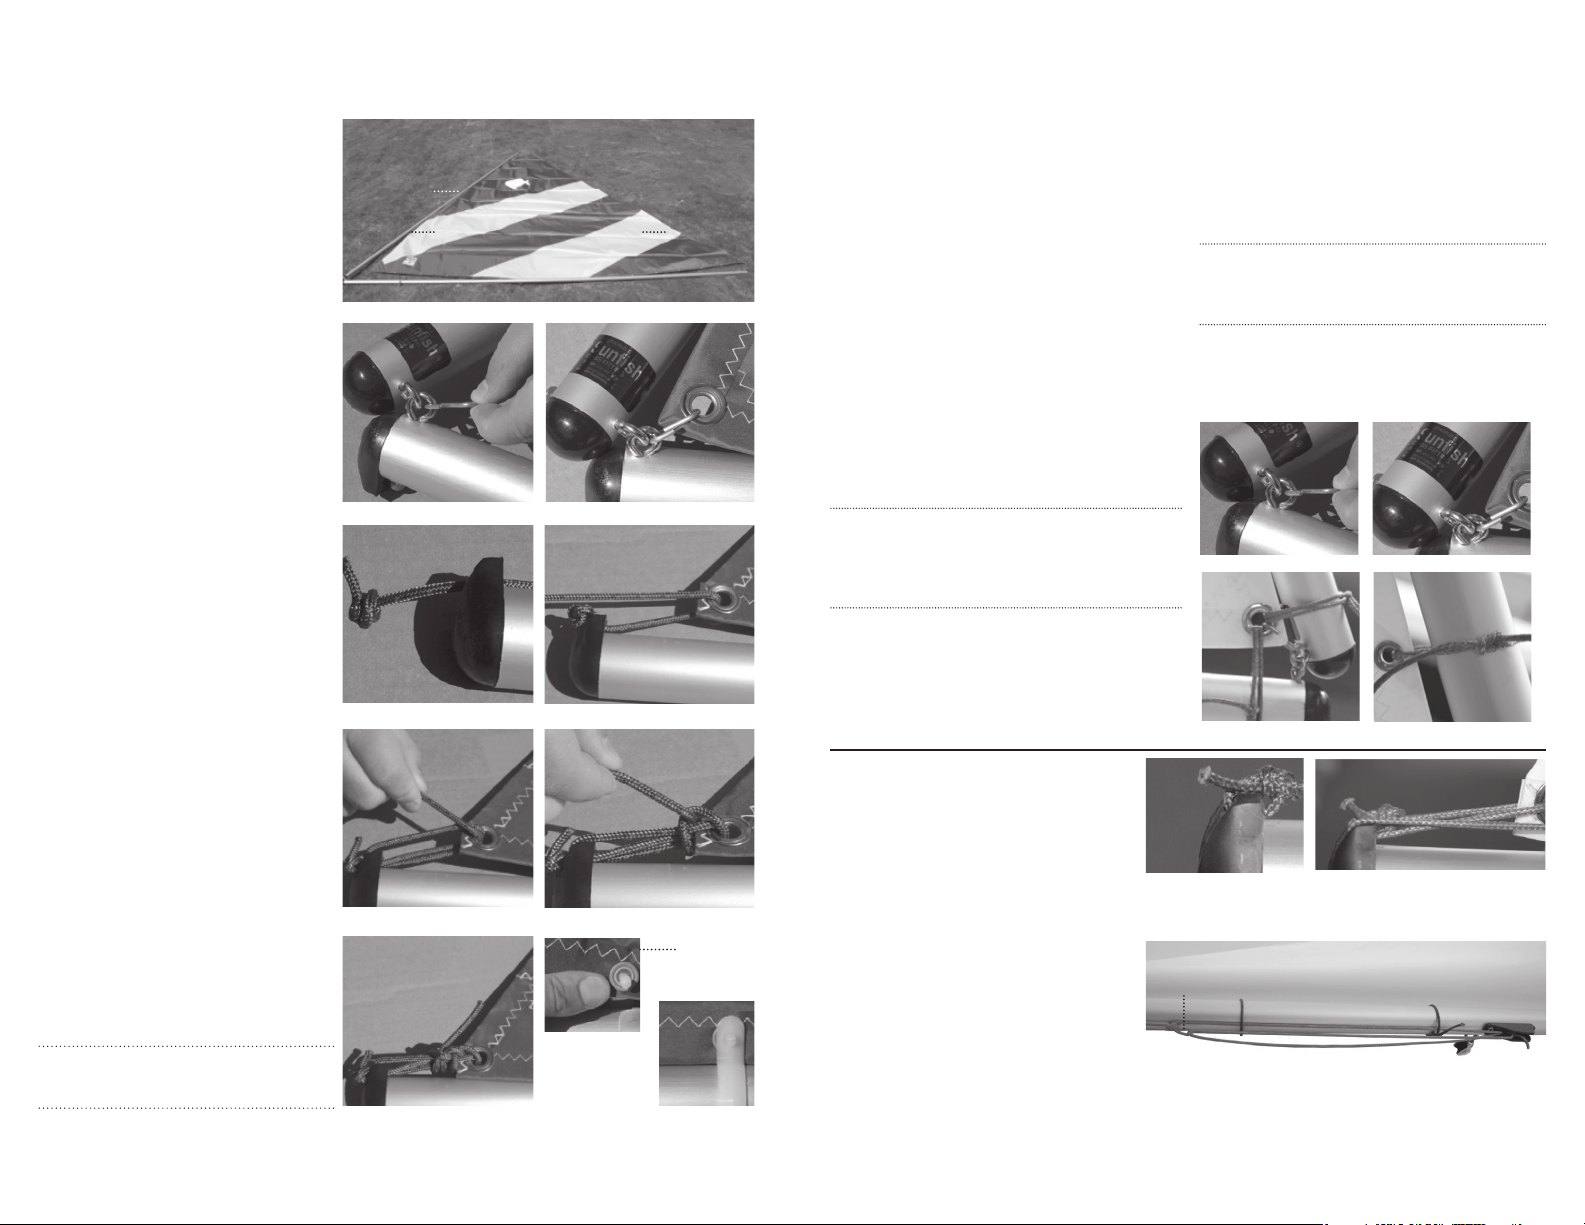
6. Attaching the Sail to the Booms (Standard):
1. From the deliver y kit locate the sa il, upper
and lower booms, S-hook and package of sa il
rings. Remove the t wo outhau l lines from the
line bag.
2. Find a fl at surface free of sharp objects that
you can spread your sail out on.
3. Align the lower boom along the foot of the
sail and the upper boom along the lu (fi gure
25). e Sun fi sh logo shou ld face the upper
boom (the boom that does not have any blocks
attached).
4. e two boom s are att ached together by interlock ing eye bolt s. is corner of the sail is
known as the tack. Take the S-hook and loop
one end through the i nterlocking eye bolt that
is attached to the lower boom (Figure 26).
5. Take the free end of t he S-hook and place it
through the grommet in t he tack of the sail.
Using a pair of pliers, crimp t he S-hook closed
(fi gure 27).
6. Attachi ng the outhaul lines: Starting at
either the head of the sail or the clew (one of
the ends t hat is not yet at tached to the booms)
take one of t he outhaul lines and tie a stopper
knot in the end of it. Feed the free end of the
line through the boom cap (fi gure 28).
7. Continue the line through the grommet
in the sa il (fi gure 29) and then back dow n
through the top cap. Double the line through
the grommet (fi gure 30) and secure w ith a
couple half hitches (fi gure 31). e outhaul
line shou ld be fairly snug (fi gure 32).
UPPER BOOM
LUFF
TACK
fi gure 25
fi gure 26 fi gure 27
fi gure 28 fi gure 29
FOOT OF SAIL
LOWER BOOM
HEAD
LEACH
CLEW
7. Attaching the Sail to the Booms (Race)
1. From the delivery kit locate the sail, upper and lower
boom, S-hook, and sail ties. Remove the c unningham
and outhaul line from the line bag. e white race sail
is attached to the booms w ith sail ties as opposed to sail
rings. ere should be 4 sail ties t hat are longer than
the remaining 32 ties. ese longer ties are the corner
sail ties.
2. Find a fl at surface free of sharp objects where you
can spread our you r sail.
3. Align the lower boom along the foot of the sail and
the upper boom along the lu (refer to fi gure 25). e
Sunfi sh logo should face the upper boom (the boom
that does not have any blocks attached).
4. e two boom s are att ached together by
interlocking eye bolts. Take the S-hook and loop one
end through the interlocking eye bolt that is att ached
to the lower boom (fi gure 34).
Tip: Some racer s use a piece o f line to secure t he sail to the
interlo cking eye bo lt as opposed t o the S-hook. It i s suggest ed to
use a 10” lon g, 2 mm piece of sp ectra that ge ts led throug h the
tack gro mmet and inte rlocking ey e bolt. Wrap the line 2 or 3 t imes
around a nd secure with a sq uare knot.
5. Take the free end of the S-hook a nd place it through
the grommet in the tack of t he sail. Using a pa ir of pliers, cri mp the S-hook closed. Using t he longer corner ties
secure the tack of the sa il to both the upper and lower
booms using separate l ines by wrapping t he line around
twice a nd securing with a square k not (Figure 35).
6. Using one of the longer sail ties in the sail tie
bundle to attac h the head of the sai l to the top end
of the boom. e sa il should not be tied taunt as the
cunn ingham wil l be rigged and used to adjust lu
tension on the Race rig. Rigging the outhaul on the
lower boom is detailed in S ection 8 (fi gure 36).
Tip: Make sure to s et the tie at the h ead of the sail s o that the
sail’s lu tensi on is as loose a s you will want it wh ile sailing.
You will then b e able to adju st the lu tensi on with the
cunningham line.
7. Finish attaching the sail to the booms with the
remai ning sail ties. For each grommet in the sail,
tie one sa il tie a round t he boom a nd through the
grommet. Secu re with a square knot (fi gure 37).
fi gure 34 fi gure 35
fi gure 36
8. Rigging the Outhaul (Race):
1. Using the outhaul line, tie a bowline to the
lower boom end cap (fi gure 38).
fi gure 37
8. Repeat the same procedures for the second
outhaul.
9. Secure the rem ainder of the sail to the
booms using the sail r ings. Locate a grommet, place the sail ring a round t he boom,
inser t the grommet between the openi ngs of
the ring and press fi rmly to secure (fi gures 33
and 34).
Tip: Pliers may b e helpful whe n closing the sa il rings.
Howev er use cautio n, as they can e asily scratc h the
booms.
fi gure 30 fi gure 31
fi gure 33
fi gure 32
GROMMET
fi gure 34
2. Lead the free end of the line through
the grommet in the sail and back through
the boom end cap (fi gure 39). Continue the
line for ward down the boom to the a ft most
boom cleat.
3. Tie an overhand knot in the out haul
two sai l ties before the boom cleat. Lead
the outhaul line through the two sail ties
and through the cleat (Figure 40).
4. Lead the line back through the overhand
knot and back for ward t hrough the cleat. Cleat
o and tie a large bowline handle in the end
(fi gure 40).
fi gure 38
1. TIE
OVER HAND
KNOT
4. THROUGH
OVER HAND
fi gure 40
KNOT
fi gure 39
2. LEAD LINE
UNDE R SAIL TIE S
5. BACK THR OUGH
CLEAT
3. THROUGH
CLEAT
6. CL EAT OFF AND T IE
A BOWLINE HANDLEKNOT
Page 6
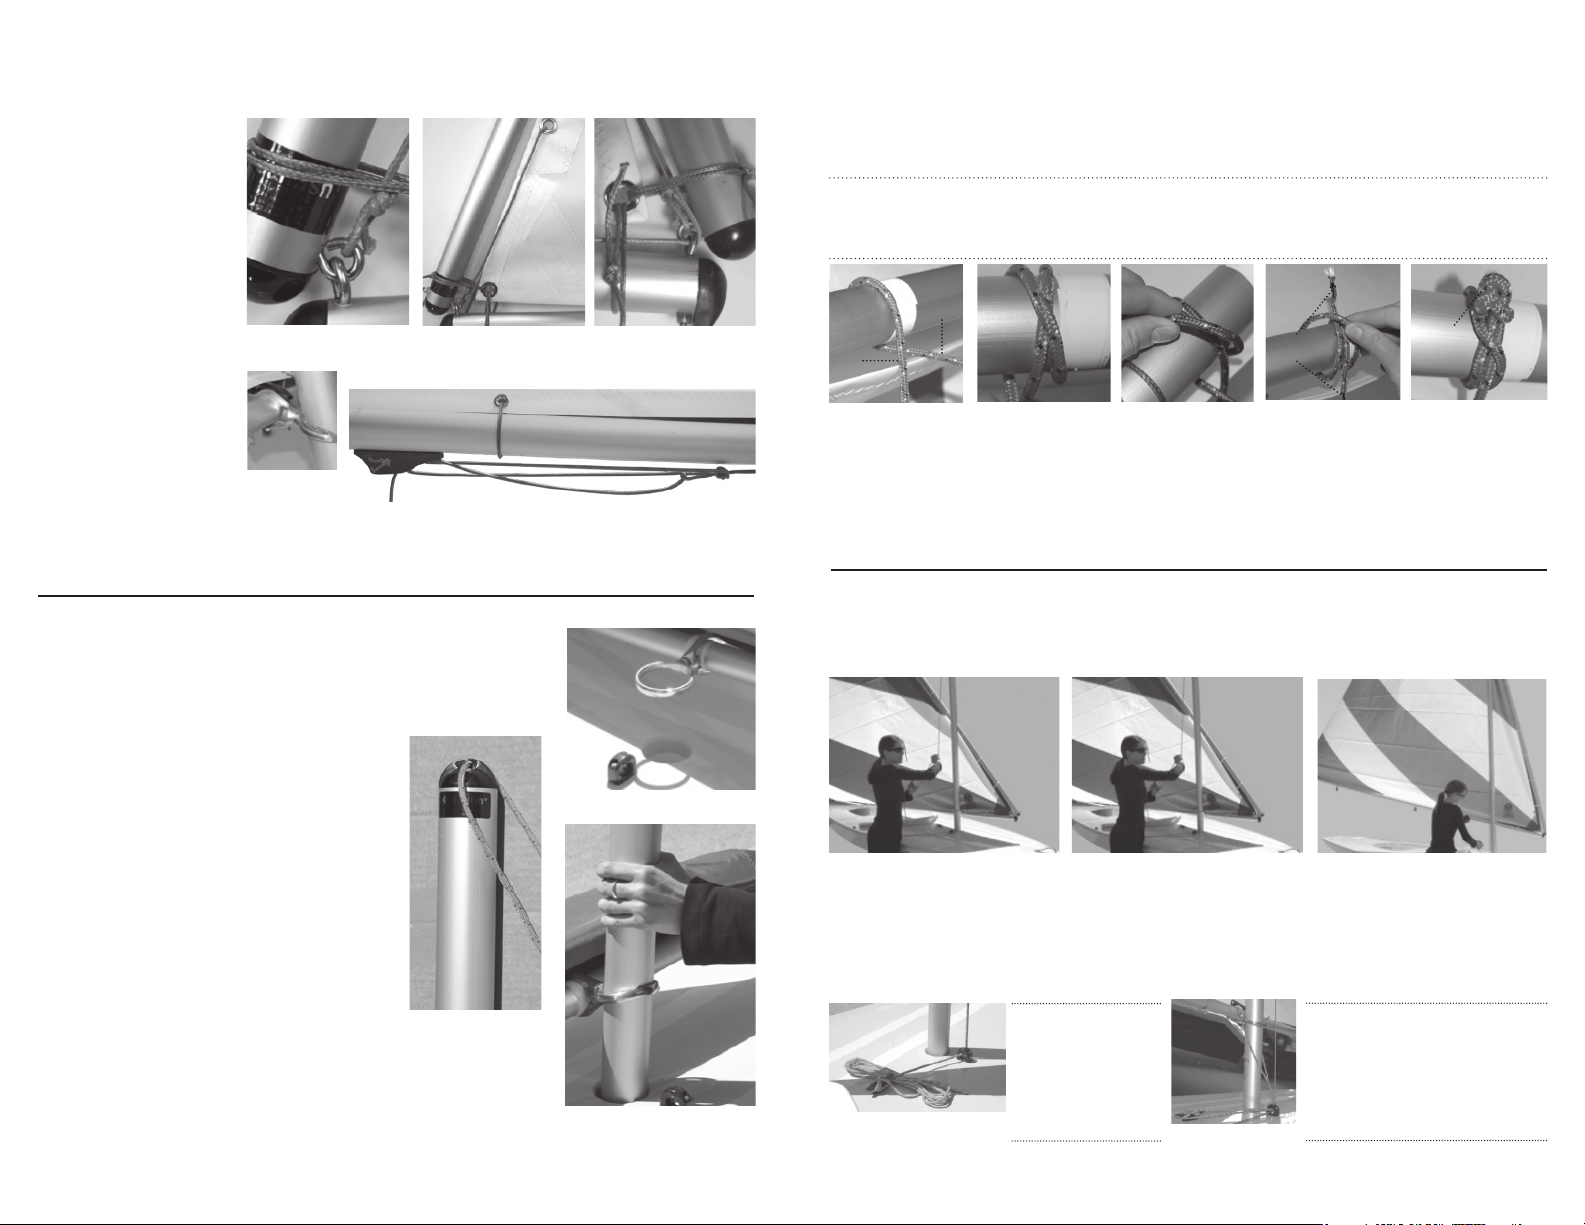
9. Rigging the Cunningham (Race)
1. Using the c unningham
line, tie a bowline to the
interlocking eyebolt of the
upper boom (fi gure 41).
2. Lead the l ine through the
grommet in the tack of the
sail (fi gure 42) and
continue it down through
the interlocking eye bolt in
the lower boom (fi gure 43).
3. Feed the line th rough the
opening in the gooseneck
that retains t he lower boom.
Just forward of the mast, tie
an overha nd knot (fi gure 44).
4. Lead the line through the
forward most cleat and back
through the overhand knot.
Cleat o and tie a bowl ine
handle with the remainder
of the line (fi gure 45).
fi gure 41
fi gure 44
fi gure 45
fi gure 42
2. LEAD LINE
THRO UGH CLEAT
4. BACK T HROUGH CLE AT
10. Stepping the Mast: Standard and Race
1. Locate the mast, a s well as the main halyard from the
line bag. read one half of the halyard through the hole
in the ma st top cap (fi gure 46).
fi gure 43
1. TIE OV ERHA ND
KNOT
3. THROUGH
OVER HAND
KNOT
11. Attaching the Main Halyard: Standard and Race
e main halyard is secured to t he upper boom with a clove hitch. It is suggested that you place three wraps of
elect rica l tape around the upper booms between the n inth and tenth sail ring (counting from the tack of t he
sail upward). e tape helps keep the halyard from sl ipping up to the next sail ring or sail tie.
Note: Tyi ng the halyard be tween the 9t h and 10th sail r ing is only a sug gestion for t he halyard locati on. You can play with th e location
of the haly ard to raise or lowe r the boom dep ending on yo ur comfort or wi nd strengt h. It is highly su ggested no t to tie the halyard up
much far ther; raisi ng the boom too fa r o the de ck may cause th e mast to ben d. For furth er information o n tuning your S unfi sh visit the
class a ssociatio n at www.sunfi shclass.org.
TAIL
FALL
1. Find one end of the
halyard (tail) and
wrap it around the
upper boom just below the electr ical
tape; leaving about a
foot long tail to complete the clove hitch.
2. Lead the tail of the
halyard over the fall
( e fall is t he
remainder of the h alyard) and a round the
upper boom again.
3. Where the tail
crosses over the fa ll
it forms an X. Pull up
on the line that creates the top of t he X.
PULL TO
TIGHTEN
4. Lead the tail under
the line you are pu lling up on. Pu ll on the
tail a nd fall in order
to tighten around the
boom.
FIGURE
8 KNOT
5. Tie a fi gure 8 knot
in the end of t he
tail.
12. Raising the sail: Standard and Race
Before ra ising the sail make sure th at the bow of t he boat is pointing into the w ind and you are clear of obstacles
that the boom might hit. Be sure to have the mainsheet and mainsheet snap shackle on hand as they w ill be the
next parts to assemble.
2. Before stepping the mast make sure that there are
NO OVERHEAD WIRES in the area or leading to the
launching site!
3. Make sure that the mast step hole a nd mast heal are
perfec tly clean. Any sand, dirt, etc. in t he mast step
will grind into the gelcoat and eventually damage t he
boat.
4. Lay the booms and sail on t he deck of t he Sun fi sh.
Alig n the gooseneck on the lower boom over the mast
step hole (Figure 47).
5. Holding onto both end s of the ha lyard, lift the mast
up setting the hea l of the mast through the gooseneck
ring. Sl ide the m ast into the mast tube (fi gure 48). Be
careful not to drop the mast into the tube for damage
to the mast step will occur!
fi gure 46
fi gure 47
fi gure 48
1. Begin raising the sail by pulling
down on the halya rd.
Tip: It is sugg ested to coi l
up the rem aining tail o f the
halyard an d place it under
the tau ght halyard sec tion
on the de ck. is will keep
the halya rd from dragging
in the wate r.
2. You will nee d to assist the lower
boom o the deck by raising t he boom
close to t he gooseneck whi le pulling
on the halyard. Continue to pull on
the halyard unt il the upper boom is
right against the top of the mast.
3. Lead the tail of the halyard
through the main halyard fairlead
on the deck. Tie o the halyard to
the main halyard cleat.
Optional: How to create a vang with the
tail of your halyard. After cleat ing o the
halyard lea d the free end of th e line through
the fairle ad, around the m ast above th e
goosen eck, and back t hrough the fairl ead.
Some race rs attach th e free end of the lin e to
the daggerboard.
Page 7
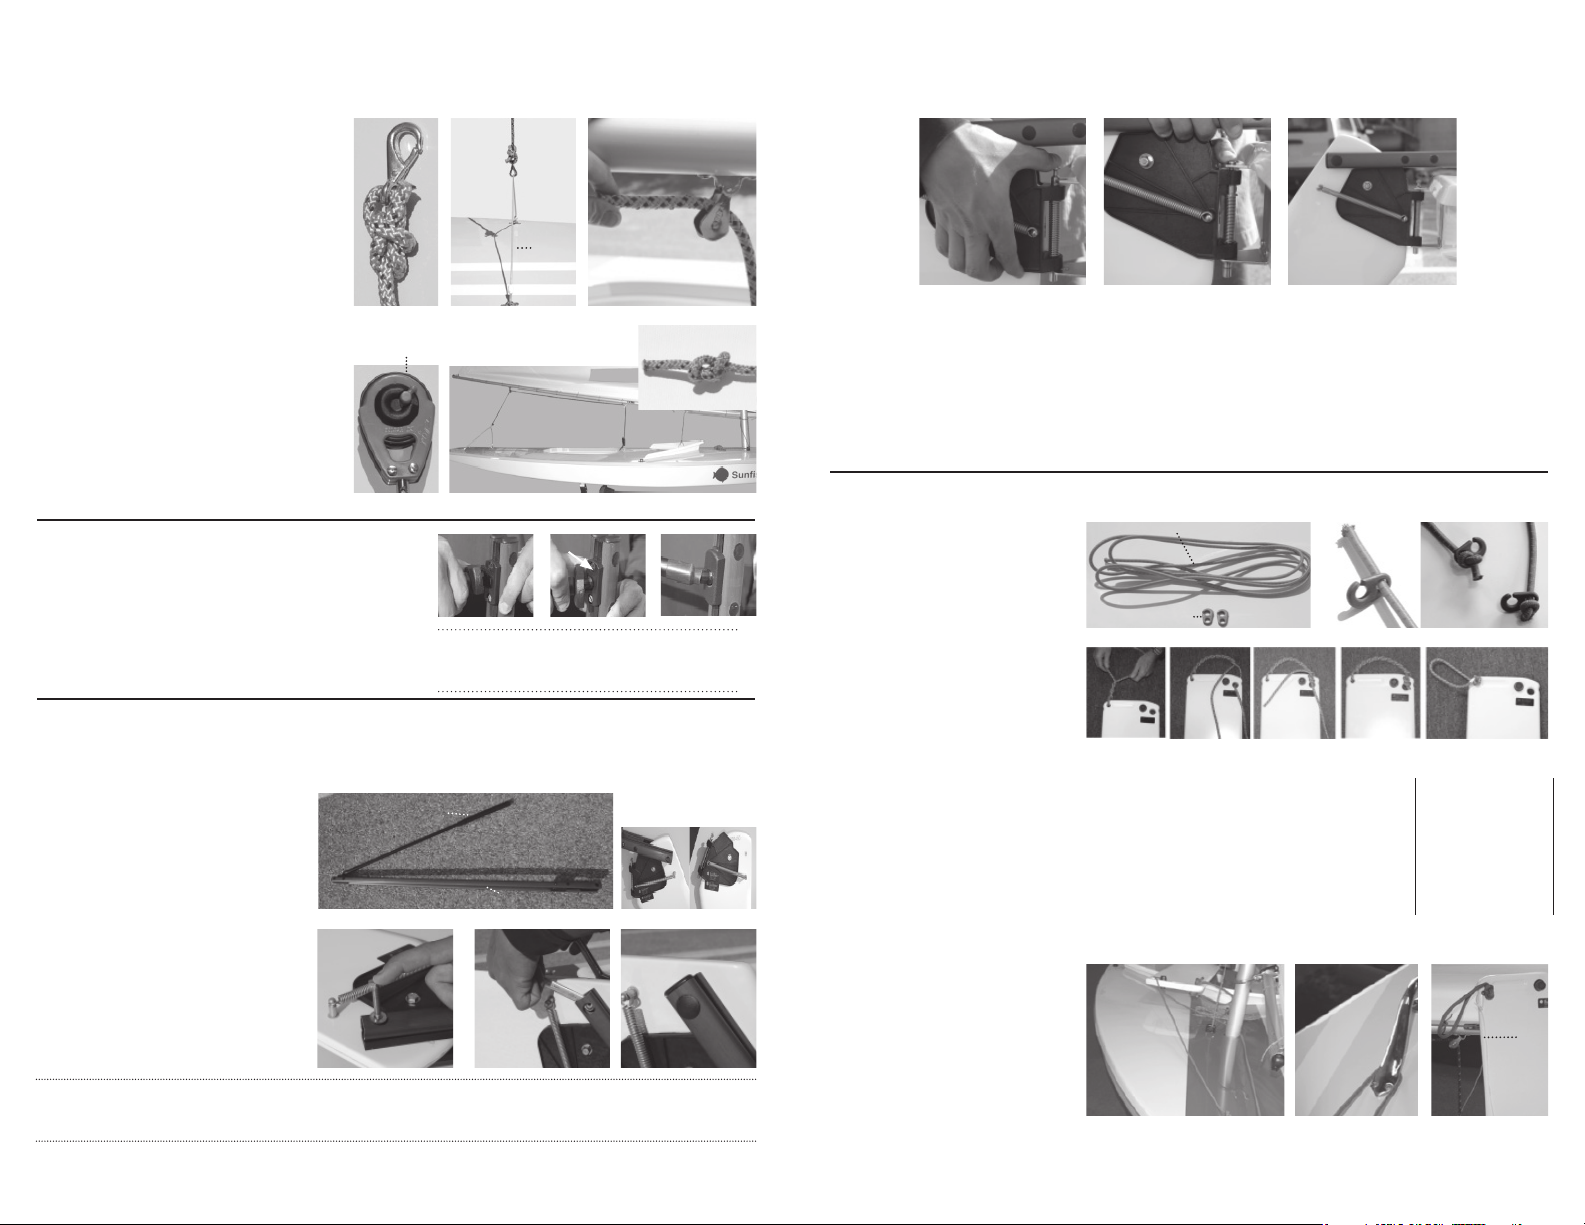
13. Rigging the Mainsheet
1. Retrieve the mainsheet from the line bag. Tie
a bowline to the mainsheet snap shackle w ith
one end of the mainsheet (fi gure 49).
2. Snap the mainsheet shackle onto the bridle
(fi gure 50).
3. Feed the free end of the mainsheet up and
through the aft most boom block and continue
toward s the bow along the boom, making sure
to go through the second boom block before
leading down to t he mainsheet block attached
to the dec k (fi gure 51).
4. Lead the line down through the ratchet
block. Making sure that while pull ing in t he
mainsheet the block ma kes a ratcheting noise.
If the block does not make a ratchet sound one
of two things could be the problem. First try
running the mainsheet through the block the
opposite way. If this does not work, locate the
lever on the mainsheet bloc k and sw itch it to
the ratchet position (fi gure 52).
fi gure
LEVER
fi gure 52
49
COMPLETE MAINSHEET
fi gure 50 fi gure 51
BRIDL E
fi gure 53
14. Tiller Extension Assembly
1. Insert tab of t iller extension into slot of tiller extension
mount, this should slide in w ith a snug fi t.
2. Once tiller exten sion tab is fully inserted into the mount,
alig n the mount cover and push down on mount to sec ure
fi tting.
Tip: Some sail ors wrap vinyl ele ctrical ta pe around bot h
ends of t he mount and ti ller to ensur e the exten sion does
not dis connect whi le sailing.
15. Assembling the Rudder and Tiller
Locate the rudder and tiller from the deliver y kit. Remove the tiller bolt and
the two plastic w ashers from the end of the black tiller straps.
1. Align t he hole in the end of the tiller with
that of the rudder head. e contour of
the tiller shou ld match that of the r udder
cheek.
2. Align the washer and bolt and inser t into
the end hole of t he tiller twisting it through
to the other end.
3. Align the second washer and lock nut on
the end of the bolt and using a 7/16” socket
head dr iver and 7/16” crescent w rench complete the install of the r udder head bolt.
4. Place the pla stic end caps on tiller ends
and rubber bolt holes.
Tip: Becaus e the socket o f the wrench wil l need to fi t into the out er hole of the ti ller, be sure you are u sing a socke t with a thin oute r wall.
On the oth er end, place t he closed (circular) en d of the cresce nt wrench in the ti ller end and the n place the loc k nut in the wrench before
screwi ng the bolt all th e way through.
TILLER EXTENSION
UNIVERSAL
TILLER
16. Attaching the Rudder: Standard and Race
1. Slide the t iller and
extension underneath the
wire br idle. e pintle pin
will have two indentations
that align with the two
notches in the gudgeon
(located on the ster n of the
boat). Alig n the pintle pin
with the gudgeon notches.
2. Press down on the top
of the pintle pin
(compressing the pintle
spring) and slide the pin’s
indentations into the
gudgeon.
3. Release the pin. e
rudder should now be
securely attached to the
boat. e r udder should be
able to pivot from side to
side easi ly. Leave the rudder in the kicked up position prior to launching.
17. Daggerboard Assembly: Standard and Race
1.Locate t he daggerboard, bungee
line, ret ainer line, daggerboard
handle line and brummel hooks (2)
from the line bag a nd delivery kit
(fi gure 54).
2. With a stopper knot, attach the
brummel hooks to each end of t he
bungee (fi gure 55).
3. read the daggerboard handle line
through the aft hole of the daggerboard head. ere are 2 suggestions for
tying the handle. Use fi gures 56 - 60.
4. read one of the brummel hooks
through the hole in the daggerboard.
5. Lead the ends of the bungee a round
the mast (fi gure 61) and through the
bow handle. Connect the two brummels (fi gure 62).
6. When you are ready to launch, slide
the daggerboard into the daggerboard
well. e bungee should be facing the
bow while the retaining line faces
the cockpit (fi gure 63). Tie a bowline
with the daggerboard retainer line to
the aft hole of the handle in the daggerboard. With the free end of the line
tie a bowline to the main sheet block
eyestrap
BUNGEE LINE
BRUMM EL HOOKS
fi gure 54 fi gure 55
fi gure 56
Find the center of the daggerboard h andle line.
Pass one end of the line through either hole and
place the center of the l ine at the hole. Twist the
two sides of t he line around each other (fi gure
56). When a su cient handle is made by the
twisting, thread one end of the line through the
opposite hole (fi gure 57). Secure with a square
knot (fi gure 58). Using a hot kn ife cut the ends of
the knot to a desired lengt h (fi gure 59).
fi gure 61 fi gure 62 fi gure 63
fi gure 57 fi gure 58 fi gure 59 fi gure 60
4. e Sunfi sh Race rudder
attachment is the same as
the standard Sunfi sh. e
only di erence between
the two models is the
rudder blade materials.
read o ne end of the
handle li ne through t he
aft hol e and tie a sto pper
knot. Co ntinue the li ne
back thr ough the hol e
and tie a s topper kn ot on
the oppo site side. Pu ll
tight. Cut excess line.
RETAINING
LINE
Page 8
18. De-rigging
When you approach shallow w ater, begin to pull up the daggerboa rd as much as possible without obstr ucting
the boom a nd kick up the rudder. After hopping out of t he boat, detach the main sheet shackle from the bridle
line. Remove the daggerboard and place it in the cockpit. It is suggested to rinse you r boat and sails with fresh
water especia lly if you are sai ling in salt water. It is also suggested to allow the sail to d ry before roll ing. After
dry ing, pul l the sa il out taught and roll it up against the booms, sec uring both t he sails and booms to the deck
with the mainsheet.
It is highly suggested to purchase covers for both the hu ll and blades in order to protect you r boat from n atural
elements. A wide variety of accessories are available for purchase through your local L aserPerformance dealer.
19. Sail Care
It is impor tant to t ake proper care of your sai l to ensure it will last longer and to provide the best perfor mance.
Follow these simple tips to help extend the life of your sail.
1. If you are sailing in sa lt water, be sure to rinse out your sail w ith fresh water after ever y use. Dacron sails do
not absorb water or salt but the salt will dry on the sai ls making t hem sti . e salt in humid weather can attract moistu re that m ay cause it mildew to g row.
2. NEVER machine wash your sails. Doing so will da mage the mater ial a s well as remove the
fi nish of the sail. If your sa il becomes dirty, clean it with a mild dish detergent a nd rin se with fresh water.
Do not bleach or use other harsh chemicals on t he sail–they can ruin the fi nish, decreasing the li fe of
the sail. It is not recommended to store your sail wet, doing so is an invitation for mildew to grow.
3. It is not recommended to dry your sai l in the sun because other than when in use, over e xposure of UV rays
will slowly break down the material of the sail. Be aware of the surface that you are dr ying your sail on as
asphalt and other parking lot surfaces are ver y abrasive to the sail material and may contain chemicals (i. e. oil)
that can damage the sa il. Avoid unnecessary fl ogging for it wi ll greatly reduce the li fe of the sail.
Owner Information
hull identifi cation number
purchased from date of purchase
contact name phone #
address:
city / state / county zip / postal code
hull color: sail #:
4. Rolling your sail is highly recommended. Cru mpling a sail will cr ack the fi nish of the material which quickly
reduces the life of the sail. Purchasing a Sunfi sh sail and spar bag is highly recommended and are available
through your local dea ler.
5. Make sure to reg ularly inspect your sail for loose or tor n stitching or small tears in the clot h. Have any
stitching or tea rs repa ired by a local sailmaker before they become more of a problem.
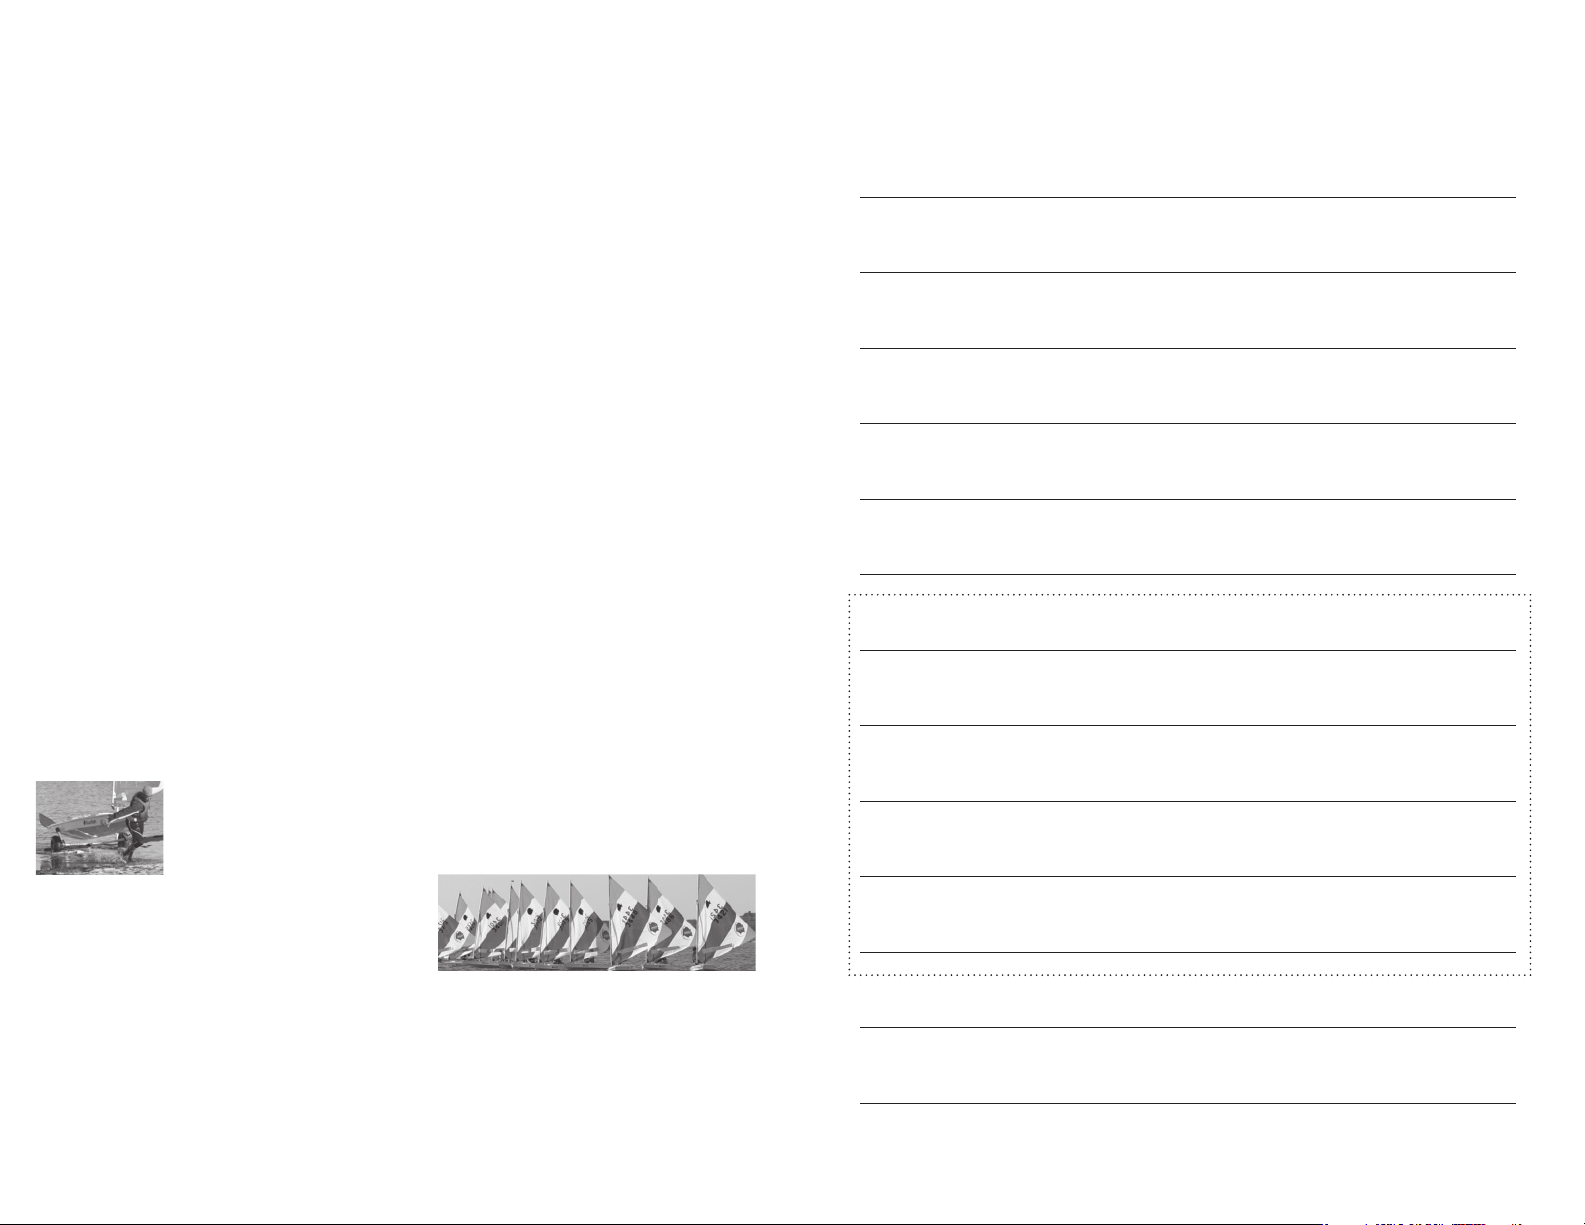
SEITECH dollies are t he easy-to-use, light-weight, small boat transportat ion solution.
e Sun fi sh dolly has been designed specifi cally to fi t and support the shape of the hu ll.
SEIT ECH dollies a llow you to spend less time getting your boat to and from the water and
more time on the water. Visit ww w.seitech.com.
Sunfi sh Class Association
For more in formation and to link to Sunfi sh sailors around
the world, join t he Sun fi sh Class Association at www.sunfi shclass.org.
LaserPerformance equips the Sunfi sh with t he highest quality pa rts available. We partner with key suppliers
to develop top-of-the-line sailing equipment so your boat will per form at the highest level possible when sa iled
with the factor y supplied rope, sails and hardware. Shop online at laserperfor mance.com or at an authorized
LaserPerfor mance dealer to be sure you are getting genuine LaserPerfor mance part s and accessories.
Visit www.laserperformance.com to fi nd your local dealer.
registration information (if applicable)
trai ler vin #
license plate number
registration number state / county registered in
insurance information
maintenance
Page 9

LaserPerformance NORTH AMERICA
300 Highpoint Avenue
Portsmouth, R hode Island 0287 1
t +1 800 966 SAIL
f +1 401 683 0990
LaserPerformance
EUROPE
Station Works, Long Buckby
Northamptonshire NN6 7PF
United Kingdom
t +44 (0) 1327 84160 0
f +44 (0) 1327 841601
LaserPerformance
ASIA
Room 3415
China Merchants Tower
Shun Tak Centre
No. 168-200 Connaught Road Central
Hong Kong
t +852 2902 2818
f +852 2587 7868
LaserPerformance
AUST RALIA
t +61 (0) 3 9016 4151
LaserPerformance
MIDDLE EAST
T5 Midd le East LLC
Knotika Marine Mall, Sheikh Zayed Road
PO Box 54070
Dubai, UAE
t +971 (4) 3039 840
f +971 (4) 3039 839
LASERPERFORMANCE.COM
All rights reserved. ©2008 LaserPerformance.
LaserPerformance and associated logos are
trademarks. Laser, SB3, Sunfi sh, and Dart
are trademarks used under license.
LaserPerformance reserves the right to make
design and/or specifi cation changes to any
of their products as part of their continuous
development program.
 Loading...