

LaserLyte TLB-BEK User Manual
1
1
2
3
TRIGGER TYME™ PISTOL
• This training pistol cannot be fired. Please respect all
•
For use with the LaserLyte® LT-PRO Universal Laser Trainer
Instructions for use:
Make the LT-PRO ready and insert into the barrel of the
Trigger Tyme™ Pistol.
Pull the trigger to activate the laser.
Ensure the LT-PRO
is snug in the barrel.
Aim in a safe direction and shoot the laser at desired
targets.
LT-TT & LT-TTC
2
®
Reaction Tyme
3
®
Works great with LaserLyte targets.
-
Laser Target, TLB-1: 62 LEDs light up on target, showing the shots
- Reaction Tyme, TLB-RT:
2 training modes, active reaction training
Reaction Tyme
- Laser Plinking Cans, TLB-BWC
Pistol Laser Trainer
Installation:
THE BATTERIES ARE ALREADY INSTALLED,
YOU MUST REMOVE A PIECE OF PLASTIC
INSULATOR BEFORE OPERATION
UNLOAD YOUR FIREARM!
Remove plastic insulator from batteries.
Insert screw through adapter and thread
into taper of trainer.
Tighten or loosen screw for caliber fit.
Gently press the trainer into the muzzle of
the pistol.
Ready your pistol and pull trigger to fire
red laser dot. (LaserLyte recommends
the use of snap caps.)
When removing from your pistol, pull
straight out! Do not twist! Ensure all parts
are out of barrel
When not in use remove batteries and
insert insulator for storage.
1
2
Batteries: (3) 377
Unscrew Battery cap.
Remove batteries.
Install new batteries.
Tighten battery cap.
1
2
3
4
3
4
6
7
8
5
LT-PRO
Training with
the LT-PRO
will improve:
• Trigger Control
• Unsighted Fire /
Point and Shoot
• Shooting from the
Holster
• Precision Shooting
• Unorthodox Shooting
Positions
STOP
+ + +
insulator
Pistol Laser Trainer
Installation:
THE BATTERIES ARE ALREADY INSTALLED,
YOU MUST REMOVE A PIECE OF PLASTIC
INSULATOR BEFORE OPERATION
UNLOAD YOUR FIREARM!
Remove plastic insulator from batteries.
Insert screw through adapter and thread
into taper of trainer.
Tighten or loosen screw for caliber fit.
Gently press the trainer into the muzzle of
the pistol.
Ready your pistol and pull trigger to fire
red laser dot. (LaserLyte recommends
the use of snap caps.)
When removing from your pistol, pull
straight out! Do not twist! Ensure all parts
are out of barrel
When not in use remove batteries and
insert insulator for storage.
1
2
Batteries: (3) 377
Unscrew Battery cap.
Remove batteries.
Install new batteries.
Tighten battery cap.
1
2
3
4
3
2
3
4
4
6
7
8
5
DANGER
LASER LIGHT
AVOID DIRECT EYE EXPOSURE
POWER OUTPUT < 5mw
WAVELENGTH 630-670mm
CLASS IIIa PRODUCT
®
A Division of P&L Industries
101 Airpark Road - Cottonwood, AZ 86326
Phone 928-649-3201 - Fax 928-649-3970
www.LaserLyte.com
LT-PRO
WARRANTY:
One Year Limited
Warranty.
Training with
the LT-PRO
will improve:
• Trigger Control
• Unsighted Fire /
Point and Shoot
• Shooting from the
Holster
• Precision Shooting
• Unorthodox Shooting
Positions
STOP
+ + +
insulator
Batteries: (3) 377
Batteries: (3) 377
Batteries: (3) 377
Unscrew Battery cap.
Remove batteries.
Install new batteries.
Tighten battery cap.
1
2
3
4
When not in use:
Unscrew adapter.
Insert into LT-PRO as shown.
7
8
Pistol Laser Trainer
Installation:
THE BATTERIES ARE ALREADY INSTALLED,
YOU MUST REMOVE A PIECE OF PLASTIC
INSULATOR BEFORE OPERATION
UNLOAD YOUR FIREARM!
Remove plastic insulator from batteries.
Insert screw through adapter and thread
into taper of trainer.
Tighten or loosen screw for caliber fit.
Gently press the trainer into the muzzle of
the pistol.
Ready your pistol and pull trigger to fire
red laser dot. (LaserLyte recommends
the use of snap caps.)
When removing from your pistol, pull
straight out! Do not twist! Ensure all parts
are out of barrel
When not in use remove batteries and
insert insulator for storage.
Batteries: (3) 377
Unscrew Battery cap.
Remove batteries.
Install new batteries.
Tighten battery cap.
1
2
3
4
DANGER
LASER LIGHT
AVOID DIRECT EYE EXPOSURE
POWER OUTPUT < 5mw
WAVELENGTH 630-670mm
CLASS IIIa PRODUCT
®
A Division of P&L Industries
101 Airpark Road - Cottonwood, AZ 86326
LT-PRO
WARRANTY:
One Year Limited
Warranty.
Training with
the LT-PRO
will improve:
• Trigger Control
• Unsighted Fire /
Point and Shoot
• Shooting from the
Holster
• Precision Shooting
• Unorthodox Shooting
Positions
Correct removal
NO
NO
+ + +
insulator
Laser Trainer Pro
LT-PRO
LT-PRO Adapter Plug Screw Hex Key
TRIGGER TYME™ PISTOL
LT-TT & LT-TTC
REV 0214
Questions or Problems?
Contact:
LASERLYTE
928-649-3201
INFO@LASERLYTE.COM
OurLimited3yearWarrantyisonlyvalidwithintheUnitedStates.
• LaserLyteoffersa3yearlimitedwarranty.
• Ifyoufindyourproductdefectivedueto
manufacturersdefectwewillfixorreplacethe
itematnocharge.
• Ifyourwarrantyexpiredyoumaystillsenditin
toberepairedforafee.
_________________________________________
TAMPERINGWITHORMODIFYINGTHELASERLYTE
PRODUCTINANYWAY,WILLVOIDWARRANTY.
AllreturnsmusthaveaReturnAuthorizationNumber
writtenclearlyontheoutsideofthepackage.To
obtainaReturnAuthorizationNumberplease
call(928)6493201andspeakwithCustomerService.
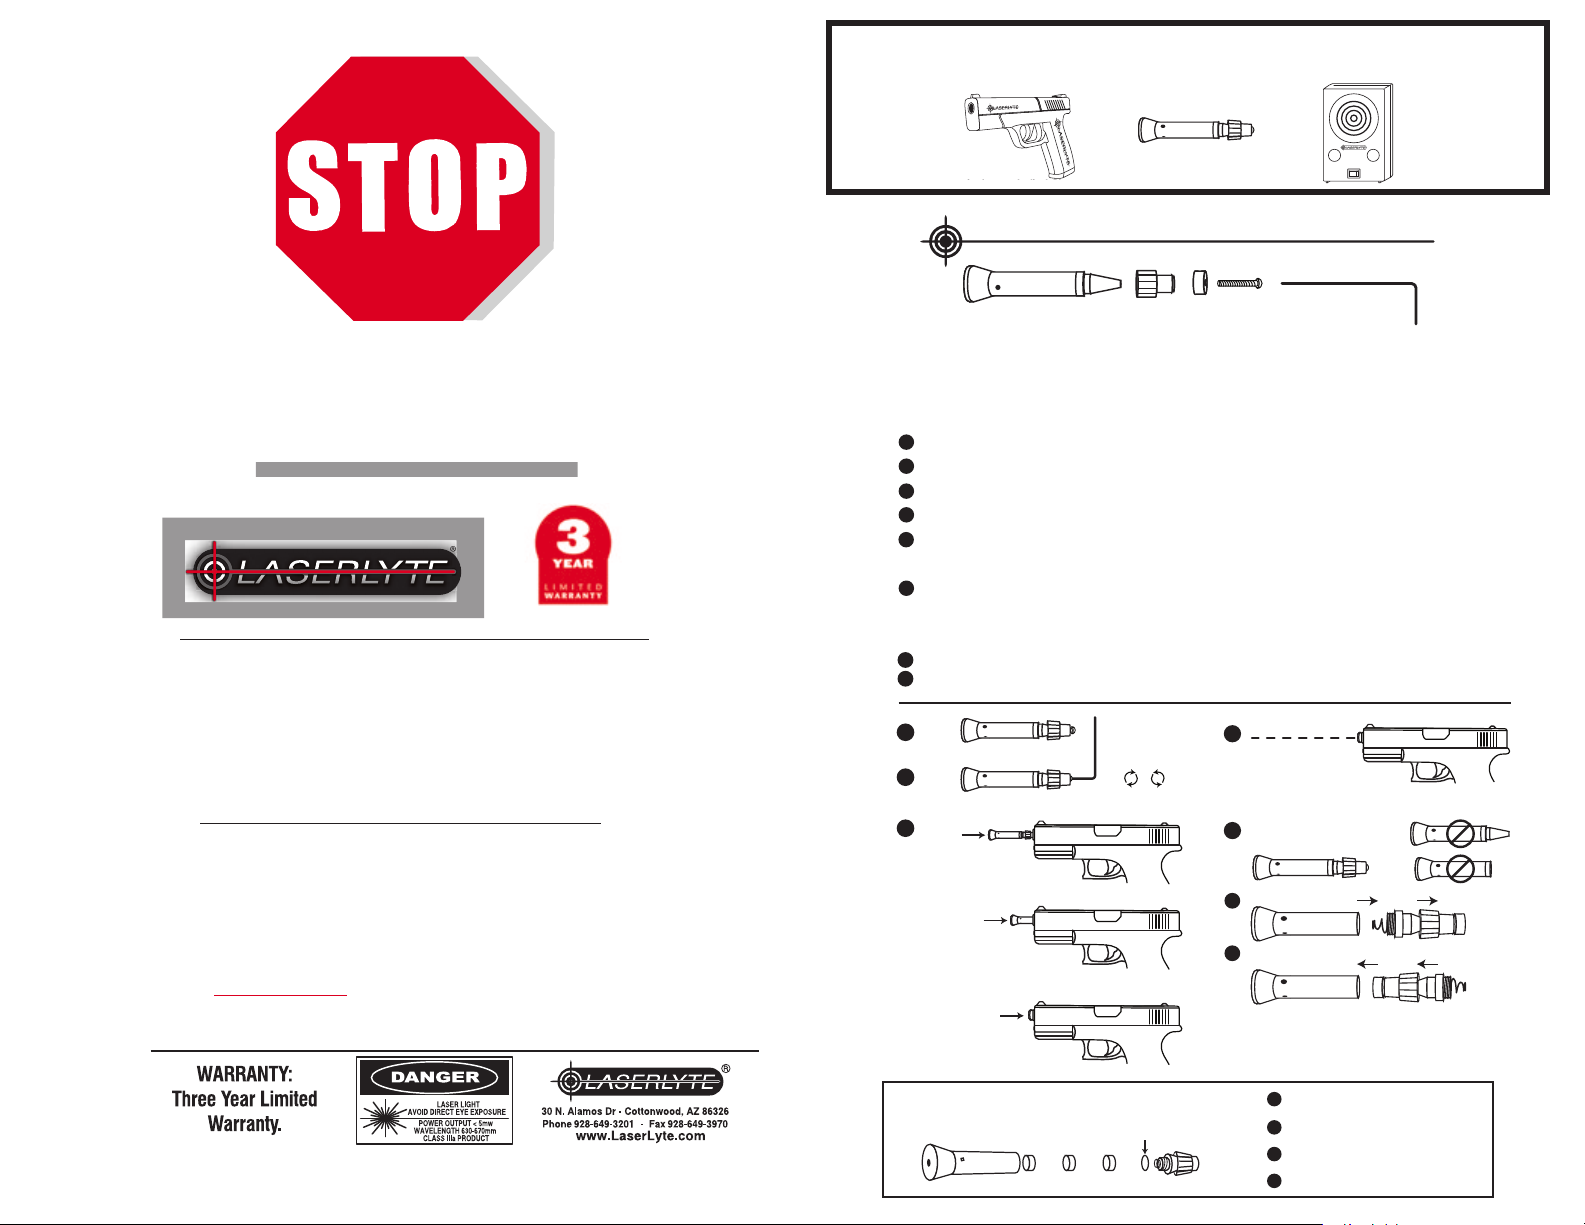
BULLSEYE TRAINING KIT
®
Laser
Target
Display
Reset
OFF ON
TLB-1
TLB-BEK
Laser Trainer Pro
LT-PRO
LT-PRO Adapter Plug Screw Hex Key
THE SOUND ACTIVATED SWITCH IS ALWAYS LISTENING
•
THE BATTERIES ARE ALREADY INSTALLED. YOU MUST REMOVE THE
•
PLASTIC INSULATOR BEFORE OPERATION. SEE BATTERIES SECTION
FOR INSTRUCTIONS.
Installation:
UNLOAD YOUR FIREARM!
1
2
Insert screw through plug & adapter and thread into taper of trainer as shown above.
Tighten or loosen screw for caliber fit.
3
4
Gently press the trainer into the muzzle of the pistol.
Ready your pistol and pull trigger to fire red laser dot.
5
(LaserLyte recommends the use of snap caps.)
When removing from your pistol, pull straight out!
6
Do not twist! Ensure all parts are out of barrel.
When not in use:
Unscrew adapter.
7
8
Insert into LT-PRO as shown.
2
3
4
***With the LT-TTC, remove the "Plug" from the LT-PRO***
5
6
Correct removal
7
8
NO
NO
1
Unscrew Battery cap.
2
insulator
+ + +
Remove batteries.
3
Install new batteries.
4
Tighten battery cap.
®
Reaction Tyme
®
Reaction Tyme
LASER TARGET
TLB-1
LASER TARGET
TLB-1
®
Laser
Target
Display
OFF ON
Reset
TLB-1
G
DC
B
A
E
F
LASER TARGET
TLB-1 Components
A: On/Off Switch
B: Target Area
C: Display Circle
D: Reset Circle
E: Wall Hanger
F: Battery Compartment
G: DO NOT TOUCH THESE SCREWS
TLB-1
®
Laser
Target
Display
OFF ON
Reset
TLB-1
G
DC
B
A
E
®
Laser
Target
Display
OFF ON
Reset
TLB-1
F
LASER TARGET
E: Wall Hanger
F: Battery Compartment
G: DO NOT TOUCH THESE SCREWS
TLB-1
®
Laser
Target
Display
OFF ON
Reset
TLB-1
G
DC
B
A
E
®
Laser
Target
Display
OFF ON
Reset
TLB-1
®
Laser
Target
Display
OFF ON
Reset
TLB-1
F
LASER TARGET
TLB-1
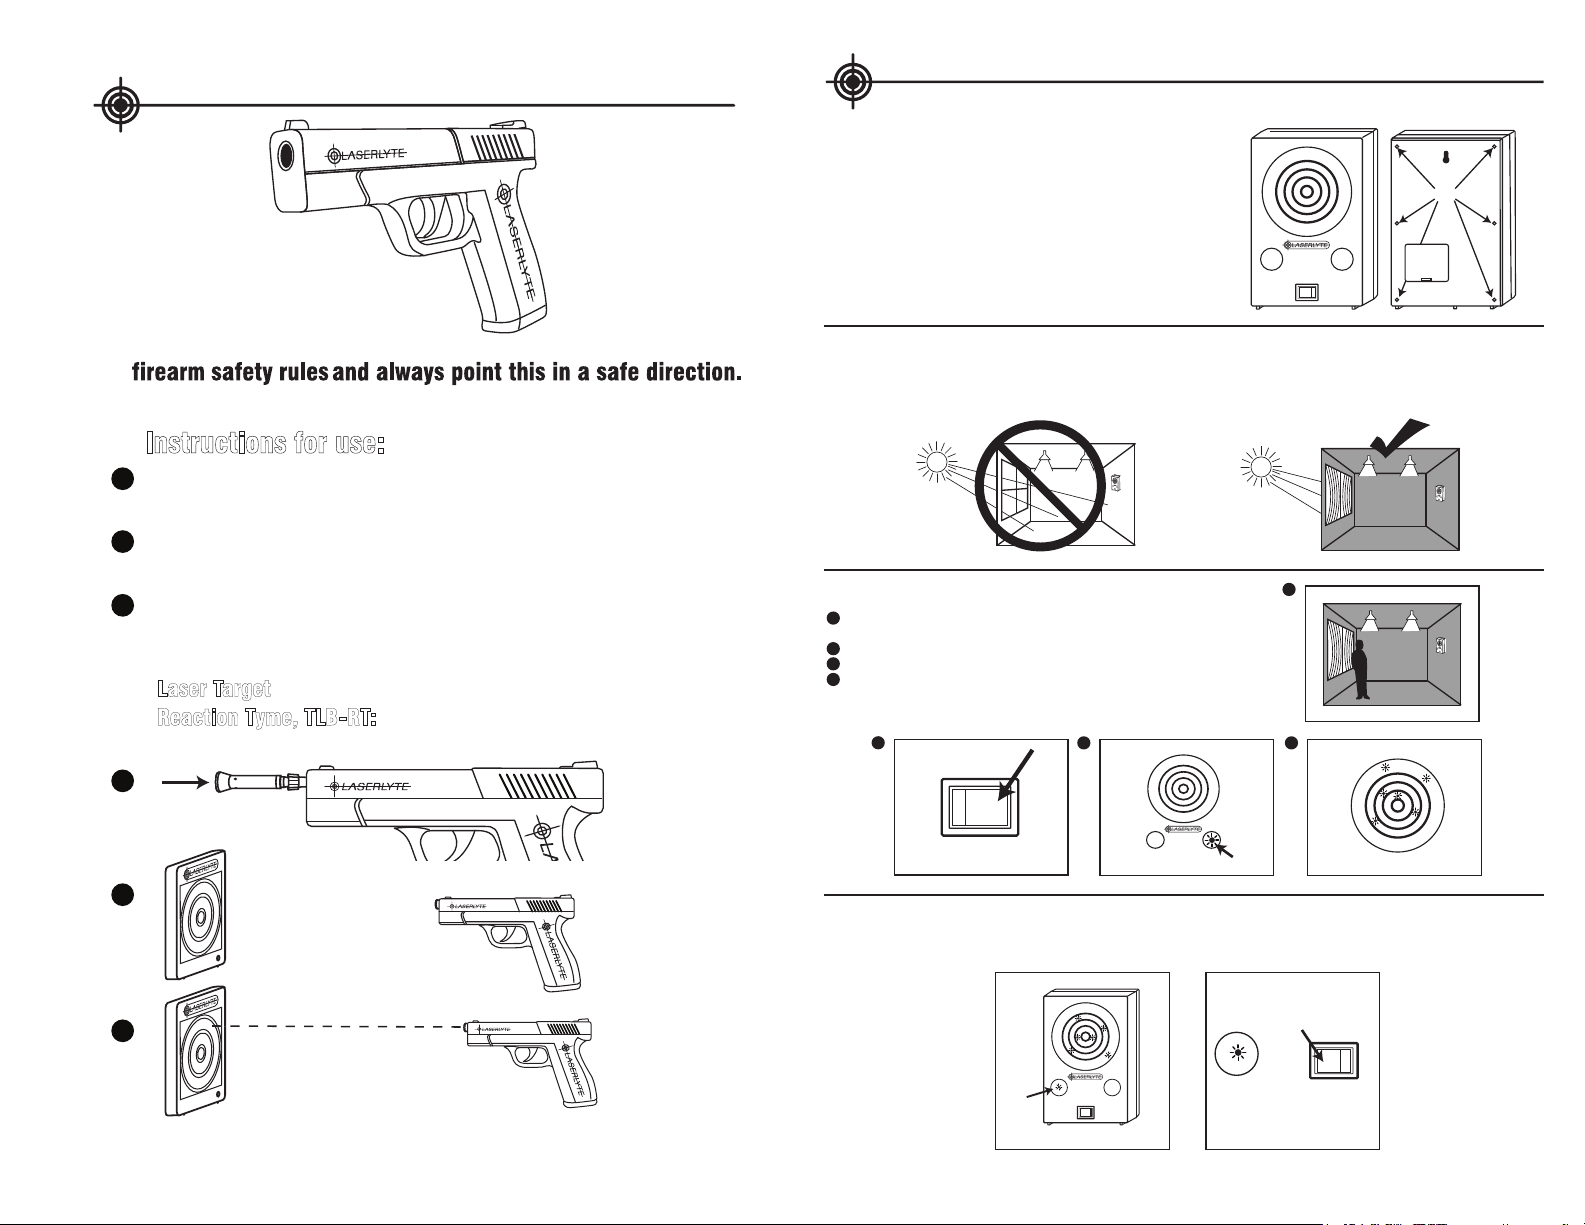
TLB-1 Target Usage:
Position target facing shooter. Be sure the target is in proper lighting
conditions. A
strong light source may affect the TLB-1’s ability to register “hits”.
Move switch to ON position.
Fire laser at Reset Circle twice to activate target.
With any LaserLyte® Laser Trainer fire the red laser dot in the target area.
1
2
3
4
®
Laser
Target
Display
OFF ON
Reset
TLB-1
2
OFF ON
TLB-1 Target Usage:
Position target facing shooter. Be sure the target is in proper lighting
conditions. A
strong light source may affect the TLB-1’s ability to register “hits”.
Move switch to ON position.
Fire laser at Reset Circle twice to activate target.
With any LaserLyte® Laser Trainer fire the red laser dot in the target area.
1
1
2
3
4
®
Laser
Target
Display
OFF ON
Reset
TLB-1
2
OFF ON
TLB-1 Target Usage:
To reset your shots:
conditions. A
strong light source may affect the TLB-1’s ability to register “hits”.
®
Laser
Target
Display
OFF ON
Reset
TLB-1
2
OFF ON
®
Laser
Target
Display Reset
x2
TRIGGER TYME™ PISTOL
LT-TT & LT-TTC
TLB-1 Components
A: On/Off Switch
B: Target Area
C: Display Circle
D: Reset Circle
E: Wall Hanger
F: Battery Compartment
G: DO NOT TOUCH THESE SCREWS
B
Display
A
Laser
Target
OFF ON
E
G
®
DC
Reset
TLB-1
F
• This training pistol cannot be fired. Please respect all
For use with the LaserLyte® LT-PRO Universal Laser Trainer
•
Instructions for use:
1
Make the LT-PRO ready and insert into the barrel of the
Trigger Tyme™ Pistol.
2
Pull the trigger to activate the laser.
is snug in the barrel.
3
Aim in a safe direction and shoot the laser at desired
targets.
Works great with LaserLyte targets.
-
Laser Target, TLB-1:
-
Reaction Tyme, TLB-RT:
-
Laser Plinking Cans, TLB-BWC
1
2
62 LEDs light up on target, showing the shots
3
Ensure the LT-PRO
2 training modes, active reaction training
* Be sure the TLB-1 Laser Target is in proper
lighting conditions.
A strong light source may affect the TLB-1’s ability to
register “hits”.
TLB-1 Target Usage:
1
Position target facing shooter. Be sure the target is in proper lighting
conditions. A
Move switch to ON position.
2
3
Fire laser at Reset Circle twice to activate target.
With any LaserLyte® Laser Trainer fire the red laser dot in the target area.
4
strong light source may affect the TLB-1’s ability to register “hits”.
2
3 4
OFF ON
To display your shot:
•Firing the red laser dot in the Display circle
will illuminate your shots on the target.
®
Laser
Target
Display
Reset
OFF ON
TLB-1
Laser
Target
Display Reset
1
®
x2
•Firing the red laser dot at the Reset circle
will clear the target. Turning the target OFF
and then ON will also clear the target.
OFF ON
Reset
 Loading...