

Page 1
User manual:
SoundTest-Master Reader
Management software for SoundTest-Master
soundlevel meter
© 2012 Umarex GmbH & Co KG
Page 2

Table of contents
ITable of contentsSoundTest-Master Reader manual
Part I
Part II
Part III
.
Installation
................................................................................................................................... 21 Basic installation procedure
......................................................................................................................................................... 2Start install menu from DVD
......................................................................................................................................................... 2Start the driver and software installation
......................................................................................................................................................... 2Connect the instrument to the PC
......................................................................................................................................................... 3Start the application and select the desired COM port
................................................................................................................................... 32 Installation Driver CP211x USB-Adapter
......................................................................................................................................................... 3Installation with Driver Installer
......................................................................................................................................................... 3Update from older driver
......................................................................................................................................................... 3Plug in the USB-adapter
......................................................................................................................................................... 4Install from Windows hardware dialog
......................................................................................................................................................... 5Check COM port after successful installation
................................................................................................................................... 63 Installation of application software (SetupXXX.exe)
First run
................................................................................................................................... 71 Registration procedure
......................................................................................................................................................... 7Enter name and valid E-Mail adress
......................................................................................................................................................... 8Receive a registration E-Mail from Laserliner server
Basic application concepts
0
2
7
9
Index
................................................................................................................................... 91 Overview
................................................................................................................................... 92 Connecting the instrument
................................................................................................................................... 103 Data views
......................................................................................................................................................... 10Life view
......................................................................................................................................................... 11Table view
.................................................................................................................................................. 11Navigator
......................................................................................................................................................... 11Chart view
................................................................................................................................... 124 Load and save files
......................................................................................................................................................... 12File manipulation
......................................................................................................................................................... 12Export document
................................................................................................................................... 135 Filter data
......................................................................................................................................................... 13Open and edit a data filter
................................................................................................................................... 146 Print table and chart reports
......................................................................................................................................................... 14Overview
......................................................................................................................................................... 15Report options
16
© 2012 Umarex GmbH & Co KG
Page 3
SoundTest-Master Reader manual
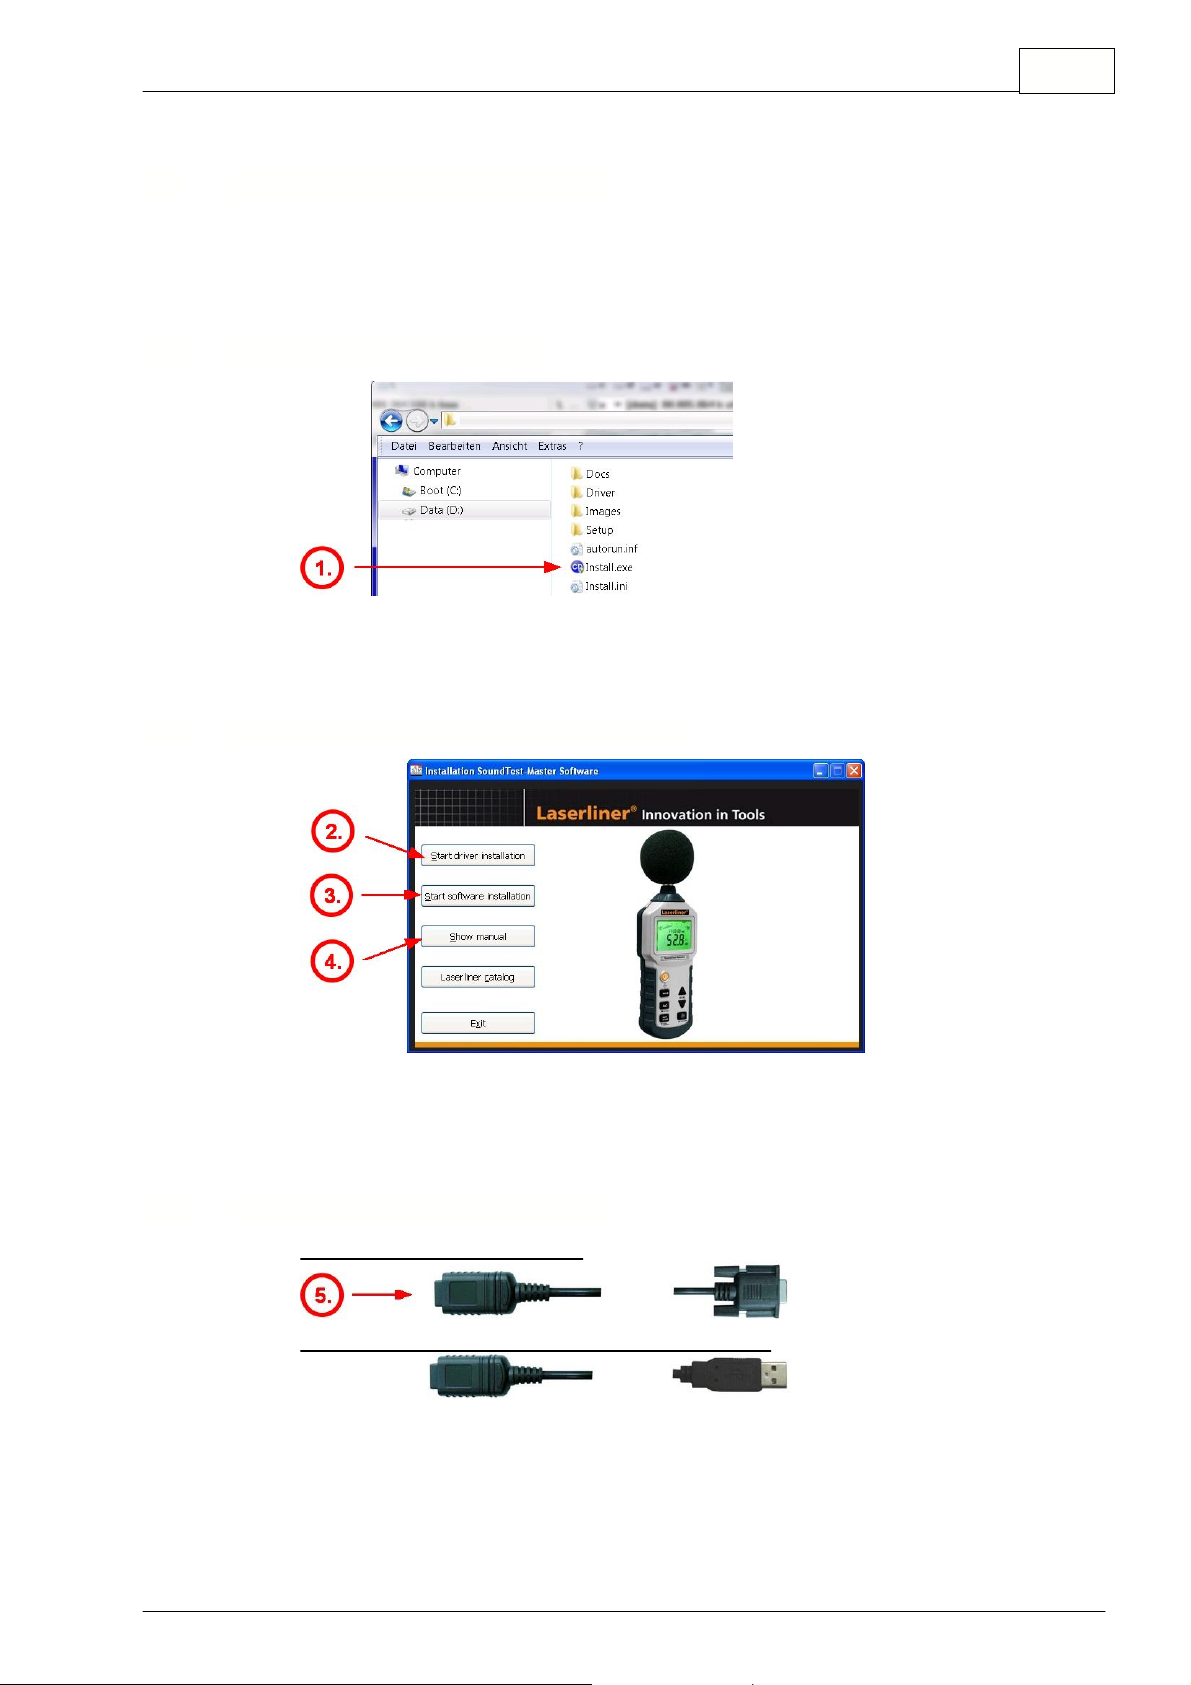
The installation DVD contains all necessary files for installation:
·
Special drivers setup (if necessary)
·
Application setup
·
Software manual
1.) Insert setup DVD and start the "Install.exe" file with Windows explorer
2.) Install the hardware drivers for USB devices
BEFORE
you plug the connector to the PC
3.) Install the application software
4.) Open the software user manual and study the instructions carefully and/or printout
Version with direct RS232-cable
:
Version with Laserliner USB-adapter cable (082.071):
1 Installation
Basic installation procedure
2
1.1
Basic installation procedure
1.1.1 Start install menu from DVD
1.1.2 Start the driver and software installation
1.1.3 Connect the instrument to the PC
© 2012 Umarex GmbH & Co KG
Page 4
SoundTest-Master Reader manual
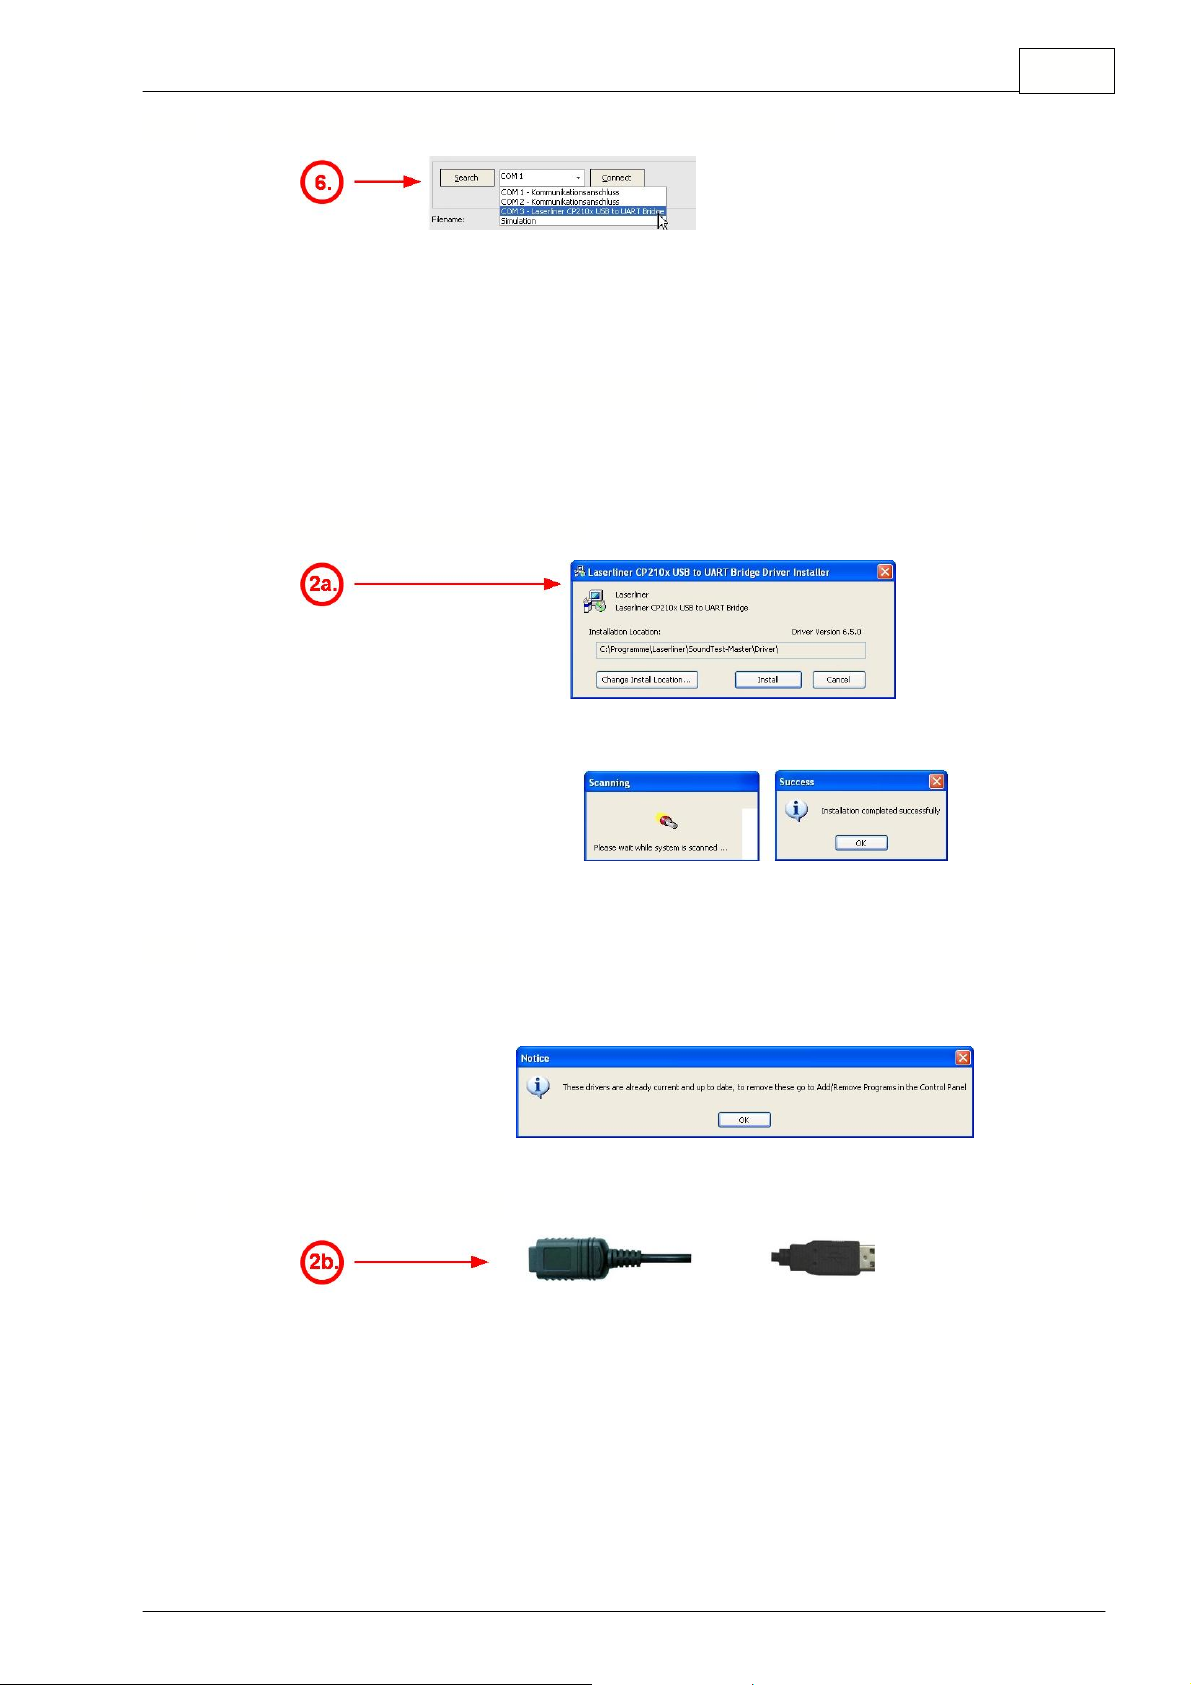
6.) After correct driver installation and connected and powered instrument,
the new COM port should appear in the COM ports list.
Only the Laserliner USB-adapter 082.071 needs a driver installation.
After starting the driver installation, the driver setup dialog is shown.
2a.) Press "
Install
" button to proceed with the driver installation process
If you received the following message you have to uninstall the old driver version first.
Please follow the instructions of the uninstall procedure in the control panel.
2b.) Plug in the USB-Adapter and power on the instrument.
Basic installation procedure
1.1.4 Start the application and select the desired COM port
3
1.2
Installation Driver CP211x USB-Adapter
1.2.1 Installation with Driver Installer
1.2.2 Update from older driver
1.2.3 Plug in the USB-adapter
© 2012 Umarex GmbH & Co KG
Page 5
SoundTest-Master Reader manual
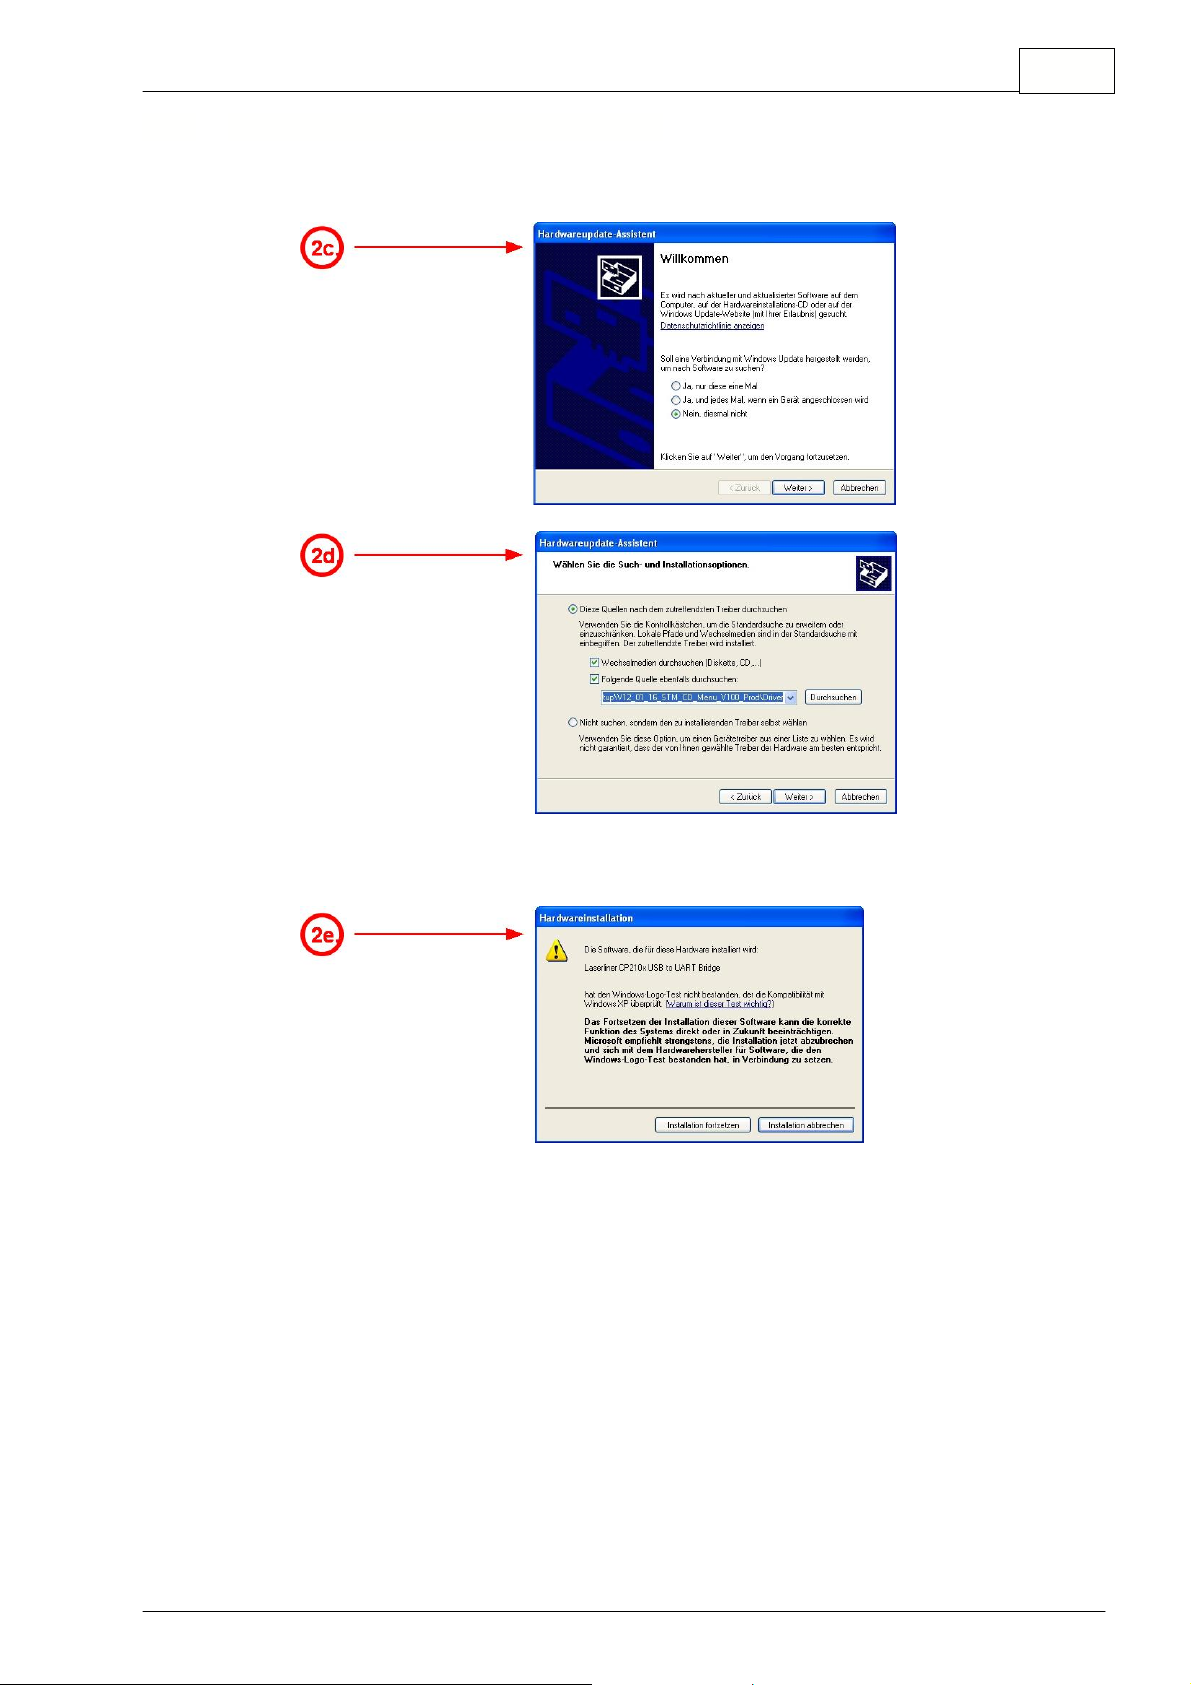
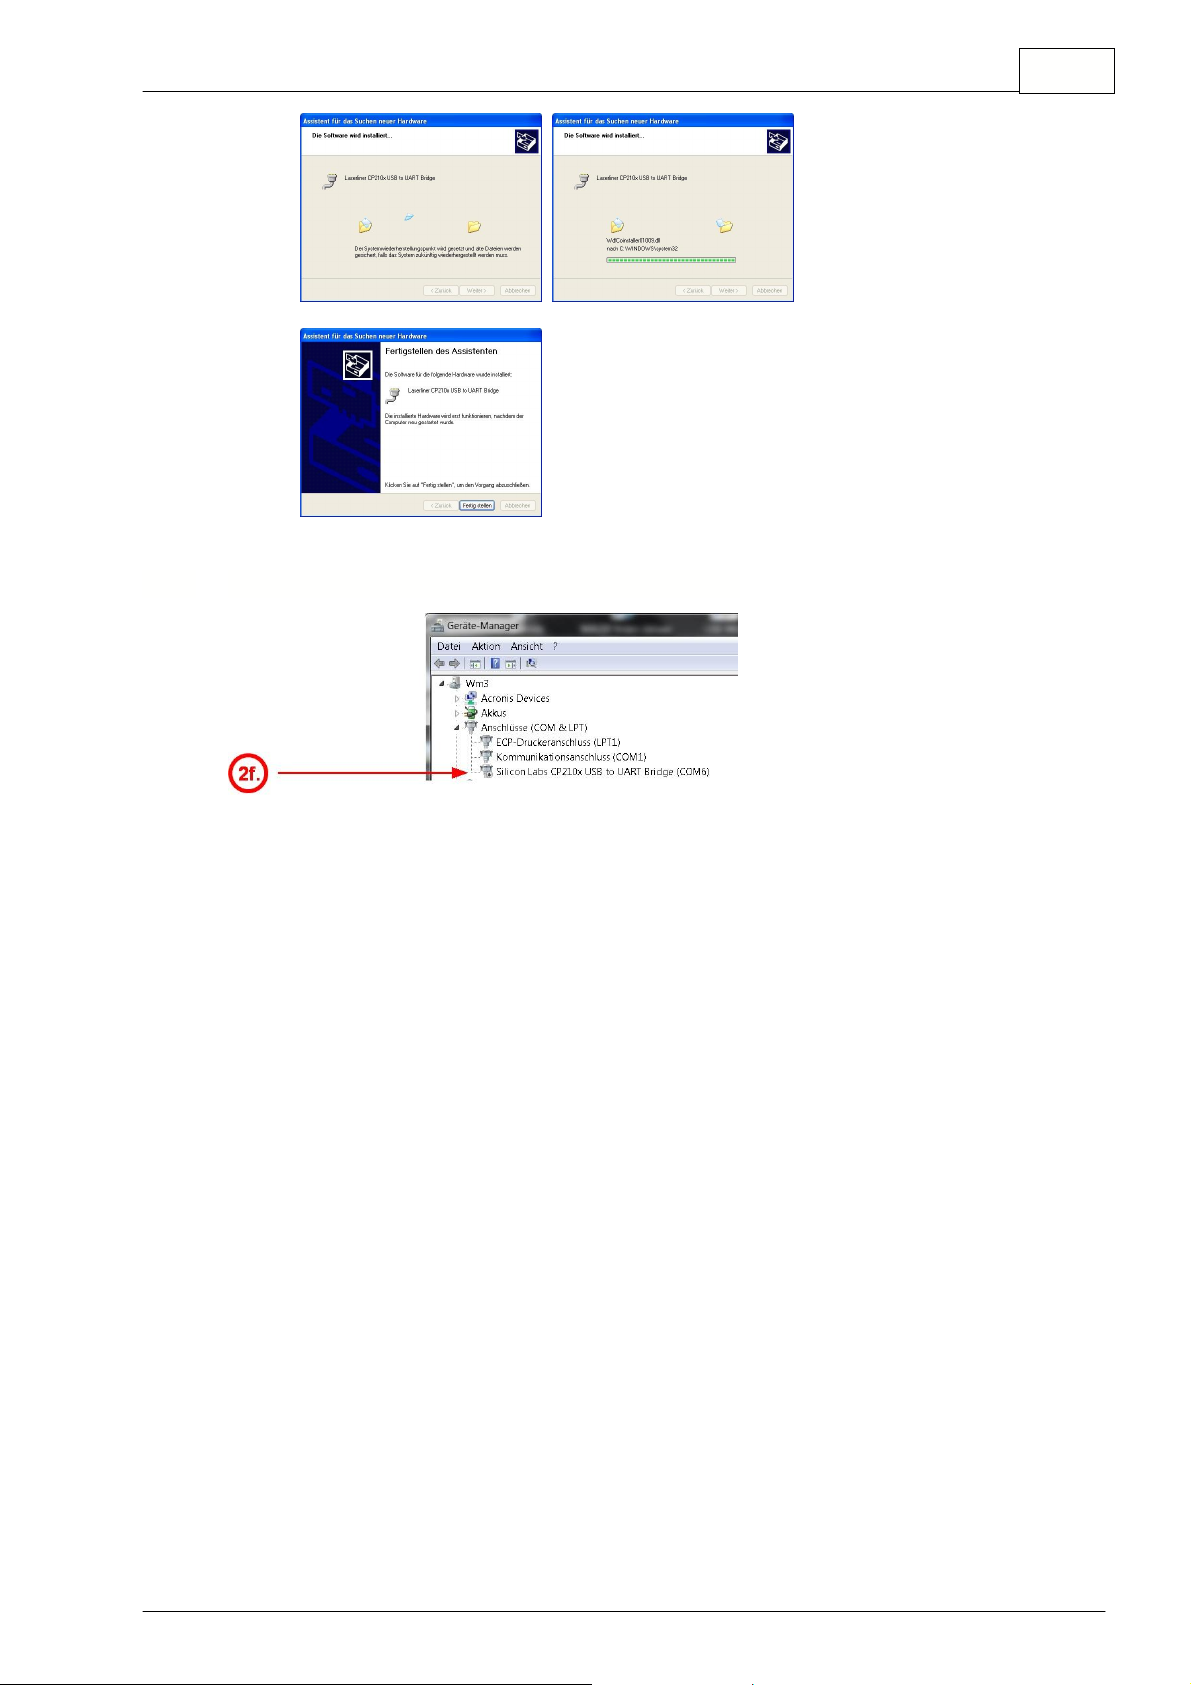
On some PC you need to proceed the hardware installation dialog after plug in the USB
Adapter.
2d.) Select the path of the driver (on DVD \Driver subfolder), and proceed.
2e.) Confirm and proceed the request for security.
Installation Driver CP211x USB-Adapter
1.2.4 Install from Windows hardware dialog
4
© 2012 Umarex GmbH & Co KG
Page 6
SoundTest-Master Reader manual
2f.) After install the new COM port must be available in the System\Hardware dialog.
Installation Driver CP211x USB-Adapter
1.2.5 Check COM port after successful installation
5
© 2012 Umarex GmbH & Co KG
Page 7

SoundTest-Master Reader manual
The SetupXXX.exe file includes all necessary application files, also a copy of the
driver files and the manual.
Read the license agreement.
Short product information
Program installation folder
Program components
Check if a desktop icon is desired
Installation summary report
Installing the selected components ...
Launch the driver and application before exit
Installation of application software (SetupXXX.exe)
6
1.3
Installation of application software (SetupXXX.exe)
© 2012 Umarex GmbH & Co KG
Page 8

SoundTest-Master Reader manual
After successful installation, the application configures at first run.
You can start the program either from the Start-menu of the OS, or from the desktop-icon is you
selected to create one on the user desktop.
After first run the registration dialog appears.
The registration can be edited with user data and a key can be requested to receive
important notifications on the application or updates.
If you don't want to register you can skip this dialog by pressing the "Continue" button.
! The registration dialog needs a valid internet connection, if this is not available you can also
send the registration data with the Install Code (top left) by standard mail.
Enter a valid E-Mail adress to receive the registration key.
Then press "Request key", to send the registration data to our server.
This dialog notes that the registration was successful.
.
2 First run
7
2.1
Registration procedure
2.1.1 Enter name and valid E-Mail adress
© 2012 Umarex GmbH & Co KG
Page 9

SoundTest-Master Reader manual
Copy and paste the "Registration key" into the Registration dialog, then press Register.
Registration procedure
2.1.2 Receive a registration E-Mail from Laserliner server
8
© 2012 Umarex GmbH & Co KG
Page 10

SoundTest-Master Reader manual
1.) Select the desired COM port and connect to a plugged instrument
2.) Select between the different views "
Life view
", "
Table view
", "
Chart view
"
3.) The "
Life view
" displays the actual status and values of the instrument
(if instrument is connected and sending data)
4.) Additional parameter for data transfer
5.) Indicator of connected and sending instrument
6.)
File management
for recorded data
7.)
Print management
for the recorded data
The SoundTest-Master has an unidirectional dataflow.
That means the software cannot control the dataflow from the instrument, but the user has to
enable sending lifedata at the instrument (SENDING mode) before recording data.
Seach
- Try to auto-search all ports and listen for incoming life data.
The instrument must be connected and in SENDING mode.
COM port
- The COM port can either be searched or manually selected
Connect
- Connect or disconnect the selected COM port.
If the instrument is not sending the Connect button will
be marked red and the IsConnected sysmbol is greyed out.
In this case the COM port might be connected, but no dataflow
from the instrument was initialized.
Record
- Enable / disable recording of incoming data to table and chart
3 Basic application concepts
Overview
9
3.1
Overview
10 11 11
10
3.2
12
14
Connecting the instrument
© 2012 Umarex GmbH & Co KG
Page 11

SoundTest-Master Reader manual
Process Auto-Search: (example)
Press Search
...
Start the search process ...
Search all available COM ports ...
If COM port with correct signature found
Instrument connected & data receiving
Incoming data is recorded to table & chart
If no COM port found or
no data received (no SENDING mode)
Process maunal connection: (example)
Select a COM port and press Connect
If instrument connected and data receiving
Incoming data is recorded to table & chart
COM port available but no data received
(no SENDING mode ?)
SENDING:
if actual life data is received from the instrument
MEMO:
if recorded data is received from the instrument
Use the date selection to overwrite the timestamp of the recorded data with
the selected date.
Connecting the instrument
10
3.3
Data views
3.3.1 Life view
© 2012 Umarex GmbH & Co KG
Page 12

SoundTest-Master Reader manual
Clear table:
Clears the complete data memory for table and chart.
Refresh:
Refreshes the display.
The Navigator at the table bottom is used for data manipulation and filtering:
- Move data cursor to first data record
- Move data cursor to the previous page
- Move data cursor to the previous data record
- Move data cursor to the next data record
- Move data cursor to the next page
- Move data cursor to last data record
- Add a data record to the table manually
- Delete a data record from the table
- Edit the selected data record
- Confirm the edited changes
- Cancel the edited changes
- Apply a user filter to the table
Moving average
- Adds an additional averaging trendline to the chart
(when set to 1 the average line is removed)
Autoscale
- Forces a redraw of the following scaling options
Range
- Scales over the full data range (including Min/Max levels)
Value
- Scales over the full data range (only the level curve)
Interval
- Scales over a defined time-ramnge from the last value
3.3.2 Table view
3.3.2.1 Navigator
Data views
11
3.3.3 Chart view
© 2012 Umarex GmbH & Co KG
Page 13

SoundTest-Master Reader manual
- New (file):
Clear the actual document and prepare for a new data file
- Load (file):
Selects and loads an existing data file from local drive
- Save as (file)
Saves the actual document to the local drive
- Next (file)
Selects and loads the next file in the actual folder
- Previous (file)
Selects and loads the previous file in the actual folder
- Export to file
Exports
the actual document to CSV or XML format
Configuration of the export parameters.
Delimiter
- Defines the actual column delimiter character in the output CSV file
Quote
- Defines the actual column quote character in the output CSV file
Format
- Selectes the available export foirmats (CSV, XML, ...)
Column parameters:
Column
- Name of the underlying dataset columns
Field no
- The index of the underlying dataset columns
Size
- Size of the columns datatype
Export
- Choose which selection of columns should be exported
UseQuote
- Choose which selection of columns should be quoted
(In the header all columns are quoted)
Load and save files
12
3.4
Load and save files
3.4.1 File manipulation
3.4.2 Export document
12
© 2012 Umarex GmbH & Co KG
Page 14

SoundTest-Master Reader manual
Select filename with file extension and press the Export button to export the whole dataset:
In the table view the filter symbol [
] is used to open a custom filter.
Add new ...
- to add and edit a new filter condition
Open
- to open previously saved filter definitions
Save as
- to save the actual filter definition to the local drive
Apply; OK
- to apply the filter to the dataset and finish the dialog
A complex filter term can be constructed by adding group terms:
Load and save files
13
3.5
Filter data
3.5.1 Open and edit a data filter
© 2012 Umarex GmbH & Co KG
Page 15

SoundTest-Master Reader manual
The print system activates the right report type according to the selected view.
The reports can be previewd and set up with the Print preview function.
For table view the table report is shown:
For the chart view the chart report is shown:
Print table and chart reports
14
3.6
Print table and chart reports
3.6.1 Overview
© 2012 Umarex GmbH & Co KG
Page 16

SoundTest-Master Reader manual
Load/Save:
Active report can be stored and re-loaded from local harddrive
Print
Active report can be printed from the report print preview
Export to PDF
Active report can be exported as PDF file, with additional PDF options:
Zoom options
To fit document to paper, to print and view on one or several pages.
Title option
Allows adding a report title
Footnote option
Allows adding report footnotes
3.6.2 Report options
Print table and chart reports
15
© 2012 Umarex GmbH & Co KG
Page 17

SoundTest-Master Reader manual Index 16
- I -
Index
- A -
Application 6, 9
Apply filter 13
Autoscale 11
Auto-Search 9
- B -
Basic concepts 9
Basic procedures 2
Install menu 2
Installation 2, 3
Installation software 6
Installation USB 3, 4, 5
Internet connection 7
Interval scale 11
- L -
Life data 10
Life view 10
Load 12
Logo Test 4
- C -
Chart report 14, 15
Chart view 11
Check COM port 5
Column 12
Connect 3
Connect instrument 2
Connecting 9
Connector 2, 3
- D -
Dataset 13
Delete 11
Delimiter 12
Desktop icon 7
Document 12, 13
Driver Installer 3
DVD 2
DVD contents 2
- E -
Edit 11
Export document 12
Export to PDF 15
- F -
Field no 12
File management 12
Filter 11, 13
First run 7
Footnote 15
Format 12
- H -
Hardware dialog 4
Hardware panel 5
- N -
Navigator 11
- O -
Old driver 3
- P -
Parameters 12
PDF export 15
Plug connector 3
Print management 14, 15
Print preview 14, 15
- Q -
Quote 12
- R -
Range scale 11
Recorded data 10
Register key 8
Registration mail 7, 8
Registration procedure 7, 8
Reports 14, 15
Request key 7
RS232 Adapter 2
- S -
Save 12
Search COM port 9
Select COM port 3
Send data 9
Sending life data 10
SENDING mode 9
Sending recorded data 10
Size 12
Start install menu 2
Start menu 7
© 2012 Umarex GmbH & Co KG
Page 18

SoundTest-Master Reader manual Index 17
- T -
Table report 14, 15
Table view 11
Title 15
- U -
Uninstall driver 3
USB 3, 4, 5
USB Adapter 2
UseQuote 12
User data 7
- V -
Value scale 11
Views 10, 11
- W -
Windows hardware dialog 4
Windows Logo Test 4
- Z -
Zoom 15
© 2012 Umarex GmbH & Co KG
Page 19

Page 20

 Loading...