

CD CDV lD PLAYER
CLD-99
-nank you for buying this Pioneer product.
"iease read through these operating instructions so you will know
- 8W t8 operate your model properly. After you have finished
'eading the instructions, put them away in a safe place for future
'eference.
n some countries or regions, the shape of the power plug and
Jower outlet may sometimes differ from that shown in the
explanatory drawings. However, the method of connecting and
operating the unit is the same.
WARNING: TO PREVENT FIRE OR SHOCK HAZARD, DO
NOT EXPOSE THIS APPLIANCE TO RAIN OR MOISTURE.
The serial number for this equipment is located on the rear panel.
"lease write this serial number on your enclosed warranty card
3"d keep it in a secure area. This is for your security.
ELITE
ACCESSORIES , 4
PRECAUTIONS 5
FEATURES AND FUNCTIONS OF THE PLAYER 6
TYPES OF DISCS THAT CAN BE PLAYED WITH THIS UNIT , 7
CARE OF DISCS 8
CONNECTIONS 9
BASIC CONNECTIONS 9
CONNECTING TO THE DIGITAL JACKS 10
SYSTEM REMOTE CONTROL CONNECTION 11
NAMES AND FUNCTIONS OF CONTROLS 12
[For Canadian model]
CAUTION: TO PREVENT ELECTRIC SHOCK, DO NOT
USE THIS (POLARIZED) PLUG WITH AN EXTENSION
CORD, RECEPTACLE OR OTHER OUTLET UNLESS THE
BLADES CAN BE FULLY INSERTED TO PREVENT BLADE
EXPOSURE.
ATTENTION:
"" PAS UTiUSER CETTE FICHE POLARISEE AVEC UN PROLONGA-
-"~P,, UN" PRISE DE COURANT OU UNE AUTRE SORTIE DE
::;::;_PANT, SAUF SI LES LAMES PEUVENT ETRE INSEREES A FOND
S':'',S "N LAiSSER AUCUNE PARTIE A DECOUVERT.
C.AUT/ON:
-- e : -: c _:: satisfies FCC regulations when shielded cables
"-c ::--e::crs are used to connect the unitto other equip-
-eo' -c c'event electromagnetic interference with electric
ar;ciia-:es euch as radios and televisions, use shielded
caciee a,c: :cnnectors for connections.
POUR PREVENIR LES CHOCS ELECTRIQUES
(V)
PIONEER®
The
ArtofEntertainment
PICTURE QUALITY ADJUSTMENT (V-DNR 3D) 18
TO SEARCH FOR A PARTICULAR TIME/FRAME -
Time Number Search/Track Time Search/ABS Time Search/
Frame Number Search 21
TO PLAY ALL CHAPTERS/TRACKS IN RANDOM ORDER-
Random Playback , , 22
TO SEARCH FOR A PARTICULAR CHAPTER/TRACK -
Hi-Lite Scan/lntro Scan 22
TO REPEATEDLY PLAY A DESIRED PASSAGE-
Repeat Playback , 23
TO PLAY ONLY DESIRED SCENES/TRACKS-
Program Playback , , 24
DISPLAY SWITCHING 25
TROUBLESHOOTING 26
SPECIFICATIONS 29
IMPORTANT
A
The lightning flash with arrowhead, within an
equilateral triangle, is intended to alert the user to the
presenoe of uninsulated "dangerous voltage" within the
product's enclosure that may be of sufficient magnitude
to constitute a risk of electric shack to persons.
SAFETY INSTRUCTIONS
READ INSTRUCTIONS - All the safety and operating
instructions should be read before the appliance is
operated.
RETAIN INSTRUCTIONS - The safety and operating
instructions should be retained for future reference.
HEED WARNINGS - All warnings on the appliance
and in the operating instructions should be adhered to.
FOLLOW INSTRUCTIONS - All operating and use
instructions should be followed.
CLEANING - Unplug this video prOduct frorn the wall
outlet before cleaning. Do not use liquid cleaners or
aerosol cleaners. Use a damp cloth for cleaning.
ATTACHMENTS Do not use attachrnents not
recommended by the video product manufacturer as
they may cause hazards.
WATER AND MOISTURE - Do not use this video
product near water - for example, near a bathtub,
wash bowl, kitchen sink, or laundry tub, in a wet
basement, or near a swimming pool, etc.
ACCESSORIES - Do not place this video product on an
unstable cart, stand. tripod, bracket, or table. The
video product may fall. causing serious injury to a
child or adult, and serious damage to the appliance.
Use only with a cart, stand, tripod, bracket, or table
recommended by the manufacturer, or sold with the
video product. Any mounting of the appliance should
follow the manufacturer's instructions, and should
use a mounting accessory recommended by the
manufacturer.
CART - An appliance and cart combination should be
moved with care. Quick stops, excessive force. and
uneven surfaces may cause the appliance and cart
combination to overturn.
VENTILATION - Slots and openings in the cabinet are
provided for ventilation and to ensure reliable
operation of the video product and to protect it from
overheating. These openings must not be blocked or
covered. They should never be blocked by placing
the video product on a bed, sofa, rug, or other similar
surface. This video product should never be placed
near or over a radiator or heat register. This video
product should not be placed In a built-in installation
such as a bookcase or rack unless proper ventilation
is provided or the manufacturer's instructions have
been adhered to.
POWER SOURCES - This video product should be
operated only from the type of power source
indicated on the marking label. If you are not sure of
the type of power supply to your home, consult your
appliance dealer or local power company. For video
products intended to operate from battery power, or
other sources, refer to the operating instructions.
POWER-CORD PROTECTION
Power-supply cords should be routed so that they
are not likely to be walked on or pinched by items
placed upon or against them. Pay particular attention
to cords at plugs, convenience receptacles, and the
point where they exit from the appliance.
••
I' ••.
~
CAUTION:
TO PREVENT THE RISK OF ELECTRIC SHOCK, DO
NOT REMOVE COVER (OR BACK). NO USER-
SERVICEABLE PARTS INSIDE. REFER SERVICING
TO QUALIFIED SERVICE PERSONNEL.
POLARIZATION - This video product IS equipped With
a polarized alternating current line plug (a plug haVing
one blade wider than the other). ThiS plug will fit into
the power outlet only one way. ThiS is a safety
feature. If you are unable to insert the plug fully Into
the outlet, try reversing the plug. If the plug should
still fail to fit, contact your electrician to replace your
obsolete outlet. Do not defeat the safety purpose of
the polarIZed plug.
LIGHTNING - For added protection for thiS video
product receiver during a lightning storm, or when it
is left unattended and unused for long periods of
time, unplug it from the wall outlet and disconnect
the antenna or cable system. ThiS will prevent
damage to the video product due to lightning and
power-line surges.
POWER LINES - An outside antenna system should
not be located in the vicinity of overhead power lines
or other electric light or power circuits, or where it
can fall into such power lines or circuits. When
installing an outside antenna system. extreme care
should be taken to keep from touching such power
lines or circuits as contact with them might be fatal.
OVERLOADING - Do not overload wall outlets and
extension cords as this can result in the risk of fire or
electric shock.
OBJECT AND LIQUID ENTRY - Never push objects of
any kind into this video product through openings as
they may touch dangerous voltage POints or short-
out parts that could result in a fire or electric shock
Never spill liquid of any kind on the video product.
SERVICING - Do not attempt to serVice this video
product yourself as opening or removing covers may
expose you to dangerous voltage or other hazards,
Refer all servicing to qualified service personnel
ELECTRIC
SERVICE
EOUIPMENT
•
•
.- POWER SERVICE GROUNDING
The exclamation point within an equilateral triangle is
intended to alert the user to the presence of imlX'rtant
operating and maintenance (servicing) instructions in
the literature accompanying the appliance.
DAMAGE REQUIRING SERVICE
Unplug this video product from the wall outlet and
refer servicing to -qualified service personnel under
the following conditions'
a. When the power-supply cord or plug is damaged.
b. If liquid has been spilled, or objects have fallen into
the video product.
c. If the video product has been exposed to rain or
water.
d. If the video product does not operate normally by
following the operating instructions. Adjust only
those controls that are covered by the operating
instructions. Improper adjustment of other controls
may result in damage and will often require
extensive work by a qualified technician to restore
the video product to ItS normal operation.
e. If the video product has been dropped or the
cabinet has been damaged.
f. When the video product exhibits a distinct change
In performance - this indicates a need for service.
REPLACEMENT PARTS - When replacernent parts are
required. be sure the service technician has used
replacement parts specified by the manufacturer or
having the same characteristics as the original part.
Unauthorized substitutions may result in fire, electric
shock or other hazards.
SAFETY CHECK - Upon completion of any service or
repairs to thiS video product, ask the service
technician to perform safety checks to determine
that the video product is In proper operating
condition
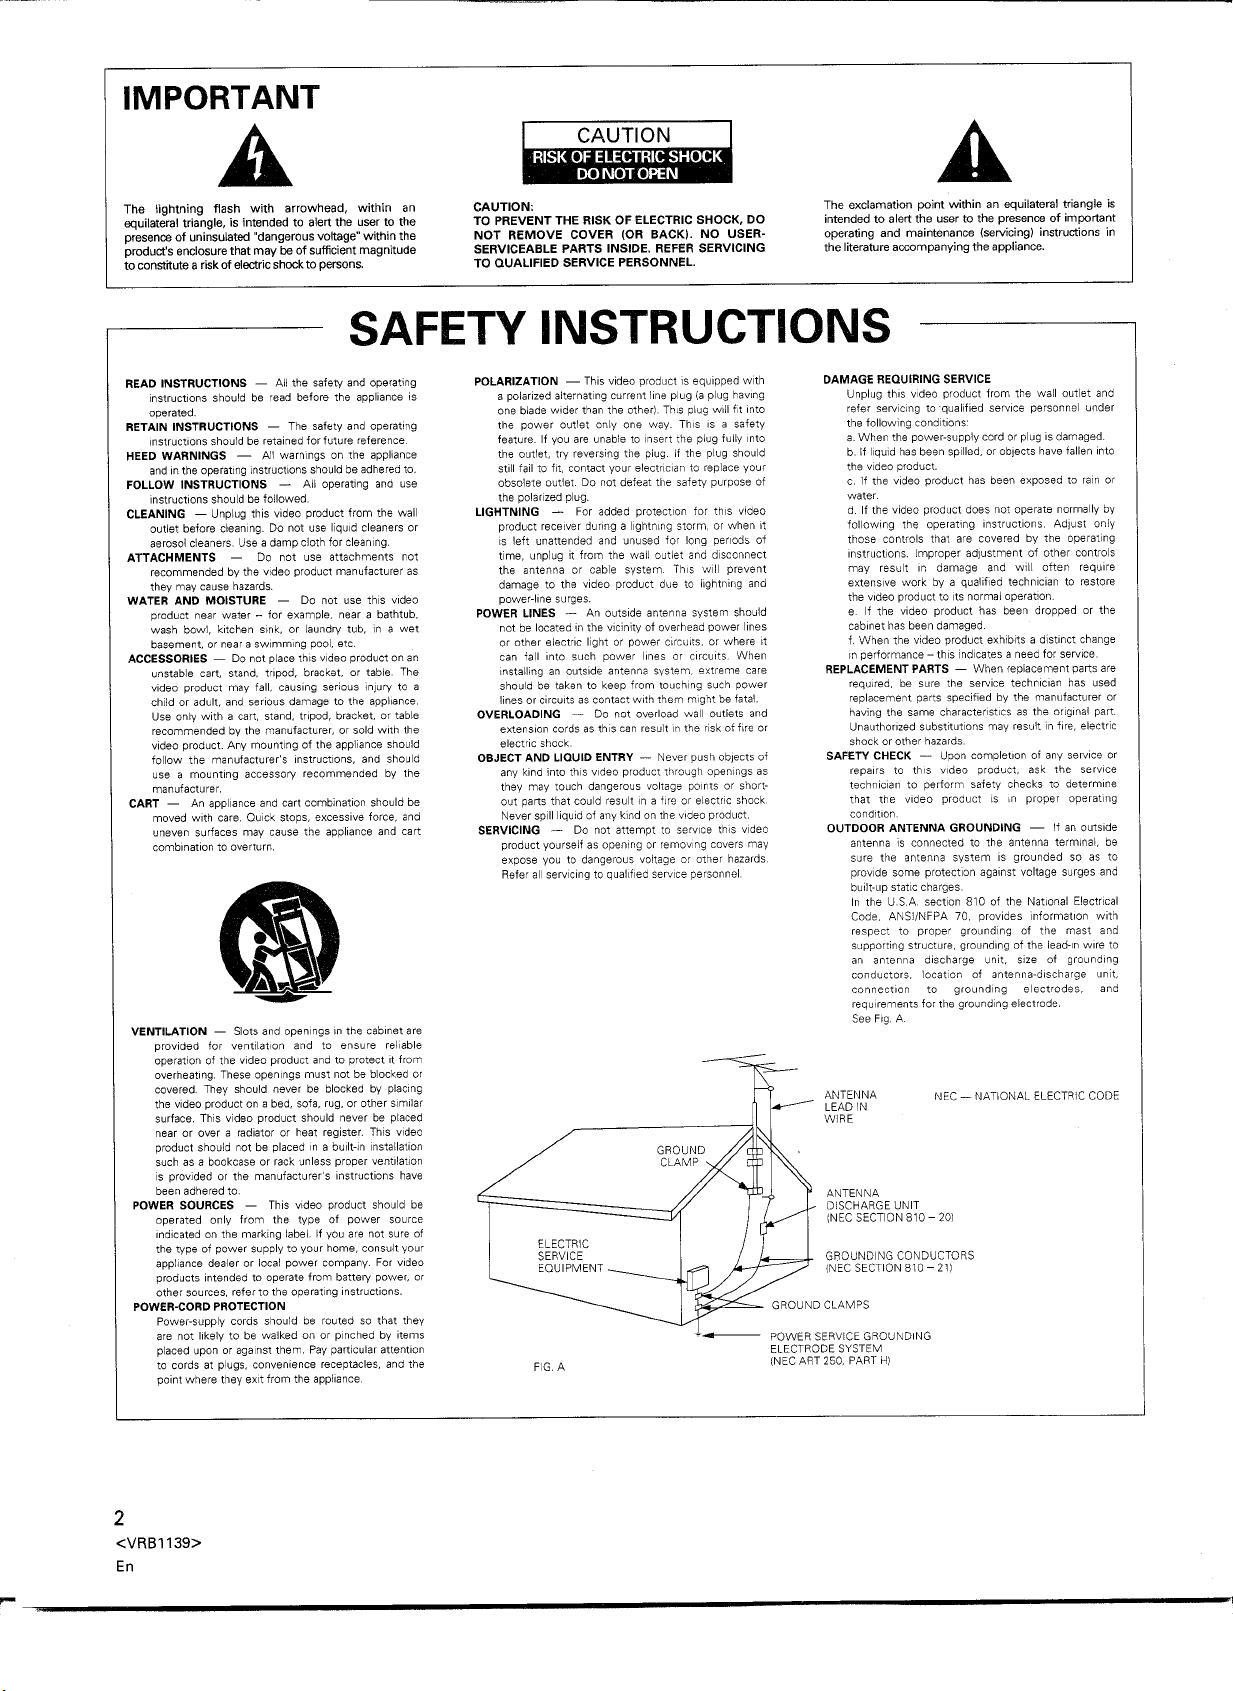
OUTDOOR ANTENNA GROUNDING - If an outside
antenna is connected to the antenna terminal, be
sure the antenna system is grounded so as to
provide some protection against voltage surges and
built-up static charges.
In the U.S.A. section 810 of the National Electrical
Code. ANSI/NFPA 70. provides information with
respect to proper grounding of the mast and
supporting structure. grounding of the lead-In wire to
an antenna discharge unit, size of grounding
conductors, location of antenna-discharge unit
connection to grounding electrodes. and
requirements for the grounding electrode.
See Fig A
ANTENNA
LEAD IN
WIRE
ANTENNA
DISCHARGE UNIT
(NEC SECTION 810 - 201
ELECTRODE SYSTEM
(NEC ART 250. PART HI
2
<VRBl139>
En
This equipment has been tested and found to comply with the limits for a Class B digital device, pursuant to Part 15 of the FCCRules. These
limits are designed to provide reasonable protection against harmful interference in a residential installation. This equipment generates,
uses, and can radiate radio frequency energy and, if not installed and used in accordance with the instructions, may cause harmful
interference to radio communications. However, there is no guarantee that interference will not occur in a particular installation. If this
equipment does cause harmful interference to radio or television reception, which can be determined by turning the equipment off and
on, the user is encouraged to try to correct the interference by one or more of the following measures:
- Increase the separation between the equipment and receiver.
- Connect the equipment into an outlet on a circuit different from that to which the receiver is connected.
- Consult the dealer or an experienced radiolTV technician for help.
Information to User
Alteration or modifications carried out without appropriate authorization may invalidate the user's right to operate the equipment.
CAUTION
• Use of control or adjustments or performance of procedures other than those specified herein may result in hazardous radiation exposure .
• The use of optical instruments with this product will increase eye hazard.
[For Canadian model]
This Class B digital apparatus meets all requirements of the Canadian Interference-Causing Equipment Regulations.
[Pour Ie modele Canadien]
Cet appareil numerique de la Classe B respecte toutes les exigences du Reglement sur Ie materiel brouilleur du Canada.
Selecting fine audio equipment such as the unit you've just purchased is only
the start of your musical enjoyment. Now it's time to consider how you can
maximize the fun and excitement your equipment offers. This manufacturer and
the Electronic Industries Association's Consumer Electronics Group want you
to get the most out of your equipment by playing it at a safe level. One that lets
the sound come through loud and clear without annoying blaring or distortion-
and, most importantly, without affecting your sensitive hearing.
Sound can be deceiving. Over time your hearing "comfort level" adapts to
higher volumes of sound. So what sounds "normal" can actually be loud and
harmful to your hearing. Guard agaiust this by setting your equipment at a safe
level BEFORE your hearing adapts.
To establish a safe level:
• Start your volume control at a low setting.
• Slowly increase the sound until you can hear it comfortably and
clearly, and without distortion.
Once you have established a comfortable sound level:
• Set the dial and leave it there.
Taking a minute to do this now will help to prevent hearing damage or loss
in the future. After all, we want you listening for a lifetime.
Used wisely, your new sound equipment will provide a lifetime of fun and
enjoyment. Since hearing damage from loud noise is often undetectable until it
is too late, this manufacturer and the Electronic Industries Association's
Consumer Electronics Gronp recommend you avoid prolonged exposure to
excessive noise. This list of sound levels is included for your protection.
Decibel
Level Example
Quiet library, soft whispers
Living room, refrigerator, bedroom away from traffic
Light traffic, normal conversation, quiet office
Air conditioner at 20 feet, sewing machine
Vacuum cleaner, hair dryer, noisy restaurant
Average city traffic, garbage disposals, alarm clock
at two feet.
THE FOLLOWING NOISES CAN BE DANGEROUS UNDER
CONSTANT EXPOSURE
90 Subway, motorcycle, truck traffic, lawn mower
100 Garbage truck, chain saw, pneumatic drill
120 Rock band concert in front of speakers, thunderclap
140 Gunshot blast, jet plane
180 Rocket launching pad
<VRB1139>
3
En
I
ACCESSORIES
• Remote control unit
.Size "AAA" (IEC R03)
dry cell battery x 2
.Video cord
(Pin plug++Pin plug)
Use to connect the player
to a color monitor, etc.
INSERTING BATTERIES INTO THE REMOTE
CONTROL UNIT
[I] Open the battery compartment cover on the back ofthe remote
control unit. Press the knob and open the cover in the direction
ofthe arrow.
[2]
Take out the two accessory size "AAA" (IEC R03) dry cell
batteries, and insert them into the battery compartment in
accordance with the display
[I] Close the cover of the battery case.
Incorrect use of batteries may lead to leakage or rupture.
Always be sure to follow these guidelines:
A. Always insert batteries into the battery compartment,
correctly matching the positive
as indicated inside the compartment.
B. Never mix new and used batteries.
C. Batteries of the same size may have different voltages,
depending on their type. Do not mix different types of
batteries.
(EEl,
8l
inside the compartment.
EEl
and negative8polarities,
.S-VIDEO cable
(Mini DIN++Mini DIN)
.Audio cord
(Pin plug x 2++Pin plug x 2)
Use to connect the player to
a stereo amplifier, etc .
• Operating instructions
.Warranty card
I
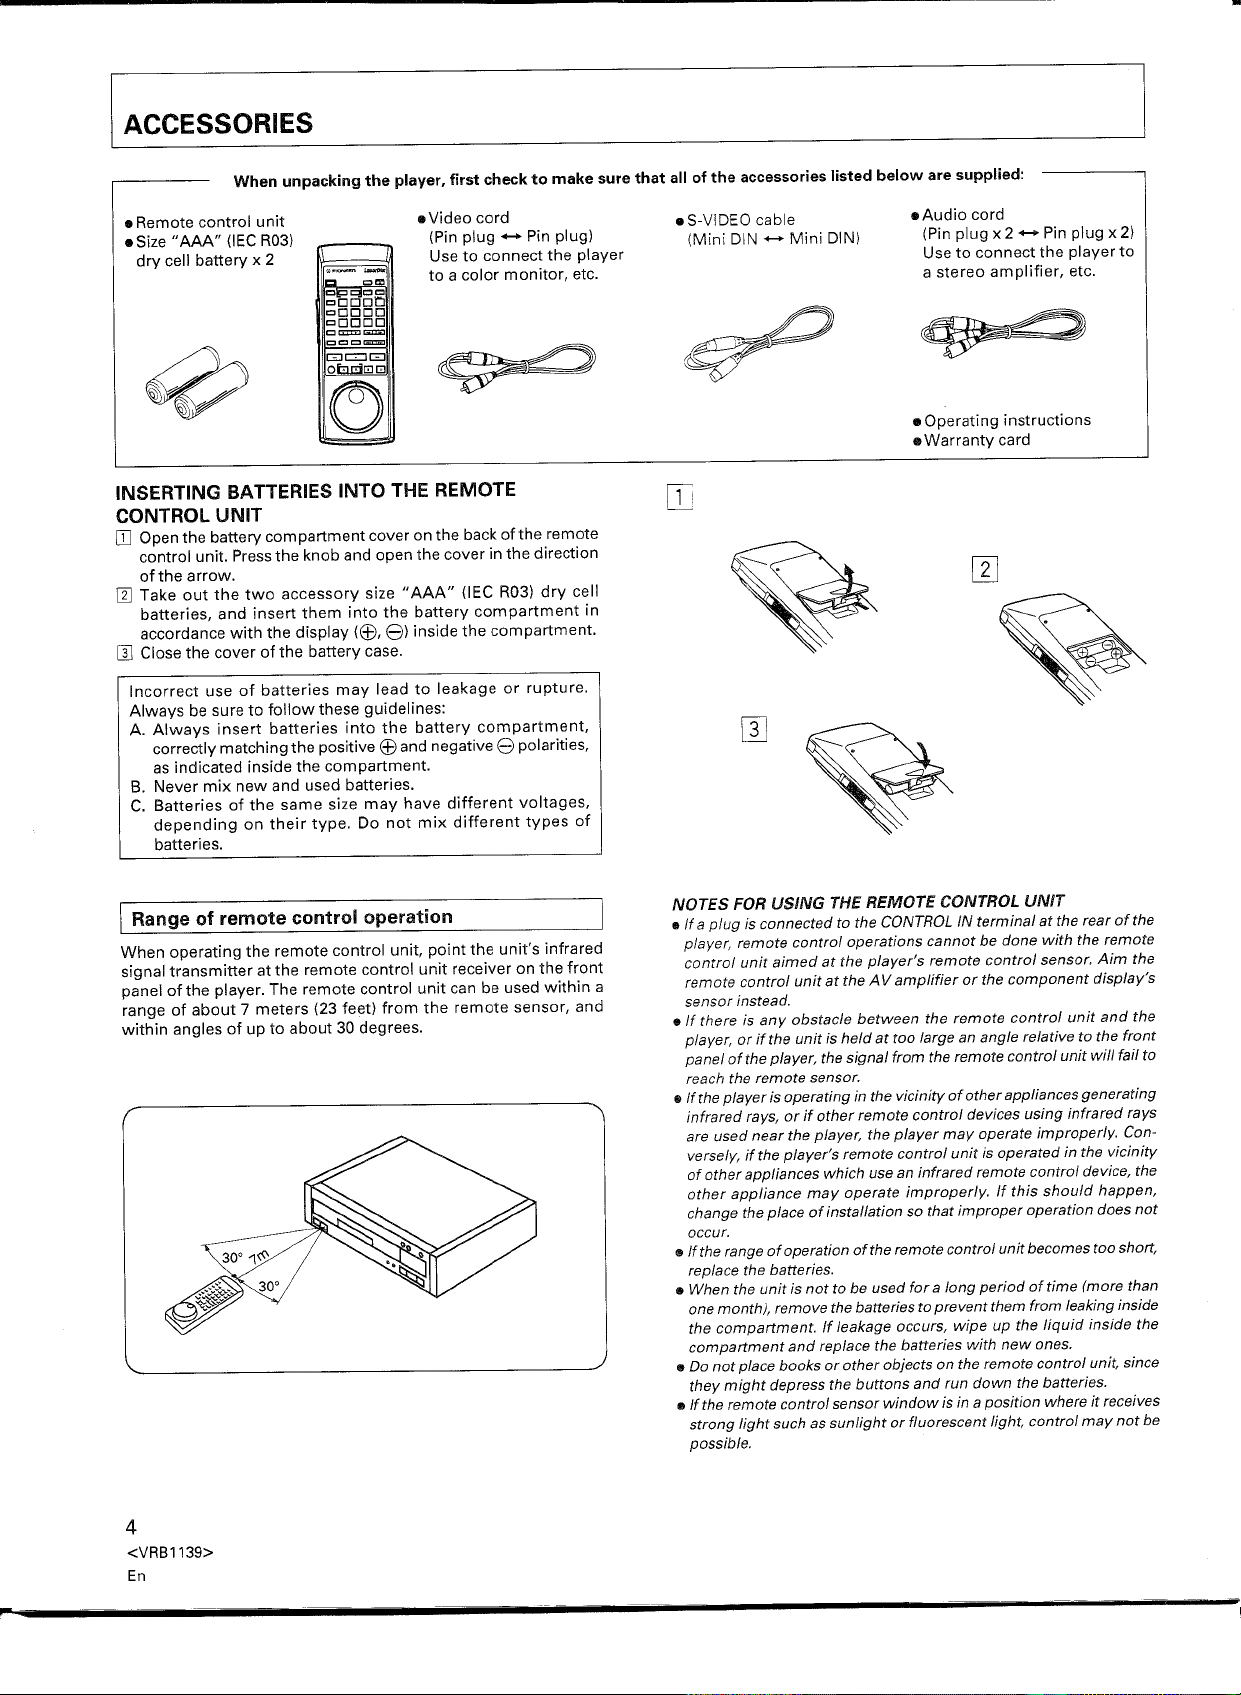
Range of remote control operation
When operating the remote control unit, point the unit's infrared
signal transmitter at the remote control unit receiver on the front
panel of the player. The remote control unit can be used within a
range of about 7 meters (23 feet) from the remote sensor, and
within angles of up to about 30 degrees.
NOTES FOR USING THE REMOTE CONTROL UNIT
• If a plug is connected to the CONTROL IN terminal at the rear of the
player, remote control operations cannot be done with the remote
control unit aimed at the player's remote control sensor. Aim the
remote control unit at the AV amplifier or the component display's
sensor instead.
• If thereisany obstacle between the remote control unit and the
player, or if the unit is held at too large an angle relative to the front
panel of the player, the signal from the remote control unit will fail to
reach the remote sensor.
• If the player is operating in the vicinity of other appliances generating
infrared rays, or if other remote control devices using infrared rays
are used near the player, the player may operate improperly. Con-
versely, if the player's remote control unitisoperated in the vicinity
of other appliances which use an infrared remote control device, the
other appliance may operate improperly. If this should happen,
change the place of installation so that improper operation does not
occur.
• If the range of operation of the remote control unit becomes too short,
replace the batteries.
• When the unit is not to be used for a long period of time (more than
one month), remove the batteries to prevent them from leaking inside
the compartment. If leakage occurs, wipe up the liquid inside the
compartment and replace the batteries with newones.
• Do not place books or other objects on the remote control unit, since
they might depress the buttons and run down the batteries .
• If the remote control sensor window is in a position where it receives
strong light such as sunlight or fluorescent light, control may not be
possible.
4
<VRB1139>
En
I
PRECAUTIONS
If it becomes necessary to transport or ship this unit in the
future, be sure to first remove the disc (if loaded), retract the disc
table to its closed position and turn the power off. After the
"OFF" display goes out on the display, disconnect the power
cord.
INSTALLING THE PLAYER
• Place the player on a stable platform next to the television and
stereo system to be used with the player.
.When using the player with a stereo system, your speakers
should be placed away from your television (or TV monitor).
• Do not place heavy objects such as a television or TV monitor on
top of the player.
• Do not place the player on top of your TV set or TV monitor. Also,
keep the player away from devices such as cassette decks which
are sensitive to magnetic fields.
When FM or AM stations are being received, signal noise may be
generated if the player is turned on. Turn off the player when not
in use. Also, ifthere is a signal noise when receiving radio stations
with an indoor antenna, adjust the position or direction of the
antenna.
INSTALL THE PLAYER IN A WELL VENTILATED PLACE
AWAY FROM HEAT AND HUMIDITY
Do not install the player in a location subject to direct sunlight, or
near a stove or radiator, etc. This could adversely affect the cabinet
and internal components. Also avoid installing the player in a
humid or dusty location. This could result in a malfunction or
accident. Do not install near a cookstove where the player could be
affected by smoke, steam, or heat.
Take the following precautions to avoid accidents!
Be careful not to catch your finger in the disc table section while
the disc table is being retracted into the unit. Also, be careful
that children do not put their hands inside the unit while the disc
table is open. This may cause injury.
STRIPE PATTERNS APPEARING ON A TV PROGRAM
Stripe patterns may appear during a TV program ifthe player unit
is turned on, depending on the quality of reception of the TV
station. This is neither a malfunction of the television nor the
player. If stripes appear while watching TV, or when watching TV
for a long period oftime, turn the player off.
~
~
CONDENSATION
Moisture will form in the operating section of the player if the
player is brought from cool surroundings into a warm room or if
the temperature of the room rises suddenly. When this happens,
player's performance will be impaired.
To prevent this, let the player stand in its new surroundings for
about an hour before switching it on, or make sure that the room
temperature rises gradually.
The same symptoms of condensation may be caused during
summer, if the player is exposed to the breeze from an air
conditioner. In such cases, change the location of the player.
AVOID SOURCES OF HEAT
Do not put the player on sources of heat, such as an amplifier.
When installing with audio components on a rack, avoid
components that generate heat, by placing the player below such
components where there is adequate ventilation and not much
dust.Avoid placing the player on surfaces such as shaggy carpets,
beds, and sofas which may block ventilation under the player and
cause damage.
CAUTIONS FOR AUTOMATIC LOADING
OPERATIONS
Since this player has an automatic loading construction, use the
button on the player or the remote control unit for opening and
closing of the disc table. To avoid damage, be careful not to
apply any force to the moving disc table.
Even when the player is in the pause mode, the disc-drive motor
is still revolving. Since leaving the player in this condition can
shorten the lifetime ofthe motor, do not leave the player in the
pause mode for a long period of time. Also, to prevent the
damage to the screen, do not use the unit for a long period of
time under conditions in which the screen display (monitor) has
been displayed characters (for example, power-ON mode, CD
PLAY, PAUSE).
CAUTION WHEN INSTALLING IN A RACK HAVING A
GLASS DOOR
Be careful to install so that when the disc table is opened by remote
control it does not hit the glass door. Strong force against movement
of the disc table may cause breakdown.
POWER-CORD CAUTION
Handle the power cord by the plug. Do not pull out the plug by
tugging the cord and never touch the power cord when your hands
are wet as this could cause a short circuit or electric shock. Do not
place the unit, a piece of furniture, etc., on the power cord, or pinch
the cord. Never make a knot in the cord or tie it with other cords.
The power cords should be routed such that they are not likely to
be stepped on. A damaged power cord can cause fire or give you
an electrical shock. Check the power cord once in a while. When
you find it damaged, ask your nearest PIONEER authorized service
center or your dealer for a replacement.
1
CLEANING CARE
Use a soft, dry cloth for cleaning. For stubborn dirt, soak the cloth
in a solution of household detergent diluted using one part detergent
to five or six parts water; wring well first and wipe. Use a dry cloth
to wipe it dry. Do not use any volatile agents such as benzine or
paint thinner, as they may damage the surface of the player.
Abnormal functioning of this unit may be caused by static
electricity, or other external interference. To restore normal
operation, turn the power off and then on again, or unplug the
AC power cord and then plug it in again.
Only one disc can be loaded at anyone time. Loading a LaserVison
Disc, a Compact Disc, an 8-cm Compact Disc or a Compact Disc with
Video on top of one another may result in breakdown, or in scratch-
ing of the discs.
Please only load one disc at a time.
This player is to be used exclusively with the NTSC color system.
Please use NTSC LaserVision Disc or NTSC Compact Disc with Video
only. PAL and SECAM system discs cannot be used with this player.
1---------
<VRB1139
5
>
En
I
FEATURES AND FUNCTIONS OF THE PLAYER
Gamma-Turn System - Two-Side Continuous Playback
With this function, both sides of a two-sided LD can be played
consecutively, eliminating the need to turn the disc over when the
first side is completed.
A Side++B Side Continuous Playback Programs
Through the use ofthe Gamma-Turn system, programs which go
from side A to side B or from side Bto side A can be freely created.
Full Digital Processing System
Virtual elimination of analog processing assures high picture
quality with minimal distortion. Thanks to the field correlation
digital video processor, the picture is dimensionally balanced with
high resolution and high SIN.
Digital TBC system
A digital TBC system is used for correcting jitter in the picture
processing circuitry, featuring a wide correction range, minimal
signal degradation and high-quality picture reproduction.
3D Digital VICSeparation Circuitry
This circuitry memorizes a scene, and immediately compares it
with the current scene to achieve
interference and cross color interference than 3-line
(2D), with no loss in horizontal, vertical, and diagonal resolution.
'-Bit DLC D/A Converters
D/A
converters are devices for transforming digital signals into
analog signals. The
advanced 1-bit conversion system. Compared to conventional
converters, this system has the following advantages:
• Theoretically no zero cross distortion is generated .
• The system is free of non-linear distortion throughout the
frequency range.
• High-precision operation can be obtained without adjustments.
With this type of conversion, there is no loss of music quality even
at minute signal levels. Moreover, the noise shaping function
necessary for 1-bit conversion is implemented using a double-step
noise shaping system. This system carries out noise shaping once
in the preliminary digital filter stage and then again in the
converter section, thus minimizing quantization noise and providing
extremely high-precision. Furthermore, two of these
are used independently for the left and right channels, realizing a
high signal-to-noise ratio and excellent separation.
Legato Link Conversion
This unit is equipped with Legato Link Conversion which makes
possible reproduction that exceeds the conventional limits of the
digital recording format.
Legato Link Conversion achieves music reproduction closer to the
original sound by deducing the original signal based on the
recorded signal.
D/A
converter used in this player employs an
VIC
separation with less dot
VIC
D/A
separation
D/A
converters
3D Digital NR
LDs contain inherent noise such as color smearing. To effectively
reduce this kind of noise, this unit features 3D Digital NR. Vou can
also independently adjust brightness and color. Naturally, since
processing is digital, there's no loss in picture quality.
Film Mode
When Film Mode is ON, the front panel display window and screen
display are turned off during playback, and the screen goes black
when changing disc sides. Play starting time and the time required
to change disc sides is shorter than during normal playback of
movie discs.
Program Playback
Up to 24 chapters can be programmed for playback in any desired
sequence.
Repeat Playback
Eight repeat modes - Memory Repeat, A-B Repeat, 1-chapter/track
Repeat, One-side Repeat, All side Repeat (for two-side LDs only),
Program Repeat, and Random Repeat - are available. (With discs
having no TOC, Random Repeat cannot be carried out.)
Special Play Functions
Thanks to the video circuitry's 8-bit digital memory, you can enjoy
a high quality picture and a range of different play modes even with
a long-playing disc (CLV).
Random Playback (For LOs, this function is only available with
discs containing TOC.)
All chapters of one side of a disc can be played in random order .
Hi-Lite/Intra Scan Playback
Hi-Lite Scan - CD, CDV-audio part
Playback starts from a point 1 minute after the beginning of the
track, and each track is played for about 8 seconds. Also, Hi-Lite
Scan playback can be started from the desired minute and
second on each track.
Intro Scan - LD, CDV-video part
The beginning of each chapter/track is played for about 8seconds.
Direct CD Function
Pressing DIRECT CD on the front panel instructs the unit to use the
CD disc table, which reduces the play starting time. In addition,
since the picture circuit does not function, the player eliminates the
interference between signals and reproduces more pure sound.
Last Memory Function
This lets you watch a LD part way through, and then resume
watching it later from where you left off.
Compatibility with Many Disc Types and Sizes
In addition to conventional LDs (12 inch, 8 inch), CDs (5 inch), and
CDV discs (5 inch), the player can play thin-type 8 inch LDs and 3
inch CD singles without an adapter.
Digital output terminals
This unit is equipped with both optical output and coaxial digital
output terminals.
6
<VRB1139>
En
This unit is a CD VIDEO SYSTEM compatible player which can play
CDs, CDV discs, and LOs.
• The marks shown in the right column are printed on the labels
and jackets of the corresponding discs.
This player can play the following seven types of discs without
using an adapter:
8 cm ] ~@--- Digital audio
(3 in.) ~ (max. 20 min.)
@D~~
DIGITAL AUDIO
Digital audio
(max. 74 min.)
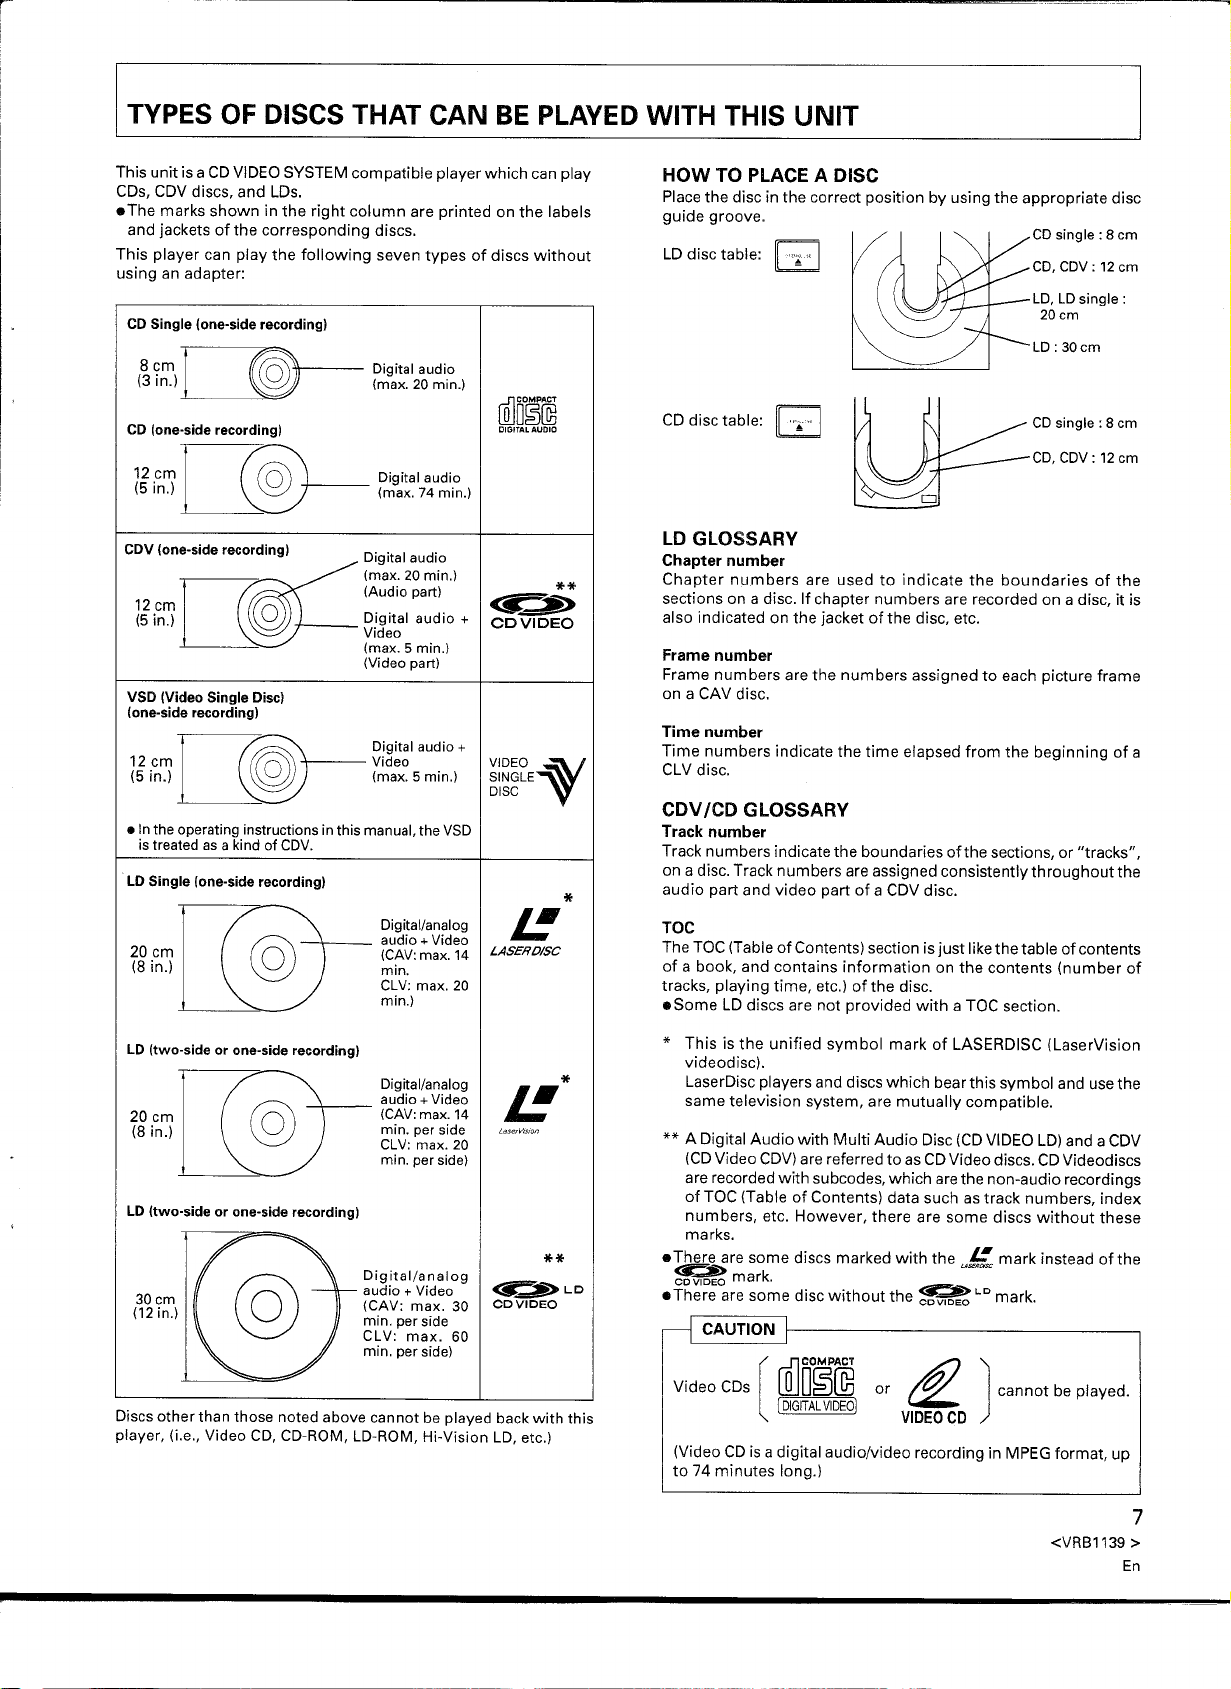
HOW TO PLACE A DISC
Place the disc in the correct position by using the appropriate disc
guide groove.
CD disc table:II"i"
I
CDV (one-side recording) Digital audio
(max. 20 min.)
(Audio part)
i~i~J
r-re@
~ Video
~
VSD (Video Single Disc)
(one-side recording)
@(@)-Digitalaudio+
12cm V~oo
(5 in.) @ (max.
[
.In the operating instructions in this manual, the VSD
is treated as a kind of CDV.
D!gital audio +
(max. 5 min.)
(Video part)
5
min.)
<it
CDVIDEO
VIDEO~
SINGLE
DISC
$>
**
*
Digital/analog
20
cm
(8 in.)
20 cm
(8
in.)
Discs other than those noted above cannot be played back with this
player, (i.e., Video CD, CD-ROM, LD-ROM, Hi-Vision LD, etc.)
audio + Video
(CAV:max. 14
min.
CLV: max. 20
min.)
Digital/analog
audio + Video
(CAV:max. 14
min. per side
CLV: max. 20
min. per side)
Digital/analog
audio + Video
(CAV: max. 30
min. per side
CLV: max. 60
min. per side)
e
LASEROISC
e
<it::">
CD VIDEO
*
LD
LD GLOSSARY
Chapter number
Chapter numbers are used to indicate the boundaries of the
sections on a disc. If chapter numbers are recorded on a disc, it is
also indicated on the jacket of the disc, etc.
Frame number
Frame numbers are the numbers assigned to each picture frame
on a CAV disc.
Time number
Time numbers indicate the time elapsed from the beginning of a
CLV disc.
CDV
ICD
GLOSSARY
Track number
Track numbers indicate the boundaries of the sections, or "tracks",
on a disc. Track numbers are assigned consistentlythroughoutthe
audio part and video part of a CDV disc.
TOC
The TOC (Table of Contents) section is just like the table of contents
of a book, and contains information on the contents (number of
tracks, playing time, etc.) of the disc.
• Some LD discs are not provided with a TOC section.
* This is the unified symbol mark of LASERDISC (LaserVision
videodisc).
LaserDisc players and discs which bear this symbol and use the
same television system, are mutually compatible.
**
A Digital Audio with Multi Audio Disc (CD VIDEO LD) and a CDV
(CD Video CDV) are referred to as CD Video discs. CD Videodiscs
are recorded with subcodes, which are the non-audio recordings
of TOC (Table of Contents) data such as track numbers, index
numbers, etc. However, there are some discs without these
marks.
• There are some discs marked with the
~ U~R=
CDVIDEO
• There are some disc without the ~
mark.
@Do~rn
(DIGITAL VIDEOI
(Video CD is a digital audio/video recording in MPEG format, up
to 74 minutes long.)
or
VIDEO CD
r£
e
mark instead ofthe
LD
mark.
J
cannot be played.
<VRB1139 >
En
7
TYPES OF DISCS THAT CAN BE PLAYED WITH
THIS UNIT
The CD VIDEO SYSTEM is the standard name for the" optical video
disc with digital audio" system that encompasses both LDs and
CDV discs.
The following mark is the standard mark for the CDVIDEO SYSTEM
and is found on all players and discs which conform to the CD
VIDEO SYSTEM format.
The following systems are included in the CD VIDEO SYSTEM:
<.!!it
»
CD VIDEO
.CDV (CD VIDEO CDV) discs
• LaserVision Discs (CD VIDEO LDs) containing digital audio with
sub codes.
• Compatible players which can play CDs and CDV discs .
• Compatible players which can play CDs, CDV discs, and LDs.
CD VIDEO LDs
A CD VIDEO LD is an LD with digital audio which is encoded with
sub codes (data such as TOC and track number data, excluding
audio and video signals).
Two types of standard LaserDisc are available - standard play
(CAV) disc and extended play (CLV) discs - which differ with
respect to their signal recording systems.
CAVDISCS
The jackets and labels ofthese discs are marked with a "Standard
Play Disc CAV" or "Standard Play" indication.
I
CARE OF DISCS
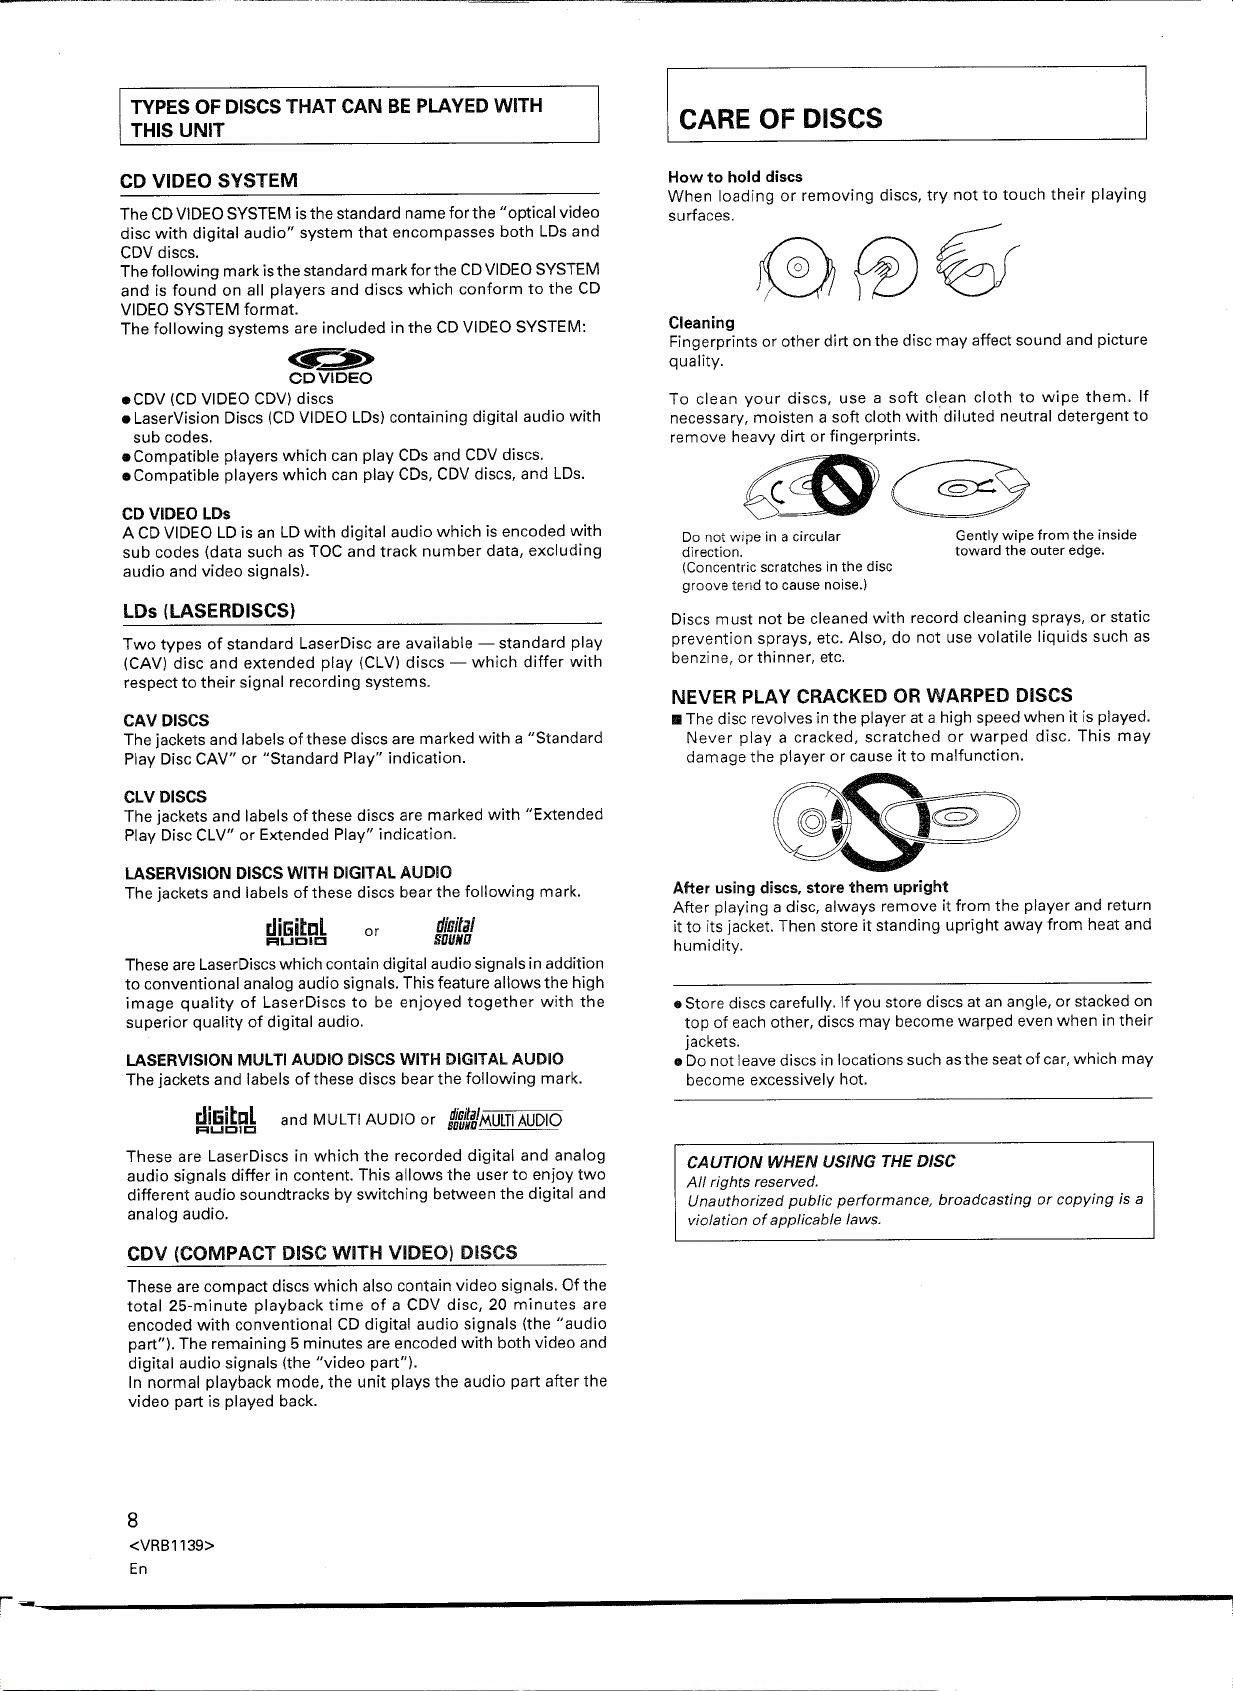
How to hold discs
When loading or removing discs, try not to touch their playing
surfaces.
Cleaning
Fingerprints or other dirt on the disc may affect sound and picture
quality.
To clean your discs, use a soft clean cloth to wipe them. If
necessary, moisten a soft cloth with diluted neutral detergent to
remove heavy dirt or fingerprints .
Do not wipe in a circular
direction.
(Concentric scratches in the disc
groove tertd to cause noise.)
Discs must not be cleaned with record cleaning sprays, or static
prevention sprays, etc. Also, do not use volatile liquids such as
benzine, or thinner, etc.
Gently wipe from the inside
toward the outer edge.
NEVER PLAY CRACKED OR WARPED DISCS
•• The disc revolves in the player at a high speed when it is played.
Never playa cracked, scratched or warped disc. This may
damage the player or cause it to malfunction.
CLVDISCS
The jackets and labels ofthese discs are marked with "Extended
Play Disc CLV" or Extended Play" indication.
LASERVISION DISCS WITH DIGITAL AUDIO
The jackets and labels of these discs bear the following mark.
diGital
RUDie
These are LaserDiscs which contain digital audio signals in addition
to conventional analog audio signals. This feature allows the high
image quality of LaserDiscs to be enjoyed together with the
superior quality of digital audio.
LASERVISION MULTI AUDIO DISCS WITH DIGITAL AUDIO
The jackets and labels of these discs bear the following mark.
~i~~p!
These are LaserDiscs in which the recorded digital and analog
audio signals differ in content. This allows the user to enjoy two
different audio soundtracks by switching between the digital and
analog audio.
These are compact discs which also contain video signals. Ofthe
total 25-minute playback time of a CDV disc, 20 minutes are
encoded with conventional CD digital audio signals (the "audio
part"). The remaining 5 minutes are encoded with both video and
digital audio signals (the "video part").
In normal playback mode, the unit plays the audio part after the
video part is played back.
and MULTI AUDIO or dJWU}MUlTIAUDIO
diuital
SOUND
After using discs, store them upright
After playing a disc, always remove it from the player and return
it to its jacket. Then store it standing upright away from heat and
humidity.
• Store discs carefully. If you store discs at an angle, or stacked on
top of each other, discs may become warped even when in their
jackets.
• Do not leave discs in locations such as the seat of car, which may
become excessively hot.
CAUTION WHEN USING THE DISC
All rights reserved.
Unauthorized public performance, broadcasting or copying is a
violation of applicable laws.
8
<VRB1139>
En
I
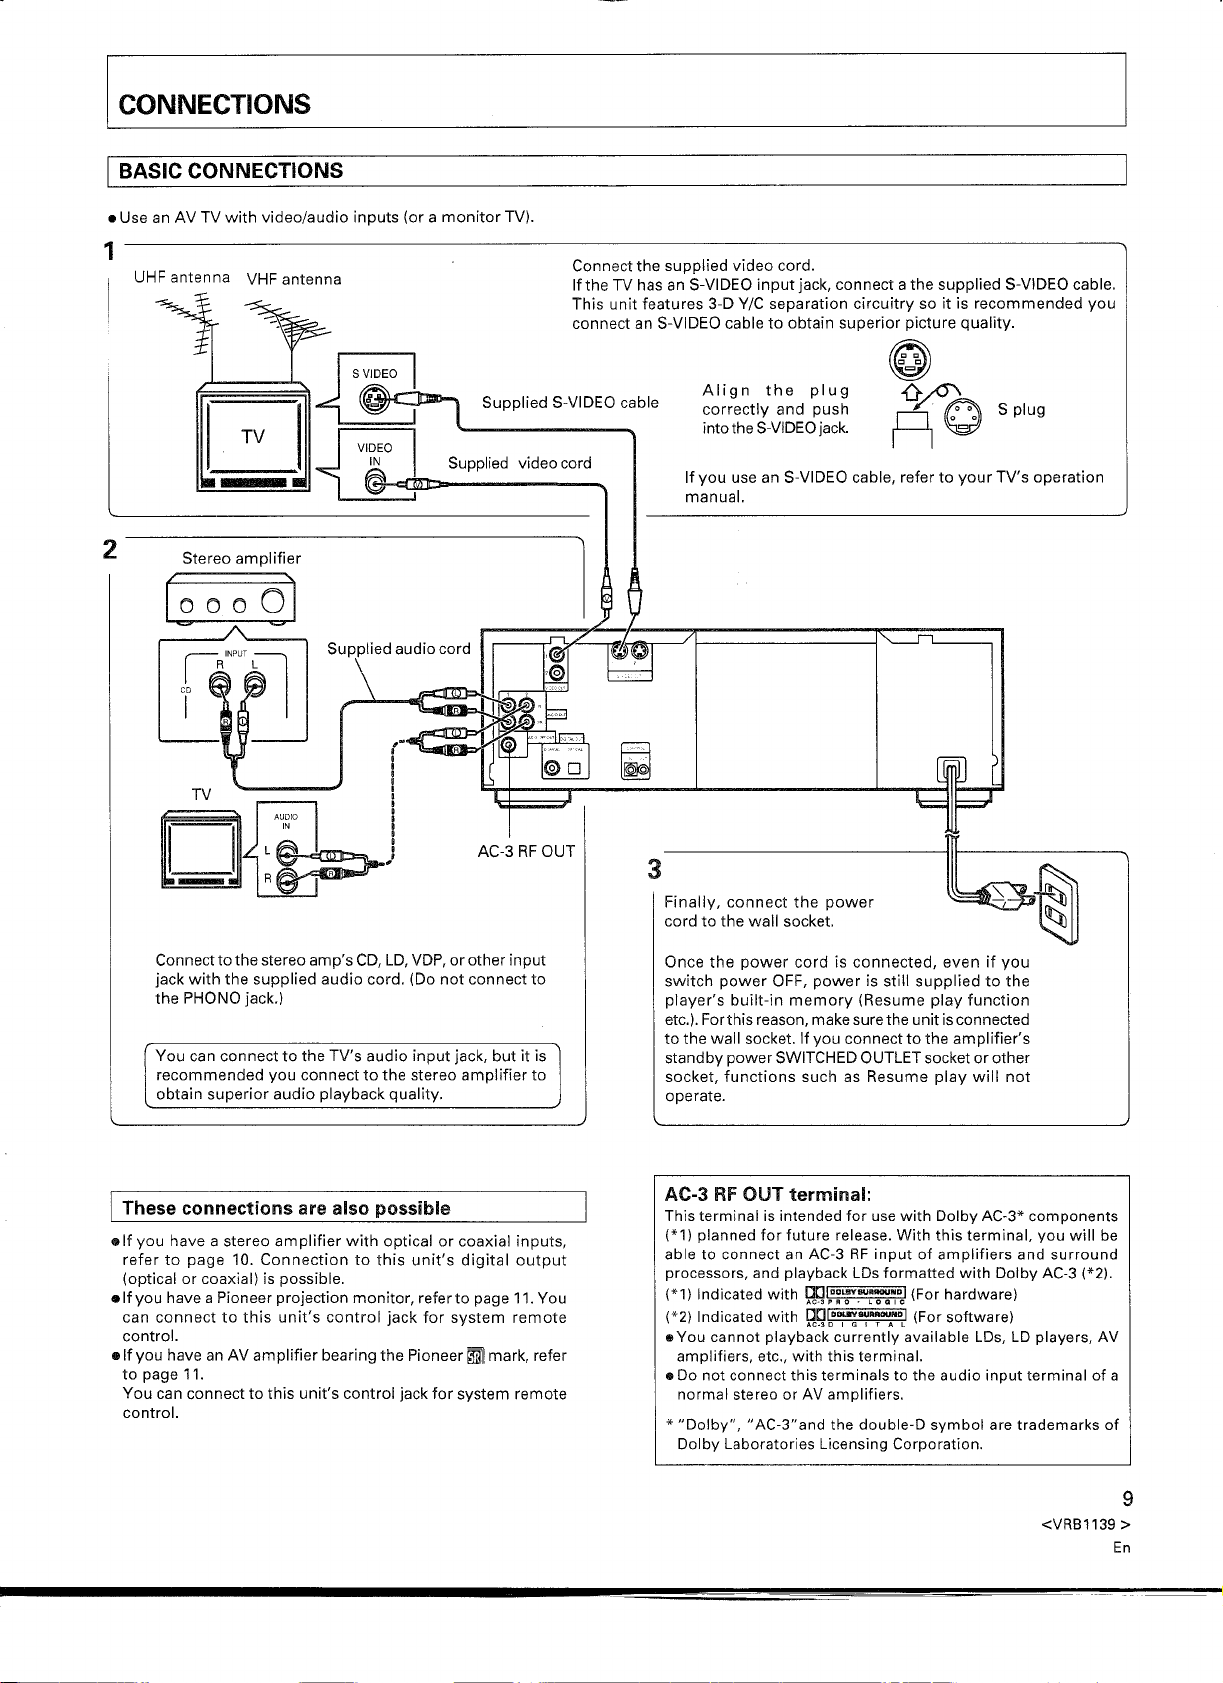
BASIC CONNECTIONS
Connect the supplied video cord.
Ifthe TV has an S-VIDEO input jack, connect a the supplied S-VIDEO cable.
This unit features 3-D
connect an S-VIDEO cable to obtain superior picture quality.
YIC
separation circuitry so it is recommended you
Stereo amplifier
rOOO OJ
<::>
~RINPUT~
CD
I
m
R
~~)
Align the plug
correctly and push
into the S-VIDEOjack.
If you use an S-VIDEO cable, refer to your TV's operation
manual.
,.
I
I
,
~
O~A
R~
Splug
I
Finally, connect the power
cord to the wa II socket.
Connectto the stereo amp's CD, LD,VDP, or other input
jack with the supplied audio cord. (Do not connect to
the PHONO jack.)
You can connect to the TV's audio input jack, but it is
recommended you connect to the stereo amplifier to
obtain superior audio playback quality.
I
These connections
elf you have a stereo amplifier with optical or coaxial inputs,
refer to page 10. Connection to this unit's digital output
(optical or coaxial) is possible.
.If you have a Pioneer projection monitor, refer to page 11. You
can connect to this unit's control jack for system remote
control.
.If you have an AV amplifier bearing the Pioneer ~ mark, refer
to page 11.
You can connect to this unit's control jack for system remote
control.
are also possible
Once the power cord is connected, even if you
switch power OFF, power is still supplied to the
player's built-in memory (Resume play function
etc.). Forthis reason, make sure the unit is connected
to the wall socket. If you connect to the amplifier's
standby power SWITCHED OUTLET socket or other
socket, functions such as Resume play will not
operate.
AC-3 RFOUT terminal:
This terminal is intended for use with Dolby AC-3* components
(*1) planned for future release. With this terminal, you will be
able to connect an AC-3 RF input of amplifiers and surround
processors, and playback LDs formatted with Dolby AC-3 (*2).
(*1) Indicated with gmD~':'~~':::~Dcl(For hardware)
(*2) Indicated with gmD~~.~NDLI (For software)
III
You cannot playback currently available LDs, LD players, AV
amplifiers, etc., with this terminal.
• Do not connect this terminals to the audio input terminal of a
normal stereo or AV amplifiers.
*
"Dolby", "AC-3"and the double-D symbol are trademarks of
Dolby Laboratories Licensing Corporation.
<VRB1139
9
>
En

The optical fiber cable and coaxial cable are not supplied with this unit. Use a separately sold optical fiber cable or coaxial cable for the
digital jack connections.
Connecting to the optical digital jack
• This unit can be connected to an amplifier equipped with an
optical digital jack.
Stereo amplifier
rooo6J
c::::::;>
'co::>
Finally, connect to the
wall socket.
• When using the OPTICAL DIGITAL OUT jack:
1. Remove the protective dust cap from this unit's OPTICAL
DIGITAL OUT jack.
2. Use an optical fiber cable to connect OPTICAL DIGITAL OUT
jack of this unit to the optical digital input jack ofthe amplifier.
• Align the plug ofthe optical fiber cable with the optical digital
jack and fully insert the plug to make a secure connection.
[ Connecting to the coaxial digital jack
.This unit can be connected to an amplifier equipped with a
coaxial digital jack.
NOTES:
• When making optical digital connections, this player can only be
connected to an amplifier which uses the same typeofoptical
transmissions/reception module.
• Fully insert the optical fiber cable plugs all the way into the jacks .
• Be
careful not to fold or crimp the cable. When coiling an optical fiber
cable for storage, make sure the diameter of the coil is 15 em (6
inches) or larger.
• Use an optical fiber cable with a lengthof3m(10 feet) or less.
• Protect the optical fiber cable plugs from scratches and dust.
• When the unit is not connected using an optical fiber cable, be sure
to keep the protective dust cap plugged into the optical digital output
jack at all time.
10
<VRB1139>
En
L.
Finally, connect to the
wall socket.

I
SYSTEM REMOTE CONTROL CONNECTION
WHEN COMBINED WITH OPTIONAL PIONEER
PROJECTION MONITOR (or COMPONENT DISPLAY)
Connect the VIDEO OUT jack of the player to the video input jack
ofthe projection monitor (or component display), and connect the
AUDIO OUT jacks of the player to the audio input jacks of the
projection monitor (or component display).
System Control
By connecting the CONTROL IN jack of the player to the remote jack
ofthe projection monitor (or component display), the system can
be controlled by the remote control unit ofthe player at the remote
control sensor ofthe projection monitor (or component display) .
• Use a commercially available cord with mini-plugs for the
connection.
Please refer also to the operating instructions for the projection
monitor (or component display).
NOTE:
When system control connections have been made, the player cannot
be directly controlled by the remote control unit. To operate the player,
aim the remote control unit at the projection monitor (or component
display).
PERFORMING SYSTEM CONTROL WHEN THE PLAYER
IS COMBINED WITH A PRODUCT THAT HAS THE ~
MARK
System control can be performed when the player is combined
with an optional AV amplifier, which can provide centralized
control of Pioneer products with the
OUT jack ofthe player to the video disc video input jack ofthe AV
amplifier and connect the AUDIO OUT jacks of the player to the
audio input jacks of the AV amplifier.
Connect the CONTROL OUT jack of the AV amplifierto the CONTROL
IN jack ofthe player using a commercially available cord with mini-
plugs .
• For details concerning the connection and operation methods,
please refer to the operating instructions for the AV amplifier.
ImiII
mark. Connect the VIDEO
Projection
monitor
Commercially available
cord with mini-plugs
(without load)
NOTE:
When a connecting cord has been connected to the CONTROL IN jack,
direct controlofthe player with the remote control unit is not possible.
Operate the player with the remote control unit by aiming it at the A V
amplifier.
Commercially
available cord
with mini-plugs
(without load)
/
11
<VRB1139
>
En

G)
POWERSTANDBY/ON switch
Press to switch power ON/OFF (STANDBY).
@
STANDBY indicator
This lights to indicate power standby.
When power is switched ON, it goes out.
®
Disc table (P. 7)
®
CD disc table (P. 7)
®
DIRECTCD button/indicator (P. 15)
®
DISCSiDE A/B button (P. 15)
(J)
Display window
®
Stop button
®
Play/Pause button
Press when power is OFF, and if there is a disc in the table, power
is switched on and play starts.
I
DISPLAY
(Il)
(P. 14)
(..-/11)
(P. 14)
®
OPEN/CLOSE button (~) (P. 14)
Press when power is OFF, and power is switched ON and the disc
ta ble opens.
QD
FL OFF display button/indicator
When you press the button, the indicator on top ofthe button lights
and the display window switches OFF. Switching off the display
prevents low level noise from adversely affecting sound quality.
Press again to switch the display ON.
@
FILM MODE button/indicator (P. 19)
Switch ON if desired when watching a movie disc.
When you switch it ON:
••The display window turns OFF. You can switch it ON/OFF with the
FL OFF display button
••Screen display (refer to P. 25 for display indications) switches
OFF.
II
When changing disc sides, the picture is usually the memorized
picture, but when using the Film mode, the screen is black.
@
Remote control sensor (P. 4)
D.
G)
Side A indicator
@
Function operation indicator
Indicates functions and operations. Refer to function explanations
for details concerning indications.
®
Side B indicator
®
1/L channel, 2/R channel indicator
Indicates audio output channel.
12
<VRB1139>
En
®
MIN/SEC indicator
Indicates play time in minutes and seconds.
®
TOTAL/REMAIN indicator
Indicates remaining play time (REMAIN) and the total play time of
the side (TOTAL).
(J)
FRAME/TIME indicator
Indicates frame number and elapsed play time.
®
Chapter/Track indicator
Indicates chapter number and track number.

I
REMOTE CONTROL
CD
POWER button (P. 14)
@AUDIO D/A button (P. 15)
® lighting button (P. 13)
® Program (PGM) button (P. 24)
® Chapter/Time (CHP/TM) button (P. 21)
® RANDOM button (P. 22)
(]) STROBE button (P. 19)
® LAST MEMORY button (P. 16)
® Highlight/lntro Scan (HIUTE/INTRO) button (P. 22)
@ ONE-SHOT MEMORY button (P. 20)
(jJ)JOG MODE button (P. 17)
@ DISC SIDE A/B buttons (P. 15)
@l
JOG Dial (P. 17)
® Memory (MEMO) button (P. 18)
@ SELECT button (P. 18)
@DISPLAY button (P. 15, 17,25)
@OPEN/CLOSE button (P. 14)
® REPEAT button (P. 23)
@l
REPEAT A/B button (P. 23)
® CLEAR button (P. 21 - 24)
@Number button (P. 14,21,24)
@ STEP buttons (..•••II/II~) (P. 16)
@MULTI-SPEED buttons (..•••/~) (P.16)
@SKIP buttons
@ PLAY button (~) (P. 14)
@SCAN buttons (..•••..•••/~) (P. 17)
@ PAUSE button (II) (P. 14)
@ STOP button (II) (P. 14)
® SHUTTlE ring (P. 17,18)
(I+ll/~)
(P. 15)
These buttons will
light up.
When the LIGHTING button is pressed, the buttons indicated in the
illustration will light for about 3 seconds.
The light will become dim and the range of the remote control
operation will become shorter when the batteries are exhausted.
If this occurs, replace both batteries with new ones.
NOTE:
The JOG MODE button lights up each time the button is pressed
regardless of the LIGHTING button setting.
<VRB1139
13
>
En

I
TO PLAY AN LD, CDV OR CD
1. Turn on the power of this unit.
If ~ on the front panel is pressed in the
STANDBY mode, the power is automatically
turned on and the disc table is opened.
OPEN
_ (ClOSE
g~ ...
~\
~,p~m ~
~ o~
o[pqoo
00000
00000
00000
0==
000=
3. Place a disc along the proper disc guide
groove.
CD/CDV : With the labeled side up.
LD: With the desired side's label up.
To play from the desired chapter or track
<Direct search>
Press the digit button of the chapter/track number to be played
first.
(Example) To play from chapter/track No.3
To search for chapter or track number 10 or above:
Use
0Qj
(Example) To enter 17
To enter 30 :
<Normal search>
Chapters can also be searched using CHP/TM.
(Example) To search chapter No. 17
The
button
:0Qj, [I]
0Qj ,0Qj ,0Qj,
ICHPfTM IICHPfTM IIJJOJ~
0Qj
button cannot be used in this case.
@]
4. Start playback .
• When ~/II is pressed in STANDBY
mode with a disc loaded in the
player, the power is turned on
automatically and playback starts.
After removing the disc from the disc table,
press ~ or ~/II to close the table.
Convenient function
When power is OFF (STANDBY), if you press the OPEN/CLOSE on
the unit, power switches ON, and the disc table comes out (Auto
Power function).
*
Precautions concerning disc loading
• Do not place more than one disc on the disc table. If two discs are
placed one on top of the other on the disc table, discs may be
scratched and/or a malfunction may occur.
• Playback is not possible unless the disc is placed properly.
14
<VRBl139>
En
To avoid malfunctions, be especially careful about the following
points:
• Do not place any object other than a disc on the disc table.
• Do not move the player while a disc is playing. This will cause the
disc to be scratched.
• Be careful not to catch your finger in the disc table section while
the disc table is being retracted into the unit. Also, be careful that
children do not put their hands inside the unit while the disc table
is open. This may cause injury.

To specify side A or B for play:
Side A refers to the upper side of a disc loaded in the table, and
B side refers to the reverse side. This is different from the actual
A and B sides ofthe disc.
To play side A only, press the DISC SIDE A without pressing
~/II.
After side A has finished, the player stops. To play side B
only, press the DISC SIDE B without pressing
has finished, the player stops.
-'/11.
After side B
Indications when disc sides change
eWhen changing from side A to side B
Side A - - - - - - - - - ,
Side B - - - - - - - - -
eWhen changing from side B to side A
SideA ---------~
Side B - - - - - - - - - ~
I
j...,J
I
Since the picture circuit is deactivated and the interference
between signals is eliminated with the Direct CD function, more
pure sound can be reproduced.
e When the Direct CD function is activated, the player does not
display information on the monitor screen.
eln Direct CD mode, time for starting play becomes short
compared with that of normal play operation.
Afi:er performing step 1 on the previous page, press the DIRECT
CD.
Each time AUDIO D/A is pressed during playback, audio output
is switched.
For example:
eto hear only the analog audio of a disc with digital audio
eto hear only one channel of stereo disc
eto select audio of the multiplex disc
LD
LD with digital audio
Audio source can be switched between digital audio, analog
audio, L channel and R channel of stereo audio.
digital audio _ analog audio _ Lchannel of
(stereo) (stereo) analog audio
c:
Rchannel?f _ L.channel?f _ Rchannel of
digital audio digital audio analog audio
e With a disc encoded with CX auto-switching signals
C
ex
off (stereo)_
ex
off (Rchannel) -
e With a disc encoded with CX auto-switching signals
r
stereo audio - L channel -- R channel
ex
on (stereo) -
ex
off (L channel) --
ex
on (L channel)
ex
on (Rchannel)
::=J
l
-J
J
To exit Direct CD mode:
Press DIRECT CD again.
To play an LD:
Cancel the Direct CD mode. Otherwise, theLDcannot be set on
the disc table.
NOTE:
During LD play, the player does not enter Direct CD mode even if
DIRECT CD ispr~ssed.
During CDV play, the player automatically turns on and off the picture
circuit accordingtothe video part or audio part in the Direct CDmode.
On screen display:
The information is displayed on the screen by pressing DISPLAY
on the remote control unit. Also, when programming or editing,
the information is displayed.
By turning off the screen display or canceling the input mode, the
player automatically turns off the picture circuit, and the screen
turns to black.
LD with analog audio
CDorCDV
r
stereo audio -.. L channel -- Rchannel
With a Multi Audio disc (anLDbearing the
MULTI AUDIO mark or the t.J~~MUlTIAUDIO mark), you can listen to
the various audio tracks recorded on the disc by using AUDIO to
select between the analog and digital tracks, and to select
between the left (1/L) and right (2/R) channels.
NOTE:
With AC-3 discs, sound is not heard when the analog R channel is
selected.
Discs marked with theD~mark
Discs marked D~ are recorded with the CX noise reduction
system for powerful audio reproduction with little noise. (Analog
audio only) However, some discs marked D~ are not encoded
with the signals necessary to instruct the unit automatically
switch on the CX system. If sound is noisy or undulates when a
disc with a D~ mark is played, press AUDIO D/A on the remote
control unit.
eD~ is a trademark of CBS Inc. This player meets the CX
EXPANDING SPECIFICATION.
!l.i!i~p~
mark and the
::=J
Searching for the
beginning of the
chapter (track)
currently playing.
II -
Searches fot the
chapter (track).
SKIP beginning of the next
II
1+1I
I I~
Press a button repeatedly or hold it depressed (only with the
remote control unit); the chapters (tracks) will be skipped
successively.
15
<VRB1139 >
En

Reverse
g
--II ...•
11
STEP
I I
11.-
11--
Forward
Press for reverse
playback.
When MULTI-SPEED is pressed once, playback speed becomes
1/8 ofthe normal playback. Each time the same button is pressed,
playback speed changes as shown in the table.
Automatic picture stop
Some of discs contain a recording of a special code called the
"picture stop code", which turns normal play or slow play
automatically into still frame display.
To cancel the automatic picture stop operation, press and hold
~/II
for more than 2 seconds until "PSC ON" (picture stop cancel
ON) is displayed on the screen. To re-activate, press and hold ••
for more than 2 seconds again until "PSC OFF" is displayed.
When playback of an LD is stopped, it can be resumed from
where it was interrupted.
In standby mode, by pressing LAST MEMORY the power is
automatically turned on and playback of the loaded disc is
resumed.
MULnSPEED
..•• I I .-
LAST
MEMORY
Press for forward
11--playback.
speed dislay
1/8
1/2
x2
1/2
1/8
1/30
During Multi-speed playback:
Sound is not output.
/11
Playback of the last played part, repeating normal playback for
about 2 seconds and fast-forward playback alternately, then
normal playback from the point slightly before where playback
is stopped.
Repetition of normal playback for about 2seconds
and fast-forward playback.
Playback speed
1/8 of the normal playback
half the normal playback
twice the normal playback
half the normal playback
1/8 of the normal playback
1/30 of the normal playback
~)
After playback of an LD is stopped by pressing
in the player. Press LAST MEMORY.
To resume playback from where playback is stopped:
position slightly before the
playback is stopped.
Press LAST MEMORY once. Playback starts from the point
slightly before whereIIis pressed.
position where playback is
stopped.
16
<VRB1139>
En
II,
leave the disc
Press LAST MEMORY twice.
Playback starts from the beginning ofthe disc, repeating normal
playback for about 2 seconds and fast-forward playback
alternately. Then player enters normal playback mode from the
point slightly before whereIIis pressed.
When LAST MEMORY is pressed during fast-forward playback,
normal playback starts from the point slightly before where
previous playback was stopped.
NOTES:
• Last memory function is carried out only for playback of an Lo. With
CO
or COV, Last memory does not function.
.If.- is pressed after playback is stopped by pressing
starts from the beginning of the disc.
• Leave the disc in the player after playback is stopped. If the disc is
once removed, Last memory does not function.
• Always connect the power cord to the active AC outlet.
II,
playback

Using the Shuttle Ring and Jog Dial changes playback speed and
direction. This function is useful to search for a desired passage.
SCAN PLAY SCAN
II - II II II II - II
JOG MODE button/Jog
indicator
Jog dial (LD/video part of CDV)
Playback is advanced according to the speed and direction of
rotation of the JOG dial. Both forward and reverse playback is
possible, and frames can be advanced at speeds of 1/2 speed,
normal speed, and double speed. Rotating the jog dial clockwise
forwards playback. Conversely, rotating it counterclockwise left
reverses playback. To use the JOG dial on the remote control
unit, first press JOG MODE so that Jog indicator lights. During
playback of an LD or CDV video part, when the JOG dial stops
rotating, the frame is displayed.
Shuttle ring
While rotating the SHUTTLE ring, playback advances or reverses
at high speed. There are four scan modes which can be selected
with rotational angles of the SHUTTLE ring.
x2 speed: Slightly rotate the SHUTTLE ring. Scan speed becomes
about x2 the normal playback speed.
x5 speed: Further rotate the SHUTTLE ring. Scan speed becomes
about x5 the normal playback speed.
Low Scan mode: Further rotate the SHUTTLE ring. Scan speed
becomes about x10 the normal playback speed.
High Scan mode: Further rotate the SHUTTLE ring. Scan speed
becomes about x20 the normal playback speed.
8G
cs
0]00
g
II -
When the button is pressed, scan speed is x10 the normal
playback speed for about two seconds and then becomes x20
the normal playback speed.
To switch the screen display, press the DISPLAY button.
eWith video part of CDV, High Scan mode cannot be carried out.
e CDs or audio part of CDVs : Sound is heard at low volume level
while scanning.
Others: Sound is muted.
To resume normal playback after using the JOG dial:
Press PLAY~.
When not using the JOG dial on the remote control unit, set JOG
MODE to OFF.
Although JOG MODE will automatically switch OFF (The Jog
indicator goes out) approximately 5 minutes after you stop operating
the JOG dial, it is recommended that you set JOG MODE to OFF as
soon asyou finish using the JOG dial in orderto prevent unnecessary
battery consumption.
Notes on CAV:
While scanning, noise may occur on the screen. This is not a
malfunction.
Notes on CLV:
• While scanning, the color of the image may fade out or the image
sometimes fluctuates.
lit
The scan speed is different between inner tracks and outer tracks.
<VRB1139 >
17
En

I
PICTURE QUALITY ADJUSTMENT (V-DNR 3D)
When playing some LDs, there may be noise or color distortion. 3D digital NR reduces this noise and color distortion. You can independently
adjust luminance (brightness) and saturation (color) as desired. This unit also features 3D
improved SIN ratio with still images and images that move very little, turn the shuttle clockwise for increased 3D
fast moving images, turn the shuttle counterclockwise to move from 3D
Selecting picture quality
.Select with the remote control's memory button. This unit has
three memories. You can memorize up to three picture quality
settings.
• When you plug in the power cord and first switch power ON, the
setting is STANDARD.
Y/C
separation to 2D
• Press MEMO once, and the current mode is displayed for two
seconds. Press the button while the current mode is displayed to
switch to the next mode .
Y/C
separation circuitry. For minimal cross color and
Y/C
separation.
Y/C
separation. For clearer
STANDARD:
This is the standard (recommended) setting.
Indication is displayed
for two seconds.
NR OFF:
This is the NR OFF setting. Other settings are the same as
STANDARD.
L_OFF
Indication is displayed
for two seconds .
• When picture selection is STANDARD with NR OFF, you can
confirm settings by pressing the SELECT. (Adjustment is not
possible.)
Select Y-NR with the SELECT, and adjust with the SHUTILE
ring. You can vary noise reduction for brightness (in 10 steps).
At the maximum setting, noise reduction is maximum.
_J
MEMORY:
These are your settings. Confirm setting adjustments by pressing
the SELECT. This puts you in the Picture Quality Adjustment
mode.
•
l,mmv
2
J
•
L·,'"
• When you plug in the power cord and first switch power ON, the
settings in MEMO are STANDARD.
Select C-NR with the SELECT, and adjust with the SHUTILE
ring. You can vary noise reduction for color (in 10 steps). Atthe
maximum setting, noise reduction is maximum.
J
Memory 1
"VNR
Select Sharp with the SELECT, and adjust with the SHUTTLE
ring. Atthe maximum setting, vertical edges are attheir sharpest.
~ ~~ ~·O-·~·~ M
~ lbdJ •
V-DNR 3D 3D.
Minllllll--- Max
C NR
Minlll-· -- -- Max
3D Vie
Minlll-· ---- Max
Sharp
Minll.l· ---- Max
Standard settings
Settings adjusted with
the shuttle ring
e.mNoR",,'
y
Minllll •• ---Max
C-NR
Minill-' ----
Y/e
Minill-' ----
Max
Max
~ sHGnLE';Og ~." ""••••. ----~
.With video output jack connection, picture quality is
changed by Y-NR and C-NR only.
• With S-Video output connection, picture quality is changed
by Y-NR, C-NR, 3D
• If you do not operate the memory button or shuttle ring for 15
seconds, setting displays go off, but setting data is stored in
memory.
18
<VRB1139>
En
Y/C,
and Sharp adjustments.
Memory-1
Y-NR
"'C-NR
3D.
vie
Sharp.
Select 3D
ring. The maximum setting is for maximum 3D
Y/C
with the SELECT, and adjust with the SHUTILE
Memory-1
Y-NR
C-NR
"'30.
vie
Sharp
Reduces cross color with
images that move very
Increased 2D : Assures a clear picture
little .
with fast moving images .
Min
111111-- -
Minlll-· ---- Max
Minll.-·----Max
Minl.l.o----Max
Y/C
Minl ••••• --- Max
Minl •• -· ---- Max
Minill-' ---- Max
Min ••••• ---- Max
Max
separation.

NOTE:
• During play of a CDV's audio part, the selected picture quality settings
for the video part are stored in memory.
• Picture quality settings are stored in memory until the power cord is
disconnected from the wall socket.
• You can adjust V-DNR 3D settings even when not playing a disc, but
you won't notice the effect of these adjustments until images are
displayed on screen.
• Depending on the disc and the scene, it may be difficult to see the Y-
NR, C-NR noise reduction effect, 3D Y/C cross color reduction, and
sharpening of edges with Sharp.
• With pictures of still images, Y-NR and C-NR are OFF, regardless of
settings, and 3D Y/C is set to minimum. Which means that adjust-
ments for still images will change setting values (displayed values)
but not picture quality. (CAV disc Y-NR, C-NR, Sharp are also effective
for still images.)
• When you set V-DNR 3D to STANDARD OFF, adjustments are not
possible, but pressing the Select button displays settings for two
seconds.
Press FilM MODE on the front panel.
,,1/
-0-
/FILM"
MODE
\\
The FILM MODE indicator will light.
Set to ON in accordance with your tastes, particularly when
viewing
When the film mode is ON:
• The display in the front panel display window turns off (can be
• The screen display (see page 25) does not function.
Still with Sound Playback
With the Still with Sound Playback function, you can stop the
video
normal playback of the audio part.
movie
discs.
turned on/off using the FL OFF).
image and display a still frame while continuing to listen to
_ STROBE
During normal playback, press
STROBE when the desired scene
g~
appears on the screen.
• The screen is blacked (blanked) while changing disc sides.
• The TOC is not read, in order to shorten the side-changing time
as much as possible. As a result, random playback cannot be
performed,
the remaining time ABS time and total time displays will not
function. (These displays will function normally if the disc is
played back once before using the film mode.)
• Press the Film Mode button once more to switch OFF.
NOTE:
When the film mode is ON, the display in the front panel display
window will not appear even when the power is turned on. In
addition, the player memorizes the ON/OFF conditionofthe film
mode even if the power is turned off, so the display will remain off the
next time power is turned on. To turn the display on again, press FL
OFF.
The screen isfrozen at the current frame and the audio continues
playing.
To resume normal playback:
Press PLAY~.
even
when the discs contain TOC codes. In addition,
Strobe Motion Playback
With the Strobe Motion Playback function, the still frame displayed
using the Still with Sound Playback function is replaced with
successive still frames at regular intervals (variable), resulting in
a strobe motion effect.
STROBE
-
After pressing STROBE, press
STROBE.
g~
The still frames shown on the screen are replaced in sequence
according to the selected replacement interval, while the audio
continues as normal.
By repeated pressing of STROBE, one of four different
replacement intervals can be selected.
STROBE button
[
Normal playback is carried out at 30 frames/second.
In order to maintain normal audio playback, faster than normal
playback modes such as x2 are not provided.
To resume normal playback:
Press PLAY~.
Screen
display
STROBE
1/90 Every 3 seconds
1/30
1/8 Every 8 frame
1/30
1/90 Every 3 seconds
Replacement interval
Still
Every second
Every second
<VRB1139 >
19
En

The One-Shot Memory function stores the image of a single
frame in the player's memory. When the One-Shot Memory
function is activated and playback ofthe current disc is completed,
the stored image is recalled and displayed on the screen. Since
the image is displayed even after playback is completed, this
function is convenient for displaying an image on the screen
while changing discs. This function also allows you to change
discs and listen to the audio of a CD or CDV disc while the image
remains on the screen as a background video image.
ONE·SHOT
MEMORY
(\
•••
-----
One-Shot
The frame displayed when the button was pressed is stored in
memory.
"One-Shot" is displayed on the TV screen for a few seconds.
During normal playback, press
ONE-SHOT MEMORY when the
desired scene appears on the
screen.
...J
After playback is finished, the memorized frame appears on the
screen. In this state, even if you change discs the scene displayed
on the TV screen does not change. To cancel the One-Shot
Memory function in order to play the video from another disc,
press ONE-SHOT MEMORY again.
With CDV discs, the following operation can also be performed:
1. Press ONE-SHOT MEMORY during playback ofthe video part.
2. Perform a direct search to the audio part.
• The memorized image ofthe video part is displayed on the
screen while the audio part is played back.
NOTES:
• With the One-Shot Memory function, since the player memorizes
the selected frame by recordiing its address, a frame which is
slightly different than the one you thought you selected may be
displayed.l,/so, ifseconds are not recorded on the disc, a completely
different frame may be displayed.
• While the memorized image is displayed on the TV screen, the
character display will not appear on the screen. The display on the
player can be switched by using DISPLA Yon the remote control
unit.
• With two-sided LOs, if disc side is switched after ONE-SHOT
MEMORY is pressed during playback, the One-Shot Memory function
will be canceled,
• One-Shot Memory does not function in the Direct CD mode.
20
<VRB1139>
En

TO
SEARCH FOR A PARTICULAR TIME/FRAME -
Time Number Search/Track Time Search/ASS Time Search/Frame Number Search
1. Press CHP/TM during playback.
When the display shows chapter No., press this button.
2. Enter
2. Press SKIP ~ or ~ so that the desired track number
3. Enter the track time (elapsed time from the beginning of the
1. Press CHP/TM so that "Ab" appears in the front panel display
2. Enter the elapsed time from the beginning of the disc with the
I:Il
rn,
Wand
[I]
If you make a mistake during entry:
Press CLEAR to reset the time number to "0.00", and then
press the correct digit buttons.
appears in the front panel display window.
specified track) with the digit buttons (0 - 9).
window. (On the monitor screen, "ASS" appears.)
digit buttons (0 - 9).
with the digit buttons.
CAUTION
If a disc does not contain information on the digits of seconds,
specify the time number only as far as the minute digits.
3. Press PLAy ••...
Playback starts from the specified elapsed time.
Any desired frame can be searched for by specifying its frame
number.
1. Press CHP/TM during playback. When the display shows
chapter No., press this button again. "Frame 0" is displayed.
NOTES:
•• The + 10 button does not function .
• If you make a mistake during entry, press CLEARand press the correct
digit buttons.
To exit search mode:
Press CLEAR.
When PLAy ••..on the remote control unit is pressed:
A still frame is displayed (LD or video part of CDV). To start normal
playback, press PLAy ••...
21
<VRB1139 >
En

Random Playback allows all chapters/tracks to be played in random
order.
• If RANDOM is pressed during Random playback, the current
playing order is canceled and random playback starts in another
order.
.In LD which contains TOC, first press ~ and then press RANDOM.
RANDOM
To stop Random Playback:
Press •.
During Random Playback:
• When the ~ is pressed, the playback order of chapters/tracks is
changed.
• When the f+Ol is pressed. the playback returns to the beginning
of the chapter or track being played.
• Random playback is canceled by pressing CLEAR. Playback
continues in normal playback mode.
NOTES:
~
• With Random Playback, chapter No. 0 will not be played .
• It is not possible to play back the programmed contents in random
order.
Press in stop mode to play an 8-second period from 1minute 00
seconds to 1 minute 8 seconds of every track in sequence.
The "Hi lite" is displayed during this operation.
When the desired track is played, press~. The unit enters play
mode.
Search
Track 1
Time 1.30
Search
Track 2
Time 1.30
HILITE
/INTRO
~
~\
Intro Scan (LD or video part of CDVI
When HILITE/INTRO is pressed, the beginning of each chapter
is played for about 8 seconds. The "Intro" is displayed in the
Intro Scan mode.
r-
Search
Chapter 1
Search
Chapter 2
NOTE:
If the button is pressed in play mode, the 8-second Hi-Lite scan
starts
from that moment. For example, if the button is pressed at 1
minute 30 secondsoftrack No.2,8seconds from1minute 30
seconds to 1minute 38 seconds of every remaining track will be
played.
22
<VRB1139>
En
When the desired chapter or track is played, press •••. The unit
enters play mode.
• With CDV, Intro Scan starts with the video part, and then the
audio part will be played with Hi-Lite Scan.
NOTE:
With discs which do not contain chapter numbers, Intro scan cannot
be operated.

REPEAT
PLAY
REPEAT
REPEAT
LB
o
Press REPEAT A-B at the point
you want to see or listen to
again (point A).
Chapter/Track Repeat - To repeat the current
chapter or track
_ REPEAT
~0
Press REPEAT while the chapterltrack to be repeated is playing.
When the end of the chapter/track is reached, the player returns to
the beginning ofthe chapter/track and the chapter/track is played
back repeatedly.
When you wish to return to point
A, press ••.on the remote control
unit.
(\
Press REPEAT A-B at the start
point of the section to be
repeated.
I
Program Repeat - To repeat a program
With the program repeat function,you can repeatedly play
programmed chapters or tracks in their programmed order.
Press REPEAT on the remote control unit while the program is
being played.
I
Random Repeat - To repeat a random play
Press REPEAT during random playback.
With the random repeat function, you can repeatedly play the
chapters or tracks in random order.
Press REPEAT A-B at the end
point of the section to be
repeated. Playback returns to
the beginning ofthe section and
the section is repeated
continuously.
,)
Press REPEAT twice.
When playback reaches the end of the playback side, the player
returns to the beginning of the disc and the same side is played
back repeatedly.
To exit repeat mode:
Press CLEAR.
To specify a different point in Memory Repeat mode:
Press CLEAR to cancel the previously memorized point, and repeat
the same operation as shown above. The previously memorized
point is erased and replaced with the new point.
Two-Side Repeat - To repeat both sides of a disc
(for two-sided LDs only)
PRESS THREE
TIMES
Press REPEAT three times. When playback of side A finishes, side
B is played back, and when playback of side B finishes, side A is
played back again.
Memory Repeat and A-B Repeat with COV discs:
These repeat functions can only be carried out within the video part
or within the audio part, and cannot be carried out between the two
parts.
With LOs which have no chapter numbers:
Chapter repeat cannot be carried out.
23
<VRB1139 >
En

TO PLAY ONLY
Selected chapters (LD) or tracks (CDV/CD) can be played in any
desired order (max. 24 chapters or tracks).
DESIRED SCENES/TRACKS -
Display with a CD/CDV
,. 3 O. 12
Program Playback
Total Time
a
0.00
~--
2. Select the desired chapters or tracks.
With two-sided, LDs, first specify side A or side S with DISC SIDE
A or S and then enter the number ofthe desired chapter with the
digit buttons.
Example: To program chapter 9 on side S, chapter 7 on side A.
and chapter 18 on side S, in that order:
Programmed
chapters
With single-sided LDs, CDs, and CDV discs, just enter the
number of the desired chapter or track with the digit buttons.
Example: To program CD tracks 9, 7, and 18 in that order:
If you make a mistake during entry:
Press CLEAR and enter the correct number with the digit
buttons.
Total Time Program
3 29 .23 Step-4
Number of programmed
tracks and total play time
Programmed track
numbers
9 07 18 ~--
Program
Step-1
I
To check the program contents
During program playback or in stop mode, press PGM to display
the program contents on the monitor screen. When PGM is
pressed again, the program contents disappear.
I
To modify the program contents
To deleteOrchange a programmed chapter/track or pause:
1. Press PGM.
2. Press
3. To delete it, press CLEAR. To replace it with another chapter/
4. Press PGM to complete programming. Pressing ~ also
I
Press CLEAR to return to normal playback.
To clear the program contents:
• Open the disc table.
• Press CLEAR while in stop mode.
NOTES:
elf ~ is held depressed during Program Playback, the playback
• During program playback, ~ and ~ can be used to skip the
I-+<ll
chapter/track or pause to be changed.
track, enter the new chapter/track number with the digit buttons.
PressIIto enter a pause.
completes programming and starts program playback with the
new program contents .
• Programmed chapter/track being played cannot be erased or
changed .
• Programmed pause being engaged cannot be erased or
changed.
or ~ to place the cursor (~) on the left side of the
To clear the program playback
position will movetoanother chapter/track, but when ~
released, the next chapter/track in the program will be played. If
•.•• is
held depressed, the playback position returns to the begin-
ning of the current chapter or track being played, but it will not
beyond it toaprevious chapter or track in the program.
programmed chapters/tracks or pause.
is
go
A pause between tracks/chapters can also be programmed by
pressingIIinstead of the digit buttons.
If you make a mistake during entry:
Press CLEAR on the remote control unit and enter the correct
number with the digit buttons.
24
<VRB1139>
En

I
DISPLAY SWITCHING
DISPLAY allows you to display informations including the play mode and disc playing time on the screen. Each press of DISPLAY switches
the screen display as shown below.
Elapsed playing time oftrack being
played
Disc Time
Absolutetime or elapsed time from
beginning of disc play up to current
point of play.
Remain Time TRK
Remaining playing time until the
end of the disc
Remain Time ALL
Remaining playing time until the
end of the disc
Total Time
Total playing time of the disc
DiscTime
Elapsed playing time from the
beginning ofthe disc
Remain Time ALL
Remaining playing time until the
end of the disc
Total Time
Total playing time of the disc
LD discs without TOC:
Frame number (CAV)/Elapsed playing time (CLV) and Display-off
mode are switched alternately on the display.
Elapsed playing time of the disc
being played
Remain Time ALL
Remaining playing time until the
end of the disc
Total Time
Total playing time of the disc
Chapter/track No.
Time or frame number display
I
I
12.49
3
Disc Time
ABS 3.12
The screen display disappears automatically if you leave it for
a long time (for about 80 minutes or more) without any operation.
In this case, press any button on the remote control unit so that
the screen display will appear on the screen.
l
I
..,
PLAY
Disc side
Disc Time: Elapsed time from
the beginning of the disc
RemainTime: Remaining playing
time
Total Time: Total playing time
ABS : Absolute time
ALL: Of disc (remaining playing
time)
TRK: Of current track (remaining
playing time)
A: Audio part (CDV)
V: Video part (CDV)
Audio output level meter display:
During elapsed play time of the track mode of CD playback or CDV
(audio part) playback, the audio output level meter will be displayed
on the monitor screen.
NOTE:
In some cases, the display output level may differ from the actual
output level, but this is not a malfunction.
11•••.••••--------
•
1
3 12.49 PLAY
L 1111I1I1tIIllllllllii1
RllIlllllllllllllllllll I
0
<VRBl139
25
>
En

I
TROUBLESHOOTING
Incorrect operations are often mistaken for trouble and malfunctions. If you think that there is something wrong with this component, check
the points below. Sometimes the trouble may lie in another component. Investigate the other components and electrical appliances being
used.
If the trouble cannot be rectified even after exercising the checks listed below, ask your nearest PIONEER authorized service center or your
dealer to carry out repair work.
Symptom
1. Disc table is not ejected when
~ is pressed.
2. Disc table comes out.
3. Remote control does not work.
4.
Operation of the remote control
unit causes the TV to operate
improperly.
Abnormal functioning of this unit may be caused by static electricity,
or other external interference. To restore normal operation, turn the
power off and then on again, or unplug the AC power cord and then
plug it in again.
.Power cord is not properly plugged into AC
wall socket.
• Power switch is not turned on.
.Disc is dirty.
• The disc is not properly set on the disc table.
• Moisture has condensed on parts in the player. • Remove disc and let player stand for 1to 2
• Disc is warped.
• The CONTROL IN terminal on the rear panel is
connected to Pioneer projection monitior or
AVamplifier.
• Batteries are weak. • Replace batteries.
• There is an obstacle between the player and
the remote control unit. position.
• Remote control unit is not in a good location • Operate the remote control unit in front of the
for transmission.
• Some TV sets have remote control functions • Move the TV and the player further apart, or
that operate improperly in response to the
remote control unit of the player.
Cause Remedy
• Plug in power cord.
• Turn on power switch.
• Clean disc.
• Set the disc properly.
hours until it is dry .
• Change the disc.
.Aim
the remote control unit at the projection
monitor or AV amplifier.
• Remove the obstacle or shift the remote control
player.
cover the remote sensor of the TV during disc
playback.
26
<VRBl139>
En

Symptom Cause
Remedy
5. Disc is rotating but there is no
picture.
6. Picture continuously moves
vertically. properly.
7.
Particular disc does not
playback properly. The
playback stops in the middle cloth with diluted neutral detergent to remove
of the disc program.
Sound is unnatural or
8.
distorted.
9.
No sound output during .MULTI-SPEED or STILL/STEP playback is
playback.
10.During STILL playback, a part
of the screen image shakes. be some cases in which a fully still image cannot
11.CHAPTER SKIP, CHAPTER .Disc in which no chapter numbers are • Press DISPLAY to check if chapter number is
PROGRAM PLAY and
CHAPTER NUMBER SEARCH
cannot be performed.
12.Certain discs take too long to
search or are not searched. depending on the disc. (At this point, a slightly different scene from that
• The TV set is not turned on.
• Wrong connections from player to TV.
• The TV vertical-hold control is not adjusted
• The playing surface of the disc is dirty.
• The disc is warped. • Change the disc.
• CX system is turned ON for disc which has no
D~
mark.
being performed. Sound is output only during mode.
the normal play mode. The audio signals are
not output during other playback modes.
recorded is loaded. displayed.
• It takes time to read the recorded code,
.Turn on TV.
• Make correct connections .
.Adjust vertical-hold control on TV.
• Use a soft cloth and lightly wipe off the dirt from
the surface of the disc. If necessary, moisten a
heavy dirt or fingerprints.
.Press AUDIO D/A to turn CX system OFF.
• Press PLAY ~ to set the player to normal play
• Even ifthe disc is a standard play disc, there may
be obtained, but this does not mean that the
player or the disc is defective .
• Press CLEAR and picture will appear .
which has been searched for may appear.)
13.Certain discs take too long to
start or do not start.
14.The player takes too long to
find point A-B (INTERVAL)
REPEAT operation.
15.Picture other than instructed is
searched in TIME NUMBER
SEARCH mode.
• There are errors when the disc code is read. • Press. and stop the playback. Press PLAY ~ and
(There is no damage to the unit.)
.Same as item 12 above.
• Method of inputting numerals in the TIME NUMBER SEARCH mode differs, depending on whether
time number is recorded on disc in hours and minutes or minutes and seconds as shown below:
[e.g.112-minute search
• Disc in which time number is recorded in minutes.
ICHPfTM
I
U
"minutes"
• Disc in which time number is recorded in minutes and seconds.
I
CHPrrM
I
U
"minutes" "seconds"
start the playback again. (Repeat this operation
a few times.)
.Same as item 12 above.
(The repeat mode is canceled.)
I
PLAY
U
I
PLAY
I
I
27
<VRB1139 >
En

,
Symptom
Cause
Remedy
~6.Player stops immediately after • Disc is loaded upside down (CD, CDV, one-sided
playback started. LD discs).
7.No sound output.
S.Sound is distorted.
When troubles
When some troubles occur during use of the player, the following display (service number) appears on the display of the player and theTV
screen. If you are in those trouble, follow the "Remedy" below.
occur:
• The playing surface ofthe disc is dirty.
• Disc is not properly set on the disc table. • Set the disc properly.
• The stereo amplifier is not correctly connected.
• You are not operating the stereo amplifier • Refer to the operating instructions for the
correctly.
• The connection term inals and/or the plugs ofthe
connection cords are dirty. again.
.The plugs of the connection cords
disconnected, or are not fully pushed in.
• The player is in pause mode.
• The audio output jacks are connected to the
PHONO jacks.
• The connection terminals and/or the plugs ofthe
connection cords are dirty. again.
• The plugs of the connection cords are not fully • Push the plug in firmly.
pushed in.
• Load the disc correctly with the label side
upward.
• Use a soft cloth and lightly wipe off the dirt
from the surface of the disc. If necessary,
moisten a cloth with diluted neutral detergent
to remove heavy dirt or fingerprints.
• Connect the amplifier correctly .
amplifier, and operate the amplifier correctly.
.Clean the plugs and terminals and connect
are
• Make sure that connections are made correctly.
• Press PLAY •. and restore the player to play
mode.
• Connect to the AUX, CD, VDP, LD, or VCRjacks.
.Clean the plugs and terminals and connect
28
<VRBl139>
En
Displayed number Condition of the player
U1 A disc is not loaded correctly on the disc table. Or,
U2
FS
P2
l3
E4
HO
H1
AS on the condition of the player.)
a disc is dirty.
Two discs are loaded on the disc table. Or, a disc
is dirty.
(The displayed number after P, F, L, E differs
depending on the condition ofthe player.)
The player is in abnormal condition.
(The displayed number after A differs depending displayed number on the display of the player or
Remedy
Reload a disc corresponding to a disc guide on
the disc table.
Wipe the disc with a soft cloth.
Open the disc table and press •. again.
Load only one disc on the disc table.
Wipe the disc with a soft cloth.
Open the disc table and press •. again.
If the same service number is displayed, the
player is in abnormal condition. When requesting
service, please notify the displayed number on
the display ofthe player or on the TV screen (for
example, 'service number E 4').
When requesting service, please notify the
on the TV screen (for example, 'service number
H1').

I
SPECIFICATIONS
1. General
System LaserVision Disc system and
Compact Disc digital audio system
Laser Semiconductor laser wavelength 780 nm
Power requirements AC 120V, 60 Hz
Power consumption 48 W
Weight 10.6kg (231b 6oz)
Dimensions 459 (W) x 432 (D) x 145 (H) mm
17-5/16 (W) x 17 (D) x 15-11/16 (H) in.
Operating temperature +50C - +350C
(41°F_95°F)
Operating humidity 5 % - 85 %
(There should be no condensation of moisture.)
2. Disc
laserVision Discs
*Maximum playing times
30 cm standard play disc 1 hour/both sides
30 cm extended play disc 2 hours/both sides
20 cm standard play disc 28 min/both sides
14 min/one side
20 cm extended play disc 40 min/both sides
20 min/one side
Spindle motor speed
Standard play disc 1,800 rpm
Extended play disc 1,800 rpm (inner circumference)
to 600 rpm (outer circumference)
(For a 30 cm disc)
Compact Discs
DISC Diameter: 5-inch, 3-inch, Thickness: 1.2 mm
Rotation direction (pickup side) Counterclockwise
Linear speed 1.2 - 1.4 m/sec
*Maximum playing time 74 min. 12 cm discs
20 min. 8 cm discs
(For stereo playback)
3. Video characteristics (two pairs)
Format NTSC specifications
Video output
Level 1 Vp-p nominal, sync. negative, terminated
Impedance 75Qunbalanced
Jacks Both RCA jacks
4. S-Video output (two pairs)
Y (luminance) - Output level 1 Vp-p (75
C (color) - Output level 286 mVp-p (75
Jack S-VIDEO jack
Number of channels 2
5. Audio characteristics (two pairs)
Output level
During analog audio output 200 mVrms
During digital audio output 200 mVrms
Jacks Both RCA jacks
Number of channels 2
Digital Audio Characteristics
Frequency response
SN ratio
Dynamic range
Total harmonic distortion
Wow and flutter
4 Hz - 20 kHz
117 dB (EIAJ)
99 dB (EIAJ)
0.0017 %
Limit of measurement (EIAJ)
(1 kHz,40%)
(1 kHz, -20 dB)
6. Other Terminals
Control input/output Both miniature jacks
Optical digital output Optical digital jack
Coaxial digital output RCA jack
AC-3· RF output RCA jack
Q)
Q)
Compact Discs with Video
DiSC Diameter: 12 cm, Thickness: 1.2 mm
Rotation direction (pickup side) Counterclockwise
Linear speed Audio portion: 1.2 - 1.4 m/sec
Video portion: 11 - 12 m/sec
*Maximum playing time Video portion: 5 mill. (CLV)
Audio portion: 20 min. (Digital)
7. Accessories
Remote control unit 1
SizeUAM" (IEC R03) dry cell batteries 2
Video cord 1
S-VIDEO cable 1
Audio cord 1
Operating instructions 1
Warranty card 1
29
<VRBl139 >
En

Function
Standard Extended Compact Compact
play Disc play Disc Disc with Disc
(CAV)
(CLV)
Video
Basic Functions
Search Fast forward (forward and reverse)
Program Chapter/track program play
Repeat Repeat between 2 points YES
Trick play
Time display Elapsed time display
Two-side play
Single-side play
Pause
Stop
Chapter!Track skip
Direct chapter!Track number search
Frame number search
Time number search
Absolute time search
Program correction
Memory repeat
Chapter!Track repeat YES YES YES YES
One-side repeat
Two-side repeat
Program repeat
Random repeat
Still/Step
Multi-speed (Forward/reverse 4-level variable)
Jog dial/Shuttle ring
Absolute time display
Remaining track time display NO NO YES YES
Remaining total time display
Total number of selections, total time display
YES
YES YES YES YES
YES YES YES YES
YES
YES
YES
YES
YES
NO
NO
YES YES YES YES
YES
YES
YES YES YES YES
YES
YES
YES*1
YES YES YES*5 NO
YES
YES
NO
YES*1
YES*1
YES*1 YES*1 YES YES
YES
YES
YES
YES YES YES
YES
NO
YES
NO
~.
YES YES YES
YES
YES
YES
YES
YES*1
YES
YES
YES
NO
YES*1
NO
YES
YES
YES YES
NO
YES YES
NO
YES YES
YES
NO
YES
YES
YES*5
YES
YES
NO YES
YES
NO
YES
YES
NO
YES
YES
NO
YES
YES
NO
YES
YES
YES
Others
*1 Only disc with TOC
*2 Valid for analog audio playing a disc with theD~mark.
*3 Can only be used with discs with digital audio tracks.
*4 Audio part only
*5 Video part only
CX system ON/OFF
Auto Digital/Analog switch
One-shot memory
Audio channel selection (Stereo, 1/L, 2/R)
Hi-Lite scan
Intro scan
V-DNR 3D
Last Memory
YES*2
YES*3
YES
YES
NO
YES
YES
YES
NOTE:
Specifications and design are subject to possible modifications with-
out notice, due to improvements.
YES*2
YES*3
YES
YES
NO
YES
YES
YES
NO NO
NO
YES*5 NO
YES YES
YES*4 YES
YES*5
YES*5 NO
NO NO
NO
NO
30
<VRB1139>
En

PIONEER ELECTRONIC CORPORATION 4-1, Meguro 1-Chome, Meguro-ku, Tokyo 153, Japan
PIONEER ELECTRONICS
PIONEER ELECTRONICS OF CANADA, INC.
PIONEER ELECTRONIC [EUROPE] N.V.
PIONEER ELECTRONICS AUSTRALIA PTV. LTD.
PIONEER ELECTRONICS DE MEXICO
[USA] INC. PO. BOX 1540, Long Beach, California 90801-1540
300 Allstate Parkway Markham, Ontario L3R OP2, Canada
Haven 1087 Keetberglaan 1,9120 Melsele, Belgium, TEL: 03/570.05.11
SA
178-184 Boundary Road, Braeside, Victoria 3195, Australia, TEL: [031580-9911
DE C.V.
Augusto Rodin No. 128 PB Col. San Juan Mixcoac Mexico D.F. CP.03730 TEL: 52-5-598-3950
Published by Pioneer Electronic Corporation
Copyright©1995 Pioneer Electronic Corporation
All rights reserved.

Limited Warranty
WARRANTY PERIOD
For the period specified below from the date of original retail purchase (the warranty period) Pioneer Electronics (USA) Inc. ("Pioneer") warrants that
products distributed by Pioneer in the United States that fail to function properly under normal use due to a manufacturing defect when installed and
operated according to Owner's Instructions enclosed with the unit will be repaired or replaced with a unit of comparable value, at Pioneer's option, without
charge to you for parts or labor for actual repair work. Parts supplied under this warranty may be new or rebuilt at Pioneer's option.
The warranty period for retail customers who rent the product commences upon the date the product is first put into use (a) during the rental period or
(b) retail sale, whichever occurs first.
This warranty does not cover any product which is used in any trade or business, or in an industrial or commercial application.
PRODUCT WARRANTY
PARTS
ELlTE® AUDIO and VIDEO PRODUCTS TWO YEARS
This warranty covers the product during the warranty period whether in the possession of the original owner or any subsequent owner. In the event service
is required, the product must be delivered within the warranty period, transportation prepaid from within the United States, as explained in this document.
You will be responsible for removal and installation of the product. Pioneer will pay for the cost of returning the repaired or replacement product to you
within the United States.
WHAT'S NOT COVERED
This warranty does not apply to any speaker that has been subjected to power in excess of its published power rating.
This warranty does not cover cabinets or any appearance item, user attached antennas, any damage to discs, any damage to the product resulting from
alterations, modifications not authorized in writing by Pioneer, accident, misuse or abuse, damage due to lightning or to power surges, subsequent damage
from leaking, damaged or inoperative batteries or the use of batteries not conforming to those specified in the owner instructions.
This warranty does not cover the cost of parts or labor, which would be otherwise provided without charge under this warranty, obtained from any source
other than a Pioneer Authorized Service Company or other designated location. This warranty does not cover defects or damage caused by the use of
unauthorized parts or labor, or from improper maintenance.
ALTERED, DEFACED OR REMOVED SERIAL NUMBERS VOID THIS WARRANTY.
YOUR RIGHTS
Pioneer limits its obligations under any implied warranties under state laws to a period not to exceed the warranty period.
Pioneer also excludes any obligation on its part for incidental or consequential damages related to the failure of its product to function properly under the
conditions set forth above.
SOME STATES DO NOT ALLOW LIMITATIONS ON HOW LONG AN IMPLIED WARRANTY LASTS, AND SOME STATES DO NOT ALLOW THE
EXCLUSION OR LIMITATION OF INCIDENTAL OR CONSEQUENTIAL DAMAGES, SO THE ABOVE LIMITATION OR EXCLUSIONS MAY NOT APPLY
TO YOU. THIS WARRANTY GIVES YOU SPECIFIC LEGAL RIGHTS, AND YOU MAY ALSO HAVE OTHER RIGHTS WHICH VARY FROM STATE TO
STATE.
TO OBTAIN SERVICE
ALL PRODUCTS - EXCEPT TELEVISION MONITORS/RECEIVERS
Pioneer has appointed a number of Authorized Service Companies throughout the United States should your product ever require service. To receive
warranty service, you will need to present your sales receipt or, if rented, your rental contract showing place and date of original owner s transaction.
Should it become necessary to ship the unit, you will need to package the product carefully and send it, transportation prepaid, to an Authorized Service
Company. Carefully package the product using adequate padding material to prevent damage in transit. The original container is ideal for this purpose.
Include in the package, your name, address, telephone number where you can be reached during the business day, a copy of your sales receipt, and
a detailed description of the problem.
TO OBTAIN SERVICE
TELEVISION MONITORS/RECEIVERS
Repairs made under the terms of the limited warranty covering Television Receivers/Monitors will be performed at the location of product, during usual
working hours, providing location of product is within normal operating distance from a Pioneer Authorized Service Company. If, solely in Pioneer's
judgement, location of product to be repaired is beyond normal operating distance of the closest Pioneer Authorized Service Company, it is owner's
responsibility to send product for repair, transportation prepaid, carefully packaged and insured, to a Pioneer designated location. Product will be returned
transportation prepaid in the United States.
ADDITIONAL INFORMATION
To find the name and address of the nearest Pioneer authorized service location, or for additional information about this warranty, please call or write:
CUSTOMER SERVICE DEPARTMENT
PIONEER ELECTRONICS SERVICE, INC.
P.O. BOX 1760
LONG BEACH, CALIFORNIA 90801-1760
1-800-421-1404
DO NOT RETURN ANY PRODUCT TO ABOVE ADDRESS. IT IS NOT A SERVICE LOCATION.
PERIOD
LABOR
TWO YEARS
@PIONEER"
The Art of Entertainment
 Loading...