

Page 1

MP4-T10 USER MANUAL
1
Please read carefully before use
Page 2

MP4-T10 USER MANUAL
2
TABLE OF CONTENTS
Important Safety Instructions and Precautions .................................................................................. 3
Product Connections and Use ............................................................................................................ 4
WHAT’S in the box ............................................................................................................................. 4
Power On & off.................................................................................................................................. 4
Connecting to a pc ............................................................................................................................. 4
Connect to usb charging adaptor ....................................................................................................... 5
Operation .......................................................................................................................................... 5
Standby mode ............................................................................................................................... 5
Music menu options - main screen .................................................................................................... 5
The music play back screen............................................................................................................ 7
Music playback options - on-screen ............................................................................................... 7
Music playback options - the settings icon ..................................................................................... 8
Picture menu options – main screen .................................................................................................. 9
The picture playback screen ........................................................................................................ 10
Picture playback options - on-screen ........................................................................................... 10
Picture playback options - the settings icon ................................................................................. 11
Video menu options – the main screen ............................................................................................ 11
The video playback screen ........................................................................................................... 12
Video playback options - the settings icon ................................................................................... 12
Still camera operations menu – the main screen ............................................................................. 13
Still camera operation – on-screen options .................................................................................. 13
Still camera operation - the settings icon ..................................................................................... 14
Video camera operations menu– the main screen ........................................................................... 15
Video camera operation - the settings icon .................................................................................. 15
Voice Recorder operations menu – the main screen ........................................................................ 16
Voice recorder operation – on-screen options ............................................................................. 16
Voice recorder operation - the settings icon ................................................................................ 16
FM radio operations menu – the main screen .................................................................................. 17
FM Radio operation – on-screen options ..................................................................................... 17
FM Radio operation - the settings icon ........................................................................................ 18
E-Book reader operations menu – the main screen.......................................................................... 18
E-Book reader operation – on-screen options .............................................................................. 19
Page 3

MP4-T10 USER MANUAL
3
E-Book reader operation – reading screen options....................................................................... 19
E-Book reader operation - the settings icon ................................................................................. 20
Utility tools ...................................................................................................................................... 21
Flash games operations menu – the main screen ............................................................................. 21
Browser operations menu – the main screen ................................................................................... 21
Browser operation – on-screen options ....................................................................................... 22
Setting ............................................................................................................................................. 22
TV OUT ............................................................................................................................................ 24
Specifications .................................................................................................................................. 24
Trouble Shooting / Q & A ................................................................................................................. 25
IMPORTANT SAFETY INSTRUCTIONS AND PRECAUTIONS
- Read all instructions carefully before use.
- Retain manuals for future reference.
- Use this product only in the manner described.
- Only use a water-dampened soft-cloth to clean the surface of this product.
- The following will damage this product: any liquid such as water or moisture, extreme heat; cold;
humidity, dusty or sandy environments.
- It is recommended to thoroughly charge MP4-T10 for the first time overnight. Subsequent
charges can be as needed. During charging, or extended use, the product may become warm.
- There are no user serviceable parts in this product.
- Un-authorized attempts to dismantle or repair this product will void product warranty and may
result in dangerous electric shock.
- Using this device near other electronic devices may cause interference.
Page 4
MP4-T10 USER MANUAL
4
PRODUCT CONNECTIONS AND USE
WHAT’S IN THE BOX
Laser T10 Video/MP3 Player, Ear buds, USB cable (charging and data transfer), AV cable
POWER ON & OFF
Slide the On/Off switch and hold down until the unit turns on (same procedure to turn off) Sliding
the power switch to lock, is used to avoid accidental key presses while the unit is either in use or in
storage.
CONNECTING TO A PC
While your T10 is connected via USB cable to a PC, you can choose between the following three
options:
1. Power & Data – Charge while transferring files
2. USB Charge- charge only
3. Charge & Play – Charge and continue to use your T10 as normal.
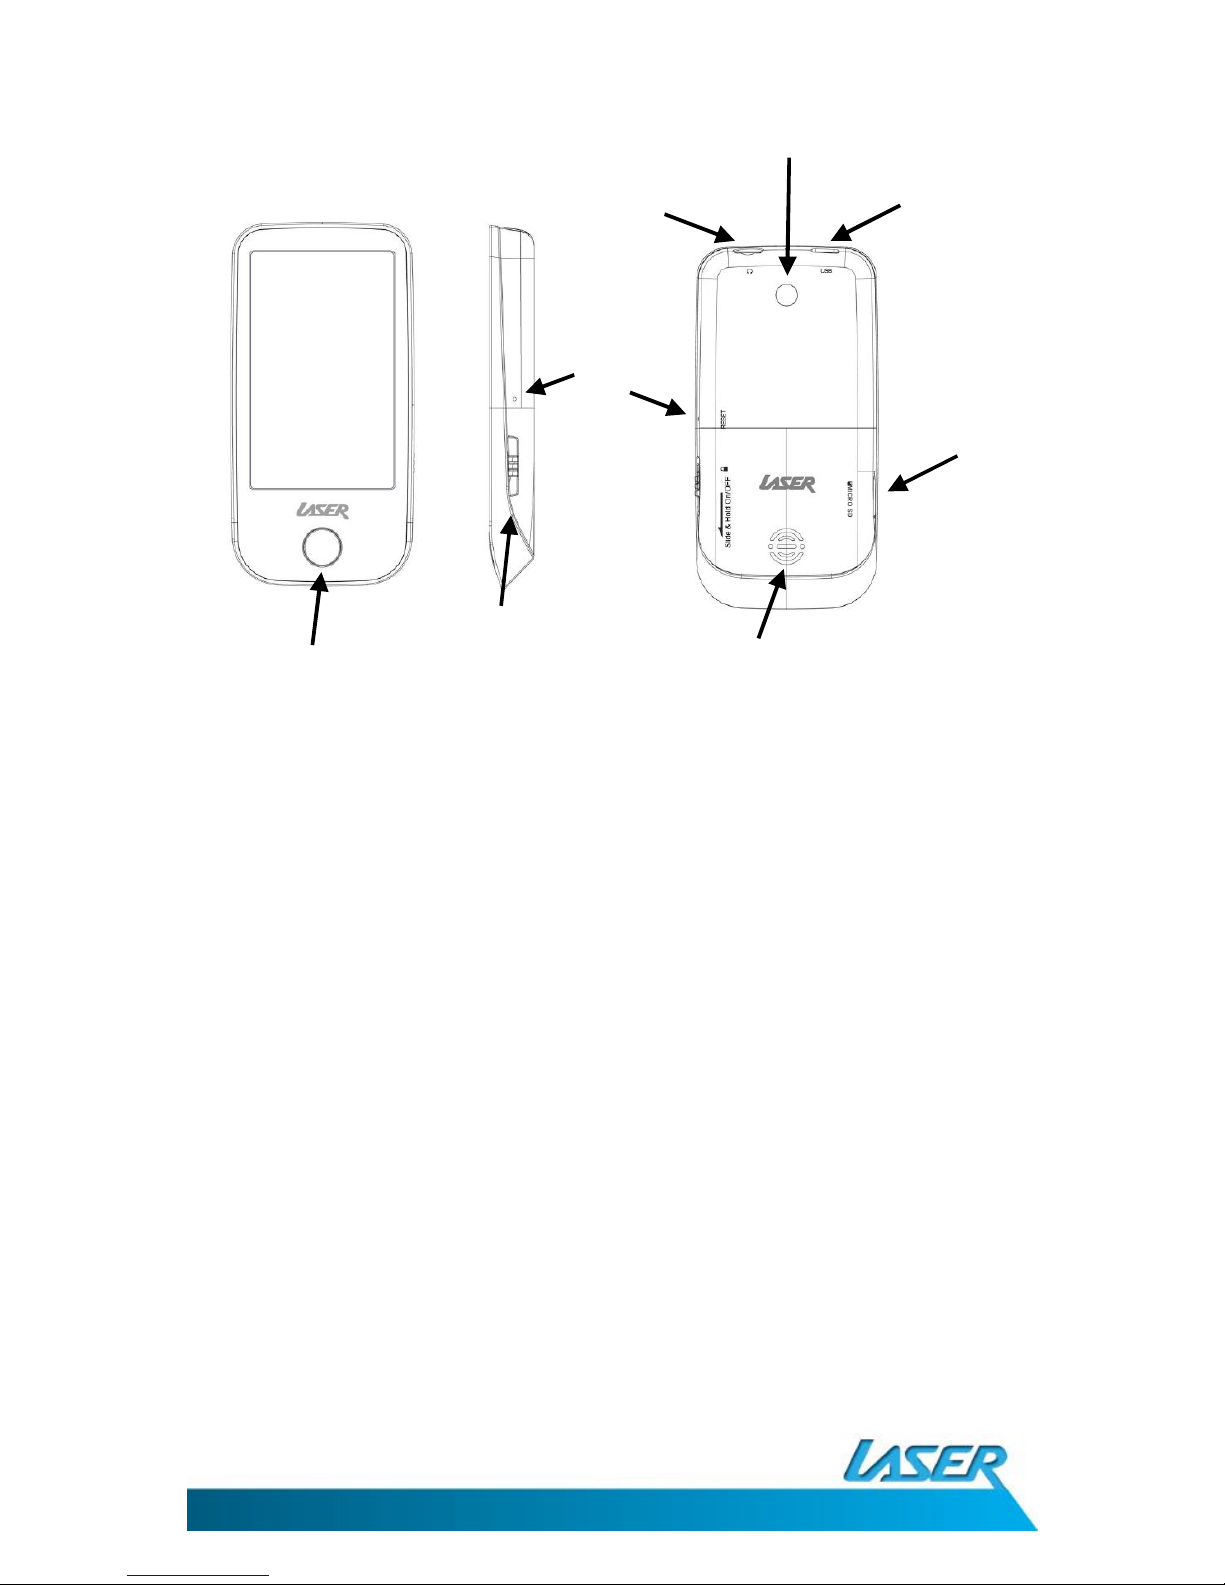
Home button
Speaker
On/Off (Lock)
Switch- slide
down & hold
Mini USB
3.5mm
Earphone Jack
Micro SD
card slot
Camera
Reset
button
Page 5
MP4-T10 USER MANUAL
5
CONNECT TO USB CHARGING ADAPTOR
While your T10 is connected via USB cable to a PC, you can choose between the following two
options:
1. USB Charge- charge only
2. Charge & Play – Charge and continue to use your T10 as normal.
OPERATION
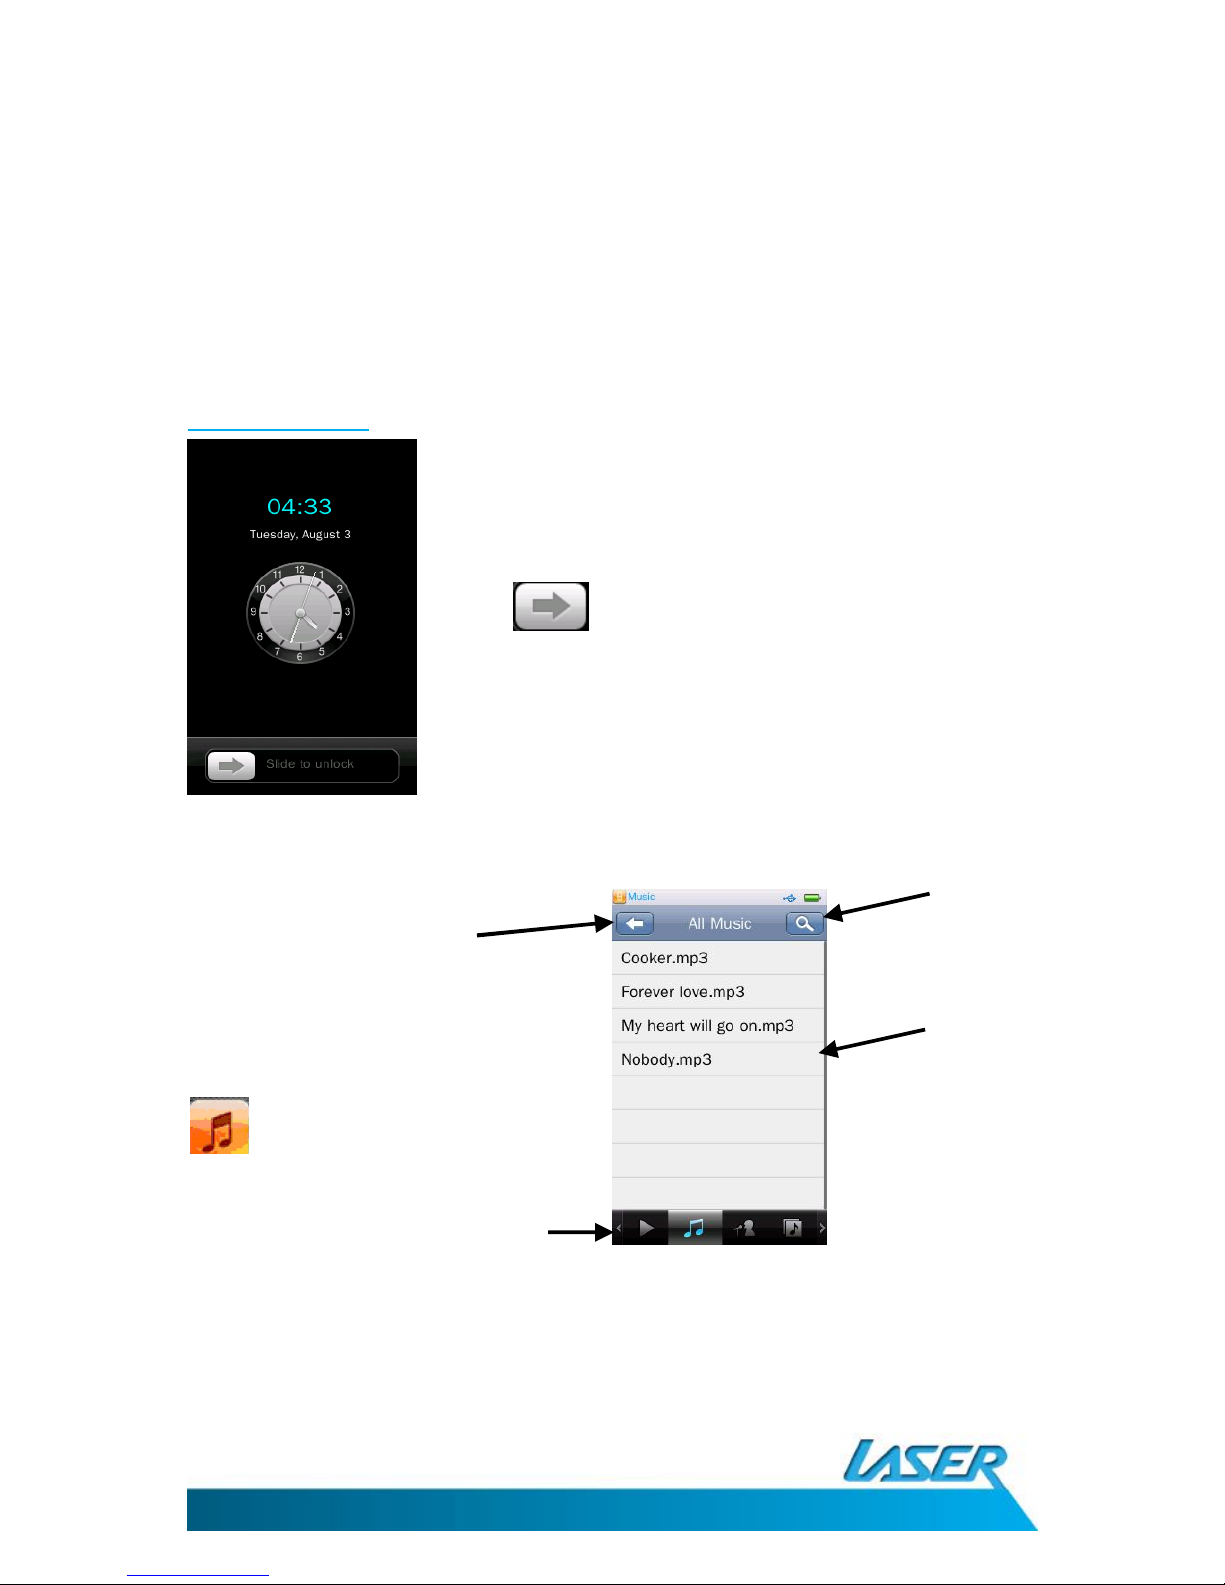
Standby mode
MUSIC MENU OPTIONS - MAIN SCREEN
Touch and swipe the bottom row of icons to explore/scroll through the following features:
From the stand by screen, use the slide
bar to enter main menu
Access the music feature
by pressing the music icon
Main screen options
Music track list
Search function
Previous screen
Page 6
MP4-T10 USER MANUAL
6
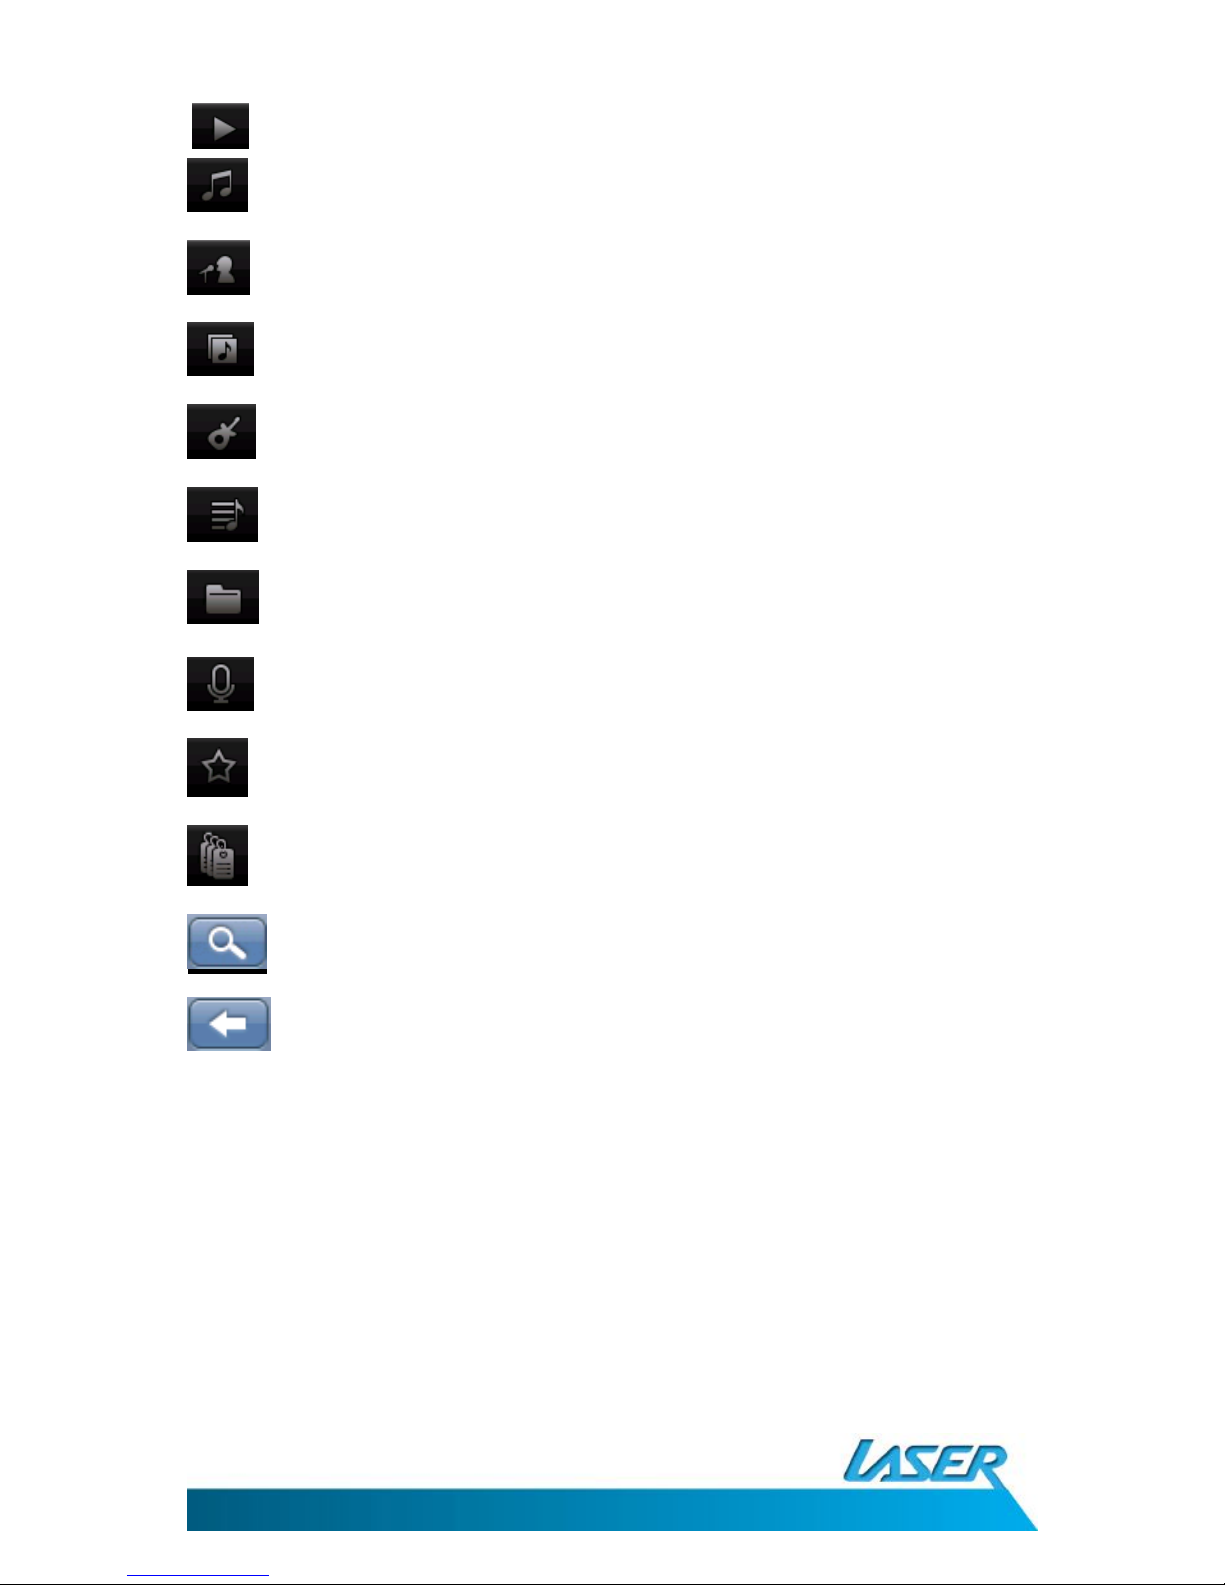
Play – Use this key to begin music playback.
All Music – view a list all music files
Artist - list all music by artist name (dependant on your file type)
Album - list all by album name (dependant on your file type)
Genre – list all by genre (dependant on your file type)
My Music List- User defined list (five available)
Directory Browse- Internal Memory, External Memory
Record File - List all recorded FM and voice files.
My Rating - User defined rating list (An allocation system of 1 to 5 stars)
Tag List - User defined List. Create up to 32 tag lists.
Search- Search music files by entering music file name
Return back to previous sub-directory or Main Menu (from a main directory).
Page 7
MP4-T10 USER MANUAL
7
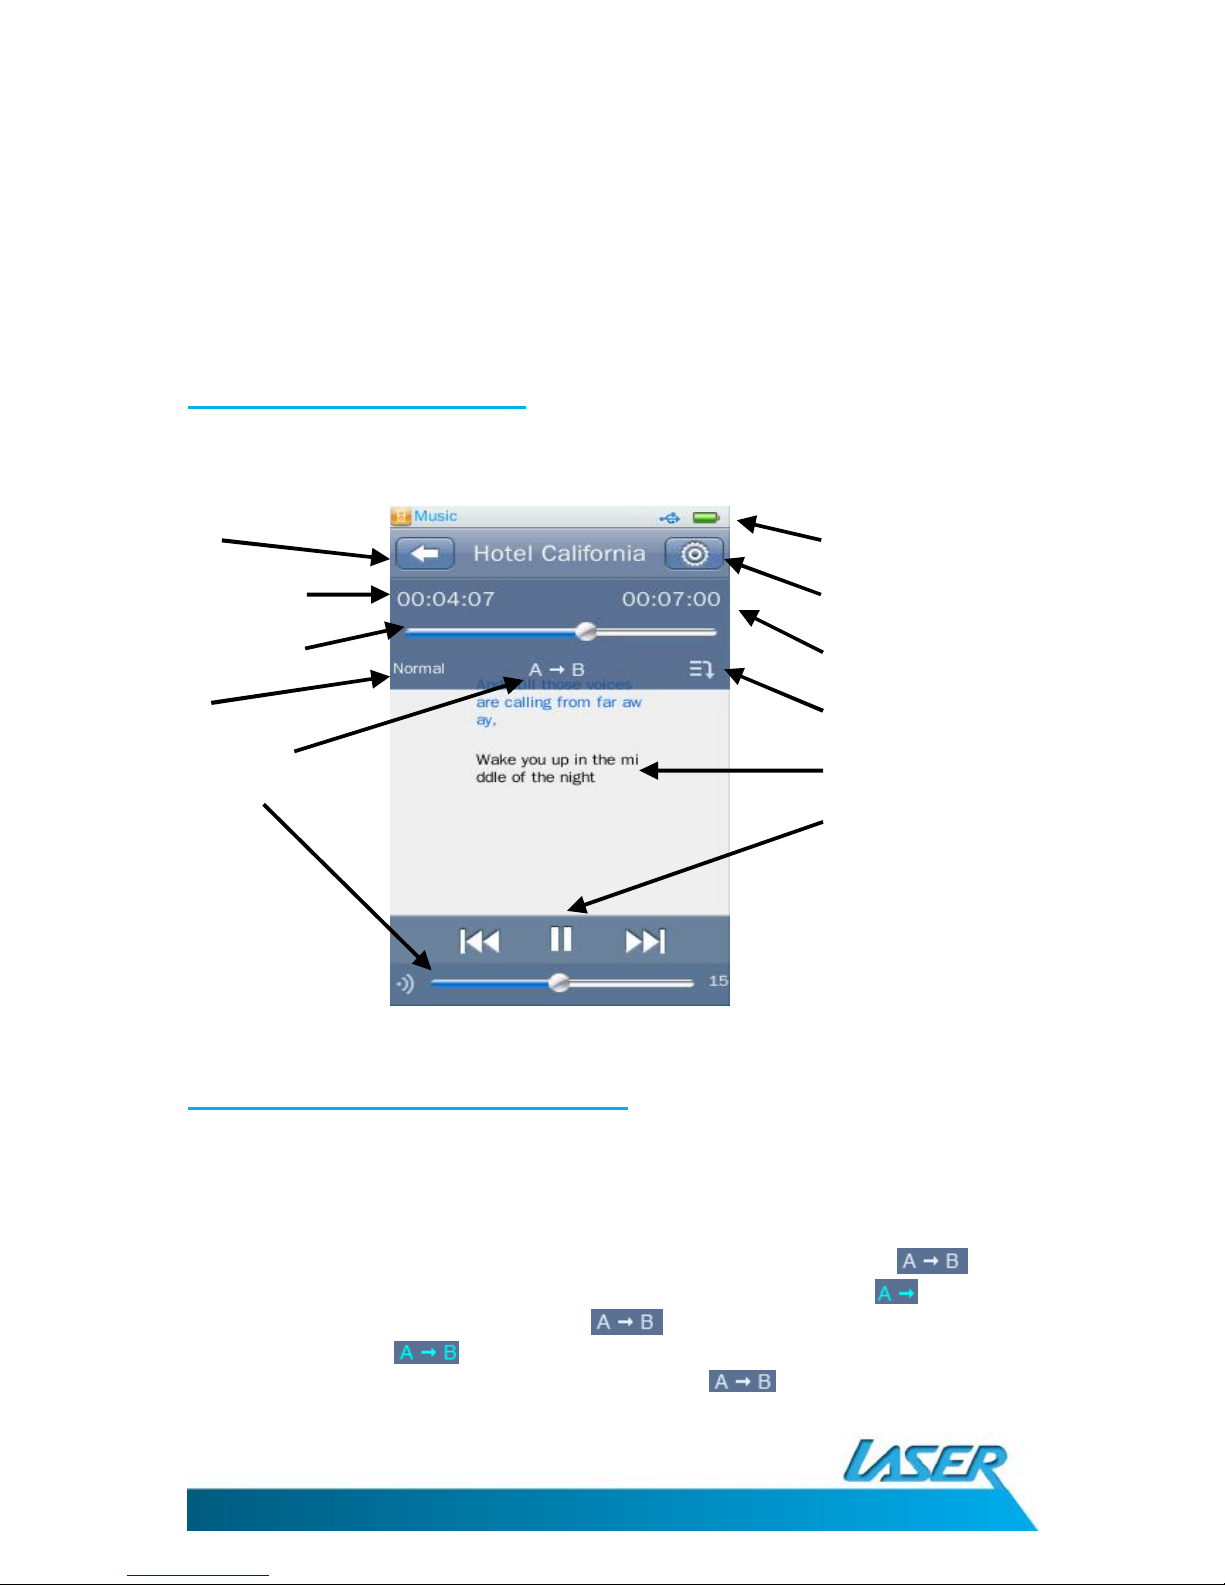
The music play back screen
Music playback options - on-screen
Note: After a short period, this information (upper dark blue coloured section) will disappear
from view. Re-enter the playback screen from the previous song list view, if this information
needs to be viewed again.
1. AB Repeat: This feature allows you to select a specific sample section of a music track and
play it back as a constant loop. To begin a sample section press the button while
the music track is playing. The colour of the “A” will then change. When you wish to
finish the sample section press the button again. The colour of the “B” will then
change colour . The sample section will then loop and automatically play back. To
finish/cancel the loop playback, simply press the again.
Battery life icon
Set
tings
Total time length
Play mode
A/B repeat
Song title / Lyrics / EQ
Elapsed time
Volume
Exit / previous
menu
Progress bar
EQ
Previous/Next/Play
Page 8

MP4-T10 USER MANUAL
8
2. Play Mode: Select between Repeat One, Repeat All, Shuffle, Shuffle + Repeat and Intro
3. EQ (Equaliser): Normal, Rock, Pop, Classic, Soft, Jazz, DBB, SRS WOW, SRS WOW HD.
4. Display Mode: Touch the middle of the screen to change the on screen information. Toggle
between the following screens; Album information, song lyrics (dependant on the file) and graphic
equaliser spectrum graph.
Music playback options - the settings icon
From the music playback screen, click the settings icon . Options include: Variable Speed
Playback, Add Tag, Delete, Information, Set Rating, add to My Play List, User EQ, SRS User Mode
and Advanced.
Note. Use the BACK button at the bottom of each list to return back to the previous menu.
1. Variable Speed Playback: adjust music playback speed from -4 to +4.
2. Add Tag: Use this option as a book mark but for music. Once you add tag to a music track,
the song title and that specific point in the song is added to the tag list. Tags can then be
reviewed using the music menu – main options feature (as explained above).
3. Delete Tag: This option allows you to delete previously made tags. From the Delete tag
screen, swipe the song title from right to left. A trash bin icon will then appear. Then click
the track to be deleted. A confirmation window will then appear asking you to confirm
your selection.
4. Delete: Use this option to permanently delete the current playing music track. A
confirmation window will then appear asking you to confirm your selection.
5. Information: Shows detailed information about the current music track such as Bit rate,
track length etc
6. Set Rating: This feature allows the user to set star ratings, from 1 to 5, for each music
track.
7. Add to My Play List: Customise and group specific music tracks into 5 individual favourites
lists. Simply choose this feature, and select which of the 5 user lists to save the current
track to. Then use the My Play List from the main menu screen to access each list for play
back. Each music track can added to multiple lists.
8. Delete from My Play List: Use the same technique as explained above to delete a tag. In
this case however enter My Play List from the main menu, select the play list where
the track has been saved, then swipe the screen from right to left and click the track to be
deleted. A confirmation window will then appear asking you to confirm your selection.
Note: deleting a music track in this way will only remove it from your play list. It will not
permanently remove it from your T10 player.
9. User EQ Setting:
9.1. User EQ: Manually adjust the playback frequencies of music tracks. Drag the value
bar to change the value up or down to adjust each of the following bands: 80Hz,
200Hz, 1KHz, 4KHz, 8KHz. Adjust each band between -6db and +6db.
Page 9

MP4-T10 USER MANUAL
9
9.2. SRS User Mode: Manually adjust the playback characteristics of music tracks.
Adjust each of the following parameters between 0 and 10: SRS 3D, Tru Bass, Focus,
Center, Definition, Speaker (choose between 60Hz, 100Hz and 150Hz), Limiter
(ON/OFF)
10. Advanced Setting
10.1. Replay Times: Choose to replay the music track once or continuously.
10.2. Replay Intervals: Adjust the time for each replay between 1 to 7 seconds.
10.3. Fade In/Out: On or off
PICTURE MENU OPTIONS – MAIN SCREEN
Click the pictures icon from the main menu screen.
Now Viewing – Shows all recently accessed pictures
All Pictures – Shows all picture files
Directory Browse – Manually browse through folders
Camera pictures – Browse pictures taken by your T10 camera
Switch views between:
List
Thumbnail
Slide
Main screen shown
as “List view”
Return to
previous screen
Main screen options
Page 10

MP4-T10 USER MANUAL
10
The picture playback screen
Picture playback options - on-screen
1. Slide show / Manual viewing: / toggle between automatic slide show and manual
viewing
1.1. Slide show interval: While in slide show operation, a new clock icon appears at the
bottom of the screen. This icon can be used to set the interval times between each
picture in the slide show. Choose between 1, 5, 10, 15 and 20 seconds
Note: While using manual viewing option, swipe the screen left to right, or right to left, to view the
next or previous images
2. Save to desk top: Save the current picture as your desktop wallpaper and as the
Standby screen wallpaper.
3. Scale (and magnification): This button returns you back to the pictures original
magnification (fit to screen size) once you have used the magnification slide bar option.
Note 1: Once the magnification slide bar has changed the picture size, you can also then drag the
image up and down, left to right
Magnification
(Slide up and down)
Settings
On screen
options
Previous screen
Picture name
Page 11

MP4-T10 USER MANUAL
11
Note 2: You are not able to move to the next or previous picture until the Scale button has returned
the current picture back to normal size
4. Rotate : Rotate the picture in clockwise increments of 90°
Picture playback options - the settings icon
From the picture playback screen, click the settings icon . Options include: Slide
effect, delete, information and screen size.
Note. Use the BACK button at the bottom of each list to return back to the previous menu.
1. Settings: Choose between; Slide effect, Delete, Information and Screen Size
1.1. Slide Effect: Choose between Move page, Louver and Fade Display
1.2. Delete – Delete current picture. A confirmation window will then appear asking you
to confirm your selection
2. Information – displays Picture Name, Resolution and Created Date information.
3. Screen Size- display pictures as Full Screen, in Original Size or as Scale
VIDEO MENU OPTIONS – THE MAIN SCREEN
Click the Video icon from the main menu screen.
Now Playing - Shows all recently accessed videos
All Video- Show all video files
View/
Search function
Previous screen
On screen
options
Main screen
List view
Page 12

MP4-T10 USER MANUAL
12
Directory Browse - Manually browse through folders
Tag List – [Please refer to the music section Tag list for this common instruction]
My Video- Browse videos taken by your T10 camera
Search- Search video files by entering video file name
Back – return to the previous screen
The video playback screen
Video playback options - the settings icon
From the video playback screen, click the settings icon . Options include: Subtitle,
Playback mode, add tag, screen size, resume, delete and information
Note: Tap the screen to show the on-screen options if they have disappeared.
1. Subtitle: Turn off or on (dependant on the type of file being used)
2. Playback Mode: Choose between Sequence, Repeat One, Repeat All, Shuffle,
Shuffle + Repeat
Progress bar
Previous screen
Play / Pause button
Previous video
Settings
Next video
Volume bar
Page 13

MP4-T10 USER MANUAL
13
3. Add Tag: [Common information. Please refer to previous sections for instruction]
4. Screen size: Choose between Full Screen, Original Size and Scale
5. Resume: Continue watching the previously exited file.
6. Delete: Delete the currently viewed video. A confirmation window will then appear asking
you to confirm your selection
7. Information: Shows file information such as name, resolution and bit rate
STILL CAMERA OPERATIONS MENU – THE MAIN SCREEN
Select the camera icon from the main menu screen.
Note 1: The toggle switch will show an image of the device you can toggle to. Eg. If a still camera
image is present, press it to change to still camera and vice versa with an image of a video camera.
Note 2: Once a selection has been made the user icons on the screen will change. Of most
significance is the take picture / shutter button.
Still camera operation – on-screen options
This screen shows a summary of currently chosen settings in the form of icons. There are
two types of icons: 1) read-out icons, and 2) user short cut keys
1. Read-out icons: These icons are a static display of previously set options from the
settings screen (Note: Settings are discussed in the next section) in a clockwise
orientation, these are: files save location, shots remaining and timer (Timer: once
Settings
Take picture
/ Shutter
File list
/ search view
Fun frames
Exposure
Timer
Toggle between
still Camera, and
Video camera
Digital Zoom
Previous
screen
Resolution
Shots remaining
Preview / image finder
Files save to
location
Page 14

MP4-T10 USER MANUAL
14
this option is turned on, the chosen number will appear. Then use the shutter button
as normal)
2. User short-cut keys: The remaining icons can be used directly from the screen as a
short-cut to that setting option.
Note: Not all user short cut keys have representing options in the settings screen
Still camera operation - the settings icon
Click the settings icon from the main menu screen. Options include white balance, exposure mode,
special effect, save path, resolution, memory free space, self timer, cont. shooting, shutter sound
and date stamp
Note. Use the BACK button at the bottom of each list to return back to the previous menu.
1. White Balance: Choose between Auto, Fine, Cloudy, Filament Lamp, and Fluorescent Lamp.
2. Exposure Mode: Choose between Auto, Indoor and Outdoor
3. Special effect: Choose between Black and White, Sepia and Negative
4. Save Path: Choose between Internal Memory and Micro SD Card. By default files are saved
to the internal memory.
5. Resolution: Choose between resolutions 2048 x 1536, 1600 x 1200, 1280 x 960 (default),
1024 x 768 and 640 x 480
6. Memory Free Space: space available for storing photos
Note. Hold the button down for scrolling read out information
7. Self-timer: Choose between 5, 10, 15 and 20 second delays.
Note: By default this option is switched off.
8. Cont. Shooting: Choose between continued shooting from 5, 10, 15 and 30 seconds.
Note: By default this option is switched off.
9. Shutter Sound: Choose between sounds 1, 2 and 3
Note: By default this option is switched off.
10. Date Stamp: Choose between Date and Date + Time options
Note: By default this option is switched off.
Page 15

MP4-T10 USER MANUAL
15
VIDEO CAMERA OPERATIONS MENU– THE MAIN SCREEN
From the main screen, select the camera icon, then use the toggle between the still camera and
video camera functions.
Note 1: The toggle switch will show an image of the device you can toggle to. Eg. If a still camera
image is present, press it to change to still camera and vice versa with an image of a video
camera.
Note 2: Once a selection has been made the user icons on the screen will change. Of most
significance is the take picture / shutter button.
Video camera operation - the settings icon
Click the settings icon from the main menu screen. Options include special effect, save path,
resolution, memory free space, record quality and record gain.
Note. Use the BACK button at the bottom of each list to return back to the previous menu.
1. Special Effect: Choose between Black & White, Sepia and Negative.
Note: By default this option is switched off.
2. Save Path: Choose between Internal Memory and Micro SD Card. By default files are saved
to the internal memory.
3. Resolution: Choose between 320 x 240 and 640 x 480 (default)
4. Memory Free Space: space available for storing video
Note. Hold the button down for scrolling read out information
5. Record Quality: Choose between High, Medium, Low and Auto
White balance
Previous
screen
Settings
Take video
/ Shutter
(start, stop, pause)
Digital Zoom
Toggle between
still Camera, and
Video camera
Exposure
Preview / image finder
Brightness
File list
/ search view
Elapsed time / time remaining
Page 16

MP4-T10 USER MANUAL
16
6. Record Gain: Choose between levels 1 to 5. Then confirm your choice.
VOICE RECORDER OPERATIONS MENU – THE MAIN SCREEN
Select the recorder icon from the main menu screen
Voice recorder operation – on-screen options
Start and pause buttons
Stop button: To stop a recording use the button. A confirmation window will then
appear asking you to confirm your selection. All recordings are saved to the file
location Music-Record File-MIC.
/ / Record Quality: Choose between Low, Mid, High
Record Gain: Choose between levels 1 to 5 to adjust the recording volume.
Voice recorder operation - the settings icon
Click the settings icon from the main menu screen. Options include record format and save path.
Note. Use the BACK button at the bottom of each list to return back to the previous menu.
1. Record Format: Choose between WAV, MP3 and WMA formats
2. Save Path: Choose between saving to the Internal Memory or to the Micro SD card. By default
files are saved to the internal memory.
Time available
Elapsed time
Sound level volume
Main screen options
Previous
screen
Settings
Page 17

MP4-T10 USER MANUAL
17
FM RADIO OPERATIONS MENU – THE MAIN SCREEN
Select the recorder icon from the main menu screen
Note: Ear buds needs to be plugged into the unit for this feature to function correctly.
FM Radio operation – on-screen options
Note: Please ensure you region code is set to USA/China. This setting covers continents
including Australia and New Zealand.
Auto Search: Click to begin the auto search and save function. Channels will then be
saved sequentially to each on-screen list (FM1, FM2, FM3).
Note 1: Previously saved channels will be deleted and replaced.
Note 2: If you are in a bad reception area, no channels will appear and be saved
FM Record: Use this feature to record live FM radio. Files will be automatically saved
to this file location: Browser-RECORD-FM
Previous
screen
Settin
gs
Main screen options
Volume
Manual
tuning
User channel lists
Saved stations
Page 18

MP4-T10 USER MANUAL
18
Save/Delete:
1.1: When listening to an automatically saved station this icon will appear as an “X”
icon. Click this icon to delete the currently played radio station.
1.2: If listening to manually selected radio station this icon will appear as the “save to
disk” icon. Click this icon to save your manually selected station. (Such stations
typically do not have strong reception for the unit to detect and therefore it is not
saved automatically)
Mute: Click to switch between Play and Mute functions
FM Radio operation - the settings icon
Click the settings icon from the main menu screen. Options include channel list, tuner region, FM
sensitivity, record quality, record gain, save path and record format.
1. Channel List: Set as default only
2. Tuner region: [Australian and New Zealand users please select “CHN/USD”]
3. FM Sensitivity: Choose between High, Medium and Low
4. Record Quality: Choose between High, Medium and low
5. Record Gain: Choose between levels 1 to 5
6. Save Path: Choose between Internal Memory and Micro SD Card. By default files are saved
to the internal memory.
7. Record format: Choose between WAV, MP3 and WMA formats
E-BOOK READER OPERATIONS MENU – THE MAIN SCREEN
Select the e-Book icon from the main menu screen
Previous
screen
Search function
Main screen options
Main screen
List view
Page 19

MP4-T10 USER MANUAL
19
E-Book reader operation – on-screen options
Now Reading: Shows all recently accessed eBooks
All eBooks: Shows all eBooks
Directory List: Shows all eBooks per folder
Tag List: [Please refer to previous sections for instructions]
Return to previous screen
Search: View and search eBook files
E-Book reader operation – reading screen options
Reader screen
options
Previous
screen
Settings
Page number
Progress bar
Page 20

MP4-T10 USER MANUAL
20
Manual Automatic
(Note: Press to engage that function)
Manual / Auto Page Turning: While in manual mode, swipe the screen to manually
navigate your e-book. Click the automatic button to engage the automatic page
turning
The timing of the page turns can be adjusted while in automatic mode. Simply click the
“time clock” icon (which should now be to the right hand side of the “hand” icon. If not, you
are currently no in automatic mode) Once you have clicked the timer clock icon you can
then choose between the following time settings: 3, 6, 9, 12 and 15 seconds
Create Tag: [Please refer to previous sections for instruction]
Font Size: Choose between font sizes:
Small (12 point), Medium (16 point) and Large (24 point)
Font Color: Choose between black back-ground with white colour text, white background
with black colour text, white background with grey coloured text or white background with
blue colour text.
Page Progress Bar: Slide the bar until the required page is reached.
Return to the previous screen
E-Book reader operation - the settings icon
Click the settings icon from the reader screen. Options include select coding, effect setting and
delete
1. Select Coding: Choose up to 22 different countries/languages
2. Effect Setting: Choose between move pages, turn page and water wave
3. Delete: Delete currently viewed file. A confirmation window will then appear asking
you to confirm your selection
Page 21

MP4-T10 USER MANUAL
21
UTILITY TOOLS
Include: Calculator, Calendar, PC Webcam (Connect to your PC via USB cable, then follow standard
hardware setup procedures)
FLASH GAMES OPERATIONS MENU – THE MAIN SCREEN
Select the flash icon from the main menu. Select any of the factory supplied games
Note: Actual games supplied may be different to those listed below
BROWSER OPERATIONS MENU – THE MAIN SCREEN
Click the browser icon from the main menu screen. Use this screen to navigate or browse through
all folders contained on your T10 device.
Browser screen
options
Main screen
List view
Previous
screen
Animation
/Cartoon list
Turn on/off/adjust
speaker volume
Game list
List/Search function
Previous
screen
Main screen
List view
Page 22

MP4-T10 USER MANUAL
22
Browser operation – on-screen options
The browser feature allows you to navigate and explore all the files stored on your T10 device. Use
the previous screen button to move back one screen / folder, or to exit this feature. The process of
navigating internal and external memory is the same.
Note: If no external Micro SD card is in use, no external Memory section will be shown (this
includes related sub-folders such as EBOOK, FLASH, MUSIC, PICTURES etc)
Memory source: Switch between Internal Memory and External card memory.
Select all: (Note: Use this feature in combination with the copy feature described below) To
move folders or files, click this button once to select all files or folders under the current
directory view. A tick icon with then appear next to all files and folders. Manually un-tick
each unwanted file or folder that does not need to be moved, by clicking each individual
tick icon. The tick icon will then return to the folder icon . If required, click the Select
all icon at the bottom of the screen again, to remove all ticks (and start again if needed).
Copy a file or folder to external memory: Once all files and folders have been marked
correctly click the copy icon to copy the selected files to your external memory. Note:
External memory must be inserted for this function to operate correctly.
Delete a file or folder: Used in the same manner as the select all and copy feature
described above, but instead of highlighting files and folder and then using the copy icon,
click the delete icon instead. Confirm your choice ion the dialogue box to complete this
step.
SETTING
Page 23

MP4-T10 USER MANUAL
23
1. Display: Adjust dimmer delay and backlight brightness
1.1. Dimmer delay: After a set period of inactivity (measured from 0 to 60 seconds)
the screen backlight will dim and then enter standby mode. Note: If zero seconds is
chosen the screen will stay on and not enter standby mode.
1.2. Backlight brightness: Increase or decrease the screen brightness from 1 to 5
units
Note: Some of the brightness and dimmer functions may not be supported across all programs,
screens and utilities on the device.
2. Calibrate: Use this feature if there seems to have an accuracy problem when touching the
touch panel screen. Eg. If a button is pressed and the button next to it seems to be
selected in error. To correctly calibrate your screen, begin the calibration process and
carefully click the middle of each calibration cursor produced on the screen. Once
completed a confirmation message will be shown.
3. Off time: Adjust when the unit enters standby mode after a set period of inactive use, or
control when the unit will power off completely.
Note: If zero seconds is chosen, the feature will effectively be deactivated.
3.1 Idle time: Use this feature to control when the unit enters idle (standby) mode
3.2 Sleep time: Use this feature to force the unit to switch off after a set period of time.
(Between 0 and 120 minutes)
4. Date & time: Use this feature to manually adjust the date and time
4.1 Set date: Use the slide wheels to adjust the date
4.2 Adjust time (Adjust date and time): Use the slide wheels to adjust the time
Note: After your selection, press the previous screen icon to confirm your selection.
5. Languages: Use to change the display language of the device.
Note: Please use this feature with extreme caution, as accidental changes are very hard to correct
when the menu options are changed to a different language.
6. TV Out: Use this feature to either turn this function off or to change the output to PAL or
NTSC. (Consult your display device manual (eg TV) for the specific requirement of your
device)
7. Select key tone: Choose between key tone sounds 1 to 4, or to turn this feature off.
8. Set as desktop: Change the background image used on the main menu. Select between the
default image and the user defined image. (Note: the default button is slid side to side)
9. Advanced:
9.1 Player info: Displays a full memory report such as used and free memory space,
how many music/video files etc are in use and the firmware version edition number
9.2 Select font: (Note: System default font only )
9.3 Check system: This is a self diagnostic tool used to correct system bugs caused by
data corruption.
Page 24

MP4-T10 USER MANUAL
24
9.4 Reset: Use to return the device back to factory settings. You must then confirm
your choice in the pop-up dialogue box.
9.5 Format internal memory: Use to format the internal memory. You must then
confirm your choice in the pop-up dialogue box.
9.6 Format card: Use to format the external memory (Micro SD card). You must then
confirm your choice in the pop-up dialogue box.
TV OUT
Turn the TV output feature on and select the correct output stream (PAL or NTSC).
Then connect the AV cable into the T10 (3.5mm jack end) and then to your TV or display (RCA –
Red, Yellow white ends). Then select a file (image or video) for play back.
SPECIFICATIONS
TFT LCD screen: 400 x 240, 260,000 full-colour
Memory capacity: 8GB
Supported AV formats: Music: WMA, WMA, OGG, APE, FLAC, WAV, AAC
Picture: JPEG, BMP, GIF, TIF, PNG
Video: AVI, WMV, FLV, RM, RMVB, H.264 , MP4, 3GP, MPEG, VOB,
DAT, SWF, MKV, VP6, MOV
FM and MIC (recording): WMA, WAV
Supported memory card formats: SD/MMC/SDHC/MS
Built-in long life 4.2v lithium battery
Page 25

MP4-T10 USER MANUAL
25
TROUBLE SHOOTING / Q & A
Q. After I copy my files (eg. MP3) to my T10, they do not play correctly:
A. Make sure your files (in this case MP3 files) are copied correctly to the corresponding folders (in this case
the MUSIC folder and vice versa for photos and videos
Q. My player will not turn on / I am having difficulty turning my player on.
A. Make sure you are using the slide button (On/Off button) and holding it for 3 seconds, or until the unit
turns on. Also make sure the unit has been fully charged.
Q. I cannot hear any sound from my ear buds
A. Ensure that the volume setting is not set to 0 (zero) and that the earphones have been plugged into the
earphone slot correctly
Q. There is a loud feedback type noise coming through on my ear buds.
A. Please check your ear bud jack (plug) is clean and dirt and contaminant free. Also test the file on another
device such as a PC in case the file has been corrupted, if possible.
Q. My FM radio is not working.
A. Make sure your ear buds are plugged in, as the ear bud cable acts as the antenna. The FM radio will also
not work with speaker function (as the ear buds still need to be plugged in)
Q. The reception for my FM is really bad
A. Adjust your location or the location of your T10 device. Extending the ear bud cable to its full length can
also help. Another contributing factor could also be neighbouring electronic devices causing noise and
feedback problems.
Q. The keys on my T10 do not work.
A. Check whether the player is in standby status
Q. I cannot transfer files to my T10 player
A. Please check the USB cable connection between your T10 and PC device is correct and that the cable is
undamaged (test it on another device is possible). Also check that you have enough free memory space.
Q. My touch screen accuracy is very poor
A. Please follow the screen calibration procedure. Using your nail as apart from the pad of your finger tips also
helps greatly.
Q. I can not turn my T10 player off for some reason….
A. Please use a straightened paper clip (for example) to engage the master reset button.
For further product information and instruction please visit our product web
page at www.laserco.net or email support@laserco.com.au
Please note: As continual improvements are made to this product, slight operational differences
may occur. For the most up-to-date user manual, please visit our web site.
Page 26

MP4-T10 USER MANUAL
26
Warranty Against Defects
Laser Corporation Pty Ltd (“Laser”) warrants your new product to be free from defects in materials
and workmanship for 12 months, from the date of purchase, provided that the product is used in
accordance with accompanying recommendations or instructions where provided. The benefit of
this warranty is in addition to your rights under the Australian Consumer Law and to other rights
and remedies of the consumer under a law in relation to the goods or services to which the
warranty relates.
Through a network of retailers and resellers, Laser will provide you with your choice of a refund,
repair or exchange (where possible) for this product if it becomes defective within the warranty
period. This warranty will no longer apply where the defect is a result of alteration, accident,
misuse, abuse, normal wear and tear, neglect or improper storage.
Please retain your receipt as proof of purchase
How to make a product warranty claim:
Step 1: Find your receipt which proves the date of purchase. Where the date of purchase cannot
be verified, your place of purchase or Laser will make an assessment based on the date of
manufacture, the condition of the Laser Product and the type of defect.
Step 2a): Contact your place of purchase. They will assess the nature of the fault and refund or
replace the product as per their store refund or warranty policy.
Step 2b): If your place of purchase cannot be contacted, then you can contact Laser . Customer
Service with details of your defective Laser Product: Phone: (02) 9870 3355; or Email:
service@laserco.com.au or online www.laserco.net/support/warranty (click on “Consumers (End
Users)”). Our business address is at 1/6-8 Byfield Street, North Ryde, NSW 2113
Step 3: Laser . will issue you with a Return Authorisation (RA) number within 48 hours. When
requested, send us the defective Product and a copy of your receipt. Laser will cover the cost of
the return delivery.
Step 4: Wait for us to contact you. Once we have received your defective Laser Product for
inspection, we will inform you of our assessment of your claim within 7 days. When we contact
you, we will firstly let you know whether you have a valid claim under this Warranty, and if so, we
will inform you whether your defective Laser Product will be replaced or repaired, together with
the number of days you can expect to wait to receive your replaced or repaired Laser Product.
Our goods come with guarantees that cannot be excluded under the Australian Consumer Law.
You are entitled to a replacement or refund for a major failure and compensation for any other
reasonably foreseeable loss or damage. You are also entitled to have the goods repaired or
replaced if the goods fail to be of acceptable quality and the failure does not amount to a major
failure.
 Loading...