

Page 1
DVBT-MP32
User Manual
Please read carefully before use
Page 2

DVBT-MP32 User Manual
3
IMPORTANT SAFETY INSTRUCTIONS AND PRECAUTIONS
• Read instruction carefully before using this product
• Observe all warnings and cautions when using this product.
• Retain all manuals and documentation for future referral.
• Only use this product in a manner described in this manual.
• Do not use this product if you are in control of a motor vehicle.
• If used in a motor vehicle is should be used away from the driver to avoid
distraction.
• Do not use this device in extremely hot, cold, humid, dusty or sandy
environments.
• Do not use this device in electrical storms or other conditions if the likelihood of
lightning is possible.
• Do not attempt to clean this product using liquid cleaners or aerosol cleaners.
Use only a damp soft cloth to clean the surface of this device.
• Extreme care should be taken when using this product near any body of water
such as swimming pools, kitchen sinks, baths and the like.
• This device is not waterproof.
• Only place the device on a stable surface and ensure that cables attached to
the device can not cause the device to fall.
• Only use the recommended accessories for this device. Use of incorrect
accessories may cause damage and void the warranty.
• Use only the recommended power supply for this device. The use of incorrect
power source may cause damage to the device or injury to the user.
• Using this device near other electronic devices may cause interference. Please
use care using this product near other devices.
• Care should be taken when using the external antenna. Please remove the
tting carefully from the device. Do not pull at the cord to remove it.
• Ensure that the ventilation holes are not blocked when using this device. Heat
build up may cause this device to fail.
• There are no serviceable parts in this device. Attempts to open this device by
unauthorised personnel may cause further damage and void the warranty.
• Picture quality will be dependant on signal quality and strength. This device may
2
Page 3
not be able to pick up all stations in all areas. For best results use in a strong
signal area and ensure that the antenna has a clear unobstructed view of the
sky.
• Do not bend, drop, crush, puncture, incinerate, or open this device.
• Avoid use in extreme temperatures. extreme temperatures.
• Do not use this device in rain, or near washbasins or other wet locations. Take
care not to spill any food or liquid into it. In case this device gets wet, unplug all
cables, turn it off and allow it to dry thoroughly before turning it on again.
• Never attempt to repair this device by yourself. It does not contain any user
serviceable parts. The battery should be replaced only by authorised service
providers.
• Use headphones safely. Use of headphones while operating a vehicle is not
recommended and is illegal in some areas. Be careful and attentive while
driving. Stop using this device if you nd it disruptive or distracting while
driving or performing any other activity that requires your full attention.
• Use only the USB drive adaptor to connect USB drives to the Device. Do not
attempt to connect the device to a PC or DC power supply using this port.
Connecting the DVB-T player to any other device other than described in this
manual may void the warranty.
3
Page 4

DVBT-MP32 User Manual
5
TABLE OF CONTENTS
Important instruction and precaution . . . . . . . . . . . . . . . . . . . . . . . . . . . . . . . . . . . . . . . . . . . . . .2
Table of contents . . . . . . . . . . . . . . . . . . . . . . . . . . . . . . . . . . . . . . . . . . . . . . . . . . . . . . . . . . . . . . . . . . .4
Accessory list and connection guide . . . . . . . . . . . . . . . . . . . . . . . . . . . . . . . . . . . . . . . . . . . . . . . 5
Knowing your DVT . . . . . . . . . . . . . . . . . . . . . . . . . . . . . . . . . . . . . . . . . . . . . . . . . . . . . . . . . . . . . . . . . .6
Basic operations . . . . . . . . . . . . . . . . . . . . . . . . . . . . . . . . . . . . . . . . . . . . . . . . . . . . . . . . . . . . . . . . . . . .7
Media Hot Keys and Using the Main Menu. . . . . . . . . . . . . . . . . . . . . . . . . . . . . . . . . . . . . . . . . .8
Quick start for rst time use . . . . . . . . . . . . . . . . . . . . . . . . . . . . . . . . . . . . . . . . . . . . . . . . . . . . . . 10
Using the DVB-T Radio . . . . . . . . . . . . . . . . . . . . . . . . . . . . . . . . . . . . . . . . . . . . . . . . . . . . . . . . . . . 12
Recording Fuction . . . . . . . . . . . . . . . . . . . . . . . . . . . . . . . . . . . . . . . . . . . . . . . . . . . . . . . . . . . . . . . . 13
Video File Playback . . . . . . . . . . . . . . . . . . . . . . . . . . . . . . . . . . . . . . . . . . . . . . . . . . . . . . . . . . . . . . . 14
Music File Playback . . . . . . . . . . . . . . . . . . . . . . . . . . . . . . . . . . . . . . . . . . . . . . . . . . . . . . . . . . . . . . . 15
Photo Viewing Mode . . . . . . . . . . . . . . . . . . . . . . . . . . . . . . . . . . . . . . . . . . . . . . . . . . . . . . . . . . . . . 16
Photo Viewing Mode - Advanced Functions . . . . . . . . . . . . . . . . . . . . . . . . . . . . . . . . . . . . . . 17
System Settings . . . . . . . . . . . . . . . . . . . . . . . . . . . . . . . . . . . . . . . . . . . . . . . . . . . . . . . . . . . . . . . . . . 18
DVB-T TVRadio Menu . . . . . . . . . . . . . . . . . . . . . . . . . . . . . . . . . . . . . . . . . . . . . . . . . . . . . . . . . . . . 21
Video File Playback . . . . . . . . . . . . . . . . . . . . . . . . . . . . . . . . . . . . . . . . . . . . . . . . . . . . . . . . . . . . . . . 23
Specications . . . . . . . . . . . . . . . . . . . . . . . . . . . . . . . . . . . . . . . . . . . . . . . . . . . . . . . . . . . . . . . . . . . . . 24
4
Page 5
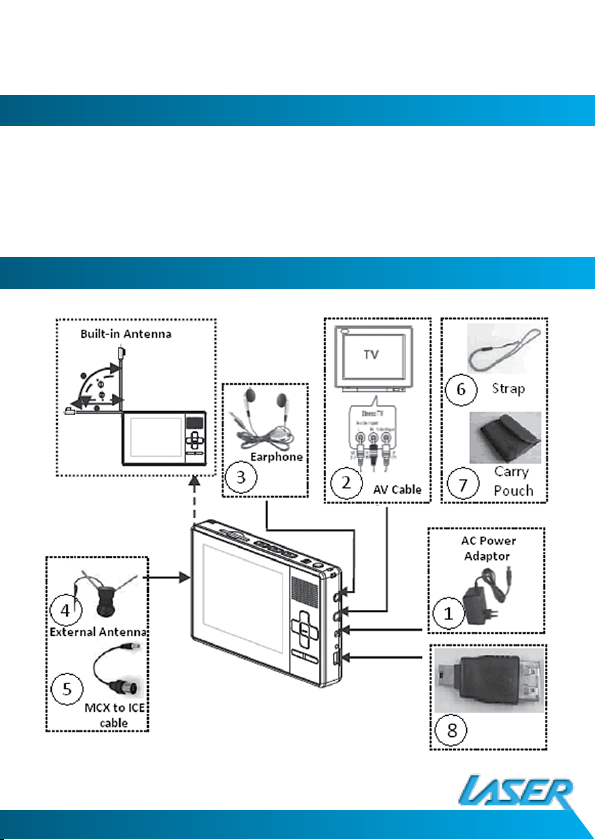
ACCESSORY LIST
1. AC/DC Power adaptor
2. AV cord
3. External Antenna
4. MCX-to-ICE cable
CONNECTION GUIDE
5. Wrist strap
6. Carry pouch
7. USB Drive Adaptor
5
Page 6
DVBT-MP32 User Manual
7
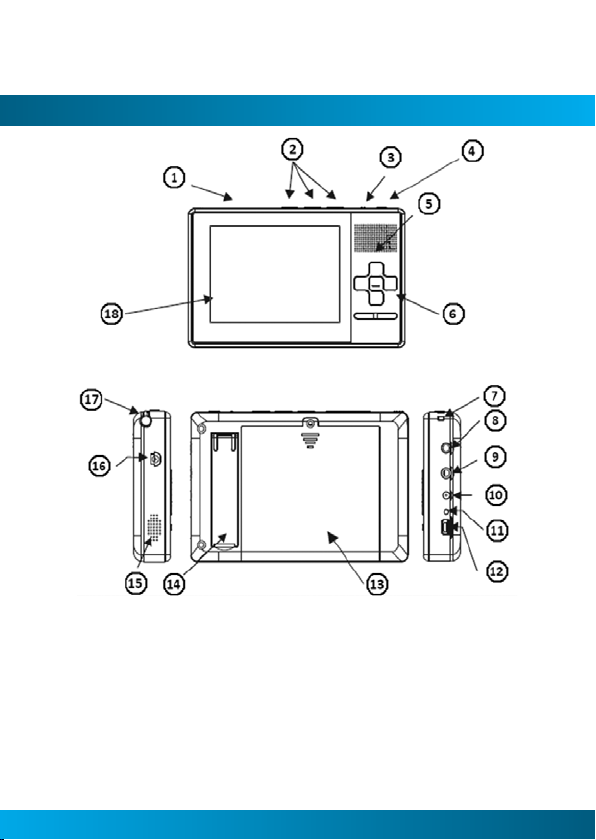
KNOWING YOUR DVT
1 SDHC/MMC Card Slot
2 Media Hot keys
3 Hold Switch
4 Power Button
5 (&15) Speaker
6 Navigation keys
7 Strap Eyelet
8 Earphone Socket
9 Audio/Video Out Socket
10 DC Power in
11 Charge Indicator LED
12 USB host Port (Adaptor supplied)
13 Battery Cover
14 Fold Out Stand
15 (&5) Speaker
16 External Antenna Socket
17 In-Built Telescopic Antenna
18 LCD Screen
6
Page 7

BASIC OPERATION
7
Page 8
DVBT-MP32 User Manual
9
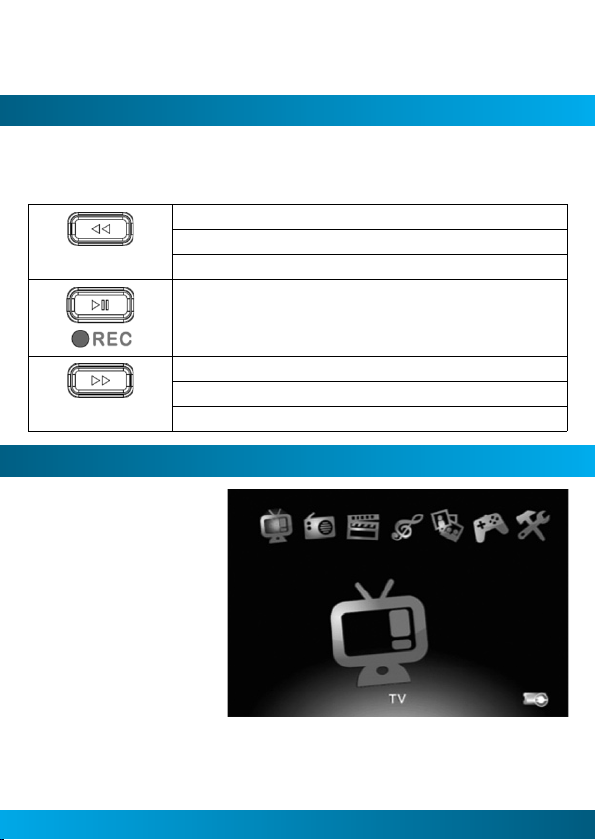
MEDIA HOT KEYS
The media hot Keys are located on the top of the device. They allow you to rewind,
fast forward, play, pause and go to the previous or next le when playing music of
video les.
Previous/Fast Rewind Function
-Press the key to play the previous video/audio le
-Press and hold key to fast rewind during playback.
Play/Pause Function
Next/Fast Forward Function
-Press the key to play the next Video/Audio le.
-Press and hold the key to fast forward during playback.
USING THE MAIN MENU
This is the Main Menu
Screen. From here you
can select DVB-T TV
mode, DVB-T Radio mode,
Video le playback, Audio
le playback , Picture
Viewer, Games and access
the settings menu. Use
the [VOL +] and [VOL -]
buttons to highlight the
required item and then
press the [OK] button to
select it.
8
Page 9

DVB-T TV mode.
To enter DVB-T TV Mode.
DVB-T Radio mode.
To Enter DVB-T Radio Mode.
Video File Playback mode.
To enter Video le playback mode.
Audio File Playback mode.
To enter Audio le playback mode.
Photo Viewing Mode.
To enter the Photo viewing mode.
Game Mode.
To enter the Game menu.
System Settings
To enter the System setting Menu to congure the device.
9
Page 10

DVBT-MP32 User Manual
11
QUICK START GUIDE FOR FIRST TIME USE
Step 1: Charging the Device
1. Connect the power adaptor to the main unit.
2. When the battery starts charging, the Charge
LED will Glow RED.
3. When the battery is fully charged The LED will
Glow GREEN. The Player can be remeoved from
the adaptor.
Step 2: Turning the Device on
Press the Power button to turn on. Press again to trun the device off.
Step 3: Press the [VOL + ]/[VOL - ] buttons to select the “TV” icon and then press the [OK] button
to enter TV mode
10
Page 11

Step 4: Press the [OK] button to enter the scan setup menu.
Step 5: Select your own OSD language, your current region and whether it is summer time (for
daylight savings).
1. Use the [CH + ]/[CH -] buttons to highlight the required menu item.
2. Use the [VOL +] button access the submenu if shown.
3. Use the [CH + ]/[CH -] buttons to highlight to the required menu item.
4. Press the [OK] button to select the highlighted item or press the [MENU] button to exit to the previous
screen.
NOTE: Time zone settings will be automatically updated once the Region setting is changed.
Step 6: Perform Auto Search to nd all available DVB-T TV channels.
1. Use the [CH +]/[CH -] button to highlight the Auto Search option.
2. Press the [OK] button to start the search.
Step 7: You can sit back and enjoy you Mobile TV.
NOTE: Press and hold the [OK] button to view the current aspect ratio of current program. Press again to
change the ratio.
11
Page 12

DVBT-MP32 User Manual
13
USING THE DVB-T RADIO
1. In the Main Menu press the [VOL +]/[VOL –]
buttons to select the Radio Icon and then press
the [OK] button to enter the Radio Mode.
2. Press the [CH +]/[CH -] to select the preferred
radio channel.
3. The Radio service will start immediately.
Note: The device can only play DVB-T radio broad-
casts. These stations are found when scanning
for TV broadcast
To rescan for radio channels please rescan for TV channels.
12
Page 13

RECORDING FUNCTION
1. During the TV ort Radio mode press
the button to start recording the
current TV or Radio Program When the
unit is recording,
in the upper left screen.
2. Press the button of the [HOME]
button to stop recording.
3. Recorded TV programs can be played
back in Video Playback Mode.
4. Recorded Radio Programs can be
played back in Music Mode.
will be displayed
Important Notes
a) An SD card, MMC card or USB drive must be tted or connected for the recording
function to work
b) The Recorded program will be stored in a default folder named “PVR”. Files
will be saved as*. MPG for video les and *.MP3 les for radio recordings. The
recorded le will be named as Channel Name + Recorded Date + Time. For
example 090131_101336.mpeg.
c) Due to the le size limitations of the FAT/FAT32 les system being 4GB,
recordings larger than 4GB will be split in multiple parts no larger than 3.9GB.
d) 1GB of storage will store approximately 45 minutes of video
e) Storage devices formatted in FAT/FAT32 will only be supported.
f) Generally all USB 2.0 drives and SD cards can be used for recoding programs.
However, there may be some cases where USB 2.0 drive and SD cards will not
record programs. It is highly recommend that all storage media be formatted
before being used on this device.
g) Warning! Please do not edit, move or delete the “*.PLT” & “RECORD.TMP” les.
Doing so will cause errors on playback.
CONNECTION GUIDE
13
Page 14

DVBT-MP32 User Manual
15
VIDEO FILE PLAYBACK
The Laser Multimedia DVB-T will support MPG, DAT, VOB and AVI les. (MPEG4ASP,
Xvid, DivX 4.0/5.0) format video les. The selection below will explain how to play
your video les stored on the SD/MMC card or USB drive.
1. After selecting Video Playback Mode from the
Main Menu, the les browser screen will appear.
Press the [OK] button to select the root folder
2. All available video les will be displayed on the
screen. Use the [CH+] and the [CH-] buttons to
scroll up and down the les. Select the desired
le by pressing the [OK] button.
Note: User can only choose Video les in this
mode. Music and image les can not be played
in Video Playback Mode.
3. Playback of the Selected Video le should begin
straight away.
Note: Press the (FR)/ (FF) buttons to
select the next or previous le. Press and hold
/ to increase or decrease the
the
playback speed. Press the (Play/Pause)
button to pause playback and again to resume.
14
Page 15

MUSIC FILE PLAYBACK
The Laser Multimedia DVB-T will support MP3 and WAV audio les. The selection
below will explain how to play your audio les stored on the SD/MMC card or USB
drive.
1. After selecting Music File Playback Mode from
the Main Menu, the les browser screen will
appear. Press the [OK] button to select the
root folder
2. All available video les will be displayed on the
screen. Use the [CH+] and the [CH-] buttons to
scroll up and down the les. Select the desired
le by pressing the [OK] button.
Note: User can only choose Music les in this mode.
Video and image les can not be played in Music
Playback Mode
3. Playback of the Selected Music le should begin
straight away.
Note: Press the (FR)/ (FF) buttons to
select the next or previous le. Press and hold
/ to increase or decrease the
the
playback speed. Press the (Play/Pause)
button to pause playback and again to resume.
15
Page 16

DVBT-MP32 User Manual
17
PHOTO VIEWING MODE
The Laser Multimedia DVB-T will support JPG, BMP and GIF format image video
les. The selection below will explain how to display your image les stored on the
SD/MMC card or USB drive.
1. After selecting Photo Viewing Mode from the
Main Menu, the les browser screen will appear.
Press the [OK] button to select the root folder
2. All available image les will be displayed on the
screen. Use the [CH+] and the [CH-] buttons to
scroll up and down the les. Select the desired
le by pressing the [OK] button.
Note:
User can only choose image les in this
mode. Video and Music image les can not be
played in Image Viewing Mode.
3. A Picture preview will appear. Press [CH+]/[CH]/[VOL+]/[VOL-] to select a picture. Press [OK]
to display the image in full screen mode.
Note: Press the (FR)/ (FF) buttons to
select the next or previous le.
Press the (Play/Pause) button to pause
Slideshow playback and again to resume.
16
Page 17

PHOTO VIEWING MODE – ADVANCE FUNCTIONS
Rotating the Picture
Press the [VOL+] button to rotate the picture clockwise. Press the [VOL-] button
to rotate the picture counter clockwise.
Slideshow
Press the (Play/Pause) button to start or stop the photo slideshow.
Zoom
1. When viewing a picture, press the [OK] button to activate the zoom function.
2. Press [OK] or to zoom in.
3. Press to zoom out.
4. Use the [CH+]/[CH-]/[VOL+]/[VOL-] to scroll around the picture
when zoomed in on a picture
5. Press [MENU] button to exit the zoom function.
17
Page 18
DVBT-MP32 User Manual
19
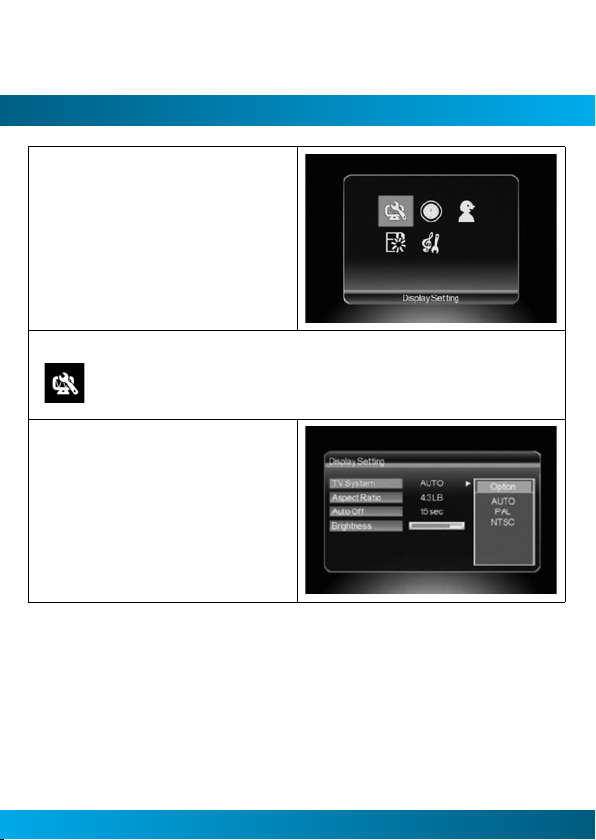
SYSTEM SETTINGS
This is the system setting menu screen. Users can
adjust the Country/Language setting, the sound
setup, Display, Time, and proceed to the software
upgrade page. Use the [VOL+] and [VOL-] buttons
to highlight the required item and press the [OK]
to select.
Display Settings
To set up the TV System (PAL, NTCS or Auto), the Aspect ratio, adjust the brightness and
switch ON/OFF the Auto backlight.
1. Press the [CH+]/[CH-] buttons to highlight the
item you want adjust.
2. Press the [VOL+] button and use the [CH+]/[CH] to scroll up and down the options.
3. Select one by pressing the [OK] button or exit
the setting by pressing the [MENU] button.
4. After adjusting, press [MENU] button to exit the
“Display Settings”.
18
Page 19

Region and Langauges
To Set up the OSD langauge and DVB-T regional settings.
1.Press the [CH+]/[CH-] buttons to highlight the
item you want to adjust.
2. Press the [VOL+] button and use the [CH+]/[CH] to scroll up and down the options.
3. Select one by pressing the [OK] button or exit
the setting by pressing the [MENU] button.
4. After adjusting, press [MENU] button to exit the
“Region & language Settings”
Sound Settings
To select a sound efect and set up the equaliser.
1.Press the [CH+]/[CH-] buttons to highlight the
item you want to adjust.
2. Press the [VOL+] button and use the [CH+]/[CH-]
to scroll up and down the options.
3. Select one by pressing the [OK] button or exit
the setting by pressing the [MENU] button.
4. After adjusting, press [MENU] button to exit the
“Sound Set Up”
19
Page 20

DVBT-MP32 User Manual
21
Software Version and Firmware upgrade
To display the current rmware version number and upgrade
1. Insert the SD/MMC card containing the rmware
le into the card slot.
2. After entering the Version/upgrade menu, press
the [CH-] button until the “SW Upgrade” option
is highlighted.
3. Press the [OK] button to start the upgrade
process.
SYSTEM SETTINGS
Important
Only use the rmware le recommend for this model device. The use of Firmware
les not specically for this device may render it inoperable and unserviceable and
will void the warranty. This should only be completed if recommended by technical
support.
20
Page 21
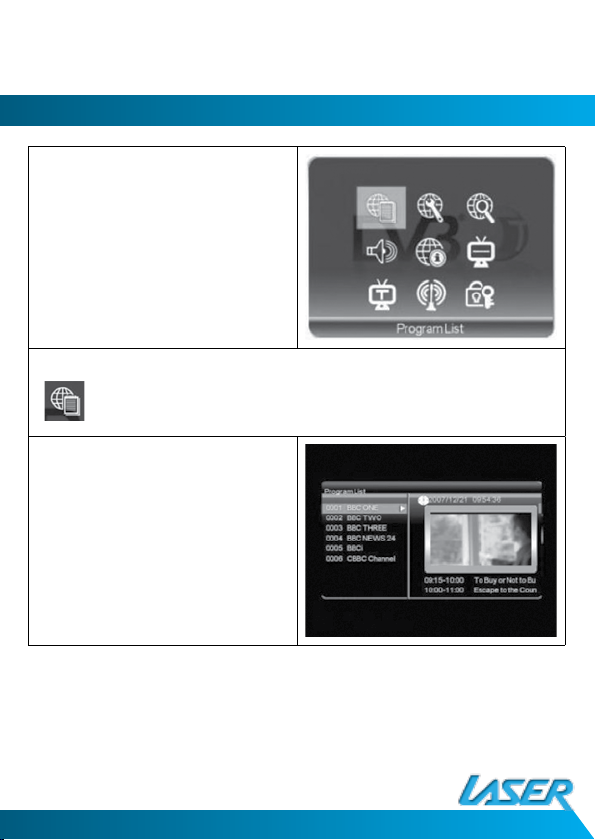
DVB-T TV/RADIO MENU
After entering the DVB-T TV or Radio service, Press
the [Menu] button. By navigating the different
options you can have access to the Program List,
Channel mangaement, the automatic serch function, DVB-T audio settings, Channel info, Subtitle
function, Teletext, Antenna selection and the
parental lock.
Program List
To Display Channel information, preview the program and to access the Electronic Program
Guide (EPG)
1. Select “Program List” in the TV Menu and press
the [OK] button.
2. Press the [CH+]/[CH-] buttons to scroll up or
down the list of channels. The highlighted chan
nel will be previewed.
3. Press the [VOL+] button to show the detail of
the current program.
4. Press the [MENU] Button to exit.
-
21
Page 22

DVBT-MP32 User Manual
23
Channel Management
To rearrangand to edit the TV channel listing using the Skip, List, Lock and Delete Fucntions.
1. Select Channel Management in the TV Menu and
press the [OK] button.
2. Press the [CH+]/[CH-] Buttons to scroll up or
down the channel list. Press the [OK] button
to enter the Editing Menu for the selected
Channel.
3. Press the [Menu] button to exit.
22
Page 23

VIDEO FILE PLAYBACK
Channel Management
Skip
1. After entering the Channel Editing Menu, select the “Skip” button on the screen
by pressing [VOL+]/[VOL-] buttons.
2. Press the [OK] button to activate the function.
Note: This Function “temporarily” removes the channel from the program list. Us-
ers can restore the channels by deactivating the function.
Lock a Channel
1. After entering the Channel Editing menu, select the “Lock” button on the screen
by pressing the [VOL+]/[VOL-] Buttons.
2. Press the [OK] button to activate or deactivate it.
23
Page 24

DVBT-MP32 User Manual
SPECIFICATIONS
Display
Antenna
Speaker
Video Output
Audio Output
Controls
OSD Languages
Features
Power supply
Battery
Operating time
Dimensions
Weight
Technical support
Media Player
Video support
Audio support
Picture support
Max record time
Equaliser selection
3.5” QVGA TFT LCD, 320 x 240 pixels
Built-in telescopic antenna for UHF band reception
Built-in speaker
3.5mm Video out socket
3.5mm Stereo Audio out / Earphone socket
9 button thumb pad + Power ON/OFF slide switch
English, German, French, Spanish, Italian, Dutch
DVB-T TV/Radio, FM Radio. Auto channel search, EPG, Channel preview,
and Subtitles (where supported)
100/240V AC power adaptor
Built in 3.7V / 2000mAh rechargable polymer battery
Typically up to 3hrs operation time.
120mm X 78mm X 20mm
200grams (including battery)
www.LaserCo.net
AVI (XvID, DivX 4.0/5.0, MPG, MPG4 ASP), DAT
MP3, WAV
JPG
aprox 2.5 hours / 4GB
Standard / Classic / Rock / Jazz / Pop
Multimedia playback and record via SD / MMC card (32GB Max)
24
 Loading...