

Page 1
Warning
Incorrect or out of phase engine timing can result in damage to the valves.
The Tool Connection cannot be held responsible for any damage caused by
using these tools in anyway.
Safety Precautions – Please read
• Disconnect the battery earth leads
(check radio code is available)
• Remove spark or glow plugs to make
the engine turn easier
• Do not use cleaning fluids on belts,
sprockets or rollers
• Always make a note of the route of the
auxiliary drive belt before removal
• Turn the engine in the normal direction
(clockwise unless stated otherwise)
• Do not turn the camshaft, crankshaft or
diesel injection pump once the timing
chain has been removed (unless
specifically stated)
• Do not use the timing chain to lock the
engine when slackening or tightening
crankshaft pulley bolts
• Do not turn the crankshaft or camshaft
when the timing belt/chain has been
removed
• Mark the direction of the chain before
removing
• It is always recommended to turn the
engine slowly, by hand and to re-check
the camshaft and crankshaft timing
positions
• Crankshafts and Camshafts may only be
turned with the chain drive mechanism
fully installed.
• Do not turn crankshaft via camshaft or
other gears
• Check the diesel injection pump timing
after replacing the chain
• Observe all tightening torques
• Always refer to the vehicle
manufacturer’s service manual or a
suitable proprietary instruction book
• Incorrect or out of phase engine timing
can result in damage to the valves
• It is always recommended to turn the
engine slowly, by hand, and to re-check
the camshaft and crankshaft timing
positions
Part No. 4576
Engine Timing Tools
Volkswagen Audi Group
3.0 V6
LASER Copyright LASER Copyright LASER Copyright LASER Copyright
LASER Copyright LASER Copyright LASER Copyright LASER Copyright
LASER Copyright LASER Copyright LASER Copyright LASER Copyright
www.lasertools.co.uk
www.lasertools.co.uk
LASER Copyright LASER Copyright LASER Copyright LASER Copyright
LASER Copyright LASER Copyright LASER Copyright LASER Copyright
Page 2
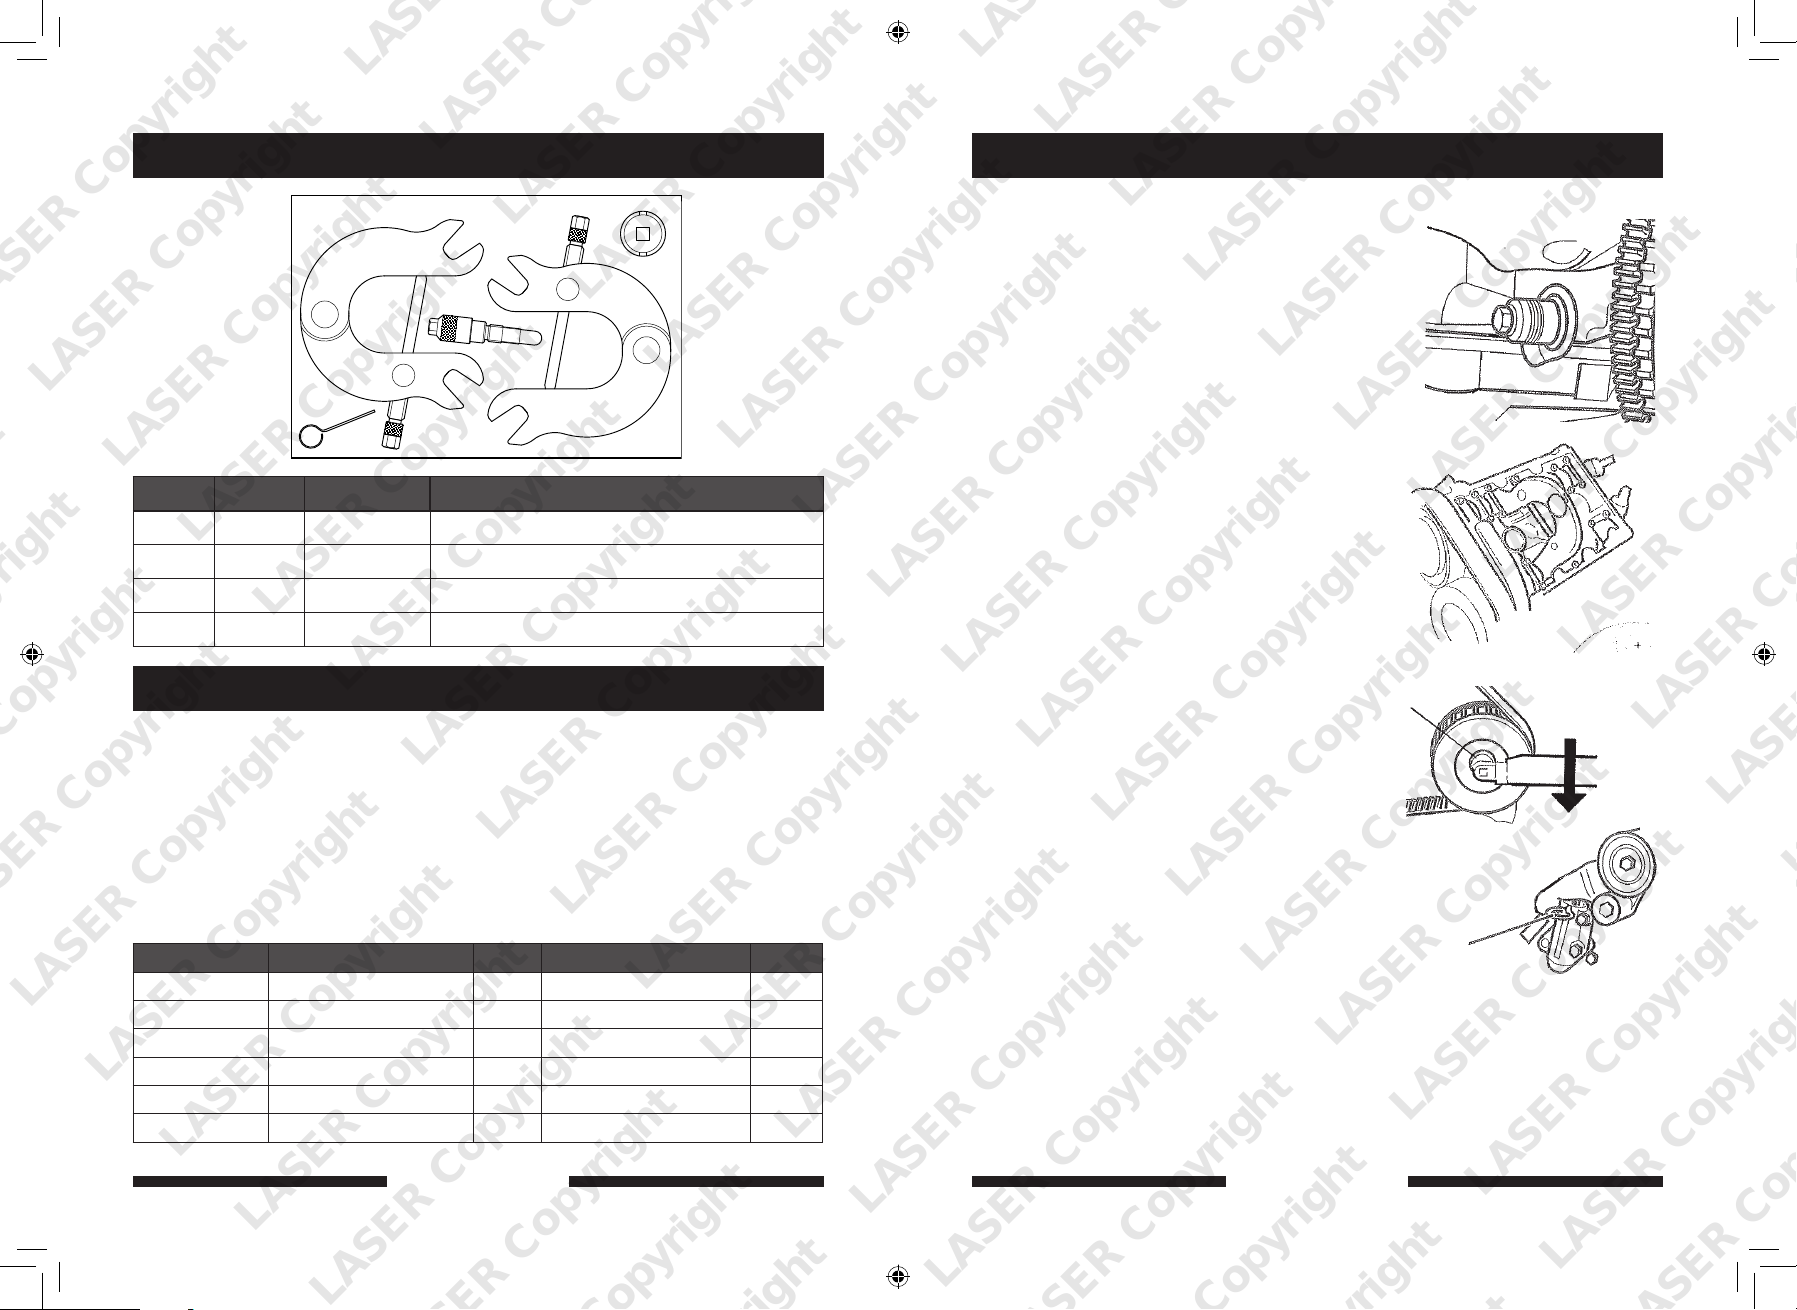
Plan Layout
Instruction
C
B
A
D
Ref Code Oem Ref Description
C361
A
B C362 T40030 Camshaft aligning tools (2)
C C363 T40028 Camshaft Sprocket Adjusting Tool
D C284 T40011 Tensioner Pin
T40026 Crankshaft aligning tool
B
Applications
The application list for this product has been compiled cross referencing the OEM Tool Code
with the Component Code.
In most cases the tools are specific to this type of engine and are necessary for Cam belt or
chain maintenance.
If the engine has been identified as an interference engine valve to piston damage will occur
if the engine is run with a broken Cam belt.
A compression check of all cylinders should be performed before removing the cylinder head.
Always consult a suitable work shop manual before attempting to change the Cam belt or
Chain.
Manufacturer Model Style Engine Code Year
LASER Copyright LASER Copyright LASER Copyright LASER Copyright
Audi A4 3.0 V6 ASN | BBJ 01-08
A4 Cabrio 3.0 V6 ASN | BBJ 01-08
A4 Quattro 3.0 V6 ASN | BBJ 01-08
LASER Copyright LASER Copyright LASER Copyright LASER Copyright
A6 3.0 V6 ASN | BBJ 01-08
A6 Quattro 3.0 V6 ASN | BBJ 01-08
A8 3.0 V6 ASN | BBJ 01-08
1. Rotate the crankshaft in a clockwise
direction until the camshaft lobes at
number 3 and 4 cylinders are angled
upwards. Fit the camshaft Locking Tools
B over the camshaft lobes on cylinder
numbers 3 and 4. Gently rock the
Crankshaft until the tools can be fitted
snugly and tightened in position using the
integral adjuster. Remove the blanking
plug from the cylinder block position
rear left hand side and replace with the
Crankshaft Locking Tool A
2. Remove the centre blanking cap and
circlip from each camshaft sprocket and
slightly slacken the centre bolt.Using an
8mm Hex Key turn the Tensioner Pulley
anti-clockwise until the holes in both
Tensioner Body and Pushrod are aligned
and retain in this position with the
Tensioning Pin D. Once the Tensioner
Pulley Bolt has been slackened the
Timing Belt can be removed. During the
installation of the new timing belt it is
necessary to turn the Camshaft Sprockets
using tool C with a torque of 10 Nm. After
tightening each Camshaft Sprocket Bolt
the Blanking Caps can be
re-fitted with the circlips to retain.
3. The Camshaft and Crankshaft Locking
Tools should be removed and the final
installation procedure followed.Support
Guides (Optional Set) can be used to
slide the front panel forward to provide
additional working space. Remove Timing
Belt covers and rear engine cover and
move the coolant expansion tank to one
side, it is unnecessary to disconnect the
hoses.
LASER Copyright LASER Copyright LASER Copyright LASER Copyright
2 3
LASER Copyright LASER Copyright LASER Copyright LASER Copyright
www.lasertools.co.uk www.lasertools.co.uk
A
B
C
D
LASER Copyright LASER Copyright LASER Copyright LASER Copyright
 Loading...