

Page 1

VISO Manual
LARSEN & BRUSGAARD
4070 Kirke Hyllinge, Denmark
Phone: +45 4648 2480
Fax: +45 4648 2490
E-mail: L-and-B@L-and-B.dk
Mosevej 3
Page 2

2
3
WARNING!
FAILURE TO FOLLOW ALL WARNINGS, INSTRUCTIONS, AND REQUIRED PROCEDURES MAY
RESULT IN SERIOUS INJURY AND DEATH.
Always ensure your altimeter is adjusted to zero prior to jumping to account for any
changes in barometric pressure.
VISO is a trademark of Larsen & Brusgaard, Denmark.
©2006. Larsen & Brusgaard ApS. All rights reserved.
Larsen & Brusgaard operates a policy of continuous development.
Therefore, we reserve the right to make changes and improvements to any of the
products described in this guide without prior notice.
Altimeters may give erroneous readings if you are tumbling or the altimeter is in a
burble (wake), such as when sit flying or sky surfing. Chest mount altimeters are more
vulnerable to this problem. If you are in doubt about how this limitation affects your
skydiving, consult a licensed instructor.
DO NOT use this equipment unless you are on, or have passed an approved skydiving
course.
Use the VISO™ at your own risk.
Page 3

4
5
CONTENTS
Introduction ............................................................................................................................ 6
Software & functions ..............................................................................................................7
Description .............................................................................................................................. 9
Display .................................................................................................................................... 10
Main Window ...........................................................................................................................14
Alti-Meter Mode ..................................................................................................................... 14
Speed-Meter Mode ..................................................................................................................16
Road Map ................................................................................................................................. 18
Customise the VISO Settings ..................................................................................................... 19
Alti-Meter / Speed-Meter Selector ............................................................................................. 22
Feet/Meter Selector ................................................................................................................ 23
Mph/Kmh Selector ................................................................................................................. 24
Altitude Offset .......................................................................................................................25
Dive Type Selector ..................................................................................................................26
True Airspeed (TAS) / Skydiver’s Airspeed (SAS) .......................................................................... 28
Set Current Year Selector ......................................................................................................... 32
Set Current Date Selector ........................................................................................................33
Set Current Time Selector ........................................................................................................ 34
Preset Jump Counter Selector................................................................................................... 35
Reset Jump Counter Selector ................................................................................................... 36
Turn VISO OFF Selector Selector ................................................................................................ 37
Backlight Setup Area ................................................................................................................39
Backlight ON/OFF ................................................................................................................... 39
Zeroing the VISO ...................................................................................................................... 41
Jump Mode ..............................................................................................................................42
Jump Data ...............................................................................................................................43
Logbook Area ........................................................................................................................... 43
Jump Number ........................................................................................................................ 44
Exit Altitude .........................................................................................................................45
Deployment Altitude ...............................................................................................................46
Freefall Time ......................................................................................................................... 47
Max. Speed in Freefall .............................................................................................................48
Max. Speed under Canopy ........................................................................................................ 49
Profile Area .............................................................................................................................. 51
Playback Altitude Versus Time .................................................................................................. 52
Playback Speed Versus Time ..................................................................................................... 53
Resetting the VISO ...................................................................................................................55
Battery Replacement ................................................................................................................ 56
Battery Status .......................................................................................................................... 57
Firmware Version ...................................................................................................................... 58
Trouble-shooting ...................................................................................................................... 59
Appendix ................................................................................................................................. 60
TAS and SAS .......................................................................................................................... 60
SPECIFICATIONS ........................................................................................................................ 63
Mechanical............................................................................................................................ 63
Logbook ............................................................................................................................... 63
Profile Storage ....................................................................................................................... 64
Factory default settings .......................................................................................................... 64
Other ................................................................................................................................... 65
Accessories .............................................................................................................................. 66
Warranty .................................................................................................................................. 67
Page 4

6
7
IntroductionIntroduction
Congratulations on purchasing your new VISO!
The VISO design is based upon the latest findings in microcomputer technology and
freefall parameters. Please read ALL of the instructions prior to actual skydiving use.
The VISO comprises three instruments:
1 Digital Alti-Meter
Stores detailed altitude information about the last jump for later review
2 Digital Speed-Meter
Stores detailed speed information about the last jump for later review
3 Jump Counter
Electronic logbook, storing and displaying information about the last 200 jumps.
- Can be used as an aid to track the amount of jumps performed on a rig.
- Can be reset at any time, but time and date for the last reset remains stored and
cannot be erased.
Features
• Digital Alti-Meter or Speed-Meter
• Electroluminescent backlight for night jumping. Can remain ON for several hours
• Automatic calibration to local elevation
• LCD screen for easy and intuitive operation and information review
• Logbook with playback of altitude/speed profile for the last jump
• Operational at sub-zero temperatures
• Switches OFF automatically after 14 hours
Software & functions
• Stores up to 10 minutes of profile data from last jump
Displays Alti-Meter and Speed-Meter details from exit to landing
• Records and displays jump information about the last 200 jumps including exit
altitude, deployment altitude, freefall time, max. speed in freefall and max. speed
under canopy
• Choice of readings in feet or meter and mph or kmh
Page 5
8
9
Introduction
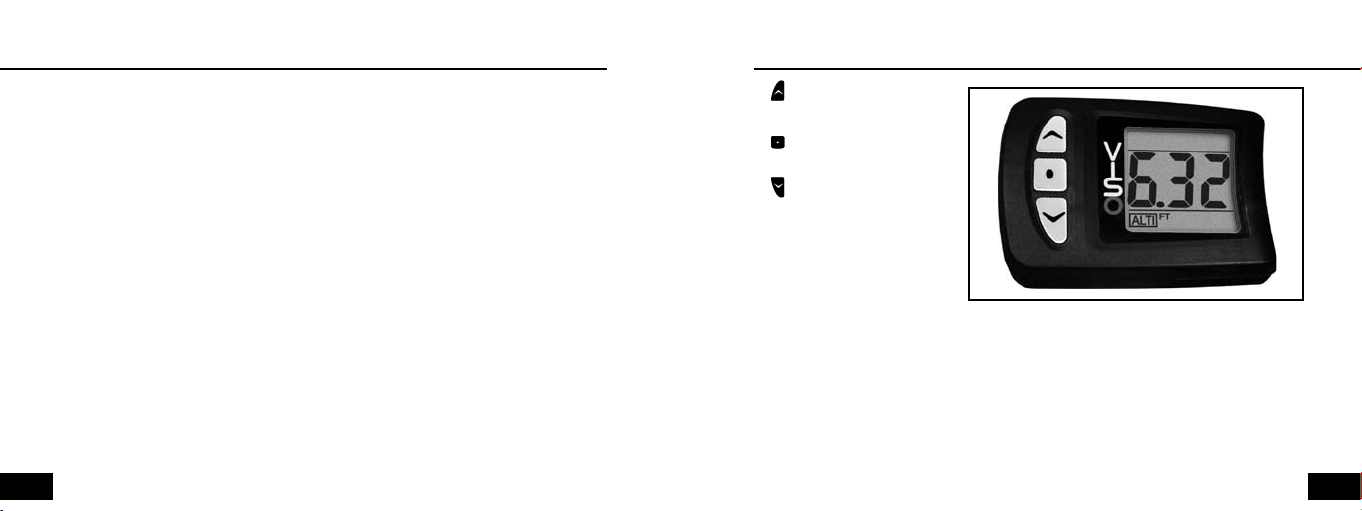
Description
If you have any questions please call, fax or e-mail us.
LARSEN & BRUSGAARD
Phone: +45 4648 2480
Fax: +45 4648 2490
E-mail: L-and-B@L-and-B.dk
1. UP button
2. Middle button
3. Down button
4. LCD display
5. Reset button (on side)
Page 6
10
11
Display
2
1
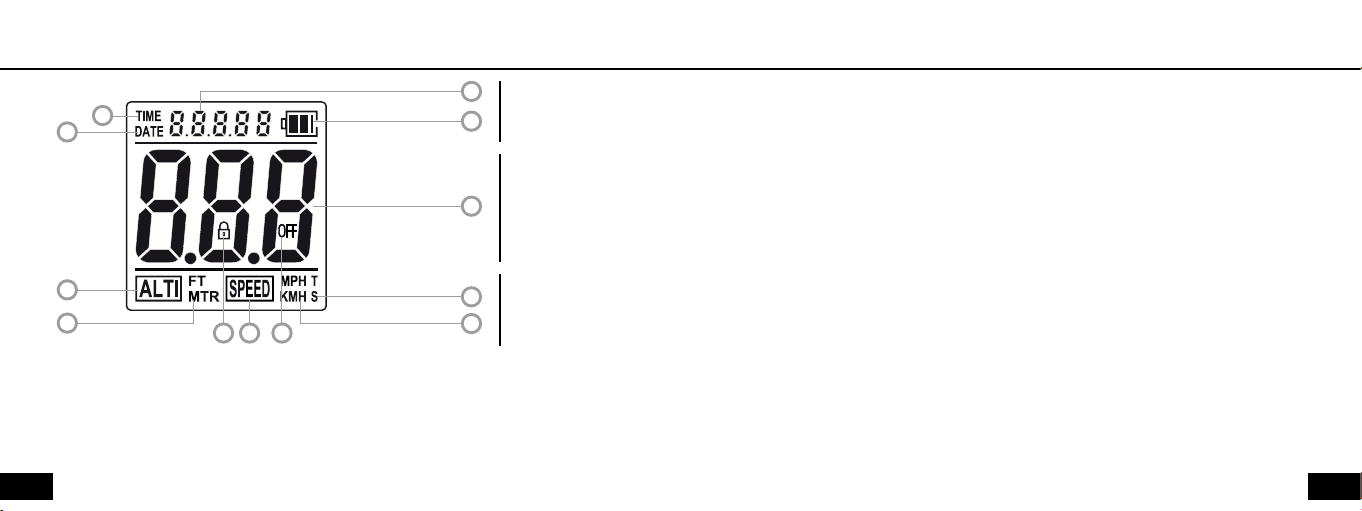
Display
3
Date /
Time Area
4
Altitude /
Speed Area
5
2 Time icon
3 Additional information, displaying:
- current date/time
- time in profile when in Profile Area
- date/time when in Logbook Area
4 Battery status
Battery Power Level icon – indicates the remaining battery capacity
12
11
10 9 8
The display has the following characteristics by default (normal usage):
Date / Time Area
1 Date icon
Status Area
6
7
Altitude / Speed Area
5 Main information, displaying:
- altitude when VISO is set to Alti-Meter mode
- speed when VISO is set to Speed-Meter mode
- detailed profile information when in Profile Area
- logbook information when in Logbook Area
- various setup information
Page 7
12
13
Display
Display
Status Area
6 True Airspeed (TAS) / Skydiver’s Airspeed (SAS) status
7 Mph / Kmh status
8 OFF icon - Used to manually power OFF the VISO
9 Speed-Meter indicator when VISO is set to Speed-Meter mode
10 Padlock icon Used to indicate and control entrance to ACCESS mode
11 Feet/Meter status
12 Altimeter indicator when VISO is set to Alti-Meter mode
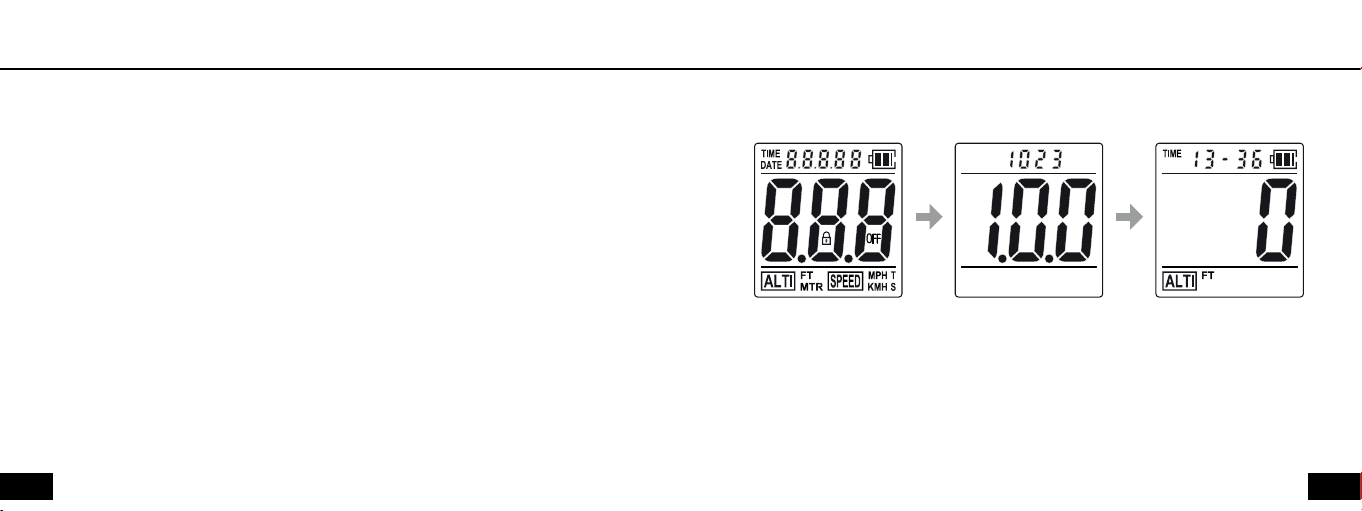
Power ON
The VISO has been powered OFF prior to shipping from our factory. To turn the
power ON, press and hold any key until the VISO beeps, then release the button.
Auto OFF
The VISO automatically switches OFF 14 hours after the last jump or 14 hours after
the last pressing of any key, whichever comes first.
The VISO runs a self-test and
displays all icons
It then displays the firmware
version number together with
a factory reference number...
...and switches to a screen
configuration referred to as
the “Main Window”.
Main Window
This represents the starting point for all further actions and subsequent displays.
Page 8
14
15
Main Window
Main Window
Explanation
The Main Window is the default window which displays current time, battery status
and either Altitude or Speed.
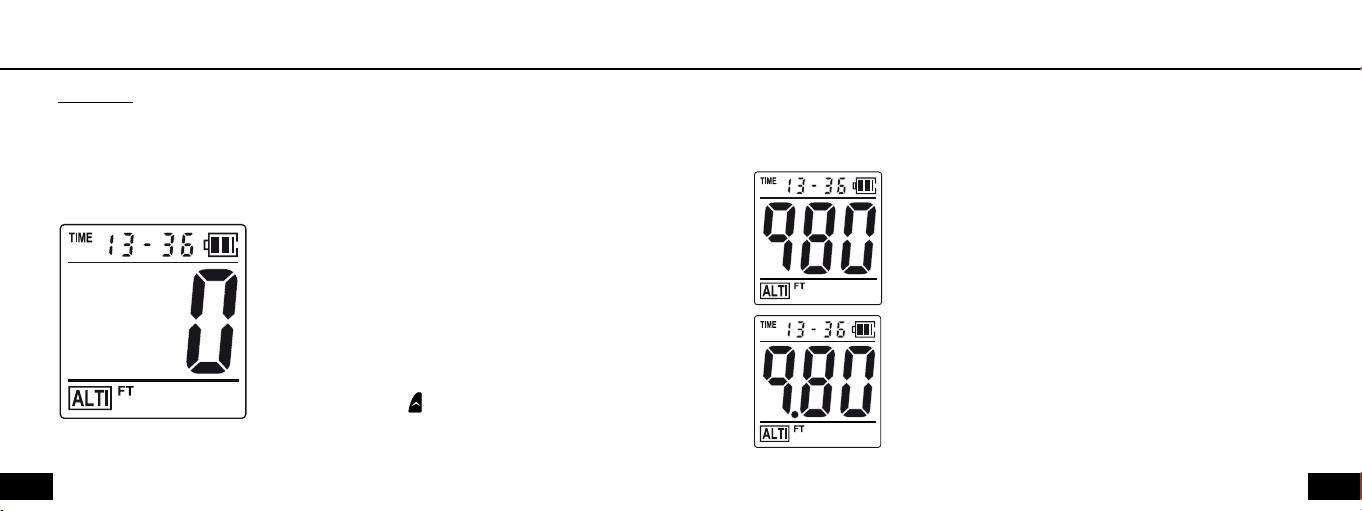
Alti-Meter Mode
When the VISO is set to Alti-Meter mode, the
“ALTI” and “Feet/Meter” icons are ON.
The VISO will display the altitude during climb, in
freefall and under canopy.
The date/time information switches OFF during
freefall and under canopy.
(When preset, press to view the current date).
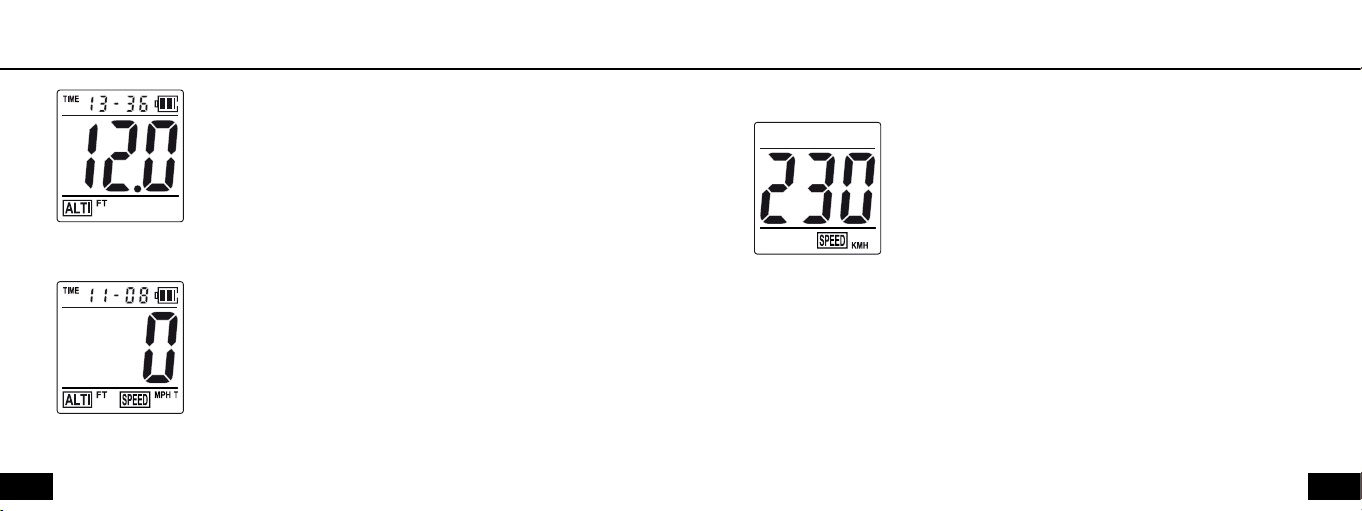
Alti-Meter Displays
In Alti-Meter mode the LCD may show 3 different displays, depending on what
altitude value is shown.
If the altitude is below 1000 the altitude is displayed as
normal. Altitude resolution is in 10 feet (5 meter) incre-
ments.
If the altitude is 1000-9999, the altitude is displayed as
tens of feet or meter. Altitude resolution is in 10 feet
(10 meter) increments
Page 9
16
17
Main Window
Main Window
If the altitude is 10000 or higher, the altitude is displayed as
hundreds of feet or meter. Altitude resolution is in 100 feet
(100 meter) increments.
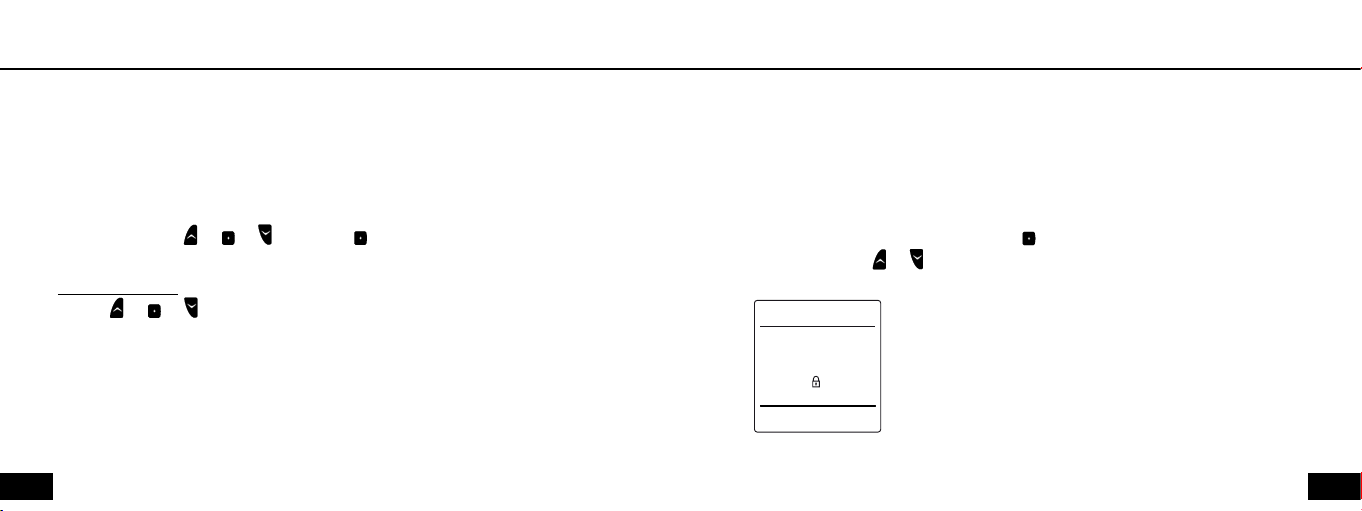
Speed-Meter Mode
When the VISO is set to Speed-Meter mode, the “ALTI”,
“Feet/Meter”, “Mph/Kmh” and “TAS/SAS” icons are ON.
Note: The VISO will display the altitude during climb and
switch to Speed-Meter during the freefall and under canopy.
Date/Time area switches OFF during the freefall and under
canopy.
Speed-Meter Display during the freefall
Speed resolution is in 1 Mph (1 Kmh) increments.
Important Notice about Speed Recordings
Experience has shown that when mounting the VISO on the hand or belly, different
air pressures induced by hand or body movements may result in incorrect recordings
of speeds.
Page 10

18
19
Road Map
VISO Settings
It is recommended that you first familiarize yourself with the VISO
ROAD MAP which is a very helpful tool when using the VISO for the first time.
The ROAD MAP comprises four areas:
• Backlight Setup Area (see page 39)
• Profile Area (see page 51)
• Setup Area (see page 19)
• Logbook Area (see page 43)
The VISO can be customised to your personal settings. Your settings will be stored
and recalled also after replacing batteries. When you first get the VISO, we recom-
mend you to go through the SETUP Selector to customise the VISO settings.
SETUP Selector
In the Setup Area the following options can be selected:
• Alti-Meter/Speed-Meter
• Feet/Meter when set to Alti-Meter
• Mph/Kmh when set to Speed-Meter
• Altitude offset
• Dive Type
• True Airspeed (TAS) / Skydiver’s Airspeed (SAS)
• Set current year
• Set current date
• Set current time
Page 11
20
21
VISO Settings
VISO Settings
• Preset jump counter
• Reset jump counter
• Turn the VISO OFF
• Padlock window
To enter the Setup Area
Perform ACCESS on or or . Then hold > 5 seconds
Performing ACCESS:
1 Press or or and release quickly. The padlock icon turns ON and OFF
2 When the padlock icon turns ON again, immediately press the same button and
keep it pressed (padlock turns OFF)
3 When the padlock icon turns ON again, release immediately
General note:
The VISO goes out of ACCESS and back to the Main Window if no button has been
pressed within 15 sec.
ALL functions (except Power ON) can be performed ONLY when the VISO is in ACCESS mode.
To leave the Setup Area
Wait until the display times out, or press repeatedly until the Padlock window
shows. Then press or to exit.
Padlock Window
Page 12

22
23
VISO Settings
VISO Settings
Alti-Meter / Speed-Meter Selector
Alti-Meter/Speed-Meter • Feet/Meter when set to Alti-Meter • Mph/Kmh when set to Speed-Meter • Altitude
offset • Dive Type • True Airspeed (TAS)/ Skydiver’s Airspeed (SAS) • Set current year • Set current date • Set
current time • Preset jump counter • Reset jump counter • Turn the VISO OFF • Padlock window
Alti-Meter / Speed-Meter
The VISO can be set to function either as an Alti-Meter or as a Speed-Meter.
Press or to toggle between Alti-Meter or Speed-Meter
mode.
The active selection flashes.
Press to save setting and enter the Feet/Meter selector.
Feet/Meter Selector
Alti-Meter/Speed-Meter • Feet/Meter when set to Alti-Meter • Mph/Kmh when set to Speed-Meter • Altitude
offset • Dive Type • True Airspeed (TAS)/ Skydiver’s Airspeed (SAS) • Set current year • Set current date • Set
current time • Preset jump counter • Reset jump counter • Turn the VISO OFF • Padlock window
Feet/Meter
Press or to toggle between Feet/Meter.
The active selection flashes.
Press to save setting and enter the Mph/Kmh selector.
Note: Jump data is continuously stored in both feet and meter.
At any time stored information may be displayed in either unit
of measurement by selecting the respective mode.
Page 13

24
25
VISO Settings
VISO Settings
Mph/Kmh Selector
Alti-Meter/Speed-Meter • Feet/Meter when set to Alti-Meter • Mph/Kmh when set to Speed-Meter • Altitude
offset • Dive Type • True Airspeed (TAS)/ Skydiver’s Airspeed (SAS) • Set current year • Set current date • Set
current time • Preset jump counter • Reset jump counter • Turn the VISO OFF • Padlock window
Mph/Kmh
Press or to toggle between Mph/Kmh.
The active selection flashes.
Press to save setting and enter Altitude Offset.
Note: Jump data is continuously stored in both Mph and Kmh.
At any time stored information may be displayed in either unit
of measurement by selecting the respective mode.
Altitude Offset
Alti-Meter/Speed-Meter • Feet/Meter when set to Alti-Meter • Mph/Kmh when set to Speed-Meter • Altitude
offset • Dive Type • True Airspeed (TAS)/ Skydiver’s Airspeed (SAS) • Set current year • Set current date • Set
current time • Preset jump counter • Reset jump counter • Turn the VISO OFF • Padlock window
Explanation
If the DZ landing elevation differs from that of the aircraft take off elevation, offset
the VISO prior to entering the aircraft as follows:
Altitude Offset
Press and hold or to offset the current altitude.
Press to save setting and enter the Dive Type selector.
Note: When performing altitude offset, the VISO enters Jump Mode and the altitude
offset will be retained for 5 hours, if no jump is made. After 5 hours the VISO recali-
brates to the field elevation where it is currently located.
The altitude offset is not retained when the VISO is powered OFF.
Page 14

26
27
VISO Settings
VISO Settings
Dive Type Selector
Alti-Meter/Speed-Meter • Feet/Meter when set to Alti-Meter • Mph/Kmh when set to Speed-Meter • Altitude
offset • Dive Type • True Airspeed (TAS)/ Skydiver’s Airspeed (SAS) • Set current year • Set current date • Set
current time • Preset jump counter • Reset jump counter • Turn the VISO OFF • Padlock window
Explanation
The Dive Type mode can be used to change parameters when the VISO detects free-
fall exit and canopy deployment.
Dive Type
Press to scroll forward through the dive type list.
Press to scroll backward through the dive type list.
Press to save setting and enter the TAS/SAS Selector.
0 = ---- (blank, factory default parameters)
1 = SLO (Slow) *
2 = STU (Student) **
* Dive Type, 1: SLO (Slow)
In SLO the exit fall rate and deployment calculation parameters are changed to fit
very slow falling types of dives, like wing suit dives, etc.
** Dive Type, 2: STU (Student)
In STU the descent rate parameters are changed to allow detection of short freefalls,
(2 sec).
Page 15

28
29
VISO Settings
VISO Settings
True Airspeed (TAS) / Skydiver’s Airspeed (SAS)
Alti-Meter/Speed-Meter • Feet/Meter when set to Alti-Meter • Mph/Kmh when set to Speed-Meter • Altitude
offset • Dive Type • True Airspeed (TAS) / Skydiver’s Airspeed (SAS) • Set current year • Set current date •
Set current time • Preset jump counter • Reset jump counter • Turn the VISO OFF • Padlock window
Explanation
True Airspeed (TAS) and Skydiver’s Airspeed (SAS) are two methods of calculating
the airspeed of a moving/flying/falling object.
TAS is a term used in aviation: It is the speed of an object relative to the surround-
ing air, regardless of the altitude.
SAS is a new concept developed by LARSEN & BRUSGAARD: SAS is the speed of a
skydiver calculated from measurements of air pressure and temperature and con-
verted to a fixed air pressure (875.3 mb) and a fixed temperature (+7.080C) which
corresponds to 4,000 feet ASL.
See separate section on page 60 for more information about TAS and SAS.
Page 16

30
31
VISO Settings
VISO Settings
True Airspeed (TAS) / Skydiver’s Airspeed (SAS)
Press or to toggle between TAS and SAS.
The active selection flashes.
Press to save setting and enter the Set Current Year
selector.
NOTE: Jump data is continuously stored in both TAS and SAS.
Stored information may be displayed in either unit of measure-
ment by selecting the respective mode.
Recommendation:
When using the VISO as a Speed-Meter in a big way base it is
recommended to set it to SAS.
SAS will show the same speed throughout the dive (at the
same body position), whereas TAS will show a different speed throughout the dive
(the same body position, different air density).
Below are some recommendations and numbers for SAS:
A good base speed should be: 110-115 mph.
A high base speed should be: 120-125 mph (tendency to wobble when docking).
A slow base speed should be: 100-105 mph (jumpers start to go low).
See separate section on page 60 for more information about TAS and SAS.
Page 17

32
33
VISO Settings
VISO Settings
Set Current Year Selector
Alti-Meter/Speed-Meter • Feet/Meter when set to Alti-Meter • Mph/Kmh when set to Speed-Meter • Altitude
offset • Dive Type • True Airspeed (TAS)/ Skydiver’s Airspeed (SAS) • Set current year • Set current date • Set
current time • Preset jump counter • Reset jump counter • Turn the VISO OFF • Padlock window
Set Current Year
Press to increase year.
Press to decrease year.
Press to save setting and enter the Set Current Date selec-
tor.
Set Current Date Selector
Alti-Meter/Speed-Meter • Feet/Meter when set to Alti-Meter • Mph/Kmh when set to Speed-Meter • Altitude
offset • Dive Type • True Airspeed (TAS)/ Skydiver’s Airspeed (SAS) • Set current year • Set current date • Set
current time • Preset jump counter • Reset jump counter • Turn the VISO OFF • Padlock window
Set Current Date
Press to increase date.
Press to decrease date.
Press to save setting and enter the Set Current Time selec-
tor.
Note: Date format is MM:DD.
Page 18

34
35
VISO Settings
VISO Settings
Set Current Time Selector
Alti-Meter/Speed-Meter • Feet/Meter when set to Alti-Meter • Mph/Kmh when set to Speed-Meter • Altitude
offset • Dive Type • True Airspeed (TAS)/ Skydiver’s Airspeed (SAS) • Set current year • Set current date • Set
current time • Preset jump counter • Reset jump counter • Turn the VISO OFF • Padlock window
Set Current Time
Press to increase time.
Press to decrease time.
Press to save setting and enter the Preset Jump Counter selec-
tor.
Note: Time format is HH:MM and in 24-hour format
Preset Jump Counter Selector
Alti-Meter/Speed-Meter • Feet/Meter when set to Alti-Meter • Mph/Kmh when set to Speed-Meter • Altitude
offset • Dive Type • True Airspeed (TAS)/ Skydiver’s Airspeed (SAS) • Set current year • Set current date • Set
current time • Preset jump counter • Reset jump counter • Turn the VISO OFF • Padlock window
Explanation
The VISO can store up to 200 jumps in the logbook and numbers them starting from
the jump number that you preset here. The counter can be used to keep track on
the number of jumps and it can be reset at any time, but time and date for the last
reset remains stored and cannot be erased.
Preset Jump Counter
Press to increase the jump counter.
Press to decrease the jump counter.
Press to save setting and enter the Reset Jump Counter
selector.
Page 19

36
37
VISO Settings
VISO Settings
Reset Jump Counter Selector
Alti-Meter/Speed-Meter • Feet/Meter when set to Alti-Meter • Mph/Kmh when set to Speed-Meter • Altitude
offset • Dive Type • True Airspeed (TAS)/ Skydiver’s Airspeed (SAS) • Set current year • Set current date • Set
current time • Preset jump counter • Reset jump counter • Turn the VISO OFF • Padlock window
Date / Time
for last Reset
Reset Jump Counter
Press AND at the same time for more
then 10 seconds to reset the Jump Counter
and delete the entire logbook.
Date and Time for the last reset is displayed
together with the number of resets which
have been made.
Press to enter the Turn VISO OFF selector
Note: Date, Time and the number of resets which have been made are stored and
there is no way to clear it. There is no way to restore the logbook information!
Turn VISO OFF Selector
Alti-Meter/Speed-Meter • Feet/Meter when set to Alti-Meter • Mph/Kmh when set to Speed-Meter • Altitude
offset • Dive Type • True Airspeed (TAS)/ Skydiver’s Airspeed (SAS) • Set current year • Set current date • Set
current time • Preset jump counter • Reset jump counter • Turn the VISO OFF• Padlock window
Turn VISO OFF
Press AND at the same time and hold until the
VISO turns OFF.
Or, press to enter the Padlock window.
We recommend that you switch OFF the VISO when
traveling on commercial flights and when driving in
mountainous areas.
Note: When switched OFF the VISO cannot be used for jumping.
Customer settings are not lost when switched OFF.
To power the VISO ON, see page 12.
Page 20

38
39
VISO Settings
Backlight Setup Area
Padlock Window
Alti-Meter/Speed-Meter • Feet/Meter when set to Alti-Meter • Mph/Kmh when set to Speed-Meter • Altitude
offset • Dive Type • True Airspeed (TAS)/ Skydiver’s Airspeed (SAS) • Set current year • Set current date • Set
current time • Preset jump counter • Reset jump counter • Turn the VISO OFF• Padlock window
Padlock Window
Press or
to leave the Setup Area and return to the
Main Window.
Or, press to return to Alti-Meter/Speed-Meter selector.
Perform ACCESS on to enter the
Backlight Setup Area
(Performing ACCESS, see page 20)
Backlight ON/OFF
Press or
To leave the Backlight Setup Area
to toggle between backlight ON/OFF
Padlock Window
Wait until the display times out. Or, press to enter
the Padlock window and then press or to return
to the Main Window.
Note: Backlight is specifically for night jumps.
Page 21

40
41
Backlight Setup Area
Zeroing the VISO
Note: If the backlight is turned ON while the VISO is not in Jump Mode, the backlight
will automatically turn OFF after 30 minutes, if still not in Jump Mode.
If the backlight is turned ON while the VISO is in Jump Mode, the backlight will
remain ON until the unit goes out of Jump Mode.
(Jump Mode see page 42)
Explanation
The VISO continuously adjusts itself to the local elevation and displays 0 FT (MT)
in the Altitude/Speed area. If the Altitude/Speed area does not display “0” prior to
jumping, the unit has not yet adjusted itself to the local elevation and it must be
manually zeroed.
To manually zero the unit either perform reset or turn the unit OFF and then ON.
(Perform reset, see page 55)
(Turn OFF the unit, see page 37)
Page 22

42
43
Jump Mode
Jump Data
Shortly after takeoff the VISO switches to Jump Mode and displays the altitude in
the Altitude/Speed area.
- When the VISO is set to Alti-Meter, the ALTI and Feet/Meter icons are ON and
it will display the altitude during climb, during the freefall and under canopy.
- When the VISO is set to Speed-Meter, the ALTI, SPEED, Feet/Meter, Mph/Kmh
and TAS/SAS icons are ON.
Note: When set to Speed-Meter, the VISO will display the altitude during climb and
switch to Speed-Meter during the freefall and under canopy.
After landing the jump data can be displayed on the LCD by accessing the Logbook
Area and Profile Area.
Logbook Area
Explanation: The logbook can store up to 200 jumps, and be reset at any time. It is
not possible to delete a single jump.
Perform ACCESS on to enter the Logbook Area (Performing ACCESS, see page 20)
In the Logbook Area press to display,
Jump number
Exit altitude
Deployment altitude
Freefall time
Max. speed in freefall
Max. speed under canopy
Padlock window
Display when logbook is empty
Page 23

44
45
Logbook Area
Logbook Area
Jump Number
Jump number • Exit altitude • Deployment altitude • Freefall time • Max. speed in freefall • Max. speed under
canopy • Padlock window
Jump Number
Toggles between
Date/Time
Press or to scroll in the jumps.
Date/Time information will switch
accordingly in the “Date/Time Area”.
Jump Number
Press to go to Exit Altitude
information.
Exit Altitude
Jump number • Exit altitude • Deployment altitude • Freefall time • Max. speed in freefall • Max. speed
under canopy • Padlock window
Exit Altitude
Exit
Jump Number
Symbol
Press or to scroll in Exit Altitudes.
Press to go to Deployment Altitude information.
Note: The LCD may show 3 different displays, depend-
ing on what altitude value is shown. See page 14.
Page 24

46
47
Logbook Area
Logbook Area
Deployment Altitude
Jump number • Exit altitude • Deployment altitude • Freefall time • Max. speed in freefall • Max. speed under
canopy • Padlock window
Deployment Altitude
Deployment
Symbol
Jump Number
Press or to scroll in Deployment Altitudes.
Press to go to Freefall Time information.
Note: The LCD may show 3 different displays, depend-
ing on what altitude value is shown. See page 14.
Freefall Time
Jump number • Exit altitude • Deployment altitude • Freefall time • Max. speed in freefall • Max. speed under
canopy • Padlock window
Freefall Time
Time Jump Number
Press or to scroll in Freefall Times.
Press to go to Max Speed in Freefall information.
Page 25

48
49
Logbook Area
Logbook Area
Max. Speed in Freefall
Jump number • Exit altitude • Deployment altitude • Freefall time • Max. speed in freefall • Max. speed under
canopy • Padlock window
Max. Speed in Freefall
Max. Freefall
Speed Symbol
Jump Number
Press or to scroll in Max Speed in Freefall.
Press to go to Max Speed under Canopy
information.
Note: In the lower right hand corner of the display
a “T” or an “S” will indicate whether the VISO is
set to “TAS” or “SAS”.
TAS/SAS
For more information about TAS and SAS,
see page 60.
Max. Speed under Canopy
Jump number • Exit altitude • Deployment altitude • Freefall time • Max. speed in freefall • Max. speed under
canopy • Padlock window
Max. Speed under Canopy
Max. Freefall
Speed Symbol
Jump Number
Press or to scroll in Max Speed under Canopy.
Press to go to the Padlock window.
TAS/SAS
Page 26

50
51
Logbook Area
Profile Area
Padlock Window
Jump number • Exit altitude • Deployment altitude • Freefall time • Max. speed in freefall • Max. speed under
canopy • Padlock window
Padlock Window
Press or to leave the Logbook Area and return
to the Main Window, or press to return to Log-
book Area.
Explanation
The Profile Area features playback of altitude/speed profile for the last jump.
Note: Speed information is available in playback mode, after freefall has lasted w6 sec.
Perform ACCESS on to enter the Profile Area.
(Performing ACCESS, see page 20)
In the Profile Area press to display,
Altitude playback information
Padlock window
Speed playback information
Display when Profile Area is empty (no jumps stored)
Page 27

52
53
Profile Area
Profile Area
Playback Altitude Versus Time
Playback altitude versus time • Playback speed versus time • Padlock Window
Playback Altitude Versus Time
Time in profile
Press to playback the altitude profile at ¼ speed
Press twice to playback in real time
Press three times to playback at 2x speed
Press four times to playback at 5x speed
Press to playback the altitude profile in reverse at ¼ speed
Press twice to playback in reverse in real time
Press three times to playback in reverse at 2x speed
Scroll
Press four times to playback in reverse at 5x speed
Press to stop playback
Press or to resume playback or press to go to
Playback Speed Versus Time.
Playback Speed Versus Time
Playback altitude versus time • Playback speed versus time • Padlock Window
Playback Speed Versus Time
Time in profile
Press to playback the speed profile at ¼ speed
Press twice to playback in real time
Press three times to playback at 2x speed
Press four times to playback at 5x speed
Press to playback the speed profile in reverse at ¼ speed
Press twice to playback in reverse in real time
Press three times to playback in reverse at 2x speed
Scroll
Press four times to playback in reverse at 5x speed
Press to stop playback
Press
or
to resume playback or press
to go to
Padlock window.
Page 28

54
55
Profile Area
Resetting the VISO
Important Notice about Speed Recordings
Experience has shown that when mounting the VISO on the hand or belly, different
air
pressures induced by hand or body movements may result in incorrect recordings of
speeds.
For more information about using the VISO as a Speed-Meter, see page ?.
Padlock Window
Playback altitude versus time • Playback speed versus time • Padlock Window
Padlock Window
Press or to leave the Profile Area to return to
the Main Window or press to return to the Profile
Area.
Press a paperclip into the tiny hole on the side of the
unit and release. The unit restarts.
After battery replacement or resetting, the battery
system requires 2 minutes to calibrate itself before
displaying the correct status.
While calibrating, the battery icon toggles between
full and low.
Note: Reset the unit after battery replacement, when troubleshooting and when verify-
ing software version number.
Page 29

56
57
Battery Replacement
Battery Status
Carefully slide out battery holder and remove batter-
ies. Install new batteries using the correct polarity.
Use only CR-2325.
After battery replacement or resetting, the battery
system requires 2 minutes to calibrate itself before
showing the correct status.
While calibrating, the battery icon toggles between
full and low.
Note: Customer settings are not lost when removing batteries. However, the built-in
clock may need to be reset to the current time.
Full capacity: Symbol shows two black bars inside the battery icon.
Half capacity: Symbol shows one black bar inside the battery icon.
Low capacity: Symbol shows no black bars, just an “empty” battery icon.
Batteries should be replaced as soon as possible.
The “Low bat” flashes once every 15 sec.
Caution: Do not make night jumps at sub zero temperatures when bat.
shows low capacity.
Empty batteries: The battery icon flashes. Replace batteries immediately.
Page 30

58
59
Firmware Version
Trouble-shooting
Factory reference number
Firmware Version
Perform reset or turn the unit OFF and then ON.
The VISO runs a self-test and displays all icons.
The unit then displays the firmware version together with a factory reference
number.
(Performing reset, see page 55)
When the VISO detects a fault, an error (“ERR”) symbol and trouble shooting num-
bers 2 to 5 and 100 are displayed in the upper part of the screen. At the same time
the unit beeps every minute.
The “ERR” trouble shooting codes are as follows: ERR 2 (transducer defective), ERR
3 (transducer out of range), ERR 4 (crystal defective), ERR 5 (comm. error to flash),
ERR 100 (flash defective). Remedy: Perform reset.
(Performing reset, see page 55)
If the unit still does not function correctly even after replacing
the batteries and performing reset, perform following: Press and hold while reset-
ting. The VISO resets to factory settings and sounds three beeps.
If the unit is still faulty, please contact your local dealer or
LARSEN & BRUSGAARD.
Page 31

60
61
APPENDIX
APPENDIX
TAS and SAS
Definitions
True Airspeed (TAS) and Skydiver’s Airspeed (SAS) are two methods of calculating
the airspeed of a moving/flying/falling object.
TAS is a term used in aviation: It is the speed of an object relative to the surround-
ing air, regardless of the altitude.
SAS is a new concept developed by LARSEN & BRUSGAARD: SAS is the speed of a
skydiver calculated from measurements of air pressure and
temperature and converted to a fixed air pressure (875.3 mb) and a fixed tempera-
ture (+7.080C) which corresponds to 4,000 feet ASL.
TAS. A skydiver’s True Airspeed (TAS) relative to the ground changes as a function
of the altitude (air pressure) and temperature which makes it difficult to compare
fall-rates.
Example: A skydiver (in a fixed freefall position) who has a terminal fall rate of
62 meters/sec at 10,000 feet will have a terminal fall rate of 50 meters/sec at
3,000 feet.
It will be seen that the difference in altitude (air pressure) makes it difficult to
compare the fall-rates when measured using TAS.
SAS. The SAS formula calculates airspeed (using the same metrics used with TAS) as
though the complete skydive had been performed at a fixed air pressure and a fixed
temperature which corresponds to 4,000 feet ASL. 4,000 feet is chosen as the refer-
ence altitude by LARSEN & BRUSGAARD since this is the average altitude at which
the working time of a skydive is normally ended.
Conclusion
Using SAS, skydivers in any body position can express their vertical speed by a
number (SAS). This number remains virtually constant regardless of altitude with
Page 32

62
63
APPENDIX
SPECIFICATIONS
little or no variance due to temperature differences and can be compared with the
airspeeds of other skydivers.
This means that regardless of the elevation of the DZ you are jumping at,
SKYDIVER’S AIRSPEED (SAS) will be the same for the same body position.
SAS is very useful when doing big formation skydiving. If using TAS, it will seem like
the base is slowing down the fall rate during the entire skydive.
For information about using the VISO as a Speed-Meter, see page 16.
Mechanical
Dimensions: 81 x 69 x 23 mm (3 1/8” x 2 ¾” x 3/4”)
Weight: 90 g (3.9 oz)
LCD area: 5.5 cm2 (0.9 inch2)
Logbook
Maximum jumps: 200
Logbook information: Exit altitude
Deployment altitude
Freefall time
Max. speed in freefall
Max. speed under canopy
Page 33

64
65
SPECIFICATIONS
SPECIFICATIONS
Tolerances: Exit altitude: +/- 1.2%
Deployment altitude: +/- 1.2%
Freefall time: +/- 1 sec
Speed (TAS/SAS): +/- 3 mph (+/- 5 kmh)
Profile Storage
Continued storage of last jump
Maximum logging time: 10 minutes
Sampling rate: 4/sec.
Maximum logging altitude: 39,999 feet (12,191 m)
Factory default settings
Mode Alti-Meter
Feet / Meter: Feet
Mph / Kmh: Mph
TAS / SAS: TAS
Type of Dive: 0
Date: 2006:01:01 (year, month, date)
Time: 12:00:00 (hours, minutes, seconds)
Other
Present altitude: +/- 10 ft
Operating altitude: 0 to 40,000 ft (0 to 12,191 m)
Clock: +/- 4 min/month
Operating Temperature Range: -30C to +60C (-22F to +140F)
Battery type: CR 2325
Battery Life Time (at normal use): approximately 2 years
L&B part no.: 205441
NATO Stock no.: 6605-22-613-6341
Page 34

66
67
Accessories
Warranty
For information about VISO accessories, please visit www.L-and-B.dk
The following conditions apply to the VISO™ warranty:
If within 12 months of the purchase of VISO™ a defect or damage is identified by
faulty manufacture, LARSEN & BRUSGAARD will repair the unit at no cost to the end
user.
To make a claim under this warranty, send the unit to an authorized dealer or di-
rectly to LARSEN & BRUSGAARD together with the dated purchase invoice or receipt.
The warranty becomes void if damage is caused by external circumstances or if the
unit has been serviced or repaired by third parties unauthorized by our national
agents or LARSEN & BRUSGAARD.
All further claims, especially for defects after skydiving accidents, are excluded.
LARSEN & BRUSGAARD has no obligation to honor any extension of warranty granted
by any national agent.
Waiver of Liability
The buyer and user of the VISOTM indemnify the manufacturer and vendor from any
liability for damage incurred before, during and after skydiving with the instrument.
Page 35

68
 Loading...