


PROTRACK II Manual
Every technical device can fail. So everything
imaginable can happen with the PROTRACK II,
including, but not limited to: displaying a status
which is not true, failing to function, or functioning
at a wrong moment or at a wrong occasion. If you
or your friends or family are not willing to accept
these uncertainties and risks, then please don’t use
PROTRACK II.

WARNING!
FAILURE TO FOLLOW ALL WARNINGS, INSTRUCTIONS, AND REQUIRED PROCEDURES MAY
RESULT IN SERIOUS INJURY AND DEATH.
Always ensure your PROTRACK II is adjusted to the selected DZ elevation prior to
jumping to account for any changes in barometric pressure.
Audible altimeters may give erroneous warnings if you are tumbling or the altimeter
is in a burble (wake), such as when sit flying.
If you are in doubt about how this limitation affects your skydiving, consult a
licensed instructor.
PROTRACK II is a trademark of LB ALTIMETERS, Denmark.
LB ALTIMETERS operates a policy of continuous development.
Therefore, we reserve the right to make changes and improvements to any of the
products described in this guide without prior notice.
DO NOT use this equipment unless you are currently participating in, or have
successfully passed, an approved skydiving course.
The PROTRACK II is intended to be a backup device and must not be relied upon as
your primary means of maintaining altitude awareness.
Do not put the PROTRACK II directly next to your ear when testing the freefall alarm

sounds on the ground, as the PROTRACK II alarm volume is very loud. It may cause
pain or damage to the ear.
Due to outside wind noise in freefall, the alarm sounds will not be perceived to be
as loud as when testing the PROTRACK II on the ground.
If the PROTRACK II is not mounted correctly, you may not hear the alarm sounds.
Make sure the PROTRACK II is mounted correctly before you jump.
The PROTRACK II must be active (powered ON) prior to entering the airplane.
Do not perform ACCESS less than 1 minute prior to exit.
Use the PROTRACK II at your own risk.
CONTENTS
1 - Introduction ........................................................................................................................ 12
2 - Features .............................................................................................................................. 14
3 - Description .......................................................................................................................... 16
3.1 Front .............................................................................................................................16
3.2 Display (Warnings section) .............................................................................................. 17
3.3 Display (Logbook section) ................................................................................................ 19
3.4 Rear .............................................................................................................................. 21
3.5 USB Connection .............................................................................................................. 22
4 – Quick Guide and Road Map ..................................................................................................... 23
5 - Power ON ............................................................................................................................. 24
6 - Ground Mode ........................................................................................................................ 26
7 - Flight Mode .......................................................................................................................... 27
8 - Main Windows ...................................................................................................................... 28
9- Performing ACCESS ............................................................................................................... 29
10 - Altitude Offset.................................................................................................................... 31

11 - Warning Windows (common for all) .......................................................................................36
11.1 Warning Memory Bank Description ................................................................................... 37
11.2 Change between Memory Banks ....................................................................................... 38
11.3 Setting the Warning Altitudes ......................................................................................... 39
11.4 Four Warning Alarms ...................................................................................................... 39
11.5 Three Warning Alarms .................................................................................................... 43
11.6 Two Warning Alarms ....................................................................................................... 43
11.7 One Warning Alarm ........................................................................................................ 43
11.8 Sequence of Warning Alarm Altitudes ............................................................................... 44
11.9 Sound Volume ............................................................................................................... 45
11.10 Sound Pitch .................................................................................................................46
11.11 Test Warning Sounds ..................................................................................................... 47
12 - Climb to Altitude Warnings ...................................................................................................48
12.1 Description ................................................................................................................... 49
12.2 Setting Warnings ........................................................................................................... 50
13 - High Speed Warnings ........................................................................................................... 51
13.1 Description ................................................................................................................... 52
13.2 Setting Warnings ........................................................................................................... 53
14 - Low Speed Warnings ............................................................................................................54
14.1 Description ................................................................................................................... 55
14.2 Setting Warnings ........................................................................................................... 55
14.3 Guide Tones ..................................................................................................................56
14.4 To disable Guide Tones .................................................................................................... 57
15 - LogBook ............................................................................................................................ 58
15.1 Logbook Screen #1. (Main information) ............................................................................ 58
15.2 Logbook Screen #2. (Date, time and dive type) .................................................................. 61
15.3 Logbook screen #3. (Playback, Jump profile).....................................................................62
15.4 Delete last jump ............................................................................................................ 63
15.5 Remaining Logbook Storage ............................................................................................64
16- Logbook Totals ....................................................................................................................65
16.1 Set accumulated number of jumps .................................................................................... 66
16.2 Set accumulated number of hours ....................................................................................67
16.3 Set accumulated number of minutes ................................................................................68
16.4 Set accumulated number of seconds ................................................................................. 69
16.5 Delete complete logbook ................................................................................................70
16.6 Remaining Logbook Storage ............................................................................................71

17 - Clock .................................................................................................................................72
17.1 Set Year ........................................................................................................................ 73
17.2 Set Month ..................................................................................................................... 74
17.3 Set Day ......................................................................................................................... 75
17.4 Set 12 / 24 Hour Format ..................................................................................................76
17.5 Set Hours ...................................................................................................................... 77
17.6 Set Minutes ................................................................................................................... 78
18 - Setup ................................................................................................................................ 79
18.1 Power OFF .....................................................................................................................81
18.2 AUT / ECO .....................................................................................................................83
18.2.1 Description ........................................................................................................... 83
18.2.2 Automatic (AUT) .................................................................................................... 83
18.2.3 Economy (ECO) ...................................................................................................... 84
18.3 Beep ON / OFF ............................................................................................................... 85
18.4 Dive Type ......................................................................................................................86
18.4.1 Dive Type, 3-SEC .....................................................................................................87
18.4.2 Dive Type, SLO (Slow) .............................................................................................87
18.4.3 Dive Type, S-SLO (Super Slow)..................................................................................87
18.5 TAS / SAS ......................................................................................................................89
18.6 Feet / Meters ................................................................................................................ 90
18.7 MPH / KMH ................................................................................................................... 91
18.8 Celsius / Fahrenheit .......................................................................................................92
18.9 Factory Default ............................................................................................................. 93
19 - Manual Zeroing ................................................................................................................... 95
20 - Landing Zone elevation differs from that of the airport ............................................................ 96
21 - Prior to Jumping ................................................................................................................. 97
22 - Battery Status .................................................................................................................... 98
23 - Mounting the PROTRACK II .................................................................................................... 99
24 - Resetting the PROTRACK II ....................................................................................................10 0
25 - Battery Replacement ........................................................................................................... 101
26 - Air Filter ............................................................................................................................ 102
27 - Trouble-shooting.................................................................................................................10 3
28 - Firmware Version / Serial Number ......................................................................................... 104
29 - USB Mode........................................................................................................................... 106
30 - TAS / SAS Definitions ........................................................................................................... 10 8
30.1 TAS ..............................................................................................................................10 8

30.3 Conclusion ................................................................................................................... 109
31 - Specifications..................................................................................................................... 111
31.1 Climb to Altitude Alarm Sounds ....................................................................................... 111
31.2 High-Speed Alarm Sounds ...............................................................................................11 2
31.3 Low Speed Alarm Sounds ................................................................................................11 3
31.4 Alarm Output Volume .....................................................................................................114
31.5 Alarm Output Pitch ........................................................................................................11 4
31.6 Altitude Selection Interval .............................................................................................. 114
31.7 Setup Defaults ..............................................................................................................11 4
31.8 Logbook .......................................................................................................................11 5
31.9 Tolerances .................................................................................................................... 116
31.10 Clock .......................................................................................................................... 116
31.11 Operating Altitude ....................................................................................................... 116
31.12 Operating Temperature Range ........................................................................................116
31.13 Storage ....................................................................................................................... 117
31.14 USB Connector ............................................................................................................. 117
32 - Warranty ........................................................................................................................... 118
33 - Waiver of Liability ............................................................................................................... 119 30.2 SAS ............................................................................................................................. 109

1 - Introduction
Please visit www.LBAltimeters.com for applications that support PROTRACK II.
Congratulations on purchasing your new PROTRACK II!
• The PROTRACK II design is based upon the latest findings in microcomputer technol-
ogy and introduces a new class of warnings for use by skydivers.
• The PROTRACK II is our most advanced instrument to date and provides added flex-
ibility in configuring frequently used warning alarms.
• The PROTRACK II includes a powerful electronic logbook loaded with advanced fea-
tures for immediate access on the large LCD display.
• The PROTRACK II is ideally suited for all types of skydives.
• The PROTRACK II includes a micro USB connector and is a Mass Storage Class (MSC)
device.
12 13
Please practice accessing the PROTRACK II and setting the warning values on the
ground prior to your first jump with it.
We hope you will enjoy jumping with your new PROTRACK II.
If you have any questions please visit www.LBAltimeters.com for contact info.
LB ALTIMETERS

2 - Features
• 4 Climb to Altitude warnings with settings up to 29,900 feet.
• 4 High Speed warnings with settings up to 29,900 feet.
Can be used for Big Way formations, wing suit setup or other events where four
high speed warnings are helpful.
• 4 Canopy Descent and Low Speed warnings with settings up to 29,900 feet.
The Canopy Descent alerts are essentially low speed alerts, which can also be
used by wingsuit flyers to keep track of altitude in preparation for separation and
canopy deployment.
• Powerful electronic logbook packed with advanced features.
Continuously stores detailed information about the last 200-300 jumps depending
on the type of dive.
14 15
• Micro USB port for connection to different types of applications.
Visit www.LBAltimeters.com for applications that support PROTRACK II.
• Large LCD screen for easy and intuitive operation and information review.
• All functions fully operational at sub-zero temperatures.
• Always ON. (Option: User selectable power modes).
• Fully automatic. It continually records the ambient air pressure and temperature
and adjusts the electronic circuitry to the local elevation.
• Thin and ergonomic design ensures a perfect and comfortable fit to your ear when
placed in a helmet.

3 - Description
3.1 Front
3.2 Display (Warnings section)
Display
1
1
33
4
5
6
8
2
7
9
Battery and lock area
Warning area
Warning bank area
1. LCD Display (see Display section)
2. Up Button
3. Mode Button
4. Down Button
2
3
4
The display has the following characteristics by default (normal usage) when
showing warnings:
16 17

Battery and lock area
1) Battery Power Level icon – indicates the remaining battery capacity
Warning Bank area:
9) Indicates active warning bank
2) Padlock icon displays when locked and flashes to control entrance to ACCESS mode
3.3 Display (Logbook section)
Warning area:
3) 1st warning altitude
4) 2nd warning altitude
5) 3rd warning altitude
6) 4th warning altitude
7) Feet/Meters status
Warning Type area:
8) Indicates either:
10
17
11
12
13
14
15
16
Battery and lock area
Logbook area
Climb to Altitude Warnings (CL)
High Speed Warnings (HI)
Low Speed Warnings (LO)
18 19

The display has the following characteristics by default (normal usage) when show-
ing logbook information:
Battery and lock area:
10) Battery Power Level icon
Indicates the remaining battery capacity
11) Padlock icon
Displays when locked, and flashes while activating ACCESS mode
Logbook area:
12) Jump number
13) Exit altitude either in feet or meters
14) Deployment altitude in feet or meters
15) Freefall time
16) Speed information in MPH or KMH
17) Lists if speed is AVG or MAX
20 21
3.4 Rear
18) Battery compartment
To replace the battery, see
“Battery replacement” section
19) Reset button
To perform reset, see
“Resetting the PROTRACK II” section
20) Air Filter.
See ”Air Filter” section
19
18
20

3.5 USB Connection
4 - Quick Guide and Road Map
21) Connector for data communication
Type Micro-B USB
21
22 23
It is recommended that you familiarize yourself with the PROTRACK II QUICK GUIDE
and ROAD MAP, which are very helpful tools when using the PROTRACK II.

5 - Power ON
Device Info
Battery capacity in mVolt
Barometric pressure in mbar (hPa)
Temperature (Celsius or Fahrenheit)
Free logbook storage in %
Firmware Version
The PROTRACK II has been powered OFF prior to shipping from our factory. To turn
the power ON, press and hold any key until the unit beeps, then release the key.
The PROTRACK II runs a self-test and sounds two beeps as it flashes the screen two
times. It then displays a “Device Info” screen.
After power up, the PROTRACK II enters Ground Mode.
In Ground Mode, the screen display will switch OFF after 60 seconds to save battery
power. However, the unit is still ready to jump.
The PROTRACK II uses very little power and does not need to be switched OFF.
However, we recommend that you switch OFF the PROTRACK II when traveling on
commercial flights, when driving in mountainous areas and when the jump season is
24 25
over. To power OFF the PROTRACK II, see “Power OFF” section.

6 - Ground Mode
7 - Flight Mode
After Power ON and shortly after landing from a jump the PROTRACK II enters
Ground Mode.
In Ground Mode the PROTRACK II continually records the ambient air pressure and
temperature and within 30 minutes calibrates itself to the local elevation.
In Ground Mode the screen display will switch OFF after 60 seconds to save battery
MM-DD
HH-MM
power. However, the unit is still ready to jump.
When in Ground Mode, press any key to enter the main window.
Shortly after take-off the Flight Mode window turns ON, indicating that the unit has
switched to Flight Mode. This window will show current altitude, date, and time.
At the lowest “Climb to Altitude” warning the PROTRACK II sounds a sequence of
beeps. See chapter 12 ”Climb to Altitude Warnings” for further explanation.
26 27

8 - Main Windows
9 - Performing ACCESS
By pressing or the PROTRACK II scrolls through the main windows.
Following windows are available:
- Flight Mode
- Climb to Altitude Warnings (CL-xx)
- High Speed Warnings (HI-xx)
- Low Speed Warnings (LO-xx)
- Logbook
- Logbook Totals
- Clock
- Setup
- Firmware / Serial Number
28 29
Note: Do not perform ACCESS less than 1 minute prior to exit.
To avoid any unintentional changes in settings, all settings are “locked” behind an
ACCESS procedure.
ACCESS procedure is required to change any settings in the PROTRACK II.
1. Press and quickly release – the padlock icon turns off (disappears)
2. When the padlock icon reappears, immediately press and keep it pressed – the
padlock icon will disappear again
3. When the padlock icon appears again, immediately release
By repeatedly pressing the PROTRACK II scrolls through the menu functions in the
selected window.

To leave a menu function, wait until the display times out, or press and hold
for
10 - Altitude Offset
5 sec.
NOTE: The PROTRACK II goes out of ACCESS and back to the Main
Display if no button has been pressed within 30 sec.
All functions (except Power ON) can be performed ONLY when the PROTRACK II is
in ACCESS mode.
MM-DD
HH-MM
Explanation:
If the Landing Zone (LZ) elevation is different from that of the aircraft takeoff, use the
altitude offset capability to set the difference prior to entering the airplane, or set the
altitude offset to zero when climbing through the LZ elevation.
30 31

Perform ACCESS from the flight mode screen:
The altitude (normally 0) next to the FT or MT indicator will begin to flash.
32 33

or to set an altitude offset to match the altitude of the aircraft takeoff
Press
relative to the Landing Zone.
Examples:
1) If the aircraft takeoff is 2000 ft. lower than the Landing Zone, the altitude offset must
be set to “-2000 ft.”
If the aircraft takeoff is 1500 ft. higher than the Landing Zone, the altitude offset
must be set to “1500 ft.”
2) If the PROTRACK II is switched OFF during climb to altitude. Switch the PROTRACK II ON
and adjust the altitude to the same altitude as shown on the airplane altimeter (AGL).
3) When doing a B.A.S.E. Jump (> 6 sec. freefall)
At the exit point enter the present altitude above the landing area.
4) When climbing to exit altitude in an airplane with a pressurized cabin activated.
When cabin pressure has been released, program the unit to the present altitude or
to a compensated altitude.
34 35
WARNING
Be cautious when operating the Altitude Offset.
If programmed to an altitude different from the present altitude, the pre-selected
warning alarms will sound relative to the new programmed altitude.
NOTE: DO NOT PROGRAM ALTITUDE OFFSET LESS THAN 1 MINUTE PRIOR TO EXIT.
NOTE: When performing manual altitude offset the PROTRACK II enters
Flight Mode and stays in Flight Mode for 14 hours, if no jump is made.
After 14 hours the PROTRACK II recalibrates to the field elevation where it is currently
located and enters Ground Mode. The altitude offset is not retained when the PROTRACK
II is powered OFF.

11 - Warning Windows (common for all)
- Set volume
- Set pitch
- Hear selected warnings, volume and pitch
11.1 Warning Memory Bank Description
The PROTRACK II makes it possible to store warning altitudes in four custom ”Warning
Memory Banks”. This is a useful option when performing various types of jumps, e.g.,
Freefly, AFF, Tandem, Camera, etc.
In the Warning Bank area, a number indicates which Warning Memory Bank the
warning altitudes are stored in.
The following options are available after performing ACCESS in “Climb to Altitude
(CL)”, “High Speed (HI)” or “Low Speed (LO)” windows.
- Select Warning Memory Bank
- Set or disable warnings
- Enable / Disable Guide Tones (only for Low Speed warnings)
36 37
NOTE: The PROTRACK II will sound at the selected altitudes that were displayed
last on the LCD.

11.2 Change between warning Memory Banks
11.3 Setting the Warning Altitudes
The setting of altitudes in each warning bank can be performed either on the ground
or in the airplane during climb to jump altitude.
11.4 Four Warning Alarms
Press until 1st warning altitude flashes
When the warning bank value is flashing, press
or to select warning bank -01
to -04.
Press or to change the 1
st
warning altitude
38 39

again and the 2nd warning altitude flashes
Press
Press or to change the 2nd warning altitude
40 41
Press again and the 3rd warning altitude flashes
Press or to change the 3rd warning altitude

again and the 4th warning altitude flashes
Press
11.5 Three Warning Alarms
You can choose to only have three warning alarms. The procedure is the same as
above, but set one of the warnings to ----- (Zero)
NOTE: (The PROTRACK II then sounds only the 2nd, 3
rd
and 4th warning alarms).
11.6 Two Warning Alarms
You can choose to only have two warning alarms. The procedure is the same as above,
but set two of the warnings to ----- (Zero)
NOTE: (The PROTRACK II then sounds only the 3rd and 4th warning alarms).
Press or to change the 4th warning altitude
11.7 One Warning Alarm
If you want only one warning alarm, set three of the warnings to ----- (Zero)
NOTE: (The PROTRACK II then sounds only the 4th warning alarm).
42 43

11.8 Sequence of Warning Alarm Altitudes
Please note that when setting the warning altitudes, it is possible to set the 1st
warning alarm altitude lower than the 2nd, or even the 4th, warning altitudes. The
2nd warning altitude could be set to a higher value than the 1st warning altitude, or
a lower value than the 3rd warning altitude, and so on. This is not a problem; when
the PROTRACK II exits ACCESS mode it will automatically sort and store the warning
alarms, such that the highest warning altitude becomes the 1st warning alarm, the
next highest warning altitude becomes the 2nd warning alarm, and the lowest warning
altitude becomes the 4th warning alarm.
44 45
11.9 Sound Volume
again to set sound volume.
Press
Output volume for all four warnings will begin to flash
Press or to change volume
”1” is very low volume (112 dB), ”9” is very high volume (117 dB)
NOTE: In case of low battery capacity the volume will automatically switch to ”1”
and it cannot be changed until the batteries have been replaced.

11.10 Sound Pitch
again to set sound pitch.
Press
11.11 Test Warning Sounds
Press again to test warning sounds.
Output pitch for all four warnings will begin to flash
Press or to change pitch.
”1” is very low pitch,”9” is very high pitch.
NOTE: When selecting a pitch on either side of 7 (3,800 Hz), the output volume will
decrease about 5 dB because the speaker is no longer at its optimum resonance frequency.
46 47
“Test” will begin to flash.
Press or .
This causes the PROTRACK II to sound the preset alarm sequence at the selected pitch
and volume. To stop the Test Warning Sounds, press , or .

12 - Climb to Altitude Warnings
12.1 Description
The PROTRACK II includes 4 “Climb to Altitude Warnings” memory banks (CL-01 to
CL-04).
The window shows:
· Warning1
· Warning2
· Warning3
· Warning4
· Active memory bank
NOTE: Factory preset values for Climb to Altitude Warnings:
--- ft., --- ft., --- ft. and 1000 ft
48 49
Up to 4 different altitudes during climb may be set in each bank.
In Flight Mode, when passing through the lowest preset climb altitude (factory preset
to 1,000 feet), the PROTRACK II sounds a sequence of beeps. These beeps have two
functions:
1. The beeps indicate that the PROTRACK II has calibrated itself correctly to the local
ground elevation and is ready to jump.
2. The number of beeps indicates the altitude at which the highest warning alarm
is set. Example: If set to 4,500 feet, the signal will sound: beep-beep-beep-beep
(pause) beep.
The number of rapid-sequence beeps indicates the ”high speed” warning altitude
in thousands of feet. The beep after a pause (if any), signifies a 500-foot altitude

increment.
Should the battery voltage show low capacity, the sequence will be followed by an
additional 5 short beeps.
Note: At the same time the output volume setting is automatically changed to
low volume “1” and it cannot be changed until the batteries have been replaced.
12.2 Setting Warnings
The setting of warning altitudes can be performed either on the ground or in the
airplane during climb to jump altitude.
For settings, please read “Warning Windows (common for all)”.
50 51
13 - High Speed Warnings
The window shows:
· Warning1
· Warning2
· Warning3
· Warning4
· Active Memory Bank
NOTE: Factory preset values for High Speed Warnings:
--- ft., 4500 ft., 3000 ft., 1500 ft.

13.1 Description
The PROTRACK II includes 4 “High Speed Warnings” memory banks (HI-01 to HI-04).
4th warning:
Siren alarm as long as vertical airspeed exceeds 13 m/sec at or below the preset
altitude.
Up to 4 different warning altitudes may be set in each memory bank.
st
warning:
1
One 1.5 second pulsating alarm if vertical airspeed exceeds 13 m/sec at preset
altitude. Sound sequence: Pulsating, low repetition.
After deployment the trigger speed switches to 35 m/sec.
Sound sequence: High pitch continuous siren.
13.2 Setting Warnings
The setting of warning altitudes can be performed either on the ground or in the
airplane during climb to jump altitude.
2nd warning:
One 3 second pulsating alarm if vertical airspeed exceeds 13 m/sec at preset altitude.
For settings, please read “Warning Windows (common for all)”.
Sound sequence: Pulsating, low repetition.
Minimum selectable altitude is 0 ft (0 meters)
3rd warning:
One 4 second pulsating alarm if vertical airspeed exceeds 13 m/sec at preset altitude.
Sound sequence: Pulsating, high repetition.
52 53

14 - Low Speed Warnings
14.1 Description
The PROTRACK II includes 4 “Low Speed Warnings” memory banks (LO-01 to LO-04).
The window shows:
· Warning 1
· Warning 2
· Warning 3
· Warning 4
· Active bank
· A small G icon is ON, if Guide Tones are
activated.
NOTE: Factory preset values for Low Speed Warnings:
--- ft., 1200 ft., 900 ft., 600 ft. and Guide = OFF.
54 55
Up to 4 different warning altitudes may be set in each memory bank.
Short beeps sound when passing through one, two, three or four altitudes.
1st warning: One 0.2 second beep
2st warning: One 0.2 second beep
3nd warning: Two 0.2 second beep
4th warning: One 1.3 second beep
14.2 Setting Warnings
The setting of warning altitudes can be performed either on the ground or in the
airplane during climb to jump altitude.
For settings, please read “Warning Windows (common for all)”.

14.3 Guide Tones
Feet
again to select Guide Tones
Press
The diagram shows an example where the 3rd warning is set to 900 ft and the 4th
warning to 300 ft. A long beep sounds when passing through the 4th selected altitude.
The steeper a glide angle the shorter time between beeps.
Press to set the GUIDE ON.
fps
fps
When Guide Tones are enabled, the G icon will be displayed in the Low Speed
Warning window next to warning 3.
Time
fps
fps
14.4 To disable Guide Tones
Press to set the GUIDE OFF.
When Guide Tones are activated, a unique series of beeps sound between the 3rd and
4th Low Speed Warnings.
The first beep sounds when passing through the 3rd warning altitude, the next beep
30% into the glide corridor, then after 55% and so on as depicted in the diagram.
56 57

15 - LogBook
15.1 Logbook Screen #1. (Main information)
The window shows:
· Jump number
· Exit altitude
· Deployment altitude
· Freefall time
· Speeds (scrolls automatically through AVG, MAX, 1st
and 2nd half)
Minimum freefall time for logbook generation in normal mode is around 8 seconds.
Minimum freefall time for logbook generation in Dive Type = “3-Sec mode” is around
3 seconds.
The PROTRACK II can display terminal speed information four different ways in mph
and km/h:
58 59
1. Max speed
2. Average speed
3. Average speed during the first half of the freefall
4. Average speed during the second half of the freefall
All speeds are calculated from 15 sec after exit to 7 sec before deployment.
If the freefall lasted between 20 and 30 sec. the display only shows:
- Average speed
- Max speed
If the freefall lasted more than 30 sec. the display shows:
- Average speed
- Max. speed
- Avg. 1st half
- Avg. 2nd half
NOTE: If the freefall lasted less than 20 sec. the display shows no speed information.

Perform ACCESS to scroll through the previous jumps.
15.2 Logbook Screen #2. (Date, time and dive type)
Press to view Logbook Screen # 2.
After performing ACCESS, press
60 61
or to scroll through any previous jump
Press or to scroll through any previous jump.
The window shows:
· Jump number
· Year
· Month and date
· Hours and minutes
· Dive Type

15.3 Logbook screen #3. (Playback, Jump profile)
to view Logbook Screen #3.
Press
The Profile area features playback of altitude/speed profile for the jump.
Note: Speed information is available in playback mode when freefall has lasted > 6 sec.
The windows shows:
- Jump number
- Altitude at time
- Freefall or canopy
indicator
- Time after exit in
Press and hold to scroll up in jump profile
Press and hold to scroll down in jump profile
NOTE: For safety reasons, playback is disabled when in Flight Mode
62 63
seconds
- Speed at time
15.4 Delete last jump
Press to view “Delete last Jump” window.
Press or to increase / decrease the flash counter to 10. At “10” press
2 beeps will sound when the unit has deleted the last jump.
At the same time the accumulated number of jumps and freefall time are updated.
Caution: When the last jump has been erased, there is no way to restore the original
information.

15.5 Remaining Logbook Storage
to view the “Remaining Logbook Storage” window.
Press
Free logbook storage in %
The PROTRACK II flash memory can store 2 MB of data (approximately 200 jumps with
two minute profiles or 26 jumps with 15 minute profiles).
When the storage is full (0% free), the PROTRACK II will overwrite the lowest jump
number in memory.
64 65
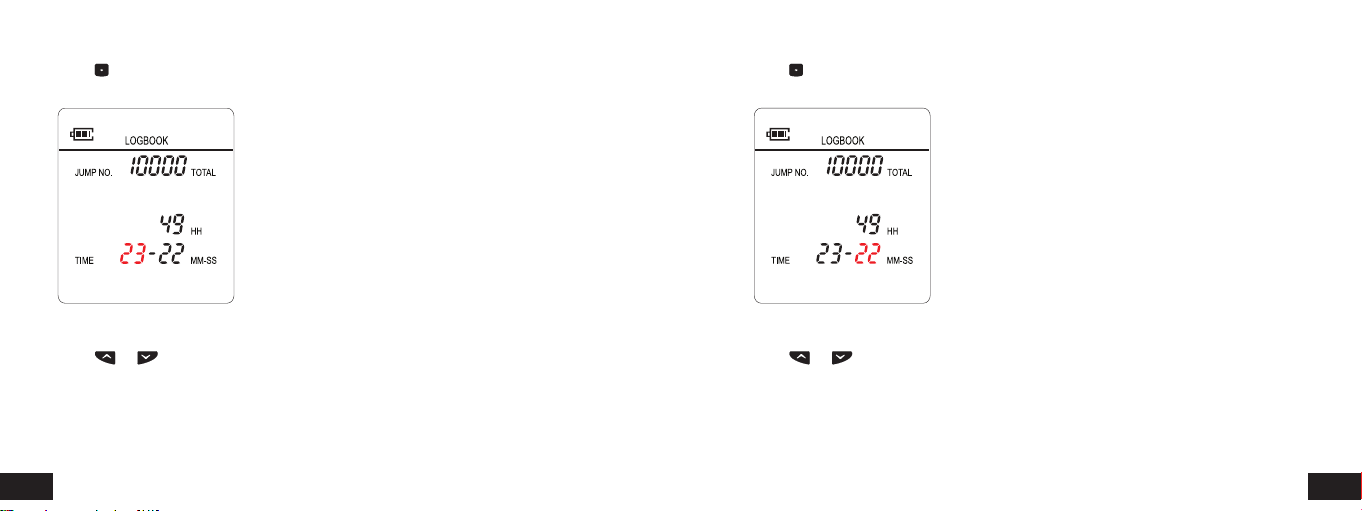
16- Logbook Totals
The options in this window are:
- Set accumulated number of jumps
- Set accumulated hours
- Set accumulated minutes
- Set accumulated seconds
- Delete logbook
- Remaining logbook storage
It is recommended that you update the PROTRACK II logbook (accumulated number of
jumps and freefall time) before making the first jump with the unit.
NOTE: Factory preset values for Logbook Totals:
0 jumps, 0 hours, 0 minutes and 0 seconds.

16.1 Set accumulated number of jumps
Perform ACCESS to change settings.
or to set the accumulated number of jumps.
Press
66 67
16.2 Set accumulated number of hours
Press and accumulated hours of freefall flashes.
Press or to set the accumulated hours of freefall.
16.3 Set accumulated number of minutes
and accumulated minutes flashes.
Press
16.4 Set accumulated number of seconds
Press and accumulated seconds flashes.
Press or to set the accumulated minutes of freefall.
68 69
Press or to set the accumulated seconds of freefall.
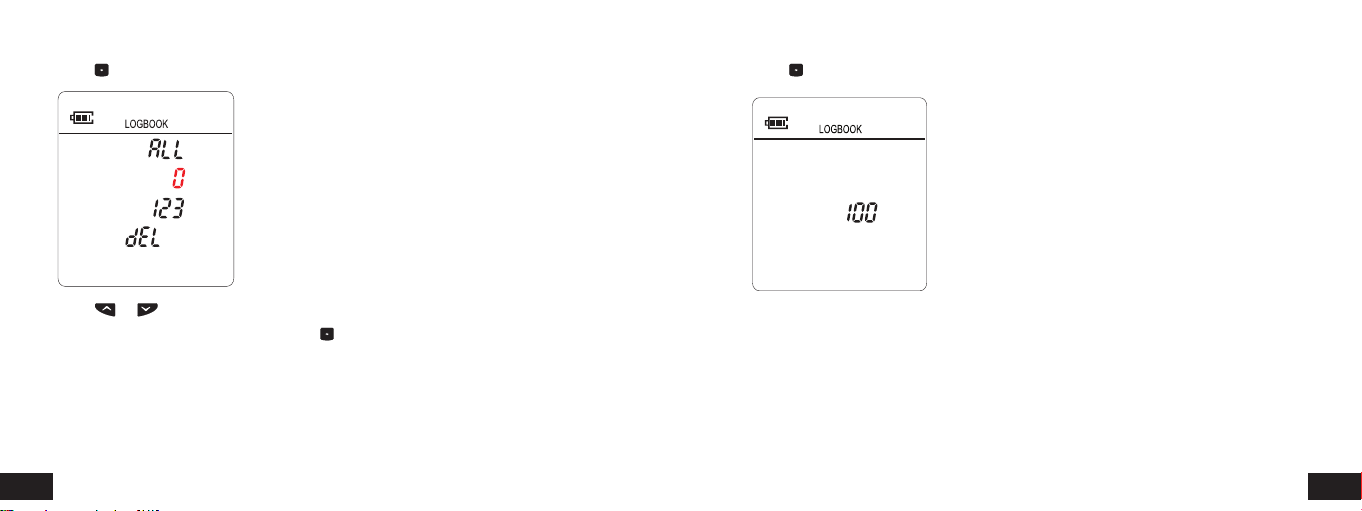
16.5 Delete complete logbook
and counter flashes.
Press
16.6 Remaining Logbook Storage
Press to view the “Remaining Logbook Storage” window.
Press or to increase or decrease the flashing counter to 123.
When flashing counter shows 123, press .
2 beeps will sound when the unit has deleted the logbook.
At the same time the accumulated number of jumps and freefall time are set to 0.
Caution: Once the PROTRACK II has beeped there is no way to restore the information.
70 71
Free logbook storage in %
The PROTRACK II flash memory can store 2 MB of data (approximately 200 jumps with
two minute profiles or 26 jumps with 15 minute profiles).
When the storage is full (0% free), the PROTRACK II will overwrite the lowest jump
number in memory.

17 - Clock
17.1 Set Year
Perform ACCESS to change settings.
Year will flash.
The options in this window are:
Set year
Set month
Set day
Set 12 / 24 hour format
Set hours
Set minutes
NOTE: Factory preset values for Clock:
Date: 2013-01-01. Time: 12-00-00. 24 hour format.
72 73
Press or to set year.

17.2 Set Month
and month flashes.
Press
17.3 Set Day
Press and day flashes.
Press or to set month.
74 75
Press or to set day.

17.4 Set 12 / 24 Hour Format
and 24 or 12 hour format flashes.
Press
17.5 Set Hours
Press and hours flashes.
Press or to select 24 hour or 12 hour Format.
76 77
Press or to set hours.

17.6 Set Minutes
and minutes flashes.
Press
Press or to set minutes.
NOTE: Clock setting is not kept in memory when replacing batteries.
78 79
18 - Setup
The PROTRACK II can be customized to your personal settings. Your settings will be
stored and recalled also after replacing batteries. When you first get the PROTRACK II,
we recommend you to go through the SETUP Selector to customize the PROTRACK II
settings.

In the Setup area the following options can be selected:
• Power OFF
• AUT / ECO (Default ECO)
• Beep ON / OFF (Default ON)
• Dive Type (Default None)
• TAS / SAS (Default TAS)
• Feet / Meters (Default Feet)
• MPH / KM/H (Default MPH / KM/H)
• Celsius / Fahrenheit (Default Celsius / Fahrenheit)
• Reset to Factory Default
Perform ACCESS to change settings.
80 81
18.1 Power OFF
The PROTRACK II can be manually powered OFF to further extend the battery life time
when not in use.
again and counter flashes.
Press
Press or to increase / decrease the flash counter to 10. At 10 press .

The PROTRACK II switches OFF.
We recommend that you switch OFF the PROTRACK II when traveling on commercial
flights, when driving in mountainous areas, and when the jump season is over.
NOTE: Customer settings (except altitude offset) are stored in nonvolatile memory when
the PROTRACK II is powered OFF.
When powered OFF, the PROTRACK II cannot be used for jumping.
To power the PROTRACK II ON, press any key until the unit beeps, then release the key.
The unit calibrates itself to the local elevation.
82 83
18.2 AUT / ECO
again and AUT/ECO flashes.
Press
Press or to toggle between AUT/ECO.
18.2.1 Description
The PROTRACK II can be operated in two power modes:
Automatic and Economy.
18.2.2 Automatic (AUT)
In AUT mode the unit is active all the time and continually records the ambient air

pressure and temperature.
Use this mode when jumping frequently. In AUT the battery life time is around 2 years
or 300 jumps.
18.2.3 Economy (ECO)
When set to ECO the PROTRACK II operates in a semi-automatic mode.
It continuously records the ambient air pressure and temperature, but switches OFF 14
hours after the last jump or 14 hours after the last pressing of any button, whichever
comes last.
This is a battery saving mode and is used when jumping is mostly done in the week-
ends.
18.3 Beep ON / OFF
again and BEEP ON/OFF flashes.
Press
NOTE: The PROTRACK II does not switch OFF while in Flight Mode (see section Flight
Mode).
84 85
Press or to toggle between BEEP ON/OFF.
This only affects the beeps when pressing buttons, and will not turn off
warning beeps.

18.4 Dive Type
The Dive Type mode can be used to change the parameters when the PROTRACK II
detects freefall exit and canopy deployment.
again and Dive Type flashes.
Press
Press or to select Dive Type.
86 87
Changing Dive Type from ”----“ (Normal) to any other mode will change the PROTRACK
II sensitivity.
18.4.1 Dive Type, 3-SEC
In 3-SEC mode the descent rate parameters are more sensitive, allowing detection of
short freefalls (around 3 sec. freefall) for logbook exit altitude generation.
See note 1 and 2.
18.4.2 Dive Type, SLO (Slow)
In SLO mode the deployment calculation parameters are more sensitive.
Supports slow falling types of dives, like normal wing suits dives etc.
See note 1 and 2.
18.4.3 Dive Type, S-SLO (Super Slow)
In S-SLO the exit and deployment calculation parameters are more sensitive.
This mode is for very slow wing suit dives, fast canopy descents, Extreme Relative
Work (XRW) etc.
All high speed warnings are enabled regardless of the vertical airspeed at the preset altitudes.

See note 1.
NOTE 1:
Freefall detection is very sensitive in this mode and may log a jump if the airplane
descends.
Exit and deployment altitudes may be incorrect.
Freefall time may be incorrect.
NOTE 2:
High speed warnings 1, 2 and 3 sound when vertical airspeed exceeds 13 m/sec at the
preset altitude.
High Speed warning 4 sounds when vertical airspeed exceeds 13 m/sec at or below the
preset altitude.
After deployment, warning 4 trigger speed switches to 35 m/sec.
88 89
18.5 TAS / SAS
again and TAS/SAS flashes.
Press
Press or to switch between TAS and SAS.
Definitions:
True Airspeed (TAS) and Skydiver’s Airspeed (SAS) are two methods of calculating
the airspeed of a falling object.
See section 30 “TAS / SAS Definitions” for more information about TAS and SAS.

18.6 Feet / Meters
again and FT or MT flashes.
Press
Press or to switch between feet (FT) or meters (MT).
18.7 MPH / KM/H
Press again and MPH/KMH flashes.
Press or to switch between miles per hour (MPH) or kilometer per hour (KM/H).
NOTE: Jump data is continuously stored in both feet and meters. At any time stored
information may be displayed in either unit of measurement by selecting the respective
mode.
90 91
NOTE: Jump data is continuously stored in both MPH and KM/H. At any time stored
information may be displayed in either unit of measurement by selecting the
respective mode.

18.8 Celsius / Fahrenheit
again and CEL/FAHr flashes.
Press
Press or to switch between Celsius(CEL) and Fahrenheit(FAHr).
92 93
18.9 Factory Default
Press again and Counter flashes.
Press or to increase / decrease the flash counter to 123.
At 123 press .

19 - Manual Zeroing
The PROTRACK II does the following:
- Deletes all information in the logbook
- Accumulated number of jumps and freefall time is reset to 0
- All warnings are reset to factory preset values
- Clock is reset to default
Caution: There is no way to restore the information.
94 95
When arriving at the Drop Zone the PROTRACK II may be in Flight Mode. (see section
Flight Mode).
In this case it is necessary to manually zero the unit before jumping, as follows:
Switch OFF the PROTRACK II and turn it ON again.
The PROTRACK II will calibrate itself to the local elevation.

20 - Landing Zone elevation differs from that of the airport
21 - Prior to Jumping
1: Perform Manual Zeroing in the airplane at Landing Zone elevation,
or
2: Compensate by adjusting the warning altitudes accordingly,
or
3: Program new altitude Offset.
See section 10
96 97
When powered ON, the PROTRACK II continually adjusts to the local elevation.
Prior to jumping the PROTRACK II should be in Ground Mode.
If the PROTRACK II is in Flight Mode and does not show the correct altitude (or your
selected altitude offset) it must be manually zeroed, as follows:
Switch OFF the PROTRACK II and turn it ON again.
The PROTRACK II will calibrate itself to the local elevation.

22 - Battery Status
23 - Mounting the PROTRACK II
Full capacity: Symbol shows two black bars inside the battery icon.
Half capacity: Symbol shows one black bar inside the battery icon.
Low capacity: Symbol shows no black bars, just an “empty” battery icon.
Batteries should be replaced as soon as possible.
As a reminder, 5 short beeps sound when climbing through the lowest preset
climb altitude.
Empty battery: The battery icon flashes. Replace batteries immediately.
98 99
NOTE: Make sure that there is no material between the PROTRACK II loudspeaker
hole and your ear.

24 - Resetting the PROTRACK II
Press a paperclip into the tiny hole on the left side of the battery cover and release.
The unit restarts.
NOTE: Reset the unit after battery replacement or when troubleshooting.
100 101
25 - Battery Replacement
Carefully remove screws from battery cover and
remove batteries.
Install new batteries and note polarity.
Use only Renata CR-2325.
NOTE: Reset the PROTRACK II after replacing batteries.
Customer settings are kept in non-volatile memory when removing batteries.
However, the built-in clock must be set to the correct time.

26 - Air Filter
The PROTRACK II is water resistant against minor splashes of water.
The air filter is the white circular part mounted on the back of the unit below the
battery cover. If it becomes wet, let the PROTRACK II dry in a warm place for 48 hours.
NOTE: The air filter must be replaced if jumping is resumed quickly or if the
PROTRACK II has been submerged into water.
102 103
27 - Troubleshooting
When the PROTRACK II detects a fault, an error (“Error”) sign, number and code are displayed.
All faults indicate that the PROTRACK II is defective.
Remedy: Replace batteries or press reset.
If the unit does not function correctly even after replacing batteries and pressing
reset, please contact your local dealer or LB ALTIMETERS.

28 - Firmware Version / Serial Number
Each PROTRACK II is programmed with a unique serial number.
Display example:
Firmware version: 1.00
Serial number: 2017-06-15-13-21-54-00
To read the number:
While in the Setup window, press and keep pressed for minimum 5 seconds.
104 105
The PROTRACK II will display the firmware version on line 1 and the serial number on
the following lines.
It is recommended that you write down the serial number for later reference in case
you need to contact LB ALTIMETERS, your dealer or your insurance company.
Serial number:
Purchased at:
Date:

29 - USB Mode
Free logbook storage in %
The PROTRACK II is a USB Mass Storage Class (MSC) device.
If a USB host device is connected to the PROTRACK II USB port, the PROTRACK II will
act as a USB slave and show USB on the LCD display.
106 107
The PROTRACK II flash memory can store 2 MB of data (approximate. 200 jumps with
two minute profiles or 26 jumps with 15 minute profiles).
When the storage is full (0% free), the PROTRACK II will overwrite the lowest jump
number in memory.
Please visit www.LBAltimeters.com for applications that support PROTRACK II.
NOTE: Do not leave the PROTRACK II connected to the PC / Mac unless accessing the
unit. Otherwise the PROTRACK II batteries will lose power very fast.

30 - TAS / SAS Definitions
difficult to compare the fall rates when measured using TAS.
True Airspeed (TAS) and Skydiver’s Airspeed (SAS) are two methods of calculating
the airspeed of a moving/flying/falling object. SAS is a concept developed by LB
ALTIMETERS:
TAS is: The speed of an object relative to the surrounding air regardless of the
altitude, a term used in aviation.
SAS is: The speed of a skydiver calculated as if the complete skydive had been
performed at 4,000 feet MSL.
30.1 TAS
A skydiver’s TAS changes as a function of the altitude (air pressure) and temperature,
which makes it difficult to compare fall rates.
Example: A skydiver (in a fixed freefall position) who has a terminal fall rate of 62
meters/sec at 10,000 feet will have a terminal fall rate of 50 meters/sec at 3,000
feet. It will be seen that the difference in altitude (and thereby air pressure) makes it
108 109
30.2 SAS
The SAS formula calculates airspeed (using the same metrics used with TAS) from
measurements of air pressure and temperature and converted to a fixed air pressure
(875.3 mb) and a fixed temperature (+7.080C) which corresponds to 4,000 feet MSL.
4,000 feet is chosen as the reference altitude by LB ALTIMETERS since this is the
average altitude at which the working time of a skydive is normally ended.
30.3 Conclusion
Using SAS, skydivers in any body position can express their vertical speed by a number
(SAS). This number remains virtually constant regardless of altitude with little or no
variance due to temperature differences and can be compared with the
airspeeds of other skydivers.
This means that regardless of the elevation of the DZ you are jumping at, SAS will be
the same for the same body position.
SAS is very useful when doing big formation skydiving. If using TAS, it will seem like

the base is slowing down the fall rate during the entire skydive.
NOTE: Jump data is continuously stored in both TAS and SAS. Stored information
may be displayed in either unit of measurement by selecting the respective mode.
110 111
31 - Specifications
Dimensions: 64 x 44 x 13 mm (2.52 x 1.73 x 0.51 inches)
LCD Display area: 29 x 31 mm (1.14 x 1.22 inches)
Weight: 37 grams (1.3 oz.)
Battery type: 2 x Renata CR-2325
Battery Life Time: Around 2 years or 300 jumps
31.1 Climb to Altitude Alarm Sounds
Calibration range: 0 to 29,900 feet (0 to 9,100 meters)
1st warning: Two 0.2 second beeps. Factory preset: ---- (disabled)
2nd warning: Two 0.2 second beeps. Factory preset: ---- (disabled)
3rd warning: Two 0.2 second beeps. Factory preset: ---- (disabled)
4th warning: Two 0.2 second beeps. Factory preset: 1000 ft.
Volume: Factory preset: 7
Pitch: Factory preset: 7

31.2 High Speed Alarm Sounds
High pitch continuous siren. Factory preset: 1500 ft.
Calibration range: 0 to 29,900 feet (0 to 9,100 meters)
Volume: Factory preset: 7
st
warning:
1
Pitch: Factory preset: 7
One 1.5 second pulsating alarm if vertical airspeed exceeds 13 m/ sec at preset
altitude. Sound sequence: Pulsating, low repetition. Factory preset: ---- (disabled)
31.3 Low Speed Alarm Sounds
2nd warning:
Calibration range: 0 to 29,900 feet (0 to 9,100 meters)
One 3 second pulsating alarm if vertical airspeed exceeds 13 m/ sec at preset altitude.
Sound sequence: Pulsating, low repetition. Factory preset: 4500 ft.
1st warning: One 0.2 second beep. Factory preset: ---- (disabled)
2nd warning: One 0.2 second beep. Factory preset: 1200 ft.
3rd warning:
One 4 second pulsating alarm if vertical airspeed exceeds 13 m/sec at preset altitude.
Sound sequence: Pulsating, high repetition. Factory preset: 3000 ft.
3rd warning: Two 0.2 second beep. Factory preset: 900 ft.
4th warning: One 1.3 second beep. Factory preset: 600 ft.
Guide: Factory preset: OFF
4th warning:
Siren alarm as long as vertical airspeed exceeds 13 m/sec at or below the preset
Volume: Factory preset: 3
Pitch: Factory preset: 7
altitude. After deployment the trigger speed switches to 35 m/sec. Sound sequence:
112 113

31.4 Alarm Output Volume
112 +/- 2dB at minimum volume “1” measured at 1 inch (2.54 cm)
117 +/- 2dB at maximum volume “9” measured at 1 inch (2.54 cm)
31.5 Alarm Output Pitch
3000 Hz at minimum pitch “1”
4000 Hz at maximum pitch “9”
31.6 Altitude Selection Interval
10 feet (10 meters)
31.7 Setup Defaults
Altitude Offset: None
AUT / ECO: ECO
Beep ON / OFF: ON
Set Dive Type: None
TAS / SAS: TAS
Feet / Meters: Feet
Celsius / Fahrenheit: Celsius
MPH / KM/H: MPH
31.8 Logbook
Minimum freefall time for logbook generation in normal mode:
Around 8 seconds.
Minimum freefall time for logbook generation in “3-Sec mode”:
Around 3 seconds.
Approximately 200 jumps with two minute profiles
Approximately 26 jumps with 15 minute profiles
Accumulated number of jumps: 29,999
Max. exit altitude: 30,000 feet (9,140 m)
When Divetype set to SLO: Max exit altitude: 39,999 feet (12,191 m)
Max accumulated freefall time: 999 hours
115

31.9 Tolerances
Exit altitude: +/- 1.2%
Deployment altitude: +/- 1.2%
Freefall time: +/- 1 sec
Speed (TAS/SAS): +/- 3 mph (+/- 5 km/h)
31.10 Clock
Accuracy: +/- 4 min/month
Factory preset values:
Date: 2017-01-01.
Time: 12-00-00.
12-24 Format: 24.
31.11 Operating Altitude
0 to 40,000 feet
31.12 Operating Temperature Range
-20°C to +50°C (-4°F to +122°F)
31.13 Storage
2 MB flash memory
USB Mass Storage Class (MSC) device
31.14 USB Connector
Micro USB Type B
Meets or exceeds EEC/89/336
L&B part no.: 213802.
NATO Stock no.: NSN 6675-22-624-9459.
117

32 - Warranty
33 - Waiver of Liability
The following conditions apply to the PROTRACK II™ warranty:
If within 12 months of the purchase of PROTRACK II™ a defect or damage is identified
by faulty manufacture, LB ALTIMETERS will repair the unit at no cost to the end user.
To make a claim under this warranty, send the unit to an authorized dealer or directly
to LB ALTIMETERS together with the dated purchase invoice or receipt.
The warranty becomes void if damage is caused by external circumstances or if the
unit has been serviced or repaired by third parties unauthorized by our national
agents or LB ALTIMETERS.
All further claims, especially for defects after skydiving accidents, are excluded.
LB ALTIMETERS has no obligation to honor any extension of warranty granted by any
national agent.
118 119
The buyer and user of the PROTRACK II indemnify the manufacturer and vendor
from any liability for damage incurred before, during and after skydiving with the
instrument.

#2.1
 Loading...