

Page 1
Threaded rod
Part Needed
Quantity
Reason why
( missing, scratched, broken glass, bent, bad finish)
Comments
PARTS & ASSEMBLY SHEET
Company Name:_______________________Co. Account #:_____________
to be filled out by retailer
Read and review installation instruction sheet, but do
NOTE: I
Fixture Name: Torbellino 8106-M1L CDB
This fixture assembled PO:__________ Date: ________
Notice:
missing or damaged, please note onthis sheet and contact the place of purchase to arrange for
replacement parts.
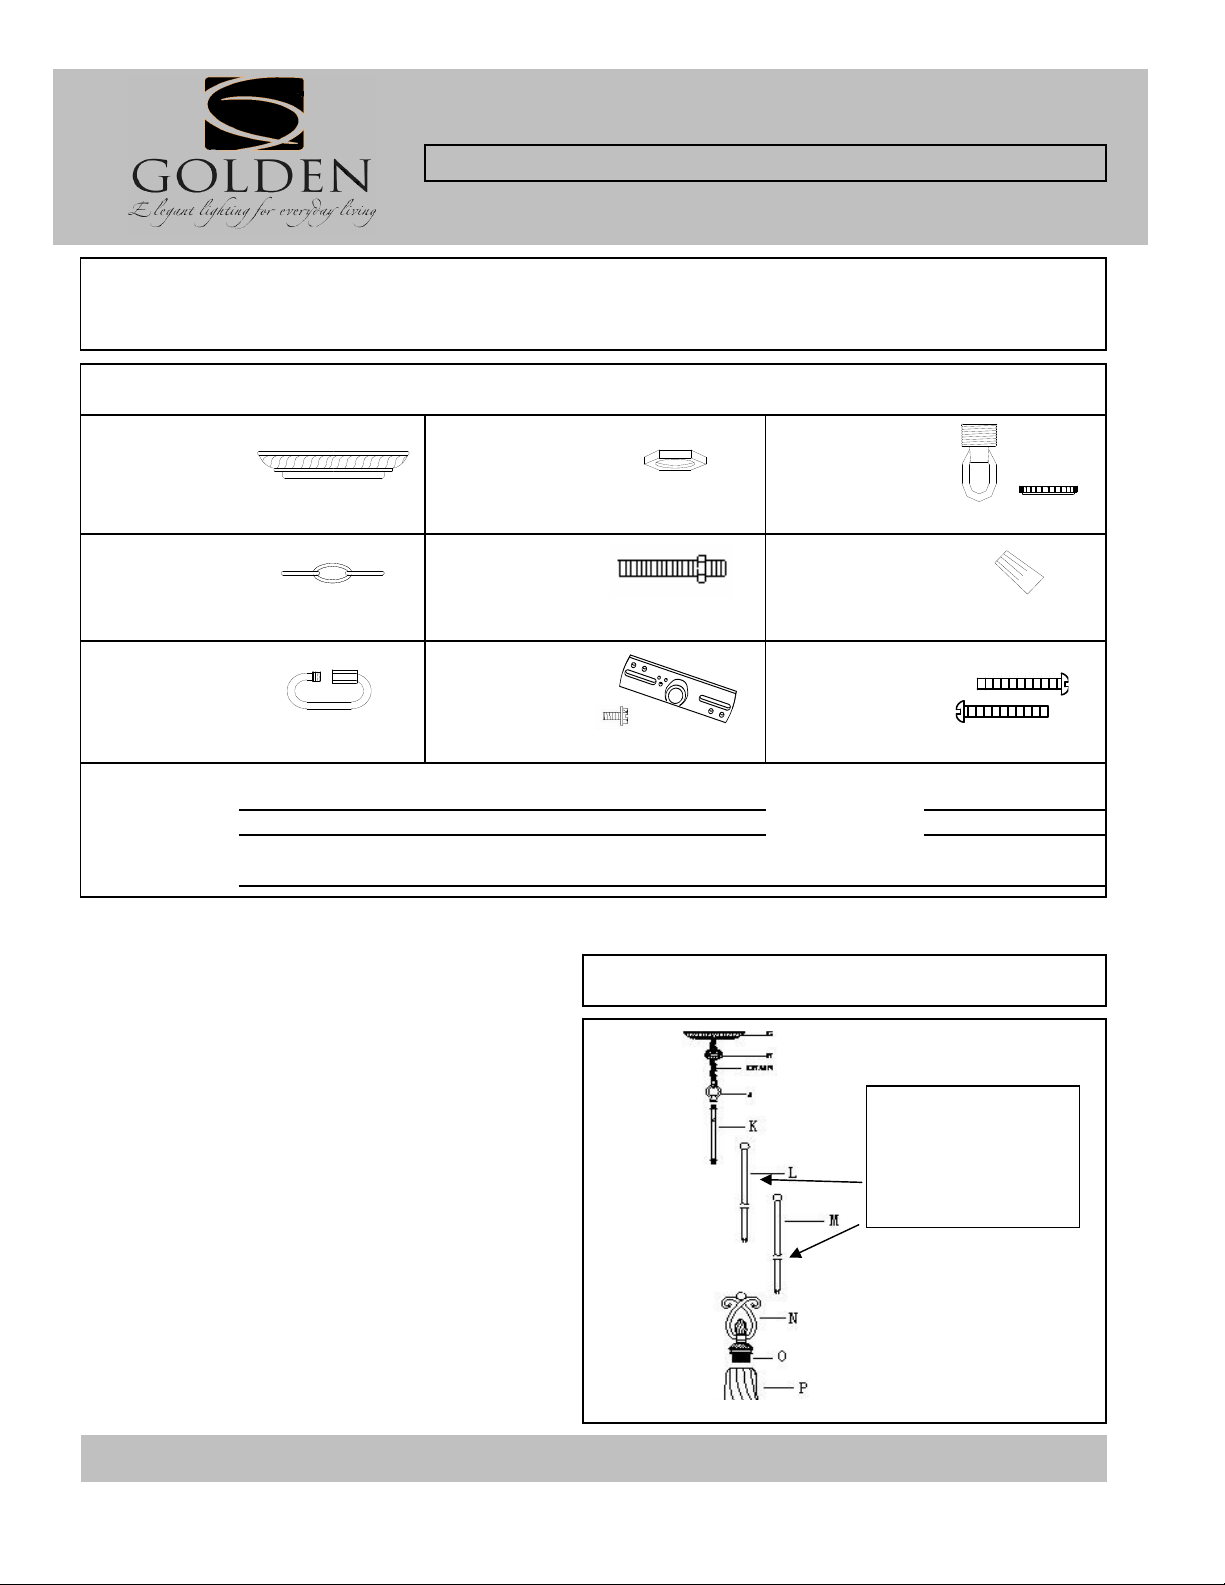
Please review the parts listing and check for all parts before assembling the fixture. If any parts are
PARTS LIST
Canopy loop
Canopy Hex Nut
1ea Φ153*32Hmm 1ea Φ19mm*4mm 1ea Φ25*45Hmm
Chain
1ea 1ft 1ea Φ12*55mm 3ea Orange
Chain
connector
2ea 23.8*59mm 1ea 100mm*20mm , 1ea Φ9*10mm 2ea 8/32T*1-1/4"L
Part Needed Quantity
Mounting Strap
and Canopy
loop collar
Wire connectors
Mounting
Screws
F
IXTURE ASSEMBLY INSTRUCTIONS
not install before assembling the fixture.
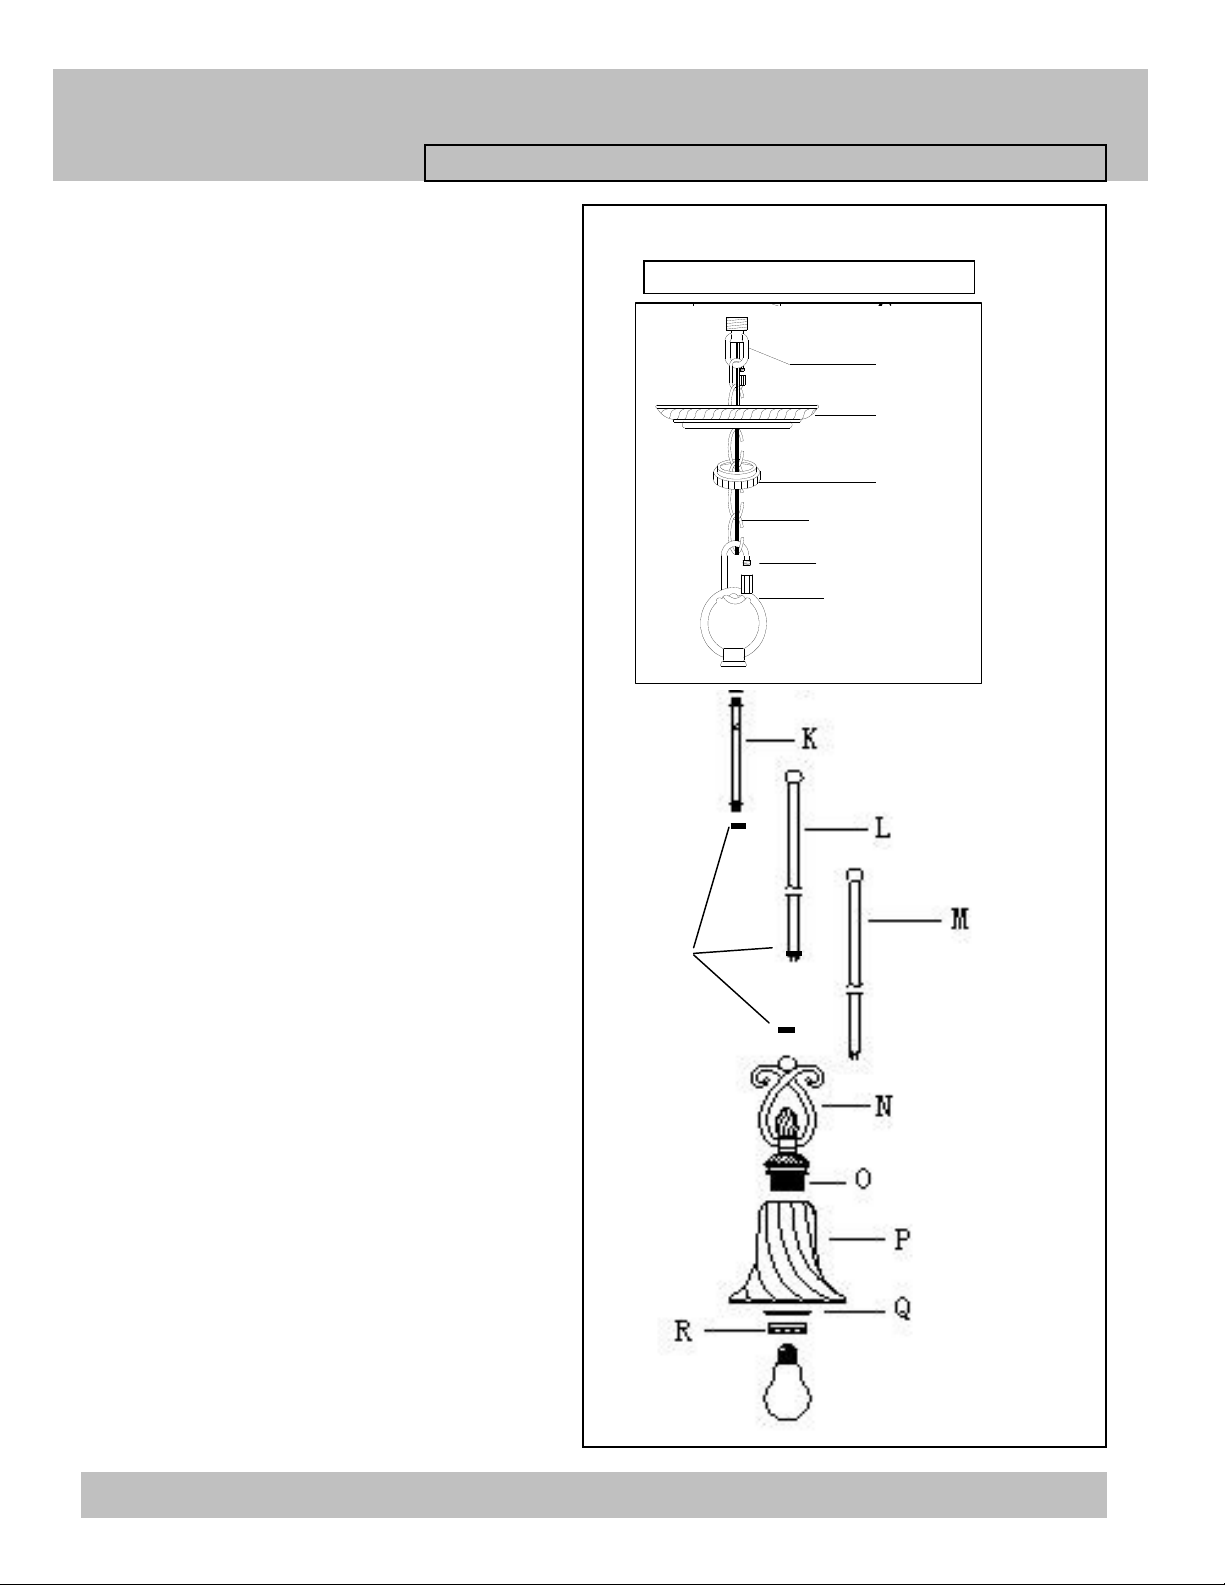
1. By measuring determine correct number of rods
needed for proper hanging height. There are 2 optional
12" rods included.
2. To shorten the fixture trim the wires to the desired
length plus at least 8~10 inches. You must use at least
one Rod (K).
3. To lengthen the fixture add additional rods (ROD-12
CDB) or additional chain (CHAIN-CDB) available
separately.
NSTALL THE GLASS ASSEMBLY
AFTER THE FIXTURE IS HUNG.
For Customer Service, contact the place of purchase to arrange for replacement parts.
8106-M1L CDB
Fig 1
These two Rods may
be removed
or
additional Rods and/or
Chain may be added.
Page 2
PARTS & ASSEMBLY SHEET
open one link of the Chain then remove the excess Chain
13. When ready to complete the installation Use the other
by the chain-not the electrical wire.
specifications.
C
Fixture Name:
4. Pull the fixture’s wire through the Rods.
5. Place Washer (S) between Rod (M) and Frame
(N),thread Rod (M) into Frame (N) until tight.
6. Place Washer (S) between Rods (M) and (L),thread
Rod (L) into Rod (M) until tight. repeat for any additional
rods.
7. Feed the fixture wires through the Top loop (J) and pull
the wires until taut.
8. Thread Top loop (J) into Rod (K) until tight.
9. By measuring determine correct number of links
needed for proper hanging height. Use a pair of pliers to
and discard it.
10. Use one chain connector (T) to attach one end of the
chain to the Top loop (J) and close the chain connector.
Torbellino 8106-M1L CDB
Fig 2
expanded view of assembly
E
F
G
H
CHAIN
T
J
11. Feed the fixture wires through the Chain (every three
links) and pull the wires until taut.
12. Slip Canopy loop collar (H) over the Chain, then do
the same with the canopy (G).
chain connector and attach the other end of the chain to
the canopy loop (F) and close the chain connector.
14. Make sure the weight of the chandelier is supported
* You may now install the fixture.
15. Place the glass shade (P) over the threaded socket
(O) and place the Socket Washer (Q) onto the threaded
socket (O) and secure both by threading the Socket ring
(R) until tight.
16. Install the light bulb in accordance with the fixture’s
S
(DO NOT EXCEED MAXIMUM WATTAGE RATING!)
For Customer Service, contact the place of purchase to arrange for replacement parts.
Page 3
2. Shut off the power at the circuit breaker and remove old fixture
junction box with junction box Screws (E). Tighten screw securely
should fit snugly on the Canopy loop after the canopy is installed.
INSTALLATION INSTRUCTIONS
Fixture Name:
Torbellino 8106-6, -9, -D5, -M1L CDB
WARNING ! SHUT OFF POWER AT FUSE OR CIRCUIT BREAKER.
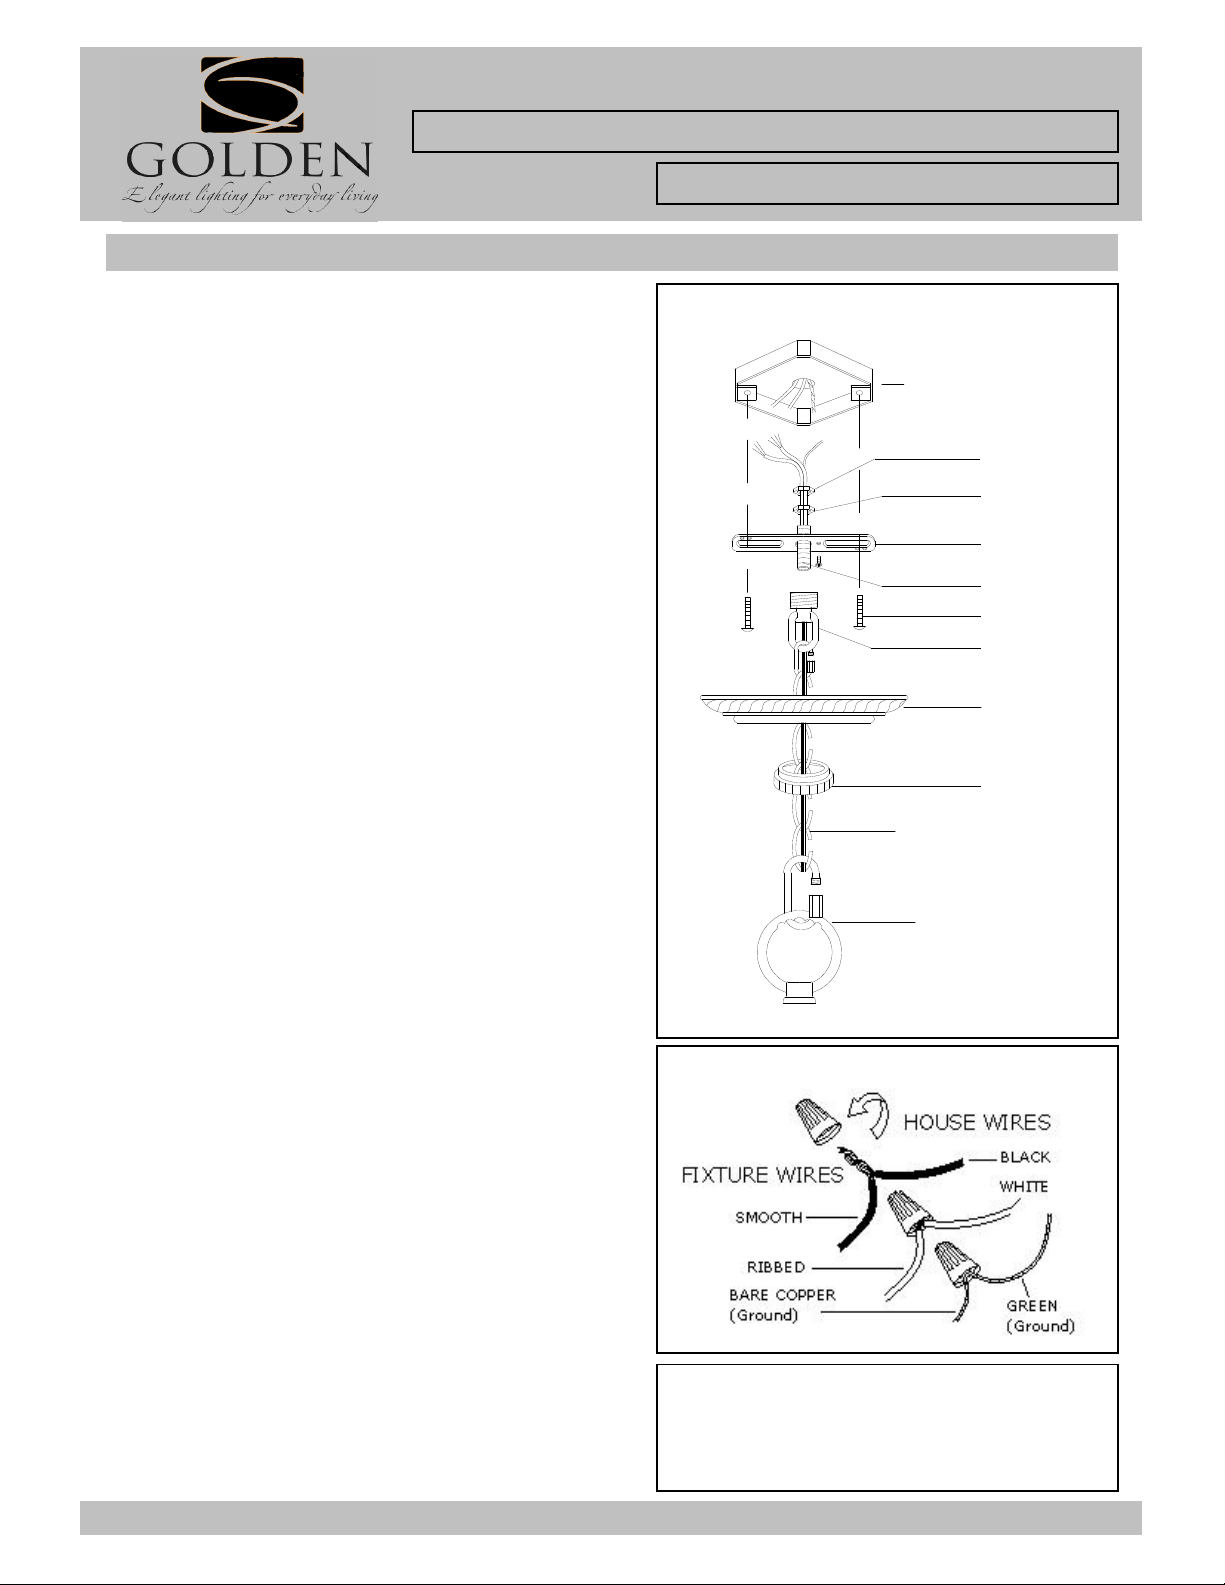
HANGING THE FIXTURE (Fig.1)
1. Carefully remove the new fixture from the carton and the
yellow bag that holds all parts. Check that all parts are included
as shown in the illustration and parts list.
from ceiling, including the old mounting strap.
3. Thread Nipple(C) into Canopy Loop (F) until snug.
4. Thread other end of the Nipple (C) with Canopy Loop attached
into Mounting Strap (D).
5. Place Lock Washer (B) over end of Nipple (C) protruding
through Mounting Strap (D) and thread Hex Nuts (A) onto Nipple
until tight.
6. Take this mounting strap assembly and mount to ceiling
with screw driver.
7. Unscrew the Canopy loop collar (H) from the Canopy loop.
Take the canopy and pass over the Canopy loop. approximatly
one half of the canopy loop exterior threads should be exposed.
Adjust until desired height is reached. *the Canopy loop collar
Remove Canopy and Canopy lock collar.
8. Assemble the fixture and have an assistant or secure support
hold the weight of the fixture while you complete the wiring
connections.
9. Thread the fixture wires and ground wire of the assembled
fixture through the canopy loop and nipple and into the outlet
box.
CONNECTING THE WIRES (Fig 2)
10. Attach the power supply wires to the fixture lead wires by
connecting BLACK to BLACK (or SMOOTH) and WHITE to
WHITE (or RIBBED).
11. Attach the GROUND wire(GREEN or COPPER) from the
Junction Box and the fixture Ground wire to the green Ground
Screw on the Mounting Bracket (D) or connect both wires
together using the correct size of wire connectors.
- NOTE: Twist the wires together in the same direction you
twist the wire connector onto the wires.
12. Tuck these wire connections neatly into the Junction Box.
For Chandelier Light Fixture
Fig. 1
JUNCTION BOX
(CEILING)
A
B
D
C
E
F
G
H
CHAIN
J
Fig. 2
13. Raise Canopy (G) to the ceiling and secure in place by
tightening the Canopy loop collar(H) into the Canopy Loop(F)
14. Install the light bulbs and glass shade as per the fixture
assembly sheet.
For Customer Service, contact the place of purchase to arrange for replacement parts.
YOUR INSTALLATION IS NOW COMPLETE.
RETURN POWER TO THE JUNCTION BOX
AND TEST THE FIXTURE.
 Loading...