

Page 1

User manual
Instrukcja obsługi
The provider of the device reserves the right to modify the device without any prior notice.
Lark Europe Sp. z o.o. zastrzega sobie prawo do wprowadzania zmian w urządzeniu
bez wcześniejszego powiadomienia.
www.lark.com.pl
50.3
Page 2

Thank you for choosing Lark FreeBird GPS device!
Please, kindly read the user manual carefully before you start
using the device.
Please, keep the manual for future reference.
The provider of the device reserves the right to modify the device or introduce
any changes to this user manual without any prior notice.
The actual layout of OSD menu screens in your device can differ from the one
showed in this manual (it depends on the software version).
Updated user manuals can be found on .
On the website you can also find Frequently Asked Questions answers and other
useful tips how to use your GPS device.
www.lark.com.pl
1
Page 3

Contents
2
Precautions and safety tips . . . . . . . . . . . . . . . . . . . . . . . . . . . . . . . . . . . . . . . . 3
Using the device . . . . . . . . . . . . . . . . . . . . . . . . . . . . . . . . . . . . . . . . . . . . . . . . 9
Getting to know the device. . . . . . . . . . . . . . . . . . . . . . . . . . . . . . . . . . . . . . . . . . 5
Changing GSP device settings . . . . . . . . . . . . . . . . . . . . . . . . . . . . . . . . . . . . . . 13
Connecting the GPS device to PC . . . . . . . . . . . . . . . . . . . . . . . . . . . . . . . . . . . . 17
Troubleshooting. . . . . . . . . . . . . . . . . . . . . . . . . . . . . . . . . . . . . . . . . . . . . . . . . 19
Specifications . . . . . . . . . . . . . . . . . . . . . . . . . . . . . . . . . . . . . . . . . . . . . . . . . . 21
Features of the device . . . . . . . . . . . . . . . . . . . . . . . . . . . . . . . . . . . . . . . . . . 5
What's in the box? . . . . . . . . . . . . . . . . . . . . . . . . . . . . . . . . . . . . . . . . . . . . . 5
Parts and buttons of the device . . . . . . . . . . . . . . . . . . . . . . . . . . . . . . . . . . . . 6
Charging the device . . . . . . . . . . . . . . . . . . . . . . . . . . . . . . . . . . . . . . . . . . . . 8
Mounting the car holder. . . . . . . . . . . . . . . . . . . . . . . . . . . . . . . . . . . . . . . . . . 8
Getting started. . . . . . . . . . . . . . . . . . . . . . . . . . . . . . . . . . . . . . . . . . . . . . . . 8
Connecting the GPS device to PC . . . . . . . . . . . . . . . . . . . . . . . . . . . . . . . . . . 8
Switching ON/OFF the device . . . . . . . . . . . . . . . . . . . . . . . . . . . . . . . . . . . . . 9
Pointing pen . . . . . . . . . . . . . . . . . . . . . . . . . . . . . . . . . . . . . . . . . . . . . . . . . 9
System reset. . . . . . . . . . . . . . . . . . . . . . . . . . . . . . . . . . . . . . . . . . . . . . . . . 9
Navigation mode . . . . . . . . . . . . . . . . . . . . . . . . . . . . . . . . . . . . . . . . . . . . . . 10
Music mode . . . . . . . . . . . . . . . . . . . . . . . . . . . . . . . . . . . . . . . . . . . . . . . . . 10
Playing video files . . . . . . . . . . . . . . . . . . . . . . . . . . . . . . . . . . . . . . . . . . . . . 11
Viewing text files . . . . . . . . . . . . . . . . . . . . . . . . . . . . . . . . . . . . . . . . . . . . . . 12
Settings . . . . . . . . . . . . . . . . . . . . . . . . . . . . . . . . . . . . . . . . . . . . . . . . . . . . 12
GPS info. . . . . . . . . . . . . . . . . . . . . . . . . . . . . . . . . . . . . . . . . . . . . . . . . . . . 12
Photos viewing . . . . . . . . . . . . . . . . . . . . . . . . . . . . . . . . . . . . . . . . . . . . . . . 11
Volume adjustment. . . . . . . . . . . . . . . . . . . . . . . . . . . . . . . . . . . . . . . . . . . . . 13
Display backlight settings . . . . . . . . . . . . . . . . . . . . . . . . . . . . . . . . . . . . . . . . 13
Language settings . . . . . . . . . . . . . . . . . . . . . . . . . . . . . . . . . . . . . . . . . . . . . 13
FM transmitter . . . . . . . . . . . . . . . . . . . . . . . . . . . . . . . . . . . . . . . . . . . . . . . . 14
Date and time settings . . . . . . . . . . . . . . . . . . . . . . . . . . . . . . . . . . . . . . . . . . 14
Calibration of the touch screen. . . . . . . . . . . . . . . . . . . . . . . . . . . . . . . . . . . . . 15
System info . . . . . . . . . . . . . . . . . . . . . . . . . . . . . . . . . . . . . . . . . . . . . . . . . . 15
USB connection. . . . . . . . . . . . . . . . . . . . . . . . . . . . . . . . . . . . . . . . . . . . . . . 15
Restore the default setting . . . . . . . . . . . . . . . . . . . . . . . . . . . . . . . . . . . . . . . . 16
Choose navigation . . . . . . . . . . . . . . . . . . . . . . . . . . . . . . . . . . . . . . . . . . . . . 16
Installing USB ActiveSync software . . . . . . . . . . . . . . . . . . . . . . . . . . . . . . . . . . 17
Page 4

WE KINDLY REQUEST NOT TO ADD/DELETE ANY FILES TO AND FROM THE INTERNAL
MEMORY OF THE DEVICE. TO STORE MULTIMEDIA FILES
(LIKE JPG, WMA, WMV AND OTHERS) PLEASE KINDLY USE EXTERNAL
MEMORY MEDIA (microSD CARDS)!
CAUTION!
IMPORTANT REMARK
The driver is fully responsible for securing safety on the road; using the navigation
device/ software does not constitute any excuse in case of any traffic regulations breach,
collision or accident.
The navigation device and the navigation software are designed to provide route
suggestions. They are absolutely not meant to release the driver from the obligation to
pay special attention to road conditions, weather or any other factors that may affect
safety while driving.
Always drive the vehicle in a safe manner.
Never operate the navigation device (input destinations, change settings etc.) while
driving as this may distract your attention from the happenings on the road and cause
potentially hazardous situations. You must be always fully aware of all driving conditions.
When installing the device in your vehicle please make sure it does not obstruct the
driver’s view of the road or interfere with vehicle operating controls.
Do not place the device unsecured on the vehicle dashboard.
Do not place the device on or above any airbag.
The provider of the device does not bear any responsibility for the adequacy of the
device/ software to any particular purpose.
The user should be aware of the current GPS technology development stage and
all its limitations.
The provider of the device in particular does not bear any responsibility for the accuracy
of the maps/navigation software which are delivered by independent companies that are
solely responsible for their products.
Precautions and safety tips
3
Page 5

4
Safety tips
CAUTION!
1. Protect the device from dust, humidity, water, shocks, very low and high temperatures.
Do not store the device where prolonged exposure to extreme temperatures may occur
(as in the windshield). Do not expose the device to water as permanent malfunction may
result.
2. A strong shock, hit or indentation of the housing may cause serious, irrepairable damage
to the device itself or the battery.
3. Always charge the battery or connect the device to the car chargerwhen:
the battery icon indicates the need to charge the battery,
the device switches off right after being switched on,
the device does not react to any buttons operations.
4. Never disconnect the device from the PC during upload or download of any data – this may
causa a permanent damage to the device as well as the data.
5. The user must take all necesary measures to secure all important data (copies on various
media etc.) The device provider does not bear any responsibility for any loss of user’s data
due to the device malfunction.
6. To minimize the risk of data loss protect the device from stron electromagnetic fields;
in particular do not store it near TV sets, speakers, mobile phones etc.
7. Protect your ears! Doctors warn that prolonged use of in-ear earphones and listening to loud
music may affect your hearing.
8. Be careful when listening to music while driving. You must be always aware of the situation
on the road which also includes attentiveness to audio signals
The music and video player with which the device is equipped can be only used to play
musi and video files to which the user has legal rights. Any breach of copyrights is at the
sole responsibility of the user.
Precautions and safety tips
Page 6

Features of the device
What's in the box?
5 inch TFT touch screen, display resolution 480x272 pixel
Stereo headphone connector, 1W speaker built-in, volume can be adjusted
Key-press and touch screen operated device
Built-in GPS module
GPS antenna built-in
microSD slot, SDHC cards supported
Video player: wmv
Audio player: wma
Picture browser: BMP, JPG, PNG, GIF
File browser: TXT
Rechargeable lithium battery built-in (recharged via USB port, can be connected to
CIG LIGHTER directly)
5
Lark FreeBird 50.3
Vehicle suction cup mount
Car adapter
Pointing pen
Getting to know the device
Page 7

RESET
Parts and buttons of the device
Front side
Back side
Getting to know the device
6
Speaker
Pointing pen
LEDs indicating
the charging
process or power
on status
Touch screen
Reset button
Page 8
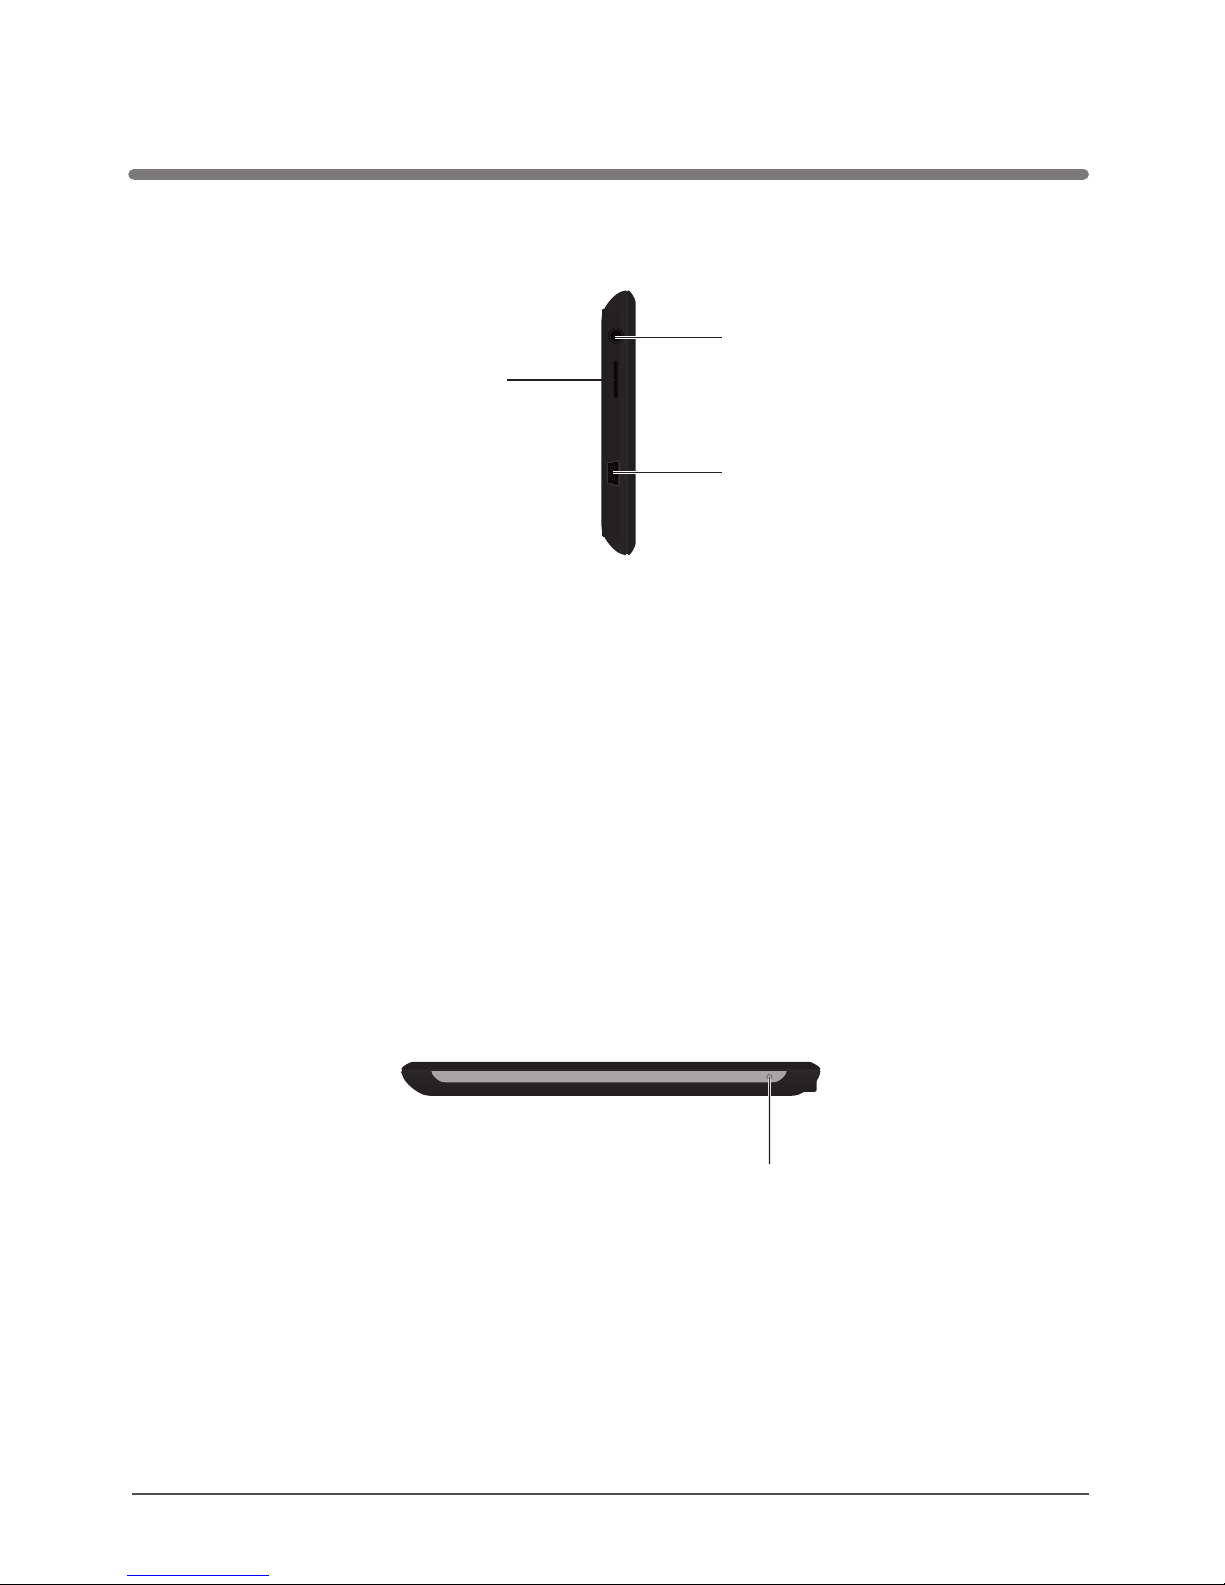
Left side
Upper side
Using microSD cards
NEVER remove the card from the slot while the device is ON.
If you want to remove the card: switch off the device, than remove the card from the slot.
The card can be properly insterted in one way only. Insert the card and push until it clicks.
To switch on / off the device press the button.
POWER
7
Getting to know the device
microSD cards slot
Necessary to use some
extra data, like maps,
music, clips etc.
Mini-USB port
Used to download/ upload
data from/to the PC
buttonPOWER
Earphone jack
Page 9

Charging the device
Mounting the car holder (vehicle suction mount)
Getting started – acquiring satellites’ signal
Connecting the GPS device to PC
To charge the battery of the device please place the USB jack of the car charger in the USB
slot of the device. The other end of the charger place in the car lighter jack (make sure the car
electricity is on). The battery will be charging regardless of the fact if the device is on or off.
. When the battery is fully charged, the LED
will turn off.
1. If you are using the device during the charging process, the charging will take longer.
2. After charging is complete or when you want to stop charging the device, simple detach
the charger’s cable from the device.
3. Never crush the battery or throw it to fire! Fire or electric shock hazard!
4. While travelling it is recommended to have the car charger attached to the device all the
time.
5. Please, make sure that the device and the cable do not obstruct the driver’s view of the
road and do not interfere with the vehicle operating controls.
LED blinking indicate the charging is in progess
Press the rubber part of the mount to the windscreen and move the latch to fasten the
mount.
Using the knobs adjust the position of the mount to your needs.
When installing the device in your vehicle please make sure it does not obstruct the
driver’s view of the road or interfere with vehicle operating controls.
Do not place the device unsecured on the vehicle dashboard.
Do not place the device on or above any airbag.
When you switch ON the device for the first time, please make sure you are in an open
space, with no large objects near (like tall buildings and trees).
Hold the device steadily until the acquisition of satellites’ signal. Pls note that acquiring
the satellites can take a few minutes.
Than you can set your route.
It is always recommended to acquire the GPS signal before placing the device in the car.
After installing the ActiveSyc software (see page 17)
connect the GPS device to your PC using the USB
cabel (mini-A USB type). The cable must be obtained
separately, it is not included in the set.
Step 1
Step 2
Getting to know the device
8
Page 10

Switching ON/OFF the device
Pointing pen
System reset
CAUTION!
If the battery is flat the device will not switch on;
you must charge the battery first.
All unstored data will be removed after resetting the system.
WARNING!
Press the button. The welcome screen
will appear and the software will load up.
POWER
Switching off the device
After pressing the POWER button the device will ask you
to choose between switching off and stand-by mode.
Stand-by mode means the screen will be temporarily
shut down and when you press the POWER button again
the device will restore the last active screen. Switching off
means that when you press the POWER again the system
will be loaded again.
The pointing pen is inserted to a slot in the back side of the device.
1. Single click – touch the screen once.
2. Double click – touch the screen twice quickly.
3. Dragging – touch the screen in the starting point than move the pen to the destination.
If the system seems jammed please use the pointing pen to press the RESET button
(on the back side of the device).
Using the device
9
Page 11

Navigation mode
Music mode
Play list
REMARK!
More info on converting the files you can easily find in the Internet.
Touch to enter mode.
If any map application is installed in the device,
it will start now.
Details concerning the usage of map application
you will find in the separate map user manual.
The device can play WAV and WMA files.
Any MP3 files must be converted to WMA format before
they can be played on the device (pls use any music files
converter available free of charge on the Internet).
Touch to enter mode.
To play music click .
To stop playing music click .
Click to move to the next file .
Click to move to the previous file.
Click for repeating.
Click to enter the random playback.
Click to adjust volume.
Click to play music from the play list.
Click to select the sound effect.
Click to minimize the window, still you can listen to music.
Click to close the application and return to the main menu.
Click
Click to select all files to add to the play list.
Click to
Click to select all files to delete from the play list.
NAVIGATION
MUSIC
On the list you can see audio files and folders containing
such files.
to select a file to add to the play list.
select a file to delete from the play list.
Using the device
10
Page 12
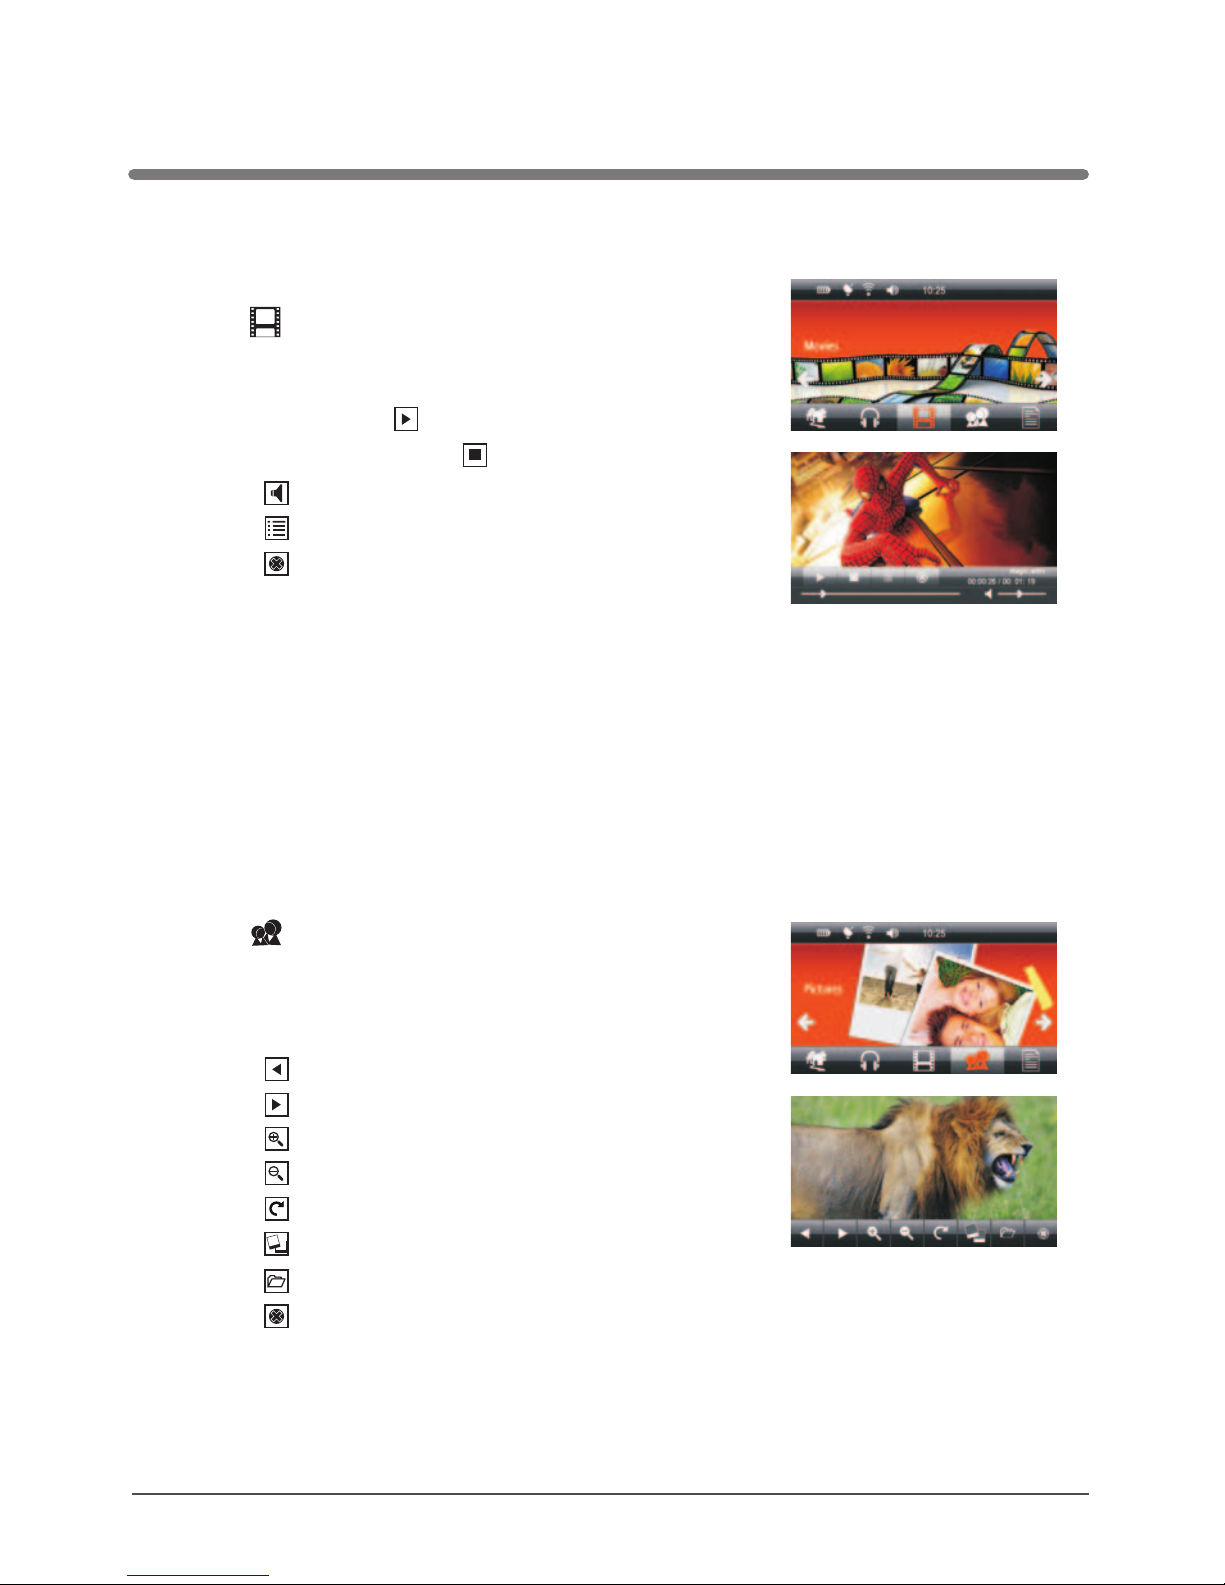
Playing video files
Photos viewing
Click twice on the screen to switch to full screen mode.
To return to normal playing mode again click twice on the screen.
REMARK!
The device can play WMV video files.
Touch to enter mode.
After entering the MOVIES mode will be started video
player.
To play movie click .
To stop playing a file click .
Click to adjust volume.
Click to choose video file from the folder.
Click to close the application and return to the
main menu.
You can view BMP, GIF, JPEG, PNG files on the device.
Touch to enter mode.
Choose a folder containg graphic files and than
click the file you want to view.
Click to view the previous picture.
Click to view the next picture.
Click to zoom the picture.
Click to reduce the size of the picture.
Click to rotate the picture.
Click to begin the auto-play.
Click to choose a folder containg graphic files.
Click to close the application and return to the
main menu.
MOVIES
PICTURES
Using the device
11
Page 13

Viewing text files
Settings
GPS info
You can view txt files on the device.
Touch to enter mode.
Click to choose a folder containg txt files and than
click the file you want to view.
Click to move to the previous page.
Click to move to the next page.
Click to change the size of the text.
Click to change the colour of the text.
Click to add a bookmark.
Click to show a bookmark.
Click to close the application and return to the
main menu.
Touch to enter mode.
Change your device settings to match your preferences
(see page 13).
Here you can check the stream of signals being received
from the satellites.
Touch to enter GPS info mode.
1. Touch to reset the GPS receiver.
2. Touch to obtain the data stream from the satellite.
3. Touch to enter a screen with the number of active
satellites in the reach of the device and their signals’
strength.
4. Touch to obtain the geographical and time data.
Click to close the application and return to the
main menu.
E-BOOK
SETTINGS
Using the device
12
Page 14

SETTINGS
Volume adjustment
VOLUME
Display backlight settings
BACKLIGHT
Language settings
LANGUAGE
Touch to enter mode.
Touch to enter mode.
1. Using and buttons adjust the volume to your
requirements. You can also drag the volume bar to set
the volume.
2. Click button if you wish the device to emit
sound each time the screen is touched.
3. Using the buttons or to set the sound.
4. Click to save the changes.
5. Click to return the Settings menu.
Touch to enter mode.
1. Using and buttons adjust the brightness of the
screen to your requirements. You can also drag the
bar to set the brightness on the demanded level.
2. Using and buttons set the time after which the
backlight will be off.
3. Click to save the changes.
4. Click to return the Settings menu.
Touch to enter mode.
1. Choose the OSD menu language.
2. Click to save the changes.
3. Click to return the Settings menu.
Changing GSP device settings
13
Page 15

FM transmitter
FM TRANSMITTER
Date and time settings
DATE&TIME
Thanks to the FM transmitter the sound from the GPS device (music or voice commands) is
played through an FM broadcast band frequency. Hence the voice commands or music can
be played through your car stereo ensuring better sound quality.
Touch to enter mode.
1. Mark the ‘ON’ option. Remove the marking when you
want to deactivate the FM transmitter mode.
While listening to music you can minimise the player
screen and activate the navigation software.
2. Set the chosen frequency on your car radio.
3. Using and buttons set the same frequency on the
device. You can also drag the bar to set the frequency.
4. Click to save the changes.
5. Click to return the Settings menu.
Touch to enter mode.
Touch DATE button to set the date.
1. Using the buttons or set the current year, month
and day.
2. Repeat the same steps to set the time.
3. Using the buttons or set the time zone you're in.
4. Click to save the changes.
5. Click to return the Settings menu.
This frequency cannot be occupied by any radio
station to avoid any signal interference.
REMARK!
Changing GSP device settings
14
Page 16

Calibration of the touch screen
System info
USB connection
SETTINGS
1. Touch button to start the calibration process.
2. When a black cross appears on the screen press the
very centre of the cross, using your pointing pen.
Than the cross will move to another position, again
press the centre of it. Continue until the ‘OK’ message
appears. Than touch the screen to confirm the calibration
setting and return to the main menu.
3. In case the calibration process fails, it will be repeated
until successful.
Touch to enter SYSTEM mode.
In this mode you can read the data concerning the device.
Click to return the Settings menu.
Touch to show next mode.
Touch to enter USB connection.
Choose an option:
“MASS STORAGE” or “MS ACTIVESYNC”
Click to return the Settings menu.
Changing GSP device settings
15
Page 17

Touch to show next mode.
1. Touch the ‘Factory settings’ button , than choose
YES, to restore the factory settings.
2. Choose YES to restore the default (factory) setting.
The process will start.
3. Click to return the Settings menu.
Touch to show next mode.
Touch to enter the CHOOSE NAVIG. mode.
To set a default navigation application:
Click . A list of folders stored in internal memory
and in the microSD card will be displayed.
Choose the file *. exe of the navigation software.
The device allows for the autostart of the navigation
software after switching on.
To activate this function click button to
„Navigation autostart after switching on”.
3. Click to save the changes.
4. Click to return the Settings menu.
SETTINGS
Choose navigation
SETTINGS
1.
2.
All unsaved data will be erased when the system is reset.
REMARK
Changing GSP device settings
16
Page 18

Installing USB ActiveSync software
http://www.microsoft.com/windowsmobile/en-us/downloads/eulas/eula_activesync45.mspx
To set up a connection between the GPS device and PC the ActiveSync Microsoft
software is necessary. This is a widely available apllication distributed by Microsoft
Corp. More data on the software you can find here:
After downloading the software double click “setup.msi” to install the software.
Click Click to continue
Click , if you wish to change Click
the installation destination
Wait until the installation process Click and restart your PC
is completed
Next Next >
Change Install
Finish
>
17
Connecting the GPS device to PC
Page 19

After installing the ActiveSync software connect the GPS device to your PC using
a USB cable (mini A type). The cable is not included in the package, but it is widely
available on the market.
1.
2.
4.
Click to continue
Click to enter the connection interface
3. After the connection is established such a screen
will appear:
Click
5. Double click to enter the following interface:
Now you can manage the files in the device’s
memory (copy, paste, delete etc.)
Next >
Next >
My computer
Connecting the GPS device to PC
18
Page 20

19
Troubleshooting
The device cannot be switched on – power problems
Black screen
System problems
Strange characters on the display
The device reacts to touching the screen in a strange way
No sound
No sound in the earphones
Files cannot be saved in the memory of the device
Files cannot be saved in memory card
Connection with PC cannot be established
The device does not find a given address.
The battery is flat or almost flat. Connect the device to power supply (eg. to the car
power outlet using the car charger).
Switch on the device, charge the battery.
Normally, resetting the device is not necessary. However, if the system does not respond
and the device cannot be switched off by simply pressing and holding the POWER button,
pls press the Reset switch (using the pointing pen).
Check what OSD language is chosen. Change the language to English or any other
language you understand.
Pls calibrate the screen.
Increase volume.
Increase volume, check if the earphones are connected properly. Check if the audio files
are not damaged (copy another files).
Pls check if the USB cable is properly connected to the device and to the PC.
Check if the USB cable is not damaged (check with another cable).
Check if ActiveSync is installed on the PC.
Check if the internal memory isn’t full.
Before you use a card, set the security switch to the UNLOCK position. Check if the card
is not full.
Check if the card is not damaged (check another microSD card).
Microsoft Active Sync® software is necessary to establish the connection.
ls install this software first.
All the questions concerning the MAPS must be addressed to the map providers
(depending on which map you are using). The coverage data can be always obtained
from map providers.
Page 21

Troubleshooting
After connecting the device to a PC it is found and recognised as an unknown device
The device cannot be switched on – power problems
After switching on the device such a screen appears:
.
We kindly request you to use external microSD cards for any extra multimedia files you
might like to play (WMV, WMA, JPEG, TXT etc.) or additional maps you would like to use.
Every manipulation in the internal memory of the device (incl. installation of additional
applications) may result in loss of the original navigation software that you might have had
received with your device. All the changes in the internal memory are done on the user's
sole responsibility and at their own risk.
REMARK!
Detach the device, install ActiveSync software first and than connect the device again.
The battery is flat or almost flat. Connect the device to power supply (eg. to the car power
outlet using the car charger).
This is a screen calibration request.
When a black cross appears on the screen press the very
centre of the cross, using your pointing pen.
Than the cross will move to another position, again press
the centre of it.
Continue until the „OK” message appears. Than touch
the screen to confirm the calibration setting and return
to the main menu.
20
Page 22

Specifications
Built-in 20-channel GPS module
CPU: 400MHz
Memory 64MB SDRAM
Built-in flash memory 1GB
Operational system: WINCE 5.0 Core
USBActiveSync connection
” LCD touch screen
Screen resolution 480×272 pixels
Supported formats: WMA/WMV/BMP/JPG/GIF/PNG/TXT
Built-in antenna
Built-in speaker 1.5W
Built-in rechargeable lithium-ion battery
USB port
microSD memory card slot
Earphones jack 3,5mm
Power consumption < 20mW
External Size: 139mm (W) x 87mm (H) x 10mm (D)
Weight: ~160g
5
Information in this document is subject to change without prior notice.
Please, visit www.lark.com.pl for updates of this document.
Lark Europe Sp. z o.o. reserves the right to change or improve its products and to make
changes in the content of this manual without obligation to notify any person or
organization of such changes or improvements.
21
Page 23

Dziękujemy za wybór nawigacji Lark FreeBird!
Prosimy zapoznać się z instrukcją przed rozpoczęciem
użytkowania urządzenia i zachować ją do wglądu na później
Producent zastrzega sobie możliwość wprowadzania zmian w urządzeniu,
jak i w instrukcji bez wcześniejszego powiadomienia.
Wygląd poszczególnych ekranów menu może się różnić od rzeczywistego
w Twoim urządzeniu.
Aktualizowane wersje instrukcji będą umieszczane na stronie
.
Prosimy odwoływać się do strony www.lark.com.pl w przypadku pytań lub
wątpliwości dotyczących obsługi urządzenia.
www.lark.com.pl
22
Page 24

Spis tre ciś
23
Wskazówki dotycz
Obsługa urz
ące bezpieczeństwa i prawidłowej eksploatacji . . . . . . . . . . . . . . . 24
Wprowadzenie do obsługi urządzenia . . . . . . . . . . . . . . . . . . . . . . . . . . . . . . . . . . 26
ądzenia . . . . . . . . . . . . . . . . . . . . . . . . . . . . . . . . . . . . . . . . . . . . . . 30
Zmiana ustawień nawigacji GPS. . . . . . . . . . . . . . . . . . . . . . . . . . . . . . . . . . . . . . 34
Podłączenie urządzenia GPS do komputera . . . . . . . . . . . . . . . . . . . . . . . . . . . . . . 39
ązywanie problemów . . . . . . . . . . . . . . . . . . . . . . . . . . . . . . . . . . . . . . . . . 41
m .. .. .. .. .. .. .. .. .. .. .. .. .. .. .. .. .. .. .. .. .. .. . 44
Rozwi
Para etry techniczne
ądzenia . . . . . . . . . . . . . . . . . . . . . . . . . . . . . . . . . . . . . . . . . . . . . 26
Co jest w pudełku?. . . . . . . . . . . . . . . . . . . . . . . . . . . . . . . . . . . . . . . . . . . . . 26
B ądzenia . . . . . . . . . . . . . . . . . . . . . . . . . . . . . . . . . . . . . . . . . . . . 27
Ładowanie urządzenia . . . . . . . . . . . . . . . . . . . . . . . . . . . . . . . . . . . . . . . . . . 29
Instalacja uchwytu samochodowego . . . . . . . . . . . . . . . . . . . . . . . . . . . . . . . . . 29
Uruchomienie urządzenia GPS . . . . . . . . . . . . . . . . . . . . . . . . . . . . . . . . . . . . 29
Podłączenie urządzenia GPS do komputera . . . . . . . . . . . . . . . . . . . . . . . . . . . . 29
Włączanie i wyłączanie urządzenia . . . . . . . . . . . . . . . . . . . . . . . . . . . . . . . . . . 30
Rysik . . . . . . . . . . . . . . . . . . . . . . . . . . . . . . . . . . . . . . . . . . . . . . . . . . . . . . 30
Reset systemu. . . . . . . . . . . . . . . . . . . . . . . . . . . . . . . . . . . . . . . . . . . . . . . . 30
Odtwarzanie muzyki . . . . . . . . . . . . . . . . . . . . . . . . . . . . . . . . . . . . . . . . . . . . 31
Odtwarzanie plików wideo . . . . . . . . . . . . . . . . . . . . . . . . . . . . . . . . . . . . . . . . 32
Przeglądanie plików tekstowych . . . . . . . . . . . . . . . . . . . . . . . . . . . . . . . . . . . . 33
Ustawienia . . . . . . . . . . . . . . . . . . . . . . . . . . . . . . . . . . . . . . . . . . . . . . . . . . 33
Status GPS . . . . . . . . . . . . . . . . . . . . . . . . . . . . . . . . . . . . . . . . . . . . . . . . . . 33
Transmiter FM . . . . . . . . . . . . . . . . . . . . . . . . . . . . . . . . . . . . . . . . . . . . . . . . 35
daty i c . . . . . . . . . . . . . . . . . . . . . . . . . . . . . . . . . . . . . . . . . . 36
.. .. .. .. .. .. .. .. .. .. .. .. .. .. .. .. .. .. .. .. .. .. .. .. .. . 38
Wybór nawigacji . . . . . . . . . . . . . . . . . . . . . . . . . . . . . . . . . . . . . . . . . . . . . . 38
Cechy urz
udowa urz
Ustawienia zasu
awigacj
ądanie zdjęć. . . . . . . . . . . . . . . . . . . . . . . . . . . . . . . . . . . . . . . . . . . . . 32
łśności. .. .. .. .. .. .. .. .. .. .. .. .. .. .. .. .. .. .. .. .. .. . 34
Ustawienia podświetlenia ekranu . . . . . . . . . . . . . . . . . . . . . . . . . . . . . . . . . . . 34
Ustawienia języka . . . . . . . . . . . . . . . . . . . . . . . . . . . . . . . . . . . . . . . . . . . . . 35
.. .. .. .. .. .. .. .. .. .. .. .. .. .. .. .. .. .. . 36
Informacje o systemie. . . . . . . . . . . . . . . . . . . . . . . . . . . . . . . . . . . . . . . . . . . 36
Ustawienia USB . . . . . . . . . . . . . . . . . . . . . . . . . . . . . . . . . . . . . . . . . . . . . . 37
Ustawienia fabryczne . . . . . . . . . . . . . . . . . . . . . . . . . . . . . . . . . . . . . . . . . . . 37
Na
. .. .. .... .. .. .. .. .. .. .. .. . 39
Przegl
Regulacja g o
Kalibracja ekranu dotykowego
Instalacja oprogramowania USB ActiveSync. .
Page 25

Szanowni Państwo.
Informujemy, iż oprogramowanie nawigacyjne LarkMap* znajduje się w pamięci wewnętrznej
urządzenia (pamięci FLASH). Wszelkie zmiany dokonane w tej pamięci (takie jak wykasowanie
plików, zmiana nazw plików, dogrywanie plików nieznanego pochodzenia) mogą spowodować
nieodwracalne uszkodzenie oprogramowania oraz utratę praw licencyjnych. Informujemy, iż
zgodnie z warunkami gwarancji (karta gwarancyjna pkt. 14 podpunkt b.) firma Lark Europe nie
odpowiada w żaden sposób za utracone dane z winy użytkownika (w tym pliki licencyjne
znajdujące się w pamięci wewnętrznej urządzenia).
W przypadku utracenia plików licencyjnych (usunięcia plików z pamięci wewnętrznej urządzenia)
użytkownik może uzyskać pomoc jedynie w przypadku wcześniejszego zarejestrowania
oprogramowania na stronie producenta . Instrukcje wykonania rejestracji
produktu znajdą państwo w pudełku z zestawem,a także na:
Ponosisz pełną odpowiedzialność i ryzyko związane z użytkowaniem urządzenia
nawigacyjnego GPS oraz prowadzeniem samochodu.
Pamiętaj, aby nie obsługiwać urządzenia w trakcie prowadzenia pojazdu. Nie odrywaj
uwagi od sytuacji na drodze w trakcie jazdy.
Musisz być zawsze w pełni świadom sytuacji na drodze, warunków pogodowych i innych
czynników wpływających na bezpieczeństwo w ruchu drogowym oraz dostosowywać do
nich styl jazdy.
Urządzenie/oprogramowanie nawigacyjne zostało stworzone, by wspomagać wytyczanie
trasy. Korzystanie z niego nie może być nigdy traktowane jako usprawiedliwienie
w przypadku złamania przepisów drogowych lub spowodowania kolizji czy wypadku.
Instalując urządzenie w samochodzie upewnij się, że nie będzie zasłaniało kierowcy pola
widzenia ani kolidowało z przyrządami sterowniczymi samochodu.
Nigdy nie montuj urządzenia w miejscu, gdzie znajdują się poduszki powietrzne lub
bezpośrednio nad nimi.
Nie zostawiaj urządzenia na desce rozdzielczej.
Producent oraz gwarant nie ponoszą żadnej odpowiedzialności za przydatność
urządzenia i jego oprogramowania do konkretnych celów oraz za następstwa ich wyboru
i użytkowania.
Użytkownik winien zapoznać się z aktualnym stanem technologii GPS oraz jej
ograniczeniami.
Gwarant nie ponosi odpowiedzialności zwłaszcza za szczegółowość i precyzję map.
www.larkmap.pl
http://www.larkmap.pl/download.htm
PROSIMY O NIEINGEROWANIE W PAMIĘĆ WEWNĘTRZNĄ URZĄDZENIA. W CELU
DOGRANIA PLIKÓW MULTIMEDIALNYCH (TAKICH JAK NP. JPG, WMA, WMV I INNE)
PROSIMY O KORZYSTANIE Z ZEWNĘTRZNEJ PAMIĘCI (KARTY microSD).
OSTRZEŻENIE!
OSTRZEŻENIE!
Wskazówki dotyczące bezpieczeństwa i prawidłowej eksploatacji
*Dotyczy tylko urządzeń z zainstalowaną aplikacją LarkMap.
24
Page 26

Ważnewskazówki
UWAGA!
1. Chroń urządzenie przed kurzem, wilgocią, wodą, wysokimi i bardzo niskimi temperaturami
oraz silnymi wstrząsami, upadkiem itp.
2. Uderzenie czy wgniecenie obudowy może spowodować poważne, nieodwracalne
uszkodzenie urządzenia lub baterii.
3. Naładuj baterięlub podłącz urządzenie do zasilacza samochodowego, jeżeli:
Wskaźnik zużycia baterii wskazuje jej znaczne wyczerpanie
Urządzenie samo się wyłącza, wyłącza się zaraz po jego włączeniu
Urządzenie nie reaguje na naciskanie przycisków.
4. Nie odłączaj urządzenia od komputera w trakcie kopiowania, zapisywania czy
przenoszenia plików – może to spowodować uszkodzeniedanych oraz urządzenia!
5. Użytkownik jest zobowiązany do właściwego zabezpieczenia ważnych danych (kopie na
różnych nośnikach itp.). Gwarant nie ponosi odpowiedzialności za utratę jakichkolwiek
danych spowodowaną nieprawidłowym działaniem urządzenia czy jego uszkodzeniem!
Ważne dane powinny być archiwizowane naco najmniej dwóchnośnikach!
6. Aby zminimalizować ryzyko utraty danych, chroń urządzenie przed silnymi polami
elektromagnetycznymi; nie przechowuj go w pobliżu telewizora, głośników, telefonu
komórkowego itp.
7. Chroń słuch. Lekarze ostrzegają, że długotrwałe słuchanie zbyt głośnej muzyki przez
słuchawki może uszkadzać słuch.
8. Zachowaj szczególną ostrożność, gdy słuchasz muzyki, prowadząc samochód. Odcięcie
od zewnętrznych bodźców może grozić niebezpieczeństwem. Staraj się nie słuchać zbyt
głośnej muzyki.
Odtwarzacz multimedialny, będący jedną z funkcji urządzenia, może być używany jedynie
do odtwarzania utworów, do których użytkownik posiada prawa autorskie lub zakupił/
otrzymał od właściciela takich praw zgodę na korzystanie z utworu. Użytkownik, który
łamie prawa autorskie, może zostać pociągnięty do odpowiedzialności karnej, zgodnie ze
stosownymi regulacjami prawnymi
Wskazówki dotyczące bezpieczeństwa i prawidłowej eksploatacji
25
Page 27

Cechy urządzenia
Co jest w pudełku?
ługiwane formaty:
Urządzenie nawigacyjne z 5-calowym ekranem TFT-LCD, 480x272 pikseli
Wbudowany 1,5W głośnik, głośność regulowana z poziomu menu
Łatwy w obsłudze, intuicyjny ekran dotykowy
Wbudowany, 20
Wbudowana antena GPS
Slot na karty pamięci microSD
Odtwarzanie plików audio i video
Możliwość odczytu plików tekstowych
Wbudowana bateria litowo-jonowa
Możliwość ładowania lub z gniazdka zapalniczki w samochodzie
(załączona ładowarka samochodowa)
-kanałowy wysokiej czułości odbiornik
poprzez port USB
GPS
Obs wmv, wma, bmp, jpeg, png, gif, txt
Lark FreeBird 50.3
Uchwyt do mocowania na szybie samochodu
Ładowarka samochodowa
Rysik
26
Wprowadzenie do obsługi urządzenia
Page 28

Budowa urządzenia
Front urządzenia
Ty ął urz dzenia
Wprowadzenie do obsługi urządzenia
Ekran dotykowy
Głośnik
Rysik
27
Dioda
sygnalizujące
włączenie
zasilania lub
tryb ładowania
RESET
Reset
Page 29

Lewa strona urządzenia
Góra urz dzeniaą
Używanie karty pamięci microSD
N
Aby włączyć urządzenie naciśnij przycisk .
IGDY nie wyjmuj karty ze slotu, gdy urz dzenie jest w czone.
musisz wyj kart – wy cz najpierw urz dzenie, a nast pnie wyjmij kart
ze slotu.
ąłą
ąć ę łą ą ę ęJeżeli
Karta microSD może zostać umieszczona w slocie tylko w jeden sposób, Włóż kartę do
slotu i maksymalnie dopchnij, aby poprawniesię osadziła w slocie.
POWER
Wprowadzenie do obsługi urządzenia
Slot na karty microSD
Potrzebne, je i chce się
zastosowac dodatkową
mapę lub inne dane
(muzyka, filmy itp.)
śl
Gniazdo słuchawek
Port Mini-USB
Używany do transmisji
danych z komputerem
Przycisk POWER
28
Page 30

Ładowanie urządzenia
Instalacja uchwytu samochodowego
Uruchomienie urz
Krok 1
Krok 2
ądzenia GPS
Podłączenie urządzenia GPS do komputera
Aby na ć akumulator, wtyczkę kabla USB lub ładowarki samochodowej umieść
w złączu USB urządzenia.
Akumulator będzie się ładować niezależnie od tego, czy urządzenie jest włączone czy
wyłączone. W czasie ładowania akumulatora miga dioda. Kiedy ładowanie się zakończy,
dioda zgaśnie.
1. Jeśli używasz urządzenia w czasie jego ładowania, proces ładowania będzie trwał
dłużej.
2. Po zakończeniu ładowania lub aby przerwać ładowanie, odłącz kabel od urządzenia.
3. Nie zgniataj akumulatora, nie wrzucaj go do ognia itd. grozi to pożarem lub
porażeniem prądem.
4. Gdy użytkujesz urządzenie w samochodzie, zalecamy podłączenie ładowarki
samochodowej do urządzenia na stałe (szczególnie podczas dłuższych podróży).
5. Jeżeli to możliwe ułóż kabel zasilający tak, aby nie utrudniał korzystania z innych
urządzeń pojazdu.
ładowa
Dociśnij gumę do czystej powierzchni szyby i przekręć dźwignię, aby „przyssać”
uchwyt do szyby
Użyj pokręteł, aby dostosować pozycję urządzenia do swoich potrzeb
Instalując urządzenie w samochodzie upewnij się, że nie będzie zasłaniało kierowcy
pola widzenia ani kolidowało z przyrządami sterowniczymi samochodu.
Nigdy nie montuj urządzenia w miejscu, gdzie znajdują się poduszki powietrzne lub
bezpośrednio nad nimi.
ć się na otwartym terenie bez dużych
przeszkód w pobliżu.
Trzymaj urządzenie stabilnie, aż do uzyskania sygnału z czterech satelit, następnie
zaprogramuj podróż.
Zaleca się wychwycenie sygnału z satelity przed umieszczeniem urządzenia
w samochodzie.
Po zainstalowaniu oprogramowania ActiveSync
(patrz str. 39) podłącz urządzenie GPS do komputera
przy pomocy kabla USB mini-A A (nie dołączony do
zestawu, dostępny powszechnie w sprzedaży).
Pierwsze uruchomienie GPS powinno odby
Wprowadzenie do obsługi urządzenia
29
Page 31

Włączanie
Rysik
Reset systemu
UWAGA!
Jeśli akumulator jest wyczerpany, urządzenie nie włączy
się (w takim przypadku podłącz je do zasilania).
iezapisane dane zostaną utracone, kiedy zresetujesz system.
UWAGA!
N
Naciśnij przycisk ojawi się ekran powitalny.
Rysik jest umieszczony na tylnej ściance urządzenia.
1. Pojedyncze kliknięcie
Jeden raz dotknij ekranu przy pomocy rysika
2. Podwójne kliknięcie
Dwukrotnie szybko dotknij ekranu przy pomocy rysika
3. Przeciąganie
Dotknij ekranu w punkcie początkowym, a następnie nie odrywając rysika od ekranu
przesuń go do miejsca docelowego.
W przypadku zawieszenia się systemu użyj rysika, aby wcisnąć przycisk
znajdujący się na lewym boku urządzenia tuż nad slotem karty pamięci.
POWER,
POWER
p
Naciśnij przycisk , system zapyta, czy chcesz,
aby urządzenie zostało wyłączone czy przeszło w stan
wstrzymania. Stan wstrzymania tymczasowo wygasi
ekran, a kiedy ponownie naciśniesz przycisk POWER,
urządzenie wróci do ostatniego ekranu aktywnego przed
przejściem w stan wstrzymania. Opcja wyłączenia
całkowicie wyłączy urządzenie i po ponownym naciśnięciu
POWER system załaduje się ponownie.
Wyłączanie
RESET
Obs urządzeniaługa
30
Page 32

Odtwarzanie muzyki
Lista plików
Wyjście audio
UWAGA!
Pliki mp3 przed zgraniem do pamięci urządzenia należy skonwertować do formatu wma.
Wszelkie informacje nt. konwertowania plików mp3 można znaleźć w internecie.
Urządzenie może odtwarzać pliki WAV, WMA.
Dotknij , aby przejść do menu
Po wybraniu trybu MUZYKA uruchomi się
odtwarzacz.
Aby odtworzyć muzykę kliknij .
odtwarzać utwory losowo.
Kliknij , aby dostosować korekcję dźwięku.
Kliknij ,aby zminimalizować okno, nadal możesz słuchać muzyki
Kliknij , aby zamknąć aplikację i wrócić do menu głównego.
Kliknij , aby dodać plik do listy.
Kliknij , aby dodać wszystkie pliki do listy.
Kliknij , aby usunąć plik z listy.
Kliknij , aby usunąć wszystkie pliki z listy.
MUZYKA.
Aby wstrzymać odtwarzanie kliknij .
Kliknij , aby przejść do następnego pliku.
Kliknij , aby przejść do poprzedniego pliku.
Kliknij , aby powtarzać odtwarzanie.
Kliknij ,
Kliknij , aby dostosować głośność odtwarzanego utworu.
Kliknij , aby wybrać odtwarzanie z listy.
Na liście pokazane są pliki audio i foldery zawierające
takie pliki.
Włącz urządzenie, włącz odtwarzanie muzyki, do gniazda słuchawkowego włóż złącze
słuchawek. Możesz teraz słuchać muzyki przez słuchawki (słuchawki nie są dołączone do
kompletu).
Obs urządzeniaługa
31
Page 33

Odtwarzanie
Przegl
plików wideo
ądanie zdjęć
Kliknij ekran dwukrotnie, aby przejść do trybu pełnoekranowego, ponownie kliknij
dwukrotnie, aby wrócić do zwykłego trybu odtwarzania filmów.
Uwaga!
Urządzenie może odtwarzać pliki WMV.
Dotknij , aby przejść do menu .
Po wybraniu trybu FILMY uruchomi się odtwarzacz wideo.
Aby odtworzyć plik wideo kliknij .
Aby wstrzymać odtwarzanie kliknij .
Kliknij , aby dostosować głośność.
Kliknij , aby wybrać plik wideo z folderu.
Kliknij , aby zamknąć aplikację i wrócić do menu
głównego.
W urządzeniu możesz przeglądać obrazy zapisane
w formacie BMP, GIF, JPG, PNG
Dotknij , aby przejść do menu Z
Wybierz folder zawierający pliki graficznie, następnie
dwukrotnie kliknij plik, który ma być wyświetlony.
Kliknij , aby obejrzeć kolejne zdjęcie.
Kliknij , obejrzeć poprzednie zdjęcie.
Kliknij , aby powiększyć zdjęcie.
Kliknij , aby pomniejszyć zdjęcie.
Kliknij , obrócić zdjęcie.
Kliknij , aby automatycznie przeglądać zdjęcia.
Kliknij , aby wyświetlić folder zawierający pliki graficznie.
Kliknij , aby zamknąć aplikację i wrócić do menu głównego.
FILMY
DJĘCIA.
.
Obs urządzeniaługa
32
Page 34

Obs urządzeniaługa
Przeglądanie plików tekstowych
Ustawienia
Status GPS
Uwaga!
W urządzeniu możesz przeglądać pliki tesktowe TXT.
Dotknij , aby przejść do menu .
Kliknij , aby wyświetlić folder zawierający pliki tekstowe.
Kliknij , aby przejść do następnej strony.
Kliknij , aby wrócić do poprzedniej strony.
Kliknij , aby zmienić wielkość czcionki.
Kliknij , aby zmienić kolor czcionki.
Kliknij , aby dodać zakładkę.
Kliknij , aby wyświetlić zakładkę.
Kliknij , aby zamknąć aplikację i wrócić do menu głównego.
W tym trybie wyświetlone są aktualne informacje
dotyczące urządzenia (więcej informacji na str. 34).
Dwukrotnie kliknij , aby wejść do podmenu
USTAWIENIA.
Dotknij , aby przejść do menu
Kliknij , aby zresetować GPS.
Kliknij , aby wyświetlić strumień danych z satelitów.
ćł
.
Kliknij , aby wyświetlić dane o współrzędnych,
wysokości I czasie.
Kliknij , aby zamknąć aplikację i wrócić do menu
głównego.
Uą
ęłć
ł.
TEKSTY
STATUS GPS.
Kliknij , aby sprawdzi status odbioru sygna u
z satelitów
rz dzenie jest przeznaczone do pracy na otwartym
powietrzu, w pomieszczeniach nie b dzie dzia a
(nie wychwyci sygna u z satelitów)
33
Page 35

Dotknij , aby wejść do podmenu
aby wejść do trybu .
przewijania
Kliknij ikonę , aby wejść do trybu
Przy pomocy przycisków oraz dostosuj jasność
ekranu do swoich wymagań. Możesz też przeciągnąć
pasek przewijania, aby ustawić żądany poziom jasności
ekranu.
Przyciskami oraz ustaw czas , po jakim
podświetlenie ma być wyłączone.
Dotknij , aby zapisać wprowadzone zmiany.
Dotknij , aby wyjść z tego podmenu
USTAWIENIA.
Regulacja g o no ci
Regulacja głośności
Ustawienia podświetlenia ekranu
Podświetlenie
ekranu.
łś ś
Kliknij ikonę ,
Przy pomocy przycisków oraz ustaw głośność
na żądanym poziomie. Możesz też przeciągnąć pasek
, aby wybrać żądany poziom głośności.
Zaznacz lub odznacz okienko pod paskiem głośności,
w zależności od tego, czy chcesz, aby urządzenie
wydawało dźwięk przy dotknięciu ekranu.
Przyciskami oraz wybierz dźwięk, jaki ma
towarzyszyć uruchamianiu urządzenia.
Dotknij , aby zapisać wprowadzone zmiany.
Dotknij , aby wyjść z tego podmenu
Zmiana ustawień nawigacji GPS
34
Page 36

aby wejść do trybu .
Transmiter FM żliwia przesyłanie muzyki z urządzenia
do dowolnego odbiornik fal radiowych UKF (FM)
np. radia samochodowe. Dodatkowo Transmiter FM
daje nam możliwość słuchania komunikatów
głosowych poprzez zestaw audio zamontowany
w samochodzie.
W trakcie odtwarzania muzyki możesz zminimalizować
odtwarzacz i uruchomić program nawigacyjny.
Dotknij , aby wejść do trybu .
Zaznacz opcję “Używaj FM”. Odznacz opcję, aby dezaktywować funkcję transmitera FM.
Ustaw wybraną częstotliwość w radiu samochodowym.
Przy pomocy przycisków oraz ustaw na urządzeniu tę samą częstotliwość, która
została ustawiona na odbiorniku radiowym w samochodzie. Możesz też przeciągnąć
pasek przewijania, aby ustawić żądany częstotliwość.
Dotknij , aby zapisać zmiany.
Dotknij , aby wyjść z tego podmenu.
Ustawienia języka
Ustawienia języka
Transmiter FM
Ustawienia FM
Kliknij ikonę ,
Przyciskami oraz wybierz język, w jakim ma
być uruchamiane menu urządzenia.
Dotknij , aby zapisać wprowadzone zmiany.
Dotknij , aby wyjść z tego podmenu
umo
UWAGA!
UWAGA!
UWAGA!
Urządzenie musi być podłączone do zasilacza w czasie korzystania z funkcji transmitera
FM (przewód zasilacza pełni funkcję anteny przekaźnikowej).
Wybrana częstotliwość nie może być zajęta przez żadną stację radiową, aby uniknąć
interferencji fal podczas przekazywania sygnału radiowego.
Na terenie Polski można korzystać z Transmitera FM, tylko na częstotliwościach
w zakresie od 88MHz do 108MHz.
Zmiana ustawień nawigacji GPS
35
Page 37

aby wejść do trybu
Przy pomocy przycisków oraz u
Kliknij ikonę , aby wejść do trybu
Wybierz TAK, aby rozpocząć kalibrację ekranu
Używając rysika dotykaj środka kursora (krzyżyka).
Kursor będzie się przemieszczał, za każdym razem
dotykaj rysikiem jego środka. Po zakończeniu kalibracji
ekran kalibracji zamknie się automatycznie. Je li proces
kalibracji si nie powiedzie, ca a procedura b dzie
powtarzana a do skutku.
Kliknij ikonę , aby wyświetlić informacje o systemie.
W tym trybie wyświetlone są aktualne informacje
dotyczące urządzenia
Dotknij , aby wyjść z tego podmenu.
Ustawienie daty i czasu
Ustawienia czasu.
Kalibracja ekranu dotykowego
Kalibracja ekranu.
Informacje o systemie
Kliknij ikonę ,
Przy pomocy przycisków oraz ustaw rok, miesiąc,
dzień i godzinę.
staw strefę czasową.
Dotknij , aby zapisać wprowadzone zmiany.
Dotknij , aby wyjść z tego podmenu.
ś
ęłę
ż
Zmiana ustawień nawigacji GPS
36
Page 38

Zmiana ustawień nawigacji GPS
ustawienie.
Dotknij , aby przejść do kolejnego ekranu menu
Ustawienia, następnie wybierz , aby przywrócić
ustawienia fabryczne
Wybierz TAK, aby w urządzeniu przywrócić ustawienia
fabryczne. Rozpocznie się proces przywracania
ustawień fabrycznych.
Dotknij , aby zapisać wprowadzone ustawienie.
Dotknij , aby wyjść z tego podmenu.
Ustawienia USB
Ustawienia USB
Ustawienia fabryczne
Dotknij , aby przejść do kolejnego ekranu menu
Ustawienia, następnie wybierz , aby przejść do
ekranu wyboru ustawienia trybu .
Wybierz opcję:
“Dysk wymienny” lub “Tryb ActiveSync”
Dotknij , aby zapisać wprowadzone
Dotknij , aby wyjść z tego podmenu.
Niezapisane dane zostaną utracone, kiedy
zresetujesz system.
UWAGA!
37
Page 39

Naawigacj
Dotknij , aby przejść do menu
Po wybraniu trybu NAWIGACJA uruchomi się
aplikacja LarkMap.*
W menu głównym urządzenia kliknij ikonkę
aby przejść do menu
Dotknij , aby przejść do kolejnego ekranu menu
Ustawienia, następnie k „
ę , wyświetli się lista z folderami
zapisanymi w pamięci urządzenia oraz na
karcie microSD.
aznacz opcję:
„Autostart nawigacji przy włączeniu urządzenia”.
Dotknij , aby zapisać wprowadzone ustawienie.
Dotknij , aby wyjść z tego podmenu.
Nawigacja.
Wybór nawigacji
Ustawienia.
Szczegóły dotyczące użytkowania aplikacji LarkMap
znajdziesz w Przewodniku Użytkownika, który jest
dołączony do zestawu.
liknij Wybierz nawig.” ,
aby ustawić domyślny program do nawigacji.
1.
2. Wybierz plik LarkMap.exe.
Domyślna ścieżka dostępu powinna wyglądać w ten
sposób:
Urządzenie umożliwia automatyczny start programu
nawigacjyjnego (LarkMap) po włączeniu urządzenia.
Aby ustawić taką opcję, z
Kliknij ikonk
ResidentFlash\LarkMap\LarkMap.exe
Zmiana ustawień nawigacji GPS
38
Page 40

Instalacja oprogramowania USB ActiveSync
łączenia urządzenia Lark Freebird z komputerem potrzebny jest program
Microsoft ActiveSync. Jest to ogólnie dostępna aplikacja dystrybuowana przez firmę
Microsoft. Więcej informacji na temat oprogramowania oraz sam program ACTIVE SYNC
znajdziesz na stronie:
Do po
Po ściągnieciu programu kliknij dwukrotnie “setup.msi”, aby zainstalować
oprogramowanie.
http://www.microsoft.com/poland/windowsmobile/activesync/activesync45.mspx
Kliknij Kliknij , aby kontynuowaDalej > Dalej > ć
Kliknij , aby wybrać ścieżkę instalacji Kliknij
Poczekaj na zakończenie instalacji Kliknij i zrestartuj komputer
Zmień Zainstaluj
Zakończ
Podłączenie urządzenia GPS do komputera
39
Page 41

Po zainstalowaniu oprogramowania ActiveSync podłącz urządzenie GPS do komputera
przy pomocy kabla USB mini-A. Aby zapwenić bezusterkową transmisję dużej ilości
danych zaleca się stosowanie kabla USB ekranowanego.
Kliknij , aby kontynuować.
Kliknij , aby wejść do interfejsu połączenia:
Po udanym połączeniu pojawi się ekran:
Kliknij na pulpicie ikonkę
ć ekran:
Teraz możesz zarządzać plikami (kopiować, usuwać itd.).
Dalej>
Dalej>
Mój komputer.
Kliknij dwukrotnie , aby wywoła
Podłączenie urządzenia GPS do komputera
40
Page 42

Rozwiązywanie problemów
Urządzenie nie włącza się - problemy z zasilaniem
Czarny wyświetlacz
Problem z systemem
Dziwne znaki na wyświetlaczu
Niewłaściwe reagowanie na dotyk
Brak dźwięku
Brak dźwięku w słuchawkach
Nie udaje się zgranie plików
Nie da się ustanowić połączenia z komputerem
Zestaw GPS nie odnajduje ulicy w miejscowości XXX
Po podłączeniu sytemu nawigacji do komputera system wykrywa je, jako nieznane urządzenie
do pamięci urządzenia
Nie udaje się zgranie plików na kartę pamięci
Poziom naładowania akumulatora jest zbyt niski, aby uruchomić urządzenie.
Podłącz urządzenie do źródła zasilania.
Włącz urządzenie, naładuj akumulator.
W normalnych warunkach, resetowanie systemu nie jest konieczne. Gdy system nie
odpowiada i nie reaguje na przycisk zasilanie, naciśnij przycisk Reset za pomocą
wskaźnika.
Sprawdź, jaki język menu wybrano. Zmień język na polski.
Przeprowadź kalibrację ekranu.
Zwiększ głośność.
Zwiększ głośność, sprawdź podłączenie słuchawek. Sprawdź, czy pliki audio nie są
uszkodzone (wgraj inne pliki). Sprawdź podłączenie słuchawek.
Sprawdź, czy kabel USB jest prawidłowo podpięty. Sprawdź poprawność instalacji
sterownika. Sprawdź, czy pamięć urządzenia nie jest pełna.
Kabel USB współpracuje tylko z oprogramowaniem Microsoft Active Sync® .
Przypominamy, iż mapa znajdująca się w urządzeniu nie gwarantuje pełnego pokrycia
Polski. Aktualne pokrycie dróg i miejscowości można sprawdzić na stronie producenta
mapy.
Odłącz urządzenie od komputera, zainstaluj sterowniki i ponownie podłącz urządzenie.
Przed użyciem karty, ustaw zabezpiecznie w pozycji UNLOCK. Sprawdź, czy pamięć
urządzenie nie jest pełna.
41
Page 43

Po włączeniu urządzenia i naciśnięciu przycisku „Nawigacja” program nawigacyjny nie uruchamia się
Po włączeniu urządzenia pojawia się ekran:
Po włączeniu urządzenia i naciśnięciu przycisku nawigacja uruchamia się inne oprogramowanie
niż LarkMap
Informujemy, iż oprogramowanie nawigacyjne LarkMap znajduje się w pamięci
wewnętrznej urządzenia (pamięci FLASH). Wszelkie zmiany dokonane w tej pamięci
(takie jak wykasowanie plików, zmiana nazw plików, dogrywanie plików nieznanego
pochodzenia) mogą spowodować nieodwracalne uszkodzenie oprogramowania oraz
utratę praw licencyjnych,
Prosimy o nieingerowanie w pamięć wewnętrzną urządzenia. W celu dogrania plików
multimedialnych (takich jak np. WMV, WMA, JPG, TXT i inne) prosimy o korzystanie
z zewnętrznej pamięci (karty microSD). Każda ingerencja w pamięć wewnętrzną, próba
zainstalowania innej aplikacji itp. działania użytkownik wykonuje na własną
odpowiedzialność i musi liczyć się z ryzykiem utraty oprogramowania oraz licencji na
oprogramowanie,
Informujemy, iż zgodnie z warunkami gwarancji (karta gwarancyjna pkt. 14 podpunkt b.)
firma Lark Europe nie odpowiada w żaden sposób za utracone dane z winy użytkownika
(w tym pliki licencyjne znajdujące się w pamięci wewnętrznej urządzenia).
Jest to ekran kalibracji ekranu. Naciśnij na środek krzyżyka,
aby rozpocząć kalibrację ekranu. Pod aj za ruchem
krzy yka, ka dorazowo dotykaj c jego rodka.
Po poprawnej kalibracji urządzenie powraca do menu
głównego. Je li proces kalibracji si nie powiedzie, ca a
procedura b dzie powtarzana a do skutku.
Sprawdź czy w ustawieniach nawigacji
(Ustawienia Wybierz nawig.) nie została zmieniona
ścieżka dostępu (patrz obrazek).
Prawidłowa ścieżka dostępu powinna wyglądać
w taki sposób:
ąż
żż ąś
śęł
ęż
_
ResidentFlash\LarkMap\LarkMap.exe
Rozwiązywanie problemów
42
Page 44

Parametry techniczne
43
Pami
Wbudowany, 20-kanałowy wysokiej czułości odbiornik GPS
Procesor 400MHz
ęć operacyjna RAM 64MB
Wbudowana pamięć flash 1GB
System operacyjny WIN CE 5.0 Core
Połączenie USBActiveSync
Formaty obsługiwanych plików: WMA/WMV/BMP/JPG/GIF/PNG/TXT
kumulatora litowo-jonowego lub ł
Gniazdo karty pamięci microSD
Pobór mocy < 20mW
Ekran dotykowy LCD 5"
Rozdzielczość ekranu 480x272 piksele, 65 tys. kolorów
Wbudowana antena
Wbudowany głośnik o mocy 1,5W
Zasilanie z wbudowanego a adowarki samochodowej
Złącze komunikacyjne USB
Gniazdo słuchawkowe 3,5mm
Wymiary: 139mm (szerokość) x 87mm (wysokość) x 10mm (grubość)
Waga: ~160g
Aktualne FAQ i ważne wskazówki znajdziesz na www.lark.com.pl
Jeśli nie znalazłeś rozwiązania problemu w dziale FAQ, zadzwoń do serwisu:
tel. (22) 332 32 56, wyślij e-mail: serwis@lark.com.pl lub faks (22) 332 33 43.
Lark Europe Sp. z o.o. zastrzega sobie prawo do wprowadzania zmian
w urządzeniu bez wcześniejszego powiadomienia.
UWAGA!
Wygl d grafiki/ animacji w urz dzeniu od
przedstawionego w instrukcji!
ą ą zale y od wersji oprogramowania i mo ró ni siżżżćeę
Page 45

Notes / Notatki
44
Page 46

Lark Europe Sp. z o.o.
Infolinia, pomoc techniczna
(22) 332 33 42 / (22) 332 32 56 / (22) 332 32 57
faks (22) 332 33 43
e-mail: serwis@lark.com.pl
Please kindly note that all electronic appliances should not be
discarded in the regular trash. In the European Union you are
legally obliged to properly dispose of used electronic and electric
appliances. Please kindly consult your local authorities how to
safely discard used electronic goods.
Przekre lony symbol pojemnika na mieci oznacza, e na terenie
Unii Europejskiej po zako czeniu u ytkowania produktu nale y
si go pozby w osobnym, specjalnie od tego przeznaczonym
punkcie. Nie nale y wyrzuca tych produktów razem
z niesortowanymi odpadami komunalnymi.
śśż
ńż ż
ęć
żć
Lark ©
© Lark Europe Sp. z o.o.
All rights reserved.
No part of this manual can be reproduced, copied, transmitted without
the written consent of Lark Europe Sp. z o.o.
All trademarks mentioned in this document are property of their legal
owners and were used only for information purposes.
Lark is a registered trademark of Lark Europe Sp. z o.o.®
Kopiowanie ca o ci lub cz ci instrukcji jest zabronione
bez wcze niejszej pisemnej
łś ęś
ś zgody właściciela praw autorskich
 Loading...