

Page 1
1/10
LARA Intercom
5276, 5277, 5278, 5279, 5280, 5281 02-59/2016 rev.:4
LARA Intercom
LARA
LAN
//
//
LARA
LARA
ELKO EP, s.r.o. | Palackého 493 | 769 01 Holešov - Všetuly | Czech Republic | e-mail: elko@elkoep.com | Support: +420 778 427 366
www.elkoep.com
INTERNET RADIO
Supported data transfer formats:
CONTROL / SETTINGS
Front panel:
Remote control:
Communication Ethernet:
Button RESET:
INTERFACE ETHERNET
Communications interface:
Connector:
Max. cable length UTP with power:
DISPLAY
Type:
Resolution:
Visible surface:
POWER SUPPLY PARAMETERS
Supply:
Min. input:
Max. input:
AMPLIFIER PARAMETERS
Amplifi er:
Max. amplifi er output
INPUTS / OUTPUTS
Microphone:
Audio input:
Audio output 1:
Audio output 2:
CONNECTION
Terminal block:
OTHER DATA
Working temperature:
Protection:
Overvoltage category:
Pollution degree:
Installation:
Dimensions: Frame - plastic:
Frame - metal, glass, wood, granite:
Weight - plastic:
mp3, ogg, acc
touchscreen buttons
IR remote control (part of supply)
via PC setting up and communicating SW LARA Confi gurator
restart product / reset product to factory settings
10/100 Mbps
RJ45
50m
color OLED
128x128 pixels
26 x 26 mm
PoE 24 V DC (max. 27 V DC) / 1.25 A
1.4 W
26W (peak at maximum playback performance)
stereophonic class D with digital output control
2 x10 W/8 Ω
yes
3.5 stereo jack
terminals LINE OUT (used for external amplifi er)*
terminals OUT L/OUT R (speaker output from int. amplifi er)
0.5 - 1 mm
2
(audio outputs)
0 .. + 55 °C
IP20
II.
2
in an installation box
85 x 85 x 46 mm
94 x 94 x 46 mm
87 g (plastic frame)
Congratulations on purchasing your LARA Intercom device (Internet radio in a switch).
The instruction manual provides information on installing and operating the device. The instruction manual is always a part of the supply. Only perform
installation after becoming thoroughly familiar with this User Guide and device functions. Problem-free function of the device also depends on the way it
was shipped, stored and handled. If you notice any signs of damage, deformation, malfunction or a missing part, do not install this product and return it to
the point of sale. At the end of its service life, the product and its parts must be treated as electronic waste. Before starting the installation, make sure that all
wires and connected parts are not under voltage. When assembling and performing maintenance, you must uphold safety regulations, standards, directives
and special provisions for working with electrical equipment.
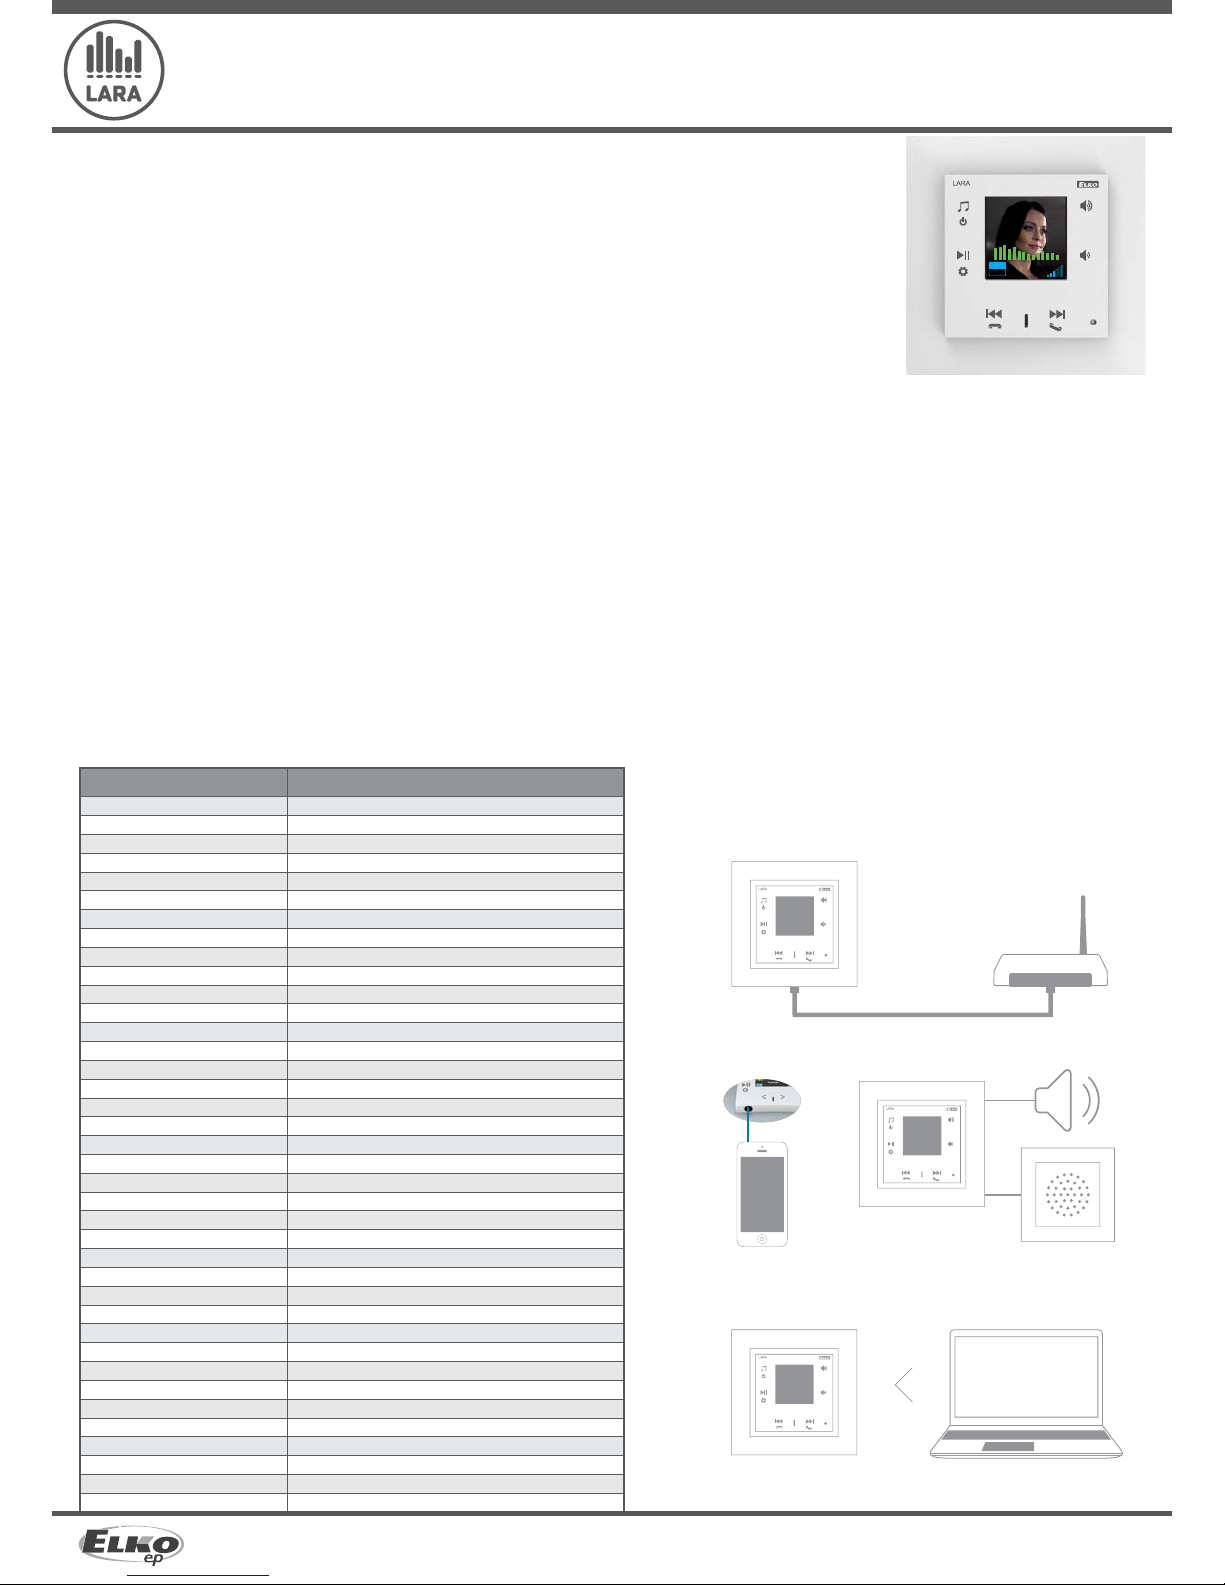
For successful installation, you will need: LARA Intercom, a set of speakers, PoE power source, UTP cable with RJ45 connector, cable for speakers, PC with the
application LARA Configurator.
To protect yourself from electrical shock, connect only safety extra-low voltage (SELV) circuits. For example power supplies PoE (SELV) or LAN circuits (SELV
circuits). Other power supplies (ELV) and WAN circuits (TNV circuits) should not be connected directly to product.
Warning: some LAN and WAN ports use the same connectors RJ-45 so be careful when connecting a product.
• LARA Intercom o ers users 5 di erent functions and expands even more options to Lara Radio - music players and internet radio stations within the range of LOGUS90 switch designs.
• LARA Intercom provides an extra functionality and videophone intercom.
• Thanks to videophone function, now it is possible to have a voice communication between LARA and the sound of the door (IP Intercom), so with someone visiting and standing in front of the
house, we can see that on LARA display as part of this function which increases the security feeling and safety besides of course, the comfort for the user.
• LARA Intercom is equipped with an OLED colored display with the size of 1.5“, which is used to transfer images and sounds from the door camera properly. The display also shows basic
information about playing music, which also serves the orientation in the menu settings, etc.
• The intercom function can also be used for communications between all the family members throughout the whole house, thanks to two way voice communications possibilities between
di ernt LARA units.
• LARA Intercom continues to offer three functions that are also supported by LARA Radio - when connected to the Internet, it can play streaming radio stations and you can store up to 40 of
them. But you can also select from thousands of radio stations from across the globe, which provide data for correct connection.
• LARA Intercom can play content from an external music source, which can be an smart phone or e.g. an MP3 player. These devices are connected to a 3.5mm stereo jack audio input, located
underneath the front panel.
• LARA Intercom can also play audio files from central data storage, onto which Logitech Media Server is installed. This LARA function can therefore be used within the complex iNELS system or as an
entirely independent home automation device. When used within iNELS, control is a part of the complex application iHC. If using with NAS data storage, the application LARA NAS App is available.
• Touch control is performed on the device front panel (six capacity buttons available), or by infrared remote control, which is included in the product packaging. The basic device settings
(network connection, language, audio input) are performed via the display and a simple menu controlled from capacity buttons on the device front cover. Further settings (selection of
stations, connection with the server, updating firmware, etc.) are configured via computer and the software LARA Configurator.
• LARA Intercom has an integrated amplifier with 2 x 10 W output, thus greatly facilitating device installation in places where such output suffices. LARA is used e.g. to provide premium sound
to the kitchen, waiting rooms, offices, reception desks, entrance halls, operating rooms or wellness facilities.
• LARA is powered by PoE with maximum voltage level 27 V DC / 1000mA. So connecting and communicating with just one cable (UTP) is a major advantage.
• For LARA, an entire series of accessories is ready for connection (PoE adapters, PoE switches), speakers (in a frame, walls or ceilings) and installation (cables, box, etc.).
• Complies with standards IEEE 802.3u (100BASE-Tx).
• Automatic cable crossing detection of Ethernet cable - MDIX.
Before you begin
Charakteristic
1. Connect LARA and switch
3. Setting of LARA through LARA con gurator
2. Connect speakers to LARA
Easy installation in 3 steps
* The cable from the LINE OUT terminals must be shielded, max. length should not exceed 5m.
Technical parametres
Speaker
(8, 16, 32 )
Speaker in design
LOGUS
90
21581
External
music
source
WiFi router with PoE
01.01.2013 12:54
STATION:
Radio
NOW PLAYING:
Radio
PLAYING ...
MP3
128
Notebook / PC
Page 2
2/10
LARA Intercom
5276, 5277, 5278, 5279, 5280, 5281 02-59/2016 rev.:4
1
1
2
2
3
4
3
4
LARA Radio
LARA Intercom
ELKO EP, s.r.o. | Palackého 493 | 769 01 Holešov - Všetuly | Czech Republic | e-mail: elko@elkoep.com | Support: +420 778 427 366
www.elkoep.com
Hardware installation
Requirements for installation environment:
- The product cannot be placed where it is exposed to moisture or excessive heat.
- Place the product at a spot where it can be connected to the Ethernet network. The Ethernet cable with PoE
supply should have a short a distance as possible between the player and PoE source due to voltage drop
occurring as the distance grows. Also use quality cables and connectors of a renowned brand for installation.
- Never install the player without its installation box, and it is prohibited to mount it directly into the wall, e.g. into
drywall partitions, where the device chassis would be directly wrapped in insulation material.
- Distributing individual elements of the installation must be de ned prior to actual installation, prior to
interference (cutting) into walls or installation of boxes.
PoE (Power over Ethernet) is fed along a data network cable, without the need to provide power to the
machine by another separate cable.
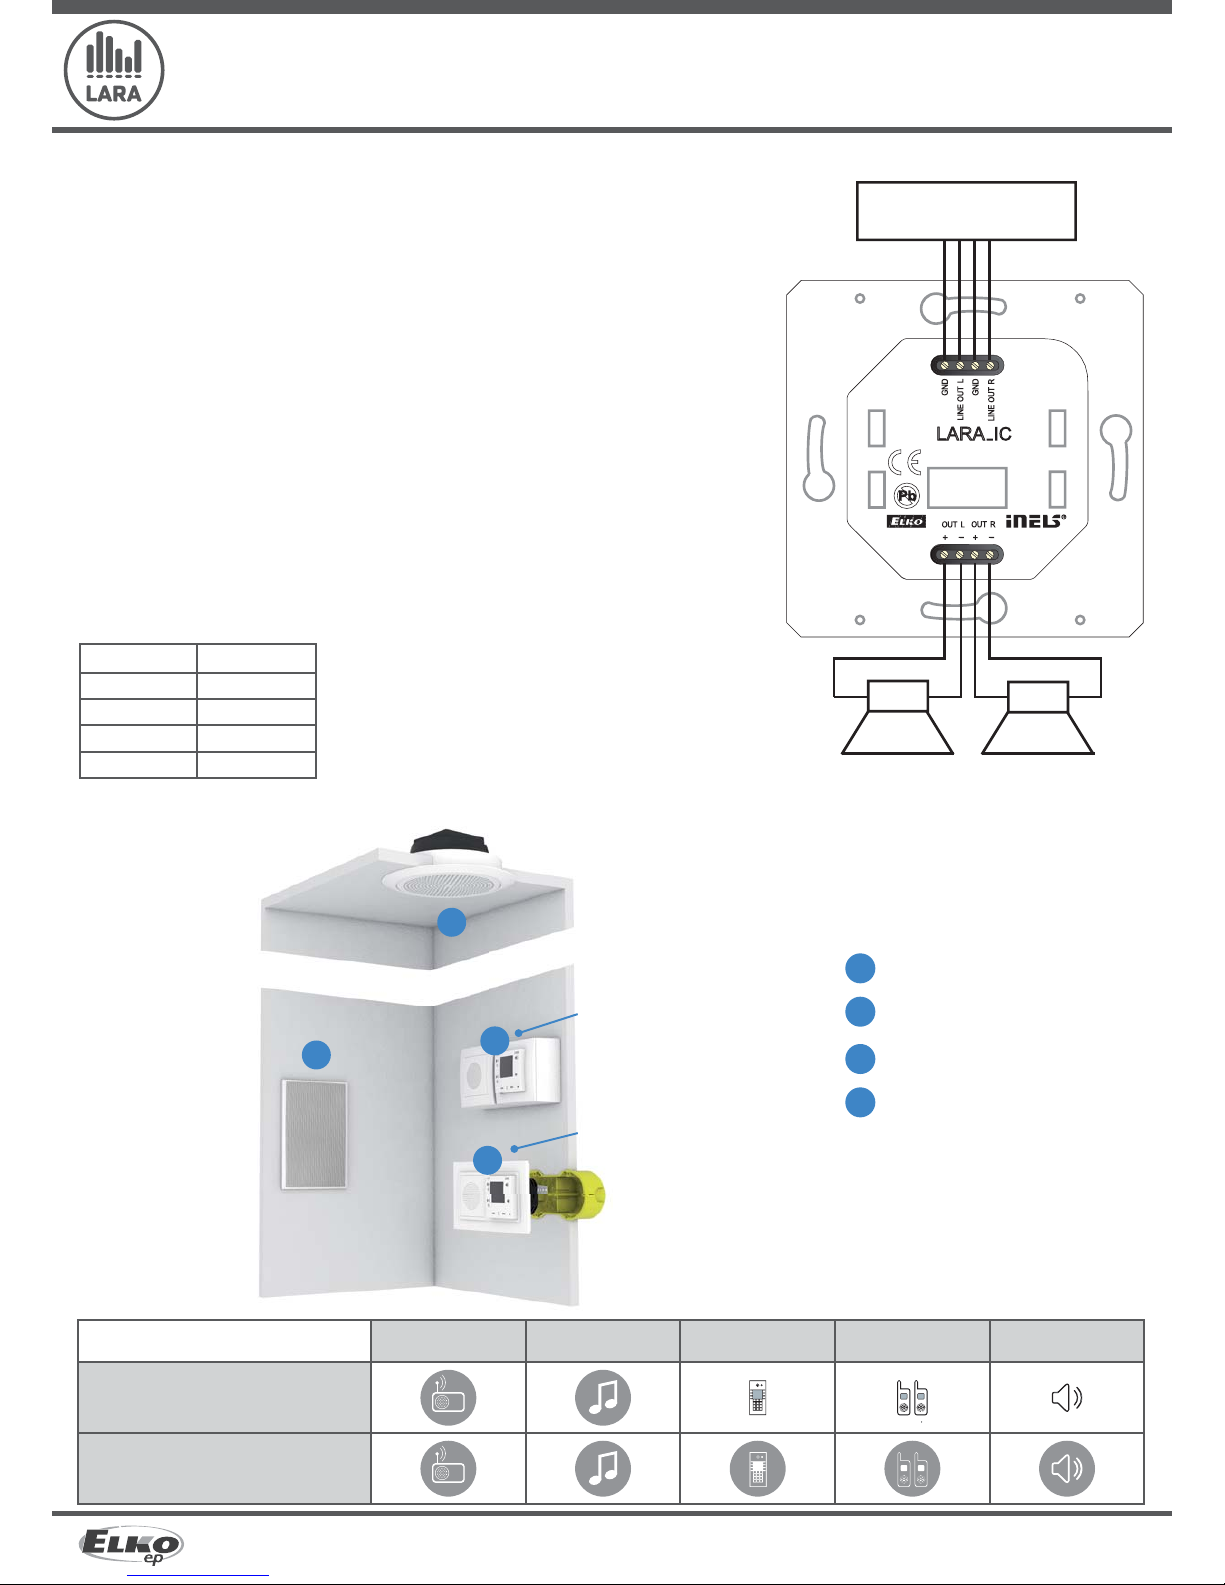
Description of installation:
Install the bottom part of the LARA player into the box KU, we recommend a box that enables mounting
devices with greater depth.Connect the speaker cables into the terminals OUT L +/- OUT R +/-. You can
connect the input to an external amplifier into the terminals LINE OUT L, LINE OUT R, GND. Snap the Ethernet
cable into the RJ45 connector. Secure the device using the installation box screws. Snap the upper part of
the player into the design frame LOGUS
90
. Snap the upper part of the player with the frame to the lower part
of the player.
Connection of these two parts must be performed with care to avoid damaging the connectors. Connect
the other end of the Ethernet cable to the PoE switch or via the PoE adapter to the Wi-Fi router, switch. After
providing power, the display shows the system information, then after around five seconds the main display
of the player.
External ampli er
Output of speakers, audio cables
speaker output (W)
2 x 4 Ω 2 x 20W
2 x 8 Ω 2 x 10W
2 x 16 Ω 2 x 5W
2 x 32 Ω 2 x 2.5W
When installing the speakers, use quality audio cables with
minimum diameter 0.5 mm, with maximum length of 30 m. It is
best to have the same cable length for the right and left channels.
left speaker right speaker
Options of design of the LARA player
Radio Music Videophone Intercom Audio zone
Connection
In-wall speaker
Installation box
Ceiling speaker
Box for surface mounting
Surface
mounting
Flush mounting
(ada pted to be
mounted
inside the wall)
•LARA - can be mounted inside your wall (installation box) or o ers a surface mounting option.
Page 3
- -
3/10
LARA Intercom
5276, 5277, 5278, 5279, 5280, 5281 02-59/2016 rev.:4
ELKO EP, s.r.o. | Palackého 493 | 769 01 Holešov - Všetuly | Czech Republic | e-mail: elko@elkoep.com | Support: +420 778 427 366
www.elkoep.com
Description and control of player
Long press
Short press
Repeated pressing
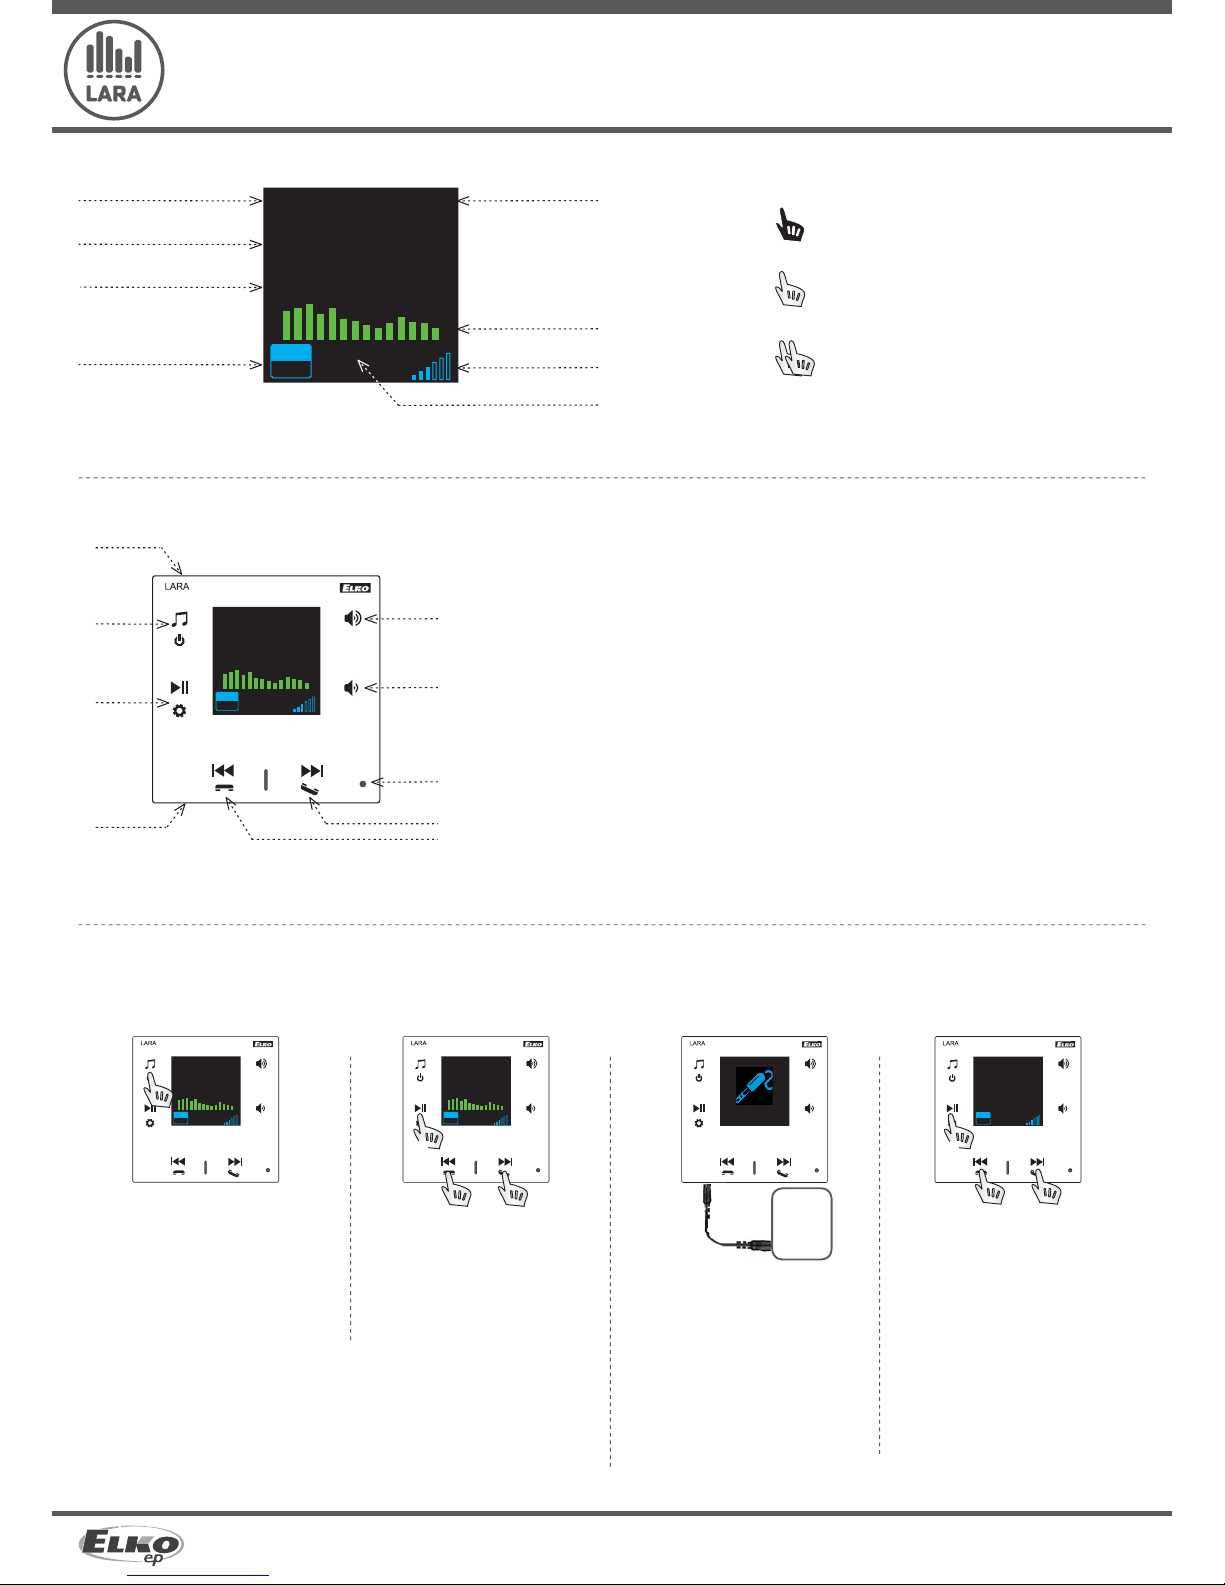
Description of display in basic display
Date
Display of actual station
name
Display of station name as
it is listed on the Internet
Bit Rate*
Time
Volume
Performed action
Graphic equalizer
Hidden button RESET
- In the opening (in the upper part of the cover), for pressing use a thin object, i.e. a paper clip
/ Short press
- navigating in the list of assigned Radios
- switching songs in the Audio Zone
- navigating in the Intercom list
Short press - switching between the Radio, AUX Input and Audio Zone
Long press - switches o the device
Short press - PLAY / PAUSE
Long press - input to settings
Short press
- volume up
- move up between rows
Short press
- volume down
- move down between rows
IR sensor of remote control
Connector for audio inputof external music source for AUX IN
* Displaying the transmission quality (transmission speed tells what volume of information is being
transferred per unit of time. The basic unit of the displayed transmission speed is a kilobit per
second).
Control
Playback
switching between the Radio, AUX Input and
Audio Zone:
Radio: Input AUX:
The input AUX IN is used to connect external
audio devices such as a mobile phone, mp3
player and others.
A 3.5 mm jack provides connection. In this
mode, the player functions as an audio
ampli er.
When activating the input, the volume on
the player is set ( xed) at 100%.
You can control only on a connected
external audio device.
External
source
music
Switching between modes is performed by a
short touch.
Audio zone:
PLAY / PAUSE
Switching between songs
PLAY / PAUSE
Navigating in the list of assigned
Radios
Short press (during a call) - opening the electric door lock
Long press - calling
- switching on / o the Intercom
01.01.2013 12:54
STATION:
Radio
NOW PLAYING:
Radio
PLAYING ....
MP3
128
01.01.2013 12:54
STATION:
Radio
NOW PLAYING:
Radio
PLAYING ...
MP3
128
01.01.2013 12:54
STATION:
Radio
NOW PLAYING:
Radio
PLAYING ...
MP3
128
01.01.2013 12:54
STATION:
Radio
NOW PLAYING:
Radio
PLAYING ...
MP3
128
01.01.2013 12:54
AUX IN
100%
01.01.2013 12:54
Audio zone
ALBUM
TRACK TITLE
WAITING ...
Page 4

MP3
128
4/10
LARA Intercom
5276, 5277, 5278, 5279, 5280, 5281 02-59/2016 rev.:4
ELKO EP, s.r.o. | Palackého 493 | 769 01 Holešov - Všetuly | Czech Republic | e-mail: elko@elkoep.com | Support: +420 778 427 366
www.elkoep.com
Switching on the Intercom
Switching between contacts
Calling
Display when the video camera to the door intercom is connected
Display when no video camera is connected
Opening the electric door lock (only during call)
Ending / refusing the call
Display after ending / refusing the call
Intercom
01.01.2013 12:54
Contakt:
NAME
01.01.2013 12:54
Connecting...
2N
1. Calling LARA - door intercom with / without video camera
01.01.2013 12:54
STATION:
Radio
NOW PLAYING:
Radio
PLAYING ...
MP3
128
01.01.2013 12:54
Active call...
2N
Switching on the Intercom
Switching between contacts
Calling
Display on the calling LARA device
Display on the called LARA device
Accept the call
Refuse / end the call
2. Calling LARA - LARA
01.01.2013 12:54
Incoming call...
LARA1
01.01.2013 12:54
Contact:
NAME
01.01.2013 12:54
Connecting...
LARA2
01.01.2013 12:54
STATION:
Radio
NOW PLAYING:
Radio
PLAYING ...
MP3
128
01.01.2013 12:54
Ringing...
LARA2
01.01.2013 12:54
Active call...
LARA2
01.01.2013 12:54
Call dismissed..
LARA2
01.01.2013 12:54
Call dismissed..
N2
Configuration, putting into operation
01.01.2013 12:54
Alarm
01.01.2013 12:54
SET TIME:
00:00
Station:
Alarm
VOLUME: 30%
STATUS: OFF
01.01.2013 12:54
SET TIME:
07:00
Station:
Alarm
VOLUME: 30%
STATUS: OFF
01.01.2013 12:54
SET TIME:
07:00
Station:
Alarm
VOLUME: 30%
STATUS: OFF
01.01.2013 12:54
SET TIME:
07:00
Station:
Alarm
VOLUME: 30%
STATUS: REPEAT
01.01.2013 12:54
SET TIME:
07:00
Station:
Alarm
VOLUME: 30%
STATUS: REPEAT
Opening change.
Setting the value hours / minutes.
Switching hours / minutes.
Saving set time.
Move down one row.
Selection alarm clock / radio station.
/ Increasing/decreasing volume.
/ On 1x / Repeat (every day) / Off.
One press - one level up, multiple presses - return to basic display
Display of alarm
clock settings
01.01.2013 12:54
Alarm
WAITING ..
The alarm stops ringing
by touching any
button.
1. Alarm setting
01.01.2013 12:54
STATION:
Radio
NOW PLAYING:
Radio
PLAYING ....
N 45
MP3
128
01.01.2013 12:54
STATION:
Radio
NOW PLAYING:
Radio
PLAYING ....
MP3
128
Page 5

5/10
LARA Intercom
5276, 5277, 5278, 5279, 5280, 5281 02-59/2016 rev.:4
ELKO EP, s.r.o. | Palackého 493 | 769 01 Holešov - Všetuly | Czech Republic | e-mail: elko@elkoep.com | Support: +420 778 427 366
www.elkoep.com
2. Selecting a language
01.01.2013 12:54
Language
01.01.2013 12:54
Čeština
01.01.2013 12:54
English
01.01.2013 12:54
English
01.01.2013 12:54
Alarm
3. Audio output settings
- Selection of the PA
output to speakers connected to terminals OUT L, OUT R
01.01.2013 12:54
Alarm
01.01.2013 12:54
Audio OUT
01.01.2013 12:54
PA
01.01.2013 12:54
PA+Line
01.01.2013 12:54
Line
- Selection Output link
to terminals Line OUT L, Line OUT R designed for an external ampli er
- Selection PA+Link
output to both terminals
simultaneously
The PA output is set as the default audio.
01.01.2013 12:54
PA+Line
01.01.2013 12:54
STATION:
Radio
NOW PLAYING:
Radio
PLAYING ....
MP3
128
01.01.2013 12:54
STATION:
Radio
NOW PLAYING:
Radio
PLAYING ....
MP3
128
01.01.2013 12:54
STATION:
Radio
NOW PLAYING:
Radio
PLAYING ....
N 45
MP3
128
01.01.2013 12:54
STATION:
Radio
NOW PLAYING:
Radio
PLAYING ....
MP3
128
4. Setting up a network
Opening a change
Move in row
Change to numerical value to +/Locking the change
Move to next line - modification see points -
Move to next line - modification see points -
* LARA won‘t display the date or time and won‘t play the radio until a new IP address is set and Internet connection
is established.
01.01.2013 12:54
Alarm
01.01.2013 12:54
LAN
01.01.2013 12:54
IP ADRESS:
192.168.0.103
SUBNET MASK:
255.255.255.0
GETEWAY:
192.168.0.1
ASSIGNMENT OF IP:
DHCP
01.01.2013 12:54
IP ADRESS:
---.---.---.---
SUBNET MASK:
---.---.---.---
GETEWAY:
---.---.---.---
ASSIGNMENT OF IP:
STATIC IP
01.01.2013 12:54
Save all
changes?
<< NO >>
01.01.2013 12:54
Save all
changes?
<< YES >>
LARA comes equipped with DHCP, meaning that it assigns the IP address itself automatically from the network range of your DHCP server.
If you select „Static IP“, LARA Intercom automatically restarts and displays the start screen.* Then in LAN you can manually set in the relevant positions:
- IP address - Enter a new address in decimal format separated by periods (default setting: 192.168.1.10).
- Subnet mask - Determines the size of the network: The value 255.255.255.0 is commonly used for the network mask.
- Gateway - Setting the default gate of the local network.
After setting, LARA Intercom automatically restarts and displays the start screen.
--.--.---- --:--
IP ADRESS:
192.168.1.10
SUBNET MASK:
255.255.255.0
GETEWAY:
192.168.1.1
ASSIGNMENT OF IP:
STATIC IP
--.--.---- --:--
LAN
--.--.---- --:--
Alarm
--.--.---- --:--
IP ADRESS:
192.168.1.10
SUBNET MASK:
255.255.255.0
GETEWAY:
192.168.1.1
ASSIGNMENT OF IP:
STATIC IP
--.--.---- --:--
IP ADRESS:
192.168.1.11
SUBNET MASK:
255.255.255.0
GETEWAY:
192.168.1.1
ASSIGNMENT OF IP:
STATIC IP
--.--.---- --:--
IP ADRESS:
192.168.1.11
SUBNET MASK:
255.255.255.1
GETEWAY:
192.168.1.1
ASSIGNMENT OF IP:
STATIC IP
--.--.---- --:--
Save all
changes?
<< NO >>
--.--.---- --:--
Save all
changes?
<< YES >>
--.--.---- --:--
STATION:
Radio
NOW PLAYING:
PLAYING ....
MP3
128
01.01.2013 12:54
STATION:
Radio
NOW PLAYING:
Radio
PLAYING ....
MP3
128
01.01.2013 12:54
STATION:
Radio
NOW PLAYING:
Radio
PLAYING ....
MP3
128
Page 6

6/10
LARA Intercom
5276, 5277, 5278, 5279, 5280, 5281 02-59/2016 rev.:4
Factory rst
5
Factory rst
0
…
>10s
ELKO EP, s.r.o. | Palackého 493 | 769 01 Holešov - Všetuly | Czech Republic | e-mail: elko@elkoep.com | Support: +420 778 427 366
www.elkoep.com
This concerns how long the display stays lit (10s, 20s, 30s, 1min, 2min, 5min). After this time expires the display goes out. It is activated by touching any button.
5. Settings of the active illumination time of the display
01.01.2013 12:54
Alarm
01.01.2013 12:54
Display
01.01.2013 12:54
DISPLAY OFF:
2 minutes
<< >>
01.01.2013 12:54
DISPLAY OFF:
5 minutes
<< >>
01.01.2013 12:54
DISPLAY OFF:
5 minutes
<< >>
Through the settings menu, select „Factory rst“ - returns the product to its factory settings, i.e. the IP address is set to 192.168.1.10, and stored stations are erased.
Reset to factory settings occurs after pressing and holding the hidden button for 10s (reset won‘t occur if the hidden button is released too quickly).
7. Device reset
01.01.2013 12:54
Reset all
setting?
<< NO >>
01.01.2013 12:54
Reset all
setting?
<< YES >>
01.01.2013 12:54
Alarm
01.01.2013 12:54
Factory rst
01.01.2013 12:54
STATION:
Radio
NOW PLAYING:
Radio
PLAYING ....
MP3
128
01.01.2013 12:54
STATION:
Radio
NOW PLAYING:
Radio
PLAYING ....
MP3
128
01.01.2013 12:54
STATION:
Radio
NOW PLAYING:
Radio
PLAYING ....
MP3
128
01.01.2013 12:54
STATION:
Radio
NOW PLAYING:
Radio
PLAYING ....
MP3
128
01.01.2013 12:54
Alarm
01.01.2013 12:54
Intercom
01.01.2013 12:54
STATION:
Radio
NOW PLAYING:
Radio
PLAYING ....
MP3
128
01.01.2013 12:54
RINGER VOLUME
50 %
MICROPHONE GAIN
LOW
CALL VOLUME
30 %
01.01.2013 12:54
RINGER VOLUME
80 %
MICROPHONE GAIN
LOW
CALL VOLUME
30 %
01.01.2013 12:54
RINGER VOLUME
80 %
MICROPHONE GAIN
AUTO
CALL VOLUME
30 %
01.01.2013 12:54
RINGER VOLUME
80 %
MICROPHONE GAIN
AUTO
CALL VOLUME
100 %
Change to numerical value to +/-
Move to next row
Change in settings
Move to next row
Change of numerical value to +/-
6. Setting the Intercom
Page 7

7/10
LARA Intercom
5276, 5277, 5278, 5279, 5280, 5281 02-59/2016 rev.:4
ELKO EP, s.r.o. | Palackého 493 | 769 01 Holešov - Všetuly | Czech Republic | e-mail: elko@elkoep.com | Support: +420 778 427 366
www.elkoep.com
Configuring the device LARA Intercom
Con guring the LARA network music player is performed using the software („SW“) LARA Con gurator via Ethernet connection.
SW enables setting the basic network parameters, a change in login data, update of rmware („FW“) of the device, and editing the list of web radios.
Start the LARA Configurator on the PC, which is signed in to the same network as LARA Intercom.
Then click on:
Administrator login: In the login window dialog box, enter the set administrator login data. The
factory settings of this data are the user: „admin“ and the password: „elkoep“. If the entered data is
invalid, it will not possible to continue in reading the LARA Intercom device settings.
LAN parameters: The IP address of the connected LARA Intercom device must be entered in the dialog
window. IP address of the connected device can also be obtained by using the function „Search device“.
Function „Search device“: In a few seconds, the function „Search device“ searches for all connected
LARA devices in the network. In the dialog window „Searching for device in the LAN network“, a list of all
discovered devices is displayed. By marking the required device and consequent pressing of the button
„Select“, the con gurator is ready to read the settings of the device with the selected IP address.
About the device: The window „About the device“ indicates the connection status, login and versi-
on of SW and HW in the LARA Intercom device. The connection status is not dependent on successful
login. The „Connected!“ status occurs under the condition of a correct network connection, login
„Successful!“ occurs after login data is correctly entered.
About the device: Information about the device and program including hypertext links to the pro-
duct manual and catalog list.
Read settings: The button „Read settings“ serves to read all settings stored in the device LARA Inter-
com. Reading occurs only in the event of successful connection and login.
Save settings: The button „Save settings“ is used to save the complete settings stored to the LARA
Intercom device.
Remote control: By using the remote control in the LARA Con gurator program, you can simply and
quickly check the function of your con gured device.
Con guring the device LARA Intercom using SW LARA Con gurator:
The con guration SW can be freely downloaded from the website
http://www.elkoep.com/products/audiovideo/lara/intercom/lara-intercom-13576/
Using the con guration SW (LARA Con gurator), you can:
- set the login data
- set the network connection parameters
- set the parameters for automatic synchronization of time
- edit the Internet radios list
- set the IMM audio zone parameters
- update FW of the LARA Intercom device
- remotely control the LARA Intercom device
The con guration SW communicates with the LARA Intercom device by means of the
Ethernet network. This SW can be run simply without installation in operating systems
Microsoft Windows XP, Windows 7, Windows 8 and Windows 10. A condition to running
the application is support of Microsoft .NET Framework 4 or its possible installation.
Device settings / Network settings
Administrator login: To change the login data, enter the new login name and password into the
text elds. You must con rm the password.
LAN parameters: To change network connection parameters, select the option „DHCP“ (automatic
assignment of an IP address by the DHCP server) or „Static IP address“. If you want to use the device
Intercom, you have to have a static IP address set.
- To change the network connection parameters of the LARA device, enter in the text elds the new IP
address, subnet mask and Epsnet port.
- IP address - Enter a new device IP address in decimal format separated by periods (default setting:
192.168.1.10).
- Subnet mask: Default value 255.255.255.0.
- Gateway: Local network rewall settings.
Date and time: The IP address of the time server is factory preset.
- SNTP server: If needed, enter the IP address of another time server supporting the SNTP protocol.
(addresses of SNTP servers can be copied from http://www.timetools.co.uk/2013/07/25/ntp-server-uk/)
- Time zone: Select the time zone in the place of installation of the LARA Intercom device for correct
display of time.
- You can switch from winter to summer time using the control element „Summer time“
Page 8

8/10
LARA Intercom
5276, 5277, 5278, 5279, 5280, 5281 02-59/2016 rev.:4
ELKO EP, s.r.o. | Palackého 493 | 769 01 Holešov - Všetuly | Czech Republic | e-mail: elko@elkoep.com | Support: +420 778 427 366
www.elkoep.com
The tab „List of stations“ is used for complete management of the list of Internet radio
stations stored in the LARA Intercom device. In LARA Intercom, several stations are preset,
which you can change or modify in any way.
Edit stations*: In the section Edit stations, you can use the buttons to add new or modify existing
stations in the list.
List of stations: It is possible to store up to 40 presets into the list for music network streams. LARA Inter-
com in its current version supports streams in the formats SHOUTcast and Icecast with audio formats
MP3, AAC and OGG, which are used in most cases of Internet broadcasting.
Control elements: After successful reading of stations along with overall device settings, you can brow-
se the list of streams and change their order. For sorting and removing items from the list, use the
relevant control elements on the right side of the list.
* To add a new station, you must know its source address, which is usually given in a variety of forms:
- http://www.servername.com:portnumber/ lename
- http://135.111.258.333:8000/ lename
Adding new radio stations: after pressing the „add“ button, you begin entering the stream parameters into the relevant elds.
Manual completion:
- Name of station: name of preselection displayed on the OLED display.
- IP address: Server address where the stream is being broadcast. The server address must
be entered in decimal format separated by periods. If it is an address with a domain
name (www.servername.com), use the automatic completion option, see below.
- Port number: This is entered as a number in decimal format. (example 1: www.
servername.com:8000/hudba.mp3 - port number = 8000) If this port number is not
listed in the address, enter port number 80 (example 2: www.servername.com/hudba.
mp3 - port no. = 80).
- File name: Not always used and not a required parameter for storing the station.
(example 3: www.servername.com:8000/hudba.mp3 - le name = hudba.mp3)
(example 4: www.servername.com:8000 - do not enter le name).
- After entering all necessary data, store the station in the list by pressing „Save“.
Note: If the le name has the extension *.m3u, it is not the music stream address , but a
playlist address containing the address (or multiple addresses) in the music stream. In
this case, use the option of automatic completion.
Automatic completion:
For most addresses, it is possible to use the function of automatic completion by the
following steps:
- Enter any name of a station.
- Click the option „Automatic completion“ and after entering the address, con rm by
pressing „OK“.
- An information message will inform you of the result of the automatic processing of
the link.
- Enter the station in the list by pressing „Save“.
Note: The automatic completion function requires an active Internet connection.
Important note: Store the prepared list of stations into the device along with settings by pressing „Save“. Until you do so, the list is elaborated and stored only in the SW memory!
Device settings / List of stations
Device settings / Function
- http://www.servername.com:8000/ lename
- http://www.servername.com:8000
- http://135.111.258.333:8000
- http://www.servername.com/ lename
Import list / Export list: Using these functions, it is possible simply to store a list of set stations by storing in the le.
Function iMM Audio Zones: used for already installed iNELS system, where the LARA
payer is a fully functional Audio Zone.
Note: the iMM Server is designed to connect nearly all technologies in the home with the intelligent
electrical installation iNELS BUS System.
Function of the iMM Audio Zone The iMM Audio Zone function can be activated and deactivated
by control unit.
IP address: Enter the IP address of the iMM server in decimal format separated by periods.
Name of equipment: This is displayed in the iMM environment and when searching for the device
in the network.
For: IMM SERVER, NAS SYNLOGY
For: NAS ZYXEL
Restart the device after each change in settings of the Intercom function.
To set the device Intercom, it is necessary to have set the Static IP Address (see Network
Settings).
The Intercom function is used to call by means of VOIP technology.
The device LARA Intercom enables setting 8 calling contacts (List of presets). It is possible to call amongst two LARA Intercom devices or between LARA Intercom and the door
intercom.
Settings for calls LARA - LARA:
Device settings / Intercom
Main settings: Allow Intercom.
From the list of presets, select the required contact (LARA being called).
Activate the contact name.
Name: Enter the contact name.
IP: Enter the IP address of the selected type of device (LARA being called) in decimal format
separated by periods.
Type of device: Select the type of device for calling (LARA Intercom).
Name:
Page 9

9/10
LARA Intercom
5276, 5277, 5278, 5279, 5280, 5281 02-59/2016 rev.:4
ELKO EP, s.r.o. | Palackého 493 | 769 01 Holešov - Všetuly | Czech Republic | e-mail: elko@elkoep.com | Support: +420 778 427 366
www.elkoep.com
Main settings: Allow Intercom.
From the list of presets, select the required contact (door intercom being called).
Activate the contact name.
Name: Enter the contact name.
IP: Enter the IP address of the selected type of device (door intercom being called) in decimal format
separated by periods.
Type of device: Select the type of device for calling.
Video camera: Calling the video camera (if the door intercom so enables).
Switch: Activation of selected relay for opening the electric door lock (for settings of the door
intercom IP-BOLD: in the rmware of the device LARA 2.5.008., the unlocking function is not
available, it can be resolved by http request by sending from the Connection server or iMM server).
Settings for calls LARA - door intercom:
Name:Nam
e
:
Name:
To update the FW in the LARA Intercom device, it is rst necessary to download the update
le with the extension „*.lfw“ from the address http://www.elkoep.com/products/audiovideo/lara/intercom/lara-intercom-13576/
Device settings / Updating FW
Select le: Pressing „Select le“ brings up a dialog window for searching and selecting the update
le. After opening the selected le, its contents are checked, and the user is then informed of the
result. If the correct le has been selected, the FW version number is displayed.
Updating FW: Pressing the button starts the update, the progress of which is illustrated graphically.
Reading a damaged or invalid le prevents the following updating steps, and it is necessary to repeat the process with the correct update le.
Speaker 2“ 32 Ω
- with mounting into an
installation box
Order Code: 21581
Speaker 5“ 32 Ω
Speaker 5“ 16 Ω
Speaker 5“ 8 Ω
- with ceiling mounted
2 way speaker 32 Ω
2 way speaker 16 Ω
2 way speaker 8 Ω
- mounting on a wall or ceiling
- dimension (mm): 270 x 183 x 37
Square 2-way speaker 32 Ω
Square 2-way speaker16 Ω
Square 2-way speaker 8 Ω
- with ceiling mounting
- dimension (mm): 204 x 204 x 92
NAS
Synology DiskStation DS213j
- the storage of data (music, movies, photos) connected
to the LAN
- 2.000 gigabytes storage size
- enables intelligent management and backup
Order Code: 7212
Accessories
PoE switch with5 ports
(to power 5x LARA)
Order Code: 6605
Power / network elements Speakers
White 90710 TBR
Ivory 90710 TMF
Ice 90710 TGE
Pearl 90710 TPE
Grey 90710 TIS
Alluminium 90710 TAL
White 75023 CBR
Ivory 75023 CMF
White 75022 CBR
Ivory 75022 CMF
White 75021 CBR
Ivory 75021 CMF
White 75106 CBR
White 75105 CBR
White 75104 CBR
White 75083 CBR
Ivory 75083 CMF
White 75082 CBR
Ivory 75082 CMF
White 75081 CBR
Ivory 75081 CMF
Cover colors: Order Code:
Power supply PoE
(PoE injector, for powering by UTP cable,
connector 2x RJ45)
Order Code: 5225
Power supply PoE + WiFi
(complete for wireless connection of LARA into
hollow walls)
Order Code: 5227
Power supply of PoE + WiFi into an installation box
(complete for wireless connection of LARA into
installation boxes)
Order Code: 5224
Note: To set LARA device after FW update it is necessary to use the same version of LARA
Con gurator as the FW version.
Page 10

10/10
LARA Intercom
5276, 5277, 5278, 5279, 5280, 5281 02-59/2016 rev.:4
ELKO EP, s.r.o. | Palackého 493 | 769 01 Holešov - Všetuly | Czech Republic | e-mail: elko@elkoep.com | Support: +420 778 427 366
www.elkoep.com
• The product is not communicating, the display is not illuminated
Solution: Check the power supply. Check to see if the product is connected to the power supply and if the RJ45 connector is connected to the product. Check if the power source PoE
is connected to the network.
• The product is illuminated but the radio does not play.
Solution: Check the IP address of the radio server, or its new settings.
Check the Ethernet network connection. Disconnect and reconnect the RJ45 Ethernet connector. After repeated connection, the product displays system information; if
within ve seconds the player display does not appear,there must be some network connection issues, check the network settings.
• Interrupted playing, frequent reading of the radio.
Probably insu cient Internet connection speed.
• Restart the product.
Device restart is used to restart without deleting the set data. Do this by a short press (+/- 1 sec) of the RESET button located on the device cover in the state where the product is
connected to the power supply, or by disconnecting and reconnecting the LAN cable or PoE adapter.
Troubleshooting
Maintaining the device
The device front panel and frame can be cleaned using a dry or slightly moistened rag. Avoid use of other cleaning agents.
The company ELKO EP, as the manufacturer, is entitled to make technical modi cations to the product, in the technical speci cation and product manual, without prior noti cation. ELKO EP bears no liability for possible incompleteness and mistakes in this document.
IP Intercoms
Card reader
3-buttons
module
Dialpad
Video
door-phone
Producer:
2N
Typ e: Ve rso
Producer: DAHUA
Typ e: VTO2000a
Producer: Alphatech
Typ e: IP-Bold
 Loading...