

Lapis Roll Laminator PL-LR, Roll Laminator PL-RL User Manual
Passport-Laminator
User Manual
Lapis Drucktechnologie GmbH
Weinheimerstr. 62
68309 Mannheim
Tel.: +49(0)621/7363866
Fax.: +49(0)621/7363868
Email: info@lapis-online.de
Version: S20/V3.42
Drucktechnologie GmbH


1
Table of contents
1. General information...........................................................5
Product description................................................................5
Symbols and conventions....................................................... 6
Intended use........................................................................6
Safety information.................................................................6
Environmental information......................................................7
2. Connection and commissioning..........................................9
Device overview....................................................................9
Unpacking and setting up the device........................................10
Mounting the feed table.........................................................10
Connecting the device............................................................11
Connecting to the power supply.........................................11
Connecting to a computer.................................................11
Switching on the device.........................................................11
Inserting film.......................................................................12
Inserting a document............................................................13
3. The control panel...............................................................15
Control panel configuration....................................................15
Key functions in the start menu..............................................15
Key functions in the configuration menu..................................16
Device statuses....................................................................17
4. Configuration.....................................................................19
Configuration via control panel................................................19
Configuration via interface......................................................21
Configuration settings............................................................23
Test....................................................................................32
System................................................................................33
5. Control...............................................................................35
Control commands................................................................35
Status query........................................................................36
3

1
6. Troubleshooting................................................................37
Types of errors and elimination................................................37
Error messages......................................................................38
7. Service...............................................................................41
Firmware upgrade.................................................................41
AVR programming protocol.....................................................42
8. Certifications......................................................................45
EG-Konformitätserklärung....................................................... 45
Safety Standard FCC..............................................................46
EMC Zertifikat.......................................................................47
4

General information
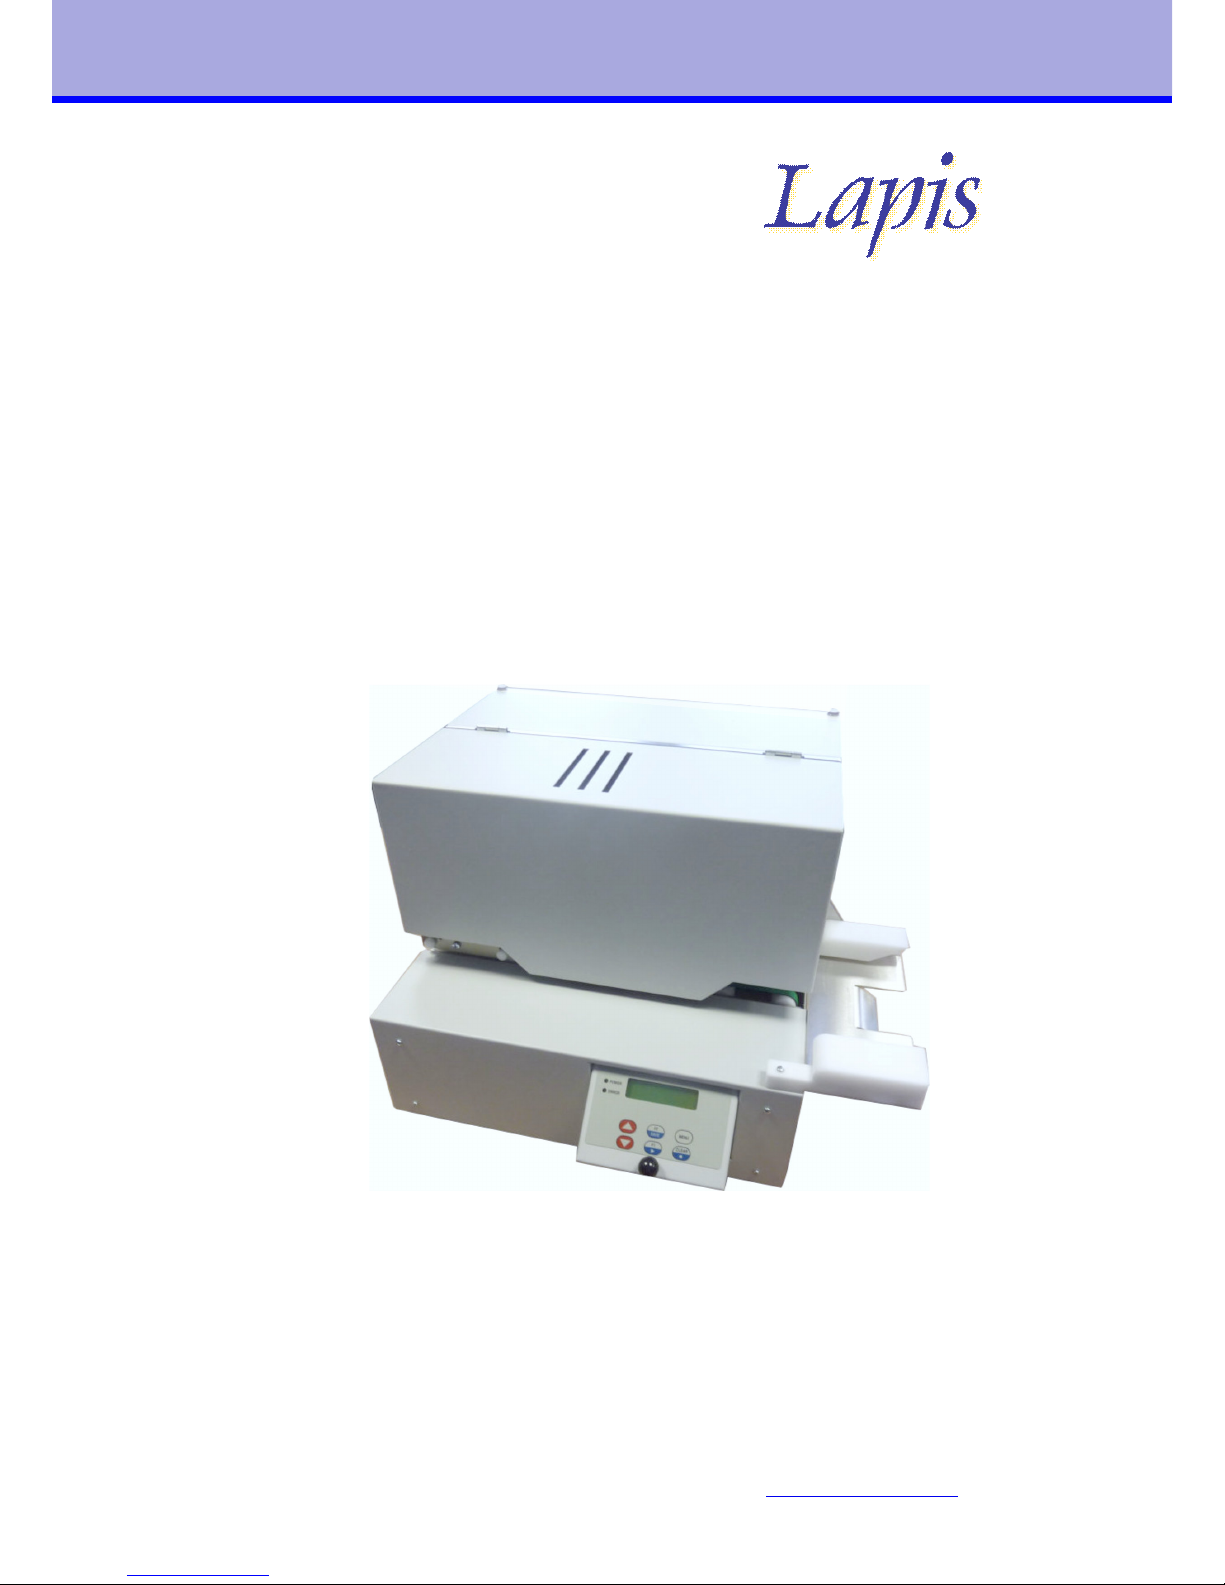
Product description
The passport laminator laminates all pages of the passport including the inside of
the cover. A wafer-thin holographic film is applied to the paper surface via a
temperature-controlled heated roller. The laminator can be integrated into an
automatic personalisation system or can function as an independent station. The
passport is fed in from the left, right or front depending on the device
configuration.
Symbols and conventions
The following symbols and conventions are applied in this user manual.
The symbol indicates parts of the device that are hot and should not
be touched.
The symbol indicates important information, which must be
observed. A failure to do so may lead to injuries.
Good advice or information regarding important working steps.
Ready
Text in monospace type indicates contents on the display.
Taste
Framed text corresponds with a key on the control panel.
5
1
1
1

Intended use
The device is constructed in accordance with the latest engineering practice and
per the recognised safety regulations. Nevertheless, danger to the life and limb of
the user or third parties or damage to the device and other property may occur
when using it.
The device must be operated exclusively when in a technically faultless condition,
as intended, with an awareness of safety and potential hazards, and in accordance
with the operating manual.
The device is intended exclusively for laminating suitable materials. Any other use
or any use exceeding this is considered unintended use. The manufacturer shall
not be liable for any damage that results from misuse. The operator is solely
responsible for the resultant risk.
Safety instructions
The device is designed for an AC mains supply from 100 V to 240 V. It must be
connected exclusively to sockets with a grounded conductor contact.
The device must be operated exclusively in a dry environment and must not be
exposed to any moisture (spray, mist, etc.).
Do not operate the device in potentially explosive atmospheres.
Do not operate the device in close proximity to high voltage lines.
If the device is operated with an open cover then it is essential to ensure that
clothing, hair, jewellery and similar personal effects cannot come into contact
with the exposed, rotating parts.
The device or parts of it may become hot during lamination. Do not touch during
operation and allow to cool prior to changing the film if necessary.
Risk of crushing when locking the heated rollers or closing the cover.
Only execute the actions described in this user manual. Further work must be
carried out exclusively by trained personnel or service technicians.
Unprofessional intervention or modifications to the device may endanger
operational safety.
6
1

Environmental information
When opening the housing cover a risk of death exists due to live
parts.
The device comprises materials that can be reused when processed by specialist
recycling companies. The optimum design of the laminator facilitates a
straightforward separation of the recyclable materials. Label the device as scrap
and dispose of it in accordance with the legal regulations
7
1

Connection and
commissioning
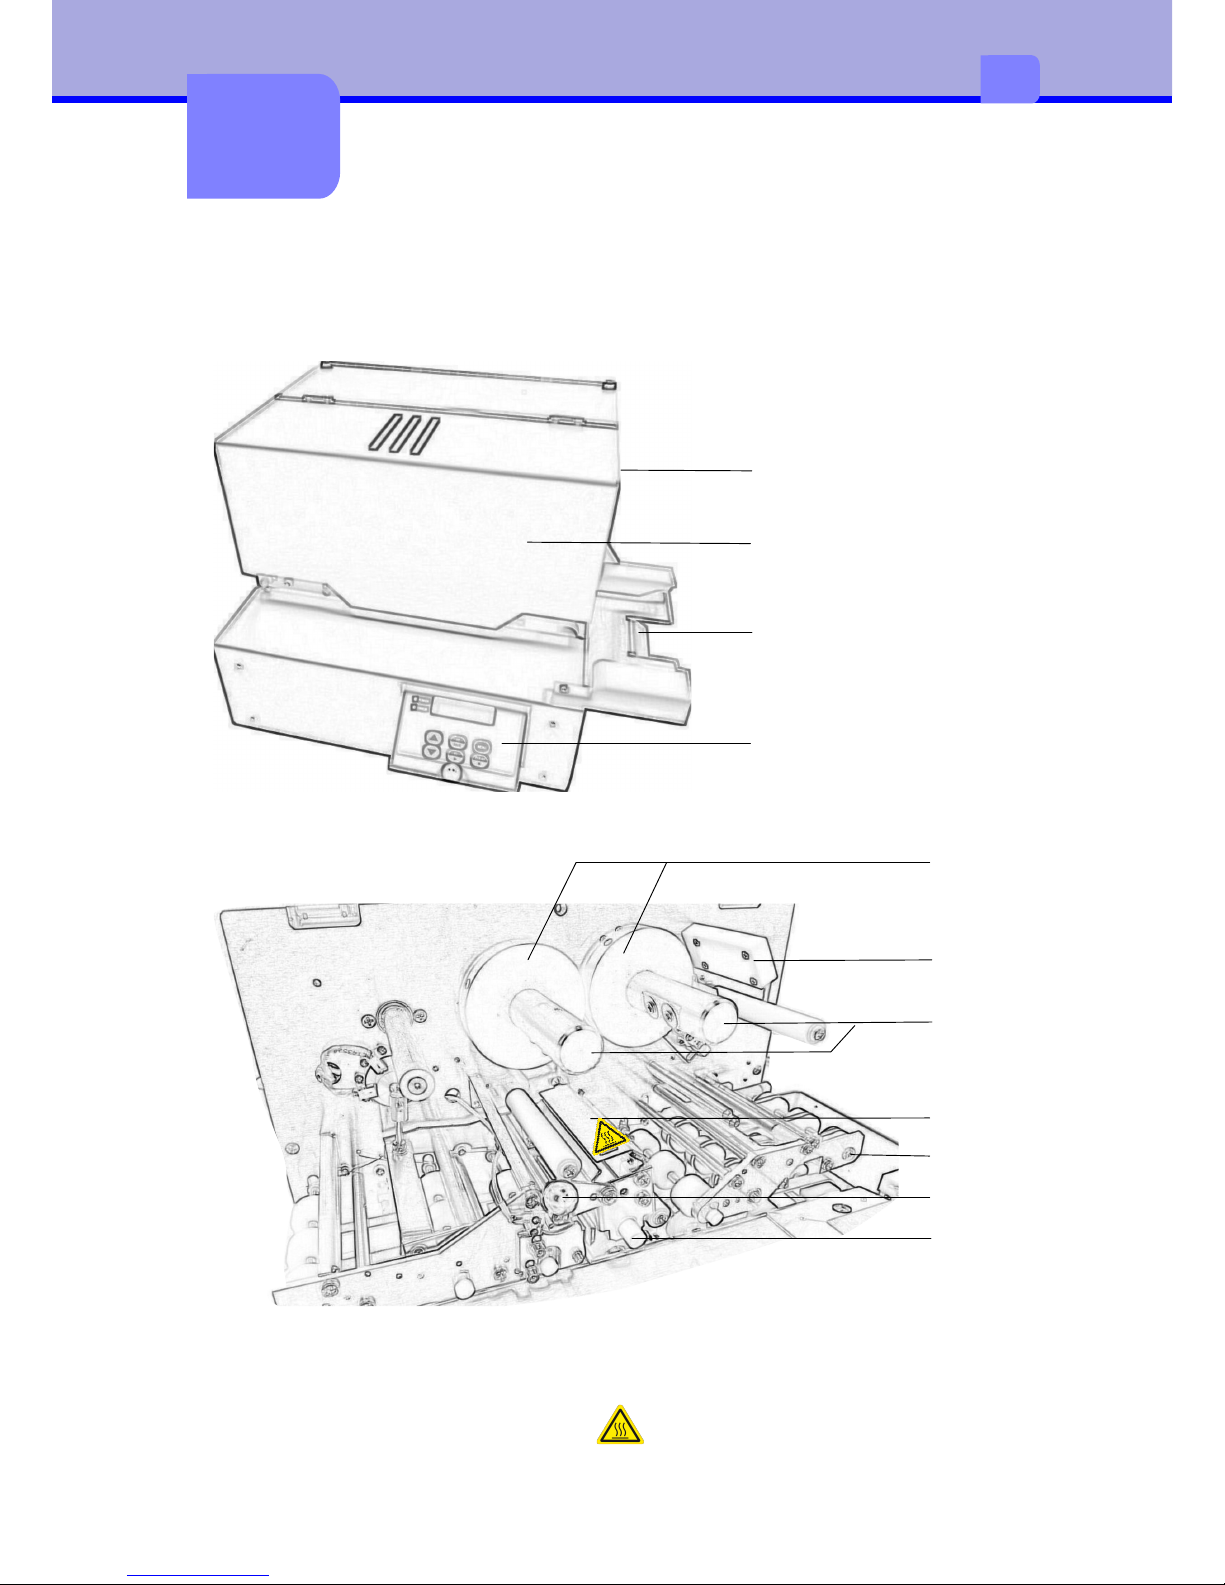
Device overview
1
2
4
3
6
7
5
1Spacer ring5Rocker for passport infeed
2RFID module6Heated roller interlocking
3Carrier roller7Heated roller
4Safety guard for heated roller
Cover hood
Feed table
Control panel
Lock
9
2
2
Unpacking and setting up the device
•Remove the device from its packaging and place on a level surface.
•Check the laminator for transport damage.
•Check delivery for completeness.
Scope of supply:
•Passport laminator
•Mains cable
•Feed table
•Key for cover hood
Store original packaging for subsequent transportation.
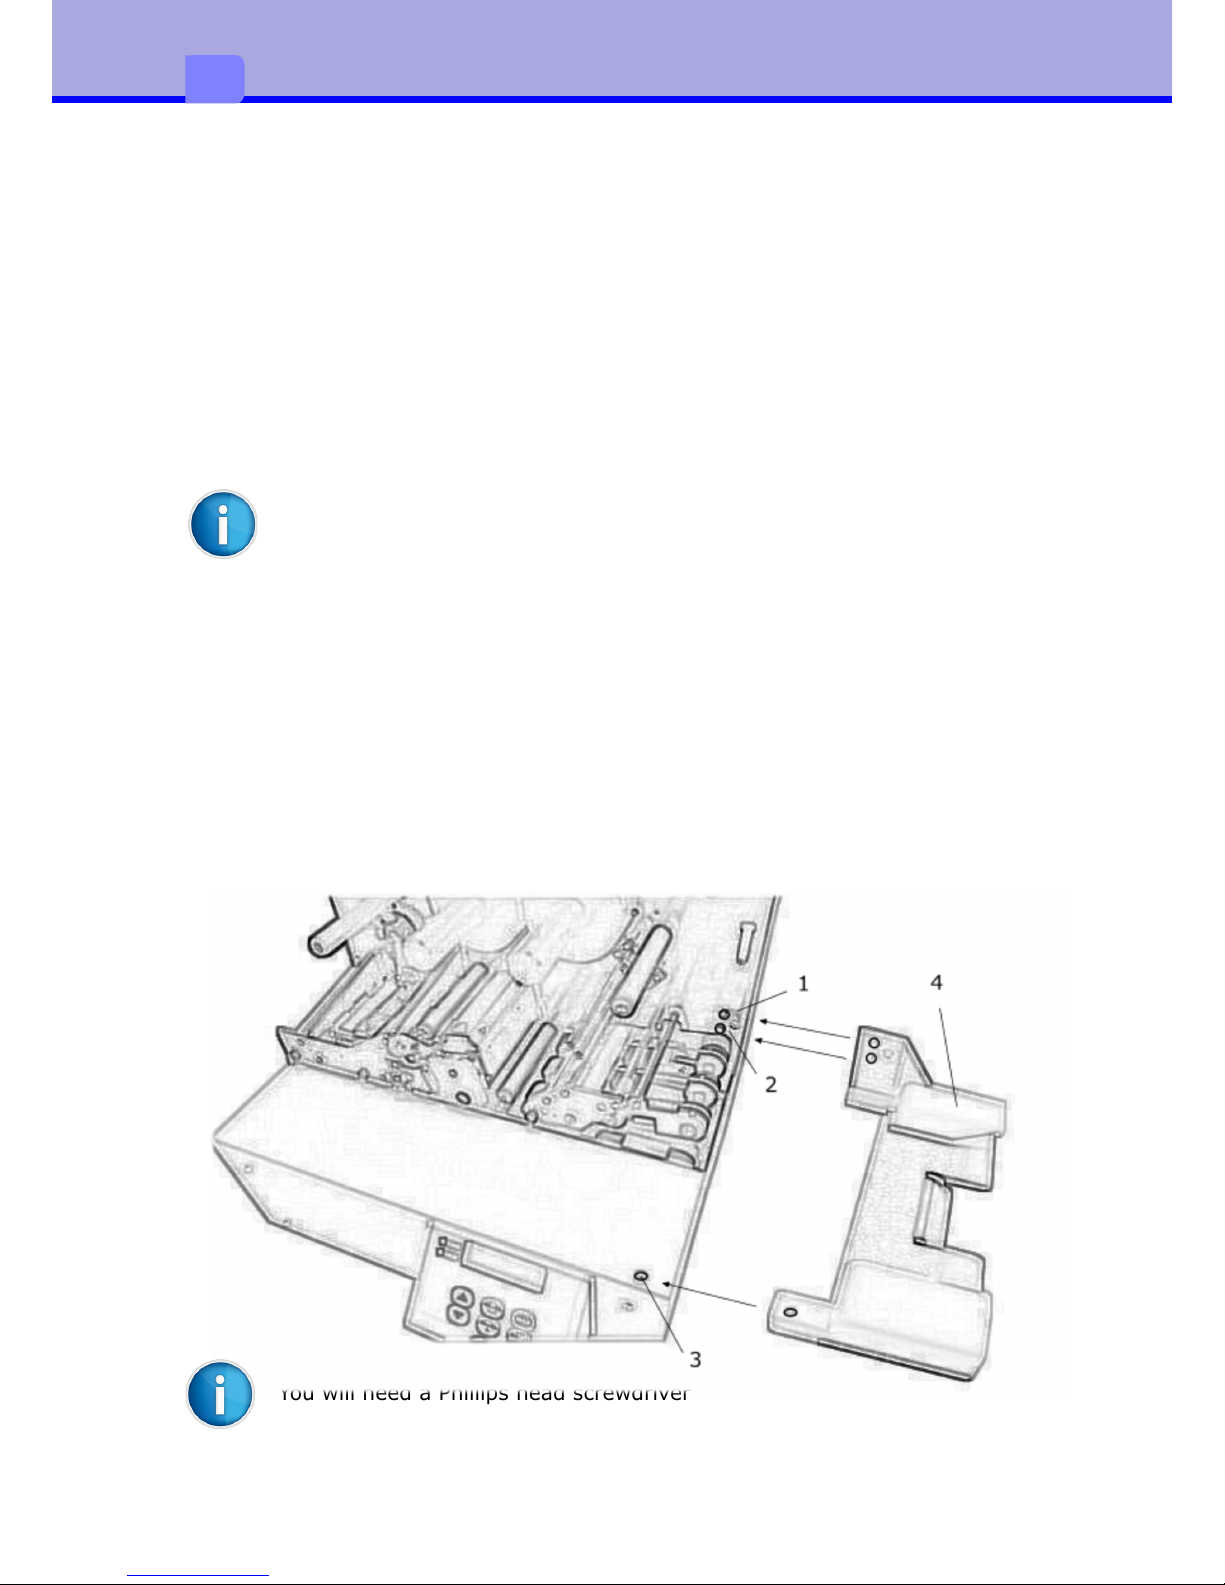
Mounting the feed table
•Open housing cover, if necessary unlock the lock first
•Remove the crosshead screws (1-3) from the device.
•Attach the feed table (4) such that the holes line up and screw in place.
You will need a Phillips head screwdriver
10
2
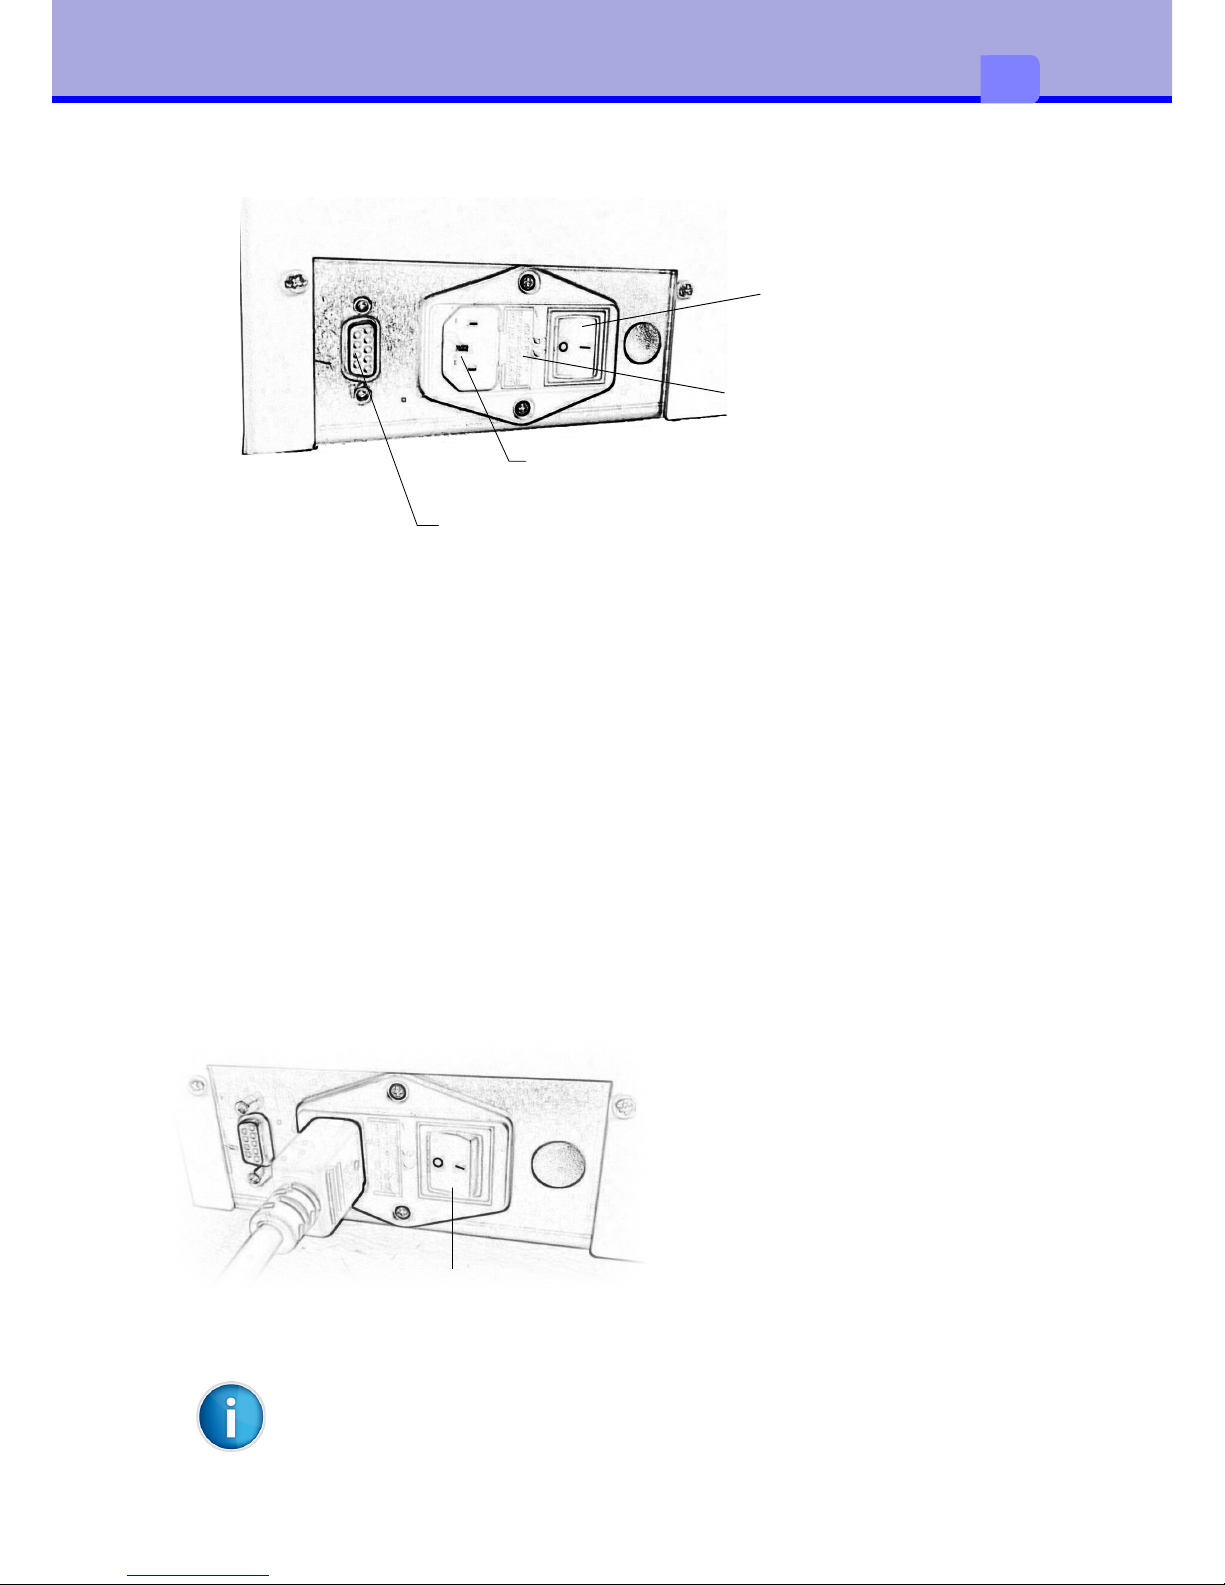
Connecting the device
Mains switch
Mains fuse 2A slow blow
Mains connection jack
RS232 interface
Connecting to the power supply
The laminator is equipped with a broad-range power pack for a mains voltage of
100 V to 240 V.
•Ensure that the device is switched off.
•Plug the mains cable into the mains connection jack.
•Plug the mains cable plug into an earthed socket
Connecting to a computer
For configuration and service purposes the laminator must be connected to the
computer with a suitable interface cable (optional).
Switching on the device
Once all connections have been
established it is possible to switch
the laminator on via the mains
switch.
The device carries out initialisation
with a simultaneous self-test. If no
error is present, heated roller
heating commences and the display
indicates HEATING. After roughly 10 minutes the laminator is ready for operation
and the display switches to the Ready status.
Mains switcher
It is assumed that film is already present inside the device.
11
2
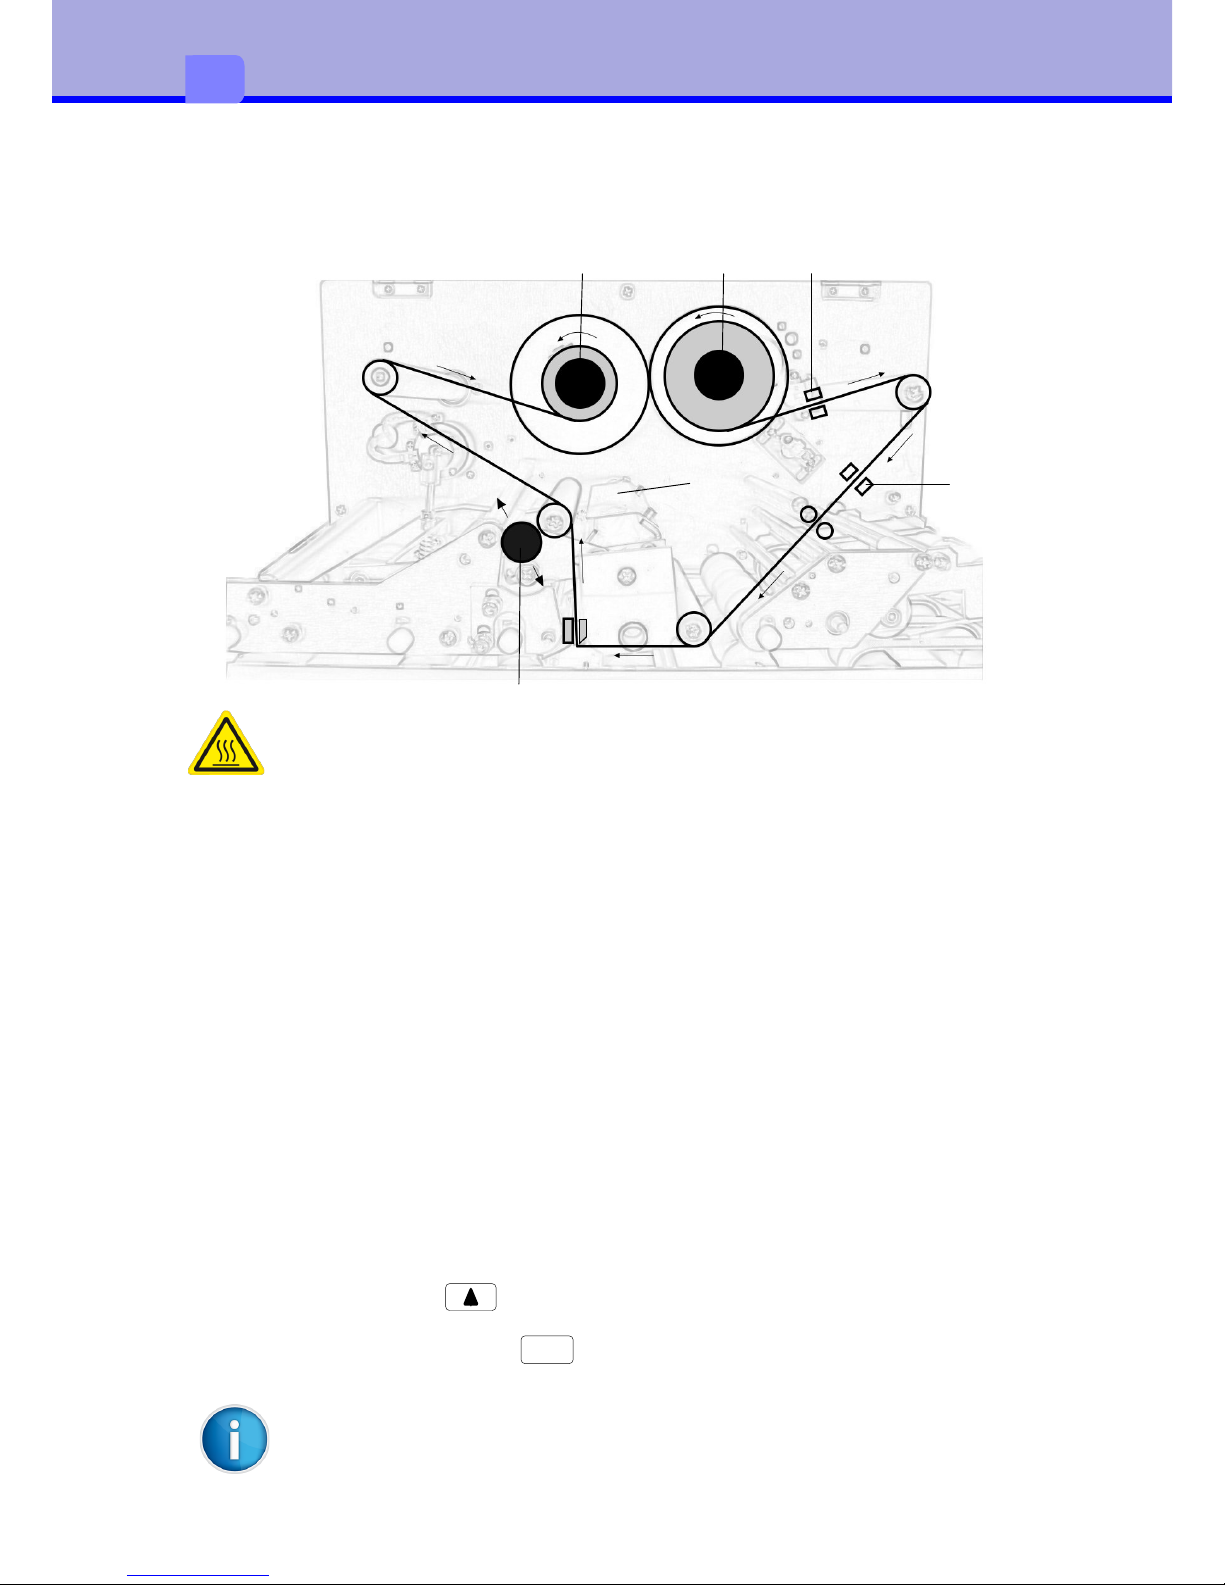
Inserting film
21
3
4
4
5
There is a risk of burning on the safety guard for the heated roller (5)
Newly inserted patch film must be subsequently synchronised. This is not
necessary in the case of holographic film without an index mark. The process
therefore differs very slightly. Refer also in this regard to the menu under Device.
When inserting or exchanging patch film proceed as follows:
•Open housing cover, if necessary unlock the lock first
•Switch off the device and let it cool down
•Release the heated roller interlocking. To do so push the lever (3) up.
•When exchanging the film additionally empty carrier rollers (1,2)
•Switch on the device. An error message is displayed.
•Slide the film roll onto the unwinding carrier roller (1) until it reaches the
limit stop.
•Slide an empty film core onto the winding carrier roller (2) until it reaches the
limit stop.
•Insert the film in accordance with the drawing shown above. Attach the start
of the film to the empty core with adhesive tape.
•Close the heated roller interlocking. To do so push the lever (3) down.
•Transport film with to the first patch and when doing so check that the
film runs correctly and crease-free.
•Delete error message with . The film is re-synchronised.
CLEAR
The first index mark on the film should lie between the two sensors (4),
in order that no patch is lost.
12
2
When inserting or exchanging holographic film without an index mark proceed as
follows:
•Open housing cover, if necessary unlock the lock first
•Switch off the device and let it cool down
•Release the heated roller interlocking. To do so push the lever (3) up.
•When exchanging the film additionally empty carrier rollers (1,2)
•Switch on the device.
•Slide the film roll onto the unwinding carrier roller (1) until it reaches the
limit stop.
•Slide an empty film core onto the winding carrier roller (2) until it reaches the
limit stop.
•Insert the film in accordance with the drawing shown above. Attach the start
of the film to the empty core with adhesive tape.
•Close the heated roller interlocking. To do so push the lever (3) down.
•Transport film with to the start and when doing so check that the film
runs correctly and crease-free.
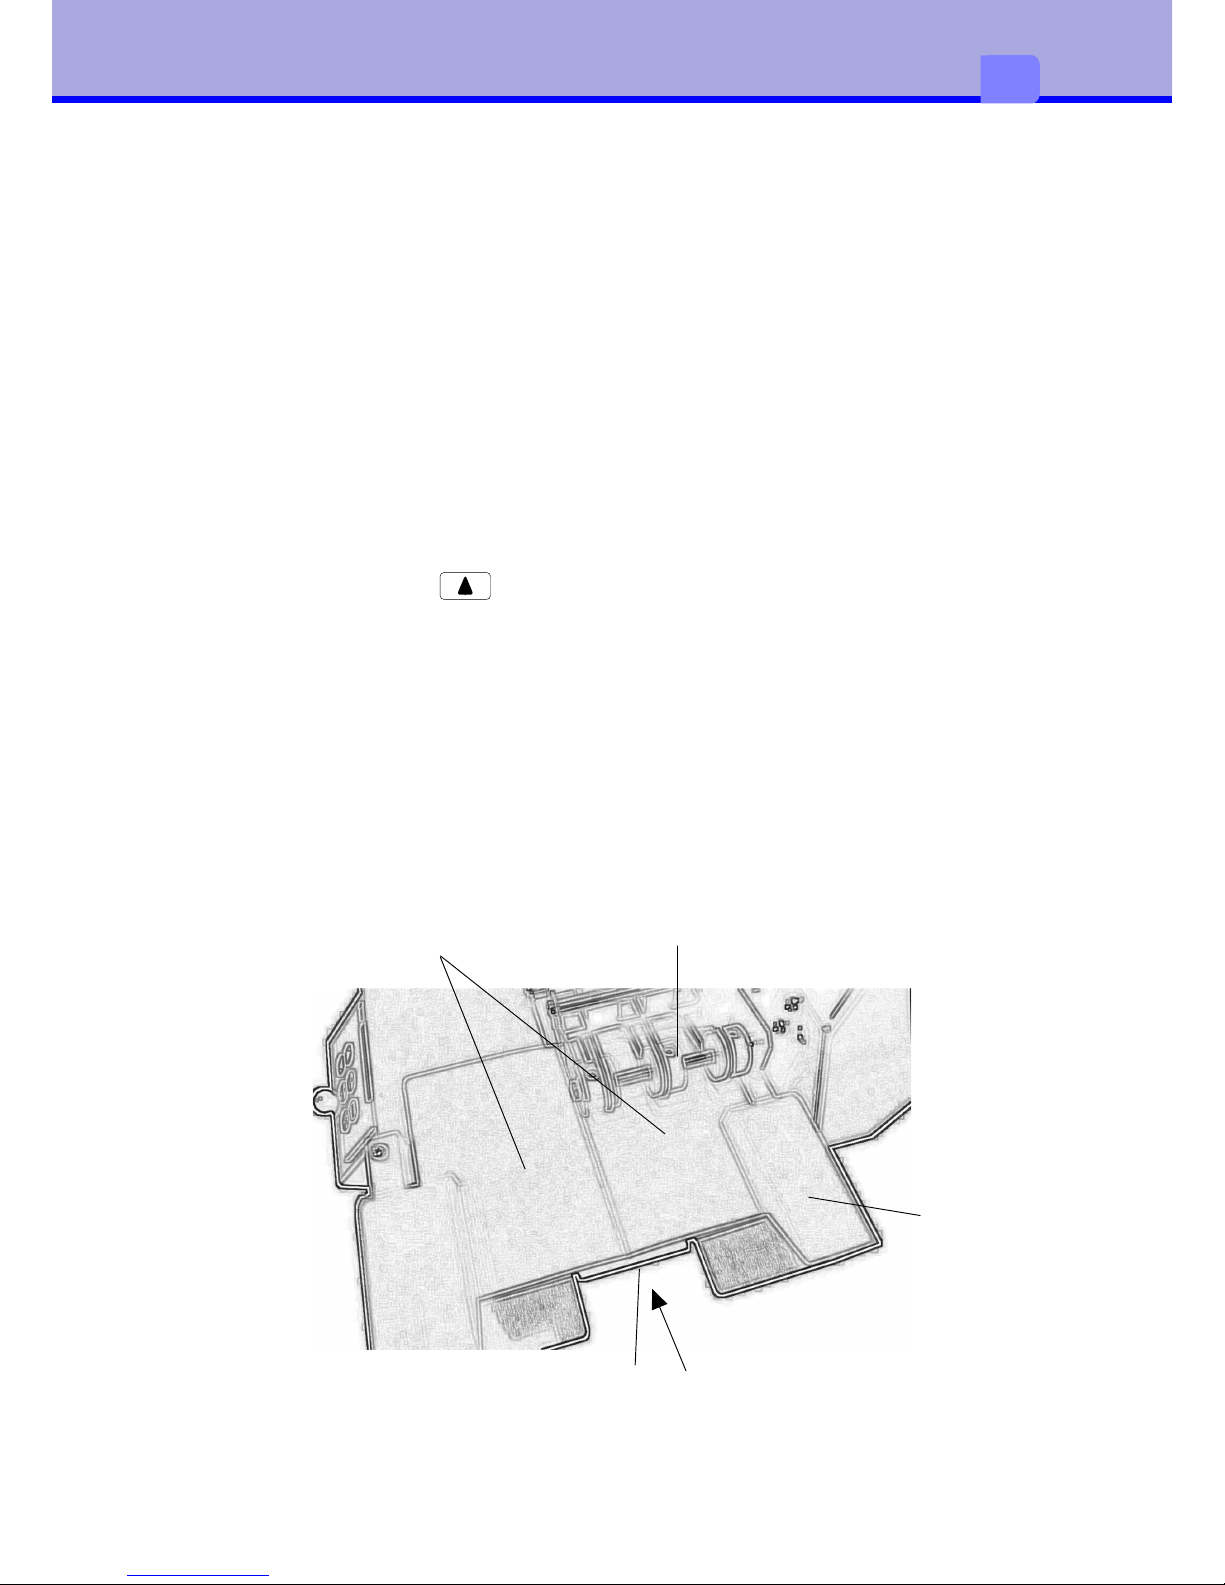
Inserting a document
Insert the passport (1) in the feed table (2) and slide it forwards until it reaches
the middle edge (3). The rocker (4) closes, takes hold of the document and
draws it in.
1
2
3
4
13
2

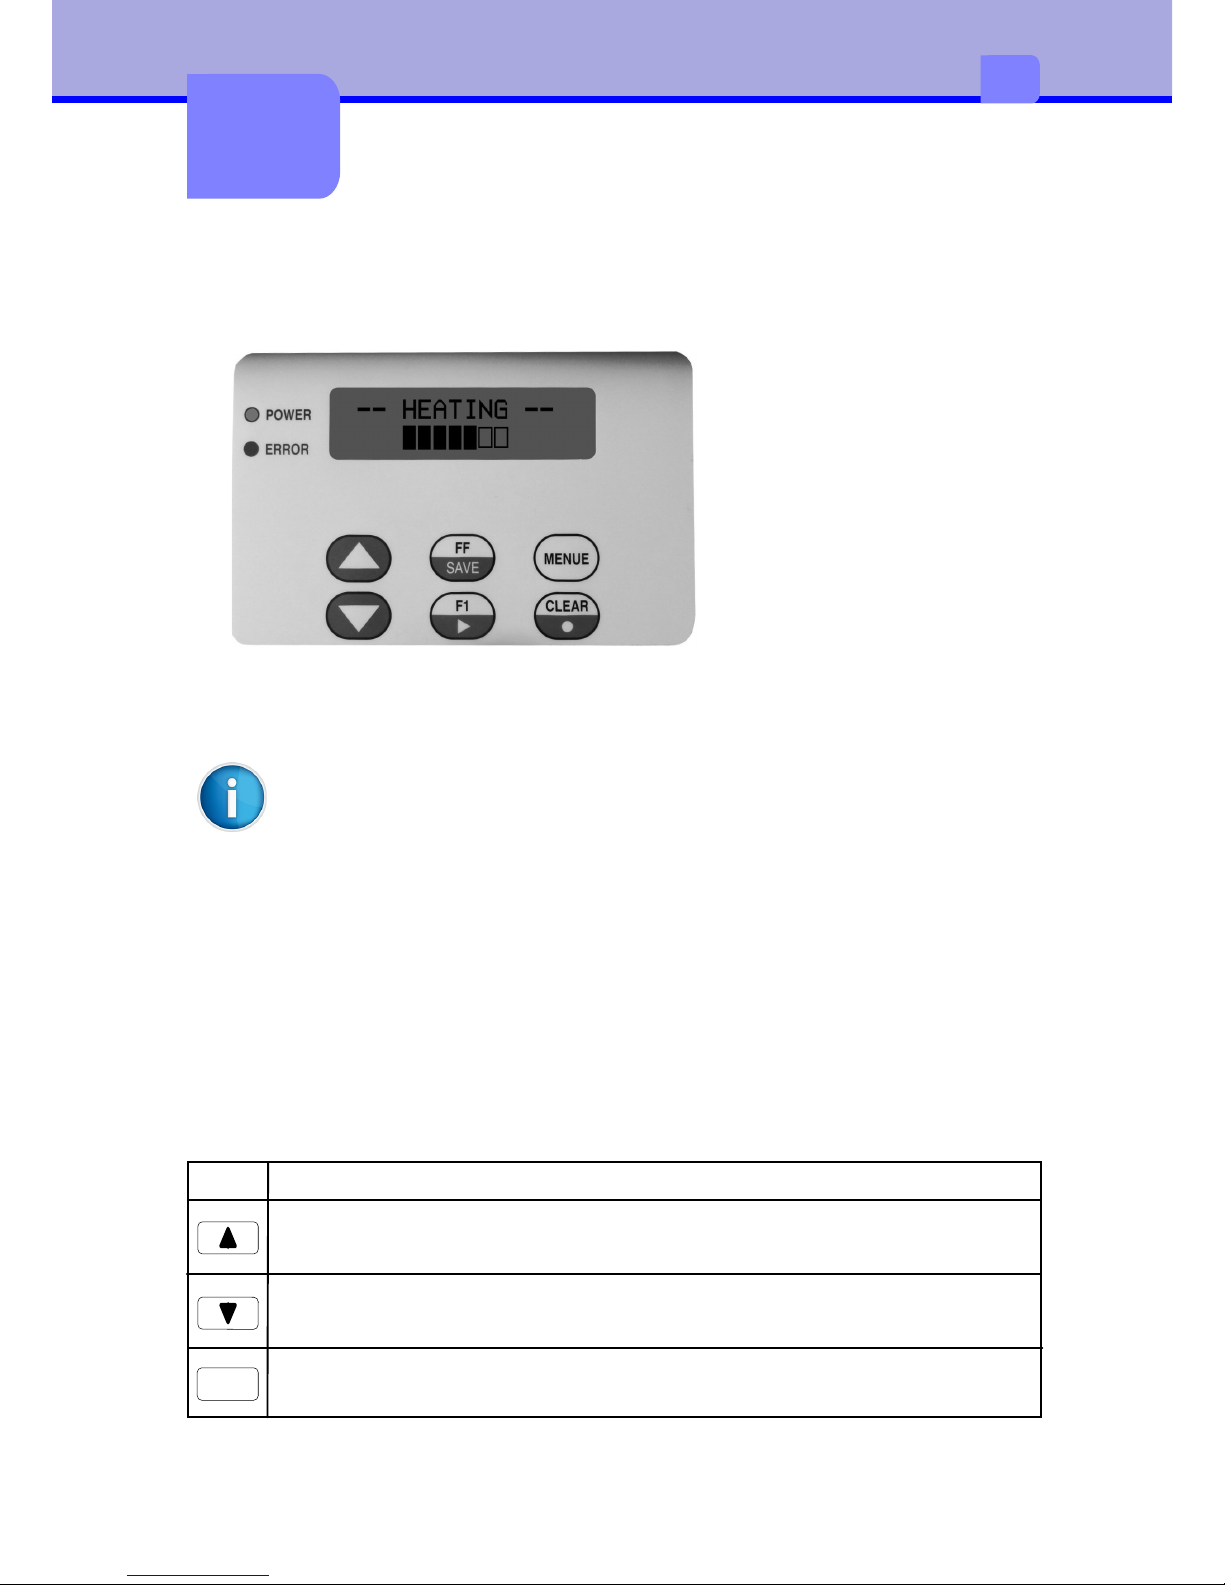
The control panel
Control panel configuration
The display informs the
user of the current device
status, reports errors and
indicates configuration
settings in the menu.
The keys enable control
functions, the accessing of
information and navigation
within the menu.
If the device is switched on then the green LED illuminates. An error is
additionally signalled via the red LED.
The control panel can be folded out for improved ease of operation and
legibility. To do this draw the black button on the bottom edge of the
control panel forwards
The functionality of the control panel differs in the start menu and the
configuration menu.
Key functions in the start menu
The start menu contains all functions on one level, making these directly
accessible. Key navigation is not required. During lamination the buttons are
locked.
KeyFunction
Transports the film forwards. Useful when inserting new film
Transports the film backwards. Useful when inserting new film
FF
Transports a document manually from the tray
15
3
3
 Loading...