

Page 1
Page 2

INTRODUCTION
Congratulations on your purchase of a LANZAR Crossover. This product has been designed
and built to deliver excellent sound quality and long lasting high performance. We are sure you
will enjoy listening to your favorite music with this LANZAR component in your car audio System.
For best result a professional car stereo installer for application advice or troubleshooting. Thank
you for choosing LANZAR products for your auto-sound system. Everything else is just noise
FEATURES
FRONT AND REAR CHANNEL : SUBWOOFER CHANNEL:
* High Pass Frequency Selector * Subwoofer Input Switch
40Hz to 400Hz / 32Hz to 250Hz * +12dB Bass Boost
* Frequencies Multiplier x1 or x20 * Phase Shift Switch
* Crossover Slope 6dB/Octave or * Stereo/Mono Switch
12dB/Octave * Output Level Control
* Signal Gain Control * Exclusive Remote Subwoofer Level Control
* Parallel Input Switch * Low Pass Frequency Selector 40Hz to 400Hz
* Bass Boost Frequency Selector 25Hz to 250Hz
SPECIFICATIONS
Power Supply....................................... DC to DC switching power
S/N Ratio............................................. 110dB
Channel Separation.............................. 80dB
Distortion.............................................. THD @ 0.01%
Crossover Slope.................................... 12dB per Octave
Input Impedance................................... 20K Ohms
Output Impedance................................ 100 Ohms
Output Gain.......................................... 1:2 (+6dB)
Output Voltage Level........................... 8Volts Max
Dimensions.......................................... 5-13/16" (W) x 8-1/4" (L) x 1-3/8" (H)
Features and specifications subject to change without notice.
INSTALLATION
1. Find a suitable location in the vehicle to mount the crossover.
2. Bolt the crossover to the mounting surface.
3. Using the screw terminals provided, connect minimum 16 gauge wire from the power,
Ground and remote terminals. Connect the shortest possible wire to a chassis ground point. The (+)
12V connection should be made directly to the car battery, and the remote should be connected to
the Remote Turn On Lead of your head unit. When connecting directly to the battery, install a 3A
Fuse within 18 inches of the battery terminal.
4. Connect all line inputs and outputs using high-quality RCA cables.
5. Recheck all connections before powering up.
6. Set all level controls to their minimum positions and set all crossover controls, switches, etc. To
the desired frequency or position.
7. Once the system is powered up, set the volume control on the head unit to a moderate level where
your normal speaking voice can be heard while the music is playing.
8. Further fine tuning of the various controls may be necessary to obtain the desired results.
9. When unsure about installation or system tuning, please consult an authorized LANZAR dealer.
- 1 -
Page 3
CONTROLS AND OPERATION
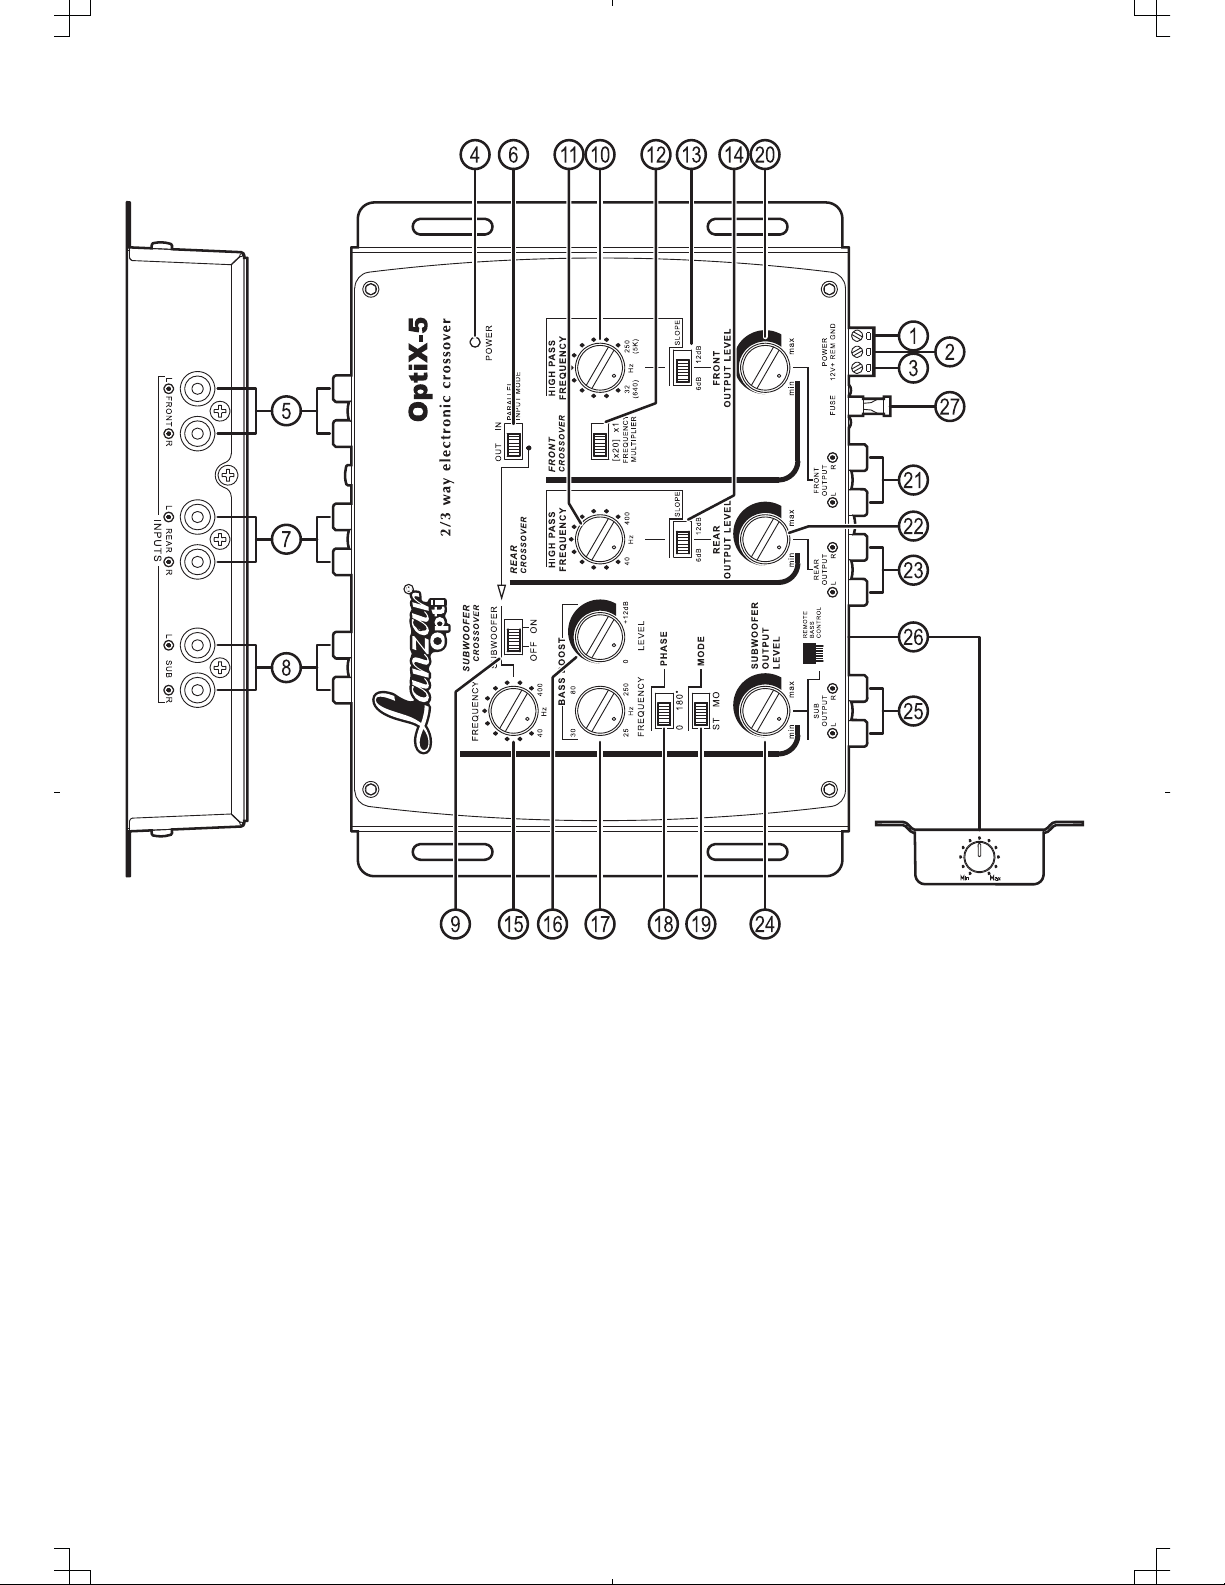
1. Ground Terminal (GND).
2. Remote Turn-On Terminal (REM).
3. Power Terminal (+12V).
4. Power Indicator.
5. Front Channel Inputs.
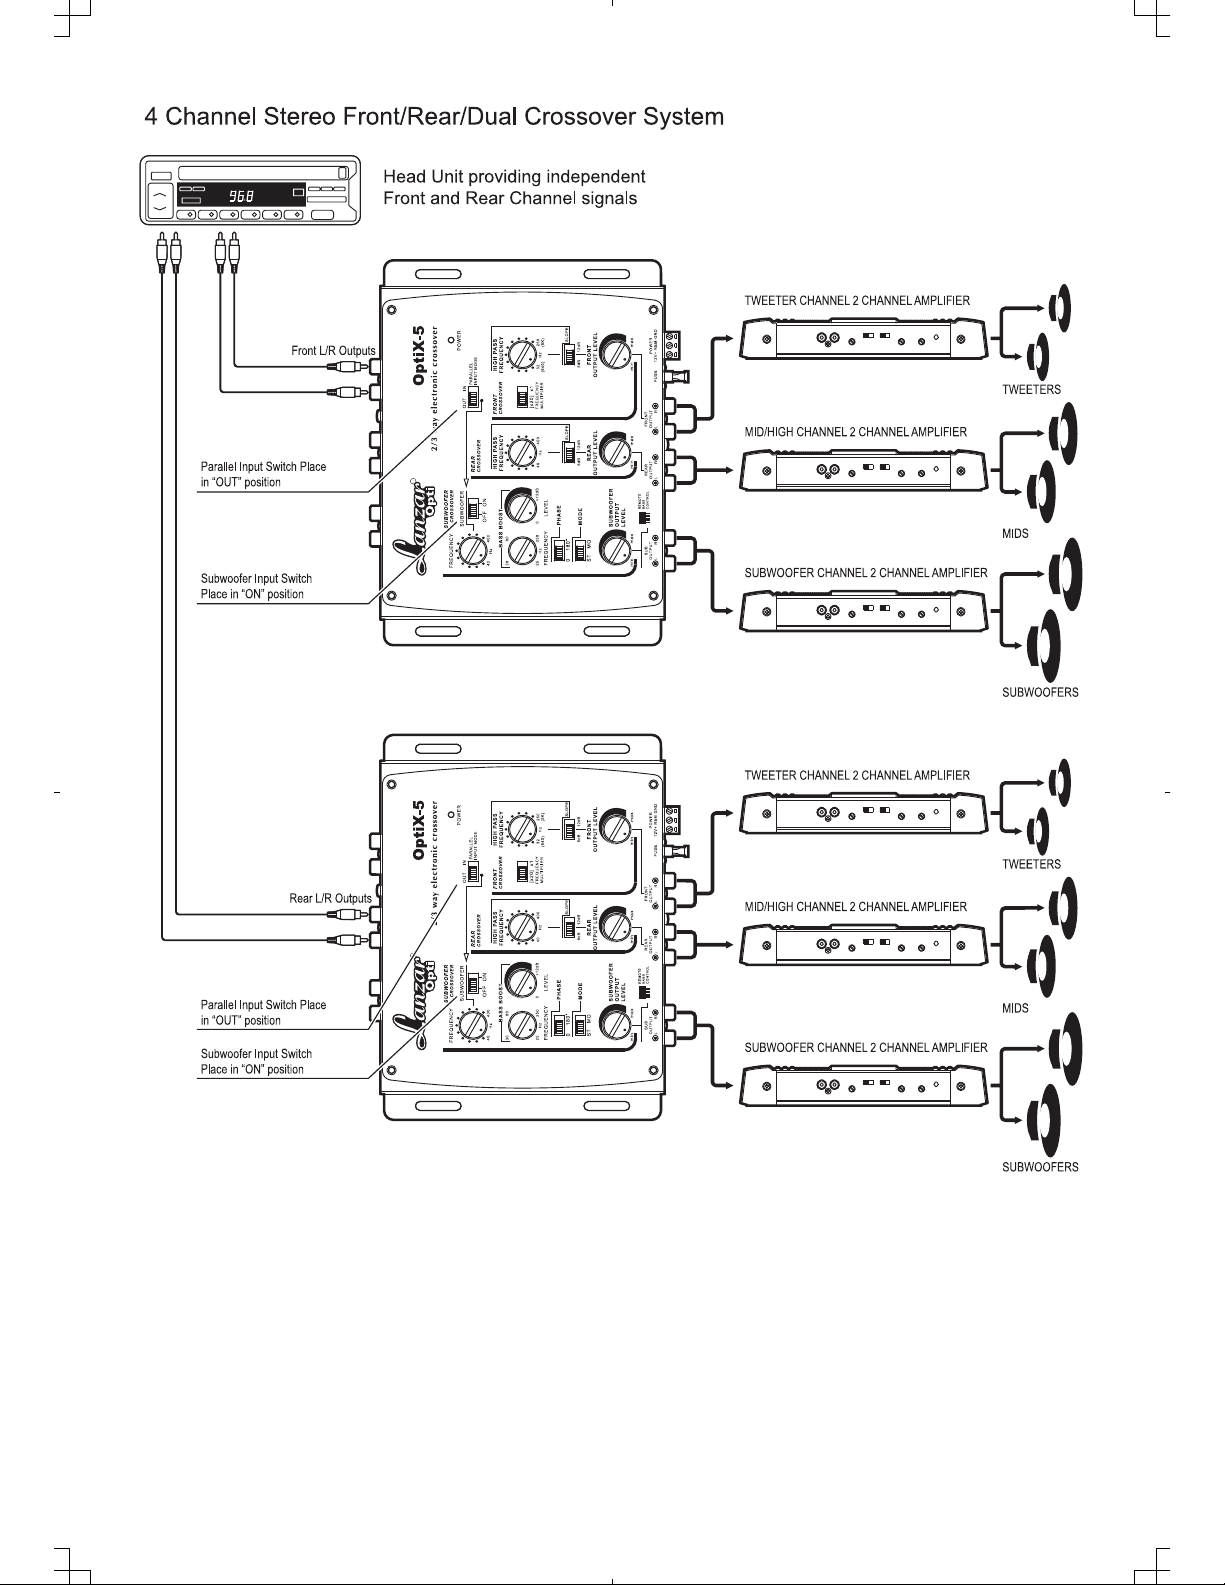
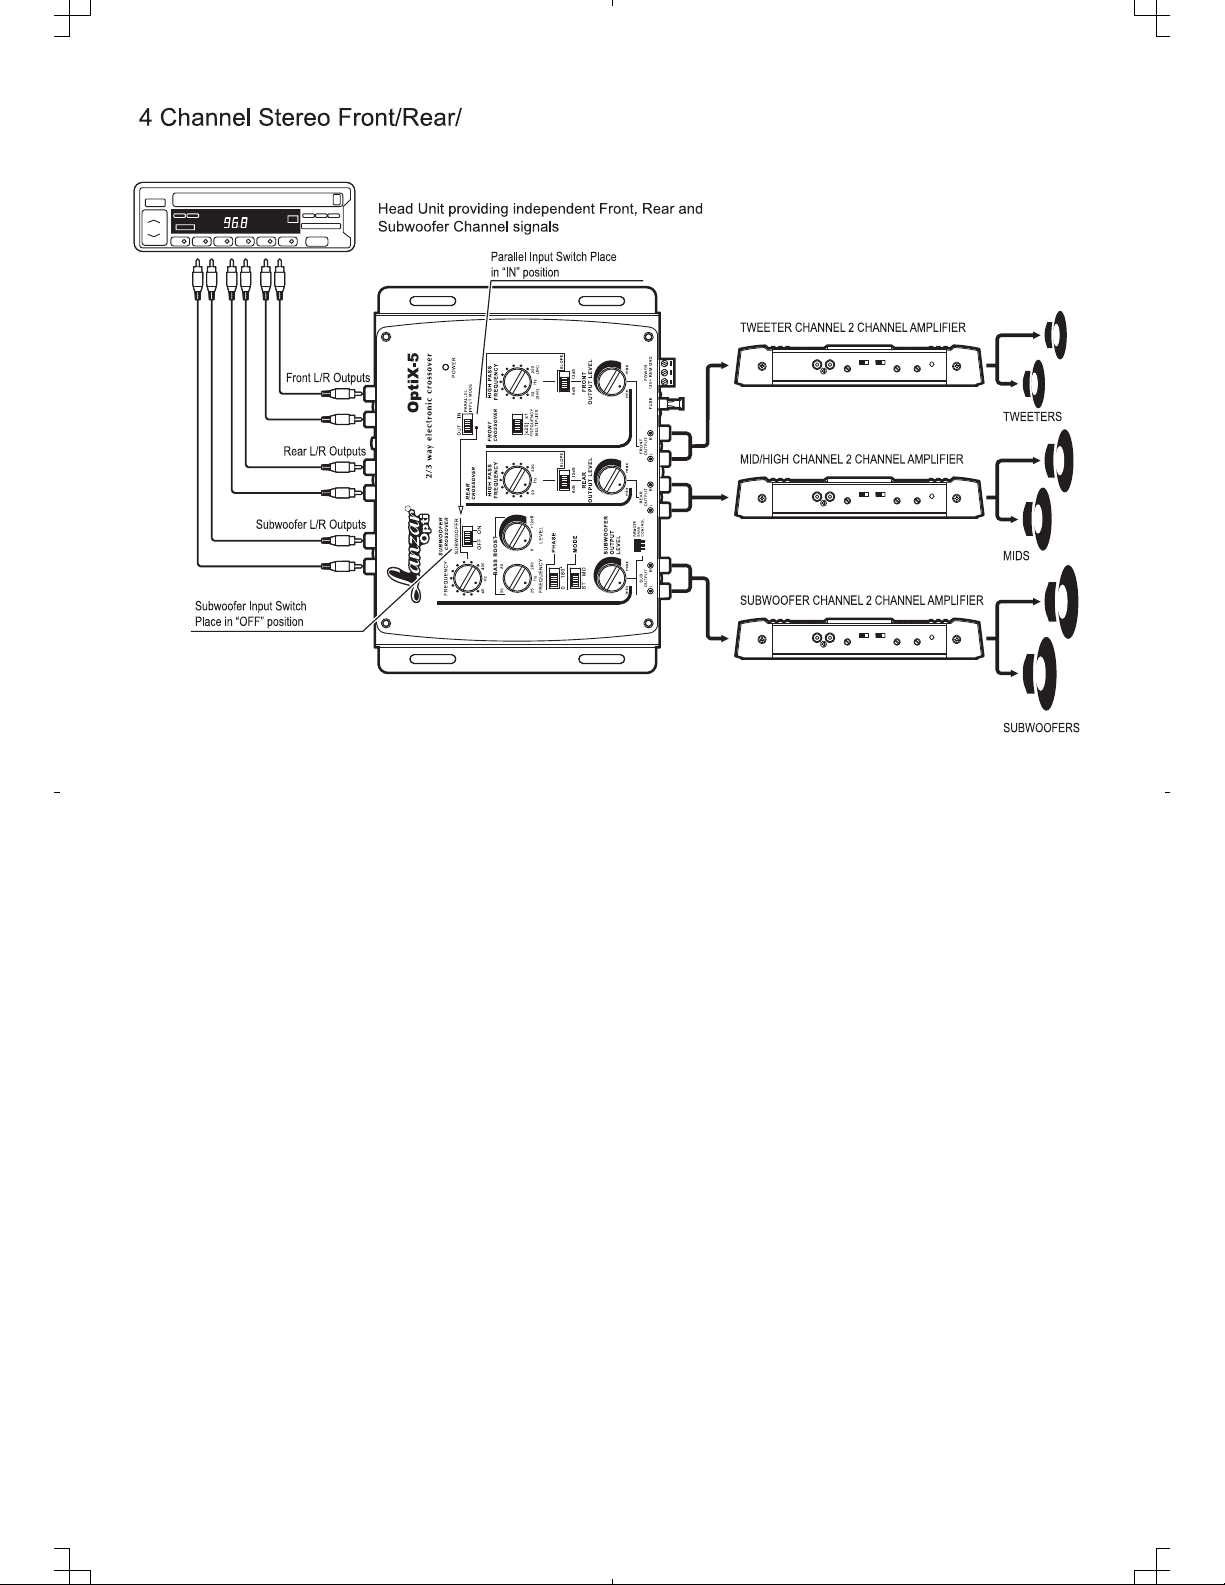
6. Parallel Input Switch: If there are 4 sets (2 pairs/ Front & Rear) RCA inputs available, place
this switch in the "IN" position. If there is only one pair of input RCA connectors being used,
place this switch in the "OUT" position to provide Front and Rear input from that single pair of
RCA inputs.
(Note that the Front inputs are essentially the main inputs, thus providing an input to
these terminals, and properly selection of the various switch positions would provide
signals on ALL of the various outputs.)
7. Rear Channel Inputs.
8. Subwoofer Channel Inputs.
9. Subwoofer Input Switch: If there is no dedicated subwoofer signal available from the signal
source, place this switch in the "ON" position to provide signal at the subwoofer output terminals.
If there is a dedicated subwoofer signal source available for this input purpose, place the switch
in the "OFF" position.
- 2 -
Page 4
10. Front channel High-Pass frequency selector.
11. Rear channel High-Pass frequency selector.
12. Frequency Multiplier: for Front Channel High Pass Frequency selector.
13 & 14: Front and Rear Channel Slope Selectors: Move the selector switch to the 6 dB
position when little or no attenuation as well as little or no separation is required between the
selected frequency and the next adjacent frequency. Selected 12dB position when greater
definition and/or attenuation is desired between the selected frequency and the other
adjacent frequencies.
15. Subwoofer Low Pass Frequency Selector.
16. Bass Boost Level Control.
17. Bass Boost Frequency Selector.
18. Phase Shift Selector switch: Use this switch to select output phase for the subwoofer
channel to provide best time alignment and stereo imaging.
19. Stereo / Mono Switch: For selection of stereo and mono mode for subwoofer output
signal.
20 & 22. Front and Rear Channel High Pass Level Controls.
21. Front Channel Outputs Terminals.
23. Rear Channel Outputs Terminals.
24. Subwoofer Low Pass Level Control
25. Subwoofer Channel Outputs Terminals.
26. Subwoofer Remote Level Control Jack: To be connected to the remote control for
adjusting the output level of subwoofer output. (Note: The remote control will adjust to the
highest preset setting of the subwoofer low pass level control.)
27. Fuse: Use only a 3 AMP fuse for replacement.
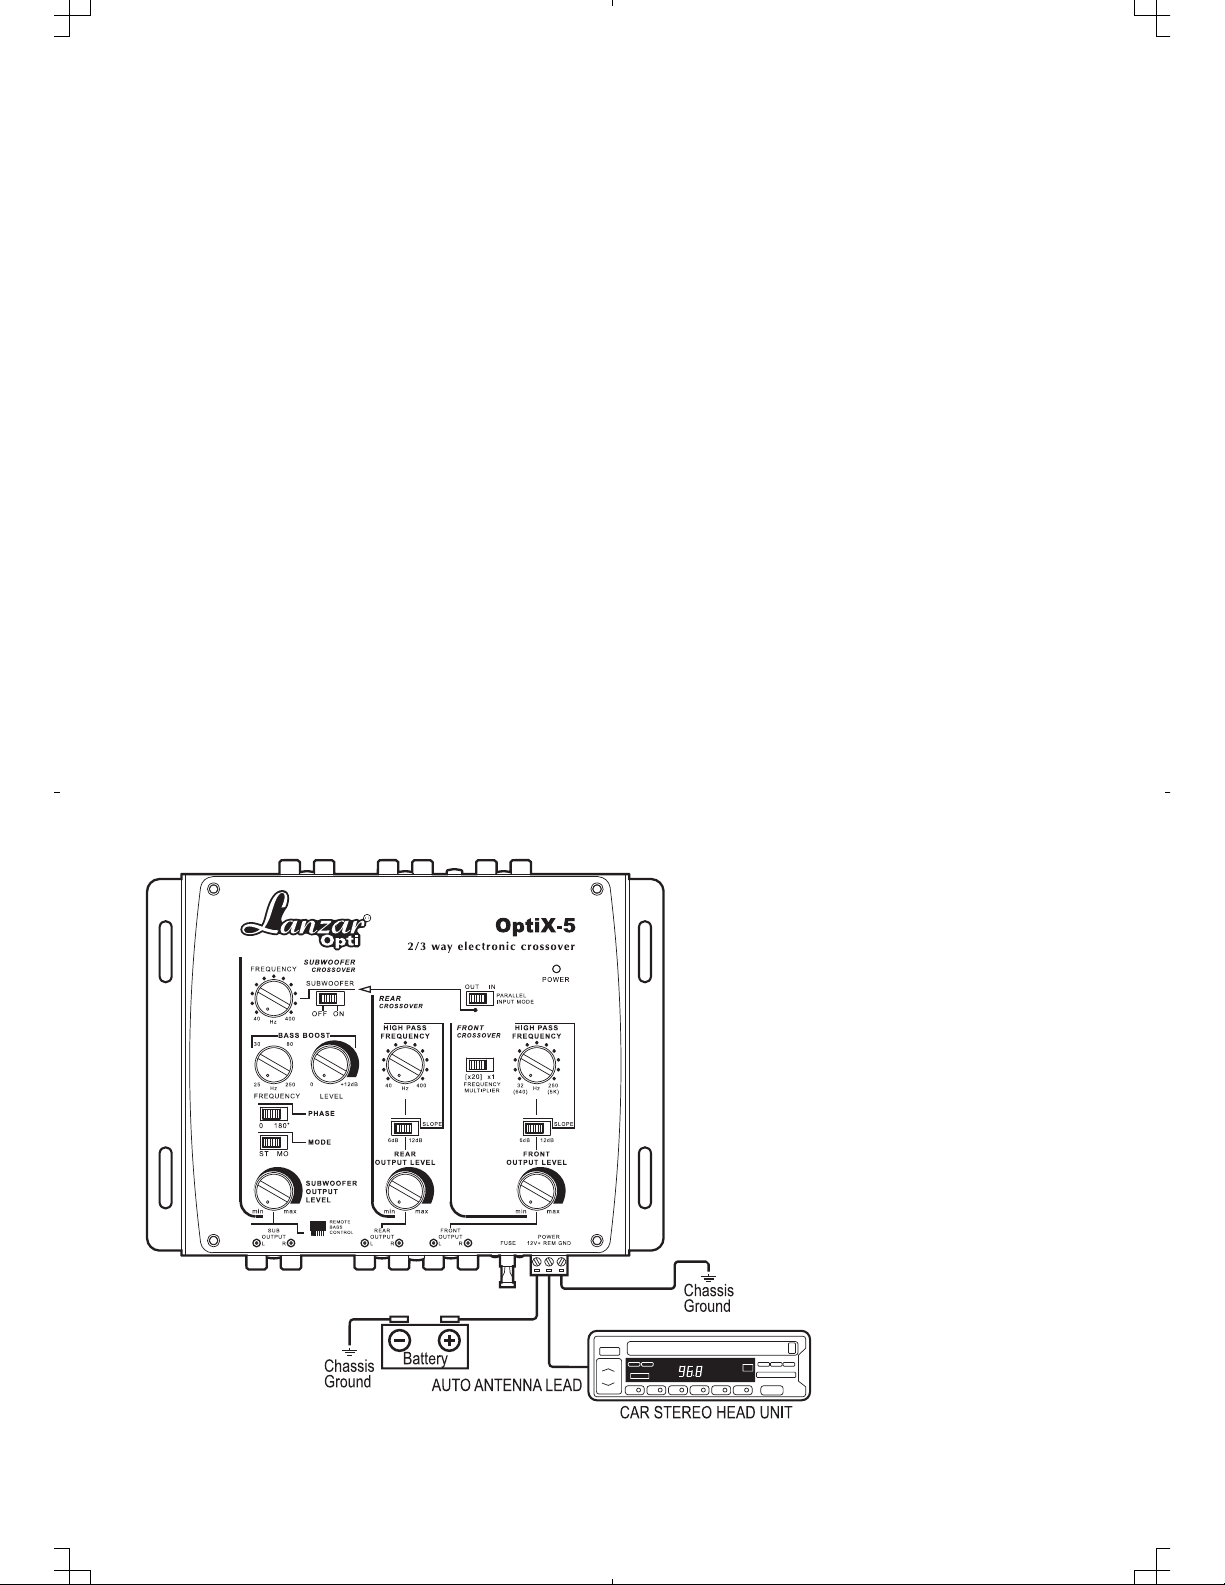
WIRING DIAGRAM : Power Connection
- 3 -
Page 5
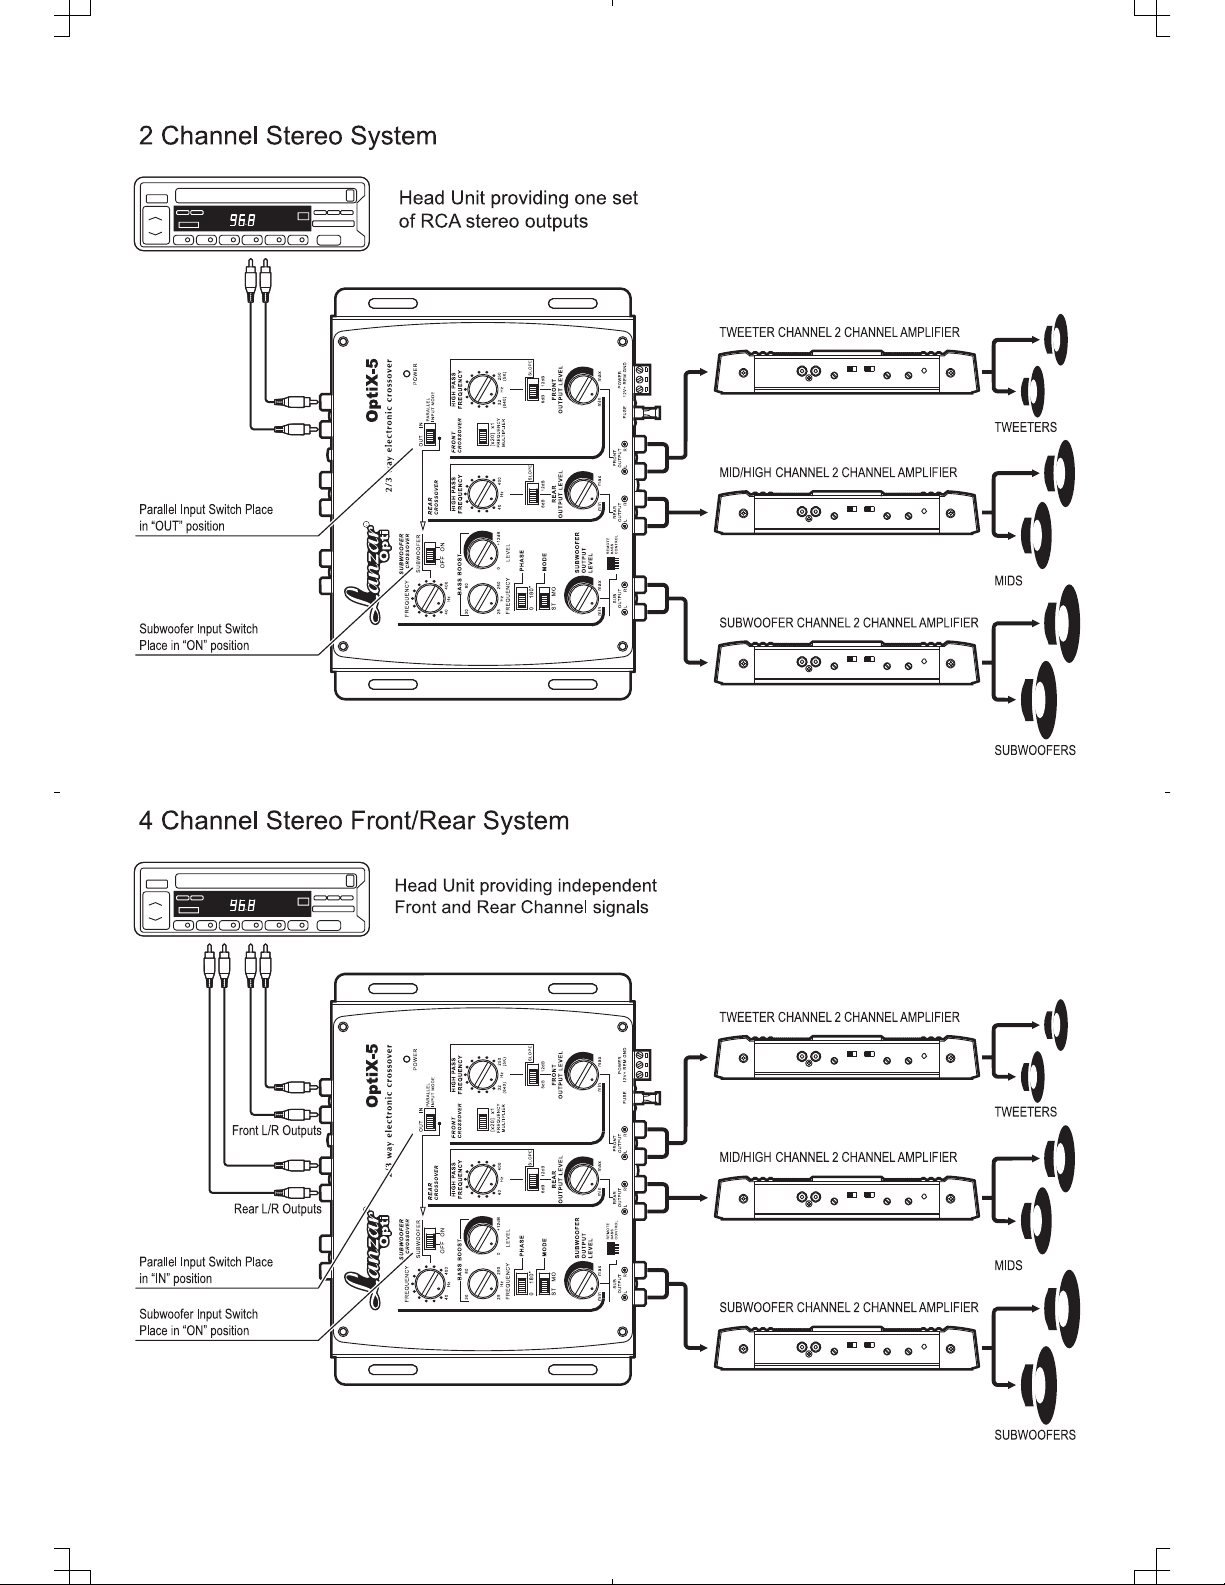
SIGNAL CONNECTION SYSTEMS:
- 4 -
Page 6
- 5 -
Page 7
Dual Rear and Subwoofer System
TROUBLE SHOOTING
Symptom Possible remedy:
Signal Processor
does not turn on.
Level of sound is
low.
Background noise
is too high.
Check:
*Remote Turn-On wire has (+) 12V
*(+) 12V wire has (+) 12V
*Ground wire is properly connected:
Check:
*Wiring is not loose or cables misconnected/disconnected
*RCA cables are not faulty
Check:
*Wiring is not loose or cables misconnected/disconnected - ground is
important
*RCA cables are not faulty
PRECAUTIONS
Enjoy your system, but use it wisely and safely!
* Never drive with the volume raised so high you cannot hear what is occurring in traffic around you.
* Be ware that repeated exposure to excessive volume levels can permanently damage you
hearing!
* Keep all electronics away from moisture, dust, extreme heat or extreme vibrations.
- 6 -
Page 8

www.lanzar.com
 Loading...