


User Manual of
Projector Mobile Phone
GSM/GPRS Digital Mobile Phone
December 2009
1

Table of Contents
1 Safety and Precautions...................................................................................................................................... 6
2 Appearance and Keypad Instructions of Mobile Phone.................................................................................... 8
.................................................. 8
Back View:..................................................................................................................................................... 8
.................................................. 8
Battery cartridge view:................................................................................................................................. 8
Top View:....................................................................................................................................................... 9
............................................................................................. 9
Bottom view:.................................................................................................................................................. 9
............................................................................................. 9
2.2 Icons of Display Screen States................................................................................................................ 10
2.3 List of Mobile Phone Specifications....................................................................................................... 10
3 To Begin with..................................................................................................................................................... 12
3.1 Battery..................................................................................................................................................... 12
2

3.2 Network Connection............................................................................................................................... 12
4 Quick Starter...................................................................................................................................................... 14
4.1 Power ON/ OFF...................................................................................................................................... 14
4.2 Make Calls.............................................................................................................................................. 14
4.2.1 Dial Status...........................................................................................................14
4.2.2 Dial Status...........................................................................................................14
4.2.3 Make the Domestic Calls.......................................................................................14
4.2.4 Dial extensions of fixed-line telephones.............................................................15
4.2.5 Make the International Calls...............................................................................15
4.2.6 Dial the numbers in call record...........................................................................15
4.3 Emergency Calls..................................................................................................................................... 15
4.4 Answer Calls........................................................................................................................................... 15
4.5 Call Services ........................................................................................................................................... 16
4.5.1 Process of Call .......................................................................................................16
4.5.2 Operations of Functions.........................................................................................16
4.5.3 Call Options ...........................................................................................................16
4.6 Auto DTMF ............................................................................................................................................ 16
5 Use the Functional Menu................................................................................................................................... 17
5.1 Function of selecting scrolled search...................................................................................................... 17
5.2 Function of selecting shortcuts............................................................................................................. 17
5.3 Exit from Menu.................................................................................................................................... 17
6 T ele phone Book................................................................................................................................................. 18
7 Message ............................................................................................................................................................. 19
7.1 SMS ........................................................................................................................................................ 19
7.1.1 In-Box....................................................................................................................19
7.1.2 Out-Box..................................................................................................................19
7.1.3 Compile Short Message.........................................................................................19
7.1.4 Common Phrase.....................................................................................................20
7.1.5 SMS Setting ...........................................................................................................20
7.2 MMS....................................................................................................................................................... 20
7.2.1 Compile MMS........................................................................................................20
7.2.2 In-Box....................................................................................................................20
7.2.3 Out-Box..................................................................................................................21
7.2.4 Draft.......................................................................................................................21
7.2.5 Template ................................................................................................................21
7.2.6 MMS Settings ........................................................................................................21
7.4 Voice Mailbox ........................................................................................................................................21
7.5 Cell Broadcast......................................................................................................................................... 21
8 Call Center......................................................................................................................................................... 22
8.1 Call Record ..........................................................................................................................................22
8.1.1 Call Record of SIM Card 1.................................................................................................................. 22
8.1.1.1 Delete the Call Record of SIM Card 1.............................................................................................. 22
8.1.1.2 Call Duration of SIM Card 1............................................................................................................. 22
8.1.1.3 Call Charge of SIM Card 1............................................................................................................... 22
8.1.1.4 SMS Counter of SIM Card 1............................................................................................................. 23
8.1.1.5 GPRS Counter of SIM Card.............................................................................................................. 23
8.2 General Call Settings ..............................................................................................................................23
8.2.1 Call Settings of SIM Card 1...................................................................................23
3

8.2.2 Auto Re-dial: When this feature is activated, the phone will automatically re-dial after call
failure every time............................................................................................................24
8.2.3 Quick Dial: Set the shortcut dial function. Press the corresponding numeric key in standby
interface for a long time to call the pre-set phone numbers............................................24
8.2.4 IP Dial: Input IP number and press ENTER to complete the setting to cancel and edit the number.
After IP number is set, you can use IP function in the telephone book or call record to automatically
add the pre-set IP number before the numbers you dialed to call...................................24
8.2.5 More....................................................................................................................24
9.1 SIM Card Settings................................................................................................................................... 25
9.2 Calibration of Touch Screen.................................................................................................................... 25
9.3 Mobile Phone Settings............................................................................................................................ 25
9.4 Network Settings..................................................................................................................................... 26
9.5 Safety Settings ........................................................................................................................................ 26
9.5.1 Safety Settings of SIM Card ..................................................................................26
9.5.2 Safety Settings of SIM Card 2 ...............................................................................26
9.5.3 Phone Lock .........................................................................................................26
9.5.4 Keypad Lock.......................................................................................................27
9.5.5 Change the password: Change the phone lock password.......................................27
9.6 Restore the Default Settings.................................................................................................................... 27
10 Multi-media ..................................................................................................................................................... 27
10.1 Camera.................................................................................................................................................. 27
10.2 Photo Album......................................................................................................................................... 28
10.3 V ideo Recorder..................................................................................................................................... 28
10.4 V ideo Player.......................................................................................................................................... 28
10.5 Music Player ......................................................................................................................................... 28
10.6 Recording.............................................................................................................................................. 29
10.7 FM Broadcast........................................................................................................................................ 29
10.8 FM Timing Record................................................................................................................................ 30
10.9 Composer.............................................................................................................................................. 30
10.10 Mobile TV........................................................................................................................................ 30
11 File Management .............................................................................................................................................30
12 Entertainment and Games................................................................................................................................ 32
12.1 Games ...................................................................................................................................................32
13 Echo Mode....................................................................................................................................................... 33
13.1 General Mode........................................................................................................................................ 33
13.2 Meeting Mode....................................................................................................................................... 33
13.3 Outdoor Mode....................................................................................................................................... 33
13.4 Indoor Mode.......................................................................................................................................... 33
13.5 Earphone Mode..................................................................................................................................... 33
13.6 Bluetooth Mode ....................................................................................................................................33
14 T ool Kit............................................................................................................................................................ 34
14.1 Calendar................................................................................................................................................ 34
14.2 T o-Do.................................................................................................................................................... 34
14.3 Alarm Clock.......................................................................................................................................... 34
14.4 Universal Time...................................................................................................................................... 34
15 Network Service............................................................................................................................................... 35
15.1 STK Service.......................................................................................................................................... 35
15.2 WAP...................................................................................................................................................... 35
4

15.3 Data Account ........................................................................................................................................35
16 Additional Functions........................................................................................................................................ 36
16.1 Calculator.............................................................................................................................................. 36
16.2 Conversion of Exchange Rate............................................................................................................... 36
16.3 Stopwatch.............................................................................................................................................. 36
16.4 E-Book.................................................................................................................................................. 36
16.5 Bluetooth............................................................................................................................................... 37
17 Mode Settings .................................................................................................................................................. 38
18 USB Functions................................................................................................................................................. 39
19 Input Methods.................................................................................................................................................. 40
19.1 Overview............................................................................................................................................... 40
19.2 Instructions of Input Methods............................................................................................................... 40
19.2.1 Handwriting Input Method...................................................................................40
19.2.2 Intelligent Pinyin (Spelling) Input Method..........................................................40
19.2.3 English Input Method...........................................................................................41
19.2.4 Digital Input Method.........................................................................................42
19.2.5 Stroke Input Method .........................................................................................43
20 Appendix.......................................................................................................................................................... 45
20.1 Security of Battery................................................................................................................................ 45
20.2 Usage and Maintenance ..................................................................................................................... 45
20.3 Troubleshooting.................................................................................................................................... 46
5

1 Safety and Precautions
Note: Please read the following briefings carefully and observe the rules seriously to avoid hazards or infringement
of the law.
Caution during Driving
Please observe all local laws and regulations. Please drive with two hands if possible during driving.
put the mobile phone into the mobile phone holder, never put it onto the vehicle seats to prevent it from
falling during scram. Upon any hazards, the airbag will inflate rapidly; so please never put any objects on
the airbag or within the operating scope of it, including the fixed and handheld wireless device. The
wireless device improperly installed inside the vehicles may cause serious personal injuries possibly when
the airbag is being inflated.
Please power off on plane
Interference from mobile phone may affect the security of planes and it’s illegal to use the mobile
phone on planes. So please power off your mobile phone on planes.
Please power off in the blasting operation area
Please power off your mobile phone in or near the blasting operation area in strict accordance with the
concerning laws or statutes.
Please power off near the dangerous goods
Never use the mobile phone in the service station or places with dangerous goods like fuels and
chemical agents, etc.
In the hospital
Please observe the concerning laws or statutes of hospital to use the mobile phone in the hospital.
Please power off near the medical facilities. The use of any wireless transmission equipment including
mobile phone may interfere with the medical facilities not protected completely and well. To use any
personal medical device, like rhythmoiphone and acousticon, etc., make sure the medical facilities used by
you are equipped with proper external radio frequency protective device and precautions for users.
Interference
All mobile phones may be interfered by radio, which may affect the performances of mobile phone.
Specialized services
Only the professionals can install or repair the mobile phone. The improper installation or reparation
of mobile phone may lead to hazards and violation of the warranty clauses.
Accessories and Battery
Please only use the accessories and battery recognized by the phone manufacturer. It’s recommended
to return the used batteries to the mobile phone manufacturer or litter them to the appointed public obsolete and
used battery recovering areas, and never put them together with other garbage or dispose them randomly.
Reasonable Use
Just use the mobile phone in normal ways. Never put your mobile phone to the extremely
high-temperature conditions, over 60°C, like the windows with direct sunshine. Please wipe and clean your
mobile with wet or antistatic cloth instead of the dry or static cloth. Please keep your cell phone dry and clean as
it is not waterproof.
Emergency Calls
Make sure the power supply of mobile phone is connected and in service status, and you can use it to
dial the emergency call number of 112. During the standby state of mobile phone, you can input the emergency
call numbers like 112, 119 and 110, etc., press the DIAL key to call. After being switched on, please brief the
emergency cases and do not end the conversation without the permission of operators.
6

Note: Like any mobile phone, some characteristics of this mobile phone may not be suppor ted for the
causes of network coverage or radio signals transmission. Some networks cannot even support 112 emergency
call services. So please do not rely on the mobile phone for the particularly crucial communications like
medical first aid purpose completely. Please inquire and check with your local network operator.
7

2 Appearance and Keypad Instructions of
Mobile Phone
Front View:
Headphone
Direction Keys
OK Confirm key
Touch Screen
Volume adjusting key
音量调整键
Back View:
Projector focus adjusting knob
Left function key
SIM2 Dial Key
SIM1 Dial Key
Right function key
Media Play one-key switch key
Power key/ Hook-up key
Numeric keys
Digital CCD camera
Volume adjusting key
Battery cartridge view:
Battery cartridge cover
Battery cartridge Hi-Fi speaker
8

Projector focus adjusting knob
Top View:
Bottom view:
Headphone
T-Flash card holder
Earphone/ data line/ charger
3-in-1 IO port
SIM2 card holder
SIM1 card holder
Head of high brillianceoptic projector
ATV Antenna
9
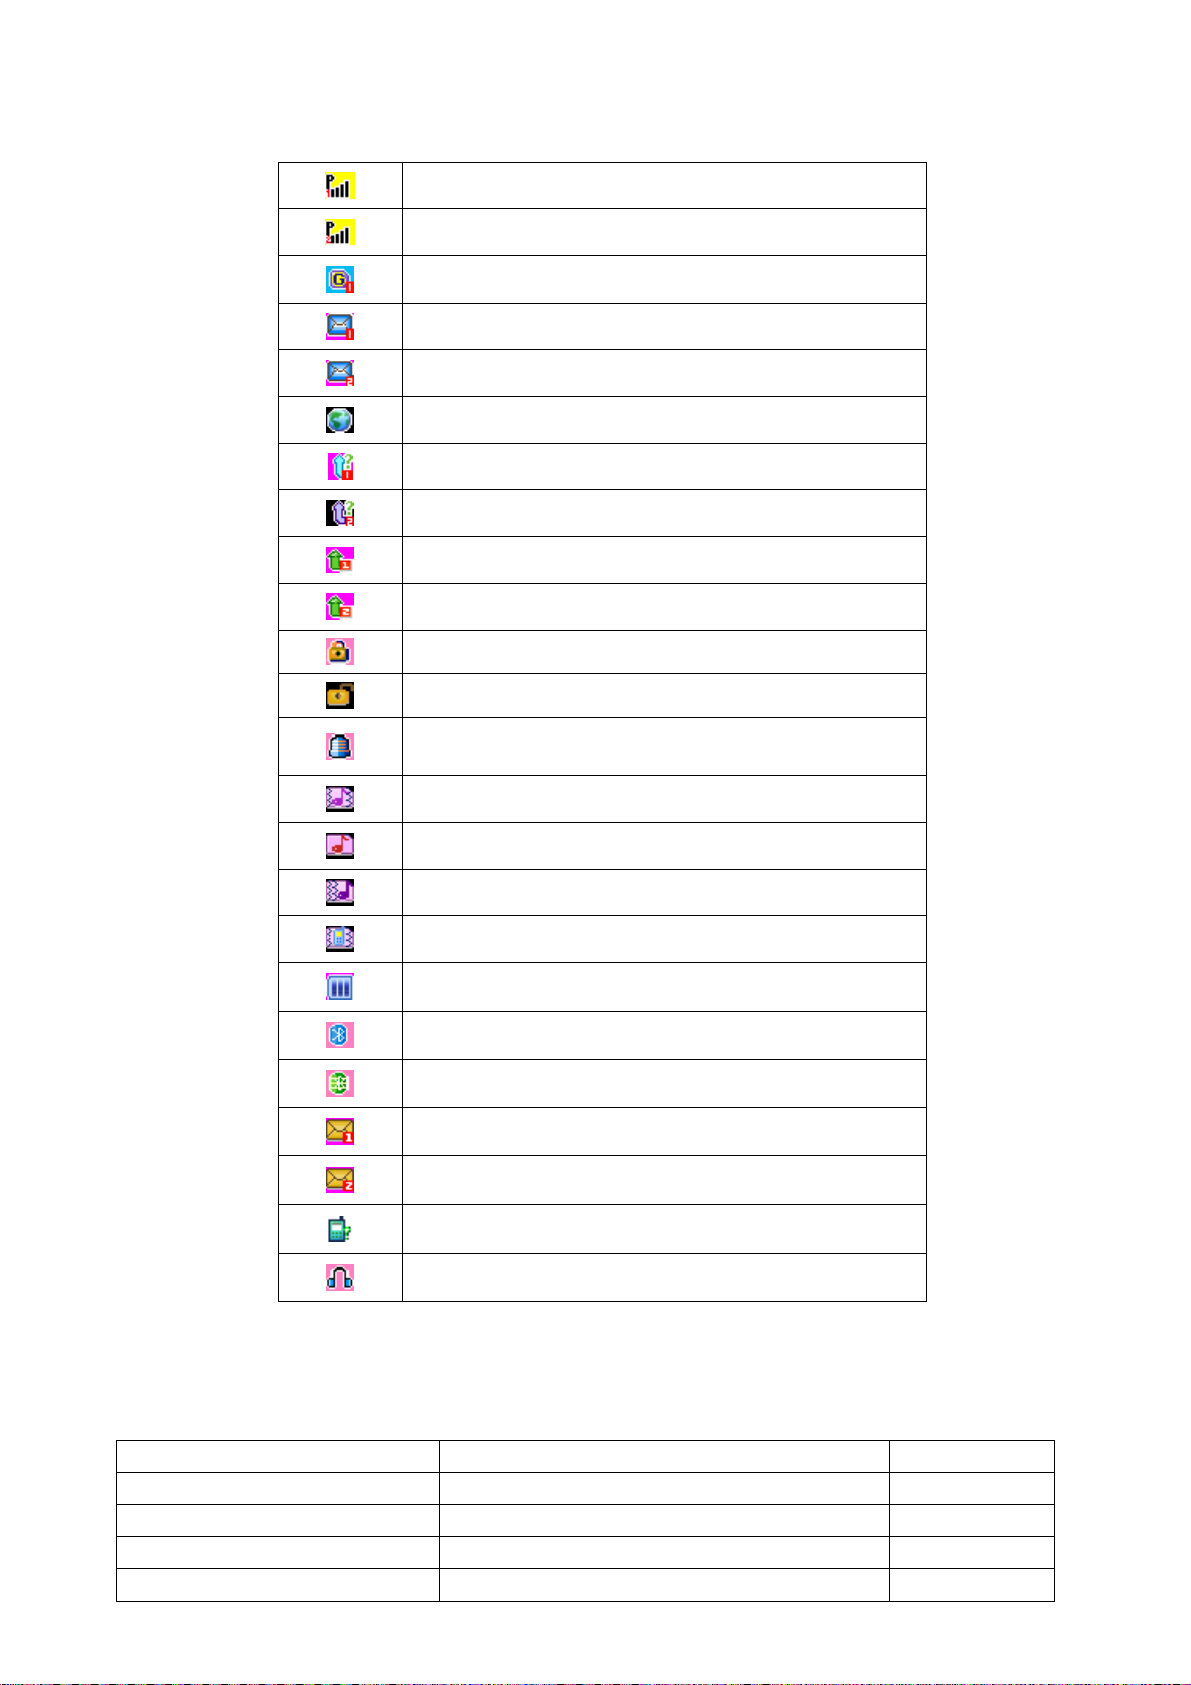
2.2 Icons of Display Screen States
Signal intensity indication of SIM Card 1
Signal intensity indication of SIM Card 2
GPRS connection
SMS not read of SIM Card 1
SMS not read of SIM Card 2
Service message not read
Calls unanswered of SIM Card 1
Calls unanswered of SIM Card 2
Call forwarding of SIM Card 1
Call forwarding of SIM Card 2
Keypad is locked
Keypad is unlocked
Alarm clock
Vibration and ring tone
Ring tone
Ring tone after vibration
Vibration mode
Battery power
Bluetooth activation
Bluetooth connected to Internet successfully
MMS not read of SIM Card 1
MMS not read of SIM Card 2
Calls refused to answer
Earphone mode
2.3 List of Mobile Phone Specifications
Function Description Remarks
Model Bar phone
Dimensions 113*49*17
Screen display 320*240 QVGA
Type of SIM Card Common SIM Card *
10

Built-in memory space 761K
Frequency band used 850/900/1800/1900 *
Capacity of telephone book
Capacity of SIM Card depends on the types; the
cell phone can save 500 telephone numbers
*
MP3 Supported
MP4 Supported
T-Flash Card Supported
CCD camera Built-in
GPRS Supported *
SMS/ MMS Supported
WAP Supported
Bluetooth It supports Bluetooth stereo music play
Data transmission
USB data line
Recording Supported
Background light Supported
Chord music ring tone Supported
Call forwarding /call barring Supported *
Call waiting /multi-party
Supported *
conversation
Alarm clock /calendar / universal
Supported
time
Telephone book / groups Supported
STK Supported *
Auto Re-dial Supported
E-book Supported
Chinese and English Input Method Supported
Dual SIM Supported
Note: * indicates that the corresponding functions or services shall be supported by Internet connection or
SIM Card.
11

3 To Begin with
Please read this section carefully before using this cell phone. This section will instruct you how to insert
and unlock SIM Card, tell you the information about digital GSM network, how to install and maintain your
phone battery and how to charge the battery.
3.1 Battery
Please run out the battery power for the first use and then charge it completely for use again; repeat this
course for continuously three times, the battery will come to the best state of use.
3.1.1 Load and Unload the Battery
Unloading steps: First pull the battery cartridge cover downward and then raise the protruding part of
battery upward and take it out.
Loading steps: First clip the upper part of battery into the slot and then load the lower part of battery to
place.
3.1.2 Charge the Battery
z Insert the charger to the power supply;
z Insert the charger plug into the mobile phone faucet;
z Then the power indication symbol on the right upper corner of mobile phone screen will flicker; if the
phone is powered off when it’s charged, the screen will still display the charging symbol. If the cell phone
is still used with low power, the power indication symbol will only appear on the screen after the battery is
charged for a period of time;
z When the power indication symbol on the right upper corner of mobile phon e screen is full and does not
flicker again, it indicates the charging is completed. If the phone is powered off when it’s charged, the
screen still displays the charge completeness prompt. Charging will last for 2-3 hours. It’s normal that the
battery, mobile phone and charger get warmer during charging;
z When charging is completed, please disconnect the AC mains socket, mobile phone and charger.
Warning: Please put the mobile phone in a well-ventilated place with the temperature between -400C and +550C during charging,
use the charger supplied by the mobile phone manufacturer. Use of the charger not recognized may lead to hazards and violation of
recognition and warranty clauses of this mobile phone.
3.1.3 Battery Use
Please charge the battery when your mobile phone powers off automatically or it warns “Low Power” on a
timely basis. The cell phone will automatically adjust to reduce the charging time if the battery power has not
run out before charging.
The phone standby time and service time presented by the phone manufacturer are based on the ideal
operating conditions. And in actual practice, the operating hours of battery vary as per the network status,
operating conditions and modes of use.
3.2 Network Connection
3.2.1 SIM Card
This unit is a dual SIM phone; your network operator will provide two plug-in SIM Cards for your mobile
phone. The SIM Card serves as the key for you to access the digital GSM network. Please insert the effective
SIM Card into the mobile phone before using it, and you can insert two SIM Cards at the same time, switch to
dual SIM modes and single SIM card mode, etc. in ON state.
Any information about network connection and your call records, as well as the names, phone numbers and
short message received and saved in the cards, are saved in SIM Card. SIM Card may be take out from your
mobile phone, and put into any GSM mobile phone for use, the new mobile phone will automatically read the
SIM Card.
To prevent your message in the card from missing and damaging, never touch the metal plane of card and
12

put the SIM Card away from the electromagnetic conditions. Once SIM Cards are damaged, you cannot access
GSM network.
3.2.2 Insert and Take out SIM Card
z Generally put SIM Card into the card and take it out before loading it into the phone.
z Turn off the mobile phone and remove the battery and other external power source.
z Aim the SIM Card notch at SIM Card holder notch, and put it into the card slot with the metal side
downward.
z Please first turn off the phone, unload the battery and then take out the SIM Card from the card slot.
Warning: Please take out the mobile phone before taking out the SIM Cards. Never insert or take out the SIM cards when the
external power source is still connected, or your SIM Card may be damaged.
3.2.3 SIM Card Lock
SIM Cards are encrypted for protection with PIN1 (Personal Identification Number) to prevent them from
being used illegally. When this function is selected, you have to key in PIN 1 Code first upon startup every time
to unlock the SIM Cards and make or answer calls. The users can cancel the SIM Card protection, but the SIM
Cards may be used without authorization. First, press and hold the Hookup key for a period of time to turn on
the mobile phone, then key in PIN 1 Code, clear it with touch pen and you can delete the input errors and press
Return key to end it with the touch pen. For example, if the PIN 1 Code is set as 1234, please key in numbers of
1234. Your SIM Cards will be locked by service network if you keyed in the code for successively three times
and the mobile phone will ask you to input PUK Code.
Note: Your network operator will set a standard PIN code for your SIM Card, you shall change it to your private password as
soon as possible.
3.2.4 Phone Lock
You can set the mobile phone password to prevent them from being used illegally. When this function is
selected, you have to key in mobile phone password after having inputted PIN Code if you have set PIN code
protection first upon startup every time to unlo ck and use the phone. The users can cancel the mobile phone
password, but the mobile phone may be used without authorization.
Key in the mobile phone password, clear it by the touch pen or delete the input error and finally press
Return key to end it with the touch pen. For example, if the mobile phone password is set as 1122, just key in
numbers of 1122. If you forget your mobile phone password, you have to contact with your retailer or the local
authorized service center to unlock the mobile phone password.
3.2.5 Connect to Internet
After SIM Cards are decrypted successively, the mobile phone will automatically search for your registered
network or other local available networks and the screen will display the texts of “Search for Network”. Once
searched, the network operator name will appear in the middle of screen and at this time, your mobile phone
enters into standby status.
Note: When the screen prompts “only for emergency calls”, it indicates that your phone is out of the working
network coverage, yet you can still make the emergency calls as per the signal intensity.
13

4 Quick Starter
4.1 Power ON/ OFF
4.1.1 Power ON
Press the power key for a long time to power on the mobile phone.
If the screen displays “Please insert SIM Card 1/ SIM Card 2” upon startup, please press the Power key for
a long time to power off and check if your SIM Card 1 and SIM Card 2 are installed correctly or if they are
installed.
Just input the correct mobile phone password or PIN Code when your mobile phone asks you to key in the
mobile phone password or PIN Code upon startup. If don’t know about PIN Code, please get contact with your
network operator. The default mobile phone password is 1122.
4.1.2 Power OFF
Press the power key for a long time to power off the mobile phone, and the power supply of mobile phone
will be disconnected when the power-off animation appears on the screen.
4.2 Make Calls
The notification bar at the left upper corner of display screen displays the network signal intensity (the
signal is most intensified when there are 4 notification bars). The quality of services is much affected by
obstacles, so the signal intensity may be improved effectively by moving within a small scope during use.
Dial numbers in the following ways:
z Find the telephone number, please refer to Telephone instructions for details, in the main menu and access
to the contact interface, select the desired number and directly press the DIAL key on SIM Card 1 or SIM
Card 2.
z Press the right function key in the standby interface to access the telephone list, select one record and press
the DIAL key on SIM Card 1 or SIM Card 2 to make a call.
z In the interface of Unanswered Calls, Answered Calls and Dialed Calls lists in the call records of SIM Card
1 /SIM Card 2, access the Option interface of this record, press the DIAL key on SIM Card 1 or SIM Card
2 to dial the telephone number in the record of dialed calls.
z The keypad is locked in standby statu s, just directly key in the numeric keys on the keypad and then press
the DIAL key on SIM Card 1 or SIM Card 2 to make a call.
4.2.1 Dial Status
Click an arbitrary numeric key to access Dial Status.
The phone will display the signal and power symbols and other icons during dial and prompt the cursor
location with the flickering upright slash.
z Press * key twice to input + to dial the international calls; press * key for three times to input P for auto
DTMF (automatically dial the extension number) like 075521 09 76 18P613.
4.2.2 Dial Status
z Key in numbers in Dial interface and press the DIAL key on SIM Card 1 or SIM Card 2 to make a call and
enter into the DIAL status.
The screen will display the signal and power indication during dialing; when the number exists in the
telephone book, it will display the corresponding names; otherwise, it just displays the phone number and the
number attribution. Press HOOKUP key to hook up the current call during dialing.
4.2.3 Make the Domestic Calls
z The simplest method to make a call is to input the telephone numbers with numeric keys, and add the zone
code except for local domestic calls to make the call. To modify the telephone number, use the touch pen to
clear the character before the cursor.
14

The screen ill display Being Dialed during dialing and will display the conversation status and information
after the called has hooked up, like the call time.
Press the HOOKUP key to end the call.
Make the domestic calls: Area code + telephone number + dial
4.2.4 Dial extensions of fixed-line telephones
Some extensions of fixed-line telephones cannot be dialed directly, you have to first dial the central
exchange and then the extension numbers. If you insert a symbol, i.e., P symbol for pause, between the central
exchange and extension numbers upon keying in the tel ephon e numbers, thi s phone wi ll complet e the who le dial
for your and automatically dial the extension number. Steps to input P: Input the phone numbers in DIAL
interface and press * key for successively three times to input P.
Dial the extensions of fixed-line telephones:
Area code + central exchange number + P+ extension number + dial
4.2.5 Make the International Calls
Press * key twice in DIAL interface to input + and the screen will display the prefix character * before the
international phone number, it makes you to dial the number from any country when you kn ow little about the
prefix of local international number.
Input the prefix first and then the country code and complete phone number. The country codes shall
subject to the common practice of the world; that of Germany is 49, that of British is 44 and that of Sweden is
46.
Like dialing the international numbers, please exclude 0 before the city code during dialing.
Make the international calls: + country code + complete telephone number + dial
4.2.6 Dial the numbers in call record
Every telephone number you dialed and received are saved in the mobile phone. The mobile phone also
provides all call records for your inquiry. The old phone numbers will be automatically deleted when the
telephone book is full. You can press this menu to dial the numbers in the call record as usual.
When the telephone numbers appear in the list, you can access the call record with the touch pen and select
the options of call record, save it by the touch pen till this number is added to the telephone book.
4.3 Emergency Calls
In any country or area available with digital GSM network, you can make the emergency calls when you
are located within the Internet coverage, you can know it by the Internet signal intensity indication bar displayed
on the left upper corner of mobile phone screen. If your network operator fails to provide the roaming services in
the area, the screen will display the texts of “Only for Emergency Calls” to tell you that you can only make such
calls. You can still make emergency calls even if your phone is not inserted with SIM Card if you are located
within the Internet coverage.
4.4 Answer Calls
The phone will enter into the Incoming Call interface when your number is called and make ring tones or
vibration according to the ring tone set presently.
The screen will display the signal and power indication when you are answering a call; if the incoming call
number exists in the telephone book, it will display the name corresponding to this number; otherwise, it only
display the number and the SIM Card properties of incoming call.
Answer calls by the DIAL key of SIM Card 1 or SIM Card 2 and refused to answer calls by the Hookup
key;
Note: You can use the earphone switch to answer calls if the earphone is inserted and you can automatically
answer the calls if you have set the auto answer and inserted the earpho ne 5 secon ds of incoming call.
15

4.5 Call Services
4.5.1 Process of Call
Access to the process of call when both ends are connected through.
Items displayed on the screen during calls include caller picture if you have set it; name or phone number;
call duration if you have activated this feature in the phone settings and SIM Card status of call.
4.5.2 Operations of Functions
Touch the options during calls with the touch pen to access the call service options; you can press the
Hookup key to hook up the present call; the current call will be automatically held if you make new call.
z Hookup key: It’s used to hook up calls.
z Left and right direction keys: It’s used to switch over several calls.
z Up and Down direction keys: It’s used to adjust the volume of microphone.
z Left function key: It’s used to access the call options during calls.
4.5.3 Call Options
Access the call options in Call Interface with the touch pen. This interface is only visible during calls. You
can operate as below for Call Options:
z Hold the single call: Pause one of calls during Multi-party Conversation.
z End the single call: End the current call.
z New conversation: When one of calls is paused during Multi-party Conversation, you can make a new call.
z Telephone book: Access the telephone book menu.
z Message center: Access the message menu.
z Record: Record the conversation.
z Mute: Turn on or off the mute mode.
z DTMF: Send DTMF signals.
Note: Some menu options only appear in particular cases or shou ld be supported by the local network.
4.6 Auto DTMF
The phone will automatically access DTMF (automatically dial the extension number) when the numbers
inputted contain P after it is switched in.
16

5 Use the Functional Menu
5.1 Function of selecting scrolled search
Press the left function key of MENU or touch MENU on the touch screen with touch pen in standby status to
access the Functional Menu interface, or press OPTIONS during calls to access the call option MENU.
Use the Up, Down, Left and Right keys on the keypad in all main menu or submenu to scroll to the desired
function and then press the Left function key to access the function options; you can press the UP and DOWN keys in
Page Turn menu to turn pages; in touch mode, directly use the auxiliary pen to touch it to access the function options.
5.2 Function of selecting shortcuts
There are shortcut numbers in both the submenus and menu options, corresponding to the due index numbers.
Press the shortcut numbers of menu options to access the corresponding options, and input the shortcut number
in the submenu options in the menu list to highlight and select the corresponding options.
5.3 Exit from Menu
Generally, you can press the Right function key or use the auxiliary pen to touch the RETURN button on the
touch screen in the functional menus to exit from the menu options; or you can press the Hookup key to directly
return to the standby status.
17

6 Telephone Book
This mobile phone is equipped with three kinds of memory banks, including SIM Card 1, SIM Card 2 and
mobile phone, the capacity of mobile phone is 500 records and those of SIM Cards are subject to the types of
SIM Cards.
Access the Telephone Book interface in the main menu interface.
You can select and access the following functions in the telephone book:
z Quick search: Search the records of desired contact persons quickly: In this menu, you can quickly search
for the contact. For example, the first letter of contact person you want to search with the family name of 赵
Zhao is z, just press the numeric key 9 for four times or press letter Z on the keypad of display screen once,
et sic de similibus. After having found the records of corresponding contacts, press the Left function key to
dial the number of the record by IP from SIM Card 1 /SIM Card 2 (the number selected will be dialed by IP
mode), send SMS, send MMS, check, edit, delete, copy, move, copy and send the business card, etc.
z Search for contact: Search the records in the telephone book by names.
z Add contacts: Add a new contact record into the telephone book; you can select the memory position in
SIM Card 1, SIM Card 2 or this phone. The records are different slightly in memory formats that are saved
in SIM Card and mobile phone.
z Copy All: This phone provides six copying modes, including from SIM Card 1to mobile phone, from
mobile phone to SIM Card 1, from SIM Card 2 to mobile phone, from mobile phone to SIM Card 2, from
SIM Card 1 to SIM Card 2 and from SIM Card 2 to SIM Card 1.
z Delete: Delete all or delete one by one from SIM Card 1, SIM Card 2 or mobile phone. To delete all, please
input the mobile phone password, same with the phone password.
z Caller group: This phone provides five caller groups for you; you can separately set up the group name,
caller ring tone, caller picture, video linkage and group members for them.
z Other numbers: You can edit and delete the numbers saved in SIM Card 1 and SIM Card 2, like owner
number, service numbers and emergency numbers, etc.
z Setting: You can set the functions of telephone books, including memory status, prior storage position,
business card setting, my business card, business card version and pronunciation of contact names in the
telephone book.
z Caller picture: Set the pictures displayed in the interface of incoming caller and called.
z Caller ring tone: You can select the ring tones in the echo mode for the caller ring tone, and set them as the
incoming caller ring tone of new contacts, original contacts or caller groups.
18

7 Message
Access the Message Menu from the main menu interface.
7.1 SMS
Touch the SMS menu with the touch pen and access SMS Menu.
This mobile phone supports the enhanced EMS, i.e., you can send and receive the short message inserted
with such attachment as pictures, ring tone and animation. Short message will be saved to SIM Card or mobile
phone as set up by the user when the short message capacity is not full. When you cannot receive any new
message when the short message capacity is full and a flickering icon will appear on the top of home screen to
warn you that the In-Box is full; then just delete some short message to release new free space to the In-Box, and
your mobile phone may continue to receive new short message.
7.1.1 In-Box
This menu contains the In-Box of SIM Card 1 and In-Box of SIM Card 2.
You can check the received short messages in these two In-Boxes, and reply, delete, edit, forward and copy
them into the mobile phone /SIM Card, move them to the mobile phone /SIM Card, delete all, copy all of t hem,
check the number used (dial or save the number) and web-site used (directly link to the web-site contained in the
web-site. When there is no message, the In-Box screen will display “Blank” and read aloud.
7.1.2 Out-Box
This menu contains the Out-Box of SIM Card 1 and Out-Box of SIM Card 2.
You can read the sent short message saved in the out-box in this menu, send, edit, delete and copy them
from SIM Card 1 /SIM Card 2 to the mobile phone /SIM Card, move then to the mobile phone /SIM Card, delete
all, move all of them, check the number used and web-site used.
7.1.3 Compile Short Message
Access the interface of Compile Short Message and operate as below:
z To edit, use the touch pen to touch the input methods at the bottom of screen to select Intelligent Pinyin
(Spelling) input method, Intelligent Case-sensitive English Input Method, Capital & Lowercase Letters
input method, digital input method, Pinyin (Spelling) input method or Stroke input method, the edition
interface will switch to the selected input method interface.
z To input short message contents, touch the Option with the touch pen and complete the edition of SIM Card
1 /SIM Card 2, use the template, insert into objects, text formats, insert numbers, insert names, insert
bookmark and edit the input method. To delete the contents completed, first use the touch pen to clean them.
After having complied the short message, select the OPTION and use the touch pen to select to send it from
SIM Card 1 or SIM Card 2; access the SEND options and select to send, save and send, save, send to
multiple parties and to groups. Press ENTER key with the touch pen to send message and directly input the
numbers or search for the numbers to be sent to by touch pen in the interface of Number to Send. After
having selected, pres ENTER key with the touch pen to send the short message.
z Return to the short message interface after sending out. The phone will receive the message report if you
have set up the short message report feature, please refer to Short Message Settings for the setting method.
Note: Please refer to the Input Method section for details of character input.
19

7.1.4 Common Phrase
You can set some phrases commonly used in this menu for convenient selection and use. Open the
Common Phrase option with the touch pen, and you can see some default phrases, touch one of them to edit,
delete it or establish new short message to the template. Select EDIT to access the interface of Edit the Common
Phrase; edit it, save and modify it with the touch pen. Select DELETE and touch YES with the touch pen to
delete the selected phrase; touch NO with the touch pen to return to the Common Phrase interface. Select new
message to access the interface of Edit Short Message.
7.1.5 SMS Setting
This menu contains the SMS settings separately for SIM Card 1 and SIM Card 2, i.e., please make the
necessary settings first to use SMS function.
Access the submenu and set th e following items:
z Mode setting: Set the suitable mode for the short message of mobile phone. Enter into all modes to set the
folder name, SMS center number, validity period of short message and sending format.
z State setting: Set whether or not to turn on the message report and/or reply path.
z Capacity inquiry: Check the space occupation status of mailboxes in SIM Card or mobile phone.
z Storage position: Select SIM Card or mobile phone as the storage position.
7.2 MMS
7.2.1 Compile MMS
Create MMS contents.
z Addressee: Input the information about the addressee as one or multiple telephone number or E-mail
address, 20 at the most. Press the left soft key “EDIT” and then select to add phone numbers or E-mail
addresses, or add new phone numbers or E-mail addresses. Select “ADD NUMBER” and press the left soft
key SEARCH when the edition area is blank to browse the telephone book and select phone numbers in it ,
then press ENTER to add the selected numbers; Select OPTION and then EDIT on the addressee
notification bar already edited to modify the current phone number or E-mail address; select DELETE to
delete the current phone number or E-mail address; select DELETE ALL to delete all phone numbers or
E-mail addresses of addressees; press ENTER key to confirm the modification of addressee.
z Copy: Phone numbers or E-mail addresses for carbon copy with the same operations of ADDRESSEE.
z Blind Courtesy Copy: Phone numbers or E-mail addresses for blind courtesy copy with the same operations
of ADDRESSEE.
z Subject matter: Input the subject matter.
z Contents to be edited: You can edit the texts, set input method, add pictures, add voice, add video files, add
attachment, add new page before, add new page after, add texts to bookmark, preview, set the interval time,
edit pictures, edit voice, edit video files and edit attachment, etc.;
After having completed the new MMS content, press Up and Down keys to select all ports of MMS, press
EDIT to modify it, press COMPLETE to access OPTION menu, select SEND to send the MMS, select SAVE &
SEND to send it and save it to Out-Box at the same time, select SAVE TO DRAFT to save it to the draft, select
SAVE AS TEMPLATE to save it into the templates, select SEND OPTIONS to access the setting page of MMS,
select EXIT and the mobile phone will ask you whether or not to SAVE and after having selected the desired
option, return to the MMS submenu interface.
7.2.2 In-Box
It contains all received MMS message and for the MMS currently selected, you can check, reply, reply by
short message, reply to all, forward, delete, delete all, save as template, details of message and items used.
20

7.2.3 Out-Box
It contains all sent MMS list and for the MMS currently selected, you can check, forward, edit, delete,
delete all, save as template, details of message and items used.
7.2.4 Draft
It contains MMS list not yet sent out and for the MMS currently selected, you can check, send, edit, delete,
delete all, save as template, details of message and items used.
7.2.5 Template
This menu contains two template modes of User-defined Template and Pre-set Template.
7.2.6 MMS Settings
z Edit: You can edit and set the editing mode, picture zoom-out and auto signature.
z Send: You can set the period of service, report of sent message, report of read message, priority, time
interval and sending time.
z Receive: You can set the master network, roaming network, sending reading report and allowing sending
report.
z Filter: You can set the filtering of anonymous senders and advertisement information.
z Server: You can set, edit and select the network parameters of SIM Card 1 and SIM Card 2.
z Memory status: You can check the MMS memory status.
Note: Please ask your network operator if it can provide the MMS network services and how to apply for the
services.
7.4 Voice Mailbox
You can separately edit the voice mailboxes of SIM Card 1 and SIM Card 2. You can save the received
voice message into the network in this menu and you must dial the voice mailbox number to listen to the
message.
z Edit: You can add and edit the voice mailbox number, to make it much faster and more convenient to use
the functions of voice mailbox.
z Connect to voice: Call the voice mailbox number you set to listen to the leave message.
7.5 Cell Broadcast
You can separately set the cell broadcast of SIM Card 1 and SIM Card 2 with the menus detailed as below:
z Receiving mode: Select to turn on or off it to receive or refuse to receive the cell broadcast information.
z Reading information: Access this menu to read the cell broadcast information you customized by you.
z Language: Set the receiving languages of cell broadcast.
z Channel setting: Set the cell broadcast channel, you can select, add new, edit and delete the chan nels.
Note: The services of cell broadcast and voice mailbox are provided by the operator, so please contact with your
operator for application.
21

8 Call Center
Move the cursor to the call center in the main menu to access this menu.
8.1 Call Record
8.1.1 Call Record of SIM Card 1
Your mobile phone may save 20 recently unanswered calls, 20 dialed calls and answered calls and you can
check these records by this menu.
z Click unanswered calls to check the list of unanswered calls.
z Click dialed calls to check the list of dialed calls.
z Click answered calls to check the list of answered calls.
In the call record list interface, touch the selected call record with the touch pen to check the details of this
record, including date, dialing time, number and call duration.
In the interface of detailed information, touch Options with the touch pen to operate the call record selected
present:
z Delete: Delete this record.
z Save: Save this number directly into the telephone book of SIM Card or this phone.
z Call: Dial this phone number from SIM Card 1.
z Edit: Edit this phone number and save it into the telephone book.
z Send SMS: Directly edit and send SMS from this number.
z Send MMS: Directly edit and send MMS from this number.
8.1.1.1 Delete the Call Record of SIM Card 1
You can select to delete all call records, or separately delete the record lists of unanswered calls, dialed calls
and answered calls.
8.1.1.2 Call Duration of SIM Card 1
There are four submenus for call durations, including last call duration, total dialed call s, total answered
calls and return all time values to zero.
z Last call duration: Check the call duration value.
z Total dialed calls: Check the gross time of dialed calls.
z Total answered calls: Check the gross time of answered calls.
z Return all time values to zero: Clear the timing data and re-start to time.
8.1.1.3 Call Charge of SIM Card 1
The service fees may be charged by the accumulated time duration.
z Last call charge: Check the last call charge.
z All call charges: Check the accumulated call charges.
z Return the call charges to zero: Input PIN 2 Code to clear the price calculator and re-start to charge.
z Cost restriction: You can read, modify or cancel this function. You have to key in PIN 2 Code to modify
and cancel this function.
z Price and rate: You can read, modify or cancel this function. You have to key in PIN 2 Code to modify and
cancel this function.
Note: You have to key in PIN 2 Code for some operations and please get contact with your network operator to get
this code.
22

8.1.1.4 SMS Counter of SIM Card 1
z Sent: Record the quantity of sent short message.
z Received: Record the quantity of received short message.
You can click RESET with the touch pen to separately clear these two short message counters.
8.1.1.5 GPRS Counter of SIM Card
z Sent last time: Record the bytes sent last time.
z Received last time: Record the bytes received last time.
z Send all: Record the total bytes sent.
z Receive all: Record the total bytes received.
z Clear the counter: Clear the data and re-counter.
8.2 General Call Settings
8.2.1 Call Settings of SIM Card 1
z Local number
¾ System pre-settings: Sending the number or not applies the default value.
¾ Hide the number: The opposite party cannot see this phone number during calls, it shall be
supported by the operator.
¾ Send number: The opposite party may see this phone number during calls.
z Call waiting: You can choose to turn on or off the call waiting functions, select INQUIRY to check the
current call waiting status.
z call forwarding
¾ Unconditional forwarding: When this function turns ON, the incoming calls may be forwarded to
the phone number you pre-set in any case.
¾ Forward upon contact failure: When this function turns ON, the incoming calls may be forwarded
to the phone number you pre-set when the caller cannot contact with you.
¾ No Answer Forward: When this function turns ON, the incoming calls may be forwarded to the
phone number you pre-set when your mobile phone does not answer the calls.
¾ Forward on busy: When this function turn s ON, the inc oming cal ls may be fo rwarde d to the ph one
number you pre-set when your mobile phone is busy.
¾ Forward all data incoming calls: When this function turns ON, the incoming calls may be
forwarded to the phone number you pre-set when the incoming calls are data calls.
¾ Cancel to forward: Cancel all call forwarding services.
z Call barring: Restrict the calls to be dialed.
¾ Barring Outgoing calls: Restrict the outgoing calls.
¾ Barring incoming calls: Restrict the incoming calls.
¾ Cancel the barring: Cancel the pre-set barring by inputting the password.
¾ Change the password: Change the password.
z Line Switching: You can switch to Line 1 or 2, and Line 1 is the default one.
Note: If Line 2 is selected, ability to make outgoing calls depends on the services provided by network operator.
z Close the groups: You can select the group list to be closed.
23

8.2.2 Auto Re-dial: When this feature is activated, the phone will automatically re-dial after call failure every
time.
8.2.3 Quick Dial
long time to call the pre-set phone numbers.
8.2.4 IP Dial
number is set, you can use IP function in the telephone book or call record to automatically add the pre-set IP
number before the numbers you dialed to call.
8.2.5 More
z Prompt of call duration: Display the call duration during conversation so that you can know about the call
time actually and select to end the call to save call charge. You can select the prompt type of OFF, One
Sound or Periodical.
z Display of call duration: You can turn on or off the display of call duration.
z Auto time limit: You can set to automatically hook up at some time during calls.
: Set the shortcut dial function. Press the corresponding numeric key in standby interface for a
: Input IP number and press ENTER to complete the setting to cancel and edit the number. After IP
24

9 Settings
Access the Setting menu interface from the main menu. You can set your mobile phone in this menu,
including SIM Card settings, touch screen calibration, mobile phone settings, network settings, security settings
and restore to factory setting.
9.1 SIM Card Settings
g Turn on two SIM cards: Select to turn on both SIM Card 1 and SIM Card 2 at the same time.
g Only turn on SIM Card 1: Select to turn on SIM Card 1.
When this option is selected, the mobile phone will switch to SIM Card 1 and turn off SIM Card 2;
g Only turn on SIM Card 2: Select to turn on SIM Card 2.
When this option is selected, the mobile phone will switch to SIM Card 2 and turn off SIM Card 1;
(Viewed from the back of mobile phone, SIM Card 2 is located above and SIM Card 1 is located below)
g Flight mode: In flight mode, the communication function of mobile phone is turned off, you cannot
make calls, send message and contact with the base station.
In this mode, the mobile phone turns off the signal related functions, but still provides other functions, like
viewing the telephone book, watch the articles and movies, etc. on the mobile phone.
Note: At present, the civil aviation departments have not launched the statute concerning Flight Mode, so
the passengers should still observe the relative regulations on the planes before going aboard to power off the
mobile phone; you can switch to this mode in the mean time like nights to save power— As most power of
mobile phone is consumed for signals and so signals are turned off in flight mode.
9.2 Calibration of Touch Screen
When you think the mobile phone responds inaccurately when the touch pen touches a certain position on
the touch screen, please calibrate the touch screen. Click the center of
till the screen prompts the completeness of calibration. When calibration fails every time after you have clicked
the center, please restore to factory setting.
with the touch pen as per the prompt
9.3 Mobile Phone Settings
z Time and date: Set the time and date.
¾ Set the city: Select a city for the local time zone of this phone.
¾ Time/ date settings: Set the present time and date.
¾ Format settings: Set the display format of time and date as 12 or 24-hour system; date format setting:
Year- Month- Date, Month- Date, Year, Day-Month- Year, Date /Month / Year, Month /Date / Year and
Year /Month / Date.
z Timing Power-On/ Off: You can set 4 time periods to power on or off at the time periods.
z Language: Set the display language of mobile phone menus, including English and simplified Chinese.
z Pre-set input method: Select a default input method.
z Standby menu display: You can set the following items as per your preference:
¾ Wallpaper: You can select the wallpaper for standby interface.
¾ Screen saver: You can select the screen saver pictures.
¾ On Animation: You can select the On Animation.
¾ Off Animation: You can select the Off Animation.
¾ Display the date and time: Select to turn on or o ff this function to set whe ther or not to displ ay the
present time in standby interface.
¾ Display the owner number: Select to turn on or off this function to set whether or not to display
the owner number in standby interface.
z Greetings: When it is activated, the phone will display the greetings upon startup and when it is disabled, it
25

will not.
z Appoint the function keys: You can set up the functions of Up, Down, Left and Right navigation keys in
the standby interface.
z Auto update time: Select to turn on or off this function to set whether or not to automatically update time.
z Handwriting settings: You can set the speed and color of handwriting pen.
z UART settings: You can select SIM Card 1 or SIM Card 2 upon connecting USB line.
z Other settings: You can select to set the brightness and time of LCD background light.
9.4 Network Settings
You can set SIM Card 1 and SIM Card 2 separately.
z Network Selection
¾ Auto: Automatically search for the local network of SIM Cards.
¾ Manual: Search for all networks available at present and register manually.
z Preferred network: You can pre-store several of your favorite networks.
9.5 Safety Settings
9.5.1 Safety Settings of SIM Card
z Lock of SIM Card 1
You can set the safety options of mobile phone in this menu to prevent the mobile phone or SIM Cards
from being used illegally. PIN Code may prevent your SIM Card from being used illegally. If PIN Code is
turned off at present, just select to turn on the protection with PIN Code, and the phone will ask you to key in
PIN Code upon startup; If PIN Code is turned on at present, you can select to turn off the protection with PIN
Code, select Safety Settings -> Change Password ->PIN Code to set new PIN Code, please input the old
PIN Code, new PIN Code and re-input the new PIN Code as per the prompts.
Note: SIM Card will be locked if PIN Code is inputted incorrectly for successively three times; then you have to
input PUK Code to unlock SIM Card. PIN Code and PUK Code may be provided to you together with SIM Card. If
not, please get contact with your network operator. The default PIN Code is generally 1234, please change it to your
own password as soon as possible.
z Fixed dialing
If supported by your SIM Card, you can restrict to only dial the selected telephone numbers. When this
function is enabled, you can only dial the telephone numbers in the fixed dialing list or the telephone numbers
initializing by certain numbers in the list.
Enter into the submenu of Fixed Dialing to make the following settings:
¾ Mode: Turn on or off the fixed dialing function, you have to input PIN 2 Code.
¾ Fixed dialing list: Input the telephone numbers for fixed dialing.
Note: You have to input PIN 2 Code to turn on or off the fixed dialing function; please get contact with your
network operator to obtain PIN 2 Code. Open the menu of Fixed Dialing, enter into the folder and to d isplay the
numbers for fixed dialing.
z Dial barring: Contrary to the fixed dialing, you can set to bar some phone numbers in this menu.
z Change the password: Change the passwords, including PIN 1 Code and PIN 2 Code.
9.5.2 Safety Settings of SIM Card 2
Please refer to the safety settings of SIM Card 1 for details
9.5.3 Phone Lock
The phone lock may prevent your mobile phone from being used illegally.
Press the phone lock to turn on the mobile phone lock password protection and the phone will ask you to
26

key in the mobile phone lock password upon startup next time; press it again to turn off the mobile phone lock
password protection.
Note: The default mobile phone lock password is 1122; please change it to your private password as soon as possible.
9.5.4 Keypad Lock
It’s used to set the waiting time of keypad lock. When it is set, the keypad will be locked automatically
when the mobile phone is not used within the et time. To unlock the keypad, first press the right function key
and then press # key to unlock the keypad.
9.5.5 Change the password:
Note: Some functions shall be supported by your network operator.
Change the phone lock password.
9.6 Restore the Default Settings
Input the phone lock password of 1122 in this menu, press ENTER key and restore the relative parameters
of mobile phone to the initial values. Data in the mobile phone will be still kept.
10 Multi-media
Access the Multi-media interface from the main menu.
10.1 Camera
Select the Camera menu and select the following items for operations: press the left and right navigation
keys to adjust the exposure compensating factor of camera; change the special effect settings; set the white
balance; set the delayed shooting time; set step-and-repeat mode; set the night shot mode; set picture quality and
set picture sizes for photography. Press OK key in the Preview interface to complete the shooting and prompt to
save the pictures. You can press # key in Preview status to switch to full screen. Or you can press the left
function key of Options in Preview status for the following operations:
z Switch to camera
You can select the front and back CCD camera and access to take pictures
z Photo Album
¾ View: View the selected pictures.
¾ Preview mode: You can select the list mode or matrix mode.
¾ Forward: You can forward the pictures as wallpaper, screen saver, startup animation, shut-off
animation, to the telephone book, to MMS and to Bluetooth.
¾ Rename: Rename the selected pictures.
¾ Delete: Delete the selected pictures.
¾ Delete all: Delete all pictures.
¾ Sort: Sort all pictures by name, by type, by time, by sizes or NONE and arrange them by the initial
record.
¾ St orage p ath: You can select to store the pictures to the mobile phone or memory card.
z Camera Settings
¾ Shutter sound: The optional sound effect modes include Sound Effect 1, Sound Effect 2, Sound
Effect 3 and Shut off.
¾ Avoid flicker: The optional modes include 50Hz and 60Hz, 50Hz shall be applied for the indoors
fluorescent lamp lighting conditions in China.
z Picture Settings
¾ Picture size: Press [8] key in Shooting Preview status to switch the settings. The optional modes
27

include 240×320 and 640×480; the bigger is the size, the more space the picture files occupy.
¾ Picture quality: Press [7] key in Shooting Preview status to switch the settings. The optional modes
include low class, middle class and high class; the higher is the quality grade, the more space the
picture files occupy.
z Storage Path
You can select to save the pictures to the mobile phone or memory card.
z Restore to the Default Settings
Restore all settings to the default ones.
10.2 Photo Album
In this menu, you can quickly view the functions of photo album files; please refer to Camera -> Photo
Album of Section 10.1.
10.3 Video Recorder
Access the multi-media interface and touch the video rec order with the touch pen to access the record
preview interface. To preview, press the Left and Right keys to adjust the exposure compensating factor of
camera; or press the Up and Down keys to adjust the amplification factor of camera. Press the Center key to start
to record video or press the left function key OPTION in preview status for the following operations:
z Vide recorder settings
Set the relative parameters of video records:
¾ Avoid flicker: The optional modes include 50Hz and 60Hz, 50Hz shall be applied for the indoors
fluorescent lamp lighting conditions in China.
z Storage Path
You can select to save the pictures to the mobile phone or memory card.
z Restore to the Default Settings
Restore all settings to the default ones.
10.4 Video Player
Select the Movie Player submenu and access the movie list:
z Use the Up and Down keys to select the file to be played, press OPTION key to play, forward, rename,
delete the movie, delete all files, sort and select the storage position.
z Directly click the movie to be selected with the auxiliary pen for corresponding operations.
During the movie play, press the Left and Right keys to control the movie play progress and press OK key
to play/ pause the movie.
10.5 Music Player
Please the Up and Down keys in Music Player interface to adjust the volume; press OK key to play/ pause;
press the left direction key to play the previous music and press the right direction key to play the next music.
Press LIST key in Music Player interface to access the present play list of mobile phone, you can select the
options to play the music files in the list, show the details, add them into ring tone base, update the play list and
set them.
Select the SETTING menu to set the following items:
z Play:
¾ List: Select the music play path as the mobile phone or memory card.
¾ Automatically generate the list: Set to turn on or of this option. When it is set to ON, you can Update
the Play List; if the music play path is set as from the mobile phone, it will update the music files in
the [Archive Management] \Mobile Phone Directory into the play list; if the music play path is set as
28

from the memory card, it will update the music files in [Archive Management]\ Memory Card
Directory into the play list without bothering to modify them manually. When it is set to OFF, you can
select the music files from newly added folders by OPTION to the play list, remove the single music
file from the play list or remove all music files from the play list.
¾ Repeat: You can use the Left and Right keys and set the repeat play mode of music as OFF (no repeat
play), single music and all.
¾ Random: Set the play order separately as ON (random play) and OFF (play as per the current list
order).
¾ Background play: Press the Left and Right keys to set this OPTION as ON to enable the mobile
phone play music in other operator interfaces, except for sound operations, camera operations or
record interfaces.
¾ Bluetooth stereo output: Select to turn on or off the Bluetooth stereo output status.
¾ Bluetooth stereo earphone: Display the Bluetooth stereo earphone status.
¾ Power display style: This phone provides two display styles, and you can select to shut off it.
¾ Lyrics display: You can turn on or off the lyrics display.
Note: As this music player only automatically put the music saved in My Music folder in the memory into the play
list, so you’d better save the downloaded music into My Music Folder of memory.
Warning: Upon using the music play functions of mobile phone, the users shall make sure to adjust the volume to a
proper level to prevent it from impairing your hearing.
10.6 Recording
This mobile phone supports three record formats of WAV, AMR and AWB; you can select one format for
recording, can record the conversation and save it to AUDIO directory of file management.
Touch RECORD with the touch pen in multi-media menu and access the RECORD interface. For the
existing record file, touch it with the touch pen to access:
z Record: Make a new record. Touch RECORD with the touch pen to start recording; then you can record all
kinds of voice, press the left function key to Pause/ Continue to record and after completing the record,
press the right function key and select STOP. Then you can re-edit the filename, and press the left function
key or OK key to access OPTION, select to save the record.
z Play: Play the record file selected currently.
z Attach: Attach and add a new record after the record file selected currently, record in WAV format is not
supported by this phone.
z Rename: Rename the record file selected currently.
z Delete: delete the record file selected currently.
z Delete All: Delete all record files.
z Set: Set the storage position, record format and voice quality. When the file format is changed, the mobile
phone screen will display the time available for recording.
z Forward: Send the current record to the echo mode, MMS and Bluetooth. After being sent to the ring tone
base of echo mode, the record file may be used as the ring tone of incoming call or alarm clock; after being
sent to MMS, the record file may be forward to others in MMS format; after being sent to the Bluetooth,
the record file may be forward to others via Bluetooth device.
Note: When call comes from the recording, the recording procedure will be interrupted and record made before the
incoming call will automatically saved into the phone.
Note: Please take pictures, image pickup and record allowed by laws.
10.7 FM Broadcast
- Channel list: Play the set channel list rapidly.
29

- Manual input: Skip to the channels inputted manually rapidly.
- Auto search and settings: Search for channels automatically and set them into the list.
- Settings: In this menu, you can set the background play, turn on/off the mobile phone speaker and
record formats, etc.
- Record: Record the FM programs.
- Attach: Play the files saved after FM recording.
- File list: Save the files saved after FM recording.
Note: With this function, you can listen to the broadcast and the broadcasting effect depends on the
coverage of broadcast stations within the particular scope.
10.8 FM Timing Record
You can set the time, date and channels and record the programs in the set channels and set time points.
10.9 Composer
Press the left function key and enter into Music Composing interface, press OPTION to set the following
items: Play, Play Speed, Select Music Instrument and Save.
10.10 Mobile TV
Your mobile phone is built in with the handheld video broadcasting receiver that may receive
the telecast, then pull out the antenna at the tail of mobile phone to automatically search for the
TV channels. With the function of watching TV programs, you can select and access the menu of
Mobile Phone TV.
In Play interface, you can click the desired buttons and icons to adjust the volume, video
measurement and shooting screenshot.
Press different OPTIONS to set the following items:
- Channel List: The optimal channel list already searched.
- Area Settings: Select the local area.
- Channel Search: Automatically search for TV channels.
※ Notice that the video effect received by the mobile phone TV is subject to the coverage of local
TV signals.
11 File Management
Access the File Management interface from the main menu to save and control various kinds of files and
documents, including graphs, audio and video files, etc. This mobile phone provides 761K of memory space;
also you can use the memory card to extend the capacity. When you access the File Management menu, all and
remaining available memory space will appear on the right upper corner of screen. Touch the OPTIONS on the
mobile phone or memory card with the touch pen upon inserting the memory card to display all folders and
select the following items:
z Open: Open an appointed file folder.
z Create a new Fold: Create a new file folder.
z Format: Format the files.
Note: By selecting FORMAT, you will lose all data saved in the file system.
Touch the file folders with the touch pen to check the differetn file foldes; touch the OPTIONs for the
folowing operations:
z Open: Open this file folder and check the contents.
30

z Create a new Fold: Create a new file folder.
z Rename: Change this folder name.
z Delete: Delete this file folder.
z Sort: Select the folder sort means as by names, by types, by time or sizes, or None (not sorting). Note:
Some file folders in this menu are hidden in default status and so when the user save the files in relative formats in the
rooth directory of mobile phone, the system will automatically display them, then the user can move these files to the
corresponding file folders.
31

12 Entertainment and Games
12.1 Games
This mobile phone only provides one game; please refer to the User Instructions for the details operations.
z Continue
In this OPTION, you can select to continue with the game interrupted last time and not re-start. During
games, you can press the right function key to exit from the OPTION list and then CONTINUE option will
appear at this time.
z New Game
Restart the game.
z Game Mode
With this function, you can set the difficulty level of game and this function is only available for Mah-jong
game.
z Top Ranking
With this function, you can check various levels of highest score records of this game.
z Game Help
With this function, you can see the simple game rules before starting the game. Press the left function key
to check game rules.
z 12.2
¾ Background sound effect: Turn on or off the background sound effect.
¾ Sound effect: Turn on or off the sound effect of game
¾ Game vibration: Turn on or of f the game vibration.
32

13 Echo Mode
Access the Echo Mode interface from the main menu.
The user can select different echo modes, and at the same time, the user can self define a few of echo
modes. This phone can provides six types of echo modes, including generally mode, meeting mode, outdoor
mode, indoor mode, earphone mode and Bluetooth mode、.
13.1 General Mode
You can select to activate or make Personal Settings in this menu.
z Activate: Active the general mode.
z Personal Settings: Access this mode for self-definition items, including ring tone settings, volume, ring
pattern, ring type, incoming numbers pronounced orally, warning tone, answer mode.
¾ Ring tone settings: Change the ring tones for the incoming calls of SIM Card 1 /SIM Card 2, startup,
shut-off, message and keypad tones of SIM Card 1 /SIM Card 2. You can select the pre-set ring tones
or select the recorded or downloaded ring tones.
¾ Volume: Adjust the volume of ring tone and keypad tone, with Levels 1-7 for options.
¾ Ring pattern: Select one ring pattern as ring tone, vibration, vibration and ring tone or ring tone after
vibration.
¾ Ring type: Select the ring type as one sound, continuous sound or increasing ring.
¾ Warning tone: Set the warning tone of several events as warning tone, error, network connection or
call connection.
¾ Answer mode: Set the answer mode as answer by arbitrary key except for Dial and Power keys, also
you can set the answer mode as answer mode in earphone mode.
13.2 Meeting Mode
The operations are same with those of general mode.
13.3 Outdoor Mode
The operations are same with those of general mode.
13.4 Indoor Mode
The operations are same with those of general mode.
13.5 Earphone Mode
It will automatically access the earphone mode when the earphone is inserted. This mode is not furnished
with startup options. The personal setting operations are same with those of general mode.
13.6 Bluetooth Mode
It will automatically access the Bluetooth mode when the Bluetooth is turned on. The personal setting
operations are same with those of general mode.
Note: Press # key in standby status to turn on or off the mute mode.
33

14 Tool Kit
Access the Tool Kit interface from the main menu.
14.1 Calendar
With this function, the user can check and edit the events at the appointed data. Select the CALENDAR
menu and press the optional function key for the following functions:
z Time table: You can check or edit the schedule of current day; please refer to the “To-do” Section for
detailed operations.
z New To-do: Add new schedules.
z Skip to the appointed date: Skip to the appointed date to check or edit the schedule of current day.
z Inspect by week/ by month: Inspect by week/ by month.
z Lunar calendar: Turn on or off the lunar calendar settings and set whether or not to display the lunar
calendar upon setting the calendar inquiry.
14.2 To-Do
You can check all stored missions. To-Do menu contains the memorandum of missions from the beginning
to the updated items. You can make the following operations for the existing To-Do items:
z View: View the details of selected mission.
z Add: Add a new mission.
z Edit: Edit the selected mission.
z Delete: Delete the selected mission.
z Delete All: Delete all missions listed for the selected date
z Send time schedule: Send the memorandum by SMS, MMS or Bluetooth or save it into the file folder.
.
14.3 Alarm Clock
Five alarm clocks are provided for the user and the user can set them as per their own demands. The alarm
clock icon will not be displayed if the alarm clock is not turned on.
z Select to turn On/Off it.
z Set the time to trigger the alarm clock.
z Select the desired alarm clock cycles as once, every day, self-defined time as one day or several days in a
week by pressing the direction keys to select and completing the selection after having activated the
functional menu.
z Select the snooze time: The default time is 1 to 10 minutes.
z Optional ring patterns include ring tone, vibration and ring tone & vibration.
z Press the right function key to complete the operations.
Note: When you select SNOOZE or do not operate during an alarm clock rings to stop it, the alarm clock will consider that the
user has not heard the ring tone in a default state; it will ring again 4 minutes later as the default, the user can set and change this
default value; When you still select SNOOZE or do not operate, the alarm clock will ring again for every 4 minutes to warn the
user. It will ring for three times and then automatically turn off when you still select SNOOZE or do not operate.
14.4 Universal Time
You can use the left and right navigation keys or touch the left and right keys on the top of screen with the
touch pen to select the city map or browse the city maps in all time zones on the world map and at the same time,
the date and time of selected city will appear on the top of screen, the city, date and time will appear at the
bottom of screen.
34

15 Network Service
Access the Network Service interface from the main menu.
15.1 STK Service
This function shall be provided by your network operator. If the SIM Card and network operator don’t
provide this service, you cannot use this function. Please get contact with your network operator for more
information.
Note: The different SIM Cards will display the different contents.
15.2 WAP
z Home page: Access this menu to directly link to the web-site default in the mobile phone, and obtain the
information about recreation, movie, fashion, making friends and games, etc.
z Bookmark: You can select to enter into the pre-set WAP web-site in this phone.
z History web-site records: The web-sites recently logged in from the mobile phone will be saved into this
menu, you can directly select and access the record.
z Stored web-sites: Store the web-sites edited before hand.
z Please input address: Edit the web-site you want to log in.
z Service In-Box: The cell phone can receive the network service message.
z Set: Set the network by options shown as below: Select SIM Card, Edit Setting Files, Browse Options,
Service Message Settings, Clear Cache and Clear the Personal Information, etc..
15.3 Data Account
Check the information about the account and the manufacturer has made the relative settings before
delivery.
35

16 Additional Functions
Access the Additional Functions interface from the main menu.
16.1 Calculator
This cell phone provides the calculator for the user, with plus, minus, multiply and divide operations. The
steps of using the calculator are shown as below:
z Input the first number: Input the first number to be calculated when 0 appears on the screen and press # key
to input the decimal point.
z Input the operational symbol: Use the touch pen or press the direction keys to select such operational
symbols as +, -, × and ÷ on the screen.
z Input the second number.
z Result: Press ENTER key or touch = symbol with the touch pen to show the result on the screen.
z Continue to calculate: To calculate with the existing result, still use the touch pen to key in the operational
symbol and the second number to calculate.
z Clear: Press the right function key to clear numbers as per the existing input status. The screen will be
cleared to 0 when result is calculated. It only clears the current operated numbers or operational symbol if
you are inputting the number to be operated.
z Exit from calculator function: Press RETURN functional key to exit and when there is no RETURN soft
key on the screen, just press CLEAR functional key to exit step by step.
16.2 Conversion of Exchange Rate
You can convert the exchange rates with this function. Input the exchange rate and touch ENTER key with
the touch pen, and then input the currencies and numbers to be conversed and finally touch ENTER key with the
touch pen to get the value conversed between the local and foreign currencies.
16.3 Stopwatch
16.3.1 General Stopwatch
This menu provides two timing functions of timing separately and timing by cycles.
z Timing separately: It can time separately and every record can only record 20 timing durations at the
maximum.
z Timing by cycles: It can record the timing record every cycle and every record can only record 20 cycles at
the maximum.
z View the record: Access to view the timing record and it will be blank if there is no record here.
16.3.2 Island Stopwatch
You can use 4 directional keys to measure the time at every direction. Press one navigation key and the
island stopwatch starts to time, and the stopwatch in other directions will suspend timing. To clear the island
stopwatch to zero, first press STOP key and press CONTINUE for a long time, the island stopwatch will be
cleared to zero.
16.4 E-Book
Touch the E-BOOK menu with the touch pen to operate the E-book as below:
z Open the E-book: Open and read the E-BOOK.
z Update: Update and arrange the E-BOOKS in the folder.
z System Default Settings: Set the E-BOOK options, including text style, font, size, page curl, auto page
curl, page curl speed, full screen, coding method and storage position.
z Information: Check the title, size and file format of current E-BOOK.
36

z Delete: Delete the current E-BOOK.
z Delete All: Delete all E-BOOKS in this folder.
z For: Sort the E-BOOK by name, by type, by time, by size and None.
z Execute the system default settings: Put all settings of E-BOOK to the system default settings.
z Help: Help you how to use some shortcut operations.
16.5 Bluetooth
This mobile phone supports Version 2.0 Bluetooth specifications and applies the Bluetooth antenna
technique; the mobile phone can be connected to the compatible Bluetooth device by the wireless antenna within
10 meters, approximately 33 feet. As the device supporting wireless Bluetooth technique communicates with
radio wave, so your mobile phone may not be aimed rightly at other Bluetooth device. However, wireless
Bluetooth connection may be disturbed by such barriers like walls or other electronic device.
Access this menu to set the Bluetooth as below:
z Activate the Bluetooth: You can turn on or off it
z Search for the handheld device: First activate the Bluetooth before accessing this menu and at the same
time, activate the Bluetooth earphone (please refer to the Instructions of Bluetooth Earphone for detailed
operations). Access this menu to search for the handheld device and after it has searched the Bluetooth
device, it will prompt to input the password for matching; just input the Bluetooth earphone password and
after matching successfully, you can use the Bluetooth device for calls and MP3 functions, etc.
Note: Different manufacturers will set the different passwords; so please refer to the Instructions of Bluetooth
Device.
z My Device: The handheld device name will be displayed when the Bluetooth is matched successfully and is
being connected.
z Connected Device: The name of connected handheld device will be displayed.
z Set: In this menu, you can set the relative information of this cell phone as below:
¾ This phone may be searched: You can turn on or off it
¾ Name of this phone: You can change the name of this phone.
¾ Request for Certification: You can turn on or off it
¾ Set the sound path: You can select to leave on this mobile phone or switch to the handheld device.
¾ File transfer setting: Access to set the shared directories and directory authority. In the directory
authority setting, you can select the free access or read-only.
z My Bluetooth: Instructions of Bluetooth Device.
Note: MP3 may only be listened only when the Bluetooth earphone is a stereo one.
37

17 Mode Settings
You can set the normal modes and projection mode of mobile phone in this menu.
This mobile phone provides projection function. Select Projection Mode to open the Projection Module
and the functions of this mobile phone will not be affected when it is used as a general projector. Press the
Projection Shortcut for a long time to project the internal data and you can view the contents on the projection
curtain, press the navigation keys and ENTER key to select and operate the corresponding menus. Please refer to
the Instructions for the usage of all menus or select the Projection of Internal Data Source option in the Mode
Setting menu in the main interface to switch to the projection mode. Press the navigation keys and ENTER key
to select and operate the corresponding menus. Please refer to the Instructions for the usage of all menus. In the
Projection Mode, press the Projection Shortcut Key shortly to switch to the high-brightness mode; vice versa,
press the Projection key for a long time to exit from the high-brightness mode.
Note: Then LCD screen will dim and you cannot use the touch screen. The mobile phone shell will get
warmer during projection.
38

18 USB Functions
The use of USB data line will turn on the charging feature of USB. In the operating system of
Windows2000 /XP, you may not install the drivers to use USB data line; in the operating system of Windows98
/98SE, you can download the driver to install and use the USB device. USB provides 3 different functions:
z Compact Flash USB Drive: Connect the data line supplied together with the mobile phone onto the
computer and if the mobile phone turns on, the mobile phone will pop out the USB setting interface with
three options; please select the storage position; if mobile phone is still OFF, you need not to set and the
computer will automatically find the storage space of mobile phone and display USB disc symbol in the
computer and you can view and modify the disc contents on the computer.
z Web camera: Connect the data line supplied together with the mobile phone onto the computer, the mobile
phone will pop out the USB setting interface with three options; please select the web camera. Then the
CCD camera of mobile phone will serve as the computer CCD camera.
Note: This function is available only when the mobile phone is ON.
z Serial Interface: Connect the data line supplied together with the mobile phone onto the computer, the
mobile phone will pop out the USB setting interface with three options; please select the Serial Interface.
Install the software supplied with the cell phone as per the prompt appearing on the computer to dial up.
Note: This function shall be supported by network, please contact with the network operator where necessary.
39

19 Input Methods
19.1 Overview
This mobile phone supports keypad input and touch handwriting in pu t methods.
In the touch handwriting input mode, the mobile phone supports to input Chinese, English (upper and lower
cases), numbers and symbols.
In the touch handwriting input mode, the user can input in two methods: one is to use the touch pen for
handwriting input by the handwriting identification feature of the phone and the other is to click the analogue
keypad at the bottom of Edit interface to input.
19.2 Instructions of Input Methods
19.2.1 Handwriting Input Method
The handwriting identifying input of this mobile phone is applied with the advanced character recognition
technique that supports the handwriting functions including number, English and Chinese.
The user can click the Input Information alert bar on Edit interface as per its own desire to switch over the
supported handwriting recognition types. For example, if the user wants to input English, he can switch the
handwriting recognition type to English input mode.
After having selected the desired handwriting recognition type, the user can directly writing with the
auxiliary pen in the handwriting area. A while after having completed the handwriting input, the screen will
display the result of automatic selecting and identifying characters and display the alternative characters. If the
characters desired by you are not displayed, please click and select the alternative ones to substitute. This cell
phone supports the Chinese association function, so please directly click the associated characters and input it to
the position where the cursor locates.
19.2.2 Intelligent Pinyin (Spelling) Input Method
In the state of Pinyin (Spelling) Input Method, the definitions of keypad are shown as below:
Keys Corresponding Characters or Functions Remarks
Numeric Key 2 abc
Numeric Key 3 def
Numeric Key 4 ghi
Numeric Key 5 jkl
Numeric Key 6 mno
Numeric Key 7 pqrs
Numeric Key 8 tuv
Numeric Key 9 wxyz
* Key Press this key to call out the characters for input
# Key Switch the input methods
UP navigation key Page Up
Down navigation key Page Down
Left navigation key Scroll to the left
Right navigation key Scroll to the right
left function key
right function key
Power key Return to the Standby interface
OK key
z Input with the auxiliary pen:
Select the candidate character inputted
Return or Clear
Select the candidate character inputted
40
Spelling
characters

¾ Key in pinyin/ spelling characters: Click the corresponding letters on the screen according to the
pronunciation spelling of words to be inputted in order to input the desired spelling characters. During
the input, the mobile phone will associate and display the possible Chinese characters in the candidate
field according to the letters already inputted.
¾ Select, determine and input the characters: Select the desired Chinese characters in the screen, and
click to select them.
¾ Select the associated characters: Associated input may offer the associated phrase of last letter, you
can click the screen to select the desired Chinese characters.
Press
Press
Press
Press
Press
to input spacebar.
to exchange lines.
to delete the letters or characters inputted.
to open the analogue keypad interface.
to close the analogue keypad interface.
z Input with Keypad:
¾ Key in pinyin/ spelling characters: Directly press the numeric keys of 2-9 on the keypad and the
screen will display the letter combination keyed in, just select the desired combination. For example,
to input “新”, just continuously press the numeric keys of 9, 4 and 6 where the pinyin/ spelling letters
of this word “xin” are located, the corresponding letter combination will appear and just select “xin”.
¾ Select, determine and input the characters: Press the Up and Down navigation keys to turn pages
up and down and the Left and Right navigation keys to find the candidate Chinese characters and
press left function key or OK key to select the desired Chinese characters.
¾ Select the associated characters: Associated input may offer the associated phrase of last letter, you
can use Up and Down navigation keys to turn pages up and down and the Left and Right
navigation keys to find the candidate Chinese characters and press left function key or OK key to
select the desired Chinese characters. Then just press * key to call out the Chinese character for input.
¾ Edit the inputted words: Press the Left and Right navigation keys to move the cursor right and left,
press the Up and Down navigation keys to move the cursor up and down, and press the right
function key to delete the Chinese characters.
¾ Switch the input methods: Press # key to switch over the current input method circularly and the
corresponding icons will be displayed on the icon area on the screen.
19.2.3 English Input Method
In the state of English Input Method, the definitions of keypad for English Input Method (including upper
and lower case English input) are shown as below:
Keys Corresponding Characters or Functions Remarks
Numeric Key 0 0 and spacebar
Numeric Key 1 Character
Numeric Key 2 ABC2; abc2
Numeric Key 3 DEF3; def3
Numeric Key 4 GHI4; ghi4
Numeric Key 5 JKL5; jkl5
Numeric Key 6 MNO6; mno6
Numeric Key 7 PQRS7; pqrs7
Numeric Key 8 TUV8; tuv8
Numeric Key 9 WXYZ9; wxyz9
* Key Press * key to call out the character input box
# Key Switch the input methods
41

UP navigation key Move up the cursor
Down navigation key Move down the cursor
Left navigation key Move the cursor to the left
Right navigation key Move the cursor to the right
right function key Return or Clear
Power key Return to the Standby interface
z Input with Auxiliary Pen
Input English letters: Click and press the corresponding letters on the screen to input letters according to the
words you want to input.
Press the screen to move the cursor.
Press
Press
Press
Press
Press
to input spacebar.
to exchange lines.
to delete the letters inputted.
to open the analogue keypad interface.
to close the analogue keypad interface.
z Input with Keypad
General operations for English Input Method:
Every key is used to input a few of characters. Just press it repeatedly and rapidly till the desired character
appears.
To input the English punctuation marks and some special symbols in English Input state (including upper
and lower case English), just press * key to call out the special symbol input box.
Press # key to switch the input methods.
Press Numeric Key 0 to input a spaceb ar in Upper or Lower Case state.
Press the right function key to clear the input errors and press the right soft key for a long time to clear all
items inputted currently.
19.2.4 Digital Input Method
The definitions of keypad for digital input method are shown as below:
Definitions of Keypad for Digital Input Method
Keys Corresponding Characters or
Functions
Numeric Key 1 1
Numeric Key 2 2
Numeric Key 3 3
Numeric Key 4 4
Numeric Key 5 5
Numeric Key 6 6
Numeric Key 7 7
Numeric Key 8 8
Numeric Key 9 9
Numeric Key 0 0
# Key Switch the input methods
UP navigation key Move up the cursor
Down navigation key Move down the cursor
Left navigation key Move the cursor to the left
Right navigation key Move the cursor to the right
42

left function key OPTION
right function key
Return or Clear
Power key Return to the Standby interface
z Input with Auxiliary Pen
Press the numbers on screen to input the corresponding numbers.
Press
Press
Press
Press
Press
to input spacebar.
to exchange lines.
to delete the letters inputted.
to open the analogue keypad interface.
to close the analogue keypad interface.
z Input with Keypad
General operations for Digital Input Method:
Press Numeric Keys 0-9 to input the corresponding numbers.
Press # key to switch the input methods.
Press the right function key to clear the input errors and press the right soft key for a long time to clear all
items inputted currently.
19.2.5 Stroke Input Method
The definitions of keypad for stroke input method are shown as below:
Numeric
Keys
1
2
3
4
5
6
7
Strokes of
Source Letter
Basic
Strokes
Name Words for Example
Horizontal stroke
Rising stroke
Vertical stroke
Vertical hook stroke
Left falling stroke
Dot
Right falling stroke
Horizontal hook stroke
Horizontal turning stroke
Horizontal Turning Hook Stroke
Horizontal Left-falling stroke
Horizontal Turning Turning
left-falling Stroke
Horizontal Left-falling Curved Hook
Stroke
Horizontal plus twice hold and hook
Stroke
Curved hook stroke
Vertical Turning stroke
Left-falling Turning Stroke
Left-falling Dot Stroke
Vertical Rising Stroke
Slanting Hook Stroke
Lying Hook Stroke
Vertical Curved Stoke
王 十 在
次 红 刁
中 业
小 水 打
八 你 所
六 学 州
人 八 火
写 字 皮
口 已 户
包 力 羽
又 之 社
及 廷
队 那 部
乃 奶 扬
家 狗 豹
山 巨 屯
去 约 能
女 巡 巢
衣 以 饭
我 或 民
心 必
四 西
43

Vertical Curved Hook Stroke
Vertical Turning Left-falling Stroke
Vertical Turning Turning Hook
Stroke
Vertical Turning Turning Stroke
8
9
Horizontal Turning Curved Hook
Stroke
Horizontal Turning Turning Stroke
Horizontal Turning Rising Stoke
(Intelligence Keys)
已 也 毛
专
马 与 张
鼎
飞 九 风
投 船 凹
话 计 认
General operation orders of stroke input method:
z Key in strokes: Press the corresponding numeric keys as per the standard strokes of Chinese characters to
input the strokes and the mobile phone will display the candidate Chinese characters corresponding to the
strokes inputted; with the stroke input method, you can input the indexing component of Chinese characters;
press the left function key to select the indexing component; and press the right function key to delete the
last stroke.
z Select, determine and input the characters: Press the Up and Down navigation keys to turn pages up
and down and the Left and Right navigation keys to scroll the cursor right and left to find the candidate
Chinese characters and press left function key to select the desired Chinese characters.
z Select the associated characters: Press the Up and Down navigation keys to turn pages up and down and
the Left and Right navigation keys to scroll the cursor right and left and press left function key to select
the desired Chinese characters.
z Edit the inputted words: Press the Left and Right navigation keys to move the cursor right and left,
press the Up and Down navigation keys to move the cursor up and down, and press the right function
key to delete the Chinese characters.
44

20 Appendix
20.1 Security of Battery
z Please only use the battery specified by your mobile phone manufacturer. The use of any other accessories
may nullify all warranty service clauses. Your mobile phone manufacturer will bear no liability for the
damages caused by your use of accessories not produced by the mobile phone manufacturer.
z The new battery will only come to the optimal performances after having been completely charged and
discharged for twice and thrice.
z The battery may be charged and discharged for hundreds of times, but will nullify finally. For this account,
please purchase and replace with new battery when finding the call time and standby time of battery are
curtailed obviously.
z Please disconnect the power supply of charger when it is not used and never connect the battery to the
charger for over one week as charging in excess may abridge the service life of battery.
z Never cause the short circuit of battery contacts with the metal objects like the keys in pocket, etc..
z Never bend or open the battery forcibly.
z Never dip the battery in water or put it to fire.
z Charge the battery in the temperature closer to room temperature. And it’s impossible to charge battery
when the temperature is below 0 centigrade or above 45 centigrade.
20.2 Usage and Maintenance
This mobile phone is a hi-end product, so please use it carefully. Please refer to the following proposals to
use and maintain this mobile phone in a better way.
z Put the parts of mobile phone in places out of the reach of children.
z Keep the mobile phone dry as rain water, moisture and all kinds of liquids or moisture may contain the
minerals that may erode the electric circuit.
z Never put or use the mobile phone in dusty and dirty places.
z Never put the mobile phone in hi-temperature places as high temperature may curtail the service lives of
electronic device and damage the battery, or distort or melt some plastic parts.
z Never put the mobile phone in low temperature places and it may produce moisture inside the phone when
the mobile phone is moved from low temperature place to high temperature place, it may damage the
circuit board.
z Never try to dismantle the mobile phone as improper handling of non-professionals may destroy the device.
z Never throw, knock on or jolt the mobile phone, the gruff usage may damage the internal main board.
z Never clean the mobile phone with irritant chemicals, detergent or corrosive detergent. Please wipe and
clean the mobile phone slightly with the soft cloth dipped in the moderate suds.
z Never paint the mobile phone as it may affect the moving parts of phone and affect the normal operation of
it.
z Only use the qualified replaceable antenna provided together with the mobile phone and the use of
unrecognized antenna or other parts may destroy the mobile phone.
z If the mobile phone is wetted by carelessness, please power it off and take out the battery, wait for the
mobile phone to dry within 24 hours and re-use it.
z During the use of this mobile phone, please apply the energy-saving means by tune down the volume and
curtailing the background lamp service time on the screen, etc. and it’s helpful to prolong the standby time
of mobile phone.
z Never contact the metal objects, except for the particularly configured charger interface and data line
interface, with the mobile phone charger interface to avoid short circuit.
45

20.3 Troubleshooting
In case of any anomaly during the operation of mobile phone, please refer to the following table to solve
the failures. If the failures cannot solved, please get contact with the dealer or service provider.
FAQ Causes Solutions
It cannot connect
to Internet when
using the wireless
Internet service
SIM Card fault
Poor reception
The network service provider does not
provide the service or you have not applied
for the service
You have not set it correctly
SIM Card is damaged Contact with your network service provider
SIM Card is not loaded correctly Examine the SIM Card
SIM Card metal surface is dirty Wipe with clean cloth
Radio wave cannot be effectively transmitted
when the mobile phone is used in the place
with poor receiving effect, like high-rise or
basement
Please contact with your network service
provider to ask how to apply and use the
service
Please refer to the introduction of wireless
Internet service
Make or answer calls in place with sound
signals
Use the mobile phone during the call
intensive period with busy services
Startup failure Battery power runs out Replace with new battery
Failure to make
calls
Failure to connect
to Internet
Failure to charge
Call barring feature is enabled Cancel the call barring feature
SIM Card is null and void Contact with your network service provider
Out of the GSM service zone
Signals are weak Try in the place with stronger signals
Inconformity of voltage and the nominal
charger voltage
Non-standard charger is used
Poor contact Examine if the plug is connected well
Never use the mobile phone during busy
hours
Move to the service zone of network
service provider
Please apply the voltage in compliance
with the nominal charger voltage
Please use the charger specially designed
for this mobile phone
46

This device complies with part 15 of the FCC rules. Operation is subject to the
following two conditions: (1) this device may not cause harmful interference,
and (2) this device must accept any interference received, including
interference that may cause undesired operation.
NOTE: The manufacturer is not responsible for any radio or TV interference
caused by unauthorized modifications to this equipment. Such modifications
could void the user’s authority to operate the equipment.
NOTE: This equipment has been tested and found to comply with the limits for
a Class B digital device, pursuant to part 15 of the FCC Rules. These limits
are designed to provide reasonable protection against harmful interference in
a residential installation. This equipment generates uses and can radiate
radio frequency energy and, if not installed and used in accordance with the
instructions, may cause harmful interference to radio communications.
However, there is no guarantee that interference will not occur in a particular
installation.
If this equipment does cause harmful interference to radio or television
reception, which can be determined by turning the equipment off and on, the
user is encouraged to try to correct the interference by one or more of the
following measures:
- Reorient or relocate the receiving antenna.
- Increase the separation between the equipment and receiver.
-Connect the equipment into an outlet on a circuit different from that to which
the receiver is connected.
-Consult the dealer or an experienced radio/TV technician for help.
 Loading...