

Page 1

LA3D-S2
DETACHABLE WIRED CONTROL GIMBAL
3-Axis Handheld Gimbal for Smartphone
USER MANUAL
Contact us for further Questions!
HONGKONG LANPARTE TECHNOLOGY LIMITED
Email:[email protected]
Tel:+86-0769-81889368
Fax:+86-0769-85841828
ADD:NO.39, 2nd Xin’an road
Changan Town, Dongguan, Guangdong, China
www.lanparte.com LA3D-S2 manual
Page 2

1
2
Appearance and Design
1
Smartphone clamp
Counterweight
Joystick
Mode indicator
Mode button
Power indicator
Power button
USB port for setting
and firmware upgrade
2 pcs 18350 Li-ion batteries
Attention!
Make sure to attach smartphone before turning on power.
Gopro mount
(Fits smartphone between 4-6”wide)
Pitch axis adjustment screw
(detachable, with 1/4 -20 thread )
1/4-20 thread
Page 3
3.1
3
4
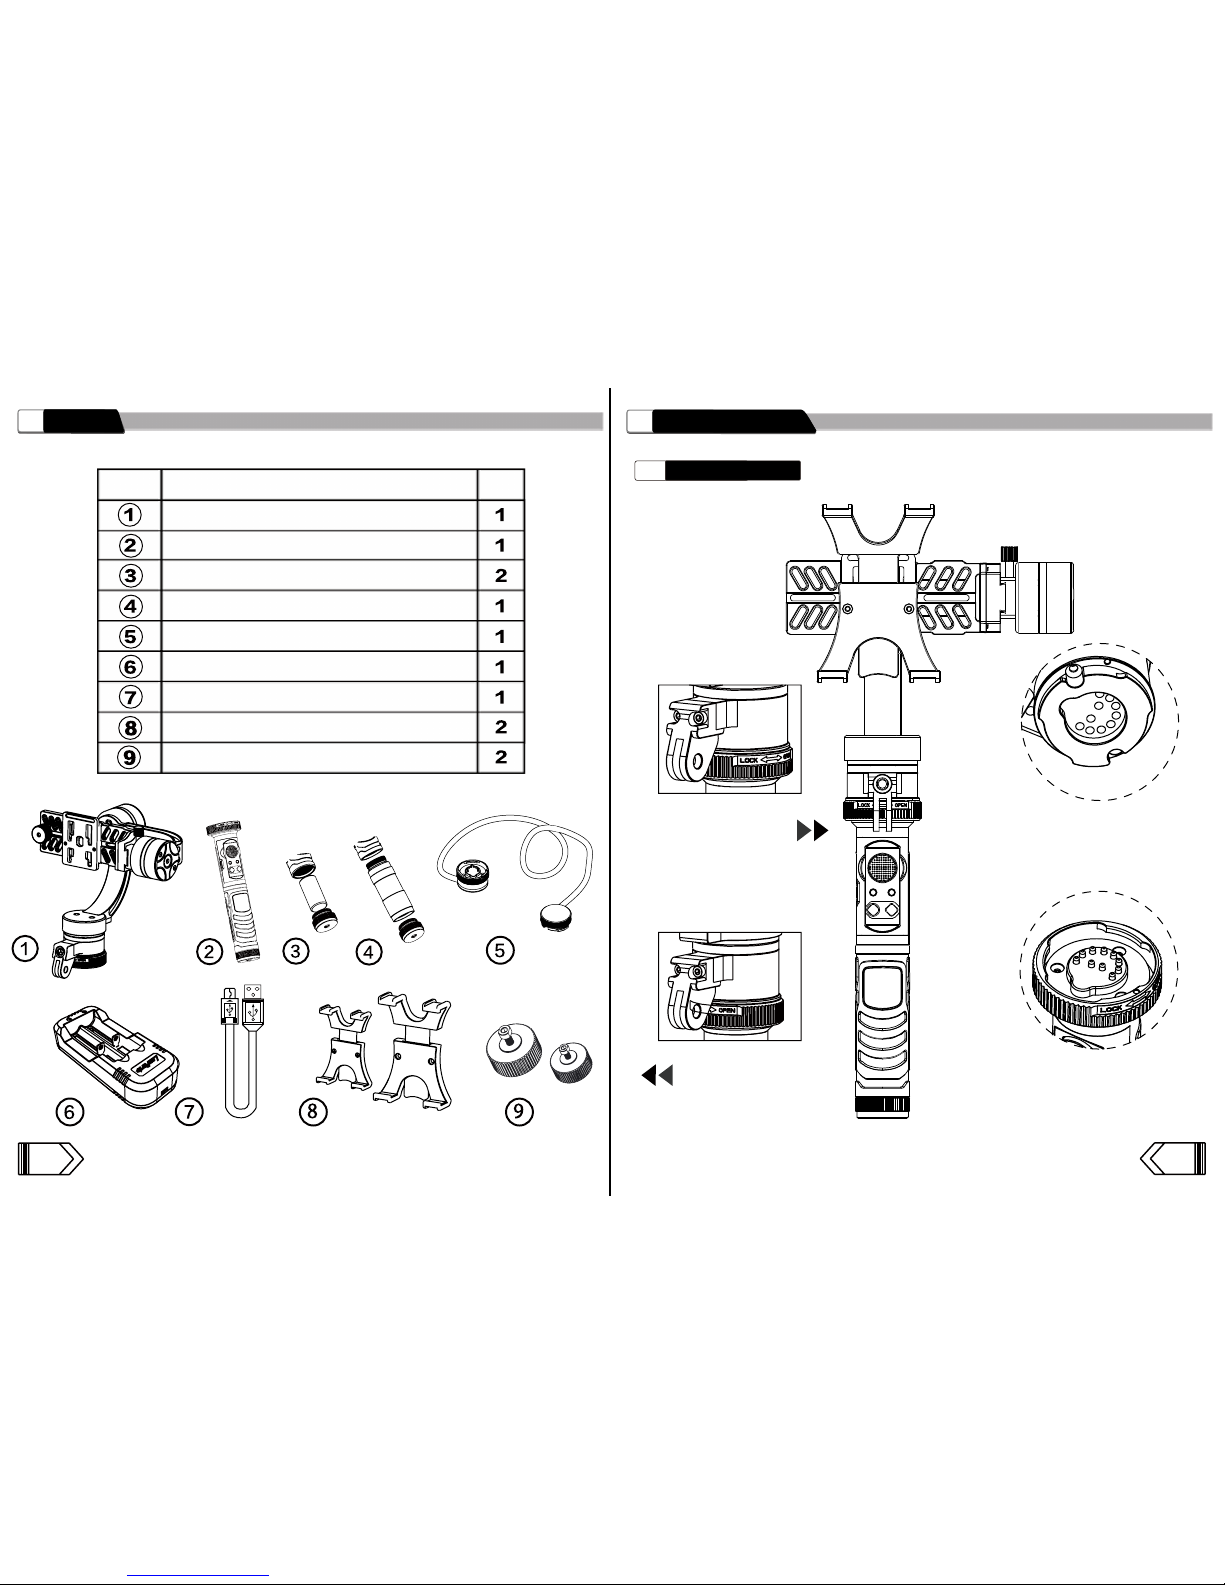
3-Axis handheld gimbal head
2
Serial No. Item Name
QTY
Gimbal handle
18350 Li-ion battery
Handle extender
Wired control cable(1.5m)
Battery charger
Micro USB cable (For battery charger)
Smartphone clamp
Counterweight
3
*Ensure that the pins are in contact
with each other before tightening the locking knob.
Align the contacts on the
handle and gimbal head
and turn clockwise.
*Same process to
connect the wired control cable
Turn clockwise
to lock
Turn counter
clockwise to open
Gimbal Installation
Gimbal InstallationItem list
Page 4
Battery Instructions
3.2
Adjustment knob
5
6
Scenario 1 Scenario 2
Not OK
Scenario 3
Scenario 4
(with extender tube)
OK
(with extender tube)
OK
Operation
4
Balance adjustment
4.1
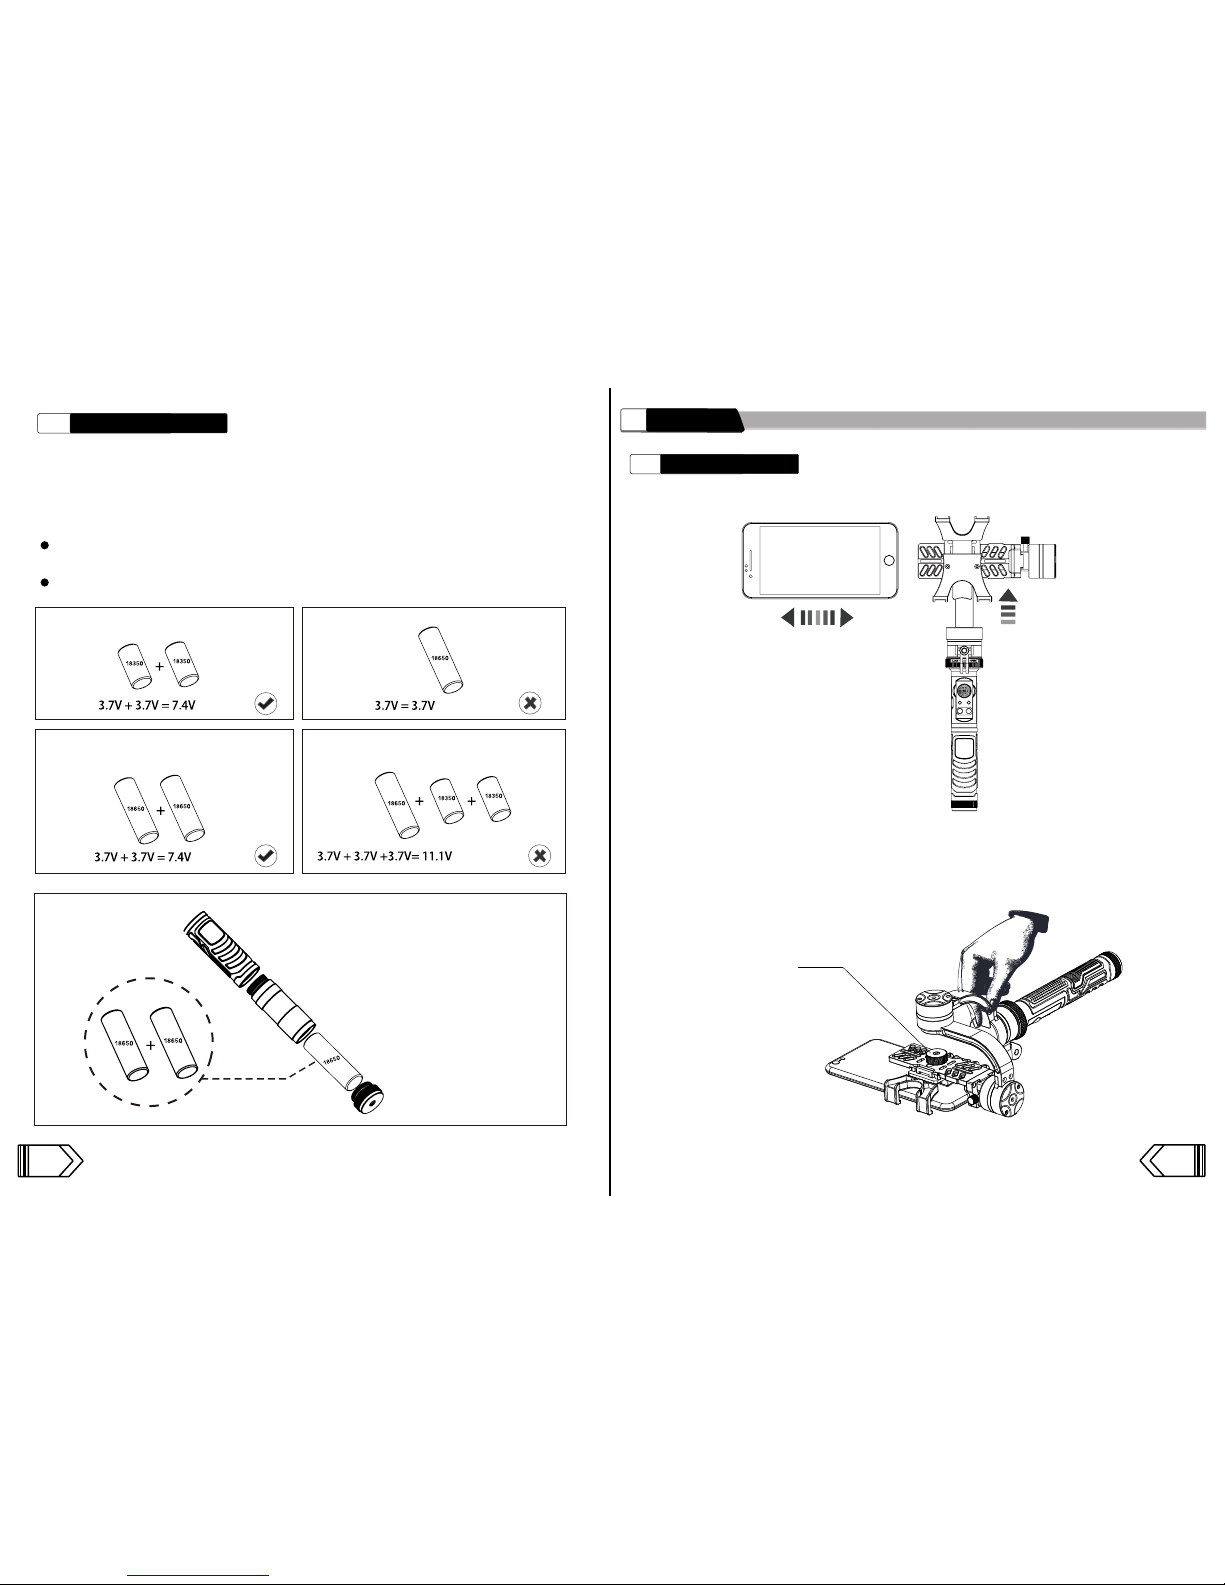
*Please note that the nominal Voltage of the gimbal is 7.4V
Each 18350 & 18650 battery is 3.7V. Therefore, the gimbal MUST operate on a
maximum of TWO batteries.
Batteries must be combined as per below scenarios:
Battery installation:
Unscrew the battery compartment cap and install two 18350 batteries; or add the handle
extender and install two 18650 batteries (install the positive end first)
Not OK
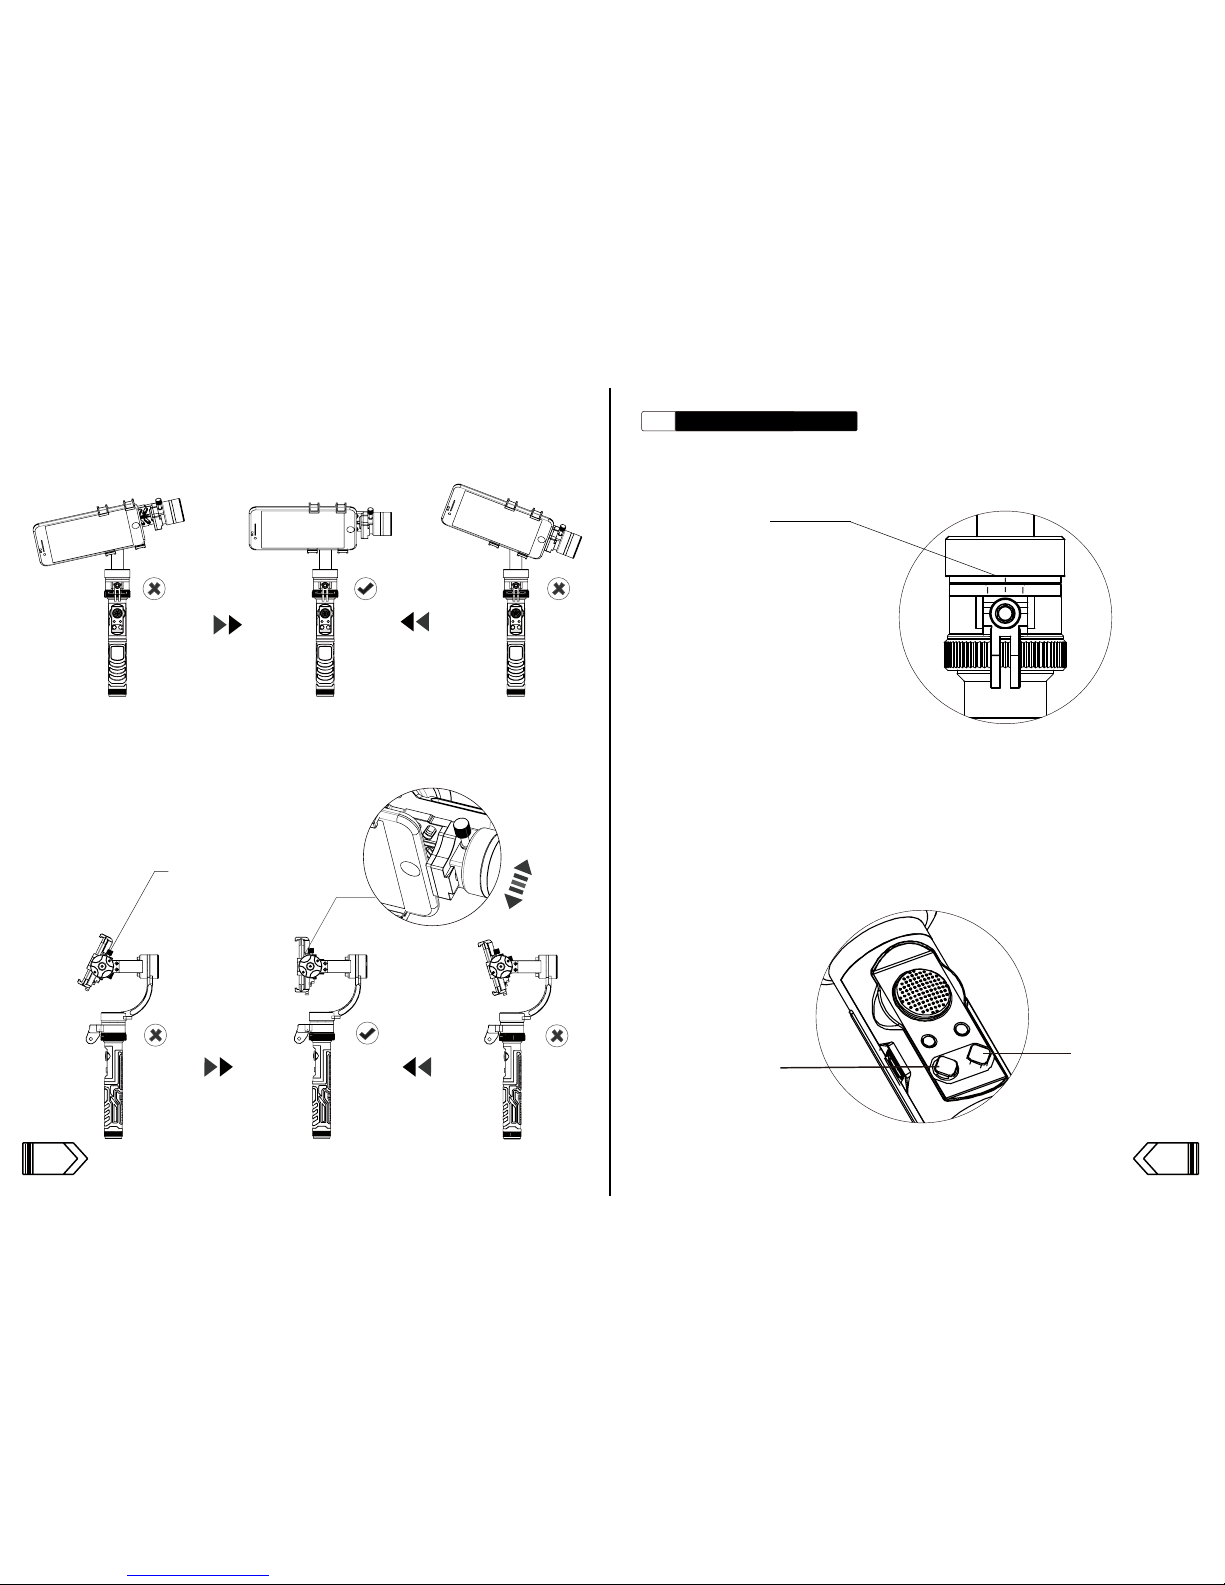
A. Open the smartphone clamp and insert the smartphone
B. Hold the handle as shown below, loosen the black adjustment knob, then slide the
smartphone forwards or backwards until the smartphone is leveled. Let go of the
smartphone and if it stays leveled, tighten the black adjustment knob. Otherwise,
make the necessary adjustment until achieving balance.
Extending the tube to
install 2pcs 18650 batteries.
Make sure to attach extender before
installing the 18650 batteries.
Handle extender
Page 5
Powering on/mode switch
4.2
7
8
C. Slide the smartphone left to right in the clamp to achieve horizontal balance. For
smaller smartphones like the iPhone 6, add the counterweight. For other smartphone
and aftermarket lens or mic combinations, use counterweights as necessary.
D. Loosen the silver adjustment screw, then slide the smartphone forwards or
backwards until vertical balance is achieved. Tighten the silver adjustment screw.
A. Before turn on the power, make sure the white line points in the middle position
B. Powering on the gimbal.Hold the power button for 2 seconds until the power indicator
turns on. The gimbal is now in STANDBY mode.
Operation modes- Hold the MODE button for 4 seconds. The gimbal will stabilize the
smartphone and enter the Default Mode 1, Follow Mode. Quickly double-tap the mode
button to enter Mode 2.Quickly triple-tap to enter Mode 3.Single-tap to return to Mode 1.
the pitch axis adjustment screw
Power button
Mode button
Zero point
Page 6
Mode
button
Single-tap
Double-tap
Red
Green
Blue
9
10
4.3
Function/Mode switching
6
Function
Activating By Remarks
Control
Button
Power on
Press Power button for 2
seconds.
The power indicator
will blink.
Standby/ Operation
mode switching
Mode
button
In standby mode, press the Mode
button for 4 seconds; Press the
Mode button for 4 seconds to
revert back to standby mode
180° rotation
function
Power
button
While the gimbal is stabilized, tap
the Power button once. Tap the
Power button to rotate back to the
original position.
The gimbal must be
horizontally even (Yaw)
before 180° rotation; the
portrait mode and 360°
full-circle function are not
available when rotated 180°.
Power
button
Portrait mode
Power
button
Double-tap Power button while in
Operation mode; Repeat to return
to landscape mode.
360° panorama
Power
button
Power
button
Power off
Triple-tap the Power button while
in Operation mode
The gimbal must be
horizontally even (Yaw)
before 180° rotation; this
function will only work when
holding the gimbal upright.
Press the Power button for 2
seconds
Mode Switching
5
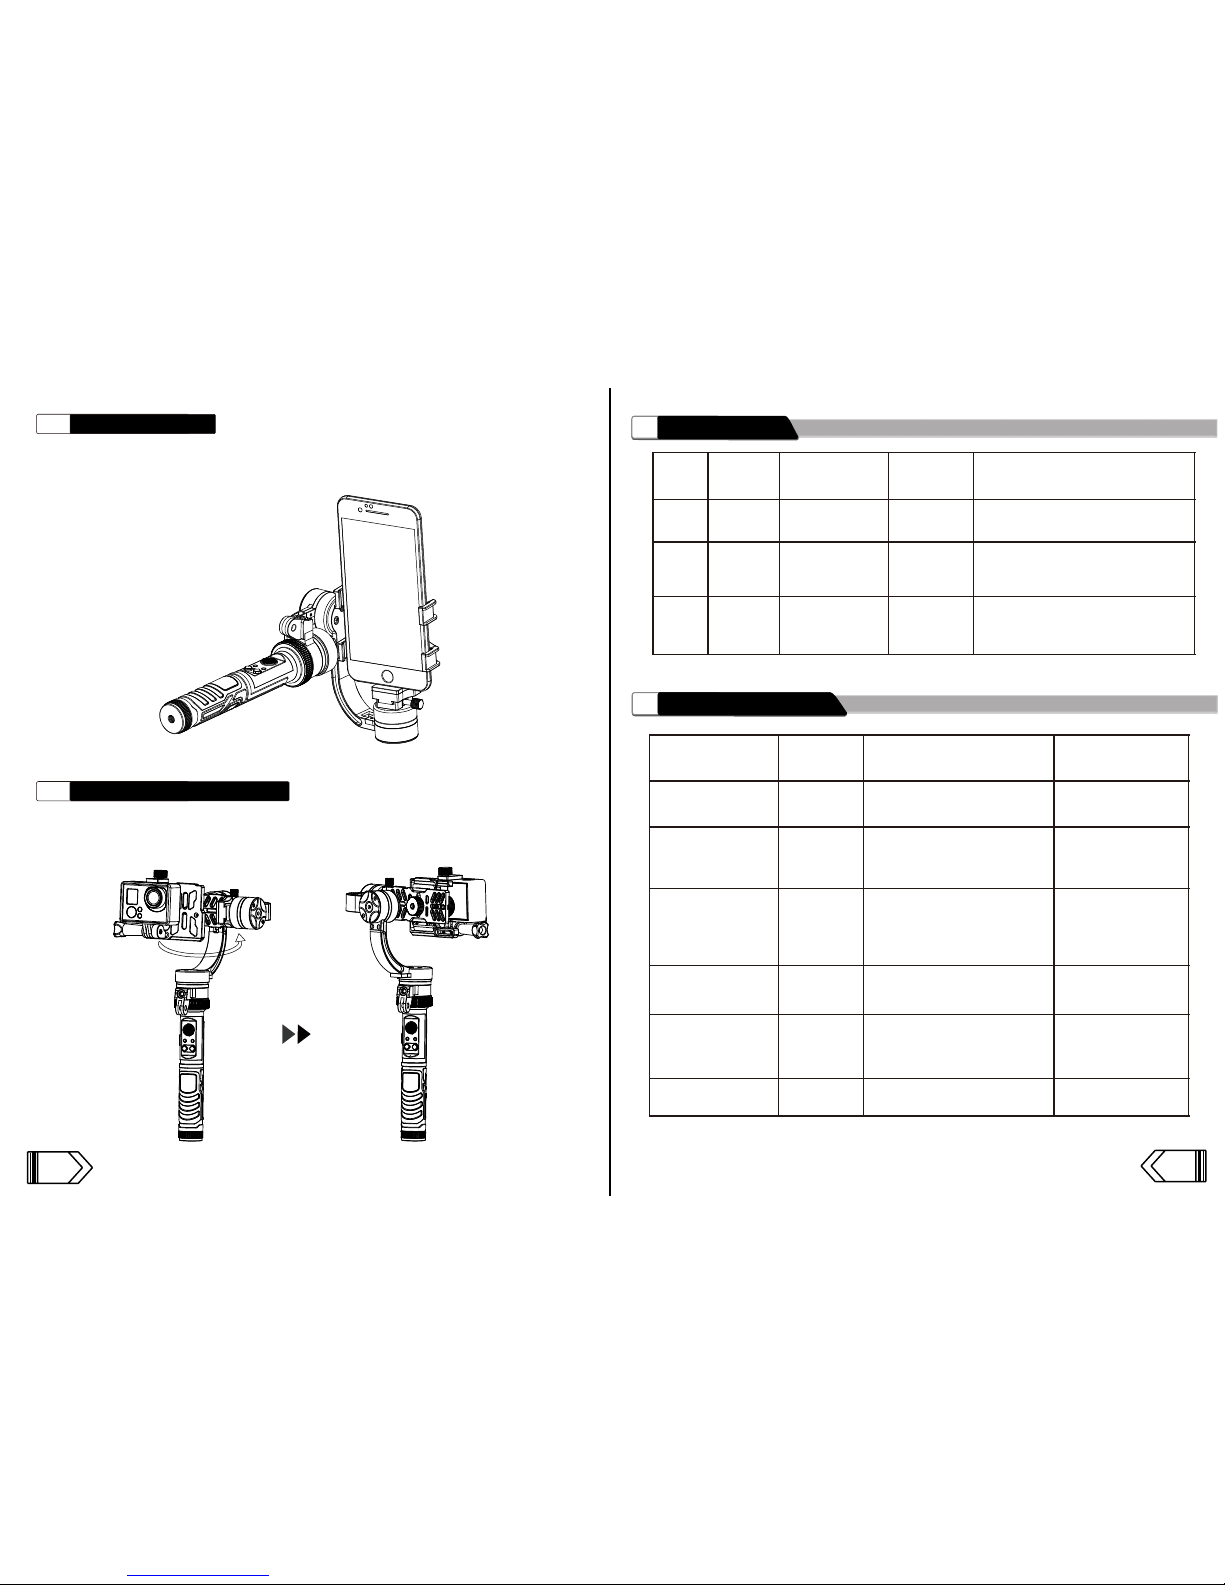
Unscrew the smartphone clamp, then mount the action camera adapter to the
gimbal plate. Tap the power button once to switch the gimbal head for
180°.
Action camera adapter(option)
4.4
Modes
Mode1
Mode2
Mode3
Control
Button
Mode
button
Mode
button
Triple-tap
Push the joystick left and right to
adjust the Roll.
Push the joystick left and right to
adjust the Roll; up and down to
adjust the Pitch (Tilt).
Push the joystick left and right to
adjust the Yaw (Pan); up and
down to adjust the Pitch (Tilt).
Direction Control
Mode
Indicator
How to activate
(in Operation mode)
Double-tap the POWER button to enter portrait mode. Repeat the double-tap to switch
back to landscape mode.
Portrait vertical mode:
180°
Page 7
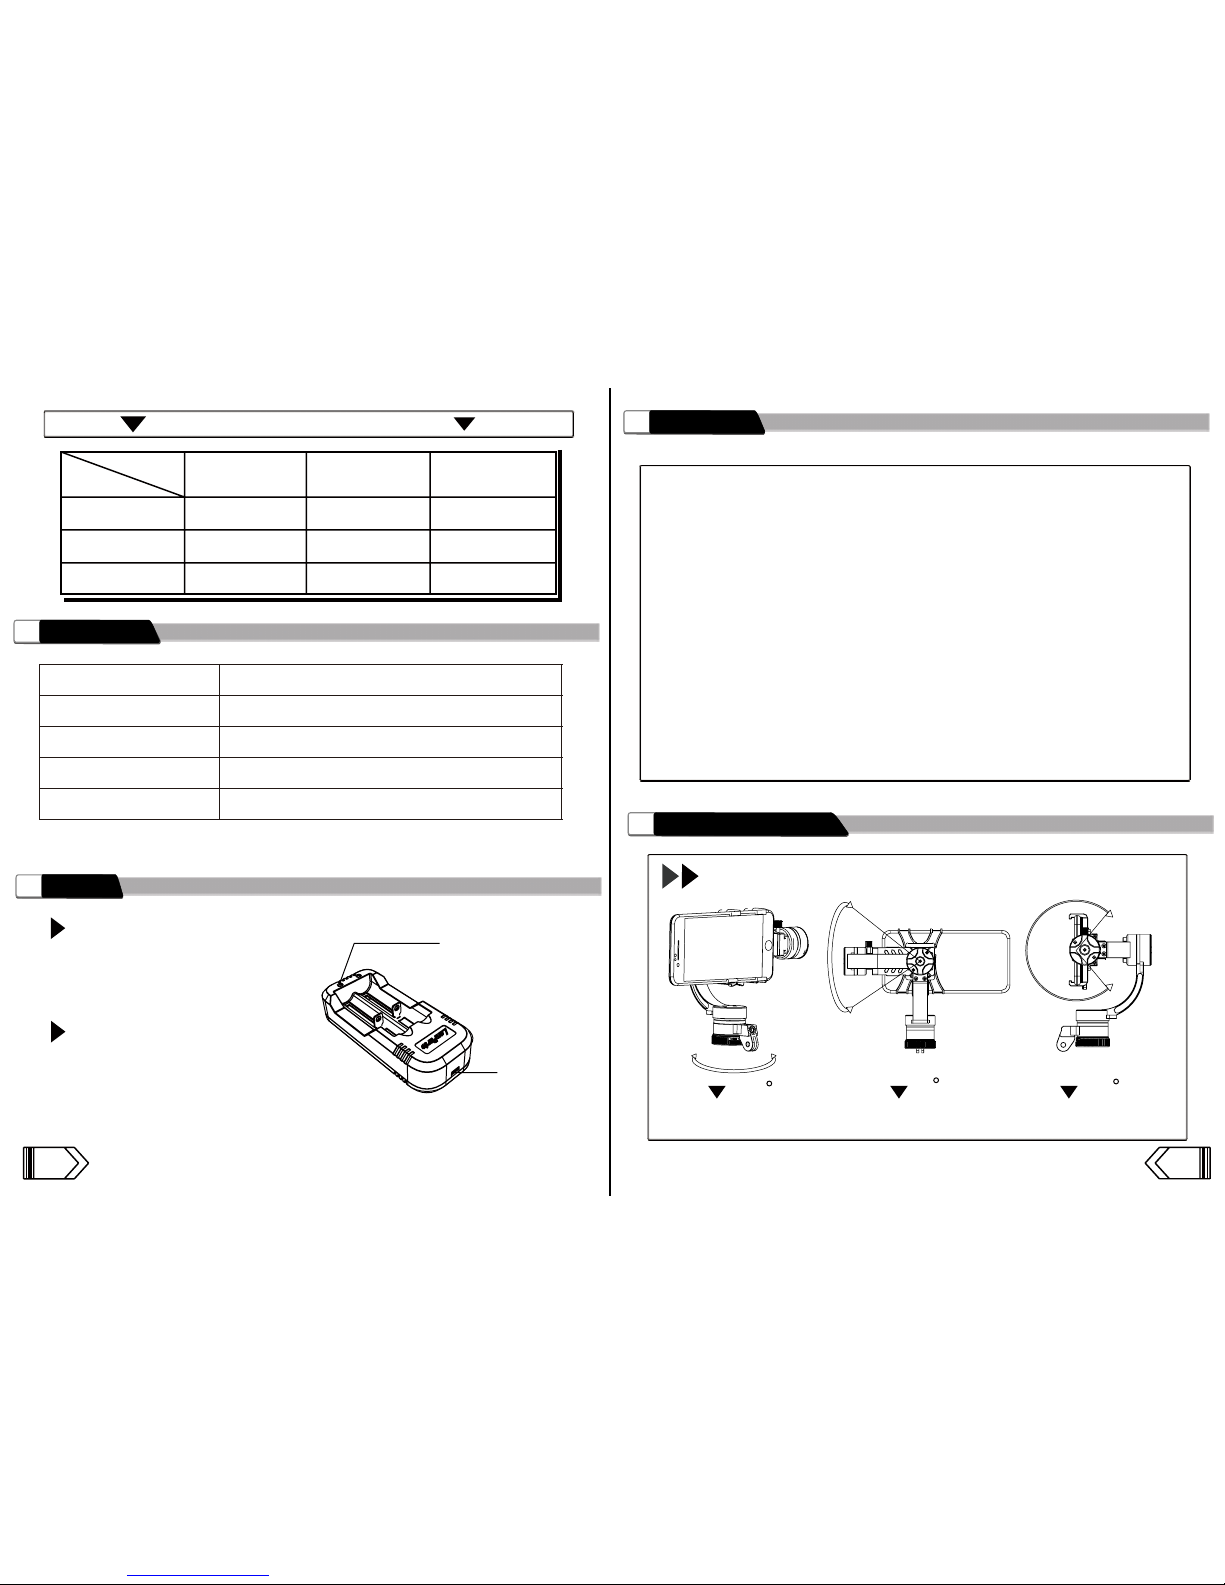
Operating mode and Axis status
Power Display
7
Power Indicator Status Indicator Status
75%-100%
50%-75%
25%-50%
Below 25%
Light blinks 4 times, 1 sec/time, repeat after 5 sec
Light blinks 3 times, 1 sec/time, repeat after 5 sec
Light blinks twice,1 sec/time, repeat after 5 sec
Light blinks continuously.
*Note: For better performance, change the battery when the power is below
25%. Otherwise low battery will begin to affect the stability of the gimbal.
Charger
8
Rechargeable battery
Model: 18350/13650 Li-ion battery
Capacity: 900mAh/2600mAh
Charging time: 3h/8h
Li-ion battery charger
lnput: DC 5V/80mAh
Output: DC 4.2V/400mAh x 2
Charging Indicator
(Green light will appear once
the battery is fully charged)
Micro USB 5V
Power input
*Note: 18350 battery charger can be charged by using smartphone charger, power bank
or any PC with a USB port.
620 50
180
11
12
Standby Mode
9
To enter Standby mode while the gimbal is off, press the Power button for
4 seconds. The mode indicator light will turn on and a blue light will flash
every few seconds. To enter Standby mode while the gimbal is on and
stabilized, press the Mode button for 4 seconds.
Factory reset: While in standby mode, press and hold the DOWN direction
on the joystick for 5 seconds. The mode indicator light will turn red and
start to blink. Wait for several seconds and all the settings will restore to
factory default.
Sensor calibration: While in standby mode, press and hold the LEFT
direction on the joystick for 5 seconds. The mode indicator light will turn
green and start to blink. The light will then turn red upon completion.
*Note: Balance the platform before calibration.
Gimbal Basic Parameters
10
Rotation Angles
Yaw Roll Pitch
Axis
Mode
Pitch(Tilt) Roll Yaw(Pan)
Mode1
Mode2
Mode2
Following Following
Following
Locked
LockedLocked
LockedLocked Locked
Page 8
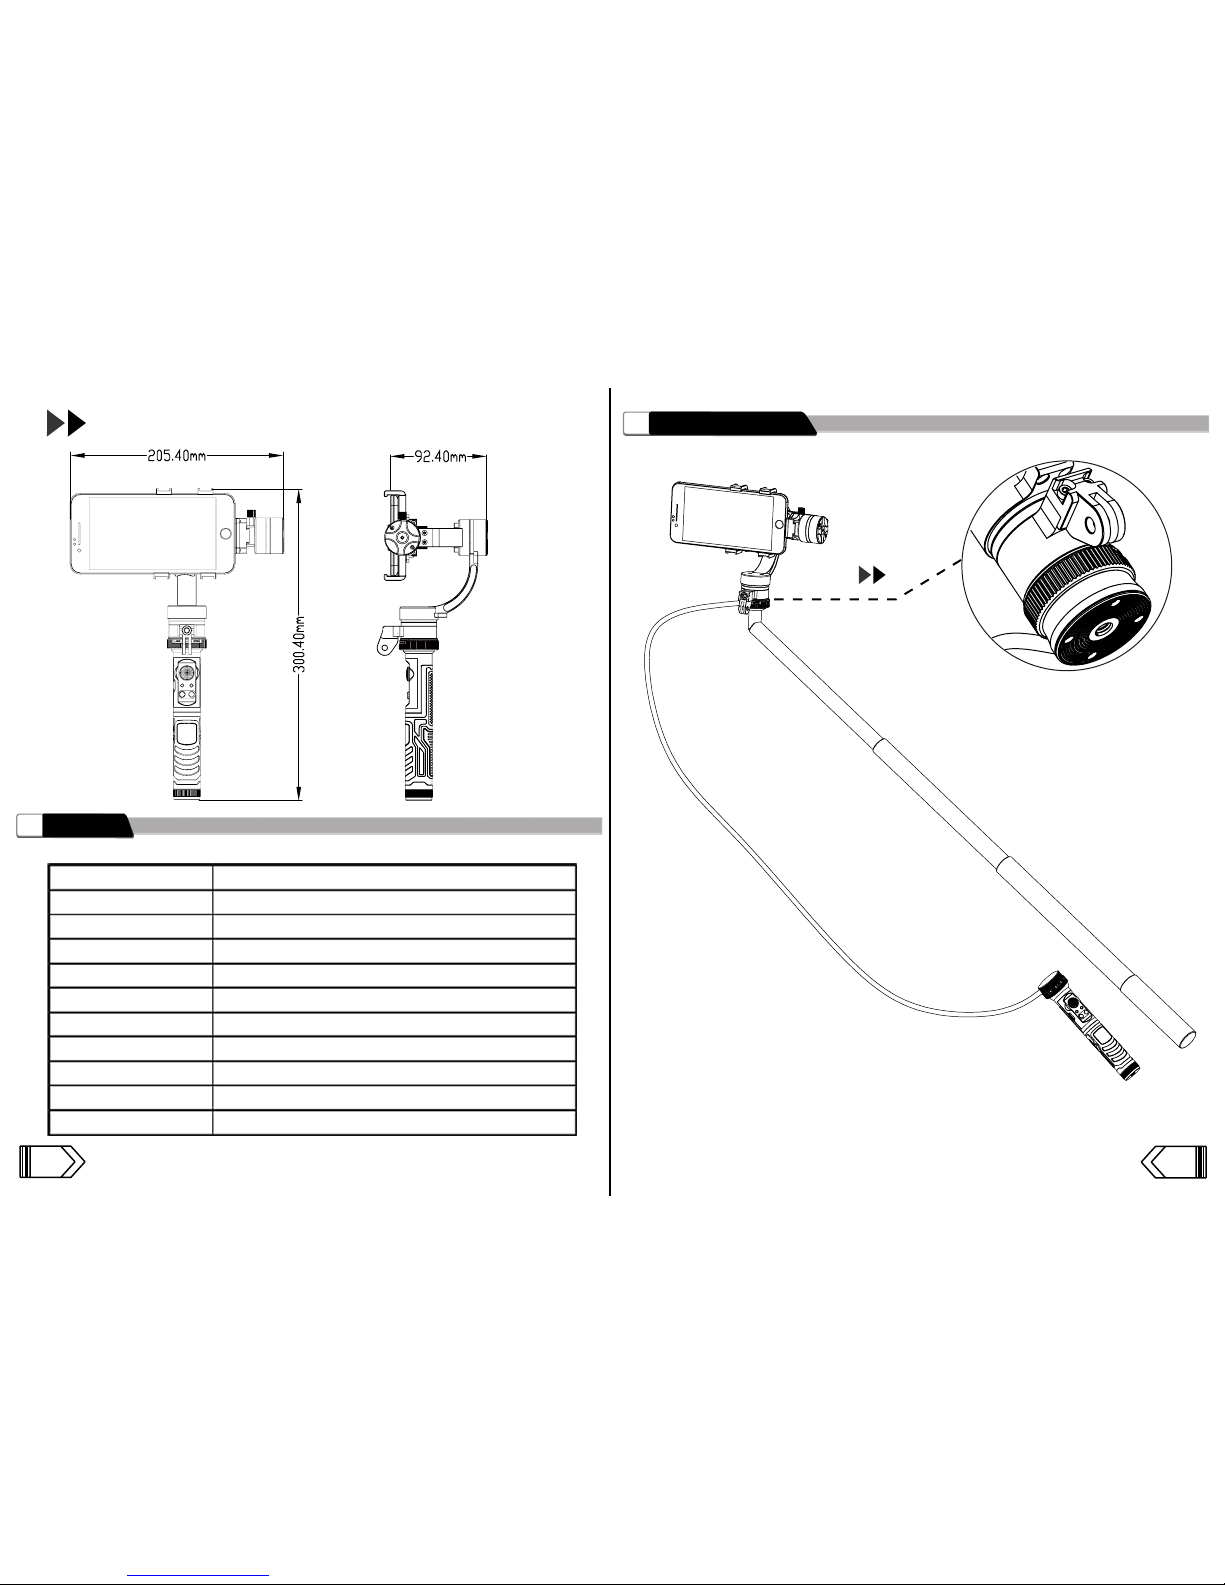
13
Size of Gimbal
Weight:414.5g
(w/o battery)
Optional Accessories
12
Standard 1/4 -20
thread hole on bottom
*1/4 thread hole on the bottom for various specific spare part.
Wired control
14
Item Parameter
Operating voltage
Operating current
Pitch angle
Roll angle
Yaw angle
Battery operating time
Operating Temperature
Net weight
Product Dimension
Package Dimension
6.5V - 12.6V
Standard 120mA
± 70
± 35
± 310
Standard 2h
- 10 ~ 40
414.5g(w/o battery and smartphone)
300.4 * 205.4 * 92.4(mm)
21 * 17 * 18(cm)
Parameter
11
 Loading...