

Page 1
Operating Instructions
General Settings Guide
Getting Started
Combined Function Operations
User Tools (System Settings)
Troubleshooting
Remarks
Specifications
240W
Read this manual carefully before you use this product and keep it handy for future reference.
For safe and correct use, please be sure to read the Safety Information in this manual before
using the machine.
Page 2

Introduction
This manual describes detailed instructions on the operation and notes about the use of this machine.
To get maximum versatility from this machine all operators are requested to read this manual carefully
and follow the instructions. Please keep this manual in a handy place near the machine.
Important
Contents of this manual are subject to change without prior notice. In no event will the company be liable for direct, indirect, special, incidental, or consequential damages as a result of handling or operating the machine.
Notes:
Some illustrations in this manual might be slightly different from the machine.
Certain options might not be available in some countries. For details, please contact your local dealer.
Operator Safety
This machine contains LED Array in scanner and writing units.
The machine is considered a class 1 LED device, safe for both office and EDP use.
Notes:
Two kinds of size notation are employed in this manual. With this machine refer to the metric version.
For good copy quality, Ricoh recommends that you use genuine Ricoh toner.
Ricoh shall not be responsible for any damage or expense that might result from the use of parts other
than genuine Ricoh parts with your Ricoh office products.
Power Source
220 - 240V, 50/60Hz, 10A or more
Please be sure to connect the power cord to a power source as above. For details about power source,
see P.62 “Power Connection”.
Page 3

Introduction
This manual describes detailed instructions on the operation and notes about the use of this machine.
To get maximum versatility from this machine all operators are requested to read this manual carefully
and follow the instructions. Please keep this manual in a handy place near the machine.
For safe and correct use of this machine, please be sure to read the Safety Information before you use
it.
Important
Contents of this manual are subject to change without prior notice. In no event will the company be liable for direct, indirect, special, incidental, or consequential damages as a result of handling or operating the machine.
Notes:
Some illustrations in this manual might be slightly different from the machine.
Certain options might not be available in some countries. For details, please contact your local dealer.
Operator Safety
This machine contains LED Array in scanner and writing units.
The machine is considered a class 1 LED device, safe for both office and EDP use.
Notes:
Two kinds of size notation are employed in this manual. With this machine refer to the metric version.
For good copy quality, Rex-Rotary recommends that you use genuine Rex-Rotary toner.
Rex-Rotary shall not be responsible for any damage or expense that might result from the use of parts
other than genuine Rex-Rotary parts in your Rex-Rotary office product.
Power Source
220 - 240V, 50/60Hz, 10A or more
Please be sure to connect the power cord to a power source as above. For details about power source,
see p.62 “Power Connection”.
Page 4

Introduction
This manual describes detailed instructions on the operation and notes about the use of this machine.
To get maximum versatility from this machine all operators are requested to read this manual carefully
and follow the instructions. Please keep this manual in a handy place near the machine.
For safe and correct use of this machine, please be sure to read the Safety Information before you use
it.
Important
Contents of this manual are subject to change without prior notice. In no event will the company be liable for direct, indirect, special, incidental, or consequential damages as a result of handling or operating the machine.
Notes:
Some illustrations in this manual might be slightly different from the machine.
Certain options might not be available in some countries. For details, please contact your local dealer.
Operator Safety
This machine contains LED Array in scanner and writing units.
The machine is considered a class 1 LED device, safe for both office and EDP use.
Notes:
Two kinds of size notation are employed in this manual. With this machine refer to the metric version.
For good copy quality, Gestetner recommends that you use genuine Gestetner toner.
Gestetner shall not be responsible for any damage or expense that might result from the use of parts
other than genuine Gestetner parts in your Gestetner office product.
Power Source
220 - 240V, 50/60Hz, 10A or more
Please be sure to connect the power cord to a power source as above. For details about power source,
see p.62 “Power Connection”.
Page 5

Introduction
This manual describes detailed instructions on the operation and notes about the use of this machine.
To get maximum versatility from this machine all operators are requested to read this manual carefully
and follow the instructions. Please keep this manual in a handy place near the machine.
For safe and correct use of this machine, please be sure to read the Safety Information before you use
it.
Important
Contents of this manual are subject to change without prior notice. In no event will the company be liable for direct, indirect, special, incidental, or consequential damages as a result of handling or operating the machine.
Notes:
Some illustrations in this manual might be slightly different from the machine.
Certain options might not be available in some countries. For details, please contact your local dealer.
Operator Safety
This machine contains LED Array in scanner and writing units.
The machine is considered a class 1 LED device, safe for both office and EDP use.
Notes:
Two kinds of size notation are employed in this manual. With this machine refer to the metric version.
For good copy quality, Nashuatec recommends that you use genuine Nashuatec toner.
Nashuatec shall not be responsible for any damage or expense that might result from the use of parts
other than genuine Nashuatec parts in your Nashuatec office product.
Power Source
220 - 240V, 50/60Hz, 10A or more
Please be sure to connect the power cord to a power source as above. For details about power source,
see p.62 “Power Connection”.
Page 6

Declaration of Conformity
“The Product complies with the requirements of the EMC Directive 89/336/EEC and its amending directives and the Low Voltage Directive 73/23/EEC and its amending directives.”
In accordance with IEC 60417, this machine uses the following symbols for the main power switch:
aaaa means POWER ON.
cccc means STAND BY.
In accordance with IEC 60417, this machine uses the following symbols for the anti-humidity heater
switch:
aaaa means POWER ON.
bbbb means POWER OFF.
Copyright © 2003
Page 7

Manuals for This Machine
This machine can be used as a copier, printer, or scanner. Its manuals are divided
thus: a manual covering common operations and functions, and separate copier,
printer, and scanner function manuals. Refer to the appropriate manual to learn
about your machine.
i
Page 8

What You Can Do with This Machine
If you install the options available for this machine, you can further increase its
functionality. If you want to add any of the options, contact your service representative.
Copier Function
The machine has all the basic copier functions, plus density adjustment, composite image, and other advanced copy functions. In addition, with the stamp board
and HDD installed, you can add stamp functions that can print patterns or user
stamps on your copies.
Printer Function
You can also use the machine as a printer. With options installed, you can increase the number of functions.
Scanner Function
You can also use the machine as a scanner. With options installed, you can increase the number of functions.
ii
Page 9

TABLE OF CONTENTS
Manuals for This Machine......................................................................................i
What You Can Do with This Machine...................................................................ii
Copier Function.......................................................................................................... ii
Printer Function.......................................................................................................... ii
Scanner Function ....................................................................................................... ii
How to Read This Manual .....................................................................................1
Symbols .....................................................................................................................1
Names of Major Options ............................................................................................2
Terms .........................................................................................................................2
Safety Information .................................................................................................3
Safety During Operation.............................................................................................3
Positions of RRRRWARNING and RRRRCAUTION Labels.............................................5
ENERGY STAR Program.......................................................................................7
Counter ...................................................................................................................9
Total Counter .............................................................................................................9
Counter for Each User Code......................................................................................9
1. Getting Started
Guide to Components .........................................................................................11
Options.....................................................................................................................14
Control Panel........................................................................................................17
Display .....................................................................................................................19
Turning On the Power .........................................................................................21
Turning On the Main Power .....................................................................................21
Turning On the Power..............................................................................................22
Turning Off the Power..............................................................................................22
Turning Off the Main Power .....................................................................................22
Saving Energy..........................................................................................................23
Anti-humidity Heater Switch .....................................................................................24
2. Combined Function Operations
Switching between Functions ............................................................................25
Using the Machine As a Copier ..........................................................................26
Switching to Copier Mode ........................................................................................26
Interrupting Other Functions to Use Copier Functions.............................................26
Using the Machine As a Printer..........................................................................27
Switching to Printer Mode ........................................................................................27
Using the Machine As a Scanner .......................................................................28
Switching to Scanner Mode .....................................................................................28
iii
Page 10

3. User Tools (System Settings)
User Tools Menu (System Settings)...................................................................29
Accessing User Tools (System Settings) ..........................................................31
Changing Default Settings .......................................................................................31
Exiting User Tools ....................................................................................................32
Settings You Can Change with User Tools .......................................................33
General Features .....................................................................................................33
Timer Settings ..........................................................................................................42
Key Op. Tools ..........................................................................................................43
4. Troubleshooting
If Your Machine Does Not Operate As You Want..............................................45
General ....................................................................................................................45
Loading Paper......................................................................................................47
Loading Paper Roll...................................................................................................47
Loading Cut Paper ...................................................................................................49
DDDDAdding Toner....................................................................................................50
xxxxClearing Misfeeds ............................................................................................52
Changing the Paper Roll Size.............................................................................56
Removing the Roll Holder ........................................................................................56
Setting the Roll Holder .............................................................................................56
5. Remarks
Dos and Don'ts.....................................................................................................59
Toner.....................................................................................................................60
Handling Toner.........................................................................................................60
Toner Storage ..........................................................................................................60
Used Toner ..............................................................................................................60
Where to Put Your Machine................................................................................61
Machine Environment ..............................................................................................61
Moving......................................................................................................................61
Power Connection....................................................................................................62
Clearance Around the Machine................................................................................62
Maintaining Your Machine ..................................................................................63
Cleaning inside the Original Cover...........................................................................63
Cleaning the Main Unit.............................................................................................64
iv
Page 11

6. Specifications
Main Unit...............................................................................................................65
Options .................................................................................................................68
Roll Feeder Type 240 A or 240 B.............................................................................68
Paper Cassette Type 240 ........................................................................................68
Table Type 240 ........................................................................................................69
Carrier Sheet............................................................................................................69
Hard Disk Drive Type 240........................................................................................69
Stamp Board ............................................................................................................69
Copy Paper...........................................................................................................70
Recommended Size and Type.................................................................................70
Unusable Paper .......................................................................................................72
Paper Storage ..........................................................................................................73
Handling paper.....................................................................................................74
INDEX......................................................................................................... 75
v
Page 12

vi
Page 13

How to Read This Manual
R
R
Symbols
This manual uses the following symbols:
WARNING:
This symbol indicates a potentially hazardous situation that might result in
death or serious injury if you misuse the machine by not following these instructions under this symbol. Be sure to read these instructions, all of which are included in the Safety Information section in the General Settings Guide.
CAUTION:
This symbol indicates a potentially hazardous situation that might result in minor or moderate injury or property damage not involving bodily injury, if you
misuse the machine by not following these instructions under this symbol. Be
sure to read the instructions, all of which are included in the Safety Information
section in the General Settings Guide.
* The above statements are for your safety.
Important
If this instruction is not followed, paper might be misfed, originals damaged, or
data lost. Be sure to read this.
Preparation
This symbol indicates the prior knowledge or preparation required before operation.
Note
This symbol indicates precautions for operation, or actions to take following
mal-operation.
Limitation
This symbol indicates numerical limits, functions that cannot be used together,
or conditions under which a particular function cannot be used.
Reference
This symbol indicates where further relevant information can be found.
[]
Keys that appear on the machine's display.
{}
Keys built into the machine's control panel.
1
Page 14

Names of Major Options
Major options for this machine are referred to as follows:
• Roll Feeder Type 240A → Paper roll tray 1
• Roll Feeder Type 240B → Paper roll tray 2
• Paper Cassette Type 240 → Cut paper tray
• Table Type 240 → Table
•Stamp Board Type A→ Stamp board
• Hard Disk Drive Type 240 → HDD
Terms
• Long length original/paper
Original/paper length longer than 1,189 mm, 46.8".
2
Page 15

Safety Information
R
R
When using this machine, the following safety precautions should always be followed.
Safety During Operation
In this manual, the following important symbols are used:
WARNING:
Indicates a potentially hazardous situation which, if instructions are not followed, could result in death or serious injury.
CAUTION:
Indicates a potentially hazardous situation which, if instructions are not followed, may result in minor or moderate injury or damage to property.
R WARNING:
• Connect the power cord directly into a wall outlet and never use an extension cord.
• Disconnect the power plug (by pulling the plug, not the cable) if the
power cable or plug becomes frayed or otherwise damaged.
• To avoid hazardous electric shock or laser radiation exposure, do not
remove any covers or screws other than those specified in this manual.
• Turn off the power and disconnect the power plug (by pulling the plug,
not the cable) if any of the following occurs:
• You spill something into the machine.
• You suspect that your machine needs service or repair.
• The external housing of your machine has been damaged.
•
Do not incinerate spilled toner or used toner. Toner dust might ignite
when exposed to an open flame.
• Disposal can take place at our authorized dealer.
• Dispose of the used toner bottle in accordance with the local regula-
tions.
3
Page 16

R CAUTION:
• Protect the machine from dampness or wet weather, such as rain and snow.
• Unplug the power cord from the wall outlet before you move the machine.
While moving the machine, you should take care that the power cord will not
be damaged under the machine.
• When you disconnect the power plug from the wall outlet, always pull the
plug (not the cable).
• Do not allow paper clips, staples, or other small metallic objects to fall inside
the machine.
• Keep toner (used or unused) and toner bottle out of the reach of children.
• For environmental reasons, do not dispose of the machine or expended
supply waste at household waste collection points. Disposal can take place
at an authorized dealer.
• The inside of the machine could be very hot. Do not touch the parts with a
label indicating the “hot surface”. Otherwise, an injury might occur.
4
Page 17
Positions of RRRRWARNING and RRRRCAUTION
Labels
This machine has labels for RWARNING and RCAUTION at the positions
shown below. For safety, please follow the instructions and handle the machine
as indicated.
6
4
2
1
7
5
3
11
8
3
9
10
12
ABB562S
5
Page 18
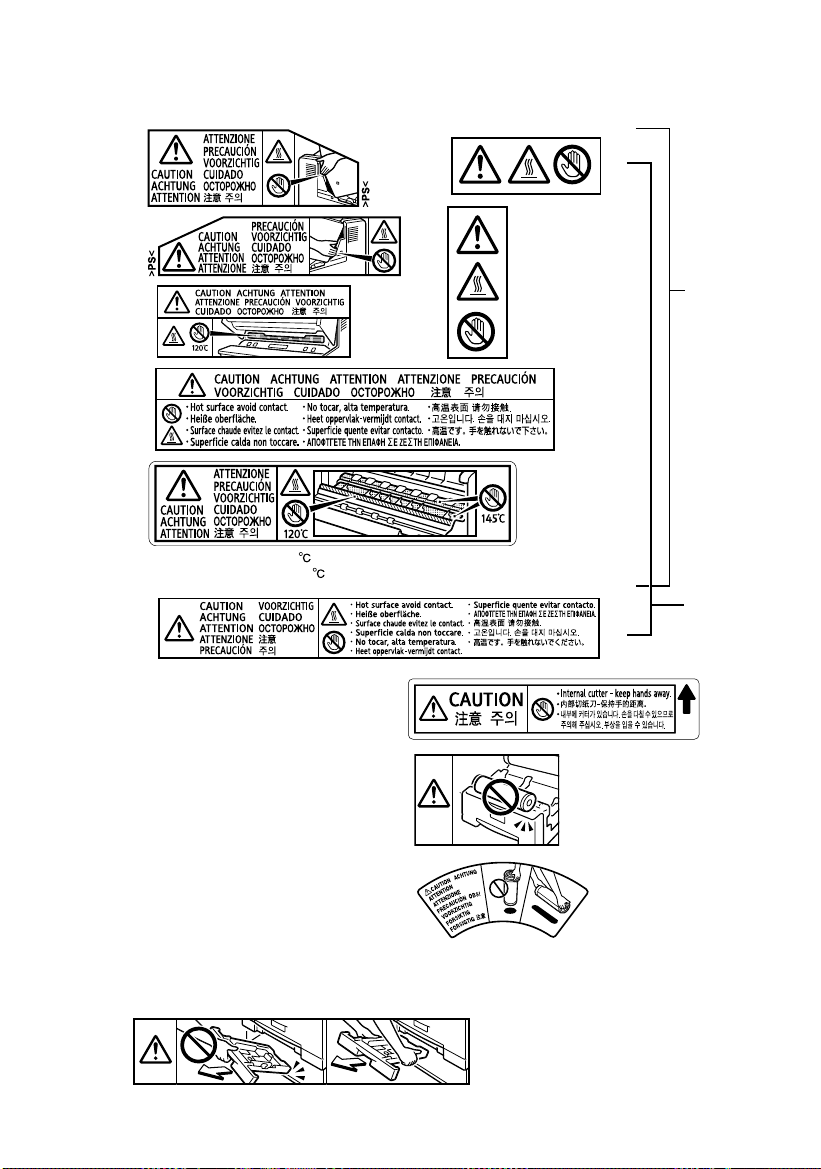
Hot Surface Warning
The inside of the machine could be very hot. When replacing or loading the paper, or clearing paper jams, do
not touch the parts with a label indicating the "hot surface". Otherwise it could cause a personal burn.
1
2
3
4
5
6
7
The higher temperature(145 ) applies to plain paper. Translucent paper can cause
the indicated part to reach 160 .
8
Fusing Section Hot Surface
Anti-Humidity Heater Hot Surface
9
Cutter Blade Warning
There is a cutter blade inside. When
replacing or loading the paper roll, or clearing
paper jams, do not touch the parts this label
indicates. Otherwise an injury may result.
Replacing Paper Roll Warning
10
When replacing or loading the paper roll, do
not put the paper roll on the upper of the
paper roll tray. Otherwise the tray may fall
and an injury may result.
Holding Paper Roll Warning
11
Hold the paper roll horizontally with both
hands. When you grab the paper holder and
hold the paper roll vertically, the paper roll
may fall off and an injury may result.
Operating Cassette Tray Warning
12
When replacing or loading the paper, or clearing paper jams, pull out the cut paper tray slowly with
both hands. Do not pull out the cut paper tray with a single hand.
Otherwise the rear of the cut paper tray may fall and an injury may result.
ABB563S
6
Page 19

ENERGY STAR Program
As an ENERGY STAR Partner, we have determined
that this machine model meets the ENERGY STAR
Guidelines for energy efficiency.
The ENERGY STAR Guidelines intend to establish an international energy-saving system for
developing and introducing energy-efficient office equipment to deal with environmental issues, such as global warming.
When a product meets the ENERGY STAR Guidelines for energy efficiency, the Partner shall
place the ENERGY STAR logo onto the machine model.
This product was designed to reduce the environmental impact associated with office equipment by means of energy-saving features, such as Low-power mode.
❖❖❖❖ Low power mode
This product automatically lowers its power consumption 7 minutes after the
last copy or print job is completed. Printing is possible in this mode, but to use
the copier, press the {{{{Energy Saver}}}} key.
• For details about changing the default interval before entering Low power
mode, see p.42 “Energy Saver”.
❖❖❖❖ Auto Off mode (Copier only)
To conserve energy, this product automatically turns off 14 minutes after the
last copy or print job is completed. Printing is possible in this mode, but to use
the copier, press the operation switch.
• For details about changing the default interval before entering Auto Off
mode, see p.42 “Auto Off Timer”.
7
Page 20

Specification
Low power mode Power consumption 150 W
Default interval 7 minutes
Recovery time 1 minute
Auto Off mode Power consumption 45 W
Default interval 14 minutes
Recovery time 2 minutes
Recycled paper
In accordance with the ENERGY STAR Program, we recommend using environmentally friendly recycled paper. Contact your sales representative for recommended paper.
8
Page 21
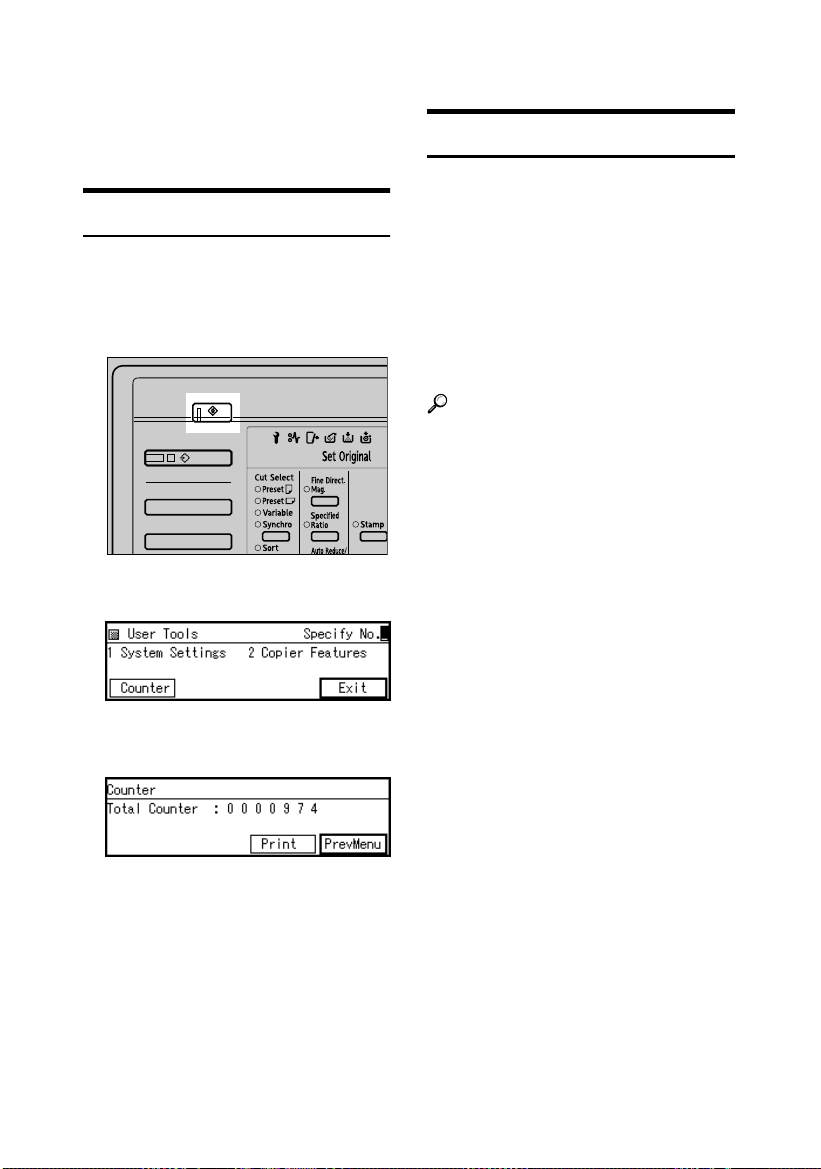
Counter
This keeps count of the number of
sheets output under the machine's
copy and print functions.
Total Counter
You can display the total counter values for the copier or printer function.
You can also print a counter list.
Press the {{{{User Tools}}}} key.
AAAA
ABB001S
Press [Counter].
BBBB
Counter for Each User Code
If user codes are set, you can record
copy numbers used under each. This
allows you to check copy numbers
made by individual users. Specify
whether or not to apply user codes in
System Settings.
You can register or change a user
code, or display or print the counter
for each user code using Copier Features.
Reference
p.43 “User Code Manage.”, “User
Tools (Copier Features)”, Copy Ref-
erence
To print a counter list, press
CCCC
[Print].
Press the {{{{Start}}}} key.
DDDD
The counter total prints out.
9
Page 22

10
Page 23
1. Getting Started
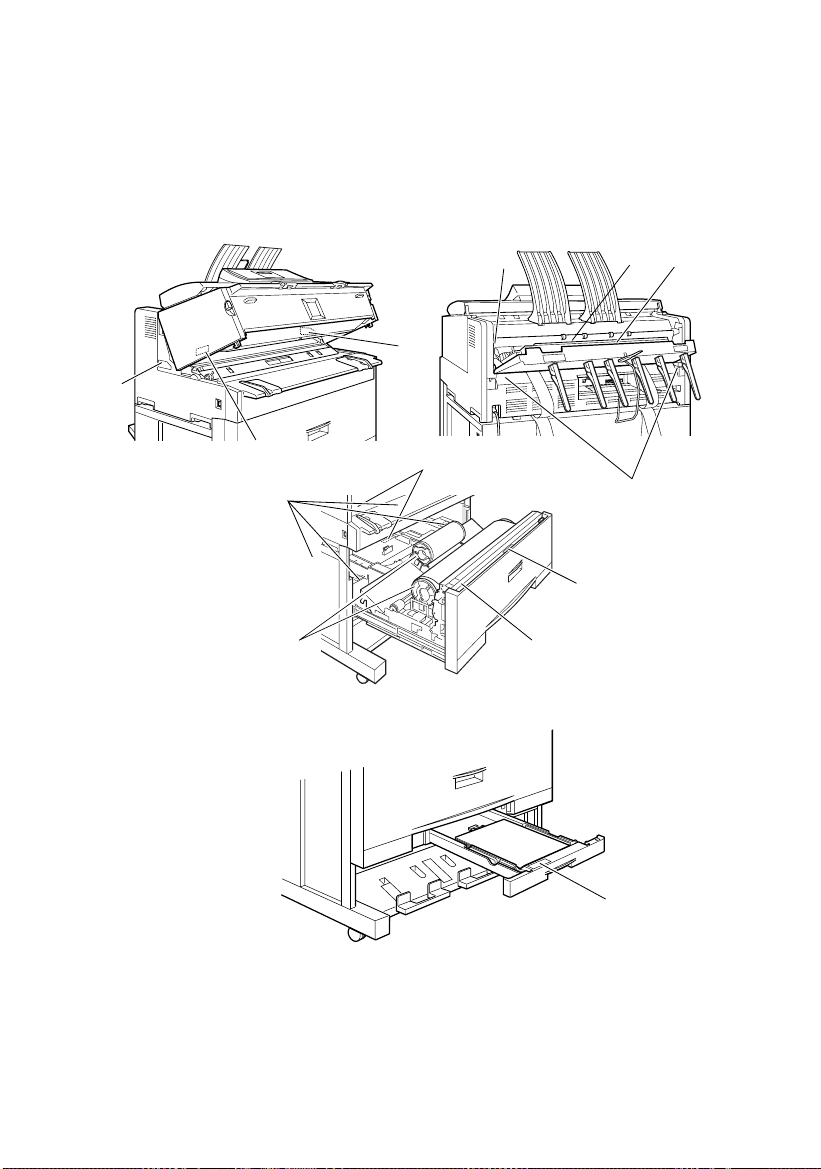
Guide to Components
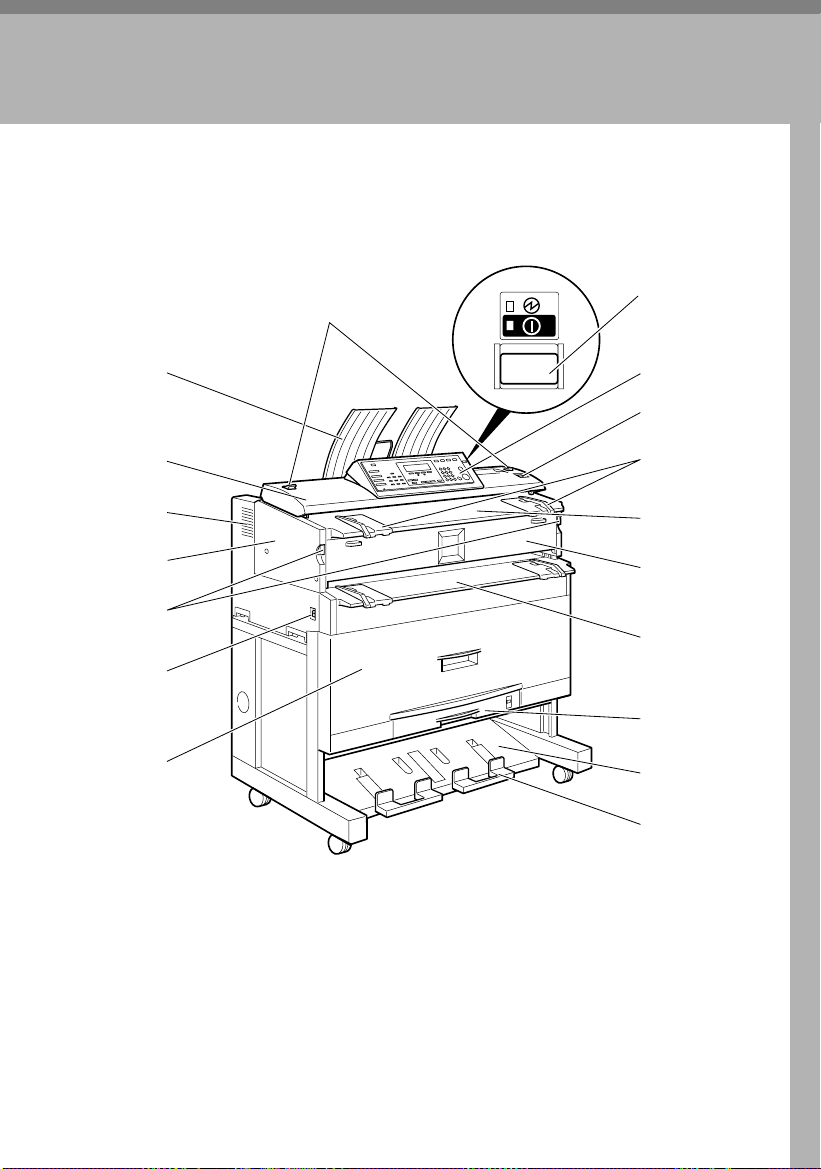
❖❖❖❖ Front
1
2
3
4
5
6
7
8
9
10
11
12
13
14
15
16
17
18
ABB002S
1.
Original switching lever
Use to copy or scan folded originals.
See “Setting Folded Originals (the
Original Switching Lever)”, Copy Ref-
erence.
2.
Upper output stacker
When the upper output is selected,
output paper is stacked at the back of
the stacker, originals at the front. See
“Copy Output Locations”, Copy Refer-
ence.
3.
Original cover
Open to clear jammed originals.
4.
Ventilation holes
Prevent overheating. Do not obstruct
them by placing anything near or
leaning objects against them. If the
machine overheats, a failure might occur.
5.
Main unit
Open when paper jam or toner runs
out.
11
Page 24

Getting Started
6.
Main unit opening lever
Use to open the main unit.
Important
1
❒ Do not leave the main unit open
more than 10 minutes, otherwise copy quality may deteriorate.
7.
Main power switch
Use to turn the main power on or off.
If you will not use the machine for a
long time, disconnect the power cord.
Normally, the machine should be left
on.
Note
❒ If the machine does not operate af-
ter turning on the operation
switch, check the main power
switch is also turned on. If off, turn
it on.
8.
Paper roll tray (optional)
Load a paper roll here. See p.14 “Op-
tions”.
9.
Operation switch
Use to turn the power on or off. The
power indicator lights when the power is on.
10.
Control panel
See p.17 “Control Panel”.
11. {
{Scanner Stop}}}} key
{{
Use if originals are feeding in slanted,
or to cance l scan ning while a n orig inal
is feeding in.
12.
Original guide
Set to the width of your originals.
13.
Original table
Place originals here scanning side
down.
14.
Main unit front cover
Open when toner runs out.
15.
Bypass tray
Use to feed paper in manually. Load
paper print side up.
16.
Cut paper tray (optional)
Load cut paper here. See p.14 “Op-
tions”.
17.
Lower output stacker
When the lower output is selected,
copies are stacked here. See “Copy
Output Locations”,Copy Reference.
18.
Lower output auxiliary guide
Pull this out to insert rolled paper or
long originals.
12
Page 25

❖❖❖❖ Rear
Guide to Components
1
2
3
4
5
6
1.
Upper output guide
Takes delivered paper to the upper
output stacker.
2.
Original exit switching lever
Takes originals to the original output
guide, and switches delivery to the
rear output. See “Original Output Locations”, Copy Reference.
3.
Original exit
Originals are delivered here.
4.
Ventilation holes
Prevent overheating. Do not obstruct
them by placing anything near or
leaning objects against them. If the
machine overheats, a failure might occur.
5.
Original output guide
Stacks originals delivered to the rear
output.
7
8
9
AAJ007S
6.
Anti-humidity heater switch (op-
tional)
When humidity is high, paper in the
paper roll or cut paper trays may absorb moisture, which can affect copy
quality. The anti-humidity heater prevents this. Turn this switch on when
humidity is high. See p.24 “Anti-hu-
midity Heater Switch” .
7.
Upper output exit
When the upper output is selected,
copies are delivered there. See “Copy
Output Locations”, Copy Reference.
8.
Lower output exit
When the lower output is selected,
copies are delivered there. See “Copy
Output Locations”, Copy Reference.
1
13
Page 26
Getting Started
9.
Lower output tray (optional)
Delivers copies from the lower output
exit, and then sends them to the lower
output stacker. See “Copy Output Lo-
1
cations”, Copy Reference.
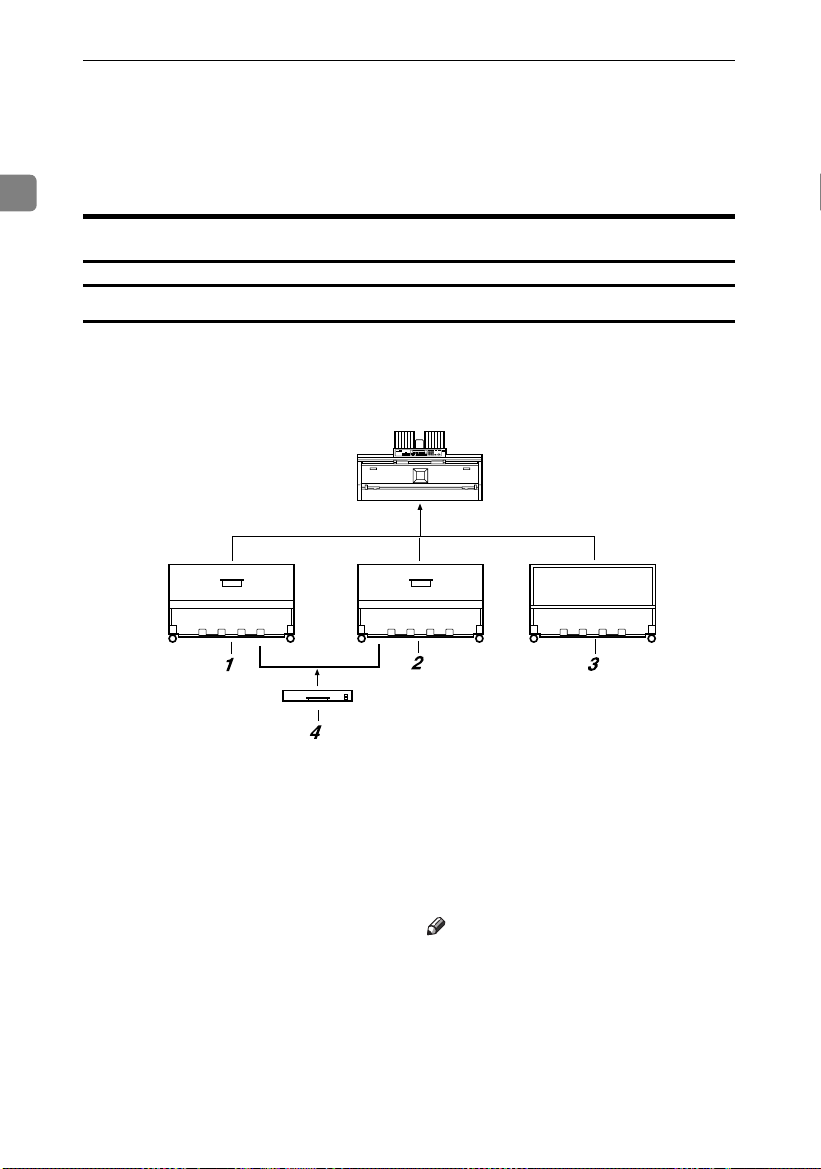
Options
Trays
1.
Paper roll tray 1
You can load one paper roll. See p.68
“Roll Feeder Type 240 A or 240 B”.
2.
Paper roll tray 2
You can load two paper rolls. See p.68
“Roll Feeder Type 240 A or 240 B”.
14
ABB011S
3.
Table
Put the main unit on this table. You can
store cut paper and so on inside it.
4.
Cut paper tray
Load cut paper here. You can load up to
250 A3 sheets.
Note
❒ The paper roll tray must be installed.
Page 27

❖❖❖❖ Paper roll tray
This illustration shows paper roll tray 2.
44
1
2
Guide to Components
1
3
1.
Paper roll 1
2.
Paper roll 2
3.
Cutter knob
Use to manually cut paper if there are
paper jams in the cutter area of the
machine. Always return the cutter
knob to the left or right end.
4.
Paper holder
The two paper holders grip the paper
roll and are mounted on the paper roll
tray's roll holder.
5
5.
6.
6
AAJ008S
Paper feed knob
Use when loading paper rolls or clearing paper jams. See p.47 “Loading Paper” and p.52 “xClearing Misfeeds”.
Roll holder
Adjust this to the size of the paper roll
you are using. See p.56 “Changing the
Paper Roll Size”.
Other Options
❖❖❖❖ Printer unit
Allows you to use the printer function.
❖❖❖❖ Scanner unit
Allows you to use the scanner function.
❖❖❖❖ HDD
You can increase the capacity of the HDD and the copy function, like the following:
• Repeat Copy (longer than A0(E)K)
• Stamp (User Stamp, Repeat User Stamp)
• User Format Overlay
❖❖❖❖ Stamp board
Provides Background Numbering, Repeat User Stamp, Preset Stamp, User
Stamp, Date Stamp, and Page Numbering functions.
15
Page 28
Getting Started
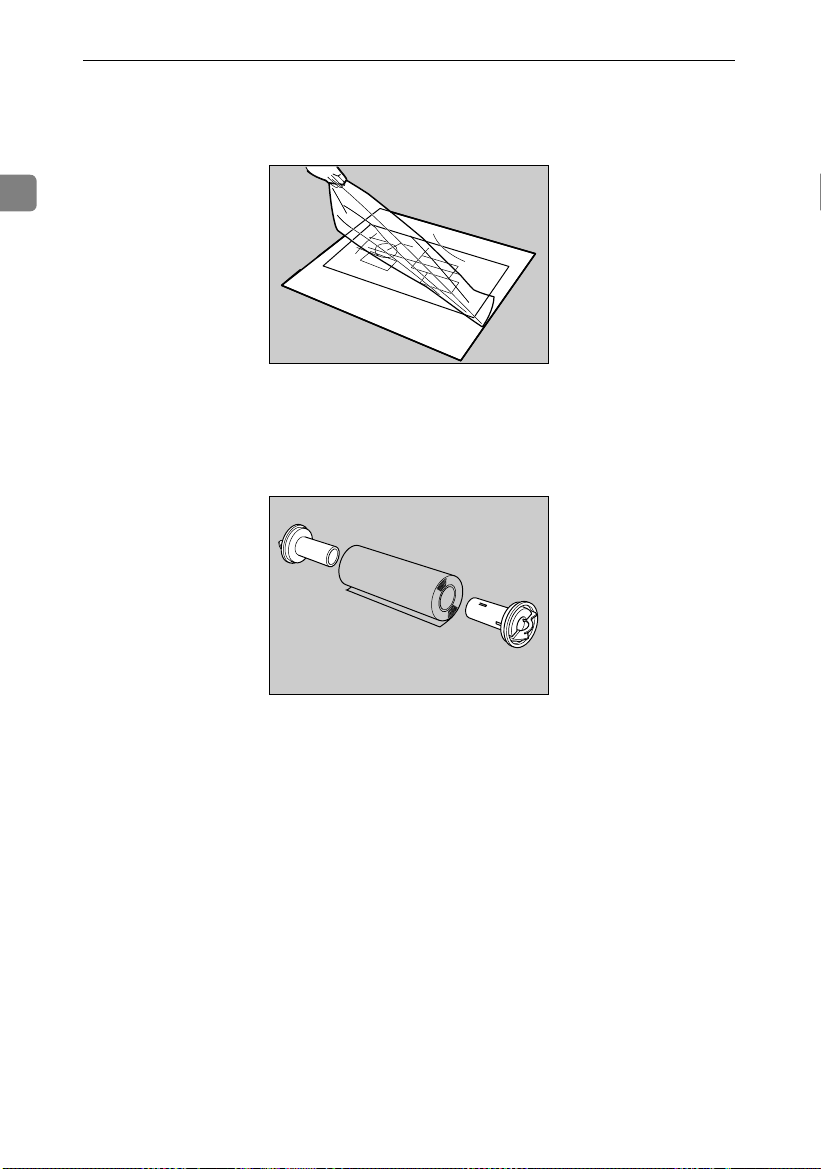
❖❖❖❖ Carrier sheet
Use to load bent, folded, creased, thin or pasted originals. See “Setting the
Carrier Sheet”, Copy Reference.
1
ZEDP020J
❖❖❖❖ Paper holder
Use to set a paper roll in the paper roll tray's roll holder.
This is useful to change quickly to a different size paper roll from the paper
holder.
16
ZEDP030J
Page 29

Control Panel
Control Panel
This illustration shows the control panel of a machine that has all options fully
installed.
1
1 2 5 6 7 8 10 11
21 19 1820 17 16 1415 13 12
1.
{{{{User Tools}}}}
Press to change default settings and operating conditions to your requirements.
See p.29 “User Tools (System Settings)”.
It also displays the total number of copies
made. See p.9 “Counter” .
2.
{{{{New Job}}}} key (copier mode)
Press to make settings for next copy job
and scan the originals during copying.
See “Job Preset”, Copy Reference.
3.
Indicators
Display errors and machine status.
• L: Service Call indicator
• x: Misfeed indicator. See p.52
“xClearing Misfeeds”.
• M: Open Cover indicator
• E: Used Toner Full indicator
• D: Add Toner indicator. See p.50
“DAdding Toner”.
• C: Load Paper indicator
• Set Original: Indicates the machine is
ready to scan.
4.
Display
Displays the keys to operate each function, operation status, and error messages.
493
5.
{{{{Program}}}} key (copier mode)
Press to store or recall frequently used
settings. See “Programs”, Copy Reference.
6.
{{{{Clear Modes}}}} key
Press to clear the current settings.
7.
{{{{Energy Saver}}}}key
Press to enter Energy Saver mode. When
you press this key again, the machine returns to the ready condition. See p.23
“Energy Saver mode”.
8.
{{{{Interrupt}}}} key
Press to make interrupt copies during
copying or printing. See “Interrupt
Copy”, Copy Reference.
9.
Main power indicator and On in-
dicator
The main power indicator lights when
the main power switch is turned on. The
On indicator lights when the operation
switch is on.
Important
❒ Do not turn off the main power
switch while On indicator is lit.
Doing so may damage the hard
disk.
ABB003S
17
Page 30

Getting Started
10.
Operation switch
Press to turn the power on (the On indicator goes off). To turn the power off,
press it again (the On indicator goes off).
11. {
{Scanner Stop}}}} key
1
{{
Press if originals are feeding in slanted,
or to cancel scanning while an original is
feeding in.
12.
{{{{Sample Copy/Partial Copy}}}} key
(copier mode)
• Sample Copy
To check the settings, copy the first
part of an original up to a length of 280
mm. See “Sample Copy”, Copy Refer-
ence.
• Partial Copy
You can choose to copy a specified
part of the original. See “Partial
Copy”, Copy Reference.
13.
{{{{Start}}}} key
Press to start copying, scanning, or printing.
14.
{{{{Clear/Stop}}}} key
• Clear
Press to clear a number entered.
• Stop
Press to stop printing.
15.
{{{{#}}}} key
Press to confirm values entered or items
specified.
16.
Number keys
Press to enter the number of copies and
other data for a selected function.
17.
{{{{Original Type}}}} key
Press to select the original type. See “Se-
lecting Original Type Setting”, Copy Ref-
erence.
18.
Image density keys
Press to adjust the image density for the
copier or scanner function. See “Adjust-
ing Copy Image Density”, Copy Reference.
19.
Selection keys
Correspond to display items. Press to select the corresponding item.
20.
Copier function keys (copier
mode)
Press to use the various copier functions,
set the paper cut length, density level,
zoom, and so on.
21.
Data In indicator (printer mode)
Lights when data is sent from the computer.
18
Page 31

Control Panel
Display
The display shows machine status, error messages, and function menus.
Important
❒ A force or impact of more than 30 N (about 3 kgf) will damage the display.
The copying screen is displayed as default when the power is turned on.
When you select or specify an item on the display, it is highlighted thus: .
Keys appearing as cannot be used.
Display and Key Operations
The display is not touch-sensitive. Use the following keys to select the keys and
items on the display.
1.
Selection keys
To select an item on the display, press the
selection key below it.
Example (on the User Tools display):
• To select [Counter], press A.
• To select [Exit], press B.
2.
00001111 key
Press to highlight items and select them.
3.
Number keys
When items have a number, select them
using the number keys.
Example (on the User Tools display):
• To select 1 [System Settings], press the
number key {{{{1}}}}.
1
19
Page 32

Getting Started
Common key operations
The following keys are common to all screens:
1
❖❖❖❖ Key list
[OK]
[Cancel]
[↑↑↑↑Prev.] [↓↓↓↓Next]
[PrevMenu]
[Exit]
Acknowledges a selected function or entered values, and then returns
to the previous display.
Deletes a selected function or entered values, and then returns to the
previous display.
Moves to the previous or next display when all items cannot be shown
on the display at once.
Returns to the previous menu display.
Closes the display.
20
Page 33

Turning On the Power
This machine has two power switches:
❖❖❖❖ Operation switch (right side of the
control panel)
Press to activate the machine.
When the machine finishes warming up, you can make copies.
❖❖❖❖ Main power switch (left side of the ma-
chine)
Turning off this switch makes the
main power indicator on the right
side of the control panel go off.
When this is done, machine power
is completely off.
Note
❒ This machine automatically enters
Energy Saver mode, Low power
mode, or turns itself off if you do
not use it for a certain amount of
time when the main power switch
is on. See p.42 “Auto Off Timer”,
p.42 “Energy Saver” and p.42
“Panel Off Timer”.
Turning On the Power
Turning On the Main Power
Make sure the power cord is firm-
AAAA
ly plugged into the wall outlet.
Turn on the main power switch
BBBB
on the left side of the machine.
The main power indicator lights.
Important
❒ Do not turn off the main power
switch immediately after turning it on. Doing so may result in
damage to the hard disk or
memory, leading to malfunctions.
1
ABB006S
21
Page 34

Getting Started
Press the operation switch.
Turning On the Power
Press the operation switch on the
AAAA
1
right side of the control panel.
The On indicator lights.
ABB005S
Note
❒ If the power does not come on
when the operation switch is
pressed, check the main power
switc h is on . If it is off, t urn it on.
AAAA
The On indicator goes off.
ABB005S
Note
❒ When you press the operation
switch, the indicator does not
go off in the following cases:
• During communication with
external equipment.
• When the hard disk is active.
Turning Off the Main Power
Turning Off the Power
Important
Limitation
❒ You cannot turn the power off by
pressing the operation switch
while the message "
wait.
" is displayed.
❒ For 10 seconds after the power is
turned on and the screen is displayed, you cannot turn the power
off by pressing the operation
switch.
❒ For 10 seconds after copying is fin-
ished and the machine stops, you
cannot turn the power off by pressing the operation switch.
Please
❒ When the On indicator lights, do
not turn off the main power
switch. Doing so may result in
damage to the hard disk or memory, leading to malfunctions.
❒ Make sure to turn off the main
power switch before pulling out
the power plug. Not doing this
may result in damage to the hard
disk or memory.
Make sure the On indicator is not
AAAA
lit.
Turn off the main power switch
BBBB
on the left side of the machine.
The main power indicator goes off.
22
Page 35

Turning On the Power
Saving Energy
----Energy Saver mode
If you do not use the machine for a
certain period after an operation, or
when you press the {{{{Energy Saver}}}}
key, the display disappears and the
machine goes into Energy Saver
mode. When you press the {{{{Energy
Saver}}}} key again, the machine returns
to standby. The machine uses less
electricity in Energy Saver mode.
Note
❒ You can change the amount of time
the machine waits before switching to Energy Saver mode after
copying finishes or the last operation is performed. See p.42 “Panel
Off Timer”.
----Low power mode
If you do not use the machine for a
certain period, it automatically lowers its power consumption. When
you press the {{{{Energy Saver}}}} key, the
machine returns to standby.
Note
❒ You can change the Low power
mode. See p.42 “Energy Saver”.
----Auto Off mode
If you do not use the machine for a
certain period, it automatically turns
itself off. This function is called “Auto
Off”. When you press the operation
switch, the machine returns to standby.
Note
❒ You can change the Auto Off
mode. See p.42 “Auto Off Timer”.
❒ Specify whether or not to use the
Auto Off Timer function. See p.44
“AOF (Always On)”.
❒ The Auto Off Timer function will
not operate in the following cases:
• When a warning message appears.
• When the service call indicator
is lit.
• When paper is jammed.
• When the cover is open.
• When the “
sage appears.
• When toner is being replenished.
• When the User Tools screen is
displayed.
• When fixed warm-up is in
progress.
• When the printer, scanner, or
other functions are active.
• When operations are suspended during printing.
• When the Data In indicator is on
or blinking.
• When the sample print display
appears.
• If copying is interrupted.
• During copying (if only one
original is inserted when using
Image Overlay).
• During copying (if all paper in
the bypass tray has not been
copied).
Add toner
” mes-
1
23
Page 36

Getting Started
Anti-humidity Heater Switch
During winter or humid periods
1
when there can be sudden changes in
temperature, the paper in the paper
roll tray, or the cut paper tray can absorb moisture. This may cause copy
quality to deteriorate.
To prevent this, the machine has a
built-in anti-humidity heater.
There is a switch for the anti-humidity heater in the paper roll tray. Turn
this switch on if the humidity level
becomes high and copy quality is affected. Turn the switch off at other
times. See p.74 “Handling paper”.
24
ABB007S
Page 37

2. Combined Function
Operations
Switching between Functions
You can use this machine not only as a copier, but also as a printer or scanner.
Note
❒ Depending on the options you have installed, you may not be able to switch
to some functions:
Limitation
❒ You cannot switch functions in the following circumstances:
• While copying.
• While adjusting system settings.
• While the machine is warming up.
• When the machine has been turned off automatically.
----System Reset
The machine returns automatically to its initial condition when the job is finished, after a certain period of time has elapsed. This function is called "System
Reset".
Note
❒ You can change the System Reset time. See p.42 “System Auto Reset”.
25
Page 38

Combined Function Operations
Using the Machine As a Copier
Switching to Copier Mode
When the printer or scanner function is not active, or has finished its job, the
copy screen is displayed as normal.
2
Reference
For details about copier functions, see Copy Reference.
Interrupting Other Functions to Use Copier Functions
You can interrupt a copy job, or another function job, and switch to the copier
function. This is called "Interrupt Copy."
Limitation
❒ You cannot use the following functions with the interrupt copy function:
• Edit
• Stamp
• Sort/Rotate sort
• Erase
26
Reference
For details about using interrupt copy during a copy job, see Copy Reference.
Press the {{{{Interrupt}}}} key while an original is being scanned or job being cop-
AAAA
ied. When printing, place the originals after pressing the {{{{Interrupt}}}} key.
The interrupt copy screen appears.
Make settings, and begin copying.
BBBB
When copying finishes, remove the originals and the interrupt copy job
CCCC
output.
Press the {{{{Interrupt}}}} key.
DDDD
Page 39

Using the Machine As a Printer
Using the Machine As a Printer
Switching to Printer Mode
When you send print job from your computer, the job is printed.
Print the job as you usually do from your computer.
AAAA
Printing...
The "
" message is displayed, and printing starts.
2
27
Page 40

Combined Function Operations
Using the Machine As a Scanner
Switching to Scanner Mode
Scan the job as you usually do from your computer.
AAAA
Scanning...
2
The "
Place your originals.
BBBB
Specify the scan settings.
CCCC
Scan the originals.
DDDD
Limitation
❒ You cannot use the machine as a scanner when originals are being scanned
for the copier function.
" message appears.
28
Page 41

3. User Tools (System Settings)
User Tools Menu (System Settings)
❖❖❖❖ General Features (see p.33 “General Features”)
User Tools item menu Default
Adjust Cut Length • Metric version
Fusing Adjustment Plain Paper: 3
Orig. Size Detect • Metric version
Tray Paper Size • Metric version
Tray Paper Type Bypass Tray: Plain
Orig. Edge Hold Off
Output Tray Upper
Orig. Feed Delay1 1 sec.
Orig. Feed Delay2 Off
Auto Roll Switch. Off
Fine Ratio:Copier 0.0%
Panel Tone On
Warm Up Notice On
Copy Count Displ. Up
Feed Start Method Auto
0.0 mm
• Inch version
0.0 inch
Translucent Paper: 2
Film: 3
A Series
• Inch version
Engineering
Bypass Tray: Under 420mm Width
Paper Roll 1
Paper Roll 2
Cut Paper Tray
• Inch version
Bypass Tray: Under 17" Width
Paper Roll 1
Paper Roll 2
Cut Paper Tray
Paper Roll 1
Paper Roll 2
Cut Paper Tray
*1
: A Series 841mm
*1
: A Series 420mm
*2
: A Series A4K
*1
: Engineering 34"
*1
: Engineering 17"
*2
: Engineering 12 × 18K
*1
: Plain
*1
: Plain
*2
: Plain
29
Page 42

User Tools (System Settings)
User Tools item menu Default
Display Contrast (Centre)
Paper Volume (printer mode)
*3
Paper Roll 1: 100%
Paper Roll 2: 100%
Adj.Print Positn. • Metric version
Paper Roll 1
Paper Roll 2
Cut Paper
• Inch version
Paper Roll 1
3
Paper Roll 2
Cut Paper
*1
: 0.0 mm
*1
: 0.0 mm
*2
: 0.0 mm
*1
: 0.00 inch
*1
: 0.00 inch
*2
: 0.00 inch
Adj.Scan Position 0
Print Image Prior (printer mode) Thin Lines
❖❖❖❖ Timer Settings (see p.42 “Timer Settings”)
User Tools item menu Default
Auto Off Timer 14 min.
Energy Saver 7 min.
Panel Off Timer On 60 sec.
System Auto Reset On 60 sec.
Date –
Time –
❖❖❖❖ Key Op. Tools (see p.43 “Key Op. Tools”)
User Tools item menu Default
User Code Manage. Off
Key Operator Code Off
AOF (Always On) On
Optional HDD
*5
Tray Prob.Setting Do not Use Bypass
*1
The paper roll tray (optional) must be installed.
*2
The cut paper tray (optional) must be installed.
*3
The printer unit (optional) must be installed.
*4
The scanner unit (optional) must be installed.
*5
The HDD (optional) must be installed.
30
Off
Page 43

Accessing User Tools (System Settings)
Accessing User Tools (System Settings)
This section is for key operators in
charge of this machine.
User Tools allow you to change or set
defaults.
Note
❒ Operations for System Settings dif-
fer from normal operations. Always quit User Tools when you
finish making settings. See p.32
“Exiting User Tools”.
❒ Any changes you make with User
Tools remain in effect even if the
main power switch or operation
switch is turned off, or the {{{{Energy
Saver}}}} or {{{{Clear Modes}}}} key is
pressed.
Changing Default Settings
Note
❒ If a key operator code is set, the
key operator code entry display
appears. Enter the key operator
code, and then press [OK]. See p.43
“Key Operator Code”.
Press the {{{{User Tools}}}} key.
AAAA
The indicator lights.
Press the number key {{{{1}}}}.
BBBB
The System Settings display appears.
Enter the number of the menu
CCCC
you want to select using the
number keys.
Reference
p.29 “User Tools Menu (System
Settings)”
Enter the number of the item you
DDDD
want to select using the number
keys.
Note
❒ Press [↑↑↑↑Prev.] or [↓↓↓↓Next] to select
an item not displayed.
Change settings by following in-
EEEE
structions on the display, and
then press [OK].
3
ABB001S
Note
❒ For details about specifying, or
changing settings, see p.19 “Dis-
play”.
❒ To cancel changing settings and
return to the initial display,
press the {{{{Use Tools}}}} key.
31
Page 44

User Tools (System Settings)
Exiting User Tools
Press the {{{{User Tools}}}} key.
AAAA
The indicator lights.
3
ABB001S
Note
❒ You can also exit User Tools by
pressing [Exit].
32
Page 45

Settings You Can Change with User Tools
Settings You Can Change with User Tools
Reference
To access User Tools, see p.31 “Accessing User Tools (System Settings)”.
General Features
❖❖❖❖ Adjust Cut Length
You can specify the cut length when using synchro, preset, or variable cut.
Note
❒ Default
• Metric version: 0.0 mm
From –25 mm to +25 mm (in 1 mm increments)
• Inch version: 0.0 inch
From –1.0 inch to +1.0 inch (in 0.1 inch increments)
❖❖❖❖ Fusing Adjustment
You can specify the characteristics of the paper in the paper tray. If the image
on copies is scratched, or the paper wrinkles when using translucent paper,
you can change the setting to get better copies.
You can specify the paper thickness for the bypass tray, paper roll, and cut paper. You can also specify the paper type (plain, translucent, and film) for the
bypass tray or paper roll tray.
3
Note
❒ Default: 3 (Plain paper or Film), 2 (Translucent paper)
❒ The paper thickness can be set from 1 (Thicker) to 5 (Thinner).
33
Page 46

User Tools (System Settings)
❒ Refer to the chart below when selecting the mode for the paper thickness.
Mode12345
Paper type
Plain paper 110 g/m
Translucent
paper
2
(29.3 lb)
70 – 90 g/m
(18.6 – 29.3
lb)
2
3
* If the paper wrinkles when using mode 2,
try using mode 1.
Film 0.07 mm –
*1
Out of guarantee
0.095 mm
(2.8 Mil – 3.7
Mil)
2
90 g/m
(23.9 lb)
70 – 80 g/m2
(18.6 – 21.3
lb)(Standard mode)
0.07 mm –
0.095 mm
(2.8 Mil – 3.7
Mil)
2
70 g/m
(Standard
mode)
(18.6 lb)
70 – 80 g/m
(18.6 – 21.3
lb)
0.07 mm –
0.095 mm
(2.8 Mil – 3.7
Mil) (Standard mode)
60 g/m
less
(15.9 lb)
2
50 – 70 g/m2
(13.3 – 18.6
lb)
0.07 mm –
0.095 mm
(2.8 Mil – 3.7
Mil) (Standard mode)
2
or
Limp paper
Hemmed
*1
paper
—
❒ Depending on paper type and operating conditions, toner fusing condi-
tions vary. To improve toner fusing, change the setting mode to 3→2→1.
❒ When using thin, soft, or limp paper, toner fusing may appear wrinkled or
the image may be blurred. If this happens, change the setting to mode
3→4→5.
❒ When translucent paper modes 1 or 2 are selected, and you change the pa-
per type from plain or film to translucent, it may take longer for the machine to get ready for copying (up to two minutes).
❖❖❖❖ Orig. Size Detect
You can specify the scanning area when detecting the size of an original.
• Metric version:
• Inch version:
❒ Default:
❒ When you change the setting, the following changes are made to the
34
• A Series
• JIS B Series (JIS:Japanese Industrial Standard)
• Architecture
• Engineering
Note
• Metric version: A Series
• Inch version: Engineering
UserAutoR/E Orig. setting in User Tools (Copier Features).
Page 47

Settings You Can Change with User Tools
❖❖❖❖ Metric version
• For A series→JIS B series, if B1JIS or B4JIS is set for the User Auto
R/E settings, the UserAutoR/E Orig. setting is changed to vertical.
• JIS B series→A series, if A0 or A4 is set for the User Auto R/E set-
tings, the UserAutoR/E Orig. setting is changed to vertical.
❖❖❖❖ Inch version
When switching between Engineering and Architecture, if E is set for
the User Auto R/E settings, the UserAutoR/E Orig. setting is changed
to vertical.
Reference
“User Auto Reduce/Enlarge”, “User Auto Reduce/Enlarge Original”,
Copy Reference
❖❖❖❖ Tray Paper Size
You can specify the size of paper in the paper tray.
• Metric version:
• Bypass tray:
• Under 420mm Width
• Over 420mm Width
• Paper roll 1 or 2:
• A Series:
• 914mm
• 880mm
• 841mm
• 800mm
• 660mm
• 594mm
• 440mm
• 420mm
• 297mm
• 210mm
• JIS B Series:
• 728mm
• 515mm
• 364mm
• 257mm
3
35
Page 48

User Tools (System Settings)
• Cut Paper tray:
• A Series:
• A3K
• A4K
• JIS B Series:
• B4JISK
• Inch version:
• Bypass tray:
• Under 17" Width
3
• Over 17" Width
• Paper roll 1 or 2:
• Engineering:
• 34"
• 22"
• 17"
• 11"
1
• 8
/2" (81/2 × 11K)
1
• 8
/2" (81/2 × 13K)
1
• 8
/2" (81/2 × 14K)
• Architecture:
• 36"
• 30"
• 24"
• 18"
• 12"
• 9"
• Cut paper tray:
• Engineering:
• 11 × 17K
1
• 8
/2 × 14K
1
• 8
/2 × 13K
1
• 8
/2 × 11K
• Architecture:
• 12 × 18K
36
Page 49

Settings You Can Change with User Tools
Note
❒ Default:
• Metric version:
• Bypass tray: Under 420mm Width
• Paper roll 1, 2:
• A series: 841mm (paper roll 1), 420mm (paper roll 2)
• Cut paper tray:
• A series: A4K
• Inch version:
• Bypass tray: Under 17" Width
• Paper roll 1, 2:
• Engineering: 34" (paper roll 1), 17" (paper roll 2)
• Cut paper tray:
• Engineering: 12
×
18K
❖❖❖❖ Tray Paper Type
You can specify the type of paper in a paper tray.
Specify the type of paper in each of the paper trays (bypass tray, paper roll
tray 1, paper roll tray 2, and cut paper tray.)
• Plain
• Translucent
• Film
• Recycled
3
Note
❒ Default: Plain
❒ You can specify plain or recycled paper for the cut paper tray.
❖❖❖❖ Orig. Edge Hold
When large size originals, such as A0(E)K or A1(D)K, are delivered to the
lower tray, you can have the machine gather the trailing edge of the original
so that it does not fall to the floor. This setting specifies whether or not to use
that function.
• On (Always)
• On (Specify)
• Off
Note
❒ Default: Off
❒ To use the function, select [On (Always)] or [On (Specify)]. To not use the func-
tion, select [Off].
❒ When [On (Specify)] is selected, select [Over A0KKKK], [Over A1KKKK], [Over A2KKKK],
[Over A3KKKK], or [Over A4KKKK] as the original size.
37
Page 50

User Tools (System Settings)
❖❖❖❖ Output Tray
You can specify the paper output tray to use when the power is turned on or
the {{{{Clear Modes}}}} key is pressed.
• Lower
• Upper
Note
❒ Default: Upper
❖❖❖❖ Orig. Feed Delay1
3
You can specify the duration of delay before an original is fed into the machine after being set. If originals frequently feed in slanted, or you are using
special originals, set the delay accordingly.
Note
❒ Default: 1 sec.
❒ The time can be set from 1 to 5 seconds.
❖❖❖❖ Orig. Feed Delay2
You can specify the duration of the pause immediately after originals are first
fed into the machine. If originals frequently feed in slanted, or you are using
special originals, set the delay accordingly.
• On 1 sec.
• Off
Note
❒ Default: Off
❒ Select [On], the time can be set from 1 to 5 seconds.
❖❖❖❖ Auto Roll Switch.
If paper roll 1 runs out during copying, the machine can automatically switch
to paper roll 2. This setting specifies whether or not to automatically switch
the paper rolls.
• On
• Off
Note
❒ Default: Off
❒ This function is only available in the paper roll tray.
38
Page 51

❖❖❖❖ Fine Ratio:Copier
Settings You Can Change with User Tools
ABB009S
Depending on paper type, environment, and humidity, copy paper can expand or shrink slightly. This means that the size of the copy and the original
do not match. If this happens, you can specify the vertical and horizontal correction ratio. You can specify this setting for each paper type (plain, translucent, film)
Note
❒ Default: 0.0%
❒ From –1.0% to 1.0% (in 0.1% increments)
❒ To set the Fine Ratio setting, measure the length of the original and the
copy image to calculate the ratio.
Calculating the Correction Value (%)
Example)
Horiz. Horiz.
To copy at the same size as the original
... For the example above:
CopyOriginal
correction value(%)
3
Set the correction value (horizontal) to 0.8%.
ZEDG010E
39
Page 52

User Tools (System Settings)
❖❖❖❖ Panel Tone
You can specify whether or not the machine should emit a tone when the keys
on the control panel are pressed.
• On
• Off
Note
❒ Default: On
❖❖❖❖ Warm Up Notice
3
You can have the beeper sound when the machine becomes ready to copy after leaving Energy Saver mode or when the power is turned on.
• On
• Off
Note
❒ Default: On
❒ If the Panel Tone setting is [Off], the beeper does not sound, regardless of
the Warm Up Notice setting.
❖❖❖❖ Copy Count Displ.
You can specify the copy count display format.
If you press [Up], the display counts upward, if you press [Down], the display
counts downward.
• Up
• Down
Note
❒ Default: Up
❖❖❖❖ Feed Start Method
You can specify whether feeding starts automatically or after pressing the
{{{{Start}}}} key.
• Auto
• Press Start Key
Note
❒ Default: Auto
❖❖❖❖ Display Contrast
You can adjust the contrast of the display in seven increments, Lighter to
Darker.
40
Page 53

Settings You Can Change with User Tools
❖❖❖❖ Paper Volume (printer mode)
When the printer unit is installed, you can specify how the paper volume
should be displayed when a paper roll is loaded in the paper roll tray. You
can specify this setting for each paper roll tray.
• 100%
• 75%
• 50%
• 25%
Note
❒ Default: 100% (paper roll tray 1 or 2)
❒ When a new 175 m roll is loaded, select [100%].
❖❖❖❖ Adj.Print Positn.
You can specify the horizontal print position. You can specify this for the paper type (paper roll 1 or 2, cut paper)
Note
❒ Default:
• Metric version: 0.0 mm (paper roll 1 or 2, cut paper)
From –10.0 mm to + 10.0 mm (in 0.1 mm increments)
• Inch version: 0.00 inch (paper roll 1 or 2, cut paper)
From –0.40 inch to +0.40 inch (in 0.01 inch increments)
3
❖❖❖❖ Adj.Scan Position
You can adjust the position of the scan area.
Note
❒ Default: 0
❒ From –10 to +10 (in 1 increments)
❖❖❖❖ Print Image Prior (printer mode)
When the printer unit is installed, you can specify the print mode priority.
• Thin Lines
• Gradation
Note
❒ Default: Thin Lines
41
Page 54

User Tools (System Settings)
Timer Settings
❖❖❖❖ Auto Off Timer
After a specified period, following job completion, the machine automatically
turns off, in order to conserve energy. This function is called "Auto Off".
The machine status after Auto Off is referred to as "Off mode". You can specify the time to elapse before Auto Off is activated.
Note
❒ Default: 14 min.
3
❒ Enter a time interval between 1 and 240 minutes.
❒ From “Off mode”, the machine is ready to use in 10 seconds.
❒ Auto Off may not work when error messages appear.
❖❖❖❖ Energy Saver
When no other key operations are performed, the machine switches to Low
power mode after a specified period.
Note
❒ Default: 7 min.
❒ The time can be set from 1 to 240 minutes.
❖❖❖❖ Panel Off Timer
When no other key operations are performed, the machine switches to Energy
Saver mode after a specified period.
• On 60 sec.
• Off
Note
❒ Default: On 60 sec.
❒ Select [On], the time can be set from 10 to 999 seconds.
❖❖❖❖ System Auto Reset
The System Reset setting automatically switches the display to its initial condition when no operations are in progress, or when an interrupted job is
cleared. This setting determines the system reset interval.
• On 60 sec.
• Off
Note
❒ Default: On 60 sec.
❒ Select [On], the time can be set from 10 to 999 seconds.
42
Page 55

Settings You Can Change with User Tools
❖❖❖❖ Date
Set the date for the machine's internal clock using the number keys.
Note
❒ To change between year, month, and day, press the 01 key.
❒ Enter the date using the number keys.
❖❖❖❖ Time
Set the time for the machine's internal clock using the number keys.
Note
❒ To change between hours, minutes and seconds, press the 01 key.
❒ Enter the time using the number keys.
Key Op. Tools
The key operator must set the following items (for settings or more information,
contact the key operator):
The key operator should program a key operator code when making settings.
See p.43 “Key Operator Code”.
If the key operator code is set, you cannot access key operator functions unless
you enter the key operator code (max.eight digits).
❖❖❖❖ User Code Manage.
Allows you to control who uses the machine by setting codes for users.
3
Note
❒ Default: Off
❒ User codes must be registered for user code management. See “Key Oper-
ator Tools”, Copy Reference.
❖❖❖❖ Key Operator Code
You can specify whether or not to use passwords (max.eight digits) to access
Key Op. Tools settings for key operator codes.
• On
• Off
Note
❒ Default: Off
❒ When [On] is selected, specify key operator code (max.eight digits).
43
Page 56

User Tools (System Settings)
❖❖❖❖ AOF (Always On)
You can specify whether or not to use Auto Off Timer.
• On
• Off
Note
❒ Default: On
❖❖❖❖ Optional HDD
When the optional hard disk is installed, if it fails, you can still use the ma-
3
chine temporarily if you turn it off. (Some functions may not be available.)
• On
• Off
Note
❒ Default: Off
Limitation
❒ When the optional hard disk is installed and [Off] is selected, you cannot
use the following functions:
• Repeat Copy (longer than A0(E)K)
• Stamp (User Stamp, Repeat User Stamp)
• Restart Copy (longer than A0(E))
• User Format Overlay
• Sample Copy (longer than A0(E))
❖❖❖❖ Tray Prob.Setting
When the paper roll tray is installed, if the cutter malfunctions, select to use
the bypass tray or not.
• Use Bypass
• Do not Use Bypass
Note
❒ Default: Do not Use Bypass
44
Page 57

4. Troubleshooting
If Your Machine Does Not Operate As You Want
The following chart gives explanations of common problems and messages. If
other messages appear, follow the instructions displayed.
Note
❒ If you cannot make copies as you want because of paper type, paper size, or
paper capacity problems, use recommended paper. See p.70 “Copy Paper”.
General
Problem Causes Solutions
Please wait.
“
pears.
The display is off. The display contrast is too
Nothing happens when the
operation switch is turned
on.
The function status indicator is red.
The user code entry display appears.
” ap-
This message appears
when you turn on the operation switch.
This message appears
when you change the toner
cartridge.
light.
The machine is in Energy
Saver mode.
The operation switch is
turned off.
The main power switch is
turned off.
The function associated
with the red indicator is interrupted.
Users are restricted by user
management.
If the machine does not come on after two minutes, contact your service representative.
Wait for the machine to get ready.
Set “Darker” in
der System Settings. See p.40 “Dis-
play Contrast”.
Press the
cel Energy Saver mode.
Turn on the operation switch.
Turn on the main power switch.
Press the function key corresponding to the indicator. Follow the instructions that appear on the control
panel.
Enter the user code (max.eight digits), and then press
[Display Contrast]
{{{{Energy Saver}}}}
{{{{#}}}}
un-
key to can-
.
45
Page 58

Troubleshooting
Problem Causes Solutions
The main power indicator does not turn
off when pressed.
Original images are
printed on the reverse side of the paper.
Misfeeds occur fre-
4
quently.
Originals jam frequently.
You forgot your key
operator code.
Central vertical lines
blur or bleed at 2.5
mm intervals.
This occ urs i n the following cases:
• The machine is
communicating
with external
equipment.
• The hard disk is
active.
You may have loaded the paper incorrectly.
There are folds or
wrinkles in the paper.
Jammed or torn paper is inside the machine.
The tray's side or end
fence may not be set
properly.
You may have loaded paper of a size not
shown on the paper
size selector.
Originals are curled. Smooth out any curls and try again.
— Contact your service representative.
The carriage roller's
studs are pressing on
the paper as it passes
through.
When you turn the main power off, check if the
machine is not communicating with a computer.
Load paper correctly. Load paper into the paper
roll tray or the cut paper tray print side down,
and into the bypass tray print side up. See p.47
“Loading Paper”.
Remove any folds or wrinkles from the paper.
Remove the paper, as necessary. See p.52
“xClearing Misfeeds”.
Check the side or end fence is set properly. See
p.49 “Loading Cut Paper”.
When using paper of a size that cannot be detected automatically, use Tray Paper SizeSettings to set the paper size. See p.35 “Tray Paper
Size” and p.70 “Copy Paper”.
Use [Adj. Print Positn.] to move the line incrementally left or right. Image moves left or right according to the number set. For details, see p.41
“Adj.Print Positn.”.
46
Page 59

Loading Paper
R
Loading Paper
CAUTION:
• Be careful when replacing the roll paper or removing misfed paper by following the operating instructions properly. Otherwise, an injury may result from
the paper cutter inside.
Important
❒ When removing paper rolls, lift the paper holders on either side of the paper
roll before removing. Do not lift one side only. This could damage the machine.
AAJ018S
Reference
For details about paper sizes and types that can be loaded, see p.70 “Copy Paper”.
For details about changing the paper roll size, see p.56 “Changing the Paper
Roll Size”.
4
Loading Paper Roll
1. Open the paper roll tray. Hold both
sides of the empty paper roll and remove
it from the unit.
2. Raise the green lever on the paper holder (A). Remove the paper holder from the
empty paper roll core (B).
Note
❒
Remove both sides of the paper holder.
47
Page 60

Troubleshooting
3. Set the paper holder in the new paper
roll (A). Lower the lever (B).
Note
❒
Insert the paper holder firmly until it
stops.
❒
Set both sides of the paper holder.
4. Hold both sides of the paper holder. Set
it in the roll holder.
5. Set the paper roll.
4
Note
❒
The edge of the paper roll should be on
the bottom.
6. Pass the paper edge under the rubber
part of the roller.
7. Turn the paper feed knob in the direction of the arrows until the edge of the paper emerges.
8. Cut the edge of the paper by sliding the
cutter knob from left to right, or from right
to left (A). Remove the offcut (B).
9. Turn the paper feed knob 90 degrees
forward.
10. Close the paper roll tray.
Note
❒ When you use the printer function, set the paper volume again after loading
the paper roll. See p.41 “Paper Volume (printer mode)”
48
Page 61

Loading Cut Paper
Loading Paper
1. Pull out the cut paper tray while lifting upward and out.
Note
❒
Be sure to load paper after all the paper in
the tray run out.
2. Hold both sides and lift the front of the tray,
and then remove it from of the machine.
3. While pressing the release lever, open the
side fence (A).
Note
❒
When changing the paper size, adjust the
end fence to the paper size while pressing
the release lever (B).
4. Load paper print face down.
Note
❒
Load paper below the limit mark on the paper guide.
5. While pressing the release lever, adjust the
side fence to the paper size.
6. Insert the cut paper tray into the machine,
push slowly until it stops.
Note
❒
If you push the cut paper tray forcefully,
the tray's paper guide may become out of
position.
Note
❒ When you change the paper size, make Tray Paper Size setting under System
Settings, see p.35 “Tray Paper Size”.
4
49
Page 62

Troubleshooting
R
R
DDDDAdding Toner
WARNING:
• Do not incinerate used toner or toner containers. Toner dust might ignite when exposed to an open flame. Dispose of used toner containers
in accordance with local regulations.
CAUTION:
• Keep toner (used or unused) and toner containers out of reach of children.
Important
❒ Faults may occur if you use non-recommended toner.
4
❒ Replace toner while the machine is turned on. If you turn the machine off,
your settings will be lost and you will not be able to resume copying.
❒ Always replace toner when the message appears.
Note
❒ When the indicators blink, replace the toner as soon as possible.
❒ If toner runs out, the message “D
copies.
Reference
For details about toner storage, see p.60 “Toner”.
Add toner
” appears and you cannot make
1. Lift both main unit opening levers, and then
open the main unit upward.
2. Open the main unit front cover.
3. Hold the toner cartridge at the edge of the
right side, and then roll it in the direction of
the arrow.
50
Page 63

DAdding Toner
4. Hold the toner cartridge at the edge of the
left side, and remove it from the machine.
5. Take out the new toner cartridge (A), and
then shake it gently five or six times (B).
6. Insert the end of the toner cartridge into the
toner holder on the left (A). Insert the toner
cartridge into the right in the direction of the
arrow (B).
Note
❒ Do not rotate the cartridge until you re-
move the tape (next step).
7. Slowly remove the tape from the toner cartridge.
4
8. Rotate the toner cartridge in the direction of
the arrow until it stops.
9. Close the main unit front cover and the main
unit.
51
Page 64

Troubleshooting
R
R
xxxxClearing Misfeeds
CAUTION:
• The fusing section of this machine might be very hot. Caution should be taken when removing misfed paper.
CAUTION:
• Be careful when replacing the roll paper or removing misfed paper by following the operating instructions properly. Otherwise, an injury may result from
the paper cutter inside.
Important
❒ Do not turn off the operation switch when removing jammed originals. If you
4
do, your settings will be lost.
❒ Remove jammed originals completely, taking care not to tear them. If scraps
of paper remain inside, originals will jam again and may cause damage to the
machine.
❒ If the original misfeeds again, call your service representative immediately.
Note
❒ Paper jam locations may be displayed in more than one place at a time. If this
happens, check all the locations indicated.
❒ Instructions for clearing paper jams in the copy output area and paper roll
tray are contained in the stickers on the machine.
52
Page 65

xClearing Misfeeds
4
53
Page 66

Troubleshooting
B is displayed
1. Lift both main unit
opening levers,
and then open the
4
main unit upward.
2. Remove the
jammed original.
3. Close the main unit.
is displayed
54
1. Open the
paper roll tray,
and then slowly
pull up the
edge of the
jammed paper.
6. Rotate the paper
roll until the edge
of the paper is fed
into the rubber
part of the roller.
Note
Make sure the
paper is not
loose, and insert
it straight into the
roller.
2. Cut the edge of the paper roll by
sliding the cutter knob right to left,
or left to right ( ), and then remove
the offcut ( ).
Note
Be sure to return the cutter knob to
the right or left end of the cutter area.
7. Rotate the paper
feed knob in the
direction of the
arrow until the
edge of the paper
roll emerges.
8. Cut the edge of the paper roll by
sliding the cutter knob right to left,
or left to right to ( ), and then
remove the offcut ( ).
Note
Be sure to return the cutter knob
to the right or left end of the
cutter area.
3. Turn the paper
feed knob 90
degrees forward.
4. If you cannot
remove the
jammed paper,
rotate the paper
in the direction of
the arrow until
the edge
emerges.
9. Turn the paper
feed knob 90
degrees forward.
10. Close the paper
roll tray.
5. Cut the edge of
the paper using
the cutter or
scissors.
Page 67

P is displayed
xClearing Misfeeds
1. Hold both sides of
the original cover
with both hands,
and then open the
original cover.
2. Remove the
jammed paper.
3. Close the original
cover with both
hands gently.
C is displayed
1. Open the rear
cover holding C1
at the rear with
both hands.
2. Hold the C2 knob,
and then tilt the
top of the fusing
unit forward.
3. Remove the
jammed paper.
4. Close the fusing unit
and rear cover.
is displayed
Pull out the cut
1.
paper tray while
lifting upward and
out.
5. If you cannot
remove the
jammed paper or
the paper misfeed
display does not
disappear,
proceed to
B is displayed .
2.
Hold both sides and
lift the front of the tray,
and then remove it
from the machine.
4
3.
Remove the jammed
paper.
Note
If the jammed paper
is forcefully pulled
out, it may tear and
scraps may leave in
the machine
4.
Insert the cut paper
tray while lifting
upward into the
machine, push
slowly until it stops.
Note
If you push the cut
paper tray forcefully,
the tray's paper
guide may become
out of position.
ABB013S
55
Page 68

Troubleshooting
Changing the Paper Roll Size
Preparation
Be sure to select the paper size with User Tools and the paper size selector. If
you do not, misfeeds might occur. See p.35 “Tray Paper Size”.
Change the left and right of the roll holder when you load different size paper
rolls.
Important
❒ Always follow the instructions below when adjusting the roll holder. Do not
force the roll holder by pulling or sliding it strongly. This could damage it.
4
Removing the Roll Holder
1. Push the roll holder inwards, and then pull
it upwards.
Note
❒
The roll holder is attached with magnets
and a hook.
Setting the Roll Holder
1. Insert the hook on the roll holder into the
hole (A).
2. Hook on the outside and insert the hook into
the hole (B).
Note
❒
Make sure the hooks are firmly in the
holes.
56
Page 69

Reference
p.47 “Loading Paper”.
Changing the Paper Roll Size
3. Check the paper size in the windows on the
inside of the roll holder.
Note
❒
Make the same setting for both left and
right sides.
4
57
Page 70

Troubleshooting
4
58
Page 71

Dos and Don'ts
R
5. Remarks
CAUTION:
• Unplug the power cord from the
wall outlet before you move the
machine. While moving the machine, you should take care that
the power cord will not be damaged under the machine.
• Do not touch areas on or around
the fusing unit. These areas get hot.
• When you use this machine for a
long time in a poorly ventilated
confined space, you may detect an
odd smell. To keep the workplace
comfortable, we recommend good
ventilation.
• The area around the ventilation
holes might feel warm. This is
caused by exhaust air and is not a
malfunction.
• Do not turn off the operation
switch while using each function.
Make sure each function is finished first.
• Do not open the main unit cover,
the paper roll tray, or the cut paper
tray while copying. If you do, misfeeds might occur.
• Do not leave the main unit open
more than 10 minutes, otherwise
copy quality may deteriorate.
• If you do not use the machine for a
long time, remove the paper from
the paper roll tray, or the cut paper
tray and place it in its storage bag.
• Condensation can lead to image
deterioration. To prevent this, this
machine has an anti-condensation
function. Even when the main
power switch is in the standby position, the anti-condensation heater is active, keeping the machine
body slightly warm.
• The paper roll tray has the Antihumidity function. Even when the
main power switch is in the standby position, the Anti-humidity
heater is active if it is turned on.
59
Page 72
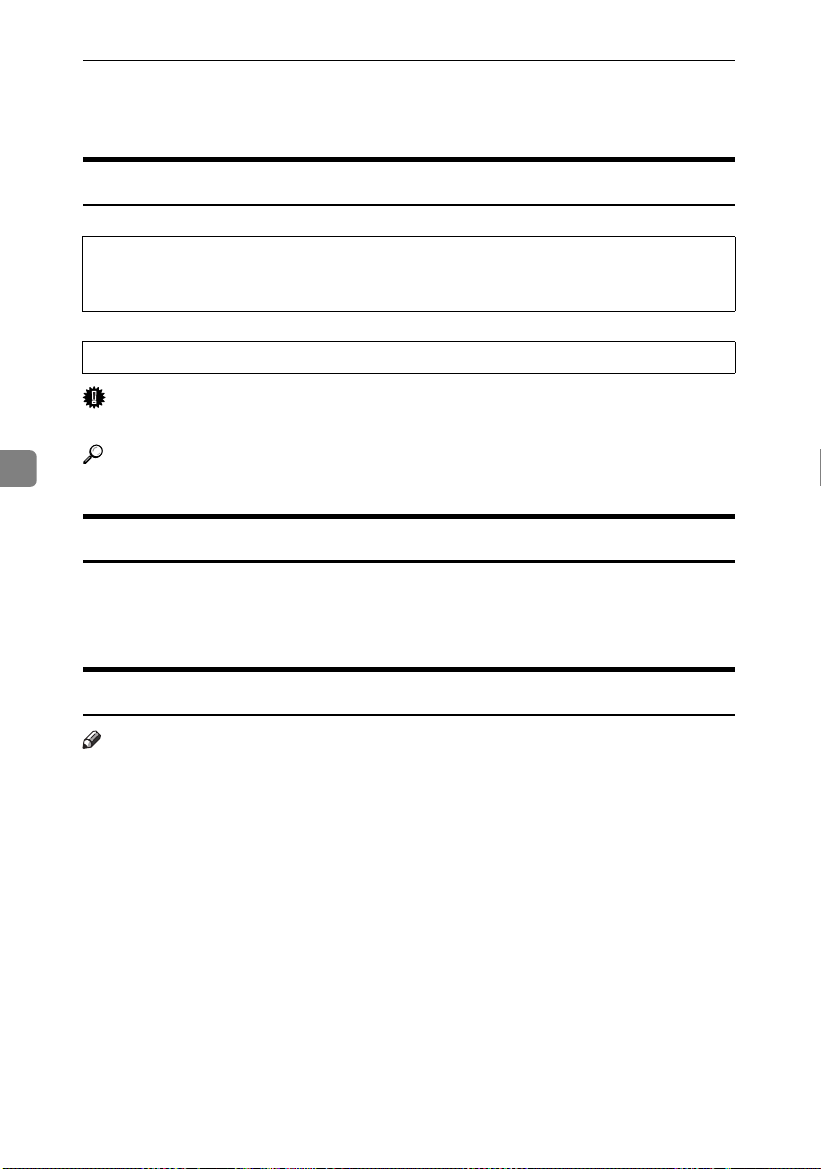
Remarks
R
R
Toner
Handling Toner
WARNING:
• Do not incinerate used toner or toner containers. Toner dust might ignite when exposed to an open flame. Dispose of used toner containers
in accordance with local regulations.
CAUTION:
• Keep toner (used or unused) and toner containers out of reach of children.
Important
❒ Faults may occur if you use non-recommended toner.
5
Reference
To add toner, see p.50 “DAdding Toner”.
Toner Storage
When storing toner, the following precautions should always be followed:
• Store toner containers in a cool, dry place free from direct sunlight.
• Store on a flat surface.
Used Toner
Note
❒ Toner cannot be re-used.
60
Page 73

Where to Put Your Machine
R
R
R
Where to Put Your Machine
Machine Environment
Choose your machine's location carefully. Environmental conditions
greatly affect its performance.
Optimum environmental conditions
CAUTION:
• Keep the machine away from humidity and dust. Otherwise a fire
or an electric shock might occur.
• Do not place the machine on an
unstable or tilted surface. If it topples over, an injury might occur.
CAUTION:
• If you use the machine in a confined space, make sure there is a
continuous air turnover.
• Temperature: 10-30 °C (50-86 °F)
• Humidity: 15-90%
• A strong and level base.
• The machine must be level within
5 mm, 0.2 inches: both front to rear
and left to right.
• To avoid possible buildup of
ozone, be sure to locate this machine in a large well ventilated
room that has an air turnover of
more than 30 m
3
/hr/person.
Environments to avoid
• Areas exposed to direct sunlight or
other sources of strong light (more
than 1,500 lux).
• Areas directly exposed to cool air
from an air conditioner or warm
air from a heater. (Sudden temperature changes can cause condensation to form inside the machine.)
• Near machines generating ammonia, such as a diazo copy machine.
• Places where the machine will be
subject to frequent strong vibration.
• Dusty areas.
• Areas with corrosive gases.
Moving
CAUTION:
• Unplug the power cord from the
wall outlet before you move the
machine. While moving the machine, you should take care that
the power cord will not be damaged under the machine.
Important
❒ Be careful when moving the ma-
chine. Take the following precautions:
• Turn off the main power. See
p.22 “Turning Off the Main
Power”.
5
61
Page 74

Remarks
R
R
R
• Unplug the power cord from
the wall outlet. When you pull
the plug out of the socket, grip
the plug (not the cord) to avoid
damaging the cord, thereby reducing the risk of fire and electric shock.
• Close all covers and trays, including the front cover and bypass tray.
❒ Move the machine carefully. If you
do not, it could be damaged and
stored files might be lost.
❒ Protect the machine from strong
shocks. Impact can damage the
hard disk and cause stored files to
be lost. As a precautionary meas-
5
ure, files should be copied to another computer.
Power Connection
WARNING:
• Connect the machine only to
the power source described on
CAUTION:
• When you disconnect the power
plug from the wall outlet, always
pull the plug (not the cable).
• When the main power switch is in
the standby position, the optional
anti-condensation heaters are on.
In an emergency, unplug the machine's power cord.
• When you unplug the power cord,
the anti-condensation heaters go
off.
• Make sure the plug is inserted
firmly in the wall outlet.
• Voltage must not fluctuate by
more than 10%.
• The wall outlet should be near the
machine and be easily accessible.
Clearance Around the Machine
Place the machine near a power
source, and provide the clearance as
shown.
the inside front cover of this
manual. Connect the power
cord directly into a wall outlet
Rear
and do not use an extension
cord.
RightLeft
• Do not damage, break or make
any modifications to the power
cord. Do not place heavy objects on it. Do not pull it hard
nor bend it more than necessary. These actions could
cause an electric shock or fire.
CAUTION:
• Unplug the power cord from the
wall outlet before you move the
machine. While moving the ma-
Front more than 100 cm (40")
Rear more than 60 cm (23")
Left more than 60 cm (23")
Right more than 60 cm (23")
Front
ABB010S
Standard setting
chine, you should take care that
the power cord will not be damaged under the machine.
Note
❒ For the required space when op-
tions are installed, please contact
62
your service representative.
Page 75

Maintaining Your Machine
If the exposure glass or platen plate
are dirty, you will not be able to make
clear copies. Clean them when they
become dirty.
❖❖❖❖ Cleaning the machine
Wipe the machine with a soft, dry
cloth. If this does not remove the
dirt, wipe the machine with a
damp and tightly wrung cloth. If a
damp cloth still does not remove
the dirt, try using a mild detergent.
Wipe the machine with a dry cloth
to remove the moisture, after using
a damp cloth.
Important
❒ Do not use chemical cleaner or or-
ganic solvent, such as thinner or
benzene. If they get into the machine or melt plastic parts, a failure
might occur.
❒ Do not clean parts other than those
specified in this manual. Such
parts should be cleaned by your
service representative.
Cleaning inside the Original
Cover
If you open the original cover, you
can access the exposure glass and
original feed mechanism.
Open the original cover while
AAAA
holding it on both sides.
Cleaning the exposure glass
A Wipe the exposure glass with a
soft, dry cloth.
Maintaining Your Machine
5
AAJ021S
AAJ023S
63
Page 76

Remarks
Cleaning the platen plate
A Wipe the platen plate with a
soft, dry cloth.
AAJ022S
Cleaning the Main Unit
Clean off toner that may have collected on the imaging area.
Lift the main unit opening levers
AAAA
on either side and open the main
unit.
Cleaning the original feed guide
5
A Wipe the original feed guides
with a soft, dry cloth.
Important
❒ Do not leave the main unit open
more than 10 minutes, otherwise copy quality may deteriorate.
Wipe it with a soft, dry cloth.
BBBB
AAJ026S
64
Note
❒ If there is paper dust or fluff
inside, remove it.
Close the original cover gently.
BBBB
AAJ024S
AAJ025S
Close the main unit cover gently.
CCCC
AAJ027S
Page 77

6. Specifications
Main Unit
❖❖❖❖ Configuration:
Desktop
❖❖❖❖ Photosensitivity type:
OPC drum
❖❖❖❖ Copy process:
Dry electrostatic transfer system
❖❖❖❖ Development:
Dry two-component magnetic brush development system
❖❖❖❖ Fusing:
Heating roll pressure system
❖❖❖❖ Original scanning:
Original feed image scanning over fixed contact image sensor
❖❖❖❖ Original size (W ×××× L):
• Metric version: 182 × 140 mm-914 × 3600 mm
• Inch version: 7" × 5"-36" × 142"
❖❖❖❖ Copy size (W ×××× L):
• Metric version:
Paper roll: 210 × 280 mm-914 × 3600 mm
Bypass tray: 210 × 257 mm-914 × 2000 mm
Cut paper: A3K, B4K, A4K
• Inch version:
EK-A K
Paper roll: 8
Bypass tray: 8
Cut paper: 12" × 18"K, 11" × 17"K, 8
11"K
1
/2" × 11" -36" × 142"
1
/2" × 10"-36" × 78"
❖❖❖❖ Reproduction ratio:
• Metric version:
Full-size: 100%
Reduce: 25.0%, 35.4%, 50.0%, 70.7%
Enlarge: 141.4%, 200.0%, 282.8%, 400.0%
Zoom: 25.0-200.0% (0.1% increments)
Zoom: 200.0-400.0% (0.2% increments)
1
/2" × 14"K, 8 1/2" × 13"K, 8 1/2"
×
65
Page 78

Specifications
• Inch version (Engineering):
Full-size: 100%
Reduce: 25.0%, 32.4%, 50.0%, 64.7%
Enlarge: 129.4%, 200.0%, 258.8%, 400.0%
Zoom: 25.0-200.0% (0.1% increments)
Zoom: 200.0-400.0% (0.2% increments)
• Inch version (Architecture):
Full-size: 100%
Reduce: 25.0%, 33.3%, 50.0%, 66.7%
Enlarge: 133.3%, 200.0%, 266.7%, 400.0%
Zoom: 25.0-200.0% (0.1% increments)
Zoom: 200.0-400.0% (0.2% increments)
❖❖❖❖ Copying speed (full-size copying):
2 copies/minute (A0K), 4 copies/minute (A1L), 3.6 mm/minute (60
mm/second)
❖❖❖❖ Original:
Sheet
❖❖❖❖ Warm-up time:
6
Less than 2 minutes (23°C)
❖❖❖❖ First copy time:
• Metric version:
When upper tray is selected: 22 seconds (A1L, paper roll tray), 34 seconds
(A1L, bypass tray)
• Inch version:
When upper tray is selected: 22 seconds (DL, paper roll tray), 34 seconds
(DL, bypass tray)
❖❖❖❖ Maximum original size:
914 × 3600 mm, 36" × 141.7"
❖❖❖❖ Non-reproduction area:
• Metric version:
• Top: 8 mm
• Bottom: 8 mm
• Left and Right 2 ± 2 mm (less than 5 mm on either side)
• Inch version:
• Top: 0.32"
• Bottom: 0.32"
• Left and Right 0.08" ± 0.08" (less than 0.20" on either side)
66
Page 79

❖❖❖❖ Continuous copying count:
20 copies
❖❖❖❖ Copy paper feed method:
bypass tray
❖❖❖❖ resolution:
600 dpi
❖❖❖❖ Power source:
220-240 V, 50/60 Hz, 10 A or more
❖❖❖❖ Dimensions (W××××D××××H):
1080 × 637 × 580 mm, 43" × 25" × 23"
❖❖❖❖ Weight:
105 kg
❖❖❖❖ Power consumption:
Full system
Warm-up 1.4 kw
Stand-by (Anti-humidity heater = OFF) 0.03 kw
Stand -by (Anti-humidity heater = ON) 0.11 kw
Copying 1.5 kw
Maximum 1.5 kw
*1
Main unit with the Roll Feeder Type 240B, Paper Cassette Type 240, Hard Disk
Drive Type 240, Stamp Board Type A, Interface PCB Type 240
*1
❖❖❖❖ Noise emission
:
*1
Sound Power Level:
Stand-by Less than 43 dB (A)
Copying Less than 68 dB (A)
*2
Sound Pressure Level
Stand-by Less than 37 dB (A)
Copying Less than 62 dB (A)
*1
The above measurements are in accordance with ISO 7779 and are actual values.
*2
Measured at the position of the operator.
:
Main Unit
6
67
Page 80

Specifications
Options
Roll Feeder Type 240 A or 240 B
❖❖❖❖ Paper sizes:
width: 210 – 910 mm, length: 150 m (diameter: 175 mm)
❖❖❖❖ Paper widths:
• Metric version
210 mm, 257 mm, 297 mm, 364 mm, 420 mm, 440 mm, 515 mm, 594 mm, 660
mm, 728 mm, 800 mm, 841 mm, 880 mm, 914 mm
• Inch version
1
/2", 9", 11", 12", 17", 18", 22", 24", 30", 34", 36"
8
❖❖❖❖ Power consumption
90 W (supplied by main unit)
❖❖❖❖ Dimensions (W ×××× D ×××× H):
6
1080 × 720 × 700 mm, 43" × 28" × 27"
❖❖❖❖ Weight:
Approx. 70 kg (Type 240 A), 72 kg (Type 240 B)
Paper Cassette Type 240
❖❖❖❖ Paper weight:
64 – 105 g/m2.
❖❖❖❖ Paper sizes:
A3K, B4 K, A4K, 12" × 18"K, 11" × 17"K, 8 1/2" × 14"K, 8 1/2" × 13"K, 8 1/2"
×
11"K
❖❖❖❖ Power consumption (Max):
Approx. 20 W (supplied by main unit)
❖❖❖❖ Paper capacity:
250 sheets
❖❖❖❖ Dimensions (W ×××× D ×××× H):
620 × 130 × 570 mm, 24" × 5" × 22"
❖❖❖❖ Weight:
Approx. 6 kg
68
Page 81

Options
Table Type 240
❖❖❖❖ Dimensions:
1080 × 720 × 700 mm, 43" × 28" × 27"
❖❖❖❖ Weight:
Approx. 34 kg
Carrier Sheet
Allows you to load bent, folded, creased, thin, or pasted originals using this
sheet.
Hard Disk Drive Type 240
Allows you to increase the copy functions, as in the following:
• Repeat Copy (longer than A0(E)K)
• Stamp (User Stamp, Repeat User Stamp)
• User Format Overlay
Stamp Board
6
Adds the print capability required for Background Numbering, Preset Stamp,
User Stamp, Date Stamp, Repeat User Stamp , and Page Numbering.
69
Page 82

Specifications
Copy Paper
Recommended Size and Type
The following limitations apply to each paper roll tray and bypass tray.
❖❖❖❖ Metric version
Where paper is placed Paper type Paper size Number of
Paper roll tray (optional)
6
Cut paper tray (optional)
Bypass tray Plain paper
Plain paper
52.3 – 110 g/m
(13.9 – 29.3 lb)
Translucent paper
Recycled paper
Film
Plain paper
52.3-110 g/m
(13.9-29.3 lb)
Recycled paper
52.3 – 110 g/m
(13.9 – 29.3 lb)
Translucent paper
Film
2
2
2
Paper roll
Diameter: less than 175 mm
Core: 75.7 mm – 77 mm
Width: 210, 257, 297, 364, 420,
440, 515, 594, 660, 728, 800, 841,
880, 914 mm
Roll length: less than 150 mm
A3K, B4K, A4
A0K, A1KL, A2
A3KL, A4K, B1K, B2KL,
B3KL, B4
Paper width: 210 – 914 mm
Paper length: 257 – 2000 mm
KL
K
KL
sheets that
can be
placed
–
250 sheets
1 sheet
70
Page 83

❖❖❖❖ Inch version
Copy Paper
Where paper is placed Paper type Paper size Number of
Paper roll tray (optional)
Cut paper tray (optional)
Bypass tray Plain paper
Plain paper
52.3 – 110 g/m
29.3 lb)
Translucent paper
(vellum)
Film
Plain paper
52.3-110 g/m
(13.9-29.3 lb)
Recycled paper
52.3 – 110 g/m
(13.9 – 29.3 lb)
Translucent paper
(vellum)
Film
2
(13.9 –
2
2
Paper roll
Diameter: 6.7" or less
Internal diameter: 2.98" - 3.03"
1
Width: 8
18", 22", 24", 34", 36"
Roll length: 5.9" or less
12" × 18"K, 11" × 17"K,
8
8
• Engineering
• Architecture
/2", 9", 11", 12", 17",
1
/2"×14"K, 81/2"×13"K,
1
K
/2"×11"
E(34"×44")K, D(22"×34")K
L
, C(17"×22")K
B(11"×17")K L,
1
/2"×11")K
A(8
E(36"×48")K, D(24"×36")K
L
, C(18"×24")K
B(12"×18")K L,
A(9"×12")K
L
L
sheets that
can be
placed
–
250 sheets
1 sheet
Important
❒ Damp or curled paper may cause misfeeds.
6
Note
❒ When loading paper in the cut paper tray, place the copy side face down.
❒ When loading paper in the bypass tray, place the copy side face up.
❒ Use recommended paper.
Paper roll
• If humidity is high, and the paper roll has expanded due to moisture, be sure
to cut off approximately 1000 mm (40"), before making copies.
• Use a paper roll that has a black core.
2
• When a paper roll of 90 g/m
(24 lb) or 110 g/m2 (29.3 lb) paper is used and
there is little paper left on the roll, copies may be faint near the leading and/or
trailing edge, or an image may be doubled. To prevent this, set 3-5 mm (0.11"-
0.19") margins from the leading and trailing edges.
71
Page 84

Specifications
R
Notes on using translucent paper
Smooth out any curls in the paper before loading it.
Load translucent paper lengthways when possible.
Hemmed paper
When using hemmed paper, wrinkles and other problems may occur on copies.
Use the following procedure when copying onto hemmed paper:
• Copy from the bypass tray.
• Make sure the paper is straight, and align the paper guides of the bypass tray
to the paper size.
• Load only one sheet at a time.
• Remove each copy from the output tray and place it on a flat surface.
Note
❒ Due to the thickness of hemmed paper, copies may be faint, blurred, or wrin-
kled, and paper jams may occur. You may be able to prevent this by copying
on the rear surface of the paper or feeding the bottom of the paper in first.
6
Unusable Paper
CAUTION:
• Do not reuse stapled paper. Do not use aluminum foil, carbon-containing
paper or other conductive paper. If you do, there is a danger of fire.
Important
❒ To prevent faults, do not use any of the following kinds of paper:
• Thermal fax paper
• Art paper
• Aluminum foil
• Carbon paper
• Conductive paper
• OHP transparencies for colour copying
• Paper with perforated lines
❒ Do not use copy paper that has been already copied onto, or a failure could
occur.
72
Page 85

Copy Paper
Note
❒ To prevent misfeeds, do not use the following kinds of paper:
• Bent, folded, or creased paper
• Torn paper
• Slippery paper
• Perforated paper
• Rough paper
• Thin paper with little stiffness
• Paper with a dusty surface
• Adhesive labels
• OHP transparencies
❒ If you copy on to rough grain paper, the copy image might be blurred.
❒ When using non-recommended paper (especially chemically treated paper,
hemmed paper, film), paper jams may occur, paper wrinkle, or copy image
deteriorate.
❒ Do not use paper that has already been copied or printed on.
❒ Do not copy on both sides of paper.
❒ If you use paper roll hat is not marked with a black core, paper jams might
occur when the paper ends.
❒ Do not use paper printed onto with an inkjet printer, as it may become entan-
gled or jammed, which may damage the machine. In the worst event, this
may cause fire, depending on paper and ink type combination.
6
Paper Storage
Note
❒ When storing paper, the following precautions always should be followed:
• Do not store paper where it will be exposed to direct sunlight.
• Avoid storing paper in humid areas (humidity: 70% or less).
• Store on a flat surface.
❒ Do not store paper vertically.
❒ In high temperature and humidity environments, store paper in vinyl bags.
73
Page 86

Specifications
Handling paper
Depending on the humidity of the storage environment, handle the paper as follows:
6
Note
❒ If humidity is above 70%, turn on the anti-humidity heater.
Reference
p.24 “Anti-humidity Heater Switch”
74
Page 87

INDEX
A
Accessing user tools (System Settings), 31
Adding toner
Adj.Print Positn.
Adj.Scan Position
Adjust Cut Length
Anti-humidity heater switch
AOF (Always On)
Auto off mode
Auto Off Timer
Auto Roll Switch.
50
,
, 41
, 7, 23
, 42
, 41
, 33
, 44
, 38
,
24
C
Changing default settings, 31
Changing the paper roll size
Cleaning inside the original cover
Cleaning the main unit
Clearance around the machine
Clearing misfeeds
Combined function operations
Common key operations
Control panel
Copy Count Displ.
Copy paper
Counter
,
Counter for each user code
, 52
, 17
, 40
, 70
9
,
64
, 20
, 9
,
56
, 63
, 62
, 25
D
Date, 43
, 19
Display
Display and key operations
Display Contrast
Do's and don'ts
,
, 59
, 19
40
E
Energy Saver, 42
Energy saver mode
ENERGY STAR program
Exiting user tools
, 23
, 7
, 32
F
Feed Start Method, 40
Fine Ratio
Fusing Adjustment
Copier
, 39
, 33
G
General Features, 29, 33
Guide to components
,
11
H
Handling paper, 74
I
If your machine does not operate as you
want
, 45
Interrupting other functions to use copier
functions
, 26
K
Key Operator Code, 43
Key Op. Tools
, 30, 43
L
Loading
cut paper
paper roll
Low power mode
, 49
, 47
, 7, 23
M
Machine environment
environments to avoid
optimum environmental conditions
Main power switch
Maintaining your machine
Main unit
Manuals for this machine
Moving
, 65
, 61
, 21
,
61
, 61
,
,
63
i
N
Names of major options, 2
O
Operation switch, 21
Optional HDD
, 14, 68
Options
Orig. Edge Hold
Orig. Feed Delay1
Orig. Feed Delay2
Orig. Size Detect
Other options
Output Tray
,
, 15
, 38
44
, 37
,
, 38
, 34
38
61
,
75
Page 88

P
T
Panel Off Timer
Panel Tone
Paper storage
Paper Volume
Positions of RWARNING and
RCAUTION labels
Power connection
Print Image Prior
, 40
,
, 73
, 41
42
, 5
, 62
, 41
R
Recommended size and type, 70
hemmed paper
notes on using translucent paper
paper roll
Removing the roll holder
, 72
, 71
, 56
S
Safety information
Saving energy
Settings you can change with user tools
Setting the roll holder
Switching between functions
Switching to
copier mode
printer mode
scanner mode
Symbols
System Auto Reset
System reset
,
1
,
, 23
, 26
25
,
, 27
, 28
, 42
3
, 56
, 25
, 72
,
33
Terms
Time
Timer Settings
Toner
Total counter
Tray Paper Size
Tray Paper Type
Tray Prob.Setting
Trays
Turning off
Turning on
2
,
, 43
, 30, 42
, 60
handling toner
toner storage
used toner
, 60
, 60
, 9
,
, 37
, 14
the main power
the power
the main power
the power
, 22
, 22
, 60
35
, 44
, 22
, 21
U
Unusable paper, 72
, 26
,
, 28
, 43
27
User Code Manage.
User tools menu (System Settings)
Using the machine
as a Copier
as a printer
as a scanner
W
Warm Up Notice
What you can do with this machine
Where to put your machine
,
40
,
61
,
29
, ii
76
Page 89

MEMO
77
Page 90

MEMO
78 GB GB B125-6500
Page 91

Declaration of Conformity
“The Product complies with the requirements of the EMC Directive 89/336/EEC and its amending di-
rectives and the Low Voltage Directive 73/23/EEC and its amending directives.”
In accordance with IEC 60417, this machine uses the following symbols for the main power switch:
aaaa means POWER ON.
cccc means STAND BY.
In accordance with IEC 60417, this machine uses the following symbols for the anti-humidity heater
switch:
aaaa means POWER ON.
bbbb means POWER OFF.
Copyright © 2003 Ricoh Co., Ltd.
Page 92

RICOH COMPANY, LTD.
15-5, Minami Aoyama 1-chome,
Minato-ku, Tokyo 107-8544, Japan
Phone: +81-3-3479-3111
Overseas Affiliates
U.S.A.
RICOH CORPORATION
5 Dedrick Place
West Caldwell, New Jersey 07006
Phone: +1-973-882-2000
The Netherlands
RICOH EUROPE B.V.
Groenelaan 3, 1186 AA, Amstelveen
Phone: +31-(0)20-5474111
United Kingdom
RICOH UK LTD.
Ricoh House,
1 Plane Tree Crescent, Feltham,
Middlesex, TW13 7HG
Phone: +44-(0)20-8261-4000
Germany
RICOH DEUTSCHLAND GmbH
Mergenthalerallee 38-40,
65760 Eschborn
Phone: +49-(0)6196-9060
France
RICOH FRANCE S.A.
383, Avenue du Général de Gaulle
BP 307-92143 Clamart Cedex
Phone: +33-(0)-821-01-74-26
Spain
RICOH ESPAÑA S.A.
Avda. Litoral Mar, 12-14,
Blue Building, Marina Village,
08005 Barcelona
Phone: +34-(0)93-295-7600
Italy
RICOH ITALIA SpA
Via della Metallurgia 12,
37139 Verona
Phone: +39-045-8181500
China
RICOH CHINA CO.,LTD.
29/F., Lippo Plaza, No.222
Huai Hai Zhong Road,
Lu Wan District,
Shanghai P.C.:200021
Phone: +86-21-5396-6888
Singapore
RICOH ASIA PACIFIC PTE.LTD.
260 Orchard Road,
#15-01/02 The Heeren,
Singapore 238855
Phone: +65-6830-5888
240W Operating Instructions General Settings Guide
Printed in The Netherlands
GB GB B125-6500
Page 93

Operating Instructions
Basics
Copying
Troubleshooting
User Tools (Copier Features)
Specifications
240W
Copy Reference
Read this manual carefully before you use this product and keep it handy for future reference.
For safe and correct use, please be sure to read the Safety Information in the "General Set-
tings Guide" before using the machine.
Page 94

Introduction
This manual describes detailed instructions on the operation and notes about the use of this machine.
To get maximum versatility from this machine all operators are requested to read this manual carefully
and follow the instructions. Please keep this manual in a handy place near the machine.
Important
Contents of this manual are subject to change without prior notice. In no event will the company be liable for direct, indirect, special, incidental, or consequential damages as a result of handling or operating the machine.
Notes:
Some illustrations in this manual might be slightly different from the machine.
Certain options might not be available in some countries. For details, please contact your local dealer.
Operator Safety
This machine contains LED Array in scanner and writing units.
The machine is considered a class 1 LED device, safe for both office and EDP use.
Notes:
Two kinds of size notation are employed in this manual. With this machine refer to the metric version.
For good copy quality, Ricoh recommends that you use genuine Ricoh toner.
Ricoh shall not be responsible for any damage or expense that might result from the use of parts other
than genuine Ricoh parts with your Ricoh office products.
Important
Do not make copies of any item for which copying is prohibited by law.
Copying the following items is normally prohibited by local law:
Bank billes, revenue stamps, bonds, stock certificates, bank drafts, checks, passports, driver's licens-
es.
Power Source
220 - 240V, 50Hz/60Hz, 10A or more
Please be sure to connect the power cord to a power source as above. For details about power source,
see “Power Connection” in General Settings Guide.
Page 95

Introduction
This manual describes detailed instructions on the operation and notes about the use of this machine.
To get maximum versatility from this machine all operators are requested to read this manual carefully
and follow the instructions. Please keep this manual in a handy place near the machine.
For safe and correct use of this machine, please be sure to read the Safety Information in General Settings Guide before you use it.
Important
Contents of this manual are subject to change without prior notice. In no event will the company be liable for direct, indirect, special, incidental, or consequential damages as a result of handling or operating the machine.
Notes:
Some illustrations in this manual might be slightly different from the machine.
Certain options might not be available in some countries. For details, please contact your local dealer.
Operator Safety
This machine contains LED Array in scanner and writing units.
The machine is considered a class 1 LED device, safe for both office and EDP use.
Notes:
Two kinds of size notation are employed in this manual. With this machine refer to the metric version.
For good copy quality, Rex-Rotary recommends that you use genuine Rex-Rotary toner.
Rex-Rotary shall not be responsible for any damage or expense that might result from the use of parts
other than genuine Rex-Rotary parts in your Rex-Rotary office product.
Power Source
220 - 240V, 50Hz/60Hz, 10A or more
Please be sure to connect the power cord to a power source as above. For details about power source,
see “Power Connection” in General Settings Guide.
Page 96

Introduction
This manual describes detailed instructions on the operation and notes about the use of this machine.
To get maximum versatility from this machine all operators are requested to read this manual carefully
and follow the instructions. Please keep this manual in a handy place near the machine.
For safe and correct use of this machine, please be sure to read the Safety Information in General Settings Guide before you use it.
Important
Contents of this manual are subject to change without prior notice. In no event will the company be liable for direct, indirect, special, incidental, or consequential damages as a result of handling or operating the machine.
Notes:
Some illustrations in this manual might be slightly different from the machine.
Certain options might not be available in some countries. For details, please contact your local dealer.
Operator Safety
This machine contains LED Array in scanner and writing units.
The machine is considered a class 1 LED device, safe for both office and EDP use.
Notes:
Two kinds of size notation are employed in this manual. With this machine refer to the metric version.
For good copy quality, Gestetner recommends that you use genuine Gestetner toner.
Gestetner shall not be responsible for any damage or expense that might result from the use of parts
other than genuine Gestetner parts in your Gestetner office product.
Power Source
220 - 240V, 50Hz/60Hz, 10A or more
Please be sure to connect the power cord to a power source as above. For details about power source,
see “Power Connection” in General Settings Guide.
Page 97

Introduction
This manual describes detailed instructions on the operation and notes about the use of this machine.
To get maximum versatility from this machine all operators are requested to read this manual carefully
and follow the instructions. Please keep this manual in a handy place near the machine.
For safe and correct use of this machine, please be sure to read the Safety Information in General Settings Guide before you use it.
Important
Contents of this manual are subject to change without prior notice. In no event will the company be liable for direct, indirect, special, incidental, or consequential damages as a result of handling or operating the machine.
Notes:
Some illustrations in this manual might be slightly different from the machine.
Certain options might not be available in some countries. For details, please contact your local dealer.
Operator Safety
This machine contains LED Array in scanner and writing units.
The machine is considered a class 1 LED device, safe for both office and EDP use.
Notes:
Two kinds of size notation are employed in this manual. With this machine refer to the metric version.
For good copy quality, Nashuatec recommends that you use genuine Nashuatec toner.
Nashuatec shall not be responsible for any damage or expense that might result from the use of parts
other than genuine Nashuatec parts in your Nashuatec office product.
Power Source
220 - 240V, 50Hz/60Hz, 10A or more
Please be sure to connect the power cord to a power source as above. For details about power source,
see “Power Connection” in General Settings Guide.
Page 98

Declaration of Conformity
“The Product complies with the requirements of the EMC Directive 89/336/EEC and its amending directives and the Low Voltage Directive 73/23/EEC and its amending directives.”
In accordance with IEC 60417, this machine uses the following symbols for the main power switch:
aaaa means POWER ON.
cccc means STAND BY.
In accordance with IEC 60417, this machine uses the following symbols for the anti- humidity heater
switch:
aaaa means POWER ON.
bbbb means POWER OFF.
Copyright © 2003
Page 99

Manuals for This Machine
This machine can be used as a copier, printer, or scanner. Its manuals are divided
thus: a manual covering common operations and functions, and separate copier,
printer, and scanner function manuals. Refer to the appropriate manual to learn
about your machine.
i
Page 100

What You Can Do with This Machine
Available functions depend on installed options. See p.3 “Functions That Require Options”.
To Put Copies into Sequentially Ordered Sets.
Sort (see p.34)
Types of Magnification
Preset Reduce/Enlarge (see p.35)
Auto Reduce/Enlarge (see p.38)
Directional Size Magnification (mm) (see p.39)
Rotate Sort (see p.34)
Zoom (see p.36)
Directional Magnification (%) (see p.38)
Horiz
Ver t
User Auto Reduce/Enlarge (see p.40)
Fine Directional Magnification (see p.19)
ABB536S
ii
 Loading...