

Page 1
Supplemental Oper ating Instructions
IS450DE VRS
IS450DE VRS
IS450DE VRSIS450DE VRS
your document management pa rtner
Image Scanner
Page 2

Copyright
Copyright © 2000 Kofax Image Products. All Rights Reserved. Printed in the USA.
Copyright © 2000 Ricoh Corporation. All Rights Reserved.
The information contained in this docu ment is the property of Kofax Image Products. Nei ther
receipt nor possession hereof conf e r s or transfers any right to reproduce or disclose any part of
the contents hereof, without the prior written consent of Kofax Image Products. No patent
liability is assumed, however, with respect to the use of the information contained herein.
Trademarks
Kofax, ImageControls, and Adrenaline are registered trademarks and VirtualReScan is a
trademark of Kofax Image Products.
All other product names and logos mentioned herein are the property of their respective
companies.
Disclaimer
The instructions and descriptions contained in this document were accurate at the time of
printing. However, succeeding products and documents are subject to change without notice.
Therefore, Kofax Image Products assumes no liability for damages incurred directly or indirectly
from errors, omissions, or discrepa ncie s be tween the product and this document.
An attempt has been made to state all allowable va lues where applicable throughout this
document. Any values or parameters used beyond those stated may have unpredictable results.
Page 3

Contents
Introduction.................................................................................................................................................. 1
Product Overview................................................................................................................................. 1
VRS Product Package........................................................................................................................... 2
System Requirements........................................................................................................................... 2
PC..................................................................................................................................................... 2
Scanner............................................................................................................................................ 2
Installation.................................................................................................................................................... 3
Step 1. Install the Software.................................................................................................................. 3
Step 2. Install the Adrenaline Hardware Accelerator...................................................................... 5
Compatibility with Current Accelerators and Engines............................................................5
Precautions..................................................................................................................................... 5
Connect PC to Scanner.................................................................................................................. 6
Configure the Accelerator - Windows 95................................................................................... 6
Configure the Accelerator - Windows NT................................................................................. 7
Step 3. Attach Your Scanner................................................................................................................ 8
Starting VirtualReScan................................................................................................................................ 9
Opening the VRS Menu..................................................................................................................... 10
First Time Calibration........................................................................................................................ 10
VRS Menu Commands ...............................................................................................................13
Defining Exception Conditions................................................................................................................ 14
Warnings Tab......................................................................................................................................14
Selecting the Threshold............................................................................................................... 15
Selecting an Action...................................................................................................................... 16
Errors Tab............................................................................................................................................ 16
Action Options.................................................................................................................................... 17
Using the Auto Resolve Manager..............................................................................................19
Selecting a Mode........................................................................................................................................ 20
Updating Image Properties...................................................................................................................... 21
Using the VRS Viewer........................................................................................................................ 22
Using the Zoom Menu to adjust the view................................................................................ 22
Using mouse buttons to adjust the view.................................................................................. 22
Using the VRS Interactive Properties Dialog Box.................................................................................23
VRS Interactive Properties Dialog Box Tabs................................................................................... 23
VRS Interactive Properties Dialog Box Buttons.............................................................................. 24
Using the Clarity Tab......................................................................................................................... 25
Using the Noise Tab........................................................................................................................... 27
Using the Skew Tab............................................................................................................................ 29
Getting Started i
Page 4

VRS Getting Started Guide
Using the Profiles Tab........................................................................................................................ 31
Using the Options Tab....................................................................................................................... 33
VRS Refresh .................................................................................................................................. 34
Intelligent Contrast Adjustment / Brightness Adjustment................................................... 34
Using the Analysis Tab...................................................................................................................... 35
Using the About Tab.......................................................................................................................... 36
Previewing Images.................................................................................................................................... 37
Resetting VRS............................................................................................................................................. 38
Technical Support...................................................................................................................................... 39
ii Kofax Image Products
Page 5

Introduction
This guide gives you instructions for installing the hardware and software components of
VirtualReScan (VRS).
Product Overview
VRS makes high-volume scanning easier and more cost-effective than ever. With automatic
detection of poor image quality, VRS performs a u tomatic image enhancements that greatly
reduce recognition errors. To ensure that every scanned image can meet your standards, VRS
provides an interactive settings control that eliminates the guesswork with easy, real-time image
correction.
Other features include the ability to scan ba tches that consist of multiple document sizes or
varying degrees of quality, as well as the ability to automatically assig n contrast and brightness
settings that are optimal for your document type. If specified, VRS can even remove color that
may interfere with the data you are collecting. V RS will also detect paper jams, bent corners, and
equipment conflicts. It is no longer necessary t o pre-sort mixed batches, and in addition to the
time savings, post-processing accuracy is increased and storage requirements are reduced.
For batch scans in which Optical Character Recognition (OCR) precision is crucial, as it is for
database-bound information, low-contrast documents traditionally pose significant problems.
With VRS, you can enable "Intellige nt Contrast / Brightness Adjustment" and process the batch
with confidence, knowing that every low-contrast image will be adju sted automatically to the
acceptable level of quality required for OCR.
VRS Getting Started Guide
In addition to Intellige nt C ontrast / Brightne ss Adjustment, VRS of fers a range of features to help
you ensure the highest level of quality for every scanned image:
• Automatic Deskew Correction
• Image Cropping
• Accelerated Scanning
• Despeckling
• Gamma Correction
• Character Smoothing
• Character Dilation/Erosion
Kofax Image Products 1
Page 6

VRS Getting Started Guide
VRS Product Package
Your VRS product package includes the following items:
• VRS installation CD
• Scanner cable
• VirtualReScan Getting Started Guide
System Requirements
Be sure that your PC and scanner meet the following requirements:
PC
• Pentium II class PC with a 200 Mhz processor, or greater
Pentium II class PC with a 400 Mhz or greater (grayscale scanning)
• 64 Mbytes RAM
128 Mbytes RAM (grayscale scanning)
• Windows 95 or Windows NT 4.0 with 32-bit support
• Hard drive with 200 Mbytes free disk space
• Monitor resolution: 800 x 600 minimum; 1024 x 768 recommended
• Adrenaline 850v Hardware Accelerator (sold separately)
Scanner
• Ricoh Model IS450DE/V
2 Kof ax Image Products
Page 7
Installation
This section explains how to install the hardware and software required to run VRS. The
installation process consists of three ba sic steps:
1
Install the VRS software on your PC.
2
Install the Adrenaline Hardware Accelerator in your PC.
3
Attach the scanner to your PC.
Step 1. Install the Software
This section explains how to install the VirtualReScan software. The default in stallation folder is
C:\ProgramFiles\Kofax\Imgctls, a lthough you can install to another f older. To install VRS under
Windows NT, you must have administrator right s.
If an earlier version of Kofax ImageControls
completing the installation procedure in this section.
To install the VRS software
!
1
Verify that the VRS installation CD is in serted in the appropriate CD-ROM drive.
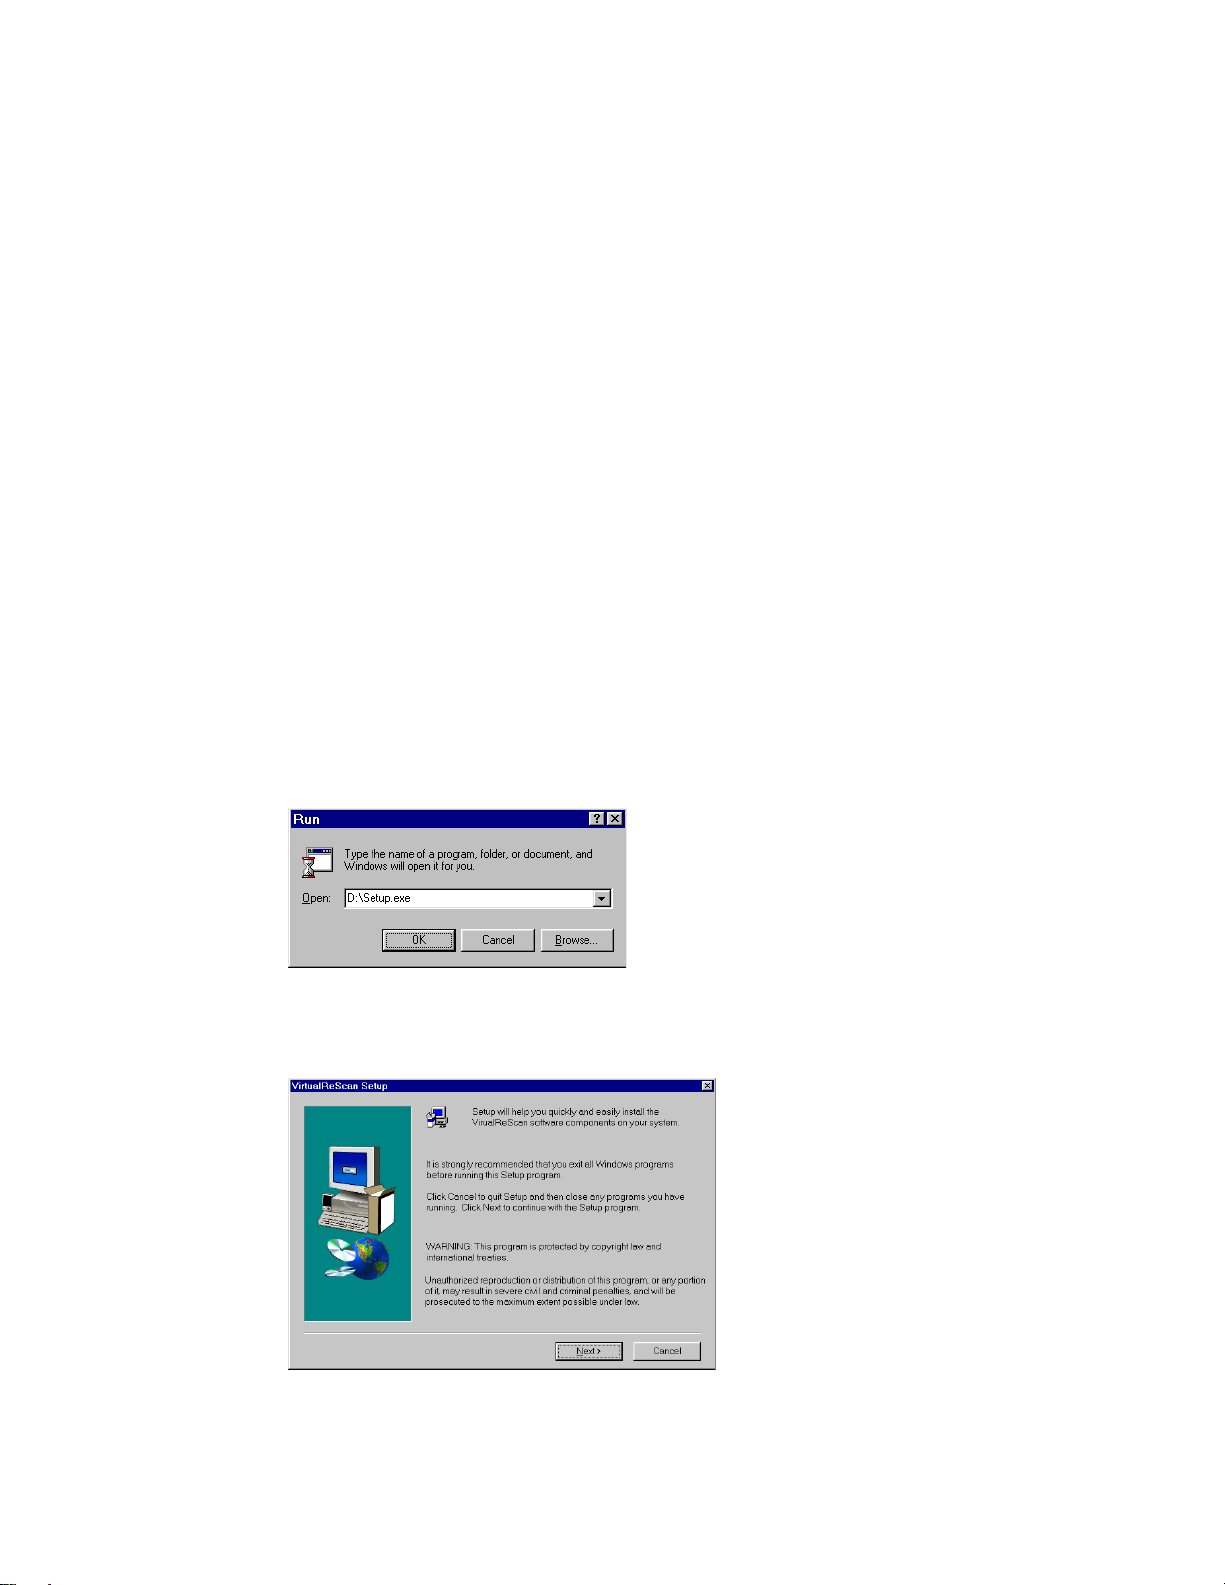
2
Select Start|Run and do one of the following to select the path for the setup file on the
VRS installation CD. Select the path as D:\Setup.Exe, where D: is the CD-ROM drive:
a
Use the Browse button to select the path.
b
In the text box, type in the path.
VRS Getting Started Guide
®
exists on your computer, you can upgrade it by
3
Click OK.
Figure 1. VRS Installation Program Path
The VirtualReScan Setup dialog box opens, a s shown in Figure 2.
Figure 2. VirtualReScan Setup Dialog Box
Kofax Image Products 3
Page 8

VRS Getting Started Guide
4
Click Next to open the next VirtualReScan Setup dialog box, similar to Figure 3. Verify
that VirtualReScan is selected, along with the correct installation folder. The default
folder is C:\Program Files\Kofax\ Imgctls. If desired, use the Browse button to select
another installation folder.
Figure 3. VirtualReScan Setup Dialog Box 2
5
Click Next. The installation begins, and a progress ind icator stays in view until the
process is done. When t he VRS installation finishes, the Setup Complete d ialog box
displays, similar to Figure 4.
Figure 4. Setup Complete Dialog Box
6
Select the option to restart your computer immediately, or to restart it later, and click
Finish.
Note:
It is important to restart the computer to ensure that Windows recognizes the
drivers required for the Adrenaline Hardware Accelerator.
7
Remove the VRS installation CD from the CD-ROM drive and store it in a safe place.
4 Kof ax Image Products
Page 9
VRS Getting Started Guide
Step 2. Install the Adrenaline Hardware Accelerator
This section explains how to install the A d renaline Hardware Accelerator.
Note:
To run VirtualReScan successfully, you need to in stall only the software provided on the
VRS installation CD. Do not install the software provided on the Adrenaline Hardware
Accelerator CD.
Compatibility with Current Accelerators and Engines
We recommend that you install the Adrenaline Hardware Accelerator on a PC with no other
Kofax hardware accelerators. If necessary, remove the older Kofax accelerators before you install
the Adrenaline Hardware Accelerator.
Precautions
When handling your Adrenaline Hardware Accelerator, follow these pr ecautions:
• Keep the accelerator in its original shippin g package until you are ready to install it.
• Power off your PC before installing the accelerator.
• Before handling the accelerator, discharge sta tic electricity from yourself and the work
area by touching the metal chassis of t he PC.
• Hold the accelerator by the edges; do not touch its metal surface.
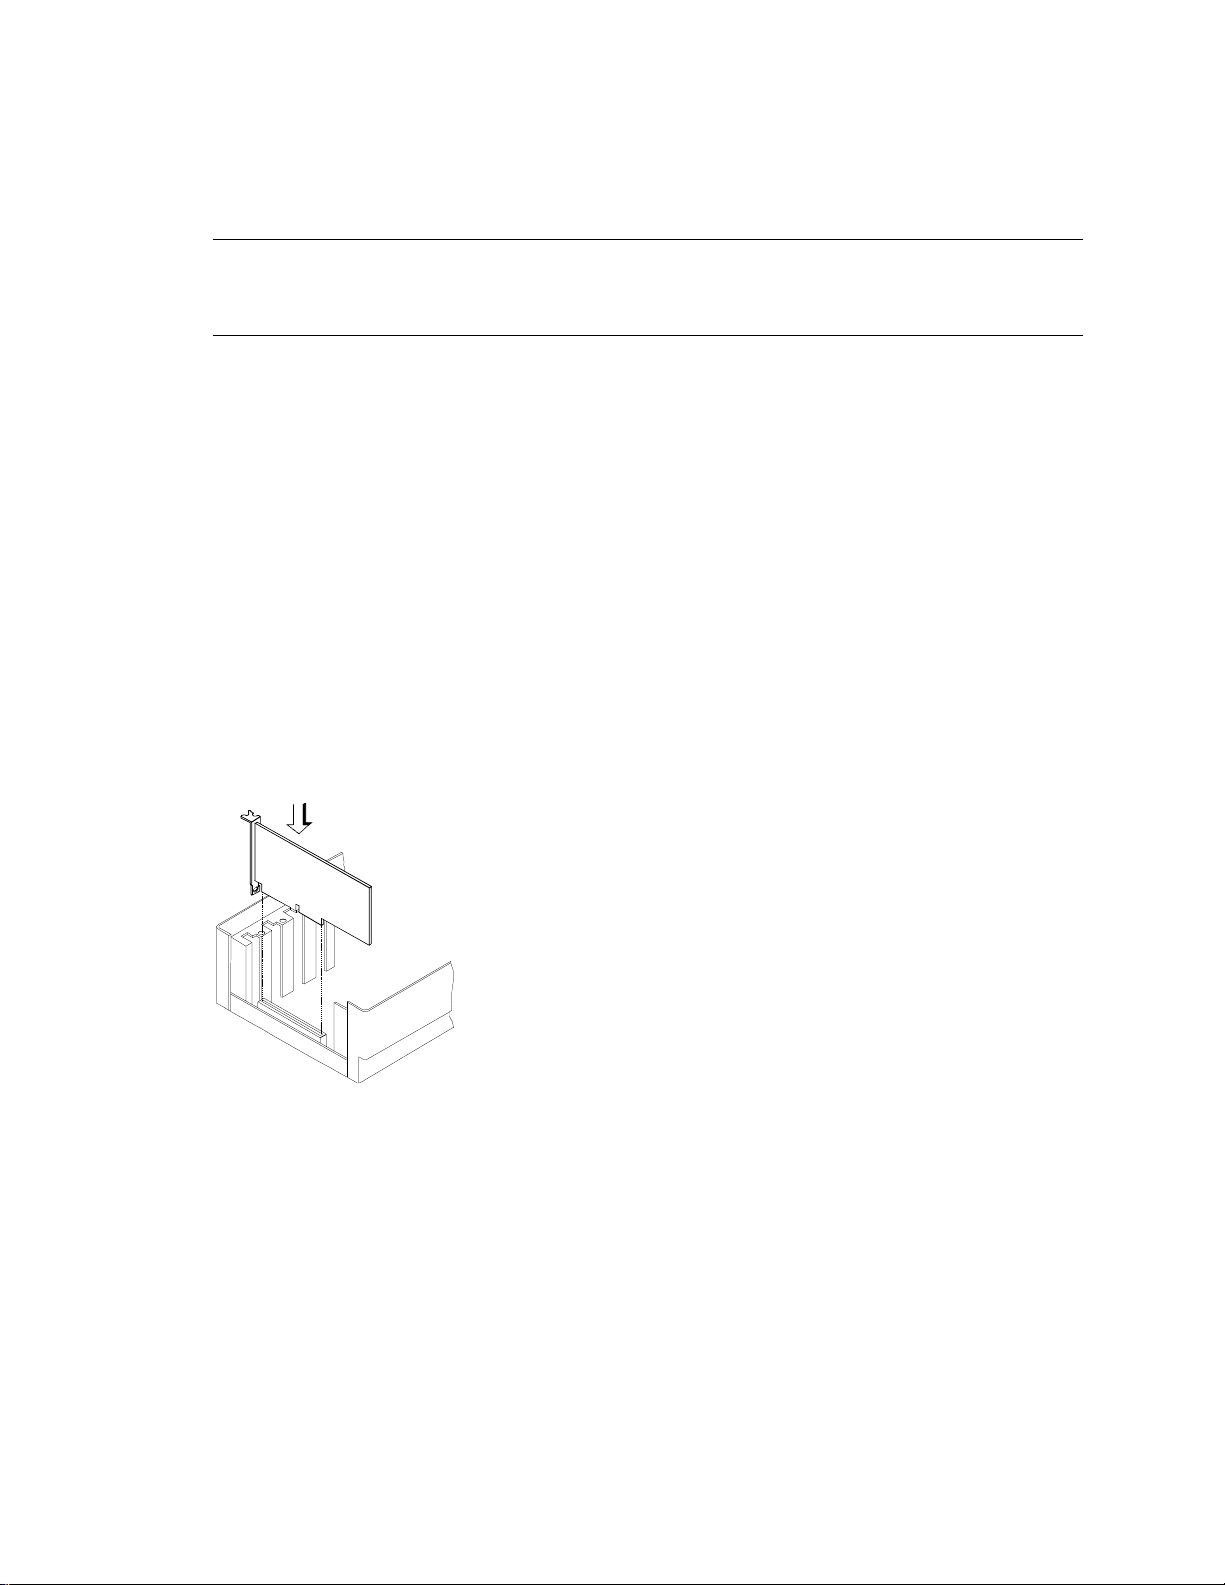
Before installing the accelerator, make sure your PC is powered off . Then, install the accelerator
in any available PCI slot. Be sure to use the screws to secure it into place.
Figure 5. Installing an Adrenaline Hardware Accelerator in Your PC
Kofax Image Products 5
Page 10
VRS Getting Started Guide
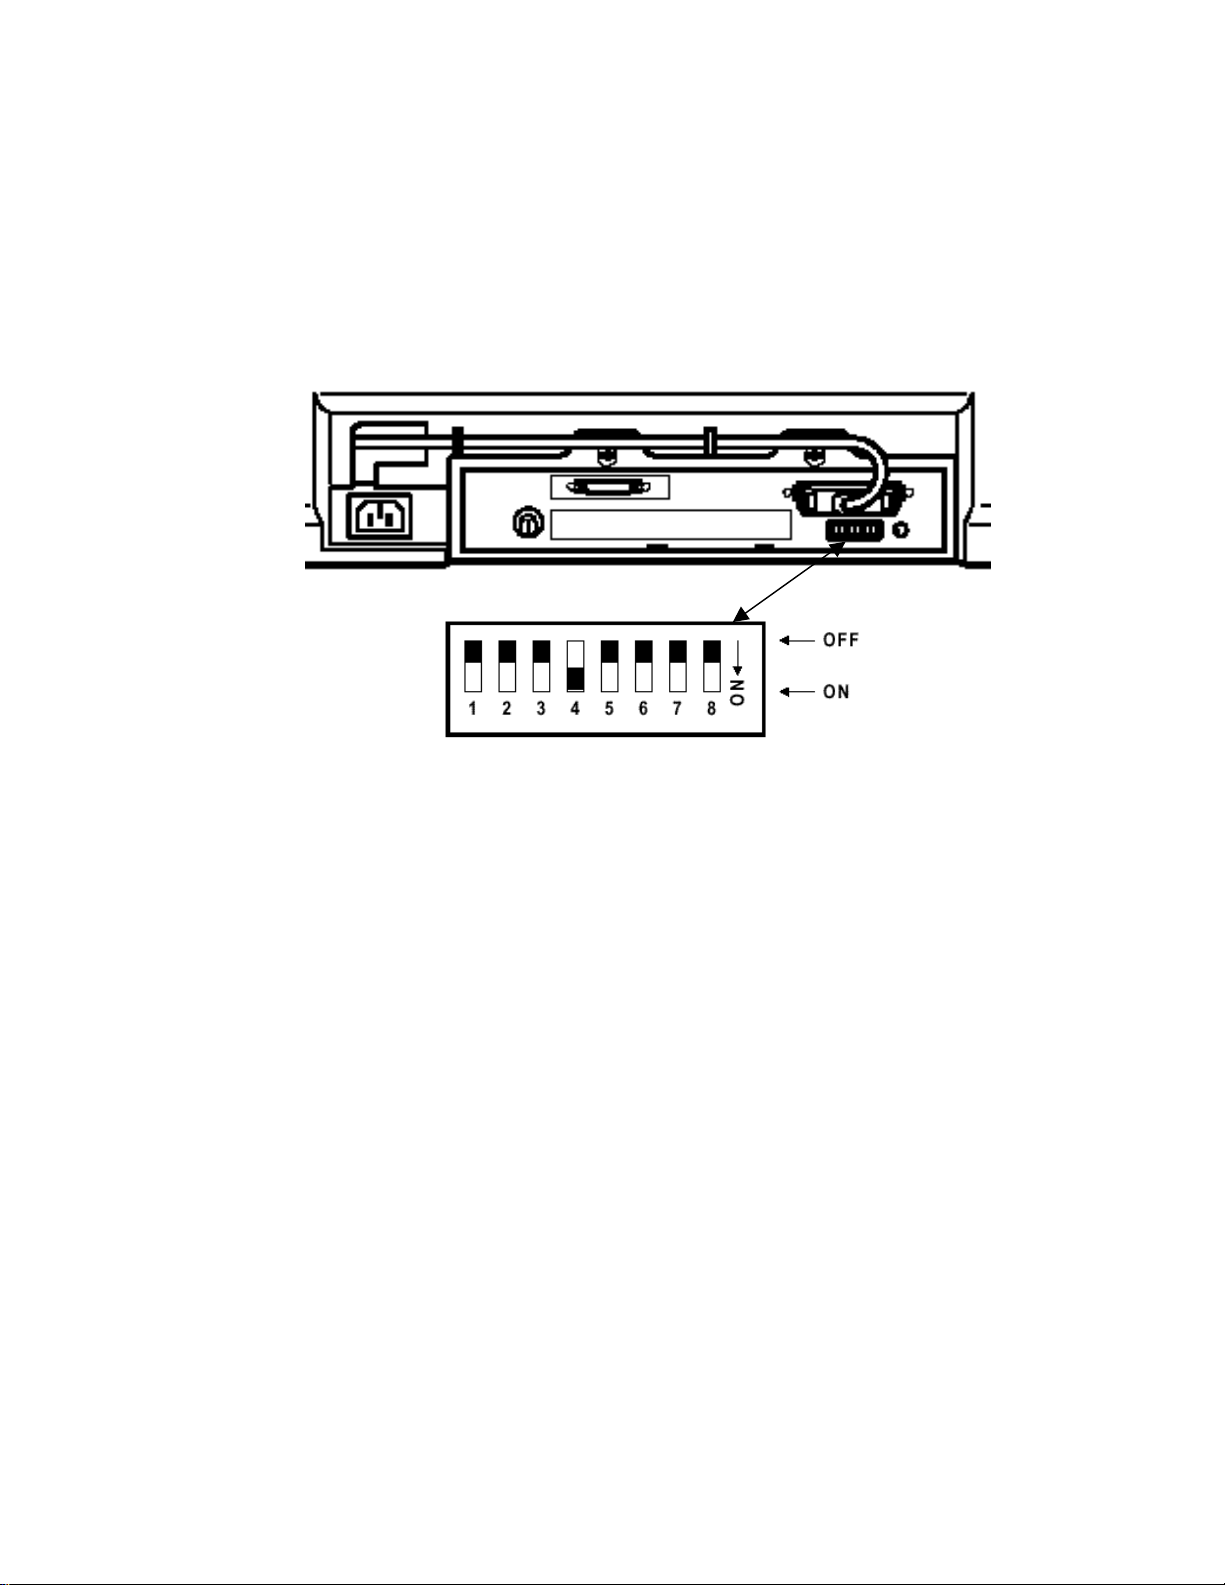
Connect PC to Scanner
Make sure switch 4 is down.
NOTE: Verify that the Dip Switches at the back of the “Scanner Control Unit” are in the
configuration illustrated belo w.
Configure the Accelerator - Windows 95
After installing the Adrenaline Hardware Accelerator, power on your PC. Windows detects the
Adrenaline Hardware Accelerator, and if you have succes sf ully installed the VRS software, it
automatically locates the drivers required by the accelerator.
6 Kof ax Image Products
Page 11

VRS Getting Started Guide
Configure the Accelerator - Windows NT
After successful installation of the sof tware, an item for the Kofax Configurati on Manager utility
is added to your Windows|Control Panel folder.
To configure your Adrenaline Hardware Accelerator under Windows NT
!
1
Select Settings|Control Panel|Kofax Conf iguration Manager. T he following dialog box
opens:
Figure 6. Kofax Configuration Manager (KCM) Dialog Box
Note:
If your Control Panel does not include the Kofax Configuration Manager utility,
the software installation was not successful.
2
Click Next. A dialog box opens, similar to Figure 7:
Figure 7. KCM Configured Accelerators Dialog Box
3
Click Next and follow the instructions on your screen to finish the installation. If
prompted to do so, reboot your PC.
Kofax Image Products 7
Page 12
VRS Getting Started Guide
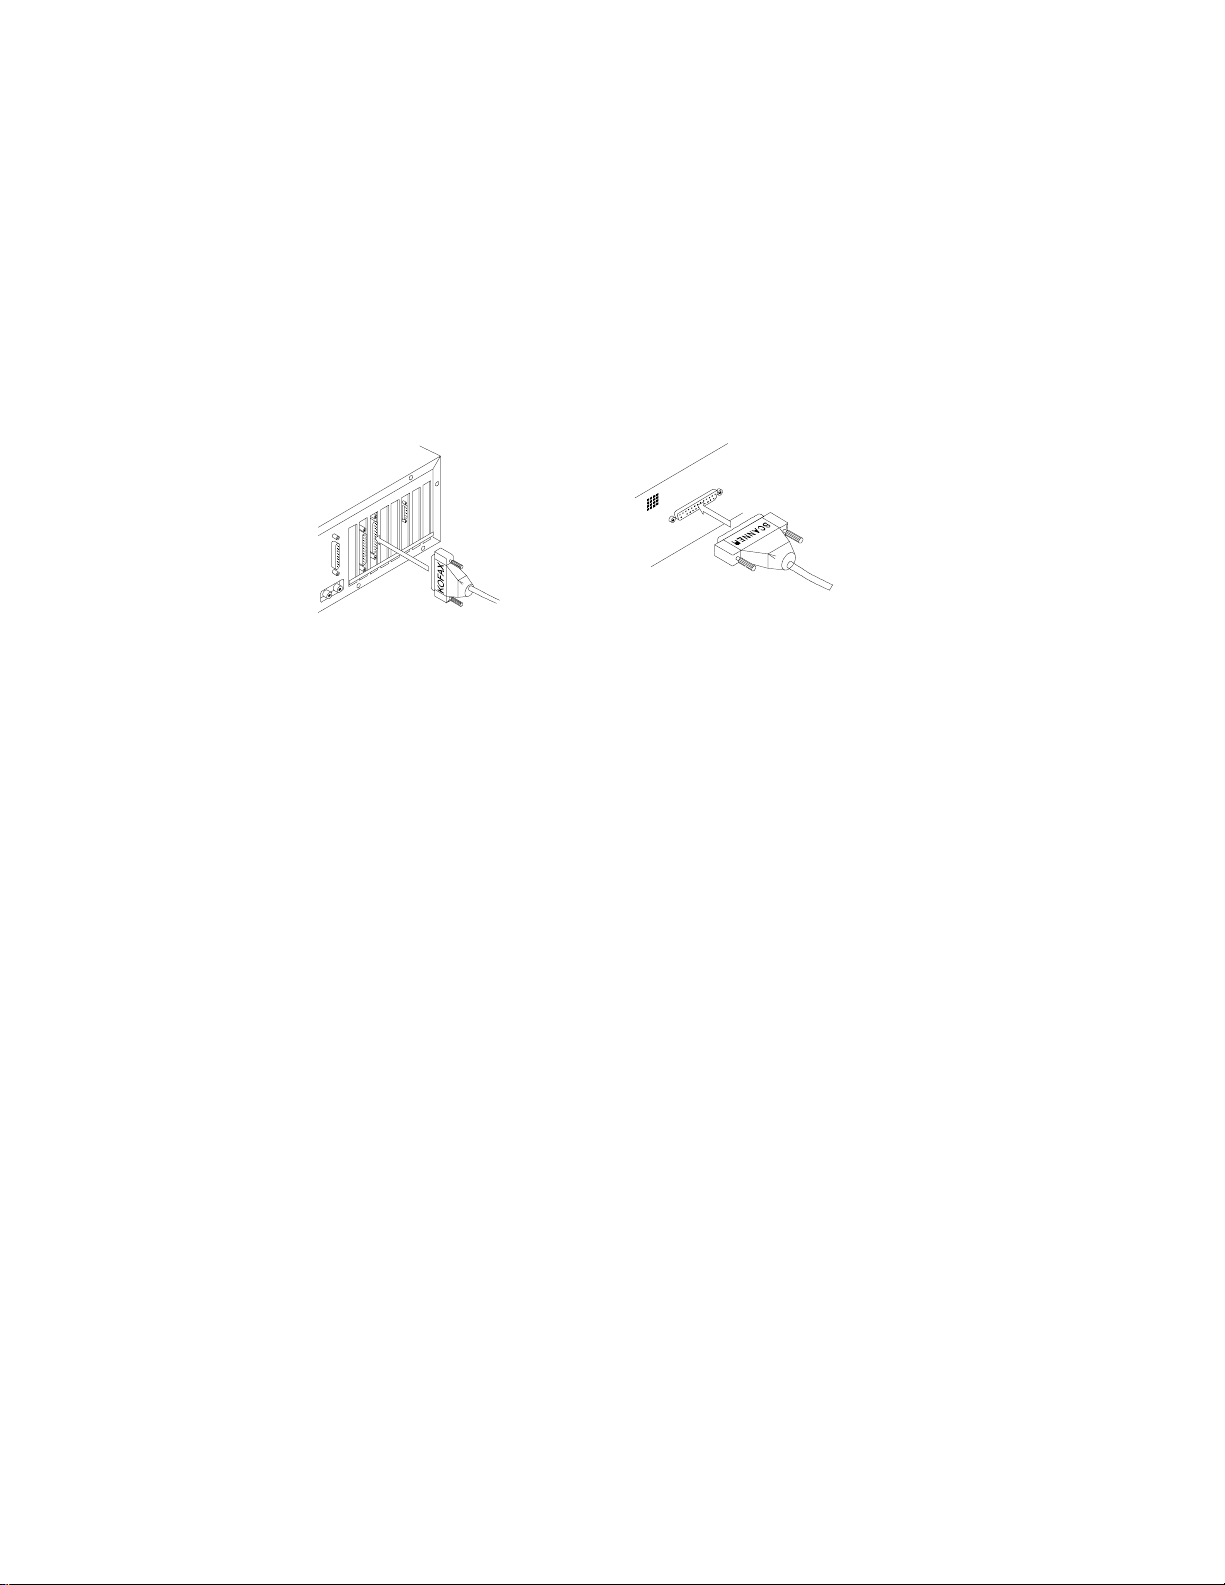
Step 3. Attach Your Scanner
When you remove the cable from your product package, notice that one connector is marked
Kofax and the other is marked Scanner. The Kofax connector attaches to the PC, and the Scanner
connector attaches to the scanner.
To connect the scanner to your PC
!
1
Attach the cable connector marked Kofax to the connector on the Kofax Adrenaline
Hardware Accelerator in your PC.
2
Attach the cable connector marked Scanner to the match ing port on the scanner.
Attach the Kofax connector
(Step 1)
Attach the Scanner connector
Figure 8. Connecting the Scanner to Your PC
(Step 2)
8 Kof ax Image Products
Page 13
Starting VirtualReScan
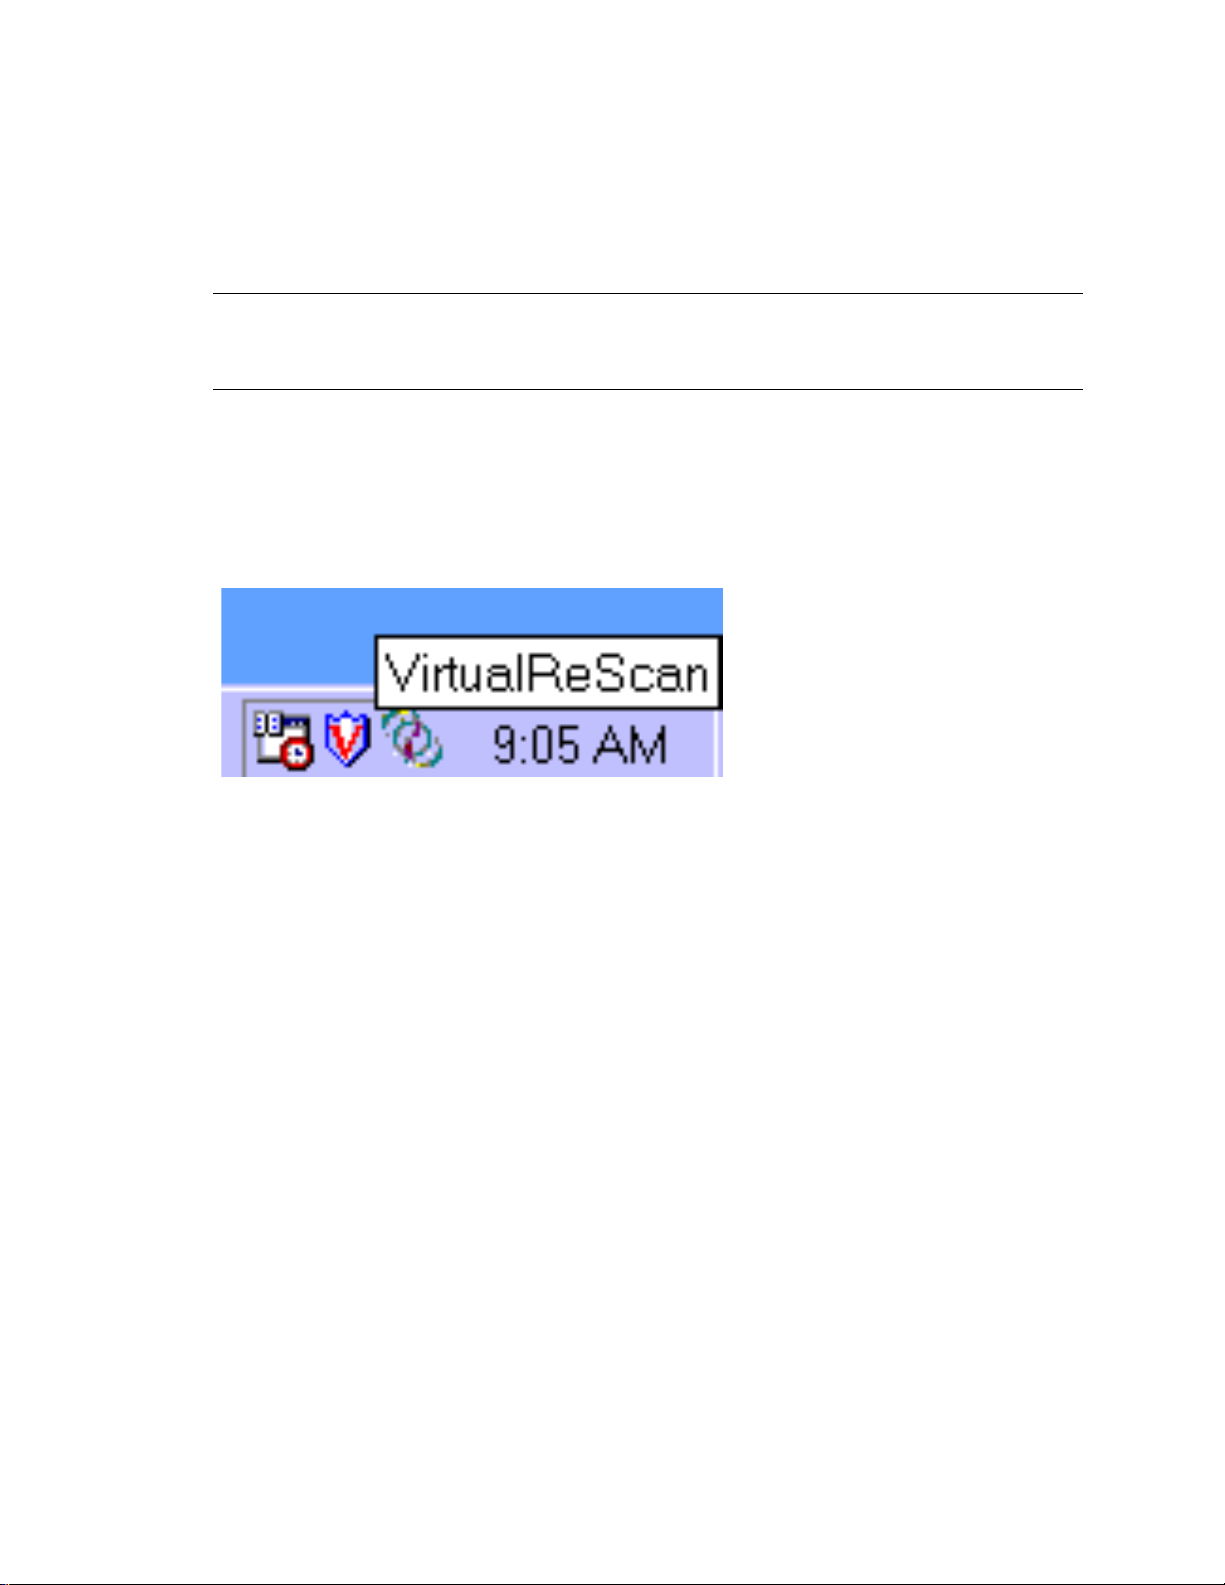
Once the installation is complete, activa te VRS by selecting the VirtualReScan Source from your
scanning application. Once you select the sourc e, the VRS icon appears on the Windows taskbar
to signal that VRS is active.
Note:
During the VRS installation process, the VirtualR eS can Source is automatically created
and set as the default scanning source. If you have questions about how to select the source from
your scanning application, consult with your s ystem administrator.
To start VRS
!
1
Power on your scanner.
2
Start your scanning application and select the VirtualReScan Source.
3
The VRS icon appears on your Windows taskbar, similar to Figure 9.
VRS Getting Started Guide
Figure 9. VRS Icon
Kofax Image Products 9
Page 14
VRS Getting Started Guide
Opening the VRS Menu
You can open the VRS menu to configure exception c ondition parameters, pr eview and update
image properties, select a profile or operating mode, or to reset the Adrena line Hardware
Accelerator in your PC.
To open the VRS menu
!
1
From the Windows taskbar , right-click on the VirtualReScan icon to open the VRS menu.
Figure 10. VRS Menu
2
When using VRS the first time, begin by selecting the Configure command. For more
information, see the section Defining Exception Conditions on page 14. For information on
other menu options, see the next section, VRS Me nu Command s.
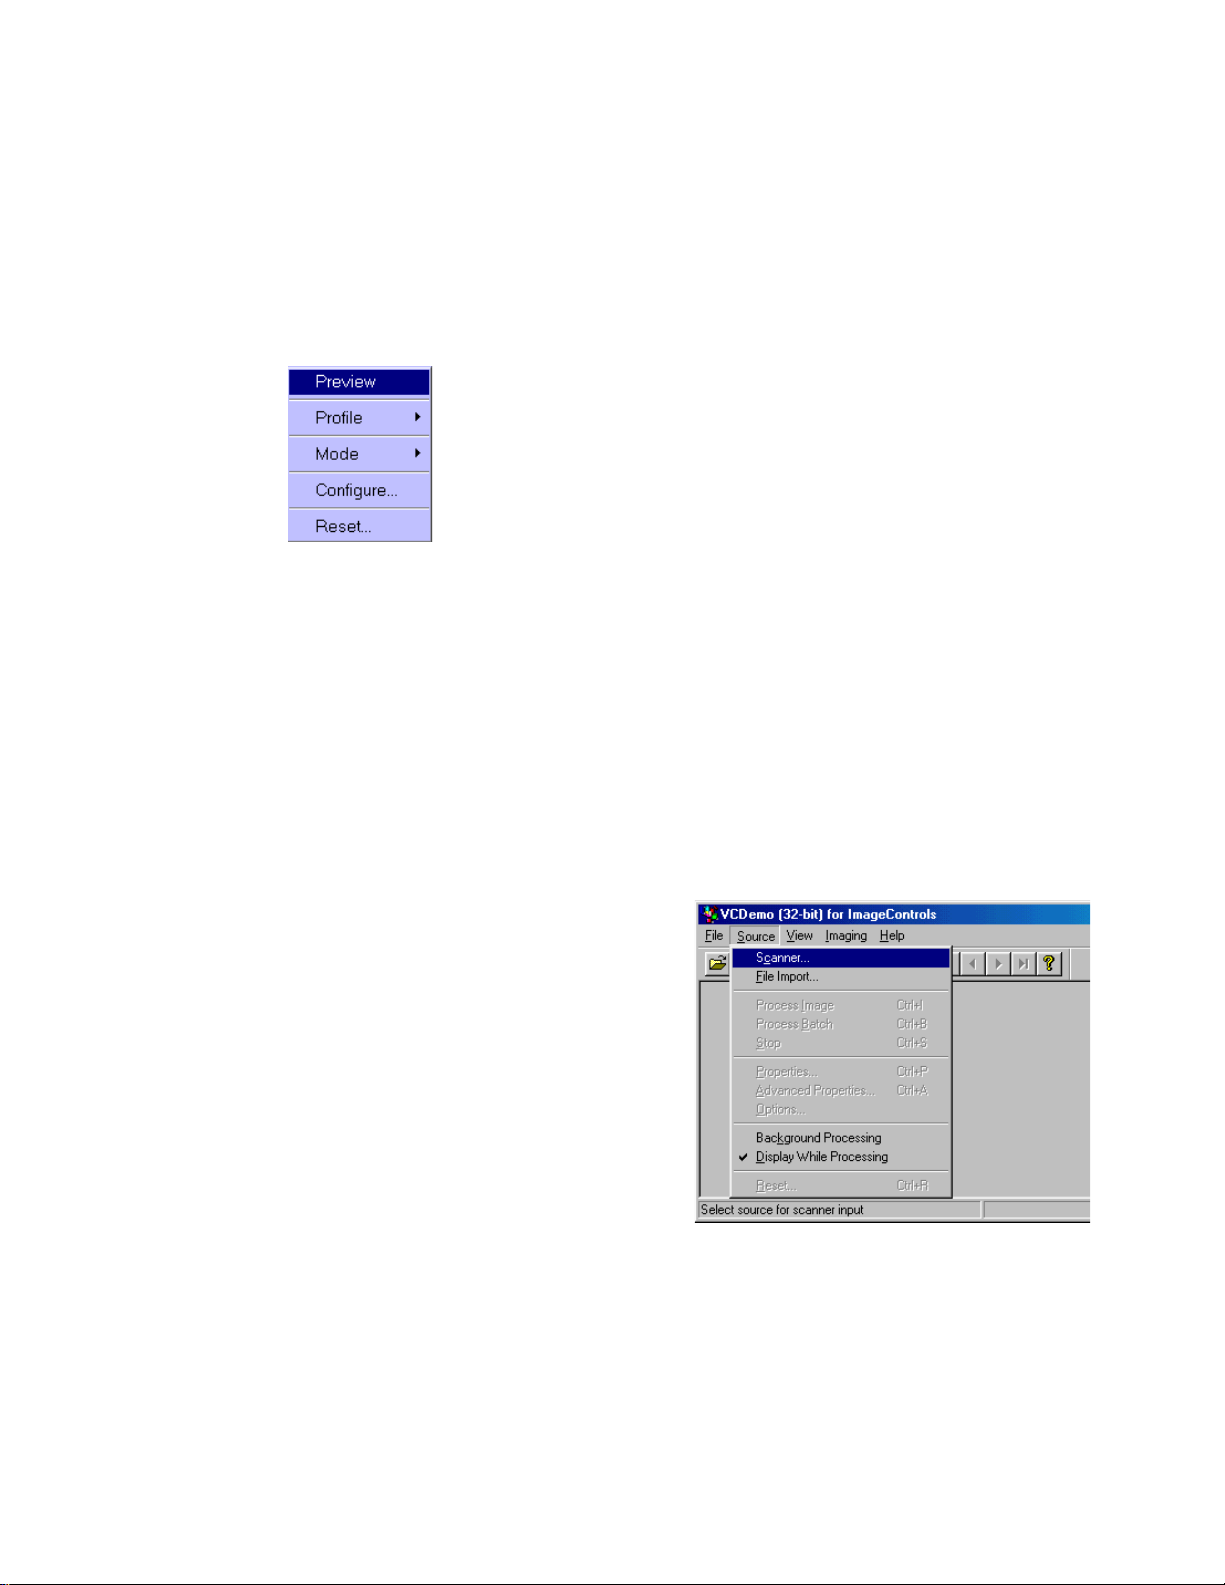
First Time Calibration
NOTE: This procedure can be repeated if the preview of the scanned original degrades.
Start Program from Icon on de sktop, Double Click VCDemo32.EXE, Maximize
1. Select Source, Scanner from pull-down menus
10 Kofax Image Products
Page 15
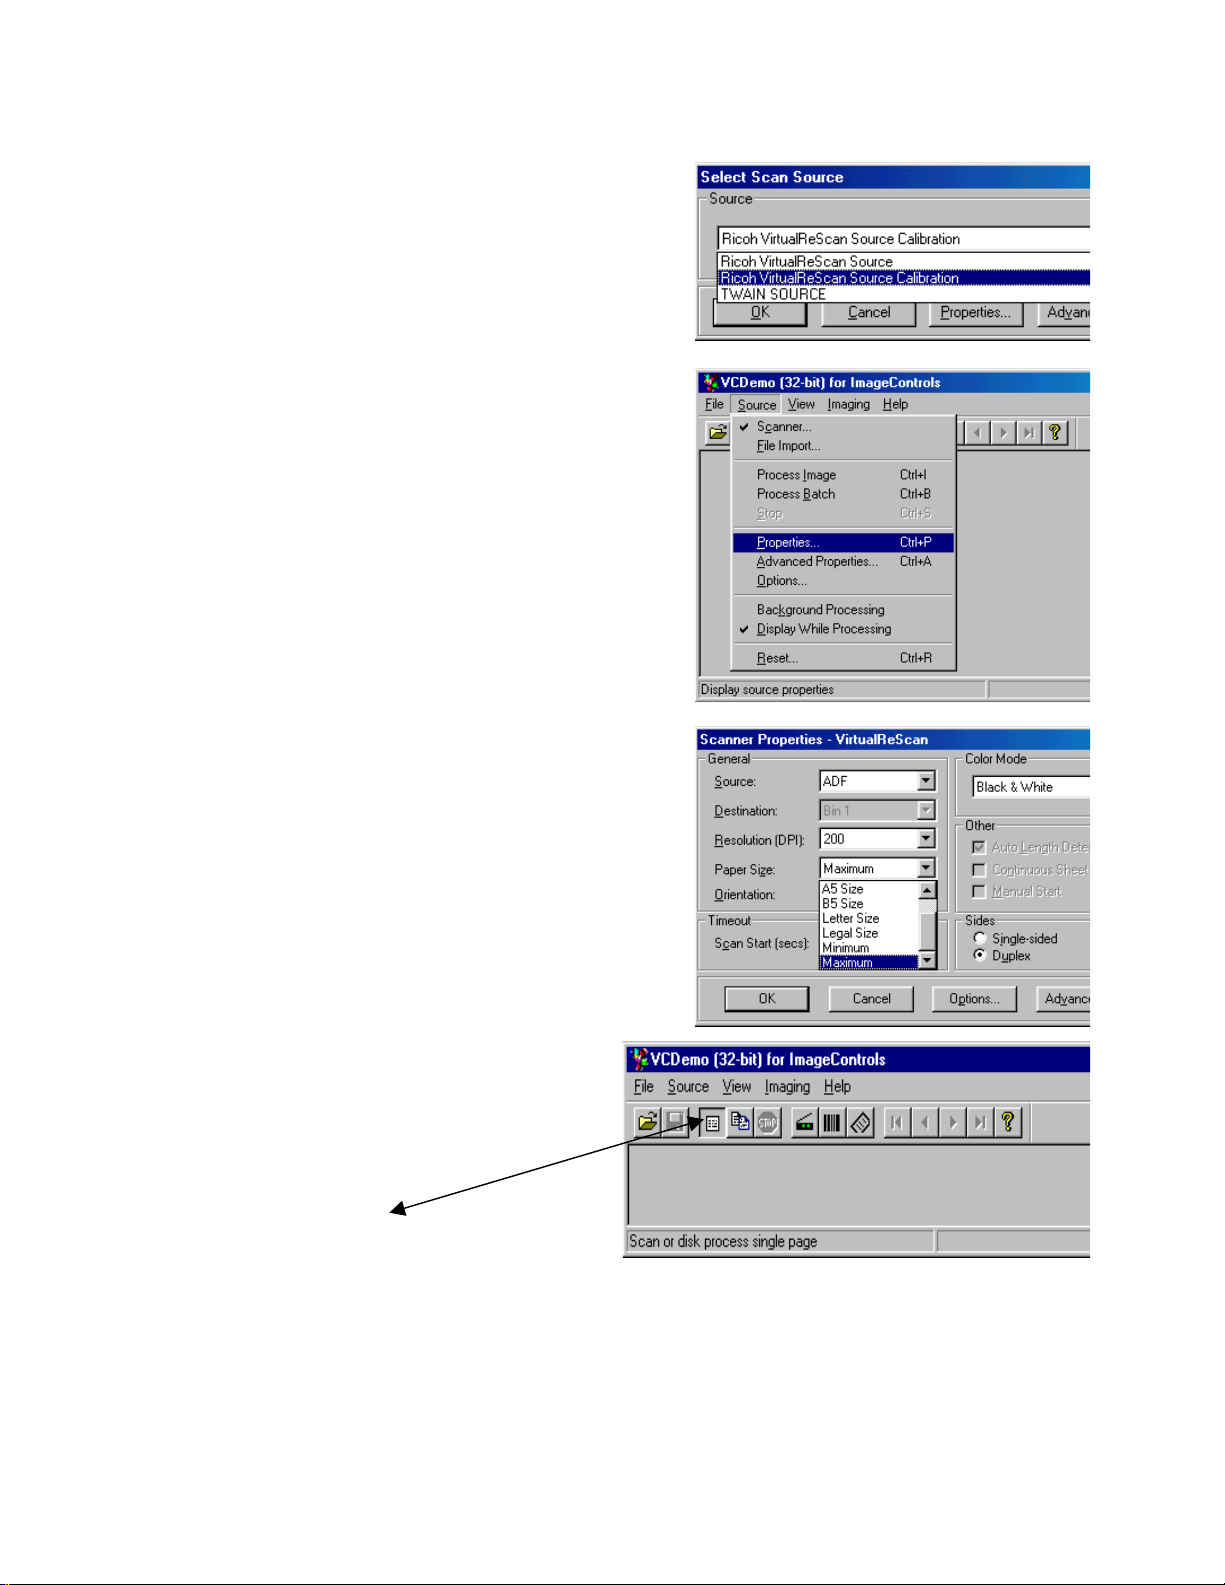
2. Select Ricoh VirtualReScan Source
Calibration from pull-down menu, then click
on OK
3. Select Source, Properties
VRS Getting Started Guide
4. Verify that the settings are as follows, ADF,
200DPI, Maximum Page Size, Duplex, click on
OK
5. Place the 12”by 12” Calibration Sheet in ADF.
The Document Guide s should be at
maximum width.
Click on the Scan Page Tool from the
Toolbar to scan and calibrate first image.
Kofax Image Products 11
Page 16

VRS Getting Started Guide
6. If Calibration is successful, the display
windows will be visible as in the example to
the right.
7. Select Source, Scanner from the pull-down
menu in preparation for an ADF scan.
8. A Window will display statin g that the source
is already in use, click on Yes to chan ge.
9. Select Ricoh VirtualReScan Source, then click
on OK.
12 Kofax Image Products
Page 17

10. Engine Load Window will display and
disappear when successfully loaded.
VRS Menu Commands
The VRS menu consists of the following commands:
Preview
Use this command to open a sample image, so that you can test image property settings. For
more information, see the section Previewing Images on page 37.
VRS Getting Started Guide
Profile
Use this command to select a profile, which co nsists of user-defined settings for image
processing. For more information about profiles, see the section Usi ng the Profiles Tab on
page 31.
Mode
Use this command to select an operating mode, which determines the conditions under
which the VRS user inte r face opens during a sca nning session. For more information, see the
section Selecting a Mode on page 20.
Configure
Use this command to open the VRS Admi nistration Utility dialog box, which is used to
define exception condition parameters. For more informatio n, see the section Defining
Exception Conditions on page 14.
Reset
Use this command if you are instructed by authorized technical support personnel to reset
the configuration for the Adrenaline Hardware Accelerator. For more information, see the
section Resetting VRS on page 38.
Kofax Image Products 13
Page 18

VRS Getting Started Guide
Defining Exception Conditions
Before scanning, set up parameters that define your requirements for image quality and
exception handling. To set the parameters, ope n the VRS Administration Ut ility dialog box by
selecting the Configure command from the VRS menu.
The VRS Administration Utility d ialog box consists of dual tabs relating to two exception types.
The Warnings tab relates to image qualit y issues, and the Errors tab relates to equipment conflicts
and paper transport issues. For each tab, you define settings that tell VRS exactly how to respond
when it detects an exception image, an equipment conflict, or a paper transport issue. You can
use the default settings on the Warnings and Err or s tabs, or customize how VRS handles each
exception type. The settings on the VRS Admin istration Utility dialog box remain in effect until
you change them again.
For detailed information on changing the settings, see the sections Warnings Tab on page 14 and
Errors Tab on page 16.
Warnings Tab
The Warnings tab lists exce ption conditions ass oc iated with image qual ity. For each condition, set
a threshold value to the level at which you want VRS to consider an image as an exception. In the
Action column, select the response to each wa rning type.
Figure 11. VRS Administration Utility Dialog Box - Warnings Tab
Table 1. Warning Types
Warning Cause
Brightness Out of Range Brightness value for the image falls outside the acceptable range.
Contrast Out of Range Contrast valu e for the image fall s outside the acceptable range.
Missing Corner Scanned image includes a missing or obscured corner.
Blank Page Scanned image is blank, or it contains a limited amount of data.
14 Kofax Image Products
Page 19

VRS Getting Started Guide
Selecting the Threshold
The threshold defi ne s the "margin of error" that VRS tolerates for brightness, contrast, missing
corners and blank pages. VRS intercepts any image with values that fall outside the margin of
error. VRS handles the image according to the a c tion you define for each e x ception type.
Brightness Out of Range Threshold
Use the threshold to define the valid range for brightness values. When a doc ument is scanned,
VRS evaluates the resulting image to determine its brightness. Then, VRS compares it to the userdefined brightness value set in the Clarity tab. Concurrently, VRS also identifies the user-defined
acceptable value in the Brightness Out of Range setting in the Warnings tab. Based on this realtime evaluation, VRS either accepts the image and allows it to be passed on to the scanning
application, or intercepts it and responds according to the user-d efined action in the Warnings
tab.
For example, if the brightness value on the Clarity tab is 50, and the threshold is 10 on the
Warnings tab, VRS accepts any image with a de tected brightness value ranging from 40 to 60. The
range starts at 40, which is 10 less than 50, and it ends at 60, which is 10 more than 50. Therefore,
an image with a brightness value of 70 would fall outside the valid range. VRS wou ld respond by
taking the action listed on the Warnings tab for Brightness Out of Range.
Contrast Out of Range Threshold
Use the threshold to define the valid range for contrast values. When a document is scanned, VRS
evaluates the resulting image to determine its contrast. Then, VRS compares it to the user-defined
contrast value set in the Clarity tab. Concurrently, VRS also identifies the user-defined acceptable
value in the Contrast Out of Range setting in the Warnings tab. Based on this rea l- time
evaluation, VRS either accepts the image and allows it to be passed on to the scanning
application, or intercepts it and responds according t o the user-d ef ined action in the Warnings
tab.
For example, if the contrast value on the Clarity tab is 6 5, and the threshold is 15 on the Warnings
tab, VRS accepts any image with a contrast value ranging from 50 to 80. The range starts at 50,
which is 15 less than 65, and it ends at 80, which is 15 more than 65. Therefore, an image with a
contrast value of 40 would fall out sid e the valid range and generate a warning. VRS would
respond by taking the action listed on the Wa rnings tab for Brightness Out of Range.
Missing Corner Threshold
Use the threshold value to define the level at which a missing or obscured corner should be
considered as an exception. The threshold is a percentage that represents the amount of the
document width that is allowed to be obscured or missing. For example, if you scan a document
with a one-half inch fold in the upper right corner, the missing section would translate to a lmost
6% (for a standard 8½ x 11 sheet). If you define the threshold for Missing Corner as 7%, VRS
would process the document without issuing a warning. If you define the threshold as 5%, VRS
would generate a warning and take the actio n listed on the Warnings tab for Missing Corner.
Blank Page Threshold
Use the threshold to define the level at which lack of data is sufficient to constitute a Blank Page
warning. The range for the Blank Page threshold is 0 to 10, with a setting of 0 representing strict
criteria that requires a blank page to be totally blank. A setting of 10 offers more flexibility,
allowing blank pages to include documents with a limited degree of data , such as smudges or
shadow-generated data. If necessa ry, adjust the threshold setting to suit your document type.
Kofax Image Products 15
Page 20

VRS Getting Started Guide
Note:
You may need to adjust the Blank Page threshold setting according to the color of the
document. For example, a threshold that successf ully detects a white blank page may not detect a
dark green blank page. If you plan to scan colored documents, it is a good idea to scan a sample
of each color to test the Blank Page threshold sett ing.
Selecting an Action
When a warning condition occurs, VRS handles it according to the Ac tion setting you select. For
details on selecting an action type, see the sectio n Action Options on page 17.
Errors Tab
The Errors tab lists exception conditions caused by equipment conflicts or paper transport issues,
as well as one condition caused by i na bility to detect document edges. In the Action column,
select the desired VRS response for each error type. To change the setting, click in the Action box
and select from the dr op-down list. For detail s, see Action Options on page 17.
Figure 12. VRS Administration Utility - Errors Tab
16 Kofax Image Products
Page 21

VRS Getting Started Guide
Table 2. Error Types
Error Description
Paper Jam Paper jam occurs in the scanner paper path.
Out of Paper* No paper is available to scan.
Cover Open Scanner cover is not closed securely.
No Power Power is off, or power cable connection is loose.
Cable Disconnect Scanner cable is not attached properly to the scanner or to th e
Adrenaline Hardware Accelerator in the PC.
Communication Communication conf lict exists between the scanner and the PC.
Timeout Scanner is un able to respond within the predefined period of time.
Auto Crop Failure Due to excessive skew or other condition, VRS is unable to detect the
edges of the scanned document.
*With some ISIS scanning applications, VRS does not generate an error for an out of paper
condition.
Action Options
Use the Action box to de fine how you want VRS t o handle each exception condition listed on the
Warnings tab and the Errors tab. To define an exception a c tion type, click in the Action box on
the Warnings tab or the Errors tab, and select from the drop-dow n list. The action options vary,
according to the type of warning or error.
Action Drop-Down List
Figure 13. Action Drop-Down List
Kofax Image Products 17
Page 22

VRS Getting Started Guide
Table 3. Action Types
Action Type Description
Return Error Pass error (without the image) to the host application.
Ignore Error
Intervention
Auto Resolve Opens the Auto Resolve Manager in automatic mode. As a result, the
Interactive
To define exception condition parameters
!
1
From the Windows taskbar , right-click on the VRS icon to open the VRS men u.
2
From the VRS menu, select Configure to open t he VRS Administration Utility dialog box.
Accept image "as is," pass it to the host application, and resume the
scanning session.
Open the Auto Resolve Manager in manual mode. As a result, the
user is presented a range of options for handling the error. See the
next section,
scanner automa tically attempts to retry the scan until the user
resolves an equipment or paper transport impediment, such as a loose
cable, paper jam, or out of paper condition. See the next section,
the Auto Resolve Manager
Opens the VRS Interactive Properties dialog box and displays the
image in the VRS Viewer, so that the user can apply new settings to
the current image. The dialog bo x opens to the tab th at relates to the
warning condition. For example, if a Brightness Out of Range
warning occur s, the dialog box would open with the focus on the
Clarity tab, where the brightness setting can be adjusted.
Using the Auto Resolve Manager
.
.
Using
3
Select one of the follo wing tabs:
a
Warnings tab
The Warnings tab gives you options to set the threshold and response for exceptions
related to image quality, as listed in Table 1 on page 14 .
b
Errors tab
The Errors tab gives you options to set the response to exceptions related to
equipment conflicts and paper transport errors, as listed in Table 2 on page 17.
4
Adjust the settings for each tab.
a
Warnings tab - Threshold
From the Warnings tab, you can type directly into the Threshold box, or click the
arrows to select a new threshold setting. For more information about thresholds, see
the section Warnings Tab on page 14.
b
Warnings tab/Errors tab - Action
From the Warnings tab and the Errors tab, define a VRS response to each exception
type by clicking in the Action box and selecting from the drop-down list. For details,
see Action Options on page 17.
5
Once you are satisfied with the settings, click Save.
18 Kofax Image Products
Page 23

VRS Getting Started Guide
Using the Auto Resolve Manager
VRS opens the Auto Resolve Manager dialog box for each occurrence of an exception condition
with an Action type of Intervention or Auto Resolve, as defined in the VRS Administration
Utility dialog box. The Auto Resolve Ma na ger gives you a range of exception handling select ions,
as explained below.
Figure 14. VRS Auto Resolve Manager
Auto Resolve check box
The check box is selected if you designated the error condition action response as Auto
Resolve from the VRS Administration Utility dialog box. With the check box selected, the
Auto Resolve Manager goes into aut oma tic mode. As a result, VRS automatically attempts to
rescan until the exception condition is res olved. If you want to temporarily disable the Auto
Resolve function for the error in question, clear the check box. Then select the Rescan button
when you are ready to scan the document again.
With the Auto Resolve check box cleared, the Auto Resolve Manager enters manual mode
and enables the Rescan, VRS, and Ignore buttons. As a result, VRS takes no action until you
select one of the button s.
Rescan (manual mode only)
After reloading a document into the scanner, select this button to rescan the sheet.
VRS (manual mode only)
Use this button to open the VRS Interactive Properties dialog box, so that you can apply
property changes to the image in question. The VRS Interactive Properties dialog box opens
to the tab that most closely relates to the current exception image. For example, if you receive
a Brightness Out of Range warning, the VRS Interactive Properties dialog box would open to
the Clarity tab.
Ignore (manual mode only)
Use this button to accept the image "as is," send it to the scannin g a pplication, and proceed
with the scanning process.
Abort
Use this button stop the batch or cancel the scanni ng pr ocess. When you select Abort, any
error information is passed to your scanning application. The error image(s) are not sent to
the scanning application.
Kofax Image Products 19
Page 24

VRS Getting Started Guide
Selecting a Mode
The Mode menu options control the conditions under which the VRS user interface opens for
image inspection and interactive updates.
Figure 15. Mode Menu
By selecting the Mode command from the VRS menu, you can request that the VRS user interface
display under the following conditions:
Stop Every Page
VRS dialogs open after each document scans; or with duplex scannin g, after each document
side scans.
Stop on Errors
VRS dialogs open only when exception conditions occur.
Stop on First Page
VRS dialogs open when you scan the first page of a batch and when exception conditions
occur.
Stop Never
VRS dialogs remain out of view, even if exception conditions occur. In t his case, any
exceptions are passed to the scanning application (unless they are defined as Ignore).
After installation, the mode is set to Stop on Errors, which opens the VRS Viewer and the VRS
Interactive Properties dialog box when an exception image is detected during the scanning
process. Once you select a mode, it stays in effect until you change it again.
To change the mode
!
1
From the Windows taskbar, right-click on the VRS icon to open the VRS menu.
2
From the VRS menu, select Mode.
3
From the Mode submenu, select an operating mode.
20 Kofax Image Products
Page 25

Updating Image Properties
While scanning, you can use VRS to apply property changes to images that are intercepted as
exceptions. To update an exception image, use the VRS Interactive Properties dialog box to apply
property changes to the image shown in the VRS Viewer.
The VRS Interactive Properties dialog box and the VRS Viewer open under the following
circumstances:
• When VRS intercepts an exception image for which the response is defined as Interactive.
See Defining Exception Conditions on page 14 .
• As defined by the active operating mode. See Selecting a Mode on page 20.
• When you select the Preview feature. See Previewing Images on page 37.
• When you select the VRS button from the VRS Auto Resolve Manager.
See Using the Auto Resolve Ma na ger on page 19.
The VRS Viewer and the VRS Interactive Properties dialog boxes open together, as shown in
Figure 16. You can use the VRS Interactive Properties d ia log box to apply attribute changes to the
image in the VRS Viewer.
For more information, see the next section, Using the VRS Viewer, as well as the section Using the
VRS Interactive Properties Dialog Box on page 23.
VRS Getting Started Guide
Figure 16. VRS Viewer with the VRS Interactive Properties Dialog Box
Kofax Image Products 21
Page 26

VRS Getting Started Guide
Using the VRS Viewer
The VRS Viewer displays scanned images for your inspection. The purpose of the Viewer is to
show you what an image looks like when it scans, and to refresh the image as you apply property
changes.
Note:
To ensure that the VRS Viewer refreshes images as quickly as possible, you can enable the
Accelerated VRS Refresh function from the Options tab. See the section Using the Options Tab on
page 33.
The VRS Viewer includes a Zoom menu with a range of image magnificati on levels.
Figure 17. VRS Viewer Zoom Menu
Using the Zoom Menu to adjust the view
From the Zoom menu, you can select a setting to magnify or reduce the image in the Viewer.
Using the Fit Window setting, you can view the entire image in the VRS Viewer.
Using mouse buttons to adjust the view
In the VRS Viewer, you can adjust the image view with the left and right mouse buttons.
Using the left mouse button, you can d o the following:
• View part of the image by clicking and dra gging a box to outline the section you wan t to
magnify.
• Restore the image to the standard view by double-clicking.
Using the right mouse button, you can move (or pan) the image position in the VRS Viewer.
22 Kofax Image Products
Page 27

Using the VRS Interactive Properties Dialog Box
The VRS Interactive Properties dialog box consists of seven tabs, including four w ith options for
dynamically adjusting image pro p erties as you scan. The tabs are shown in Figure 18 .
VRS Getting Started Guide
Figure 18. VRS Interactive Properties Dialog Box
When the dialog box opens for an exception condition, the status line lists the specific cause for
the warning or error. Otherwise, you see "Status OK" on the status line. The dialog box opens to
the tab that is relevant to the current warning or error condition. For example, if the warning is
caused by a Brightness Out of Range condition, the VRS Interactive Proper ties dialog box opens
to the Clarity tab. From the Clarity tab, you co uld make adjustments to resolve the cond ition.
VRS Interactive Properties Dialog Box Tabs
The VRS Interactive Properties dialog box consists of the following tabs:
Clarity
Use this tab to adjust the settings for brightness, contrast and gamma correction. For details,
see the section Using the Clarity Tab on page 25.
Noise
Use this tab to select image enhancement filters, to a pply character erosion/dilation, or to
remove unwanted speckling from an image. For details, see the section Using the Noise Tab on
page 27.
Skew
Use this tab to straighten an image that is skewed, or crooked. Settings on the Skew tab apply
only to the current image in the VRS Viewer window. For details, see the section Using the
Skew Tab on page 29.
Profiles
Use this tab to create and manage image property profile s. A profile consists of user-defined
settings from the Clarity, Noise, and Options tabs in the VRS Interactive Properties dialog
box. For details, see the section Using the Profiles Tab on page 31.
Kofax Image Products 23
Page 28

VRS Getting Started Guide
Options
Use this tab to activate optional features, suc h as A utomatic Deskew, Image Crop,
Accelerated Scanning, and VRS Refresh. For details, see the section Using the Options Tab on
page 33.
Analysis
Use this tab to view a summary of the property settings for the most recently scanned image.
For details, see the section Using the Analysis Tab on page 35.
About
Use this tab to view information about y our VRS software version, as well as the street
address, telephone and fax numbers, web site address, and e-mail address for Kofax Image
Products. Additional ly, the VRS Online button gives you direct access to t he Vir t ualReScan
web site, which offers product information and instructions for downloading VRS product
updates. For details, see the section Using the About Tab on page 36.
VRS Interactive Properties Dialog Box Buttons
The following buttons are available when you use the VRS Interactive Properties dialog box.
Keep in mind that the button selection applies to the entire set of dialog box tabs, including the
active tab. When you change the settings on the VRS Interactive Properties dialog box, they
remain in effect until you close VRS. When VRS resta rts, the dialog box is reset to the default
settings.
Rescan
After reloading a document into the scanner, select this button when you are ready to send
the sheet through the scanner again. If you are using an automatic document feeder (ADF),
you need to reload the document into the sca nner ADF.
Apply Page
Use this button to apply the current settings to the image in the VRS Viewer. With this
selection, the settings do not stay in effect f or subsequent scanned images.
Apply Batch
Use this button to apply the current dialog box setti ngs to the image in the VRS Viewer
window, and to keep the settings in effect for future ba tches.
Ignore
Use this button to indicate that VRS should accept an image "as is." As a result, VRS ignores a
warning/error cond ition and resumes the scanning session. Additionally, VRS abandons any
changes, and restores the settings that were in effect when the dialog box first opened.
Abort
Use this button to stop the batch and close the VirtualReScan Interactive Properties dialog
box without applying or saving a ny cha nges. When you select Abort, VRS passes any errors
to the scanning application. Error images are not sent to the scanning application.
24 Kofax Image Products
Page 29

VRS Getting Started Guide
Using the Clarity Tab
The Clarity tab provides options to adjust the contrast, brightness, and gamma correctio n f or a n
image. Contrast relates to the range of the lightest and darkest shades in an image. Brightness
relates to the intensity (or density) of the gray shades in an image. Gamma relates to the contrast
between the light and dark areas of an image.
Figure 19. Clarity Tab
Brightness and Contrast
You can set the values for contrast and brightness yourself, or opt to have VRS automatically
assign optimal values for contrast and brightness. To enable VRS-assigned values, select
Intelligent Contrast Adjustment/Brightness Adjustment fro m the Options tab. See the section
Using the Options Tab on page 33.
When VRS checks the validity of the brightness and contrast values for a scanned image, it checks
the Clarity tab settings and the VRS Administration Utility - Warnings tab settings. For example,
if the image brightness value matches t he brightness setting on the Clarity tab, or f alls within the
range defined by the Brightness Out of Range threshold on the Warnings tab, it is acceptable. If
the image brightness value does not fall within the acceptable range, VRS intercepts the image.
To illustrate, if the brightness level is set to 50 on the Clarity tab, and the Brightness Out of Range
threshold is set to 10 on the Warnings tab, VRS accepts any image with a brightness value from
40 to 60. (Both 40 and 60 represent a margin of error 10 for the setting at 50.) If VRS detects an
image with a brightness value outside the acceptable range, it puts into effect the action selectio n
for Brightness Out of Range, as listed on the Warnings tab.
Brightness and Contrast Visual Markers
The Clarity tab includes the following vi sual markers to help you identify the valid range f or
Brightness and Contrast:
Black Lines
The black lines indicate the baseline Brightness and Contrast values, which reflect the
settings that you last applied (usi ng the Apply Batch button).
Kofax Image Products 25
Page 30

VRS Getting Started Guide
Blue Rectangle
This box shows you the region of acceptable Brightness and Contrast values. T he box is
centered around the baseline settings for Brightness and Contrast, with the borders
representing the Brightness and Contrast thre shold values from the VRS Administration
Utility dialog box. Valid settings must f all within the blue box. Invalid settin gs fall outside
the blue box borders, and they generate warnings.
Dotted Red Lines
The dotted red lines represent the current values for Brightness and Contrast. When you
have Intelligent Brightness/Contrast Adju stment enabled, the dotted red lines (along wit h
the slider) are automatically adjusted to reflect the “intelligent” brightne ss and contrast
values.
Gamma
Gamma correction relates to the contrast between the lightest and darkest areas of an image. You
can use the slider to adjust the setting, or yo u can make a selection from the Gamma Correct edit
box on the Clarity tab.
To change the Clarity settings
!
1
From the VRS Interactive Properties dialog box, select the Clarity tab.
a
To adjust the contrast and brightness at the same time, click within the boundaries
of the brightness/contrast scale.
Click the pointer so that the intersection of the cros shairs represents the desired
values for brightness and contrast. Then, a dotted line appears on the
brightness/contrast scale. The horizontal dotted line represents the brightness value,
and the vertical dotted line represents the contrast value.
b
To adjust the contrast and brightness separately, skip to the next step.
2
In the Brightness box, VRS displays the current brightness setting. To chan ge the setting,
do one of the following:
a
Click in the Brightness box, click the arrows to move through the list of settings, a nd
click your selection.
b
Click in the Brightness box and type in a va lue.
c
Use the Brightness slider control to select a value.
3
In the Contrast box, VRS displays the current contrast setting. To change the setting, do
one of the following:
a
Click in the Contrast box, click the arrows to move thr ough the list of settings, and
click your selection.
b
Click in the Contrast box and type in a value.
c
Use the Contrast slider control to select a value.
4
In the Gamma Correct box, VRS displays the gamma correction setting. The correction
values range from Dark to Light, with Normal at the midpoint. To change the setting, do
one of the following:
a
Click in the Gamma Correct box, click the arrows to m ove through the list of values,
and click your selection.
b
Click in the Gamma Correct box and type in a value.
c
Use the Gamma slider control to select a value.
26 Kofax Image Products
Page 31

VRS Getting Started Guide
Using the Noise Tab
The Noise tab gives you a set of filters that enhance image quality and remove excessive
speckling. As you adjust the Noise settings, the effects are applied to the image in the VRS
Viewer window. You can fine-tune the settings until the image appearance meets your quality
standards.
Note:
The Noise tab settings are intended for black and white scanning; they have no effect on
grayscale scanning.
Figure 20. Noise Tab
To change the Noise settings
!
1
From the VRS Interactive Properties dialog, select the Noise tab.
2
Under Enhancement Filters, you can select one of the following:
a
None: Disables all the enhancement filters.
b
Descreening: Activates a shade removal filter that is useful for removing halftone
patterns.
c
Image smoothing: Activates a filter that helps to smooth chara c ters or lines that
appear jagged on your image.
d
Image cleanup: Activates a filter that smooths out characters, removes background
noise, and eliminates some lines.
3
Use the Erosion/Dilation Slider to select the amount of thinning/thickening to apply to
image elements.
a
For image elements that are ballooned or blended together, improvement occurs as
you move the slider toward the Thin settin g.
b
For image elements that are too thin or too light, improvement occurs as you move
the slider toward the Thick setting.
Kofax Image Products 27
Page 32

VRS Getting Started Guide
4
Use the Speckle Removal Slider to remove unwanted black dots.
a
Move the slider toward Small if removal of small dots will achieve the desired image
quality.
b
Move the slider toward Medium if removal of sma ll and medium dots will achieve
the desired image quality.
c
Move the slider toward Large if removal of small, mediu m, a nd large dots will
achieve the desired image quality.
28 Kofax Image Products
Page 33

VRS Getting Started Guide
Using the Skew Tab
The Skew tab gives you settings to straighten an image that appears to be skewed, or crooked, in
the VRS Viewer. To straighten an image, you rotate it up to 45 degrees clockwise, or counterclockwise. Use the movable angle control arm to rotate the image. If necessary, you can fine-tune
the rotation with the Fine Angle Adjustment slider. The Angle box on the Skew tab lists the
current image angle. When the Angle box lists 0 . 00, the image is not skewed.
Note:
The deskew process is designed to straighten an image, rather than the text on the image.
Figure 21. Skew Tab
If you want VRS automatically to correct any skewed images in a batch, select the Automatic
Deskew function. Se e Using the Options Tab on page 33.
Kofax Image Products 29
Page 34

VRS Getting Started Guide
To change the Skew tab settings
!
1
From the VRS Interactive Properties dialog box, select the Skew tab.
2
Adjust the movable angle control arm until the image is straight:
a
Use the mouse to select the vertical arm. When selected, the pointer changes to a hand
icon.
b
Move the arm counter-clockwise to rotate the image to the left, or clockwise to rotate
it to the right. The Angle setting changes as the image rotates; the valid range is -45
degrees to 45 degrees.
3
In the Angle box, you have two ways to adjust the Angle setting:
a
Place your cursor in the Angle box, click the arrows to review the list of settings, and
click your selection.
b
Type a value for the correction angle directly into the Angle box.
The valid range for the angle is -45 degrees to 45 degrees.
4
Using the Fine Angle Adjustment Slider, you can fine-tune the deskew angle in single
degree, or partial degree, increments, as follows:
a
By moving the slider all the way to the left, you select a co mplete one-degree, counterclockwise angle adjustment.
b
By moving the slider all the way to the right, you select a co mplete one-degree,
clockwise angle adjustment.
c
By moving the slider to a position in between the leftmost or rightmost setting, you
select an angle shift that is less than a full degree. Each line on the slider scale
represents 5 percent of one degree.
30 Kofax Image Products
Page 35

VRS Getting Started Guide
Using the Profiles Tab
The Profiles tab helps you se t up and manage VRS image property profiles. Each profile is a userdefined combination of settings for the Clarity, Noise, and Options tabs. You can establish
multiple profiles to accommodate different scanning situations, so t hat you don’t have to repeat
the process of defining image properties.
VRS uses the profile Default settings, unless you define and select another one. From the Profiles
tab, you can define, update, load, and remove profiles.
Figure 22. Profiles Tab
To set up a profile
!
1
Open the VRS Interactive Properties dialog box and make selections from the Clarity,
Noise, and Options tabs.
2
Select the Profiles tab.
3
In the New Profile text box, assign a name to the new profile. Be sure to assign a profile
name with alphanumeric characters.
4
Select Save As. The new profile name appears in the Ava ilable Profiles list, and it
becomes the active profile.
Kofax Image Products 31
Page 36

VRS Getting Started Guide
Table 4. Invalid Characters for Profile Names
Character Description Character Description
: Colon ' Single quotation
; Semicolon "
\ Backslash > Greater than
/ Slash < Less than
|Pipe^ Caret
& Ampersand . Period
?Question mark
To change the active profile
!
1
From the VRS Interactive Properties dialog, select the Profiles tab.
2
From the Available Profiles list, select the profile you want to use.
3
Select the Load button.
Note:
If an image is open in the VRS Viewer when you change the active profile, the
Double
quotation
image is refreshed with the new settings.
or
1
From the VRS Interactive Properties dialog, select the Profiles tab.
2
From the Available Profiles list, double-c lick the name of the profile you want to use.
or
1
From the VRS menu, select the Profiles command.
2
When the Profiles submenu opens, select the name of the profile you want to use.
Note:
If you change the active profile, it stays in effect for the current VRS session. Each
time you start VRS, Default settings is reset as the active profile.
To remove a profile from the Available Profiles list:
!
1
From the VRS Interactive Properties dialog box, select the Profiles tab.
2
From the Available Profiles list, select the profile(s) you want to remove.
3
Select Remove. The profile name clears from the Available Profiles list.
32 Kofax Image Products
Page 37

VRS Getting Started Guide
Using the Options Tab
The Options tab selections support automatic adjustments, accelerated scanning a nd image
refresh, and assignment of optimal (or "intelligent") values for bright ness and contrast. When you
select a function from the Options tab, it remains in effect for the remainder of your VRS session,
unless you change it again.
Figure 23. Options Tab
Automatic Deskew
Activates the VRS feature that automatically straightens images that are skewed when they scan.
The skew is determined by the leading edge of the document.
Note:
The Automatic Deskew process is page-based, rather than content- based. While VRS will
automatically straighten a page, it will not straighten the data on the page (if the data was not
straight on the original document).
If you prefer to correct the skew angle on an individual image basis, do not select Automatic
Deskew; use the Skew tab settings instead. See the section Using the Skew Tab on page 29.
Image Crop
With Automatic Deskew selected, you can activate Image Crop to automatically crop any image
to reflect the actual size of the scanned document. This is helpful if you scan a batch of images
that consist of multiple paper sizes.
Note:
If your scanning application does not support cropped images, VRS disables the Image
Crop function, even if Automatic Deskew is selected.
For example, if you scan a postcard, you can enable the Image Crop feature to ensure that excess
borders are removed. As a result, the image would match the actual postcard dimensions (rather
than the paper size specified in the scanning application).
Kofax Image Products 33
Page 38

VRS Getting Started Guide
Accelerated Scanning
While high resolution settings ha ve a positive impact on image qualit y, they can slow down the
scanning process. Wit h Accelerated Scanning in effect, VRS achieves the quality of a high
resolution image without compromising speed. To maintain speed, VRS scans the image at a rate
that is lower than the DPI (dots per inch) rate defined in your scanning application. Then, VRS
performs an internal translation so that the image is output at the desired DPI setting.
To illustrate, suppose you select 300 DPI in your scanning application and enable Accelerated
Scanning from the Options tab in VRS. As a result, the image scans at 200 DPI to maintain speed,
and VRS translates it to 300 DPI to achieve the desired resolution. The table below lists the DPI
settings that VRS uses for Accelerated Scanning.
Note:
If you select a DPI setting of 400, VRS automatically puts Accelerated Scanning into effect.
Table 5. Accelerated Scanning DPI Settings
Your DPI Setting Actual Scan DPI Setting Image Output DPI Setting
400 300 400
300 200 300
240 200 240
200 200 200
VRS Refresh
To minimize the time it takes for the VRS Viewer to update an image when you apply property
changes, enable the VRS Refresh function. With VRS Refresh, you ensure that VRS updates
images as quickly as possible.
Intelligent Contrast Adjustment / Brightness Adjustment
With Intelligent Contrast Adjus tment/Brightness Adjustment, VRS automatically selects the
optimal values for contrast and bright ness. This saves time and eliminates guesswork, and you
achieve the best possible image quality for every page in a batch of documents.
For example, if you scan a yellow invoice and enable Intelligent Contrast Adjustment and
Intelligent Brightness Adjust ment, VRS automatically adjusts the contrast and brightness values
to produce the best image quality for the colored sheet. When "intelligent" settings are enabled
for a batch, VRS automatically applies the most accurate settings to each image in the batch. As
you scan, the intelligent values for contrast and brightness are reported for each page on the
Analysis tab. On the Clarity tab, the red dotted line and the slider positions are automatically
updated to reflect the intelligent values detected by VRS. See the section Using the Clarity Tab on
page 25.
To change the selections on the Options tab
!
1
From the VRS Interactive Properties dialog box, select the Options tab.
2
Under Automatic, Accelerated, and Intelligent, select the options that you want to enable
for the next batch scan.
34 Kofax Image Products
Page 39

VRS Getting Started Guide
Using the Analysis Tab
Use the Analysis tab to view a summary of the properties for the current image in the VRS
Viewer. The summary reflects the properties at the time VRS scans the image. With the exception
of the Speckle Count, none of the Analysis tab information is updated as you apply image
property changes. You cannot edit the information on the Analysis tab.
Figure 24. Analysis Tab
The information on the Analysis tab may help you identify proper threshold values for contrast
and brightness on the VRS Administration Utility dialog box, as well as settings for contrast and
brightness on the Clarity tab.
For example, suppose you are preparing to scan a batch of documents that have a purple
background. If you are not sure how to adjust the c ontrast and brightness settings to achieve the
best possible image quality for purple documents, scan a sample page. Then check the contrast
and brightness values on the Analysis tab, because they should be close to the values that would
be appropriate for the Clarity tab.
Note:
If you are scanning in duplex mode, VRS evaluates only the front side of an image.
Therefore, the information on the Analysis tab relates only to the front side.
If you enable the Intelligent Contrast Adjustment and/or the Intelligent Brightness Adjustment
functions from the Options tab, the contrast and brightness values on the Analysis tab are
automatically put into effect. With the i ntelligent settings enabled, VRS automatically updates the
red dotted line and the sliders on the Clarity tab to reflect the contrast a nd brigh tness values
listed on the Analysis tab.
Kofax Image Products 35
Page 40

VRS Getting Started Guide
Using the About Tab
The About Tab lists the VRS ve rsion information, along with the mailing address, telephone and
fax numbers, web site address, and e-mail a d d r ess for Kofax Image Products. For direct access to
the Internet, you can do the following:
• Click the VRS Online button to visit the VRS product web site, which includes
information on how to download firmware and software updates.
• Select www.kofax.com to vis it the Kofax Image Products we b site.
• Select www.virtualrescan.com to visit the VirtualReScan web site.
Figure 25. About Tab
36 Kofax Image Products
Page 41

Previewing Images
The preview process gives you an opportunity t o test image property settings to meet quality
standards. Use the Preview feature to test property settings before you scan a batch of
documents, or to adjust the settings in between batches.
When you select Preview, VRS opens the most recently scanned image in the VRS Viewer. As
you apply property changes from the VRS Interactive Properties dialog box, the preview image is
refreshed so you can evaluate the adjustments. Be aware that the changes to the preview image
are not sent to your scanning application; the image is intended only for preview purposes.
Note:
The Preview function is available only if a scanned image exists in the scanner's memory.
For information on the VRS Viewer wind ow, see the section Using the VRS Viewer on page 22. For
information on updating image properties, see the section Using the VRS I nteractive Properties
Dialog Box on page 23.
To preview an image
!
1
Scan a document that is similar to the document type you plan to use for batch scanning.
VRS Getting Started Guide
2
From the VRS menu, select Preview to display the sample image in the VRS Viewer.
When you select Preview, VRS always displays the last image scanned since the scanner
was powered on (provided that such an image exists).
3
If desired, use the Zoom menu to adjust the magnification level.
For more information on the Zoom menu, see the section Using the VRS Viewe r on
page 22.
4
If necessary, use the VRS Interactive Properties dialog to change the image properties.
For more information on the VRS Interactive Properties dialog box, see the section Using
the VRS Interactive Properties Dialog Box on page 23.
5
When you are satisfied with the appearance of the preview image, select the Apply Batch
button in the VRS Interactive Properties dialog box.
The property settings are saved and put into effect for the ne xt batch of scanned
documents. If you expect to use the settings on a regular basis, save them as a profile, so
they can be recalled as often as necessary. Se e the section Using the Profiles Tab on
page 31.
Kofax Image Products 37
Page 42

VRS Getting Started Guide
Resetting VRS
The Reset command reloads the default configuration for the Adrenaline Hardware Accelerator
in your PC. You should use the Reset func tion only if an authorized member of the K ofax
technical support staff instructs yo u to do so.
To reset the VRS configuration
!
1
From the Windows taskbar, right-click on the VRS icon to open the VRS menu.
2
From the VRS menu, select the Reset command.
A progress indicator appears for a few moments as the configuration is reset for the
Adrenaline Hardware Accelerator.
3
From your scanning application, reselect the Vir tualReScan Source.
4
Proceed with your scanning session.
38 Kofax Image Products
Page 43

Technical Support
For assistance with VirtualReScan, contact the Kofax technical suppor t staff, as shown below.
Before contacting the technical support staff, please have the following inf or mation available:
• Version of VRS you are usin g
• Type of hardware you are using, including your PC and any peripherals such as scanners
or printers
• Type of hardware accelerator and software engine you are using
• Operating system you are using
• Description of how the problem occurred, including error message te x t
Headquarters European Headquarters
Kofax Image Products
16245 Laguna Canyon Road
Irvine, CA 92618-3603
VRS Getting Started Guide
Kofax Image Products
Kranenberg 6
1731 Zellik, Brussels, Belgium
(949) 727-1733 (voice)
(949) 727-3923 (fax)
Internet
http://www.kofax.com</A (Kofax Image Products home page)
http://www.kofax.com/support (Kofax Technical Suppor t page)
mailto:info@kofax.co m ( e-mail)
Contact Ricoh at:
Ricoh Corporation
5 Dedrick Place
West Caldwell, NJ 07006
(800) RICOH38 (voice)
Internet
http://www.ricoh-usa.com
+32-2-481-6030 (Tel.)
+32-2-463-1706 (Fax)
Kofax Image Products 39
Page 44

Page 45

A
Abort button, 1 9
About tab, 36
Accelerated scanning, 24, 34
DPI settings for, 34
Action types
Auto Resolve, 18
Ignore Error, 18
Interactive, 18
Intervention, 18
Return Error, 18
Adrenaline Hardware Accelerator
compatibility, 5
configuring for Windows 95, 6
configuring for Windows NT, 7
installation, 5
Analysis tab, 35
Apply Batch button, 24
Apply Page button, 24
Auto Crop Failure error, 17
Auto Resolve, 18
Auto Resolve check box, 19
Auto Resolve Manager, 19
Automatic deskew, 24, 33
Automatic refresh, 34
VRS Getting Started Guide
Index
Dilation, 27
DPI settings
for accelerated scann ing, 34
E
Erosion, 27
Error Types
Auto Crop, 17
Cable disconnect, 17
Communication, 17
Cover open, 17
No power, 17
Out of Paper, 17
Paper jam, 17
Timeout, 17
Errors tab, 16, 17, 18
F
Filters
descreening, 27
Image cleanup, 27
image enhancement, 27
image smoothing, 27
Fine Angle Adjustment slider, 29
First Time Calibration, 10
B
Blank Page warning, 15
Brightness, 23, 25
brightness adjustment, intelligent, 34
C
Cable, 8
Cable Disconnect error, 17
Clarity tab, 25
Cleanup, image, 27
Communication error, 17
Configure command, 13
Connecting PC to Scanner, 6
Contrast, 23, 25, 26
contrast adjustment, intelligent, 34
Cover Open error, 17
G
Gamma, 25, 26
I
Ignore button, 19
Image cropping, 24, 33
Image Smoothing, 27
ImageControls, 39
existing version, 3
Installation, 3
Adrenaline Hardware Accelerator, 5
scanner cable, 8
software, 3
intelligent brightness adjustment, 34
intelligent contrast adjustment, 34
M
D
descreening, 27
Deskew angle, 23, 30
Kofax Image Products 1
Mode command, 13
Mode menu, 20
Page 46

VRS Getting Started Guide
N
No Power error, 17
Noise tab, 27
O
Options tab, 33
accelerated scanning, 34
automatic brightness adjustment, 34
automatic contrast adjustment, 34
automatic deskew, 33
automatic refr esh, 34
image crop, 33
Out of Paper error, 17
P
Paper Jam error, 17
Preview command, 13
Previewing Images, 37
Product package, 2
Profile
changing the active, 32
default, 31
removing a, 32
setting up a, 31
Profile command, 13
Profiles tab, 31
R
Rescan button, 19
Reset, 38
Reset command, 13
Return Error, 18
S
Scanning source
VirtualReScan, 9
Skew tab, 29
Software installation, 3
Speckles
removing, 23
System Requirements, 2
T
Threshold, selecting, 15
Thresholds
Blank Page, 15
Brightness Out of Range, 15
Contrast Out of Range, 15
Missing Corner, 15
Timeout error, 17
V
VirtualReScan
starting, 9
VRS Administration Utility dialog box, 14
Action Options, 17
Errors, 14
Warnings, 14
VRS button, 19
VRS icon, 9
VRS Interactive Properties dialog box, 18, 21, 23, 24,
26, 27, 30, 31, 32, 34, 37
About tab, 24
Analysis tab, 24
buttons, 24
Clarity tab, 23
Noise tab, 23
Options tab, 24
Profiles tab, 23
Skew tab, 23
tab overview, 23
VRS Menu, 10, 13
Configure, 13, 14
Mode, 13
Preview, 13, 21, 37
Profile, 13
Reset, 13, 38
VRS Online button, 36
VRS Refresh, 34
VRS Viewer, 18, 20, 21, 22, 23, 24, 27, 29, 35, 37
using, 22
Zoom Menu, 22
W
Warning Types
Blank Page, 14
Brightness Out of Range, 14
Contrast Out of Range, 14
Missing Corner, 14
Warnings tab, 14, 18
Web site
VirtualReScan, 36
Windows 95, 6
Windows NT, 2, 5, 7
Z
Zoom menu, 22
2 Kof ax Image Products
Page 47

VRS Getting Started Guide
2 Kof ax Image Products
 Loading...