

Page 1
2004/e2004
Basic Features
Page 2

Introduction
This manual contains detailed instructions on the operation and maintenance of this machine. To get
maximum versatility from this machi ne all operators s ho uld carefully re ad a nd follow the instr uctions in
this manual. Please keep this manual in a handy place near the machine.
Please read the Safety Infor mation in the Advanced Features manual before using t his machine. I t contains important information related to USER SAFETY and PREVENTING EQUIPMENT PROBLEMS.
Notes:
Some illustrations might be slightly different from your machine.
Certain options migh t not be ava ilable in some countri es . For det a ils, please contact yo ur loc al dealer.
Laser Safety:
The Center for Devices and Radi ologi cal Hea lth (CD RH) pr ohibit s th e repai r of las er-bas ed opt ica l unit
in the field. The optical housing unit can only be repaired in a factory or at a location with the requisite
equipment. The laser subsystem is replac eable in t he fiel d by a qual ified Cus tomer En gineer. The laser
chassis is not repairable in the field. Customer engineers are therefore directed to return all chassis
and laser subsystems to the fact ory or se rvice dep ot when replaceme nt or the opt ical subsyst em is required.
Operator Safety:
This machine is considered a CDRH Class I laser device, safe for office/EDP use. The machine contains a 5-milliwat, 765 - 805 nanometer wavelength, GaAIAs laser diode. Direct (or indirect reflected)
eye contact with the laser beam may c ause serious eye damage. Safety precautions and interlock
mechanism have been designed to prevent any possible laser beam exposure to the operator.
Warning:
Use of controls or adjustment or performance of procedures other than those specified in this manual
might result in hazardous radiation exposure.
Notes:
Two kinds of size notation are employed in this manual. With this machine refer to the inch version.
For good copy quality, Ricoh recommends that you use genuine Ricoh toner.
Ricoh shall not be responsi ble for any damage or exp ense that mi ght res ult from the use of parts other
than genuine Ricoh parts in your Ricoh office product.
Important
Parts of this manual are subject to change without prior notice. In no event will the company be liable
for direct, indirect, special, incidental, or consequential damages as a result of handling or operating
the machine.
Power Source:
AC120V, 60Hz
Please be sure to connect the power cord to a power source as above.
Declaration of Conformity
Product Name: Facsimile
Model Number: FAX3900NF
Responsible party: Ricoh Corporation
Address: 5 Dedrick Place, West Caldwell, NJ 07006
Telephone number: 973-882-2000
This device complies with part 15 of FCC Rules. Operation is subject to the following two conditions:
(1)This device may not c ause h armful int erfe renc e, and (2)t his d evic e mus t acc ept any int erf erenc e received, including interference that may cause undesired operation.
Page 3

USA
❖
FCC Requirements
1. This equipment comp lies wi th Part 6 8 of the FCC rules . On the cover of this e quipment i s a labe l
that contains, among other information, the FCC registration number and ringer equivalence
number (REN) for this equipment. If requested, this information must be provided to the telephone company.
2. This equipment uses the following USOC jack: RJ11C
3. The REN is used to deter mine the quan tity of d evices whic h may be conne cted to th e telepho ne
line. Excessive REN's on th e telephon e li ne may res ult in the devic es not ri nging in resp onse to
an incoming call. In most, but not all areas, the sum of the REN's should not exceed five (5.0).
Contact the telephone company to determine the maximum REN for the calling area.
4. If this equipment cause s ha rm to t he telephone network, the telephone company will noti f y you
in advance that temporary discontinuance of service may be required. If advance notice is not
practical, the telephone company wil l n ot i f y th e c us t ome r as soo n as pos s ib le. Also, you will be
advised your right to file a complaint with the FCC if you believe it is necessary.
5. The telephone company may make changes in its facilities, equipment, operations, or procedures that could affect the operation of the equipment. If this happens, the telephone company
will provide advanc e notice in order to make necessar y mo difications in order to maint ain uninterrupted service.
6. In the event of operation problems (document jam, copy jam, communication error indication),
refer to the solving problems section in this manual.
7. If you cannot correct the problem, please contact the RICOH CORP. CUSTOMER SUPPORT
DEPT. at 1-800-FASTFIX for repair and warranty information. If it is causing harm to the telephone network, the telephone company m ay r equest you to di sconnect the equipme nt from the
network until the problem is resolved.
8. This equipment canno t be used t ele phone c ompany- prov ided coin servic e. Con nect ion to Pa rty
Line Service is subject to state tariffs.
❖
WHEN PROGRAMMING EMERGENCY NUMBERS AND/ OR MAKING TEST CALLS TO
EMERGENCY NUMBERS:
1. Remain on the line and briefly explain to the dispatcher the reason for the call before hanging up.
2. Perform such activities in the off-peak hours, such as early morning hours or late evenings.
CANADA
The Industry Canada label identifies certified equipment. This certification means that the equipment
meets telecommunications network protective, operational, and safety requirements as prescribed in
the appropriate Terminal Equipment Technical Requirements document(s). The department does not
guarantee the equipment will operate to the user's satisfaction.
Before installin g t h is equipment, users s hou ld ensure that it i s per mi s si ble to be connected to the facilities of the lo ca l t ele co mm uni ca t ion s co mpa ny . The equipment must also be installed us ing an acceptable method of connection. The customer should be aware that compliance with the above conditions
may not prevent degradation of service in some situations.
Repairs to certified equipment should be coordinated by a representative designated by the supplier.
Any repairs or alte rations made by the user to this equipment, or equipm ent malfunc tions, may give the
telecommunications company cause to request the user disconnect the equipment.
User should ensure for their own protection that the electrical ground connections of the power utility,
telephone lines, and internal metallic water pipe system, if present, are connected together. This precaution may be particularly important in rural areas.
Caution: Users should not attempt to make such connections themselves, but should contact the appropriate electric inspection authority, or electrician, as appropriate.
The Ringer Equivalence Num ber (REN) as signed to eac h termina l device prov ides an indi cation of t he
maximum number of terminals allowed to be connected to a telephone interface. The termination on
an interface may consist of any combination of device subject only to the requirement that the sum of
the Ringer Equivalence Numbers of all the devices does not exceed 5.
In accordance with IEC 60417, this machine uses the following symbols for the main power switch:
means POWER ON.
a
means POWER OFF.
b
Copyright © 2000 Ricoh Co., Ltd.
Page 4

How to Read this Manual
R
How to Read this Manual
Symbols
In this manual, the following symbols are used:
R
WARNING:
This symbol indicates a potentially hazardous situation that might result in
death or serious injury when you misuse the machine without following the instructions under this symbol. Be sure to read the instructions, all of which are described in the Safety Information section in the Advanced Features manual.
CAUTION:
This symbol indicates a potentially hazardous situation that might result in minor or moderate injury or property damage that does not involve personal injury
when you misuse the machine without following the instructions under this
symbol. Be sure to read the instructions, all of which are described in the Safety
Information section in the Advanced Features manual.
* The statements above are notes for your safety.
Important
If this instruction is not followed, paper might be misfed, originals might be
damaged, or data might be lost. Be sure to read this.
Preparation
This symbol indicates the prior knowledge or preparations required before operating.
Note
This symbol indicates precautions for operation, or actions to take after misoperation.
Limitation
This symbol indicates numerical limits, functions that cannot be used together,
or conditions in which a particular function cannot be used.
Reference
This symbol indicates a reference.
{}
Keys built into the machine's operation panel.
i
Page 5

TABLE OF CONTENTS
Manuals for this machine ......................................................................... 1
Basic Features (This Manual) ....................................................................... 1
Advanced Features ....................................................................................... 1
1.Introduction
Part Names................................................................................................. 3
Operation Panel......................................................................................... 5
Symbols and Conventions Used in This Manual.................................... 8
2.Faxing
Transmission Modes................................................................................. 9
Suitable Document Types....................................................................... 10
Memory Transmission and Immediate Transmission.......................... 11
Memory Transmission................................................................................. 11
Canceling a Memory Transmission............................................................. 13
Immediate Transmission............................................................................. 14
Canceling an Immediate Transmission....................................................... 15
Very Fine Detail Faxing........................................................................... 16
Resolution................................................................................................... 16
Dialing....................................................................................................... 17
Entering Numbers Directly.......................................................................... 17
Entering Pauses.......................................................................................... 18
Switching to Tone Signals............................. ......... ....... ...... ... ....... ....... ....... 18
Using Quick Dial.......................................................................................... 18
Using Speed Dial ........................................................................................ 19
Using Groups.............................................................................................. 20
Reception Modes..................................................................................... 22
How to Select the Reception Mode............................................................. 22
ii
Page 6

3.Setup
Initial Settings and Adjustments............................................................ 23
Initial Settings.............................................................................................. 24
Storing and Editing Fax Numbers.......................................................... 27
Storing Quick Dial Numbers........................................................................ 27
Editing Quick Dial Numbers........................................................................ 29
Deleting Quick Dial Numbers...................................................................... 30
Printing a Quick Dial Key Label................................................................... 31
Quick Dial Key Labels................................................................................. 32
Storing Speed Dial Numbers....................................................................... 33
Editing Speed Dial Numbers....................................................................... 34
Deleting Speed Dial Numbers..................................................................... 36
Storing and Editing a Group of Fax Numbers ..................................... 37
Storing a Group of Fax Numbers................................................................ 37
Editing a Group........................................................................................... 40
Deleting a Group......................................................................................... 43
Entering Characters................................................................................ 46
Entering Symbols........................................................................................ 46
Wild Card .................................................................................................... 46
4.Troubleshooting
Loading Paper in the Main Paper Cassette........................................... 49
Adjusting the Volume and Sounds the Machine Makes ...................... 51
If an Indicator Lights on the Operation Panel....................................... 53
Communication Problems...................................................................... 54
Clearing a Document Jam...................................................................... 55
Clearing a Copy, Fax, or Print Jam........................................................ 56
Print Delivery Tray....................................................................................... 56
Inside the Machine...................................................................................... 56
Cassette Entrance....................................................................................... 57
Upper Rear Unit.......................................................................................... 58
Error Messages........................................................................................ 60
Solutions to Common Problems............................................................ 62
5.Appendix
Options ..................................................................................................... 67
INDEX........................................................................................................ 68
iii
Page 7

iv
Page 8

Manuals for this machine
This machine is provided with a Basic Features manual and an Advanced Features manual. Please consult the manual that suits your needs.
Basic Features (This Manual)
The Basic Features manual explains the most frequently used fax functions and
operations.
Advanced Features
The Advanced Features manual describes more advanced functions, and also
explains settings for key operators.
❖
Chapter 1 Transmission Options
Explains transmission features such as scheduling transmission for a specific
time, setting personal codes, sending confidential documents; and storing
documents for pick-up by polling transmission.
❖
Chapter 2 Communication Information
Explains how to obtain information about stored documents, confidential
documents, and memory-locked documents; explains how to print the Journal.
❖
Chapter 3 Other Transmission Features
Discusses special dialing features, switching between G3 and G4 communication; and explains advanced transmission features such as broadcasting and
batch transmission.
❖
Chapter 4 Reception Features
Explains various reception features. You can find out about receiving documents in telephone mode, and printing two pages of received documents on
one page.
❖
Chapter 5 Copying
Read this chapter when you would like to know about copying operations
and functions.
❖
Chapter 6 Facsimile User Tools
Explains about programming frequently used functions for Quick Dial Key
and User Function Key.
❖
Chapter 7 Key Operator Settings
Explains a variety of settings that can be made by the fax machine's key operator to control and monitor usage of the machine. You can find out about setting up the phone line type, and how to store the Memory Locked ID and the
Confidential ID.
1
Page 9

❖
Chapter 8 Troubleshooting
Discusses troubleshooting topics such as printing the help list, clearing jams,
and reading reports.
❖
Chapter 9 Maintaining Your Machine
Explains about loading paper in the optional bypass feeder, cleaning the rollers and scanner and so on.
❖
Chapter 10 Installation
Explains installation considerations, connection to a telephone line, and connecting the power.
❖
Chapter 11 Appendix
Lists specifications and the machine's advanced communication features.
2
Page 10
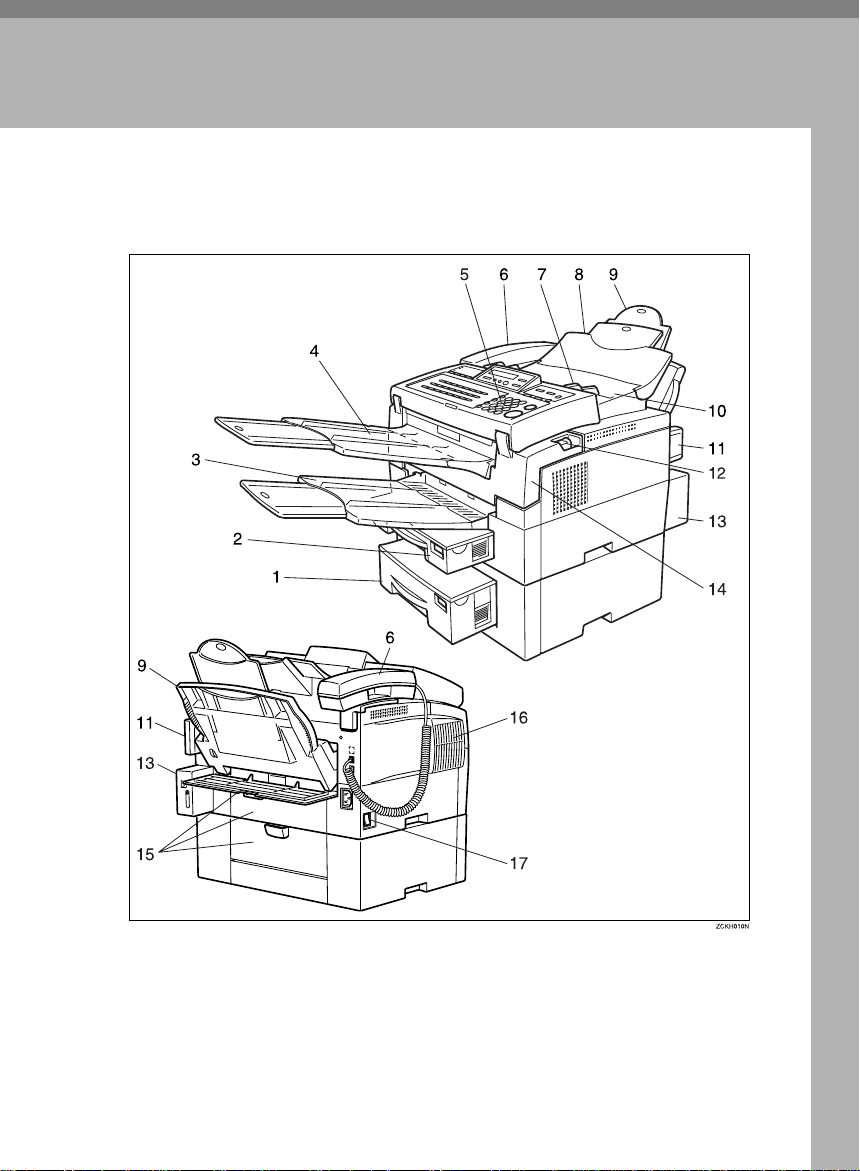
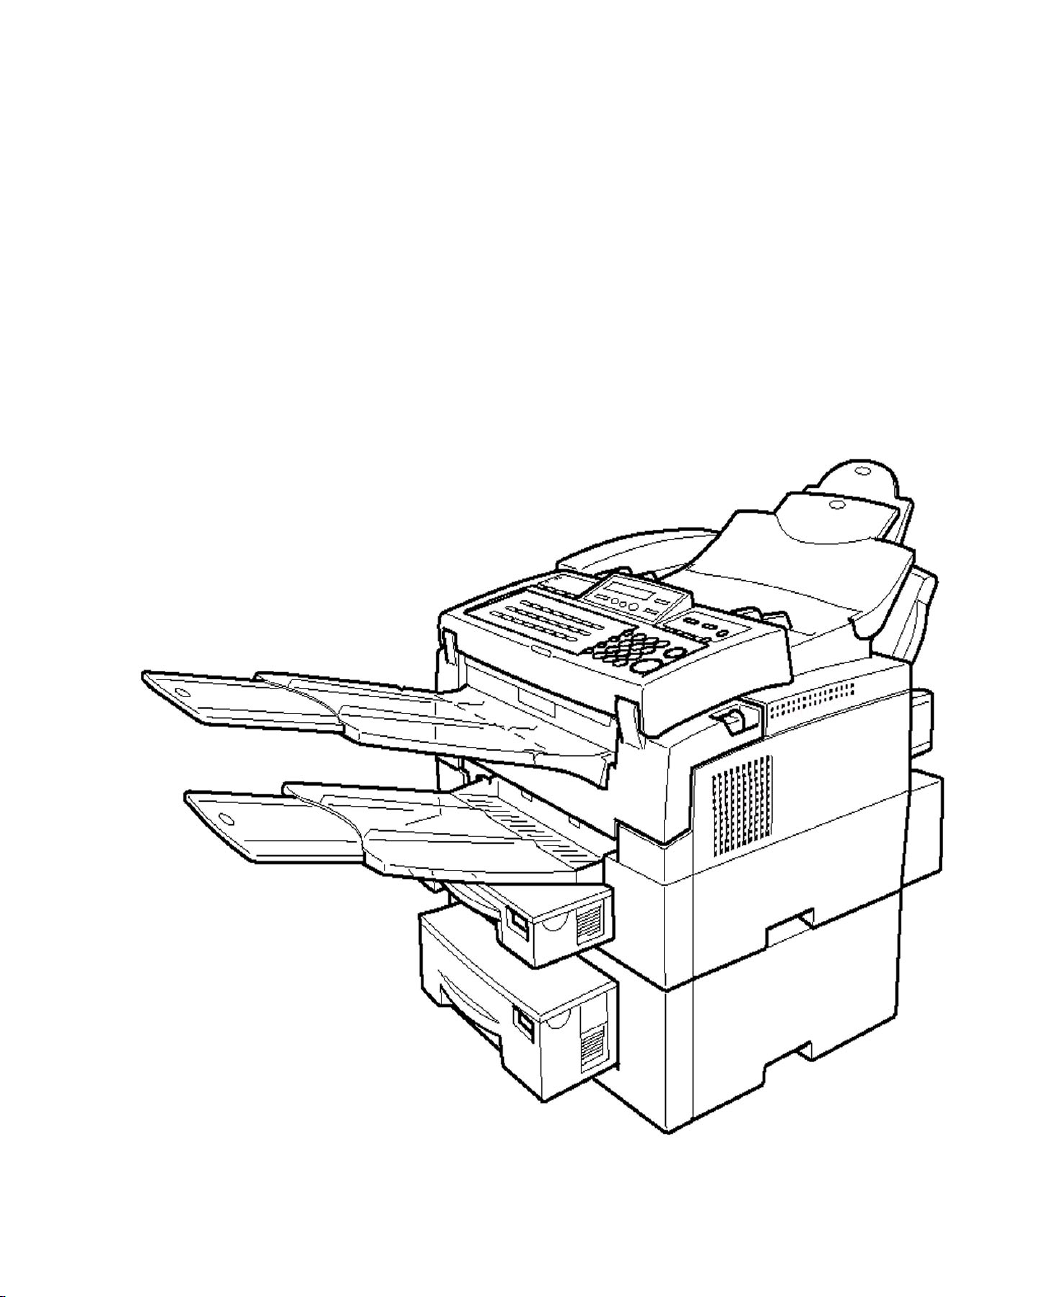
Part Names
ZCKH010N.eps
1. Introduction
1. Optional Second Paper Cassette
The optional second paper cassette holds
more paper.
2. Main Paper Cassette
The main paper cassette holds copy paper.
3. Print Delivery Tray
Copies, incoming faxes, and prints are
delivered here. The tray can be extended
for large paper sizes.
4. Document Delivery Tray
Scanned documents are stacked on the
document delivery tray.
3
Page 11

1
Introduction
5. Operation Panel
Key panel for operating the machine.
6. Optional Handset
7. Document Guide
Match the document guide to the size of
your original documents.
8. Document Table
Document table holds up to 50 sheets
which are fed one at a time. Place your
original documents here.
9. Optional Bypass Feeder
Expands paper delivery capability to
handle A4, Legal and F4 sizes.
10. Auto Document Feeder (ADF)
Set multi-page documents here to have
them automatically scanned in one page
at a time.
11. Memory Card Cover
Protects the machines optional memory
card.
12. Front Cover Release Lever
Pull this lever to release the front cover.
13. G4 Interface Unit
Allows the fax machine to be connected
for G4 (ISDN) communication.
14. Front Cover
15. Rear Covers
16. Ventilation Port
Provides ventilation for internal parts of
the machine in order to prevent overheating.
17. Main Switch
The main switch turns your machine on
and off.
4
Page 12
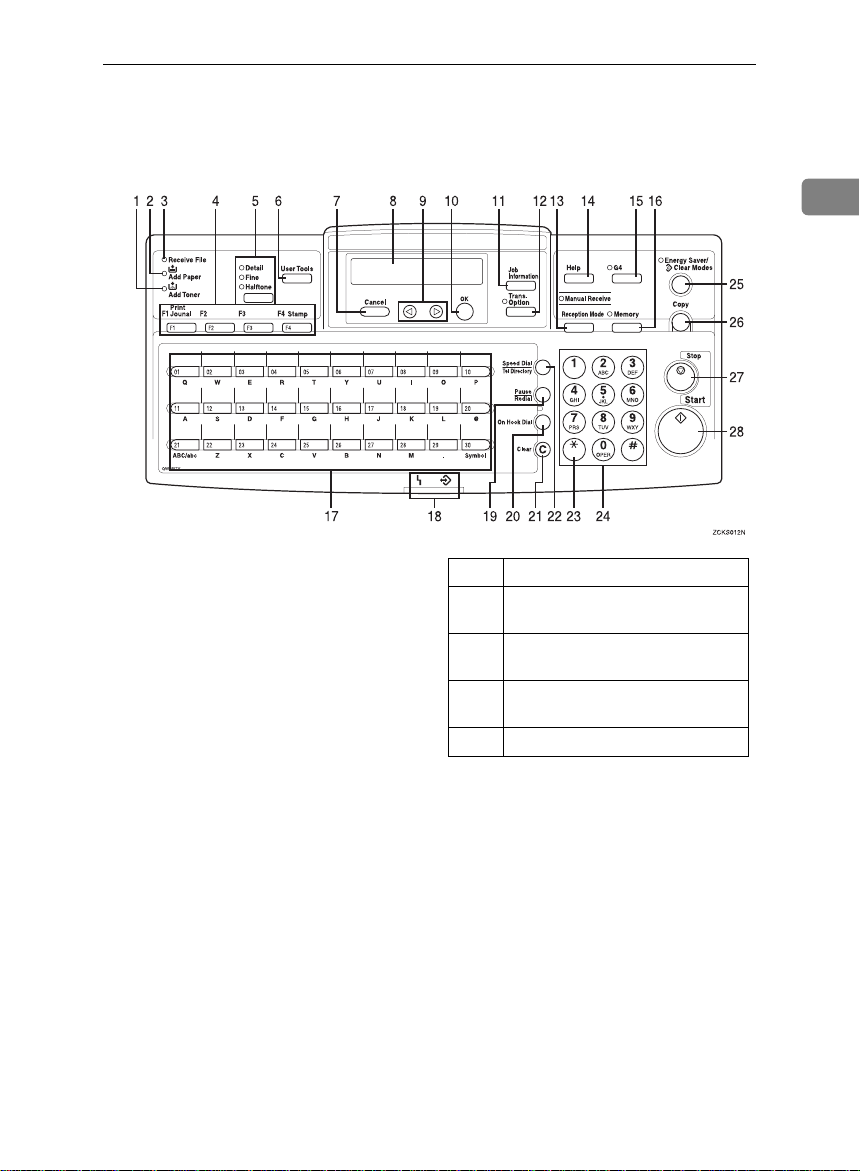
Operation Panel
ZCKS012N.eps
Mail Addr.
Mail RX
Operation Panel
1
1. Add Toner indicator
Blinks when toner is about to run out and
lights continuously when toner has run
out.
2. Add Paper indicator
Lights when a cassette is empty or the paper cassette is not fully inserted.
3. Receive File indicator
Lights when an incoming document is received into memory, and flashes when
confidential or memory-locked document is received. (See P.53
Lights on the Operation Panel”
“If an Indicator
).
4. User Function keys
There are four User Function keys.
Four User Function keys are provided to
store frequently used functions and operations.
The following functions are registered by
default:
Key Function
F1 Prints a transmission management
report.
F2 Initiates entry of an E-mail ad-
dress.
F3 Immediately checks for and re-
ceives any incoming E-mail.
F4 Switches stamping off/on.
5.
Resolution
{
Selects the scanning resolution or the
halftone scanning mode. When the Detail
mode, Fine mode, or Halftone mode is selected, the corresponding indicator
lights. Standard mode is selected when
no indicator is lit.
The Detail and Fine modes offer progressively higher scanning resolutions. The
Halftone mode is used for faxing photographs or drawings that contain halftones.
}
key
5
Page 13

Introduction
1
6.
User Tools
{
Press to access User Tool Settings and
customize various functions.
7.
Cancel
{
Press when you want to cancel an operation or return to the previous display.
key
}
key
}
8. Control panel display
Guides you through tasks and informs
you of the status of the machine. Messages appear here.
9. Scroll Keys
Use these keys to move the cursor in the
display, or to change the display.
10.
Press to answer "Yes" to a question displayed on the display.
11.
Press to search for information on a specific job.
12.
Press to change the transmission option
settings. The indicator lights when option settings are changed.
13.
Press to select the reception mode. When
the Manual Receive indicator is on, Manual Receive is selected.
14.
Press the Help key when you want to
print a help list.
15.
When the optional G4 unit is installed,
press to select G3 or G4 mode. When the
indicator is lit, G4 is selected.
16.
Press to select Immediate Transmission.
When the Memory indicator is not lit, Immediate Transmission is selected, and
when the indicator is lit, Memory Transmission is selected.
key
{OK}
Job Information
{
Trans. Option
{
Reception Mode
{
key
Help
{
}
key
{G4}
Memory
{
key
}
}
key
}
key
key
}
17.
Quick Dial
{
There are 30 Quick Dial keys. Use them to
store individual fax numbers (see P.27
“Storing and Editing Fax Numbers”
enter characters (see P.46
). In addition, you can use the
acters”
Quick Dial keys to register functions such
as groups, programs, and auto documents.
You can select either a QWERTY key
board layout (as shown in the illustration) or an ABC layout. See Chapter 7,
"Key Layout" in the Advanced Features
manual.
When attaching the Quick Dial label,
make sure you remove the Quick Dial
cover (transparent).
keys
}
), or to
“Entering Char-
18. Status Indicators
These indicators keep you informed
about the current status of the unit.
•hAlarm
When the alarm indicator flashes,
check the display and read the message to identify a problem (such as paper jam or open cover).
•mCommunicating
Lights during fax transmission or reception.
19.
Pause/Redial
{
Inserts a pause when you are dialing or
storing a fax number, or redials the last
number dialed when pressed by itself.
(The redial feature does not work once
you have started dialing a new number.)
20.
On Hook Dial
{
Press to dial a phone call from the keypad
without lifting the external telephone or
taking the handset off the hook (if the machine is equipped with the optional telephone or handset).
21.
Clear
{
}
Press to delete the last character or digit
entered, or press 0 or 1 to move the cursor, and then press the
lete whatever is at the cursor.
key
key
}
key
}
{
Clear
key to de-
}
6
Page 14

Operation Panel
22.
Speed Dial/Tel Directory
{
Press when you want to use the Speed
Dial or Telephone Directory feature.
23.
If your telephone line uses pulse dialing,
press this button to switch temporarily to
tone dialing if you want to use telephone
services that utilize telephone touch
tones.
(Tone) key
{p}
key
}
24. Number keys
Use the number keys to dial fax numbers,
to enter the number of copies, and so
forth.
25.
Energy Saver/3Clear Modes
{
Energy Saver: Hold down for 2 seconds
to select or deselect energy saver mode.
When the machine is not used or no data
is received for a fixed period, the machine goes into energy saver mode automatically.
Clear Modes: Press to clear any selected
settings and return the machine to its previous condition.
26.
{
Press to copy the document currently
loaded in the feeder.
27.
{
Stops transmissions or document scanning, reception, and long copy runs. The
machine finishes printing out the current
page, then stops.
28.
{
Press to start transmission, copy operation, or output of reports.
Copy
Stop
Start
}
key
}
key
}
key
}
key
1
7
Page 15

Introduction
Symbols and Conventions Used in This Manual
1
❖
Documents:
A document is anything you put
on the document table of your machine, whether you are faxing it or
copying it.
❖
Prints:
A print is anything that comes out
of the machine, whether: a received fax or a copy you made.
❖
Procedures:
Procedures are described step by
step. Perform them in order. When
you see a display, it always shows
what comes after performing the
step it accompanies. Other illustrations accompanying steps help
you find the right key or handle, or
show you how to perform the step.
A This is a step in a procedure.
THIS CORRESPONDS TO
THE PANEL DISPLAY.
8
Page 16
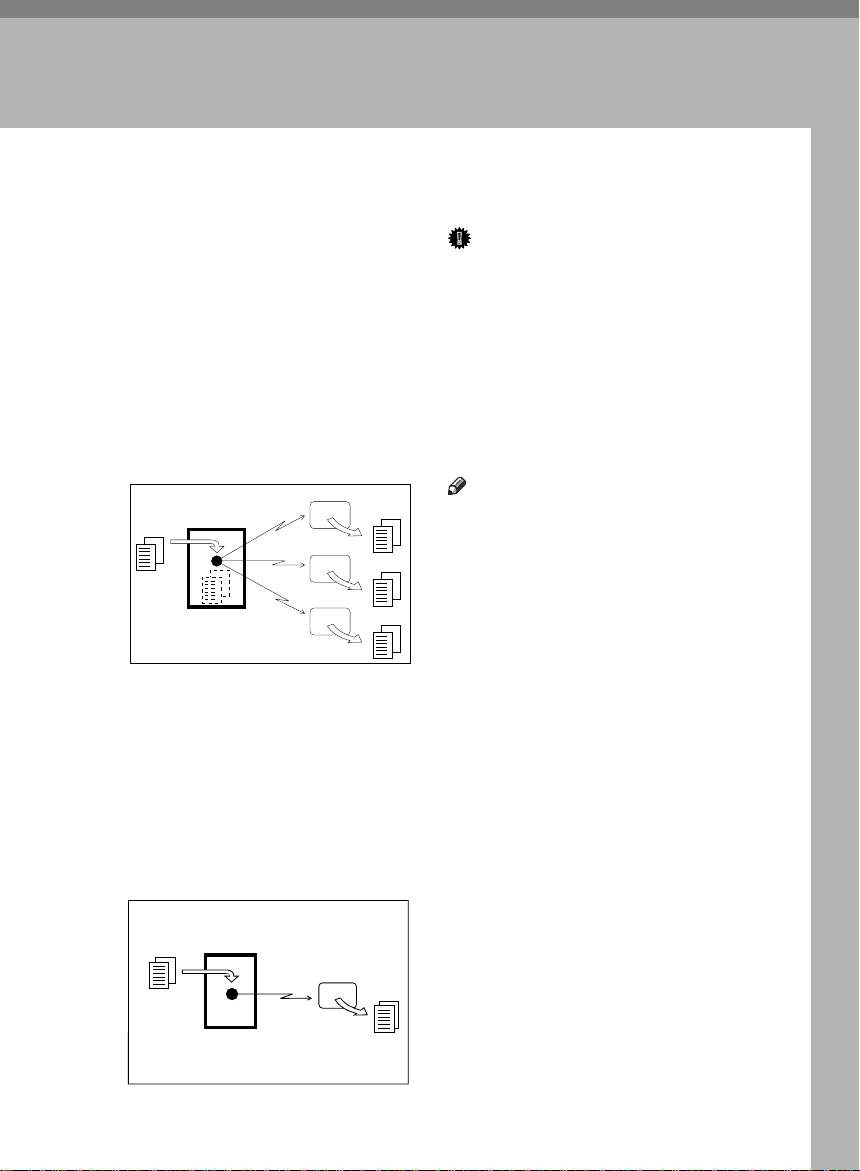
Transmission Modes
2. Faxing
There are two types of transmission.
❖
Memory Transmission
When a fax document is stored in
memory, then transmission starts
automatically.
It is convenient when you would like
to take documents back in a hurry.
You can send the same message to
more than one destination in a single operation. This technique is referred to as Broadcasting.
GDRH230E.eps
Transmitter (This machine)
❖
Immediate Transmission
Receiver
Receiver
Receiver
GDRH230E
The machine dials immediately, and
transmits the fax while scanning.
It is convenient when you would
like to send a document immediately, and would like to check whether
you have successfully connected
with the other party's fax machine.
A fax document is not stored in memory.
GDRH240E.eps
Important
❒
If there is a power failure, the power switch is turned off, or the plug
is pulled out for more than 1 hour,
all documents stored in memory
are deleted. As soon as power is restored, the Power Failure Report is
printed to help you identify deleted documents. See Chapter 8
"Power Failure Report" in the Advanced Features manual.
Note
❒
Using the Internet Fax feature of
your fax machine, you can also
scan documents and send them
over the Internet as E-mail, as well
as receive document images sent
as E-mail by another Internet Fax
machine or PC. See the NIC FAX
KIT manual for details.
Transmitter
(This machine)
Receiver
GDRH240E
9
Page 17

Faxing
Suitable Document Types
2
Never load damaged originals in the
ADF (Auto Document Feeder) for
scanning. Always check the stack of
originals before loading.
• Always check the sheets and remove staples, pins, paper clips, or
any other type of fasteners.
• If the sheets are curled or folded,
flatten them.
• Separate all the sheets to ensure
that they will not jam or double
feed during scanning.
• If the sheets are heavily creased,
torn, punched with holes for binding, or patched together with tape,
make copies and then load the copies in the ADF.
• Before loading a stack of originals,
make sure that they are all the
same size. Do not mix sheets of different sizes.
• Before loading a stack of originals,
always fan them to remove static
cling.
• To protect fragile or legal documents from damage due to document jams, copy such documents
and then load the copies for scanning.
Important
❒
Never place the following types of
originals in the ADF:
• Sheets marked with crayon,
paint, charcoal, or soft pencil.
• Sheets pasted up with tape or
glue.
• Specially treated paper, including thermal paper, OHP sheets,
vinyl sheets or film, waxed paper, carbon paper, deed paper,
or paper treated with silicone
oil.
• Paper that is not perfectly dry. If
documents have ink or correction fluid that is still wet, all
them to dry thoroughly before
loading them into the ADF.
10
Page 18
Memory Transmission and Immediate Transmission
Memory Transmission and Immediate
Transmission
Memory Transmission
Memory Transmission is convenient
because:
• Fax documents can be scanned
much more quickly. Your scanned
document is stored in the memory,
and then sent automatically,
meaning you do not have to wait
for your document to send.
• While your fax document is being
sent, another user can operate the
machine (people do not have to
wait long to use the fax machine).
• You can send the same document
to more than one place with the
same operation.
• There are two kinds of Memory
Transmission: Parallel and Normal. Parallel Memory Transmission is the default. See Chapter 3,
"Parallel Memory Transmission" in
the Advanced Features manual.
Limitation
❒
If 0% is displayed, you cannot perform Memory Transmission. Send
your document using Immediate
Transmission.
Reference
See Chapter 2, "Transmission" in
the NIC FAX KIT manual for how
to scan and send documents as Email.
Make sure that the machine is in
A
standby mode.
The display should look like this:
Ready 100% 02:39PM
Set Orig./ Enter No.
Note
❒
If the display is blank, press the
Energy Saver
{
gy Saving mode.
Fan your document stack (maxi-
B
mum: 50 pages, 20 lb) to make
sure all pages are loose, and then
tap the edges to square the stack.
TSTS010N.eps
key to exit Ener-
}
2
Note
❒
If your document jams while it is being scanned, press the
and then refer to P.55
Document Jam”
how to safely remove the original.
for instructions on
Stop
{
“Clearing a
key,
}
Limitation
❒
All pages set in the feeder must
be of the same size.
11
Page 19
Faxing
1 2 3
4 5 6
7 9
*
GFDIAL0N
Speed Dial
1
0
Example: Speed Dial 10
GFDIAL2N
2
12
Insert the document facedown
C
into the feeder until the machine
beeps. Then adjust the guides to
match the width of the document.
ZCKY010N.eps
Note
❒
You can dial before you set the
document. Place the document
after you dial the number and
go to step G.
❒
Set your document straight in
the feeder. If you set more than
15 sheets, make sure the leading
ends of the documents are even.
Zcky800n.eps
The display will look like this:
D
Ready 100% 02:39PM
Enter Fax Number
If the memory indicator is not lit,
E
press the
Memory
{
key.
}
Dial the number in one of the fol-
F
lowing ways.
Dest.1 OK to Add
0123456789_kkkkkkkkk
Number keys Quick Dial
07
06
Speed Dial Group
Example:
*1
Method
Dial key 08.
Method
and 1 number key.
*1
In this example, Group Dial is programmed in Quick Dial 08.
*2
In this example, the
programmed as the Group key,
and Group dial number 1 is programmed.
Note
❒
If you want to erase a digit of
the phone number, press the
key.
Clear
}
{
❒
The number of pages that you
can store in memory depends
on the original document images and the scan settings. You can
store up to 160 standard pages
(ITU-T No.1 chart, Resolution:
Standard, halftone mode: off).
Reference
Programming Quick Dial: see
“Quick Dials”
P.27
Programming Speed Dial: see
“Speed Dials”
P.27
Programming Group Dial: see
“Storing and Editing a Group
P.37
of Fax Numbers”
Programming Group key: see
“Programming groups in the
P.37
{Group} key”
Quick
*2
{
{
}
F4
.
.
GFDIAL1N
F4
key
}
key is
Page 20
Memory Transmission and Immediate Transmission
Press the
G
er fax number.
key to enter anoth-
OK
}
{
Dest.2 OK to Add
9876543210_kkkkkkkkk
Note
❒
Repeat steps F and G until all
destinations are entered.
❒
If you enter only one destination, press the
❒
The machine stores your message and dials the first number
(or, if you selected Send Later, it
will return to standby mode and
the fax document will be sent at
the time that you selected).
Press the
H
The machine dials the other party's
number.
{
Start
key.
}
Start
{
key.
}
0123456789
File No.001 P.001
Note
❒
If the other party's line is busy,
your machine will redial.
❒
If the other party's fax machine answers, both machines connect and
your machine sends the document.
The other party's Own Name or Own
Fax Number appears on the upper line.
❒
If your line goes through a local switchboard (a PBX) remember to dial the exit
code. Press the
ly after the code. If the number includes
a country code, press the
after the country code, and then dial
the rest of the number. Pauses are displayed as a dash (-) on the display.
The File number. is used for managing
documents in memory, and is required
when canceling transmission of a document or printing out its contents.
Pause
{
key immediate-
}
Pause
{
key
}
Canceling a Memory Transmission
Before the {Start} key is pressed
Press the
A
key, or remove the docu-
Modes
}
ment set in the feeder.
While the document is being scanned in
Press the
A
All parts of the document that
have been scanned in are cleared.
Confirm and press the
During transmission
Confirm the destination.
A
The destination name or fax number for the current transmission is
displayed.
Press the
B
{
{
Cancel Trans.? hi/OK
[Yes] No
Confirm and press the
C
Transmission is canceled.
Stop
{
Stop
Stop
key or
}
key.
}
key.
}
{
OK
{
OK
key.
}
}
Clear
{
key.
2
13
Page 21
Faxing
2
While the document is awaiting
transmission
Limitation
❒
Pages already being sent to the
destination cannot be canceled,
even if you cancel the transmission. The transmission may be sent
before you can cancel it, even if
you start canceling the transmission before it is fully sent.
Press the
A
and confirm that "1. Cancel TX/
RX" is displayed.
Job Information
{
Job Information
1.Cancel TX / RX hi
Press the
B
{
OK
key.
}
File No. To Cancel
No.[_kk] (Browsehi)
Display the file you want to delete.
C
Enter the file number with the num-
0
ber keys, or search using
If you are unable to find the file, it
has already been sent.
or 1.
Cancel File? hi/OK
NO.005
If the document you want to delete
D
is displayed, press the
{OK}
Cancel? hi/OK
[Yes] No
Confirm and press the
E
{
OK
Trans.Cancelled
File Deleted
key,
}
key.
key.
}
Immediate Transmission
Immediate Transmission is convenient when:
• You wish to send a document immediately as it is scanning.
• You wish to quickly check whether
you have successfully connected
with the other party's fax machine.
• Your machine's memory is getting
full.
The machine dials immediately after
you press the
is scanned and transmitted page by
page without being stored in memory.
Note
❒
You can only specify one destination for Immediate Transmission.
Make sure that the machine is in
A
standby mode.
The display should look like this:
Ready 100% 02:39PM
Set Orig./ Enter No.
Note
❒
The Memory indicator should
be out. If the Memory indicator
is lit, press the
Place the document facedown in
B
the feeder.
Ready 100% 02:39PM
Enter Fax Number
Note
❒
Do not load more than 50 pages
into the feeder at one time.
❒
You can set the document at any
point up until you press the
key.
Start
}
{
key. The message
Start
{
}
Memory
{
key.
}
14
Page 22
Dial the other party's number.
C
Dest. Press Start
0123456789_kkkkkkkkk
If you want to erase a digit of the
number, press the
enter the correct number.
Press the
D
{
Start
key.
}
Clear
{
key and
}
0123456789
Dialing...
The machine dials and connects to
the other party's machine. The
number that you dialed and the
other party's Own Name or Own
Fax Number is displayed.
After the transmission, the machine returns to standby mode.
Note
❒
If you install the optional handset or an external telephone,
you can send the document
manually. Simply pick up the
handset and dial.
Memory Transmission and Immediate Transmission
Canceling an Immediate Transmission
Before the {Start} key is pressed
Press the
A
key.
Modes
}
If a document is set in the feeder,
remove it.
While dialing or during transmission
Press the
A
However, the part that has already
been scanned is sent to the other
party. After you have canceled the
transmission, remove the document from the feeder.
{
Stop
{
Stop
key or
}
key.
}
Clear
{
2
15
Page 23

Faxing
Very Fine Detail Faxing
2
To ensure that text, diagrams and images stand out clearly in your document, the machine automatically
detects the image density and makes
adjustments.
However, if you need to send a document which requires optimum clarity, select the resolution setting
appropriate to your needs.
You can select different settings for
each page of your document. Simply
change the settings for page 2 while
page 1 is being scanned.
Limitation
❒
High resolution images and text
are scanned into the machine. If
the other party's machine does not
support the resolution at which
you are sending, this machine automatically switches to a resolution supported by the other party's
machine. This machine can send
documents in Standard, Detail,
and Fine resolution. It can receive
documents in Standard and Detail
resolution.
Resolution
The
Resolution
{
trol over document quality. The indicators above the button show the
current setting. Choose a setting that
matches your document.
❖
Standard:
Standard quality. Use for most
printed or typewritten documents.
This is selected when the other resolution indicators are not lit.
key gives you con-
}
❖
Detail :
High quality. Use for documents
with small print or fine details. Detail resolution is twice the clarity of
Standard resolution.
❖
Fine :
Very high quality. Use this for high
quality reproduction. Fine resolution is four times the clarity of
Standard resolution.
❖
Halftone:
Use this for optimum quality if
your document contains photographs or diagrams with complex
shading patterns or gray tones. If
you choose this setting, resolution
will automatically be Detail.
Note
❒
You can confirm the resolution for
previously sent documents in the
Journal.
❒
Faxing at a higher resolution requires more time. Frequent use of
high resolution could cause an increase in your phone bill, especially for long distance transmissions.
❒
There are two methods for sending
documents that contain photographic images - Image priority
and Speed priority. If you select
Speed priority, you can send your
image faster, but the quality of the
image may be inferior to when
sending with Image priority. See
Chapter 7, "User Parameters"
(switch 10, bit 7) in the Advanced
Features manual.
16
Page 24
Dialing
Dialing
The number keys, Quick Dial, Speed
Dial, and Group dial can all be used
for dialing.
Entering Numbers Directly
Enter numbers directly using the
number keys (1234567890*#) on the
right side of the operation panel.
Press the
key to enter a pause or tone.
❒
❒
❒
❒
❒
{
Note
Maximum length of a fax number:
254 digits.
Maximum number of documents
that can be stored for Memory
Transmission: 100
Maximum number of destinations
per Memory Transmission: 140
The combined total number of destinations that can be stored is 300.
However, only 197 destinations
can be specified if all of the destinations specified are different.
The maximum destinations you
can specify with the number keys
is 67. However, this limitation is
subject to memory capacity.
Reference
When sending documents as Email, see Chapter 2, "Transmission" in the NIC FAX KIT manual
for how to enter E-mail addresses.
Pause
key or
}
{p}
(Tone)
Make sure that the machine is in
A
standby mode.
Carefully place your document
B
into the document table and select any settings you require.
Ready 100% 02:39PM
Enter Fax Number
Enter the number with the num-
C
ber keys.
Note
❒
The number you entered appears in the display.
❒
If you want to enter another
destination, press the
and repeat step C above.
❒
If you make a mistake, press the
key and try again.
Clear
}
{
❒
You can enter a pause, tone, or
dial options.
Reference
Pause: see P.18
es”
.
Tone: see Chapter 3, "Tone Signals" in the Advanced Features
manual.
Press the
D
{
Start
“Entering Paus-
key.
}
{
OK
0123456789
File No.001 P.001
key
}
2
17
Page 25

2
Faxing
Limitations when dialing with
-
the number keys:
• Destinations entered with the number keys are stored in the machine's
internal memory (separate to document storage memory) until they
have finished sending. You can store
up to 67 destinations for Memory
Transmission (including Polling Reception), Transfer Stations and End
Receivers when making Transfer
Requests, and Groups. (Quick Dials
and Speed Dials are not included.)
Example: If 60 destinations have already been registered with the number
keys for Groups, you can register another 7 destinations for Memory
Transmission with the number keys.
• The remaining memory for storing
documents appears in the display.
Because destinations are stored in a
different memory, the remaining
memory in the display does not
change when you store new destinations.
Entering Pauses
When dialing an outside line through a
PBX, you must enter a number, such as
"0", at the beginning of the number, and
it may take a moment after you have dialed the number before a connection is
made to an outside line. If this occurs,
enter a pause after the "0". If you enter a
pause, a 2-second pause is inserted before the outside number is dialed.
Note
❒
A pause is shown as a "-" character
on the display.
❒
You can enter a pause in numbers
stored in Quick Dials and Speed
Dials.
18
Limitation
❒
You cannot enter a pause at the beginning of a fax number
Switching to Tone Signals
This feature allows a machine connected to a pulse dialing line to send tone
signals (for example if you want to use
a special service on a tone dialing line).
For details on basic services, please contact your service representative. This
feature is not necessary with a Tone dialing line. See Chapter 3, "Tone Signals"
in the Advanced Features manual.
Using Quick Dial
You can specify destinations simply
be pressing the Quick Dial.
You must program the destination's fax
number in a Quick Dial beforehand.
Additionally, you can store a name
for the destination in Quick Dials.
Note
❒
To store, edit, or delete a Quick Dial, see P.27
Numbers”
❒
To check the contents of all Quick
Dials, print the Quick Dial list. See
Chapter 6, "Lists You Can Print
Out Yourself" in the Advanced
Features manual.
Reference
When sending documents as Email, see Chapter 2, "Transmission" in the NIC FAX KIT manual
for how to enter E-mail addresses.
Make sure that the machine is in
A
standby mode.
“Storing and Editing Fax
.
Page 26

Carefully place your fax document
B
into the auto document feeder and
select any settings you require.
Ready 100% 02:39PM
Enter Fax Number
Press the Quick Dial that is pro-
C
grammed with the destination.
Dialing
Using Speed Dial
You can specify destinations simply
be pressing the
Speed Dial code (00 to 99).
You must store the destination's fax
number in a Speed Dial beforehand.
Additionally, you can store a name
for the destination in Speed Dials.
Speed Dial
{
key and a
}
2
Dest.1 OK to Add
a01 ABC COMPANY
Note
❒
When a name is stored for the
destination, the name is displayed, and when no name is
stored, the fax number is displayed.
❒
If you want to enter another
destination, press the
and repeat step C above or enter
a number manually.
❒
When dialing another destination using a Quick Dial, you do
not need to press the
❒
If you make a mistake, press the
key, and the display will
Stop
}
{
return to that in step B.
Press the
D
{
Start
key.
}
{
ABC COMPANY
File No.001 P.001
OK
{
OK
}
key.
}
key
Note
❒
To store, edit, or delete Speed Dial
entries, see P.27
ing Fax Numbers”
❒
To check the contents of all Speed
Dials, print the Speed Dial list. See
Chapter 6, "Lists You Can Print
Out Yourself" in the Advanced
Features manual.
Reference
When sending documents as Email, see Chapter 2, "Transmission" in the NIC FAX KIT manual
for how to enter E-mail addresses.
Make sure that the machine is in
A
standby mode.
Carefully place your fax document
B
into the auto document feeder and
select any settings you require.
“Storing and Edit-
.
Ready 100% 02:39PM
Enter Fax Number
Press the
C
Speed Dial
{
key.
}
Speed Dial:Enter No.
[b_k]
19
Page 27

Faxing
2
Using the number keys, enter the
D
Speed Dial number (00 to 99) that
is programmed with the destination.
Dest.1 OK to Add
b00 DEF COMPANY
Note
❒
When a name is stored for the
destination, the name is displayed, and when no name is
stored, the fax number is displayed.
❒
If you want to enter another
destination, press the
and repeat steps C and D above.
❒
If you make a mistake, press the
key, and the display will
Stop
}
{
return to that in step B.
Press the
E
{
Start
key.
}
{
OK
DEF COMPANY
File No.001 P.001
Using Groups
key
}
Note
❒
To store, edit, or delete Groups, see
“Storing and Editing a Group of
P.37
Fax Numbers”
❒
To check the contents of all
Groups, print the Group Dial list.
See Chapter 6, "Lists You Can Print
Out Yourself" in the Advanced
Features manual. The method for
specifying Groups differs according to the way they were programmed.
• When programmed in a Quick
Dial: Press the Quick Dial.
• When not programmed in a
Quick Dial: First, Program the
Group function in a User Function key. When you want to
specify a destination, press the
Group key, and then press the
Group number. (See Chapter 6,
"User Function Keys" in the Advanced Features manual.)
❒
You can program the Group function in User Function keys
. (See Chapter 6, "User Func-
F4
}
{
tion Keys" in the Advanced Features manual.)
.
{
F1
to
}
You can store multiple destinations as
a single Group and simply specify a
particular Group.
You must store the destinations' fax
number in a Group beforehand.
Additionally, you can store destination names and a Group name in
Groups.
Limitation
❒
Quick Dials programmed with
Groups cannot be used for any other function.
❒
You cannot use Immediate Transmission to send Groups. You can
only use Memory Transmission.
20
When specifying a Group with a Quick
Dial
Make sure that the Memory indicator
is lit, and if it is not lit, press the
key to light it.
ory
}
Make sure that the machine is in
A
standby mode.
Carefully place your fax docu-
B
ment into the auto document
feeder and select any settings you
require.
Mem-
{
Ready 100% 02:39PM
Enter Fax Number
Page 28

Dialing
Press the Quick Dial that is pro-
C
grammed with the destination.
Dest.1 OK to Add
a01:Gp.D1 GROUP 1
Note
❒
If you want to specify another
Group, press the
then repeat step C above.
❒
If you make a mistake, press the
key, and the display will
Clear
}
{
return to that in step B.
Press the
D
{
Start
key.
}
{
OK
key, and
}
Storing...Memory 99%
File No.001 P.001
When specifying a Group with th e Group
key
Confirm that the Memory indicator is
not lit, and if it is not lit, press the
Memory
{
❒
key to light it.
}
Note
Before using the
must program the Group function
in a User Function key. (See Chapter 6, "User Function Keys" in the
Advanced Features manual.)
{
Group
key, you
}
Press the User Function key pro-
C
grammed with the Group function.
Group Dial:Enter No.
[Gp.D_]
Enter the Group number (1 to 7)
D
with the number keys.
Dest.1 OK to Add
G1 GROUP 1
Note
❒
If you want to specify another
Group, press the
then repeat step C above.
❒
If you make a mistake, press the
key, and the display will
Clear
}
{
return to that in step B.
Press the
E
{
Start
key.
}
{
OK
key, and
}
Storing...Memory 99%
File No.001 P.001
2
Make sure that the machine is in
A
standby mode.
Carefully place your fax docu-
B
ment into the auto document
feeder and select any settings you
require.
Ready 100% 02:39PM
Enter Fax Number
21
Page 29

2
Faxing
Reception Modes
The machine can treat incoming fax
documents and telephone calls in two
ways.
❖
Manual Receive
Use this mode if your line is shared
by a fax machine and a telephone
but you wish to answer all calls
yourself and decide whether they
are fax documents or telephone
calls. You must manually hit the
key to receive a fax.
Start
}
{
The machine will ring continuously until you answer the call, so you
have to be near the machine at all
times. The Manual Receive indicator is lit when the machine is in this
mode.
❖
Auto Receive
Use this mode if you have a dedicated fax line. The machine assumes all calls are fax documents.
It will ring once to alert you of an
incoming call, and then starts receiving.
How to Select the Reception Mode
The Manual Receive indicator is lit
when the machine is in Manual Receive mode. To switch to a different
mode, follow the steps below.
Press the
A
Reception Mode
{
Reception Mode hi/OK
[Auto Sense]
Press 0 or 1 to select the recep-
B
tion mode.
Reception Mode hi/OK
Manual Receive
Press the
C
{
OK
key.
}
Ready 100% 02:39PM
Set Orig./ Enter No.
key.
}
22
Reference
To receive Internet Fax documents,
see Chapter 2, "Reception" in the
NIC FAX KIT manual.
Page 30

Initial Settings and Adjustments
3. Setup
If you have not already the initial procedure (or if you need to change the
initial settings), you must enter a few
settings and make a few adjustments
before connecting your machine to
the telephone line.
❖
Own Name
This should be your name or company name, in 20 characters or less.
During communication, if the other party's fax machine supports
Own Name, this replaces the Own
Fax Number that follows. This
name will appear on the display of
the other party's Fax machine, and
the name registered on that machine will appear on yours.
Limitation
❒
The registered name will not be
used unless the other party has
a same machine of the same
make that supports the Own
Name feature.
❖
Fax Header
This is ordinarily the telephone
number of the line your machine is
connected to. Your fax header can
be up to 32 characters long, and is
printed on the header of every
page you send. In the United
States, a fax header containing the
telephone number is required by
law.
❖
Own Fax Number (Required by international law)
This is your fax machine's phone
number, which must include country and area codes, in 20 characters
or less. During any communication, your Own Fax Number appears on their display. (Conversely
their Own Fax Number appears on
your display.)
Important
❒
When sending a fax, your Own Fax
Number is required by international law. You cannot legally connect a fax machine to the telephone
system if the Own Fax Number is
not programmed. Further, the Fax
Header and the date and time of
transmission must be included in
the header of all pages faxed to,
from, or within the United States.
Note
❒
You can confirm the Own Name,
Fax Header, and Own Fax Number
settings in the User Parameters
List.
❒
In order to send and receive documents using the Internet Fax feature, you must have your network
administrator make E-mail server
settings and configure the fax machine for connection to your LAN.
See Chapter 1, "Getting Ready" in
the NIC FAX KIT manual.
23
Page 31

Setup
3
Initial Settings
During the course of this procedure
you will have to enter letters and other characters.
Use the number keys to enter numbers. Use Quick Dial keys for entering
letters, the
acter, the
(depending on your fax machine's
configuration) to enter spaces, and
the
Symbol
{
“Entering Characters”
(P.46
Note
❒
Make sure the machine is in standby mode before making the following settings.
Storing and Editing Programmed Data
The following procedure describes
how to make initial settings.
Press the
A
User Tools Main Menu
1.Program / Deletehi
key to accept a char-
OK
}
{
or
Space
{
key to enter symbols
}
User Tools
{
Symbol
}
{
).
key.
}
}
key
Press the
E
Confirm that "1. Own Name" is
displayed.
{
OK
key.
}
Fax Information:
1.Own Name hi
Press the
F
{
OK
key.
}
Own Name[ABC]
_kkkkkkkkkkkkkkkkkkk
Enter your Own Name.
G
Own Name[ABC] OK
MAIN OFFICE_kkkkkkkk
Note
❒
If you want to erase a character
of the name, press the
key.
Reference
“Entering Characters”
P.46
Press the
H
Your Own Name is programmed.
{
OK
key.
}
{
Clear
}
24
Press 0 or 1 to display "3. Setup".
B
User Tools Main Menu
3.Setup hi
Press the
C
{
OK
key.
}
Setup:
1.Monitor Volume hi
Press 0 or 1 to display "4. Fax In-
D
formation".
Setup:
4.Fax Information hi
Fax Information:
1.Own Name hi
Press 0 or 1 to display "2. Fax
I
Header".
Fax Information:
2.Fax Header hi
Press the
J
The programmed Own Name is
displayed.
{
OK
key.
}
Header[ABC] OK
MAIN OFFICEkkkkkkkkk
Page 32

Initial Settings and Adjustments
Enter your Fax Header.
K
If your Fax Header is the same as
your Own Name, go to step L.
Header[ABC] OK
MAIN OFFICEkkkkkkkkk
Press the
L
Your Fax Header is programmed.
{
OK
key.
}
Fax Information:
2.Fax Header hi
Press 0 or 1 to display "3. Own
M
Fax Number".
Fax Information:
3.Own Fax Number hi
Press the
N
{
OK
key.
}
Fax Number
_kkkkkkkkkkkkkkkkkkk
Enter your Own Fax Number.
O
Press the
P
Your Own Fax Number is programmed.
{
OK
key.
}
Fax Information:
3.Own Fax Number hi
Press the
Q
turn to standby display.
Deleting Programmed Data
The following procedure describes
how to delete programmed data.
Press the
A
User Tools
{
User Tools
{
key to re-
}
key.
}
User Tools Main Menu
1.Program / Deletehi
Press 0 or 1 to display "3. Setup".
B
User Tools Main Menu
3.Setup hi
Press the
C
{
OK
key.
}
3
Fax Number OK
0123456789_kkkkkkkkk
Note
❒
The format of the number is
normally as follows: International Dial Prefix, Your Country
Code, Your Area Code (do not
insert a pause after your Area
Code), followed by your telephone number. Check the International Dialing Prefix and the
Country Code with your local
telecommunications operator.
Characters you can enter include
numerals 0-9, plus signs (+), and
spaces.
Setup:
1.Monitor Volume hi
Press 0 or 1 to display "4. Fax In-
D
formation".
Setup:
4.Fax Information hi
Press the
E
{
OK
key.
}
Fax Information:
1.Own Name hi
25
Page 33

Setup
Press 0 or 1 to display the item
F
you want to delete.
Fax Information:
3.Own Fax Number hi
3
Press the
G
{
OK
key.
}
Fax Number OK
0123456789kkkkkkkkkk
Press the
H
Clear
{
key.
}
Fax Number
_kkkkkkkkkkkkkkkkkkk
Press the
I
The programmed information is
deleted.
{
OK
key.
}
Fax Information:
3.Own Fax Number hi
Press the
J
turn to standby mode.
User Tools
{
key to re-
}
26
Page 34

Storing and Editing Fax Numbers
Storing and Editing Fax Numbers
You can store numbers that you often
use in the machine's memory. A
stored number will remain in memory even if the power is cut.
You can store numbers in two ways.
❖
Quick Dials
Each fax number is assigned to its
own key. To dial that number, just
press the key. You can store up to
30 numbers in this way.
❖
Speed Dials
The number is given a two-digit
code. To dial the number, press the
Speed Dial
{
code. There are 100 Speed Dial
codes available, numbered 00 to
99.
Reference
You can also program E-mail addresses as Quick Dials, Speed Dials, and Group Dials. See Chapter
4, "Registering E-mail Addresses"
and Chapter 5, "Address Book
(Quick Dial, Speed Dial, Group Dial)" in the NIC FAX KIT manual.
key and enter the
}
Storing Quick Dial Numbers
The following procedure describes how
to store fax numbers in Quick Dial keys.
Limitation
❒
You cannot store fax numbers in
Quick Dials used for groups and
programs.
Note
❒
The combined total number of fax
numbers that can be stored is 30.
❒
Maximum number of digits per fax
number: 254
❒
Maximum number of characters
per name: 20
❒
You can confirm fax numbers
stored in Quick Dials on the Quick
Dial List (See Chapter 6, "Printing
Dial Lists" in the Advanced Features manual).
❒
You can print a Quick Dial label
showing the contents of each
Quick Dial (See Chapter 6, "Printing a Quick Dial Label" in the Advanced Features manual).
❒
You can use the Quick Dial keys to
store individual fax numbers, or to
register functions such as groups,
programs, and auto documents.
3
Press the
A
User Tools
{
key.
}
User Tools Main Menu
1.Program / Deletehi
Confirm that "1. Program / Delete"
is displayed.
27
Page 35

3
Setup
Press the
B
{
OK
key.
}
Program / Delete:
1.Prog. Quick Dialhi
Confirm that "1. Prog. Quick Dial"
is displayed.
Press the
C
{
OK
key.
}
Press Key to Program
(Browsehi)
❒
Make sure a Dial Option is stored
in one of the User Function keys,
and then enter the other party's fax
number and press the User Function key that contains the Dial Option. You can specify SUB or SEP,
SID, PWD, and sub-addresses (See
Chapter 3, "Dial Options" in the
Advanced Features manual).
Press the
F
The fax number is programmed.
{
OK
key.
}
Display the number of the Quick
D
Dial key you want to store.
Press a Quick Dial key, or search
using 0 or 1.
a01 Fax No.
_kkkkkkkkkkkkkkkkkkk
Note
❒
If a Quick Dial has already been
stored, the contents are displayed.
0
Press
Dial that is not programmed, then
press the
Enter the fax number with the
E
number keys.
or 1 to select a Quick
key.
{OK}
a01 Press OK
9876543210_kkkkkkkkk
Note
❒
If you want to erase a digit of the
number, press the
❒
If you press the
key, the last 10 fax numbers dialed are displayed. Press 0 or
1
to select the fax number you
want to specify, and then press
{
OK
key.
}
the
Clear
{
}
Pause/Redial
{
key.
a01[ABC] Name
_kkkkkkkkkkkkkkkkkkk
Enter the name.
G
a01[ABC] OK
ABC COMPANY_kkkkkkkk
Press the
H
The name is programmed.
Note
❒
When the optional G4 unit is installed, "G3/G4: Select" is displayed. Press
or G4, and then press the
{
key.
OK
}
0
or 1 to select G3
{OK}
key.
Label Insert: hi/OK
Yes [No]
Press 0 or 1 to select either "Yes"
I
or "No".
Note
❒
}
Label insertion allows the receiver's
name that is programmed in Quick
Dial or Speed Dial to be printed on
the fax when it is received at the
other end. See Chapter 3, "Label Insertion" in the Advanced Features
manual.
28
Label Insert: hi/OK
[Yes] No
Page 36

Storing and Editing Fax Numbers
Press the
J
{
OK
key.
}
Program / Delete:
1.Prog. Quick Dialhi
If you want to store another Quick
Dial, go to step C.
Press the
K
turn to the standby mode.
User Tools
{
key to re-
}
Editing Quick Dial Numbers
The following procedure describes
how to edit fax numbers stored in
Quick Dial keys.
Press the
A
User Tools
{
User Tools Main Menu
1.Program / Deletehi
Confirm that "1. Program / Delete"
is displayed.
Press the
B
{
OK
}
Program / Delete:
1.Prog. Quick Dialhi
Confirm that "1. Prog. Quick Dial"
is displayed.
Press the
C
{
OK
}
Press Key to Program
(Browsehi)
key.
key.
key.
}
Display the Quick Dial key you
D
want to edit.
Press a Quick Dial key or search
using 0 or 1.
Program? hi/OK
a01 ABC COMPANY
Press the
E
{
OK
key.
}
a01 Press OK
9876543210kkkkkkkkkk
Press the
F
new number.
key and enter the
Clear
{
}
a01 Press OK
5432109876_kkkkkkkkk
Note
❒
The previously entered fax number flashes. Pressing the
key deletes all digits of the number. If you want to delete a single
0
digit, press
cursor to the digit to be deleted,
then press the
❒
If you do not want to change the
number, go to step G.
❒
After programming a user function
key with a Dial Option and registering a fax number, you can press that
key and program the SUB, SEP,
SID, PWD, or sub-address.
Press the
G
The fax number is changed.
or 1 to move the
Clear
{
key.
OK
{
}
key.
}
Clear
{
3
}
a01[ABC] /OK
ABC COMPANYkkkkkkkkk
29
Page 37

Setup
3
Enter the name.
H
a01[ABC] OK
DEF COMPANY_kkkkkkkk
Note
❒
If you do not want to change the
name, go to step I.
❒
The previously entered name
flashes. Pressing the
deletes all characters of the name.
If you want to delete a single char-
0
acter, press
cursor to the character to be deleted, then press the
Press the
I
The name is changed.
or 1 to move the
key.
OK
{
}
Clear
{
Clear
{
key.
}
Label Insert: hi/OK
[Yes] No
Note
❒
When the optional G4 unit is installed, "G3/G4: Select" is displayed. Press 0 or 1 to select
G3 or G4, then press the
key.
Press 0 or 1 to select "Yes" or
J
"No".
key
}
{
OK
Press the
K
{
OK
key.
}
Program / Delete:
1.Prog. Quick Dialhi
If you want to edit another Quick
Dial, go to step C.
Press the
L
turn to standby mode.
User Tools
{
}
Deleting Quick Dial Numbers
The following procedure describes
how to delete fax numbers stored in
Quick Dial keys.
Press the
A
User Tools
{
User Tools Main Menu
1.Program / Deletehi
Confirm that "1. Program / Delete"
is displayed.
Press the
B
Press 0 or 1 to display "2. Del.
C
}
Quick Dial".
{
OK
}
Program / Delete:
2.Del. Quick Dial hi
key.
key.
}
key to re-
30
Note
❒
Label insertion allows the receiver's name that is programmed in Quick Dial or
Speed Dial to be printed on the
fax when it is received at the
other end. See Chapter 3, "Label
Insertion" in the Advanced Features manual.
Label Insert: hi/OK
Yes [No]
Press the
D
{
OK
key.
}
Press Key to Delete
(Browsehi)
Page 38

Display the Quick Dial key that
E
you want to delete.
Press a Quick Dial key or search by
pressing 0 or 1.
Delete? hi/OK
a01 ABC COMPANY
The number of the Quick Dial key
and the fax number or name are
displayed.
Press the
F
The stored data (fax number and
name) is deleted.
{
OK
key.
}
Program / Delete:
2.Del. Quick Dial hi
Storing and Editing Fax Numbers
Printing a Quick Dial Key Label
To print a template that can be used to
make labels for Quick Dial keys, perform the following procedure.
Press the
A
Press 0 or 1 to display "2. Re-
B
ports / Lists".
User Tools
{
User Tools Main Menu
2.Reports / Lists hi
Press the
C
Press 0 or 1 to display "4. Quick
D
Dial Label".
{
OK
}
key.
key.
}
3
If you want to delete another
Quick Dial key, go to step D.
Press the
G
turn to standby mode.
User Tools
{
key to re-
}
Reports / Lists
4.Quick Dial Labelhi
Press the
E
Press the
F
The Quick Dial label is printed.
Once the label is printed, the ma-
chine returns to the standby mode.
{
{
OK
Start
key.
}
}
key.
31
Page 39

3
Setup
Quick Dial Key Labels
The Quick Dial key label will have the destination, Group, Program, or Auto
Document name programmed in Quick Dials.
Note
❒
A protective transparent film is attached to the operation panel. Peel off the
film and place the Quick Dial key labels onto the operation panel.
GFWTLB0N.eps
QUICK KEY LABEL ( FEB. 1. 2001 9:13AM )
* * *
Time printed
01: 02: 03: 04: 05: 06: 07: 08: 09: 10:
abc com BCD. com cde com Group 1
pany pany pany
11: 12: 13: 14: 15: 16: 17: 18: 19: 20:
MAP
21: 22: 23: 24: 25: 26: 27: 28: 29: 30:
Printout of Quick Dial numbers assigned to keys,
01: 02: 03: 04: 05: 06: 07: 08: 09: 10:
11: 12: 13: 14: 15: 16: 17: 18: 19: 20:
21: 22: 23: 24: 25: 26: 27: 28: 29: 30:
including programmed names (up to 20 characters)
* * *
FAX HEADER: ABC COMPANY
P. 1
32
Labels without printed names. (Write in names yourself.)
abc comp BCD. comp cde comp Group 1
any any any
MAP
PLEASE CUT THE SHEET INTO THREE LABELS ALONG THE DOTTED LINE,
Printout of Quick Dial numbers assigned to keys, including programmed names (up to 16 characters)
AND PUT LABELS ON THE QUICK DIAL PANEL.
GFWTLB0N
Page 40

Storing Speed Dial Numbers
If you store numbers in Speed Dials,
you can specify the fax number simply
by pressing the
tering a two-digit Speed Dial number.
The following procedure describes
how to store fax numbers in Speed
Dials.
Note
❒
The combined total number of
Speed Dial numbers that can be
stored is 100.
❒
You can specify numbers from 00 to 99.
❒
The maximum number of digits
per fax number is 254.
❒
The maximum number of characters per name is 20.
❒
You can confirm the contents of
Speed Dial numbers in the Speed
Dial list. (See Chapter 6, "Printing
Dial Lists" in the Advanced Features manual.)
Press the
A
Speed Dial
{
User Tools
{
User Tools Main Menu
1.Program / Deletehi
Confirm that "1. Program / Delete"
is displayed.
Press the
B
Press 0 or 1 to display "3. Prog.
C
Speed Dial".
{
OK
key.
}
key, and en-
}
key.
}
Storing and Editing Fax Numbers
Display the number of the Speed
E
Dial you want to store (00 to 99).
Enter the Speed Dial number with
the number keys, or search using
0
or 1.
b01 Fax No.
_kkkkkkkkkkkkkkkkkkk
Note
❒
If you want to delete a digit of
the number, press the
key and enter the correct number.
❒
If a Speed Dial number has already been stored, the contents
are displayed. Press 0 or 1 to
select an unprogrammed number, then press the
Enter the fax number with the
F
number keys.
{
OK
{
key.
}
b00 Press OK
5432109876_kkkkkkkkk
Note
❒
If you want to delete a digit of
the number, press the
key.
Press the
G
The fax number is programmed.
{
OK
key.
}
{
b00[ABC] Name
_kkkkkkkkkkkkkkkkkkk
Clear
Clear
3
}
}
Program / Delete:
3.Prog. Speed Dialhi
Press the
D
{
OK
key.
}
Enter No.to Program
[b_k] (Browsehi)
Enter the name.
H
b00[ABC] OK
DEF COMPANY_kkkkkkkk
33
Page 41

Setup
3
Press the
I
The name is programmed.
{
OK
key.
}
Label Insert: hi/OK
Yes [No]
Note
❒
When the optional G4 unit is installed, "G3/G4: Select" is displayed. Press 0 or 1 to select
G3 or G4, and then press the
key.
OK
}
{
Press 0 or 1 to select "Yes" or
J
"No".
Note
❒
Label insertion allows the receiver's name that is programmed in Quick Dial or
Speed Dial to be printed on the
fax when it is received at the
other end. See Chapter 3, "Label
Insertion" in the Advanced Features manual.
Label Insert: hi/OK
[Yes] No
Press the
K
{
OK
key.
}
Program / Delete:
3.Prog. Speed Dialhi
If you want to store another Speed
Dial number, go to step D.
Press the
L
turn to standby mode.
User Tools
{
key to re-
}
Editing Speed Dial Numbers
The following procedure describes
how to edit programmed Speed Dial
numbers.
Press the
A
User Tools
{
User Tools Main Menu
1.Program / Deletehi
Confirm that "1. Program / Delete"
is displayed.
Press the
B
Press 0 or 1 to display "3. Prog.
C
Speed Dial".
{
OK
}
Program / Delete:
3.Prog. Speed Dialhi
Press the
D
{
OK
}
Enter No.to Program
[b_k] (Browsehi)
Display the Speed Dial number
E
you want to edit (00 to 99).
Enter the Speed Dial number with
the number keys or search using
or 1.
Program? hi/OK
b00 DEF COMPANY
Note
❒
If you want to delete a digit of
the number, press the
key and enter the correct number.
❒
The Speed Dial number and the
fax number or name are displayed.
key.
key.
key.
}
Clear
{
0
}
34
Page 42

Storing and Editing Fax Numbers
Press the
F
{
OK
key.
}
b00 Press OK
5432109876kkkkkkkkkk
Press the
G
fax number.
key and enter the
Clear
{
}
b00 Press OK
9876543210_kkkkkkkkk
Note
❒
If you do not want to change the
number, press the
go to step I.
❒
If you want to erase a digit of
the number, press the
key.
Press the
H
The fax number is changed.
{
OK
}
key.
{
OK
b00[ABC] /OK
DEF COMPANYkkkkkkkkk
Enter the name.
I
b00[ABC] OK
ABC COMPANY_kkkkkkkk
key and
}
Clear
{
Press the
J
The name is changed.
Note
❒
When the optional G4 unit is installed, "G3/G4: Select" is displayed. Press 0 or 1 to select
G3 or G4, and then press the
OK
}
{
Label Insert: hi/OK
[Yes] No
Press 0 or 1 keys to select "Yes"
K
or "No".
Note
}
❒
Label insertion allows the receiver's name that is programmed in Quick Dial or
Speed Dial to be printed on the
fax when it is received at the
other end. See Chapter 3, "Label
Insertion" in the Advanced Features manual.
{
key.
OK
key.
}
3
Label Insert: hi/OK
Yes [No]
Press the
L
{
OK
key.
}
Note
❒
The previously entered name
flashes. Pressing the
deletes all characters of the
name. If you want to delete a
single character, press 0 or
to move the cursor to the character to be deleted, then press
Clear
{
key.
}
the
Clear
{
key
}
1
Program / Delete:
3.Prog. Speed Dialhi
If you want to edit another name,
go to step D.
Press the
M
turn to standby mode.
User Tools
{
key to re-
}
35
Page 43

Setup
3
Deleting Speed Dial Numbers
The following procedure describes
how to delete fax numbers in Speed
Dials.
Press the
A
User Tools
{
User Tools Main Menu
1.Program / Deletehi
Confirm that "1. Program / Delete"
is displayed.
Press the
B
Press 0 or 1 to display "4. Del.
C
Speed Dial".
{
OK
}
Program / Delete:
4.Del. Speed Dial hi
Press the
D
{
OK
}
Enter No. to Delete
[b_k] (Browsehi)
key.
key.
key.
}
Press the
F
The programmed data (fax number and name) is deleted.
{
OK
key.
}
Program / Delete:
4.Del. Speed Dial hi
If you want to delete another
name, go to step D.
Press the
G
turn to standby mode.
User Tools
{
key to re-
}
36
Display the Speed Dial number
E
you want to delete (00 to 99).
Enter the Speed Dial number with
the number keys or search using
or 1.
Delete? hi/OK
b00 DEF COMPANY
The Speed Dial number and the fax
number or name are displayed.
Note
❒
If you want to delete a digit of
the number, press the
key and enter the correct number.
{
Clear
0
}
Page 44

Storing and Editing a Group of Fax Numbers
Storing and Editing a Group of Fax
Numbers
If you regularly broadcast documents
to the same set of destinations, you
can combine these numbers into a
group. Then just select the group and
each number will be dialed in sequence automatically.
There are two ways of programming
Groups:
❖
Programming groups in Quick Dial
keys
If you program a group in a Quick
Dial key, you can specify that
group by pressing a Quick Dial
key. However, if you use Quick
Dial keys to program groups, you
will be able to program fewer
Quick Dial keys .
Limitation
❒
You cannot store another function (Quick Dials, Auto Documents, or Programs) in a Quick
Dial key already used for a
group. Also, you cannot store
groups in a Quick Dial key already used for another function.
❖
Programming groups in the {Group
key
To program a group in the
key, you must firstassign the
Group feature to a Function key.
To send a fax, press the
key, and then enter the group
number (1 to 7).
Group
{
Group
{
Storing a Group of Fax Numbers
You can register the following items
in a Group:
• Destination fax numbers
• Group name (up to 20 characters)
You can enter destination numbers by
Quick Dial keys, Speed Dials, or the
number keys.
Note
❒
You can register up to 7 Groups
with 140 numbers each.
❒
The combined maximum number
of destinations you can register in
all Groups is 129. This 129 can be
composed of up to 30 Quick Dial
numbers, 50 Speed Dial numbers
and 49 numbers entered directly
with the number keys.
❒
The number of destinations that
can be registered with the number
keys depends on how the machine
is used. In theory you can register
}
}
}
up to a combined maximum of 76
destinations with the number keys
for all groups. However, if you
register 76 items with the number
keys, Memory Transmission becomes unavailable, only register
up to 75 items with the number
keys.
❒
If you register the same destination
more than once with a Speed Dial or
Quick Dial in Groups, it is only counted as one item. However, if you register two or more identical destinations
with the ten keys they will be counted
as two or more items.
3
37
Page 45

3
Setup
❒
If all destinations are different, you
may not be able to store 140 destinations in a Group.
❒
It is recommended that you print
the Group Dial list and keep it
when you register or change destinations. See Chapter 6, "Printing
Dial Lists" in the Advanced Features manual.
❒
How to count numbers.
Registered items
Quick Dial: [01], [03], [05]
Speed Dial: [01], [02], [10]
Ten Key: 0312345678
Group 1
Quick Dial: [01], [05]
Speed Dial: [01], [02], [08]
Ten Key: 0312345678,
Group 2
0451119999
Registered items
Total Numbers
10 numbers
Press the
A
User Tools
{
key.
}
User Tools Main Menu
1.Program / Deletehi
Confirm that "1. Program / Delete"
is displayed.
Press the
B
Press 0 or 1 to display "5. Prog.
C
Group Dial".
{
OK
key.
}
Program / Delete:
5.Prog. Group Dialhi
Press the
D
{
OK
key.
}
Enter No./ Press Key
[Gp.D_] (Browsehi)
Display the number of the group
E
you want to store (1 to 7).
Enter the group number with the
number keys, or search using 0 or
1
.
38
Quick Dial: [01], [02], [03]
Speed Dial: [01], [02], [03]
Ten Key: 0312345678
Group1
Quick Dial: [04], [05]
Speed Dial: [04], [05], [06]
Ten Key: 0312345678,
Group2
0451119999
❒
This section describes how to program a Group.
Total Numbers
14 numbers
_kkkkkkkkkkkkkkkkkkk
Note
❒
If a group has already been
stored, the contents are displayed. Press 0 or 1 to select a
group number that is not programmed, then press the
key.
❒
If a group is programmed, but
no name is specified, the group
number only is displayed on the
lower line of the display.
{
OK
}
Gp.D1:#1 Fax No.
Page 46

Storing and Editing a Group of Fax Numbers
Specify the destination using one
F
of the following three methods:
Enter the fax number with the
number keys.
Gp.D1:#1 Press OK
0123456789_kkkkkkkkk
Press a Quick Dial key.
Gp.D1:#1 Press OK
a01 ABC COMPANY
Press the
ter a Speed Dial number.
Speed Dial
{
key and en-
}
Gp.D1:#1 Press OK
b00 DEF COMPANY
Note
❒
If you specify a Quick Dial or
Speed Dial that is not programmed, "
Programmed
specify the destination.
Press the
G
The destination is programmed.
Press the 0 or 1 to select "Add"
H
or "Exit".
This key is Not
" is displayed. Re-
key.
OK
{
}
Program? hi/OK
[Add] Delete Exit
Note
❒
When the optional G4 unit is installed, "G3/G4: Select" is displayed. Press 0 or 1 to select
G3 or G4, and then press the
key.
OK
}
{
Press the
I
If you selected "Exit", go to step K.
{
OK
key.
}
Repeat steps F to I and program a
J
destination.
Enter the group name.
K
If you do not want to program a
group name, press the
and go to step M.
{
OK
Gp.D1[ABC] Name
Group A_kkkkkkkkkkkk
Note
❒
If you want to delete a character
of the name, press the
key.
Press the
L
The group name is programmed.
{
OK
key.
}
{
Assign to Key? hi/OK
Yes [No]
Press 0 or 1 to select "Yes" or
M
"No" to be programmed in the
Quick Dial.
Assign to Key? hi/OK
[Yes] No
Press the
N
If you selected "No", go to step Q.
{
OK
key.
}
Press Quick Dial Key
[a_k]
Press the Quick Dial key you
O
want to program.
Press Quick Dial Key
[a02]
key
}
Clear
3
}
39
Page 47

Setup
3
Press the
P
{
OK
key.
}
Program / Delete:
5.Prog. Group Dialhi
Press the
Q
turn to standby mode.
User Tools
{
key to re-
}
Editing a Group
You can add destinations or edit the
group name for programmed groups.
To edit a destination:
• For destinations programmed in
Quick Dials or Speed Dial, edit the
contents of the programmed Quick
Dial or Speed Dial.
• For destinations programmed with
the number keys, delete the destination you want to edit from the
group, and then program the new
destination.
Editing a Group Name
The following procedure describes
how to edit a group name.
Press the
A
User Tools
{
User Tools Main Menu
1.Program / Deletehi
Confirm that "1. Program/Delete"
is displayed.
Press the
B
Press 0 or 1 to display "5. Prog.
C
Group Dial".
{
OK
}
Program / Delete:
5.Prog. Group Dialhi
key.
key.
}
Press the
D
{
OK
key.
}
Enter No./ Press Key
[Gp.D_] (Browsehi)
Display the number of the group
E
you want to edit (1 to 7).
Enter the group number with the
number keys, or search using
0
Program? hi/OK
Gp.D1 Group A
Press the
F
{
OK
key.
}
Change Dest.?: hi/OK
[Yes] No
Press 0 or 1 to select "No".
G
Change Dest.?: hi/OK
Yes [No]
Press the
H
{
OK
key.
}
Gp.D1[ABC] /OK
Group Akkkkkkkkkkkkk
Press the
I
new name.
key and enter the
Clear
{
}
Gp.D1[ABC] OK
Group B_kkkkkkkkkkkk
Note
❒
If you want to delete a character
of the name, press the
key.
❒
If you press the
the display will return to that
shown for step C.
❒
If you are finished, press the
User Tools
{
key.
}
Cancel
{
{
or 1.
Clear
key,
}
}
40
Page 48

Storing and Editing a Group of Fax Numbers
Press the
J
The name is changed.
{
OK
key.
}
Assign to Key? hi/OK
Yes [No]
Press 0 or 1 to select "Yes" if the
K
group was programmed in a
Quick Dial, or select "No" if it was
not.
Assign to Key? hi/OK
[Yes] No
Press the
L
If you selected "No" ,go to step N .
{
OK
key.
}
Press Quick Dial Key
[a02]
Note
❒
If you want to edit a programmed Quick Dial key, press
the Quick Dial key and then the
key.
OK
}
{
Press the
M
{
OK
key.
}
Program / Delete:
5.Prog. Group Dialhi
If you want to program another
group name, go to step D.
Press the
N
turn to standby mode.
User Tools
{
key to re-
}
Adding a Fax Number to a Group
The following procedure describes
how to add a destination to a group.
Press the
A
User Tools
{
key.
}
User Tools Main Menu
1.Program / Deletehi
Confirm that "1. Program / Delete"
is displayed.
Press the
B
Press 0 or 1 to display "5. Prog.
C
Group Dial".
{
OK
key.
}
Program / Delete:
5.Prog. Group Dialhi
Press the
D
{
OK
key.
}
Enter No./ Press Key
[Gp.D_] (Browsehi)
Display the number of the group
E
to which you want to add a number (1 to 7).
Enter the group number with the
number keys, or search using 0 or
1
.
Program? hi/OK
Gp.D1 Group A
Press the
F
{
OK
key.
}
3
Change Dest.?: hi/OK
[Yes] No
41
Page 49

Setup
3
Press 0 or 1 to select "Yes" and
G
press the
{
OK
key.
}
Program? hi/OK
[Add] Delete Exit
Note
❒
If you have finished adding destinations, select "Exit" and go to
step L.
Press 0 or 1 to select "Add" and
H
press the
{
OK
key.
}
Gp.D1:#5 Fax No.
_kkkkkkkkkkkkkkkkkkk
Specify the destination using one
I
of the following three methods:
Enter the fax number with the
number keys.
Gp.D1:#5 Press OK
0123456789_kkkkkkkkk
Press a Quick Dial key.
Gp.D1:#5 Press OK
a01 ABC COMPANY
Press the
J
The destination is added.
Note
❒
When the optional G4 unit is installed, "G3/G4: Select" is displayed. Press 0 or 1 to select
G3 or G4, and then press the
OK
}
{
To add another destination, re-
K
peat steps G to J.
If you have finished adding desti-
L
nations, select "Exit".
{
key.
OK
key.
}
Program? hi/OK
Add Delete [Exit]
Press the
M
{
OK
key.
}
Gp.D1[ABC] /OK
Group Akkkkkkkkkkkkk
Note
❒
If you want to change the group
name, press the
enter the new name.
Press the
N
{
OK
key.
}
Clear
{
key and
}
42
Press the
ter a Speed Dial number.
User Tools
{
key and en-
}
Gp.D1:#5 Press OK
b00 DEF COMPANY
Note
❒
If you specify a Quick Dial or
Speed Dial that is not programmed, "
Programmed
specify the destination.
This key is Not
" is displayed. Re-
Assign to Key? hi/OK
Yes [No]
Press 0 or 1 to select "Yes" if the
O
group was programmed in a
Quick Dial, or select "No" if it was
not.
Assign to Key? hi/OK
[Yes] No
Page 50

Storing and Editing a Group of Fax Numbers
Press the
P
If you selected "No", go to step Q.
{
OK
key.
}
Press Quick Dial Key
[a02]
Note
❒
If you want to edit a programmed
Quick Dial, press the Quick Dial,
{OK}
key.
}
key.
Press the
Q
and then the
OK
{
Program / Delete:
5.Prog. Group Dialhi
If you want to add another destination to the group, go to step D.
Press the
R
turn to standby mode.
User Tools
{
key to re-
}
Deleting a Group
The following procedure describes
how to delete a destination from a
group.
• When you delete a destination
from a group programmed in a
Quick Dial or a Speed Dial, the
contents of the Quick Dial or Speed
Dial are not deleted.
Press 0 or 1 to display "5. Prog.
C
Group Dial".
Program / Delete:
5.Prog. Group Dialhi
Press the
D
{
OK
key.
}
Enter No./ Press Key
[Gp.D_] (Browsehi)
Display the group number for the
E
destination you want to delete (1
to 7).
Enter the group number with the
number keys, or search using 0 or
1
.
Program? hi/OK
Gp.D1 Group A
Press the
F
{
OK
key.
}
Change Dest.?: hi/OK
[Yes] No
Press 0 or 1 to select "Yes" and
G
press the
{
OK
key.
}
Program? hi/OK
[Add] Delete Exit
3
To delete a destination from a group
Press the
A
User Tools
{
key.
}
User Tools Main Menu
1.Program / Deletehi
Confirm that "1. Program / Delete"
is displayed.
Press the
B
{
OK
key.
}
Press 0 or 1 to select "Delete"
H
and press the
{
OK
key.
}
Select Destination
withhi
Press 0 or 1 to display the desti-
I
nation you want to delete.
Delete? hi/OK
a01 ABC COMPANY
43
Page 51

Setup
3
Press the
J
{
OK
key.
}
Program? hi/OK
Add [Delete] Exit
To delete another destination, re-
K
peat steps H to J.
If you are finished deleting desti-
L
0
nations, press
it", and then press the
or 1 to select "Ex-
{OK}
Gp.D1[ABC] /OK
Group Akkkkkkkkkkkkk
Press the
M
{
OK
key.
}
Assign to Key? hi/OK
Yes [No]
Press 0 or 1 to select "Yes" if the
N
group was programmed in a Quick
Dial, or select "No" if it was not.
Press the
O
If you selected "No", go to step Q.
{
OK
key.
}
Press Quick Dial Key
[a02]
Note
❒
If you want to edit a programmed
Quick Dial key, press the Quick
Dial key and then the
Press the
P
standby mode.
{
key to return to
OK
}
{OK}
Program / Delete:
5.Prog. Group Dialhi
If you want to delete another destination from the group, go to step
key.
key.
To erase an entire group
Press the
A
User Tools Main Menu
1.Program / Deletehi
Confirm that "1. Program / Delete"
is displayed.
Press the
B
Press 0 or 1 to display "6. Del.
C
Group Dial".
Program / Delete:
6.Del. Group Dial hi
Press the
D
Enter No./ Press Key
[Gp.D_] (Browsehi)
Display the number of the group
E
you want to delete (1 to 7).
Enter the group number with the
number keys, or search using 0 or
1
.
Delete? hi/OK
Gp.D1 Group A
Press the
F
The entire group is deleted.
Program / Delete:
6.Del. Group Dial hi
Press the
G
turn to standby display.
.
D
User Tools
{
key.
OK
{
}
key.
OK
{
}
key.
OK
{
}
User Tools
{
key.
}
key to re-
}
44
Press the
Q
turn to standby mode.
User Tools
{
key to re-
}
Page 52

To change and delete Quick
-
Dials programmed as groups:
To store an entire group under a different Quick Dial key, or to delete the
group from the Quick Dial key altogether, perform the following procedure:
Press the
A
Confirm that "1. Program / Delete"
B
User Tools
{
key.
}
is displayed.
Press the
C
0
or 1 to display "5. Prog. Group
key, and then press
OK
{
}
Dial".
Press the
D
Enter the group number (1 to 7).
E
Press the
F
Press 0 or 1 to select "No", and
G
then press the
Press the
H
If you want to change the Quick
I
{
{
{
OK
OK
OK
key.
}
key.
}
{
key.
}
OK
key.
}
Dial key, press "Yes", and if you
want to delete the Quick Dial key,
press "No".
Press the
J
{
OK
key.
}
If you selected "No" in step I, the
Quick Dial key is deleted. Go to
step M.
If you want to change the Quick
K
Dial key, press the new Quick Dial
key.
Press the
L
{
OK
key.
}
The Quick Dial key is changed.
Press the
M
User Tools
{
key to return
}
to standby mode.
Storing and Editing a Group of Fax Numbers
3
45
Page 53

3
Setup
Entering Characters
Use the number keys to enter numbers. Use Quick Dial keys for entering
letters, and the
tering symbols.
If at any time you make a mistake
when entering a character or digit,
press the
correct a character or number already
entered, use 0 or 1 to reach the mistake, enter the new character, and
then press the
the mistaken character.
Note
❒
When Mail Address input is selected, you can enter the "@" symbol
and periods in E-mail addresses
with the Quick Dial keys. See
Chapter 1, "Operation Panel" in the
NIC FAX KIT manual.
❒
You can switch the character input
mode between uppercase letters
(ABC) and lowercase letters (abc)
by pressing the
can input symbols regardless of
this mode.
❒
With the QWERTY keyboard layout, the
and with the ABC layout it is key
29. The
both layouts.
Symbols
{
key to delete it. To
Clear
}
{
Clear
{
{
ABC/abc
{
Symbol
{
}
Entering Symbols
Press the
A
Press 0 or 1 to scroll through the
B
symbols.
Symbol
{
key for en-
}
key to delete
}
ABC/abc
}
key is key 30 with
}
key. You
}
key is key 21,
key.
Wild Card
Using wild cards, you can greatly enhance the effectiveness of the following features:
•Authorized Reception
•Memory Lock
• Multi-copy Reception
• Specified Cassette Selection
• Forwarding
In each of these features, you have to
store the Own Name or Own Fax
Number setting of the various terminals that you normally receive fax
documents from. Then, when your
machine detects an incoming call, it
checks the Own Name or Own Fax
Number setting of the other terminal
and acts accordingly.
When you use Own Name with these
features, you can program wild cards
to greatly expand the number of terminals that you can specify.
For example, if you wish to accept
documents from all 150 branches of
XYZ Company (using Authorized Reception), and forward them on to
head office (using Forwarding), you
do not have to store the Own Name of
each branch of XYZ Company. Program "XYZ" as a wild card for each of
these functions. If the Own Name settings of all XYZ branches contain
"XYZ", incoming documents from
those branches will be accepted and
sent on to the head office.
46
Note
❒
You can enter the following
symbols: – _ (space) . , ( ) / @ &
$ ! " ' # * % + : ; < = > ? ^ [ ] ` { | } ∼
Press the
C
{
OK
key.
}
Page 54

Note
❒
This feature cannot recognize
spaces. If you store MAN as a wild
card, and a terminal with an Own
Name including MANCHESTER,
HUMAN, or HUMANE calls you,
your machine will recognize MAN
as a wild card and accept and/or
forward the document.
Reference
See Chapter 7, "Authorized Reception" (switch 10, bit 7) in the Advanced Features manual.
See Chapter 7, "Forwarding" in the
Advanced Features manual.
Own Name and Own Fax Number,
see P.23
ments”
“Initial Settings and Adjust-
.
Entering Characters
3
47
Page 55

3
Setup
48
Page 56

4. Troubleshooting
Loading Paper in the Main Paper Cassette
The following procedure describes how
to load paper in the main paper cassette.
Important
❒
When loading paper, be careful
not to pinch your fingers inside the
machine.
❒
Before loading paper, make sure
that the machine is not outputting
a copy or received document.
Reference
For paper sizes, paper direction,
and the number of sheets that can
be loaded in the main paper cassette, see Chapter 11, "Document
and Paper Specifications" in the
Advanced Features manual.
For information on how to load the
optional bypass feeder, see Chapter 9, "Loading Paper in the Optional Bypass Feeder" in the
Advanced Features manual.
Pull out the main paper cassette
A
and place it on a flat surface.
ZCKY180N.eps
Lift up the cassette cover and re-
B
move it.
ZCKY470N.eps
Remove any remaining paper.
C
ZCKY490N.eps
If the metal base plate is raised,
D
push it firmly down until it locks
into place.
ZCKY040N.eps
Note
❒
Remove any paper that may
have dropped inside the machine in the area vacated by the
paper cassette.
49
Page 57

Troubleshooting
4
Prepare a stack of blank paper.
E
For smoother operation, square
the edges by tapping the paper
stack on the bench.
TSTS010N.eps
Load the paper into the cassette.
F
ZCKY050N.eps
Replace the cassette cover.
G
ZCKY060N.eps
Note
❒
The frosted side of the cover
must be faceup when closed.
Replace the cassette. Push it in
H
firmly until it locks into place.
ZCKY230N.eps
50
Note
❒
Do not load paper above the paper level marks inside the cassette.
Note
❒
If you cannot close the cassette,
check that the metal base plate
is not raised.
Page 58

Adjusting the Volume and Sounds the Machine Makes
Adjusting the Volume and Sounds the
Machine Makes
You can change the beeper (monitor) volume for the following features:
On Hook
Transmission
Reception
Dialing
Key Tone
Alarm
The following procedure describes how to adjust the volume for the above features.
Note
❒
Make sure that the machine is in standby mode.
The sound that indicates on hook dialing.
The sound that indicates transmission.
The sound that indicates reception.
The sound that indicates dialing.
The sound that indicates a key being pressed.
The sound that indicates something has gone wrong.
4
Press the
A
User Tools
{
key.
}
User Tools Main Menu
1.Program / Deletehi
Press 0 or 1 to display "3. Setup".
B
User Tools Main Menu
3.Setup hi
Press the
C
Confirm that "1. Monitor Volume" is displayed.
{
OK
key.
}
Setup:
1.Monitor Volume hi
Press the
D
{
OK
key.
}
Monitor Volume:
1.On Hook hi
Press 0 or 1 to select the item you want to adjust, and then press the
E
On Hook: hi/OK
Low---l---High
{OK}
key.
51
Page 59

Troubleshooting
Press 0 or 1 to adjust the volume.
F
On Hook: hi/OK
Low-----l-High
4
Press the
G
The volume is adjusted.
{
OK
key.
}
Monitor Volume:
1.On Hook hi
If you want to adjust another item, repeat steps E to G.
Press the
H
User Tools
{
key to return to standby mode.
}
52
Page 60

If an Indicator Ligh ts on the Operation Panel
If an Indicator Lights on the Operation
Panel
Whenever you see the file receive indicator or the alarm indicator light,
always read the document in the control panel display.
❖
The Receive File indicator is lit:
You have received a fax document
which is now stored in the machine. See Chapter 4, "Printing
Documents That Have Been Received into Memory (Substitute
Reception)"in the Advanced Features manual.
❖
The Communicating indicator is lit.
You are sending or receiving a fax.
See P.5
❖
The Alarm indicator flashes.
An error has occurred. Read the
message in the display and take
appropriate action. See P.5
tion Panel”
“Operation Panel”
.
.
“Opera-
4
53
Page 61

4
Troubleshooting
Communication Problems
Transmission Failed / OK
If "
pears in the display: Press the
key.
Causes:
Transmission Failed
/OK
• A poor line caused the communication to fail.
• The line is noisy. Try to retransmit.
• The other machine is out of order.
Ask the other party to check their
machine.
" ap-
OK
{
}
54
Page 62

Clearing a Document Jam
Clearing a Document Jam
When an original is jammed, "
Misfed Orig. Stor ing Stopped, /
OK
" is displayed. Perform the follow-
ing procedure to solve the problem.
Note
❒
If copies, documents, or prints are
jammed, follow the procedure on
the next page.
Open the operation panel to an
A
angle of about 45°.
ZCKY080N.eps
Remove the original.
B
ZCKY090N.eps
Clear
Close the operation panel com-
C
pletely. Make sure that it clicks
and locks into place.
ZCKY100N.eps
4
Important
❒
Do not pull out the document
without opening the operation
panel, or you will damage the
scanning mechanism.
55
Page 63

Troubleshooting
Clearing a Copy, Fax, or Print Jam
4
When "
played, follow the procedure below
to solve the problem.
To clear original jams, see the previous page.
❒
❒
Clear Misfed Paper
Important
The transfer roller and surrounding area inside the machine becomes hot during printing. To
avoid injury when removing paper
jams, do not touch any parts other
than those specified in this manual.
Note
If paper jams occur in the optional
second paper cassette or optional
bypass feeder. (See chapter 8,
"Clearing a Copy Fax, or Print Jam"
in the Advanced Features manual.).
" is dis-
Print Delivery Tray
Fold the tray up (1) and remove
A
any jammed paper (2).
ZCKY110N.eps
Inside the Machine
Pull the front cover release lever
A
towards you and open the front
cover.
Note
❒
If you do not pull the lever, only
the operation panel will open.
ZCKY120N.eps
ZCKY600N.eps
56
Remove the toner cassette.
B
ZCKY130N.eps
Page 64

Clearing a Copy, Fax, or Print Jam
Remove any jammed paper un-
C
derneath.
ZCKY140N.eps
Replace the toner cassette by
D
aligning it with the guide rails
and sliding it into place.
ZCKY150N.eps
Push the front cover closed until
F
you hear it lock into place.
ZCKY170N.eps
Cassette Entrance
Remove the main paper cassette
A
and place it on a flat surface.
ZCKY180N.eps
4
Confirm that the toner casstte is
E
locked into position.
ZCKY160N.eps
Lift the document delivery table
B
and remove any jammed paper
from inside the machine.
ZCKY200N.eps
57
Page 65

4
Troubleshooting
Return the document delivery ta-
C
ble to its original position.
ZCKY210N.eps
Push down on the paper until you
D
hear the base plate lock into
place.
ZCKY900N.eps
Upper Rear Unit
Pull the document table toward
A
the front of the machine.
ZCKY240N.eps
Open the lower rear cover and
B
then upper rear cover as shown in
the illustration.
ZCKY250N.eps
58
Replace the main paper cassette.
E
ZCKY230N.eps
Remove any jammed paper.
C
ZCKY260N.eps
Page 66

Close the upper rear cover and
D
then the lower rear cover as
shown in the illustration.
ZCKY270N.eps
Clearing a Copy, Fax, or Print Jam
Return the document table to its
E
original position.
4
59
Page 67

4
Troubleshooting
Error Messages
The following messages may appear while you are operating or programming
the machine.
Reference
See Chapter 6, "Error Messages" in the NIC FAX KIT manual for network errors that may occur when using Internet Fax.
Message Problem/Solution
No Files Exist
Cannot Combine:(currently selected function)
This Key is in Use as a
Group Dial
This Key is in Use as a
Program
This Key is in Use as a
Quick Dial
This Key is Not Programmed
This Speed Dial No. is
Not Programm ed
This Dest. is Already
Selected
Insert Pause "_" Af ter
Area Code
Replace Toner
Clear Misfed Orig.
Clear Misfed Paper
Close Front Co ve r
Close Rear Cover
Machine is in Use.
Please Wait.
No polling reception operations have been programmed.
There are no documents in memory waiting for transmis-
sion.
Incorrect file number. Check the file number and try again.
Appears when you attempt to select a function that cannot
be used in combination with another currently selected
function.
This Quick Dial Key has a Group stored in it.
This Quick Dial Key has a Keystroke Program stored in it.
This Quick Dial Key has a Quick Dial stored in it.
Either:
• This Quick Dial Key does not contain a number.
• This Quick Dial Key does not contain a Keystroke Program.
This Speed Dial number does not contain a number.
Either:
• This number is already included in this Group.
• The same destination was specified more than once.
You must add a pause after your area code when you input
your fax terminal's own telephone number.
The toner cassette is empty. Install a new cassette.
A document is jammed in the feeder.
Paper is jammed in the printer.
A cover is not closed properly. Check that all covers are
closed.
Machine cannot print a list/file, because the plotter is not
ready.
60
Page 68

Message Problem/Solution
Call Service.
Check Paper Size. Press
OK to Correct.
This Dial is in Use.
Cannot Delete.
Machine is out of order. Contact your service representative.
The size of the installed paper does not match the currently
selected paper size.
OK
Press the
appropriate paper.
This Quick Dial is being used (such as for a Send Later
Transmission).
key, and then set the paper size or install the
}
{
This Dial is in Use.
Cannot Change.
Some Page(s) are Blank
Reset Toner Co rr ec tl y
Toner is Almost Empty
Copy Mode Locked
Change ADF Pad
An almost entirely blank document was scanned. Check
your document.
The toner cassette is not set correctly.
The toner cassette is nearly empty.
Copy mode is disabled. Enable it with the User Parameters.
Replace the ADF separation pad.
Error Mess a ge s
4
61
Page 69

4
Troubleshooting
Solutions to Common Problems
Problem Required Action
STANDBY MODE
Nothing happens when the
switch is turned on.
Set Orig. / Enter No.
"
is not displayed.
The display does not show the
Ready condition, or the machine
stops during an operation.
TRANSMISSION
The original is not pulled into
the auto document feeder.
Check the power cord. Is it properly plugged into the outlet?
Plug it in firmly.
Switch the power on.
"
If the Power indicator does not light, check that the power
cord is plugged in.
If the Energy Saver indicator lights, press the Energy Saver
key.
Clear Misfed Orig.
Does "
Paper
" appear in the display?
Clear the misfed paper.
" or "
Reference
“Clearing a Document Jam”
See P.55
Copy, Fax, or Print Jam”
Load Paper
Does "
Load paper into the paper tray. See P.49
Main Paper Cassette”
Close Front Cover
Does "
er
" appear in the display?
Close all covers.
Is the Add Toner indicator on?
Load a new toner cassette.
You did not feed the document far enough into the feeder.
Insert the document into the feeder until it stops.
Retransmit.
Do user maintenance, especially rollers (2) and (6). See the illustration in Chapter 9, "Cleaning the Rollers and Exposure
Glass" in the Advanced Features manual.
The telephone line is disconnected.
Check that the line is connected properly.
The telephone line type setting is incorrect.
Check the telephone line type setting.
The dialed number does not contain a PSTN access code or
a pause.
Include the outside line access number and a pause before
the telephone number.
.
" appear in the display?
.
" or "
Clear Misfed
, and P.56
“Loading Paper in the
“Clearing a
Close Rear Cov-
62
Page 70

Problem Required Action
The original is not pulled into
the auto document feeder.
Frequent original misfeeds
(Multifeeds)
Frequent original misfeeds
(Non-feeds)
Transmission cannot take place;
Clear Misfed Orig.
"
pears.
The dialed number did not have enough pauses between the
outside line access number and the telephone number.
Try adding more pauses after the outside line access number.
Incorrect positioning of originals. Position the document in
the feeder correctly. See P.11
Incorrect alignment of originals. Align the edges of the document. See P.10
Curled pages. Flatten the document. See P.10
ument Types”
Incorrect document type. Use a proper document type. See
P.10
Mixed document types. The pages must all be of the same
type.
Static electricity on the originals. Shuffle the document. See
P.11
Do user maintenance, especially rollers (2) and (6). See the illustration in Chapter 9, "Cleaning the Rollers and Exposure
Glass" in the Advanced Features manual.
Copier silicone oil on the originals. Wait a few minutes, then
try again.
Incorrect alignment of originals. Align the edges of the document. See P.11
Curled pages
Flatten the document. See P.10
Incorrect document type. Use a proper document type. See
P.10
More than 50 pages in the feeder. Do not load more than 50
pages in the automatic document feeder at once.
Do user maintenance, especially rollers (2) and (6). See the illustration in Chapter 9, "Cleaning the Rollers and Exposure
Glass" in the Advanced Features manual.
The document is jammed in the feeder.
" ap-
Remove the jammed document. See P.55
ment Jam”
The document may be longer than the maximum limit.
Make sure that none of your originals exceed this limit.
Do user maintenance, especially rollers (2) and (6). See the illustration in Chapter 9, "Cleaning the Rollers and Exposure
Glass" in the Advanced Features manual.
.
“Suitable Document Types”
“Memory Transmission”
“Suitable Document Types”
.
Solutions to Common Problems
“Memory Transmission”
“Suitable Document Types”
.
.
“Memory Transmission”
.
“Suitable Document Types”
.
.
.
“Suitable Doc-
4
.
“Clearing a Docu-
63
Page 71

4
Troubleshooting
Problem Required Action
Transmission cannot take place.
Before taking action, wait until
the machine is in standby mode,
then press the
Consistent difficulty in communicating with a particular terminal
Consistent poor image quality
when communicating with a
particular terminal
RECEPTION
The telephone keeps ringing and
no fax is printed.
RECEPTION/COPYING
No printout; the Add Paper indi-
cator is lit.
No printout;
Paper
Copies are blank. The original must be placed facedown in the document feed-
Copy paper misfeeds occur frequently.
Stop
{
Clear Misfed
appears.
key.
}
The other machine is out of order.
Check the error report.
Ask the other party to check their machine and correct the
fault.
The line is noisy.
Check that the dial tone is sent out.
Try to retransmit.
There are some bad lines between you and that other terminal.
Store that terminal's number as a Quick Dial Key or Speed
Dial Code.
Then call a service technician.
Inform them of the nature of the problem and give the Quick
Dial Key or Speed Dial Code that you stored the number in.
You are in Manual Receive mode.
Change to Auto Receive mode. See P.22
Power is switched off.
Switch the power on.
The cassettes are empty.
Add Paper. See P.49
sette”
.
The printer has jammed.
Clear the jam. See P.56
er.
Position the original correctly. See P.11
sion”
.
Is the proper paper in the paper cassette?
Paper size and weight must be within the standards set for
this machine.
Is folded, wrinkled, damp, or curled paper in the paper cas-
sette?
Always use dry, undamaged paper.
Is the paper set properly in the paper cassette?
Always load paper correctly. See P.49
Main Paper Cassette”
Make sure that there is not too much paper in the trays; do
not fill them up over the load limit mark.
“Loading Paper in the Main Paper Cas-
“Clearing a Copy, Fax, or Print Jam”
.
“Reception Modes”
“Memory Transmis-
“Loading Paper in the
.
.
64
Page 72

Problem Required Action
Copy paper misfeeds occur frequently.
Stripes on copies. The exposure glass is dirty.
TELEPHONING
You cannot receive phone calls;
the unit only rings once then
goes into receive mode.
You cannot receive phone calls;
the unit does not ring.
Are there any pieces of misfed paper or other foreign objects
in the machine?
Make sure that the paper path is completely clear of paper
and other material after a misfeed.
Are you copying onto recycled paper?
Fan the stack of recycled paper and load it in the paper tray.
Clean the exposure glass. See Chapter 9, "Cleaning the Rollers and Exposure Glass" in the Advanced Features manual.
You are in Auto Receive mode.
Change to Manual Receive mode. See P.22
Modes”
.
The telephone line is not connected.
Connect the modular cord.
Solutions to Common Problems
“Reception
4
65
Page 73

4
Troubleshooting
66
Page 74

5. Appendix
Options
❖
PAPER FEED UNIT TYPE180 (Second Paper Cassette)
A second paper feed unit can be added to the base machine.
❖
BYPASS FE EDER TYPE18 0
A third paper feed unit can be added to the base machine.
❖
ADF MAINTENANCE KIT TYPE 210
This is a maintenance kit for the ADF (Auto Document Feeder).
❖
FAX EXPANSION CARD TYPE20
A 2-Mbyte memory card can be added.
❖
FAX EXPANSION CARD TYPE40
A 4-Mbyte memory card can be added.
❖
ISDN INTERFACE UNIT TYPE 190 (G4 Unit)
This allows you to send and receive using the ISDN (Integrated Service Digital Network).
❖
HANDSET TYPE 100
This allows you to dial fax numbers without having to use the operation panel.
❖
MECHANICAL COUNTER TYPE 210
This is a tamper-proof mechanical counter whose reading cannot be changed
by the user.
67
Page 75

INDEX
A
Add Paper indicator
Add Toner indicator
Auto Document Feeder (ADF)
,
,
5
5
,
C
Canceling a Memory Transmission
Before the start key is pressed
During Transmission
While the document is awaiting
transmission
While the document is being scanned in
Canceling an Immediate Transmission
Before the start key is pressed
While dialing or during transmission
key
Cancel
{
}
Characters
Entering
CLEAR COPY
Clearing a Jam
Document
Inside the machine
{
} key
Clear
Communication Problems
Control panel display
{
} key
Copy
CSI → Own Fax Number
,
,
,
,
46
,
,
14
6
46
,
56
,
56
,
55
,
6
,
7
,
,
13
,
56
,
54
6
,
23
D
Deleting
Quick Dial Numbers
Speed Dial Numbers
,
Dialing
Document Delivery Tray
Document Guide
Document Jam
Document Table
17
,
,
,
55
,
30
,
36
,
3
4
4
E
Editing
Fax Numbers
4
,
13
13
,
13
,
15
15
,
15
Group
Quick Dial Number
Speed Dial Numbers
{
Energy Saver/3Clear Modes
Entering
Characters
Symbols
Entering Numbers Directly
Error Messages
F
Fax Header
,
Faxing
Front Cover
Front Cover Release Lever
,
27
,
40
,
29
,
34
,
7
} key
,
46
,
46
,
17
,
60
,
23
9
,
4
,
4
G
6
, 43,
,
40
,
44
4
,
41
,
43
,
21
,
20
,
40
,
37
G4 Interface Unit
{
Group
Group Name, Editing
Group of Fax Numbers, Storing
,
} key
G4
,
20
Adding a Fax Number to
Deleting
Deleting a Destination From
Editing
Specifying with Group key
Specifying with Quick Dial
H
,
} key
6
{
Help
I
23
,
53
,
53
22
, 9,
14
Immediate Transmission
Indicators
Check Display
Manual Receive
Memory
,
11
Receive File
Initial Settings
Introduction
,
,
,
3
68
Page 76

J
Q
,
{
Job Information
} key
6
M
,
,
,
3
4
,
,
4
6
, 9,
Main Paper Cassette
Main Switch
Manual Receive indicator
Memory Card Cover
{
} key
Memory
Memory Transmission
N
Number keys
,
7
O
,
{OK} key
{
On Hook Dial
Operation Panel
Optional Bypass Feeder
Optional Handset
Optional Second Paper Cassette
Own Fax Number (Required by
international law)
Own Name
6
} key
,
23
,
, 4,
,
,
6
5
,
4
4
23
P
,
Paper
49
Loading
,
49
Part Names
{
Pause/Redial
Pauses, Entering
Print Delivery Tray
Programmed Data
Programming
,
3
,
6
} key
,
18
,
3
Deleting
,
25
Storing and Editing
Fax Header
Fax Numbers
Group
Own Fax Number
Own Name
Quick Dial Numbers
Speed Dial Numbers
,
37
,
,
,
23
27
,
23
,
,
23
,
24
27
33
11
22
,
} keys
Deleting
Editing
Storing
, 18,
,
,
,
29
27
30
,
27
,
31
6
Quick Dial
Quick Dial Key Labels
{
Quick Dial
Quick Dial Number
R
Rear Covers
Receive File indicator
Reception Mode
{
Reception Mode
Resolution
{
Resolution
RTI → Own Name
,
4
Auto Receive
Manual Receive
,
16
} key
,
} key
,
,
5
22
,
22
,
6
5
,
23
S
3
Scroll Keys
Sending a Fax
Solutions to Common Problems
Speed Dial
Speed Dial Numbers
{
Speed Dial/Tel Directory
{
Start
Status Indicators
{
Stop
Storing and Editing Fax Numbers
Suitable Document Types
Switching to Tone Signals
Symbols
,
, 19,
Deleting
Editing
Storing
,
} key
,
} key
,
8
Entering
,
,
,
7
7
6
,
,
34
33
36
11
,
62
33
,
7
} key
,
6
,
27
,
10
,
18
46
69
Page 77

T
,
,
,
11
} key
,
,
53
7
14
,
,
6
49
,
,
49
,
23
{p} (Tone) key
Transmission
Immediate
Memory
Transmission Modes
{
Trans. Option
Troubleshooting
Clearing a Copy, Fax or Print Jam
Clearing a Document Jam
Common Problems
Communication Problems
Error Messages
Indicators
Loading Paper
Volume Adjustment
TTI → Fax Header
U
60
,
9
,
56
,
55
62
,
54
,
51
,
,
5
6
User Function keys
{
User Tools
} key
V
Ventilation Port
Volume Control
,
,
4
51
W
While the document is being scanned in
,
Wild Cards
46
,
13
70
Page 78

MEMO
71
Page 79

MEMO
72 UE USA H537
 Loading...