

Page 1
Operator Guide
5631
Digital Color Copier/Printer
your document ma nagement par tner
Page 2

Page 3

Introduction
This manual contains detailed instructions on the operation and maintenance of this machine. To get
maximum versatility from this machine all operators should carefully read and follow the instructions in
this manual. Please keep this manual in a handy place near the machine.
Please read the Safety Information before using this machine. It contains important information related
to USER SAFETY and PREVENTING EQUIPMENT PROBLEMS.
Notes:
Some illustrations might be slightly different from your machine.
Certain options might not be available in some countries. For details, please contact your local dealer.
Operator Safety:
This machine is considered a CDRH class 1 laser device, safe for office/EDP use. The machine contains two 15-milliwat, 760-800 nanometer wavelength, GaAIAs laser diodes. Direct (or indirect reflected) eye contact with the laser beam might cause serious eye damage. Safety precautions and interlock
mechanisms have been designed to prevent any possible laser beam exposure to the operator.
Laser Safety:
The Center for Devices and Radiological Health (CDRH) prohibits the repair of laser-based optical unit
in the field. The optical housing unit can only be repaired in a factory or at a location with the requisite
equipment. The laser subsystem is replaceable in the field by a qualified Customer Engineer. The laser
chassis is not repairable in the field. Customer engineers are therefore directed to return all chassis
and laser subsystems to the factory or service depot when replacement or the optical subsystem is required.
Warning:
Use of controls or adjustment or performance of procedures other than those specified in this manual
might result in hazardous radiation exposure.
Two kinds of size notation are employed in this manual. With this machine refer to the inch version.
For good copy quality, Ricoh recommends that you use genuine Ricoh toner.
Ricoh shall not be responsible for any damage or expense that might result from the use of parts other
than genuine Ricoh parts in your Ricoh office product.
Power Source:
120V, 60Hz, 12A or more
Please be sure to connect the power cord to a power source as above. For details about power source,
⇒ P.189 “Power Connection”.
Page 4

Note to users in the United States of America
Notice:
This equipment has been tested and found to comply with the limits for a Class B digital device, pursuant to Part 15 of the FCC Rules. These limits are designed to provide reasonable protection against
harmful interference in a residential installation. This equipment generates, uses and can radiate radio
frequency energy and, if not installed and used in accordance with the instructions, may cause harmful
interference to radio communications. However, there is no guarantee that interference will not occur
in a particular installation. If this equipment does cause harmful interference to radio or television reception, which can be determined by turning the equipment off and on, the user is encouraged to try to
correct the interference by one more of the following measures:
Reorient or relocate the receiving antenna.
Increase the separation between the equipment and receiver.
Connect the equipment into an outlet on a circuit different from that to which the receiver is
connected.
Consult the dealer or an experienced radio /TV technician for help.
Warning
Changes or modifications not expressly approved by the party responsible for compliance could void
the user's authority to operate the equipment.
Note to users in Canada
Note:
This Class B digital apparatus complies with Canadian ICES-003.
Remarque concernant les utilisateurs au Canada
Avertissement:
Cet appareil numérique de la classe B est conforme à la norme NMB-003 du Canada.
In accordance with IEC 60417, this machine uses the following symbols for the main power switch:
aaaa means POWER ON.
cccc means STAND BY.
Copyright © 2000 Ricoh Co., Ltd.
Page 5

Lanier 5631 Operating Instructions Copy Reference - Additional Information
Please note the following:
USA (This information is for facsimile option users only.)
❖FCC Requirements
1. This equipment complies with Part 68 of the FCC rules. On the cover of this equipment is a label that contains, among
other information, the FCC registration number and ringer equivalence number (REN) for this equipment. If requested,
this information must be provided to the telephone company.
2. This equipment uses the following USOC jack: RJ11C
3. The REN is used to determine the quantity of devices which may be connected to the telephone line. Excessive
REN's on the telephone line may result in the devices not ringing in response to an incoming call. In most, but not all
areas, the sum of the REN's should not exceed five (5.0). Contact the telephone company to determine the maximum
REN for the calling area.
4. If this equipment causes harm to the telephone network, the telephone company will notify you in advance that
temporary discontinuance of service may be required. If advance notice is not practical, the telephone company will
notify the customer as soon as possible. Also, you will be advised of your right to file a complaint with the FCC if you
believe it is necessary.
5. The telephone company may make changes in its facilities, equipment, operations, or procedures that could affect
the operation of the equipment. If this happens, the telephone company will provide advance notice in order for you
to make necessary modifications in order to maintain uninterrupted service.
6. In the event of operation problems (document jam, copy jam, communication error indication), refer to the solving
problems section in this manual.
7. If you cannot correct the problem, please contact the RICOH CORP. CUSTOMER SUPPORT DEPT. at 1-800-FASTFIX
for repair and warranty information. If it is causing harm to the telephone network, the telephone company may
request you to disconnect the equipment from the network until the problem is resolved.
8. This equipment cannot be used on telephone company-provided coin service. Connection to Party Line Service is
subject to state tariffs.
❖WHEN PROGRAMMING EMERGENCY NUMBERS AND/OR MAKING TEST CALLS TO EMERGENCY NUMBERS:
1. Remain on the line and briefly explain to the dispatcher the reason for the call before hanging up.
2. Perform such activities in the off-peak hours, such as early morning hours or late evenings.
CANADA (This information is for facsimile option users only.)
The Industry Canada label identifies certified equipment. This certification means that the equipment meets
telecommunications network protective, operational, and safety requirements as prescribed in the appropriate Terminal
Equipment Technical Requirements document(s). The department does not guarantee the equipment will operate to the
user's satisfaction.
Before installing this equipment, users should ensure that it is permissible to be connected to the facilities of the local
telecommunications company. The equipment must also be installed using an acceptable method of connection. The
customer should be aware that compliance with the above conditions may not prevent degradation of service in some
situations.
Repairs to certified equipment should be coordinated by a representative designated by the supplier. Any repairs or
alterations made by the user to this equipment, or equipment malfunctions, may give the telecommunications company
cause to request the user disconnect the equipment.
Users should ensure for their own protection that the electrical ground connections of the power utility, telephone lines,
and internal metallic water pipe system, if present, are connected together. This precaution may be particularly important
in rural areas.
Caution: Users should not attempt to make such connections themselves, but should contact the appropriate electric
inspection authority, or electrician, as appropriate.
The Ringer Equivalence Number (REN) assigned to each terminal device provides an indication of the maximum number
of terminals allowed to be connected to a telephone interface. The termination on an interface may consist of any
combination of devices subject only to the requirement that the sum of the Ringer Equivalence Numbers of all the
devices does not exceed 5.
B017-8651
Page 6

SDC326A / CS231 Operating Instructions <Copy Reference> - Additional Information
Please note the following:
USA (This information is for facsimile option users only.)
❖FCC Requirements
1. This equipment complies with Part 68 of the FCC rules. On the cover of this equipment is a label that contains, among
other information, the FCC registration number and ringer equivalence number (REN) for this equipment. If requested,
this information must be provided to the telephone company.
2. This equipment uses the following USOC jack: RJ11C
3. The REN is used to determine the quantity of devices which may be connected to the telephone line. Excessive
REN’s on the telephone line may result in the devices not ringing in response to an incoming call. In most, but not all
areas, the sum of the REN’s should not exceed five (5.0). Contact the telephone company to determine the maximum
REN for the calling area.
4. If this equipment causes harm to the telephone network, the telephone company will notify you in advance that
temporary discontinuance of service may be required. If advance notice is not practical, the telephone company will
notify the customer as soon as possible. Also, you will be advised of your right to file a complaint with the FCC if you
believe it is necessary.
5. The telephone company may make changes in its facilities, equipment, operations, or procedures that could affect
the operation of the equipment. If this happens, the telephone company will provide advance notice in order for you
to make necessary modifications in order to maintain uninterrupted service.
6. In the event of operation problems (document jam, copy jam, communication error indication), refer to the solving
problems section in this manual.
7. If you cannot correct the problem, please contact the SAVIN CORPORATION at 1-203-967-5000 for repair and
warranty information. If it is causing harm to the telephone network, the telephone company may request you to
disconnect the equipment from the network until the problem is resolved.
8. This equipment cannot be used on telephone company-provided coin service. Connection to Party Line Service is
subject to state tariffs.
❖WHEN PROGRAMMING EMERGENCY NUMBERS AND/OR MAKING TEST CALLS TO EMERGENCY NUMBERS:
1. Remain on the line and briefly explain to the dispatcher the reason for the call before hanging up.
2. Perform such activities in the off-peak hours, such as early morning hours or late evenings.
CANADA (This information is for facsimile option users only.)
The Industry Canada label identifies certified equipment. This certification means that the equipment meets
telecommunications network protective, operational, and safety requirements as prescribed in the appropriate Terminal
Equipment Technical Requirements document(s). The department does not guarantee the equipment will operate to the
user’s satisfaction.
Before installing this equipment, users should ensure that it is permissible to be connected to the facilities of the local
telecommunications company. The equipment must also be installed using an acceptable method of connection. The
customer should be aware that compliance with the above conditions may not prevent degradation of service in some
situations.
Repairs to certified equipment should be coordinated by a representative designated by the supplier. Any repairs or
alterations made by the user to this equipment, or equipment malfunctions, may give the telecommunications company
cause to request the user disconnect the equipment.
Users should ensure for their own protection that the electrical ground connections of the power utility, telephone lines,
and internal metallic water pipe system, if present, are connected together. This precaution may be particularly important
in rural areas.
Caution: Users should not attempt to make such connections themselves, but should contact the appropriate electric
inspection authority, or electrician, as appropriate.
The Ringer Equivalence Number (REN) assigned to each terminal device provides an indication of the maximum number
of terminals allowed to be connected to a telephone interface. The termination on an interface may consist of any
combination of devices subject only to the requirement that the sum of the Ringer Equivalence Numbers of all the
devices does not exceed 5.
B017-8652
Page 7

Notice
Do not make copies of any item for which copying is prohibited by law.
Copying the following items is normally prohibited by local law:
Bank bills, revenue stamps, bonds, stock certificates, bank drafts, checks, passports, driver's licenses.
The color copy samples in this book may differ slightly from the actual copies
due to printing effects.
The color on each Color key may differ slightly from that of the actual copy.
This machine is equipped with a function that prevents making counterfeit bank
bills. Due to this function the original images similar to bank bills may not be
copied properly.
i
Page 8
Safety Information
R
R
When using your equipment, the following safety precautions should always be
followed.
Safety During Operation
In this manual, the following important symbols are used:
WARNING:
CAUTION:
Indicates a potentially hazardous situation which, if instructions
are not followed, could result in death or serious injury.
Indicates a potentially hazardous situation which, if instructions are not
followed, may result in minor or moderate injury or damage to property.
R WARNING:
• Connect the power cord directly into a wall outlet and never use an extension cord.
• Disconnect the power plug (by pulling the plug, not the cable) if the
power cable or plug becomes frayed or otherwise damaged.
• To avoid hazardous electric shock or laser radiation exposure, do not
remove any covers or screws other than those specified in this manual.
• Turn off the power and disconnect the power plug (by pulling the plug,
not the cable) if any of the following conditions exists:
• You spill something into the equipment.
•
You suspect that your equipment needs service or repair.
•
Your equipment's cover has been damaged.
• Do not incinerate spilled toner or used toner. Toner dust might ignite
when exposed to an open flame.
• Disposal can take place at our authorized dealer or at appropriate collection sites.
• Dispose of the used toner cartridge in accordance with the local regulation.
ii
Page 9

R CAUTION:
• Protect the equipment from dampness or wet weather, such as rain, snow,
and so on.
• Unplug the power cord from the wall outlet before you move the equipment.
While moving the equipment, you should take care that the power cord will
not be damaged under the equipment.
• When you disconnect the power plug from the wall outlet, always pull the
plug (not the cable).
• Do not allow paper clips, staples, or other small metallic objects to fall inside
the equipment.
• Keep toner (used or unused) and toner cartridge out of the reach of children.
• For environmental reasons, do not dispose of the equipment or expended
supply waste at household waste collection points. Disposal can take place
at an authorized dealer or at appropriate collection sites.
• The inside of the machine could be very hot. Do not touch the parts with a
label indicating the “hot surface”. Otherwise it could cause a personal burn.
• Our products are engineered to meet high standards of quality and functionality, and we recommend that you only use the expendable supplies available at an authorized dealer.
iii
Page 10

How to Read This Manual
R
R
Symbols
In this manual, the following symbols are used:
WARNING:
This symbol indicates a potentially hazardous situation that might result in
death or serious injury when you misuse the machine without following the instructions under this symbol. Be sure to read the instructions, all of which are described in the Safety Information section.
CAUTION:
This symbol indicates a potentially hazardous situation that might result in minor or moderate injury or property damage that does not involve personal injury
when you misuse the machine without following the instructions under this
symbol. Be sure to read the instructions, all of which are described in the Safety
Information section.
WARNINGS and CAUTIONS are notes for your safety.
Important
If this instruction is not followed, paper might be misfed, originals might be
damaged, or data might be lost. Be sure to read this.
Preparation
This symbol indicates the prior knowledge or preparations required before operating.
Note
This symbol indicates precautions for operation or actions to take after misoperation.
Limitation
This symbol indicates numerical limits, functions that cannot be used together,
or conditions in which a particular function cannot be used.
Reference
This symbol indicates a reference.
[]
Keys that appear on the machine's panel display.
{}
Keys built into the machine's operation panel.
iv
Page 11

TABLE OF CONTENTS
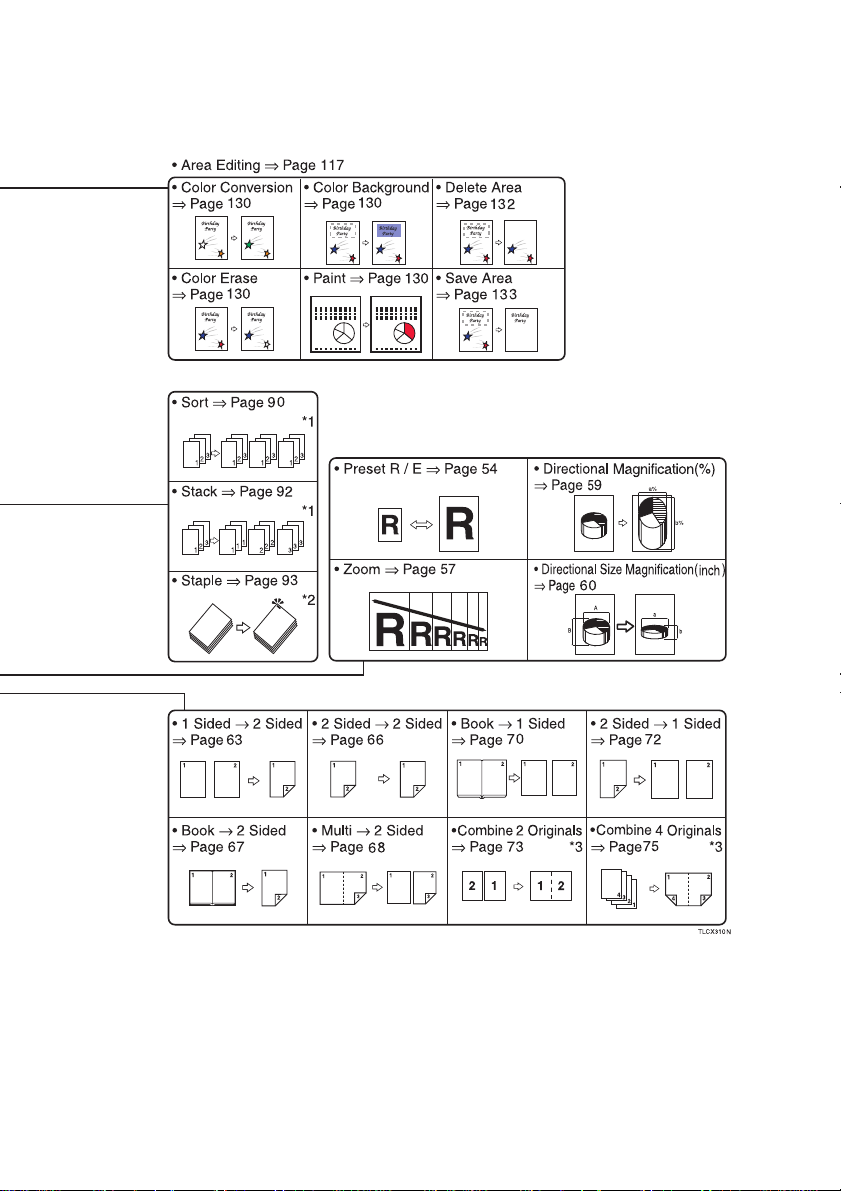
What You Can Do with This Machine ...................................................... 2
Guide To Components.............................................................................. 4
Options....................................................................................................... 6
Operation Panel......................................................................................... 7
Using the Touch Panel Display................................................................ 8
Selecting Functions....................................................................................... 8
Entering Numbers ......................................................................................... 9
Color Sample Chart................................................................................. 10
1.Basics
Turning On the Power............................................................................. 11
Turning on the Main Power......................................................................... 11
Starting the Machine ................................................................................... 12
Originals ................................................................................................... 14
Standard Size Originals .............................................................................. 14
Recommended Originals............................................................................. 14
Non-recommended Originals for the Document Feeder ............................. 14
Setting Originals on the Exposure Glass.............................................. 16
Setting a Stack of Originals in the Document Feeder.......................... 17
Setting one Original at a Time in the Document Feeder...................... 19
Setting Originals of Different Sizes in the Document Feeder ............. 21
Setting Custom Sized Originals............................................................. 22
Removing the Platen Cover to Copy a Large Original......................... 24
2.Copying
Basic Procedure ...................................................................................... 25
Adjusting Copy Image Density .................................................................... 26
Selecting a Color Mode............................................................................... 28
Twin color mode.......................................................................................... 31
Selecting the Original Image Type .............................................................. 33
Selecting the Copy Paper Size ................................................................... 36
Copying from the Bypass Tray.................................................................... 37
Auto Reduce/Enlarge.................................................................................. 48
Energy Saver Mode .................................................................................... 49
Auto Off Mode............................................................................................. 49
Interrupt copying ......................................................................................... 50
Auto Start .................................................................................................... 51
Program ...................................................................................................... 51
Check Modes .............................................................................................. 53
Counter ....................................................................................................... 54
Preset R/E................................................................................................... 54
v
Page 12

Zoom........................................................................................................... 57
Directional Magnification (%) ...................................................................... 59
Directional Size Magnification (inch) ........................................................... 60
Duplex—Making 2 Sided Copies............................................................ 63
1 Sided → 2 Sided ...................................................................................... 63
2 Sided → 2 Sided ...................................................................................... 66
Book → 2 Sided .......................................................................................... 67
Multi → 2 Sided........................................................................................... 68
Series Copies........................................................................................... 70
Book → 1 Sided .......................................................................................... 70
2 Sided → 1 Sided ...................................................................................... 72
Combine ................................................................................................... 73
Combine 2 Originals.................................................................................... 73
Combine 4 Originals.................................................................................... 75
Shifting the Image ................................................................................... 76
Shift............................................................................................................. 76
Margin Adjustment ...................................................................................... 77
Cover Sheet.............................................................................................. 79
Front Cover ................................................................................................. 79
Front and Back Cover ................................................................................. 80
Color Creation.......................................................................................... 83
Color Conversion ........................................................................................ 83
Color Erase ................................................................................................. 85
Color Background ....................................................................................... 86
Image Creation......................................................................................... 88
Mirror........................................................................................................... 88
Positive/Negative ........................................................................................ 89
Finishing................................................................................................... 90
Sort.............................................................................................................. 90
Stack ........................................................................................................... 92
Staple.......................................................................................................... 93
Combination Chart .................................................................................. 97
3.Adjustment and Color Memory
Color Balance ........................................................................................ 103
Color Balance Adjustment......................................................................... 103
Color Balance Program............................................................................. 104
Color Adjustment .................................................................................. 106
Image Adjustment ................................................................................. 108
Soft/Sharp, Contrast, Background Density, and Pastel ............................ 109
U.C.R. Adjustment, A.C.S. Sensitivity and Auto Text/Photo Sensitivity.... 110
Program User Color .............................................................................. 111
Adjusting Colors Based on the Selected Color ......................................... 111
Mixing Colors Manually with the Number Keys ......................................... 113
Sampling the User Color (Option)............................................................. 115
vi
Page 13

4.Area Editing (Option)
What is Area Editing? ........................................................................... 117
How to Edit Areas.................................................................................. 118
Designating Areas ................................................................................. 119
Designate Area Display............................................................................. 120
Designate Area Tools................................................................................ 121
Area Shapes ............................................................................................. 122
Frame/Line................................................................................................ 125
Notes for Designating Areas..................................................................... 128
Selecting Modes for Designated Areas............................................... 130
Area Editing............................................................................................... 131
Delete Area ............................................................................................... 132
Save Area ................................................................................................. 133
Frame/Line................................................................................................ 134
Selecting Modes for Outside Designated Areas................................. 135
Area Shapes ............................................................................................. 136
Changing Basic Settings for the Entire Image ................................... 138
Checking and Changing Areas ............................................................ 140
Change Modes.......................................................................................... 140
Adding Areas............................................................................................. 141
Erasing an Area ........................................................................................ 142
Erasing a Group........................................................................................ 143
Exiting Area Editing .............................................................................. 145
Combination Chart for Area Editing.................................................... 146
5.What to Do if Something Goes Wrong
If Your Machine Does not Operate as You Want ................................ 149
If You Cannot Make Copies as You Want............................................ 151
B Loading Paper................................................................................... 154
Non-recommended Paper for Paper Trays ............................................... 154
Loading Paper in the Paper Tray .............................................................. 155
D Changing The Toner Cartridge........................................................ 156
Pulling Out the Toner Cartridge ................................................................ 156
Setting the New Toner Cartridge............................................................... 159
x Clearing Misfeeds............................................................................. 161
Check the Misfeed Location Display ......................................................... 161
Clearing Paper Misfeeds........................................................................... 162
d Adding Staples ................................................................................. 164
e Removing Jammed Staples............................................................. 166
vii
Page 14

6.Changing the Machine's Settings
Changing Paper Size............................................................................. 169
Changing Paper Size with the User Tools ................................................ 171
User Tools .............................................................................................. 173
Accessing the User Tools ......................................................................... 173
Exiting from the User Tools....................................................................... 174
Setting You can Change with the User Tools (System Settings).............. 175
Settings You can Change with the User Tools (Copier Features) ............ 179
7.Others
Do's and Don'ts ..................................................................................... 187
Where to Put Your Machine.................................................................. 188
Machine Environment ............................................................................... 188
Power Connection..................................................................................... 189
Access to Machine.................................................................................... 190
Maintaining Your Machine .................................................................... 191
Exposure Glass......................................................................................... 191
Platen Cover ............................................................................................. 191
Document Feeder ..................................................................................... 192
Remarks ................................................................................................. 193
Copier........................................................................................................ 193
Use and Storage of Supplies................................................................ 194
Copy Paper ............................................................................................... 194
Paper Storage ........................................................................................... 195
Toner Storage ........................................................................................... 195
8.Specification
Mainframe............................................................................................... 197
Document Feeder (Option)................................................................... 201
20-bin Sorter Stapler (Option).............................................................. 202
10-bin Sorter Stapler (Option).............................................................. 203
3-bin Sorter (Option) ............................................................................. 204
1000-sheet Tray Unit (Option) .............................................................. 205
1500-sheet Tray Unit (Option) .............................................................. 206
Multi-access ........................................................................................... 207
INDEX...................................................................................................... 209
viii
Page 15

1
Page 16

What You Can Do with This Machine
Tlcx301n.eps
2
Page 17
eps
3
Page 18
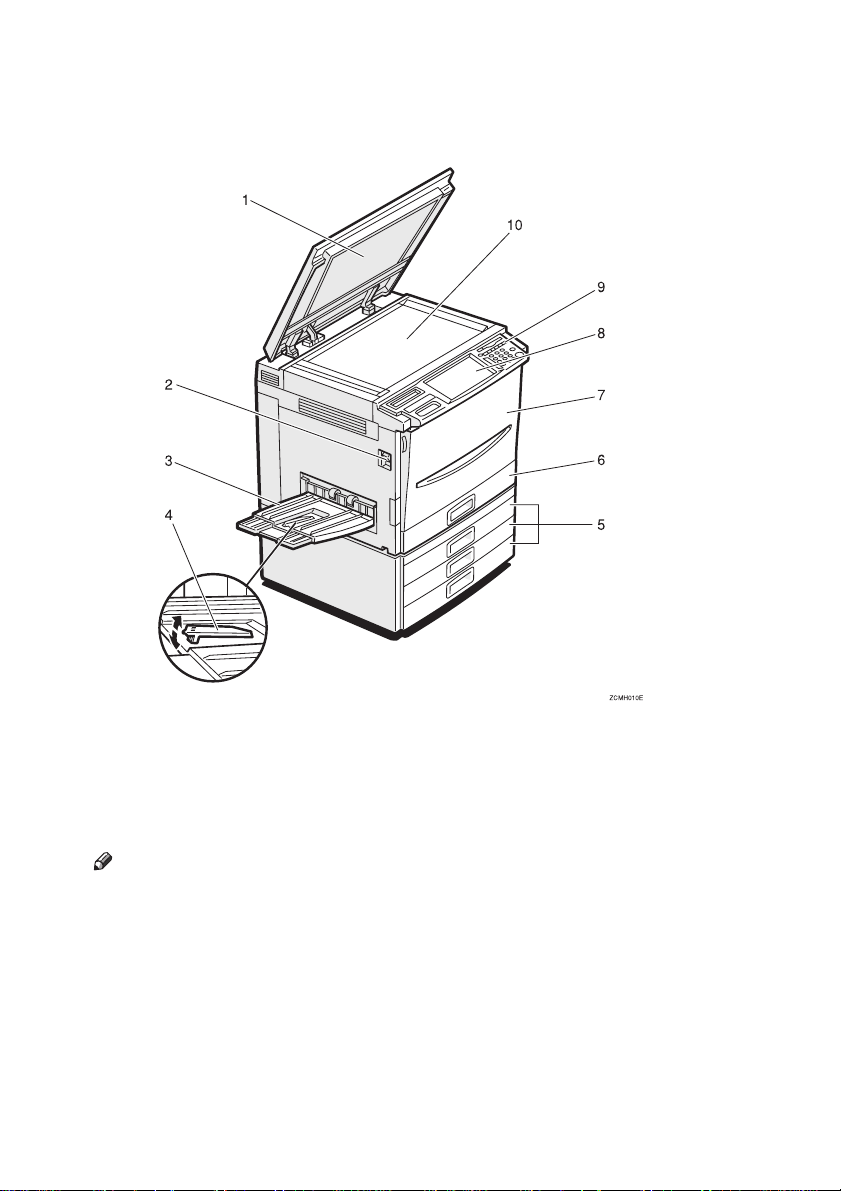
Guide To Components
Zcmh010e.eps
1.
Platen cover (option)
Lower this cover over originals placed on
the exposure glass for copying.
2.
Main power switch
To start the machine, turn on this switch.
Note
❒ If the machine does not operate after
turning on the operation switch, check
if the main power switch is turned on.
If it is off, turn it on.
3.
Copy tray
Completed copies are delivered here.
4.
Stopper
When you copy onto thin paper, raise
this to prevent curling.
4
5.
Paper tray
B
Set paper here. ⇒ P.154 “
per”.
6.
Auto duplex tray
Use to make two-sided copies.
7.
Front cover
Open to access the inside of the machine.
8.
Operation panel
⇒ P.7 “Operation Panel”.
9.
Operation switch
Press this switch to turn the power (on
the On indicator goes on). To turn off the
power off, press this switch again (the On
indicator goes off).
10.
Exposure glass
Position originals here face down for
copying.
Loading Pa-
Page 19

Zcmh021e.eps
1.
Bypass tray
Use to copy onto OHP transparencies,
adhesive labels, translucent paper, post
cards, and custom size paper, ⇒ P.37
“Copying from the Bypass Tray”.
2.
Right side cover/Lower right cov-
er
Open this cover to remove jammed paper.
3.
Ventilation holes
Prevent overheating. Do not obstruct the
ventilation holes by placing or leaning an
object near them. If the machine overheats, a fault might occur.
5
Page 20

Options
This machine can be provided with the following options:
Zcmp010e.eps
1.
Platen cover
Lower this cover over originals placed on
the exposure glass for copying.
2.
Document feeder (ADF)
Insert a stack of originals here. They will
be fed automatically.
3.
Original tray
Put your originals.
4.
1000-sheet tray unit (two 500-
sheet trays)
Consists of two paper trays.
Other Options:
• Controller Interface Unit
• Printer Controller
5.
1500-sheet tray unit (three 500-
sheet trays)
Consists of three paper trays.
6.
20-bin sorter stapler
Sorts, stacks, and staples copies.
7.
3-bin sorter
Sorts and stacks copies.
8.
10-bin sorter stapler
Sorts, stacks, and staples copies.
6
Page 21

Operation Panel
Zcms011n.eps
1.
Touch panel display
You can see the operation status and
messages here.
2.
Screen Contrast knob
You can change the brightness of the display.
3.
{{{{User Tools}}}} key
Press to change the default setting. ⇒
P.173 “User Tools”.
4.
{{{{Adjustment}}}} key
Press to adjust the image or color balance,
or to make user colors. ⇒ P.103 “Adjust-
ment and Color Memory”.
5.
{{{{Program}}}} key
Press to select the program mode. ⇒ P.51
“Program”.
6.
{{{{Clear Modes}}}} key
Press to clear the previously entered settings.
7.
{{{{Interrupt}}}} key
Press to make interrupt copies. ⇒ P.50
“Interrupt copying”.
8.
{{{{Energy Saver}}}} key
Press to enter/exit the Energy Saver
mode. ⇒ P.49 “Energy Saver Mode”.
9.
{{{{Counter}}}} key
Press to display the total number of copies made.
10.
Main Power indicator
This indicator goes on when the main
power switch is turned on, and goes off
when the switch is turned off.
11.
On indicator
This indicator goes on when the operation switch is turned on, and goes off
when the switch is turned off.
12.
Operation switch
Press this switch to turn the power on
(the On indicator goes on). To turn the
power off, press this switch again (the On
indicator goes off).
13.
{{{{Clear/Stop}}}} key
Press to cancel the copy number entered.
While copying, press to stop copying.
This key is also used to clear data.
14.
{{{{Start}}}} key
Press to start copying.
15.
{{{{#}}}} key
Press to enter data in selected modes.
16.
Number keys
Use to enter the desired number of copies. They are also used to enter data.
7
Page 22

Using the Touch Panel Display
Selecting Functions
On the touch panel display, you can find keys, instructions and messages. By
pressing keys on the display, you can select or deselect functions, and enter data
for the selected modes. If you make a mistake and wish to clear the current settings, press the {Clear Modes} key.
Zcmp022n.eps
1.
Messages and instructions appear
here.
2.
Total number of copies to make
3.
COPY COUNTER
Counts number of copies made so far.
Note
❒ You can select whether the copy
counter counts up (counter up) or
counts down (counter down). If you
want to change the setting, ⇒ P.175
“System settings”.
Keys that do not have the option of being selected are fainter.
In this manual, keys on the display are indicated as follows:
Example:
• Key on the display:
• In the manual: [Auto Paper Select] key
Note
❒ Do not press the touch panel display with any hard or sharp object.
This machine's features are accessed by
simply pressing the name of the feature
and following the instructions that come
up on the display.
4.
Keys that have been selected.
5.
Keys that have the option of be-
ing selected.
8
Page 23
Entering Numbers
When the display prompts you to enter a number, type in the number with the
number keys and press the [#] key on the display to accept it.
Should you make a mistake:
• If you have not pressed the [#] key yet, press the [Clear] key and then re-enter
it. If there is not the [Clear] key on the display, press the {Clear/Stop} key.
• If you have already pressed the [#] key, press the item you wish to change on
the display and re-enter the number with the number keys. Press the [#] key
on the display to accept it.
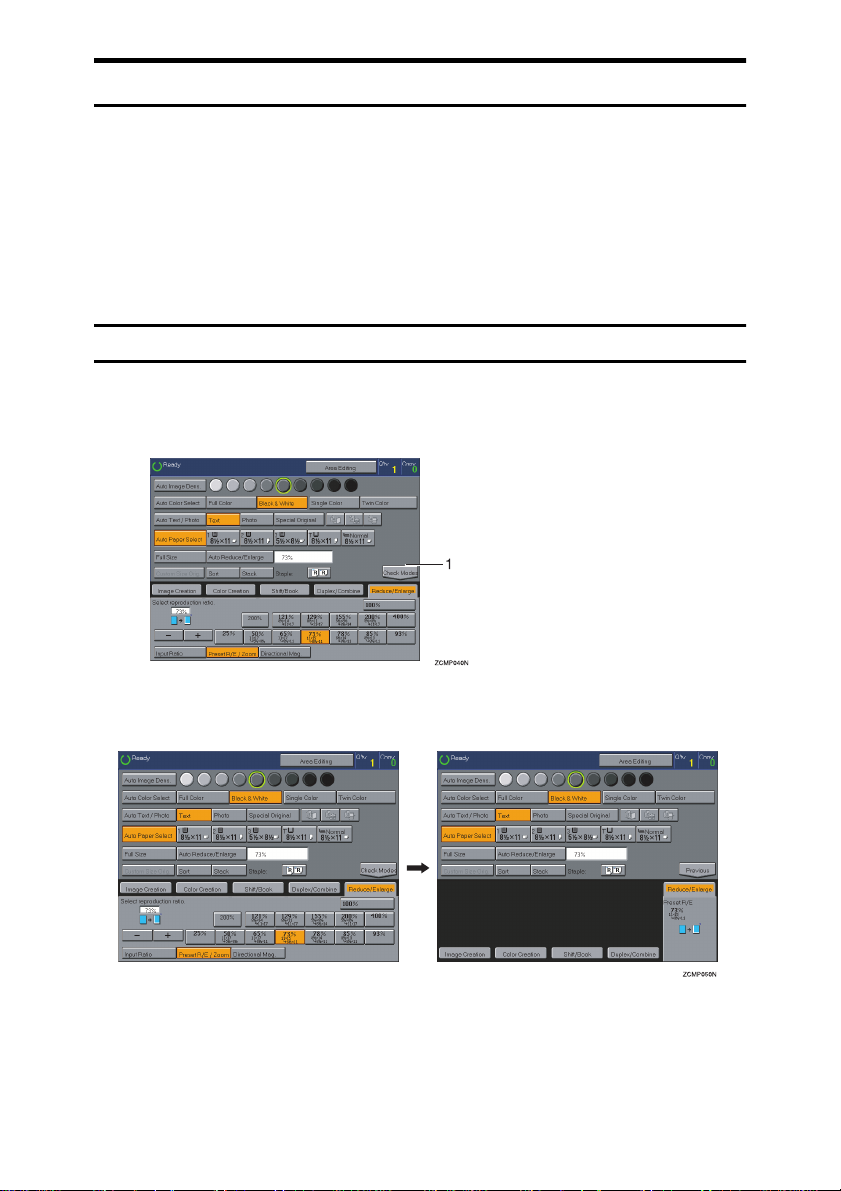
Checking the Functions You Have Selected
When you set one or more copy settings, the last item you selected will remain
on the screen.
Zcmp040n.eps
1.
{{{{Check Modes}}}} key
To check all the settings you have set so far, press the [
Zcmp050n.eps
Check Modes
] key.
9
Page 24
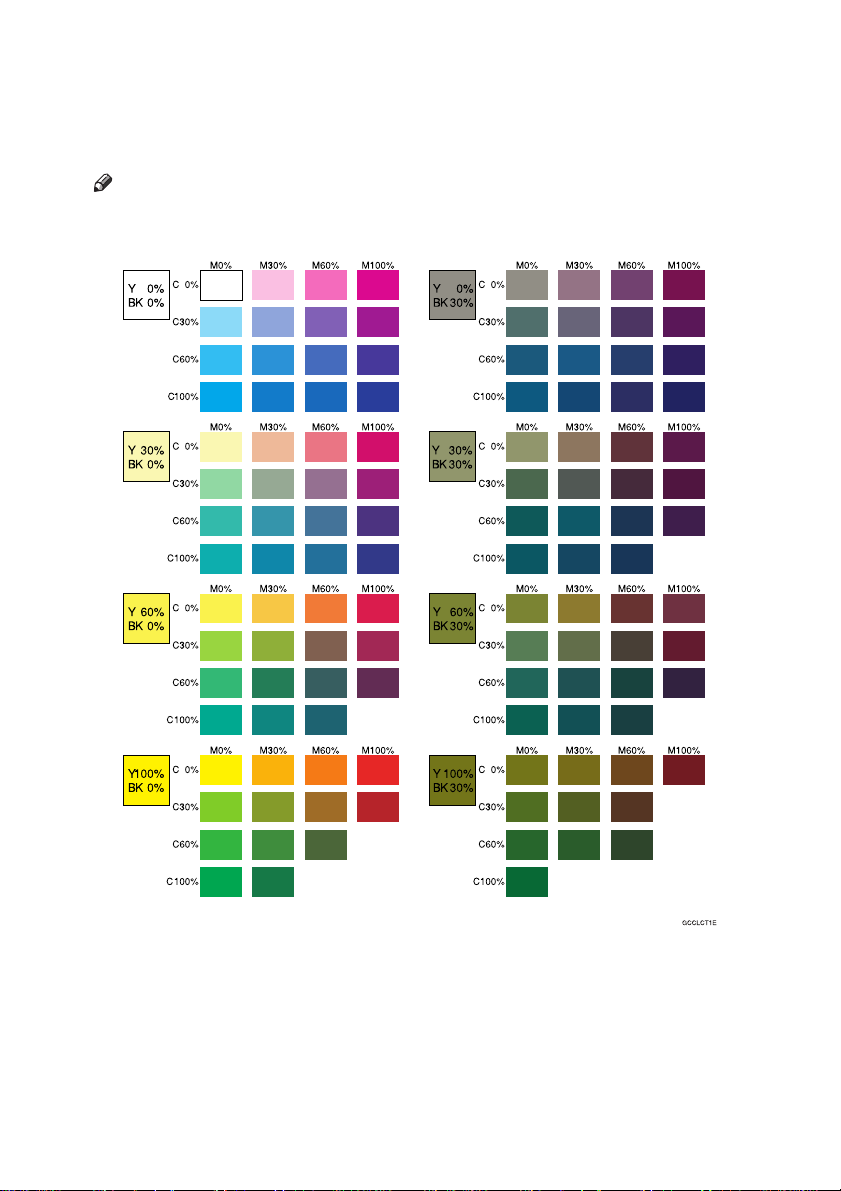
Color Sample Chart
This is the User Color sample. You can mix the basic colors to make your own
colors (User Color).
Note
❒ The color sample might differ somewhat from actual copies due to printing
effects.
GCCLCT1E.eps
10
Page 25

1. Basics
Turning On the Power
To start the machine, press the operation switch to turn the power on.
Note
❒ This machine automatically enters Energy Saver mode or turns itself off if you
do not use the machine for a while. For details, ⇒ P.49 “Energy Saver Mode”.
For details Auto Timer, ⇒ P.175 “System settings”.
----Power Switches
This machine has the operation switch and main power switch.
❖❖❖❖ Operation switch (right side of the operation panel)
Press this switch to activate the machine. When the machine has warmed up,
you can make copies.
❖❖❖❖ Main power switch (left side of the machine)
When the machine is not to be used for an extended period of time, turn off
the main power switch.
Turning on the Main Power
Make sure that the power cord is firmly plugged into the wall outlet.
A
Turn on the main power switch.
B
Trsh080n.eps
11
Page 26
Basics
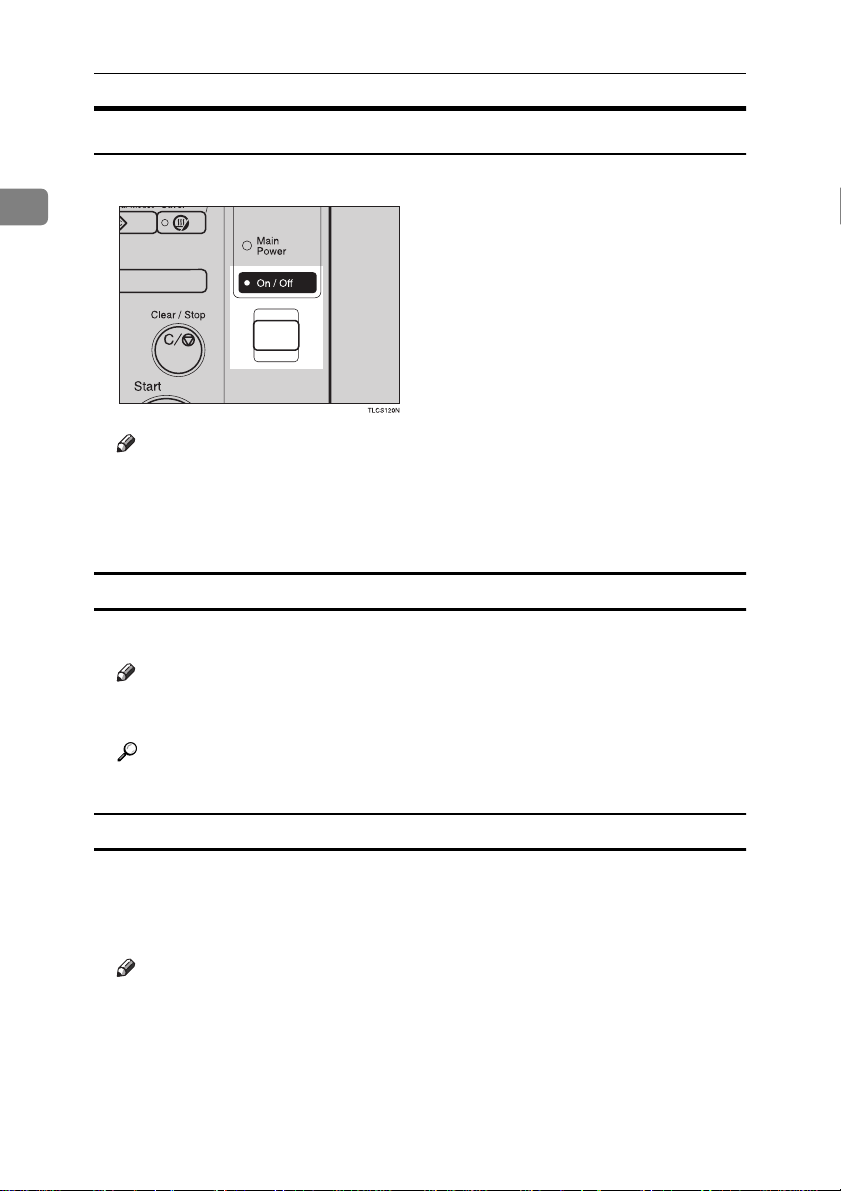
Starting the Machine
Press the operation switch to make the On indicator go on.
A
1
Tlcs120n.eps
Note
❒ If the power is not turned on when the operation switch is pressed, check
if the main power switch is on. If off, turn it on.
❒ During the warm-up period (Less than 270 seconds), you can use the Auto
Start function. ⇒ P.51 “Auto Start”.
When the machine is set for user codes
Enter your user code using the number keys. Then press the {{{{#}}}} key.
A
Note
❒ To prevent others from making copies with your user code, press the {Clear
Modes} key and the {Clear /Stop} key simultaneously after copying.
Reference
For more about user codes, ⇒ P.179 “General Features”.
When the Energy Saver indicator is lit
The machine is in Energy Saver mode.
Press any key.
A
The machine will return to the ready condition.
Note
❒ The machine will also return to the ready condition when an original is set
in the document feeder, or when the platen cover or the document feeder
is opened.
12
Page 27

Shutting down the machine
Press the operation switch to make the On indicator go off.
A
Turning On the Power
Turning off the main power
Turn off the main power switch.
A
The main power indicator of the control panel goes off.
1
13
Page 28

Basics
Originals
1
Standard Size Originals
The machine will detect originals of the following sizes and directions as standard size originals:
❖❖❖❖ When you set originals on the exposure glass
Metric version
Inch version
A3L, B4L, A4LK, B5LK, 8
1
11"×17"L, 10"×14"L, 8
/2"×14"L, 81/2"×11"
1
/2"×13"L
*1
, 81/4"×13"L
LK
*1
, 8"×13"L
*1
❖❖❖❖ When you set originals in the document feeder
Metric version
Inch version
*181
/2"×13", 81/4"×13" or 8"×13" can be set by your service representative.
A3L, B4L, A4LK, B5LK, A5LK, B6LK, 11"×17"L, 81/2"×11"LK,
1
8
/2"×13"L
A4LK, 11"×17"L, 11"×15"L, 10"×14"L, 8
LK
*1
, 81/4"×13"L
1
/4"×13"L, 8"×13"L, 8"×10"L, 51/2"×81/2"
, 8
*1
, 8"×13"L
*1
1
/2"×14"L, 81/2"×13"L, 81/2"×11"
LK
Recommended Originals
Reference
For originals that the document feeder can handle, ⇒ P.201 “Document Feeder
(Option)”.
Non-recommended Originals for the Document Feeder
Note
❒ The following types of originals are not recommended for use with the docu-
ment feeder. Place them directly on the exposure glass.
2
• Originals thicker than 128g/m
• Originals thinner than 40g/m
• For originals between 40 and 52g/m
, 34 lb
2
, 11 lb
2
, 11 and 14 lb, the document feeder
must be set to ADF Thin paper mode with the user tools.
• Originals larger than A3, 11"×17"
1
• Originals smaller than B6LK, 5
/2" × 81/2"LK
• Folded, curled, creased, or damaged originals
• Mailing labels, or perforated originals
• Bound, stapled, or clipped originals
14
Page 29

Originals
• OHP transparencies
• Translucent paper
• Pasted originals
• Damp originals
• Sticky originals
• Wavy originals
• Originals that are not made from paper
• Originals written in pencil on both sides, or two-sided carbon originals
• Thermal fax paper, CRO (camera ready originals) or aluminum foil
• Books, pamphlets, and booklets
1
15
Page 30

Basics
Setting Originals on the Exposure Glass
Lift the platen cover or the document feeder.
A
1
Set the original face down on the exposure glass. The original should be
B
aligned to the rear left corner.
Trsr010e.eps
1.
Reference mark
2.
Scale
Note
❒ Start with the first page to be copied.
16
Lower the platen cover or the document feeder.
C
Page 31

Setting a Stack of Originals in the Document Feeder
Setting a Stack of Originals in the
Document Feeder
You can insert a stack of originals into the document feeder. These originals are
individually fed onto and removed from the exposure glass.
Note
❒ Some originals are unsuitable for the document feeder. ⇒ P.14 “Non-recom-
mended Originals for the Document Feeder”.
❒ Do not press down or hold originals after inserting them.
❒ While originals are fed from the original table to the exposure glass, do not
pull them out.
❒ Do not lift the document feeder until the original has been completely fed out.
Correct any curl, fold, or crease in the originals before setting them.
A
Make sure the Insert Original indicator is lit and the exposure glass is clear
B
of originals.
Trsr050e.eps
TRSR050E
Adjust the guide to the original size.
C
1
17
Page 32

Basics
Set the originals face up into the document feeder until the Insert Original
D
indicator goes off.
Tcar060e.eps
1
1
1.
Limit mark
2.
Original guide
Note
❒ The last page should be on the bottom.
❒ The original guide must touch the front side of the originals.
❒ Do not stack originals above the limit mark.
2
18
Page 33

Setting one Original at a Time in the Document Feeder
Setting one Original at a Time in the
Document Feeder
If you set one original at a time in the document feeder, the second and subsequent originals can be fed and copied automatically without pressing the {Start}
key.
Note
❒ Do not press down or hold originals after inserting them.
❒ While originals are fed from the original table to the exposure glass, do not
pull them out.
❒ Do not lift the document feeder until the original has been completely fed out.
Correct any curl, fold, or crease in the originals before setting them.
A
Make sure the Insert Original indicator is lit and the exposure glass is clear
B
of originals.
Trsr050e.eps
TRSR050E
Adjust the guide to the original size.
C
1
Set the original face up into the document feeder until the Insert Original
D
indicator goes off.
Note
❒ If you are copying a stack of originals one sheet at a time and you want to
keep them in order, start with the last page of the originals.
❒ The original guide must touch the front side of the original.
Press the {{{{Start}}}} key.
E
19
Page 34

Basics
While the Auto Feed indicator is lit after an original is fed, set the next orig-
F
inal. The original is automatically fed and copied.
Tcar070e.eps
1
Note
❒ You can adjust the time the machine waits before being ready for the next
original with the user tools.
20
Page 35

Setting Originals of Different Sizes in the Document Feeder
Setting Originals of Different Sizes in the
Document Feeder
Preparation
To use this function, you have to select ADF Mixed Sizes mode with the user
tools. ⇒ P.184 “Duplex/ADF/Sorter”.
You can insert a stack of originals of different standard sizes (e.g. A4, B5 etc.) into
the document feeder. These originals are individually fed onto and removed
from the exposure glass.
Limitation
❒ The weight of originals that can be set with this function is 52 - 81g/m
20 lb.
❒ Smaller size originals might be skewed a little.
Note
❒ If your stack of originals contains pages of different sizes, make sure that:
• Longer originals are at the bottom of the stack, and shorter originals are at
the top.
• All originals are flush with the back fence of the document feeder.
Align the rear and left edges of the originals as shown in the illustration.
A
Gcgenk0n.eps
2
, 14 -
1
1.
Document feeder feed direction.
2.
Vertical size
Adjust the guide to the widest original size.
B
Set the aligned originals face up into the document feeder.
C
21
Page 36

Basics
Setting Custom Sized Originals
When copying from custom sized originals, specify the size of the originals so
1
that copies are well aligned.
Limitation
❒ You must set your custom size originals on the exposure glass.
Reference
For the standard sizes the machine can detect, ⇒ P.14 “Standard Size Origi-
nals”.
Note
❒ The dimensions you can enter must be within the following ranges:
Vertical size 50 - 297mm (in 1mm steps), 2.0" - 11.7" (in 0.1" steps)
Horizontal size 50 - 432mm (in 1mm steps), 2.0" - 17" (in 0.1" steps)
Select the copy paper size.
A
Press the [Custom Size Orig.] key.
B
copy4na.tif
22
Make sure that the [Orig. Horiz.] key is selected. Enter the horizontal size
C
with the number keys, then press the [#] key.
copy5na.tif
Note
❒ To change the value entered, press the [Clear] key and enter a new value.
Page 37

Setting Custom Sized Originals
Press the [
D
then press the [#] key.
Press the [OK] key.
E
Set your original on the exposure glass, then press the {{{{Start}}}} key.
F
Orig. Vert.
] key and enter the vertical size with the number keys,
1
23
Page 38

Basics
Removing the Platen Cover to Copy a Large Original
1
You can remove the platen cover to copy a large (more than A3, 11" × 17") original.
Note
❒ You cannot remove the document feeder.
To remove the platen cover, lift it out.
Tlch060e.eps
Note
❒ Lift the platen cover with both hands. Place the removed cover on a flat sur-
face, such as a desk, and where it will not be damaged.
To reset the platen cover, align the pins of the platen cover and the holes of the
copier. Then push the platen cover onto the copier.
Tlch061e.eps
24
Page 39

2. Copying
Basic Procedure
Set your original on the exposure glass or in the document feeder. ⇒⇒⇒⇒ P.28
A
“Full color copy mode”, ⇒⇒⇒⇒ P.33 “Auto Text/Photo mode”, or ⇒⇒⇒⇒ P.36 “Auto
paper select”.
Make sure that the [Black & White], [Text], [Auto Paper Select], [Full Size] keys are
B
selected.
copy6na.tif
Note
❒ Full Color copy mode. ⇒ P.28 “Full color copy mode”.
❒ Auto Text/Photo. ⇒ P.33 “Auto Text/Photo mode”.
❒ Auto Paper Select. ⇒ P.36 “Auto paper select”.
Enter the number of copies required using the number keys.
C
Tlcs140n.eps
Note
❒ To change the number entered, press the {Clear/Stop} key, then enter the
new number.
25
Page 40

Copying
Press the {{{{Start}}}} key.
D
Tlcs060n.eps
2
Note
❒ To stop the machine during a multi-copy run, press the {Clear/Stop} key.
❒ If you want to change the settings, press the {Clear/Stop} key. If you want
to resume the copy run, press the {Start} key.
❒ To return the machine to the initial condition after copying, press the {Clear
Modes} key.
Adjusting Copy Image Density
Image density affects the contrast of copies. With these functions you can control
the image density so that copies match originals. Make the selection you require
then set your originals and press the {Start} key.
Auto image density
The machine automatically controls the image density.
If Auto Color Select mode is selected, select other color modes to cancel it.
A
⇒⇒⇒⇒ P.28 “Selecting a Color Mode”.
Press the [Auto Image Density] key.
B
copy1na.tif
26
Page 41

Basic Procedure
Manual image density
If you require darker or lighter copies, adjust the image density yourself.
If [
A
Auto Image Density
Press the desired color density level.
B
copy6na.tif
Combined auto and manual image density
Use when copying originals with a dirty background (such as newspapers). You
can adjust the foreground density while masking out the dark background.
If Auto Color Select mode is selected, select other color modes to cancel it.
A
⇒⇒⇒⇒ P.28 “Selecting a Color Mode”.
Press the [Auto Image Density] key.
B
copy1na.tif
] key is selected, press it to cancel it.
2
Press the desired color density level.
C
27
Page 42

Copying
Selecting a Color Mode
Select a color mode that best suits your originals and copying requirements.
Auto color select mode
2
The machine automatically detects whether the original has color parts or not.
Originals with only black images will be copied in Black & White mode. Originals with some color areas will be copied in Full Color mode.
Note
❒ If you make one copy set of a black original using the document feeder, it is
recommended to select Black & White mode. If you choose Auto Color Select
mode, the machine will reset the color selection for every original page, taking a long time to complete the job.
Press the [Auto Color Select] key.
A
copy8na.tif
Set your originals, then press the {{{{Start}}}} key.
B
Full color copy mode
This function makes copies in full color.
Note
❒ You can adjust the overall color tone of copies. ⇒ P.103 “Color Balance”.
28
Page 43

Basic Procedure
Make sure that the [
A
copy7na.tif
Set your originals, then press the {{{{Start}}}} key.
B
Black & White copy mode
This function makes copies in black.
Press the [Black & White] key.
A
copy6na.tif
Full Color
] key is selected.
2
Set your originals, then press the {{{{Start}}}} key.
B
Single color mode
This function makes copies in single colors.
Note
❒ 12 basic colors: Yellow, Orange, Red, Magenta, Green, Cyan, Blue, Yellow
Green, Beige, Marine Blue, Pink, Purple
❒ 15 user colors: Up to 15 colors can be manually mixed and stored in memory.
⇒ P.113 “Mixing Colors Manually with the Number Keys”.
29
Page 44

Copying
Basic color
Press the [Single Color] key.
A
Select the color.
B
copy10.tif
2
Note
❒ You can select the color density level.
Press the [OK] key.
C
Set your originals, then press the {{{{Start}}}} key.
D
User colors
Note
❒ When Single Color copying, user colors might come out lighter.
Reference
Program User Color, ⇒ P.111 “Program User Color”.
Press the [Single Color] key.
A
Press the [User Color 10] key.
B
copy11.tif
30
Page 45

Basic Procedure
Select the color.
C
copy11.tif
Note
❒ You can select the color density level.
Press the [OK] key.
D
Set your originals, then press the {{{{Start}}}} key.
E
Twin color mode
Two methods are available:
❖❖❖❖ Color Copy
Reproduces black areas of the original in one selected color and areas in other
colors using the second selected color.
2
Note
❒ You can have colored areas copied in one of the following colors: Red, Green,
Blue, Yellow, Cyan, Magenta, Yellow Green, Orange, Marine Blue, Beige,
Pink, Purple and User Colors
❒ You can have black parts copied in one of the following colors: Red, Green,
Blue, Yellow, Cyan, Magenta, Yellow Green, Orange, Marine Blue, Beige,
Pink, Purple, and User Colors
❖❖❖❖ Red & Black
Reproduces red areas of the original in red, and areas in other colors using
black.
Note
❒ You cannot change the color.
31
Page 46

Copying
Twin Color (Color Copy)
Press the [Twin Color] key.
A
Select the color you want to copy the color parts of the original in.
B
copy12.tif
2
If you wish to copy black parts using a different color, press the [Change
C
Black] key.
Note
❒ If you don't want to do this, go to step E.
Select the color you want to copy the black parts of the original in. Then
D
press the [OK] key.
Press the [OK] key.
E
Set your originals, then press the {{{{Start}}}} key.
F
Twin Color (Red & Black Copy)
Note
❒ If Color Sensitivity is set to wide, the machine recognizes orange or purple as
red. This adjustment affect Color Erase or Color Conversion. ⇒ P.108 “Image
Adjustment”
Press the [Twin Color] key.
A
32
Page 47

Basic Procedure
Press the [
B
copy13.tif
Set your originals, then press the {{{{Start}}}} key.
C
Red & Black Color
] key, then press the [OK] key.
Selecting the Original Image Type
To optimize the likeness between copies and originals, select an image type that
matches your originals.
Note
❒ You can adjust the readability of black lettering in colored areas, ⇒ P.106
“Color Adjustment”.
Auto Text/Photo mode
This mode automatically detects the areas of your original containing text or
photographs. The text areas are copied using Text mode, and the photographs
are copied with Photo mode.
2
Note
❒ There are 3 types of Photo mode:
• [Press Print]:
Use when copying photographs or pictures that are printed on paper (e.g.
magazines).
• [
Glossy Photo
Use when copying developed photographs.
• [
2nd Generation
Use when copying copies or originals generated by printers.
]:
]:
33
Page 48

Copying
Make sure that the [
A
copy702na.tif
Auto Text / Photo
] key is selected.
2
Select the photo mode.
B
Set your originals, then press the {{{{Start}}}} key.
C
Text mode
This modes is suitable for copying originals consisting of characters, line diagrams, and letter, but not photographic images.
Press the [Text] key.
A
copy1na.tif
Set your originals, then press the {{{{Start}}}} key.
B
Photo mode
This mode is suitable for copying originals consisting of pictures, photographs,
and screened letters/areas, but not solid letters.
34
Page 49

Note
❒ There are 3 types of Photo mode:
• [Press Print]:
Use when copying photographs or pictures that are printed on paper (e.g.
magazines).
• [Glossy Photo]:
Use when copying developed photographs.
• [2nd Generation]:
Use when copying copies or originals generated by printers.
Press the [Photo] key.
A
copy11na.tif
Select the photo mode.
B
Basic Procedure
2
Set your originals, then press the {{{{Start}}}} key.
C
Special original mode
Use this function for originals written in highlight pen, originals printed from
inkjet printers, or maps.
Press the [Special Original] key.
A
Select the original type from the [Highlight Pen], [Inkjet Output], and [Map] key.
B
copy17.tif
Set your originals, then press the {{{{Start}}}} key.
C
35
Page 50

Copying
Selecting the Copy Paper Size
Select a suitable size of copy paper based on the original size and the reproduction ratio.
Auto paper select
2
The machine automatically selects a suitable size of copy paper based on the
original size and the reproduction ratio.
Reference
Regarding functions that cannot be used together with this function, ⇒ P.97
“Combination Chart”.
Note
❒ Sizes of certain originals might not be detected depending on the originals
size and type. In this case, select the size manually.
Make sure that the [Auto Paper Select] key is selected.
A
copy6na.tif
Manual paper select
You can select the copy paper manually.
Select the copy paper.
A
copy4na.tif
36
Page 51

Basic Procedure
----Image Rotation
If the direction in which your original is set (landscape or portrait) is different
from the paper you are copying onto, this function rotates the original image by
90° and fits it on the copy paper.This function works when Auto Select or Auto
Reduce/Enlarge are selected. ⇒ P.179 “General Features”
Note
❒ Image Rotation does not work with the following functions:
• Area Editing
• Series Copies (2-sided → 1-sided)
• Duplex Copies (1-sided → 2-sided, 2-sided → 2-sided)
• OHP Slip Sheet
Copying from the Bypass Tray
Use the bypass tray to copy onto thick paper, adhesive labels, OHP transparencies, or custom size paper. Also use the bypass tray to copy onto the reverse side
of paper that has already been copied onto.
Note
❒ The following limitations apply:
2
37
Page 52

Copying
2
2
, 14 - 28 lb)
2
, 28 - 43 lb)
L
: A3, B4, A4, B5, A5, B6,
A6, 11" × 17", 12" × 18"
K
: A4, B5, A5, 8
Inch version:
L
: 12" × 18", 11" × 17", 8
1
11", 5
/2" × 81/2"
1
K
: 8
/2" × 11", 51/2" × 81/2"
Metric version:
Vertical: 100 - 305mm (in
1mm steps)
Horizontal: 140 - 457mm (in
1mm steps)
Inch version:
Vertical: 3.9" - 12.0" (in 0.1"
steps)
Horizontal: 5.5" - 18.0" (in
0.1" steps)
1
/2" × 11"
1
/2" ×
Acceptable paper types
2
Number of sheets that can be
set at one time
Normal paper (52 - 105g/m
Thick paper (105 - 160g/m
Post cards
OHP transparencies
Adhesive labels
Translucent paper
Standard size Metric version:
Custom size
1
3
GCBYPA1E
1: Horizontal
2: Vertical
3: Feed direction
Normal paper: 50 sheets
Thick paper, OHP transparencies: 30 sheets (Smaller than 8"
×
13"), 15 sheets (8" × 13" or large)
Adhesive labels: 30 sheets
Translucent paper: 50 sheets
Post cards: 25 sheets
❒ Select one of the following settings or keys:
• [Normal]: normal paper
• [Thick]: thick paper, post cards, adhesive labels, translucent paper
• [
• [
]: OHP transparencies
OHP
Duplex Back
]: Copying onto the reverse side of paper that has been already
copied onto. ⇒ P.46 “Copying onto the reverse side of paper”.
• [
Custom Size
]: Select this after the paper type for custom sized paper. ⇒
P.41 “Copying onto custom size paper with the bypass tray”.
38
Page 53

Basic Procedure
❒ When you copy onto OHP transparencies, you can select whether a blank slip
sheet is inserted between OHP transparencies.
Gchyoh1e.eps
❒ When you set several sheets at a time, fan them to get air between them before
loading.
❒ If the copy paper is curled, gently roll it to remove the curl.
❒ When you copy onto OHP transparencies, insert them with the copy side up.
❒ Do not stack copy paper above the limit mark.
❒ If the copy paper is bent, correct it before setting paper in the bypass tray. If
the bend is not corrected, a paper misfeed might occur.
❒ When the optional sorter stapler is installed, copies made onto thick or OHP
transparencies are not delivered in the proof tray but in the first bin instead.
❒ When setting custom size paper, be sure to set the size after pressing the [
Cus-
tom Size] key.
Copying onto standard size paper with the bypass tray
2
Note
❒ When you copy onto the reverse side of paper that has been already copied
onto, ⇒ P.46 “Copying onto the reverse side of paper”.
Open the bypass tray.
A
Tlch040e.eps
39
Page 54

Copying
Press the [
B
copy18.tif
Normal
], [
Thick
] or [
OHP
] key.
2
Note
❒ Make sure that the [Standard Size] key is selected.
❒ When you copy onto OHP transparencies, you can select whether a blank
slip sheet is inserted between OHP tranparencies.
Gchyoh1e.eps
Press the [KKKK/LLLL] key to select the paper orientation.
C
copy18.tif
40
Press the [OK] key.
D
Page 55

Basic Procedure
Adjust the paper guides to the paper size.
E
Trsh050e.eps
1
2
4
1.
Horizontal size
2.
Vertical size
3.
Extender
4.
Paper guides
Note
❒ Make sure the paper size and direction in the bypass tray is displayed on
the operation panel.
❒ Make sure that the paper guides matches to the paper size. If the paper
guides are not adjusted to the paper size properly, paper might be skewed
or a paper misfeed might occur.
❒ With large copy paper (more than A4L, 8
tender.
3
TRSH050E
1
/2" × 11"L), swing out the ex-
2
With the side you wish to copy onto face up, insert the paper into the by-
F
pass tray until it stops.
Set your originals, then press the {{{{Start}}}} key.
G
Copying onto custom size paper with the bypass tray
Preparation
You can register custom paper sizes you use often in keys [Custom 1], [Custom
2], and [Custom 3] with the user tools. ⇒ P.175 “System settings”.
Note
❒ Be sure to set the paper size or a paper misfeed might occur.
Open the bypass tray.
A
Press the [Normal], [Thick] or [OHP] key.
B
Press the [KKKK/LLLL] key to select paper orientation.
C
41
Page 56

Copying
Press the [
D
copy18.tif
Custom Size
] key.
2
Select [Custom 1], [Custom 2], [Custom 3] or [Enter Size] keys.
E
copy12na.tif
Note
❒ If you selected [Custom 1], [Custom 2] or [Custom 3], go to step H.
42
If you selected [Enter Size] in step EEEE, enter the horizontal paper size with the
F
number keys, then press the [#] key.
copy12na.tif
Note
❒ To change the value entered, press the [
] key and enter a new value.
Clear
Page 57

Basic Procedure
Enter the vertical paper size with the number keys, then press the [#] key.
G
copy13na.tif
Press the [OK] key.
H
Adjust the paper guides to the paper size.
I
Note
❒ Make sure that the paper guides match the paper size. If the paper guides
are not adjusted to the paper size properly, paper might be skewed or a paper misfeed might occur.
Insert the paper into the bypass tray.
J
Set your originals, then press the {{{{Start}}}} key.
K
2
43
Page 58

Copying
Making A3, 11" ×××× 17" full bleed copies
By sliding the paper guides of the bypass tray to greater than A3 (11") size, A3
11" × 17", full bleed copying mode is automatically selected.
In this mode, you can make A3, 11" × 17" full bleed copies with 12" × 18" paper.
This is useful to make for making A3, 11" × 17" size copies with a colored background (e.g. catalogues).
2
GCBLEE0E.eps
1.
A3, 11"
2.
In standard copy mode, margins
appear on copies
3.
12"
4.
Cut around the margins to pro-
duce a full image
By sliding the paper guides of the bypass tray, the machine enters A3, 11" × 17",
full bleed copying mode automatically.
Note
❒ This function can be used with 12" × 18" paper.
❒ When A3, 11" × 17" full bleed copying mode is selected, the paper direction is
automatically changed to widthwise L.
❒ When A3, 11" × 17" full bleed copying is made, the original image is copied
onto the center.
By sliding the paper guides of the bypass tray, the machine enters A3, 11" × 17"
full bleed copying mode automatically.
××××
17" size Original
××××
18" Full Bleed Copy
44
Page 59

Pull up the tab.
A
Zcby010e.eps
Leaving the tab up, slide the paper guides until they stop.
B
Zcby020e.eps
Basic Procedure
2
Note
❒ Make sure that the paper guides match the paper size.
❒ Be sure to return the tab to its original position before you close the bypass
tray. If you do not return it correctly, the bypass tray might not close properly.
45
Page 60

Copying
Copying onto the reverse side of paper
You can copy onto the reverse side of paper that has been already copied onto.
Note
❒ If you wish to copy 2 sided onto normal paper, use the Duplex feature. ⇒ P.63
“Duplex—Making 2 Sided Copies”.
2
❒ Make sure that you set your original and the copy paper in the correct direc-
tion to achieve the results you require.
Original set
on the exposure glass
Copy paper
set on the bypass tray
Copies
ABC
GCMRYO2E
46
BA
GCMRYO4E
ABC
GCMRYO1E
BA
GCMRYO3E
❒
Page 61

Basic Procedure
❒ If Duplex copying cannot be done because of paper problems, set paper on
the bypass tray to copy on the front side, and once again copy on the backside.
❒ You cannot use this function for OHP transparencies, translucent paper, ad-
hesive labels and postcards.
❒ Do not use copy paper that has been already copied onto by other machines.
❒ If the copy paper is bent, correct it before setting paper in the bypass tray. If
the bend is not corrected, a paper misfeed might occur.
Open the bypass tray.
A
Insert the paper into the bypass tray.
B
Note
❒ Make sure the front side (the side that has been copied onto) faces down.
Press the [Normal] or [Thick] key.
C
Press the [KKKK/ LLLL] key to select paper orientation.
D
Press the [Duplex Back] key.
E
copy21.tif
2
Note
❒ To copy onto custom size paper, press the [Custom Size] key and select or
enter the size. For details, ⇒ P.41 “Copying onto custom size paper with the
bypass tray”.
Press the [OK] key.
F
Adjust the paper guides to the paper size.
G
Note
❒ Make sure that the paper guides match the paper size. If the paper guides
are not adjusted to the paper size properly, paper might be skewed or a paper misfeed might occur.
Set your originals, then press the {{{{Start}}}} key.
H
47
Page 62

Copying
Auto Reduce/Enlarge
The machine can select the proper reproduction ratio based on the selected paper size and the original size.
GCYHEN1E.eps
2
111
R
R
R
Note
❒ Regarding functions that cannot be used together with this function, ⇒ P.97
“Combination Chart”.
Example:
• Metric version: original: A3L, copy paper: A4L
• Inch version: original: 11" × 17"L, copy paper: 8
Press the [Auto Reduce/Enlarge] key.
A
copy14na.tif
RRR
GCYHEN1E
1
/2" × 11"L
48
Set your original on the exposure glass or in the document feeder.
B
Choose your copy paper size (e.g. A4LLLL, 81/2" ×××× 11"LLLL).
C
Press the {{{{Start}}}} key. The original image is enlarged or reduced to fit the se-
D
lected copy paper.
Page 63

Basic Procedure
Energy Saver Mode
If you do not operate the machine for a certain period after copying or press the
{Energy Saver} key, the display goes out and the machine enters Energy Saver
mode. When you press the {Energy Saver} key again, set originals in the document feeder or open the platen cover or document feeder, the machine returns
to the ready condition. In Energy Saver mode, the machine uses less electricity.
Press the {{{{Energy Saver}}}} key to enter Energy Saver mode.
A
Tlcs100n.eps
Note
❒ To exit this mode, press the {Energy Saver} key again.
Auto Off Mode
2
This machine automatically turns itself off 60 minutes after the last copy or print
job has finished. If you wish to make copies when the machine is in Auto Off
mode, press the operation switch.
Reference
For how to change the default interval that the machine waits before entering
Auto Off mode, see “Auto Timer” ⇒ P.175 “System settings”
49
Page 64

Copying
Interrupt copying
Use the {Interrupt} key to interrupt a copy run and make urgently needed copies.
Reference
Regarding functions that cannot be used together with this function, ⇒ P.175
“System settings”.
2
Press the {{{{Interrupt}}}} key. The machine will stop the copy run and store the
A
present settings in memory before returning to ready condition.
Tlcs050n.eps
Remove the previous originals. Set your original for interrupt copying on
B
the exposure glass or in the document feeder.
Make your copies.
C
50
After interrupt copying is completed, press the {{{{Interrupt}}}} key again. The
D
machine will recall the previous copy settings.
Reset the previous originals and press the {{{{Start}}}} key to resume the previ-
E
ous run.
Page 65

Basic Procedure
Auto Start
If you press the {Start} key during the warm-up period, the {Start} key will blink
and the machine will start copying after the warm-up period.
Set your copy settings during the warm-up period.
A
Press the {{{{Start}}}} key.
B
Tlcs060n.eps
Note
❒ To cancel Auto Start, press the {Clear/Stop} key.
Program
2
You can store up to five frequently used copy job settings in machine memory
and recall them for future use.
Note
❒ If you want to change the stored programs, store another program again.
Storing your settings
Set the copy settings you want to put into memory.
A
Press the {{{{Program}}}} key.
B
Zcms023n.eps
51
Page 66

Copying
Press the [
C
copy78.tif
Program
] key.
2
Select the program number you want to store the settings in.
D
Note
❒ If this program number is already being used, the machine asks whether
you wish to overwrite it or not. Press the [Yes] or [No] key.
Recalling your settings
Press the {{{{Program}}}} key.
A
Zcms023n.eps
52
Note
❒ If you want to recall Area Edit settings stored in a program, press the [Area
Editing] key then press the {Program} key.
❒ After you recall the Area Edit settings stored in a program, you can change
them. However, you can not add or delete the Area/Group.
Page 67

Basic Procedure
Press the [
B
copy79.tif
Select the program number you want to recall. The stored settings are dis-
C
played.
Note
❒ Only programs with m contain a program.
Set your originals, then press the [Start] key.
D
Recall
] key.
Check Modes
By pressing the [
selected.
copy2na.tif
Check Modes
] key, you can see at a glance the modes you have
2
53
Page 68

Copying
Counter
By pressing the {Counter} key, you can check the total number of copies made.
Zcms030n.eps
2
Preset R/E
Gcthen1e.eps
GCTHEN1E
Reference
Regarding functions that cannot be used together with this function, ⇒ P.97
“Combination Chart”.
Note
❒ You can add up to two preset ratios with the user tools. ⇒ P.179 “General Fea-
tures”.
❒ You can select a ratio regardless of the size of an original or copy paper. With
some ratios, parts of the image might not be copied or margins will appear on
copies.
❒ To return to 100%, press the [100%] key.
54
Page 69

Reducing
Press the [Reduce/Enlarge] key.
A
Basic Procedure
Make sure that the [
B
copy16na.tif
Select the ratio you require.
C
copy15na.tif
Set your originals, then press the {{{{Start}}}} key.
D
Preset R/E / Zoom
] key is selected.
2
55
Page 70

Copying
Enlarging
Press the [Reduce/Enlarge] key.
A
Make sure that the [
B
copy16na.tif
Preset R/E / Zoom
] key is selected.
2
Select the ratio you require.
C
copy17na.tif
Set your originals, then press the {{{{Start}}}} key.
D
56
Page 71

Basic Procedure
Zoom
Gczoom1e.eps
GCZOOM1E
You can change the reproduction ratio from 25% to 400% in 1% steps.
Note
❒ You can select a ratio regardless of the size of an original or copy paper. With
some ratios, parts of the image might not be copied or blank margins will appear on copies.
❒ To return to 100%, press the [100%] key.
❒ You can select a preset ratio which is near the desired ratio, then press the
[Zoom] key and adjust the ratio with the [+] or [-] key.
❒ There are two ways to set the ratios.
2
Using the [-] and [+] keys
Press the {{{{Reduce/Enlarge}}}} key.
A
Make sure that the [Preset R/E / Zoom] key is selected.
B
copy16na.tif
57
Page 72

Copying
Adjust the reproduction ratio with the [+] or [-] key.
C
copy18na.tif
2
Set your originals, then press the {{{{Start}}}} key.
D
Using the number keys
Press the [Reduce/Enlarge] key.
A
Press the [
B
copy19na.tif
Enter the reproduction ratio with the number keys.
C
Note
❒ To change the ratio entered, press the [Clear] key and enter a new ratio.
Press the [#] key.
D
Set your originals, then press the {{{{Start}}}} key.
E
Input Ratio
] keys.
58
Page 73

Directional Magnification (%)
Gcdhen1e.eps
1
Basic Procedure
2
GCDHEN1E
1.
Horizontal %
2.
Vertical %
Copies can be reduced or enlarged at different reproduction ratios horizontally
and vertically.
Note
❒ You can select a ratio from between 25% to 400%.
❒ You can select a ratio regardless of the size of an original or copy paper. With
some ratio, parts of the image might not be copied or blank margins might appear on copies.
Press the [Reduce/Enlarge] key.
A
Press the [Directional Mag.] key.
B
Make sure that the [Direct. Mag.(%)] key is selected.
C
Enter the horizontal ratio with the number keys, then press the [#] key.
D
copy20na.tif
2
Note
❒ To change the ratio entered, press the [Clear] key and enter a new ratio.
59
Page 74

Copying
Enter the vertical ratio with the number keys, then press the [#] key.
E
copy21na.tif
2
Set your originals, then press the {{{{Start}}}} key.
F
Directional Size Magnification (inch)
Gcdhen2e.eps
1
2
1.
Horizontal original size
2.
Vertical original size
3.
Horizontal copy size
4.
Vertical copy size
3
4
GCDHEN2E
The suitable reproduction ratios will be automatically selected when you enter
the horizontal and vertical lengths of the original and copy image you require.
Note
❒ You can enter sizes within the following ranges:
Metric Version 1 - 999mm (in 1mm steps)
Inch Version 0.1" - 99.9" (in 0.1" steps)
❒ If the calculated ratio is over the maximum or under the minimum ratio, it is
corrected within the range of the ratio automatically. However, with some ratios, parts of the image might not be copied or blank margins might appear
on copies.
60
Page 75

Basic Procedure
Press the [
A
Press the [Directional Mag.] key.
B
Press the [D. Size Mag.(mm)] key.
C
Enter the horizontal original size with the number keys, then press the [#]
D
key.
copy22na.tif
Note
❒ To change the value entered:
• If you have not pressed the [#] key yet, press the [Clear] key and enter a
• If you have already pressed the [#] key, select the specified key and en-
Enter the horizontal copy paper size with the number keys, then press the
E
[#] key.
copy24na.tif
Reduce/Enlarge
new value.
ter the a value.
] key.
2
61
Page 76

Copying
Enter the vertical original size with the number keys, then press the [#] key.
F
copy23na.tif
2
Enter the vertical copy paper size with the number keys, then press the [#]
G
key.
copy23na.tif
62
Set your originals, then press the {{{{Start}}}} key.
H
Page 77

Duplex—Making 2 Sided Copies
Duplex—Making 2 Sided Copies
1 Sided →→→→ 2 Sided
Gcaryo1e.eps
This function makes double sided copies from single sided originals.
Limitation
❒ You cannot use the following kinds of copy paper with this function:
• Paper smaller than A5, 5
• Translucent paper
• Adhesive labels
• OHP transparencies
• Post Cards
1
/2" × 81/2"
2
Note
❒ The following paper limitations apply:
• Metric version
Single color Full color
Paper weight
maximum copy quantity B4 or smaller: 50 sheets A3 - A5: 20 sheets
64 - 105g/m
A3: 30 sheets
2
• Inch version
Single color Full color
Paper weight 17 - 28 lb
maximum copy quantity
1
/2" × 14" or smaller: 50
8
sheets
11" × 17": 30 sheets
11" × 17" - 51/2" × 81/2": 20
sheets
63
Page 78

Copying
Note
❒ The image on the backside of copies is shifted by just the binding margin.
❒ You can change the width and position of the binding margin.
❒ You can change the default binding margin.
Reference
Regarding functions that cannot be used together with this function, ⇒ P.97
2
“Combination Chart”.
❖❖❖❖ The resulting copy image will differ according to the direction in which you set your
original (lengthwise KKKK or widthwise LLLL).
Gctyty1e.eps
64
*1
The illustrations show the directions of copied images on the front and back, not the
directions of delivery.
Press the [Duplex/Combine] key.
A
copy32na.tif
Page 79

Duplex—Making 2 Sided Copies
Press the [
B
copy33na.tif
Press the [Even] key or the [Odd] key according to the number of your origi-
C
nals.
Note
❒ When you set an odd number originals, the back side of the last page is left
blank.
❒ If you don't know the total number of originals, press the [Auto Count] key,
then press the [
The optional document feeder is required to use Auto Count function.
Press the [OK] key.
D
Set your originals in the document feeder, then press the {{{{Start}}}} key.
E
1 Sided→→→→2 Sided
Start Count
] key.
] key.
2
65
Page 80

Copying
2 Sided →→→→ 2 Sided
Gcaryo2e.eps
2
This function makes double sided copies from double sided originals.
Press the [Duplex/Combine] key.
A
copy32na.tif
66
Press the [2 Sided→→→→2 Sided] key.
B
copy34na.tif
Set your originals in the document feeder, then press the {{{{Start}}}} key.
C
Page 81

Duplex—Making 2 Sided Copies
Book →→→→ 2 Sided
Gcaryo3e.eps
Use this feature to copy facing pages of a book or magazine onto both sides of
the copy paper.
Note
❒ Select the lengthwise K copy paper.
❒ The following table summarizes the relationship between the size of originals
and copy paper size for full-size copying.
• Metric version
Original Copy Paper
L
A3
B4
A4
L
L
A4 K (2-sided)
B5 K (2-sided)
A5 K(2-sided)
2
• Inch version
Original Copy Paper
1
/2" × 11"
L
L
11" × 17"
8
Press the [Duplex/Combine] key.
A
copy32na.tif
1
/2" × 11" K(2-sided)
8
51/2" × 81/2" K(2-sided)
67
Page 82

Copying
Select the lengthwise KKKK copy paper.
B
Press the [Book→→→→2 Sided] key.
C
copy35na.tif
2
Set your original on the exposure glass, then press the {{{{Start}}}} key.
D
Multi →→→→ 2 Sided
Gcaryo4e.eps
This function makes one single sided and one double sided copy from a three
page pamphlet.
Note
❒ The following table summarizes the relationship between the size of originals
and copy paper size for full-size copying (100%).
• Metric version
Original Copy Paper
L
A3
B4
A4
L
L
A4 K (2-sided)
B5 K (2-sided)
A5 K(2-sided)
68
Page 83

• Inch version
Original Copy Paper
1
/2" × 11"
L
L
11" × 17"
8
Press the [Duplex/Combine] key.
A
copy32na.tif
Select lengthwise KKKK copy paper.
B
Press the [Multi→→→→2 Sided] key.
C
copy36na.tif
Duplex—Making 2 Sided Copies
1
/2" × 11" K(2-sided)
8
51/2" × 81/2" K(2-sided)
2
Set your originals in the document feeder, then press the {{{{Start}}}} key.
D
69
Page 84

Copying
Series Copies
Book →→→→ 1 Sided
GCSEPR1E.eps
2
12
12
GCSEPR1E
This function makes one-sided copies from two facing pages of bound (book)
originals.
Reference
Regarding functions that cannot be used together with this function, ⇒ P.97
“Combination Chart”.
Note
❒ The following table summarizes the relationship between the size of originals
and copy paper size for full-size copying (100%).
• Metric version
Original Copy Paper
L
A3
B4
A4
L
L
A4 K × 2 sheets
B5 K × 2 sheets
A5 K× 2 sheets
• Inch version
Original Copy Paper
11" × 17"
1
/2" × 11"
8
L
L
1
/2" × 11" K× 2 sheets
8
K×
51/2" × 81/2"
2 sheets
70
Page 85

Series Copies
Press the [
A
copy32na.tif
Select lengthwise KKKK copy paper.
B
Press the [Book→→→→1 Sided] key.
C
copy37na.tif
Set your originals, then press the {{{{Start}}}} key.
D
Duplex/Combine
] key.
2
71
Page 86

Copying
2 Sided →→→→ 1 Sided
The optional document feeder is required to use this function.
Gcsepr2e.eps
2
1
2
Reference
Regarding functions that cannot be used together with this function, ⇒ P.97
“Combination Chart”.
Press the [Duplex/Combine] key.
A
copy32na.tif
12
GCSEPR2E
72
Select lengthwise KKKK copy paper.
B
Press the [2 Sided→→→→1 Sided] key.
C
copy38na.tif
Set your originals in the document feeder, then press the {{{{Start}}}} key.
D
Page 87

Combine
Combine 2 Originals
The optional document feeder is required to use this function.
Combine
GCSYYK1E.eps
This function automatically combines two single sided originals onto one copy.
Note
❒ If the original size and direction is set differently, you cannot use the combine
function.
❒ When you use the combine function, Auto Reduce/Enlarge is selected auto-
matically.
Reference
Regarding functions that cannot be used together with this function, ⇒ P.97
“Combination Chart”.
Setting originals (Originals set in the document feeder)
• Originals reading from left to right
Gcsyyk3e.eps
2
• Originals reading from top to bottom
Gcsyyk2e.eps
73
Page 88

Copying
Press the [
A
copy32na.tif
Duplex/Combine
] key.
2
Select widthwise LLLL copy paper.
B
Press the [Combine 2 originals] key.
C
copy39na.tif
Set your originals in the document feeder, then press the {{{{Start}}}} key.
D
74
Page 89

Combine 4 Originals
Gcaryo5e.eps
Reference
Regarding functions that cannot be used together with this function, ⇒ P.97
“Combination Chart”.
Press the [Duplex/Combine] key.
A
copy32na.tif
Combine
2
Select widthwise LLLL copy paper.
B
Press the [Combine 4 originals] key.
C
copy40na.tif
Set your originals in the document feeder, then press the {{{{Start}}}} key.
D
75
Page 90

Copying
Shifting the Image
Shift
Gcidoh3e.eps
2
You can move the image to a corner or edge as well as center it. This function is
useful when the copy paper is larger than the original.
Note
❒ You cannot use 12" × 18" size copy paper for this function.
Press the [Shift/Book] key.
A
76
Press the [Shift] key.
B
copy41na.tif
Page 91

Select the direction in which you want to shift the image.
C
copy42.tif
Note
❒ When you want to center the image, press the [Center] key.
Press the [OK] key.
D
Select the copy paper size.
E
Set your originals, then press the {{{{Start}}}} key.
F
Margin Adjustment
GCTOJS1E.eps
Shifting the Image
2
A
You can make a margin by shifting the image to the left or right. This function is
useful when you want to bind copies.
Note
❒ You can change the width of the binding margin as follows:
Metric Version 0 - 20mm (in 1mm steps)
Inch Version 0" - 0.8" (in 0.1" steps)
A
GCTOJS1E
77
Page 92

Copying
❒ The margin width default is as follows. You can change this default setting
with the user tools. ⇒ P.179 “General Features”.
Metric Version • Front: 0mm Left
• Back: 0mm Right
Inch Version • Front: 0" Left
• Back: 0" Right
2
❒ If you set too wide a margin, areas you do not want to delete might be erased.
Reference
Regarding functions that cannot be used together with this function, ⇒ P.179
“General Features”.
Press the [Shift/Book] key.
A
Press the [Margin Adjustment] key.
B
copy25na.tif
Enter the margins for the front side and back side of the copy paper.
C
Note
❒ To change the value entered, press the [Clear] key and enter a new value.
❒ To make a left margin, press the [→→→→] key until the number displayed reach-
es the required setting.
❒ To make a right margin, press the [←←←←] key until the number displayed
reaches the required setting.
78
Press the [OK] key.
D
Set your originals, then press the {{{{Start}}}} key.
E
Page 93

Cover Sheet
Front Cover
The optional document feeder is required to use this function.
Cover Sheet
Gchyos1e.eps
B
C
A
Note
❒ The cover sheets should be identical in size and direction with the copy paper.
❒ The cover sheets should be fed from the bypass tray.
❒ The covers are copied in Thick mode.
Reference
Regarding functions that cannot be used together with this function, ⇒ P.97
“Combination Chart”.
When you use front cover mode with 1 Sided →→→→ 1 Sided mode
Press the [Shift/Book] key.
A
copy44na.tif
A
B
C
GCHYOS1E
2
Press the [Front Cover] key.
B
Set your originals in the document feeder, then press the {{{{Start}}}} key.
C
79
Page 94

Copying
When you use Front Cover mode with 2 Sided →→→→ 1 Sided or 2 Sided →→→→ 2 Sided mode
Enter 2 Sided
A
ed” or
Follow steps AAAA to BBBB on
B
→→→→
1 Sided mode”.
2
Select [Image] or [Blank] key depending on the reverse side of first original
C
has an image or not.
copy47.tif
Press the [OK] key.
D
Set your originals in the document feeder, then press the {{{{Start}}}} key.
E
→→→→
1 Sided or 2 Sided
⇒⇒⇒⇒
P.66 “2 Sided
→→→→
2 Sided”.
⇒⇒⇒⇒
P.79 “When you use front cover mode with 1 Sided
→→→→
2 Sided mode.
⇒⇒⇒⇒
P.72 “2 Sided
→→→→
1 Sid-
Front and Back Cover
The optional document feeder is required to use this function.
❖❖❖❖ Back Cover: Copy
Gchyos3e.eps
80
A
B
C
B
C
A
GCHYOS3E
Page 95

Cover Sheet
❖❖❖❖ Back Cover: Blank
GCHYOS2E.eps
Note
❒ You can specify whether to copy onto the back cover sheet. If you select
[Copy], the last pages will be copied onto the back cover sheet. If you select
[Blank], a cover sheet will just be inserted after the last copy.
❒ The cover sheets should be identical in size and direction to the copy paper.
❒ The cover sheets should be fed from the bypass tray.
❒ The covers are copied in Thick mode.
❒ If Blank Cover mode is selected, the back cover will not be counted as a copy.
Reference
Regarding functions that cannot be used together with this function, ⇒ P.97
“Combination Chart”.
2
When you use Front & Back covers mode with 1 Sided →→→→ 1 Sided mode
Press the [Shift/Book] key.
A
copy45na.tif
Press the [Front&Back Cover] key.
B
Press the [Copy] or [Blank] key to choose whether to copy onto the back cover.
C
Set your originals in the document feeder.
D
Press the {{{{Start}}}} key.
E
81
Page 96

Copying
When you use Front & Back Covers mode with 2 Sided →→→→ 1 Sided or 2 Sided →→→→ 2 Sided
mode
Enter 2 Sided
A
ed” or
Follow steps AAAA to CCCC in the previous procedure.
B
2
Press the [
C
first original has an image or not.
copy46.tif
Press the [Image] or [Blank] key depending on whether the reverse side of
D
last original has an image or not.
Press the [OK] key.
E
Follow steps DDDD and EEEE in the previous procedure.
F
→→→→
1 Sided or 2 Sided
⇒⇒⇒⇒
P.66 “2 Sided
] or [
Image
→→→→
2 Sided”.
] key depending on whether the reverse side of the
Blank
→→→→
2 Sided mode.
⇒⇒⇒⇒
P.72 “2 Sided
→→→→
1 Sid-
82
Page 97

Color Creation
Color Creation
Color Conversion
Gcclprae.eps
This function converts selected colors of an original into different colors on the
copy.
Note
❒ Up to 4 colors can be converted at one time.
❒ Colors you can convert: Yellow, Red, Magenta, Green, Cyan, Blue, Black,
White.
❒ Colors that can be converted to: Yellow, Orange, Red, Magenta, Green, Cyan,
Blue, Yellow Green, Black, White, Beige, Pink, Marine Blue, Purple and User
colors.
❒ This function can be made more or less sensitive to the color to be converted.
It can be adjusted within five levels from “Narrow” to “Wide”. ⇒ P.108 “Im-
age Adjustment”. For example, if red is selected as the color to be converted,
“Narrow” will result in only red being converted, and “Wide” will result in
other colors close to red being converted.
❒ This function can be used in Full Color mode.
2
Press the [Color Creation] key.
A
83
Page 98

Copying
Press the [
B
copy48na.tif
Color Conversion
] key.
2
Select the original color (color to be converted).
C
copy49.tif
Select the new color (color to convert to).
D
copy50.tif
84
If you want to convert more than one color, repeat steps CCCC and DDDD.
E
Note
❒ If you pick the wrong color, press the [
Press the [OK] key.
F
Set your originals, then press the {{{{Start}}}} key.
G
Clear
] key.
Page 99

Color Creation
Color Erase
Gcclpr2e.eps
This function erases selected colors from the original image.
Note
❒ Up to 4 colors can be erased at one time.
❒ Colors that can be erased: Yellow, Red, Magenta, Green, Cyan, Blue and
Black.
❒ This function can be made more or less sensitive to the color to be erased. It
can be adjusted within five levels from “Narrow” to “Wide”. ⇒ P.108 “Image
Adjustment”. For example, if red is selected as the color to be erased, “Nar-
row” will result in only red being erased, and “Wide” will result in other colors close to red being erased.
2
Press the [Color Creation] key.
A
Press the [Color Erase] key.
B
copy48na.tif
85
Page 100

Copying
Select the color to be erased.
C
copy51.tif
2
Press the [OK] key
D
Set your originals, then press the {{{{Start}}}} key.
E
Color Background
Gcclpr3e.eps
This function makes copies with the selected color background.
Note
❒ Colors that can be selected as a background color: Yellow, Orange, Red, Ma-
genta, Green, Cyan, Blue, Yellow Green, Black, Beige, Pink, Marine Blue, Purple and User Colors.
❒ In this mode, color tones of photos or pictures might be changed depending
on the color on the background.
Press the [Color Creation] key.
A
86
 Loading...