

Page 1
your document management part n er
Page 2

Introduction
This manual contains detailed instructions on the operation and maintenance of this machine. To get
maximum versatility from this machine all operators should carefully read and follow the instructions in
this manual. Please keep this manual in a handy place near the machine.
Please read the Safety Information before using this machine. It contains important information related
to USER SAFETY and PREVENTING EQUIPMENT PROBLEMS.
Notes:
Some illustrations may be slightly different from your machine.
Certain options may not be available in some countries. For details, please contact your local dealer.
Operator Safety:
This machine is considered a class 1 laser device, safe for office/EDP use. The machine contains two
GaAIAs laser diodes, 5-milliwatt, 760-800 nanometer wavelength for each emitter. Direct (or indirect
reflected ) eye contact with the laser beam might cause serious eye damage. Safety precautions and
interlock mechanisms have been designed to prevent any possible laser beam exposure to the operator.
Laser Safety:
The Center for Devices and Radiological Health (CDRH) prohibits the repair of laser-based optical unit
in the field. The optical housing unit can only be repaired in a factory or at a location with the requisite
equipment. The laser subsystem is replaceable in the field by a qualified Customer Engineer. The laser
chassis is not repairable in the field. Customer engineers are therefore directed to return all chassis
and laser subsystems to the factory or service depot when replacement or the optical subsystem is required.
Warning:
Use of controls or adjustment or performance of procedures other than those specified in this manual
might result in hazardous radiation exposure.
Notes:
The model names of the machines do not appear in the following pages. Check the type of your machine before reading this manual. (For details, ⇒ p.2 “Machine Types”.)
• Type1: 5622 AG
• Type2: 5627 AG
Certain types might not be available in some countries. For details, please contact your local dealer.
Two kinds of size notation are employed in this manual. With this machine refer to the inch version.
For good copy quality, Savin recommends that you use genuine toner.
Savin shall not be responsible for any damage or expense that might result from the use of parts other
than genuine parts in your office product.
Power Source
120V, 60Hz, 12A or more
Please be sure to connect the power cord to a power source as above. For details about power source,
see “Power Connection” in the “Copy Reference” manual.
Page 3

Note to users in the United States of America
Notice:
This equipment has been tested and found to comply with the limits for a Class B digital device, pursuant to Part 15 of the FCC Rules. These limits are designed to provide reasonable protection against
harmful interference in a residential installation. This equipment generates, uses and can radiate radio
frequency energy and, if not installed and used in accordance with the instructions, may cause harmful
interference to radio communications. However, there is no guarantee that interference will not occur
in a particular installation. If this equipment does cause harmful interference to radio or television reception, which can be determined by turning the equipment off and on, the user is encouraged to try to
correct the interference by one more of the following measures:
Reorient or relocate the receiving antenna.
Increase the separation between the equipment and receiver.
Connect the equipment into an outlet on a circuit different from that to which the receiver is
connected.
Consult the dealer or an experienced radio /TV technician for help.
Warning
Changes or modifications not expressly approved by the party responsible for compliance could void
the user's authority to operate the equipment.
1. Properly shielded and grounded cables and connectors must be used for connections to host computer (and/or peripheral) in order to meet FCC emission limits.
2. AC adapter with ferrite core must be used for RF interference suppression.
Note to users in Canada
Note:
This Class B digital apparatus complies with Canadian ICES-003.
Remarque concernant les utilisateurs au Canada
Avertissement:
Cet appareil numérique de la classe B est conforme à la norme NMB-003 du Canada.
In accordance with IEC 60417, this machine uses the following symbols for the main power switch:
aaaa means POWER ON.
cccc means STAND BY.
Page 4

Copyrights and Trademarks
Trademarks
Ethernet® is a registered trademark of Xerox Corporation.
PostScript
rated.
Apple Talk, Apple, Macintosh are registered trademarks of Apple Computer, Incorporated.
Novell, and Netware are registered trademarks of Novell, Inc.
Information about Installed Software
expat
Expat(Version 1.1). Copyright 1998, 1999 James Clark. All rights reserved.
• The software installed on this product includes the expat application software Version 1.1 (hereinafter "expat 1.1").
• The product manufacturer has not made any modification to the source code
of the expat 1.1.
• The product manufacturer provides warranty and support to the software of
the product including the expat 1.1 and the product manufacturer makes Mr.
James Clark, the initial developer of the expat 1.1, free from these obligations.
• The expat 1.1 is made available under Mozilla Public License Version 1.1
(hereinafter "MPL 1.1"), and controller software of the product equals the
Larger Work as defined in MPL 1.1. The software of this product except the
expat 1.1 is licensed to the product manufacturer under separate agreement(s).
• The source code of the expat 1.1 is available at:
ftp://ftp.jclark.com/pub/xml/expat1_1.zip
• MPL 1.1 is also available at:
http://www.mozilla.org/MPL/MPL-1.1.html
• Information relating to the expat 1.1 is available at:
http://www.jclark.com/xml/expat.html
®
and Acrobat® are registered trademarks of Adobe Systems Incorpo-
i
Page 5

NetBSD
Copyright Notice of NetBSD
For all users to use this product:
This product contains NetBSD operating system:
For the most part, the software constituting the NetBSD operating system is not
in the public domain; its authors retain their copyright.
The following text shows the copyright notice used for many of the NetBSD
source code. For exact copyright notice applicable for each of the files/binaries,
the source code tree must be consulted.
A full source code can be found at http://www.netbsd.org/.
Copyright © 1999, 2000 The NetBSD Foundation, Inc.
All rights reserved.
Redistribution and use in source and binary forms, with or without modification, are permitted provided that the following conditions are met:
A Redistr ibutio ns of so urce co de must retain the a bove copyr ight no tice, this list
of conditions and the following disclaimer.
B Redistributions in binary form must reproduce the above copyright notice,
this list of conditions and the following disclaimer in the documentation
and/or other materials provided with the distribution.
C All advertising materials mentioning features or use of this software must
display the following acknowledgement:
This product includes software developed by the NetBSD Foundation, Inc.
and its contributors.
D Neither the name of The NetBSD Foundation nor the names of its contribu-
tors may be used to endorse or promote products derived from this software
without specific prior written permission.
THIS SOFTWARE IS PROVIDED BY THE NETBSD FOUNDATION, INC. AND
CONTRIBUTORS ''AS IS'' AND ANY EXPRESS OR IMPLIED WARRANTIES,
INCLUDING, BUT NOT LIMITED TO, THE IMPLIED WARRANTIES OF MERCHANTABILITY AND FITNESS FOR A PARTICULAR PURPOSE ARE DISCLAIMED. IN NO EVENT SHALL THE FOUNDATION OR CONTRIBUTORS
BE LIABLE FOR ANY DIRECT, INDIRECT, INCIDENTAL, SPECIAL, EXEMPLARY, OR CONSEQUENTIAL DAMAGES (INCLUDING, BUT NOT LIMITED TO, PROCUREMENT OF SUBSTITUTE GOODS OR SERVICES; LOSS OF
USE, DATA, OR PROFITS; OR BUSINESS INTERRUPTION) HOWEVER
CAUSED AND ON ANY THEORY OF LIABILITY, WHETHER IN CONTRACT, STRICT LIABILITY, OR TORT (INCLUDING NEGLIGENCE OR OTHERWISE) ARISING IN ANY WAY OUT OF THE USE OF THIS SOFTWARE,
EVEN IF ADVISED OF THE POSSIBILITY OF SUCH DAMAGE.
ii
Page 6

Authors Name List
All product names mentioned herein are trademarks of their respective owners.
The following notices are required to satisfy the license terms of the software
that we have mentioned in this document:
• This product includes software developed by the University of California,
Berkeley and its contributors.
• This product includes software developed by Jonathan R. Stone for the NetBSD Project.
• This product includes software developed by the NetBSD Foundation, Inc.
and its contributors.
• This product includes software developed by Manuel Bouyer.
• This product includes software developed by Charles Hannum.
• This product includes software developed by Charles M. Hannum.
• This product includes software developed by Christopher G. Demetriou.
• This product includes software developed by TooLs GmbH.
• This product includes software developed by Terrence R. Lambert.
• This product includes software developed by Adam Glass and Charles Han-
num.
• This product includes software developed by Theo de Raadt.
• This product includes software developed by Jonathan Stone and Jason R.
Thorpe for the NetBSD Project.
• This product includes software developed by the University of California,
Lawrence Berkeley Laboratory and its contributors.
• This product includes software developed by Christos Zoulas.
• This product includes software developed by Christopher G. Demetriou for
the NetBSD Project.
• This product includes software developed by Paul Kranenburg.
• This product includes software developed by Adam Glass.
• This product includes software developed by Jonathan Stone.
• This product includes software developed by Jonathan Stone for the NetBSD
Project.
• This product includes software developed by Winning Strategies, Inc.
• This product includes software developed by Frank van der Linden for the
NetBSD Project.
• This product includes software developed for the NetBSD Project by Frank
van der Linden
• This product includes software developed for the NetBSD Project by Jason R.
Thorpe.
• The software was developed by the University of California, Berkeley.
• This product includes software developed by Chris Provenzano, the Univer-
sity of California, Berkeley, and contributors.
iii
Page 7

JPEG LIBRARY
• The software installed on this product is based in part on the work of the Independent JPEG Group.
iv
Page 8

ENERGY STAR Program
As an ENERGY STAR Partner, we have determined
that this machine model meets the ENERGY STAR
Guidelines for energy efficiency.
The ENERGY STAR Guidelines intend to establish an international energy-saving system for
developing and introducing energy-efficient office equipment to deal with environmental issues, such as global warming.
When a product meets the ENERGY STAR Guidelines for energy efficiency, the Partner shall
place the ENERGY STAR logo onto the machine model.
This product was designed to reduce the environmental impact associated with office equipment by means of energy-saving features, such as Low-power mode.
• Low-Power mode and Off mode or Sleep mode
This product automatically lowers its power consumption when it is not operated for a fixed time (standard setting time: 1 minute). This is called“Off
mode”with a single function copying machine and “Sleep mode” with a multiple function machine equipped with optional facsimile and printing functions.
Off mode: Equivalent to the condition when the operation switch is turned
off.
Sleep mode: Equivalent to the condition when the operation switch is turned
off. Receiving fax messages and printing from a computer are possible.
If you want to operate this product while it is in either of these modes, do one
of followings:
-Turn on the operation switch.
-Place an original in the document feeder (ADF) tray.
-Lift and lower the exposure glass cover or the document feeder (ADF).
The default interval before entering Off mode or Sleep mode can be adjusted.
To change it, see ⇒ p.77 “Timer Setting”.
The ENERGY STAR Program establishes two modes which lower the power
consumption of the product when it is not operated for a fixed time. These
modes are the Low-Power mode and the Off mode or Sleep mode. This product has only one mode, the Off mode or Sleep mode. This mode meets the requirements of both the Low-Power mode and Off mode or Sleep mode. In this
manual, the Off mode is called the Auto Off mode.
v
Page 9

• Duplex Priority
The ENERGY STAR Program recommends use of the Duplex function. By
conserving paper resources this function is less of a burden to the environment. For applicable machines, duplex function (one-sided originals→ twosided copies) can be selected preferentially when the operation switch or the
main power switch is turned on, the{{{{Energy Saver}}}} key is pressed, or the machine resets itself automatically. To change the settings of the Duplex Priority
mode, see “Duplex Mode Priority” in the Copy Reference manual.
Specification
❖❖❖❖
Low- Power mode, Auto
Off Mode
Duplex Priority 1 Sided→2 Sided
Power consumption 7 W
Default interval 1 minute
Recovery time 10 seconds or less
Recycled Paper
In accordance with the ENERGY STAR Program, we recommend use of recycled
paper which is environment friendly. Please contact your sales representative
for recommended paper.
vi
Page 10

How to Read this Manual
R
R
Symbols
In this manual, the following symbols are used:
WARNING:
This symbol indicates a potentially hazardous situation that might result in
death or serious injury when you misuse the machine without following the instructions under this symbol. Be sure to read the instructions, all of which are included in the Safety Information section in the Copy Reference manual.
CAUTION:
This symbol indicates a potentially hazardous situation that might result in minor or moderate injury or property damage that does not involve personal injury
when you misuse the machine without following the instructions under this
symbol. Be sure to read the instructions, all of which are included in the Safety
Information section in the Copy Reference manual.
* The statements above are notes for your safety.
Important
If this instruction is not followed, paper might be misfeed, originals might be
damaged, or data might be lost. Be sure to read this.
Preparation
This symbol indicates the prior knowledge or preparations required before operating.
Note
This symbol indicates precautions for operation or actions to take after misoperation.
Limitation
This symbol indicates numerical limits, functions that cannot be used together,
or conditions in which a particular function cannot be used.
Reference
This symbol indicates a reference.
[]
Keys that appear on the machine's display panel.
{}
Keys built into the machine's control panel.
vii
Page 11

TABLE OF CONTENTS
Manuals for this Machine........................................................................... 1
Machine Types ............................................................................................ 2
Additional Functions Provided by Internal Options................................ 3
Copy Mode..................................................................................................... 3
Facsimile Mode (Option) ................................................................................ 3
Printer Mode (Option)..................................................................................... 3
Scanner Mode (Option) .................................................................................. 3
1.Basics
Connecting the Machine ............................................................................ 5
Requirements................................................................................................. 6
Connecting the Network Cable to the Network .............................................. 7
Turning On the Power ................................................................................ 9
Turning On the Main Power ........................................................................... 9
Turning On the Power .................................................................................. 10
Turning Off the Power .................................................................................. 10
Configuring the Network.......................................................................... 12
Configuring the Network............................................................................... 12
Configuring the Network with the Operation Panel ...................................... 13
2.Combined Function Operations
Control Panel ............................................................................................ 23
Changing Modes....................................................................................... 25
Copy Mode ................................................................................................ 26
Changing to Copy Mode .............................................................................. 26
Document Server Mode ........................................................................... 28
Copying by Using the Document Server...................................................... 28
Storing Documents in the Document Server................................................ 28
Interrupt the Operating Function and Start Storing ...................................... 29
Facsimile Mode......................................................................................... 30
Changing to Facsimile Mode........................................................................ 30
Printing a Received Fax ............................................................................... 30
Sending a Fax .............................................................................................. 31
Printer Mode.............................................................................................. 32
Changing to Printer Mode ............................................................................ 32
Printing......................................................................................................... 32
Scanner Mode........................................................................................... 33
Changing to Scanner Mode ......................................................................... 33
Interrupting scanning.................................................................................... 34
Multi-Access ............................................................................................. 35
viii
Page 12

3.Document Server
Overview.................................................................................................... 39
Process ........................................................................................................ 40
Relationship between Document Server and Other Functions............ 41
Features and Benefits .............................................................................. 42
On Demand Printing..................................................................................... 42
File Merge Printing ....................................................................................... 43
Facsimile Resend......................................................................................... 45
Operation from a Computer ......................................................................... 46
Scanning Originals................................................................................... 47
Scanning in Document Server Mode ........................................................... 47
Printing Saved Documents...................................................................... 51
Sample Copy................................................................................................ 54
Print First Page ............................................................................................ 55
Deleting Saved Documents ..................................................................... 56
Searching Saved Documents .................................................................. 58
To Search by File Name .............................................................................. 58
To Search by User Name............................................................................. 58
To Check the Details of Stored Documents........................................... 60
4.User Tools (System Settings)
Accessing the User Tools (System Settings) ........................................ 61
Changing the Settings.................................................................................. 61
Exiting from the User Tools.......................................................................... 62
User Tools Menu (System Settings) ....................................................... 63
Settings You Can Change with the User Tools ..................................... 68
General Features 1/2.................................................................................... 68
General Features
Paper Size Settings
Paper Size Settings
Paper Size Settings
Timer Setting................................................................................................ 77
Interface Settings/Network
Interface Settings/Parallel Interface ............................................................. 81
File Transfer................................................................................................. 82
Key Operator Tools
Key Operator Tools
Entering Text........................................................................................... 100
Available Characters.................................................................................. 100
Keys ........................................................................................................... 100
How to Enter Text ...................................................................................... 101
2
/2.................................................................................... 71
1
/3................................................................................ 72
2
/3................................................................................ 74
3
/3................................................................................ 75
1
/2—2/2.............................................................. 79
1
/2................................................................................. 84
2
/2................................................................................. 99
ix
Page 13

5.Appendix
Other Functions...................................................................................... 103
Inquiry ........................................................................................................ 103
Changing the Display Language ................................................................ 104
Displaying the Total Counter...................................................................... 104
INDEX....................................................................................................... 105
x
Page 14

Manuals for this Machine
This is a multi-functional machine combining copier, facsimile, printer and scanner functions. This manual describes procedures common to these functions.
Each function's reference describes the operational procedures for that functions. Please consult the manual that suits your needs.
❖❖❖❖ System Settings (this manual)
Provides an overview of the machine. This manual introduces the functions
of the machine. It also introduces the options that allow you to use additional
functions and describes how to access the system user tools to make the machine easier to use.
❖❖❖❖ When using as a copier
• Copy Reference
Describes the various copying functions from basic copying to more advanced functions such as reducing/enlarging copies or combining originals into one copy.
❖❖❖❖ When using as a facsimile
• Facsimile Reference (option)
Describes the operational procedures and functions to use the machine as
a facsimile.
❖❖❖❖ When using as a printer
• Printer Reference (option)
Describes the system settings, procedures and functions for using this machine as a printer.
❖❖❖❖ When using as a scanner
• Scanner Reference (option)
Describes the system settings, procedures and functions for using this machine as a scanner.
1
Page 15

Machine Types
This machine comes in two models which vary in copy speed. To make sure
which model you have, see the inside front cover.
Type 1 Type 2
Copy speed 22 copies/minute
(A4K, 8
1
/2" × 11"K)
27 copies/minute
(A4K, 81/2" × 11"K)
2
Page 16

Additional Functions Provided by Internal Options
You can expand the capabilities of
this machine to include fax functions.
When you want to add a function,
contact your sales or service representative.
Copy Mode
In copy mode you can make basic
copies and also copy using more sophisticated techniques, such as reduction/ enlargement or combining
several originals onto one copy. You
can install optional expansion memory for storage of document images,
thereby making the best use of memory with various copy functions.
Facsimile Mode (Option)
You can send and receive fax messages in facsimile mode. Installation of
optional expansion memory allows
more functions to be used and more
data to be stored.
Scanner Mode (Option)
You can use this machine as a scanner.
Limitation
❒ The following functions require
the optional Hard Disk Unit:
• Document server
• File transfer
• Sample print
• Locked print
Printer Mode (Option)
Installation of optional expansion
memory allows more data to be
stored.
3
Page 17

4
Page 18

1. Basics
Connecting the Machine
Make sure that the shape and the position of the connector are as shown in the
illustration.
Note
❒ The Ethernet Board (for Ethernet interface) and the IEEE1394 Board (for
IEEE1394 interface) cannot be installed in the machine at the same time. The
illustration below shows all interface connectors for explanatory purposes
only.
1
3
2
ZFFH010E
1.
10BASE-T/100BASE-TX (option)
2.
Parallel port
Reference
For more information about the parallel port and IEEE1394 interface connections, see "Connecting the Machine" in the Printer Reference.
3.
IEEE 1394 ports (option)
5
Page 19

Basics
Requirements
1
Requirements
Before using this machine, make sure that all the environmental and electrical
requirements have been met. Connect the machine to the host computer using
the parallel port, Network Interface Board, or both.
Make sure that all the cables, connectors, and electrical outlets necessary to attach the machine to the host computer or network are present.
Important
❒ The interface cable is not supplied. It is your responsibility to provide the in-
terface cable appropriate for the computer that you are using.
Reference
For more information about using the parallel port, see the Printer Reference.
For more information about using a network, see p.6 “Network cable require-
ments”.
Network cable requirements
The Network Interface Board can be installed to allow direct connection to an
Ethernet network.
The Network Interface Board supports 10BASE-T or 100BASE-TX connections.
You can use the machine in the following network environments:
• Using the appropriate network management software and printer driver
• Attaching the machine to a network computer set up as a server
Client
Driver
PCL 6/5e, RPCS™, PostScript 3
File Server
Protocol
*1
Under Windows NT 4.0, only × 86 CPU is supported.
*2
For information about usable versions of the Mac OS, see the "PostScript Supplement".
*3
Under Windows 95/98/Me, Windows 2000 and Windows NT 4.0 only. Only for
Peer-Peer Printing.
NetWare 3.x, NetWare 4.x, NetWare 5/5.1
TCP/IP, IPX/SPX, NetBEUI
Windows 95/98/Me, Windows 2000, Windows NT 4.0
(optional PostScript 3 Unit Type 1027 is required ), UNIX
*3
, AppleTalk
*1
, Mac OS
*2
In a mixed network environment, the protocol switches automatically.
Reference
For more information about network connection settings, see p.61 “User
Tools (System Settings)”.
6
Page 20
Connecting the Machine
Note
❒ Consult your network administrator before connecting the machine to a net-
work.
❒ Make sure to use a properly shielded and grounded cable (UTP, STP, Catego-
ry/Type5) for the connection to the host computer (and/or HUB) in order to
meet FCC and EMC Directive 89/336/EEC emission guidelines.
Connecting the Network Cable to the Network
Limitation
❒ The IEEE1394 Board and the Network Interface Board cannot be installed at
the same time.
Turn off the main power switch.
AAAA
Loop the network cable twice. The loops should be about 10cm (4”) from
BBBB
the end of the cable closest to the printer.
Attach the ferrite core to the loops.
CCCC
1
ZFFH210E
Attach the network cable to the jack on the board.
DDDD
ZFFH030E
Connect the other end of the network cable to the network.
EEEE
Turn on the main power switch.
FFFF
7
Page 21

Basics
Indicators on Network Interface Board
1
1.
Indicator (green)
Turns green while the machine is connected to the network correctly.
1
2
ZFFH020E
2.
Indicator (yellow)
Turns yellow while 100 BASE-TX is operating.
Turns off while 10 BASE-T is operating.
8
Page 22

Turning On the Power
To turn the machine on, press the operation switch.
Note
❒ This machine automatically enters
Energy Saver mode or turns itself
off if you do not use the machine
for a while. ⇒ p.77 “Timer Setting”.
----Power switches
This machine has two power switches.
❖❖❖❖ Operation switch (right side of the
control panel)
Press this switch to activate the
machine. When the machine has
warmed up, you can make copies.
❖❖❖❖ Main power switch (left side of the ma-
chine)
When the machine is not to be used
for an extended period of time,
turn off the main power switch.
Turning On the Power
Turning On the Main Power
Make sure that the power cord is
AAAA
firmly plugged into the wall outlet.
Open the switch cover and turn
BBBB
on the main power switch (make
sure that the Main Power indicator goes on).
Important
❒ Do not switch off the main pow-
er immediately after it has been
switched on. Failure to observe
this may result in damage to the
hard disk or memory, leading to
malfunctions.
1
ZFFH110N
9
Page 23
Basics
Turning On the Power
Press the operation switch to
AAAA
1
make the On indicator go on.
The display panel will come on.
ZFFH120N
Note
❒ If the power is not turned on
when the operation switch is
pressed, check if the main power switch is on. If off, turn it on.
❒ The machine will be ready for
use within 10 seconds of being
turned on.
❒ If the user code dialog box ap-
pears on the display panel instead of the copier display,
enter a registered user code, and
then click the [#] key. See p.86
“User Code”.
Turning Off the Power
Make sure that the exposure glass
AAAA
or the document feeder is in the
right position.
Press the operation switch to
BBBB
make the On indicator go off.
Note
❒ Even if you press the operation
switch, the indicator does not
go off and blinks in the following cases:
• When the exposure glass or
the document feeder is open
• When communication is in
progress with external
equipment
• When the hard disk is operating
ZFFH120N
10
Page 24

Turning Off the Main Power
Preparation
Usually keep the main power
switch turned on.
Before you turn it off, be sure to
read the "Important" information
below and take the following procedural steps:
Make sure that the On indicator is
AAAA
off.
Turn off the main power switch to
BBBB
make the Main Power indicator
go off.
Important
❒ Do not turn off the main power
switch when the On indicator is
on or blinking. Failure to observe this may result in damage
to the hard disk or memory.
❒ Pull out the power plug after
you turn off the main power
switch. Failure to observe this
may result in damage to the
hard disk or memory.
❒ If the main power switch is
turned off, or the power plug is
disconnected, any documents
stored in fax memory will be
lost after approximately one
hour.
Turning On the Power
1
11
Page 25

Basics
Configuring the Network
1
Configuring the Network
Preparation
To connect the machine to a network, you must first install the optional Network Interface Board Type 1027 and at least 64MB of memory in the machine.
Network Interface Board Type 1027 comes packaged with Printer Controller
Type 1027 and Printer/Scanner Controller Type 1027.
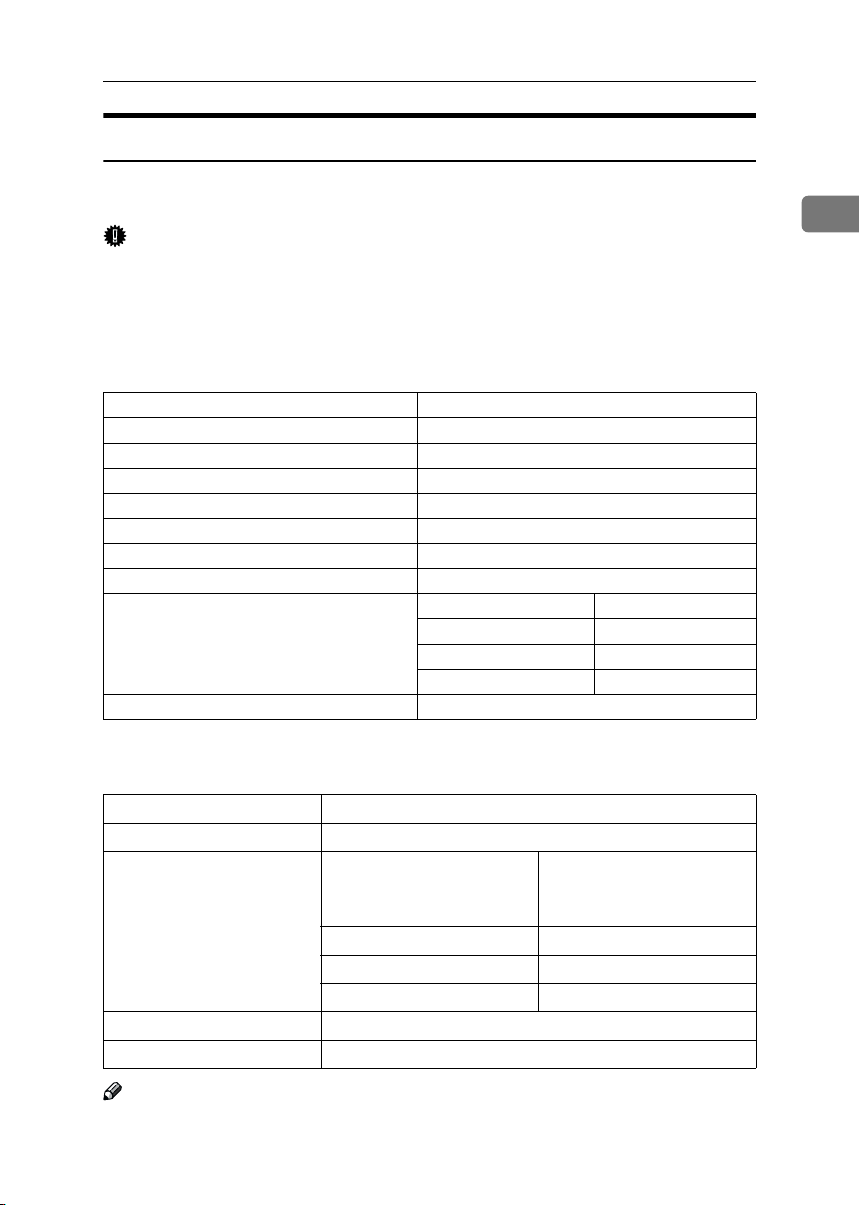
Mode Network Setting
Distribute received fax
documents
Scanner (Network Twain
Scanner)
Scanner (Network Delivery Scanner)
Printer (TCP/IP)
Printer (NetWare)
*1
To use this function, you'll need Scan Router V2 Lite (packaged with optional Print-
*1
*2
*3
*4
*5
IP Address, Subnet Mask, Gateway Address, Delivery Server IP
Address,Fax RX File Transmission, Effective Protocol (TCP/IP)
IP Address, Subnet Mask, Gateway Address, Effective Protocol
(TCP/IP)
IP Address, Subnet Mask, Gateway Address, Effective Protocol
(TCP/IP), Delivery Server IP Address, Number of Recalls, Recall
Interval time
IP Address, Subnet Mask, Gateway Address, Network Boot, Effective Protocol
Effective Protocol, NW Frame Type
er/Scanner Controller Type 1027 or Scan Router V2 Professional). In addition to the
network settings, you must set the "Delivery Server IP Address" and "Fax RX File
Transmission" for file transfer.
*2
You will need to specify the settings for a network TWAIN scanner and network delivery scanner when using the scanner function.
*3
When you use this function, you need to have an optional network interface board
and 64MB of memory, or Scan Router V2 Lite which bundled with the Printer/Scanner Controller Type 1027. If you need to have Scan Router V2 Professional, see the
“Scanner Reference”.
*4
Make the necessary settings for your network environment. For details about settings, see the “Printer Reference”.
*5
Configure the TCP/IP when you use pure IP of NetWare 5/5.1.
This section describes the basic operation procedure. For more information
about the settings, see p.68 “Settings You Can Change with the User Tools”.
For a network environment that uses TCP/IP, you can use SmartNetMonitor to
configure IP addresses for Admin and the web browser packaged with Printer
Controller Type 1027 or Printer/Scanner Controller Type 1027.
12
Reference
For details about SmartNetMonitor, see the "Network Printing Guide".
Page 26
Configuring the Network
Configuring the Network with the Operation Panel
This section describes the basic procedures. Please make the settings appropriate
for the network you are using.
Important
❒ These settings should be made by your systems administrator or after con-
sulting with your systems administrator.
The following table shows the operation panel settings and their default settings. These are included in “TCP/IP Menu” of the ”Network“ menu.
❖❖❖❖ Interface Settings/Network
Setting Name Value
IP Address 011.022.033.044
Subnet Mask 000.000.000.000
Gateway Address 000.000.000.000
Access Control 000.000.000.000
Access Mask 000.000.000.000
Network Boot None
NW Frame Type Auto Select
Effective Protocol TCP/IP
NetWare
NetBEUI
AppleTalk
Ethernet Speed Auto
*1
❍ means that this protocol is active.
*1
❍
*1
❍
*1
❍
*1
❍
1
❖❖❖❖ File Transfer Settings
Setting Name Value
Delivery Server IP Address 000.000.000.000
Fax RX File Transmission Setting per Line • Port 1: Do not Deliver.
• Port 2: Do not Deliver.
• Port 3: Do not Deliver.
Print at Delivery No
Files to Deliver All Files
Delivery Failure File —
Recall Interval Time 300 seconds
Number of Recalls No
Note
❒ The file transfer function requires the optional Hard Disk Unit.
13
Page 27

Basics
Network Settings
The following describes the settings required to use the machine in a network.
For more information about the settings, see p.68 “Settings You Can Change
1
with the User Tools”.
Press {{{{User Tools/Counter}}}}.
AAAA
ZFFH150N
The “User Tools Main Menu” appears.
14
Press {{{{System Settings}}}}.
BBBB
Press [
CCCC
DDDD
Interface Settings
The following screen appears on the panel display.
Make sure that the [
The following screen appears on the panel display.
].
Network
] key is selected.
Page 28

Configuring the Network
Click [Effective Protocol].
EEEE
Note
❒ Consult the network administrator for help with these settings.
❒ You must configure IP Address for using TCP/IP protocol. You don't have
to configure it if Networkboot is DHCP.
❒ Press [Invalid] for protocols that you don't use.
❒ Press [Effective] for TCP/IP protocol when you use pure IP of NetWare
5/5.1.
Limitation
❒ You need to have PostScript 3 module for AppleTalk.
AAAA Make sure that the [Effective Protocol] key is pressed.
BBBB Select [Invalid] or [Effective] for each protocol.
1
CCCC Press [OK].
The following operation will be different, according to each protocol.
When Using TCP/IP
AAAA Make sure that the [Network] key is pressed.
BBBB Press [IP Address].
15
Page 29

Basics
CCCC Use the number keys to enter the IP address.
1
Note
❒ Press the [←←←←] and [→→→→] keys to move to the next entry field.
❒ If you enter the wrong IP address, press [Clear] and re-enter the IP ad-
dress.
DDDD Press [OK].
EEEE Make the [Sub-net Mask], [Gateway Address], [Access Control], and [Access
Mask] settings. For each item, click the corresponding button on the
screen shown in step BBBB, and then perform the same procedure as described in steps CCCC and DDDD.
Acquiring the IP Address from the DHCP Server
To use the DHCP server to acquire the IP address, select [DHCP] from [Network
Boot].
Note
❒ You need to change the settings when you use DHCP.
❒ To always assign the same IP address to the machine, reserve the IP ad-
dress for the machine on the DHCP server.
❒ Use the default IP address.
AAAA Make sure that the [Network] key is selected.
16
BBBB Press [Network Boot].
Page 30

CCCC Press [DHCP], and then press [OK].
When using NetWare
Configuring the Network
1
To use the machine on NetWare, be sure to select the type of [
You can select the following frame types:
• Auto select (Default)
• Ethernet II
• Ethernet 802.2
• Ethernet 802.3
• Ethernet SNAP
Note
❒ Select File server which connection must be same as the frame type.
❒ To use the machine in a pure IP environment on NetWare 5/5.1, select [
] for TCP/IP in step
fective
AAAA Make sure that the [Network] is selected, and then press [TTTTNext].
BBBB Press [
NW Frame Type
.
E
].
NW frame
].
Ef-
CCCC Select the Frame Type, and then press [OK].
Press [Exit].
FFFF
Returns to the [User Tools/Counter] display.
17
Page 31

Basics
Press [List/Test Print] to print out the settings.
GGGG
Note
❒ Skip this step and go to step
1
printer and scanner functions.
AAAA Press [Printer Features].
BBBB Press [List/Test Print].
CCCC Press [Config. Page].
The configuration Page will be printed.
Reference
For details about List/Test Print refer to the Printer Reference.
if your machine is not equipped with the
H
Press {{{{User Tools/Counter}}}} key.
HHHH
Note
❒ The settings become effective and back to display.
File Transfer Settings
Preparation
The file transfer function requires the optional Hard Disk Unit.
The following describes the file transfer settings required for sending received
facsimile files and the scanner function. For more information about the settings, see p.68 “Settings You Can Change with the User Tools”.
18
Page 32

Press {{{{User Tools/Counter}}}}.
AAAA
ZFFH150N
The [User Tools Main Menu] appears.
Click [System Settings].
BBBB
Configuring the Network
1
Click [
CCCC
File Transfer
Assigning a Delivery Server IP Address
Note
❒ You must also set the delivery server IP address on ScanRouter V2
Lite/Professional. The relevant setting on the machine will be overwritten
by the delivery server IP address set on ScanRouter V2 Lite/Professional.
AAAA Click [
Delivery Server IP Address
].
].
19
Page 33

Basics
BBBB Use the number keys to enter the delivery server IP address.
1
Note
❒ Press the [←←←←] or [→→→→] key to move to the adjacent entry field.
❒ To correct the delivery server IP address entered, press [Clear], and then
enter the correct delivery server IP address.
CCCC Click [OK].
Making Settings to Transmit Received Facsimile Files
AAAA Click [Fax RX File Transmission].
BBBB Make the following settings as required:
20
• Setting per Line
• Print at Delivery
• File to Deliver
• Delivery Failure File
CCCC Click [OK].
Setting the Recall Interval Time
AAAA Click [Recall Interval Time].
Page 34

Configuring the Network
BBBB Use the number keys to enter the recall interval time.
Note
❒ To correct the recall interval time entered, press [Clear], and then enter
the correct recall interval time.
CCCC Click [OK].
Setting the Number of Recalls
AAAA Click [Number of Recalls].
BBBB To resend files to the delivery server, press [Yes].
1
The menu to specify the number of recalls appears.
Note
❒ To not resend files, press [No] and go to step D.
CCCC Use the number keys to enter the number of recalls.
Note
❒ To correct the entered number of recalls, press [Clear], and then enter the
correct number of recalls.
DDDD Click [OK].
Click [Exit].
DDDD
21
Page 35

Basics
Press {{{{User Tools/Counter}}}}.
EEEE
The new settings become effective and the display returns to the main function menu.
1
Note
❒ You can also click the [Exit] key on the [User Tools Main Menu] to return
to the main function menu.
22
Page 36

2. Combined Function
Control Panel
Operations
ZFFH160N
1.
Indicators
Show errors and machine status.
2. {
{User Tool/Counter}}}} key
{{
• User Tools
Press to change the default settings
and conditions to meet your requirements.⇒ p.68 “Settings You Can
Change with the User Tools”
• Counter
Press to check or print the total number of copies made.
• Inquiry
Press to check where to contact for
machine repairs and ordering toner.
3.
Display panel
Shows operation status, error messages,
and function menus.
4.
{{{{Clear Modes}}}} key
Press to clear the previously entered copy
job settings.
5.
{{{{Energy Saver}}}} key
Press to switch to and from Energy Saver
mode.
6.
{{{{Interrupt}}}} key
Press to make interrupt copies during a
copy run.
7.
Main power indicator and power
indicators
The main power indicator goes on when
you turn on the main power switch.
The power indicator blinks when the
power is on.
Important
❒ Do not turn off the power while
the power indicator is blinking.
Doing so may damage the hard
disk.
8.
Operation switch
Press this switch to turn the power on
(the On indicator goes on). To turn the
power off, press this switch again (the On
indicator goes off).
Note
❒ The operation switch is ineffective
during a system setting operation.
23
Page 37

Combined Function Operations
9.
{{{{Sample Copy}}}} key
Press to make a single set of copies or
prints to check for poor copying or printing before making multiple sets of copies
or prints.
10.
{{{{Start}}}} key
Press to start copying, scanning, or print-
2
ing documents stored on the Document
Server.
11.
{{{{Clear/Stop}}}} key
• Clear
Press to delete a number entered.
• Stop
Press to stop a copy job in progress.
12.
{{{{#}}}} key
Press to enter a value.
13.
Number keys
Use to enter the desired number of copies
and data for selected modes.
14.
Function keys
Press the appropriate key to choose any
of the following functions:
• Copy
• Document Server
• Facsimile
• Printer
• Scanner
15.
Function Status indicator
These show the status of the above functions:
• Yellow: the function is selected.
• Green: the function is active.
• Red: the function has been interrupt-
ed.
24
Page 38

Changing Modes
Changing Modes
You can use this machine not only as a copier, but optionally as a fax, printer and
scanner machine as well. Press the {{{{Copy}}}}, {{{{Document Server}}}}, {{{{Facsimile}}}}, or
{{{{Printer}}}}, {{{{Scanner}}}} key to use each function.
2
Limitation
❒ You cannot switch modes in any of the following cases:
• When scanning in a fax message for transmission
• During immediate transmission
• When accessing the user tools
• During interrupt copying
• During on hook dialing for fax transmission
• While scanning an original
ZFFH170N
25
Page 39

Combined Function Operations
Copy Mode
You can make basic copies, and enlarge/reduce, combine, or use various other copy functions to make
copies. You can also add options to
2
further increase the number of functions. For more details, refer to "Options" in the Copy Reference manual.
Changing to Copy Mode
You can always make a copy when
the machine isn't printing or scanning
originals for faxes.
Press the {{{{Copy}}}} key.
AAAA
The copier display appears on the
panel display.
Reference
For details, see the “Copy Reference”.
Limitation
❒ You cannot use the interrupt copy
function in the following cases:
• during fax immediate transmission
• while scanning an original for
memory transmission
• during interrupt copying
Press the {{{{Interrupt}}}} key.
AAAA
If the machine is scanning originals, it will immediately stop the
scanning job. On the other hand, if
the machine is performing a copy
or print job, it will still continue the
job until you press the {{{{Start}}}} key
after pressing the {{{{Interrupt}}}} key.
When the current job stops, the interrupt copy display appears on
the panel display.
Note
❒ When you interrupt a copying
job, remove the previous original.
Make your copies.
BBBB
Interrupt copying to make urgently
needed copies
You can interrupt the current job to
make a copy.
Note
❒ The display may differ depending
on the settings described on p.68
“Function Priority” and p.84 “User
Code Management”.
26
Important
❒ If the remaining memory space
is 0%, the machine fails to receive fax data. Wait until the
machine completes printing a
received fax, then start making
copies.
Note
❒ While copying, a received fax
document is stored in memory
and the Receive File indicator is
lit.
After interrupt copying is com-
CCCC
pleted, remove the original and
delivered copies.
Page 40

Copy Mode
Press the {{{{Interrupt}}}} key again.
DDDD
The machine resumes the printing
job of the received fax document.
Resuming the interrupted
copying job
AAAA Reset the previous original.
BBBB Press the {{{{Start}}}} key.
The machine resumes the interrupted copy run.
Copying and Multi-accessing
If you want to make copy while using
another function, follow the procedure below.
Press the {{{{Interrupt}}}} key.
AAAA
The interrupt display appears on
the panel display.
Place originals, and then press the
BBBB
{{{{Start}}}} key.
The machine interrupts the job that
is printing and starts copying your
originals.
Reference
⇒ p.35 “Multi-Access”
❖❖❖❖ When “Print Priority” = “Fax”,
“Printer”, or “Display” (default)
The machine completes the operation of the function set by
Print priority before performing
the operation of another function.
Limitation
❒ While the machine is per-
forming two-sided printing
in fax mode, you cannot
make two-sided copies until
the printing ends.
❖❖❖❖ When “Print Priority” = “Inter-
leave”
The machine performs the operations in the order in which they
are initiated. If another function
is initiated during operation,
the machine completes the current operation before performing the operation of the function
initiated.
2
When copying is complete, re-
CCCC
move your originals and the copies.
Press the {{{{Interrupt}}}} key again.
DDDD
The previous job settings will be
restored and the machine will continue from where it left off.
Note
❒ Machine operations are different
depending on the“Print Priority”settings (⇒ p.68 “General
Features
Management” (⇒ p.68 “General
Features
1
/2”) or the “User Code
1
/2”) settings.
27
Page 41

Combined Function Operations
Document Server Mode
You can store files in the Document
Server.
Limitation
❒ The Document Server function re-
2
quires the optional Hard Disk
Unit.
Note
❒ If you want to re-send fax docu-
ments, go back to the Facsimile
display.
❒ For details about this function and
its operation to the Copy Reference.
Reference
For more information about the
Document Server, see p.39 “Docu-
ment Server”.
Copying by Using the
Note
❒ When the optional Internal
Tray, Internal Shift Tray, Finisher 500, or Finisher 1000 is installed on the machine, you can
specify an output tray to which
documents are to be delivered.
For more information about
how to specify an output tray
for each function, see the following descriptions:
• p.70 “Output: Copier”
• p.70 “Output: Document
Server”
• p.70 “Output: Facsimile”
• p.71 “Output: Printer”
Storing Documents in the Document Server
Document Server
Storing Documents in the Document
You can print from the Document
Server while using other functions.
Press the {{{{Document Server}}}} key.
AAAA
The Document Server display appears on the panel display.
Server
Place originals.
AAAA
Press the {{{{Document Server}}}} key.
BBBB
The Document server display appears on the panel display.
28
Select the desired documents, and
BBBB
then press [OK].
Press the [Scan Original] key.
CCCC
Press the {{{{Start}}}} key.
DDDD
Documents are stored for the copier function.
Page 42

Document Server Mode
Storing Documents while Copying
You can copy while storing files.
Place originals.
AAAA
Press the {{{{Copy}}}} key.
BBBB
The Copier display appears on the
panel display.
Press [Store File], and then press
CCCC
[OK].
Both copying and storing documents will be started.
Press the {{{{Start}}}} key.
DDDD
Storing Documents from the Fax display
You can select to store and transmit
documents at the same time or store
documents only.
Place originals.
AAAA
Press the {{{{Facsimile}}}} key.
BBBB
The facsimile display appears on
the panel display.
Press the [Store File] key.
CCCC
Press [Store&Transmit] or [Store Only],
DDDD
and then press the [OK] key.
If you selected [Store&Transmit], in
EEEE
put the dial numbers. If you selected [
Press the {{{{Start}}}} key.
FFFF
If you selected [Store&Transmit], the
machine starts storing documents
and transmitting them. If you selected [
starts storing documents.
Store Only
Store Only
], go to step
], the machine
.
FFFF
Storing Documents from Printer
If you want to store files from the
printer, use this function from the
printer driver.
Interrupt the Operating Function and Start Storing
Even if another function is operating,
you can use the Document Server.
Refer to the following procedure.
While Copying
Press the {{{{Clear/Stop}}}} key.
AAAA
The copy job will be interrupted.
Remove the originals.
BBBB
Press the {{{{Document Server}}}} key.
CCCC
The Document Server display appears on the panel display.
Place originals to be stored.
DDDD
Press the [Scan Original] key.
EEEE
The machine starts storing documents.
Note
❒ If you want to go back to the
copier function, press {{{{Copy}}}}.
2
Reference
For details about this function,
refer to the “Facsimile Reference”.
29
Page 43

Combined Function Operations
Facsimile Mode
Changing to Facsimile Mode
You can always use the machine as a
facsimile when you are not copying.
2
Press the {{{{Facsimile}}}} key.
AAAA
The facsimile display appears on
the panel display.
Note
❒ The Memory Transmission/Re-
ception function is performed
automatically even when another function is being used.
You need not switch the display. When data is received in
memory, the Receive File indicator is lit.
Reference
For details, see the “Facsimile
Reference”.
Printing a Received Fax
When you are not copying, a received
fax is printed automatically. You do
not need to switch to Facsimile mode.
If you wish to print a received fax
while copying, see below.
Preparation
Machine operations are different depending on the “Print Priority”set-
tings (⇒ p.68 “General Features
1
/2”) or “User Code Management”
(⇒ p.84 “Key Operator Tools
Reference
⇒ p.35 “Multi-Access”
Printing a received fax while copying
❖❖❖❖ When “Print Priority” = “Fax” or “Dis-
play” (default)
The machine interrupts the copying
and receives a fax. Upon completing the fax reception, it resumes the
interrupted copying job.
❖❖❖❖ When “Print Priority” = “Interleave”
The machine performs the operations in the order in which they are
initiated. If another function is initiated during operation, the machine completes the current
operation before performing the
operation of the function initiated.
1
/2”).
30
❖❖❖❖ Printing a received fax in a hurry
Press the {{{{Facsimile}}}} key to switch
to the facsimile display. The copying job is interrupted and the machine starts printing the received
fax automatically. After printing
the fax, press the {{{{Copy}}}} key and
do the previous job again.
Page 44

Facsimile Mode
Sending a Fax
Sending a fax while printing a received fax
Scanning originals for memory
transmission
The machine can scan your originals
for memory transmission even while
printing a received fax.
Complete the usual operations
AAAA
for sending a fax, then press the
{{{{Start}}}} key.
Sending a fax while copying
Press the {{{{Facsimile}}}} key to switch
AAAA
to the facsimile display.
You can send a fax while copying.
Note
❒ Remove any originals from
your copy job.
Sending a fax while printing
Press the {{{{Facsimile}}}} key to switch
AAAA
to the fax display.
Printing is interrupted.
Complete the usual operations
BBBB
for sending a fax, and then press
the {{{{Start}}}} key.
After the transmission has finished, printing re-starts.
When Scanning Other Jobs
You cannot scan originals to be
AAAA
sent by fax when scanning originals for another job.
2
Complete the usual operations
BBBB
for sending a fax, and then press
the {{{{Start}}}} key.
After the transmission has fin-
CCCC
ished, press the {{{{Copy}}}} key.
Reset the copy job originals, and
DDDD
then press the {{{{Start}}}} key.
The machine resumes the interrupted copy run.
31
Page 45

Combined Function Operations
Printer Mode
Changing to Printer Mode
To print from an application being
run on a personal computer, you
2
need not switch to printer mode on
this machine. You must switch to
printer mode, however, to perform
the following operations:
• Form feeding
• Job reset
• Sample print
• Locked print
Press the {{{{Printer}}}} key.
AAAA
The printer display appears on the
panel display.
Reference
For details, see the “Printer Reference”.
Printing
The machine can receive print data
while another mode is functioning.
Print the job from your computer.
AAAA
Printing starts.
Reference
For details, see the “Printer Reference”.
Note
❒ If user codes have been set for
the printer function as described on p.84 “User Code
Management”, you must enter
your user code from the Printer
Driver.
32
Page 46

Scanner Mode
Scanner Mode
Changing to Scanner Mode
This scanner unit has two scanner
functions: “Network TWAIN Scanner” and “Network Delivery Scanner”.
Reference
To configure the function priority,
see the “Scanner Reference”.
Limitation
❒ In the following cases, the machine
cannot be used as a scanner.
• While scanning originals for
copying
• While scanning a fax message
for transmission
• During immediate fax transmission
• While scanning an original
Storing Documents in Memory
Place originals.
AAAA
Press the {{{{Scanner}}}} key.
BBBB
The scanner display appears on
the panel display.
Using the Network TWAIN Scanner
Place originals.
AAAA
Configure the scan options using
BBBB
the computer.
Start the scan.
CCCC
Reference
For more information, see the
“Scanner Reference”.
Using the Network Delivery Scanner
Place originals.
AAAA
Press the {{{{Scanner}}}} key.
BBBB
The screen for the scanner mode
appears.
Set the scan options, address and
CCCC
sender.
Press the {{{{Start}}}} key.
DDDD
2
Press the
CCCC
The machine prepares to store the
DDDD
document.
Press the {{{{Start}}}} key.
EEEE
Store File
{{{{
key.
}}}}
Reference
For more information, see the
“Scanner Reference”.
33
Page 47

Combined Function Operations
Remove the originals.
Interrupting scanning
If you want to scan while copying or
faxing, follow the procedure below.
Scanning while copying
2
Usually, you cannot use this machine
as a scanner until it finishes copying.
Preparation
Select Function Reset Timer to set
“Instant”. ⇒ p.69 “Function Reset
Timer”
Press {{{{Clear/Stop}}}} key.
AAAA
Copying is interrupted.
Remove the originals.
BBBB
Press {{{{Reset}}}} key.
CCCC
Start the scan.
DDDD
Note
❒ When the scan is completed,
press the {{{{Copy}}}} key and restart
copying.
BBBB
Start the scan.
CCCC
Note
❒ When the scan is completed,
press the {{{{Facsimile }}}} key and restart faxing.
Scanning while doing an Immediate Fax Transmission
Usually, you cannot use the scanner
function while it is doing immediate
fax transmissions.
Preparation
Select Function Reset Timer to set
“Instant”. ⇒ p.69 “Function Reset
Timer”.
Press {{{{Clear/Stop}}}} key.
AAAA
The immediate fax transmission is
interrupted.
Note
❒ Previously scanned originals
will be delivered.
Scanning while scanning a fax message for memory transmission
Usually, you cannot use the scanner
function until scanning a fax message
for memory transmission is completed.
Preparation
Select Function Reset Timer to set
“Instant”. ⇒ p.69 “Function Reset
Timer”
Press {{{{Clear/Stop}}}} key.
AAAA
The fax message scan is interrupted.
Note
❒
When using quick memory delivery, previously scanned originals
will be delivered. For more infor-
34
mation, see "Facsimile Reference".
Remove the originals.
BBBB
Start the scan.
CCCC
Note
❒ When the scan is completed,
press {{{{Facsimile}}}} key and restart
faxing.
Scanning while printing
You can scan without interrupting
printing.
Page 48

Multi-Access
Multi-Access
You can carry out another job using a different function while the current job is
being performed.
This allows you to handle your jobs efficiently regardless of how the machine is
being used. For example:
• While making copies, you can scan documents to store in the Document Server.
• While printing documents saved in the Document Server, the machine can receive print data.
• You can make copies while receiving fax data.
• While printing print data, you can make operations for copying.
Performing multiple functions simultaneously like this is called Multi-accessing.
Note
❒ The chart below shows sample operations with "Print priority" set to "Inter-
rupt" (⇒ p.68).
❒ $: Operation is enabled when the relevant function key is pressed and re-
mote switching (of the scanner) is done.
❒❍: Operation is enabled when the [Interrupt] key is pressed to interrupt the
preceding operation.
❒ →: Operation is performed automatically after the preceding operation ends.
❒ ×: The operation must be started after the preceding operation ends. (Simul-
taneous operations are not available.)
❒ When the optional Internal Tray, Internal Shift Tray, Finisher 500, or Finisher
1000 is installed on the machine, you can specify an output tray to which documents are to be delivered. For more information about how to specify an
output tray for each function, see the following descriptions:
• p.70 “Output: Copier”
• p.70 “Output: Document Server”
• p.70 “Output: Facsimile”
• p.71 “Output: Printer”
2
35
Page 49

Combined Function Operations
----Sample operations
This chart is based on the following conditions:
• When “Print priority” is set to “Interrupt” (⇒ “Print Priority” on p.69 “Print
Priority”)
• For details on operations under other conditions, contact your service repre-
2
sentative.
Mode after you select Copy
Facsimile Printer
Interrupt
Copying
Transmission
Reception
Print
Scanner
Document Server
DeskTopBinder V2
Professional/Lite
Mode before you select
Copy
Interrupt
Transmission Operation/Manual
Reception Operation
Facsimile
36
Operations for Copying
Stapling
Sort
Operations for Copying
Copying
Scanning an Original for Memory Transmission
Memory Transmission
Immediate Transmission
Memory Reception
Printing Received Data
Printing
Stapling
Operations for Scanning
Scanning
Operations for Document Server
Scanning a Document to Store in Document Server
*2
$$
*2
Printing from Document Server
❍
*4
❍❍❍
Transmission Operation/Manual Reception Operation
Operations for Copying ×××❍❍
Stapling ❍
Sort ❍
Operations for Copying ❍❍❍××××❍ × ❍❍❍❍❍ЧЧЧЧЧ❍❍
Copying ❍❍❍××××❍ × ❍ → ❍ →→ЧЧЧЧЧ→❍
Copying
Scanning an original for
Memory Transmission
Memory Transmission ❍❍❍❍❍❍❍❍
Immediate Transmission ЧЧЧЧЧЧЧ❍
Transmission
Memory Reception ❍ ❍❍❍❍❍❍❍
Printing Received Data ❍❍❍❍❍❍❍❍
Reception
→
→
*1
*1
*1
→
→
*1
*1
*1
$$$
ЧЧЧЧЧЧЧ❍ × ❍❍❍❍❍ЧЧЧЧЧ❍❍
$$❍$
$$
❍❍
*5
$$
❍❍
❍❍××❍ × ❍❍❍❍❍
$
❍
*2
*2
$
❍
*2
*2
❍
*3
*3
× ❍
*2
❍
*3
*3
❍❍
*8
Data Reception
❍❍❍❍❍
❍❍❍❍→ $$$$
❍❍❍❍❍
❍
❍
❍❍❍❍❍❍❍❍❍❍
*3
*3
❍❍❍❍ЧЧЧЧЧ❍❍
*3
❍
❍
❍❍❍❍❍❍❍❍❍❍
*3
*3
× ❍❍❍❍❍❍❍❍❍❍
*8
$$$$$
$$
*2
$$$$$
Printing from Document Server
Sending a Facsimile from Document Server
❍❍
❍
❍
*4
❍❍
*3
*3
*3
*3
Page 50

Multi-Access
Mode after you select Copy
Mode before you select
Data Reception ❍❍❍❍❍❍❍❍❍❍❍→→→❍❍❍❍❍❍❍
Sort Print ❍❍❍❍❍❍❍❍❍❍❍❍→→❍❍❍❍❍❍ ❍
Stapling ❍ → ❍❍❍
Printer
Print
Operations for Scanning $$$❍❍$$❍ $ ❍❍ ❍❍❍××$$$❍❍
Scanning ЧЧЧЧЧЧЧ❍ × ❍❍❍❍❍ЧЧЧЧЧ❍❍
Scanner
Operations for Document
Server
Scanning a Docum ent to Store
in Document Server
Printing from Document
Server
Document
Server
Printing from Document
Server
Sending a Facsimile from Document Server
Operations for Copying
Stapling
$$$❍❍$$❍ $ ❍❍ ❍❍❍$$×××❍❍
$ ××❍❍$ × ❍ × ❍❍ ❍❍❍$ ××××❍❍
❍❍❍❍❍❍❍❍❍❍❍❍❍❍❍
$ ❍
*4
❍❍
❍❍❍❍❍❍❍❍❍❍❍❍❍❍❍❍❍→ ❍
*4
❍❍❍❍❍❍❍❍
Facsimile Printer
Interrupt
Copying
Transmission
Sort
Transmission Operation/Manual Reception Operation
Operations for Copying
Copying
Scanning an Original for Memory Transmission
❍❍❍❍❍❍❍→→❍❍❍❍❍
*5
Reception
Memory Transmission
Immediate Transmission
Memory Reception
Printing Received Data
❍
❍
❍
*3
*3
❍❍❍❍❍❍❍❍❍→
*3
*3
Print
Data Reception
Printing
Scanner
Stapling
Operations for Scanning
Document Server
Scanning
Operations for Document Server
Scanning a Document to Store in Document Server
*4
❍
❍
*8
*8
*8
DeskTopBinder V2
Professional/Lite
Printing from Document Server
Printing from Document Server
Sending a Facsimile from Document Server
❍
❍
*4
❍❍
2
DeskTopBinder V2
Professional/Lite
*1
Simultaneous operations are only available after the preceding job documents are all
scanned and the [
*2
You can scan a document after the preceding job documents are all scanned.
*3
Simultaneous operations are only possible with an additional line installed and
Next Job
] key appears.
when the facsimile function is not using the line given line priority in the facsimile
settings.
*4
During stapling, printing automatically starts after the current job.
*5
Stapling is not available.
*6
Simultaneous operations become available after you press the [
*7
If you are making stapled copies with paper larger than A4, 81/2" × 11" using the op-
Next Job
] key.
erational 1000 sheet finisher, subsequent operations using the finisher shift tray are
suspended until the current job is finished.
*8
If you scan a document during printing, the scanning speed might be slow.
*9
During parallel receptions, any subsequent job is suspended until the receptions are
completed.
37
Page 51

Combined Function Operations
Limitation
❒ Stapling cannot be used at the same time for multiple functions.
Note
❒ A machine with the Finisher 500 installed cannot accept other jobs while
printing with the stapling operation.
❒ A machine with the Finisher 1000 installed, that is printing with the stapling
2
operation on paper larger than A4,
(for which Internal Shift Tray is specified as the output tray) only after the
current print job finishes.
❒ While printing is in progress, the scanning of a document using another func-
tion may take more time.
81/2" × 11" size starts the subsequent job
38
Page 52

3. Document Server
Overview
The Document Server enables you to save documents in the machine memory
and then edit and print them as you want.
You can save the following:
• Data from documents scanned using the document feeder
• Data from documents scanned using the exposure glass
• Data sent from a computer
Copy Printing
(Except Scanner)
Facsimile
Transmission
Scanner
Transferring Document
data for PC
Printer
Sending
stored
facsimile
documents
ZFFH050E
39
Page 53

Document Server
Process
Prepare the documents you want to save.
AAAA
Save the documents.
BBBB
• The documents are saved in the machine memory.
Print the documents, send faxes, and transfer the documents and the data
CCCC
to a PC.
3
• You can print saved documents with any settings you desire at any time.
• Scanned document data can be transfered to a PC.
• You can resend saved documents you desire at any time.
Important
❒ Do not turn off the main power switch when the Operation Switch is on or
the On indicator is lit. If you turn it off during an operation, the memory
or hard disk might be damaged.
❒ Avoid any strong shocks to the machine. This could damage the hard drive
or delete stored files. For precautionary reasons, files should be copied to
another local computer.
❒ If trouble occurs in the internal hard disk unit of the machine, data saved
on the hard disk may be lost. Therefore, the user should avoid using the
internal hard disk as a recording and storage medium for important data.
We assume no responsibility for any damage suffered by the user due to
loss of data.
40
Limitation
❒ The Document Server function requires the optional Hard Disk Unit.
❒ Data for documents in the Document Server function list that were
scanned in using the Scan function are not displayed.
❒ The documents stored by scanning are not available to print.
❒ You can fax documents stored using the facsimile feature.
❒ Optional Desk Top Binder V2 Professional or Desk Top Binder V2 Lite are
required for transfering data to your computer.
Page 54

Relationship between Document Server and Other Functions
Relationship between Document Server
and Other Functions
The following table lists the relationship between the Document Server and other machine functions.
Function name
Copy
Printer
Facsimile Facsimile Enabled Enabled Enabled
Scanner Scanner Disabled Disabled Disabled
How to issue
storage
instructions
Copy/
Document Server
Personal
computer
Displaying a list
Enabled Enabled Disabled
Enabled Enabled Disabled
Printing
documents
Sending
documents
3
41
Page 55

Document Server
E
Features and Benefits
On Demand Printing
Use to print any saved document as required.
❖❖❖❖ Your current situation might be…
• When you need to print multiple sets of documents 2-sided and stapled to-
gether, you normally print the originals, make duplex copies and then sta-
3
ple them together manually.
❖❖❖❖ With the Document Server
If you save your document in the Document Server, you can print it out at any
time with the necessary print settings, such as duplex and stapling.
You can store fax documents and document data so that you can print them
whenever necessary.
42
ZFFH060E
ZFFH070
Page 56

Features and Benefits
E
Note
❒ Stapling and punching require the installation of the optional finisher.
❒ You can use a password to prevent others from printing saved documents.
File Merge Printing
You can combine multiple scanned documents to print them in one set.
❖❖❖❖ Your current situation might be…
You want to combine several originals that are different in density, size, and
paper weight.
You can merge documents that were created with different applications or
that were created separately on different computers.
You can merge documents that were sent from a computer with paper originals that have been scanned such as the following:
• Scrapped and pasted originals
• Photo originals
• One sided originals
• Two sided originals
3
ZFFH080
43
Page 57

Document Server
❖❖❖❖ With the Document Server
Set the print order to print documents together.
Merge and print fax documents, document data sent, and originals that have
been scanned.
Merge documents created with different applications or created on different
computers.
Store electronic originals created by a computer on the network and originals
that have been scanned using the document feeder.
3
ZFFH090E
44
Note
❒ You can check the print result by printing a sample set before making a
large print run by pressing the {{{{Sample Copy}}}} key. If you are not satisfied
with the print result of some pages of the set, you can scan that part again.
Page 58

Features and Benefits
Facsimile Resend
You can print or resend a sent document received by fax. This is useful when
you want to send a large document that needs to be sent several times, since you
do not have to scan the document each time.
❖❖❖❖ You current situation might be...
• When you need to retransmit multiples sets of the same documents, you
have to scan them again and again.
❖❖❖❖ With the Document Server
You can send the original data stored in memory whenever necessary. You
can merge and send data stored from a previous fax with additional scanned
originals.
3
ZFFH100E
45
Page 59

Document Server
Operation from a Computer
If you install Desk Top Binder V2 Professional or Desk Top Binder V2 Lite on
your computer you can check the contents of the stored documents, print copies
for confirmation and perform other operations. You can also delete data stored
in the Document Server. In addition, you can also export documents stored in
the Document Server to your computer as a file.
You can also perform tasks on data stored in the Document Server from your
computer, rather than from the machine.
3
Note
❒ You can perform the following operations from your computer:
• Search by File Name and User Name
• Indicate easily the 1 st page of your documents
• Display the document infomation, change the file name and the password
• Delete documents
• Copy documents to your computer
• Print documents
• Send the stored facsimile documents
❒ Optional Network Interface board and 64 MB memory or the Printer Scanner
unit are required for operations from your computer. Desk Top Binder V2
Professional or Desk Top Binder V2 Lite must be installed on your computer.
Reference
For more detailed information, refer to Desk Top Binder V2 Professional/Lite
manuals.
46
Page 60

Scanning Originals
You can scan the originals you want
to save in the Document Server using
the control panel of the machine. The
originals can be either on the exposure glass or in the document feeder.
The saved documents will automatically be named in the order of scanning as “COPY0001”, “COPY0002”….
Note
❒ Based on the factory settings, the
machine automatically deletes
documents from the Document
Box one day (24 hours) after each
document was saved. The user can
disable the automatic deletion of
documents or change the automatic deletion period, for example, to
several days. For details, see p.99
“Auto Delete File”.
❒ You can change the file names that
are assigned automatically.
❒ You can use a password to prevent
others from printing saved documents.
Scanning Originals
Scanning in Document Server Mode
Press the {{{{Document Server}}}} key.
AAAA
ZFFH180N
The “Select Files to Print” display
appears.
Press the [Scan Original] key.
BBBB
3
The “Scan Original” display appears.
Enter a file name, user name, or
CCCC
password if necessary.
Note
❒ If you do not wish to register a
file name, go to step D.
❒ If you do not register a file
name, one is automatically assigned.
47
Page 61

Document Server
To change the file name
AAAA Press the [File Name] key.
The "Change File Name" dis-
3
play appears.
BBBB Press the [Delete All] key to de-
lete the old file name.
Note
❒ You can also use the [Back-
space] key to delete unneces-
sary characters.
CCCC Enter a new file name.
To register or change the user name
AAAA Press the [User Name] key.
If user names have already been
registered, the "Change User
Name" display appears.
If user names have not been registered, go to step D.
BBBB To change your user name to a
registered user name, select a
registered user name from the
list, and then click [OK].
48
Note
❒ A string of up to 10 charac-
ters can be entered as a file
name. Note that only eight
characters of each file name
are displayed in the document list.
Reference
For more information about
how to enter characters, see
p.100 “Entering Text”.
DDDD Click [OK].
To change your user name to an
unregistered user name, go to
the next step.
Reference
For more information about
how to register users, see
p.87 “To Register the New
User Code”.
Page 62

Scanning Originals
CCCC To enter an unregistered user
name, press the [Unregistered
Name] key.
The screen used to enter the
user name appears.
DDDD Enter the new user name.
Reference
For more information about
how to enter characters, see
p.100 “Entering Text”.
EEEE Click [OK].
To set or change the password
AAAA Press the [Password] key.
BBBB Enter the password using the
number keys (4 digits).
Place your originals either on the
DDDD
exposure glass or in the document
feeder.
Reference
For more information about
how to place the types of originals that can be placed, see the
Copier Reference.
Make any desired settings.
EEEE
Note
❒ Press the [Scanning Finished] key
to cancel the file name, password, or print settings and return to the “Select Files to Print”
display.
Reference
For details, see the explanations
of each function in this manual.
Press the {{{{Start}}}} key.
FFFF
The document is saved in the Document Server. The saved documents are displayed on the “Select
Files to Print” display.
3
Note
❒ To change the number en-
tered, press the [
{{{{Clear/Stop}}}} key and enter a
new number.
CCCC Press the [OK] or {{{{#}}}} key.
Clear
] or
Note
❒ If you have placed your origi-
nals in the document feeder, the
“Select Files to Print” display
appears automatically after all
originals have been scanned.
❒ If you have placed your origi-
nals on the exposure glass, press
the [Scanning Finished] key after
all originals have been scanned.
The “Select Files to Print” display appears.
❒ To stop scanning, press the
{{{{Clear/Stop}}}} key.
49
Page 63

Document Server
❒ To resume the paused scanning
job, press the [Resume] key in the
confirmation dialog box. To delete the saved images and cancel
the job, press the [Cancel] key.
❒ When a password is stored,
appears on the left side of the
file name.
Press the [Scanning Finished] key.
GGGG
The line for the selected document is highlighted.
BBBB Press the [File Management] key.
3
CCCC Press the [Change File Name],
[Change User Name], or [Change
To change the file name, user name, or password
AAAA Select the document for which
the user name, file name, or
password is to be changed.
Password] key.
DDDD Enter the new file name, user
name, or password using the
letter keys or number keys.
50
• If no password is set for the document, the line for the selected
document is highlighted.
• If a password has already
been set for the document,
the password entry dialog
box appears.
Enter the password, and then
click [OK].
Reference
For more information about
changing the file name, see
p.48 “To change the file
name”.
For more information about
changing the user name, see
p.48 “To register or change
the user name”.
For more information about
changing the password, see
p.49 “To set or change the
password”.
EEEE Press the [OK] key.
Page 64

Printing Saved Documents
Printing Saved Documents
You can print any of the documents
saved in the Document Server.
Follow these steps to select a document and print it out.
Press the {{{{Document Server}}}} key.
AAAA
The “Select Files to Print” display
appears.
Press the line for the document
BBBB
you want to print.
• If no password is set for the document, the line for the selected
document is highlighted.
• If a password has been set for
the document, the password entry dialog box appears.
Enter the password, and then
click [OK].
Note
❒ You can search for the docu-
ment you desire by the file
name or the user name. ⇒ p.58
“To Search by File Name”
❒ You can sort the files in order of
[
User Name
[
Date
sort by.
❒ If the desired file name is not
shown, see the next or previous
screen using the [TTTT Next] and [UUUU
Prev.] keys.
❒ If you cannot find the desired
document using the names, you
can print the first page of a document to check its contents.
Press the line for the desired
document, and press the [Print
1st Page] key followed by the
{{{{Start}}}} key.
❒ Press the selected line again to
cancel the print job.
❒ If you select a document which
requires a password, the “Input
the Password” window appears. Enter your password using the number keys, then press
the [OK] key. To delete the value
entered, press the [Clear] or
{{{{Clear/Stop}}}} key. To cancel a selected document, press the [Can-
cel] key.
], [
File Name
]. Press the key you want to
], or
3
The selected line is highlighted.
To print more than one docu-
CCCC
ment, repeat step
desired documents in the order
you want to print them out.
The selected order is shown in the
priority column next to the selected document(s).
to select the
BBBB
51
Page 65

Document Server
Note
❒ Up to 30 documents can be se-
lected for printing.
❒ To change the print order, press
the highlighted lines to cancel
their selection, and then select
them again in the order you
want to print.
❒ Press the {{{{Clear Modes}}}} key to
cancel all the settings.
3
❒ If you press the [Printg Odr] key,
the selected documents are displayed in printing order.
If you need to change any of the
DDDD
print settings, press the [Print Set-
tings] key.
The “Print Settings” display appears.
Note
❒ The print settings made for
printing in copier or printer
mode are stored in the machine
after printing and applied to the
next printing. The print settings
made in facsimile mode, however, are not stored.
❒ The print settings remain in the
machine after printing.
❒ The print setting items are listed
below. For more information
about the print results according to each setting, see the Copy
Reference.
❖❖❖❖ Binding format
• 2-Sided Copy Top to Top
• 2-Sided Copy Top to Bot-
tom
• Booklet
• Magazine
❖❖❖❖ Cover handling
• Cover/Slip Sheet
• Edit/Stamp
❖❖❖❖ Finish
• Sort
• Stack
• Staple
❒ The print settings of the docu-
ment you select first are applied
to the merged documents.
❒ When multiple documents are
printed at the same time, the
print settings made for the document printed first are applied
to all other documents.
❒ If you select multiple files, you
can confirm the file names or
print order of the files you selected in step
through the list with the [TTTT] and
[UUUU] keys.
❒ Press the [Select File] key to re-
turn to the “Select Files to Print”
display.
❒ "Booklet", "Magazine", and
"Stamp" cannot be set for documents saved in facsimile mode.
❒ "Booklet" and "Magazine" can-
not be set for documents saved
under multiple functions.
Reference
For details, see the explanations
of each function in this manual.
by scrolling
C
52
Page 66

Enter the required number of
EEEE
prints using the number keys.
Note
❒ Up to 99 can be entered.
❒ To change the value entered,
press the {{{{Clear/Stop}}}} key and
enter the new value.
❒ If you print more than one set
using the Sort function, you can
check the print result by printing out only the first set. ⇒ p.54
“Sample Copy”.
Press the {{{{Start}}}} key.
FFFF
The machine starts printing.
Note
❒ To pause the print job, press the
{{{{Clear/Stop}}}} key. In the confirmation dialog box, press the [Re-
sume] key to resume it, or press
the [Cancel] key to cancel it.
Printing Saved Documents
Changing the number of copies during printing
You can change the number of copies
during printing.
Limitation
❒ The number of copies can only be
changed with the Sort function selected in the print settings.
Press the [Clear/Stop] key.
AAAA
The following dialog box appears.
Click the [Change Set Qty.] key.
BBBB
Use the number keys to enter a
CCCC
new number of copies.
3
Stopping printing
You can stop printing in progress.
Press the {{{{Clear/Stop}}}} key.
AAAA
The following confirmation dialog
box appears.
Press the [Yes] key.
BBBB
The printing operation stops.
Note
❒ To cancel printing from being
stopped, click the [Print] key in
the confirmation dialog box.
Printing then continues for the
remaining part of the document.
Click the [#] key.
DDDD
Click the [Print] key.
EEEE
Printing restarts.
53
Page 67

Document Server
Sample Copy
If you print multiple sets using the
Sort function, you can check if the
print order or the print settings are
correct by printing out only the first
set using the {{{{Sample Copy}}}} key.
Limitation
❒ This function can be used only
3
when the Sort function has been
turned on.
Select the document to be printed.
AAAA
• If no password is set for the document, the line for the selected
document is highlighted.
Note
❒ You can search for a desired
document by user or file name
by using the [Search by User
Name] or [Search by File Name]
keys, respectively. ⇒ p.84 “User
Code Management”
❒ You can sort document names
in the list by the user names, file
names, or dates. To sort the
documents, click the [User
Name], [File Name], or [Date] key.
❒ You can scroll up or down the
file names listed by using the
[Prev.] or [Next] key, respectively.
❒ To cancel a document selection,
press the highlighted line for
the selected document.
Press the {{{{Sample Copy}}}} key.
BBBB
54
• If a password has been set for
the document, the password entry dialog box appears.
Enter the password, and then
click [OK].
The selected line is highlighted.
After the first set is printed out,
CCCC
press the [Print] key to print the
rest of the print job. Press the
[Suspend] key to cancel printing
and return to the “Print Settings”
menu for changing the settings.
Page 68

Printing Saved Documents
Print First Page
You can print the first page of the document selected in the “Select Files to
Print” display to check the contents.
If more than one document is selected, the first page of each document is
printed.
Select the document to be printed.
AAAA
• If no password is set for the document, the line for the selected
document is highlighted.
• If a password has been set for
the document, the password entry dialog box appears.
Enter the password, and then
click [OK].
Note
❒ You can search for a desired
document by the user or file
name, using the [Search by User
Name] or [Search by File Name]
keys, respectively. ⇒ p.84 “User
Code Management”
❒ You can sort document names
in the list by the user names, file
names, or dates. To sort the
documents, click the [User
], [
Name
❒ You can scroll up or down the
file names listed by using the
[Prev.] or [Next] key, respectively.
❒ To cancel a document selection,
press the highlighted line for
the selected document.
Click the [
BBBB
The following confirmation dialog
box appears.
File Name
Print 1st Page
], or [
Date
] key.
] key.
3
The selected line is highlighted.
Press the {{{{Start}}}} key.
CCCC
The first page is printed out.
Note
❒ To cancel printing of the first
page, click the [Cancel] key.
55
Page 69

Document Server
Deleting Saved Documents
All unnecessary documents should
be deleted.
This section describes how to delete
saved documents.
Important
❒ You can save up to 3,000 docu-
ments in the Document Server. No
3
more documents can be saved
when there are 3,000 documents in
the Document Server. You should
delete unnecessary documents.
❒ You can set the timer to delete the
documents stored in the Document Server with the User Tools.
⇒ p.99 “Auto Delete File” in “Key
Operator Tools
Note
❒ You can delete all the saved docu-
ments at a time with the User
Tools. ⇒ p.99 “Delete All Files” in
“Key Operator Tools
Follow these steps to delete saved
documents.
Press the {{{{Document Server}}}} key.
AAAA
The “Select Files to Print” display
appears.
Select the document to be deleted.
BBBB
• If no password is set for the document, the line for the selected
document is highlighted.
2
/2”.
2
/2”.
• If a password has been set for
the document, the password entry dialog box appears.
Enter the password, and then
click [OK].
The selected name is highlighted.
Note
❒ You can search for the docu-
ment you desire by the file
name or the user name. ⇒ p.58
“To Search by File Name”
❒ You can sort the files in order of
[User Name], [File Name], or
[Date]. Press the key you want to
sort by.
❒ If the desired file name is not
shown, see the next or previous
screen using the [TTTT Next] and [UUUU
Prev.] keys.
❒ If you cannot find the desired
document using the names, you
can print the first page of a document to check its contents.
Press the line for the desired
document, and press the [Print
1st Page] key followed by the
{{{{Start}}}} key.
❒ Press the selected line again to
cancel the print job.
56
Page 70

❒ If you select a document which
requires a password, the “Input
the Password” window appears. Enter your password using the number keys, and press
the [OK] key. To delete the value
entered, press the [Clear] or
{{{{Clear/Stop}}}} key. To cancel a selected document, press the [Can-
cel] key.
Repeat step BBBB if you want to select
CCCC
more than one document.
Deleting Saved Documents
3
Press the [
DDDD
A confirmation dialog box appears.
Press the [Delete] key to delete the
EEEE
document.
Note
❒ To cancel the delete operation,
press the [Do not Delete] key.
Delete File
] key.
57
Page 71

Document Server
Searching Saved Documents
You can use either the [Search by File
] or [
Name
search for documents stored on the
Document Server. You can also list
the stored documents in the order
you prefer. If you install Desk Top
Binder V2 Professional or Desk Top
Binder V2 Lite on your co mputer , you
3
can search and rearrange the documents from your computer.
❖❖❖❖ Search by File Name
You can search the documents
stored in the Document Server by
the file name.
❖❖❖❖ Search by User Name
You can search the documents
stored in the Document Server by
the user name.
Search by User Name
To Search by File Name
This searches for documents on the Document Server that match a file name.
Press the {{{{Document Server}}}} key.
AAAA
Press the [Search by File Name] key.
BBBB
] key to
To Search by User Name
This searches for documents on the
Document Server that match a user
name.
Press the {{{{Document Server}}}} key.
AAAA
Press the [Search by User Name] key.
BBBB
To specify a registered user name,
CCCC
select the user name from the displayed list, and then click [OK].
To specify an unregistered user
name, follow the procedure below.
To specify an unregistered user
DDDD
name, click the [Unregistered Name]
key. The entry dialog box below
appears. Enter the unregistered
user name in the entry dialog box,
and then click [OK].
58
Enter the file name using the let-
CCCC
ter keys.
Reference
For details on entering characters, refer to p.100 “Entering
Text”.
Press the [OK] key.
DDDD
Only the files beginning with the
name entered appear in the “Select
Files to Print” display.
Note
❒ To display all the files saved in
the Document Server, press the
[All the files] key.
Reference
For more information about
how to enter characters, see
p.100 “Entering Text”.
Page 72

Press the [OK] key.
EEEE
Only the files beginning with the
name entered appear in the “Select
Files to Print” display.
Searching Saved Documents
Note
❒ To display all the files saved in
the Document Server, press the
[All the files] key.
3
59
Page 73

Document Server
To Check the Details of Stored Documents
Select the document for which
AAAA
you want detailed information.
3
• If no password is set for the document, the line for the selected
document is highlighted.
• If a password has been set for
the document, the password entry dialog box appears.
Enter the password and click
[OK].
❒ You can sort document names
in the list by the user names, file
names, or dates. To sort the
documents, click the [User
Name], [File Name], or [Date] key.
❒ You can scroll up or down the
file names listed by using the
[UUUUPrev.] or [TTTTNext] key, respec-
tively.
❒ If you cannot determine the
contents of a desired document
by its file name, you can print
just the first page of the document for checking purposes. To
do this, select the document to
be checked, and then click the
[Print 1st Page] key.
❒ To cancel document selection,
press the highlighted line for
the selected document.
Press the [
BBBB
Detail
] key.
60
The selected name is highlighted.
Note
❒ You can search for a desired
document by the user or file
name, using the [Search by User
Name] or [Search by File Name]
keys, respectively. ⇒ p.84 “User
Code Management”
The detailed information about the
document is displayed.
Note
❒ If you have selected several doc-
uments, use the [UUUU] [TTTT] keys to
view the details of each document.
❒ Click [OK]. The "Select Files to
Print" display appears.
Page 74

4. User Tools (System Settings)
Accessing the User Tools (System Settings)
This section is for the key operators in
charge of this machine. You can
change or set the machine's default
settings.
Preparation
After using the User Tools, be sure
to exit from the User Tools.
The selected key is highlighted.
Any changes you make with the
User Tools remain in effect even if
the main power switch or operation switch is turned off, or the
{{{{Energy Saver}}}} key is pressed.
Reference
For information on the User Tools
(Copy/Document Server Features), see the Copy Reference
manual.
Changing the Settings
Press the {{{{User Tools/Counter}}}} key.
AAAA
The User Tools Main Menu appears.
Press the [
BBBB
The System Settings menu appears.
Select the desired menu and press
CCCC
the desired key.
Change the settings by following
DDDD
the instructions on the display
panel. Then press the [OK] key.
Note
❒
[OK]: Press to set the new settings and return to the previous
menu.
❒
[Cancel]: Press to return to the
previous menu without changing any data.
❒ To cancel the changes made to
settings and return to normal
the function display, press the
{{{{User Tools/Counter}}}} key.
System Settings
] key.
ZFFH150N
61
Page 75

User Tools (System Settings)
Exiting from the User Tools
After changing the User Tools set-
AAAA
tings, press the [
User Tools Main Menu.
Changing the User Tools is finished, and the machine is ready for
copying.
] key on the
Exit
4
Note
❒ To exit from changing the ma-
chine's default settings and return to Copy mode, press the
{{{{User Tools/Counter}}}} key.
❒ You can also exit from the User
Tools by pressing the {{{{User
Tools/Counter}}}} key.
62
Page 76

User Tools Menu (System Settings)
User Tools Menu (System Settings)
1
❖❖❖❖ “General Features
/2”⇒⇒⇒⇒ p.68,“General Features 2/2”⇒⇒⇒⇒ p.71
4
63
Page 77

User Tools (System Settings)
1
❖❖❖❖ “Paper Size Settings
Settings
3
/3”⇒⇒⇒⇒ p.75
/3”⇒⇒⇒⇒ p.72,“Paper Size Settings 2/3”⇒⇒⇒⇒ p.74,“Paper Size
4
64
Page 78

❖❖❖❖ “Timer Setting”⇒⇒⇒⇒ p.77
User Tools Menu (System Settings)
4
❖❖❖❖ “Interface Settings/Network
1
/2—2/2”⇒⇒⇒⇒ p.79
65
Page 79

User Tools (System Settings)
❖❖❖❖ “Interface Settings/Parallel Interface”⇒⇒⇒⇒ p.81
4
❖❖❖❖ “File Transfer”⇒⇒⇒⇒ p.82
66
Page 80

❖❖❖❖ “Key Operator Tools
User Tools Menu (System Settings)
1
/2”⇒⇒⇒⇒ p.84,“Key Operator Tools 2/2”⇒⇒⇒⇒ p.99
4
67
Page 81

User Tools (System Settings)
Settings You Can Change with the User Tools
Reference
For how to access the User Tools, seep.61 “Accessing the User Tools (System
Settings)”.
General Features 1/
❖❖❖❖ Panel Tone
The beeper (key tone) sounds when a key is pressed.
4
Note
❒ Default: ON
❖❖❖❖ Warm Up Notice
Specify whether the beeper sounds when the machine becomes ready for
copying after Energy Saver mode is deactivated or the power is turned on.
Note
❒ If the “Panel Tone”setting is “Off”, the beeper does not sound irrespective
of the “Warm Up Notice”setting.
❒ Default: ON
❖❖❖❖ Copy Count Display
The copy counter can be set to show the number of copies made (count up) or
the number of copies remaining to be made (count down).
Note
❒ Default: Up (count up)
❖❖❖❖ Function Priority
You can specify the mode to be displayed immediately after the operation
switch is turned on or System Reset mode is turned on.
Note
❒ Default: Copier
2
68
Page 82

Settings You Can Change with the User Tools
❖❖❖❖ Print Priority
Set print priority for each mode.
• "Display mode"
Print priority is given to the mode displayed on the display.
• "Copier"
Print priority is given to the copy function.
• "Document Server"
Print priority is given to the Document server.
• "Facsimile"
Print priority is given to the fax function.
• "Printer"
Print priority is given to the printer function.
• "Interleave"
Prints jobs in the order in which they are initiated regardless of
mode/function. Output from each function might be mixed. If you want
to avoid such mixing, specify an independent tray for each feature using
"Output". When using different functions, attaching internal tray 2 allows
you to specify an independent tray for each function. If you want to attach
one, contact your local dealer.
Note
❒ Default: Display mode
❒ When the optional Internal Tray, Internal Shift Tray, Finisher 500, or Fin-
isher 1000 is installed on the machine, you can specify an output tray to
which documents are to be delivered. For more information about how to
specify an output tray for each function, see the following descriptions:
• p.70 “Output: Copier”
• p.70 “Output: Document Server”
• p.70 “Output: Facsimile”
• p.71 “Output: Printer”
4
Reference
⇒ p.35 “Multi-Access” or "Output" on ⇒ p.68 “General Features
1
/2”
❖❖❖❖ Function Reset Timer
The length of time the machine waits before changing modes when using the
multi-access function. This is useful if you make many copies where you have
to change the settings for each copy. If you set a large value, you can prevent
jobs from other functions interrupting the copy job. This setting is ignored if
"Interleave" is set for "Print Priority".
Note
❒ Default: Set Time
❒ The Function Reset Timer setting is ignored if "Interleave" is set for "Print
Priority" (⇒ p.69).
❒ When you select "Set Time", enter the time (3∼30 seconds by 1 second
steps) with the number keys.
❒ The default time setting is 3 seconds.
69
Page 83

User Tools (System Settings)
❖❖❖❖ Output: Copier
You can specify a tray to which documents are delivered.
Internal Tray 2
Internal Tray 1
Finisher Shift Tray
Internal Tray 1
Finisher Proof Tray
4
Finisher Shift Tray
ZFFH110E
• Internal Tray 1
• Internal Tray 2
• Finisher Proof Tray
• Finisher Shift Tray
❖❖❖❖ Output: Document Server
You can specify a tray to which documents are delivered.
• Internal Tray 1
• Internal Tray 2
• Finisher Proof Tray
• Finisher Shift Tray
Note
❒ For details about output trays, refer to p.70 “Output: Copier”.
❖❖❖❖ Output: Facsimile
You can specify a tray to which documents are delivered.
• Internal Tray 1
• Internal Tray 2
• Finisher Proof Tray
• Finisher Shift Tray
70
Note
❒ For details about output trays, refer to p.70 “Output: Copier”.
Page 84

Settings You Can Change with the User Tools
General Features 2/
2
❖❖❖❖ Output: Printer
You can specify a tray to which documents are delivered.
• Internal Tray 1
• Internal Tray 2
• Finisher Proof Tray
• Finisher Shift Tray
Note
❒ The output trays set on the Printer Driver have priority over the output
tray specified above.
❒ For details about output trays, refer to the illustration in p.70 “Output:
Copier”.
❖❖❖❖ Prepare Stapling
Perform a test staple after replacing staples or removing jammed staples.
Note
❒ Press [OK] to prepare stapling.
❖❖❖❖ <F/F4> Size Settings
Currently three types of F size are available: 81/2"×13", 81/4"×13", and 8"×13".
The document feeder or exposure glass sensor cannot distinguish these three
types of originals. This function sets the F size for the document feeder or exposure glass sensor. Auto Paper Select or Auto Reduce/Enlarge can be used
for F size originals based on this setting. You'll find it very convenient to use
the machine with the F size setting.
4
Note
❒ Default: 8
1
/2"×13"
Output tray settings
Limitation
❒ You cannot interrupt the current job with a job of a different function that
specifies stapling or sorting.
❒ You can interrupt the current job with an ordinary copy job or facsimile re-
ception. The output tray used when the job is interrupted varies depending
on the type of finisher shift tray and output tray specified for interruption.
71
Page 85

User Tools (System Settings)
❖❖❖❖ When Finisher 500 is the finisher shift tray:
• When the output tray specified for the interrupting job is the finisher
tray, the interrupting job will be delivered to Internal Tray 1.
• When the output tray specified for the interrupting job is not the finish-
er tray, the interrupting job will be delivered to the specified output
tray.
❖❖❖❖ When Finisher 1000 is the finisher shift tray:
• When the output tray specified for the interrupting job is the finisher
tray, the interrupting job will be delivered to the Finisher Proof Tray.
• When the output tray specified for the interrupting job is not the finish-
er tray, the interrupting job will be delivered to the specified output
tray.
4
❒ When the Finisher 500 or Finisher 1000 is installed and stapling is specified
for a job, the job will be delivered to the finisher shift tray regardless of the
output tray specified.
Paper Size Settings 1/
3
❖❖❖❖ Paper Tray Priority (Copier)
You can specify the output tray for delivery.
Note
❒ Default: Tray 1
❖❖❖❖ Paper Tray Priority (Printer)
You can specify the output tray for delivery.
Note
❒ Default: Tray 1
❖❖❖❖ Tray Paper Size: (Tray 1–4)
Select the size of the copy paper set in the paper tray.
❖❖❖❖ The paper sizes you can set for trays 1, 3 and 4 are as follows:
• A3L,B4L,A4K,A4L,B5K,B5L,A5L
• 11"×17"L,81/2"×14"L,81/2"×11"K,81/2"×11"L,51/2"×81/2"L,71/4"×101/2"
L
,71/4"×101/2"K,8"×13"L,81/2"×13"L,81/4"×13"L,custom size
(140-297 mm (5.46"-11.58") wide x 182-432 mm (7.09"-16.8") long)
72
Page 86

Settings You Can Change with the User Tools
❖❖❖❖ The paper sizes you can set for tray 2 are as follows:
• A3L,B4L,A4K,A4L,B5K,B5L,A5L,A5K,B6L,A6L,C5L,C6L,
DL EnvL
• 11"×17"L,81/2"×14"L,81/2"×11"K,81/2"×11"L,51/2"×81/2"L,71/4"×101/2"
L
,71/4"×101/2"K,8"×13"L,81/2"×13"L,81/4"×13"L,41/8"×91/2"L,37/8"
71/2"L, custom size (100-297 mm (3.9"-11.58") wide x 148-432 mm (5.77"-
16.8") long)
Reference
Copy Reference "Changing the Paper Size".
Important
❒ If the specified paper size differs from the size of paper actually set in the
paper tray, a paper misfeed might occur because the paper size is not detected correctly.
Note
❒ The tray fence for the optional large capacity tray (LCT) is fixed. If you
need to change the paper size, contact your service representative.
❒ If the paper size set for the dial in paper tray 1 and 2 is different to the pa-
per size for this setting, the paper size of the dial has priority.
❒ If you load paper in tray 1 or 2 that is not available on the paper size dial,
set the dial to "*".
❒ Default:
• Tray 1: LTK
• Tray 2: DLTL
• Tray 3:
For optional paper-feed table: LT
For large capacity tray (LCT): LT
• Tray 4: LGL
L
L
×
4
Specifying a custom paper size
To use paper of a custom size, follow the procedure below to specify the custom
paper size.
Click the [Custom Size] key on the "Tray Paper Size" display.
AAAA
The "Custom Size" dialog box appears.
73
Page 87

User Tools (System Settings)
Press the [Vertical] or [Horizontal] key to specify the vertical or horizontal size,
BBBB
respectively. Then enter the size with the number keys, and then click the
[#] key.
Note
❒ To correct the entered value, click the [Clear] key, and then enter the correct
value.
Click [OK].
4
CCCC
The specified custom size is then set and the "Tray Paper Size" display appears.
Paper Size Settings 2/
❖❖❖❖ Paper Type (Bypass Tray)
Sets the display so you can see what type of paper is loaded in the bypass tray.
❖❖❖❖ The paper types you can set for the bypass tray are as follows:
• Plain paper, Recycled paper, Special paper, Color paper, Letterhead,
OHP, Label paper, Thick Paper, Thin paper
Note
❒ Default: No display
❖❖❖❖ Paper Type (Tray1–4)
Sets the display so you can see what type of paper is loaded in each of the paper trays. This information is used by the print function to automatically select the paper tray.
❖❖❖❖ The paper types you can set for trays 1, 3 and 4 are as follows:
• Plain paper, Recycled paper, Special paper, Color paper, Letterhead
3
74
Page 88

Settings You Can Change with the User Tools
❖❖❖❖ The paper types you can set for tray 2 are as follows:
• Plain paper, Recycled paper, Special paper, Color paper, Letterhead,
OHP, Label paper, Thick Paper, Thin paper
Note
❒ Default:
• Paper Type: No display
• Copying Method: 2 Sided Copy
• Apply Auto Paper Select: Yes
❒ A key mark is displayed next to the paper tray if No is selected.
Limitation
❒ Auto paper select can only be selected for the Copy function if No display
and Recycled paper are selected. However, auto paper select is not used if
No is selected.
4
Paper Size Settings 3/
3
❖❖❖❖ Paper Type (LCT)
Sets the display so you can see what type of paper is loaded in the large capacity tray.
❖❖❖❖ The paper types you can set for LCT are as follows:
• Plain paper, Recycled paper, Special paper, Color paper, Letterhead
Note
❒ Default
• Paper Type: No display
• Copying Method in Duplex: 2 Sided Copy
• Apply Auto Paper Select: Yes
❒ A key mark is displayed next to the paper tray if No is selected.
Limitation
❒ Auto paper select is only selected for the Copy function if No display and
Recycled paper are selected. However, auto paper select is not used if No
is selected.
75
Page 89

User Tools (System Settings)
❖❖❖❖ Cover Sheet Tray (for Copy/Document Server function only)
Allows you to specify and display the paper tray to set cover sheets. After selecting the paper tray, you can also specify the display timing and copy method for two-sided copying.
Note
❒ Default:
• Tray to program: NONE
❒ The functions that use the Cover Sheet Tray setting are the front cover
function and both covers function.
❒ When Mode Selected is selected, the cover settings options are only dis-
played when the cover function or slip sheet function is selected.
❒ You can only set the Copying Method in Duplex setting when At Mode se-
4
lected is selected.
❖❖❖❖ Slip Sheet Tray (for Copy/Document Server function only)
Allows you to specify and display the paper tray to set slip sheets. After selecting the paper tray, you can also specify the display timing and copy method for two-sided copying.
Note
❒ Default:
• Tray to program: NONE
❒ When you use the Slip Sheet function, you can use the output tray speci-
fied in the Slip Sheet Tray setting.
❒ When At Mode selected is selected, the options are only displayed when
the cover function or slip sheet function is selected.
76
Reference
Copy Reference "Cover/Slip Sheet"
Page 90

Settings You Can Change with the User Tools
Timer Setting
When entering Set Time mode, if a key operator code has been set, you must enter the code (up to 8 digits). ⇒ p.86 “User Code”
❖❖❖❖ Auto Off Timer
The machine turns off automatically to conserve energy after a specified
amount of time has past after a job. This function is called "Auto Off".
The machine status after the Auto Off operation is called "Off mode" or "Sleep
mode". For the Auto Off Timer, specify the time to elapse before the Auto Off
function is activated.
The Time can be set from 10 seconds to 240 minutes.
Note
❒ Default: 1 minute
❒ Enter numbers with number keys
❒ Use the [←←←←] and [→→→→] keys to switch between minutes and seconds.
❒ When in Off or Sleep mode, the machine can be ready for use within 10 sec-
onds.
❒ Auto off may not work while an error is displayed.
❖❖❖❖ Panel Off Timer
Set the amount of time the machine waits before switching the panel off after
copying has finished or the last operation is performed.
4
Note
❒ The default setting is the same time interval as the Auto Off Timer default
setting, so the Panel Off Timer is not used. This setting is only used if the
Auto Off Timer setting is set to a longer interval than the Panel Off Timer
setting.
❒ The warm up time for making a copy from standby mode is three seconds.
❒ The default: 1 minute
❒ Enter a time interval between 10 seconds and 240 minutes with the number
keys.
❒ Press the [←←←←] or [→→→→] keys to move the cursor between minutes and sec-
onds.
❖❖❖❖ System Reset Timer
The System Reset setting is a setting that automatically switches to the screen
for the function set in Function Priority. This happens if no operations are performed or when an interruputed job is cleared. This setting sets the system reset interval.
Note
❒ Default: Yes, 60 seconds
❒ The time can be set from 10 to 999 seconds.
77
Page 91

User Tools (System Settings)
❖❖❖❖ Copier/Document Server Auto Reset Timer
Specifies the time to elapse before the copier and Document Server functions
are reset.
Note
❒ If No is selected, the machine will not automatically switch to the user code
entry screen, and you will not be able to limit who uses the machine.
❒ Default: Yes, 60 seconds
❒ The time can be set from 10 to 999 seconds.
❖❖❖❖ Facsimile Auto Reset Timer
Specifies the time to elapse before the facsimile function is reset.
Note
4
❒ Default: 30 seconds
❒ The time can be set from 30-999 seconds.
❖❖❖❖ Scanner Auto Reset Timer
Specifies the time to elapse before the scanner function is reset.
Note
❒ If No is selected, the machine will not automatically switch to the user code
entry screen, and you will not be able to limit who uses the machine.
❒ Default: Yes, 60 seconds
❒ The time can be set from 10-999 seconds.
78
❖❖❖❖ Set Date
Set the date for the copier's internal clock.
Note
❒ To change among year, month and day, press the [←←←←] and [→→→→] keys.
❖❖❖❖ Set Time
Set the time for the copier's internal clock.
Note
❒ To change between minutes and seconds, press the [←←←←] and [→→→→] keys.
Page 92

Settings You Can Change with the User Tools
Interface Settings/Network 1/2—2/
2
❖❖❖❖ IP Address
Before using this machine with the network environment, you must configure the IP address.
Note
❒ Default: 011.022.033.044
❒ Do not use an IP address that has been used for another machine. To get
the addresses, contact your network administrator.
❒ Press the [←←←←] or [→→→→] key to move between each group of three numbers.
❒ Press [Clear] if you enter the wrong number.
❖❖❖❖ Sub-net Mask
A number used to mathematically "mask" or hide an IP address on the network by eliminating those parts of the address that are alike for all the machines on the network.
Note
❒ Default: 000.000.000.000
❒ Press the[←←←←] or [→→→→] key to move between each group of three numbers.
❒ Press [Clear] if you enter the wrong number.
❖❖❖❖ Gateway Address
A gateway is a connection or interchange point that connects two networks.
Configure the gateway address for the router or host computer used as a gateway.
4
Note
❒ Default: 000.000.000.000
❒ To get the address, contact your network administrator.
❖❖❖❖ Access Control and Access Mask
You can control the client access. Access control and Access mask should be
set together.
Note
❒ Default: 000.000.000.000
❒ If you do not want to set any limitation for this machine, use the default
settings.
❒ Press [Clear] if you enter the wrong number.
❒ If you set access control as 192.168.15.16, clients addresses might be as-
signed as follows:
79
Page 93

User Tools (System Settings)
Address for access mask Client Address
000.000.000.000 xxx.xxx.xxx.xxx
255.000.000.000 192.xxx.xxx.xxx
255.255.000.000 192.168.xxx.xxx
255.255.255.000 192.168.15.xxx
255.255.255.255 192.168.15.16
❖❖❖❖ Network Boot
Select how to set an IP address from a client.
Note
❒ Default: NONE
4
❒ For details about settings, consult your network administrator.
❖❖❖❖ Effective Protocol
Select the protocol, to use in the network.
Note
❒ Default: TCP/IP:Effective, NetWare:Effective, NetBEUI:Effective, AppleTalk:
Effective
❖❖❖❖ NW Frame Type
Select the frame type when you use NetWare.
❒ Default: Auto select
❖❖❖❖ Ethernet Speed
Set the access speed for networks.
Select a speed that matches your network environment. "Auto Select" should
usually be specified.
❒ Default: Auto select
80
Note
Note
Page 94

Settings You Can Change with the User Tools
Interface Settings/Parallel Interface
❖❖❖❖ Parallel Timing
Specifies the timing setting for the parallel interface. Under normal circumstances, you will not need to change this setting.
Note
❒ Default: ACK outside
❖❖❖❖ Parallel Communication Speed
Specifies the communication speed for the parallel interface. If the communication speed is set too fast, data transfers may not flow smoothly. If this occurs, change the setting to “Standard”.
Note
❒ Default: High speed
❖❖❖❖ Selection Signal Status
Specifies the level for the select signal setting of the parallel interface.
Note
❒ Default: High
❖❖❖❖ Input Prime
Specifies whether the prime signal is active or inactive when an input prime
signal is sent. Under normal circumstances, you will not need to change this
setting.
4
Note
❒ Default: Invalid
❖❖❖❖ Bidirectional Communication
Specifies the printer's response mode and so forth for a status request when
using the parallel interface. If you experience problems when using other
manufacturers printers, set this to “Off”. However, if this is set to “Off”, asynchronous functions will not work.
Note
❒ Default: Yes
❖❖❖❖ Signal Control
Specifies the error processing settings for when an error occurs when printing
from a computer or sending faxes. Under normal circumstances, you will not
need to change this setting.
Note
❒ Default: Job acceptance priority
81
Page 95

User Tools (System Settings)
File Transfer
Make these settings as required when using ScanRouter V2 Lite/Professional.
Note
❒ The file transfer function requires the optional Hard Disk Unit.
❒ The optional ScanRouter V2 Professional is required for distributing received
fax documents.
❖❖❖❖ Delivery Server IP Address
Specifies the IP address of the ScanRouter V2 Lite delivery server for distributing documents or data from the machine.
4
Note
❒ Default: 000.000.000.000
❒ Press the [←←←←] or [→→→→] key to move between each group of three numbers.
❒ If you make a mistake, press and enter the correct number.
❒ You must also set the delivery server IP address on ScanRouter V2
Lite/Professional. The relevant setting on the machine will be overwritten
by the delivery server IP address set on ScanRouter V2 Lite/Professional.
❖❖❖❖ Fax RX File Transmission
• Setting per Line
Specifies whether or not received fax documents should be sent to ScanRouter V2 Professional for each of the fax lines.
Note
❒ Default: G3 Port 1/Do not Deliver, G3 Port 2/Do not Deliver, G3 Port 3/Do
not Deliver
• Print at Delivery
Specifies whether or not received fax documents that are sent to ScanRouter V2 Professional should also be printed by the machine at the same time.
Note
❒ Default: No
• File to Deliver
Specifies whether all received fax documents or only received fax documents that include delivery codes (documents with an ID and F code)
should be sent to ScanRouter V2 Professional.
82
Note
❒ Default: File with Dlvry Code
Page 96

Settings You Can Change with the User Tools
• Delivery Failure File (Dlvry Failure File)
If a received fax document cannot be sent to ScanRouter V2 Professional,
the document is stored in the machine's memory. To print this stored data,
select “Print File”; to delete the data, select “Delete File”.
Note
❒ If the machine can send data to ScanRouter V2 Professional, data is sent
automatically.
❒ If you delete the data, you will not be able to distribute or print the data.
❖❖❖❖ Recall Interval Time
Specifies the interval the machine waits before resending data or a document,
if it could not be sent to ScanRouter V2 Professional.
Note
❒ Default: 300 Seconds
❒ Enter an interval within the range of “60 -999 seconds” (in one second in-
tervals) with the number keys.
❒ This setting is for the Scanner function. The distribution of received fax
documents will still be performed.
❖❖❖❖ Number of Recalls
Note
❒ Default: No
❒ Enter the number of times within the range of “1 to 99” with the number
keys.
❒ This setting is for the Scanner function. The distribution of received fax
documents will still be performed.
4
83
Page 97

User Tools (System Settings)
Key Operator Tools 1/
If an access code has been set, you cannot use the Key Operator Tools unless you
enter the access code (max. 8 digits). ⇒ p.84 “Key Operator Code”
Reference
For details about user codes, ⇒ p.86 “User Code”
2
❖❖❖❖ User Code Management
Allows you to control who uses the machine by setting user codes for users.
To use function with "User Code Management" set to "ON", you must enter a
registered user code. User codes must be registered for user code management. For more information about user codes, see p.86 “User Code”.
4
Note
❒ Default: Copier/OFF, Document Server/OFF, Facsimile/OFF, Scanner/OFF,
Printer/Auto Program
❒ By using “Auto Registration” for the printer, you can keep a print log for
each user code entered from the driver.
❖❖❖❖ Key Counter Management
Use the key counter to specify whether users are limited or not.
Note
❒ Default: Copier/OFF, Document Server/OFF, Facsimile/OFF, Scanner/OFF,
Printer/OFF
❖❖❖❖ Key Operator Code
84
Important
❒ The administrator must properly manage the key operator codes set for
the machine.
This specifies whether or not to use passwords (max. 8 digits) to control use
of the “Timer Setting” or “Key Operator Tools” settings for the access codes.
Note
❒ Default: OFF
❒ If you select “ON”, enter the access code (max. 8 digits) with the number
keys, and then select “Partial” or “All Initial Settings” to set the access limit.
• If you selected “Partial”
An access code is only required for the “Timer Setting”, “Key Operator
Tools” initial settings and for “Key Operator Tools” for the fax initial
settings. “MENU PROTECT” will be set for “CHANGE/CONTROL” in
the printer initial settings.
Page 98

Settings You Can Change with the User Tools
• If you selected “All Initial Settings”
An access code will be required to access all the items in the System Settings, Copier/Document Server Features, Facsimile Features, Printer
Features, and Scanner Features.
❒ If you select “All Initial Settings”, you will need to enter the access code to
access the Key Operator Code screen.
❖❖❖❖ Program/Change/Delete User Code
Adds, changes or deletes user codes (max 8 digits).
Note
❒ You can register up to 100 user codes. If you add the optional extension
module, you can register up to 500 user codes.
❒ You can also register user codes from SmartNetMonitor for Admin (print-
er option required).
❒ Even if you change the user codes, the counter values are not cleared.
❒ If you clear a user code, the counter values associated with it are also auto-
matically cleared.
• [Program/Change]
This registers new user codes and changes the functions that can be
used with user codes and user names.
• [Delete]
Deletes a user code.
• [Delete All]
Deletes all the user codes.
4
❖❖❖❖ Display/Print Counter
Allows you to view and print the various counters.
• Display/Print Counter
Displays counters for each functions ( Total, Copier, Facsimile, and Printer).
• Print Counter List
Prints out a list of counters for all functions (Total, Copier, Facsimile, Printer, A3/DLT, 2-Sided Copy and Staple).
A If you want to print Counter List, press [Print Counter List], and then press
start.
Note
❒ If you do not want to print, then press [Cancel].
B Press [Exit]
85
Page 99

User Tools (System Settings)
❖❖❖❖ Display/Clear/Print Counter per User Code
Allows you to view and print the various counters accessed with user codes
and to set the values to 0.
Important
❒ If you use “Delete All” for the user codes, the user code names (Fax func-
tion), counter values, and communication settings will also be deleted. Be
sure to print the list of these settings before pressing the “OK” key.
Note
❒ Press the [UUUU ] and [TTTT] keys to show all counters.
• Print Counter per User Code
Prints the counter values for each of the user codes.
• Clear Counter per User Code
4
Sets the counter value for each of the user codes to 0.
❖❖❖❖ Change User Name Order
Changes the order of the registered user codes.
Note
❒ You can rearrange the order of items on the same page, but you cannot
move the items to another page. For example, you cannot move an item
from “PLANNING” to “DAILY”.
❒ Select the user code you want to move and press the [←←←←], [↑↑↑↑], [↓↓↓↓], and [→→→→]
keys to change its position. To move it to the end, press “To End”.
User Code
By registering user codes, you can limit the users of each function and check
their use of each function. By installing an optional key card in the machine, you
can summarize and manage the use data on each function and manage the users
of each function in more detail.
The management and control items for each function are as follows:
❖❖❖❖ Copier
Limits the users who can use the Copy function and manages the use of each
user code.
Note
❒ Specify "ON" for "Copier" in the User Code Management settings (⇒ p.84).
❖❖❖❖ Document Server
Limits the users who can use the Document Server function and manages the
use of each user code.
Note
❒ Specify "ON" for "Document Server" in the User Code Management set-
tings (⇒ p.84).
86
Page 100

Settings You Can Change with the User Tools
❖❖❖❖ Facsimile
Limits the users who can use the Fax function and manages the use of each
user code.
Note
❒ Specify "ON" for "Facsimile" in the User Code Management settings (⇒
p.84).
❖❖❖❖ Printer
Limits the users who can use the Printer function and manages the use of each
user code.
Note
❒ Specify "ON" for "Printer" in the User Code Management settings (⇒ p.84).
❖❖❖❖ Scanner
Limits the users who can use the Scanner function and manages the use of
each user code.
Important
❒ The functions associated with each user code are the same. If you change
or delete user codes, the management data and limits associated with that
user code will become invalid.
Note
❒ Specify "ON" for "Scanner" in the User Code Management settings (⇒
p.84).
To Register the New User Code
Press the {{{{User Tools/Counter}}}} key.
AAAA
Press the [System Settings] key.
BBBB
Press the [Key Operator Tools] key.
CCCC
Press the [Program/Change/Delete User Code] key.
DDDD
4
Press [New Program] key.
EEEE
87
 Loading...