

Page 1

Operator Guide
5625
Digital Color Copier/Printer
your document management partner
Page 2

Page 3

Introduction
This manual contains detailed instructions on the operation and maintenance of this machine. To get
maximum versati lit y from this machine all oper ators shou ld caref ully rea d and follow the instruc tions in
this manual. Please keep this manual in a handy place near the machine.
Please read the Saf ety Inform ati on before using thi s machine . It cont ains i mportant infor mation relate d
to USER SAFETY and PREVENTING EQUIPMENT PROBLEMS.
Notes:
Some illustrations might be slightly different from your machine.
Certain options might not be avai lable in some countries. For detail s, please contact your local dealer.
Operator Safety:
This machine is considered a CDRH class I laser device, safe for office/EDP use. The machine contains a 15-milliwat, 760-800 nanometer wavelength, GaAIAs laser diode. Direct (or indirect reflected)
eye contact with the laser beam might cause serious eye damage. Safety precautions and interlock
mechanisms have been designed to prevent any possible laser beam exposure to the ope rat or.
Laser Safety:
The Center for Devices and Radi ologi cal Heal th (CDRH) pro hibit s the repai r of laser -bas ed optic al unit
in the field. The opt ical housing unit can only be re paired in a factory or at a location with the requisite
equipment. The laser s ubsy stem is repl acea ble i n the fiel d b y a qual ifi ed Cust omer Enginee r. The l aser
chassis is not repairable in the field. Customer engineers are therefore directed to return all chassis
and laser subsystems to the factory o r service depot when replacement or the optic al subsystem is required.
Warning:
Use of controls or adjustment or performance of procedures other than those specified in this manual
might result in hazardous radiation exposure.
Two kinds of size notati on are employed in this manual. With this machine refer to the inch version.
For good copy quality, Ricoh recommends that you use genuine Ricoh toner.
Ricoh shall not be responsible for any dam age or expens e that might re sult from the use of parts other
than genuine Ricoh par ts in your Ricoh office product.
Power Source:
120V, 60Hz, 12A or more
Please be sure to conn ect the powe r c ord to a powe r sour ce as abov e. For det ails about p ower source,
⇒ P.147
“Power Connection”
.
Page 4

Note to users in the United States of America
Notice:
This equipment has been t ested and foun d to comply wit h the limits for a Class B digit al devic e, pursuant to Part 15 of the FCC Rules. These limits are designed to provide reasonable protection against
harmful int erference in a residential installation. This equipment generates, uses and can radiate radio
frequency ener gy and, i f not in stall ed and used i n ac cordance with the instr uctio ns, ma y cause har mful
interference to radio communications. However, there is no guarantee that interference will not occur
in a particular installation. If this equipment does cause harmful interference to radio or television reception, which can be deter min ed by turning the equip ment off and on, the user is encour aged to try t o
correct the interference by one more of the foll owing measures:
Reorient or relocat e the receiving antenna.
Increase the separation between the equipment and receiver.
Connect the equipment into an outlet on a circuit different from that to which the receiver is con-
nected.
Consult the dealer or an expe rienced radio /TV technician for help.
Warning
Changes or modifications not expressly approved by the party responsible for compliance could void
the user's authority to operate the equipment.
1. Properly shielded and g rounded cables and connectors must be used for connect ions to host computer (and/or peripheral) in order to meet FCC emission limits.
2. AC adapter with ferrite core must be used for RF interference suppression.
This device complies wi th Par t 15 of FCC Rules.
Operation is subject to the following two cond itions:
1. This device may not cause harmful interf erence, and
2. This device must accept any interference received,
including interference that may caus e undesired operation.
Ricoh Corporation, 5 Dedrick Place, West Caldwell, NJ 07006
973-882-2000
Note to users in Canada
Note:
This Class B digital apparatus complies with Canadian ICES-003.
Remarque concernant les utilisateurs au Canada
Avertissement:
Cet appareil numér ique de la classe B est conforme à la norme NMB-003 du Canada.
In accordance wit h IEC 60417, this machine uses the following symbols for the main powe r swi tch:
means POWER ON.
a
means STAND BY.
c
Copyright © 2000 Ricoh Co., Ltd.
Page 5

Notice
Do not make copies of any item for which copying is prohibited by law.
Copying the following items is normally prohibited by local law:
Bank bills, revenue stamps, bonds, stock certificates, bank drafts, checks, pass-
ports, driver's licenses.
The color copy samples in this book may differ slightly from the actual copies
due to printing effects.
This machine is equipped with a function that prevents making counterfeit bank
bills. Due to this function the original images similar to bank bills may not be
copied properly.
i
Page 6
Safety Information
R
R
When using your equipment, the following safety precautions should always be
followed.
Safety During Operation
In this manual, the following important symbols are used:
WARNING:
CAUTION:
R
WARNING:
Connect the po wer cord direc tly i nto a wal l outl et an d neve r use a n ex-
•
tension cord.
Disconnect the power plug (by pulling the plug, not the cable) if the
•
power cable or plug becomes frayed or otherwise damaged.
Indicates a potentially hazardous situation which, if instructions
are not followed, could result in deat h or serious injury.
Indicates a potentially hazardous situation which, if instructions are not
followed, may result in minor or moderate injury or damage to property.
To avoid hazardous electric shock or laser radiation exposure, do not
•
remove any covers or screws other than those specified in this manual.
Turn off the power and disconnect the power plug (by pulling the plug,
•
not the cable) if any of the following conditions exists:
You spill something into the equipment.
•
You suspect that your equipment needs service or repair.
•
Your equipment's cover has been damaged.
•
Do not incinerate spilled toner or used toner. Toner dust might ignite
•
when exposed to an open flame.
Disposal can take place at our authorized dealer or at appropriate col-
•
lection sites.
Dispose of the used toner cartridge in accor dance with the local reg-
•
ulation.
ii
Page 7

R
CAUTION:
•
Protect t he eq uip men t f rom damp ne s s or w et we at he r, su ch a s rai n, sno w,
and so on.
•
Unplug th e power co rd from the wall out let bef ore you mov e the equi pment.
While mov ing th e e qui pme nt , yo u sh oul d t ake c are t ha t th e po wer c or d wi ll
not be damaged under the equipment.
•
When you disconnect the power p lug from the wall outlet, al ways pull the
plug (not the cabl e).
•
Do not allow pa per cl ips, s taples , or o ther s mall meta llic objec ts to f all i nside
the equipment.
•
Keep toner (used or unused) and t oner cartridge out of the reach of children.
•
For envi ronmenta l reasons, do not disp ose of the equipment or expended
supply wa ste at hous ehold wast e collec tion poi nts. Di sposal c an take plac e
at an authorized dealer or at appropriate collection sites.
•
The inside of the machine could be very hot. Do not tou ch the parts with a
label i nd ica ti ng t he “ho t s ur fa ce” . O th erw ise it coul d cau se a per so na l bu rn.
•
Our produc ts are en ginee red to meet high stan dards of quality and func tionality, and we recommend that you only use the expendable supplies available at an authoriz ed dealer.
iii
Page 8

How to Read This Manual
R
R
Symbols
In this manual, the following symbols are used:
WARNING:
This symbol indicates a potentially hazardous situation that might result in
death or serious injury when you misuse the machine without following the instructions under this symbol. Be sure to read the instructions, all of which are described in the Safety Information section.
CAUTION:
This symbol indicates a potentially hazardous situation that might result in minor or moderate injury or property damage that does not involve personal injury
when you misuse the machine without following the instructions under this
symbol. Be sure to read the instructions, all of which are described in the Safety
Information section.
WARNINGS and CAUTIONS are notes for your safety.
Important
If this instruction is not followed, paper might be misfed, originals might be
damaged, or data might be lost. Be sure to read this.
Preparation
This symbol indicates the prior knowledge or preparations required before operating.
Note
This symbol indicates precautions for operation or actions to take after misoperation.
Limitation
This symbol indicates numerical limits, functions that cannot be used together,
or conditions in which a particular function cannot be used.
Reference
This symbol indicates a reference.
[]
Keys that appear on the machine's panel display.
{}
Keys built into the machine's operation panel.
iv
Page 9

TABLE OF CONTENTS
What You Can Do with This Machine ...................................................... 2
Guide to Components............................................................................... 4
Options..................................... .......... ..................................... ......... .......... 6
Operation Panel......................................................................................... 7
Panel Display............................................................................................. 9
Layout and Keys ........................................................................................... 9
Common Keys............................................................................................. 10
Exam ple Di sp la y s . .... ... ... ... ............. ... .... ... ... ... .... ... ... ... ... .... ... ... ... ............. ... 10
1.Basics
Turning On the Power............................................................................. 13
Turning On the Main Power ........................................................................ 13
Starting the Machine ................................................................................... 14
Originals................................................................................................... 16
Standard Size Originals .............................................................................. 16
Recommended Originals............................................................................. 16
Non-recommended Originals for the Document Feeder............................. 16
Setting Originals on the Exposure Glass.............................................. 18
Setting a Stack of Originals in the Document Feeder.......................... 19
Setting one Original at a Time in the Document Feeder...................... 21
Setting Originals of Different Sizes in the Document Feeder............. 23
Setting Non-standard Size Originals..................................................... 24
Removing the Platen Cover to Copy a Large Original......................... 26
2.Copying
Basic Procedure...................................................................................... 27
Adjusting Copy Image Density.................................................................... 28
Selecting a Color Mode............................................................................... 29
Selecting the Original Image Type (Photo/Text) ......................................... 35
Selecting the Copy Paper Size ................................................................... 39
Copying from the Bypass Tray.................................................................... 41
Auto Reduce/Enlarge.................................................................................. 50
Energy Saver Mode .................................................................................... 51
Auto Off Mode............................................................................................. 52
Interrupt Copying......................................................................................... 52
Auto Start.................................................................................................... 53
Program ...................................................................................................... 54
Check Modes .............................................................................................. 57
Counter ....................................................................................................... 58
Reduce/Enlarge....................................................................................... 59
v
Page 10

Preset R/E................................................................................................... 59
Zoom........................................................................................................... 61
Directional Magnification (%) ...................................................................... 63
Directional Size Magnification (inch)........................................................... 64
Shifting the Image ................................................................................... 67
Centering..................................................................................................... 67
Margin Adjustment ...................................................................................... 68
Series Copies........................................................................................... 70
Book → 1 Sided .......................................................................................... 70
2 Sided → 1 Sided ...................................................................................... 71
Combine...................................................................................................... 73
Cover Sheet.............................................................................................. 75
Front Cover ................................................................................................. 75
Front & Back Covers................................................................................... 77
Color Creation.......................................................................................... 80
Color Conversion ........................................................................................ 80
Color Erase ................................................................................................. 82
Image Creation......................................................................................... 85
Mirror........................................................................................................... 85
Positive/Negative ........................................................................................ 86
Finishing................................................................................................... 88
Sort.............................................................................................................. 88
Stack ........................................................................................................... 89
Staple .......................................................................................................... 91
3.Adjustment and Color Memory
Color Balance.......................................................................................... 95
Color Balance Adjustment........................................................................... 95
Color Balance Program............................................................................... 96
Image Adjustment................................................................................... 98
Sharp /So ft, Con tr a st, B ac kg rou nd De ns i ty, an d P ast el ..... ... ... ... .... ... ... ... ... 99
U.C.R. Adjustment, A.C.S. Sensitivity Level and Auto Separation Sensitivity
Level.......................................................................................................... 101
4.Combination Chart
Combination Chart................................................................................ 103
5. What to Do If Something Goes Wrong
If Your Machine Does Not Operate as You Want................................ 109
If You Cannot Make Copies as You Want............................................ 111
B
Loading Paper................................................................................... 114
Non-recommended Paper for Paper Trays............................................... 114
vi
Page 11

Loading Paper in the Paper Tray .............................................................. 114
D
Adding Toner.................................................................................... 116
x
Clearing Misfeeds............................................................................. 118
When A , B, C or Y is Dis pl a yed : ....... .... ... ... ... .... ... ... ... ... .... ... ... ... ............. . 119
When P is Displ a yed :.. ... ... .... ... ... ... ... .... ... ... ... .... ... ... ... ............. ... .... ... ... ... . 119
When R is Displayed:................................................................................ 120
d
Adding Staples................................................................................. 121
e
Removing Jammed Staples............................................................. 123
6.Changing the Machine's Settings
Changing Paper Size............................................................................. 125
To Adjus t th e Pap er S ize w ith the Us e r Tool s.......... ... ... .... ... ... ... .... ... ... ... . 127
User Tools.............................................................................................. 129
Acces s ing th e Us e r Tool s ........ ... ... ... ............. .... ... ... ... ... .... ... ... ... .... ... ... ... . 129
Exiting from the User Tools....................................................................... 130
Settings You Can Change with the User Tools (System Settings)........... 130
Settings You Can Change with the User Tools (Copy Features).............. 135
7.Others
Do's and Don'ts ..................................................................................... 145
Where to Put Your Machine.................................................................. 146
Machine Environment ............................................................................... 146
Power Connection..................................................................................... 147
Access to Machine.................................................................................... 147
Maintaining Your Machine.................................................................... 149
Exposu r e Gl ass........... ............. ... ... ... .... ... ... ... .... ... ... ... ... .... ... ............. ... ... . 149
Platen Cover ............................................................................................. 149
Docum en t Fe ed er .......... ............. ... ... .... ... ... ... .... ... ... ... ... .... ... ... ............. ... . 15 0
Remarks ................................................................................................. 151
Copier........................................................................................................ 151
Use and Storage of Supplies................................................................ 152
Copy Paper ............................................................................................... 152
Paper Storage ........................................................................................... 153
Toner S tora g e ...... .... ... ... ... .... ............ .... ... ... ... .... ... ... ... ... .... ... ... ... .... .......... 153
8.Specification
Mainframe............................................................................................... 155
Document Feeder (Option)................................................................... 159
20-bin Sorter Stapler (Option).............................................................. 160
10-bin Sorter Stapler (Option).............................................................. 161
3-bin Sorter (Option) ............................................................................. 162
vii
Page 12

1000-sheet Tray Unit (Option) .............................................................. 163
1500-sheet Tray Unit (Option) .............................................................. 164
INDEX...................................................................................................... 165
viii
Page 13

1
Page 14
What You Can Do with This Machine
2
Page 15
3
Page 16
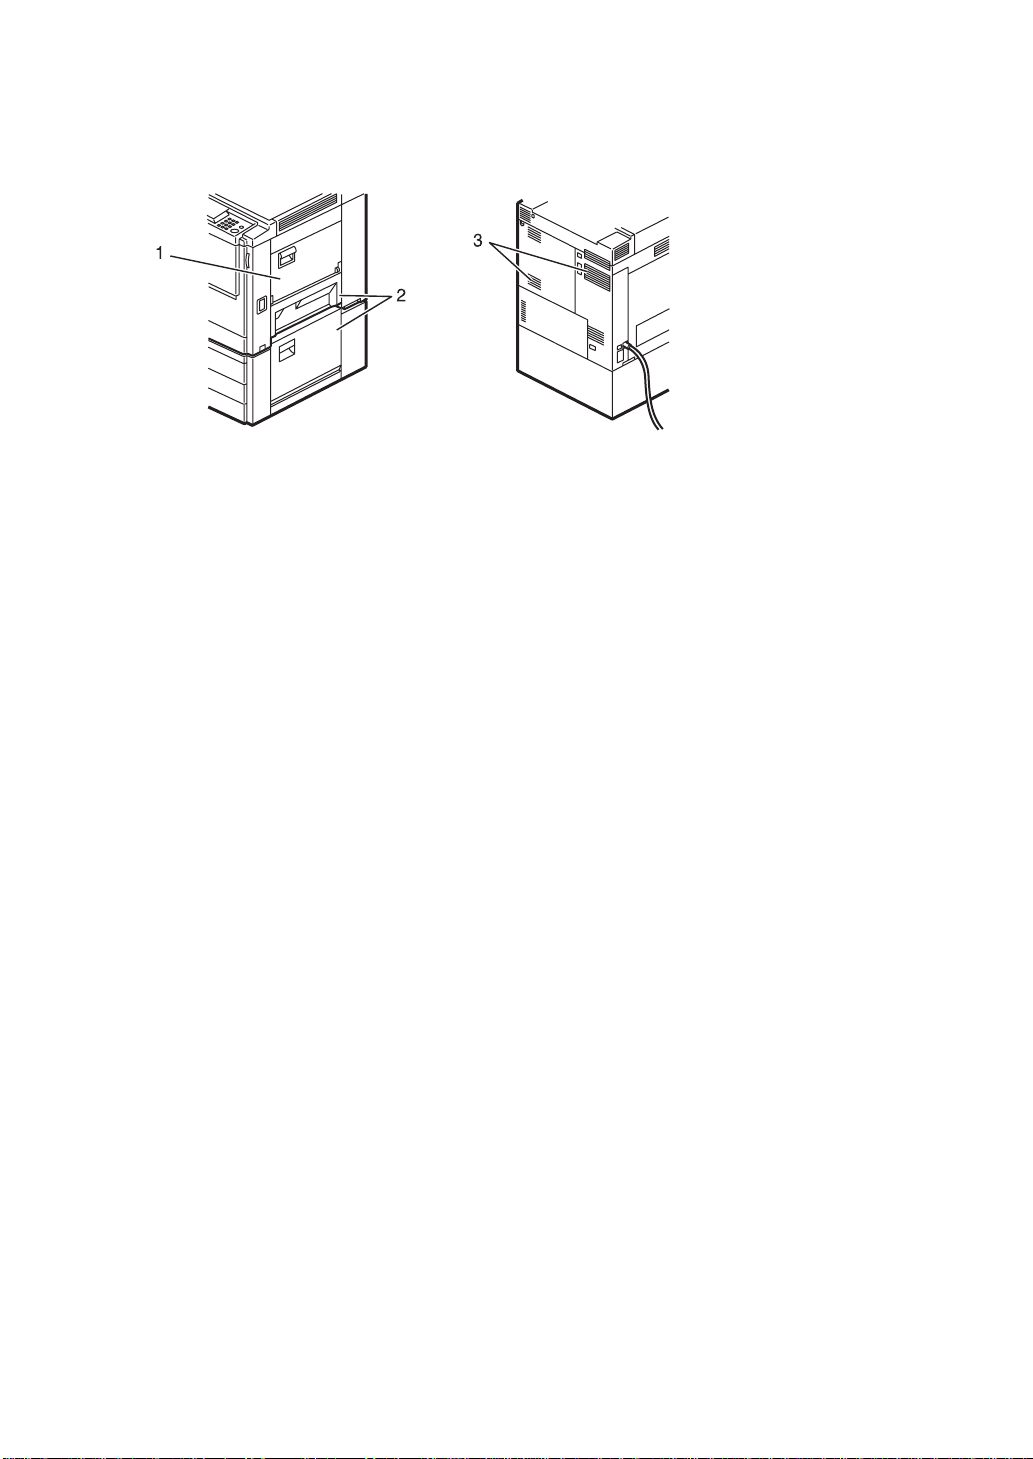
Guide to Components
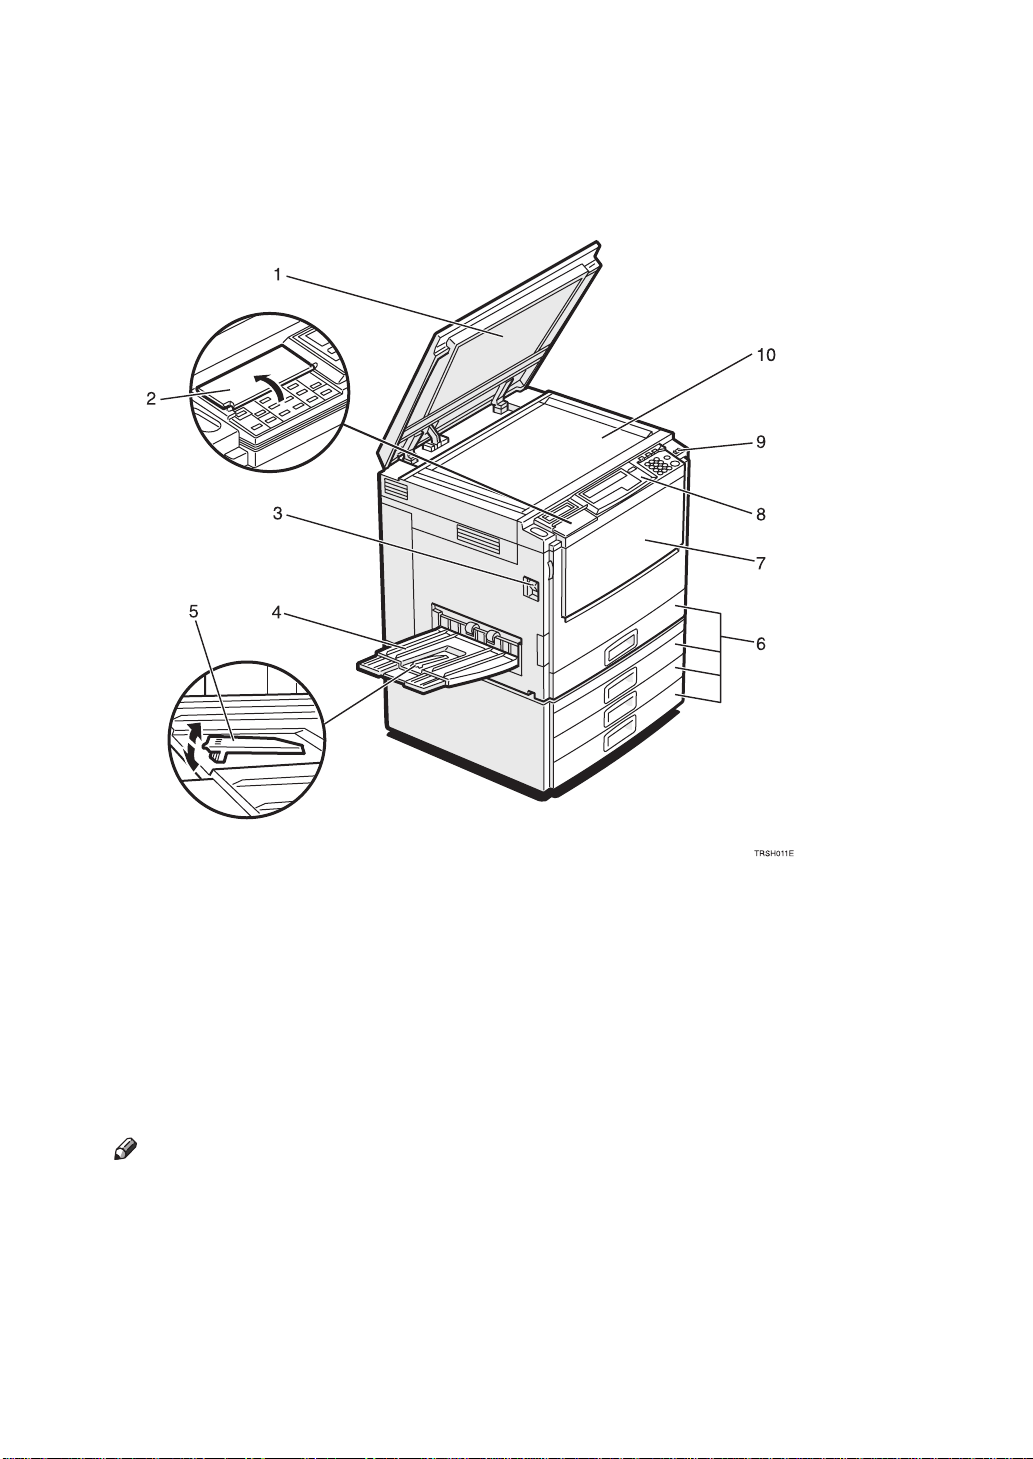
1. Platen cover (option)
Lower this cover over originals placed on
the exposure glass for copying.
2. Flip cover
Flip this up when to access the keys underneath.
3. Main power switch
To start the machine, turn on this switch.
Note
❒
If the machine does not operate after
turning on the operation switch, check
if the main power switch is turned on.
If it is off, turn it on.
4. Copy tray
Copied paper is delivered here.
4
5. Stopper
When you copy onto thin paper, raise
this to prevent curling.
6. Paper tray
Set paper here.
7.
Front cover
Open to access the inside of the machine.
8. Operation panel
⇒
“Operation Panel”
P.7
.
9. Operation switch
Press this switch to turn the power on
(the On indicator lights up). To turn the
power off, press this switch again (the
indicator goes off).
On
Page 17
10. Exposure glass
Position originals here face down for
copying.
1. Bypass tray
Use to copy onto OHP transparencies,
adhesive labels, translucent paper, post
cards, and non-standard size paper.
2. Right covers
Open this cover to remove jammed paper.
3. Ventilation holes
Prevent overheating. Do not obstruct the
ventilation holes by placing or leaning an
object near them. If the machine overheats, a fault might occur.
5
Page 18
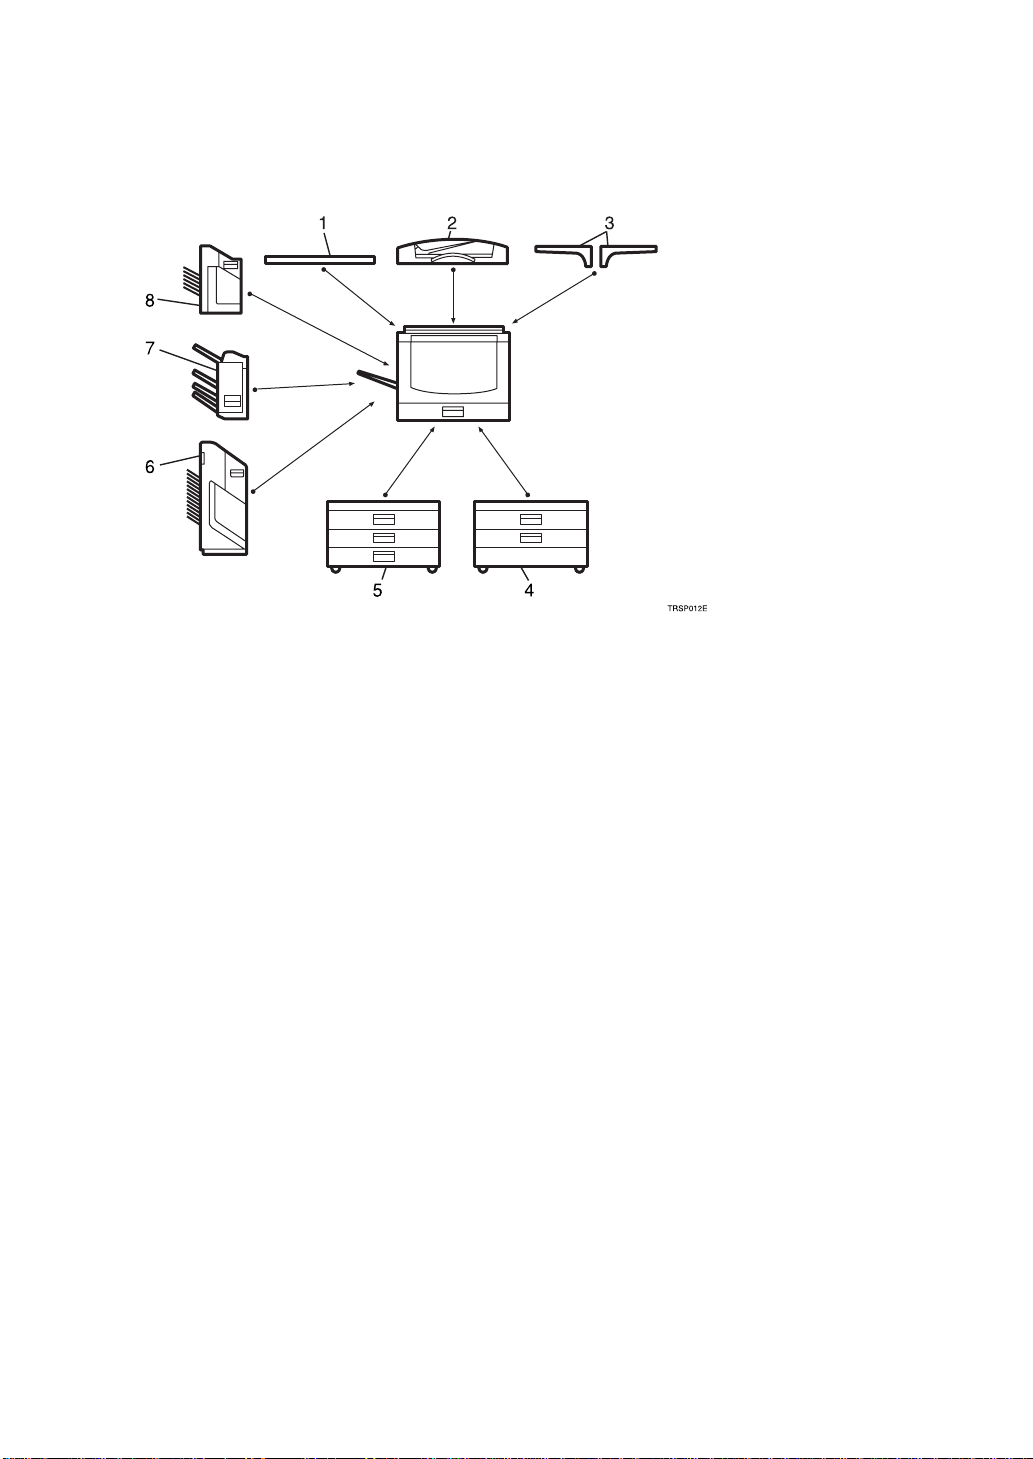
Options
This machine can be provided with the following options:
1. Platen cover
Lower this cover over originals placed on
the exposure glass for copying.
2. Document feeder (ADF)
Insert a stack of originals here. They will
be fed automatically.
3. Original tray
4. 1000-sheet tray unit (two 500-
sheet trays)
Consists of two paper trays.
Other options:
• Controller Interface unit
5. 1500-sheet tray unit (three 500-
sheet trays)
Consists of three paper trays.
6. 20-bin sorter stapler
Sorts, stacks, and staples copies.
7. 3-bin sorter
Sorts and stacks copies.
8. 10-bin sorter stapler
Sorts, stacks, and staples copies.
6
Page 19
Operation Panel
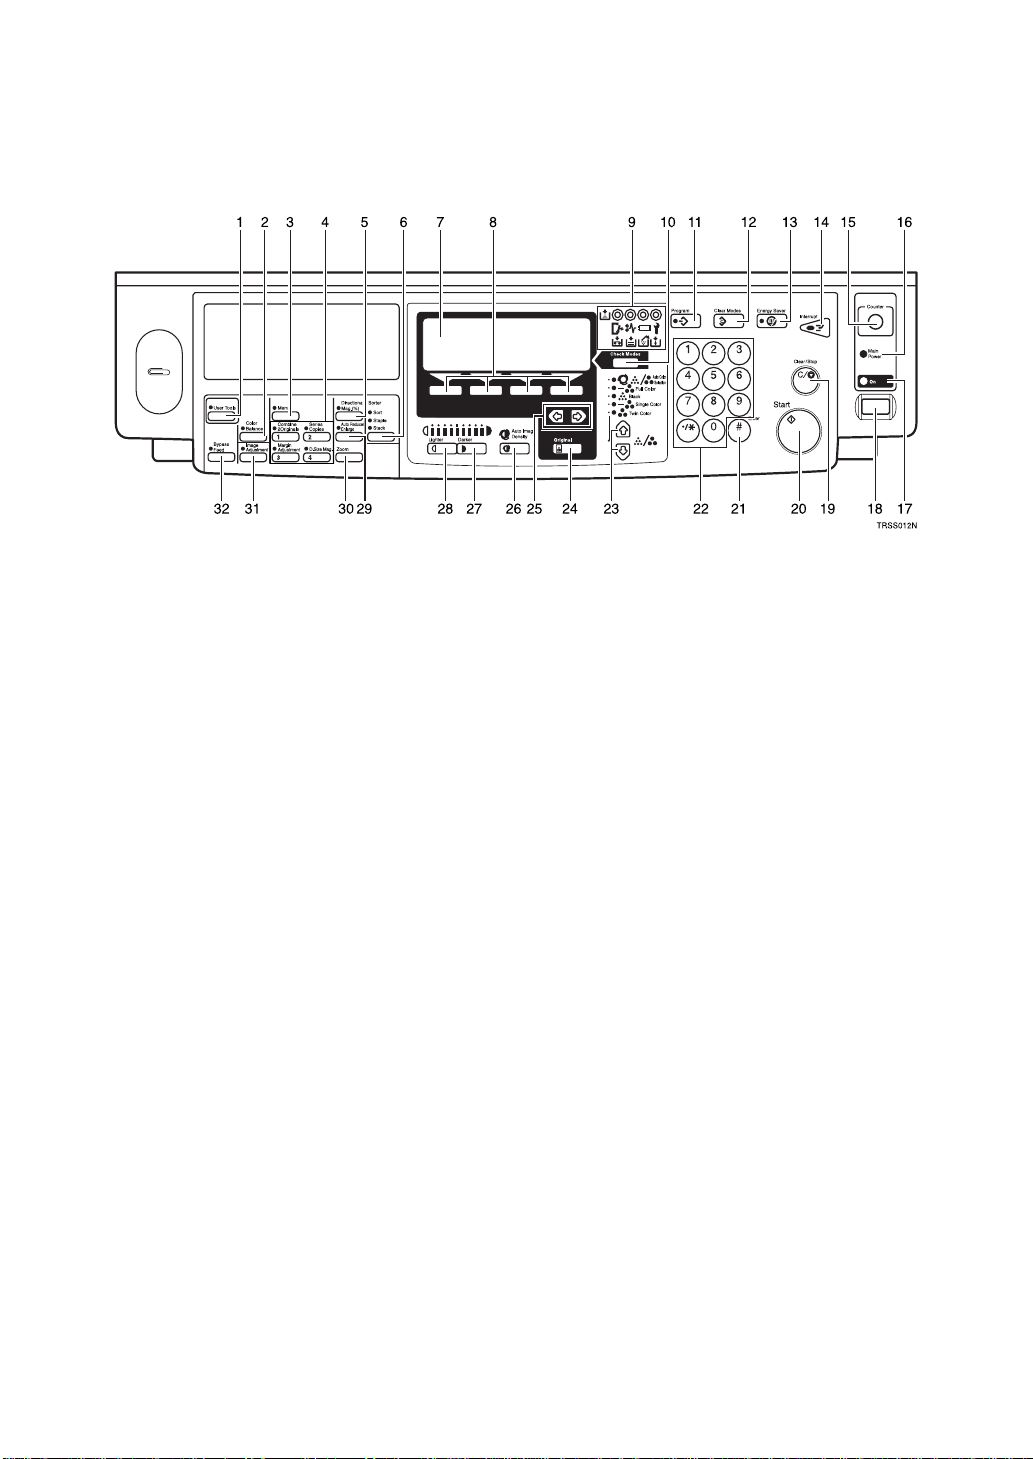
1.
User Tools
{
Press to change the default settings and
conditions to meet your requirements.
2.
Color Balance
{
Press to adjust and store the color balance. ⇒ P.95
3.
Menu
{
Displays the names of available functions.
4.
{
Press to use the stored functions you frequently use. By default, the following
functions are stored:
• Combine 2 Originals
• Series Copies
• Margin Adjustment
• Directional Size Magnification (mm)
5.
{
Press to use Directional Magnification
(%) mode. ⇒ P.63
tion (%)”
6.
{
Press to select Sort, Stack or Staple mode.
⇒
P.88
}
Favorite
Directional Mag.(%)
.
Sorter
“Sort”
key
}
key
}
“Color Balance”
key
keys
}
“Directional Magnifica-
key
}
.
key
}
.
7. Panel Display
Shows operation status, error messages,
and function menus. ⇒ P.9
play”
.
8.
Selection
{
Press the key under the item you wish to
select.
keys
}
“Panel Dis-
9. Indicators
These indicators show errors or the status
of the machine. ⇒ P.109
Something Goes Wrong”
10.
Check Modes
{
Press to check all the settings you have
set.
11.
Program
{
Press to select the program mode. ⇒ P.54
“Program”
12.
Press to clear the previously entered settings.
13.
Press to enter/exit Energy Saver mode.
⇒
P.51
.
Clear Modes
{
Energy Saver
{
“Energy Saver Mode”
key
}
}
key
}
}
“What to Do If
.
key
key
.
7
Page 20

14.
Interrupt
{
Press to make interrupt copies. ⇒ P.52
“Interrupt Copying”
key
}
.
26.
Auto Image Density
{
Press to make copies in Auto Image Density mode. ⇒ P.28
“Auto image density”
key
}
.
15.
Counter
{
Press to check the total number of copies
made. ⇒ P.58
key
}
“Counter”
.
16. Main Power indicator
This indicator lights up when the main
power switch is turned on, and goes off
when the switch is turned off.
17. On indicator
This indicator lights up when the operation switch is turned on, and goes off
when the switch is turned off.
18. Operation switch
Press this switch to turn the power on
(the On indicator lights up). To turn the
power off, press this switch again (the
indicator goes off).
19.
Clear/Stop
{
Press to cancel the copy number entered.
While copying, press to stop copying.
This key is also used to clear data.
key
}
On
27.
Darker
{
Press to increase the image density.
28.
Lighter
{
Press to lower the image density.
29.
Auto Reduce/Enlarge
{
Enlarges or reduces the image automatically according to the specified paper
size. ⇒ P.50
30.
Zoom
{
Enlarges or reduces in 1 % steps. ⇒ P.61
“Zoom”
31.
Image Adjustment
{
Press to change the default settings for
image adjustment. ⇒ P.98
ment”
.
32.
Bypass Feed
{
Press to select the paper type when copying with the bypass tray. ⇒ P.41
from the Bypass Tray”
key
}
key
}
“Auto Reduce/Enlarge”
key
}
.
key
}
.
key
}
key
}
“Image Adjust-
“Copying
.
Start
key
key
}
20.
{
Press to start copying. Use to set the Auto
Start.
21.
{#}
Use to enter data in selected modes.
22. Number keys
Use to enter the desired number of copies. They are also used to enter data.
23.
12 keys (Color Mode keys)
Press to select the color mode. ⇒ P.29
“Selecting a Color Mode”
24.
Original
{
Press to specify the type of original image. ⇒ P.35
Type (Photo/Text)”
25.
<>
Press to select an item on the panel display.
key
}
“Selecting the Original Image
keys (Cursor keys)
.
.
8
Page 21
Panel Display
The panel display shows the status of the machine, error messages, and function
menus.
Important
❒
Do not apply a strong shock or force of about 30N (about 3kgf) or more to the
panel display or you could damage it.
Note
❒
Currently selected items are shown highlighted on the panel display
Auto
(e.g. ).
❒
Keys that are not available are shown grayed out (e.g. ).
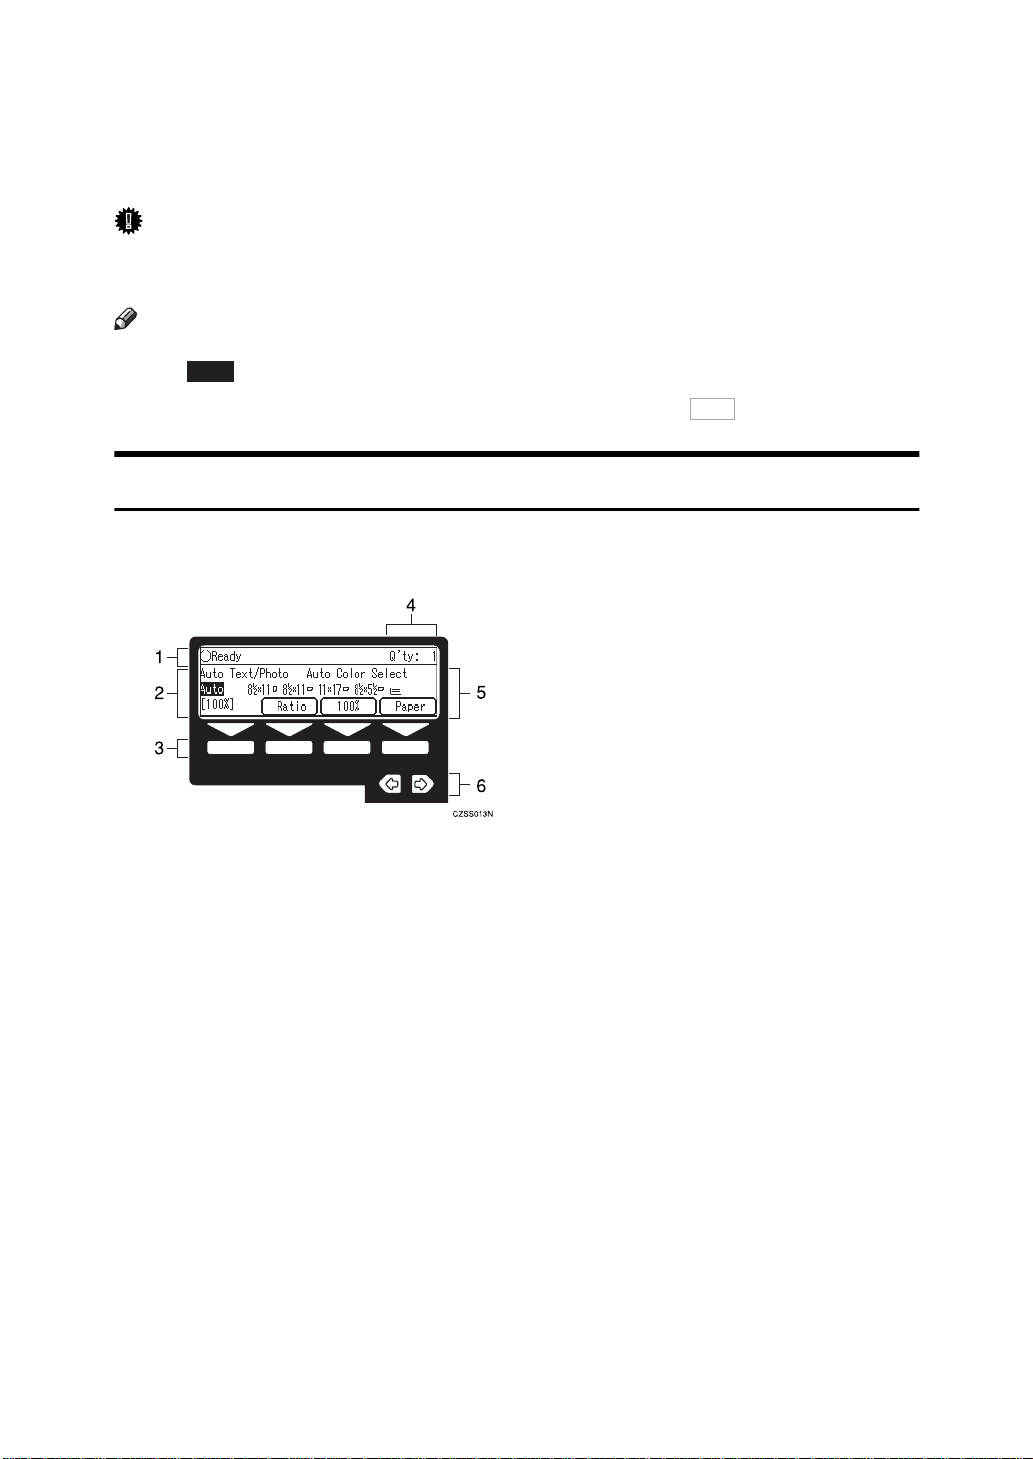
Layout and Keys
❖
Initial display
OK
1. The machine status and messages
appear here.
2. Items which can be selected or
specified.
3. These four keys correspond to the
keys that are in the bottom line of
the display (e.g.
in the above display). Press
Paper
[
]
the relevant key to select a key in the
display.
Ratio
[
], [
100%
, and
]
4. Number of copies set.
5. Settings for this function.
6. Press these keys to select an item
on the display.
To move the selection to the left, press the
key.
<
To move the selection to the right, press
the > key.
9
Page 22
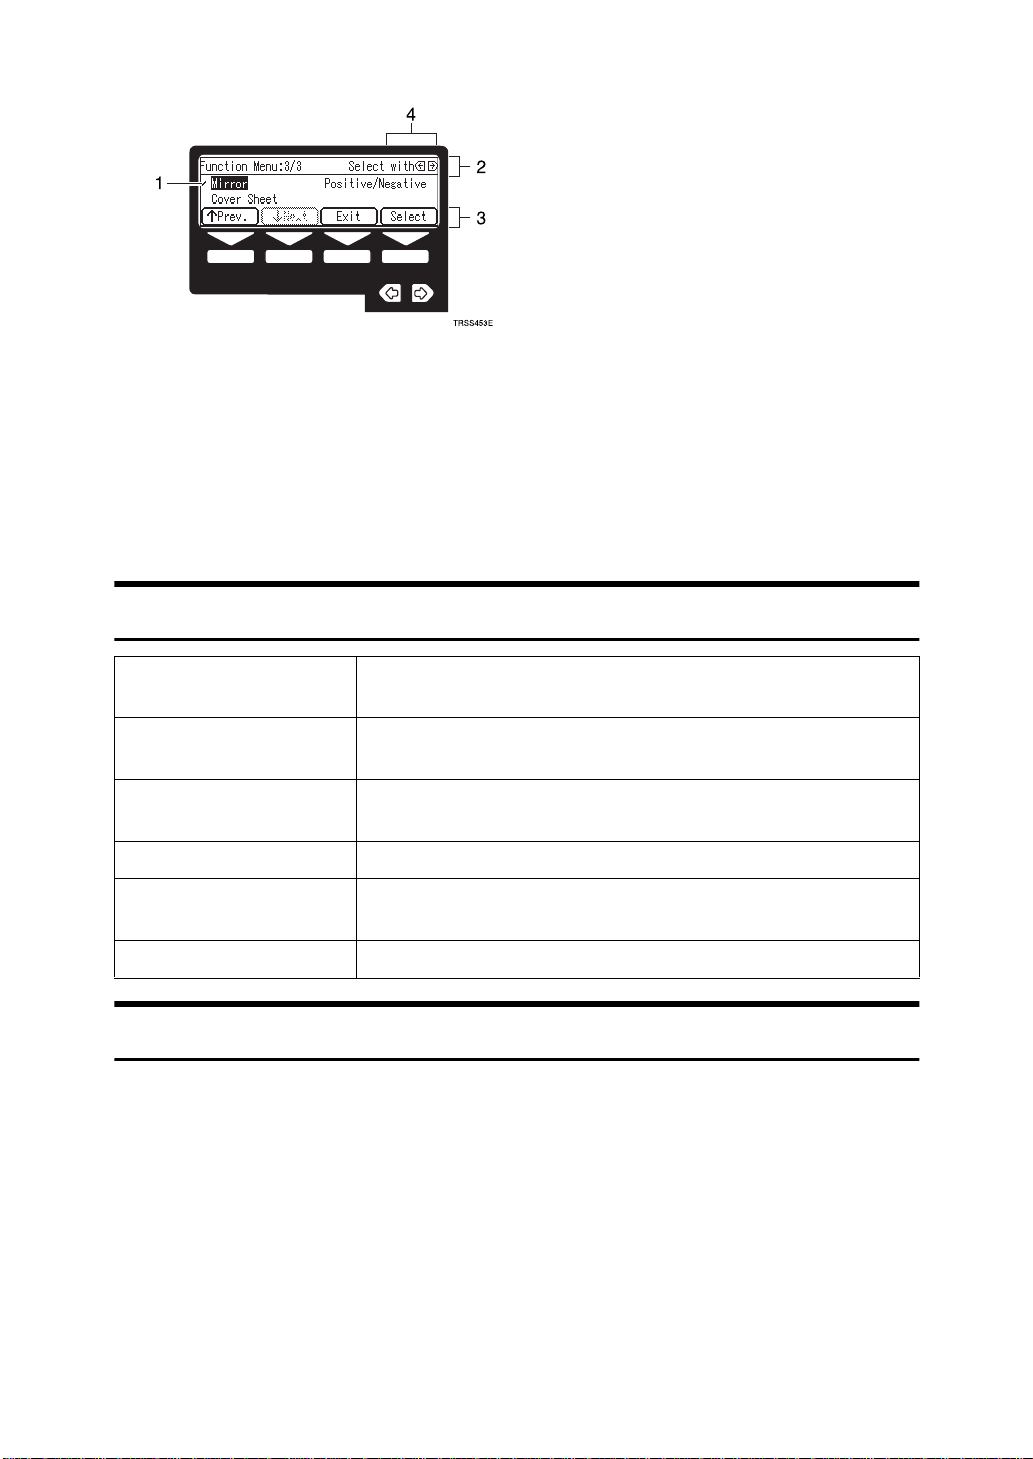
❖
Function menu display
1. A
✓
mark appears before the
names of functions that are currently
selected.
2. The machine status and messages
appear here.
3. Items which can be selected or
specified.
Common Keys
[OK]
Cancel
[
↑
Prev.
[
<>
Exit
]
[
]
][
↓
Next
]
Confirm the selected function or value and return to the
previous display.
Cancel the selected function or value and return to the previous display.
When there are too many items to fit on the display, use
these keys to move between pages.
Press to highlight items you wish to select.
Confirm the selected function or value and return to the ini-
tial display.
Select
[
]
Confirm the selected function.
Example Displays
The basic elements used on the display are shown below. Understanding their
meaning help you exploit this machine's features quickly and easily.
10
Page 23
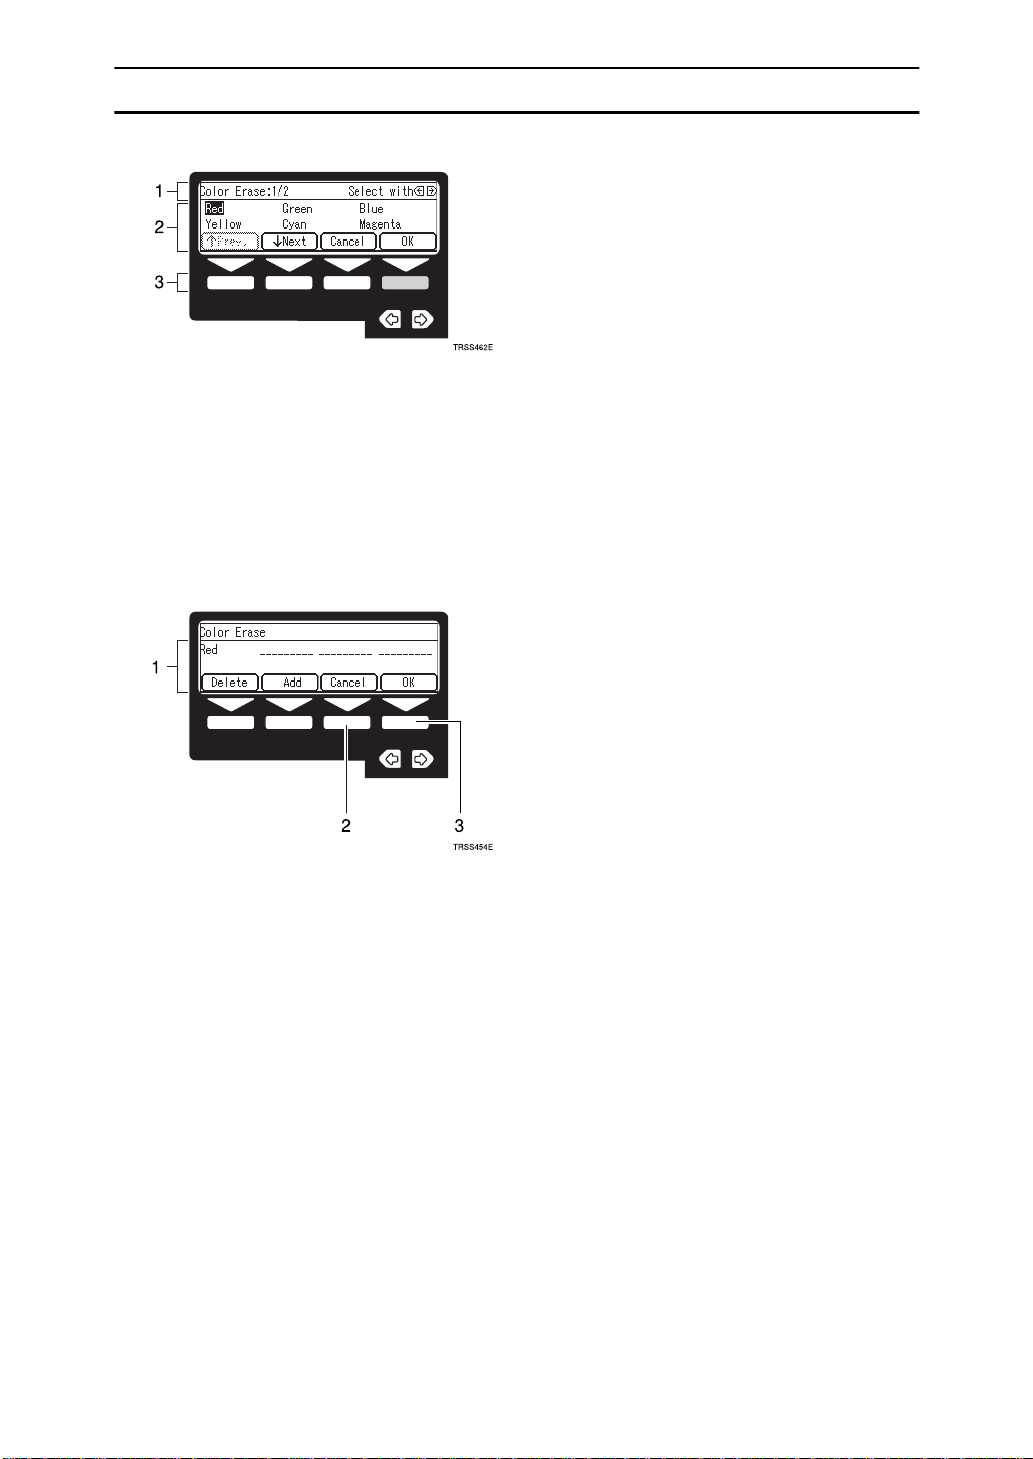
Sample display for color erase
1. The machine status and messages
appear here.
2. Available settings.
3. A screened key means you should
press it.
OK
Press the
k
key.
]
[
1. Selected item.
2. Cancel the settings and return to
the previous display.
3.
Confirm the settings and return to
the previous display.
11
Page 24

12
Page 25
1. Basics
Turning On the Power
To turn the machine on, press the operation switch.
Note
❒
This machine automatically enters Energy Saver mode or turns itself off if you
do not use the machine for a while. For details, ⇒ P.51
For details Auto Off Timer, ⇒ P.131
Power Switches
-
This machine has two power switches.
❖
Operation switch (right side of the operation panel)
Press this switch to activate the machine. When the machine has warmed up,
you can make copies.
“System settings”
“Energy Saver Mode”
.
.
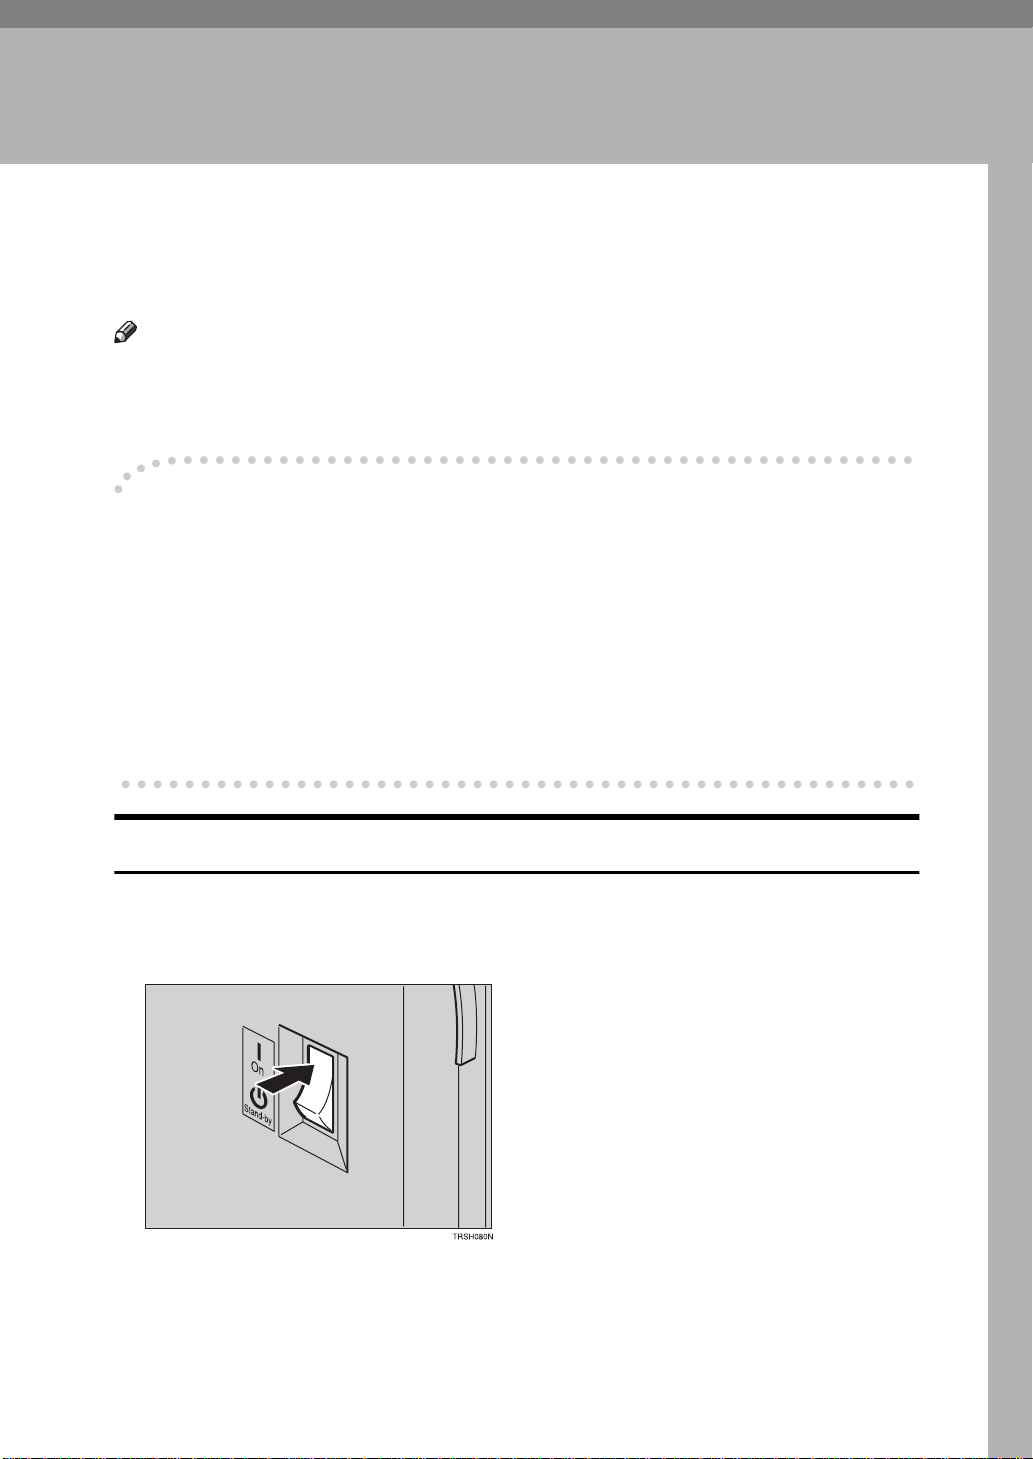
❖
Main power switch (left side of the machine)
When the machine is not to be used for an extended period of time, turn off
the main power switch.
Turning On the Main Power
A Make sure that the power cord is firmly plugged into the wall outlet.
B Turn on the main power switch.
13
Page 26
1
Basics
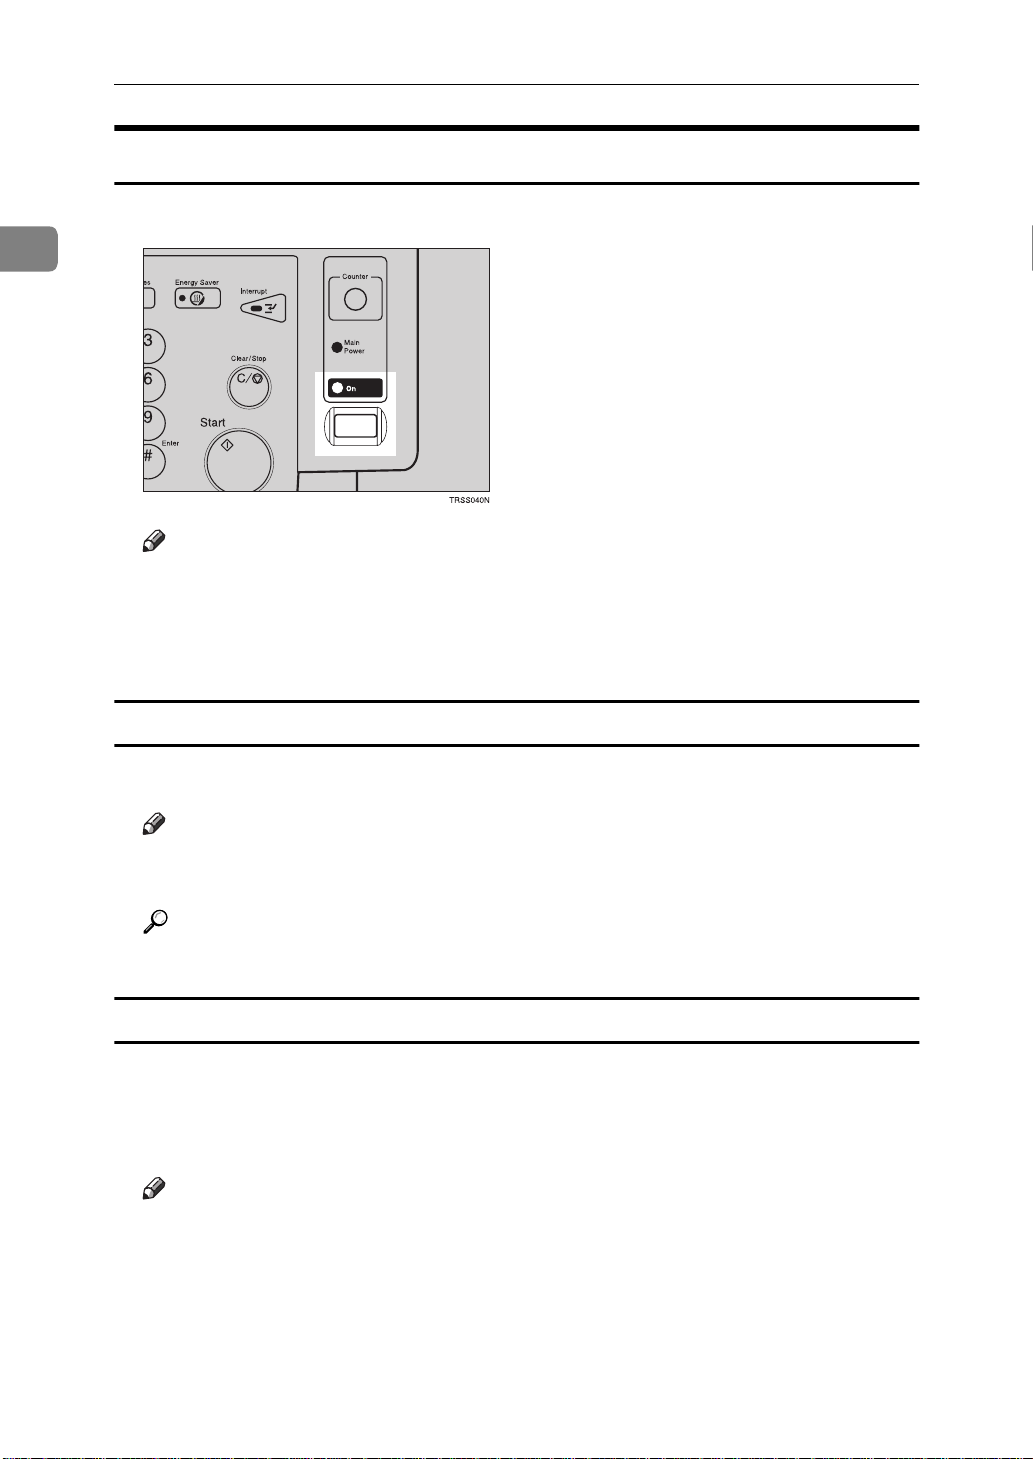
Starting the Machine
A Press the operation switch to make the On indicator go on.
Note
❒
If the power is not turned on when the operation switch is pressed, check
if the main power switch is on. If off, turn it on.
❒
During the warm-up period (about 7 minutes), you can use the Auto Start
function. ⇒ P.53
“Auto Start”
.
When the machine is set for user codes
A Enter your user code using the number keys. Then press the
Note
❒
To prevent others from making copies with your user code, press the
Modes
Reference
For more about user codes ⇒ P.136
key and the
}
Clear/Stop
{
key simultaneously after copying.
}
“General features”
.
#
{
When the Energy S aver indicator is lit
The machine is in Energy Saver mode.
A Press any key.
The machine will return to the ready condition.
Note
❒
The machine will also return to the ready condition when an original is set
in the document feeder, or when the platen cover or the document feeder
is opened.
key.
}
Clear
{
14
Page 27

Shutting down the machine
A Press the operation switch to make the On indicator go off.
Turning On the Power
Turning off the main power
A Turn off the main power switch.
The main power indicator of the operation panel goes off.
1
15
Page 28
Basics
Originals
1
Standard Size Originals
The machine will detect originals of the following sizes and directions as standard size originals:
❖
When you set originals on the exposure glass
Metric version
Inch version
❖
When you set orig inals in the document feeder
Metric version A3L, B4L, A4
Inch version
A3L, B4L, A4
11" × 17"L, 10" × 14"L, 8
11"
LK
390mmL, 195 × 267mm
" × 11"
2
A4
8" × 13"L, 8
LK
,11" × 17"L, 11" × 15"L, 10" × 14"L, 8
LK
LK
LK
1
/2" × 11"
, B5
, B5
LK
LK
LK
LK
1
/2" × 13"
, 8
1
/2" × 14"L, 81/2" × 13"L, 81/2" ×
, A5
LK
, 11" × 17"L, 8
, 8" × 10"L, 51/2" × 81/2"
L
, B6
LK
1
/2" × 13"L, 81/
1
, 267 ×
/2" × 14"L,
LK
Recommended Originals
Regarding originals that the document feeder can handle, ⇒ P.159
Feeder (Option)”
.
“Document
Non-recommended Originals for the Document Feeder
Note
❒
The following types of originals are not recommended for use with the document feeder. Place them directly on the exposure glass.
KL
2
, 34 lb
2
, 11 lb
1
, 5
/2" x 81/2"
2
, 11 and 14 lb, the document feeder
LK
• Originals thicker than 128g/m
• Originals thinner than 40g/m
• For originals between 40 and 52g/m
must be set to Thin Paper mode with the user tools.
• Originals larger than A3, 11" × 17"
• Originals smaller than B6
• Folded, curled, creased, or damaged originals
• Mailing labels, or perforated originals
• Bound, stapled, or clipped originals
16
Page 29

• OHP transparencies
• Translucent paper
• Pasted originals
Originals
• Damp originals
• Sticky originals
• Wavy originals
• Originals that are not made from paper
• Originals written in pencil on both sides, or two-sided carbon originals
• Thermal fax paper, CRO (camera ready originals) or aluminum foil
• Books, pamphlets, and booklets
1
17
Page 30
1
Basics
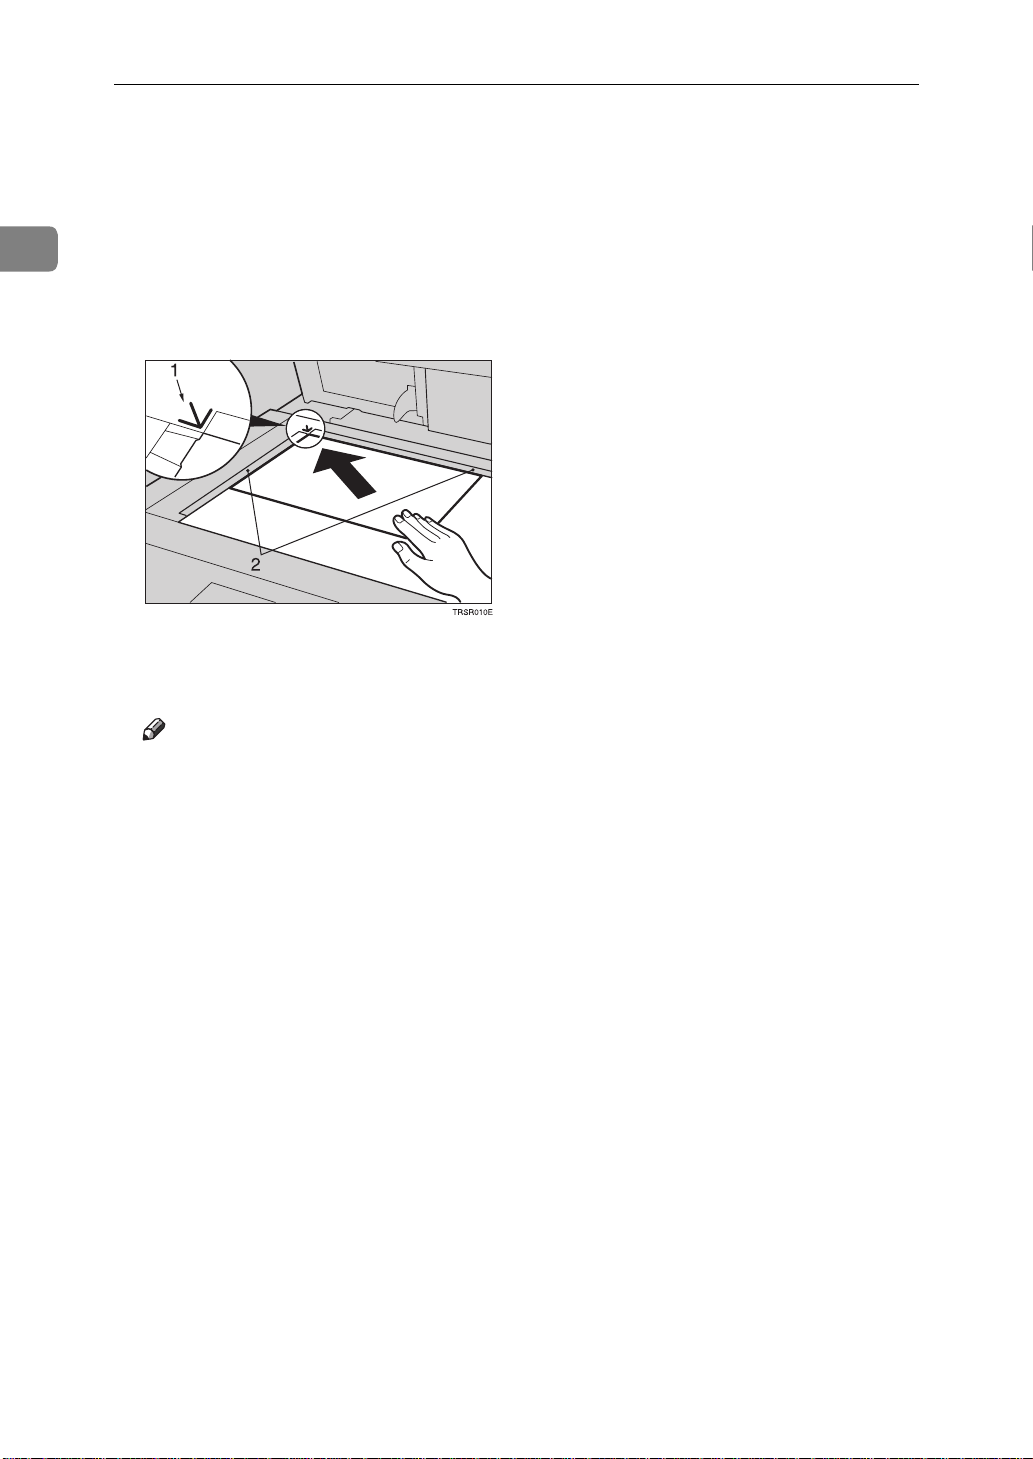
Setting Originals on the Exposure Glass
A Lift the platen cover or the document feeder.
B Set the original face down on the exposure glass. The original must be
aligned with the rear left corner.
1. Reference mark
2. Scale
Note
❒
Start with the first page to be copied.
C Lower the platen cover or the document feeder.
18
Page 31

Setting a Stack of Originals in the Document Feeder
Setting a Stack of Originals in the
Document Feeder
You can insert a stack of originals into the document feeder. These originals are
individually fed onto and removed from the exposure glass.
Note
❒
Some originals are unsuitable for the document feeder. ⇒ P.16
mended Originals for the Document Feeder”
❒
Do not press down or hold originals after inserting them.
❒
While originals are fed from the original table to the exposure glass, do not
pull them out.
❒
Do not lift the document feeder until the original has been completely fed out.
.
“Non-recom-
A Correct any curl, fold, or crease in the originals before setting the originals.
B Make sure the Insert Original indicator is lit and the exposure glass is clear
of originals.
1
C Adjust the guide to the original size.
D Set the originals face up into the document feeder until the Insert Original
indicator goes off.
19
Page 32

1
Basics
1. Limit mark
2. Original guide
Note
❒
The last page should be on the bottom.
❒
The original guide must touch the front side of the originals.
❒
Do not stack originals above the limit mark.
20
Page 33

Setting one Original at a Time in the Document Feeder
Setting one Original at a Time in the
Document Feeder
If you set one original at a time in the document feeder, the second and subsequent originals can be fed and copied automatically without pressing the
key.
Note
❒
Do not press down or hold originals after inserting them.
❒
While originals are fed from the original table to the exposure glass, do not
pull them out.
❒
Do not lift the document feeder until the original has been completely fed out.
Start
{
A Correct any curl, fold, or crease in the originals before setting them.
B Make sure the Insert Original indicator is lit and the exposure glass is clear
of originals.
1
}
C Adjust the guide to the original size.
D Set the original face up into the document feeder until the Insert Original
indicator goes off.
Note
❒
If you are copying a stack of originals one sheet at a time and you want to
keep them in order, start with the last page of the originals.
❒
The original guide must touch the front side of the original.
E Press the
{
Start
key.
}
21
Page 34

1
Basics
F While the Auto Feed indicator is lit after an original is fed, set the next orig-
inal. The original is automatically fed and copied.
Note
❒
You can adjust the time the machine waits before being ready for the next
original with the user tools.
22
Page 35

Setting Originals of Different Sizes in the Document Feeder
Setting Originals of Different Sizes in the
Document Feeder
Preparation
To use this function, you have to select ADF Mixed Sizes mode with the user
tools. ⇒ P.142
You can insert a stack of originals of different standard sizes (e.g. A4, B5 etc.) into
the document feeder. These originals are individually fed onto and removed
from the exposure glass.
Limitation
❒
The weight of originals that can be set with this function is 52 - 81g/m
20 lb.
❒
Smaller size originals might be skewed a little.
Note
❒
If your stack of originals contains pages of different sizes, make sure that:
• Longer originals are at the bottom of the stack, and shorter originals are at
the top.
• All originals are flush with the back fence of the document feeder.
“ADF/Sorter”
.
2
, 14 -
A Align the rear and left edges of the originals as shown in the illustration.
1
1. Document feeder feed direction
2. Vertical size
B Adjust the guide to the widest original size.
C Set the aligned originals face up into the document feeder.
23
Page 36

1
Basics
Setting Non-standard Size Originals
When copying from non-standard size originals, enter the original size so that
copy is well aligned.
Limitation
❒
You must set your non-standard size originals on the exposure glass.
Reference
For the standard sizes the machine can detect, ⇒ P.16
nals”
.
Note
❒
The dimensions you can enter must be within the following ranges:
Vertical size 50 - 297mm (in 1mm steps), 2.0" - 11.7" (in 0.1" steps)
Horizontal size 50 - 432mm (in 1mm steps), 2.0" - 17" (in 0.1" steps)
A Select the copy paper size.
“Standard Size Origi-
B Press the
Menu
{
key.
}
C Make sure that the
Custom Size Orig.
[
is selected, then press the
]
Select
[
key.
]
24
Page 37

Setting Non-standard Size Originals
D Enter the vertical original size with the number keys, then press the
key.
#
}
{
Note
❒
To change the value entered, press the
value.
Clear/Stop
{
key and enter the new
}
E Enter the horizontal original size with the number keys, then press the
key.
F Set your original on the exposure glass, then press the
{
Start
key.
}
>
OK
[
or
1
]
25
Page 38

Basics
Removing the Platen Cover to Copy a Large Original
1
You can remove the platen cover to copy a large (more than A3, 11" × 17") original.
Note
❒
You cannot remove the document feeder.
To remove the platen cover, lift it out.
Note
❒
Lift the platen cover with both hands. Place the removed cover on a flat surface, such as a desk, and where it will not be damaged.
To reset the platen cover, align the pins of the platen cover and the holes of the
copier. Then push the platen cover onto the copier.
26
Page 39

2. Copying
Basic Procedure
A Set your original on the exposure glass or in the document feeder.
B Make sure that the
lect), and
Note
❒
Auto Text / Photo. ⇒ P.35
❒
Auto Color Select. ⇒ P.30
❒
Auto Paper Select. ⇒ P.40
[
are selected.
100%
]
Auto Text/Photo
[
“Auto Text/Photo mode”
“Auto color selection mode”
“Auto paper select”
Auto Color Select
], [
], [
.
.
(Auto Paper Se-
Auto
]
.
C Enter the number of copies required using the number keys.
Note
❒
To change the number entered, press the
new number.
Clear/Stop
{
key, then enter the
}
27
Page 40

Copying
2
D Press the
Note
❒
To stop the machine during a multi-copy run, press the
❒
To return the machine to the initial condition after copying, press the
Modes
{
key.
}
Start
key.
}
Clear/Stop
{
key.
}
{
Clear
Adjusting Copy Image Density
Image density affects the contrast of copies. With these functions you can control
the image density so that copies match originals. Make the selection you require
then set your originals and press the
{
Start
key.
}
Auto image density
The machine automatically controls the image density.
Note
❒
Auto Image Density and Auto Color Select cannot be set together.
A If Auto Color Selection mode is selected, select other color modes to cancel
it. ⇒ P.30
B Press the
“Auto color selection mode”
Auto Image Density
{
key to light the Auto Image Density indicator.
}
.
28
Page 41

Basic Procedure
Manual image density
If you require darker or lighter copies, adjust the image density yourself.
A If the Auto Image Density indicator is lit, press the
to cancel it.
B Press the
(right) key to increase the image density.
Combined auto and manual image density
Use when copying originals with a dirty background (such as newspapers). You
can adjust the foreground density while masking out the dark background.
Lighter
{
(left) key to lower the image density. Press the
}
Auto Image Density
{
}
Darkers
{
key
A If Auto Color Selection mode is selected, select other color modes to cancel
it. ⇒ P.30
“Auto color selection mode”
.
}
2
B Press the
C Press the
Auto Image Density
{
Lighter
{
}
or
Darkers
{
key to light the Auto Image Density indicator.
}
key to adjust the density.
}
Selectin g a Color Mod e
Select a color mode that best suits your originals and copying requirements.
29
Page 42

2
Copying
Auto color selection mode
The machine automatically detects whether the original has color parts or not.
Originals containing only black images will be copied in Black mode. Originals
with some color areas will be copied in Full Color mode.
Note
❒
If you make one copy set of a black original using the document feeder, it is
recommended to select Black mode. If you choose Auto Color Selection
mode, the machine will reset the color selection for every original page, taking a long time to complete the job.
A Make sure that the Auto Color Selection indicator is lit.
Note
❒
If it is not, press the 12 keys to light the Auto Color Selection indicator.
B Set your originals, then press the
Full color copy mode
This function makes copies in full color.
Note
❒
You can adjust the overall color tone of copies. ⇒ P.95
{
Start
key.
}
“Color Balance”
.
30
Page 43

A Press the 12 keys to light the Full Color indicator.
Basic Procedure
2
B Set your originals, then press the
Black copy mode
This function makes copies in black.
{
Start
key.
}
A Press the 12 keys to light the Black indicator.
B Set your originals, then press the
Single color mode
{
Start
key.
}
This function makes copies in single colors.
Note
❒
You can choose one of the following colors: Red, Green, Blue, Yellow, Cyan,
Magenta, Yellow Green, Orange, Marine Blue, Beige, Pink, and Purple
31
Page 44

2
Copying
A Press the 12 keys to light the Single Color indicator.
B Select the color with the
Note
❒
You can select the color density level after pressing the
C Set your originals, then press the
Twin color mode
Two methods are available:
❖
Twin Color (Color Copy)
Reproduces black areas of the original in one selected color and areas in other
colors using the second selected color.
keys. Then press the
<>
Start
}
{
key.
OK
[
key.
]
Density
[
key.
]
32
Note
❒
You can have colored areas copied in one of the following colors: Red,
Green, Blue, Yellow, Cyan, Magenta, Yellow Green, Orange, Marine Blue,
Beige, Pink, and Purple.
❒
You can have Black areas copied in one of the following colors: Red, Green,
Blue, Yellow, Cyan, Magenta, Yellow Green, Orange, Marine Blue, Beige,
Pink, Purple, and Black.
❖
Twin Color (Red & Black)
Reproduces red areas of the original in red, and areas in other colors using
black.
Page 45

Note
❒
You cannot change the color.
Twin Color (Color copy)
A Press the 12 keys to light the Twin Color indicator.
Basic Procedure
2
B Press the
Colors
[
key.
]
C Select the color you want to copy in for the color parts of the original with
the
keys. Then press the
<>
OK
[
key.
]
33
Page 46

Copying
2
D Press the
[
Black
key.
]
E Select the color you want to copy in for the black parts of the original with
the
F Set your originals, then press the
keys. Then press the
<>
OK
[
key.
]
Start
{
key.
}
Twin Color (Red & Black)
Note
❒
If Color Sensitivity is set to wide, the machine recognizes orange or purple as
red. This adjustment affect Color Erase or Color Conversion. ⇒ P.98
Adjustment”
.
A Press the 12 keys to light the Twin Color indicator.
“Image
34
Page 47

Basic Procedure
B Press the
C Press the
Red&BK
[
OK
[
key.
]
key.
]
D Set your originals, then press the
Start
{
key.
}
2
Selecting the Original Image Type (Photo/Text)
To optimize the likeness between copies and originals, select an image type that
matches your originals.
Note
❒
You can adjust the readability of black lettering in colored areas, ⇒ P.98
age Adjustment”
.
Auto Text/Photo mode
This mode automatically detects the areas of your original containing text or
photographs. The text areas are copied using Text mode, and the photographs
are copied with Photo mode.
Note
❒
There are 3 types of Photo mode:
•
Press Print
[
Use when copying photographs or pictures that are printed on paper (e.g.
magazines).
•
Glossy Photo
[
Use when copying developed photographs.
:
]
:
]
“Im-
•
2nd Generation
[
Use when copying copies or originals generated by printers.
:
]
35
Page 48

Copying
2
A Make sure that the
B Press the
C Press the
Original
{
Photo Typ
[
}
Auto Text/Photo
[
key.
key.
]
appears on the display.
]
D Select the photo type with the
E Press the
OK
[
key.
]
F Set your originals, then press the
Text mode
This mode is suitable for copying originals consisting of characters, line diagrams, and letter, but not photograph images.
36
keys. Then press the
<>
key.
Start
}
{
OK
[
key.
]
Page 49

Basic Procedure
A Press the
B Select
Text
[
Original
{
with the
]
key.
}
keys. Then press the
<>
[OK]
2
key.
C Set your originals, then press the
{
Start
key.
}
Photo mode
This mode is suitable for copying originals consisting of pictures, photographs,
and screened letters/areas, but not solid letters.
Note
❒
There are 3 types of Photo mode:
•
Press Print
[
Use when copying photographs or pictures that are printed on paper (e.g.
magazines).
•
Glossy Photo
[
Use when copying developed photographs.
•
2nd Generation
[
Use when copying copies or originals generated by printers.
:
]
:
]
:
]
37
Page 50

Copying
2
A Press the
B Select
Photo
[
Original
{
with the
]
key.
}
<>
keys.
C Press the
Photo Typ
[
D Select the photo type with the
E Press the
OK
[
key.
]
key.
]
<>
F Set your originals, then press the
keys. Then press the
key.
Start
}
{
OK
[
key.
]
38
Page 51

Basic Procedure
Special orig inal mode
Use this function for originals written in marker pen, originals printed from inkjet printers, or maps.
A Press the
B Select
Special Orig.
[
Original
{
key.
}
with the
]
keys. Then press the
<>
[OK]
2
key.
C Select the original type with the
D Set your originals, then press the
keys. Then press the
<>
key.
Start
}
{
OK
[
key.
]
Selecting the Copy Paper Size
Select a suitable size of copy paper based on the original size and the reproduction ratio.
39
Page 52

2
Copying
Auto paper select
The machine automatically selects a suitable size of copy paper based on the
original size and the reproduction ratio.
Reference
Regarding functions that cannot be used together with this function, ⇒ P.103
“Combination Chart”
Note
❒
Sizes of certain originals might not be detected depending on the original size
and type. In this case, select the size manually.
.
A Make sure that the
is selected on the display.
Auto
[
]
Manual paper select
You can select the copy paper manually.
A Select the copy paper with the
Image Rotation
-
If the direction in which your original is set (landscape or portrait) is different
from that of the paper you are copying onto, this function rotates the original image by 90° and fits it on the copy paper. This function works when Auto Paper
Select or Auto Reduce/Enlarge is selected. ⇒ P.136
<>
keys.
“General features”
40
Note
❒
The following functions cannot be used.
•Centering
•Book → 1 Sided
• OHP Slip Sheet
Page 53
Basic Procedure
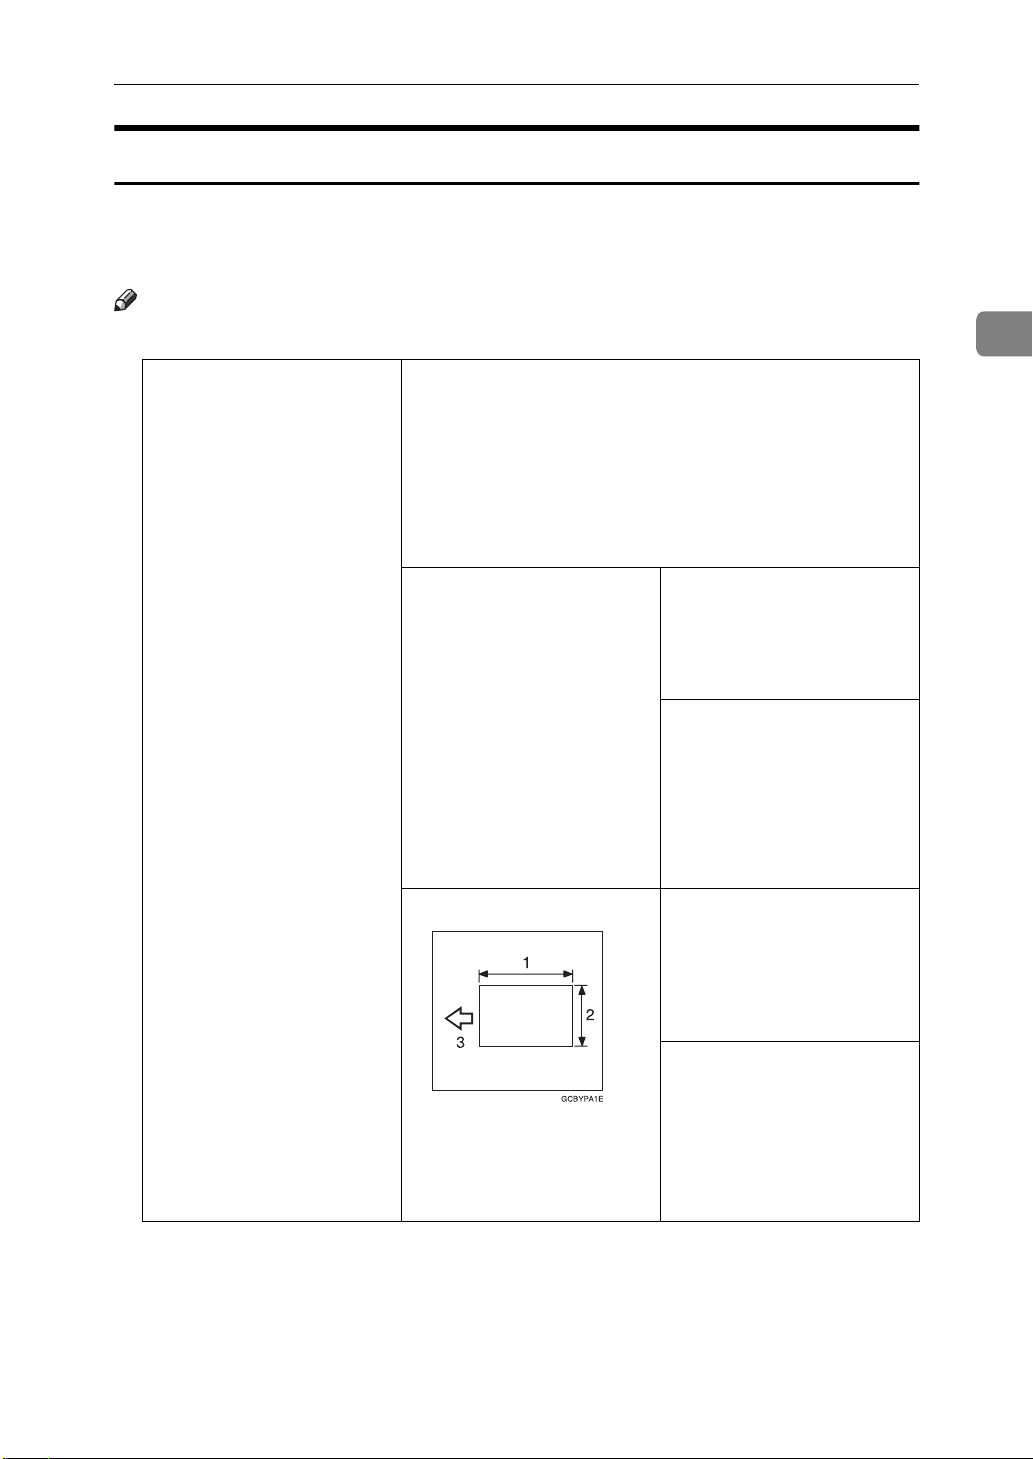
Copying from the Bypass Tray
Use the bypass tray to copy onto thick paper, adhesive labels, OHP transparencies, or non-standard size paper. Also use the bypass tray to copy onto the reverse side of paper that has already been copied onto.
Note
❒
The following limitations apply:
Acceptable paper types
Normal paper (52 - 105g/m
Thick paper (105 - 160g/m
Post cards
OHP transparencies
Adhesive labels
Translucent paper
Standard size Metric version:
2
, 14 - 28 lb)
2
, 28 - 43 lb)
: A3, B4, A4, B5, A5, B6,
L
A6, 12" × 18", 11" × 17"
1
: A4, B5, A5, 8
K
/2" × 11"
2
Non-standard size
1: Horizontal
2: Vertical
3: Feed direction
Inch version:
: 12" × 18", 11" × 17", 10"
L
×
14", 8" × 13", 8
1
/2" × 81/2"
5
1
/2" × 11", 51/2" × 81/
: 8
K
"
2
1
/2" × 11",
Metric version:
Vertical: 100 - 305mm (in
1mm steps)
Horizontal: 140 - 457mm
(in 1mm steps)
Inch version:
Vertical: 3.9" - 12.0" (in 0.1"
steps)
Horizontal: 5.5" - 18.0" (in
0.1" steps)
41
Page 54

Copying
2
Number of sheets that can
be set at one time
❒
Select one of the following settings or keys:
•
•
•
•
Normal
[
Thick
[
OHP
[
Duplex
[
: normal paper
]
: thick paper, post cards, adhesive labels, translucent paper
]
: OHP transparencies
]
: Use for copying onto the reverse side of paper that has been al-
]
ready copied onto. ⇒ P.48
•
Duplex Thick
[
160g/m
verse side of paper”
•
Custom
[
: Use for copying onto the reverse side of thick paper (105-
]
2
, 28-43 lb) that has been copied onto. ⇒ P.48
.
: Use to specify a non-standard sized. ⇒ P.44
]
standard size paper with the bypass tray”
❒
If the copy paper is bent, correct it before setting paper in the bypass tray. If
Normal paper: 50 sheets
Thick paper, OHP transparencies: 30 sheets (smaller
than 8" × 13"), 15 sheets (8" × 13" or larger)
Adhesive labels: 30 sheets
Translucent paper: 50 sheets
Post cards: 25 sheets
“Copying onto the reverse side of paper”
.
“Copying onto the re-
“Copying onto non-
.
the bend is not corrected, a paper misfeed might occur.
❒
When you copy onto OHP transparencies, you can select whether a blank slip
sheet is inserted between OHP transparencies.
❒
When you set several sheets at a time, fan them to get air between them before
loading.
❒
If the copy paper is curled, gently roll it to remove the curl.
❒
When you copy onto OHP transparencies, insert them with the copy side up.
❒
Do not stack copy paper above the limit mark.
❒
When setting non-standard size paper, be sure to set the size after pressing
the
Custom
[
key.
]
Copying onto standard size paper with the bypass tray
Note
❒
When you copy onto the reverse side of paper that has been already copied
onto, ⇒ P.48
“Copying onto the reverse side of paper”
42
.
Page 55

A Open the bypass tray.
Basic Procedure
2
B Select
C Press the
D If you selected
slip sheets are inserted between OHP transparencies with the
Normal
[
L
[
/
], [
K
[
or
Thick
]
key to select the paper direction.
]
in step 2, press the
OHP
]
OHP
[
with the
]
keys.
<>
key then select whether blank
[OK]
<>
keys.
Note
❒
If you select
and direction to the OHP transparencies set in the paper tray.
, make sure that the paper for slip sheets is identical in size
On
[
]
43
Page 56

Copying
2
E Press the
OK
[
key.
]
F Adjust the paper guides to the paper size.
1. Horizontal size
2. Vertical size
3. Extender
4. Paper guides
Note
❒
Make sure the paper size and direction in the bypass tray is displayed on
the operation panel.
❒
Make sure that the paper guides match the paper size. If the paper guides
are not adjusted to the paper size properly, paper might be skewed or paper misfeed might occur.
❒
With large copy paper (more than A4L, 8
tender.
1
/
" × 11"
2
L
), swing out the ex-
G With the side you wish to copy onto face up, insert the paper into the by-
pass tray until it stops.
H Set your originals, then press the
Copying onto non-standard size paper with the bypass tray
Preparation
You can register non-standard paper sizes you use often in keys
[
Custom2
Note
❒
Be sure to set the paper size or a paper misfeed might occur.
, and
]
Custom3
[
with the user tools. ⇒ P.131
]
{
Start
key.
}
“System settings”
A Open the baypass tray.
44
Custom1
[
.
,
]
Page 57
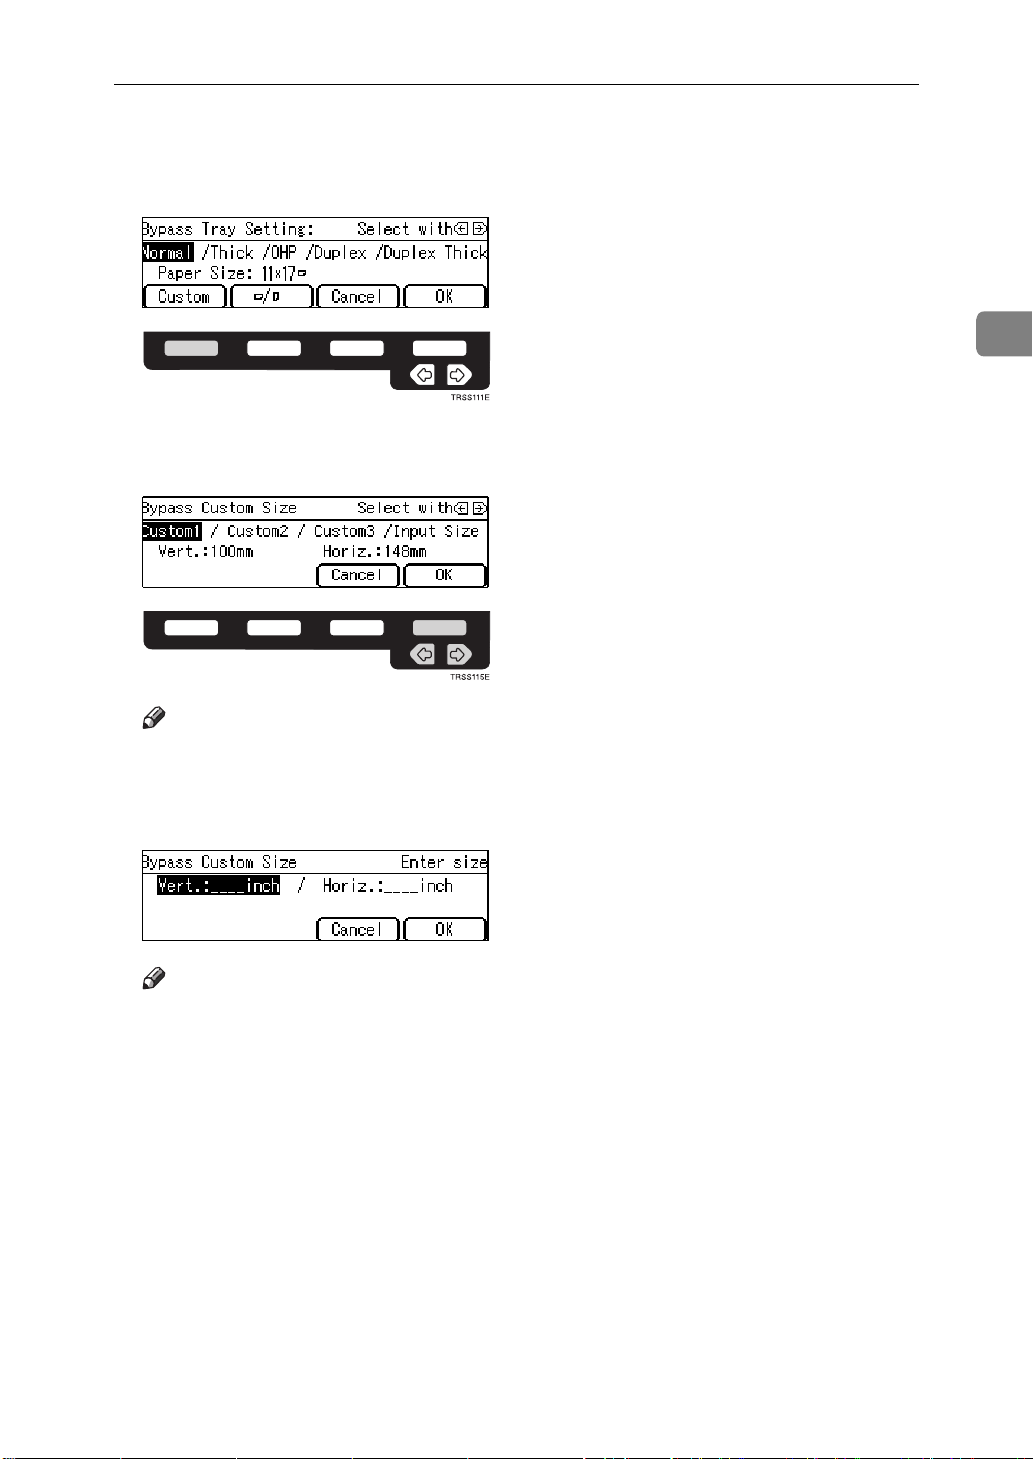
Basic Procedure
B Select one of desired paper types or settings with the
], [
key.
]
key.
]
Custom2
Custom1
[
Custom3
], [
Custom2
], [
]
or
or
]
Input Size
[
Custom3
[
with the
]
, go to step H.
]
C Press the
D Select
press the
❒
Custom1
[
Note
If you selected
Custom
[
OK
[
<>
keys.
keys. Then
<>
2
E If you selected
number keys, then press the > or
Note
❒
To change the value entered, press the
value.
Input Size
[
in step D, enter the vertical paper size with the
]
key.
#
[
]
Clear/Stop
{
key and enter the new
}
F Enter the horizontal paper size with the number keys, then press the
key.
G Press the
OK
[
key.
]
H Adjust the paper guides to the paper size.
OK
[
]
45
Page 58

2
Copying
1. Horizontal size
2. Vertical size
3. Extender
4. Paper guides
Note
❒
Make sure that the paper guides match the paper size. If the paper guides
are not adjusted to the paper size properly, paper might be skewed or paper misfeed might occur.
I With the side you wish to copy onto face up, insert the paper into the by-
pass tray.
J Set your originals, then press the
Making A3, 11" × 17" full bleed copies
By sliding the paper guides of the bypass tray to greater than A3 (11") size, A3,
11" × 17" full bleed copying mode is automatically selected.
In this mode, you can make A3, 11" × 17" full bleed copies with 12" × 18" paper.
This is useful for making A3, 11" × 17" size copies with a colored background
(e.g. catalogues).
{
Start
key.
}
46
Page 59

1. A3, 11" × 17" size Original
Basic Procedure
2
2. In standard copy mode, margins
appear on copies
3. 12" × 18" Full Bleed Copy
4. Cut around the margins to pro-
duce a full image
Note
❒
This function can be used with 12" × 18" paper.
❒
When A3, 11" × 17" full bleed copying mode is selected, the paper direction is
automatically changed to widthwise L.
❒
When A3, 11" × 17" full bleed copying is made, the original image is copied
onto the center.
By sliding the paper guides of the bypass tray, the machine enters A3, 11" × 17"
full bleed copying mode automatically.
47
Page 60

2
Copying
A Pull up the blue tab.
B Leaving the blue tab up, slide the paper guides until they stop.
Note
❒
Make sure that the paper guides match the paper size.
❒
Be sure to return the blue tab to its original position before you close the
bypass tray. If you do not return it correctly, the bypass tray might not
close properly.
Copying on to th e reverse side of paper
You can copy onto the reverse side of paper that has been already copied onto.
Note
❒
If you want to copy onto thick paper (105-160g/m
.
Thick
]
❒
Make sure that you set your original and the copy paper in the correct direction to achieve the results you require.
2
, 28-43 lb), select
Duplex
[
48
Page 61

Basic Procedure
Original set
on the exposure
glass
Copy paper
set on the
bypass tray
Copies
2
❒
You cannot use this function for OHP transparencies, translucent paper, adhesive labels and postcards.
❒
Do not use copy paper that has been already copied onto by other machines.
❒
If the copy paper is bent, correct it before setting paper in the bypass tray. If
the bend is not corrected, a paper misfeed might occur.
A Open the bypass tray.
49
Page 62

Copying
2
B Select
❒
Duplex
[
Note
To copy onto non-standard size paper, press the
enter the size. For details, ⇒ P.44
the bypass tray”
C Press the
OK
[
, or
Duplex Thick
]
[
.
key.
]
with the
]
“Copying onto non-standard size paper with
<>
keys.
Custom
[
key and select or
]
D Adjust the paper guides to the paper size.
Note
❒
Make sure that the paper guides match the paper size. If the paper guides
are not adjusted to the paper size properly, paper might be skewed or paper misfeeds might occur.
E Insert the paper into the bypass tray.
Note
❒
Make sure that front side (the side that has been copied onto) faces down.
F Set your originals, then press the
{
Auto Reduc e/E nla rge
The machine can select the proper reproduction ratio based on the selected paper size and the original size.
Start
key.
}
50
Page 63

Basic Procedure
Note
❒
Regarding functions that cannot be used together with this function, ⇒ P.103
“Combination Chart”
Example:
• Metric version:
original: A3
copy paper: A4
• Inch version:
original: 11" × 17"
copy paper: 8
L
1
L
/
" × 11"
2
.
L
L
2
A Press the
Auto Reduce/Enlarge
[
key.
]
B Set your originals.
C Choose your copy paper size (e.g. A4
D Press the
lected copy paper.
{
key. The original image is enlarged or reduced to fit the se-
Start
}
L
, 81/
" × 11"
2
Energy Saver Mode
If you do not operate the machine for a certain period after copying, or when you
press and hold the
blank and the machine enters Energy Saver mode. When you press the
Saver
platen cover or document feeder is opened, the machine returns to the ready
condition. In Energy Saver mode, the machine uses less electricity.
key again, when the originals are set in the document feeder, or when the
}
Energy Saver
{
key for more than one second, the display goes
}
L
).
Energy
{
51
Page 64

Copying
2
A Hold down the
Saver mode.
Note
❒
To exit this mode, press the
Energy Saver
{
key more than one second to enter Energy
}
Energy Saver
{
key again.
}
Auto Off Mode
This machine automatically turns itself off 60 minutes after the last copy or print
job has finished. If you wish to make copies when the machine is in Auto Off
mode, press the operation switch.
Reference
For how to change the default interval that the machine waits before entering
Auto Off mode, see “Auto Timer” ⇒ P.131
“System settings”
.
Interrupt Copying
Use the
copies.
Reference
Regarding functions that cannot be used together with this function, ⇒ P.103
“Combination Chart”
Interrupt
{
key to interrupt a multicopy run and make urgently needed
}
.
52
Page 65

Basic Procedure
A Press the
present settings in memory before returning to the ready condition.
Interrupt
{
key. The machine will stop the copy run and store the
}
B Remove the previous originals. Set your originals for interrupt copying on
the exposure glass or in the document feeder.
C Make your copies.
D After interrupt copying is completed, press the
machine will recall the previous copy settings.
E Reset the previous originals and press the
ous run.
Start
{
Interrupt
{
key to resume the previ-
}
key again. The
}
2
Auto Start
If you press the
and the machine will start copying after the warm-up period.
{
key during the warm-up period, the
Start
}
{
A Set your copy settings during the warm-up period.
B Press the
Note
❒
To cancel Auto Start, press the
{
Start
key.
}
Clear/Stop
{
key.
}
key will blink
Start
}
53
Page 66

Copying
Program
You can store up to five frequently used copy job settings in machine memory
and recall them for future use.
Storing your settings
2
A Set the copy settings you want to put into memory.
key.
]
key.
}
B Press the
C Press the
Program
{
Store
[
D Select the program number you want to store the settings in with the
54
keys. Then press the
Note
❒
If this program number is already used, the machine asks whether you
wish to overwrite it or not. Press the
OK
[
key.
]
Yes
[
or
]
[No]
key.
<>
Page 67

Recalling your settings
Basic Procedure
A Press the
Program
{
key.
}
B Select the program number you want to recall with the
<>
2
keys.
Note
❒
Only programs with m contain a program.
C Press the
The stored settings are displayed.
OK
[
key.
]
D Set your originals, then press the
Deleting a program
A Press the
Program
{
key.
}
Start
{
key.
}
55
Page 68

Copying
2
B Press the
Delete
[
key.
]
C Select the program number that contains the program you wish to delete
with the
D Press the
keys. Then press the
<>
key.
Yes
[
]
[
OK
key.
]
56
E Press the
Exit
[
key.
]
Page 69

Check Modes
Basic Procedure
By pressing the
selected.
Note
❒
You can check the following modes:
•Book → 1 Sided
• 2 Sided → 1 Sided
•Combine
• Margin Adjustment
•Centering
Check Modes
{
key, you can see at a glance the modes you have
}
2
•Cover
• Color Conversion
• Color Erase
• Mirror
• Positive/Negative
• Bypass Feed Copying
57
Page 70

Copying
Counter
2
By pressing the
Counter
{
key, you can check the machine's counter.
}
58
Page 71

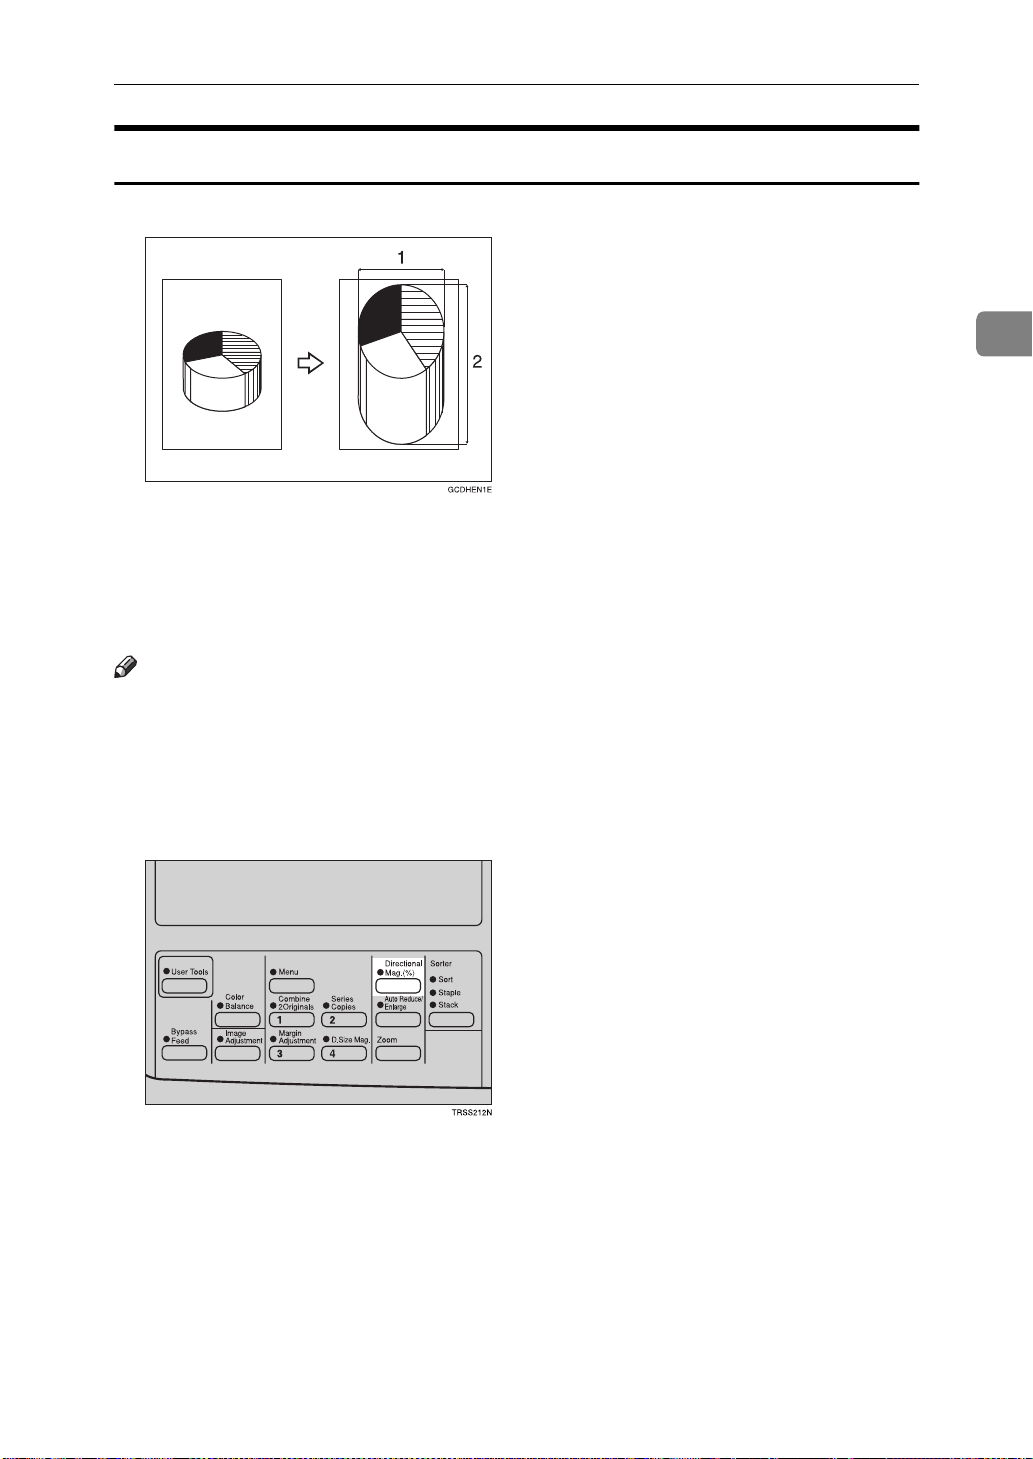
Reduce/Enlarge
Reduce/Enlarge
Preset R/E
Reference
Regarding functions that cannot be used together with this function, ⇒ P.103
“Combination Chart”
.
2
Note
❒
You can add up to two preset ratios with the user tools. ⇒ P.136
tures”
.
❒
You can select a ratio regardless of the size of an original or copy paper. With
some ratios, parts of the image might not be copied or margins will appear on
copies.
❒
To return to 100%, press the
Reducing
A Press the
[
Ratio
key.
]
[
100%
key.
]
“General fea-
59
Page 72

Copying
2
B Press the
C Press the
Reduce
[
OK
[
or < key to select the reducing ratio.
]
key.
]
D Set your originals, then press the
Enlarging
A Press the
[
Ratio
key.
]
Start
{
key.
}
B Press the
C Press the
Enlarge
[
OK
[
or > key to select the enlarging ratio.
]
key.
]
D Set your originals, then press the
Start
{
key.
}
60
Page 73
Reduce/Enlarge
Zoom
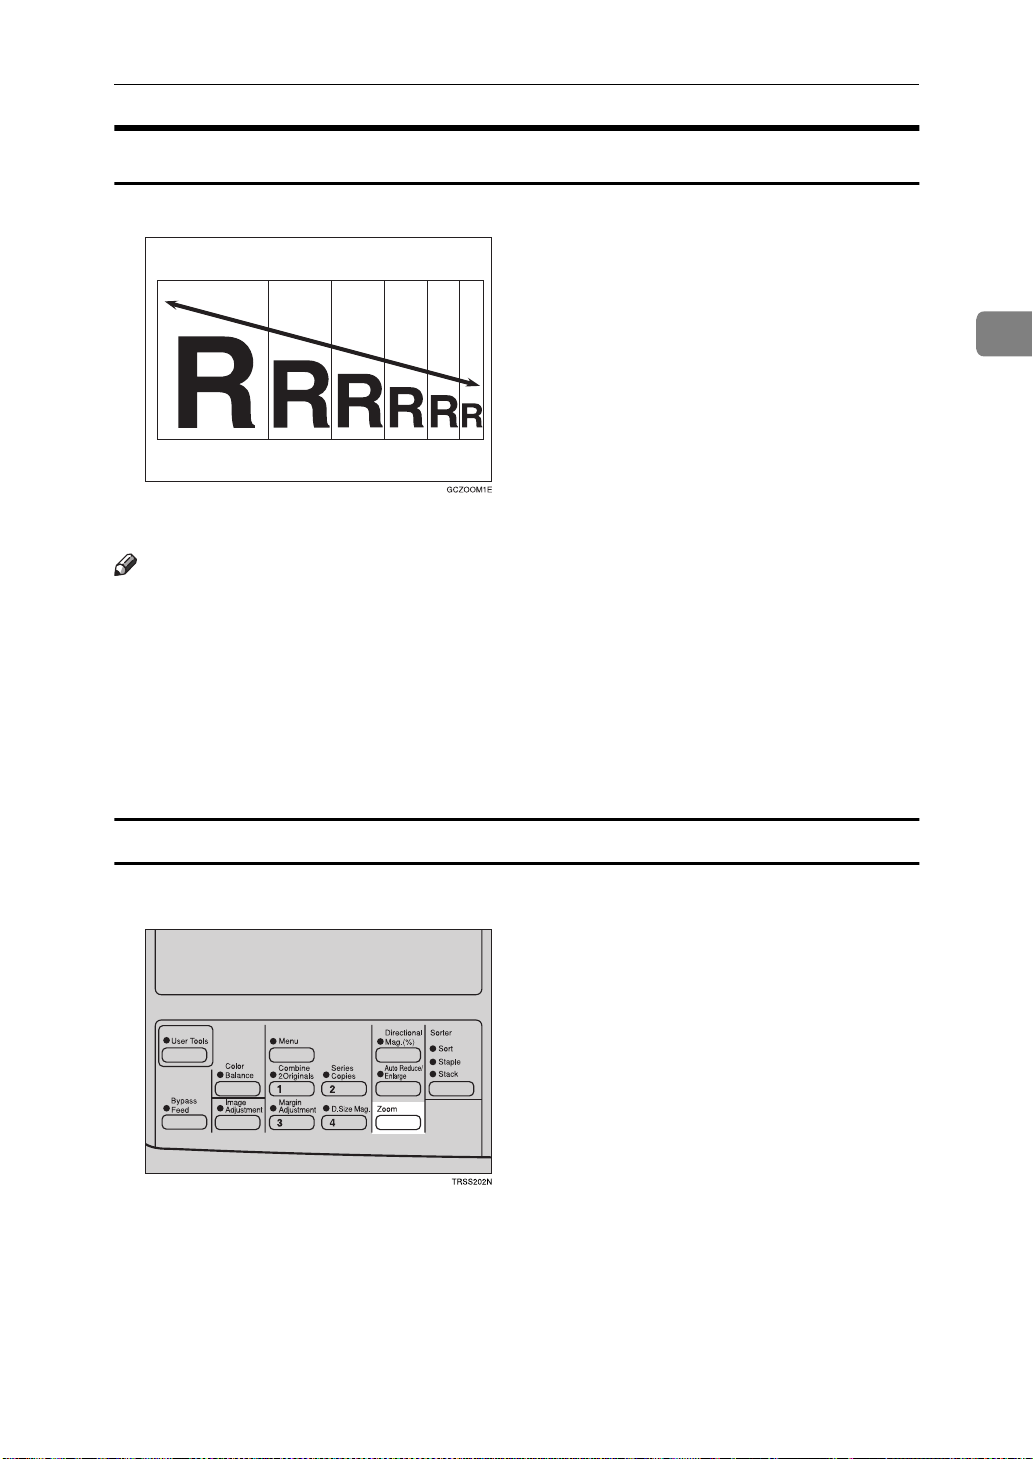
You can change the reproduction ratio from 25% to 400% in 1% steps.
Note
❒
You can select a ratio regardless of the size of an original or copy paper. With
some ratios, parts of the image might not be copied or blank margins will appear on copies.
❒
To return to 100%, press the
❒
You can select a preset ratio which is near the desired ratio, then press the
Zoom
{
❒
There are two ways to set the ratios.
key and adjust the ratio with the
}
[
100%
key.
]
or
[-]
key.
+
[
]
2
Using the [-] and [+] keys
A Press the
Zoom
{
key.
}
61
Page 74

Copying
2
B Adjust the reproduction ratio with the
C Press the
D Set your originals, then press the
Using the number keys
A Press the
OK
[
Zoom
{
key.
]
key.
}
Start
{
+
[
]
key.
}
or
[-]
key.
B Enter the reproduction ratio with the number keys.
C Press the
D Set your originals, then press the
62
OK
[
key.
]
Start
{
key.
}
Page 75
Reduce/Enlarge
Directional Magnification (%)
1. Horizontal %
2. Vertical %
Copies can be reduced or enlarged at different reproduction ratios horizontally
and vertically.
2
Note
❒
You can select the ratio from 25% to 400%.
❒
You can select a ratio regardless of the size of an original or copy paper. With
some ratio, parts of the image will not be copied or blank margins will appear
on copies.
A Press the
Directional Mag.(%)
{
key.
}
63
Page 76

Copying
2
B Enter the vertical ratio with the number keys, or the
Note
❒
To change the ratio entered, press the
ratio.
C Press the
>
or
#
[
key.
]
Clear/Stop
{
+][-
[
key and enter the new
}
D Enter the horizontal ratio with the number keys or the
keys.
]
+][-
[
keys.
]
E Press the
F Set your originals, then press the
OK
[
key.
]
Start
{
}
Directional Size Magnification (inch)
key.
64
Page 77

Reduce/Enlarge
1. Horizontal original size
2. Vertical original size
3. Horizontal copy size
4. Vertical copy size
The suitable reproduction ratios will be automatically selected when you enter
the horizontal and vertical lengths of the original and copy image you want.
Note
❒
You can enter sizes within the following ranges:
Metric Version 1 - 999mm (in 1mm steps)
Inch Version 0.1" - 99.9" (in 0.1" steps)
❒
If the calculated ratio is over the maximum or under the minimum ratio, it is
corrected within the range of the ratio automatically. However, with some ratios, parts of the image might not be copied or blank margins will appear on
copies.
2
A Press the
Note
❒
If you have assigned the Directional Size Magnification (inch) function to
one of the
the
B Press the
{
Favorite
{
↓
[
Menu
key.
}
Favorite
{
keys, ⇒ P.144
}
key until
Next
]
keys, press it and go to step D. To assign a function to
}
“Set favorite keys”
D. Size Mag. (inch)
[
.
is displayed.
]
65
Page 78

Copying
2
C Select
D. Size Mag. (inch)
[
with the
]
keys, then press the
<>
Select
[
key.
]
D Enter the vertical original size with the number keys, then press the
key.
#
[
]
Note
❒
To change the value entered:
• If you have not pressed the > or
enter a new value.
• If you have already pressed the > or
key and enter the new value.
<>
#
[
]
key yet, press the
key, select
#
[
]
Orig.:Vert.
[
{
Clear
key and
}
with the
]
>
or
E Enter the vertical copy paper size with the number keys, then press the
or
key.
#
[
]
Note
❒
If you press the
the horizontal ratio will become same as the vertical ratio automatically.
key after entering the vertical original and paper sizes,
OK
[
]
F Enter the horizontal original size with the number keys, then press the
or
key.
#
[
]
>
>
G Enter the horizontal copy paper size with the number keys, then press the
key.
#
[
]
H Press the
I Set your originals, then press the
OK
[
key.
]
Start
{
key.
}
66
Page 79
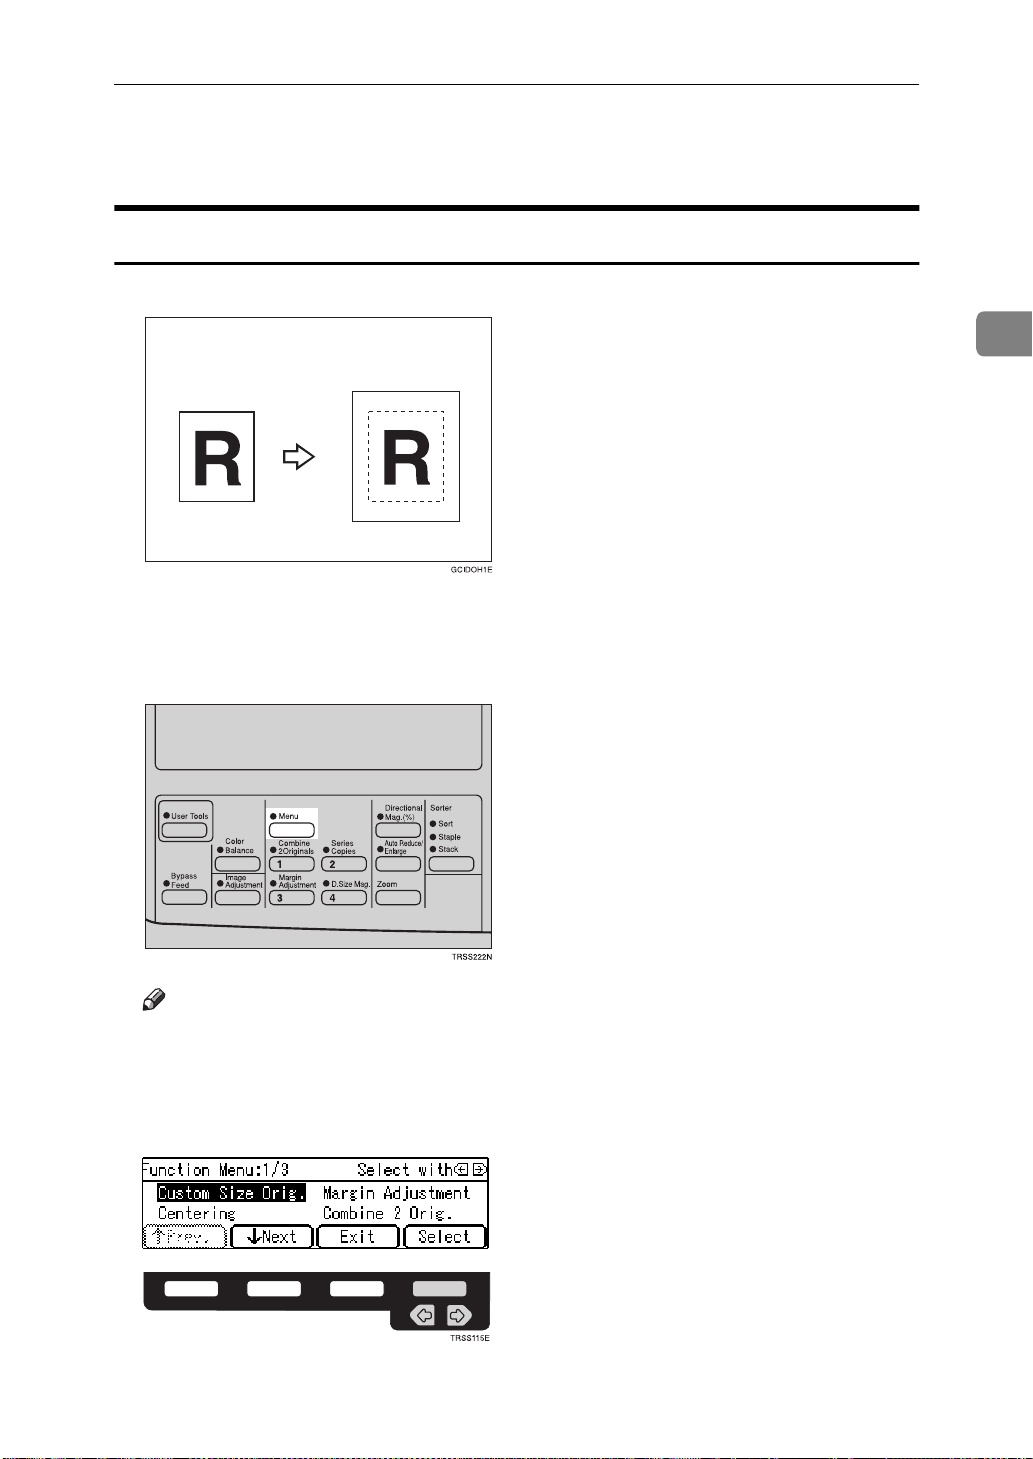
Shifting the Image
Shifting the Image
Centering
You can move the image to the center. This function is convenient when the copy
paper is larger than the original.
2
A Press the
Note
❒
If you have assigned the Centering function to one of the
press it and go to step D. To assign a function to the
“Set favorite keys”
B Select
Menu
{
Centering
[
key.
}
.
with the
]
keys. Then press the
<>
Favorite
{
Select
[
Favorite
{
keys, ⇒ P.144
}
key.
]
}
keys,
67
Page 80

Copying
2
C Press the
Exit
[
key.
]
D Select the copy paper size.
E Set your originals, then press the
{
Margin Adjustment
You can make a margin by shifting the image to the left or right. This function is
convenient when you want to bind copies.
Start
key.
}
Note
❒
You can change the width of the binding margin as follows.
Metric Version 0 - 20mm (in 1mm steps)
Inch Version 0" - 0.8" (in 0.1" steps)
❒
The margin width default is as follows. You can change this default setting
with the user tools. ⇒ P.136
Metric Version 10mm Left
Inch Version 0.4" Left
❒
If you set too wide a margin, areas you do not want to delete might be erased.
Reference
Regarding function that cannot be used together with this function, ⇒ P.103
“Combination Chart”
.
“General features”
.
68
Page 81

Shifting the Image
A Press the
Note
❒
If you have assigned the Margin Adjustment function to one of the
ite
}
keys, ⇒ P.144
B Select
Menu
{
keys, press it and go to step C. To assign a function to the
Magin Adjustment
[
key.
}
“Set favorite keys”
with the
]
.
keys. Then press the
<>
Select
[
Favor-
{
Favorite
{
key.
]
2
}
C Select
enter the desired margin width with the number keys.
Note
❒
To change the value entered, press the
value.
D Press the
E Set your originals, then press the
(left margin) or
Left
[
]
key.
OK
[
]
Right
[
(right margin) with the
]
Clear/Stop
{
key.
Start
}
{
keys. Then
<>
key and enter the new
}
69
Page 82

2
Copying
Series Copies
Book → 1 Sided
This function makes one-sided copies from two facing pages of bound (book)
originals.
Reference
Regarding functions that cannot be used together with this function, ⇒ P.103
“Combination Chart”
A Press the
Note
❒
If you have assigned the Series Copies function to one of the
keys, press it and go to step D. To assign a function to the
⇒ P.144
Menu
{
“Set favorite keys”
key.
}
.
Favorite
{
Favorite
{
.
keys,
}
}
70
Page 83

Series Copies
B Press the
C Make sure that
Note
❒
If your machine do not have the document feeder, go to step E.
↓
[
Next
]
[
key until
Series
is selected, then press the
]
Series
[
is displayed.
]
Select
[
key.
]
2
D Make sure that
Book → 1 Sid ed
[
is selected, then press the
]
E Select the copy paper size.
F Set your originals, then press the
{
2 Sided → 1 Sided
The optional document feeder is required to use this function.
Start
key.
}
[OK]
key.
71
Page 84

2
Copying
Reference
Regarding functions that cannot be used together with this function, ⇒ P.103
“Combination Chart”
.
A Press the
Note
❒
If you have assigned the Series Copies function to one of the
keys, press it and go to step D. To assign a function to the
⇒ P.144
B Press the
Menu
{
↓
[
key.
}
“Set favorite keys”
key until
Next
]
.
Series
[
is displayed.
]
Favorite
{
Favorite
{
keys,
}
}
72
Page 85

Series Copies
C Make sure that
D Select
2 Sided→1 Sided
[
Series
[
is selected, then press the
]
with the
]
keys, then press the
<>
Select
[
key.
]
E Select the copy paper size.
F Set your originals in the document feeder, then press the
[OK]
Start
{
key.
key.
}
2
Combine
The optional document feeder is required to use this function.
This function automatically combines 2 one-sided originals onto one copy.
Note
❒
You cannot use the bypass tray with this function.
❒
If the original size and direction is set differently, you cannot use the Combine
function.
73
Page 86

Copying
❒
When you use the Combine function, Auto Reduce/Enlarge is selected automatically.
Reference
Regarding functions that cannot be used together with this function, ⇒ P.103
“Combination Chart”
.
2
A Press the
Note
❒
If you have assigned the Combine 2 Originals function to one of the
ite
}
keys, ⇒ P.144
B Select
Menu
{
keys, press it and go to step C. To assign a function to the
Combine 2 Orig.
[
key.
}
“Set favorite keys”
with the
]
.
keys, then press the
<>
Select
[
{
key.
]
Favor-
{
Favorite
}
C Select the copy paper size.
D Set your originals in the document feeder, then press the
74
Start
{
key.
}
Page 87

Cover Sheet
Front Cover
The optional document feeder is required to use this function.
Cover Sheet
2
Note
❒
The cover sheets should be identical in size and direction with the copy paper.
❒
The cover sheets should be fed from the bypass tray.
❒
The covers are copied in Thick Paper mode.
Reference
Regarding functions that cannot be used together with this function, ⇒ P.103
“Combination Chart”
A Press the
Note
❒
If you have assigned the Cover Sheet function to one of the
press it and go to step D. To assign a function to the
“Set favorite keys”
Menu
{
key.
}
.
Favorite
{
Favorite
{
.
keys, ⇒ P.144
}
keys,
}
75
Page 88

Copying
2
B Press the
C Select
↓
Next
[
Co ver S heet
[
D Make sure that
key until
]
with the
]
Front Cover
[
Cover Sheet
[
<>
is selected, then press the
]
is displayed.
]
keys, then press the
Select
[
[OK]
key.
]
key.
E Select orientation of the copy paper and cover sheets with the
then press the
OK
[
key.
]
F Set cover sheets into the bypass tray.
G Set your originals in the document feeder.
Start
key.
}
76
H Press the
{
<>
keys,
Page 89

Front & Back Covers
The optional document feeder is required to use this function.
❖
Back Cover: Cop y
❖
Back Cover: Bla n k
Cover Sheet
2
Note
❒
You can specify whether to make a copy on a back cover sheet. If you select
, the last page will be copied on the back cover sheet. If you select
Copy
]
[
❒
Blank
[
, a cover sheet will just be inserted after the last copy.
]
The cover sheets should be identical in size and direction with the copy paper.
❒
The cover sheets should be fed from the bypass tray.
❒
The covers are copied in Thick Paper mode.
❒
If Blank Cover mode is selected, the back cover will not be counted as a copy.
Reference
Regarding functions that cannot be used together with this function, ⇒ P.103
“Combination Chart”
.
77
Page 90

Copying
2
Next
}
]
key.
.
key until
Cover Sheet
[
is displayed.
]
A Press the
Note
❒
If you have assigned the Cover Sheet function to one of the
press it and go to step D. To assign a function to the
“Set favorite keys”
B Press the
Menu
{
↓
[
Favorite
{
Favorite
{
keys, ⇒ P.144
}
keys,
}
78
C Select
D Select
Co ver S heet
[
Front & Back Cover
[
with the
]
<>
with the
]
keys, then press the
keys, then press the
<>
Select
[
key.
]
[OK]
key.
Page 91

Cover Sheet
E Specify whether to copy on back cover sheets with the
press the
OK
[
key.
]
<>
F Select orientation of the copy paper and cover sheets with the
then press the
OK
[
key.
]
G Set cover sheets into the bypass tray.
keys, then
keys,
<>
2
H Set your originals in the document feeder.
I Press the
{
Start
key.
}
79
Page 92

2
Copying
Color Creation
Color Conversion
This function converts a selected color of an original into a different color on the
copy.
Note
❒
Up to 4 colors can be converted at one time.
❒
Colors that can be converted: Red, Green, Blue, Yellow, Cyan, Magenta,
Black, and White
❒
Colors you can convert to: Red, Green, Blue, Yellow, Cyan, Magenta, Yellow
Green, Orange, Marine Blue, Beige, Pink, Purple, and Black
❒
This function can be made more or less sensitive to the color to be converted.
It can be adjusted within five levels from “Narrow” to “Wide”. ⇒ P.141
age adjustment”
“Narrow” will result in only red being converted, and “Wide” will result in
other colors close to red being converted.
❒
This function can be used in Full Color mode.
. For example, if red is selected as the color to be converted,
“Im-
A Press the
Note
❒
If you have assigned the Color Conversion function to one of the
keys, press it and go to step D. To assign a function to the
⇒ P.144
Menu
{
key.
}
“Set favorite keys”
.
Favorite
{
Favorite
{
keys,
}
}
80
Page 93

Color Creation
B Press the
C Select
↓
[
Color Conversion
[
Next
]
key until
Color Conversion
[
with the
]
is displayed.
]
keys, then press the
<>
D Select the original color (color to be converted) with the
press the
OK
[
key.
]
Select
[
<>
key.
]
keys, then
2
E Select the new color (color to convert to) with the
<>
F If you want to select the color density level, press the
keys.
Density
[
key.
]
81
Page 94

Copying
2
G Select the level with the
H Press the
OK
[
key.
]
keys. Then press the
<>
I If you want to convert more than one color, press the
steps D to H.
Note
❒
Repeat step I until you have finished designating colors.
❒
If you pick the wrong color, press the
Delete
[
key.
]
OK
[
[
key.
]
key. Then repeat
Add
]
J Press the
K Set your originals, then press the
OK
[
key.
]
Start
{
key.
}
Color Erase
This function erases a selected color from the original image.
Note
❒
Up to 4 colors can be erased at one time.
❒
Colors that can be erased: Red, Green, Blue, Yellow, Cyan, Magenta, and
Black
❒
This function can be made more or less sensitive to the color to be erased. It
can be adjusted within five levels from “Narrow” to “Wide”. ⇒ P.141
adjustment”
will result in only red being, and “Wide” will result in other colors close to
red being erased.
82
. For example, if red is selected as the color to be erased, “Narrow”
“Image
Page 95

Color Creation
Next
}
]
key.
.
key until
Color Erase
[
is displayed.
]
A Press the
Note
❒
If you have assigned the Color Erase function to one of the
press it and go to step D. To assign a function to the
“Set favorite keys”
B Press the
Menu
{
↓
[
Favorite
{
Favorite
{
keys, ⇒ P.144
}
keys,
}
2
C Select
Color Erase
[
with the
]
keys, then press the
<>
D Select the color to be erased with the
keys, then press the
<>
Select
[
key.
]
[
OK
key.
]
83
Page 96

Copying
2
E If you want to erase more than one color, press the
step D.
Note
❒
Repeat step E until you have finished designating colors.
❒
If you pick the wrong color, press the
F Press the
OK
[
key.
]
G Set your originals, then press the
Start
{
Delete
[
key.
}
key.
]
key. Then repeat
Add
[
]
84
Page 97

Image Creation
Mirror
This function makes a mirror image copy of the original.
Note
❒
Set the original as below when setting on the exposure glass.
Image Creation
2
A Press the
Menu
{
key.
}
85
Page 98

Copying
Note
❒
If you have assigned the Mirror function to one of the
it and go to step D. To assign a function to the
favorite keys”
.
Favorite
{
Favorite
{
keys, ⇒ P.144
}
keys, press
}
“Set
2
B Press the
C Make sure that
↓
[
Next
]
[
key until
Mirror
is selected, then press the
]
Mirror
[
D Set your originals, then press the
Positive/Negative
is displayed.
]
key.
Start
}
{
Select
[
key.
]
This function copies the original image in complementary colors. If you use a
black and white original, black and white areas of the original are reversed.
86
Page 99

Image Creation
A Press the
Note
❒
If you have assigned the Positive/Negative function to one of the
ite
}
keys, ⇒ P.144
B Press the
Menu
{
keys, press it and go to step D. To assign a function to the
↓
[
key.
}
“Set favorite keys”
key until
Next
]
.
Positive/Negative
[
is displayed.
]
Favor-
{
Favorite
{
2
}
C Select
Positive/Negative
[
with the
]
D Set your originals, then press the
keys. Then press the
<>
key.
Start
}
{
Select
[
key.
]
87
Page 100

Copying
Finishing
Note
❒
To avoid problems caused by curled copies, try turning over the paper stack
in the paper tray. If there is no improvement, change to copy paper with less
curl.
2
Reference
Regarding functions that cannot be used together with this function, ⇒ P.103
“Combination Chart”
.
Sort
The optional 20-bin sorter stapler, 10-bin sorter stapler, or 3-bin sorter is required to use
this function.
One copy of each original is delivered to each bin and copies are collated into
sets.
88
Note
❒
It is recommended to set originals in the document feeder with this function.
❒
For sorting, the following limitations apply:
Maximum paper size
20-bin sorter stapler 10-bin sort-
1
/2"
er stapler
: A3, 11" ×
L
17"
: A4, 8
K
×
11"
Normal paper mode
: A3, 12" ×
L
18"
1
K
×
11"
: A4, 8
/2"
Thick paper
mode
: A3, 12" ×
L
18"
: A4, 8
K
×
11"
1
/2"
3-bin sorter
st
1
bin 2nd or 3rd
bin
: A3, 12" ×
L
18"
: A4, 8
K
×
11"
1
/2"
: A3, 12" ×
L
18"
: A4, 8
K
×
11"
1
/2"
 Loading...