

Page 1
Operator Guide
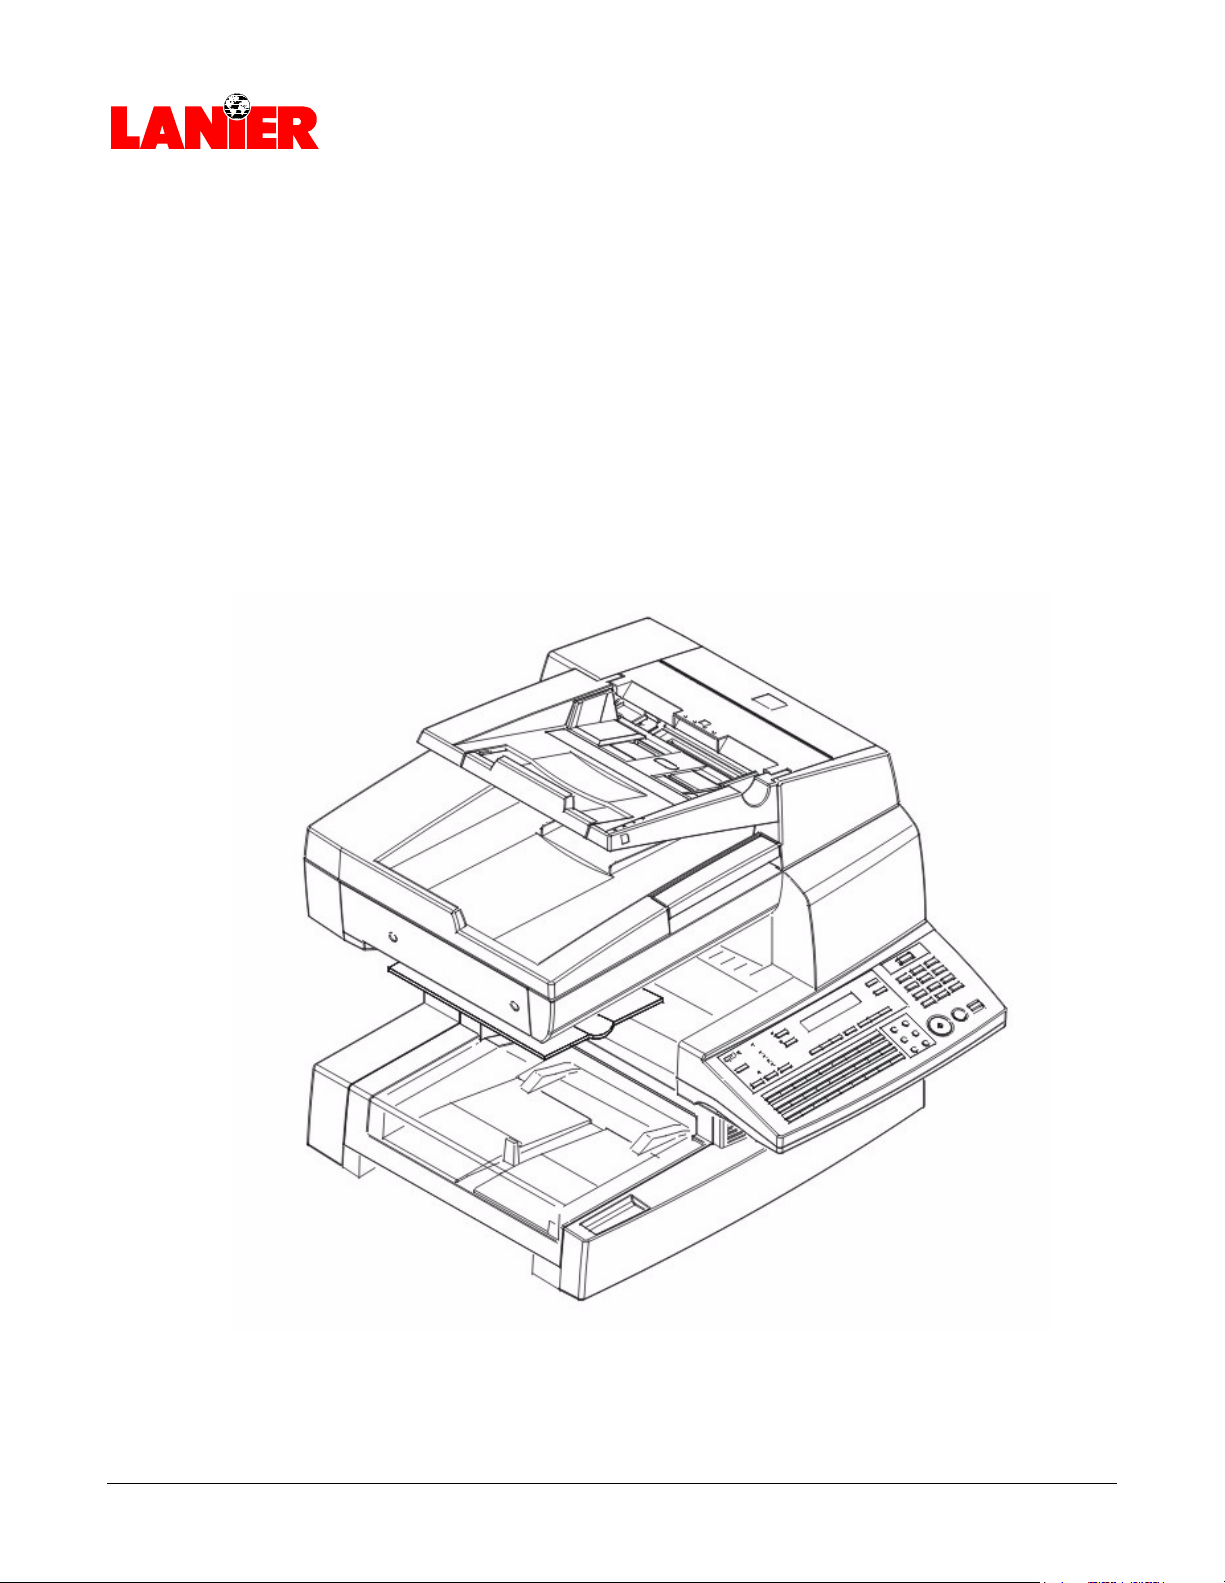
5415MFD
Multi-Function Digital Copier
your document management partner
Page 2

When ordering supplies or requesting service for your
copier, you will need to provide the model and serial
number of your machine.
Please take a moment to enter your model and serial
numbers here.
MODEL NUMBER: __________________________
SERIAL NUMBER: __________________________
To order supplies, call: ( )
To request service, call: ( )
Customer Vision® -
Our commitment to your
complete satisfaction
As an Energy Star Partner, Lanier Worldwide, Inc. has
determined that this product meets the Energy Star
guidelines for energy efficiency.
© 2000 Lanier Worldwide, Inc. Month
Printed in the U.S.A.
Page 3

Table of Contents
23456
7
8IGIGIG10
9111213
About the Machine
Power ON & OFF ......................................................................................1-1
Turning the Power ON ...................................................................1-1
Turning the Power OFF...................................................................1-2
Control Panel ...........................................................................................1-3
Keys on the Control Panel ..............................................................1-3
Key Pad ....................................................................................... 1-5
One Touch Keys ...........................................................................1-5
One Touch Key 27 (&) ...................................................................1-6
European Symbols ....................................................................................1-7
LED’s on the Control Panel.........................................................................1-8
Message Display.......................................................................................1-9
Initial Screen ................................................................................1-9
Selecting Screen’s Function .......................................................... 1-12
Meaning of the Symbol.................................................................1-13
Adjusting Brightness of Message Display ........................................ 1-17
Initial User Data ...................................................................................... 1-18
Setting Line Type (TONE/PULSE) .................................................. 1-18
Setting the Initial User Data...........................................................1-19
Setting Date & Time .................................................................... 1-19
Setting Your Fax Number (User Fax Number) .................................. 1-19
Setting Your Name (User Name) ................................................... 1-19
Connecting the Telephone Line.................................................................1-21
Connecting to a Private Branch Exchange (PBX) ......................................... 1-22
How to Operate .......................................................................... 1-22
Setting Line Type (PSTN/PBX) .................................................................. 1-23
Table of Contents
11
III9III
Making Copies
Making Copies..........................................................................................2-1
Copying Documents - Basics .......................................................... 2-1
Setting the Original Document ....................................................................2-2
Using the Automatic Document Feeder (ADF) ...................................2-2
Using the Exposure Glass................................................................2-3
Selecting Paper Tray .................................................................................2-4
Using the Manual Bypass Tray ........................................................2-4
Specifying the Number of Copies ................................................................2-6
Enlargement and Reduction Ratios ..............................................................2-7
Using Preset Copy Ratios ...............................................................2-7
Using Custom Zoom Copy Ratios .................................................... 2-7
Using the Keypad to Set Ratios .......................................................2-7
Selecting Copy Darkness Modes .................................................................2-8
Using Automatic Image Density ......................................................2-8
Using Manual Image Density ..........................................................2-8
2 in 1 Function .........................................................................................2-9
Using the ADF ..............................................................................2-9
I
i
Page 4

1
2
3
4
5
6
Table of Contents
Using the Exposure Glass .............................................................. 2-9
Sort Function..........................................................................................2-10
Basic Fax Operations
Transmitting a Document .......................................................................... 3-1
Basic Steps ................................................................................. 3-1
Direct Communication and Memory Communication ........................ 3-1
Resolution ................................................................................... 3-2
Loading the Document ................................................................... 3-5
Receiving a Document .............................................................................3-13
Printing Mode (Reduction RX) .......................................................3-13
Selecting the Reception Mode (Setting RX Mode) ............................3-14
Operation at Reception..................................................................3-15
Using Fax as a Telephone Set...................................................................3-16
Making a Telephone Call ..............................................................3-16
Receiving a Telephone Call ...........................................................3-16
Advanced Fax Operation
Transmitting a Document Using Memory TX................................................ 4-1
Redial the Same Destination (Redial TX)...................................................... 4-2
Auto Redial ................................................................................. 4-2
Manual Redial .............................................................................. 4-2
Verifying Audible Signal Before TX ............................................................. 4-3
Manual Transmission .................................................................... 4-3
Manual Reception ......................................................................... 4-3
Transmitting Special Document (BOOK TX) ................................................. 4-4
77I77
II8
II9
0
1
Function Utilities
Function Utilities ...................................................................................... 5-1
Selecting the FUNCTION Utilities................................................................ 5-2
Press the Numeric Keys ................................................................ 5-2
Press the Function Key................................................................... 5-3
Broadcast................................................................................................ 5-4
Using Broadcast Function .............................................................. 5-4
Timer TX................................................................................................. 5-8
Using Timer TX Function ............................................................... 5-8
Mailbox TX.............................................................................................5-10
Using Mailbox TX Function ...........................................................5-10
Print Mailbox RX .....................................................................................5-12
Using Print Mailbox RX Function ...............................................................5-13
1) Registering Mailbox Password ...................................................5-13
2) Changing Mailbox Password .....................................................5-13
3) Printing Mailbox Document .......................................................5-14
Polling TX ..............................................................................................5-15
Using Polling TX ..........................................................................5-15
Polling RX ..............................................................................................5-16
Using Polling RX ..........................................................................5-16
Relay Initiate ..........................................................................................5-17
Using Relay Initiate ......................................................................5-17
Cancel Reserve .......................................................................................5-18
Using Cancel Reserve ..................................................................5-18
2
3
Enhanced Utilities
Using the Program Key ............................................................................. 6-1
List of Program Key Functions ........................................................ 6-1
ii
Page 5

Table of Contents
4112356GGG7
8
910121113
Outline of Major Features ...............................................................6-3
Selecting the Program Function........................................................ 6-5
Dial Registration .......................................................................................6-6
One-Touch Dial and Speed Dial ....................................................... 6-6
Group Dial.....................................................................................6-8
Program Dial................................................................................6-12
Using Batch TX ..........................................................................6-13
Setting of TX Operations .........................................................................6-14
Closed Network TX .....................................................................6-14
Header .......................................................................................6-14
Setting of RX Operations .........................................................................6-15
Memory RX Mode .......................................................................6-15
Two Page Print............................................................................6-17
Closed Network RX ......................................................................6-18
Enhanced Programming
Using the Enhanced Utilities (2) ..................................................................7-1
Machine Settings ......................................................................................7-3
Setting AUTO RESET .....................................................................7-3
Setting POWER SAVE Mode ...........................................................7-3
Setting POWER SAVE OFF..............................................................7-4
Setting PRINT DENSITY .................................................................7-4
Setting LCD CONTRAST ................................................................ 7-4
Setting BUZZER VOLUME ...............................................................7-5
Setting REMOTE MONITOR .............................................................7-6
Setting TRAY 1 PAPER SIZE ...........................................................7-6
Setting PAPER SOURCE..................................................................7-7
Copy Setting ............................................................................................7-8
Setting DENSITY/PHOTO ...............................................................7-8
Setting AUTO DENSITY .................................................................7-8
Setting MANUAL DENSITY ............................................................7-8
Setting DENSITY(ADF).................................................................... 7-9
Setting 2in1 MODE .......................................................................7-9
Setting SORT MODE .................................................................... 7-10
More about TX Operation ........................................................................7-11
Setting SCAN CONTRAST ...........................................................7-11
Setting RESOLUTION ...................................................................7-11
Setting PAGE COUNT TX .............................................................. 7-12
Setting DEFAULT TX.................................................................... 7-13
Setting OT-DIAL IN COPY ............................................................ 7-13
More about RX Operation ........................................................................7-14
Setting No. of RINGS ...................................................................7-14
Communication Setting ........................................................................... 7-15
Setting LINE MONITOR ................................................................ 7-15
I
Report Utilities
Using the Report Utilities ...........................................................................8-1
TX/RX RESULT .............................................................................8-1
Machine Counter ......................................................................................8-2
Displaying the Counters .................................................................8-2
Printing Reports ........................................................................................8-3
Printing the Reports .......................................................................8-3
Printing Reports
About the Reports ....................................................................................9-1
I
iii
Page 6

1
2
3
4
5
6
Table of Contents
One Touch List ............................................................................. 9-2
Speed Dial List.............................................................................. 9-3
Key Setting List............................................................................. 9-4
Machine Status List ....................................................................... 9-5
TX Result Report........................................................................... 9-9
RX Result Report..........................................................................9-12
Activity Report.............................................................................9-15
Reservation Reports......................................................................9-17
Memory Data List.........................................................................9-18
Memory Image Print......................................................................9-20
Backup RAM Error Report..............................................................9-22
Lost Report..................................................................................9-24
Relay Broadcast Report .................................................................9-25
Printing a Report .....................................................................................9-27
Automatic Printing the Report (Setting by Program key) ...................9-27
Manual Printing of Reports ...........................................................9-28
PC Connection
TWAIN Driver Option...............................................................................10-1
Twain Interface ...........................................................................10-1
Installing the TWAIN Driver ..........................................................10-1
Scanning Control Window ............................................................10-1
Scanning an Image .......................................................................10-3
Class 1 FAX/Modem................................................................................10-4
Class 1 interface .........................................................................10-4
Setting up Class 1 .......................................................................10-4
77I77
II8
II9
0
1
2
Printer
PCL4 .....................................................................................................11-1
GDI Enhance...........................................................................................11-2
PCL5e ...................................................................................................11-3
PCL5e Driver Installation ..........................................................................11-4
Windows 95 ...............................................................................11-4
Windows 98................................................................................11-9
Windows NT.............................................................................11-14
Operation Guide ....................................................................................11-19
Set Printer ................................................................................11-19
Auto Cass. Select .....................................................................11-19
Symbol Set................................................................................11-20
Font Number..............................................................................11-21
Line Number ..............................................................................11-22
Print Fonts ................................................................................11-22
Service and Supplies
Troubleshooting ......................................................................................12-1
ERROR LED Indicator ...................................................................12-1
Error Messages ...........................................................................12-1
Improving Image Quality ...............................................................12-4
Replacing the Imaging Cartridge ................................................................12-6
Adding Paper to Paper Trays.....................................................................12-8
Paper Tray (TRAY 1) ....................................................................12-8
For Paper Feed Unit (TRAY 2) ........................................................12-9
Clearing Paper Misfeeds.........................................................................12-10
Paper Tray Misfeed ....................................................................12-10
Paper Feed Unit Misfeed .............................................................12-11
3
iv
Page 7

Table of Contents
4112356GGG7
8
910121113
Separator Jam/Fuser Jam............................................................12-13
Original Document Jam............................................................... 12-15
When PAPER SIZE ERROR Occurs........................................................... 12-17
During Copying .........................................................................12-17
During Reporting or Printing reception ..........................................12-17
Resetting the Machine ........................................................................... 12-19
Specifications
Safety Information .................................................................................. 13-1
CE Marking (Declaration of Conformity) ......................................... 13-1
Main Unit............................................................................................... 13-7
Physical .................................................................................... 13-7
Electrical ............................................................................................... 13-7
Operational ................................................................................. 13-8
Environmental .............................................................................13-9
Fax ..................................................................................................... 13-10
General .................................................................................... 13-10
Transmit (Tx).............................................................................13-11
Receive (Rx).............................................................................. 13-12
Dialing .................................................................................... 13-12
Reports..................................................................................... 13-13
Service Functions ...................................................................... 13-13
Paper Feed Unit (PFU) ........................................................................... 13-14
PC Function ......................................................................................... 13-15
Printer ................................................................................................. 13-16
NIC ..................................................................................................... 13-17
Glossary
Copier Terms ...........................................................................................G-1
Index
Machine Terms.......................................................................................... I-1
Warranty
New Machine Warranty and Limitation of Liability ......... inside back cover
I
I
v
Page 8

1
2
3
4
5
Table of Contents
6
77I77
II8
II9
0
1
2
3
vi
Page 9

About the Machine
Chapter 1
Page 10

Chapter Overview
This chapter provides information on:
• “Power ON & OFF” on page 1-1
• “Control Panel” on page 1-3
• “European Symbols” on page 1-7
• “LED’s on the Control Panel” on page 1-8
• “Initial User Data” on page 1-18
• “Connecting the Telephone Line” on page 1-21
• “Connecting to a Private Branch Exchange (PBX)” on page 122
• “Setting Line Type (PSTN/PBX)” on page 1-23
About the Machine
Page 11

Power ON & OFF
Keep the ""Power Switch"" in the (ON) position to maintain constant communication. If it
is in the (OFF) position, the machine is able neither to receive a document nor store the
contents of the document in its memory. Communication is also interrupted if the "Power
Switch" is pressed to the (OFF) position during communication.
Turning the Power ON
Press the "Power Switch" to the (ON) position.
When the machine is turned ON, the message
"*PLEASE WAIT!*" is displayed in the
Message Display. After approximately 25
seconds, the message in the Message Display
changes and the unit is ready for operation.
Power ON & OFF
Error
Utility
Confirm
PC
Memory TX
Auto RX
Standard
Fine
Super Fine
Half Tone
Resolution
2in1
Sort
Auto/
Photo
X PLEASE WAIT X
Paper
The Resolution indicator lights when the message display changes.
Error
Utility
Confirm
PC
Memory TX
Auto RX
Standard
Fine
Super Fine
Half Tone
Resolution
2in1
Sort
TEXT
Auto/
Photo
[ ]
A
x1.00
1
A4
Paper
Space
Space
Yes
No
C
Zoom
Delete
Yes
1
No
C
Zoom
Delete
About the Machine 1 - 1
Page 12

Power ON & OFF
Turning the Power OFF
1
If the percentage shown is less than 100%, it means there are documents stored in memory
which have not been transmitted. In this case, perform the following steps to retain these
documents.
When the memory contains a document to be transmitted:
Output the Memory Image Print, and retransmit at another time.
When the memory contains a document received:
Let the machine print the document received according to the specific procedure as
follows.
Check that the memory volume display on the Message Display shows 100%.
Printing the Document Received by Memory RX mode.
•
Printing the Mailbox Document.
•
Turn the "Power Switch" to "ϒϒϒϒ" (OFF) position.
2
1 - 2 About the Machine
Page 13
Control Panel
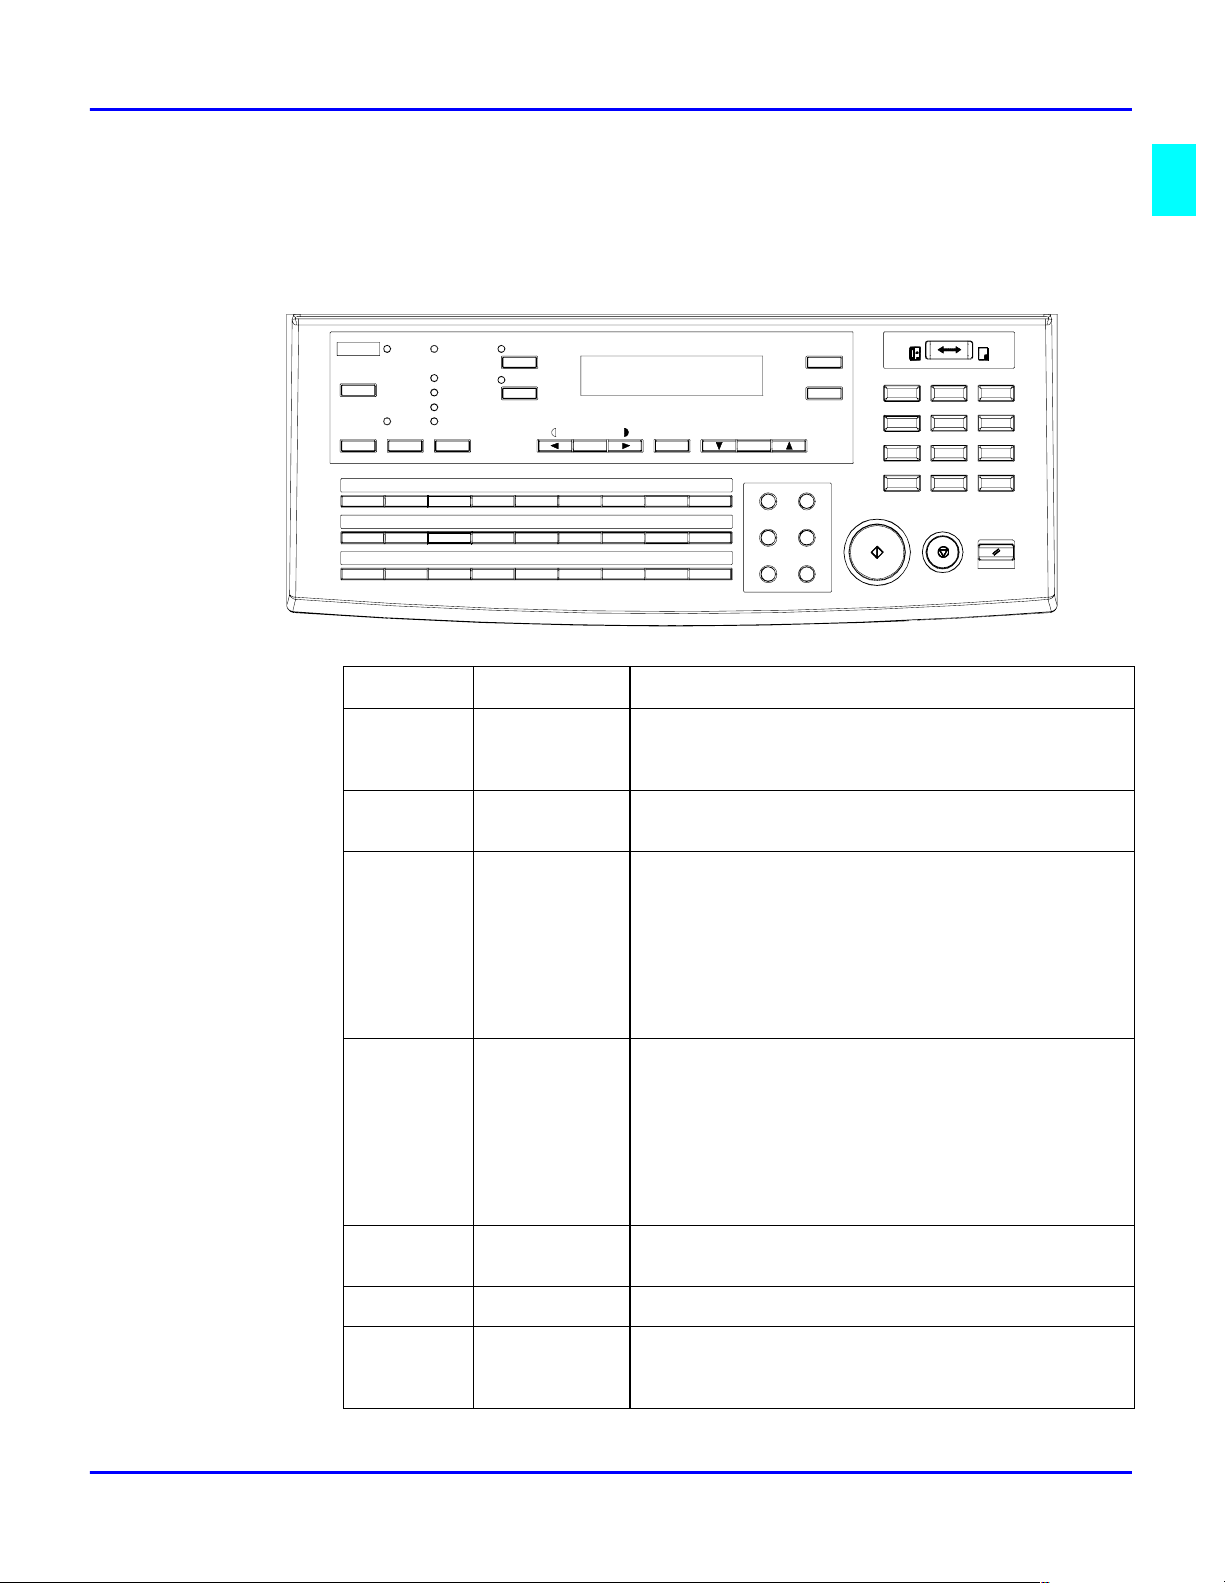
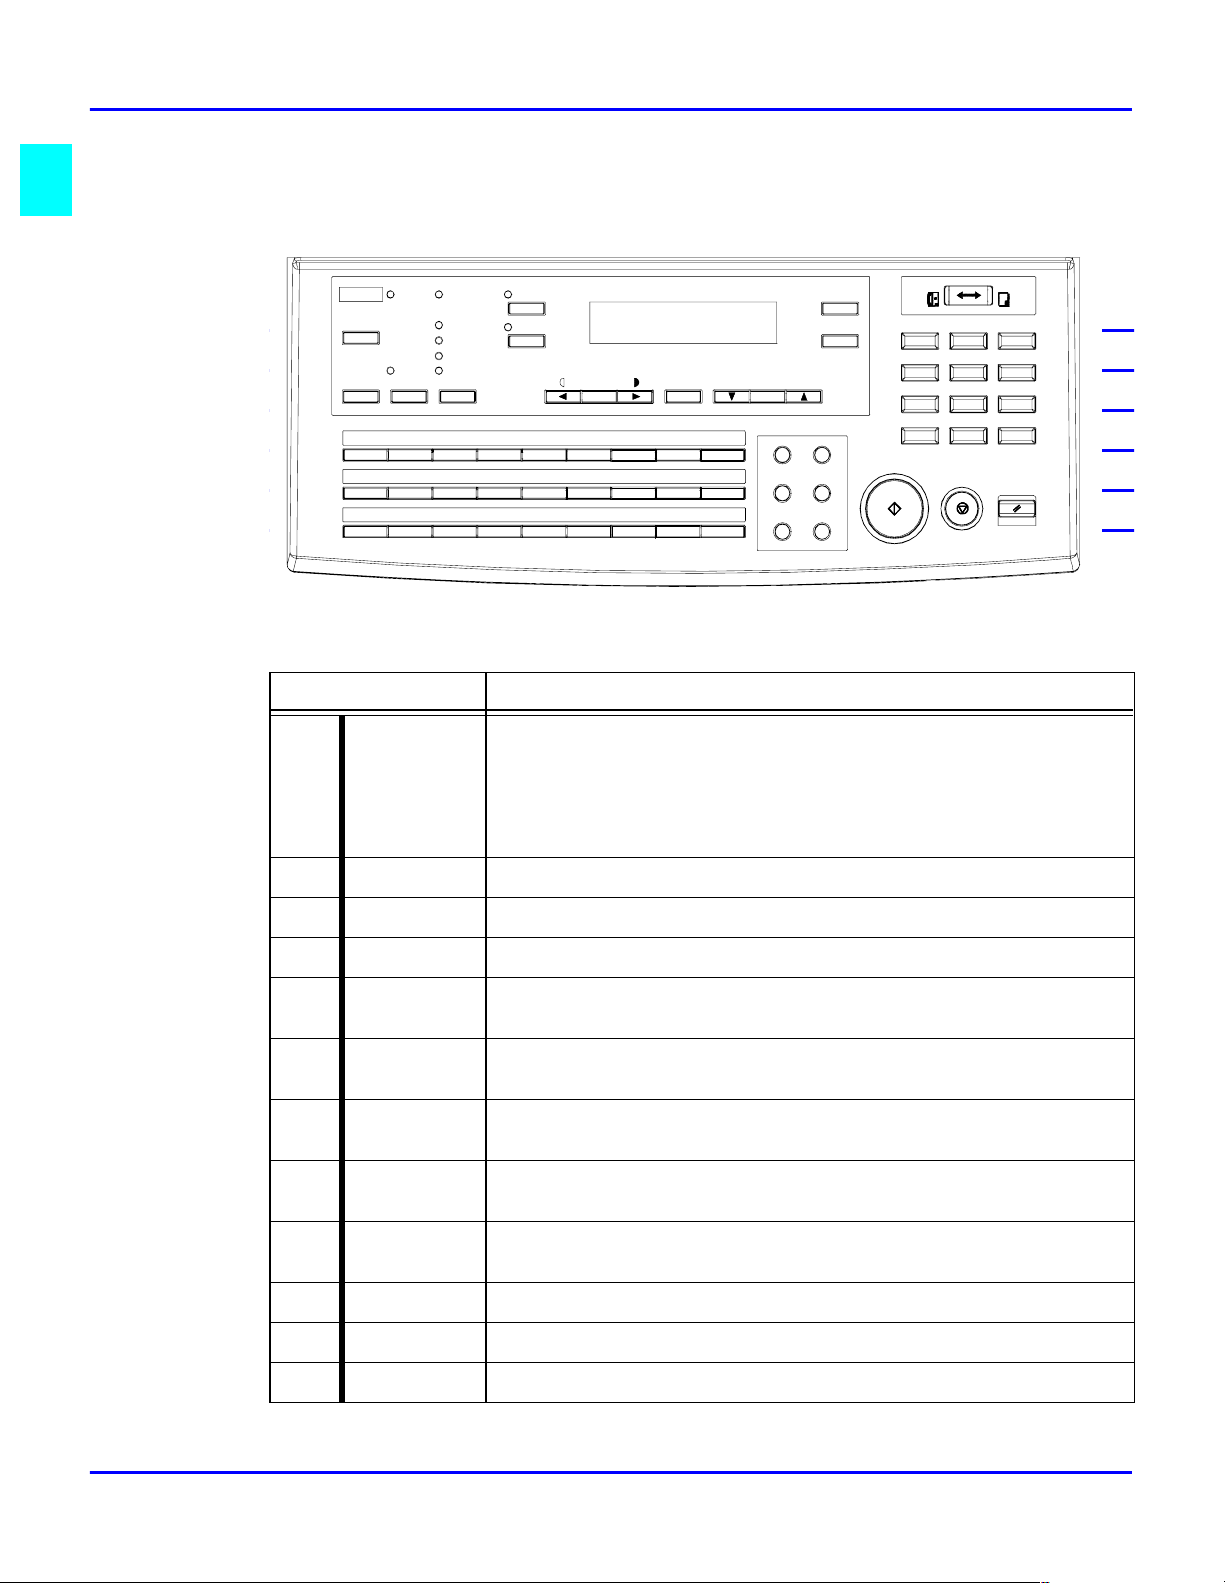
Keys on the Control Panel
Control Panel
04030201
D
13
M
22
Key
2IN1
Sort
F
14
15
NEO
23
24
WX
Auto/
Photo
G
16
P
Y25Z
Paper
Space
09
0806 0705
I
H
18
17
R
Q
27
26
&
Functions
PCError
Utility
Memory TX
Confirm
A
B
10
11
J
K
19
20
ST
Item
Auto RX
Standard
Fine
Super Fine
Half Tone
Resolution
C
12
L
U21V
1 Start key Start copying
Start transmission or Reception
Others depend on LCD message.
2 Stop key Cancel copying
Cancel transmission or reception
3 Panel Reset
key
Return to the initial setting:
<copy screen >
Number of Copies: 1
Zoom ratio: Equal
Copy Function: Initial setting by user
Density: Initial setting by user
Copy screen: Initial setting by user
Paper source: Initial setting by user
Zoom
Delete
Speed Dial Funtion
Phone Book Pau se
Book TX Spe aker
Redial/
Yes
No
C
Start
Fax Copy
ABC
OPER
DEF
3
JKL
MNO
65
TUV
WXYZ
Panel Reset
1
2
GHI
4
PQRS
89
7
*0#
Stop
4 Keypad Input the number of copies.
Input zoom ratio.
When setting custom size for bypass copy, input
paper size.
Input Fax number
Input numbers in registration of name
Input speed dial number
Specify Fax function or Program item
5 Θ key Send tone signal
Input European font in registration of name.
6 # key External/Internal function
7 Yes key Fix the selected item and inputted number or
character.
Others: Depend on LCD message.
About the Machine 1 - 3
Page 14

Control Panel
8 No/Clear key Clear inputted number or character.
Back to the previous display.
Others: Depend on LCD message.
9 Copy/Fax
Switching key
10 Zoom key Enter setting zoom ratio with Keypad
11 Paper key Select paper source
12 Auto/Photo
key
13 Up Arrow
key
14 Down Arrow
key
15 Right Arrow
key
Switch to Fax screen from copy screen.
Switch to Copy screen from Fax screen.
Select the fixed zoom ratio
Switch 3 density modes: Text-auto density / Photomanual density / Text-manual density
When setting the zoom ratio, increase the ratio by
0.01.
Display items or contents by rotation.
When inputting numbers or characters, delete a
character at the cursor.
When setting the zoom ratio, decrease the ratio by
0.01.
Display items or contents by rotation.
When inputting number or character, insert a space
at the cursor.
When adjusting the manual density, change the
density into darker level.
When inputting number or character, move the
cursor to the right.
When selecting item, move the mark to the right.
16 Left Arrow
key
17 2 in1 key Operate 2 in 1 copy
18 Sort key Operate Sort copy
19 Resolution
key
20 Memory TX
key
21 Program key Set machine status, initial setting for copy, Fax
22 Report key Display communication result
When adjusting the manual density, change the
density to a lighter level.
When inputting numbers or characters, move the
cursor to the left.
When selecting an item, move the mark to the left.
When ADF is not installed, this key is not effective.
Select the resolution and the image mode for
transmission.
Switch memory TX/ADF TX.
operations and register dials.
Display machine counter
Print report
1 - 4 About the Machine
Page 15
Control Panel
Key Pad
23 One-touch
keys
24 Speed Dial
key
25 Phone Book
key
26 Book TX key Call Book TX function.
27 Function key Call Fax communication function.
28 Redial/Pause
key
29 Speaker key Off hook for manual TX/RX
One-touch dial 01 – 27
Group dial 01 – 27
Program dial 24 – 27
Input character and symbol in registration of name.
Input +/- in registration dial number.
Call Speed dial function
Retrieval and call registered number.
Call the previously dialed number.
When inputting the dial number, insert pause at the
cursor.
The Keypad can be used to enter numerals and European symbols when registering names
for Initial User Data, One Touch Dial and Speed Dial.
For details on entering names, follow the procedure for each registration method.
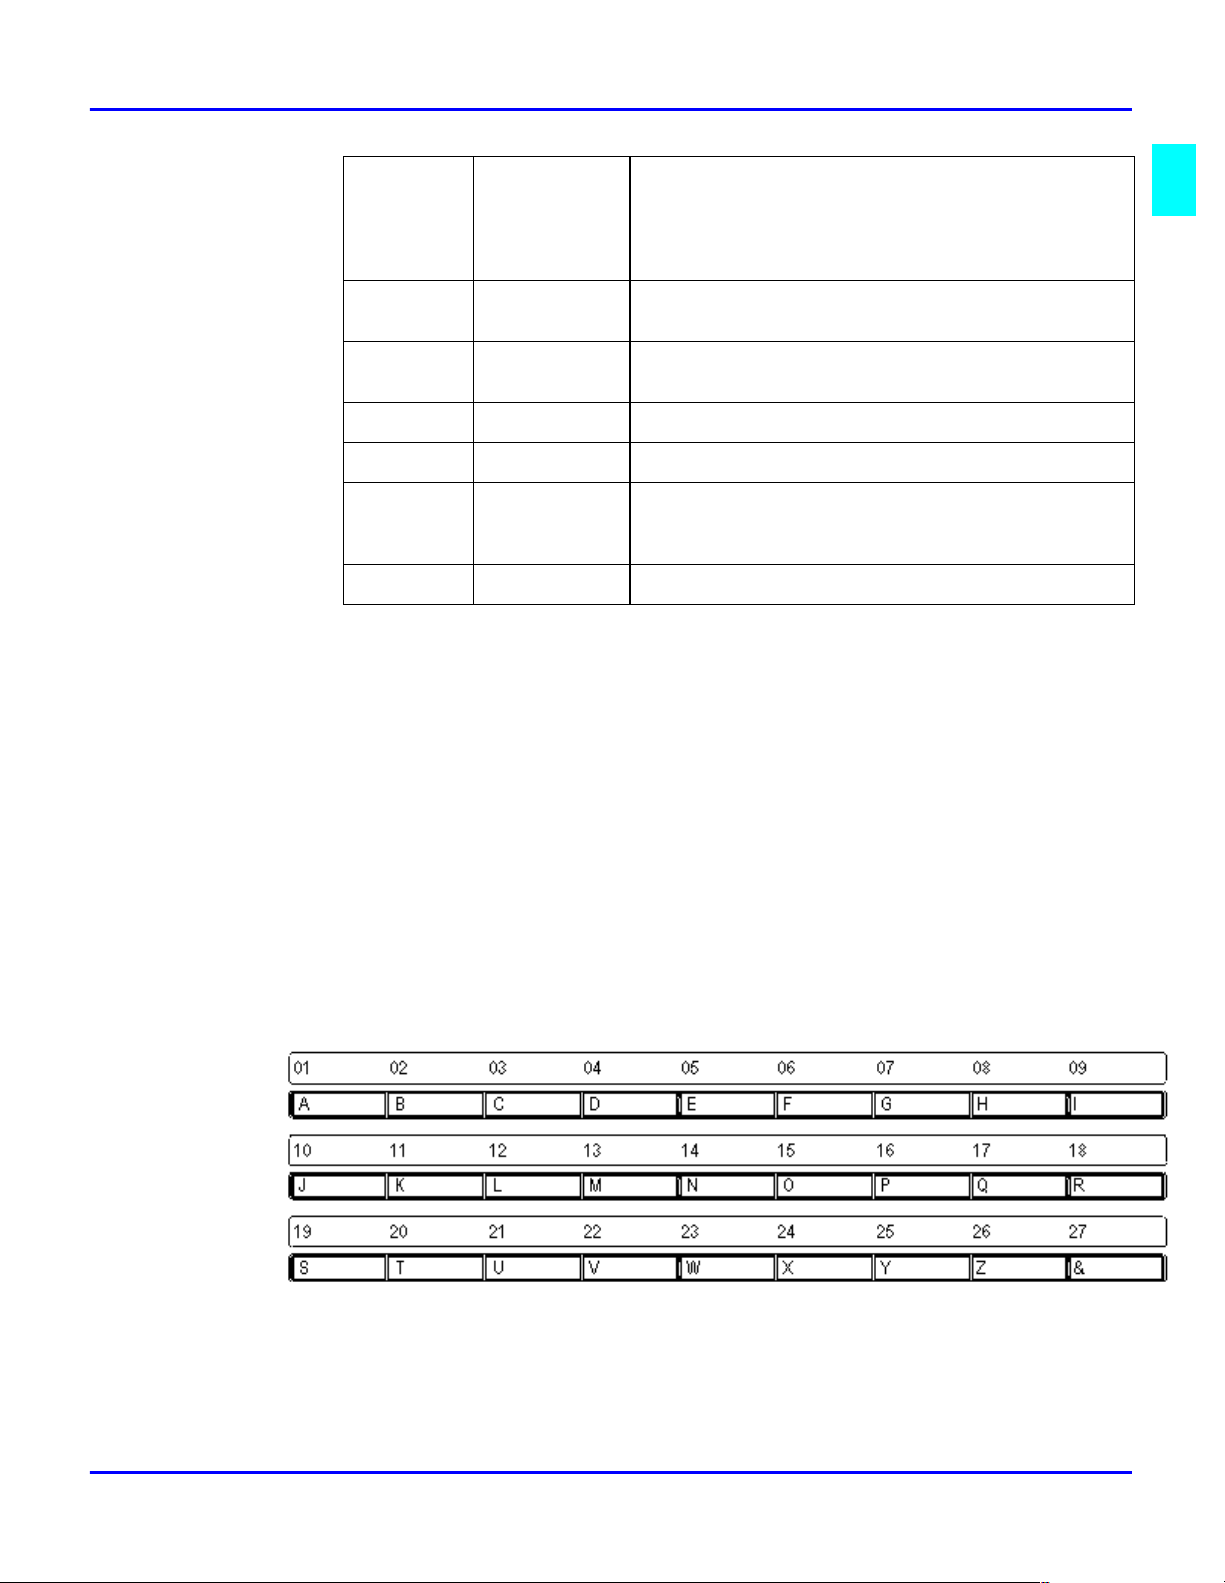
One Touch Keys
The "One Touch" keys have the following two functions:
•
•
One Touch Dial Function
Press the key to dial the registered destination and start transmitting the document.
One Touch Dial function
Input Characters
About the Machine 1 - 5
Page 16
Control Panel
Input Characters
One Touch
Key
1A8H15O22V
2B9I16P23W
3 C 10 J 17 Q 24 X
4 D 11 K 18 R 25 Y
5 E 12 L 19 S 26 Z
6 F 13 M 20 T 27
7G14N21U
Char. One Touch
One Touch Key 27 (&)
Press the "One Touch" key 27 as many times to display the desired symbols.
N Symbol N Symbol N Symbol N Symbol
Key
Char. One Touch
Key
Char. One Touch
Key
(see
below)
Char.
symbols
1& 7) 13= 19;
2# 8ð 14< 20@
3* 9. 15> 21%
4 - 10 , 16 ? 22 [
5 / 11 ! 17 $ 23 ]
6 ( 12 + 18 : 24 ¢
When the desired symbol appear, press the "Arrow" key to input this symbol.
1 - 6 About the Machine
Page 17

European Symbols
Press the Θ key as many times to display the European symbols
European Symbols
N Symbol N Symbol N Symbol
1Ä 9é 17ç
2ä 10í 18Æ
3Ö 11ó 19Ñ
4ö 12ú 20¿
5Ü 13Å 21Ø
6ü 14î 22?
7á 15à 23ß
8É 16?
When the desired symbol appear, press the "Arrow" key to input this symbol.
About the Machine 1 - 7
Page 18
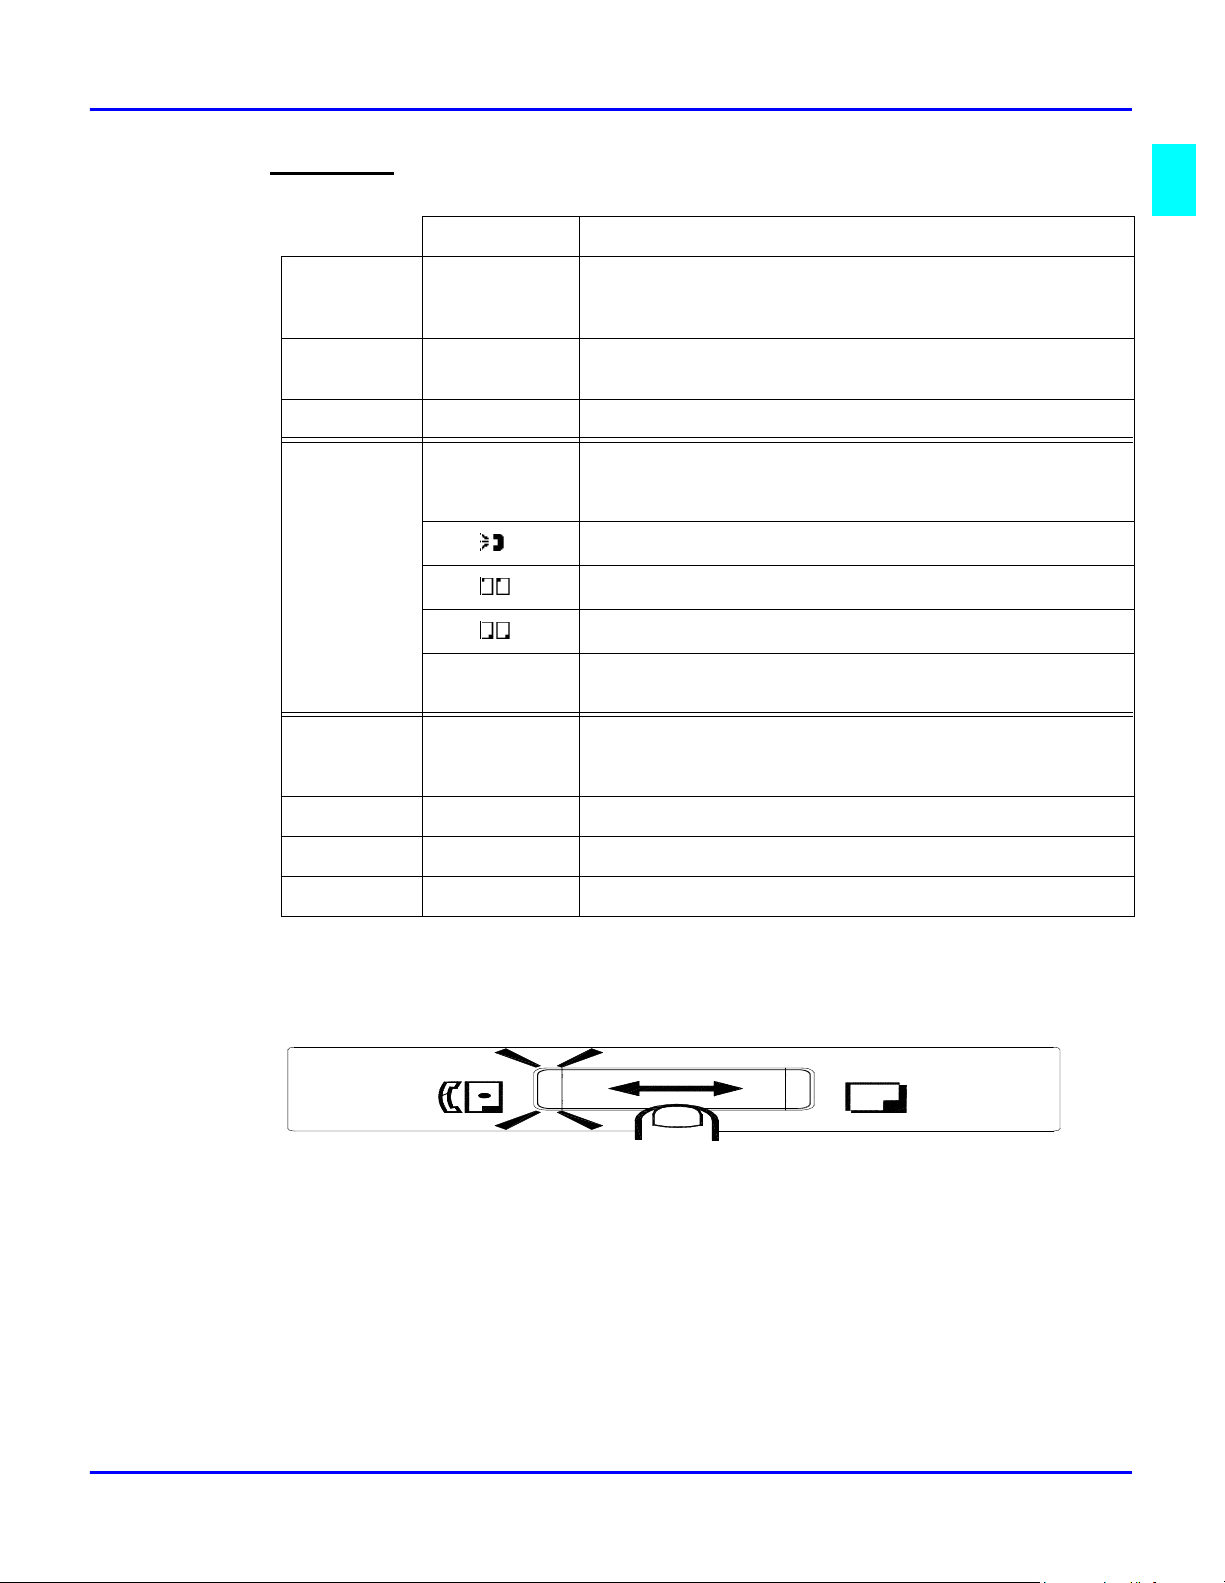
LED’s on the Control Panel
LED’s on the Control Panel
PCError
Utility
Memory TX
Confirm
A
B
10
11
J
K
19
20
ST
Auto RX 2IN1
Standard
Fine
Super Fine
Half Tone
Resolution
04030201
C
D
12
13
L
M
22
U21V
Sort
F
14
15
NEO
23
24
WX
Auto/
Photo
G
16
P
Y25Z
Yes
No
C
Paper
0806 0705
H
17
Q
26
Zoom
Space
09
I
18
R
27
&
Delete
Speed Dial Funtion
Redial/
Phone Book Pause
Book TX Speaker
Start
Fax
1
GHI
4
PQRS
7
*0#
Copy
ABC
OPER
DEF
3
JKL
MNO
65
TUV
WXYZ
Panel Reset
2
89
Stop
LED Functions
A Ready Copy screen: Lights green when the copy can be start or the scan
is available. Lights orange when the copy cannot be started or the
scan is not available.
Fax screen: Lights green when the transmission or reception
operation is available. Lights orange when the transmission
reservation is not available.
B Copy Lights in Copy screen.
C Fax Lights in Fax screen.
D 2in1 copy Lights when 2 in1 Copy screen is selected.
E Sort copy Lights when Sort Copy screen is selected.
When ADF is not installed, LED is always off.
F Standard Lights when the document for transmission is scanned at standard
resolution.
G Fine Lights when the document for transmission is scanned at fine
resolution.
H Super Fine Lights when the document for transmission is scanned at super
fine resolution.
I Half Tone Lights when the document for transmission is scanned in half tone
mode.
J Memory TX Lights when memory TX is selected.
K Auto RX Lights when auto RX is selected.
L PC Blinks when the machine receives data from PC and prints PC data.
1 - 8 About the Machine
Page 19

M Error Lights when any error occurs.
Message Display
When the ""Power Switch"" is turned to the ON position, the Message Display lights up.
Initial Screen
Copy Screen
When the machine completes warming up, the initial screen appears on the Message
Display. This initial screen serves as the basis for all later operations.
It includes:
•
•
•
•
•
•
•
Message Display
Copy Screen
Zoom Ratio
Copy Quantity
Density Level
Paper Source
Paper Size
Message Area
Fax Screen
You can press the Copy/Fax key switch to the Fax screen.
The fax screen includes:
Date
•
Time
•
Memory Available
•
Message
•
About the Machine 1 - 9
Page 20
Message Display
Paper Source
Paper Source Pictorial Symbol
Paper tray (Tray 1)
Paper Feed Unit (Tray 2)
Manual Bypass tray
Paper Size
Metric Inch
Paper source Paper type Paper Displays Paper Displays
Tray 1 Plane paper A4
A5
Manual Bypass
tray
Plane paper A4
A5
B5
B6
Free size
OHP A4
Card A4
A5
B5
B6
A4
A5
A4
A5
B5
B6
[]
A4 OHP
A4 CARD
A5 CARD
B5 CARD
B6 CARD
Letter
Legal
Half letter
Letter
Legal
Half letter
Free size
Letter
Letter
Legal
Half letter
Free size
LT
LG
HL
LT
LG
HL
[]
LT OHP
LT CARD
LG CARD
HL CARD
[]CARD
Free size
Tray 2 Plane paper A4
1 - 10 About the Machine
[]CARD
A4
Letter
LT
Page 21
Message Display
Message area
Copy
function
Fax
functions
Other
functions
(In Copy screen)
Message Description
0%~100% Memory remaining volume. This message appears when
the machine scans the original for the Sort copy
A4 ◊◊◊◊A5
LG ◊◊◊◊LT
:EMPTY Chosen paper tray has no paper
Fax: ( The machine respond for reception
Fax:
Fax:
Fax:
Fax Err Errors which concern fax function. If this message
WARM UP The machine is warming up
Zoom ratio (examples)
The machine calls the transmission
The machine is sending the fax data
The machine is receiving the fax data
appears, see the detailed information on fax screen
REPORT The machine is printing the report
PC:PRN The machine is printing the data received from PC
PC Err No paper for PC printing
Note: For more details about the message appear on the copy screen, switch to
FAX screen.
Fax
C opy
About the Machine 1 - 11
Page 22

Message Display
Selecting Screen’s Function
Here we explain the different components on the LCD display, and show you the ways to
scroll the menus and select the desired setting.
Example: Press "Program" key, the display shows the message “MACHINE SETTING”.
Using the "Arrow" keys to scroll through the function selection.
1
For example: Press the "Arrow" key scroll to the “COPY SETTING”.
•
Press the "Yes" key to access this item.
2
Press "Yes" key, the message in the display appears as “1 AUOT RESET”---a
•
sub-item of “MACHINE SETTING”.
Using the Keypad to select an item.
3
For example: Press ‘3’ to select the third function of the “MACHINE
•
SETTING”
Another Screen’s Selection
Select the choice by the "Arrow" keys and then press "Yes" key.
1 - 12 About the Machine
Page 23
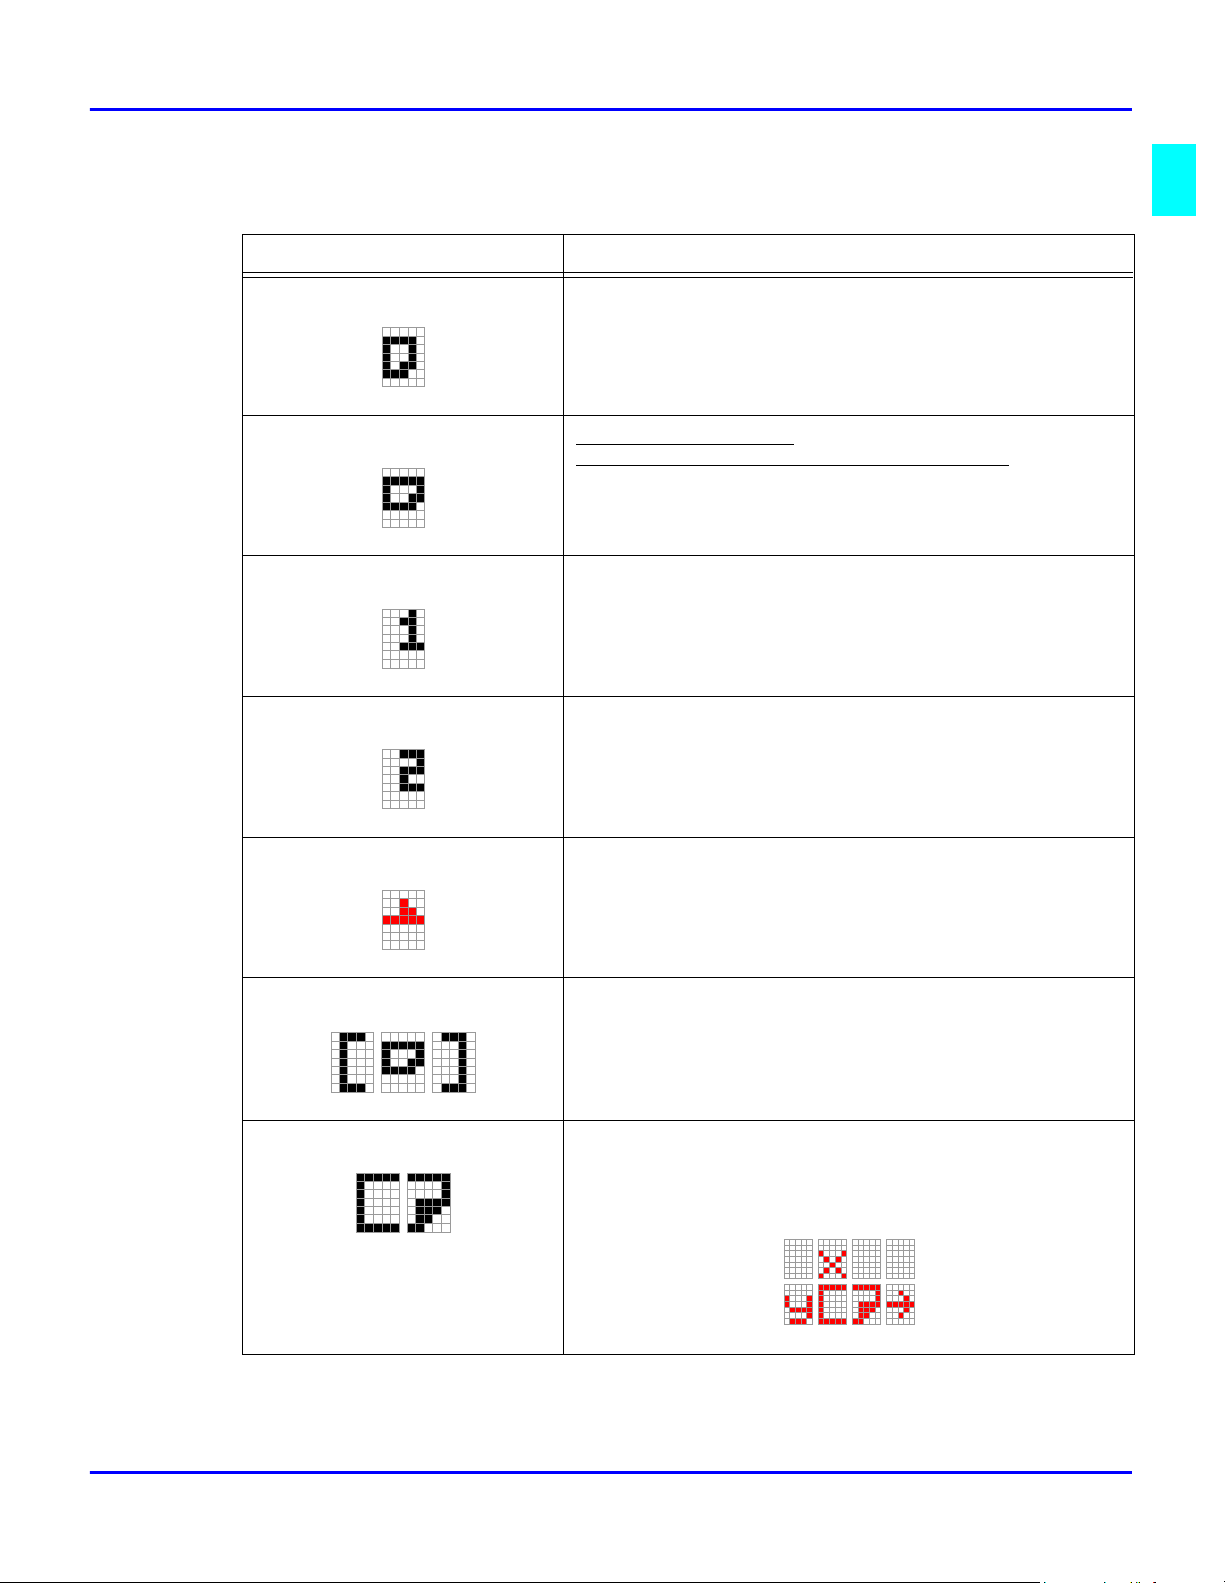
Meaning of the Symbol
Symbol Contents
Message Display
The number of copies
Direction of copy paper
Direction of the original document for machine
(Landscape)
Paper Tray (Tray 1)
When the Paper Tray is selected
Paper Feed Unit (Tray 2)
When the Paper Feed Unit is selected
Manual Bypass tray
When the Manual Bypass Tray is selected
. (Landscape)
.
Custom size for bypass copy
When the size of copy paper for the Manual Bypass
Tray is custom size (when size was set with the Keypad)
Input custom size for bypass copy
While inputting the custom size with the numeric
The X and Y direction of copy paper is expressed.
About the Machine 1 - 13
Page 24
Message Display
Input Fax number
When inputting a dial number for Fax communication, dial
registration, or user Fax number
Number of scanning pages
Memory TX: during scanning and when the scanning and
TX are completed
ADF TX, Manual TX during TX
When TX is completed
Auto density
When the Auto Density is selected
Manual density
When the manual density is selected.
The farther left the line is placed, the lighter the density
becomes. The farther right the line is placed, the darker
the density becomes.
1 - 14 About the Machine
Page 25
Message Display
Blink
Blink in
turn
Blink in
turn
Blink
Off hook in Dialing state
(Transmission)
12
Receive calling in Dialing state
12
Transmitting
Receiving
(Transmission)
1234
(Reception)
1234
(Reception)
Timer TX in memory
When Timer TX or Batch TX reservation is in Machine
memory.
Polling TX in memory
When Polling TX is in Machine memory.
SUB address
When the "Arrow" key is pressed in inputting Fax number.
External/Internal
When "#" key is pressed first when inputting Fax number.
About the Machine 1 - 15
Page 26
Message Display
Tone
When * key is pressed first when inputting Fax number.
Pause
When Pause key is pressed in inputting Fax number, “P” is
inputted in the place of cursor.
Combination dial
Press One-touch 27(Symbol) key an even number of times
while inputting the Fax number, ‘+’ is inputted in the
place of cursor.
Dial registration
When One-touch 27 (Symbol) key is pressed an odd
number of times when inputting Fax number, ‘-’ is input in
place of the cursor.
Cursor: Left
Move cursor to left.
Cursor: Right
Move cursor to right
Cursor: Up
Scroll the menu or job display.
, User Fax number
, User Fax number
Cursor: Down
Scroll the menu or job display.
Sub-Address / Selective Polling
1 - 16 About the Machine
Page 27

Adjusting Brightness of Message Display
The brightness of the Message Display can be adjusted to suit your needs.
Press the "Program" key, the first message is “MACHINE SETTING”.
1
Press "5" of keypad. Then the following message appears briefly, to confirm your selection.
2
Using the "Arrow" keys, adjust the brightness of the display.
3
Message Display
Press the "Arrow" key to make the display lighter.
•
Press the "Arrow" key to make the display darker.
•
Press "Yes" key to validate the brightness setting.
4
Press the "No/Clear" key to leave the “MACHINE SETTING”.
5
About the Machine 1 - 17
Page 28

Initial User Data
Initial User Data
Before making the first communication after your machine has been installed, you must
make the following settings for communication setting and Initial User Data:
Line type setting:Tone/Pulse
1
Initial User Data:Date & Time, User Fax No., User Name
2
The data recorded through these operations is printed as the header in a document
transmitted and footer in a document received (Header Print and Footer Print functions).
The data is also used for timer communications, reports, and password communications.
Setting Line Type (TONE/PULSE)
Check that the initial screen is shown.
1
Press the "Program" key 6 times to enter the "COMM. SETTING".
2
Press "1" of the keypad it will show "1 TONE/PULSE" on the display briefly.
3
Using the "Arrow" keys, select either TONE or PULSE according to the telephone system
4
connection to your fax.
Check the settings you have made. If they are correct, press the "Yes" key to validate the
5
settings, and the display of "Comm. Setting" appears again.
If Pulse is selected:
Using the "Arrow" keys to select 10 pps or 20 pps.
•
If you don’t want to change this setting, press the "No/Clear" key.
•
Then press the "Yes" key to stop the setting, the message “COMMU. SETTING”
•
appears again.
Press the "No/Clear" key return to the initial screen.
6
1 - 18 About the Machine
Page 29

Setting the Initial User Data
Check that the initial screen is shown.
1
Press the "Program" key 8 times to enter the "INITIAL USER DATA" mode.
2
Setting Date & Time
Press "1" of the Keypad to show "1 DATE & TIME" on the display.
1
Set the current time with the Keypad.
2
If a wrong time has been entered, press the "Arrow" key, the cursor position moves back
one position. Enter the correct time again.
In the same way, enter the current year, month and date.
3
For example: 2000/10/6
Check the settings you have made. If they are correct, press the "Yes" key to validate the
4
date and time. (Pressing the "Yes" key to start the built-in clock)
Initial User Data
Setting Your Fax Number (User Fax Number)
Press "2" of the Keypad to show "2 USER FAX NO." on the display.
1
Using the Keypad, enter your fax number.
2
Up to 20 numbers can be entered for a fax number.
•
For example: 03-5423-7801
If a wrong number has been entered, press the "Arrow" key. The cursor position moves
•
back one position. Enter the correct number again.
Check your setting and press "Yes" key if it is correct.
3
This validates the setting of your fax number.
Before validating the User Fax No. setting, you may press the "No/Clear" key to make a
4
correction. The message display returns to the previous display to enter the fax number.
Setting Your Name (User Name)
Press "3" of the Keypad, it will show "3 USER NAME" on the display.
1
Using the "One Touch" keys and some function keys, enter your name. A name can consist
2
of up to 32 characters and symbols. Selecting Characters and Symbols using the following
matrix, enter the characters of your name by pressing the corresponding "One Touch" keys
and some functions keys.
About the Machine 1 - 19
Page 30

Initial User Data
Inputting Characters:
I want…. Use which key?
Input
characters
Edit operation Delete "Up Arrow" key
For example: LANIER
3
If the wrong letter has been entered, press the "No/Clear" key. Enter the correct
name again.
Letters (ABCDEFGHIJ.…….XYZ) "One Touch" keys 1-26
Symbols (&#*-/()”.,!…………….) "One Touch" key 27
European symbols (Ä ä Õ õ Û û.) *key
Numeral (1234567890) Keypad
<Pause> Redial/Pause key
<Space> "Down Arrow" key
Move cursor to left "Left Arrow" key
Move cursor to right "Right Arrow" key
Accept the selection "Yes" key
Clear input data "No/Clear" key
Check your data entry and press the "Yes" key to accept the name setting.
4
Press the "No/Clear" key to back the initial screen.
5
1 - 20 About the Machine
Page 31

Connecting the Telephone Line
Arrangement:
Connecting the Telephone Line
Connect the plug of the cord to the telephone jack of the
1
telephone line.
Connect the other plug of the cord to the line
2
connection on the backside of the machine.
Connect the currently used telephone cord
3
to the TEL connection on the backside of
the machine.
Connection is completed.
4
About the Machine 1 - 21
Page 32

Connecting to a Private Branch Exchange (PBX)
Connecting to a Private Branch Exchange (PBX)
When dialing an outside number via a PBX, it may take some time to be connected to the
outside line after dialing out.
In such a case, if you enter the numbers consecutively, a connection may not be achieved
after dialing (Dial Error).
To avoid such an error, enter a pause command at the beginning of the telephone number
after entering the number for accessing the outside line.
By entering a pause, you can avoid the dial error caused by the PBX system.
The number you dial to access the outside line differs for different PBX systems.
How to Operate
Enter the access number used by your PBX.
1
Press the "Redial/Pause key after ‘0’ wait about 2.5 seconds to connect to the PSTN
2
line.
Use the Keypad to input the number you want to dial.
3
If you have entered the wrong number, press the "Arrow" key.
•
The cursor position moves back one position.
•
Enter the correct number again.
•
Press "Start" key to perform the transmitting.
4
1 - 22 About the Machine
Page 33

Setting Line Type (PSTN/PBX)
Press "Program" key 6 times.
1
Press "3" of the Keypad.
2
Use the "Arrow" keys to select either PSTN or PBX and press "Yes" key.
3
If you select PBX, you should enter the prefix number
•
Prefix can be up to 4 digit length. Then press "Yes" key.
•
When you are in the PBX mode, pressing the "#" key causes the machine to dial the
4
programmed access number(s). If you are dialing within a PBX then the "@" symbol is
displayed.
Phone Line Telephone Number LCD Display/Dialing Access Line
Setting Line Type (PSTN/PBX)
PBX mode,
prefix=0
PBX mode,
prefix=0
123 @123 PBX
#123 0-123 PBX-PSTN
About the Machine 1 - 23
Page 34

Setting Line Type (PSTN/PBX)
Notes:
1 - 24 About the Machine
Page 35

Making Copies
Chapter 2
Page 36

Chapter Overview
This chapter provides information on:
• “Making Copies” on page 2-1
• “Setting the Original Document” on page 2-2
• “Selecting Paper Tray” on page 2-4
• “Enlargement and Reduction Ratios” on page 2-7
• “Selecting Copy Darkness Modes” on page 2-8
• “2 in 1 Function” on page 2-9
• “Sort Function” on page 2-10
Making Copies
Page 37

Making Copies
Copying Documents - Basics
Generally, full size copies are reproduced at a zoom ratio of 100%.
To make a copy, set the document (step 2), specify the number of copies to be generated
(step 8), and press the "Start" key (step 9).
Note: The default paper tray, zoom ratio and auto exposure settings are
automatically selected in the Initial state.
Be sure the "Copy/Fax" key" is set for Copy.
1
The Copy Indicator should be ON.
•
If not, press the Copy / Fax key to switch.
•
Set the original document by two alternative ways.
2
Open the cover and set the document face down onto the glass.
•
Set the document face up into the Automatic Document Feeder.
•
Making Copies
Select the paper tray using the "Paper" key.
3
Select the zoom ratio.
4
For preset zoom ratio using the "Zoom" key.
•
For custom zoom ratios, use the up and down arrows to increase or decrease the ratio in
•
1 percent increments.
Select the copy density.
5
Press the Exposure Control keys to specify the desired level of density. For example, to
•
lighten a copy, press the "Left Arrow" key to the lighter density.
Press the Auto/Photo Exposure Mode key to specify the desired level of density.
•
Select the 2 in1 function.
6
Select the Sort function.
7
Use the Keypad to specify the number of copies or groups of documents to be copied.
8
Up to 100 copies can be specified.
•
Press the "No/Clear" key to clear this entry.
•
Press the "Start" key.
9
Press the "Stop" key to stop the operation if necessary.
•
Making Copies 2 - 1
Page 38

Setting the Original Document
Setting the Original Document
Using the Automatic Document Feeder (ADF)
The Automatic Document Feeder feeds originals placed into the Document Feed Tray. Please
follow the instructions provided when using this device. Failure to follow these instructions may
cause a misfeed or other complications.
Originals should meet these specifications:
Type of Paper: Plain paper (50-110 g/m2)
•
Paper Size: A4-A5, Legal L - Half Letter L
•
Originals that are not compatible with the Automatic Document Feeder:
Typing paper, paraffin paper and other thin paper types
•
Thick paper
•
Sizes that are larger than Legal L or smaller than Half Letter L
•
OHP transparencies, tracing paper or other transparent paper types
•
Wrinkled, folded, curled or tome originals
•
Originals that are stapled or are attached with paper clips
•
Carbon paper or paper with coated surfaces
•
To produce copies from an original document described above, place it on the Original
•
Glass.
Adjust the Document Guide Plates to the size of the document.
1
Set the document so that the side that you wish to copy is facing up.
2
2 - 2 Making Copies
Page 39

Using the Exposure Glass
For General Documents (plain or thick paper).
Open the cover.
1
Set the document onto the original glass with the side that you wish to copy facing down.
2
Align the rear left corner of the original document with the scale marker.
3
Gently close the cover.
4
For Transparent Documents (OHP transparencies)
Open the cover.
1
Set the document onto the original glass with the side that you wish to copy facing down.
2
Align the rear left corner of the original document with the scale marker.
3
Setting the Original Document
Place a blank sheet of paper of the same or bigger size as the original on top of the original.
4
Gently close the cover.
5
Making Copies 2 - 3
Page 40

Selecting Paper Tray
Selecting Paper Tray
Paper trays are selected using the "Paper" key. You can select Paper Tray (Tray 1), the Paper Feed
Unit (Tray 2) and the Manual Bypass Tray depending on the configuration of your copy
application. Each tray you select will display on the message display.
Using the Manual Bypass Tray
Use this tray to copy documents onto paper that is not otherwise loaded into the machine or to
copy onto OHP transparencies or special paper types.
Types of Paper
Paper and media supported by the Manual Bypass Tray
•
Regular paper: 16-24lb (60-90 g/m2)
•
Thick paper: 24-60lb (90-163 g/m2)
•
OHP transparencies and post cards
•
Paper Size
Maximum: 8.5” x 14” (216mm x 356mm)
•
Minimum: 3.38” x 5.82” (86 mm x 148mm)
•
Loading Standard Size Paper
When setting documents using plain or thick paper types.
Set the original document, using the ADF or the Exposure Glass.
1
Adjust the Document Guide Plates to the original document. Insert the original paper face
2
up into the tray until it stops.
Select the Manual Bypass Tray by pressing the "Paper" key.
3
Press the "Yes" key to accept the standard paper size used for Manual Bypass Tray.
4
The display shows the Manual Bypass Tray with the standard paper size.
Press the "Start" key to perform the copying.
5
Loading Non-Standard Size Paper
Set the original document, using the ADF or the Exposure Glass.
1
Adjust the Document Guide Plates to the original document. Insert the original paper face
2
up into the tray until it stops.
Select the Manual Bypass Tray by pressing the "Paper" key.
3
2 - 4 Making Copies
Page 41

Press the "No/Clear" key to select the non-standard paper size
4
Use the left or "Right Arrow" keys to select the desired paper type you wanted
5
PLAIN: Regular paper
•
OHP:Transparencies(A4/Letter)
•
CARD: Thick paper.
•
Press the "Yes" key to accept the selection.
6
Use the left or "Right Arrow" keys to select the paper size (standard) you want.
7
LT: Letter
•
LG: Legal
•
HL: Half Legal
•
Press "Yes" key to accept the selection.
8
Free Size or Custom Paper Size
Selecting Paper Tray
Set the original document, using the ADF or the Exposure Glass.
1
Adjust the Document Guide Plates to the original document. Insert the original paper face
2
up into the tray until it stops.
Select the Manual Bypass Tray by pressing the "Paper" key.
3
Press the "No/Clear" key to select the non-standard paper size
4
Use the left or "Right Arrow" keys to select the desired paper type you wanted
5
PLANE: Regular paper
•
OHP:Transparencies (Letter)
•
CARD: Thick paper.
•
Press the "Yes" key to accept the selection.
6
Press the "Down Arrow" key to select Free Size.
7
Press "Yes" key to accept the selection.
8
Using the keypad, enter the width “x” direction length of the paper.
9
Press the "Yes" key to accept the value entered.
10
Using the keypad, enter the length “y” direction length of the paper.
11
Making Copies 2 - 5
Page 42

Specifying the Number of Copies
Press the "Yes" key to accept the selection.
12
Press the "Start" key to begin copying.
13
Specifying the Number of Copies
Enter the number of copies desired using the Keypad.
1
The maximum copy quantity is 99.
•
The copier automatically sets 1 copy as the default setting.
•
If you want to change the quantity entered, press the "Reset" key, then enter your new
2
quantity.
2 - 6 Making Copies
Page 43

Enlargement and Reduction Ratios
Using Preset Copy Ratios
You can select from the following preset zoom ratio by pressing the "Zoom" key.
100%
129% : 5.5” x 8.5” to 8.5” x 11” (HL to LT)
154%: 5.5” x 8.5” to 8.5” x 14” (HL to LG)
64%: 8.5” x 11” to 5.5” x 8.5” (LT to HL)
78%: 8.5” x 14” to 8.5” x 11” (LG to LT)
To reset the ratio to 100%, press the "Reset" key.
Using Custom Zoom Copy Ratios
Adjust the zoom ratio in 1% increments by pressing the Up and "Down Arrow" keys. The
zoom range is from 50% to 200%.
Enlargement and Reduction Ratios
Press the "Down Arrow" key to decrease the Zoom ratio by 1%.
1
Press the "Up Arrow" key to increase the Zoom ratio by 1%.
2
To reset the ratio to 100%, press the "Reset" key.
3
Using the Keypad to Set Ratios
Press the "Zoom" key until (X) is shown in the display.
1
Using the Keypad, enter the desired ratio.
2
To reset the ratio to 100%, press the "Reset" key.
3
Making Copies 2 - 7
Page 44

Selecting Copy Darkness Modes
Selecting Copy Darkness Modes
Using Automatic Image Density
Press the "Auto/Photo" key to select the Text Mode with Auto Density.
Using Manual Image Density
You can adjust the copy density from 9 levels.
Press the "Auto/Photo" key to select the desired copy mode.
1
There are three modes you can select. The selected copy mode is displayed in the message
display.
“Text Mode” with auto density
•
“Photo Mode” with manual density
•
“Text Mode” with manual density
•
Press the Left or "Right Arrow" key to adjust the desired level.
2
The "Left Arrow" key darkens the copy
•
The "Right Arrow" key lightens the copy
•
2 - 8 Making Copies
Page 45

2 in 1 Function
The 2 in1 function copies two images onto one side of one sheet of paper.
Using the ADF
1
2
3
2 in 1 Function
Note: Initial setting value can be changed in 2 in 1 priority of Program function.
Refer to “Setting 2in1 MODE” on page 7-9.
Turn the 2 in1 function ON by pressing the 2 in 1 key
The 2 in1 indicator lights up
•
Copy ratio automatically changes to 67%
•
Place the original documents in the ADF.
Press the "Start" key to perform the 2 in1 copy.
Using the Exposure Glass
Turn the 2 in 1 function ON by pressing the 2 in 1 key
1
The 2 in 1 indicator lights up
•
Copy ratio automatically changes to 67%
•
Align the rear left corner of the first page original document with the scale marker
2
Press the "Start" key to copy this document.
3
Remove the first document and place the second page on the Exposure Glass, aligning it
4
with the scale markers.
Press the "Start" key to copy this document.
5
The 2 in 1 page is then printed.
6
For more pages, repeat the procedure from step 2 to 4.
7
Note: If you have a document with odd pages, after copying the last page, you
must copy another page to print the last 2 in 1 page.
Making Copies 2 - 9
Page 46

Sort Function
Sort Function
When using the Sort function, multiple copies are copied in sets and in sequential order.
.
Sort mode and Non-Sort mode can be switched by pressing the”Sort” key. When Sort mode is
selected the Sort indicator lights up. The default setting is Sort mode. This setting is effective untill
the Panel Reset is performed.
1
2
3
Note: Installation of the Automatic Document Feeder and expansion memory is
required for this function.
Place the original document in the ADF.
Turn ON Sort function by pressing the “Sort” key
The Sort indicator lights up.
•
Press the "Start" key.
Copies are assembled as sets in sequential order.
•
2 - 10 Making Copies
Page 47

Basic Fax Operations
Chapter 3
Page 48

Chapter Overview
This chapter includes:
• “Transmitting a Document” on page 3-1
• “Receiving a Document” on page 3-13
• “Using Fax as a Telephone Set” on page 3-16
Basic Fax Operations
Page 49

Transmitting a Document
You can transmit documents in several different ways. This chapter explain how to transmit a
document directly from the Automatic Document Feeder (ADF).
Basic Steps
1. Select the resolution (transmission image quality).
Set the resolution for the transmission
•
2. Load the document.
Ensure that the document is suitable for transmission
•
Place the document in the feeder
•
3. Dial the desired fax number.
Use the Keypad to dial the number. (Manual Dialing)
•
Use the One Touch Dial function
•
Use the Speed Dial function
•
Use the Combination Dial function
•
Use the Phone Book (List) function
•
Use the Phone Book (Search) function
•
When the number is dialed, the machine starts scanning and transmitting the document.
Transmitting a Document
Direct Communication and Memory Communication
A document can be transmitted or received through either direct or memory communication.
Features of Direct Communication
You can transmit long documents without concern about memory capacity. With memory
communication, transmission or reception of a document is not available when there is not enough
memory for the document.
Features of Memory Communication
Since the machine scans the contents of all pages of a document at high speed before starting a
transmission, you can bring that document back to your desk quickly. The machine also allows you
to make the necessary settings for the transmission of another document even while transmitting or
receiving the current document.
Memory Substitute Reception Function:
The machine automatically switches from printing or direct reception to memory reception if the
machine runs out of paper or misfeeds, ensuring reception of important documents. The document
received is printed as soon as paper is loaded or the misfeed is cleared.
Basic Fax Operations 3 - 1
Page 50

Transmitting a Document
Resolution
Overview of the Resolution
Select the resolution for the transmission based on the characteristics of the document to
be transmitted so that the receiver gets a highly legible document. There are 3 levels of
resolution to choose from. They can also be set to Half-Tone mode.
Standard
Use this selection for transmitting a standard document
containing characters of a common size, either handwritten
or word-processed. Standard resolution results in the fastest
transmission times.
Fine
Fine offers better resolution than Standard. Fine is suitable for
newspapers and similar documents which have small type or
detailed illustrations, or when there is a willingness to trade speed
for higher image quality.
Standard
Fine
Super Fine
Half Tone
Standard
Fine
Super Fine
Super-Fine
Super-Fine offers better resolution than fine. Super fine is
suitable for smaller type and very detailed illustrations. SuperFine takes longer to transmit.
Note: The better resolution you select, the longer the
transmission time you have.
Half Tone
Standard
Fine
Super Fine
Half Tone
3 - 2 Basic Fax Operations
Page 51

Transmitting a Document
Half-Tone Mode
Suitable for documents with half-tone photo illustrations and for colored documents. The HalfTone setting is not mutually exclusive of Standard or Fine resolutions. Resolution can be set in
addition to Half-Tone.
Standard with Half-Tone Mode
Standard resolution adds the Half-Tone mode.
Standard
Fine
Fine with Half-Tone Mode
Super Fine
Half Tone
Fine resolution adds the Half-Tone mode.
Standard
Fine
Super-Fine with Half-Tone
Super Fine
Super-fine resolution adds the half-tone mode.
Note: Half-Tone mode significantly increases the
transmission time.
Half Tone
Standard
Fine
Super Fine
Half Tone
Basic Fax Operations 3 - 3
Page 52

Transmitting a Document
Selecting Resolution
Check that the message display is in Fax screen.
1
If not, press the "Copy/Fax" key to switch.
Press the Resolution key to select the desired resolution.
2
Each time the key is pressed, a new resolution is selected.
When the document has been transmitted, the initial
3
setting of Standard is automatically reset to the default
resolution. For example: Standard resolution
Standard
Fine
Super Fine
Half Tone
Standard
Fine
The Program function allows selection of another
resolution type as the default resolution.
Super Fine
Half Tone
3 - 4 Basic Fax Operations
Page 53

Loading the Document
Documents Suitable for Transmission
Type Sheet (1-sided only)
Size Standard ♦A4
Transmitting a Document
♦Letter
♦Legal
♦Government Legal
Nonstandard
Effective scanning
area
weight
Loaded pages Up to 50 sheets
Note: For any of the following types of documents, make a copy prior to
transmission or use a Carrier Sheet for transmission.
Width or length smaller than the minimum permissible dimensions. Minimum
•
permissible dimensions: Width 5.8”, Length 3.9”
A lightweight page weighing 14 lb (50 g/m2) or less.
•
A creased, torn, wrinkled, or curled page.
•
OHP transparencies.
•
A page with a stamp on it, or a page with adhesive tape affixed to it.
•
Paper with a coated surface.
•
Heat- or pressure-sensitive paper.
•
Glossy paper.
•
Width 5.8” x 8.5” (148~216 mm)
Length 3.9” x 39.3” (100~1000 mm)
The machine will not transmit information contained in
the margins of 2 mm along the four sides of the
document.
When preparing a document, allow a blank margin of
this width along the four sides.
2
14 - 28 lb (50~110g/m
)
If your document is very important, confidential or for an emergency, it is recom-
mended that you make a phone call to tell the other party that you are sending the docu-
ment.
Basic Fax Operations 3 - 5
Page 54

Transmitting a Document
Loading the Document
This machine scans the data on the front side of the document. This means that you should
place the document face up in the ADF.
You can transmit the document with the date printed at the top of the document by the
Header function. To use the Header function properly, load the document top edge down.
When sending a multi-page document, the machine scans from the top down. A document
placed in the feeder such as page 1, page 2,.... page X will be sent in the same order.
Document ejecting style is straight-ahead ejection. The same rule applies when placing
your document for the copy or scanner function.
Check that the message display is in Fax screen.
1
If not, press the "Copy/Fax" key to select Fax.
Adjust the Document Guide Plates to fit the size of the document.
2
Place the document face up and turn the top edge of the document into feeder.
3
(Slide the document along the Document Feeding Tray into the feeder until it stops.)
Note: Do not mix pages of assorted sizes together, as a paper
misfeed or skewing could result.
For multi-page documents, be sure to remove staples, paper clips, tape etc.
Transmitting documents without removing these items can cause misfeeds or
damage to machine.
If multi-page documents are misfeed or piggybacked (two or more sheets are
stuck and fed together), set the documents with each page shifted and parted
slightly from the lower page as if the forefront of them form a wedge viewed from
the side.
The Message Display now prompts you to enter the fax number.
4
Dialing the Number (Transmitting the Document)
Using the Keypad (Manual Dialing)
Using the Keypad to dial is the most basic method. Load your document, enter the fax number of
the destination with the Keypad, and press the "Start" key.
Check that the message display is shown Fax screen. If not, press the "Copy/Fax" key.
1
Place the document face up and put it on the Document Feeding Tray, and side it into feeder
2
until it stops.
From the Keypad, enter the fax number of the other party.
3
Up to 30 characters can be entered for a fax number.
•
If you want to correct the entered number, press the "No/Clear" key.
•
3 - 6 Basic Fax Operations
Page 55

Transmitting a Document
If you want access to a PC that is connected to the destination LAN network, input the Sub-
4
Address.
To input "Sub Address," press the “Down Arrow” key once.
•
The display shows ":", meaning that the input of "Sub Address" is ready.
•
If you have entered a wrong number, press the "Left Arrow" key. This brings the
•
cursor back one position, then enter the correct number.
Press the "Start" key.
5
The machine automatically dials the number and starts feeding the document.
•
If you want to stop transmitting the document, press the "Stop" key, and then the "Yes"
•
key.
When a PBX is Being Used
When dialing a number to an outside line via a PBX, it may take some time to be
connected. You can insert a Pause.
When the transmission is completed, a buzzer sounds and the message "TX COMPLETE"
is shown for two seconds, indicating that the document has been successfully transmitted
to the other party.
To obtain detailed results of a transmission, print the Activity Report. Refer to “Activity
Report” on page 9-15.
If the Line is Busy
If the line of the receiving party is busy, the Auto Redial function is automatically
activated and the machine repeats dialing the number.
If the Transmission Fails
If the transmission fails, a buzzer sounds intermittently for two seconds and the Error
Indicator lights up.
(The error code: OODA may be different than yours)
The machine automatically prints a TX / RX Result Report.
Press the "Stop" key.
The document is fed out and the Error Indicator will go out, note the reason for failure on
the TX/RX Result Report and retry transmission or check the fax number is correct.
Using the One Touch Dial Function
One Touch Dial function allows you to transmit a document to a particular party by
pressing one of the "One-Touch" keys which has previously been programmed with that
party’s information.
To use this function, you must previously program each "One-Touch" key with a fax
number and other data.
For more detailed register procedures, refer to “Dial Registration” on page 6-6.
Basic Fax Operations 3 - 7
Page 56

Transmitting a Document
Check that the message display is shown Fax screen. If not press the "Copy/Fax" key to
1
display the fax screen.
Place the document into the Document Feeding Tray.
2
Press the "One-Touch" key in which the desired number has been programmed.
3
•
•
•
When the transmission is completed, a buzzer sounds and the message "TX
4
COMPLETE" is shown for two seconds, indicating the document has been
successfully transmitted to the other party.
•
•
Using the Speed Dial Function
Speed Dial allows you to transmit a document to a particular party by just entering a 2digit number assigned to that party. To use this function, you must first program each
Speed dial number (2-digits) with fax number and other data.
The machine now dials the fax number and feeds the document.
If you want to stop the transmission, press the "Stop" key.
Then, press the "Yes" key, the transmission is canceled.
Then, the initial screen is displayed.
To obtain detailed results of the transmission, print the Activity Report.“Activity
Report” on page 9-15.
Up to 100 different numbers can be registered for Speed Dial.(Speed dial numbers: 00 to
99).
Check that the Fax screen is shown. If not press the "Copy/Fax" key to display the fax
1
screen.
Place the document into the Document Feeding Tray.
2
Press the "Speed Dial" key, and the display appears the prompt.
3
Using the Keypad, enter the Speed dial Number to which you are going to transmit a
4
document.
Then, press the "Start" key.
5
The machine now starts dialing the fax number and starts feeding the document.
6
If you want to stop the transmission, press the "Stop" key and then the "Yes" key.
When transmission is completed, a buzzer sounds and the message "TX COMPLETE" is
7
shown for 2 secomds, indicating that the document has been successfully transmitted to the
other party.
Then, the initial screen reappears
•
3 - 8 Basic Fax Operations
Page 57

Transmitting a Document
To obtain detailed results of a transmission, print the TX Result Report.
•
Combination Dial Function
When a dial registered as a Combination Dial is used, you can enter the dial number
following the Combination Dial.
Setting a Combination dial:
To register One Touch Dial No. or Speed Dial No. as a Combination Dial, enter the ‘+’
symbol (One Touch Dial key 27[&]) after One Touch Dial number or Speed Dial number.
Press "Program" key 3 times.
1
Press ‘2’ of Keypad, then the message “2 SPEED DIAL” appears briefly.
2
Input the Speed Dial No.
3
Input the Fax number by pressing the Keypad.
4
Press the One Touch Dial key 27(&) after the Fax number, the display would shows
5
the ‘+’ symbol.
Press "Yes" key.
6
The display shows a message to confirm the Speed Dial is programmed as shown.
Press the "Reset" key to go back to the initial state.
7
Using the Combination Dial
Place the document into the Document Feeding Tray.
1
Check that the Fax screen is shown. If not, press the "Copy/Fax" key to switch.
2
Press "Speed Dial" key. Enter the NO. which registered as a Combination dial.
3
The display shows the number programmed in Speed Dial, followed by the
•
symbol ‘+’, indicating that it is a Combination Dial.
Enter the other numbers using the dialing as shown:
4
Dial No. (Keypad) + "Start" key
•
One Touch Dial (which has not yet been registered as a Combination Dial)
•
Speed Dial and Keypad
•
For example: Use the Keypad to input the other numbers(67890) to complete this
combination dial. (The symbol ‘+’ will disappear automatically)
Then press the "Start" key to perform the transmission.
Note: The following applies to Combination Dial.
When a One Touch Dial or "Speed Dial" key is used after a Combination Dial,
•
Basic Fax Operations 3 - 9
Page 58

Transmitting a Document
•
•
•
•
Using the Phone Book Function
Overview of Phone Book function
Phone Book is a list of locations you have programmed for One Touch Dial and Speed Dial.
This function offers you a directory list for locating a destination by yourself or by machine
(Search) for transmission of a document to that party.
the slower communication speed is applied.
Batch processing is not available when Group Dial, Program Dial, Timer
Transmission or Communication Function is registered by using One Touch
Dial or Speed Dial as a Combination Dial.
For any registered Dial No., when it is changed or deleted, it will delete from the
registration of Transmission (Calling) Stand-by job and "Program" key.
An error occurs and transmission becomes impossible when combined numbers
are registered to the Combination Dial or when the total number of digits in a
fax number exceeds 30.
If you use the combination dial, inputting SUB or SUB registers in One-touch
dial or Speed Dial will not be valid.
To use the Phone Book, you must first program the fax numbers and other data for the destinations
to which you will transmit a document by One Touch Dial or Speed Dial.
Up to 27 different numbers can be registered for One Touch Dial and up to 100 for Speed Dial.
Phone Book (List)
Place the document into the Document Feeding Tray.
1
Check that the Fax screen is shown. If not press the "Copy/Fax" key to display the
2
fax screen.
Press the "Phone Book" key.
3
Make sure that “LIST” is selected
•
Then press the "Yes" key.
•
Press the “Up” or “Down” key to search.for the party to whom you are going to
4
transmit a document.
Once the desired destination is displayed press the "Start" key.
5
The machine starts dialing the fax number
•
Then it feeds the document.
•
Press the "Stop" key if you want to stop the transmission.
•
3 - 10 Basic Fax Operations
Page 59

Transmitting a Document
When the transmission is completed, a buzzer sounds and the message "TX
6
COMPLETE" is shown for two seconds, indicating that the document has been
successfully transmitted to the other party.
Then, the initial screen is displayed.
•
If you want to know the result of the transmission, check it either by using the
•
Confirm function or by printing the Activity Report.
ACTIVITY REPORT
NO. SESSION DATE TIME TX/RXDESTINATION
STATION
01 0014 SEP.17 09:30 TX----OSAKA
03 345 0987
TOTAL TX ----------------- 1 00 H
RX ----------------- 0 00 H
Phone Book (Search)
Check that the Fax screen is shown. If not press the "Copy/Fax" key to display the fax
1
screen.
Place the document into the Document Feeding Tray.
2
Press the "Phone Book" key.
3
Press the “Left” or "Right Arrow" keys to select “SEARCH”, then, press the "Yes" key.
4
Using the "One-Touch" keys and Keypad, enter the name or beginning portion of
5
the name of the party for witch you want to search.
PAGE DURATION MODE RESULT
1 00 H
01’25”
01’25”
01’25”
ECM OK
------ -----------
-
------ -----------
-
Selecting Characters
Enter the characters of the name or beginning of the name by pressing the corresponding "OneTouch" key. Do the same for the destination you wish to locate.
Press the "Yes" key. The machine now searches for the exact name or possible names
6
beginning with the letters entered. Here you can find two destinations searched.
Press the “Up” or "Down Arrow" keys to locate the party to whom you are going to transmit
7
a document. Each press of the arrow key shows the next party name on the Message Display
Once the correct destination is dis"Stop" keyplayed, press the "Start" key.
8
The machine dials the fax number, then feeds the document.
•
Press the "Stop" key if you want to stop the transmission.
•
When the transmission is completed, a buzzer sounds and the message "TX
•
Basic Fax Operations 3 - 11
Page 60

Transmitting a Document
If you want to know the result of the transmission, check it either by using the Confirm
function
or by printing the Activity Report.
COMPLETE" is shown for two seconds, indicating that the document has been
successfully transmitted to the other party.
3 - 12 Basic Fax Operations
Page 61

Receiving a Document
A document can be received several ways. This section explains how to receive a document and
directly print it on your fax machine without using the memory function. For the procedure using
the memory function (memory reception), see "Printing the Document of Received by Memory
RX mode".
Before receiving a document, the following functions must be set.
Reception Mode
This determines the mode in which your machine should be set to receive a document from the
other party.
Print Mode
This determines the zoom ratio at which the document received from the other party is to be
printed through your machine printer.
Printing Mode (Reduction RX)
Receiving a Document
Your machine may be in either one of the following three modes when printing a document
received from the other party. Select the appropriate mode according to your needs.
Reduction RX Description
ON The machine will reduce the documents as needed to fit on
the loaded paper.
OFF The machine will not reduce the document and instead will
print the remainder on a second page if the image size
exceeds the length of the paper.
CUT The machine will automatically cut off the remainder of the
document if it is less than 18mm. If the remainder exceeds
18mm, it will be printed on a second page.
Selecting the Printing Mode
Press the "Program" key 5 times into the " RX OPERATION" mode.
1
Press "4" of the Keypad to show "4 REDUCTION RX" on the Message Display.
2
Using the Arrow keys, select the desired printing mode.
3
Select ON, this selects the Reduction Priority mode.
•
Select OFF, this selects the Full Size Priority mode.
•
Selects CUT, this selects the Cut mode.
•
Basic Fax Operations 3 - 13
Page 62

Receiving a Document
Once the desired selection is made, press the "Yes" key to validate it.
4
Press the "No" key to exit from the "RX OPERATION" mode. The initial screen is
5
displayed.
Selecting the Reception Mode (Setting RX Mode)
Your machine may be in either one of the following two modes when receiving a document from
the other party. Select the appropriate mode according as how you are going to receive the
document.
Fax mode (Auto RX mode)
Select this mode when you use your machine mainly as a fax machine. When a
document comes in, your machine rings several times before starting an auto-
matic reception. The number of rings can be set as required. “Setting No. of
RINGS” on page 7-14.
TEL mode (Manual RX mode)
Select this mode when you use your machine mainly as a telephone. To receive
a fax document, pick up the Handset, if you hear a fax tone, press the "Start"
key and hang-up to receive it manually. Note in this mode you cannot receive a
document automatically.
Selecting the Reception Mode
Press the "Program" key 5 times into the "RX OPERATION".
1
Press "7" of the Keypad to show "7 RX Mode" on the Message Display.
2
Select the Arrow keys to select "AUTO RX " or "MANUAL RX".
3
Then press the "Yes" key.
4
The machine is now ready to receive based on the mode selected through the above steps.
5
3 - 14 Basic Fax Operations
Page 63

Operation at Reception
Receiving a Document in the Fax Mode (Auto RX mode)
When using a telephone, the telephone also rings indicating that a fax call is coming in.
1
The machine communication starts after the preset number of rings is detected.
2
The number of rings before the machine answers is programmable.
When all pages of the document are received, a buzzer sounds, notifying that the
3
communication has been completed.
Receiving a Document in the Tel Mode (Manual RX mode)
When using a telephone unit, the telephone also rings indicating that a fax call is coming in.
1
You pick up the telephone.
2
This stops the machine ringing.
Receiving a Document
If you hear a fax signal, press the "Start" key for reception, then you can hang up the
3
telephone.
The document is received and printing out.
4
When all pages of the document are received, a buzzer sounds, notifying that the
communication has been completed.
Basic Fax Operations 3 - 15
Page 64

Using Fax as a Telephone Set
Using Fax as a Telephone Set
This machine can be used as a telephone set, in addition to a fax machine.
Making a Telephone Call
Check that the display is shown as the Fax screen.
1
If not, press the "Copy/Fax" key to switch.
Using the keypad on the telephone unit or the Keypad on the FAX, enter the telephone
2
number of the receiving party.
The telephone unit now operates as a normal telephone.
3
Once the voice call is completed, hang up the telephone.
4
Receiving a Telephone Call
When using as a telephone, the telephone rings indicating that a call is coming in. Pick up
1
the telephone. Now you can talk to the calling party over the phone.
Note: When you pick up the telephone with the machine in the Tel mode and find
that the call received is a fax communication press the "Start" key.
Once a voice call has been completed, hang up the telephone.
2
3 - 16 Basic Fax Operations
Page 65

Notes:
Using Fax as a Telephone Set
Basic Fax Operations 3 - 17
Page 66

Using Fax as a Telephone Set
3 - 18 Basic Fax Operations
Page 67

Chapter 4
Advanced Fax Operation
Page 68

Chapter Overview
This chapter includes:
• “Transmitting a Document Using Memory TX” on page 4-1
• “Redial the Same Destination (Redial TX)” on page 4-2
• “Verifying Audible Signal Before TX” on page 4-3
• “Transmitting Special Document (BOOK TX)” on page 4-4
Advanced Fax Operation
Page 69

Transmitting a Document Using Memory TX
Transmitting a Document Using Memory TX
Memory TX lets the machine scan the contents of the document to be transmitted at high speed
into its built-in memory and transmit it to the other party. (The procedure in which you directly
transmit the document without using memory is called “Direct Transmission”)
Check that the message display is shown Fax screen.
1
If not, press the Copy/Fax key to dsiplay the fax screen.
Press the Memory TX key.
2
If Memory TX indicator lights up,Memory TX function is selected, otherwise the Direct
•
Transmission is selected.
This function is used to set the TX mode of the machine, two options are available.
•
Choices Available Description
Memory TX When set in this mode, documents are scanned into
memory for transmission and dialing starts after the
first page is scanned (Quick TX).
ADF TX (Direct
Transmission)
Note: In Memory Transmission Mode, you can retrieve your original document
sooner than you can do in ADF TX (Direct Transmission) Mode.
Make the necessary settings other than Memory TX, load the document, and then dial the
3
other party.
Note: If the memory becomes full while scanning a fax, the message
“MEM.FULL/TX CANCEL is displayed in the Fax mode. If you are in the Copy
mode, a “Fax:Err” is displayed.
If you would like to transmit the portion of the document stored in memory, press
the "Start" key to perform transmission. The machine transmits the portion of the
document which is stored in memory.
If you want to delete the portion of the document, which was stored in memory,
press the "Yes" key to select CANCEL. This deletes the contents of the document.
When set in this mode, documents are scanned for
transmission after connection has been made to the
receiving unit. (When the available memory is
insufficient, please select ADF TX for a successful
transmission)
If line is not available, the message “LINE IS BUSY” is
displayed. Redial attempts and intervals that were
preset will be done.
If you fail to make a choice within 1 minute after the MEM.FULL/TX CANCEL
is displayed, the contents of the document are automatically deleted.
Note:
When transmitting a document using Direct TX mode, and the line is busy,
Advanced Fax Operation 4 - 1
Page 70

Redial the Same Destination (Redial TX)
REDIAL WAITING is displayed. The unit will wait for the time interval to redial,
you can press "Stop" key to cancel the transmission, but your machine would not
print out an error report. In Direct transmission mode, if the redials all fail, your
machine would not print out an error report.
Redial the Same Destination (Redial TX)
Redial TX would display the destination that the machine has previously dialed, but not connected
to. The following two sub-features are available.
Auto Redial
•
Manual Redial
•
Auto Redial
If the line is busy, the machine temporarily stops dialing. Several seconds later, it dials the number
again. This redialing sequence is repeated several times.
Manual Redial
The last dialed is redial by pressing the Redial/Pause key.
Example: Using the Manual Redial
1
2
3
4
Auto Redial has been factory-set, you do not need to set it.
•
Redial interval time and the number of redials depend on the country in which
•
the machine is used. Consult with your Lanier Service Technician for more
details.
Place the document into the Document Feed Tray.
Press the Redial/Pause key, and the message “TX=START” is displayed.
If the destination is correctt, press the "Start" key to start transmission.
The machine starts to feed the documents, and redialing this fax number.
•
When the line is connected the machine starts the transmission.
•
If you want to stop the transmission, press the "Stop" key, and then the "Yes" key.
After you canceled a transmission, the “TX RESULT REPORT’ is printed.
•
When the transmission is complete, the display shows “TX COMPLETE.
5
Note: Redialing is not possible if the last transmission was a Broadcast or Group
Transmission to multiple destinations.
4 - 2 Advanced Fax Operation
Page 71

Verifying Audible Signal Before TX
This function is available when a telephone is connected to the fax. Manual Communication
allows you to verify that the line is connected with the audible signals heard from the speaker of
telephone.
This feature enables you to hear that the line has been properly connected.
Note: Manual transmission cannot be used in combination with Memory TX,
Broadcast TX, or other enhanced utilities.
Manual Transmission
Place the document into the Document Feeding Tray.
1
Pick up the telephone, you will hear a dial tone from the speaker of the telephone.
2
The display shows “*TALKING*”.
Dial the fax number. When the line is connected, the dial tone changes to a calling tone.
3
Verifying Audible Signal Before TX
When you hear a fax answer tone, press the "Start" key. The fax then starts feeding the
4
document for transmission.
If you want to stop the transmission, press the "Stop" key.
5
Then press the "Yes" key.
6
After you canceled a transmission, the “TX RESULT REPORT’ is printed.
•
When the transmission is complete, the message “TX COMPLETE” is displayed briefly.
7
Note: If the line of the other party is busy, hang up the handset to cancel the
Manual Transmission mode.
Manual Reception
When using a telephone, the telephone also rings indicating that a call has been received.
1
Pick up the telephone. Make sure that you hear a fax answer tone from the speaker of the
2
telephone.
Press the "Start" key. Then, hang up the handset.
3
The machine starts the reception and prints the received documents.
•
To stop the reception, press the "Stop" key and then the "Yes" key.
•
Note: Before you can start receiving a transmission you must ensure that the
Document Feeding Tray is empty.
Advanced Fax Operation 4 - 3
Page 72

Transmitting Special Document (BOOK TX)
Transmitting Special Document (BOOK TX)
When the documents you want to transmit can not use the ADF, for example: a magazine. Then the
transmission must be performed by Book Transmission.
It is possible to use with combination each function of the Broadcast, Timer Transmission (expect
Timer Polling Reception), Mailbox Transmission, Polling and Relay Broadcast instruction.
Press the Book TX key.
1
Input the remote destination number, or select the FUNCTION.
2
For example: One Touch key 01.
Here we use the Keypad to input the destination fax number.
3
Press the "Yes" key.
4
The display prompts you with a message. It allows you to select original document size or
5
start to scan the original documents right now
If you want to change the original document size press
6
the “No/Clear” key.
Press the “Left” or “Right Arrow” keys to select the
7
desired paper size.
Then press the "Yes" key to accept the selection, and
8
the display will show the selected paper size.
Place the book on the Exposure Glass.
9
Press the "Yes" key start to scan the first page of the book.
10
After scanning the first page is complete:
11
If you have other pages to be scanning change the book page and press the "Yes" key.
•
If you want to change the original document size press the "No" key.
•
Do this procedure until all pages you want to transmit are scanned.
•
After you scanned all the pages, press the "Start" key to transmit these pages.
12
When the transmission is complete, the message “*TX COMPLETE*”is displayed briefly.
13
4 - 4 Advanced Fax Operation
Page 73

Function Utilities
Chapter 5
Page 74

Chapter Overview
This chapter provides information on:
• “Function Utilities” on page 5-1
• “Selecting the FUNCTION Utilities” on page 5-2
• “Broadcast” on page 5-4
• “Timer TX” on page 5-8
• “Mailbox TX” on page 5-10
• “Print Mailbox RX” on page 5-12
• “Using Print Mailbox RX Function” on page 5-13
• “Polling TX” on page 5-15
• “Polling RX” on page 5-16
• “Relay Initiate” on page 5-17
• “Cancel Reserve” on page 5-18
Function Utilities
Page 75

Function Utilities
The Function utilities make your machine more convenient to use. The following eight functions
are available.
Function Description
1 BROADCAST Transmits the same document to two or more numbers with a
2 TIMER TX Scans a document into memory for transmission to the
3 MAILBOX TX Transmits a confidential document to a particular person at
Function Utilities
single operation.
destination at a specified time.
the receiving party. The document is stored in memory at the
receiving end. The entry of a password is necessary before
printing the document.
4PRINT
MAILBOX RX
5 POLLING TX Scans the document into memory, and the machine upon
6 POLLING RX Gives a polling transmission command to another fax which
7RELAY
INITIATE
8CANCEL
RESERV.
Receives a confidential document from a particular person.
The document will not be printed until the correct password is
entered.
receiving a polling transmission command from the other
party, transmits the documents to them.
enables it to transmit a document previously stored in
memory.
Relay TX allows the operator to make one long distance call
to a remote unit. The remote unit then relays the message to
one or more fax units in local area. With this function, you
can save valuable time and telephone charges. This function
can also instruct the remote fax machine to send a TX Result
report to one of its Speed Dial locations.
Cancels a job which has been stored in memory for future
transmission, including: Broadcast, Timer TX, Polling TX and
deletes the document from memory. Only jobs that are not in
processing can be canceled.
Function Utilities 5 - 1
Page 76

Selecting the FUNCTION Utilities
Selecting the FUNCTION Utilities
Press the "Function" key.
1
The Message Display now prompts you to select the FUNCTION utilities.
There are two method to select the Function utilities:
2
Pressing the keypad.
•
Pressing the "Function" key.
•
Press the Numeric Keys
Key Function
1 BROADCAST
2TIMER TX
3MAILBOX TX
4 PRINT MAILBOX RX
5 POLLING TX
6 POLLING RX
7 RELAY INITIATE
8 CANCEL RESERV.
For example, when you press the ‘3’ of Keypad, the display would show “MAILBOX TX”.
5 - 2 Function Utilities
Page 77

Press the Function Key
Press the "Function" key again. The display shows the first Function utility.
1
Now you can scroll the Function utilities either press the "Function" key or press the "Up"
2
and "Down Arrow" keys.
Function Sequence:
1 BROADCAST
2 TIMER TX
3 MAILBOX TX
4 PRINT MAILBOX RX
5 POLLING TX
6 POLLING RX
7 RELAY INITIATE
8 CANCEL RESERV
Selecting the FUNCTION Utilities
Function Utilities 5 - 3
Page 78

Broadcast
Broadcast
Broadcast enables the machine to scan the documents into memory, then transmit it to two or more
destinations. The same document can be transmitted sequentially to up to 143 different
destinations. This feature is convenient for transmitting the same document to many different
destinations.
This eliminates the need to repeat procedures when performing a fax distribution, increasing
productivity and reducing the amount of time required performing this activity. It also can reduce
the wear made by feeding the document since the machine needs to scan it once only.
Using Broadcast Function
Place the original document into the Document Feeding Tray.
1
Press the "Function" key.
2
Press ‘1’ of the Keypad to select “BROADCAST”.
3
Specify the receiving destinations as these methods shown.
4
(1) One Touch Dial keys
(2) Speed Dial
(3) Combination Dial
(4) Phone Book (Search & List)
(5) Keypad
(1) Using One Touch Keys to Specify Destinations
Press the One Touch key in which the receiving destination has been programmed.
1
The Message Display shows the party programmed in the selected One Touch key ,
•
indicating that it has been selected for Broadcast 001.
If you select an incorrect destination, pressing the "No/Clear" key will cancel the
•
inclusion of this destination in the broadcast.
Press the "Yes" key if the party has been correctly selected.
2
The Message Display now prompts you to select the next receiving destination.
•
If you want to continue selecting the receiving destinations using the One Touch keys,
•
repeat steps 1 to 2.
5 - 4 Function Utilities
Page 79

(2) Using Speed Dial to Specify Destinations
Press the "Speed Dial" key.
1
From the keypad, enter the Speed Dial number in which the receiving party has been
2
registered.
For example: To select Speed Dial 23 for Broadcast 001.
1. Press "Speed Dial" key,
2. Then press ‘2’ and ‘3’ of the Keypad.(Without pressing "Yes" key)
The Message Display shows the destination registered in Speed Dial 23, indicating
that it has been selected for Broadcast 001.
Press the "Yes" key if the party has been correctly selected.
3
The Message Display now prompts you to select the next receiving destination.
•
If you select an incorrect destination, pressing the "No/Clear" key cancels this
•
destination in the broadcast. The previous screen reappears.
If you want to continue selecting receiving destinations using Speed Dial, repeat steps 2
•
and 3.
Broadcast
(3) Using Phone Book (List) to Specify Destinations
Press the "Phone Book" key.
1
Press the Left or Right Arrow key to select "LIST", then press the "Yes" key.
2
Using the UP or Down Arrow key search for the receiving destination you want to select.
3
When the desired destination is displayed, press the "Start" key.
4
The Message Display now shows the receiving party you chose, indicating that it has been
selected for Broadcast 001.
Press the "Yes" key if the party has been correctly selected.
5
The Message Display now prompts you to select the next receiving destination.
•
If you select an incorrect destination, pressing the "No/Clear" key will cancel the
•
inclusion of this destination in the broadcast.
If you want to continue selecting the receiving destinations using Phone Book, repeat
•
steps 1 to 5.
(4) Using Phone Book (Search) to Specify Destinations
Press the "Phone Book" key.
1
Function Utilities 5 - 5
Page 80

Broadcast
Press the Right Arrow key to select the “SEARCH”.
2
Press the "Yes" key.
3
Using the One Touch keys and Keypad, enter the name or initial portion of the destination
4
you want to find.
For example: “Lanier”.
Press the "Yes" key.
5
The machine now searches for the exact name or names beginning with the letters
•
entered.
Search for the destination name having Lanier at the beginning of the name.
•
Using the U”p” or “Down Arrow” keys to select the destination you want.
6
Press the "Start" key.
7
The Message Display now shows the receiving destination you selected, indicating that it
has been specified for Broadcast 001.
Press the "Yes" key if the party has been correctly selected.
8
The Message Display now prompts you to select the next receiving destination.
•
If you select an incorrect destination, pressing the "No/Clear" key will cancel the
•
inclusion of this destination in the broadcast. The previous screen will reappear.
If you want to continue selecting the receiving destinations using Phone Book, repeat
•
steps 1 to 8.
(5) Using the Keypad to Specify Destinations
Transmit a document to a destination which is not registered in memory.
1
For example: Specify a destination (the fax number is 0354237801) for Broadcast [001]
which is not programmed in memory. Enter the fax number of the destination using the
Keypad.
If the specified destination is correct, press the "Yes" key.
2
The display is changed to the next destination specifying display.
•
When you want to clear the specified destination, press the "No/Clear" key.
•
To continue specifying fax numbers with the Keypad, repeat the operation of steps 1 and 2.
3
When all the receiving parties have been selected for a broadcast, press the "Start" key.
4
5 - 6 Function Utilities
Page 81

Checking Selected Destinations
The receiving parties you have selected can now be checked to ensure that the correct
destinations have been selected.
Press the "Yes" key.
1
Or, you can skip checking the destinations selected by pressing the "Start" key, which
iniates the Broadcast transmission procedure immediately.
To check selected destinations press the "Yes" key.
2
The Message Display first shows the receiving party specified for 001.
If the party has been correctly specified, press the "Yes" key.
3
Then, the Message Display shows the next specified receiving party.
If you find that you have selected an incorrect destination or if you want to delete a
4
particular destination, pressing the "No/Clear" key deletes that destination.
Broadcast
The Message Display shows for several seconds that the selected destination has been
•
deleted.
The Message Display then shows the next receiving destination selected.
•
When one destination is deleted, the Broadcast number is advanced by one.
•
Repeat steps 1 through 3 to continue checking destinations selected.
•
When you complete or have skipped checking the selected destinations, press the "Start"
5
key to begin the Broadcast transmission.
The document in the Document Feeding Tray is scanned into the memory of the fax.
6
If the Reserv. Report from the REPORTING utilities has been set to ON, the machine
•
prints a Broadcast Reservation Report before it executes the transmission.
The machine now begins transmitting the document to the selected destinations,
•
beginning with broadcast 001.
After completing the transmission, the machine prints a TX Result Report.
7
The Report indicates which destinations did not receive the document.
•
Retransmit the document to those destinations if you need.
•
Note: If the line of a receiving party is busy and the machine is unable to transmit
the document, that party would be put at the last of the transmission sequence.
This receiving party is redialed after the machine has completed transmitting the
document to all other parties.
Function Utilities 5 - 7
Page 82

Timer TX
Timer TX
Timer TX lets the machine scan the document into memory and transmit it to a destination at a
specified time. This feature enables the transmission of a document at some times when special
telephone discount rates maybe applicable. This can contribute to reductions in communication
costs.
The timer can be set up to 24 hours in advance.
Using Timer TX Function
Place the original document into the Document Feeding Tray.
1
Press the "Function" key.
2
Press ‘2’ of the Keypad to select TIMER TX.
3
From the Keypad, enter the time (24-hour system) at which to transmit the document.
4
Example: 11:30 p.m. →Press 2, 3, 3, 0.
Press the "Yes" key if it is correctly selected.
•
Press the "No/Clear" key if you want to change it.
•
Specify the receiving destination to which you want to transmit the document by Timer TX.
5
For how to specify the destination. Refer to “Dialing the Number (Transmitting the
Document)” on page 3-6.
Speed Dial
•
Combination Dial
•
Phone Book
•
Keypad Dialing
•
When the receiving destination has been specified, the document placed on the Document
6
Feeding Tray is fed in and the machine starts scanning it into memory.
After scanning the document, the machine shows the initial screen on the Message
•
Display and entering the standby state for Timer TX.
When the setting time arrives, the machine automatically transmits the document to the
•
specified destination(s).
5 - 8 Function Utilities
Page 83

Timer TX
Notes:
If you want to use other FUNCTION utilities in combination with Timer TX, when the message
"ENTER FAX NO." is displayed, press the "Function" key and select the function you want. Only
the following three features can be used together with Timer TX:
Broadcast
•
Mailbox TX
•
Polling RX
•
For the setting the FUNCTION utilities to be used in combination with Timer TX, see the
relevant pages dealing with those features in greater detail.
All fax transmission functions can be used even while the machine is in the standby state
•
for Timer TX.
When you changed the contents of the destination registered in One Touch Dial key and
•
"Speed Dial" key before starting the Timer transmission, the changed destination is
deleted from the destinations to which you want to perform the Timer transmission.
If you want to perform the Timer transmission to the changed destination, you need to set
the Timer TX again.
For example:
1. At time: 12:00, you set the Timer transmission by the Broadcast.
Transmission time: 23:00
•
Transmission party: One Touch key 01, 02, 03
•
2. At time: 15:00, if you change the setting of the One Touch key 01
Change the fax number of One Touch key 01, then One Touch key 01 is automatically
deleted from the Timer and Broadcast transmission.
Transmission time: 23:00
•
Transmission party: One Touch key 02, 03
•
3. Add One Touch key 01 to the Timer transmission again, if you need
Add the new One Touch key 01 to the Timer transmission.
Transmission Time: 23:00
•
Transmission Party: One Touch key 01, 02, 03
•
Function Utilities 5 - 9
Page 84

Mailbox TX
Mailbox TX
Mailbox TX lets the machine transmit a document confidentially to a particular person. It is
convenient when you want to send a confidential or private document to a particular person
without allowing any other people to read it.
A mailbox transmission is initiated only after the password entered on the transmitting end
matches the mailbox password on the receiving end. This ensures that a confidential document
will not be transmitted to the wrong person.
The transmitted document is stored in the mailbox of the memory built in the receiving fax
machine.
Unless the receiving end re-enters the previously programmed mailbox password, it is unable to
print the data stored in the built-in memory. This means that only the particular person or persons
who know the mailbox password at the receiving party can print the document.
NOTE:
The following conditions must be met for Mailbox TX.
The machine on the receiving end is a similar machine.
•
The receiving party must have programmed at least one mailbox password for the
•
mailbox function before the transmission use of Mailbox TX.
The transmitting party knows the mailbox password of the receiving fax machine.
•
Using Mailbox TX Function
Place the original document into the Document Feeding Tray.
1
Press the "Function" key.
2
Press ‘3’ of the Numeric key to select "MAILBOX TX".
3
Using the Keypad, enter the 4-digit mailbox password.
4
The mailbox password is the number registered for the mailbox of the receiving fax
•
machine.
For example: Mailbox password → Press 3, 8, 5, and 0, in order.
•
If you have entered the wrong number, press the "No/Clear" key.
•
The password you inputted would be canceled, then enters the correct number.
•
Note: Contact the receiving party in advance to make sure of the correct mailbox
password.
Check the mailbox password setting and, if it is correct, press the "Yes" key to validate the
5
mailbox password.
5 - 10 Function Utilities
Page 85

Mailbox TX
Specify the receiving party to which you want to transmit the document by Mailbox TX.
6
Refer to "Dialing the Number" in Chapter 3 for information on how to use these different
formats..
One Touch Dial
•
Speed Dial
•
Combination Dial
•
Phone Book
•
Numeric Key Dialing
•
When the receiving destination has been specified, press "Start" key, the document placed
7
on the Document Feeding Tray is feeding in and the machine starts the Mailbox
transmission.
Function Utilities 5 - 11
Page 86

Print Mailbox RX
Print Mailbox RX
Mailbox RX lets the machine receive and print a document from a particular person transmitted
confidentially by Mailbox TX. It is convenient when you want to receive a confidential or private
document from a particular person without any other people reading it.
A mailbox transmission is started only after the password that is entered on the transmitting end
matches the mailbox password on the receiving end. This ensures that a confidential document
will not be transmitted to the wrong person.
The transmitted document is stored in the mailbox (the memory in your machine).
Unless you enter the previously registered mailbox password, you are unable to print out the data
stored in the mailbox. This means that only a particular person or persons who knows the mailbox
password at your site can print the document.
Note: There are 10 Mailboxes in this machine.
5 - 12 Function Utilities
Page 87

Using Print Mailbox RX Function
1) Registering Mailbox Password
Press the "Program" key 5 times, the message RX OPERATIONS? is displayed.
1
Press ‘5’ of the Keypad to select “MAILBOX RX’.
2
Enter the number (0-9) to take your mailbox number. (For example press ‘9’)
3
The display prompts you to input the password of Mailbox 9.
4
If you want to correct this entry, press the "No/Clear" key and enter the password again.
•
Press the "Yes" key. The Mailbox registration is complete.
5
2) Changing Mailbox Password
Using Print Mailbox RX Function
Press the "Program" key 5 times.
1
Press ‘5’ of the Keypad to select "MAILBOX RX".
2
Select a Mailbox number to delete using the Keypad.
3
The message “REGISTERED! KEEP? is displayed.
4
Press the "No/Clear" key to delete the registered password, then the display appears the
5
message as below.
Enter the currently password of Mailbox 9 with the Keypad.
6
(If you don’t know the password, you cannot delete the password.)
Press the "Yes" key.
7
If the password you entered is correct, then the password of this mailbox is deleted.
•
The display returns to the display of step 3.
•
If the entered password does not correspond to a mailbox, this password cannot be
•
deleted.
The display returns to the display of step 5.
If you have completed this operation, exit this setting by the flowing procedure:
8
Press the "No/Clear" key.
•
Press the "Yes" key.
•
Function Utilities 5 - 13
Page 88

Using Print Mailbox RX Function
Press the "No/Clear" key then the display returns to the initial state.
•
3) Printing Mailbox Document
Your machine rings when a call is being received. The Message Display shows that a
1
document has been received by Mailbox RX
Press the "Function" key.
2
Press ‘4’ of the Keypad to select “PRINT MAILBOX RX”.
3
Using the Keypad, enter the 4-digit mailbox password which has previously been
4
programmed for the mailbox involved and which has been given to the other party.
If you have entered the wrong number, press the "No/Clear" key and enter the correct
number.
Check that the mailbox password is correct.
5
Press the "Yes" key to validate the mailbox password.
•
If the password you entered is correct, then your machine starts printing the
•
document that is stored in memory.
5 - 14 Function Utilities
Page 89

Polling TX
Using Polling TX
Polling TX
Polling TX allows you to set a document to be retrieved by a remote fax machine. Your machine
automatically sends the stored document in response to polling requests from remote devices. You
can set a 4-digit password to distinguish polling document.
Polling TX offers Single and Multi Modes:
Single Mode The specified file is deleted after it has been transmitted
Multi Mode The specified file could transmit several times to those who
need this file, until you cancel this Reservation Session.
You can set a 4-digit ID to distinguish polling document. Contact your Key Operator to
•
have this set up for you.
It does not matter if network is set to ON or OFF, your document can be polled by
•
remote fax machine with correct polling password.
Place the original document into the Document Feeding Tray.
1
Press the "Function" key.
2
Press ‘5’ of Keypad to select the "POLLING TX ".
3
A message appears briefly to confirm your selection.
Enter the 4-digit Polling ID if you need.
4
For example: 1234
Press "Yes" key.
5
Press the “Left” or “Right Arrow” keys to select “SINGLE” or “MULTI”.
6
Press "Yes" key to start the Polling session.
7
Your document is scanned into memory, where it is ready to be polled.
•
The ‘P‘ in the Message Display indicates that the Polling Document is in
•
memory.
Function Utilities 5 - 15
Page 90

Polling RX
Polling RX
Using Polling RX
Polling RX starts from your end, the transmission of a document that has been put in the ready
state at the other party’s end, to receive that document at your end.The other party must be ready
for polling transmission before you can receive a document by Polling RX. To receive (poll) the
document, you need to enter the correct polling password number. You can poll up to 143
destinations by a single operation.
Check that there are no documents in the Document Feeding Tray.
1
Press the "Function" key.
2
Press ‘6’ to select the POLLING RX.
3
A message appears briefly to confirm your selection.
Enter the remote fax number.
4
For example: Use the Keypad to input the fax number “0123456’
If the remote fax machine has the polling ID, press the “Down Arrow” key.
•
Use the numeric key to input the polling password.
•
If you input a wrong number press the "No/Clear" key to clear this entry and input the ID
•
again.
Note: If you do not have the password of the remote fax unit, you must to contact
the remote fax operator for this information.
Press the "Yes" key.
5
Then the message asks for the next polling RX destination.
•
Repeat the procedure step 4 to 5, until all the polling RX destinations have been
•
specified.
Press the "Start" key to finish the input operation.
6
Then the message asks if you want to check these destinations.
•
If you want to check the destinations you entered, press the "Yes" key.
•
Press "Yes" key to accept this entry, then the display shows the next destination.
•
If you want to delete this destination, press the "No/Clear" key.
•
Continue it until all entries have been checked.
•
Press the "Start" key to perform the Polling RX function.
7
5 - 16 Function Utilities
Page 91

Relay Initiate
Relay TX allows the operator to make one long distance call to a remote unit and the remote unit
will relay the message to one or more fax units in the local area. With this function, you can save
valuable time and telephone charges. This function can also instruct the remote fax machine to
send an TX Result report to one of its Speed Dial locations.
The following conditions must be met for Relay Initiate function:
Using Relay Initiate
1
Relay Initiate
The fax on the receiving party is either Lanier 5415, 12XX, or 20XX.
•
The receiving party must register the One Touch key or Group dial key for relay
•
function.
The receiving party must register one Speed Dial for send report.
•
Place the original document in the Document Feeding Tray.
Press the "Function" key.
2
Press ‘7’ to select “RELAY INITIATE TX”. A message appears confirming the selection.
3
Select a “One-Touch” key that registered as the remote fax unit (Relay station).
4
The name or telephone number associated with this One-Touch key appears to confirm this
is the location you intended to poll.
Press "Yes" key to accept this selection.
5
The display prompts the message to ask you the relay group number registered in the Initial
station.
Use the Keypad to input the two digit One-Touch number in the remote fax machine that
6
represents the end locations to which you wish to transmit.You can set 01-64.
Press the "Yes" key.
7
The display prompts the message to ask you the Speed Dial number (registered in the relay
station) for where to send the TX result report.
Use the Keypad to input the two digit Speed Dial number that should receive the TX
8
Results Report.You can set 00-99.
Press "Yes" key to begin transmitting. Your document is scanned into memory and sent to
9
the Relay station.
Note: If the Relay Group No. at remote unit is not registered, it will send a error
report according to the speed Dial No. setting at remote unit. If the speed Dial No.
at remote unit is not registered no reports will be generated.
Function Utilities 5 - 17
Page 92

Cancel Reserve
Cancel Reserve
Cancel Reserve cancels a transmission reservation for a document previously stored in memory for
Timer TX, Broadcast TX, and Polling TX.
Using Cancel Reserve
1) Checking Documents Reserved for Transmission
Press the Report key 3 times. The message " PRINT REPORT?" appears.
1
Press the "Yes" key.
2
Press the Report key 3 times.
3
The message "MEMORY DATA LIST" appears.
Press the "Yes" key.
4
The machine prints a Memory Data List.
•
Go over the list and identify the documents reserved for transmission and the particular
•
FUNCTION features specified.
Print a Memory Image Print if you want to check for the contents of a particular reserved
•
document.
2) Canceling Document Reserved for Transmission
Press the "Function" key.
1
Press ‘8’ of the Keypad to select “CANCEL RESERV”.
2
The document data display consists of the following five items.
Session number
•
Communication start time
•
Function:
•
TIMER POLL-TX
B-CAST MEMORY (Memory reservation)
M.B. TX RELAY
POLL-RX
Press Yes to delete this transmission.
•
Press the Right Arrow key to see more details.
•
Press the "Up" and "Down Arrow" keys to select the item you want to cancel.
3
Then press the "Yes" key.
4
If the document is not what you want to cancel, press the "No/Clear" key.
5 - 18 Function Utilities
Page 93

Notes:
Cancel Reserve
Function Utilities 5 - 19
Page 94

Cancel Reserve
5 - 20 Function Utilities
Page 95

Enhanced Utilities
Chapter 6
Page 96

Chapter Overview
This chapter provides information on:
• “Using the Program Key” on page 6-1
• “Dial Registration” on page 6-6
• “Setting of TX Operations” on page 6-14
• “Setting of RX Operations” on page 6-15
Enhanced Utilities
Page 97

Using the Program Key
List of Program Key Functions
The Program key functions refer to the functions for which you can change the settings to suit your
particular operating needs. There are a total of 45 features available in the Program key function,
classified under 8 major groups as detailed below.
This chapter details 11 out of the total 45 features that are classified under the groups of Dial
Registration, TX Operation, and RX Operation. These are the most frequently used features.
For other features, see Chapter 7, Enhanced Utilities
Note: Displayed setting item depends on your country or installed options. Some
item may not be displayed.
Group Setting Item Detail
Using the Program Key
1. MACHINE SETTING 1. AUTO RESET ON /OFF
2. POWER SAVE MODE OFF timer
3. POWER SAVE OFF Disable/Enable
4. PRINT DENSITY Dark to Light (7 step)
5. LCD CONTRAST Dark to Light (4 step)
6. BUZZER VOLUME High/Low/OFF
7. REMOTE MONITOR ON/OFF
8. TRAY1 PAPER SIZE A4/A5 or LT/LG/HL
9. PAPER SOURCE Select paper source
2. COPY SETTING 1. DENSITY/PHOTO Auto/Manual/Photo
2. AUTO DENSITY Dark to Light (3 step)
3. MANUAL DENSITY Dark to Light (9 step)
4. DENSITY(ADF) Mode1/Mode2
5. 2 in1 MODE ON/OFF
6. SORT MODE Sort/Non-Sort
3. DIAL
REGISTRATION
Enhanced Utilities 6 - 1
1. ONE-TOUCH DIAL One touch dial
2. SPEED DIAL Speed dial
3. GROUP DIAL Group dial
4. PROGRAM DIAL Program dial
Page 98

Using the Program Key
5.BATCH TX Batch TX
4. TX OPERATION 1.SCAN CONTRAST Dark to Light (5 step)
2. RESOLUTION Std/Fine/S-fine/HT
3. PAGE COUNT TX ON/OFF
4. CLOSED NETWORK ON/OFF
5. DEFAULT TX Mem. TX/ADF TX
6. HEADER ON/OFF
7.OT-DIAL IN COPY DISABLE / ENABLE
5.RX OPERATION 1.MEMORY RX MODE ON (Time and
Password)/OFF
(Password)
2. NO. of RINGS 1-16
3. TWO PAGE PRINT ON/ON (Sort)/OFF
4. REDUCTION RX ON/OFF/Cut
5. MAILBOX RX ID No.
6. CLOSED NETWORK ON/OFF
7. RX MODE Auto/Manual
8. FOOTER ON/OFF
6. COMM. SETTING 1. TONE/PULSE Tone/Pulse (10pps/
20pps)
2. LINE MONITOR High/Low/OFF
3. PSTN/PBX PSTN/PBX (Pre-Fix No.)
7. REPORTING 1. ACTIVITY REPORT ON/OFF
2. RESERV. REPORT ON/OFF
3. TX RESULT REPORT ON/OFF
4. RX RESULT REPORT ON/OFF
8. INITIAL USER DATA 1. DATE & TIME Date & Time
2. USER FAX NO. User Fax No
3. USER NAME User Name
6 - 2 Enhanced Utilities
Page 99

Outline of Major Features
Dial Registration
1.ONE TOUCH DIAL
Register the most frequently dialed fax numbers in the 27 One-Touch keys.
2.SPEED DIAL
You can program 100 speed dial locations, then transmit your documents quickly and easily by
pressing the Speed-Dial key with a Speed-Dial number.
3.GROUP DIAL
Destinations registered in One-Touch Dial keys, Speed Dial keys and the Phone Book can be
registered together as a Group in a Group Dial key. This feature then allows you to transmit a
document to all destinations in one group with a single operation. If you frequently send the same
document to multiple destinations, register these destinations into a Group Dial key. Up to 27
Groups can be registered.
4.PROGRAM DIAL
Several transmission functions can be pre-programmed in some of the One-Touch keys. This
allows a multiple step operation to be registered in a single key. For example, a single key can be
set up to Broadcast to designated locations at a preset time. This reduces the time necessary for
jobs that are frequently repeated.
Using the Program Key
5.BATCH TX
One Touch Dial key can be pre-programmed with Batch TX time. This allows multi jobs to be
transmitting at the same time by one transmission.
TX Operation
4. CLOSED NETWORK
Limits the parties to which you can transmit a document to only those registered for One Touch
Dial, Speed Dial, and Phone Book. When this feature is turned ON, you can no longer transmit a
document to any party that has not been registered for One Touch Dial, Speed Dial, or Phone
Book. This provides a means of controlling machine communication.
6. HEADER
Sends the receiving destination your name, fax number, and other data for a document transmitted.
This information is printed at the top of each page. This lets the receiving party identify where the
document came from, when it came in and how many pages it was.
RX Operation
1. MEMORY RX MODE
Stores the contents of a received document into memory. The document is not printed unless the
machine receives a print command that may be a timer or password. The timer print command
causes the machine to start printing the document stored in memory when the specified time
arrives. The password print command, on the other hand, causes the machine to start printing when
Enhanced Utilities 6 - 3
Page 100

Using the Program Key
a password is input. This feature provides a means of controlling the documents received through
the fax.
3. TWO PAGE PRINT
Prints two copies of a received document automatically. This feature eliminates the need for
making copies of the document after printing.
6. CLOSED NETWORK
Limits the parties from which you can receive a document to only those registered for One Touch
Dial, Speed Dial, and Phone Book. When this feature is turned ON, you can no longer receive a
document from any party that has not been registered in One Touch Dial, Speed Dial, or Phone
Book. This provides a meaning of controlling reception of documents through the fax machine.
8. FOOTER
Prints on each page of the received document the name, date, time, communication number and
page number of the received document. By printing an Activity Report using the Session number,
you can identify where the document came from. This feature provides a means of controlling
reception of documents through the fax machine.
6 - 4 Enhanced Utilities
 Loading...